Introduction to Purchase Invoices in Standard Accounts
The Purchase Invoice register is a record of your company's purchases. Each time you make a purchase, you will receive a Purchase Invoice from the Supplier, which you should enter to the Purchase Invoice register. You will therefore use this register for a number of tasks:- The Purchase Invoice is a record of the payment demanded from your company by the Supplier;
- Unpaid Purchase Invoices in the register provide the basis for your creditor management reports; and
- Each Purchase Invoice causes a Nominal Ledger Transaction to be created, thus generating the overall purchase and creditor figures in your monthly and yearly management reports. This creation process is automatic, requiring no intervention or work from you.
- You will receive standard Purchase Invoices when goods have been delivered or work carried out before you have issued payment. You should record Payments against such Purchase Invoices in the Payment register, described here.
- The Cash Note represents your issuing of a payment at the same time as the work is carried out. When you enter a Cash Note to the Purchase Invoice register, Standard Accounts will treat it as having being paid, so there is no need to enter a separate payment record in the Payment register. Standard Accounts will also look after the Nominal Ledger implications for you (crediting the Cash Account rather than the Creditor Account).
- You should use Credit Notes to correct mistakes in Purchase Invoices, or to cancel Invoices that have been raised in error. They are, in effect, negative Invoices that reduce your overall purchase and creditor figures. Again, Standard Accounts looks after these Nominal Ledger implications automatically.
The use of the Purchase Invoice register, including each of these types of purchase transaction, is now described in detail. Before you start entering Purchase Invoices, however, you must ensure that you have defined the current (accounting) year, using the Fiscal Years setting.
Before working with Purchase Invoices, you should also look at the following settings and registers:
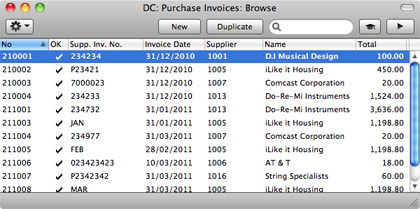
As in all browse windows you can change the sort order by clicking on the column headings. To reverse any sort, simply click once again on the column heading. You can scroll the list using the scroll bars or the trackpad. Finally, you can search for a record by entering a keyword in the field at the top right-hand corner. Standard Accounts will search for the first record matching the keyword in the same column as the selected sorting order. You can also change the order of the columns by dragging the column headings, and remove columns altogether using the check boxes in the drawer.
---
In this chapter:
- Introduction
- Entering a Purchase Invoice
- Entering a Purchase Invoice - Example
- Inspecting and Approving Purchase Invoices
- Nominal Ledger Transactions from Purchase Invoices
- Cash Notes
- Crediting Purchase Invoices
- Operations menu
- Home page for Standard Accounts manual
Entering a Purchase Invoice
To enter a new Purchase Invoice, open the 'Purchase Invoices: Browse' window as described here and click [New] in the Button Bar or use the ⌘-N keyboard shortcut. Alternatively, highlight a Purchase Invoice similar to the one you want to enter and click [Duplicate] on the Button Bar.The 'Purchase Invoice: New' window is opened, empty if you clicked [New] or containing a duplicate of the highlighted Purchase Invoice. In the case of the duplicate, the Supplier Invoice Number will not be copied. Complete the Purchase Invoice record as described below, then save it using the [Save] button and close the window by clicking the close box. Then, close the browse window using the close box again.
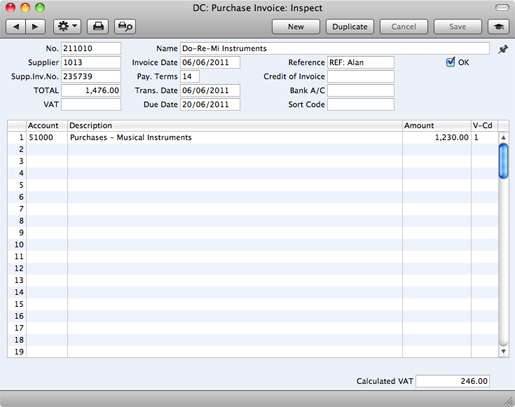
- No.
- Paste Special
Select from another Number Series
- The number of the Invoice in your Purchase Ledger is provided automatically by Standard Accounts. The default is the first unused number in the first valid number sequence in the Number Series - Purchase Invoices setting. You may change this number, but not to one that has already been used.
- If you have not defined any number sequences in the Number Series - Purchase Invoices setting, the Purchase Invoice Number sequence will start at 1 and continue consecutively. If you want the sequence to start from another number, change the Purchase Invoice Number of a Purchase Invoice before saving it: Standard Accounts will then continue the sequence from there.
- If you have not defined any number sequences in the Number Series - Purchase Invoices setting, the Purchase Invoice Number sequence will start at 1 and continue consecutively. If you want the sequence to start from another number, change the Purchase Invoice Number of a Purchase Invoice before saving it: Standard Accounts will then continue the sequence from there.
- Name
- The Supplier's Name will be brought in when you have enter the Supplier Number in the field described immediately below.
- Supplier
- Paste Special
Suppliers in Contact register
- Enter the Supplier Number or use the 'Paste Special' function. When you press Return, the Supplier's name and other information will be entered into the appropriate fields.
- Invoice Date
- Paste Special
Choose date
- The date when the Supplier issued the Invoice. This date, together with the Payment Terms, will determine when the Invoice will become due for payment. The date of the previous Purchase Invoice entered is used as a default.
- Reference
- Record here any additional code associated with the Purchase Invoice. When you pay the Purchase Invoice, this Reference will be printed on the document provided you have included the "Our Reference" field in your Form design.
- OK
- When you check this box and save the record by clicking [Save], the Purchase Invoice will be approved and posted to your Purchase Ledger. A corresponding Transaction will also be created in the Nominal Ledger. Because of these consequences, you will no longer be able to make changes to the Purchase Invoice except to the Due Date and Supplier Inv. No. fields.
- References in these web pages to approved Purchase Invoices are to Purchase Invoices whose OK check box has been switched on (i.e. an approved Purchase Invoice is one that is no longer a Draft).
- References in these web pages to approved Purchase Invoices are to Purchase Invoices whose OK check box has been switched on (i.e. an approved Purchase Invoice is one that is no longer a Draft).
- Supplier Inv. No.
- The Supplier's invoice number.
- Pay. Terms
- Paste Special
Payment Terms setting, Sales Ledger/Purchase Ledger
- Default taken from Contact record for the Supplier (Purch. Pay Terms)
- Payment Terms entered here will be used to calculate the Due Date (below).
- Payment Terms are also the means by which Cash Notes and Credit Notes are distinguished from ordinary Invoices. Using 'Paste Special', select a Payment Term record of the "Cash" or "Credit Note" Type respectively. When you then approve and save the Invoice, the appropriate Nominal Ledger Transaction will be created. In the case of Cash Notes, this will credit the Cash Account (as specified in the Payment Term record) rather than the Creditor Account, while in the case of Credit Notes, the Transaction will be a reversal of the original Invoice Transaction.
- Cash Notes are immediately treated as paid and so will not appear in your creditor reports. There is no need to enter a Payment against them. If you need to reverse a Cash Note, use a negative Cash Note, not a Credit Note.
- When you select a Payment Term of the "Credit Note" type, enter the number of the Invoice to be credited in the Credit of Inv. field, using 'Paste Special' if necessary to bring up a list of open (unpaid) Invoices.
- Payment Terms entered here will be used to calculate the Due Date (below).
- Credit of Inv.
- Paste Special
Unpaid Purchase Invoices
- If you are entering a Purchase Credit Note, enter here the number of the Purchase Invoice being credited. The Purchase Invoice being credited cannot itself be a Purchase Credit Note.
- Remember to specify a Payment Term of Type "Credit Note" in the Payment Terms field: you must leave the Credit of Inv. field blank when the Payment Term is of any other Type.
- Remember to specify a Payment Term of Type "Credit Note" in the Payment Terms field: you must leave the Credit of Inv. field blank when the Payment Term is of any other Type.
- TOTAL
- The total amount to pay for this Invoice, including any taxes. Before you can save the Purchase Invoice, this figure must equal the sum of the Amounts of the rows plus VAT.
- Trans. Date
- Paste Special
Choose date
- This date will be used as the Transaction Date in the Nominal Ledger Transaction that will result from the Purchase Invoice. You may thus separate Invoice and Transaction Dates in your ledgers.
!
If you enter different Invoice and Transaction Dates, there will be a timing difference between Purchase Ledger and the Nominal Ledger so long as the Invoice remains unpaid. This will be apparent when comparing the Purchase Ledger report with the Creditor Control Account.
- Bank Account
- Default taken from
Contact record for the Supplier
- The Supplier's bank account number is brought in from the 'Account' card of the Contact record for the Supplier.
- VAT
- As you add rows to a Purchase Invoice, the Calculated VAT field in the footer will be updated with the total VAT value, calculated using the Amounts and VAT Codes in each row.
- If the total VAT amount on the Supplier's Invoice is different to the figure the Calculated VAT field, enter that amount here.
- This serves two purposes. First, as mentioned in the description of the TOTAL field above, you will only be able to save the Purchase Invoice if the TOTAL is the same as the sum of the Amounts of the rows plus VAT. The VAT figure in this equation will be the figure in this field or, if this field is empty, in the Calculated VAT field. Second, the total figure posted to the VAT Input Account(s) will be the figure in this field or, if this field is empty, in the Calculated VAT field.
- If the total VAT amount on the Supplier's Invoice is different to the figure the Calculated VAT field, enter that amount here.
- Due Date
- The date when the Purchase Invoice is to be paid, calculated by Standard Accounts using the Invoice Date and the Payment Term. You can change the Due Date, even after you have approved the Invoice. This will be useful if you agree a new Due Date for the Invoice with the Supplier and you need to re-schedule it in your Purchase Ledger.
- Sort Code
- Default taken from
Contact record for the Supplier
- The sort code of the Supplier's bank is brought in from the 'Account' card of the Contact record for the Supplier.
- Account
- Paste Special
Account register, Nominal Ledger
- Specify the Cost Account to be debited by the Purchase Invoice. Enter an Account number and press Enter. The Account name will be entered automatically to the Description field.
- If the Contact record for the Supplier has a Cost Account specified on the 'Account' card, this will be entered as a default in the first row.
- If the Contact record for the Supplier has a Cost Account specified on the 'Account' card, this will be entered as a default in the first row.
- Description
- Default taken from
Account
- The Account Name will be entered here automatically when you specify the Account above. You can change the Description if necessary.
- Amount
- The amount to be debited to the Cost Account.
- A convenient way of quickly entering the correct value is to move the insertion point into the field and then to press the Enter or Return key. Standard Accounts will enter the correct value to balance the Purchase Invoice, taking the TOTAL and any previous rows into account.
- A convenient way of quickly entering the correct value is to move the insertion point into the field and then to press the Enter or Return key. Standard Accounts will enter the correct value to balance the Purchase Invoice, taking the TOTAL and any previous rows into account.
- V-Cd
- Paste Special
VAT Codes setting, Nominal Ledger
- This VAT Code will determine the rate at which VAT will be charged and the Input VAT Account to be debited.
- The default offered in each row will be chosen as follows:
- The Purch. VAT Code for the Supplier will be used.
- It will be taken from the Account record.
- The VAT Code in the Account Usage P/L setting will be used.
- The default offered in each row will be chosen as follows:
- Calculated VAT
- The VAT sum, calculated from the Purchase Invoice rows. This figure is calculated automatically as you add rows to the Purchase Invoice.
In this chapter:
- Introduction
- Entering a Purchase Invoice
- Entering a Purchase Invoice - Example
- Inspecting and Approving Purchase Invoices
- Nominal Ledger Transactions from Purchase Invoices
- Cash Notes
- Crediting Purchase Invoices
- Operations menu
- Home page for Standard Accounts manual
Entering a Purchase Invoice - Example
We shall now show how to use the various fields on the Purchase Invoice screen with the help of a few examples.To open the Purchase Invoice register, first ensure you are in the Purchase Ledger and then click the [Purchase Invoices] button in the Master Control panel or use the ⌘-1 keyboard shortcut. The 'Purchase Invoices: Browse' window appears, listing the Purchase Invoices that are already in the system. Start entering a new Purchase Invoice by clicking the [New] button or using the ⌘-N keyboard shortcut. The 'Purchase Invoice: New' window opens, with internal Invoice Number entered.
The insertion point will be in the Supplier Number field. Press ⌘-Return: this brings up the 'Paste Supplier' window. Select a Supplier from the list by double-clicking on its name (or by using the cursor keys and pressing Return). Press Return again and Supplier information such as Name and default Payment Term will be placed in the appropriate fields on the Purchase Invoice screen.
After entering the Supplier's Invoice Number, press Return again to move the insertion point to the TOTAL field. Enter the total amount payable (inclusive of tax), and, in the VAT field, the tax amount (this latter is optional).
Press Return again to move the insertion point to the Invoice Date field. Enter the Invoice Date as shown on the Supplier's paper Invoice and press the Return key twice. The Invoice Date will be copied to the Transaction Date field. In almost all cases, these two dates should be the same otherwise your Creditor Account may not match your Purchase Ledger report.
Continue and enter the accounting information. Move the insertion point to the Account Number field of the first row in the grid area, and enter the Account Number. Use the 'Paste Special' function to gain access to the Chart of Accounts, from where you can choose the Account that you need. Search among the Accounts in the normal way, by Number or by Name. Highlight the relevant Account in the 'Paste Special' list and press Return or choose it by double-clicking. The Account will be brought into the Purchase Invoice row. Press Return again twice and enter the row amount (excluding VAT). In the last row, pressing Return in the Amount field will cause the Amount to be calculated for you so that the Invoice balances.
When you have added all the items and have checked the Invoice, approve it by checking the OK box. When you save the Invoice, it will be committed to your Purchase Ledger.
Save the Invoice by clicking [Save] or [New]: use the latter option to continue with the next invoice. The TOTAL must equal the sum of the Amounts of the rows plus VAT before you can continue. If this is not the case, Standard Accounts will display the error message: "Transaction out of balance" when you try to save.
Until you have approved the Invoice by checking the OK box and saving, you can still change it.
---
In this chapter:
- Introduction
- Entering a Purchase Invoice
- Entering a Purchase Invoice - Example
- Inspecting and Approving Purchase Invoices
- Nominal Ledger Transactions from Purchase Invoices
- Cash Notes
- Crediting Purchase Invoices
- Operations menu
- Home page for Standard Accounts manual
Inspecting and Approving Purchase Invoices
If you did not approve a Purchase Invoice when you entered it, you must approve it at a later time in order to commit it to your Purchase Ledger, and, if so defined in the Sub Systems setting in the Nominal Ledger, for the Nominal Ledger Transaction to be generated. Approval also causes the Invoice record to be locked, so that you cannot change it after this point. You can only issue Payments against approved Purchase Invoices.There are two ways to approve an Invoice:
- When viewing a Purchase Invoice, click the OK check box and then [Save]; or
- Highlight one or more Invoices in the 'Purchase Invoices: Browse' window and select 'OK' from the Operations menu.
In this chapter:
- Introduction
- Entering a Purchase Invoice
- Entering a Purchase Invoice - Example
- Inspecting and Approving Purchase Invoices
- Nominal Ledger Transactions from Purchase Invoices
- Cash Notes
- Crediting Purchase Invoices
- Operations menu
- Home page for Standard Accounts manual
Nominal Ledger Transactions from Purchase Invoices
When you approve and save a Purchase Invoice, a Nominal Ledger Transaction will be generated automatically if you have so determined in the Sub Systems setting in the Nominal Ledger. An example is illustrated below: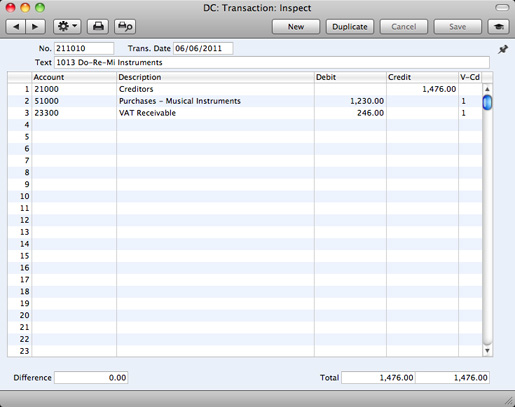
In some instances a default Purchase Account will be placed in the Account field in the first row of a Purchase Invoice. This default will appear if you have specified a Cost Account on the 'Account' card of the Contact record for the Supplier. You might specify such a default for Suppliers of services (such as electricity or telephone services), whose Purchase Invoices are always posted to the same Account.
For each row in an Invoice, the VAT Account will be taken from the specified VAT Code. This will be chosen as follows:
- The Purchase VAT Code in the record for the Supplier in the Contact register will be used. If you have not specified a Purchase VAT Code for the Supplier in question:
- The VAT Code will be taken from the relevant Account record in the Account register. If this is blank:
- The VAT Code specified in the Account Usage P/L setting is used.
- The Creditor Account specified on the 'Account' card of the Contact record for the Supplier is used. If this is blank:
- The Creditor Account in the Supplier Category to which the Supplier belongs is used. If this is blank, or the Supplier does not belong to a Category:
- The Creditor Account will be taken from the Account Usage P/L setting.
Once the Transaction has been generated, you can look at it straight away using the 'Open NL Transaction' function on the Operations drop-down menu.
---
In this chapter:
- Introduction
- Entering a Purchase Invoice
- Entering a Purchase Invoice - Example
- Inspecting and Approving Purchase Invoices
- Nominal Ledger Transactions from Purchase Invoices
- Cash Notes
- Crediting Purchase Invoices
- Operations menu
- Home page for Standard Accounts manual
Cash Notes
A Cash Note is an Invoice that is to be treated as being paid. It differs from a normal Invoice in that it does not affect your Creditor Account or appear in any of your credit management reports: instead, a credit posting for the Invoice value is made directly to your Cash Account.To enter a Cash Note, follow the procedure described here for entering Invoices, with just one exception: change the Payment Terms (using the 'Paste Special' function if necessary) to refer to a Payment Term record of Type "Cash". You can register such a Payment Term in the Contact records for Suppliers you will always pay immediately (using the Purch. Pay. Terms field in the Contact register), so that you don't have to make this change every time.
Click the OK check box when you are sure the Cash Note is correct. As with ordinary Invoices, you must approve Cash Notes by checking the OK check box and saving, for them to be posted to your Purchase Ledger and for Nominal Ledger Transactions to be created.
---
In this chapter:
- Introduction
- Entering a Purchase Invoice
- Entering a Purchase Invoice - Example
- Inspecting and Approving Purchase Invoices
- Nominal Ledger Transactions from Purchase Invoices
- Cash Notes
- Crediting Purchase Invoices
- Operations menu
- Home page for Standard Accounts manual
Crediting Purchase Invoices (Debit Memos)
If you want to credit a Purchase Invoice that has been sent to you, follow these steps:- Ensure you are in the Purchase Ledger and click the [Purchase Invoices] button in the Master Control panel. The 'Purchase Invoices: Browse' window is opened, showing all registered Invoices.
- Find the Purchase Invoice to be credited in the list, open it and select 'Create Credit Note' from the Operations menu. You can also duplicate the Purchase Invoice you want to credit. Duplicating or using the 'Create Credit Note' function will ensure that the correct Purchase Account will be credited. If you don't want to connect the Credit Note to a particular Invoice, click the [New] button to open an empty new record.
- Fill in the data in the normal way, but change the Payment Terms to refer to a Payment Term record of Type "Credit Note" and enter the number of the credited Invoice in the Credit of Inv. field. Use 'Paste Special' from this field to search for the correct Purchase Invoice Number. The Invoice to be credited must be approved.
If you used the 'Create Credit Note' function to create the Credit Note, the Payment Term and number of the Invoice to be credited will be placed in the new Credit Note automatically.
- When you approve and save the Invoice, your Purchase Ledger will be updated, and a new Nominal Ledger Transaction will be generated.
In this chapter:
- Introduction
- Entering a Purchase Invoice
- Entering a Purchase Invoice - Example
- Inspecting and Approving Purchase Invoices
- Nominal Ledger Transactions from Purchase Invoices
- Cash Notes
- Crediting Purchase Invoices, including:
- Operations menu
- Home page for Standard Accounts manual
Crediting Purchase Invoices - Purchase Credit Notes and Cash Notes
If you need to reverse a Cash Note, you cannot follow the standard crediting procedure. A Credit Note will debit the Creditor Account, while reversing a Cash Note should debit the Cash Account. Instead you should enter a new Cash Note (i.e. with a Payment Term of Type "Cash") with a negative value.---
In this chapter:
- Introduction
- Entering a Purchase Invoice
- Entering a Purchase Invoice - Example
- Inspecting and Approving Purchase Invoices
- Nominal Ledger Transactions from Purchase Invoices
- Cash Notes
- Crediting Purchase Invoices, including:
- Purchase Credit Notes and Cash Notes
- Invalidating Purchase Invoices
- Purchase Credit Notes and Cash Notes
- Operations menu
- Home page for Standard Accounts manual
Crediting Purchase Invoices - Invalidating Purchase Invoices
In some circumstances it can be appropriate to invalidate a Purchase Invoice using the 'Invalidate' command on the Record menu. This function will remove the Invoice from your Purchase Ledger; any associated Nominal Ledger Transaction will be removed as well. An invalidated Invoice is easily distinguished because all fields have red lines drawn through them. These red lines are also shown in the 'Purchase Invoices: Browse' window.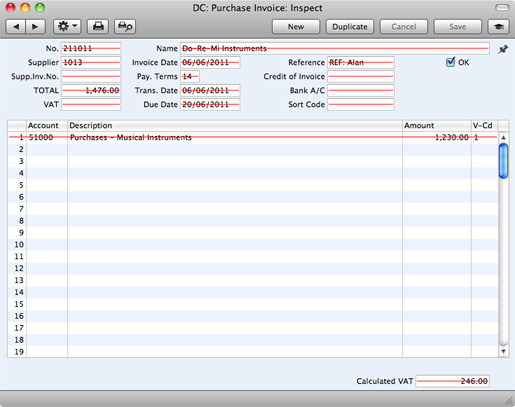
---
In this chapter:
- Introduction
- Entering a Purchase Invoice
- Entering a Purchase Invoice - Example
- Inspecting and Approving Purchase Invoices
- Nominal Ledger Transactions from Purchase Invoices
- Cash Notes
- Crediting Purchase Invoices, including:
- Purchase Credit Notes and Cash Notes
- Invalidating Purchase Invoices
- Purchase Credit Notes and Cash Notes
- Operations menu
- Home page for Standard Accounts manual
Operations Menu

---
In this chapter:
- Introduction
- Entering a Purchase Invoice
- Entering a Purchase Invoice - Example
- Inspecting and Approving Purchase Invoices
- Nominal Ledger Transactions from Purchase Invoices
- Cash Notes
- Crediting Purchase Invoices
- Operations menu, including:
- Home page for Standard Accounts manual
Operations Menu - OK
This command is only available on the Operations menu for the 'Purchase Invoices: Browse' window. It allows you to approve a Purchase Invoice and is therefore the equivalent of checking the OK box in a Purchase Invoice record and saving it. You can also select several Purchase Invoices (hold down the Shift key to select a range of Purchase Invoices in the list) and approve them all at once. Remember that, if so defined in the Sub Systems setting in the Nominal Ledger, this action causes Nominal Ledger Transactions to be created for each Purchase Invoice in the selection and that therefore once it has been carried out you will no longer be able to modify those Purchase Invoices.---
In this chapter:
- Introduction
- Entering a Purchase Invoice
- Entering a Purchase Invoice - Example
- Inspecting and Approving Purchase Invoices
- Nominal Ledger Transactions from Purchase Invoices
- Cash Notes
- Crediting Purchase Invoices
- Operations menu, including:
- Home page for Standard Accounts manual
Operations Menu - Invoice Status
This command prints a report to screen summarising all aspects of the Invoice, including Accounts and payment history. In the illustration below, the Purchase Invoice in question has been paid with a Payment.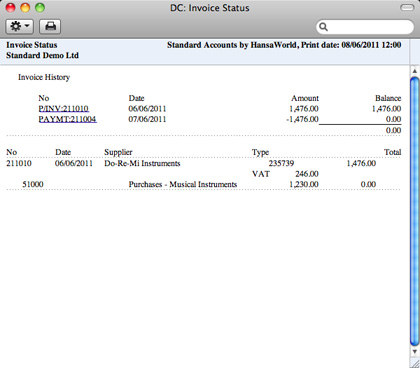
---
In this chapter:
- Introduction
- Entering a Purchase Invoice
- Entering a Purchase Invoice - Example
- Inspecting and Approving Purchase Invoices
- Nominal Ledger Transactions from Purchase Invoices
- Cash Notes
- Crediting Purchase Invoices
- Operations menu, including:
- OK
- Invoice Status
- Balance
- Open NL Transaction
- Create Credit Note
- OK
- Home page for Standard Accounts manual
Operations Menu - Balance
Before you can save a Purchase Invoice, the amount in the TOTAL field in the header must equal the sum of the Amounts of the Invoice rows plus the VAT. If this is not the case, an error message 'Transaction out of balance' will appear when you try to save. You can then use this function to balance the figures.Before you use the function, you should place the insertion point either in the TOTAL field in the header or in the Amount field of one of the Purchase Invoice rows. Selecting the function will cause the value in the field containing the insertion point to be adjusted so that the Purchase Invoice balances, allowing you to save it.
---
In this chapter:
- Introduction
- Entering a Purchase Invoice
- Entering a Purchase Invoice - Example
- Inspecting and Approving Purchase Invoices
- Nominal Ledger Transactions from Purchase Invoices
- Cash Notes
- Crediting Purchase Invoices
- Operations menu, including:
- Home page for Standard Accounts manual
Operations Menu - Open NL Transaction
When you approve and save a Purchase Invoice, a Nominal Ledger Transaction will be created. This function allows you to view that Transaction.On selecting the function, the Transaction will be opened in a new window.
---
In this chapter:
- Introduction
- Entering a Purchase Invoice
- Entering a Purchase Invoice - Example
- Inspecting and Approving Purchase Invoices
- Nominal Ledger Transactions from Purchase Invoices
- Cash Notes
- Crediting Purchase Invoices
- Operations menu, including:
- OK
- Invoice Status
- Balance
- Open NL Transaction
- Create Credit Note
- OK
- Home page for Standard Accounts manual
Operations Menu - Create Credit Note
Use this function to create a Purchase Credit Note from the Purchase Invoice. Please refer to here for details.---
In this chapter:
- Introduction
- Entering a Purchase Invoice
- Entering a Purchase Invoice - Example
- Inspecting and Approving Purchase Invoices
- Nominal Ledger Transactions from Purchase Invoices
- Cash Notes
- Crediting Purchase Invoices
- Operations menu, including:
- OK
- Invoice Status
- Balance
- Open NL Transaction
- Create Credit Note
- OK
- Home page for Standard Accounts manual