Introduction to Forms in the Production Module
The 'Forms' function allows you to print particular records or documents in batches.Each separate document that you can print contains two elements, the "Form" and the "Form Template". The Form element extracts the relevant information from the database and places it in printable fields, while the Form Template is the graphic layout design of the printed output i.e. it determines where on the page the printable fields will be placed.
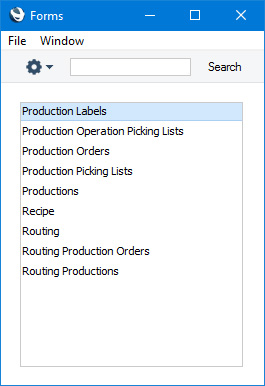
To begin printing forms, first ensure you are in the Production module. Then, if you are using Windows or macOS, click the [Forms] button in the Navigation Centre or use the Ctrl-D (Windows)/⌘-D (macOS) key combination. If you are using iOS or Android, tap the [Routines] button in the Navigation Centre and then tap [Forms]. The window illustrated below appears, listing the forms that you can print from the Production module.
- If you are using Windows or macOS, double-click the form name in the list or highlight it and press the Enter key. If you are using iOS or Android, tap the form name in the list. In both cases, a specification window will then appear, where you can determine the records that you want to be printed (e.g. which Production Orders are to be printed). The specification windows for each form are described in detail on the pages describing each form..
- Click or tap [Run] to print the documents.
- Close the 'Forms' window using the close box (Windows/macOS) or by tapping < (iOS/Android).
Before you can print a form, you must connect it to a Form Template. The Form Template contains the layout of the printed output. If necessary you can connect a form to more than one Form Template: for example, you might need a particular form to be able to produce printed output in different Languages determined by the Language of the Customer. To connect a form to a Form Template, follow this procedure, which you must carry out using Windows or macOS:
- For each option, design a Form Template using the Form Template register in the System module. A file containing samples of each Form Template is supplied with Standard ERP: if you want to use these samples as the basis for your own designs, import the "UKForms.txt" file as described on the Importing Set-up Data page.
- Change to the Production module and open the 'Forms' list window by clicking the [Forms] button in the Navigation Centre or using the Ctrl-D (Windows)/⌘-D (macOS) key combination.
- Highlight each item in the list in turn and for each one select 'Define Form' from the Operations menu. In the subsequent 'Form Definition' window, assign a Form Template (or more than one Form Template) to each form. The 'Form Definition' window is fully described here. For example, each form can be printed using different Form Templates, determined perhaps by the Number Series of the Production record.
- You only need use the 'Define Form' function once. Afterwards, Form Template selection will be automatic.
You can often possible print forms from a range of records, such as a range of Productions. To do this, enter the lowest and highest values of the range, separated by a colon. For example, to print Productions 001 to 010, enter "001:010" in the Production Number field. Depending on the field, the sort used might be alpha or numeric. In the case of an alpha sort, a range of 1:2 would also include 100, 10109, etc.
---
Please follow the links below for details about each form:
- Introduction
- Production Labels
- Production Operation Picking Lists
- Production Orders
- Production Picking Lists
- Productions
- Routing Production Orders
- Recipe
- Routing
- Routing Productions
- and please refer here for a list of standard fields that you can include in almost every Form Template
- Home page for Production manual
- Home page for Standard ERP manual
Production Labels
This page describes the Production Labels form in the Production module.---
The Production Labels form allows you to print labels for a particular Production or range of Productions. One label will be printed per page.
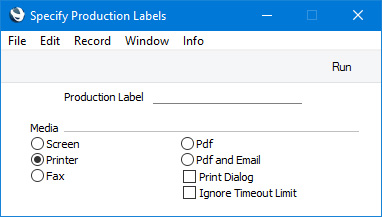
- Production Label
- Range Reporting
Numeric
- Specify the Productions for which you need labels to be printed. You must specify a Production Number or range of Production Numbers: if you leave this field empty, no labels will be printed.
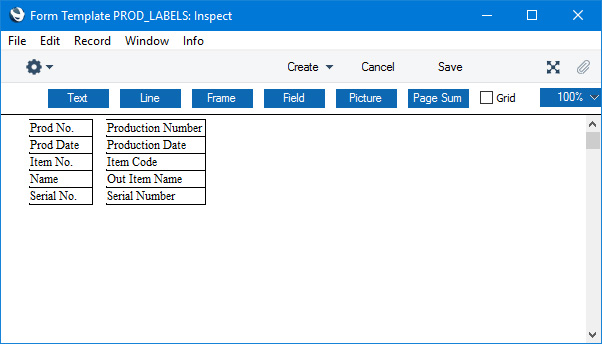
If you want static text to be printed on your labels (i.e. text that identifies the information on the labels, such as "Item Name"), follow these steps:
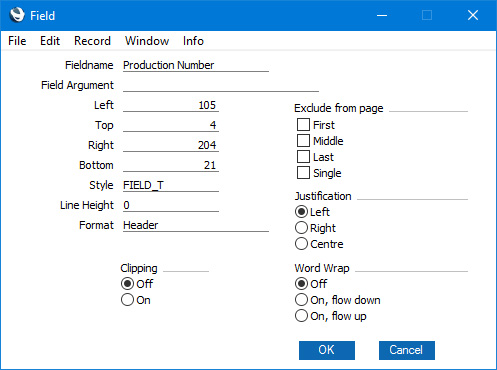
- Click the [Field] button and draw a rectangle where you want the static text to appear. The Field dialogue box opens.
- Leave the Fieldname blank and enter the static text in the Field Argument field.
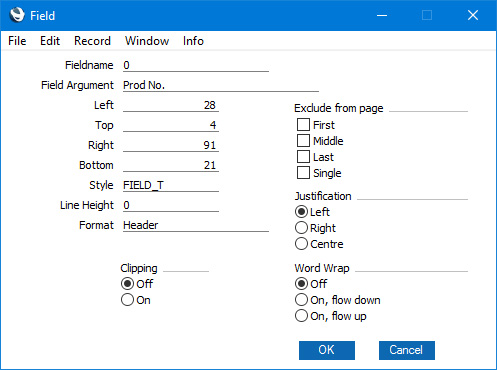
- Click [OK] to save.
- Do not use the [Text] button for this purpose: any text that you add to the Form Template this way will only be printed for the first label.
| Field in Form Template | Prints (from Production record) |
| Header Fields (these print once per Production) | |
| End Time | End Time |
| Fixed Asset Code | Machine |
| Location | Location |
| Location Name | Name from the Location record |
| Production Number | No. |
| Production Date | End Date |
| Quantity | Qty (two decimal places) |
| Recipe Code | Recipe |
| Recipe Name | Name |
| Start Time | Start Time |
| Total Weight | Out Weight (two decimal places) |
| Row Fields (If these fields have a Format of "Header", they will print once for each row, so remember to specify a Line Height. If they have a Format of "Matrix", they will only print for the first row) | |
| Item Code | Item |
| Out Item Name | Descr. |
| Quantity Out | Out (two decimal places) |
| Serial Number | Serial No. |
---
Go back to:
- Home page for Forms in the Production module
- Home page for Production manual
- Home page for Standard ERP manual
Production Operation Picking Lists
This page describes the Production Operation Picking Lists form in the Production module.---
The Production Operation Picking Lists form allows you to print a Production Operation as a picking list that warehouse staff can use to transfer the components from the warehouse to the production area. Only rows with In Quantities will be printed.
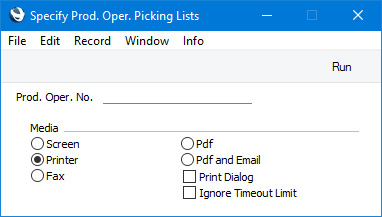
- Prod. Oper. No.
- Range Reporting
Numeric
- Specify the Production Operations that you want to be printed. You must specify a Production Operation Number or range of Production Operation Numbers: if you leave this field empty, no forms will be printed.
| Field in Form Template | Prints (from Production Operation record) |
| Header Fields (these print once per Production Operation) | |
| Actual Qty | Actual Qty (number of decimal places determined by the data e.g. "1.00" will be printed as "1", "1.50" will be printed as "1.5", etc) |
| Calculated Volume | Sum of (In Qty * Item Volume from the Item record) for each row (two decimal places) |
| Calculated Weight | Sum of (In Qty * Weight from the Item record) for each row (two decimal places) |
| Delivery Date and Time | The date and time when the form was printed |
| End Time | End Time |
| Number of Items in Text | Prints as a word the number of different Items in the Production Operation. The word is taken from the relevant record in the Values in Text setting in the System module for the Language of the Production Operation or, if that is blank, the Language in the Company Info setting |
| Order Number (ordnummer) | Prod. Order |
| Payment Number for Russia | Prints the No. of the Production Operation with the first three characters removed |
| Production Date | End Date |
| Production Number | Prod. No. |
| Serial Number (Number Series) | No. |
| Sequence | Sequence |
| Start Date | Start Date |
| Start Time | Start Time |
| Sub Sequence | Sub-Sequence |
| Total FIFO | Sum of (Row FIFO) from each row (two decimal places) |
| Total Quantity | Sum of (In Qty) from each row (two decimal places) | Total Quantity (totqty) | Qty (number of decimal places determined by the data e.g. "1" will be printed as "1", "1.5" will be printed as "1.5", etc) |
| Row Fields (these print once per Input row, so remember to specify a Line Height and to set the Format to "Matrix". Output rows are not printed) | |
| Alternative Code | Alternative Code from the Item record |
| Barcode | Barcode from the Item record |
| Catalog Serialnumber (K-xxxx) | If the first character of the Item Number is "K", prints the No. of the Production Operation with "K-" as a prefix. Otherwise, prints the No. |
| Commodity Code | Commodity Code from the Item record |
| Conversion 1 | Conversion 1 from the Item record |
| Conversion 2 | Conversion 2 from the Item record |
| Delivered Quantity (antallev) | In Qty (number of decimal places determined by the data e.g. "1" will be printed as "1", "1.5" will be printed as "1.5", etc) |
| Delivered Unit | Unit from the Item record |
| Department on Item Record | Department from the Item record |
| Depth | Item Depth from the Item record (two decimal places) |
| Description 1 | Descr. |
| EU Code | Commodity Code from the Item record |
| FIFO | FIFO (number of decimal places determined by the Round Off setting in the System module) |
| Height | Item Height from the Item record (two decimal places) |
| Item Code | The full Item Number, including any portion representing Varieties. For example, if the Item Number is "10126.GRE.SM", "10126.GRE.SM" will be printed |
| Item Varieties | The portion of the Item Description representing Varieties. For example, if the Item Description is "Shirt, Green, Small", "Green, Small" will be printed. If the Item does not have Varieties, nothing will be printed |
| Item Without Varieties | The basic Item Number, without any portion representing Varieties. For example, if the Item Number is "10126.GRE.SM", "10126" will be printed |
| Material | Material |
| Quantity Conversion 1, Quantity Conversion 2, Quantity Conversion 3 | If the Item record has a Conversion 1 and a Conversion 2, these fields print the relevant quantities. Please refer to the description of these fields here for details and an example. You should set the Format to 1 in these fields. |
| Quantity In | In Qty (number of decimal places determined by the data e.g. "1.00" will be printed as "1", "1.50" will be printed as "1.5", etc) |
| Quantity Out | Out Qty |
| Row Number | Row number |
| Sales Depth | Sale Depth from the record in the Batch Specifications setting in the Stock module for the Item/Serial Number combination (two decimal places) |
| Sales Height | Sale Height from the record in the Batch Specifications setting in the Stock module for the Item/Serial Number combination (two decimal places) |
| Sales Width | Sale Width from the record in the Batch Specifications setting in the Stock module for the Item/Serial Number combination (two decimal places) |
| Serial Number bc39 | Serial No., printed using the Code 39 barcode format. You should give this field a Style that uses a Code 39 barcode font |
| Serial Number (serienr) | Serial No. |
| Shelf Code | Shelf Code from the Item record |
| Sum, FIFO | In Qty * FIFO (number of decimal places determined by the Round Off setting in the System module) |
| Supplier Address 1 | If the Item has a Default Purchase Item, the first line of the Invoice Address of the Supplier in that Purchase Item |
| Supplier Address 2 | If the Item has a Default Purchase Item, the second line of the Invoice Address of the Supplier in that Purchase Item |
| Supplier Address 3 | If the Item has a Default Purchase Item, the third line of the Invoice Address of the Supplier in that Purchase Item | Supplier Code | If the Item has a Default Purchase Item, the Contact Number of the Supplier in that Purchase Item |
| Supplier Item No. | If the Item has a Default Purchase Item, the Supplier's Item Number in that Purchase Item |
| Supplier Name | If the Item has a Default Purchase Item, the Name of the Supplier in that Purchase Item |
| Unit | If the Item has a Unit, the correct translation for the Language of the Production Operation of the Unit Name from the Units setting |
| Volume | Volume from the Item record (two decimal places) |
| Volume, row | In Qty * Item Volume from the Item record (two decimal places) |
| Weight | Weight from the Item record (two decimal places) |
| Weight, row | In Qty * Weight from the Item record (two decimal places) |
| Width | Item Width from the Item record (two decimal places) |
Please refer here for details about the standard fields that you can also include in the Form Template.
---
Go back to:
- Home page for Forms in the Production module
- Home page for Production manual
- Home page for Standard ERP manual
Production Orders
This page describes the Production Orders form in the Production module.---
Use the Production Order form when you need to print a Production Order record or a range of Production Order records, perhaps to provide instructions to the assembly department.
You can also print an individual Production Order by opening the record and clicking the Printer icon (Windows/macOS) or selecting 'Print' from the File menu (all platforms). To print a Production Order to screen, click the Preview icon (Windows/macOS only).
A Production Order will be printed with the text "Test Printout" as a diagonal watermark if its Status is Started and if you are not using the No Test Printout option in the Optional Features setting in the System module.
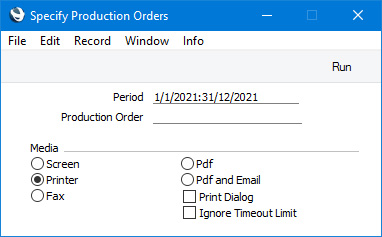
- Period
- Paste Special
Reporting Periods setting, System module
- If there are any Production Orders in the range that you specify below with Start Dates, those whose Start Dates fall within this period will be printed. To have a Start Date, a Production Order must be Started or Finished. Production Orders in the range with blank Start Dates (i.e. those that are Created and Accepted) will also be printed.
- Production Order
- Range Reporting
Numeric
- Enter a Production Order Number to print a single Production Order, or a range of Production Order Numbers, separating the first and last number with a colon (:).
- You must specify a Production Order Number or range of Production Order Numbers: if you leave this field empty, no forms will be printed.
| Field in Form Template | Prints (from Production Order record) |
| Header Fields (these print once per Production Order) | |
| Barcode | Barcode |
| Description | Comment. The three Comment lines will be printed on separate lines, so you should specify a Line Height for this field |
| Description 1 | Instruction. The three Instruction lines will be printed on separate lines, so you should specify a Line Height for this field |
| Description 2 | Comment. The three Comment lines will be printed on separate lines, so you should specify a Line Height for this field |
| Fixed Asset Code | Machine |
| Instructions | Instruction. The three Instruction lines will be printed on separate lines, so you should specify a Line Height for this field |
| Location | Location |
| Location Name | Name from the Location record |
| Payment Number for Russia | Prints the No. of the Production Order with the first three characters removed |
| Person | Person |
| Person Name | Name from the Person record |
| Production Date | Due Date |
| Recipe Code | Recipe |
| Recipe Name | Name |
| Routing | Routing |
| Serial Number (Number Series) | No. |
| Start Time | Start Time |
| Total Quantity (totqty) | Qty (number of decimal places determined by the data e.g. "1" will be printed as "1", "1.5" will be printed as "1.5", etc) |
| Total Quantity In | Qty (from the header) * sum of (In Qty) from each row (number of decimal places determined by the Round Off setting in the System module) |
| Total Quantity out | Qty (from the header) * sum of (Out Qty) from each row (number of decimal places determined by the Round Off setting in the System module) |
| Serial Number bc39 | No., printed using the Code 39 barcode format. You should give this field a Style that uses a Code 39 barcode font |
| Row Fields (these print once per row, so remember to specify a Line Height and to set the Format to "Matrix") | |
| Comment 2 | Descr. |
| Item Code | Item |
| Item Code 2 | Item |
| Material | Material |
| Quantity In | In Qty (number of decimal places determined by the Round Off setting in the System module) |
| Quantity Out | Out Qty (number of decimal places determined by the Round Off setting in the System module) |
| Shelf Code (lagerplats) | Shelf Code from the Item record |
| Unit | Unit from the Item record |
| Row Fields (these print once per Output row, so remember to specify a Line Height and to set the Format to "Matrix". These fields are not printed for Input rows) | |
| Comment | Descr. |
| Out item | Item |
| Out Item Name | Descr. |
| Out Item Quantity | Out Qty (number of decimal places determined by the data e.g. "1.00" will be printed as "1", "1.50" will be printed as "1.5", etc) |
| Quantity | Out Qty (number of decimal places determined by the Round Off setting in the System module) |
| Quantity 2 | Out Qty * Unit Coefficient from the Item record, or Out Qty / Unit Coefficient from the Item record (depends on the Unit 2 Conversion Calculation options in the Stock Settings setting in the Stock module) (number of decimal places determined by the Round Off setting in the System module) |
| XItemCode | Item |
Please refer here for details about the standard fields that you can also include in the Form Template.
---
Go back to:
- Home page for Forms in the Production module
- Home page for Production manual
- Home page for Standard ERP manual
Production Picking Lists
This page describes the Production Picking Lists form in the Production module.---
The Production Picking Lists form is unusual in that it first creates new records and then prints them. You can use it when there is insufficient stock of components in the production area for a Production and you need to create a Stock Movement to move stock there from the warehouse. After the Stock Movement has been created, it will be printed as a picking list that warehouse staff can use to transfer the components from the warehouse to the production area.
The 'Specify Production Picking Lists' window contains a single field:
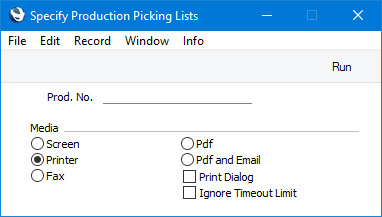
When you press the [Run] button, a separate Stock Movement will be created for each Production in the range, as follows:
- If the Status of a Production is Created or Started, a Stock Movement will be created that will move the components from the Main Location specified in the Stock Settings setting to the Production Location. All Input rows with Stocked Items from the Productions in the range will be transferred to the corresponding Stock Movement.
By default, the Requested Quantity in each Stock Movement row will be the exact Quantity needed to complete the Production. This will be the In Qty in each Production row, less any quantity that has been moved in a previous Stock Movement (i.e. one of any status with the same Production Number in the For Production field). If there is not enough stock in the From Location to satisfy the Requested Quantity, then it will be reduced to the quantity in stock. This because each Stock Movement will be marked as Reserved, meaning that when you deliver similar Items, Standard ERP will maintain sufficient stock for the Stock Movement until it are Sent or Received. It is not possible to reserve stock that is not there.
- If the Status of a Production is Finished, a Stock Movement will be created that will move the assembled Item from the Production Location. The To Location will be left empty, so you will need to choose one before you can mark the Stock Movement as Received. All Output rows with Stocked Items from the Production will be transferred to the Stock Movement. The Quantity in each Stock Movement row will be the exact Quantity built by the Production.
- If the Status of a Production is Cancelled or Discarded, no new Stock Movement will be created.
- If there is a previous Stock Movement (of any status) for the entire In Qty, no new Stock Movement will be created and nothing will be printed.
Please refer here for full details about Stock Movements.
You can use the following fields when you design the Form Template to be used by the Production Picking List form:
| Field in Form Template | Prints (from Stock Movement record) | |
| Header Fields (these print once per Stock Movement) | ||
| From Address | Address of From Location from the Location record. This will be printed on separate lines, so you should specify a Line Height for this field | |
| From Contact | Contact of From Location from the Location record | |
| From Fax Number | Fax of From Location from the Location record | |
| From Location | From Location | |
| From Name | Name of From Location from the Location record | |
| From Telephone | Telephone of From Location from the Location record | |
| Payment Number for Russia | Prints the No. of the Stock Movement with the first three characters removed | |
| Person | Name of the Person printing the form, from their Person record | |
| Stock Serial Number | No. | |
| To Address | Address of To Location from the Location record. This will be printed on separate lines, so you should specify a Line Height for this field | |
| To Contact | Contact of To Location from the Location record | |
| To Fax | Fax of To Location from the Location record | |
| To Location | To Location | |
| To Name | Name of To Location from the Location record | |
| To Phone | Telephone of To Location from the Location record | |
| Row Fields (these print once per row, so remember to specify a Line Height and to set the Format to "Matrix") | ||
| Alternative Code | Alternative Code from the Item record | |
| Barcode | Barcode from the Item record | |
| Catalog Serialnumber (K-xxxx) | If the first character of the Item Number is "K", prints the No. of the Stock Movement with "K-" as a prefix. Otherwise, prints the No. | |
| Commodity Code | Commodity Code from the Item record | |
| Conversion 1 | Conversion 1 from the Item record | |
| Conversion 2 | Conversion 2 from the Item record | |
| Delivered Unit | Unit from the Item record | |
| Depth | Item Depth from the Item record (two decimal places) | |
| Description 1 | Description | |
| EU Code | Commodity Code from the Item record | |
| FIFO | R. Old Unit Pr. (number of decimal places determined by the Round Off setting in the System module) | |
| Height | Item Height from the Item record (two decimal places) | |
| Item Code | The full Item Number, including any portion representing Varieties. For example, if the Item Number is "10126.GRE.SM", "10126.GRE.SM" will be printed | |
| Item Varieties | The portion of the Item Description representing Varieties. For example, if the Item Description is "Shirt, Green, Small", "Green, Small" will be printed. If the Item does not have Varieties, nothing will be printed | |
| Item Without Varieties | The basic Item Number, without any portion representing Varieties. For example, if the Item Number is "10126.GRE.SM", "10126" will be printed | |
| Department on Item Record | Department from the Item record | |
| Ordered Quantity | Req. Qty (number of decimal places determined by the data e.g. "1.00" will be printed as "1", "1.50" will be printed as "1.5", etc) | |
| Production Number | For Production | |
| Routing | Routing from the Production | |
| Quantity Conversion 1, Quantity Conversion 2, Quantity Conversion 3 | If the Item record has a Conversion 1 and a Conversion 2, these fields print the relevant quantities (calculated from the Req. Qty). Please refer to the description of these fields here for details and an example. You should set the Format to 1 in these fields. | |
| Row Number | Row number | |
| Sales Depth | Sale Depth from the record in the Batch Specifications setting in the Stock module for the Item/Serial Number combination (two decimal places) | |
| Sales Height | Sale Height from the record in the Batch Specifications setting in the Stock module for the Item/Serial Number combination (two decimal places) | |
| Sales Width | Sale Width from the record in the Batch Specifications setting in the Stock module for the Item/Serial Number combination (two decimal places) | |
| Serial Number bc39 | Serial No., printed using the Code 39 barcode format. You should give this field a Style that uses a Code 39 barcode font | |
| Serial Number (serienr) | Serial No. | |
| Shelf Code | Shelf Code from the Item record | |
| Supplier Address 1 | If the Item has a Default Purchase Item, the first line of the Invoice Address of the Supplier in that Purchase Item | |
| Supplier Address 2 | If the Item has a Default Purchase Item, the second line of the Invoice Address of the Supplier in that Purchase Item | |
| Supplier Address 3 | If the Item has a Default Purchase Item, the third line of the Invoice Address of the Supplier in that Purchase Item | |
| Supplier Code | If the Item has a Default Purchase Item, the Contact Number of the Supplier in that Purchase Item | |
| Supplier Item No. | If the Item has a Default Purchase Item, the Supplier's Item Number in that Purchase Item | |
| Supplier Name | If the Item has a Default Purchase Item, the Name of the Supplier in that Purchase Item | |
| Unit | If the Item has a Unit, the correct translation for the Language of the Production Operation of the Unit Name from the Units setting | |
| Volume | Volume from the Item record (two decimal places) | |
| Weight | Weight from the Item record (two decimal places) | |
| Width | Item Width from the Item record (two decimal places) | |
Please refer here for details about the standard fields that you can also include in the Form Template. In particular, you may want to include the "Date" field (the date when the form was printed) if you want a date to be printed.
---
Go back to:
- Home page for Forms in the Production module
- Home page for Production manual
- Home page for Standard ERP manual
Productions
This page describes the Productions form in the Production module.---
Use the Production form when you need to print a Production record or a range of Production records, perhaps to provide instructions to the assembly department.
You can also print an individual Production by opening the record and clicking the Printer icon (Windows/macOS) or selecting 'Print' from the File menu (all platforms). To print a Production to screen, click the Preview icon (Windows/macOS only).
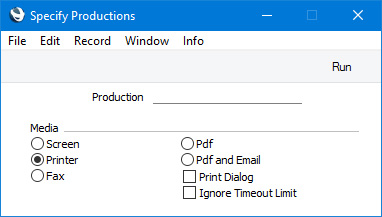
- Production
- Range Reporting
Numeric
- Enter a Production Number to print a single Production, or a range of Production Numbers, separating the first and last number with a colon (:). If you leave the field empty, every Production will be printed.
| Field in Form Template | Prints (from Production record) |
| Header Fields (these print once per Production) | |
| Actual Qty | Actual Qty |
| Barcode | No. |
| Comment 2 BC39 | Second line of Comment, printed using the Code 39 barcode format. You should give this field a Style that uses a Code 39 barcode font |
| Description | First line of Comment |
| Description 1 | Second line of Comment |
| Description 2 | Third line of Comment |
| Discarded Reason | Discarded Reason |
| End Time | End Time |
| Fixed Asset Code | Machine |
| Location | Location |
| Location Name | Name from the Location record |
| Payment Number for Russia | Prints the No. of the Production with the first three characters removed |
| Person | Person |
| Person Name | Name from the Person record |
| Production Date | End Date |
| Production Number | No. |
| Production Order | Prod. Ord. |
| Recipe Code | Recipe |
| Recipe Name | Name |
| Responsible Person | Inspector |
| Responsible Person Name | Name of the Inspector, from their Person record |
| Routing | Routing |
| Serial Number bc39 | Third line of Comment, printed using the Code 39 barcode format. You should give this field a Style that uses a Code 39 barcode font |
| Serial Number (Number Series) | No. |
| Start Date | Start Date |
| Start Time | Start Time |
| Total Quantity (totqty) | Qty (number of decimal places determined by the data e.g. "1.00" will be printed as "1", "1.50" will be printed as "1.5", etc) |
| Total Weight | Out Weight (number of decimal places determined by the data e.g. "1.00" will be printed as "1", "1.50" will be printed as "1.5", etc) |
| Row Fields (these print once per row, so remember to specify a Line Height and to set the Format to "Matrix") | |
| Actual Qty - Row | Actual |
| Comment 2 | Descr. |
| Extra Cost | W-cost (number of decimal places determined by the Round Off setting in the System module). You should set the Format to 1 in this field |
| Item Code | Item |
| Item Code 2 | Item |
| Material | Material |
| Price | I-cost (number of decimal places determined by the Round Off setting in the System module). You should set the Format to 1 in this field |
| Quantity In | In Qty (number of decimal places determined by the Round Off setting in the System module) |
| Quantity Out | Out Qty (number of decimal places determined by the Round Off setting in the System module) |
| Serial Number | Serial No. |
| Total Quantity In | In Qty (if you are using the Production Lines Hold Actual Qty option in the Production Settings setting) or In Qty * Qty from the Production header (otherwise) (number of decimal places determined by the Round Off setting in the System module). You should set the Format to 1 in this field |
| Total Quantity out | Out Qty (if you are using the Production Lines Hold Actual Qty option in the Production Settings setting) or Out Qty * Qty from the Production header (otherwise) (number of decimal places determined by the Round Off setting in the System module). You should set the Format to 1 in this field |
| Unit | Unit from the Item record |
| Row Fields (these print once per Output row, so remember to specify a Line Height and to set the Format to "Matrix". These fields are not printed for Input rows) | |
| Comment | Descr. |
| Out item | Item |
| Out Item Name | Descr. |
| Out Item Price | I-cost (number of decimal places determined by the Round Off setting in the System module). You should set the Format to 1 in this field |
| Out Item Quantity | Out Qty (number of decimal places determined by the data e.g. "1.00" will be printed as "1", "1.50" will be printed as "1.5", etc) |
| Out Item Serial Number | Serial No. |
| Quantity | Out Qty (number of decimal places determined by the data e.g. "1.00" will be printed as "1", "1.50" will be printed as "1.5", etc) |
| Quantity 2 | Out Qty * Unit Coefficient from the Item record, or Out Qty / Unit Coefficient from the Item record (depends on the Unit 2 Conversion Calculation options in the Stock Settings setting in the Stock module) (number of decimal places determined by the Round Off setting in the System module) |
| Serial Number (serienr) | Serial No. |
| XItemCode | Item |
| XItemName | Descr. |
| XItemUnit | Unit from the Item record |
| Row fields relating to jewellery (if you are using the Jewellery module, various fields will be added to the Item window that you can use to record specifications for jewellery Items. If a jewellery Item is used in a Production row, these specifications will be copied to that Production row although they will not be visible there. Use the fields listed below to print this information. As they are row fields, you should specify a Line Height and set the Format to "Matrix" in each one) | |
| Bracelet/Strap, Row | Bracelet/Strap |
| Certificate, Row | Certificate |
| Clarity, Row | Clarity |
| Colour, Row | Colour |
| Gender, Row | Gender |
| Length, Row | Length |
| Major Stone, Row | Major Stone Detail |
| Metal, Row | Metal |
| Minor Stone, Row | Minor Stone Detail |
| Movement, Row | Movement |
| Other Comment, Row | Other |
| Other Comment 2, Row | Other2 |
| Size, Row | Size |
| Style Name, Row | Style Name |
| Watch Brand, Row | Watch Brand |
| Watch Metal, Row | Watch Metal |
| Weight, row | Weight |
Please refer here for details about the standard fields that you can also include in the Form Template.
---
Go back to:
- Home page for Forms in the Production module
- Home page for Production manual
- Home page for Standard ERP manual
Recipe
This page describes the Recipe form in the Production module.---
The Recipe form allows you to print an individual Recipe record.
You can also print a Recipe by opening the record and clicking the Printer icon (Windows/macOS) or selecting 'Print' from the File menu (all platforms). To print a Recipe to screen, click the Preview icon (Windows/macOS only).
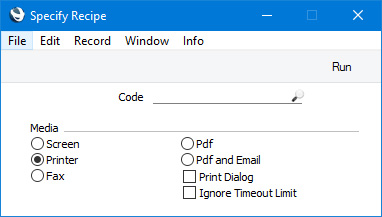
- Code
- Paste Special
Recipe Register, Production module
- Enter the Code of the Recipe that you need to be printed.
Header Fields
These fields print once per Recipe.| Field in Form Template | Prints (from Recipe record) |
| Days to Produce | Days to Produce |
| Fixed Assembly Days | Fixed Assembly Days |
| Hours To Produce | Hours to Produce |
| Instructions | First line of Instructions |
| Instructions 1 | Second line of Instructions |
| Instructions 2 | Third line of Instructions |
| Minimum Produce Qty | Min Prod Qty |
| Minutes To Produce | Minutes (to Produce) |
| Normal Produce Qty | Normal Prod Qty |
| Number Produced | Number Produced |
| Recipe Code | Code |
| Recipe In Sum | Cost of In-Items |
| Recipe Name | Comment |
| Recipe Out Sum | Value of Out-Items |
| Routing | Default Routing |
| Seconds To Produce | Seconds (to Produce) |
| Setup Time | Time to Setup |
| Standard Batch Size | Standard Batch |
Row Fields
These fields print once per row, so remember to specify a Line Height and to set the Format to "Matrix".| Field in Form Template | Prints (from Recipe record) |
| Comment | Specification |
| Item Code | Item |
| Material | Material |
| Planned In Qty | In (input quantity) |
| Planned Out Qty | Out (output quantity) |
| Relative Value | Rel. |
| Row Number | Row number |
| Sub Recipe | Recipe (from flip B) |
Item Information
These row fields print information from the records in the Item register for the Items specified in each Recipe row. In these fields, you should specify a Line Height and set the Format to "Matrix".| Field in Form Template | Prints (from Item record) |
| Alternative Code | Alternative Code |
| Barcode | Barcode |
| Commodity Code | Commodity Code |
| Department on Item Record | Department |
| Depth | Depth |
| Group | Group |
| Height | Height |
| Item Cost Price | Cost Price |
| Item Price | Base Price |
| Price Change | Cost Price Change |
| Shelf Code | Shelf Code |
| Tag/Object | Tags/Objects |
| Transaction Date (transdate) | Base Price Change |
| Unit | Unit |
| Volume | Item Volume |
| Weight, Item | Weight |
| Width | Item Width |
Please refer here for details about the standard fields that you can also include in the Form Template.
---
Go back to:
- Home page for Forms in the Production module
- Home page for Production manual
- Home page for Standard ERP manual
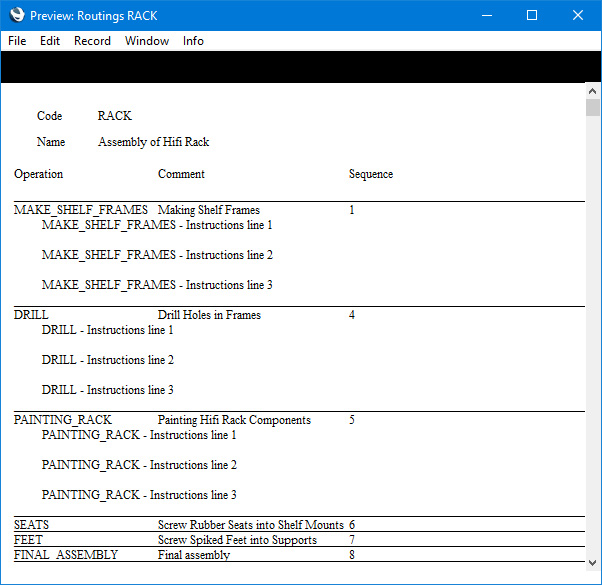
Routing
This page describes the Routing form in the Production module.---
The Routing form allows you to print an individual Routing record.

- Code
- Paste Special
Routings setting, Production module
- Enter the Code of the Routing record that you need to be printed.
| Field in Form Template | Prints (from Routing record) |
| Header Fields (these print once per Routing) | |
| Date Created | Reg. Date |
| Routing | Code |
| Routing Name | Comment |
| Row Fields (these print once per row, so remember to specify a Line Height and to set the Format to "Matrix") | |
| Comment | Description |
| Fixed Asset Code | Machine |
| Fixed Asset Group | Mach. Group |
| Fixed Asset Group Name | Description from the Asset record for the Machine |
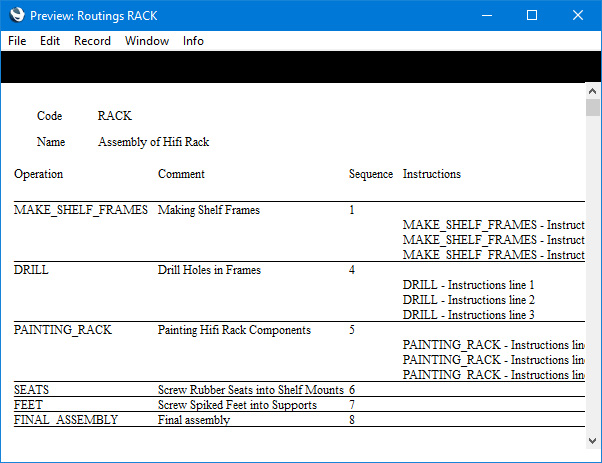
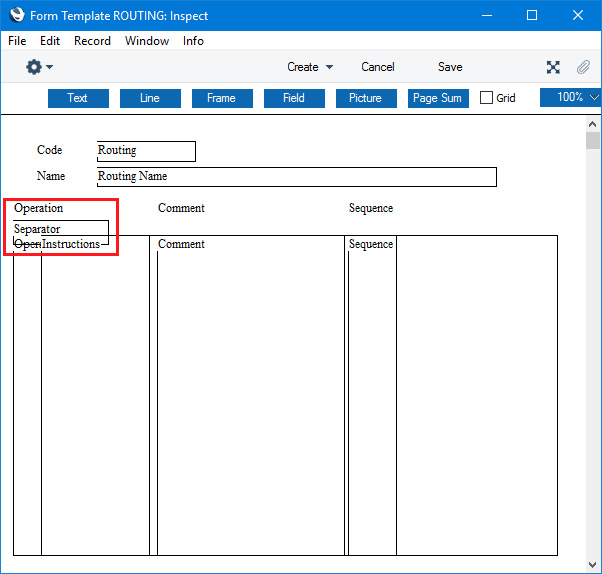
| Instructions | Prints the Text from the 'Instructions' card in the Standard Operation record. More details can be found towards the end of this page |
| Move Time | Move Time |
| Operation | Operations |
| Queue Time | Queue Time |
| Queue Time In Minutes | Queue Time converted to minutes |
| Row Number | Row number |
| Run Time | Run Time |
| Run Time In Minutes | Run Time converted to minutes |
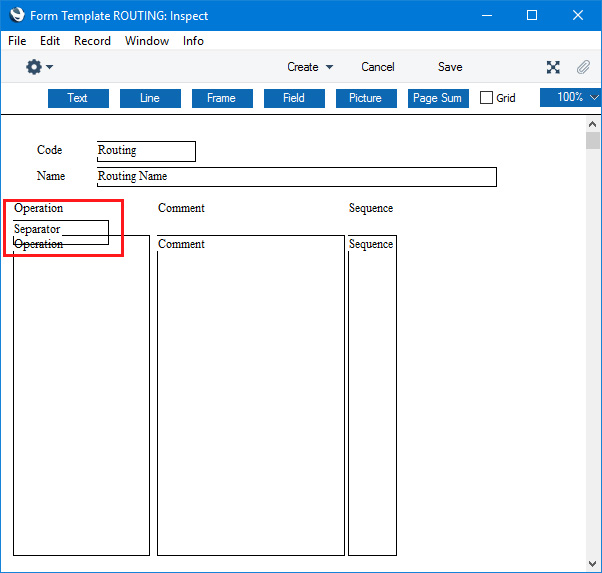
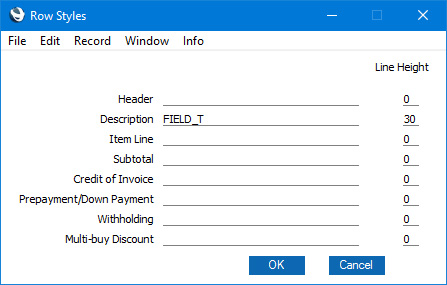
| Separator | Prints a separator line between each row. More details can be found towards the end of this page |
| Sequence | Sequence |
| Setup Time | Setup Time |
| Setup Time In Minutes | Setup Time converted to minutes |
| Sub Sequence | Sub |
| Use Argument | Prints the Field Argument in the field. |
Please refer here for details about the standard fields that you can also include in the Form Template.
The "Separator" row field will print a separator line between each row, as shown in this example:
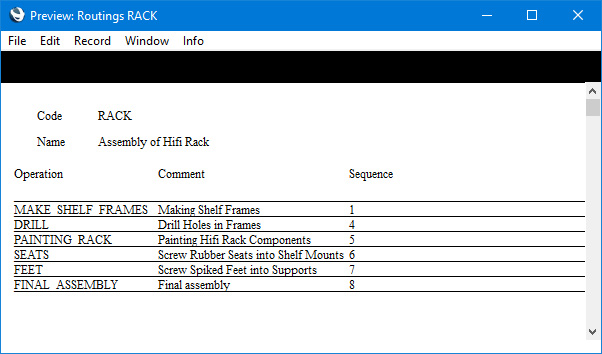
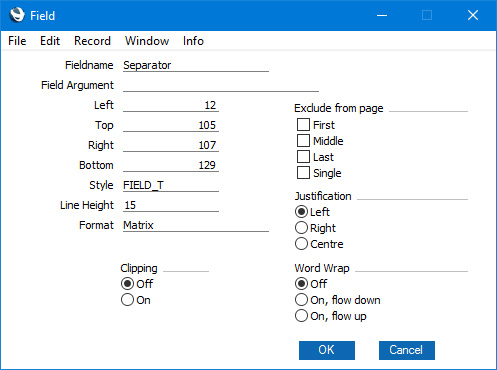
It is recommended that the Top figure in the "Separator" row field should be the same as the Top figure in the other row fields less the Line Height. For example, if the Top figure in the other row fields is 120 and the Line Height is 15, the Top figure in the "Separator" row field should be 105. This will ensure that the first separator line (which will be drawn above the rows of text) will be in the correct place.


Go back to:
- Home page for Forms in the Production module
- Home page for Production manual
- Home page for Standard ERP manual
Routing Production Orders
This page describes the Routing Production Orders form in the Production module.---
Use the Routing Production Orders form when you need to print details of a Production Order together with a list of its connected Production Operations. The connected Production Operations will be listed in Status order (Created, Started, Finished, Cancelled and finally Discarded). Production Operations with the same Status will be listed in Sequence order.
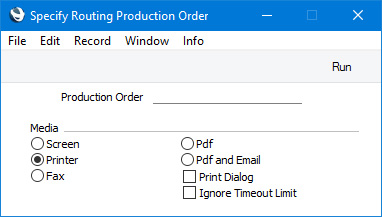
- Production Order
- Range Reporting
Numeric
- Enter a Production Order Number to print a single Production Order, or a range of Production Order Numbers, separating the first and last number with a colon (:). You must enter a Production Order Number or range of Production Order Numbers: if you leave this field empty, no forms will be printed.
| Field in Form Template | Prints (from Production Order record) |
| Header Fields (these print once per Production Order) | |
| Comment | Comment from the connected Routing record |
| Due Date | Due Date |
| Fixed Asset Code | Machine |
| Location | Location |
| Planned Date | Should Start |
| Recipe Code | Recipe |
| Recipe Name | Name |
| Routing | Routing |
| Serial Number (Number Series) | No. |
| Row Fields (these print once for each Production Operation that is connected to the Production Order, so remember to specify a Line Height) | |
| Comment 2 | Comment |
| End Date 2 | End Date |
| End Time 2 | End Time |
| Fixed Asset Code | Actual Machine |
| Fixed Asset Group | Machine Group |
| Fixed Asset Name | Description from the Asset record for the Actual Machine |
| Instructions | Text (from the 'Instructions' card). More details can be found in the description of the Routing form |
| Queue Time In Minutes | Queue Time converted to minutes |
| Row Number | Row number (i.e. counts the number of connected Production Operations) |
| Run Time In Minutes | Run Time converted to minutes |
| Sequence | Sequence |
| Serial Number, row | No. |
| Separator | Prints a separator line between each row. More details can be found in the description of the Routing form |
| Setup Time In Minutes | Setup Time converted to minutes |
| Start Date 2 | Start Date |
| Start Time2 | Start Time |
| Status | Status |
| Sub Sequence | Sub |
Please refer here for details about the standard fields that you can also include in the Form Template.
---
Go back to:
- Home page for Forms in the Production module
- Home page for Production manual
- Home page for Standard ERP manual
Routing Productions
This page describes the Routing Productions form in the Production module.---
Use the Routing Productions form when you need to print details of a Production together with a list of its connected Production Operations. The connected Production Operations will be listed in Status order (Created, Started, Finished, Cancelled and finally Discarded). Production Operations with the same Status will be listed in Sequence order.
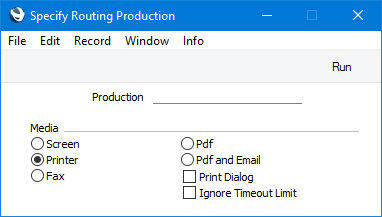
- Production
- Range Reporting
Numeric
- Enter a Production Number to print a single Production, or a range of Production Numbers, separating the first and last number with a colon (:). You must enter a Production Number or range of Production Numbers: if you leave this field empty, no forms will be printed.
| Field in Form Template | Prints (from Production record) |
| Header Fields (these print once per Production) | |
| Comment | Comment from the connected Routing record |
| Description | First line of Comment |
| Description 1 | Second line of Comment |
| Description 2 | Third line of Comment |
| End Time | End Time |
| Fixed Asset Code | Machine |
| Location | Location |
| Person Name | Name of the Inspector, from their Person record |
| Production Date | End Date |
| Production Order | Prod. Ord. |
| Recipe Code | Recipe |
| Recipe Name | Name |
| Responsible Person | Inspector |
| Responsible Person Name | Name of the Inspector, from their Person record |
| Routing | Routing |
| Serial Number (Number Series) | No. |
| Start Date | Start Date |
| Start Time | Start Time |
| Row Fields (these print once for each Production Operation that is connected to the Production, so remember to specify a Line Height) | |
| Comment 2 | Comment |
| End Date 2 | End Date |
| End Time 2 | End Time |
| Fixed Asset Code | Actual Machine |
| Fixed Asset Group | Machine Group |
| Fixed Asset Name | Description from the Asset record for the Actual Machine |
| Instructions | Text (from the 'Instructions' card). More details can be found in the description of the Routing form |
| Queue Time In Minutes | Queue Time converted to minutes |
| Row Number | Row number (i.e. counts the number of connected Production Operations) |
| Run Time In Minutes | Run Time converted to minutes |
| Sequence | Sequence |
| Serial Number, row | No. |
| Separator | Prints a separator line between each row. More details can be found in the description of the Routing form |
| Setup Time In Minutes | Setup Time converted to minutes |
| Start Date 2 | Start Date |
| Start Time2 | Start Time |
| Status | Status |
| Sub Sequence | Sub |
Please refer here for details about the standard fields that you can also include in the Form Template.
---
Go back to:
- Home page for Forms in the Production module
- Home page for Production manual
- Home page for Standard ERP manual