Introduction to the Form Template Register
You can print many documents from Standard ERP, including Invoices, Orders, Quotations and Customer Labels.Each separate document that you can print consists of two elements, the "Form" and the "Form Template". The Form element extracts the relevant information from the database and places it in printable fields, while the Form Template is the graphic layout design of the printed output i.e. it controls where on the page each printable field will be placed (and it can contain other design elements such as lines and frames as well).
The Form Template element in each document can be unique, allowing each document to have its own design. Usually, Invoices, Orders and Quotations will have similar (but not identical) designs, while Customer Labels will have a different design.
A file containing samples of each Form Template is supplied with Standard ERP. The name of this file will vary depending on your location: in UK versions of Standard ERP, the file will be named "UKForms.txt". If you want to use these samples as the basis for your own designs, import this file as described on the Importing Set-up Data page.
To design a new Form Template or to edit an existing one, use the Form Template register in the System module. The Form Template window contains a graphical editor that you can use to design each Form Template. You can only use this editor using Windows or Mac OS X.
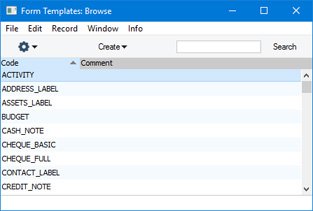
To open the editor, ensure you are in the System module and click the [Registers] button in the Navigation Centre and double-click 'Form Templates' in the resulting list. The 'Form Templates: Browse' window opens, showing the Form Templates that are already in the system:
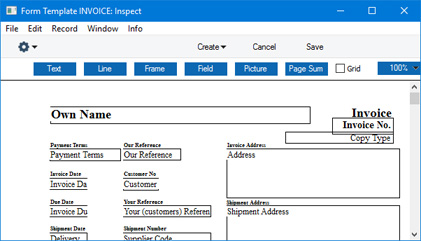
As the Form Template window is entirely occupied by the graphical editor, it does not contain any fields that you can use to set the specifications of a Form Template. These fields are in a separate window, the 'Properties' window, which you can open by selecting 'Properties' from the Operations menu. When you create a new Form Template, you must open the 'Properties' window to assign it a Code and Name before you can save it for the first time.
When you have designed the Form Template and assigned it a Code and Name in the 'Properties' window, click the [Save] button in the Button Bar to save it in the normal way.
After saving a new Form Template, you should connect it to a form. As described at the top of this page, each document that you can print consists of two elements, the "Form" and the "Form Template". Connecting the Form Template to the form will ensure that the form will be printed using the correct layout. Please refer to the Printing Forms page for details.
---
Please refer to the following pages for more information about designing Form Templates:
- Adding and Editing Objects
- Operations menu
- Single- and Multi-Page Form Templates
- Printing Forms
- Page Setup
- Standard Fields for inclusion in all Form Templates
- Home page for System Module manual
- Home page for Standard ERP manual
Adding and Editing Objects in Form Templates
This page describes adding objects or design elements of various kinds to a Form Template.---
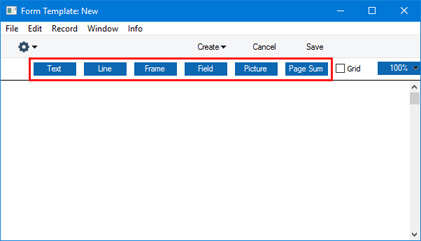
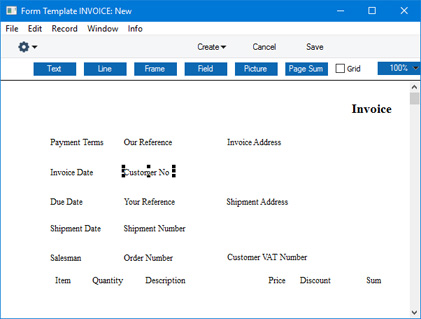
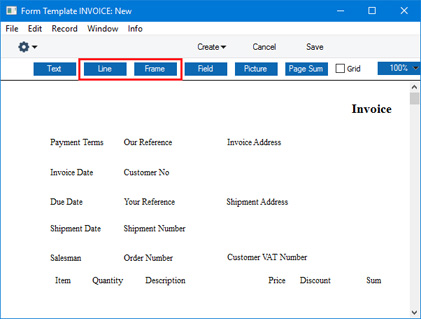
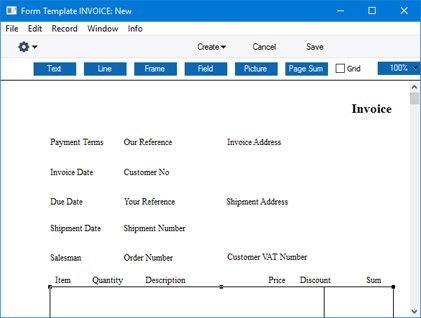
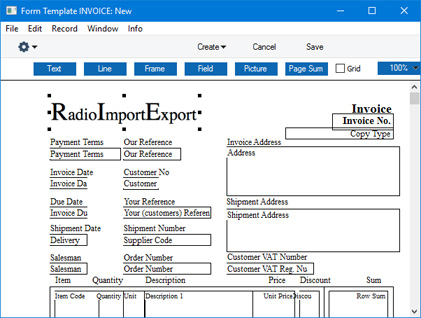
There are six types of object or design element that you can add to a Form Template: Text, Line, Frame, Field, Picture and Page Sum. Each type of object has its own button at the top of the Form Template window:
If you need to see a grid to help with placing objects on the page, select the Grid option towards the top right of the window. You can also change the magnification using the drop-down menu to the right of the Grid option. If you are using Windows, you will need to save the Form Template after changing the Grid option selection or the magnification.
Please refer to the following pages for details about each object type:
- Text objects
- Lines and Frames
- Fields
- Pictures
- Page Sums
- Standard Fields for inclusion in all Form Templates
The Form Template register in Standard ERP:
- Introduction to Form Templates
- Adding and Editing Objects
- Operations menu
- Single- and Multi-Page Form Templates
- Printing Forms
- Page Setup
- Home page for System Module manual
- Home page for Standard ERP manual
Adding and Editing Objects in Form Templates - Text Objects
This page describes adding text objects to a Form Template.---
A text object allows a word or phrase to be printed as fixed text on a form Examples might include the title of the form (e.g. "Invoice", "Order", "Quotation", etc.) or text that identifies a piece of information or a column.
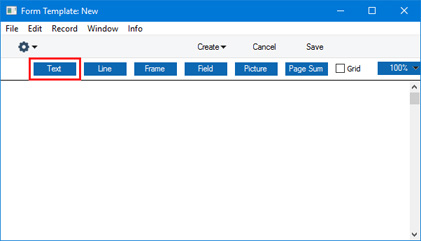
To add a new text object to the Form Template, click the [Text] button at the top of the Form Template window:
- Text
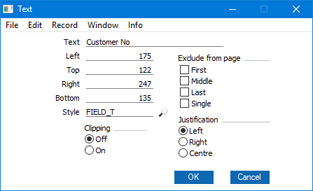
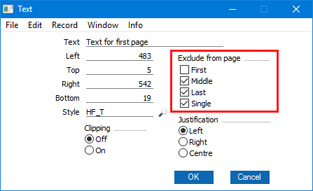
- The text that is to be printed on the Form Template. This can be up to 80 characters long, but it is limited to one line. To create a text area with more than one line, use the appropriate number of separate one-line text objects.
- Left, Top, Right, Bottom
- Use these fields to specify the size and position of the text box that is to contain the text. When you add a new text object to a Form Template, the measurements of the box that you have just drawn will appear here.
- Style
- Paste Special
Styles setting, System module
- Use this field to assign a font and font style to the text. If you do not enter a Style, the first record in the Styles setting will be used.
- Exclude from page
- Please refer to the Single- and Multi-Page Forms page for details about these options.
- Clipping
- These options control how the text will be printed if the text box is not wide enough to contain the text string. If Clipping is On, the text string will be truncated (i.e. only the text that fits inside the text box will be printed). If Clipping is Off, the text will not be truncated so part of it will be printed outside the text box.
- Justification
- Use these options to specify where the text will appear inside the text box.
Please refer to the following pages for details about the different types of object that you can add to Form Templates:
- Text Objects
- Lines and Frames
- Fields
- Pictures
- Page Sums
The Form Template register in Standard ERP:
- Introduction to Form Templates
- Adding and Editing Objects
- Operations menu
- Single- and Multi-Page Form Templates
- Printing Forms
- Page Setup
- Standard Fields for inclusion in all Form Templates
- Home page for System Module manual
- Home page for Standard ERP manual
Adding and Editing Objects in Form Templates - Lines and Frames
This page describes adding lines and frames to a Form Template.---
You can add lines and frames to a Form Template as design elements or to make the form easier to read. To do so, click the [Line] or [Frame] buttons at the top of the Form Template window:
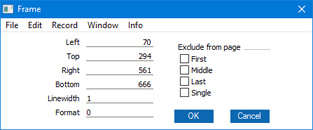
- Left, Top, Right, Bottom
- Use these fields to position the line or frame precisely on the Form Template.
- Line Width
- Specify the width in pixels of the line or frame. If you are adding a line, you can also use 'Paste Special' to choose a Style: the font size in the Style will determine the width of the line.
- Format
- This field is only available if you are adding a frame. If you set the Format to 1, the frame will be printed repeatedly down the page.
- Exclude from page
- Please refer to the Single- and Multi-Page Forms page for details about these options.
Please refer to the following pages for details about the different types of object that you can add to Form Templates:
- Text Objects
- Lines and Frames
- Fields
- Pictures
- Page Sums
The Form Template register in Standard ERP:
- Introduction to Form Templates
- Adding and Editing Objects
- Operations menu
- Single- and Multi-Page Form Templates
- Printing Forms
- Page Setup
- Standard Fields for inclusion in all Form Templates
- Home page for System Module manual
- Home page for Standard ERP manual
Adding and Editing Objects in Form Templates - Fields
This page describes adding fields to a Form Template.---
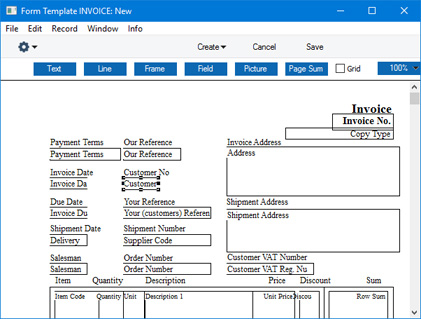
A field is an area on the Form Template where a piece of information from your Standard ERP database or a calculated value is to be printed.
To add a field to a Form Template, click the [Field] button at the top of the Form Template window:

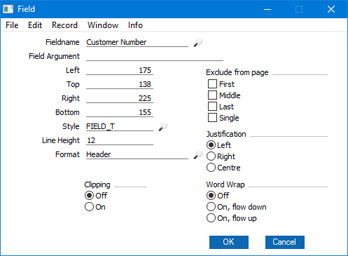
- Fieldname
- Paste Special
Fields for the Form Type
- Enter the Field Name using 'Paste Special'. If you have assigned a Form Type to the Form Template as described here, 'Paste Special' will only list the fields that can be used with that Form Type. Otherwise it will list every field. Fields belonging to other Form Types will not be printed in the final documents. Please refer to the descriptions of the individual forms for full lists of the fields you can use with each Form Type.
- Field Argument
- You can use the Field Argument with certain fields to control how they will be printed. For example, in some fields you can use the Field Argument to specify the number of decimal places that will be printed. The Field Argument can only be used with a few fields: please refer to the descriptions of the individual forms for details.
- Left, Top, Right, Bottom
- Use these fields to specify the size and position of the field on the page. When you add a new field to a Form Template, the measurements of the box that you have just drawn will appear here.
- Style
- Paste Special
Styles setting, System module
- Use this field to assign a font and font style to the field. If you do not enter a Style here, the first record in the Styles setting will be used.
- Line Height
- Some fields will cause more than one line of text to be printed in a document (e.g. fields that print the text in Letters and Mails, address fields, and the fields listing the Items in Quotations, Orders and Invoices). In these fields, you should use the Line Height field to specify the vertical spacing between lines (in pixels). Usually the number of pixels that you specify here should be the same as the font size. If you leave this field empty, the lines of text will be printed on top of each other.
- Format
- Paste Special
Choice of possible entries
- There are two types of field that you can add to a Form Template: Header fields and Matrix fields (often also known as row fields). Use this field to specify whether the field you are adding is a Header field or a Matrix field.
- Header fields
- A Header field will be printed once in each document (for example, the fields that print the Invoice Number, Invoice Date and Customer information in an Invoice are Header fields).
- A few Header fields will print information on several lines. Examples are the fields that print the text in Letters and Mails, address fields. You should specify a Line Height in these fields.
- A few Header fields will print information on several lines. Examples are the fields that print the text in Letters and Mails, address fields. You should specify a Line Height in these fields.
- Matrix fields
- A Matrix field can be printed many times in a single document. Examples are the fields that print the Items in Quotations, Orders and Invoices.
- A matrix field will print a single piece of information from each row in the record being printed. For example, the "Item Code" field will print each Item Number in an Invoice. The Item Numbers will be printed as a list i.e. in a column. For this reason, you should always specify Line Heights in Matrix fields, to set the spacing between the lines in the column. Usually, you should use the same Line Height and Style in each Matrix field, so that the information in each column is aligned correctly.
- If information in a particular column is not properly aligned, the probable causes are that you did not specify a Line Height, or you did not set the Format to "Matrix".
- In some records (Opportunities, Project Budgets, Quotations, Sales Orders, Sales Invoices and Stock Movement Invoices), the matrix can contain rows of different types (for example, the rows containing the Items, "Header" rows, "Subtotal" rows, rows connecting Invoices to Prepayments, and so on). When the record is printed, the rows of various types can be printed with different Styles and Line Heights. To set the Styles and Line Heights for the different row types, use the 'Row Styles' function on the Operations menu. You should still set Line Heights and Styles in the fields themselves.
- A matrix field will print a single piece of information from each row in the record being printed. For example, the "Item Code" field will print each Item Number in an Invoice. The Item Numbers will be printed as a list i.e. in a column. For this reason, you should always specify Line Heights in Matrix fields, to set the spacing between the lines in the column. Usually, you should use the same Line Height and Style in each Matrix field, so that the information in each column is aligned correctly.
- Header fields
- Exclude from page
- Please refer to the Single- and Multi-Page Forms page for details about these options.
- Clipping
- These options control how the text in a field will be printed if the field is too small to contain the text string. If Clipping is On, the text will be truncated (i.e. only the text that fits inside the field will be printed). If Clipping is Off, the text will not be truncated so part of it will be printed outside the field.
- In Header fields, an alternative to clipping is to use the Word Wrap options below.
- In Header fields, an alternative to clipping is to use the Word Wrap options below.
- Justification
- Use these options to specify where the text will appear inside the field.
- Word Wrap
- Use these options to control how the contents of a field will be printed if the field is not wide enough. You should only use these options with Header fields.
- Off
- The contents will be truncated to fit the width of the field.
- On
- The contents will be printed on several lines, with the width of the field being preserved. You must make the field deep enough to accommodate the possibility that more than one line will be printed. You should only use Word Wrap in Header fields.
- Off
Address Formatting
You can set a standard format to be used by the fields that print addresses (for example, the fields to print invoice and delivery addresses and your company's address). To do this, use the Form Settings setting in the System module. For example, you can specify whether the company name will be included in an address, whether blank lines will be included, whether different parts of an address should be printed on different lines or on the same line and if so what the separator should be. Please refer to the description of the Form Settings setting here for more details.Please refer to the following pages for details about the different types of object that you can add to Form Templates:
The Form Template register in Standard ERP:
- Introduction to Form Templates
- Adding and Editing Objects
- Operations menu
- Single- and Multi-Page Form Templates
- Printing Forms
- Page Setup
- Standard Fields for inclusion in all Form Templates
- Home page for System Module manual
- Home page for Standard ERP manual
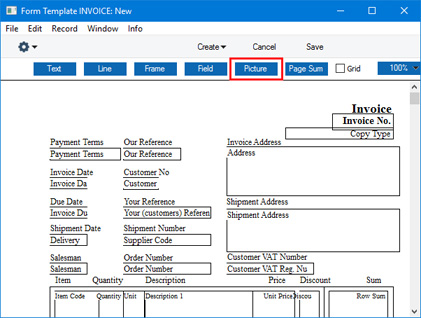
Adding and Editing Objects in Form Templates - Pictures
This page describes adding pictures and images to a Form Template.---
To add a picture to a Form Template, click the [Picture] button at the top of the Form Template window:
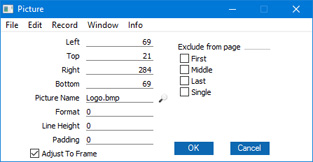
- Left, Top, Right, Bottom
- Use these fields to specify the size and position of the picture on the page. When you add a new picture to a Form Template, the measurements of the frame that you have just drawn will appear here.
- Picture Name
- Paste Special
Files on your hard disk
- Enter the file name of the picture as it is on your hard disk. You can use 'Paste Special' to ensure that the file name is spelt correctly and that the case is correct (important for Linux). However, doing so will bring in the absolute path name of the picture. It is recommended that you store picture files in the same directory or folder as your Standard ERP database and application and that you remove the path name to leave the file name only (i.e. that you use a relative path name). If you use the absolute path name, it will become incorrect if you move your Standard ERP folder and as a result the picture will no longer be printed.
- In multi-user systems, pictures should be stored on the server. If you are working from a client machine when you design a Form Template and you want to see the pictures in the Form Template window, then the pictures should be on your client machine as well. If you store your pictures in the same directory or folder as the Standard ERP application on both the server and your client and you use relative path names as recommended in the previous paragraph, then those path names will point to the picture files both when printing and when editing Form Templates.
- The following file formats are supported: 8-Bit BMP, 24-Bit BMP, JPG and PNG. Additionally, PDF is supported for Mac OS X clients. If you will use the Form Template to create pdf files, the picture format must be 24-Bit BMP, JPG or PNG. This applies when the pdf file will be generated by Standard ERP. Please refer to the lower part of the Styles page for details about pdf generation.
- All picture file names should have the correct extensions.
- If the Form Template is one that will be faxed through a fax server, bear in mind that any pictures will be omitted.
- In multi-user systems, pictures should be stored on the server. If you are working from a client machine when you design a Form Template and you want to see the pictures in the Form Template window, then the pictures should be on your client machine as well. If you store your pictures in the same directory or folder as the Standard ERP application on both the server and your client and you use relative path names as recommended in the previous paragraph, then those path names will point to the picture files both when printing and when editing Form Templates.
- Format
- The pictures that you can include in a Form Template fall into two categories: pictures that will be printed once in a document (e.g. your company logo); and pictures of Items to be printed in documents such as Quotations, Orders and Invoices (i.e. a different Item picture can be printed in each row). For the first category, enter the file name of the picture in the Picture Name field above and enter 0 as the Format. For the second category, leave the Picture Name field empty and enter 1 as the Format.
- Line Height, Padding
- These fields are only used when the Format above is 1. Please refer to the Printing Item Pictures on Forms page for full details.
- Adjust to Frame
- This option controls how the picture will be printed if it is larger than the frame that you define using the Left, Top, Right and Bottom fields. If you select this option, the picture will be scaled so that they fit in the frame. This may result in the picture being distorted if its proportions are different to those of the frame. If you do not select this option, part of a large picture will be printed outside the frame.
- Exclude from page
- Please refer to the Single- and Multi-Page Forms page for details about these options.
Please refer to the following pages for details about the different types of object that you can add to Form Templates:
- Text Objects
- Lines and Frames
- Fields
- Pictures
- Page Sums
—
The Form Template register in Standard ERP:
- Introduction to Form Templates
- Adding and Editing Objects
- Operations menu
- Single- and Multi-Page Form Templates
- Printing Forms
- Page Setup
- Standard Fields for inclusion in all Form Templates
- Home page for System Module manual
- Home page for Standard ERP manual
Adding and Editing Objects in Form Templates - Page Sums
This page describes adding page sums to a Form Template.---
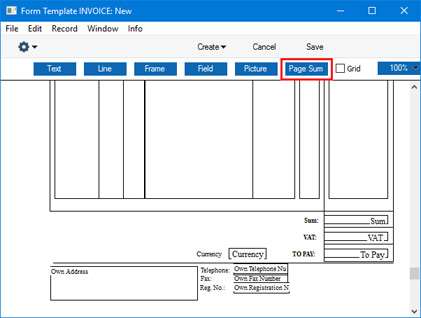
A page sum will print a running total for a particular Matrix or row field on each page.
To add a page sum to a Form Template, click the [Page Sum] button at the top of the Form Template window:
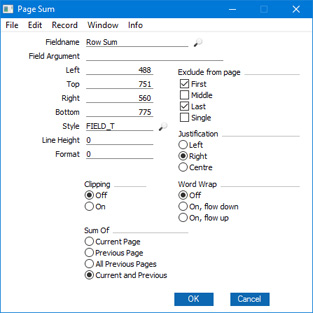
- Fieldname
- Paste Special
Fields for the Form Type
- Use 'Paste Special' to choose the field for which a running total is to be printed. This must be a numeric matrix field (for example, the "Row Sum" field in Quotations, Orders and Invoices). You should add the field to the Form Template before adding the page sum, otherwise the page sum won't be printed.
- Field Argument
- If the field is one where you can specify a Field Argument (e.g. to specify the number of decimal places that will be printed), you can specify the same Field Argument for that field's page sum. If you do specify a Field Argument for a page sum, it will also be used in the field itself, overruling any Field Argument that you may have specified there.
- Left, Top, Right, Bottom
- Use these fields to specify the size and position of the page sum on the page. When you add a new row sum to a Form Template, the measurements of the box that you have just drawn will appear here.
- Style
- Paste Special
Styles setting, System module
- Use this field to assign a font and font style to the page sum. If you do not enter a Style here, the first record in the Styles setting will be used.
- Line Height
- There will usually be no need to specify a Line Height in page sums.
- Format
- The Format should usually be 0 in page sums (if you set the Format to 1, the figures that make up the page sum will be printed individually.
- Exclude from page
- Please refer to the Single- and Multi-Page Forms page for details about these options. Usually, you would exclude a page sum from Single pages and, depending on the Sum Of options below, from Last pages.
- Justification
- Use these options to specify where the text will be printed inside the field.
- Clipping
- These options control how the text in a page sum will be printed if the field is not wide enough to contain it. If Clipping is On, the text will be truncated (i.e. only the text that fits inside the field will be printed). If Clipping is Off, the text will not be truncated so part of it will be printed outside the field.
- An alternative to clipping is to use the Word Wrap options below.
- An alternative to clipping is to use the Word Wrap options below.
- Word Wrap
- Use these options to control how the contents of a field will be printed if the field is not wide enough.
- Off
- The contents will be truncated to fit the width of the field.
- On
- The contents will be printed on several lines, with the width of the field being preserved. You must make the field deep enough to accommodate the possibility that more than one line will be printed. You should only use Word Wrap in Header fields.
- Off
- Sum Of
- Use these options to specify how the running total will be calculated.
- Current Page
- The running total will be the total for the current page.
- Previous Page
- The running total will be the total for the previous page.
- All Previous Pages
- The running total will be the total for all previous pages.
- Current and Previous
- The running total will be the total for the current and all previous pages.
- Current Page
- Text Objects
- Lines and Frames
- Fields
- Pictures
- Page Sums
The Form Template register in Standard ERP:
- Introduction to Form Templates
- Adding and Editing Objects
- Operations menu
- Single- and Multi-Page Form Templates
- Printing Forms
- Page Setup
- Standard Fields for inclusion in all Form Templates
- Home page for System Module manual
- Home page for Standard ERP manual
Operations Menu - Form Templates
If you are using Windows or Mac OS X, you can open the Operations menu by clicking the button with the 'cog' icon (shown highlighted in the illustration above). If you are using iOS or Android, you can access the Operations menu functions through the Tools menu (with 'wrench' icon).
Before using the function on the Operations menu in the 'Form Templates: Browse' window, you should highlight a record in the browse window. The function will then be applied to that record. If you highlight more than one Form Template, the function will only be applied to the first one. If you are using iOS or Android, you can highlight a single record in the browse window by searching for it.
Please follow these links for details about each function on the Operations menu:
- Remove Page Setup
- Properties
- PC Printer
- Copies
- Send to Back
- View All, First Only, Middle Only, Last Only, Single Page Only
- Row Styles
- Standard Fields for inclusion in all Form Templates
The Form Template register in Standard ERP:
- Introduction to Form Templates
- Adding and Editing Objects
- Operations menu
- Single- and Multi-Page Form Templates
- Printing Forms
- Page Setup
- Home page for System Module manual
- Home page for Standard ERP manual
Operations Menu - Form Templates - Remove Page Setup
Please refer to the Page Setup page for details about this function.---
The Form Template register in Standard ERP:
- Introduction to Form Templates
- Adding and Editing Objects
- Operations menu, including:
- Remove Page Setup
- Properties
- PC Printer
- Copies
- Send to Back
- View All, First Only, Middle Only, Last Only, Single Page Only
- Row Styles
- Remove Page Setup
- Single- and Multi-Page Form Templates
- Printing Forms
- Page Setup
- Standard Fields for inclusion in all Form Templates
- Home page for System Module manual
- Home page for Standard ERP manual
Operations Menu - Form Template - Properties
This page describes the 'Properties' function on the Operations menu in the Form Template record window.---
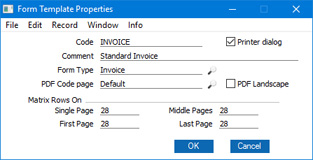
As the Form Template window is entirely occupied by the graphical editor, it does not contain any fields that you can use to set or change the specifications of a Form Template. These fields are in a separate window, the 'Form Template Properties' window. To open this window, select 'Properties' from the Operations menu. In particular, when you create a new Form Template, you must open the 'Form Template Properties' window to assign it a Code and Name before you can save it for the first time.

- Code
- Enter the unique code of the Form Template: this is the means by which the Form Template will be identified elsewhere in Standard ERP. If you create a new Form Template by duplicating an existing one, you must enter a new Code here before you can save it.
- Printer Dialog
- Select this option if you would like a printer dialogue to be shown each time the Form Template is printed.
- Among other things and depending on your operating system, the printer dialogue will allow you to specify the number of copies that is to be printed, to choose the printer that will print the document and to choose whether the document will be printed as a pdf file.
- For example, if you are designing a Form Template that will be used when you print Invoices, select this option if you would like the printer dialogue to be shown whenever you print an Invoice by clicking the Printer icon or using the [Forms] button in the Navigation Centre.
- Among other things and depending on your operating system, the printer dialogue will allow you to specify the number of copies that is to be printed, to choose the printer that will print the document and to choose whether the document will be printed as a pdf file.
- Comment
- Enter text describing the Form Template here.
- The Comment will be shown in the 'Paste Special' list that you will use when assigning Form Templates to forms, so it should be descriptive enough to make the selection of the correct Form Template easy for all users.
- The Comment will be shown in the 'Paste Special' list that you will use when assigning Form Templates to forms, so it should be descriptive enough to make the selection of the correct Form Template easy for all users.
- Form Type
- Paste Special Choices of possible entries
- Using 'Paste Special', enter one of the available Form Types into this field. The purpose of the Form Type is to help you choose fields when adding them to the Form Template. When you add a field to the Form Template, you will open the 'Field' dialogue box and then open the 'Paste Special' list from the Fieldname field. This will be a list of the fields that you can use with the specified Form Type. If you do not assign a Form Type to a Form Template, every field will be included in this 'Paste Special' list, making it more difficult to choose the ones that you need.
- Using 'Paste Special', enter one of the available Form Types into this field. The purpose of the Form Type is to help you choose fields when adding them to the Form Template. When you add a field to the Form Template, you will open the 'Field' dialogue box and then open the 'Paste Special' list from the Fieldname field. This will be a list of the fields that you can use with the specified Form Type. If you do not assign a Form Type to a Form Template, every field will be included in this 'Paste Special' list, making it more difficult to choose the ones that you need.
- PDF Code page
- Paste Special
Choices of possible entries
- If you will use the Form Template to create pdf files, specify here the code page that is to be used, if different to the default. For example, you may usually use the CP1252 code page, but you may need to use KOI8-R Cyrillic in a particular Form Template.
- This applies when the pdf file will be generated by Standard ERP. Please refer to the lower part of the Styles page for details about pdf generation.
- The default code page will depend on the language of the Standard ERP interface you are using, as follows:
Language Default Code Page Estonian, Latvian, Lithuanian CP1257 Polish, Hungarian, Slovak, Slovenian, Serbian CP1250 Russian, Ukrainian, Byelorussian KOI8-R Others CP1252 In a multi-language installation of Standard ERP, it is recommended that you specify a PDF Code Page in every Form Template that you will use to create pdf files. Otherwise, Persons who use the Estonian and Russian interfaces, for example, will create pdf files from the same Form Template using different code pages.
- This applies when the pdf file will be generated by Standard ERP. Please refer to the lower part of the Styles page for details about pdf generation.
- PDF Landscape
- If you will use the Form Template to create pdf files, select this option if you would like those pdf files to be created in landscape format.
- This applies when the pdf file will be generated by Standard ERP, in which case a landscape format specified using the 'Page Setup' function on the File menu would not be applied. Please refer to the lower part of the Styles page for details about pdf generation.
- This applies when the pdf file will be generated by Standard ERP, in which case a landscape format specified using the 'Page Setup' function on the File menu would not be applied. Please refer to the lower part of the Styles page for details about pdf generation.
- Matrix Rows On
- Please refer to the Single- and Multi-Page Forms page for details about these options.
---
The Form Template register in Standard ERP:
- Introduction to Form Templates
- Adding and Editing Objects
- Operations menu, including:
- Remove Page Setup
- Properties
- PC Printer
- Copies
- Send to Back
- View All, First Only, Middle Only, Last Only, Single Page Only
- Row Styles
- Remove Page Setup
- Single- and Multi-Page Form Templates
- Printing Forms
- Page Setup
- Standard Fields for inclusion in all Form Templates
- Home page for System Module manual
- Home page for Standard ERP manual
Operations Menu - Form Template - PC Printer
This page describes the 'PC Printer' function on the Operations menu in the Form Template record window.---
If you will print a Form Template using a dot matrix printer, use the 'PC Printer' function on the Operations menu dialogue box to define the page size for that Form Template.
Press the [OK] button to assign the changes to the Form Template. Note that the changes won't be saved permanently until you save the Form Template itself.
---
The Form Template register in Standard ERP:
- Introduction to Form Templates
- Adding and Editing Objects
- Operations menu, including:
- Remove Page Setup
- Properties
- PC Printer
- Copies
- Send to Back
- View All, First Only, Middle Only, Last Only, Single Page Only
- Row Styles
- Remove Page Setup
- Single- and Multi-Page Form Templates
- Printing Forms
- Page Setup
- Standard Fields for inclusion in all Form Templates
- Home page for System Module manual
- Home page for Standard ERP manual
Operations Menu - Form Template - Copies
This page describes the 'Copies' function on the Operations menu in the Form Template record window.---
The 'Copies' function allows you to specify how many copies should be printed each time a Form Template is used, the headings that can be printed on each copy and the printer tray from which each copy is to be printed.
- Copies
- Specify here how many copies should be printed whenever the Form Template is used to print a document.
- If you will use the Form Template to print records that have an OK check box, only one copy (marked with the Text 1 text) will be printed from a record that has not been marked as OK.
- There are some records (e.g. Invoices, Receipts and Payments) that have a flag that is set when they are printed. Again, only one copy will be printed if you are reprinting one of these records.
- If you will use the Form Template to print records that have an OK check box, only one copy (marked with the Text 1 text) will be printed from a record that has not been marked as OK.
- Text 1, Text 2, etc
- Enter in these fields the text that should be printed on each copy. In the example illustrated above, we have specified that two copies of each document will be printed: one marked "Office" and one "Customer".
- These headings will be printed in the "Copy Type" field, so if you need these headings to be printed on a document, be sure to include that field in your Form Template design.
- These headings will be printed in the "Copy Type" field, so if you need these headings to be printed on a document, be sure to include that field in your Form Template design.
- Tray
- Specify here the printer tray from which each copy is to be printed.
An alternative and more recommended method for printing copies is as follows:
- Duplicate the Form Template so that you have one Form Template for each copy.
- If necessary, add a Text object to each duplicate containing the text to be printed on each copy (e.g. "Office" and "Customer").
- From the 'Form Templates: Browse' window, highlight each of the duplicate Form Templates in turn and select 'Page Setup' from the File menu. Set the printer and tray as appropriate. Please refer to the 'Page Setup' page for more details about page setups.
Each user that is likely to print the document should log in and carry out this step before printing the document for the first time.
- Follow the steps on the 'Printing Forms' page to open the 'Form Definition' window for the form in question. List the duplicate Form Templates in the matrix, remembering to specify a Seq. for each one. An illustrated example can be found on the 'Page Setup' page.
The Form Template register in Standard ERP:
- Introduction to Form Templates
- Adding and Editing Objects
- Operations menu, including:
- Remove Page Setup
- Properties
- PC Printer
- Copies
- Send to Back
- View All, First Only, Middle Only, Last Only, Single Page Only
- Row Styles
- Remove Page Setup
- Single- and Multi-Page Form Templates
- Printing Forms
- Page Setup
- Standard Fields for inclusion in all Form Templates
- Home page for System Module manual
- Home page for Standard ERP manual
Operations Menu - Form Template - Send to Back
This page describes the 'Send to Back' function on the Operations menu in the Form Template record window.---
If you want certain objects in a Form Template to appear behind other objects, click on them and select this function.
---
The Form Template register in Standard ERP:
- Introduction to Form Templates
- Adding and Editing Objects
- Operations menu, including:
- Remove Page Setup
- Properties
- PC Printer
- Copies
- Send to Back
- View All, First Only, Middle Only, Last Only, Single Page Only
- Row Styles
- Remove Page Setup
- Single- and Multi-Page Form Templates
- Printing Forms
- Page Setup
- Standard Fields for inclusion in all Form Templates
- Home page for System Module manual
- Home page for Standard ERP manual
Operations Menu - Form Template - View All, First Only, Middle Only, Last Only, Single Page Only
Please refer to the Single- and Multi-Page Forms page for details about the 'View All', 'First Only', 'Middle Only', 'Last Only' and 'Single Page Only' functions on the Operations menu in the Form Template record window. .---
The Form Template register in Standard ERP:
- Introduction to Form Templates
- Adding and Editing Objects
- Operations menu, including:
- Remove Page Setup
- Properties
- PC Printer
- Copies
- Send to Back
- View All, First Only, Middle Only, Last Only, Single Page Only
- Row Styles
- Remove Page Setup
- Single- and Multi-Page Form Templates
- Printing Forms
- Page Setup
- Standard Fields for inclusion in all Form Templates
- Home page for System Module manual
- Home page for Standard ERP manual
Operations Menu - Form Template - Row Styles
This page describes the 'Row Styles' function on the Operations menu in the Form Template record window.---
In some records (Opportunities, Project Budgets, Quotations, Sales Orders, Sales Invoices and Stock Movement Invoices), the matrix can contain rows of different types. Examples are the rows containing the Items, "Header" rows, "Subtotal" rows, rows connecting Invoices to Prepayments, and rows in Credit Notes connecting them to Invoices.
When you design the Form Templates that will be used to print these records, you can specify that the rows of various types will be printed with different Styles and Line Heights. For example, you may want "Subtotal" rows to be printed in a larger font and with a larger line spacing.
To set the Styles and Line Heights for the different row types, select the 'Row Styles' function from the Operations menu. If you use this feature, you should still set Line Heights and Styles in the fields themselves.
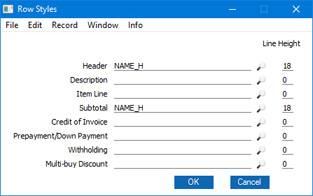
You don't need to specify a Style and Line Height for every row type: leave both fields empty to use the Styles and Line Heights that are specified in the fields.
If you only want to change the Line Height for a particular row type, do not leave the Style empty. Instead, specify the same Style that is in the fields. Leaving the Style empty will mean that the changed Line Height won't be used.
Usually a "normal" row will be printed using the Item Line Style and Line Height. If a row does not have an Item Number or a Sum, it will be printed using the Description Line Style and Line Height.
Row Styles are only used when printing Opportunities, Project Budgets, Quotations, Sales Orders, Sales Invoices and Stock Movement Invoices. Entering Row Styles in the Form Templates that will be used to print other records and documents will have no effect.
Press the [OK] button to assign the changes to the Form Template. Note that the changes won't be saved permanently until you save the Form Template itself.
---
The Form Template register in Standard ERP:
- Introduction to Form Templates
- Adding and Editing Objects
- Operations menu, including:
- Remove Page Setup
- Properties
- PC Printer
- Copies
- Send to Back
- View All, First Only, Middle Only, Last Only, Single Page Only
- Row Styles
- Remove Page Setup
- Single- and Multi-Page Form Templates
- Printing Forms
- Page Setup
- Standard Fields for inclusion in all Form Templates
- Home page for System Module manual
- Home page for Standard ERP manual
Single- and Multi-Page Forms
This page describes designing Form Templates to cater for the printing of multi-page documents.---
When you design a Form Template, you should consider what is to happen when the printing of a document requires more than one page. Two options are available:
- The "simple" option, where the same page design is used for each page.
- The "multi-page" option allows the use of up to four page designs, as follows:
- First
- The first page of a multi-page document.
- Middle
- The pages between the first and last pages in a multi-page document.
- Last
- The last page of a multi-page document.
- Single
- The sole page of a single-page document.
- First
The number of pages printed will vary from record to record, depending on the number of rows that the record has. An Invoice with one Item will be printed on a single page (i.e. using those objects whose Single box is not ticked). An Invoice with 100 Items (i.e. 100 rows) will be printed over several pages. You should specify the maximum number of rows that can be printed on each page by selecting 'Properties' from the Operations menu. This opens the 'Form Template Properties' window, which has four fields under the overall heading of Matrix Rows On:
| Invoice rows | Pages | Type of Page |
| Up to 5 | 1 | Single |
| 5-12 | 2 | First and Last |
| 13-19 | 3 | First, Middle and Last |
| 19-25 | 4 | First, 2 x Middle, Last |
If you do not want any matrix rows to be printed on a particular page type, enter "-1" in the relevant field. Entering "0" will signify that you want every matrix row to be printed.
If you specify that you want matrix rows to be printed on a particular page type, ensure that you have added some matrix fields to that page type. For example, if you have specified that ten matrix rows will be printed on the first page, ensure you have added some matrix fields that you have not excluded from the first page to print those rows. If you do not add any fields to the first page, the print engine will still try to print the ten rows on the first page and will start the next page with row 11. The effect will be that the first ten rows will not be printed.
Printing Cash Receipts (Till Slips)
If you need to print Cash Receipts from POS Invoices, the design of the Form Template will depend to some extent on the printer that you are using. Some suggestions are:
- Place the header information including any column headings on the first page only.
- One option is to specify that no matrix rows will be printed on the first page (i.e. in the 'Properties' window, enter "-1" in the Single Page and First Page fields) and one row will be printed on the last page (enter "1" in the Last Page field). This will mean that every till receipt will be printed using the first page, an appropriate number of middle pages, and the last page.
- You can also specify that only one matrix row will be printed on each middle page (i.e. in the 'Properties' window, enter "1" in the Middle Page field).
- When adding matrix fields to the middle page, remember to set the Format to "Matrix" and to specify a Line Height.
- You can place the "Description 1" field above or below the fields that will print the Item Number, quantity and price information. This will give more space for long Item Names.
If you do this and you specified that more than one matrix row will be printed on each middle page, you will need to double the Line Height in each field.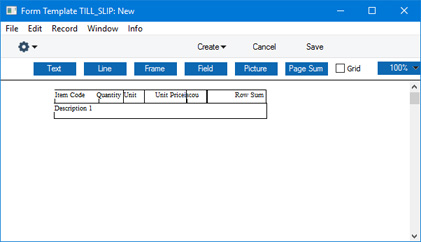
- Place the totals and footer information on the last page, at the top of the page.
- In the 'Properties' window, do not tick the Printer dialog option. In a Point of Sales environment, it will probably not be necessary for cashiers to process a printer dialogue for every till receipt.
- Depending on the printer, you may also need to select 'PC Printer' from the Operations menu, enter "1" in the Rows Per Page field and tick the End Page with Form Feed (FF) option, as well as specifying a Codepage.
- In a mixed network with Windows and Mac OS X tills, you may need a separate Form Template for each operating system. If so, you can ensure the appropriate Form Template will be printed from each till using Languages. Assign a Language (for example, Mac or Windows) to each cashier (in their Person records) and then enter a row for each Language/operating system in the 'Form Definition' window:
Please refer to the Printing Forms page for more details about the 'Form Definition' window.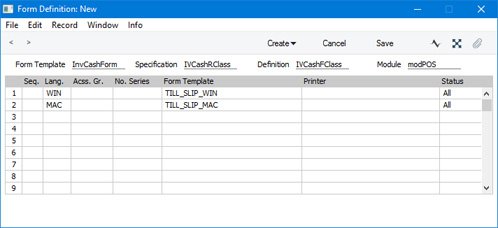
Page Sums
If you need running totals to be printed on each page, add page sums to the Form Template. For example, when printing a multi-page Invoice, you can use page sums in the following ways:- You can add a page sum to the top of the Middle and Last pages that will print the total value of the preceding pages.
- You can add a page sum to the bottom of the First and Middle pages that will print the total value of the page in question, or total value of the page in question and all preceding pages.
Page Numbers
If you need a page number to be printed on each page, add the "Page Number" field to the Form Template design.---
The Form Template register in Standard ERP:
- Introduction to Form Templates
- Adding and Editing Objects
- Operations menu
- Single- and Multi-Page Form Templates
- Printing Forms
- Page Setup
- Standard Fields for inclusion in all Form Templates
- Home page for System Module manual
- Home page for Standard ERP manual
Printing Forms
Each document that you can print consists of two elements, the "Form" and the "Form Template". The Form element extracts the relevant information from the database and places it in printable fields, while the Form Template is the graphic layout design of the printed output i.e. it controls where on the page each printable field will be placed (and it can contain other design elements such as lines and frames as well).Once you have designed a Form Template, you should you should connect it to a form. This will ensure that the form will be printed using the correct layout. This will usually only be necessary if you have given your Form Template a new Form Template Code using the 'Properties' Operations menu function.
A file containing samples of each Form Template is supplied with Standard ERP. The name of this file will vary depending on your location: in UK versions of Standard ERP, the file will be named "UKForms.txt". If you want to use these samples as the basis for your own designs, import this file as described on the Importing Set-up Data page. The file will include the sample Form Templates, and it will also connect those Form Templates to the relevant forms.
If you edit the sample Form Templates so that they meet your requirements, you don't need to re-connect them to forms. However if you create new Form Templates (perhaps by duplicating the samples), or you choose not to import the sample Form Templates and to create your own from scratch, you will then need to connect the new Form Templates to the relevant forms.
To connect a Form Template to a form, follow these steps:
- Use the [Switch Module] button in the Navigation Centre to select the module in which the form is to be found. For example, to connect a Form Template to the Invoice form, change to the Sales Ledger.
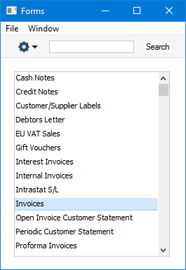
- Click the [Forms] button in the Navigation Centre. The 'Forms' list window will be opened, showing a list of available forms. Highlight the form that you need to connect to a Form Template ('Invoices' in the example).
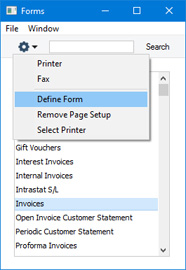
- Select 'Define Form' from the Operations menu.
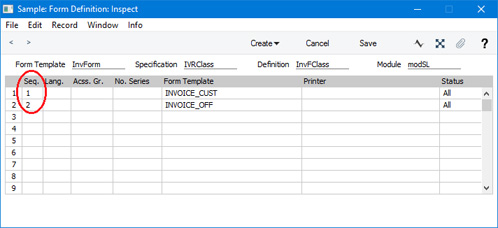
- The 'Form Definition' window opens. In the Form Template field in the first row, use 'Paste Special' to choose the Form Template that you need.

- Click [Save] to save the form definition. This will connect the Form Template to the form. In the example, whenever you print an Invoice, it will use the Form Template that you specified in the 'Form Definition' window.
The 'Define Form' function is available for every form that you can print from Standard ERP, giving you a high level of flexibility in the production of printed output.
---
The Form Template register in Standard ERP:
- Introduction to Form Templates
- Adding and Editing Objects
- Operations menu
- Single- and Multi-Page Form Templates
- Printing Forms
- Page Setup
- Standard Fields for inclusion in all Form Templates
- Home page for System Module manual
- Home page for Standard ERP manual
Page Setup
Note: if you are using Windows, you may need to log in to your computer as a user with administrative privileges to be able to change the Page Setups for documents.---
There are two ways to set the Page Setup for a particular document. Setting a Page Setup includes specifying the paper size, specifying the printer that will be used to print the document and specifying the tray in that printer that will be used. The two methods are:
- Open the list of forms from the Navigation Centre, highlight a form and select 'Page Setup' from the File menu.
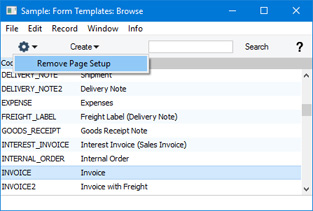
- Open the Form Template register, highlight a Form Template and select 'Page Setup' from the File menu. This method cannot be used on Mac OS X machines.
Note that when a particular user sets the page setup for a document, that page setup will not be universal. It will only be used when that user prints the document. Each user that will print a particular document should therefore set their own page setup for that document using one of the two methods above after having logged in. As well as being user-specific, a page setup is also platform-specific. So, if a user is likely to print a particular document on more than one platform (for example, from Windows and Mac OS X machines), that user should set separate page setups for each platform (from a machine of each type).
The advantage using the first method to set a page setup is that it will not be necessary to give a particular user access to the System module to enable them to set page setups. The second method will be advantageous when you assign more than one Form Template to a particular form: the different Form Templates can be printed using different page setups. One situation where this can be useful is when you need different copies of a particular document to be printed from different printer trays or even different printers. For example, you may need office and customer copies of each Invoice to be printed from different trays. One way to achieve this is to duplicate the Form Template and then list both Form Templates in the relevant 'Form Definition' window, remembering to specify a Seq. for each one:
If you are using Mac OS X, after selecting 'Page Setup' from the File menu, press the [OK] and then [Print] buttons to save the page setup. If you do not press [Print], the page setup will not be saved.
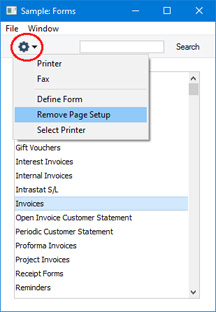
Removing a page setup will depend on the method that you originally used to assign the page setup. If you used the first method, open the list of forms from the Navigation Centre, highlight a form and select 'Remove Page Setup' from the File menu:
The Form Template register in Standard ERP:
- Introduction to Form Templates
- Adding and Editing Objects
- Operations menu
- Single- and Multi-Page Form Templates
- Printing Forms
- Page Setup
- Standard Fields for inclusion in all Form Templates
- Home page for System Module manual
- Home page for Standard ERP manual
Standard Fields
There are a number of standard fields that you can include in the Form Templates that will be used by almost every form. These fields are:| Field in Form Template | Prints |
| These fields print information from the Company Info setting: | |
| Chief Accountant | Chief Accountant |
| Copy Type | When you design a Form Template, you can use the 'Copies' function on the Operations menu to specify that more than one copy will be printed, and that each copy will be marked with specified text (e.g. "Office Copy", "Customer Copy", etc). This field will print the specified text |
| Date | The date when the Form was printed |
| Document for Training Purposes | Prints the phrase "Document for training purposes Only". This field will only be printed from sample databases |
| Invalid Invoice | Prints the phrase "Document not valid as an invoice" (prints blank in Sales Cash Notes, Sales Credit Notes, Sales Interest Invoices, Sales Internal Invoices, Sales Invoices, Sales Proforma Invoices and Project Invoices) |
| Manager / CEO | CEO |
| Own Address | Company Name and Address. This information will be printed on separate lines, so you should specify a Line Height for this field. Use the Form Settings setting to set the format of this field (e.g. to specify whether blank lines will be printed, whether parts of the address will be printed on the same line, etc.) |
| Own Address 2 | Address. This information will be printed on separate lines, so you should specify a Line Height for this field. Use the Form Settings setting to set the format of this field (e.g. to specify whether blank lines will be printed, whether parts of the address will be printed on the same line, etc.) |
| Own ANA Code | ANA Code |
| Own Bank 1 | Bank 1 |
| Own Bank 2 | Bank 2 |
| Own Bank Code | Bank Code. This information will only be printed if there is a record in the Banks setting in the Purchase Ledger for the Bank Code specified in the Company Info setting |
| Own Bank Customer ID | Bank Customer ID |
| Own Business Name | Business Name |
| Own Commercial Registration Number | Commercial Reg.No. |
| Own Country Code | ISO Code from the record in the Countries setting for the Country or, if blank, the Country |
| Own Email | |
| Own Fax Number | Fax |
| Own GLN | GLN (this field is only visible if the VAT Law in the Company Info setting is set to "Norwegian") |
| Own Home Community | Home Community |
| Own Line of Business | Line of Business |
| Own Name | Company Name |
| Own Registration Number | Reg. No. |
| Own Share Capital | Share Capital |
| Own Sort Code | Sort Code |
| Own Telephone Number | Telephone. If you enter "N" as the Field Argument, the Telephone Number will be printed without spaces or other non-numeric characters. |
| Own VAT Reg. Number | VAT Reg. No. |
| Own WWW Address | WWW Address |
| Page Number | Page number |
| Period | The period from the Form's specification window |
| Product Name | The name of the product you are using (i.e. Standard ERP) |
| Short Underline | _______________ |
| Time | The time when the Form was printed |
| These fields print information from the record in the Banks setting in the Purchase Ledger for the Bank Code specified in the Company Info setting: | |
| Own Bank Account (IBAN) | Account (IBAN) |
| Own Bank Address | Address. This information will be printed on separate lines, so you should specify a Line Height for this field |
| Own Bank Address 1 | First line of the Address |
| Own Bank Address 2 | Second line of the Address |
| Own Bank Address 3 | Third line of the Address |
| Own Bank Address 4 | Fourth line of the Address |
| Own Bank Address 5 | Fifth line of the Address |
| Own Bank BIC (SWIFT) | BIC (SWIFT) |
| Own Bank Corr. Acc. | Expense Account |
| Own Bank Clearing | Clearing |
| Own Bank Name | Name |
| Own Bank Sorting | Sort Key |
The Form Template register in Standard ERP:
- Introduction to Form Templates
- Adding and Editing Objects
- Operations menu
- Single- and Multi-Page Form Templates
- Printing Forms
- Page Setup
- Standard Fields
- Home page for System Module manual
- Home page for Standard ERP manual