Entering Opening Balances
Unless you are starting a new business and intend to use Enterprise by HansaWorld to administer your accounts from the first day, you will need to enter some opening balances. If you are starting to use Enterprise by HansaWorld at the beginning of the fiscal year, these opening balances will take the form of the closing balances for each Account for the end of the previous year. If you are starting to use Enterprise by HansaWorld in the middle of the fiscal year, there will be two components to opening balance figures: the closing balances for each Account for the end of the previous year and Account balances for the current year to date.To carry out this task, you should equip yourself with as much information as you can in the form of transaction data and reports produced by the old system, in order to make this task as easy as possible.
We recommend that you change during a current financial year. You should enter Account balances for the previous year and then enter individually all current year transactions registered so far. This will a) make you familiar with Enterprise by HansaWorld, and b) automatically give you a check of the old transactions.
You should already have specified the current and, if appropriate, previous financial years using the Fiscal Years setting and entered the Chart of Accounts and VAT Codes you wish to use. A sample Chart of Accounts is supplied with Enterprise by HansaWorld that you can use or adapt. If this is not suitable, you can import your own chart from a text file or enter it manually. For more instructions about this process, please refer to the Importing Sample Data page.
If you will be using Currencies, you should also enter the Currencies used in your business together with Exchange Rates. If any Accounts will have Currency balances, enter the appropriate Currency in the relevant Account records. You should specify in the Base Currency setting in the System module that your local Currency is to be used as Base Currency 1 and the Default Base Currency and, if you are using the Dual-Base currency conversion system you should also specify in the same setting the Currency that is to be used as Base Currency 2. The Dual-Base system will be useful for companies that have offices in two countries that need to report in both Currencies, for companies operating in countries where there is a second Currency (usually the US Dollar or Euro) in common use in addition to the national one, and for companies in the Euro zone who retain their old national Currency for comparison purposes.
If you will not be using Currencies, it is still a good idea (and a recommended course of action) to enter one record in the Currency register to represent your local Currency, and to specify in the Base Currency setting in the System module that this is your Base Currency 1 and Default Base Currency. This will make it easier to start using Currencies in the future if you need to do so while having absolutely no impact on your work before that time comes.
Once you have entered your Fiscal Year, Chart of Accounts, VAT Codes and Currencies it's a good idea to enter all the opening balances at once. Ideally, this process should be completed before you start to enter new Transactions but it is possible to change the opening balances at any time during the financial year.
When entering opening balances, the level of detail is up to you. Factors influencing this decision may be the number of Transactions, the time available to enter these Transactions, whether you can import them (otherwise, you will have to enter them manually) and the level of detail required in your reports. It might be that you enter or import all Transactions individually (in the form of Invoices, Receipts, Purchase Invoices, Payments and Nominal Ledger Transactions) or it might be that you enter a single opening balance for each Account. Full details covering the necessary data entry processes follow in the next sections.
Once you have entered your opening balances in their chosen form, print the reports you usually use and compare them with the reports from your old system. These reports should include the Trial Balance, Profit & Loss and Balance Sheet from the Nominal Ledger, and lists of Debtors and Creditors using the Sales and Purchase Ledger reports respectively.
---
In this chapter:
- Introduction
- Opening Balances in the Nominal Ledger
- Opening Balances in the Sales Ledger
- Opening Balances in the Purchase Ledger
- Opening Balances in the Stock Module
- Importing Opening Balances
- Printing Reports
- Home page for Starting Work manual
- Home page for Enterprise by HansaWorld manual
Opening Balances in the Nominal Ledger
In the Nominal Ledger, the task of entering opening balances can have two stages:- You should enter balances for each Account as they stood at the end of the previous fiscal year. You can use the Brought Forward Balances register or the Simulation register for this task. This information should be available in the Trial Balance report obtained from your old system.
You can enter a single opening balance figure for each Account, or you can divide the opening balance figure into individual postings. This decision may depend on the Account itself.
The advantages of using the Brought Forward Balance register for this purpose are that you can save unbalanced Brought Forward Balance records, and you can return to a Brought Forward Balance record to change it. This allows you to enter opening balances as a gradual process, saving frequently. The disadvantage is that the Account Reconciliation register does not recognise balances entered in the Brought Forward Balance register. So, if you are entering opening balances for Bank Accounts as individual postings that later you will need to reconcile with your bank statement, as may be the case in the UK, you will need to use the Simulation register. You can return to saved Simulations to edit them, again allowing the process of entering opening balances to be a gradual one. While a Simulation must balance before you can save it, you can save a Simulation periodically with a posting to a temporary balancing Account on the last line until it is complete. You can then convert it to a Transaction, after which the postings will be made available to the Account Reconciliation register.
If you want to use the Brought Forward Balance register, refer to steps 1-8 below. If you want to use the Simulation register, refer to steps 9-17.
- If appropriate, enter Transactions for the current year to date, using the Transaction register. Please refer to steps 18-24 below.
The following sections assume you have already defined a Chart of Accounts and a set of VAT Codes.
To enter Account balances as they stood at the end of the previous financial year to the Nominal Ledger using the Brought Forward Balance register, follow these steps:
- Select the Nominal Ledger module using the [Module] button in the Master Control panel or the Ctrl-0/⌘-0 keyboard shortcut.
- Click the [Brought Fwd Balances] button in the Master Control panel to open the Brought Forward Balance register.
- When the 'Brought Forward Balances: Browse' window opens, click [New] on the Button Bar to open a new record.
- Enter the information as shown in the following illustration. Full details of the fields are to be found in the description of the Brought Forward Balances register. It is recommended that you choose a Transaction Date that is at the end of the previous fiscal year and that is, in any case, prior to the date when you will be starting work with Enterprise by HansaWorld.
Use each row in the grid to enter the balances of each Account, taking the figures from the Trial Balance report produced by your old system.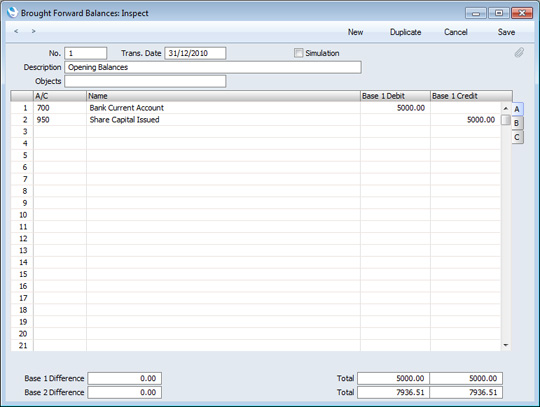
If you are not using Currencies, enter the balances in the Base 1 Debit and Credit fields.
If you have Accounts with balances in Base Currency 2, enter those balances in the Base 2 Debit and Credit fields on flip B (click the small button marked "B" on the right of the grid to see these fields). If you have Accounts with balances in a foreign Currency (i.e. not in Base Currency 1 or 2), use the fields on flip C. You should also enter home Currency balances for these Accounts on flip A: no Currency conversion will take place because users will have many different methods of converting opening balance figures.
- The Brought Forward Balances screen has 500 rows, allowing you to enter opening balances for up to 500 Accounts in a single record. If you need to enter a significant number of opening balances, it is recommended that you save the Brought Forward Balances record periodically, by clicking the [Save] button in the top right-hand corner. The record does not have to balance for you to save it. Account balances will be updated as soon as you save the record. However, if you discover a mistake at a later date, you will be able to correct the record without difficulty.
- If you run out of rows, click the [New] button (or use the Ctrl-N/⌘-N keyboard shortcut) . The Brought Forward Balances record will be saved and closed, and a new empty record will be opened, allowing you to enter more opening balances.
- If you are using Objects, you should enter a separate record to the Brought Forward Balances register for each Object and one for the total. For example, if you have a Cash Account with a balance of 100.00 that is divided between two departments so that 49.00 belongs to Department 1 and 51.00 to Department 2, enter three Brought Forward Balance records as follows:
- 1st record, Cash Account, no Objects, total figure (100.00)
- 2nd record, Cash Account, Object for Dept 1, figure for Dept 1 (49.00)
- 3rd record, Cash Account, Object for Dept 2, figure for Dept 2 (51.00)
- 2nd record, Cash Account, Object for Dept 1, figure for Dept 1 (49.00)
- 1st record, Cash Account, no Objects, total figure (100.00)
- Finish with [Save] when you have entered the last balance, and close the window by clicking the close box.
- Select the Nominal Ledger module using the [Module] button in the Master Control panel or the Ctrl-0/⌘-0 keyboard shortcut.
- Click the [Simulations] button in the Master Control panel to open the Simulation register.
- When the 'Simulations: Browse' window opens, click [New] on the Button Bar to open a new record.
- Enter the information as shown in the following illustration. Full details of the fields are to be found in the description of the Simulation register. It is recommended that you choose a Transaction Date that is at the end of the previous fiscal year and that is, in any case, prior to the date when you will be starting work with Enterprise by HansaWorld.
If you are entering a single opening balance figure for each Account, use each row in the grid to enter these balances, taking the figures from the Trial Balance report produced by your old system. If you are entering opening balances as individual postings, enter each posting on a separate row. You can enter single opening balance figures for some Accounts, and individual postings for others. For example, you can enter previously unreconciled postings to your Bank Account(s) individually, so that you can reconcile them with your bank statement later. Please refer to the description of the Account Reconciliation register for details about reconciling postings with your bank statement.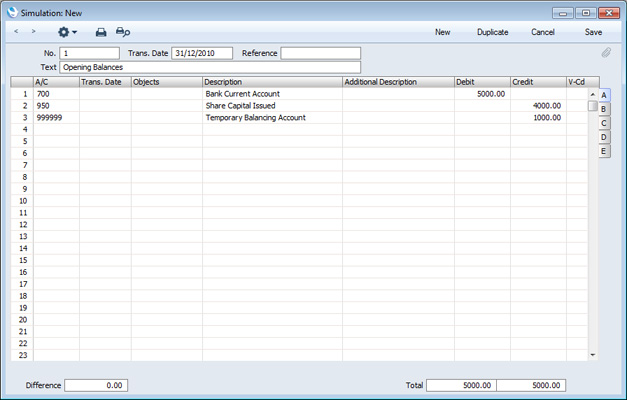
If you are not using Currencies, enter the balances in the Base 1 Debit and Credit fields.
If you have Accounts with balances in Base Currency 2, enter those balances in the Base 2 Debit and Credit fields on flip C (click the small button marked "C" on the right of the grid to see these fields). If you have Accounts with balances in a foreign Currency (i.e. not in Base Currency 1 or 2), use the fields on flip D. In both cases, enter the Currency itself on flip D as well. You should also enter home Currency balances for these Accounts on flip A: no Currency conversion will take place because users will have many different methods of converting opening balance figures.
- The Simulation screen has 300 rows, allowing you to enter opening balances for up to 300 Accounts in a single record. If you need to enter a significant number of opening balances, it is recommended that you save the Simulation record periodically, by clicking the [Save] button in the top right-hand corner. The record has to balance for you to save it, so each time you need to save, you can make a balancing posting to a temporary balancing Account as shown in the illustration above. If you discover a mistake at a later date, you will be able to correct the record without difficulty.
- If you run out of rows, click the [New] button (or use the Ctrl-N/⌘-N keyboard shortcut) . The Simulation record will be saved and closed, and a new empty record will be opened, allowing you to enter more opening balances.
- If you are using Objects, you should enter a separate row in the Simulation for each Object, but not a separate row for the total. For example, if you have a Cash Account with a balance of 100.00 that is divided between two departments so that 49.00 belongs to Department 1 and 51.00 to Department 2, enter two rows in the Simulation as follows:
- 1st row, Cash Account, Object for Dept 1, figure for Dept 1 (49.00)
- 2nd row, Cash Account, Object for Dept 2, figure for Dept 2 (51.00)
- 1st row, Cash Account, Object for Dept 1, figure for Dept 1 (49.00)
- Finish with [Save] when you have entered the last balance, and close the window by clicking the close box.
- When you save a Simulation, it will not update Account balances immediately. This means you can save it many times, making sure that it contains no mistakes.
When you are sure the Simulation is correct, close it by clicking the close box. On returning to the 'Simulations: Browse' window and highlight the Simulation in the list. Choose 'Create NL Transactions' from the Operations menu in the top left-hand corner of the window:
A Nominal Ledger Transaction will be generated from the Simulation. This Transaction will update the balances of each Account. You cannot change a Transaction once it has been created, hence the need to make sure the Simulation was correct. This is also the reason for entering opening balances in the Simulation register and not directly to the Transaction register. Transactions are described in more detail below in points 18-24.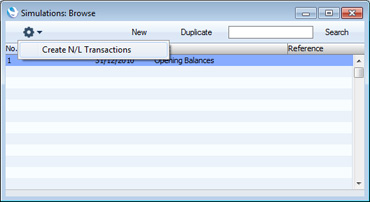
If you created more than one Simulation, you can highlight them all in the 'Simulations: Browse' window before choosing the 'Create NL Transactions' function. Nominal Ledger Transactions will be generated from each highlighted Simulation. To highlight several Simulations, click on the first one, hold down the Shift key on your keyboard and click on the last one.
- Using the [Module] button in the Master Control panel, ensure you are in the Nominal Ledger.
- Click the [Transactions] button in the Master Control panel to open the Transaction register.
- When the 'Transactions: Browse' window opens, click [New] in the Button Bar to open a new record.
- Enter the information as shown in the following illustration. Full details of the fields are to be found in the description of the Transaction register. Ensure you use the same Transaction Date that was used when entering the Transaction to your previous system.
Use the Base 1 Debit and Credit fields to record values in your home Currency. Please refer here for details about using foreign Currencies in Nominal Ledger Transactions.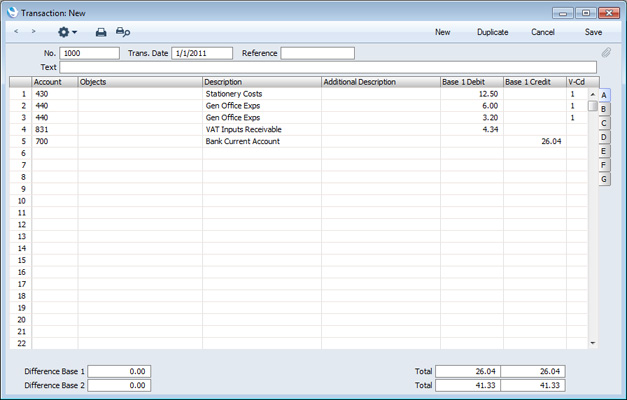
- The Transaction screen does not have an OK check box, so Account Balances are updated as soon as you save the Transaction. Therefore, before saving the Transaction, make sure that no mistakes have been made. One check is that the Debit and Credit totals are the same. Once you have saved the Transaction, you will not be able to change it.
- Click the [Save] button (or use the Shift-Enter keyboard shortcut) to save the Transaction. Alternatively, if you click the [New] button (or use the Ctrl-N/⌘-N keyboard shortcut) , the Transaction will be saved and closed, and a new empty record will be opened, allowing you to enter another Transaction.
You can use another feature when you need to enter several Transactions quickly in one sitting and don't want to interrupt your typing by reaching for the mouse. Enter the debits in a Transaction first and then, with the cursor in the Base 1 Credit field in the final credit row, press the Return or Enter key twice. The first pressing causes the correct credit amount to be entered for you, balancing the entry. The second saves, closes and commits the Transaction to the Nominal Ledger and opens a new, empty, Transaction.
- Finish with [Save] when you have entered the last Transaction, and close the window by clicking the close box.
In this chapter:
- Introduction
- Opening Balances in the Nominal Ledger
- Opening Balances in the Sales Ledger
- Opening Balances in the Purchase Ledger
- Opening Balances in the Stock Module
- Importing Opening Balances
- Printing Reports
- Home page for Starting Work manual
- Home page for Enterprise by HansaWorld manual
Opening Balances in the Sales Ledger
It is worth repeating that there can be two components to opening balance figures in the Sales Ledger: the final Customer balances from the previous fiscal year and, if you will be starting to use Enterprise by HansaWorld in the middle of a fiscal year, Customer balances for the current year to date.In considering Customer balances from the previous year, you only need to take account of those that are open (i.e. unpaid). You can enter these in one of two ways:
- as a single outstanding balance for each Customer; or
- as separate outstanding Invoices per Customer.
- the minimum is to enter a balance for each Customer as a single figure (in fact, you will need to enter an Invoice total and a Receipt total, representing totals for the current fiscal year to date, enabling you to reconcile your bank account and to keep your Aged Debtor report accurate);
- the opposite extreme is to enter all Invoices raised so far in the current fiscal year, and all Receipts;
- a compromise route to reduce the amount of work required is to enter monthly Invoice and Receipt balances for each Customer;
- a final option that you can use if you are changing to Enterprise by HansaWorld from an older computerised system is to import the current year's Invoices and Receipts from a text file. Please refer to your local HansaWorld representative if you would like to consider this option.
If you need to enter opening balances in the Sales Ledger, you should first ensure that you have entered your Customers in the Contact register using the process described on the Entering the First Customers, Suppliers and Contact Persons page. If you are entering individual Invoices, you should also ensure that you have entered the Items that you sell in the Item register, as described on the Entering the First Items page. You may be able to import this information from text files. Finally, if you are entering Receipts in any form (i.e. individual Receipts, or monthly or year-to-date Receipts) make sure you have entered all relevant Payment Modes (i.e. payment methods), so that you can post the Receipt amounts to the correct Bank or Cash Account.
---
In this chapter:
- Introduction
- Opening Balances in the Nominal Ledger
- Opening Balances in the Sales Ledger, including:
- Opening Balances in the Sales Ledger - and the Nominal Ledger
- Opening Balances in the Sales Ledger - Payment Modes
- Opening Balances in the Sales Ledger - Opening Balances
- Opening Balances in the Sales Ledger - Entering Receipts
- Opening Balances in the Sales Ledger - and the Nominal Ledger
- Opening Balances in the Purchase Ledger
- Opening Balances in the Stock Module
- Importing Opening Balances
- Printing Reports
- Home page for Starting Work manual
- Home page for Enterprise by HansaWorld manual
Opening Balances in the Sales Ledger - and the Nominal Ledger
You should enter Sales Ledger opening balances in the form of Invoices and Receipts. Any Invoices and Receipts from the previous fiscal year that you enter should not be posted to the Nominal Ledger if you have already entered previous-year Nominal Ledger opening balances to the Brought Forward Balance and Simulation registers as described here. The Nominal Ledger opening balances include balances for the Accounts affected by Invoices (e.g. the Debtors Account) and so to post to those Accounts from opening balance Invoices is to post the same amounts twice. Therefore, before you can enter your Sales Ledger opening balances, you need to ensure that Invoices and Receipts from the previous fiscal year will not update the Nominal Ledger.Using the [Module] button in the Master Control panel, ensure that you are in the Nominal Ledger. Click [Settings] in the Master Control panel or use the Ctrl-S/⌘-S keyboard shortcut. In the subsequent list, double-click 'Sub Systems'. The following window appears:
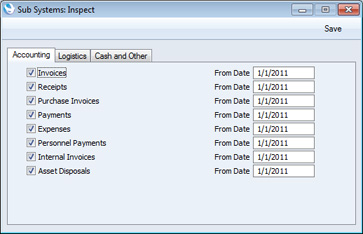
It is recommended that for each Sub System you enter the first day of your fiscal year. When you enter previous-year opening balances, use a date prior to the Sub System date. This will ensure that Nominal Ledger Transactions will be created when expected and that they will not be created for opening balances. If it takes longer than expected to enter opening balances, you can continue doing so and start to create new records without needing to worry about the consequences in the Nominal Ledger. For example, you can enter previous-year Invoices and Receipts (dated prior to the dates in the Sub System setting) at the same time as issuing new Invoices. The Sub Systems setting will ensure the Nominal Ledger is only updated when it should be.
If you are starting to use Enterprise by HansaWorld in the middle of a financial year, you should already have entered the Nominal Ledger Transactions for the current year so far, as described here. If, as was recommended, you entered these from the original documentation and did not copy them from Transaction Journal reports produced from your old system, you will not have any current year Transactions that relate to the Sales or Purchase Ledger. These will now be created automatically from the Invoices and Receipts (and Purchase Invoices and Payments) that you are about to enter, providing that they are dated later than the Sub System date (the first day of your fiscal year). If you did enter current year Transactions relating to the Sales or Purchase Ledger as part of the previous exercise, you will not want them created again when you enter Invoices and Receipts. In this case, make the Sub System date later (a few days before the date when you will start originating transactions in Enterprise by HansaWorld). This means you will be able to enter Invoices for the current year to date and to issue new Invoices simultaneously without needing to worry about the consequences in the Nominal Ledger.
If you are not certain whether you have entered current year Transactions relating to the Sales or Purchase Ledger, produce a Trial Balance report for the current year and check the balances for your Sales, Purchase, Debtor and Creditor Accounts. If these are zero, you have not entered these Transactions. If they are the same as those on the Trial Balance produced from your old system, you have entered these Transactions already. Please refer to this page for instructions about printing a Trial Balance report.
Once the Sub Systems setting is to your satisfaction, save and close the window by clicking [Save] in the Button Bar.
! | Note that if you have entered previous-year opening balances in the Nominal Ledger, you should not post any Sales, Purchase or Stock opening balances to your Nominal Ledger. To do so will duplicate the work you have already done and will immediately render your accounts inaccurate. |
In this chapter:
- Introduction
- Opening Balances in the Nominal Ledger
- Opening Balances in the Sales Ledger, including:
- Opening Balances in the Sales Ledger - and the Nominal Ledger
- Opening Balances in the Sales Ledger - Payment Modes
- Opening Balances in the Sales Ledger - Opening Balances
- Opening Balances in the Sales Ledger - Entering Receipts
- Opening Balances in the Sales Ledger - and the Nominal Ledger
- Opening Balances in the Purchase Ledger
- Opening Balances in the Stock Module
- Importing Opening Balances
- Printing Reports
- Home page for Starting Work manual
- Home page for Enterprise by HansaWorld manual
Opening Balances in the Sales Ledger - Payment Modes
Before entering the first opening balance in the Sales Ledger, there is a single setting that you need to check if you will be entering Receipts for the fiscal year to date.Use the [Module] button in the Master Control panel to enter the Sales Ledger and click the [Settings] button, also in the Master Control panel. In the subsequent list window, double-click on 'Payment Modes'.
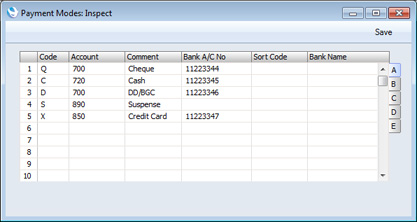
If you imported the sample Chart of Accounts supplied with Enterprise by HansaWorld as described on the Importing Sample Data page, you will also have imported some basic Payment Modes. If you have modified the Chart of Accounts supplied, or you have created your own, ensure that the Account Numbers shown in the second column now refer to the correct Account (remember, you can use 'Paste Special' if necessary).
To create a new Payment Mode, simply click in the first blank row and enter a unique Code. Then enter the other details as appropriate, referring to this page if necessary. Referring to the 'Sales Ledger' manual for details, click flips B-E to complete the entry. Click [Save] when you have finished. Then, close the 'Settings' list using the close box.
---
In this chapter:
- Introduction
- Opening Balances in the Nominal Ledger
- Opening Balances in the Sales Ledger, including:
- Opening Balances in the Sales Ledger - and the Nominal Ledger
- Opening Balances in the Sales Ledger - Payment Modes
- Opening Balances in the Sales Ledger - Opening Balances
- Opening Balances in the Sales Ledger - Entering Receipts
- Opening Balances in the Sales Ledger - and the Nominal Ledger
- Opening Balances in the Purchase Ledger
- Opening Balances in the Stock Module
- Importing Opening Balances
- Printing Reports
- Home page for Starting Work manual
- Home page for Enterprise by HansaWorld manual
Opening Balances in the Sales Ledger - Opening Balances
The process described below applies to the entering of opening balances both from the previous fiscal year and for the current year to date.You are now ready to enter the first Invoice. Follow the described below. If you are entering a single opening balance figure per Customer, either for the previous fiscal year or for the current year to date, you will need to do this by entering it in an Invoice. If so, omit step 7 in the following procedure.
- If you are not already in the Sales Ledger module, move into it using the [Module] button in the Master Control panel.
- Click the [Invoices] button in the Master Control panel to open the Invoice register.
- When the 'Invoices: Browse' window opens, click [New] in the Button Bar to open a new record.
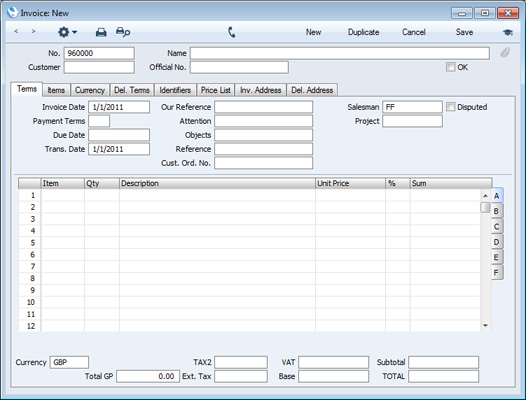
- When the 'Invoice: New' window opens, the Invoice and Transaction Date fields will both contain the current date taken from the system clock. Depending on the Base Currency setting in the System module, the Currency field may also contain a default (your home Currency).
If you are entering a single opening balance figure for each Customer, you might like to use a separate numbering sequence for opening balances (use the Number Series - Invoices setting in the Sales Ledger to set up numbering sequences). If you are entering individual Invoices, you will need to use the Invoice Number and Date of the original Invoice. In multi-user systems, an Invoice Number will be allocated when you save the Invoice for the first time, but you can enter the Invoice Number yourself before saving to be sure that it is correct. When entering individual Invoices for the current year to date, it is recommended that you enter these Invoices in number order from a single client computer to ensure each Invoice retains the number with which it was originally issued.
- Place the insertion point in the Customer field and activate 'Paste Special' using the Ctrl-Enter (Windows and Linux) or ⌘-Enter (Mac OS X) keyboard shortcut. The 'Paste Customer' window appears, showing a list of the Customers recorded in the Contact register. Select a Customer by clicking on its row and pressing the Return key twice. The first pressing causes the Customer Number to be transferred to the field in the Invoice, and the second will move information about the Customer (Name, Address etc.) to the Invoice.
- Use the Tab or Return key to move the insertion point to the Date field. In the case of Customer balances from the end of the previous fiscal year, ensure that this is set to a date that is earlier than the cut-off date you specified in the Sub Systems setting.
- If you are entering individual Invoices, move the insertion point to the Item field and press Ctrl-Enter or ⌘-Enter again. Select the correct Item from the list and press Return twice. The insertion point is moved to the Qty field. Enter the number of items sold, and press Tab or Return. Check that the Unit Price is correct and repeat for each item on the Invoice.
- If you are entering single opening balances, do not enter an Item Number as described in step 7 and instead move the insertion point to the Qty field and enter a quantity of 1. Press Tab or Return and enter the text "Opening Balance" in the Description field. Enter an amount (excluding VAT) in the Unit Price field.
- Until you are familiar with the Invoice screen, it is a good idea to check that every field is correct. Clicking the named tabs marked 'Currency', 'Delivery', 'Identifiers', etc causes different information about the Invoice to be shown, while the tabs marked A-F display further information about the Invoice items. Pay particular attention to the Sales Account and VAT Code fields on flip B. These defaults are taken from the Item record or, if not specified there, from the Account Usage S/L setting. It will be the latter in the case of single opening balances as then you are not referring to the Item register.
- At the bottom of the Invoice the total is shown, together with the VAT amount and the total payable amount.
- Click [Save] to save the Invoice.
The window title changes to 'Invoice: Inspect'. You can now correct any mistakes before you click the OK check box in the bottom left-hand corner. With the OK box checked, clicking the [Save] button once again approves the Invoice and commits it to your Sales Ledger. After this you may not change the individual fields. You must approve Invoices before you can allocate Receipts to them and for them to appear in the Periodic Customer Statement.
- Finish with [New] if you wish to enter another Invoice. Or, if you are entering all Invoices for the current fiscal year, click [Duplicate]. This will create a new Invoice which will be a copy of the one just saved. This will save you having to enter Customer details, etc, again if they are the same.
- Finish with [Save] when you have entered the last Invoice, and close the window by clicking the close box.
In this chapter:
- Introduction
- Opening Balances in the Nominal Ledger
- Opening Balances in the Sales Ledger, including:
- Opening Balances in the Sales Ledger - and the Nominal Ledger
- Opening Balances in the Sales Ledger - Payment Modes
- Opening Balances in the Sales Ledger - Opening Balances
- Opening Balances in the Sales Ledger - Entering Receipts
- Opening Balances in the Sales Ledger - and the Nominal Ledger
- Opening Balances in the Purchase Ledger
- Opening Balances in the Stock Module
- Importing Opening Balances
- Printing Reports
- Home page for Starting Work manual
- Home page for Enterprise by HansaWorld manual
Opening Balances in the Sales Ledger - Entering Receipts
As with entering Invoices, you can get a lot of help with entering your Receipts using the shortcuts built in to Enterprise by HansaWorld. Perhaps the most useful tool is the 'Paste Special' command. You can use 'Paste Special' whenever you enter data in a field that refers to another register or setting.There is no need to enter any Receipts from the previous fiscal year, because you should only have entered outstanding Invoices from that year. You should only follow the steps described below for Receipts from the current year to date (i.e. only if you are starting to use Enterprise by HansaWorld in the middle of a fiscal year).
- Open the 'Receipts: Browse' window by ensuring you are in the Sales Ledger and clicking the [Receipts] button in the Master Control panel.
- When the 'Receipts: Browse' window opens, click [New] or use the Ctrl-N (Windows and Linux) or ⌘-N (Mac OS X) keyboard shortcut to open a new record.
- The 'Receipt: New' window is shown. You can use a single window to enter all your Receipts from the earlier part of the year, even if they are in different Currencies and Payment Modes.
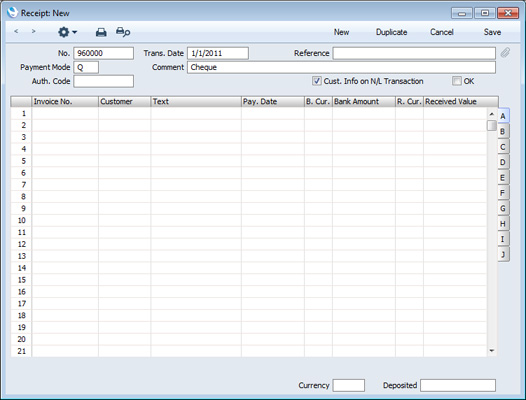
- Enter the data in the top of the window. Select a Payment Mode using 'Paste Special' to open a list of the Payment Modes you created earlier. Make sure the Transaction Date is correct.
- For each Receipt, enter the Invoice Number in the first column (or use 'Paste Special' to choose from a list of unpaid Invoices) and press the Return key.
- If you have an Invoice that is part-paid, alter the Received Value field to show the amount paid.
- If any receipt uses a different Payment Mode to that specified in the top of the window, move to flip C to enter a Payment Mode to be used for that row only. Again, use 'Paste Special' to ensure the correct one is selected.
- When you have entered every Receipt, you should check what you have entered. If you find any errors you can change them as needed. When you are satisfied, click the OK check box in the lower left-hand corner.
- When you click [New] or [Save], the Receipt is approved and after this may not deleted or changed.
In this chapter:
- Introduction
- Opening Balances in the Nominal Ledger
- Opening Balances in the Sales Ledger, including:
- Opening Balances in the Sales Ledger - and the Nominal Ledger
- Opening Balances in the Sales Ledger - Payment Modes
- Opening Balances in the Sales Ledger - Opening Balances
- Opening Balances in the Sales Ledger - Entering Receipts
- Opening Balances in the Sales Ledger - and the Nominal Ledger
- Opening Balances in the Purchase Ledger
- Opening Balances in the Stock Module
- Importing Opening Balances
- Printing Reports
- Home page for Starting Work manual
- Home page for Enterprise by HansaWorld manual
Opening Balances in the Purchase Ledger
When entering opening balances in the Purchase Ledger, you should follow the same basic decisions and procedures described on the Sales Ledger page, using the Purchase Invoice and Payment registers in the Purchase Ledger. Before entering opening balances, use the Sub Systems setting in the Nominal Ledger to make sure that your previous year Purchase Ledger opening balances will not be posted to the Nominal Ledger, as described here.---
In this chapter:
- Introduction
- Opening Balances in the Nominal Ledger
- Opening Balances in the Sales Ledger
- Opening Balances in the Purchase Ledger
- Opening Balances in the Stock Module
- Importing Opening Balances
- Printing Reports
- Home page for Starting Work manual
- Home page for Enterprise by HansaWorld manual
Opening Balances in the Stock Module
When entering opening balances in the Stock module, the precise procedure to be followed will be determined by the nature of your business and the Items that are sold. Again, as in the Sales Ledger, the accuracy of the opening balances increases with the level of detail entered, but the time required by the task increases as well.You should decide whether to:
- enter each example of each Item in stock at the moment of implementing Enterprise by HansaWorld. You may prefer this option if the cost price of each Item is often subject to fluctuation, and you must use it for Items that carry serial numbers;
- enter a single line for each Item together with a quantity and an average purchase price; or
- use a combination of the two methods.
You should also use the Goods Receipt check box and date in the Sub Systems setting in the Nominal Ledger to make sure that your stock control opening balances will not be posted to the Nominal Ledger, as described here.
When entering opening balances in the Stock module, follow the same basic procedures described on the Sales Ledger page, using the Goods Receipt register.
---
In this chapter:
- Introduction
- Opening Balances in the Nominal Ledger
- Opening Balances in the Sales Ledger
- Opening Balances in the Purchase Ledger
- Opening Balances in the Stock Module
- Importing Opening Balances
- Printing Reports
- Home page for Starting Work manual
- Home page for Enterprise by HansaWorld manual
Importing Opening Balances
If you are changing to Enterprise by HansaWorld from another computer program, it is likely that you will want to import opening balances for all three ledgers from text files created by your old system. If you wish to do this, please follow the import instructions described on the Importing Sample Data page to import your text file. This procedure, although described there as one used to import a Chart of Accounts, is in fact an all-encompassing function that will import whatever is in the selected text file and save it in the appropriate place in your Enterprise by HansaWorld database. For details of the composition of the text files, please refer to your HansaWorld representative. Ensure that they contain opening balances as they were at the beginning of the fiscal year and all subsequent transactions as described in the previous sections.---
In this chapter:
- Introduction
- Opening Balances in the Nominal Ledger
- Opening Balances in the Sales Ledger
- Opening Balances in the Purchase Ledger
- Opening Balances in the Stock Module
- Importing Opening Balances
- Printing Reports
- Home page for Starting Work manual
- Home page for Enterprise by HansaWorld manual
Printing Reports
You can produce many different reports from Enterprise by HansaWorld. Detailed descriptions of each report can be found in the appropriate sections of these web pages. You should, however, always print a Transaction Journal for the Transactions entered during one work session. The same goes for the Invoice Journal in the Sales Ledger.Having completed the process of entering your opening balances, you should now print a Trial Balance and compare it with a Trial Balance produced from your old system.
To print a Trial Balance, follow these steps:
- Ensure you are in the Nominal Ledger module using the [Module] button in the Master Control panel and click the [Reports] button, also in the Master Control panel.
- The window illustrated below is opened. This is a list of the reports that you can produce from the Nominal Ledger.
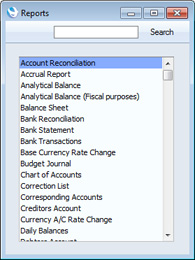
- Scroll to the bottom of the list and choose 'Trial Balance' by double-clicking. You can also type the first few characters of the name of the report ("trial" in this example) and then press the Enter or Return key twice to confirm your choice. The 'Specify Trial Balance' window appears.
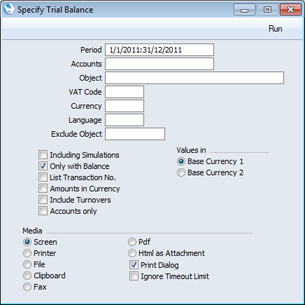
- To report on your opening balances, you should enter in the Period field a period from the beginning of the current fiscal year to the current date. Separate the start and end dates of this period using a colon (:), as shown in the illustration. You can leave all the other fields blank, ensuring that all Accounts, Currencies etc will be included in the report.
- Use the Media options at the bottom of the window to choose a print destination (for example, 'Printer' or 'Screen'), and click the [Run] button to produce the report.
- If you printed to screen and now wish to print on a printer, simply click the Printer icon in the Button Bar of the report window.
In this chapter:
- Introduction
- Opening Balances in the Nominal Ledger
- Opening Balances in the Sales Ledger
- Opening Balances in the Purchase Ledger
- Opening Balances in the Stock Module
- Importing Opening Balances
- Printing Reports
- Home page for Starting Work manual
- Home page for Enterprise by HansaWorld manual