User Accounts
One of your first tasks in creating a new database should be to create a User Account for each member of your staff. One reason for doing this is to protect your data: User Accounts allow you to assign a password to each User. It's a good idea to do this even in a single-user system: protecting your database with a password might prove to be a wise precaution if your computer is stolen.Each User Account can consist of the following components, some of which are optional:
- The basic component of a User Account is a record in the Person register in the System module. Creating a record in this register for each member of staff allows you to assign passwords to them. Using this register together with the Access Groups setting (also in the System module) allows you to ensure each member of staff only has access to the modules and functions that are relevant to their job.
- Each User can have their own Mailbox. Mailboxes allow members of staff to send and receive mail, and to use the Personal Desktop.
If the User is a Named User, you must create a Mailbox for them. If the User is a Concurrent User, you should only give them a Mailbox if you have purchased an Extra Mailbox for them. Full details about Named and Concurrent Users can be found on the page describing the Person register.
- Each User can also have their own record in the Contact register. This will contain any or all of their telephone, mobile and home numbers, Skype name, SIP user name, extension number and email address. This record must exist if the User will use Enterprise by HansaWorld to make calls through an Asterisk-based or TAPI switchboard, and it is recommended that it exists if the User will use Enterprise by HansaWorld to send text (SMS) messages.
- If you have more than one Company in your database and you want a User to have access to some or all of those Companies, you can create a Global User record for that User. This will make it easier to manage that User's access rights, passwords, Calendar and Task Manager.
- Access Groups
- User Accounts (Named Users and Concurrent Users with Mailboxes)
- User Accounts (Concurrent Users without Mailboxes)
- User Accounts when you have more than one Company
- Home page for Starting Work manual
- Home page for Enterprise by HansaWorld manual
Access Groups
Access Groups allow you to control the access that each User has to your Enterprise by HansaWorld system. For example, if the User is a sales person, you may want to grant them access to Quotations and Sales Orders while preventing them from entering the Nominal Ledger.If you have more than one Company in your database, it is recommended that you share the Access Groups setting. This means that the same Access Groups will be made available to every Company. If you want to share the Access Groups setting, you should do so while the setting is empty. Please refer to the Shared Registers page for details about sharing this setting, and then return to this section for details about entering Access Groups.
Follow these steps:
- Select the System module by using the Ctrl-0 (zero) (Windows and Linux) or ⌘-0 (Mac OS X) keyboard shortcut to open the list of modules and double-clicking 'System'. If the System module is not available in the list of modules, this will probably be because you have not granted yourself access to the System module in the Configuration setting. Please refer to the Modules, Users and Companies page.
- Use the Ctrl-S (Windows and Linux) or ⌘-S (Mac OS X) keyboard shortcut to open the list of Settings and double-click 'Access Groups'.
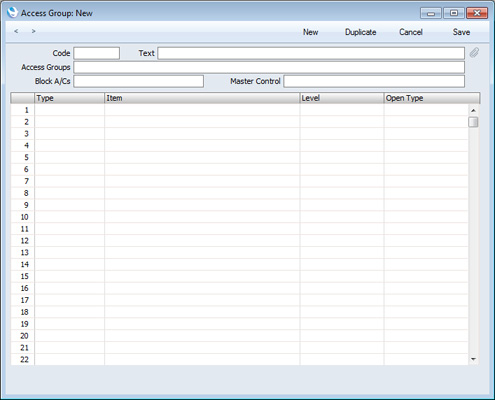
- The 'Access Groups: Browse' window opens, listing the Access Groups that already exist. To create a new Access Group, click the [New] button above the list, or highlight an Access Group in the list and click the [Duplicate] button. The 'Access Group: New' window opens:
- There are two ways of configuring an Access Group:
- You can exclude members of the Access Group from everywhere in your Enterprise by HansaWorld database except those areas that you list in the grid. This is known as "Starting from No Access".
- You can allow members of the Access Group to go everywhere in your Enterprise by HansaWorld database except to those areas that you list in the grid. This is known as "Starting from Full Access".
Bear this choice in mind while configuring your Access Groups as described in the following steps. When you come to assign an Access Group to a User (step 7 on the User Accounts (Named Users and Concurrent Users with Mailboxes) page), you will also specify whether that User will start from No Access or from Full Access.
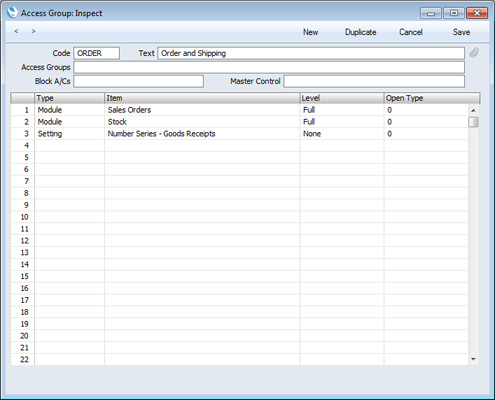
The example illustration below shows a "Starting from No Access" Access Group. Members of this Access Group will only have access to two modules - Sales Orders and Stock. The Sales Orders module is featured in the first row of the grid, so this will be the active module when they first log in to Enterprise by HansaWorld. They will be allowed access to every function in those modules, except the Number Series - Goods Receipts setting.
- You can exclude members of the Access Group from everywhere in your Enterprise by HansaWorld database except those areas that you list in the grid. This is known as "Starting from No Access".
- To add a new item to the grid, place the insertion point in the Type field in the first empty row. Then, open the 'Paste Special' list of possible entries using the Ctrl-Enter (Windows and Linux)/⌘-Enter (Mac OS X) key combination:
If you double-click "Module", this will allow you to give or deny access to an entire module. Otherwise, you can give or deny access to specific registers, settings, reports, documents and functions.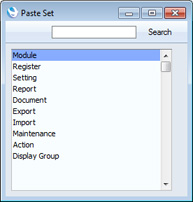
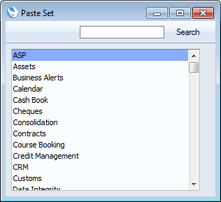
- After choosing a Type, press Tab or Return to move the insertion point to the Item field and use 'Paste Special' (Ctrl-Enter or ⌘-Enter) once again to open a list of options. This list will depend on the Type. For example, if you entered "Module" in the Type field, the 'Paste Special' list from the Item field will contain a list of modules:
- Choose an Item (in this example, a module) by double-clicking, and then press Tab or Return to move the insertion point to the Level field. Then, use 'Paste Special' once again to choose a Level of access. The options listed by 'Paste Special' will again vary depending on the Type. The full list of options is as follows:
You can use the following two options with any Type: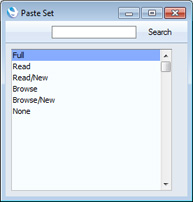
- Full
- Allows full access to the Item.
- None
- Denies all access to the Item.
- If the Type is "Document", this Level will allow Users to print from browse and record windows, but any further access will be denied. For example, a User with no access to the Invoice document will be able to open an Invoice record and print it. They will not be able to choose which Invoices are to be printed from the 'Documents' list window, and they will not be able to change the Form used when Invoices are printed.
- Browse
- Allows Users to open the register or setting and to see the records it contains in a list. Users will be able to search the list. Users will not be able to open, modify or create individual records.
- Browse/New
- Allows Users to open the register or setting and to see the records it contains in a list. Users will be able to search the list. Users will not be able to open or modify individual records, but they will be able to create new ones (although not by duplicating existing ones).
- Read
- Allows Users to open the register or setting and to see the records it contains in a list. Users will be able to search the list. Users will be able to open individual records but not to modify them or to create new ones.
You can also use this Level when the Type is "Report", in which case Users will be able to print the report to screen but not to a printer or to a text file.
- Read/New
- Allows Users to open the register or setting and to see the records it contains in a list. Users will be able to search the list. Users will be able to open individual records but not to modify them. They will be able to create new records (including by duplicating existing ones).
- Full
- After choosing the Level, press Tab or Return and then use 'Paste Special' again to choose an Open Type. This only applies if the Type is Register. When Users open the register, the Open Type will determine whether a browse window or a record window will open. If a record window opens, this will allow the User to enter a new record immediately.
- After adding all the necessary rows to the Access Group as described in steps 5-8, save it by clicking the [Save] button in the top right-hand corner of the window or using the Shift-Enter key combination. Then, create other Access Groups as required.
In particular, in multi-user systems it is recommended that at least one member of staff acts as a system administrator, able to use the Technics module on a client machine when other users are logged in. To implement this, create an Access Group that explicitly grants full access to the Technics module:
If you do not have an Access Group that grants access to the Technics module, you will not be able to carry out certain tasks (e.g. backing up or changing the Master Password) on a client machine. You will only be able to do them on the server machine when no other users are logged in. This may not be convenient if the server is in another building or is otherwise inaccessible.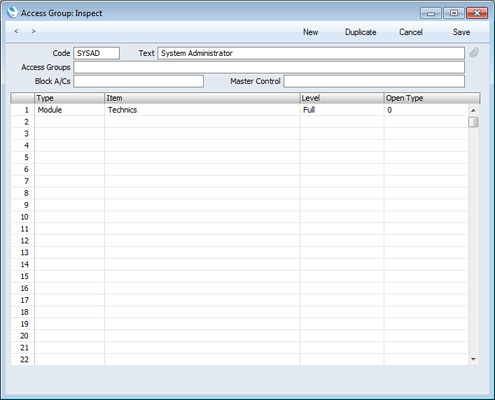
In this chapter:
- Introduction
- Access Groups
- User Accounts (Named Users and Concurrent Users with Mailboxes)
- User Accounts (Concurrent Users without Mailboxes)
- User Accounts when you have more than one Company
- Home page for Starting Work manual
- Home page for Enterprise by HansaWorld manual
User Accounts (Named Users and Concurrent Users with Mailboxes)
When you create a new Enterprise by HansaWorld database as described here, you will create at least one User Account, consisting of a Person record, a Mailbox and a Contact record. If you have a single Company in your database, follow the steps below to create similar additional User Accounts for Named Users and for Concurrent Users with Mailboxes. If you have more than one Company, you should read this page in combination with the User Accounts when you have more than one Company page.Before following these steps, you should first make sure that you have recorded the correct number of Users (Names plus Concurrent) (in the Named Users field), Concurrent Users (in the Concurrent Enablers field) and Mailboxes for Concurrent Users (in the Extra Mailboxes field) in the Configuration setting in the System module. Named Users by definition include Mailboxes, so there is no separate field for the number of Mailboxes for Named Users.
- If you are not already in the System module, select it using the [Module] button in the Master Control panel or the Ctrl-0 (zero) (Windows and Linux) or ⌘-0 (Mac OS X) keyboard shortcut.
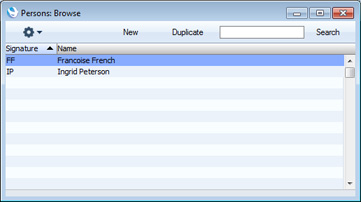
- Open the Person register by clicking the [Persons] button in the Master Control panel. The 'Persons: Browse' window will open, listing the Persons (i.e. the User Accounts) that already exist:
- Choose 'Create User' from the Operations menu (in the top left-hand corner of the window). The 'Create User' window appears:
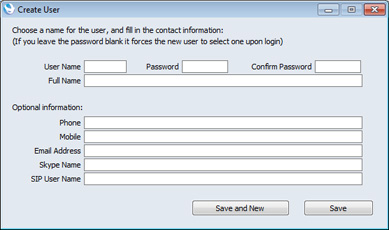
- You must enter a User Name and Full Name to create a new User Account and you should enter a password, but the other information is optional. The User Name is the name that will be used as the log-in identity code each time the User logs in to Enterprise by HansaWorld.
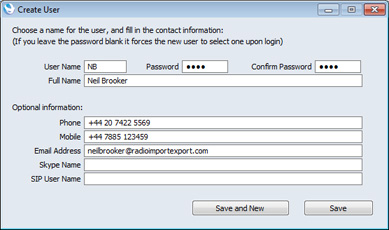
- When you click the [Save] or [Save and New] buttons, a new User Account will be created. In the case of [Save], the 'Create User' window will be closed, returning you to the 'Persons: Browse' window. In the case of [Save and New], a new User Account will be created and a new 'Create User' window will be opened, allowing you to begin creating another User Account.
When you click [Save] or [Save and New], behind the scenes the process of creating a new User Account includes the following:
- a new record for the User will be created in the Person register;
- a new Mailbox will be created for that User; and
- a new record for the User will be created in the Contact register, containing the information that you entered in the optional section of the 'Create User' window. You may want to edit this record, as described in step 10 on the User Accounts (Concurrent Users without Mailboxes) page.
The Person record, Mailbox and Contact record will be correctly linked together, so the User Account will be fully operational when the User logs in for the first time.
- a new record for the User will be created in the Person register;
- The User Account will now be fully operational, and the User will be able to log in and begin work.
At any time, you can change the User's password. Highlight the new User in the 'Persons: Browse' window and choose 'Change Password' from the Operations menu (you may need to close and re-open the 'Persons: Browse' window (step 2 above) before the new User is included in the list). The 'Change Password' window opens:
Enter the Password twice to ensure that it is correct. Click the [Save] button or use the Shift-Enter key combination to close the window and save: use the close box if you do not want to save changes. The password is case-sensitive. Note that to change the User's password using this method it is not necessary to know the old password. This method is intended for system administrators and you should therefore use Access Groups to ensure that only system administrators have access to the Person register.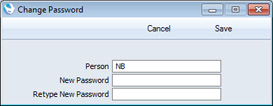
The User can change their own password. This is described here. You may want to use the Password Security setting in the System module to ensure Users regularly change their passwords, and to ensure they use passwords that meet certain requirements.
- The User Account is now fully operational and protected by a password. But before the User logs in for the first time, you may want to give them an Access Group, to restrict the access they have to your Enterprise by HansaWorld system.
Double-click the User's name in the 'Persons: Browse' window. The 'Person: Inspect' window opens:
Place the insertion point in the Access Groups field and open the 'Paste Special' list using the Ctrl-Enter/⌘-Enter key combination. A list of the Access Groups that you created following the instructions here will appear. Choose one by double-clicking. If necessary, you can enter more than one Access Group, separated by commas.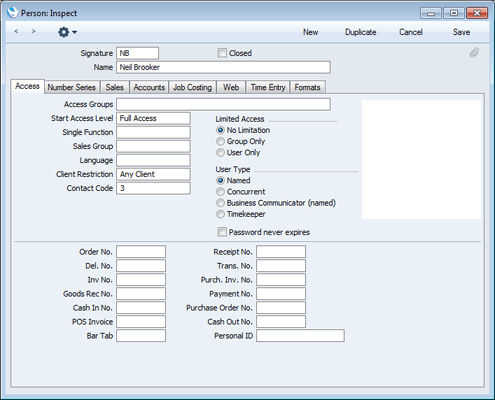
Move the insertion point to the Start Access Level field, to choose whether the User will start from No Access or from Full Access. Please refer to step 4 on the Access Groups page for details.
By default, it will be assumed that the User is a Named User. If this is not the case (i.e. the User is a Concurrent User with Mailbox), choose "Concurrent" as the User Type.
While the Person record is open, you may want to attach a picture of the User to the record. This is described on the Pictures page.
Save the record by clicking the [Save] button in the top right-hand corner of the window or using the Shift-Enter key combination. Now, when the User logs in, their access to your Enterprise by HansaWorld system will be controlled by the Access Group you have just assigned to them.
Remember to assign the system administrator's Access Group (illustrated on this page) to the appropriate User(s).
In this chapter:
- Introduction
- Access Groups
- User Accounts (Named Users and Concurrent Users with Mailboxes)
- User Accounts (Concurrent Users without Mailboxes)
- User Accounts when you have more than one Company
- Home page for Starting Work manual
- Home page for Enterprise by HansaWorld manual
User Accounts (Concurrent Users without Mailboxes)
The procedure described on the User Accounts (Named Users and Concurrent Users with Mailboxes) page will create a new User Account that consists of a Person record, a Contact record and a Mailbox. Therefore, you cannot use it if you need to create a new User Account for a Concurrent User who will not have a Mailbox. In this case, you need to create the Person and Contact record components separately, and then connect them together yourself. Follow these steps:- If you are not already in the System module, select it using the [Module] button in the Master Control panel or the Ctrl-0 (zero) (Windows and Linux) or ⌘-0 (Mac OS X) keyboard shortcut.
- Open the Person register by clicking the [Persons] button in the Master Control panel. The 'Persons: Browse' window will open, listing the Persons (i.e. the User Accounts) that already exist.
- Click the [New] button in the Button Bar at the top of the browse window.
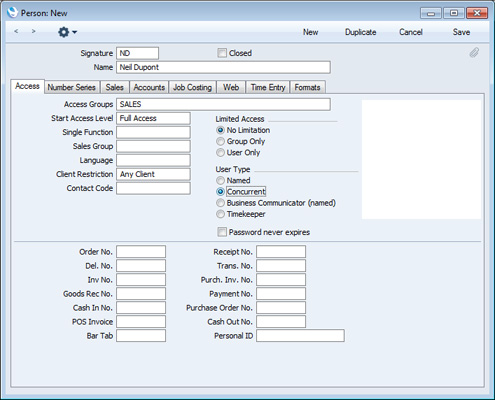
The 'Person: New' window opens, allowing you to open a new Person record. A Person record is the most basic component of a User Account: once created, it will allow the User to log in to your Enterprise by HansaWorld system.
You must enter a Signature and a Name as shown in the illustration below. The Signature is the name that will be used as the log-in identity code each time the User logs in to Enterprise by HansaWorld. You can assign an Access Group and Start Access Level to the Person, as described in step 7 on the User Accounts (Named Users and Concurrent Users with Mailboxes) page. Choose "Concurrent" as the User Type.
- Click the tabs (named 'Access', 'Serial Nos', 'Sales', etc) to enter more information about the member of staff. For full details of each field, please refer here.
- Click the [Save] button in the top right-hand corner of the window. The record is saved in the Person register.
- The window title changes to 'Person: Inspect', giving you a chance to check you have not made any mistakes in entering the record.
- Close the record by clicking the close box or using the Ctrl-F4 (Windows and Linux) or ⌘-W (Mac OS X) keyboard shortcut.
- If you have a number of personnel to enter, click [New] instead of [Save] at step 5 above (or use the Ctrl-N/⌘-N keyboard shortcut). The Person record is saved and closed, and a blank window is opened, allowing you to enter another record straight away.
- When you close the last Person record at step 7 above, you will be returned to the 'Persons: Browse' window, which now lists the members of staff that you have just registered. Click on each one in turn and allocate a password by selecting 'Change Password' from the Operations menu, as described in step 6 on the User Accounts (Named Users and Concurrent Users with Mailboxes) page. If you do not allocate a password to each new User, they or anyone happening upon one of the new Signatures can log in without specifying a password.
- If any of the new Users will use Enterprise by HansaWorld to make calls through an Asterisk-based or TAPI switchboard, you must create records in the Contact register for them. Optionally, you can also use these Contact records if the new Users will use Enterprise by HansaWorld to send text (SMS) messages. For example, if a User sends a text (SMS) message, the mobile phone number in their Contact record will be used as the source of that text (SMS) message. This mobile number can also be taken from the User's Person record, but you may prefer to store it in a Contact record where the User can change it themselves if necessary. In a large system, you probably would not want to give Users access to the Person register, as this might allow them to change access rights and passwords.
Use the [Module] button or the Ctrl-0 (zero) (Windows and Linux) or ⌘-0 (Mac OS X) keyboard shortcut to change to a module containing the Contact register (e.g. the Sales Ledger or the CRM module). Open the Contact register by clicking the [Contacts] button in the Master Control panel. The 'Contact: New' window opens, allowing you to enter a new Contact record:
Enter the User's name and their contact details (telephone and mobile numbers, Skype name, SIP user name, Extension (if you are using TAPI), etc). Do not mark any of the Customer, Supplier, Guest or Dealer boxes in the top right-hand corner. Click the [Save] button in the top right-hand corner of the window. The record is saved in the Contact register.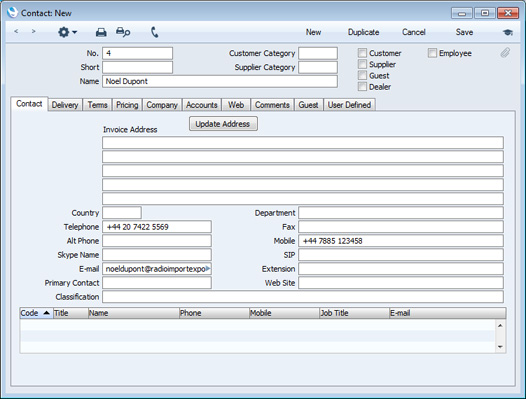
Make a note of the Contact Number (4 in the illustration above), return to the Person record and enter this number in the Contact Code field. (You can also use Ctrl-Enter/⌘-Enter from the Contact Code field to choose the correct Contact from a list.) This connects the Person record to the Contact record:

In this chapter:
- Introduction
- Access Groups
- User Accounts (Named Users and Concurrent Users with Mailboxes)
- User Accounts (Concurrent Users without Mailboxes)
- User Accounts when you have more than one Company
- Home page for Starting Work manual
- Home page for Enterprise by HansaWorld manual
User Accounts when you have more than one Company
If you have more than one Company in your database, bear in mind when creating a User Account in a particular Company that the resulting record in the Person register will be specific to the Company in which you are working. However, the connected Mailbox is not Company-specific in this way. Mailboxes are stored in Company 0, a partition of the database that stores information available in every Company . This allows mail to be sent between Persons in different Companies. One implication of this is that all Persons across all Companies should have different Signatures (User Names i.e. log-in identity codes). If there are two or more Persons in different Companies with the same Signature, they will not be able to have their own Mailbox. For example, if you have given the Signature "RS" to Robert Smith in Company 1, you cannot also use "RS" for Roberta Smith in Company 2.The remainder of this page only applies to systems where Users need to be able to work in more than one Company. In this situation, you can create Person records for each User in each Company with the same Signature. You only need create one Mailbox. For example, if RS needs access to Companies 1, 3 and 5, create Person records with "RS" as the Signature in those three Companies, and one Mailbox. There are four implications to following this course of action:
- The User will need to set separate passwords in each Company. The password can be the same, but when the User sets or changes it in one Company, it will not be copied to the other Companies.
- If the User creates an Activity, it will only be visible in the Company in which it was created. Users in other Companies will not be aware of the Activity. The User may end up with different Activities in different Companies, which will make their Calendar and Task Manager difficult to manage.
- You will be able to give the User different access rights in each Company. However, if you need to change those access rights, you will need to do so in each Company individually. Depending on the
number of Companies, this could be a time-consuming process.
- If the User is a Named User, creating Person records in more than one Company will take up more than one Named User licence. For example, creating Person records in three Companies will take up three Named User licences.
- A single password will apply to every Company. When the User sets or changes the password in one Company, it will be copied to the other Companies immediately.
- If the User creates an Activity, it will always be saved in the same Company, irrespective of the Company in which the User was working at the time. Users in other Companies will be aware of the Activity, even if they do not have access to the Company in which the Activity was saved.
- You will be able to give the User different access rights in each Company. If you need to change those access rights, you can do so in a single Global User record: there will be no need to log in to each Company individually to make the change.
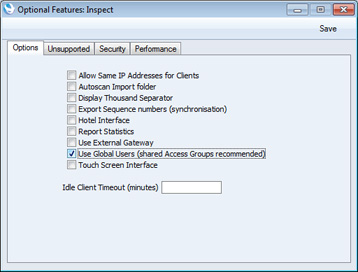
- Open the Optional Features setting in the System module and choose to Use Global Users:
- Change to the Technics module and open the Global CRM Settings setting:
Specify the Company in which, by default, each Global User's Activities will be stored.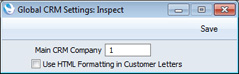
Please refer to the description of the Main CRM Company in step 5 below for full details of the purpose of this field. For the reasons described in that description, it is recommended that the Main CRM Company should be a Company to which every User will have access.
- Remaining in the Technics module, use the Shared Registers setting to share the Access Groups setting, as described here.
- Working in the Main CRM Company, create User Accounts as described on the User Accounts (Named Users and Concurrent Users with Mailboxes) and User Accounts ( Concurrent Users without Mailboxes) pages, depending on the type of User. If you need to create a Contact record for a Concurrent User as described in step 10 on the User Accounts (Concurrent Users without Mailboxes) page, again you must be working in the Main CRM Company.
- The next step is to create the Global Users.
Global Users are stored in Company 0. Company 0 is a partition of the database that stores information that is available to every Company. This means you can be working in any Company when you need to work with Global Users. However, you may find it advantageous to work in the Main CRM Company because you will be given some assistance with entering data.
If you are not already there, change to the Technics module and open the Global User register by clicking the [Global Users] button in the Master Control panel. When the 'Global Users: Browse' window opens, click the [New] button. The 'Global User: New' window appears:
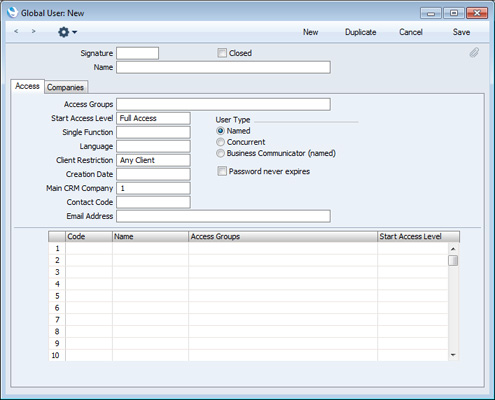
- Signature
- If you are working in the Main CRM Company, when you enter a User's Signature, their Name, Access Groups, Start Access Level, User Type, Contact Code and Email Address will all be brought in from their Person record in the same Company.
- Main CRM Company
- This will be copied from the Global CRM Settings setting (step 2 above). Although you can change the Main CRM Company for a particular Global User, it is not recommended that you do so. Bear the points in the following paragraphs in mind before making any changes. If you do change a Global User's Main CRM Company and you need to create a Contact record for that Global User as described at the end of step 4 above, you must create this Contact record working in the Main CRM Company specified in the Global User record.
- A Global User's Main CRM Company is used for two purposes. First, whenever the Global User saves a new Activity for the first time, it will be stored in their Main CRM Company (irrespective of the Company the Global User is working in at the time). The Global User must therefore have access to this Company in order to be able to store Activities there. Second, whenever the Global User or anyone else opens the Global User's Calendar or Task Manager, they will be shown a list of the Global User's Activities stored in that Global User's Main CRM Company (again irrespective of the Company being worked in at the time).
- Any User in an Enterprise by HansaWorld system can create Activities for any other User. Therefore, it is recommended that you use the same Main CRM Company for every Global User. For example, Global User 1's Main CRM Company is Company 1, and Global User 2's Main CRM Company is Company 2. Every Activity created by Global User 1 will be stored in Company 1. So, if Global User 1 creates an Activity for Global User 2, it will be stored in Company 1. But Global User 2 (or anyone else) will not be aware of that Activity because when they open their Calendar they will see Activities stored in their Main CRM Company, which is Company 2.
- Although the Global User can be working in any Company when they save a new Activity for the first time, that Global User or anyone else must be working in the Main CRM Company if they need to open or edit an existing Activity. Note, however, that the Global User must be working in their Main CRM Company for the automatic Activities to be created when making or answering calls in the 'Business Communicator' window.
- A Global User's Main CRM Company is used for two purposes. First, whenever the Global User saves a new Activity for the first time, it will be stored in their Main CRM Company (irrespective of the Company the Global User is working in at the time). The Global User must therefore have access to this Company in order to be able to store Activities there. Second, whenever the Global User or anyone else opens the Global User's Calendar or Task Manager, they will be shown a list of the Global User's Activities stored in that Global User's Main CRM Company (again irrespective of the Company being worked in at the time).
- Access Groups, Start Access Level, 'Companies' card
- If you want the Global User to have access to every Company, and the same level of access to those Companies, leave the grid on the 'Companies' card empty and specify Access Groups and a Start Access Level on the 'Access' card as shown in the illustration below.
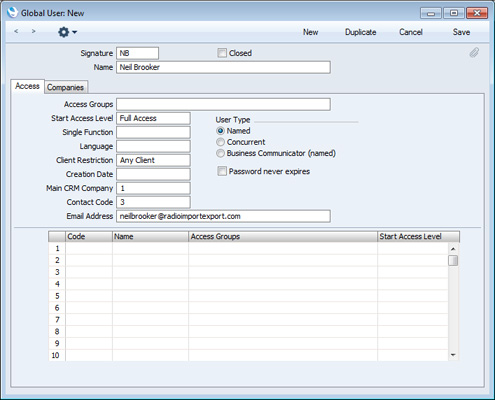
- In this example, you must have a "SALES" Access Group available to every Company, hence the recommendation in steps 1 and 3 above to share the Access Groups setting. If you have not shared the Access Groups setting, you must enter a "SALES" Access Group in every Company. If one Company does not have a "SALES" Access Group, User NB will have full unlimited access to that Company.
- If you only want the Global User to have access to some Companies, and/or you want to give them different levels of access to each Company, list the Companies together with Access Groups and Start Access Levels in the grid on the 'Companies' card, as illustrated below:
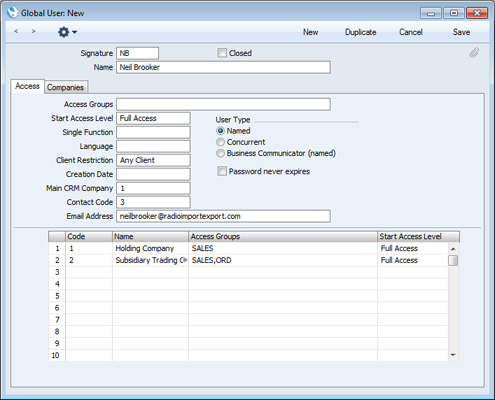
- This example gives User NB access to Company 1 (controlled by the "SALES" Access Group) and to Company 2 (controlled by the "SALES" and "ORD" Access Groups). User NB will have no access at all to any other Companies in the database.
- As shown in this illustration, wherever you need to specify Access Groups (in Person records and on the 'Access' and 'Companies' cards of Global User records), you can specify several Access Groups, separated by commas. If you specify the same item in more than one of these Access Groups (e.g. if the "SALES" Access Group gives Full access to the Contact register while the "ORD" Access Group only gives Browse access to that register), the User will be given the level of access specified in the last-mentioned Access Group (Browse access from the "ORD" Access Group in this example).
- If you add a single row to the matrix on the 'Companies' card, the Global User will only have access to the Company specified in that row (with one exception, described in the next paragraph). So, if you want the Global User to have access to every Company, but with varying levels of access, you will need to list every Company in the matrix. If you want to give a User access to most or all of your Companies, choose 'Add All Companies' from the Operations menu. This will cause every Company to be listed on the 'Companies' card. If the User exists in a particular Company (i.e. the User has a Person record in that Company), the User's Access Group in that company will be brought into the list as well. If you want to list the Companies where the User already exists (i.e. Companies in which the User has Person records), choose 'Add Companies Where This User Exists' from the Operations menu.
- As previously mentioned, if you add a single row to the matrix on the 'Companies' card, the Global User will only have access to the Company specified in that row. However, if the User exists in a second Company (i.e. the User has a Person record in that Company), they will also be given access to that second Company, with the level of access specified in the Person record.
- In this example, you must have a "SALES" Access Group available to every Company, hence the recommendation in steps 1 and 3 above to share the Access Groups setting. If you have not shared the Access Groups setting, you must enter a "SALES" Access Group in every Company. If one Company does not have a "SALES" Access Group, User NB will have full unlimited access to that Company.
- Signature
- Save the Global User by clicking the [Save] button. The Global User is made operational immediately, but the User or anyone happening upon their Signature can log in without specifying a password. Any passwords the User may have had before the Global User was created will be lost.
Return to the 'Global Users: Browse' window, highlight the new Global User in the list and choose 'Change Password' from the Operations menu. Enter the Password twice to ensure that it is correct. Click the [Save] button or use the Shift-Enter key combination to close the window and save. This password will apply to every Company to which the Global User has access.
After logging in, the Global User will be able to choose their own password, as described here. They will only need to change their password once: they can do this in any Company, and any change will apply to every Company immediately.
The Global User feature is intended to make the administration of User Accounts easier. It means the User only has to remember a single password, and it allows the system administrator to administer access rights from a single screen, without the need to log in to every Company separately.
If a User Account contains a Global User component, there is no compulsory need for it also to contain a Person component at all, in any Company. If a User Account does not contain a Person component, the User will still be able to log in and use most Enterprise by HansaWorld features. However, a Person record contains many fields that are missing from a Global User record, such as Object, Account (for advances and settlements) and Cost and Price Per Hour (used in the Job Costing module). If you need to use some or all of these fields, you must create Person records (with the same Signature) in the relevant Company. For example, if you will use the Expenses module to administer a User's expense claims, you must create a Person record with an Account and Object for that User in the Company/ies in which these claims will be made. If the Person will carry out chargeable work that you will administer through the Job Costing module, then again you should create a Person record in the relevant Company/ies. Creating a Person record in more than one Company will allow you to charge the User's work at different rates depending on the Company responsible for the work. Finally, you should create Person records for a Global User in every Company from which that Global User will send Text SMS messages).
Some fields such as Access Group, Name, Language and Contact Code are common to the Global User and Person records. If both fields contain values, those in the Global User record will be given priority.
Bear in mind when planning Persons in a multi-Company database that each Company must contain at least one Person record with a password. If a Company does not contain a Person record, it will be completely open: anyone will be able to access any part of it without restriction. However, as soon as you create the first Global User record with a password, access to all Companies will be restricted,
---
In this chapter:
- Introduction
- Access Groups
- User Accounts (Named Users and Concurrent Users with Mailboxes)
- User Accounts (Concurrent Users without Mailboxes)
- User Accounts when you have more than one Company
- Home page for Starting Work manual
- Home page for Enterprise by HansaWorld manual