Installation
The installation of a Standard ERP system is technically simple. If you are used to computers and have some experience of installing software, you will find the installation of Standard ERP very straightforward.You can use Standard ERP in many environments: Windows, Mac OS X, Linux, iOS, Android and AIX. In this chapter, we describe the installation procedures for Windows, Mac OS X and Linux Server. Please contact your local HansaWorld representative for details about the other environments.
---
In this chapter:
- Introduction
- Installation - Single-user
- Installation - Multi-user
- Installation - Linux Server
- After Installation
- Home page for Introduction and Installation manual
- Home page for Standard ERP manual
Installation
Please click for details about installing Standard ERP in single-user and multi-user systems.---
In this chapter:
- Introduction
- Installation - Single-user
- Installation - Multi-user
- Installation - Linux Server
- After Installation
Go back to:
- Home page for Introduction and Installation manual
- Home page for Standard ERP manual
Installation - Multi-user
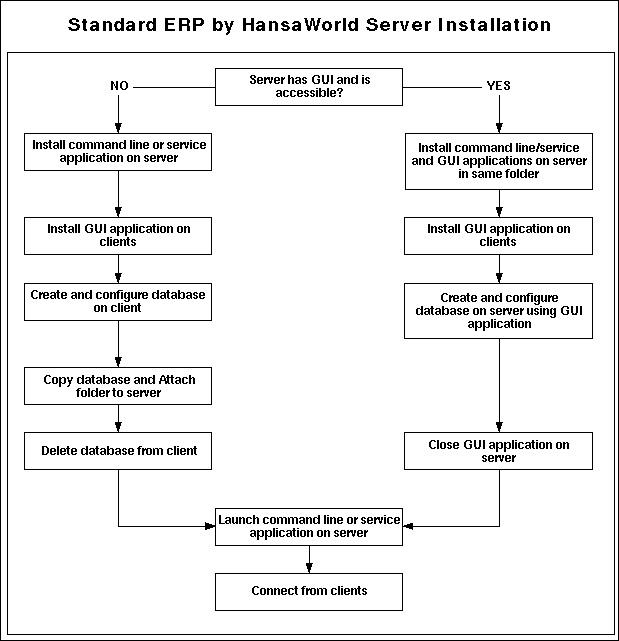
You should use a command line (Linux and Mac OS X) or service (Windows) version of Standard ERP as your server application. These versions do not have graphical interfaces. This allows their speed to be optimised, and also reduces the risk of users causing them to quit accidentally.It is recommended that you use the GUI application to create a new database and carry out the initial configuration work described in this manual, effectively working single-user. When you have completed the configuration work, you can then make the database available to the network using the command line or service applications (depending on platform). You can do this as follows:
- If the server machine has a graphical interface and is accessible, you can install both the GUI and command line or service versions of the application in the same folder on the server. Use the GUI application to create the database and carry out the initial configuration work. When you are ready to make the database available to the network, close the GUI application and start the command line or service application. Because both applications are in the same folder, they will both automatically open the same database.
- If the server machine does not have a graphical interface and/or is not accessible (e.g. it is in a different building), you should install the command line or service version of the application on the server remotely. Using the GUI application on a local machine, create the database and carry out the initial configuration work. When you are ready to make the database available to the network, copy it to the folder on the server containing the command line or service application. The file that you should copy will be named "HANSA.HDB". You should also copy the "Attach" folder if you added any Attachments. Then, remove the database from the local machine or at least move it out of the folder containing the GUI application. This will prevent the possibility of saving data in the wrong database. Finally, start the command line or service application on the server remotely.
- Create a network including all the computers and other equipment you are going to use. Use the Windows, Mac OS X or Linux installation tools to install and configure TCP/IP on each machine.
- Click the link to go to our product download website, www.standardinstall.com.
- Choose your platform and country from the drop-down menus at the top of the page.
- Download the appropriate versions for your platform and operating system. The versions you should download and install are as follows:
- Standard ERP Server YYYY-MM-DD
- Use as the server application (for Windows, separate downloads are available for 32- and 64-bit machines. .NET Framework 3.5 or .NET Framework 3.5 Client Profile must be installed)
- Standard ERP YYYY-MM-DD
- Use as the client application. Also use as a GUI application (i.e. application with graphical user interface) on the server for initial configuration work only
- Standard ERP Server YYYY-MM-DD
- For Windows, the server version of the Standard ERP application is a service. A service is an application that runs in the background with no user intervention. Services are usually launched automatically when the server starts up.
Install the service version following the procedure described in step 3 on the Single-user page. The installer will install the application as a service, so that it appears in the services registry..
- If your server is a Mac OS X machine, the command line application is supplied as a .dmg file. Open the .dmg file by double-clicking, and then copy its contents to the 'Applications' folder on your server.
- If your server is a Linux machine, install the appropriate command line application as described on the Linux Server Installation page.
- In all cases, if the server machine has a graphical interface and is accessible, and you want to create your database and carry out the initial configuration work using that machine, install the relevant GUI version of the application in the same folder or directory as the command line or service application. To do this, follow the procedure described on the Single-user page.
- Install the relevant GUI versions of Standard ERP on each of the client machines, again as described on the Single-user page.
- After Installation (description of files and folders required by Standard ERP)
- Companies and databases
- Starting Standard ERP with an existing database
- Creating a new database
- Logging in to a new database from a client for the first time
In this chapter:
- Introduction
- Installation - Single-user
- Installation - Multi-user
- Installation - Linux Server
- After Installation
Go back to:
- Home page for Introduction and Installation manual
- Home page for Standard ERP manual
Installation - Linux Server
If your server is a Linux machine, you should use the relevant command line version of the Standard ERP application as your server application. If the machine itself has a graphical interface and is accessible, you can install this application following the procedure described in step 5 on the single-user page. If the machine does not have a graphical interface or you want to use the Terminal, follow these steps:- Download the latest version of Standard ERP that is correct for your platform and operating system (i.e. the Linux Command Line version).
- Put the machine into "Terminal" mode using the Terminal icon in the Dock or Panel.
- Type the following, remembering that the Terminal environment on Linux is case-sensitive:
- cp /Users/username/Desktop/standarderp.server.tgz /Applications
- Copies the installer file (named standarderp.server.tgz in this example) from the desktop to the "Applications" directory.
- cd /Applications/
- Makes the "Applications" directory the current directory.
- tar -xvzf standarderp.server.tgz
- Expands the standarderp.server.tgz installer file. A new directory will be created in your "Applications" directory. This new directory will be named "StandardERPServer", and will contain the application and the necessary auxiliary files.
- rm -xvzf standarderp.server.tgz
- Deletes the installer file.
- cp /Users/username/Desktop/standarderp.server.tgz /Applications
- After Installation (description of files and folders required by Standard ERP)
- Companies and databases
- Starting Standard ERP with an existing database
- Creating a new database
- Logging in to a new database from a client for the first time
In this chapter:
- Introduction
- Installation - Single-user
- Installation - Multi-user
- Installation - Linux Server
- After Installation
Go back to:
- Home page for Introduction and Installation manual
- Home page for Standard ERP manual
Installation - Single-user
To download and install Standard ERP, follow these steps:- Click the link to go to our product download website, www.standardinstall.com.
- Choose your platform and country from the drop-down menus at the top of the page.
- Download the appropriate version for your platform and operating system. For a single-user installation, download and install "Standard ERP YYYY-MM-DD".
- Under Windows, a Standard ERP installer will be saved on your hard disk.
Launch the installer by double-clicking, and follow the instructions on screen.
- Under Mac OS X, a .dmg file will be saved on your hard disk. Open the .dmg file by double-clicking, and then copy the folder it contains to your 'Applications' folder.
Having successfully installed Standard ERP, please click the links to refer now to the following sections:
- After Installation (description of files and folders required by Standard ERP)
- Companies and databases
- Starting Standard ERP with an existing database
- Creating a new database
In this chapter:
- Introduction
- Installation - Single-user
- Installation - Multi-user
- Installation - Linux Server
- After Installation
Go back to:
- Home page for Introduction and Installation manual
- Home page for Standard ERP manual
After Installation
After installation, the Standard ERP directory or folder will contain a number of files: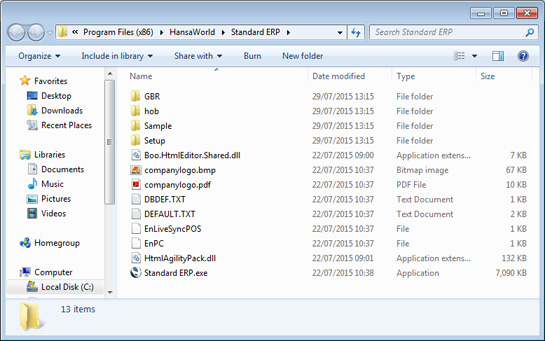
- The Standard ERP application, named "Standard ERP.exe" (Windows) or "Standard ERP.app" (Mac OS X).
- The database, always named "HANSA.HDB". This file will be created by the application the first time you use it.
- The "Hob" folder, containing language and other files. This must be present in the same folder or directory as the Standard ERP application.
- The file "DBDEF.TXT", which is used by Standard ERP to import some basic settings information to new databases. This file must be present in the same folder or directory as the program when you create a new database.
- The file "DEFAULT.TXT", which is used by Standard ERP to import some basic settings information to new Companies. This file must be present in the same folder or directory as the program when you create a new Company in a database. Companies and databases are described here.
- The "Setup" folder or directory, which contains a number of set-up files, including Form Template designs and a chart of Accounts. You can import some or all of this set-up information to your database and then modify it to suit your own requirements. Depending on those requirements, it may be easier to do this than to start from scratch. This is especially recommended in the case of Form Template designs. The names and contents of these files will vary according to the country of use. Please refer to the Importing Set-up Data page for details about the contents of these files and importing them.
- The "Sample" folder or directory, which contains a back-up of an example database. You can import this file to a new database to test new or unfamiliar Standard ERP features before using them in your "live" database. The name and precise make-up of these files will vary according to the country of use. Please refer to the Creating a New Database - Sample page for details about importing this file.
- An "Attach" folder, which must be present if you want to use the Document Manager to attach files to records. The Document Manager is fully described here. In multi-user installations, this folder should be on the server machine. This folder will be created by the application the first time you use it.
- The "tmp" folder is used for two purposes. First, if you read an attached file (i.e. a file in the Document Manager), it will be copied to the "tmp" folder on your client machine and then opened in the relevant application. Second, it should be present on the Gateway machine if you will be using the Standard ERP Mail facility to send and receive external mail (i.e. to communicate with standard email programs outside your Standard ERP network). The HansaWorld Gateway uses it to store mail attachments downloaded from the POP3 server before they are transferred to the "Attach" folder and attachments that are to be uploaded to the SMTP server. The Standard ERP Mail facility is described here. This folder will be created by the application the first time you use it.
- A "Backup" folder or directory, to be used for storing daily back-up files. This folder will be created by the application the first time you use it.
- If you are using the Autoscan Import feature, any files placed in the "Import" folder or directory will be imported to your Standard ERP database automatically. Please refer to the Imports page for details of this feature. The "Import" folder will be created by the application the first time you use it.
- Two extra folders, "PS" and "Scripts", will be present in Linux installations.
- A HansaWorld-Slave application will be included in some installations. This is a client application with no interface that can be used as external mail or TAPI gateways. Please refer here for more details about external mail, and here for more details about the TAPI gateway.
- If you would like your company logo to be shown in the Navigation Centre, save the logo as a .png file with the name "companylogo.png" in your Standard ERP folder. The maximum width of the logo should be 80 pixels, and the maximum height 32 pixels. This feature is Mac OS X only.
- The "Halcust" and/or "Halpatch" folders contain bespoke (HAL) files (e.g. customised reports). If you have one or both of these folders, they should be on the server and on all clients likely to use the bespoke files.
- The "Web" folder contains language and other files required if you wish to use the HansaWorld Web Shop. This folder should be on the server machine.
- The "Webcust" folder is used to store images used in the Web Shop (e.g. images of the Items that you sell). This folder should be on the server machine.
- Companies and databases
- Starting Standard ERP with an existing database
- Creating a new database - server
- Logging in to a new database from a client for the first time
- Creating a new database - single-user
In this chapter:
- Introduction
- Installation - Single-user
- Installation - Multi-user
- Installation - Linux Server
- After Installation
Go back to:
- Home page for Introduction and Installation manual
- Home page for Standard ERP manual