Introduction to the Returned Goods Register in Standard ERP
The Returned Goods register allows you to manage Customer returns. Each time a Customer returns goods that you have delivered, you should add a new record to the Returned Goods register to manage the process.The difficulty with the returning of goods to stock is to establish the actual value of the goods being returned. The purpose of the Returned Goods register is to allow you to record values that are as accurate as possible. The Original Cost on Returned Goods option in the Cost Accounting setting will help you achieve this. For example, if you are using the Queued Cost Model (FIFO or LIFO) Cost Model, you should receive the Item back into stock with the same value as when you delivered it. If you are using the Weighted Average or Cost Price Cost Models, the Weighted Average or Cost Price may have changed in the time between delivery and return.
When you mark a Return as OK and save, the stock levels of the Items in the Return will be updated accordingly. In addition and if so defined in the Sub Systems setting in the Nominal Ledger and in the Number Series - Returned Goods setting, a Nominal Ledger Transaction will be generated automatically to update the stock valuation in the Nominal Ledger. If the Customer requires a replacement unit, you can then issue another Delivery from the Sales Order. If you need to issue a Credit Note (if you have already issued an Invoice and the Customer does not require a replacement), you can do so from the Returned Goods record or from the original Invoice.
To open the Returned Goods register, ensure you are in the Stock module and click (Windows/macOS) or tap (iOS/Android) the [Registers] button in the Navigation Centre. Then, double-click or tap 'Returned Goods' in the resulting list. The 'Returned Goods: Browse' window will be opened. Returns will normally be listed in number order, with the Official Number and the Return Number of each Return being shown in the left-hand columns, followed by a tick if a Return has been marked as OK, the Date, Location, originating Order Number, Customer Number and Name and Comment. As in all browse windows, you can re-sort the list and search for particular records.
Please refer now to the following pages:
- Introduction
- Entering a Return
- Nominal Ledger Transactions from Returns
- Returning Goods when there is no Delivery
- Operations Menu
- Create Menu
- Row Menu
Go back to:
- Home page for Stock Module manual
- Home page for Standard ERP manual
Entering a Return
You can create Returns from the following records, in each case by opening the record in a record window and selecting 'Returned Goods' from the Create menu (Windows/macOS) or + menu (iOS/Android):- From a Sales Order. The new Return will include every Item in the Order that has been delivered. You must have issued and marked as OK at least one Delivery from the Order.
You will not be able to create a Return from an Order if any of the following conditions apply:
- You are using the Original Cost on Returned Goods option in the Cost Accounting setting.
- You are using the option to insert Returned Goods at their original position in the FIFO/LIFO cost queue in the same setting.
- At least one of the delivered Items uses a Queued Cost Model (FIFO or LIFO).
- You are using the Do not allow Returned Goods from Order option in the Order Settings setting.
- You have logged in as a user belonging to an Access Group in which access to the 'Returned Goods from Order' Action has been denied.
- You are using the Original Cost on Returned Goods option in the Cost Accounting setting.
- From a Delivery. The new Return will include every Item in the Delivery. You must have marked the Delivery as OK and saved before you can create a Return.
It is usually recommended that you create Returns from Deliveries rather than from Orders. Doing so will make it more likely that you will be able to receive Items back into stock with the same value as when you delivered them, especially if you issued more than one Delivery for a particular Item from the same Order and the Item is one with a fluctuating value.
- From a Service Order. The new Returned Goods record will include every Item in each Work Sheet connected to the Service Order. You must have issued and marked as OK at least one Work Sheet connected to the Service Order.
You can prevent individual users from creating Returned Goods records from Service Orders by assigning them to Access Groups in which you have denied access to the 'Returned Goods from Service Order' Action.
- From a Work Sheet. The new Return will include every Item in the Work Sheet. You must have marked the Work Sheet as OK and saved before you can create a Return.
You can prevent individual users from creating Returned Goods records from Work Sheets by assigning them to Access Groups in which you have denied access to the 'Returned Goods from Work Sheet' Action.
---
The Returned Goods register in Standard ERP:
- Introduction
- Entering a Return, including:
- Header
- 'Terms' card
- 'Items' card
- 'Currency' card
- 'Comment' card
- Header
- Nominal Ledger Transactions from Returns
- Returning Goods when there is no Delivery
- Operations Menu
- Create Menu
- Row Menu
- Home page for Stock Module manual
- Home page for Standard ERP manual
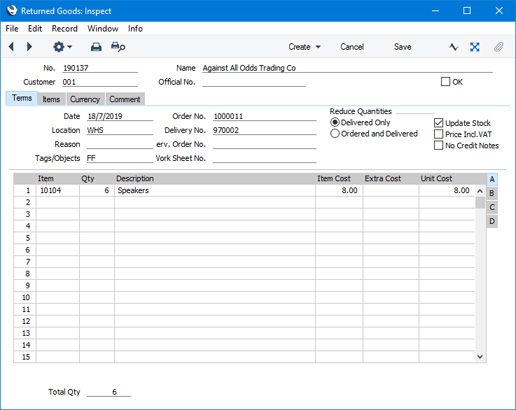
Entering a Return - Header
This page describes the fields in the Header of the Returned Goods record window. Please follow the links below for descriptions of the other cards:- Header
- 'Terms' card
- 'Items' card
- 'Currency' card
- 'Comment' card
- No.
- Paste Special
Select from another Number Series
- An identifying code for each Returned Goods record will be generated automatically, and in most cases there will be no need to change it. The default will be chosen as follows:
- It will be taken from the first valid row in the Number Series - Returned Goods setting.
- It will be the next number following on from the last Returned Goods record entered.
- You may change the default, but not to a number that has already been used. If you have defined at least one number sequence in the Number Series - Returned Goods setting, the number you change to must be inside a valid number sequence.
- You will not be able to save a Returned Goods record if the No. does not belong to a valid number sequence. A valid number sequence is one for the period in which the Transaction Date of the Returned Goods record falls and with unused numbers, so this problem will most usually occur at the beginning of a new calendar or financial year.
- If you are working in a multi-user environment, the Returned Goods Number in a record that you are entering yourself will be assigned when you save the record for the first time, chosen as described above and providing you have not already specified a number yourself.
- It will be taken from the first valid row in the Number Series - Returned Goods setting.
- Customer
- Paste Special
Customers in Contact record
- In a Returned Goods record that you created from an Order, Delivery, Service Order or Work Sheet, this field will contain the Customer Number from the originating record. In a Returned Goods record that you are entering yourself, choose the Customer using 'Paste Special'.
- Name
- The Customer Name, taken from the originating record or from the Contact record for the Customer.
- Official No.
- Paste Special
Select from another Legal Record Number sequence
- Default taken from Legal Record Numbers setting, Sales Ledger
- In some countries it is a legal requirement to allocate an official serial number to each Returned Goods record. It may be that companies will be assigned number sequences to be used for this purpose (perhaps supplied pre-printed on stationery), or it may be that companies can generate the number sequences themselves using official formatting and other rules.
- If the VAT Law in the Company Info setting has been set to "Portuguese", you will need to configure the Legal Record Numbers setting so that Official Nos. will be assigned to Returned Goods when you save them after marking them as OK. This assignment will be automatic. If the VAT Law is not "Portuguese", Official Nos. will not be assigned to Returned Goods records automatically.
- In some countries it is a legal requirement to allocate an official serial number to each Returned Goods record. It may be that companies will be assigned number sequences to be used for this purpose (perhaps supplied pre-printed on stationery), or it may be that companies can generate the number sequences themselves using official formatting and other rules.
- OK
- When the Return is complete and correct, you should mark it as OK and save. No further changes to the record will be possible (with the exception of the Comment field).
- If you have ticked the Update Stock box ('Terms' card), stock levels of the Items in the Return will be updated. If you have so determined in the Sub Systems setting in the Nominal Ledger and in the Number Series - Returned Goods setting and if you have ticked the Update Stock box, a Nominal Ledger Transaction will be created in the Transaction register. Please refer to the Nominal Ledger Transactions from Returns page for details about this Transaction.
- You must mark a Return as OK and save before you can raise a Credit Note for it. If you are using the Create Credit Note when OKing Returned Goods option in the Order Settings setting in the Sales Orders module, a Credit Note will be created automatically. This Credit Note will also be marked as OK immediately and automatically. Please refer to the page describing the 'Credit Note' function on the Create menu for more details.
- If a Return was created from a Service Order or a Work Sheet, Work Sheet Transactions will be created for each Item on the Return when you save it after marking it as OK. These Work Sheet Transactions will allow the Return to be taken into account when invoicing the Service Order. They will be included in the Invoice with negative quantities, so you will need to be using the Allow Negative Quantities on Invoices option in the Optional Features setting in the System module when invoicing the Service Order.
- You can use Access Groups to prevent certain users from marking Returned Goods as OK. To do this, deny them access to the 'OK Returned Goods' Action.
- If you have ticked the Update Stock box ('Terms' card), stock levels of the Items in the Return will be updated. If you have so determined in the Sub Systems setting in the Nominal Ledger and in the Number Series - Returned Goods setting and if you have ticked the Update Stock box, a Nominal Ledger Transaction will be created in the Transaction register. Please refer to the Nominal Ledger Transactions from Returns page for details about this Transaction.
The Returned Goods register in Standard ERP:
- Introduction
- Entering a Return, including:
- Header
- 'Terms' card
- 'Items' card
- 'Currency' card
- 'Comment' card
- Header
- Nominal Ledger Transactions from Returns
- Returning Goods when there is no Delivery
- Operations Menu
- Create Menu
- Row Menu
- Home page for Stock Module manual
- Home page for Standard ERP manual
Entering a Return - Terms Card
This page describes the fields on the 'Terms' card in the Returned Goods record window. Please follow the links below for descriptions of the other cards:- Header
- 'Terms' card
- 'Items' card
- 'Currency' card
- 'Comment' card

- Date
- Paste Special
Choose date
- The date of the Return. The default is the current date.
- Location
- Paste Special
Locations setting, Stock module
- The Location into which the Items are to be returned. If you have specified a Main Location in the Stock Settings setting, leaving the field blank means that the Main Location will be used.
- You must specify a Location here if you are using the Require Location option in the Stock Settings setting.
- If you have specified a Default Return Location in the Local Machine setting in the User Settings module, that Location will be copied here as a default. This option is useful if you only have a single Location into which you receive Returned Items. Note that the Local Machine setting is specific to the client machine you are working on and therefore if you need to use the Default Return Location feature you should specify it in the Local Machine setting separately on each client machine. If you have not specified a Default Return Location, then the Location in the originating Order or Delivery will be copied here.
- You can specify a Location in any of the Return rows (flip B), to override the one entered here.
- You must specify a Location here if you are using the Require Location option in the Stock Settings setting.
- Reason
- Paste Special
Standard Problems setting, Sales Ledger/Service Orders module
- Specify here a Standard Problem to describe the reason why the Customer needed to return the goods.
- If you need it to be mandatory that a Reason is specified in every Returned Goods record, select the Force Reason option in the Stock Settings setting.
- If you create a Credit Note from a Returned Goods record, the Reason that you specify here will be copied to the Credit Note automatically.
- If you need it to be mandatory that a Reason is specified in every Returned Goods record, select the Force Reason option in the Stock Settings setting.
- Tags/Objects
- Paste Special
Tag/Object register, Nominal Ledger/System module
- You can assign up to 20 Tags/Objects, separated by commas, to a Return, to be transferred to the consequent Nominal Ledger Transaction. You might define separate Tags/Objects to represent different departments, cost centres or product types. This provides a flexible method of analysis that you can use in Nominal Ledger reports.
- Usually the Tags/Objects in this field will represent the Customer and the Salesman. By default, they will be taken from the Order, Delivery, Service Order or Work Sheet from which you created the Return, but you can change them if necessary. In a Returned Goods record that you are entering yourself, the Sales Tags/Objects specified in the Contact record for the Customer will be copied here when you enter a Customer Number in the header.
- In the Nominal Ledger Transaction generated from a Return, the Tags/Objects specified here will be assigned to the credit posting to the Cost of Sales or Returned Goods Account (unless you are using the Skip Header A/C Objects on Cost A/C option in the Account Usage P/L setting in the Purchase Ledger). These Tags/Objects will also be assigned to the debit posting to the Stock Account if you are using the Tag/Object on Stock Account option in the Cost Accounting setting.
- Usually the Tags/Objects in this field will represent the Customer and the Salesman. By default, they will be taken from the Order, Delivery, Service Order or Work Sheet from which you created the Return, but you can change them if necessary. In a Returned Goods record that you are entering yourself, the Sales Tags/Objects specified in the Contact record for the Customer will be copied here when you enter a Customer Number in the header.
- Order No.
- If you create a Returned Goods record from an Order or Delivery, the Order Number will be copied here. This field cannot be changed.
- Delivery No.
- If you create a Returned Goods record from a Delivery, the Delivery Number will be copied here. The Delivery and the Return will also be connected to each other through the Link Manager. This field cannot be changed.
- Serv. Order No.
- If you create a Returned Goods record from a Service Order or Work Sheet, the Service Order Number will be copied here. When created from a Service Order, the Service Order and the Return will also be connected to each other through the Link Manager. This field cannot be changed.
- Work Sheet No.
- If you create a Returned Goods record from a Work Sheet, the Work Sheet Number will be copied here. The Work Sheet and the Return will also be connected to each other through the Link Manager. This field cannot be changed.
- Reduce
- Default taken from
Returned Goods Settings setting, Stock module
- In a Return that you created from an Order or Delivery, use these options to control the effect of the Return on the original Sales Order:
- Delivered Quantity
- This option reduces the Del. and Del. OK quantities on flip D of each Order row. You should use it when goods are returned because they are faulty (i.e. the Customer requires a replacement). Then, after marking the Returned Goods record as OK and saving, you can return to the Order to raise another Delivery for the appropriate quantity to fulfil the Order. In this situation you may choose to treat the Item as written off. If you need to return the Items to your Supplier, it is recommended that you update stock levels and then enter a Returned Goods to Supplier record (if you originally purchased the Items using a Purchase Order) or a Stock Depreciation record (if there is no originating Purchase Order).
- Ordered and Delivered Qty
- This option reduces the Order quantity as well as the Del. and Del. OK quantities in each Order row. You should use it when goods are returned without a replacement being required (perhaps the Customer has cancelled the Order). In this case, choose to reduce the ordered quantity and to update stock levels. If the Order has been invoiced, selecting 'Credit Note' from the Create menu (Windows/macOS) or + menu (iOS/Android) in the Returned Goods record will create a Credit Note with appropriate Payment Terms and a reference to the Invoice being credited. If you have created more than one Invoice from the Sales Order, you will not be able to create the Credit Note from the Returned Goods and instead will need to do so from the Order or from the Invoice to be credited.
- Delivered Quantity
- Update Stock
- Use this option if you need stock levels for the Items on the Return to be updated and a Nominal Ledger Transaction to be created when you mark the Return as OK and save. If the Item being returned is to be written off, you can then do so using a Stock Depreciation record or a Returned Goods to Supplier record, depending on the circumstances.
- If you deselect this option, stock levels for the Items on the Return will not be updated and a Nominal Ledger Transaction will not be created when you approve the Return, even if you have so specified in the Sub Systems setting in the Nominal Ledger and in the Number Series - Returned Goods setting.
- If you deselect this option, stock levels for the Items on the Return will not be updated and a Nominal Ledger Transaction will not be created when you approve the Return, even if you have so specified in the Sub Systems setting in the Nominal Ledger and in the Number Series - Returned Goods setting.
- Price Incl VAT
- Select this option if the Item Costs for the Items in the Return include VAT. The Unit Cost of each Item will be adjusted to show the cost excluding VAT.
- No Credit Notes
- Select this option in a Return if you do not want to be able to create Credit Notes from it. This may be because the Customer is not to be credited, or because you have already issued a partial Credit Note and you do not want to credit the remainder.
- Selecting this option will prevent you from creating Credit Notes from the Return i.e. no Credit Note will be created when you select 'Credit Note' from the Create menu. However you will still be able to create a Credit Note from the original Invoice. An automatic Credit Note will still be created if you are using the Create Credit Note when OKing Returned Goods option in the Order Settings setting.
- You will be able to change this option in a Return that has been marked as OK and saved. However, you can use Access Groups to prevent certain users from changing this option, by granting them Full access to the 'Disallow Changing 'No Credit Notes' on Returned Goods' Action.
- Selecting this option will prevent you from creating Credit Notes from the Return i.e. no Credit Note will be created when you select 'Credit Note' from the Create menu. However you will still be able to create a Credit Note from the original Invoice. An automatic Credit Note will still be created if you are using the Create Credit Note when OKing Returned Goods option in the Order Settings setting.
The Returned Goods register in Standard ERP:
- Introduction
- Entering a Return, including:
- Header
- 'Terms' card
- 'Items' card
- 'Currency' card
- 'Comment' card
- Header
- Nominal Ledger Transactions from Returns
- Returning Goods when there is no Delivery
- Operations Menu
- Create Menu
- Row Menu
- Home page for Stock Module manual
- Home page for Standard ERP manual
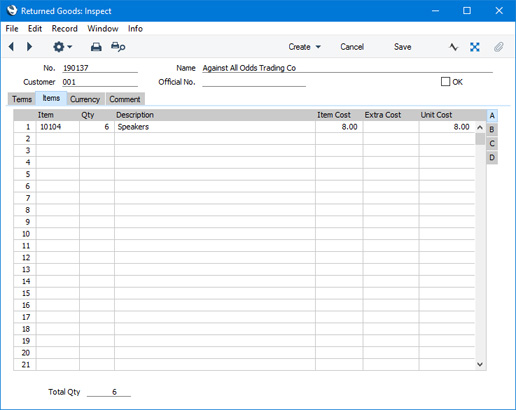
Entering a Return - Items Card
This page describes the fields on the 'Items' card in the Returned Goods record window. Please follow the links below for descriptions of the other cards:- Header
- 'Terms' card
- 'Items' card
- 'Currency' card
- 'Comment' card
A new Return will contain the following Items:
- A Return created from an Order will contain every Item in the Order that has been delivered i.e. included in Deliveries connected to the Order that have been marked as OK.
- A Return created from a Delivery will contain the Items in that Delivery.
- A Return created from a Service Order will contain every Item included in Work Sheets connected to the Service Order that have been marked as OK.
- A Return created from a Work Sheet will contain the Items in that Work Sheet.
By default, you cannot enter a Quantity that is greater than the quantity delivered, and you cannot add rows to a Return. Both will be possible if you are using the Allow Returned Goods Not Linked to Orders option in the Returned Goods Settings setting. Using this option therefore means that the Quantity in a Return will not be checked against the quantity that was delivered.
If you are using the Allow Returned Goods Not Linked to Orders option, you can use Access Groups to prevent individual users from adding rows to Returns, by denying them access to the 'Add Items to Returned Goods' Action. In effect, these users will also not be able to enter Returns directly to the Returned Goods register.
Flip A
- Item
- The Item Number from the Order or Delivery.
- If an Item being returned is a Structured Item, you should list its components in the Return, not the Structured Item itself. Structured Items are built the moment the Delivery is made and are not kept in stock themselves. Therefore, they should not be included on a Return. Only the components should be listed on the Return: this will ensure they are correctly received back into stock.
- If an Item being returned is a Structured Item, you should list its components in the Return, not the Structured Item itself. Structured Items are built the moment the Delivery is made and are not kept in stock themselves. Therefore, they should not be included on a Return. Only the components should be listed on the Return: this will ensure they are correctly received back into stock.
- Qty
- Enter the quantity returned (the default is that delivered, less any that have already been returned). You can reduce this figure, but not increase it.
- Description
- The Item Name from the Order or Delivery.
- Item Cost
- The unit Cost Price of the Item being returned, in the Currency of the Return. This figure will be updated each time you save the Return.
- In a Return created from a Delivery and if you are using the Original Cost on Returned Goods option in the Cost Accounting setting, the default will be a unit price calculated from the Row FIFO figure on flip C of the originating Delivery. If you are not using this option, the default Item Cost will be the Cost Price from the Item record.
- In a Return created from an Order, the default will be the Weighted Average or the Cost Price from the Order row, depending on the Cost Model. If the Item uses a Queued Cost Model (FIFO or LIFO), you will not be able to create the Return from the Order, because Queued values are not stored in Orders.
- In a Return created from a Project or Work Sheet and if you are using the Original Cost on Returned Goods option, the default will be a unit price calculated from the Row FIFO figure on flip D of the originating Work Sheet. If you are not using this option, the default Item Cost will be the Cost Price from the Item record.
- In a Return that you enter directly to the Returned Goods register, the default will be the Cost Price from the Item record. You can change this figure to the true unit value of the returned Item which you can find by referring to flip C of the original Invoice.
- If you are not using the Original Cost on Returned Goods option in the Cost Accounting setting and/or you are not using the option to insert Returned Goods at their original position in the FIFO/LIFO cost queue in the same setting you can change the Item Cost, although this is not recommended. Instead, if you have incurred any costs in receiving the Item back into stock, it is recommended that you enter an Extra Cost.
- If the Item is one that has its Cost Price updated on Goods Receipt using the Weighted Average option (set on the 'Costs' card of the Item record) and if you are using the Update Weighted Average from Return Goods and Credit Notes option in the Cost Accounting setting, any change in Price here will be fed back to that Cost Price automatically. The FIFO/LIFO and Weighted Average values of the Item will be adjusted accordingly.
- If you have selected the Price Incl. VAT option on the 'Terms' card, this figure should include VAT.
- In a Return created from a Delivery and if you are using the Original Cost on Returned Goods option in the Cost Accounting setting, the default will be a unit price calculated from the Row FIFO figure on flip C of the originating Delivery. If you are not using this option, the default Item Cost will be the Cost Price from the Item record.
- Extra Cost
- Use this field to record any additional cost (per unit) incurred by your company in having the item returned. It will be shown added to the Item Cost in the Cost Price field to the right.
- You can either enter an amount (in your home Currency), or a percentage followed by the % character.
- You can only add an Extra Cost if you are not using the Original Cost on Returned Goods option in the Cost Accounting setting and/or you are not using the option to insert Returned Goods at their original position in the FIFO/LIFO cost queue in the same setting.
- In the Nominal Ledger Transaction generated from a Return, any costs in this field will be credited to the Extra Costs Account specified in the Account Usage Stock setting and included in the debit posting to the Stock Account.
- The FIFO/LIFO value of the Item will not be affected by the Extra Cost but, if you are using the Update Weighted Average from Return Goods and Credit Notes option in the Cost Accounting setting, the Extra Cost will be included in the Weighted Average calculation for the Item. The Extra Cost will therefore be fed back to the Cost Price of the Item if you are using this option and if the Item is one that has its Cost Price updated on Goods Receipt using the Weighted Average option (set on the 'Costs' card of the Item record).
- You can either enter an amount (in your home Currency), or a percentage followed by the % character.
- Unit Cost
- The Unit Cost of the Item in your home Currency, including any Extra Costs.
Flip B
- Tags/Objects
- Paste Special
Tag/Object register, Nominal Ledger/System module
- Default taken from Order, Delivery or Work Sheet row
- You can assign up to 20 Tags/Objects, separated by commas, to a row in a Return, to be transferred to the consequent Nominal Ledger Transaction. You might define separate Tags/Objects to represent different departments, cost centres or product types. This provides a flexible method of analysis that can be used in Nominal Ledger reports. Usually the Tags/Objects specified here will represent the Item.
- By default, the Tags/Objects entered here will be taken from the Order, Delivery or Work Sheet row to which the Return row corresponds, but you can change them if necessary.
- In the Nominal Ledger Transaction generated from a row in a Return, the Tags/Objects specified here will be assigned to the credit posting to the Cost of Sales or Returned Goods Account. This assignment will merge these Tags/Objects with those of the parent Return (shown on the 'Terms' card). They will also be assigned to the debit posting to the Stock Account if you are using the Tag/Object for Stock Account option in the Cost Accounting setting.
- You can assign up to 20 Tags/Objects, separated by commas, to a row in a Return, to be transferred to the consequent Nominal Ledger Transaction. You might define separate Tags/Objects to represent different departments, cost centres or product types. This provides a flexible method of analysis that can be used in Nominal Ledger reports. Usually the Tags/Objects specified here will represent the Item.
- Location
- Paste Special
Locations setting, Stock module
- You can enter a separate stock Location for each row of the Return.
- If you have specified a Default Return Location in the Local Machine setting in the User Settings module, that Location will be copied both here and to the Location field on the 'Terms' card as defaults. This option is useful if you only have a single Location into which you receive Returned Items. Note that the Local Machine setting is specific to the client machine you are working on and therefore if you need to use the Default Return Location feature you should specify it in the Local Machine setting separately on each client machine. If you have not specified a Default Return Location, then the Location in the originating Order, Delivery or Work Sheet row will be copied here.
- If you have specified a Default Return Location in the Local Machine setting in the User Settings module, that Location will be copied both here and to the Location field on the 'Terms' card as defaults. This option is useful if you only have a single Location into which you receive Returned Items. Note that the Local Machine setting is specific to the client machine you are working on and therefore if you need to use the Default Return Location feature you should specify it in the Local Machine setting separately on each client machine. If you have not specified a Default Return Location, then the Location in the originating Order, Delivery or Work Sheet row will be copied here.
- Cost A/C
- Paste Special
Account register, Nominal Ledger/System module
- The Cost Account specified here will be credited with the value of the Item (i.e. with the Unit Cost * Quantity) in the Nominal Ledger Transaction that will result from the Returned Goods record.
- If you have not specified a Default Return Location in the Local Machine setting, the Cost Account in a Returned Goods record that you create from a Delivery or a Work Sheet will be copied from the corresponding Delivery or Work Sheet row.
- If you have specified a Default Return Location and in a Returned Goods record that you enter directly to the Returned Goods register, the default Cost Account in each row will be chosen as follows:
- If you have specified a Cost Account for the Location in the Location Accounts setting in the Stock module, that Cost Account will be used. The Location is the one specified on flip B or, if blank, on the 'Terms' card.
- If you are using the Use Item Groups for Cost Accounts option in the Cost Accounting setting, the Cost Account for the Item Group to which the Item belongs will be used. If that is blank or the Item does not belong to an Item Group, the Cost Account for the Item will be used.
However, if you are not using the Use Item Groups for Cost Accounts option, the Cost Account for the Item will be used. If that is blank, the Cost Account for the Item Group to which the Item belongs will be used.
- In all other cases, the Cost Account specified in the Account Usage Stock setting will be used.
You can only enter records directly to the Returned Goods register if you are using the Allow Returned Goods Not Linked to Orders option in the Returned Goods Settings setting.
- If the Cost Account field in any row is empty (i.e. if you remove the Account that is offered), the Returned Goods Account specified in the Account Usage Stock setting will be credited in the Nominal Ledger Transaction generated from the Returned Goods record.
- If you have not specified a Default Return Location in the Local Machine setting, the Cost Account in a Returned Goods record that you create from a Delivery or a Work Sheet will be copied from the corresponding Delivery or Work Sheet row.
- Serial No.
- Paste Special
Serial Numbers of Items in stock
- If the Item uses Serial Numbers at the unit or batch level, you must enter a valid Serial Number here.
- In a Return that you create from a Delivery or Work Sheet, this field will contain a default, taken from the Items that have already been delivered. In a Return that you create from an Order, there will be no default, because the Serial Numbers of delivered Items are not all stored in Orders if the Order Quantity is greater than one.
- If you are using the No Serial No. on Goods Receipts option in the Stock Settings setting, it will not be compulsory to enter Serial Numbers, and a Quantity greater than 1 will be allowed.
- If you are using the Generate Bulk Serial Numbers automatically option in the Serial Number Tracking setting, you will be able to enter a range of Serial Numbers in this field for Serial Numbered Items in a Return that you enter directly to the Returned Goods register. If you have already entered a Qty and then enter the first Serial Number in this field, it will be overwritten by a range of Serial Numbers, separated by a colon (:).
- In a Return that you create from a Delivery or Work Sheet, this field will contain a default, taken from the Items that have already been delivered. In a Return that you create from an Order, there will be no default, because the Serial Numbers of delivered Items are not all stored in Orders if the Order Quantity is greater than one.
- Best Before
- In the case of perishable goods, enter a Best Before date here. The default will be taken from the Items that have already been delivered from the Order.
Flip C
- BuyBack Cost
- In a Return that you create from a Delivery, the BuyBack Cost from the Delivery row will be copied here. Otherwise this field will remain empty. Please refer here for details about the BuyBack feature
- Position
- Paste Special
Position register, Warehouse Management module
- If the Location specified in the header is a large one that has been sub-divided into Positions, enter here the Position where the Item is to be stored. You must specify a Position if you have selected the Demand Position option in the Location in question. The Position must be in the correct Location. The 'Paste Special' list only lists Free Positions (Positions that are empty). When you mark the Return as OK and save, the Status of the Position specified here will be changed to "Used" automatically. If you created the Returned Goods record from a Delivery, Service Order or Work Sheet, a default Position will be taken from the relevant Delivery or Work Sheet row.
- Recipe
- The Recipe for Structured Items will be entered here. This field cannot be changed.
- Width, Height, Depth
- Default taken from
Item
- These fields contain the dimensions of the Item.
- If the Item is one that is sold by area or volume, you can have the Quantity calculated by multiplying the dimensions together. Follow these steps if you would like to use this feature:
- Select the Enable Quantity Calculation option in the Item Settings setting in the Sales Ledger.
- Select the Calculate Quantity option for the Unit that has been assigned to the Item. If the Item is sold by area, choose the Two Dimensions option in the Unit record. If the Item is sold by volume, choose the Three Dimensions option.
- In the Return, enter the Width and Height (if the Item is sold by area) or the Width, Height and Depth (if the Item is sold by volume). The Quantity will be calculated automatically.
Please refer to the page describing the Units setting for details and an example.
- If the Item is one that is sold by area or volume, you can have the Quantity calculated by multiplying the dimensions together. Follow these steps if you would like to use this feature:
Footer
- Total Qty
- This field shows the total number of Items returned. Whenever you add or change a row in the Return, this figure will be updated automatically.
The Returned Goods register in Standard ERP:
- Introduction
- Entering a Return, including:
- Header
- 'Terms' card
- 'Items' card
- 'Currency' card
- 'Comment' card
- Header
- Nominal Ledger Transactions from Returns
- Returning Goods when there is no Delivery
- Operations Menu
- Create Menu
- Row Menu
- Home page for Stock Module manual
- Home page for Standard ERP manual
Entering a Return - Currency Card
This page describes the fields on the 'Currency' card in the Returned Goods record window. Please follow the links below for descriptions of the other cards:---

- Currency
- Paste Special
Currency register, System module
- The Currency of the Return.
- Exchange Rates
- Default taken from
Base Currency Rates setting and/or Exchange Rate register, System module
- By default, these fields will display the exchange rates for the specified Currency on the Date of the Return.
- One of two conversion methods will be used to calculate prices in Currency. The Dual-Base system will be useful for companies that have offices in two countries that need to report in both Currencies, for companies operating in countries where there is a second Currency (usually the US Dollar or Euro) in common use in addition to the national one, and for companies in the Euro zone who retain their old national Currency for comparison purposes. The second method is a simple conversion from the foreign Currency to the home Currency, applicable to the majority of worldwide Currency transactions. These are described below.
- Exchange Rates (Dual-Base System)
- If you are using the Dual-Base system, the Base Currency 1 and 2 fields on the left show in the form of a ratio the exchange rate between the two base Currencies (taken from the record in the Base Currency Rates setting that applies together on the Return Date).
- Note that European Monetary Union (EMU) regulations specify that the ratios must always show how many units of the home or foreign Currency can be bought with one Euro.
- Note that European Monetary Union (EMU) regulations specify that the ratios must always show how many units of the home or foreign Currency can be bought with one Euro.
- Exchange Rates (Simple Currency Conversion System)
- In the case of a simple currency conversion system, the Rate and right-hand Base Currency 1 fields are used to show a simple exchange rate between the foreign and home Currencies.
- One of two conversion methods will be used to calculate prices in Currency. The Dual-Base system will be useful for companies that have offices in two countries that need to report in both Currencies, for companies operating in countries where there is a second Currency (usually the US Dollar or Euro) in common use in addition to the national one, and for companies in the Euro zone who retain their old national Currency for comparison purposes. The second method is a simple conversion from the foreign Currency to the home Currency, applicable to the majority of worldwide Currency transactions. These are described below.
The Returned Goods register in Standard ERP:
- Introduction
- Entering a Return, including:
- Nominal Ledger Transactions from Returns
- Returning Goods when there is no Delivery
- Operations Menu
- Create Menu
- Row Menu
- Home page for Stock Module manual
- Home page for Standard ERP manual
Entering a Return - Comment Card
This page describes the fields on the 'Comment' card in the Returned Goods record window. Please follow the links below for descriptions of the other cards:---

- Comment
- Any comment entered here (perhaps the reason for the return) will be shown in the 'Returned Goods: Browse' window.
- The Comment field will remain editable after marking a Return as OK and saving.
The Returned Goods register in Standard ERP:
- Introduction
- Entering a Return, including:
- Header
- 'Terms' card
- 'Items' card
- 'Currency' card
- 'Comment' card
- Header
- Nominal Ledger Transactions from Returns
- Returning Goods when there is no Delivery
- Operations Menu
- Create Menu
- Row Menu
- Home page for Stock Module manual
- Home page for Standard ERP manual
Nominal Ledger Transactions from Returns
After entering a Returned Goods record and checking that it is correct, you should mark it as OK and save it. A Nominal Ledger Transaction will be generated automatically if you have so determined in the Sub Systems setting in the Nominal Ledger and in the Number Series - Returned Goods setting, and if at least one of the Items on the Return is a Stocked Item.The Stock Account debited in this Nominal Ledger Transactions will be determined as follows:
- The Stock Account for the specified Location will be debited.
- If this is blank or if you have not specified a Location, and if you are using the Use Item Groups for Cost Accounts option in the Cost Accounting setting, the Stock Account for the Item Group to which the Item belongs will be debited.
- In all other cases, the Stock Account in the Account Usage Stock setting will be debited.
If you have not specified a Default Return Location in the Local Machine setting in the User Settings module, the Cost Account in a Returned Goods record that you create from a Delivery or a Work Sheet will be copied from the corresponding Delivery or Work Sheet row. Otherwise (i.e. if you have specified a Default Return Location, and in a Returned Goods record that you enter directly to the Returned Goods register), this Account will be determined as follows:
- If you have specified a Cost Account for the Location in the Location Accounts setting in the Stock module, that Cost Account will be used. The Location is the one specified on flip B or, if blank, on the 'Terms' card.
- If you are using the Use Item Groups for Cost Accounts option in the Cost Accounting setting, the Cost Account for the Item Group to which the Item belongs will be used. If that is blank or the Item does not belong to an Item Group, the Cost Account for the Item will be used.
However, if you are not using the Use Item Groups for Cost Accounts option, the Cost Account for the Item will be used. If that is blank, the Cost Account for the Item Group to which the Item belongs will be used.
- In all other cases, the Cost Account specified in the Account Usage Stock setting will be used.
If there are any Extra Costs, these will be posted to the Extra Costs Account specified in the Account Usage Stock setting.
Any Tags/Objects in the Return representing the Customer and the Salesman (shown on the 'Terms' card) will be assigned to the credit posting to the Cost of Sales or Returned Goods Account (unless you are using the Skip Header A/C Objects on Cost A/C option in the Account Usage P/L setting in the Purchase Ledger). The Tags/Objects representing the Item (shown on flip B of the 'Items' card) will also be assigned to the credit posting. If you are using the Tag/Object for Stock Account option in the Cost Accounting setting, all Tags/Objects will also be assigned to the debit posting to the Stock Account.
Below is shown an example of a Nominal Ledger Transaction created from a Return:
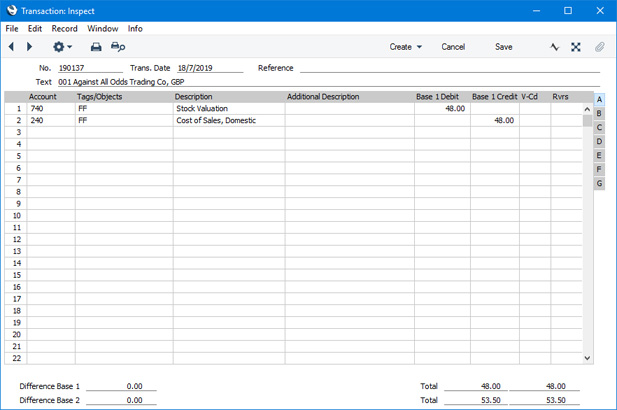
Once the Transaction has been generated, you can look at it straight away using the 'Open NL Transaction' function on the Operations menu (Windows/macOS) or Tools menu (iOS/Android) (subject to access rights set in the Access Groups setting in the System module).
---
The Returned Goods register in Standard ERP:
- Introduction
- Entering a Return
- Nominal Ledger Transactions from Returns
- Returning Goods when there is no Delivery
- Operations Menu
- Create Menu
- Row Menu
- Home page for Stock Module manual
- Home page for Standard ERP manual
Returning Goods when there is no Delivery
You can deliver goods from stock without a Sales Order or Delivery. This process is described on the Deliveries from the Sales Ledger page. In this circumstance (i.e. without a Sales Order or Delivery), if such goods are returned to you, you can use the following methods to receive them back into stock:- Using a Credit Note. Please refer to the 'Using a Credit Note to receive a Returned Item back into stock' section here for details.
- Using a Goods Receipt. Please refer to the 'Using a Goods Receipt or a Returned Goods record to receive a Returned Item back into stock' section here for details.
- Using a Returned Goods record that you enter directly to the Returned Goods register. To be able to use the Returned Goods register in this way (i.e. without a Sales Order or Delivery), select the Allow Returned Goods Not Linked to Orders option in the Returned Goods Settings setting. Again, please refer to the 'Using a Goods Receipt or a Returned Goods record to receive a Returned Item back into stock' section for details.
The Returned Goods register in Standard ERP:
- Introduction
- Entering a Return
- Nominal Ledger Transactions from Returns
- Returning Goods when there is no Delivery
- Operations Menu
- Create Menu
- Row Menu
- Home page for Stock Module manual
- Home page for Standard ERP manual
Operations Menu - Returned Goods
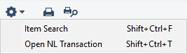
If you are using Windows or macOS, you can open the Operations menu by clicking the button with the 'cog' icon (shown highlighted in the illustration above). If you are using iOS or Android, you can access the Operations menu functions through the Tools menu (with 'wrench' icon).
Note that in Standard ERP version 8.0, some functions that were previously on the Operations menu were moved to the Create and Row menus. On iOS and Android there is no Row menu, so on those platforms the Row menu functions remain on the Operations/Tools menu.
Please follow the links below for details about each function on the Operations menu:
The Returned Goods register in Standard ERP:
- Introduction
- Entering a Return
- Nominal Ledger Transactions from Returns
- Returning Goods when there is no Delivery
- Operations Menu
- Create Menu
- Row Menu
- Home page for Stock Module manual
- Home page for Standard ERP manual
Operations Menu - Returned Goods - Item Search
This page describes the 'Item Search' function on the Operations menu in the Returned Goods record window. If you are using iOS or Android, the 'Item Search' function is on the Tools menu (with 'wrench' icon).---
If you are using the Allow Returned Goods Not Linked to Orders option in the Returned Goods Settings setting, you will be able to add rows to a Return that you created from another record such as a Delivery or Work Sheet, and you will be able to add records directly to the Returned Goods register. One way to search for Items that you can then add to a Returned Goods record is to use the 'Item Search' function. This function is therefore an alternative to the 'Paste Special' feature.
To use this function, place the insertion point in the Item field in any row and then select 'Item Search' from the Operations menu (Windows/macOS) or Tools menu (iOS/Android). The following window opens:
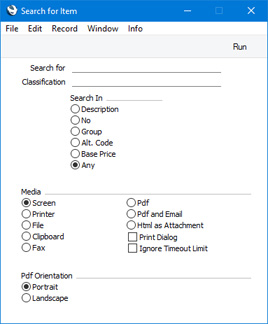
- Search for
- Enter here the string (e.g. part of an Item Number or Name) that you are looking for. You must make an entry in this field, otherwise no search will be carried out.
- Classification
- Paste Special
Item Classifications setting, Sales Ledger
- If you enter an Item Classification here, the search for the string that you specified in the field above will be restricted to Items belonging to that Classification.
- Search In
- Specify the field in which you want to search.
---
The Returned Goods register in Standard ERP:
- Introduction
- Entering a Return
- Nominal Ledger Transactions from Returns
- Returning Goods when there is no Delivery
- Operations Menu, including:
- Item Search
- Open NL Transaction
- Item Search
- Create Menu
- Row Menu
- Home page for Stock Module manual
- Home page for Standard ERP manual
Operations Menu - Returned Goods - Open NL Transaction
This page describes the 'Open NL Transaction' function on the Operations menu in the Returned Goods record window. If you are using iOS or Android, the 'Open NL Transaction' function is on the Tools menu (with 'wrench' icon).---
When you mark a Return as OK and save it, a Nominal Ledger Transaction will be created (if so defined in the Sub Systems setting in the Nominal Ledger and in the Number Series - Returned Goods setting). The 'Open NL Transaction' function allows you to view that Transaction from the Return.
When you select this function from the Operations menu (Windows/macOS) or Tools menu (iOS/Android), the Transaction will be opened in a new window.
You can use Access Groups to prevent certain users from opening Transactions from Returns. To do this, deny them access to the 'Open Transactions from Operations Menu' Action or to the Nominal Ledger altogether.
---
The Returned Goods register in Standard ERP:
- Introduction
- Entering a Return
- Nominal Ledger Transactions from Returns
- Returning Goods when there is no Delivery
- Operations Menu, including:
- Item Search
- Open NL Transaction
- Item Search
- Create Menu
- Row Menu
- Home page for Stock Module manual
- Home page for Standard ERP manual
Create Menu - Returned Goods
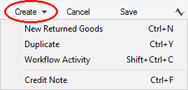
The standard 'New' and 'Duplicate' functions will only be visible if you are using the Allow Returned Goods Not Linked to Orders option in the Returned Goods Settings setting. Use these functions to create new records, in this case in the Returned Goods register. Please follow the links below for details about the other function.
The Returned Goods register in Standard ERP:
- Introduction
- Entering a Return
- Nominal Ledger Transactions from Returns
- Returning Goods when there is no Delivery
- Operations Menu
- Create Menu
- Row Menu
- Home page for Stock Module manual
- Home page for Standard ERP manual
Create Menu - Returned Goods - Credit Note
This page describes the 'Credit Note' function on the Create menu in the Returned Goods record window. If you are using iOS or Android, the 'Credit Note' function is on the + menu.---
When you have invoiced Customer for an Item and the Customer then returns the Item without requiring a replacement, you can create a Credit Note using the following methods:
- From the Return, select 'Credit Note' from the Create menu (Windows/macOS) or + menu (iOS/Android). This function is described on this page.
- From the original Invoice, select 'Credit Note' from the Create or + menu. Every Item in the Invoice will be included in the Credit Note, so method 1 might be preferred as this will only credit the returned Items.
- If a Return was created from a Service Order or Work Sheet, Work Sheet Transactions will have been created from the Return when you marked it as OK. If you have not invoiced the Service Order yet, both the outgoing Work Sheet Transactions (from the Work Sheet) and the incoming Work Sheet Transactions (from the Return) will be included when you do create the Invoice. The incoming Work Sheet Transactions will be listed separately in the Invoice with negative quantities, so you will need to be using the Allow Negative Quantities on Invoices option in the Optional Features setting in the System module in order to be able to mark the Invoice as OK.
If you have already invoiced the outgoing Work Sheet Transactions, the following options are available:
- Create another Invoice from the Service Order for the incoming Work Sheet Transactions. This Invoice will again have negative quantities.
- Create a Credit Note from the Return (method 1 above).
- Create a Credit Note from the original Invoice (method 2 above). This method is not recommended because every Item in the Invoice will be included in the Credit Note, not just the returned Items, and because the incoming Work Sheet Transactions will not be marked as Invoiced so there is a risk they will be included again in a subsequent Invoice created from the Service Order.
- Create another Invoice from the Service Order for the incoming Work Sheet Transactions. This Invoice will again have negative quantities.
- If a Return was created from a Sales Order or Delivery and if you have not yet invoiced the Order, the Return will be included when you do create the Invoice from the Order or the Delivery. If you have already invoiced the Order, you can create another Invoice from the Order (but not from the Delivery). This Invoice will have negative quantities so again you will need to be using the Allow Negative Quantities on Invoices option.
- If you are using the Create Credit Note when OKing Returned Goods option in the Order Settings setting in the Sales Orders module, a Credit Note will usually be created automatically when you mark a Return as OK and save.
A Credit Note will not be created from a Return that itself was created from an Order, Delivery, Service Order or Work Sheet if the returned Items have not yet been invoiced.
The new Credit Note will usually be marked as OK immediately and automatically. If the process can establish which Invoice is to be credited, a reference to this Invoice will be included in the Credit Note. But, it will not be possible to establish which Invoice is to be credited if you created the Credit Note from a Return that you entered directly to the Returned Goods register or from a Return that you created from an Order, Delivery, Service Order or Work Sheet that has more than one connected Invoice. In this case, if you are using the
Do not allow Credit Invoices without No. option in the Account Usage S/L setting, the Credit Note will not be marked as OK and will be opened in a separate window so you can allocate it to a previous Invoice before marking it as OK and saving.
To create a Credit Note, open the Return in a record window and select 'Credit Note' from the Create menu (Windows/macOS) or + menu (iOS/Android). A new record will be created in the Invoice register and opened in a new window, entitled 'Invoice: Inspect'. This means that it has been created and saved and is being opened for amendment and approval.
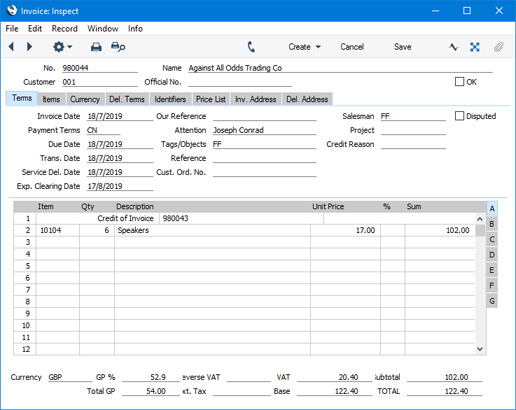
If you have only created one Invoice from the originating Order or Service Order, its Invoice Number will be shown in the first row of the grid, stating that it is the Invoice being credited. If this is wrong, you can change it, using 'Paste Special' if necessary to bring up a list of open (unpaid) Invoices. If you have created more than one Invoice from the originating Order or Service Order, or you entered the Return directly to the Returned Goods register, the first row will not have an Invoice Number (i.e. there will be no reference to the Invoice being credited) because it will not be possible to establish which Invoice is to be credited. You will be able to specify this yourself, again using 'Paste Special' if necessary. If you are using the Do Not Allow Credit Invoices Without No. option in the Account Usage S/L setting, you will not be able to mark the Credit Note as OK until you have done this.
If the Return was created from an Order or Delivery, the invoiced quantity on flip D of the originating Order will be updated if you are using the Credit Notes Update Invoiced Quantity option in the Order Settings setting in the Sales Orders module. You will not be able to credit a greater quantity than was returned. If you are not using this option, the invoiced quantity on flip D of the originating Order will not be updated (use the 'Recalculate Orders' Maintenance function in the Sales Orders module to update this figure), and so there will be no control over the number of Credit Notes that you will be able to create.
To print the Credit Note, click the Printer icon (Windows/macOS only) or select 'Print' from the File menu (all platforms). If you have not marked the Credit Note as OK and if you are not using the No Test Printout option in the Optional Features setting in the System module, the printed Credit Note will be marked as a test print, so that it cannot be confused with the final version of the Credit Note.
When the Credit Note is complete, click the OK check box and save. This signifies that the Credit Note has been approved. Associated transactions in the Nominal Ledger will now be raised and you will no longer be able to modify the Credit Note.
Please refer here or a full description of the Invoice/Credit Note window, and here for details about Credit Notes.
To close the window and return to the Return, click the close box (Windows/macOS) or tap < (iOS/Android). You will be asked if you want to save any changes.
If the function does not create a Credit Note, the probable causes are:
- You have selected the No Credit Notes option on the 'Terms' card of the Returned Goods record.
- You have not marked the Returned Goods record as OK and saved.
- The Items on the Return have not been invoiced (or the Invoice has not been marked as OK).
- There is no valid Number Series for Credit Notes. This might be a fault in the Number Series - Invoices setting, or it might be because the default Invoice Number on the 'Number Series' card of the current user's Person record or in the Number Series Defaults setting (in the System module) is not in a valid Number Series. This problem will usually occur at the beginning of a new year. Please refer to the Credit Notes and Number Series page for details about using separate Number Series for Invoices and Credit Notes.
- You have logged in as a user belonging to an Access Group in which access to the 'Credit Note from Returned Goods' Action has been denied.
The Returned Goods register in Standard ERP:
- Introduction
- Entering a Return
- Nominal Ledger Transactions from Returns
- Returning Goods when there is no Delivery
- Operations Menu
- Create Menu, including:
- Credit Note
- Row Menu
- Home page for Stock Module manual
- Home page for Standard ERP manual
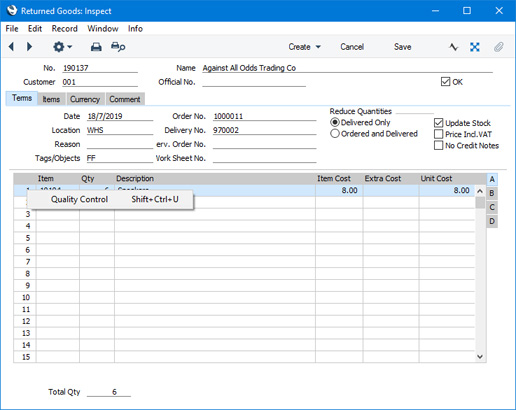
Row Menu - Returned Goods
The matrix in the Returned Goods window has its own menu, which contains a function that refers to or affects an individual row in the matrix. This is sometimes known as the "Row Menu".If you are using Windows or macOS, you can open the Row menu by first clicking in any field in the row in question (i.e. the row to which the function is to be applied), and then right-clicking (Windows) or Ctrl-clicking (macOS) the row number (on the left of the row). A menu will appear, where you can select the function:
Please follow the links below for details about the function on the Row menu:
The Returned Goods register in Standard ERP:
- Introduction
- Entering a Return
- Nominal Ledger Transactions from Returns
- Returning Goods when there is no Delivery
- Operations Menu
- Create Menu
- Row Menu
- Home page for Stock Module manual
- Home page for Standard ERP manual
Row Menu - Returned Goods - Quality Control
This page describes the 'Quality Control' function on the Row menu in the Returned Goods record window. If you are using iOS or Android, the 'Quality Control' function is on the Tools menu (with 'wrench' icon).---
If a row in a Returned Goods record contains an Item with a Serial Number and a Best Before Date, you may need the Item to undergo quality control tests in order to confirm whether it can be re-sold. The 'Quality Control' function allows you to record the result of this test.
To use this function, first place the insertion point in the Return row containing the Item that has been tested. Then open the Row menu by right-clicking (Windows) or ctrl-clicking (macOS) the row number. When the Row menu opens, select 'Quality Control'. If you are using iOS or Android, select 'Quality Control' from the Tools menu (with 'wrench' icon). A 'Batch Quality Control: New' window will open, allowing you to enter the details of the test. In particular, use the Result field to connect the Batch Quality Control record to a record in the Batch Status setting. After you mark the Batch Quality Control record as OK and save, this Batch Status record will determine whether you will be warned when using the Item/Serial Number combination in an outgoing stock transaction, or whether you will be prevented from using the Item/Serial Number altogether.
Please refer here for more details about the 'Quality Control' function and about alternative methods that you can use to record the result of a quality control test on the Item/Serial Number.
---
The Returned Goods register in Standard ERP:
- Introduction
- Entering a Return
- Nominal Ledger Transactions from Returns
- Returning Goods when there is no Delivery
- Operations Menu
- Create Menu
- Row Menu, including:
- Quality Control
- Home page for Stock Module manual
- Home page for Standard ERP manual