Introduction to the Expense Register
Your company's employees should use the Expense register to submit their expense claims. Typically, an employee will submit expense claims by creating new records once a month.If you want to support an expense claim for mileage with details of the journeys you have made, you should first record the journey details in a new record in the Mileage register. You can then quote the Mileage record on flip D of the Expense record. The Total Cost from the Mileage record will be brought in to the Expense record automatically, and Account, VAT Code and Description details will be taken from the Mileage Settings setting.
Similarly, if you need to submit a claim for daily allowances for nights spent away from home, you should first list the nights spent away from home in a new record in the Daily Allowance register. You can then quote the Daily Allowance record on flip E of the Expense record. The TOTAL and Project (if any) from the Daily Allowance record will be brought in to the Expense, and the Account, VAT Code, Qty and Item will be brought in from the Daily Allowance Settings setting. Finally, the Description will be brought in from the Daily Allowance record or from the Account.
If an employee pays and claims an expense that should be assigned to a Supplier, you may need to enter that expense as a Purchase Invoice, especially if the expense includes a VAT element. This will ensure the expense will be included in Purchase Ledger VAT reports and in the Periodic Supplier Statement. When entering the Purchase Invoice, use a Payment Term in which the Type is "Employee". The resulting Nominal Ledger Transaction will credit the Account from the relevant Person record ('Accounts' card), and the Person's Tag/Object will be assigned to the credit posting(s). In other respects, the Purchase Invoice will be similar to a Cash Note, so it will immediately be treated as paid. Please refer to the Registering Expenses Using Purchase Invoices page for more details.
To open the Expense register, first ensure you are in the Expenses module. Then, if you are using Windows or Mac OS X, click the [Registers] button in the Navigation Centre and then double-click 'Expenses' in the resulting list. If you are using iOS or Android, tap the [Registers] button in the Navigation Centre and then tap 'Expenses' in the 'Registers' list.
The 'Expenses: Browse' window will be opened, showing any Expenses that have already been entered. Expenses that have been marked as OK and posted to the Nominal Ledger are shown with a tick in the OK column.
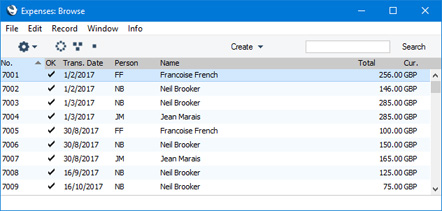
Searching for a particular Expense record depends on whether you are using the Browse Filtering option in the Optional Features setting in the System module, as follows:
- If you are not using the Browse Filtering option, first sort the list by the column that you want to use for the search. Then, enter the text that you want to find in the Search field in the top of the window (in the top right-hand corner if you are using Windows/Mac OS X) and press the Return key (Mac OS X) or Search (iOS/Android). The first record containing a match for your search string will be highlighted (if you are using Windows, a match will be highlighted as you type each character). For example, to search for a particular Person, sort by Person or Name before entering a Signature or a Name (or the first few characters) in the Search field.
- If you are using the Browse Filtering option, all you need to do is to start typing a letter, word, number, or date in the Search field (there is no need to click in the field before typing). As you type each character, non-matching records will be removed from the list. There is no need to sort the list first.
If you are using Windows or Mac OS X, there will be three buttons in the top left-hand corner of the 'Expenses: Browse' window. These are part of the Limited Access feature. You can use them as follows (Windows versions of the buttons illustrated on the left, Mac OS X on the right):

- Lists all Expense records.

- Lists Expense records submitted by members of the same Sales Group as the current user.

- Lists Expense records submitted by the current user (i.e. Expense records where the Person field contains the Signature of the current user).
Please refer to the page describing the 'Access' card of the Person register for full details about the Limited Access feature.
The Expense register in Standard ERP:
- Introduction
- Entering an Expense record
- Inspecting Expense records, Marking as OK and Posting to the Nominal Ledger
- Expenses in Currency
- Error Messages
- Invalidating Expenses
- Registering Expenses Using Purchase Invoices
- Operations menu
- Create menu
Go back to:
- Home page for Expenses module manual
- Home page for Standard ERP manual
Entering an Expense Record
To enter a new record in the Expense register, first open the 'Expenses: Browse' as described here and select 'New' from the Create menu (Windows/Mac OS X) or from the + menu (iOS/Android). You can also use the Ctrl-N (Windows) or ⌘-N (Mac OS X) keyboard shortcuts. Alternatively, highlight an Expense record similar to the one you want to enter and select 'Duplicate' from the same menu. If you don't want to open the 'Expenses: Browse' window before creating a new record, you can also use the + menu in the Navigation Centre (all platforms).The 'Expense: New' window will be opened, empty if you selected 'New' or containing a duplicate of the highlighted Expense record.
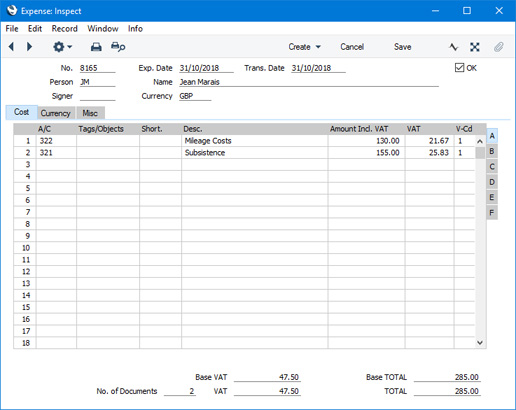

If you are using iOS or Android, there will only be two tabs, marked 'Items' and 'Details'. 'Items' is the equivalent of the 'Cost' card in Windows and Mac OS X. If you tap 'Details', you will see every card except 'Items' arranged vertically on screen. You can scroll down to see each one, or you can jump to any card by tapping on any tab and selecting the tab you want to go to.
Complete the Expense record as appropriate and as described on the pages listed below describing each card, then save it using the [Save] button (Windows/Mac OS X) or by tapping √. The window title will change from 'Expense: New' to 'Expense: Inspect'. You must save all changes you have made before you can print an Expense record or send it by email.
Please follow the links below for details about each card in the Expense record:
- Header
- 'Cost' card
- 'Currency' card
- 'Misc' card
The Expense register in Standard ERP:
- Introduction
- Entering an Expense record
- Inspecting Expense records, Marking as OK and Posting to the Nominal Ledger
- Expenses in Currency
- Error Messages
- Invalidating Expenses
- Registering Expenses Using Purchase Invoices
- Operations menu
- Create menu
- Home page for Expenses module manual
- Home page for Standard ERP manual
Entering an Expense Record - Header
This page describes the fields in the Header of the Expense record. Please follow the links below for descriptions of the other cards:- Header
- 'Cost' card
- 'Currency' card
- 'Misc' card
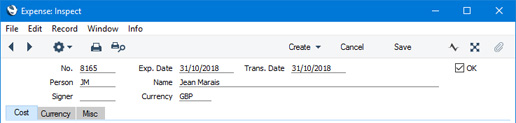
- No.
- Paste Special
Select from another Number Series
- The unique identifying number of the Expense record. The default will be chosen as follows:
- It will be taken from the first valid row in the Number Series - Expenses setting.
- It will be the next number following on from the last Expense record entered.
- You may change the default, but not to a number that has already been used. If you have defined at least one number sequence in the Number Series - Expenses setting, the number you change to must be inside a valid number sequence.
- You will not be able to save an Expense record if the No. does not belong to a valid number sequence. A valid number sequence is one for the period in which the Transaction Date falls and with unused numbers, so this problem will most usually occur at the beginning of a new calendar or financial year.
- If you are working in a multi-user system, the Expense Number will be assigned when you save the Expense record for the first time, chosen as described above and providing you have not already specified a number yourself.
- It will be taken from the first valid row in the Number Series - Expenses setting.
- Exp. Date
- Paste Special
Choose date
- The date of the employee's expense claim. In Russia, this field should contain the date when the record was created.
- Changing the Exp. Date will cause the Trans. Date (below) to change as well. If you need the two dates to be different, change the Trans. Date.
- Changing the Exp. Date will cause the Trans. Date (below) to change as well. If you need the two dates to be different, change the Trans. Date.
- Trans. Date
- Paste Special
Choose date
- This date will be used as the Transaction Date in the Nominal Ledger Transaction that will be created from the Expense record.
- Person
- Paste Special
Person register, System module and Global User register, Technics module
- Default taken from Current user
- The Person whose expense claim is being entered. After entering a Person's Signature, the Person's name will be entered to the field to the right.
- If you have more than one Company in your database, the employee that you specify here should have a Person record in the Company in which you are working. In the Nominal Ledger Transaction resulting from an Expense, the full value of the Expense record will be credited to the Account specified in the Person record of the Person entered here. If you specify a Global User who does not have a Person record in the Company in which you are working, it will not be possible to establish the Account that should be credited.
- The Person whose expense claim is being entered. After entering a Person's Signature, the Person's name will be entered to the field to the right.
- Name
- The Person's Name will be brought in after you have entered their Signature in the field to the left.
- Signer
- If you need expense claims to be authorised by particular members of staff before they can be marked as OK, follow these steps:
- Assign most Persons to Access Groups in which you have explicitly denied access to the 'Authorise Expenses' Action (the Level for this Action should be "None"). This will mean that only certain Persons will be able to authorise Expenses.
- Select the Signer Required option in the Expense Settings setting. This will mean that you will not be able to mark an Expense record as OK if it hasn't been authorised.
- To authorise an Expense record, a Person able to do so should open the Expense record in a record window and select 'Authorise' from the Operations menu (Windows/macOS) or Tools menu (iOS/Android). Their Signature will be placed in the Signer field. It will now be possible to mark the Expense record as OK.
- Assign most Persons to Access Groups in which you have explicitly denied access to the 'Authorise Expenses' Action (the Level for this Action should be "None"). This will mean that only certain Persons will be able to authorise Expenses.
- Currency
- Paste Special
Currency register, System Module
- Default taken from Default Base Currency
- You can record an expense claim in any Currency. When you specify a Currency, the correct exchange rate for the Transaction Date will be shown on the 'Currency' card where you can modify it for the particular Expense record if necessary.
- You can specify a different Currency and/or Exchange Rate in an individual Expense row (flip F).
Please refer to the Expenses in Currency page for more details.
- You can record an expense claim in any Currency. When you specify a Currency, the correct exchange rate for the Transaction Date will be shown on the 'Currency' card where you can modify it for the particular Expense record if necessary.
- OK
- Tick the OK box and save the Expense record when the details of the Expense record have been checked and are correct and complete. If you have so determined in the Sub Systems setting in the Nominal Ledger and in the Number Series - Expenses setting, a corresponding Transaction will be created in the Nominal Ledger. This Transaction will include separate debit postings corresponding to the rows in the Expense record, while the full value of the Expense record will be credited to the Account specified in the Person record of the Person submitting the expense claim. Because of this, you will no longer be able to make changes to the Expense record.
- You can use Access Groups to prevent certain users from marking Expense records as OK. To do this, deny them access to the 'OK Expenses' Action.
- There are two checking processes that Expense records can pass through before you can mark them as OK. One is the authorisation process described above in the description of the Signer field. The other is the approval process that you can configure using the Approval Rules register in the Business Alerts module. Please refer to the description of the Approval Status field on the 'Misc' card for brief details about the approval process and here for full details.
- You can use Access Groups to prevent certain users from marking Expense records as OK. To do this, deny them access to the 'OK Expenses' Action.
The Expense register in Standard ERP:
- Introduction
- Entering an Expense record, including:
- Header
- 'Cost' card
- 'Currency' card
- 'Misc' card
- Header
- Inspecting Expense records, Marking as OK and Posting to the Nominal Ledger
- Expenses in Currency
- Error Messages
- Invalidating Expenses
- Registering Expenses Using Purchase Invoices
- Operations menu
- Create menu
- Home page for Expenses module manual
- Home page for Standard ERP manual
Entering an Expense Record - Cost Card
This page describes the fields on the 'Cost' card of the Expense record. Please follow the links below for descriptions of the other cards:- Header
- 'Cost' card
- 'Currency' card
- 'Misc' card
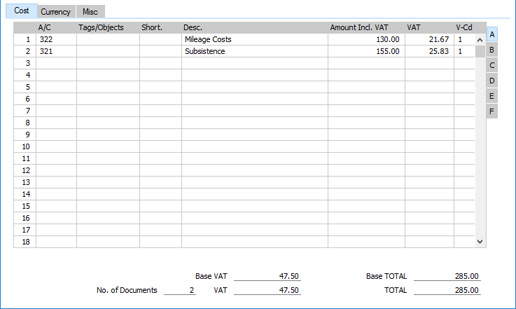
The grid is divided into six horizontal flips. When you click (Windows/Mac OS X) or tap (iOS/Android) on a flip tab (marked A-F), the two or three right-hand columns in the grid will be replaced.
If you are using iOS or Android, you can add rows by tapping the + button below the matrix. To remove a row, long tap on the row number on the left of the row and select 'Delete Row' from the resulting menu. To insert a row, long tap on the row number where the insertion is to be made and select 'Insert Row' from the resulting menu.
Flip A
- A/C
- Paste Special
Account register, System module/Nominal Ledger
- Enter the Cost Account that is to be debited in the Nominal Ledger Transaction that will be created from the Expense record. After entering an Account number, the Account name will be brought in to the Description field automatically. Use 'Paste Special' to choose from the Chart of Accounts.
- You can have an Account brought in by specifying an Account Short Code in the Short. field to the right.
- You can also enter the Code of an Autotransaction in this field. You can use Autotransactions to automate the entry of frequently-used Expense transactions, not only reducing labour but also ensuring the correct Accounts are used every time. An example Autotransaction might be one that distributes the cost of an Expense item across several Tags/Objects on a percentage basis.
- If you specify a Mileage record on flip D, the Domestic Cost Account from the Item in the Mileage Settings setting will be copied here automatically. If the Item does not have a Domestic Cost Account or you have not specified an Item in the Mileage Settings setting, the Account in the Mileage Settings setting will be brought in.
- If you specify a Daily Allowance record on flip E, the Daily Allowances A/C from the Daily Allowance Settings setting will be copied here automatically.
- You can have an Account brought in by specifying an Account Short Code in the Short. field to the right.
- Tags/Objects
- Paste Special
Tag/Object register, Nominal Ledger/System module
- You can assign up to 20 Tags/Objects, separated by commas, to a row in an Expense record, to be transferred to the consequent Nominal Ledger Transaction. You might define separate Tags/Objects to represent different departments, cost centres or product types. This provides a flexible method of analysis that can be used in Nominal Ledger reports. Usually the Tags/Objects specified here will represent the item or cost (i.e. the type of expense).
- In the Nominal Ledger Transaction generated from an Expense record, any Tags/Objects specified here will be assigned to the debit posting to the Cost Account.
- You will usually have assigned a Tag/Object to each member of personnel in the Person register. The Tag/Object for the Person submitting an Expense claim will automatically be assigned to each credit posting in the resulting Nominal Ledger Transaction. You don't need to enter the Person's Tag/Object in this field unless you want it to be assigned to the debit postings as well as to the credit postings.
- If you enter a Project on flip B and the Project has been given a Tag/Object, this Tag/Object will be copied here automatically. You can also have a Tag/Object brought in by specifying an Account Short Code in the field immediately to the right.
- If you specify a Mileage record on flip D, the Tags/Objects from the Mileage header will be copied here automatically. If the Mileage record has been connected to a Project, the Tags/Objects in that Project will have been copied to the Mileage record so they will be transferred to the Expense record.
- If you specify a Daily Allowance record on flip E and that Daily Allowance record has been connected to a Project, the Tags/Objects in that Project will be copied here automatically.
- In the Nominal Ledger Transaction generated from an Expense record, any Tags/Objects specified here will be assigned to the debit posting to the Cost Account.
- Short.
- Paste Special
Account Short Codes setting, Nominal Ledger
- You can use Short Codes to help reduce errors when selecting Accounts and Tags/Objects. You can also use them if you do not want the members of staff who work with Purchase Invoices and Expenses to have any access to the Account and Tag/Object registers (which means that they will not be able to use 'Paste Special' to choose Accounts and Tags/Objects). Enter a Short Code here to bring in the appropriate Account and Tag(s)/Object(s).
- Desc.
- Default taken from
Account
- The Account name will be entered here automatically when you specify an Account number. This text can be changed if necessary.
If you have entered a Language in the Company Info setting in the System module, you have entered an appropriate translation of the Account Name on the 'Texts' card of the Account record and you are using the Account Description in Company Language option in the Transaction Settings setting in the Nominal Ledger, then the appropriate translation of the Account Name for the Company Info Language will be brought in.
- If you specify a Mileage record on flip D, the Description from the Item in the Mileage Settings setting will be copied here automatically instead of the Account name. If you have not specified an Item in the Mileage Settings setting, the Purpose Description in the Mileage record or, if that is blank, the Comment in the Mileage record will be brought in.
- Similarly, if you specify a Daily Allowance record on flip E, the Comment from the Daily Allowance record will be copied here automatically instead of the Account name. If the Daily Allowance does not have a Comment, then the Account name will be brought in as normal (the Account will be taken from the Daily Allowance Settings setting).
- If you specify a Mileage record on flip D, the Description from the Item in the Mileage Settings setting will be copied here automatically instead of the Account name. If you have not specified an Item in the Mileage Settings setting, the Purpose Description in the Mileage record or, if that is blank, the Comment in the Mileage record will be brought in.
- Amount Incl. VAT
- Enter here the expense amount inclusive of VAT. If you have specified a Currency either in the header or in the row on flip F, this figure should be in that Currency.
- If you specify a Mileage record on flip D, the Total, cost from the Mileage footer will be copied here automatically. If the Mileage record has been connected to more than one Project, a separate row for each Project will be brought in to the Expense record. In each Expense row, the Amount Incl. VAT will be calculated by adding the Dist. Miles/Kilometers in each Mileage row related to the relevant Project together and multiplying the result by the Cost, m in the Mileage header.
- If you specify a Daily Allowance record on flip E, the TOTAL from the Daily Allowance footer will be copied here automatically.
- If you specify a Mileage record on flip D, the Total, cost from the Mileage footer will be copied here automatically. If the Mileage record has been connected to more than one Project, a separate row for each Project will be brought in to the Expense record. In each Expense row, the Amount Incl. VAT will be calculated by adding the Dist. Miles/Kilometers in each Mileage row related to the relevant Project together and multiplying the result by the Cost, m in the Mileage header.
- VAT
- VAT for this row is calculated from the Amount Incl. VAT and the VAT Code (below).
- V-Cd
- Paste Special
VAT Codes setting, Nominal Ledger
- The VAT Code entered here determines the rate at which VAT will be charged on this Expense item and the Input VAT Account to be debited.
- The default will be chosen as follows:
- If you specify an Account in the Expense row, the VAT Code will be taken from the Account record. If you have not specified a VAT Code in the Account record, the Domestic VAT Code specified on the 'VAT' card of the Account Usage P/L setting will be used.
- If you specify a Supplier on flip C, the Purch. VAT Code in the Contact record for the Supplier will be brought in. If the Supplier doesn't have a Purch. VAT Code, the appropriate VAT Code for the Zone of the Supplier will be brought in from the Account Usage P/L setting.
- If you specify a Mileage record on flip D, the default will be the Domestic VAT Code from the Item in the Mileage Settings setting. If that Item does not have a Domestic VAT Code, the Domestic VAT Code in the Item Group to which the Item belongs or in the Account Usage P/L setting will be used. If you have not specified an Item in the Mileage Settings setting, the Domestic VAT Code in the Account Usage P/L setting will be used.
- If you specify a Daily Allowance record on flip E, the VAT Code from the Daily Allowance Settings setting will be copied here automatically.
You can change this default in a particular Expense row if necessary.
- In the Nominal Ledger Transaction generated from an Expense record, this VAT Code will be assigned to the debit posting to the Account specified above. If you want it assigned to the debit posting to the Input VAT Account as well, use the Add VAT Code to VAT A/C rows option in the Transaction Settings setting in the Nominal Ledger.
- In Mexico, withholding taxes can be included in an expense claim. Enter the expense claim in the first row(s) as normal, then enter the rows containing the values of the ISR and/or VAT withholdings. In the row for the ISR withholding, specify a VAT Code that has been assigned a Tax Rule in which the VAT Type is "ISR Withholding". In the row for the VAT withholding, specify a VAT Code that has been assigned a Tax Rule in which the VAT Type is "Withholding". The expense row and the withholding rows should have the same Date, Supplier and Document No. If you produce the VAT Report Purchases (Mexico) report in the Purchase Ledger using the Include Expenses option, the expense row will be included but not the withholding rows. The ISR withholding row will not be included in files created by the 'VAT Purchases (Mexico, DIOT)' export function, while the VAT withholding row will be included in the figure for VAT withholdings for the Supplier. The VAT Report Purchases (Mexico) report and 'VAT Purchases (Mexico, DIOT)' export function will only be available when the VAT Law in the Company Info setting is "Mexican".
- The default will be chosen as follows:
Flip B
- Item
- Paste Special
Item register
- You can enter the Item Number of the purchased Item here. If you have specified a Project in the field to the right, this information will be used by the Job Costing module, as described in the description of the Project field.
- If you specify a Mileage record on flip D, the Item from the Mileage Settings setting will be copied here automatically. This Item will determine the A/C and VAT Codes on flip A. If the Item does not have a Domestic Cost Account or VAT Code or you have not specified an Item in the Mileage Settings setting, the Account and VAT Code will be copied from the Mileage Settings setting.
- If you specify a Daily Allowance record on flip E, the Item from the Daily Allowance Settings setting will be copied here automatically.
- If you specify a Mileage record on flip D, the Item from the Mileage Settings setting will be copied here automatically. This Item will determine the A/C and VAT Codes on flip A. If the Item does not have a Domestic Cost Account or VAT Code or you have not specified an Item in the Mileage Settings setting, the Account and VAT Code will be copied from the Mileage Settings setting.
- Qty
- Enter the quantity of the Item that you purchased here.
- If you specify a Mileage record on flip D, the Total, Miles/Kilometers from the Mileage footer will be copied here automatically. If the Mileage record has been connected to more than one Project, a separate row for each Project will be brought in to the Expense record. In each Expense row, the Qty will be the sum of the Dist. Miles/Kilometers in each Mileage row related to the relevant Project. The Qty field will only be filled in if you have specified an Item in the Mileage Settings setting.
- If you specify a Daily Allowance record on flip E, the Default Quantity from the Daily Allowance Settings setting will be copied here automatically.
- If you specify a Mileage record on flip D, the Total, Miles/Kilometers from the Mileage footer will be copied here automatically. If the Mileage record has been connected to more than one Project, a separate row for each Project will be brought in to the Expense record. In each Expense row, the Qty will be the sum of the Dist. Miles/Kilometers in each Mileage row related to the relevant Project. The Qty field will only be filled in if you have specified an Item in the Mileage Settings setting.
- Project
- Paste Special
Project register, Job Costing module (if installed)
- If you are using the Job Costing module, you can enter a Project Number if you need to connect the Expense row to a Project.
- If you enter a Project, you must also enter an Item and Quantity.
- When you mark an Expense record as OK and save it, separate Project Transactions will be created for each row in which you have specified a Project, Item and Quantity. These Project Transactions allow the cost of the Expenses to be included when producing cost analysis reports for the Project in the Job Costing module. Depending on how the Project has been configured, the Project Transactions will also ensure that the Customer will be invoiced for the Expenses. If you invalidate the Expense record, the Project Transaction(s) will be deleted. You will not be able to invalidate the Expense if the Project Transaction has already been invoiced Please refer here for full details.
- If the Project has been given a Tag/Object, this will be copied to the Tags/Objects field on flip A of the Expense row.
- If you specify a Mileage record on flip D, Projects will be brought in as follows:
- If you have specified a Project in the header of the Mileage record, that Project will be copied here automatically.
- If you have specified a Project in the header of the Mileage record and a different Project in at least one of the rows (on flip C), separate rows for each Project will be added to the Expense record. The row with the Project from the Mileage header will include Mileage rows in which the Project field is blank.
- If you have not specified a Project in the header of the Mileage record but you have specified a Project in at least one of the rows (on flip C), separate rows for each Project will be added to the Expense record. This will include a row in which the Project is blank, which will be created from Mileage rows in which the Project field is blank.
If separate rows for each Project are not added for each Project as described in points 2 and 3 above, the probable cause is that you have not entered an Item in the Mileage Settings setting. If you will be connecting Mileage records to Projects so that travel can be charged to those Projects, it is strongly recommended that you specify an Item in the Mileage Settings setting. Doing so will ensure that Mileage records, Expense records and Projects are correctly connected as described in points 2 and 3.
- If you specify a Daily Allowance record on flip E, the Project from the Daily Allowance header will be copied here automatically. If that Project has been given a Tag/Object, that Tag/Object will be copied to the Tags/Objects field on flip A.
- If you enter a Project, you must also enter an Item and Quantity.
Flip C
- Date
- Paste Special
Choose date
- If an Expense claim is supported by a receipt or invoice, enter the date of the receipt or invoice here. This Date cannot be later than the Transaction Date in the header.
- If you have specified a Currency on flip F, entering a Date in this field will cause the appropriate Exchange Rate for that date to be brought in, also on flip F.
- If the Currency in a row is blank, that row will use the Currency specified in the header. If you specify a Date in a row in which the Currency is blank, the Default Base Currency will be brought in to that row automatically. If the Currency in the header is not the Default Base Currency, this in effect changes the Currency in the row from the header Currency to the Default Base Currency. So, you may need to change the row Currency after specifying the Date. If you have not specified a Default Base Currency, the Currency in the row will remain blank when you specify a Date.
- The Date field can be important in an Expense record in Currency, if you have not specified a Default Base Currency. If the Exchange Rate changes between this Date and the Transaction Date in the header, and if you are using the Expense Date Rate for Cost Accounting option in the Expense Settings setting, the difference will be posted to the Rate Gain Account or Rate Loss Account (as appropriate) on the 'Exchange Rate' card of the Account Usage P/L setting. Please refer to the Expenses in Currency page for more details and an example.
- If you have specified a Currency on flip F, entering a Date in this field will cause the appropriate Exchange Rate for that date to be brought in, also on flip F.
- Supplier
- Paste Special
Suppliers in Contact register
- If an Expense claim is supported by a receipt or invoice, enter the Supplier from the receipt or invoice here. The VAT Reg. No. and Name from the Contact record for the Supplier will be brought in to the Identifier and Supplier Name fields.
- Specifying a Supplier will have no consequences in the Purchase Ledger. If you need there to be consequences in the Purchase Ledger (e.g. you need an expense with a VAT element that is paid by an employee to be included in Purchase Ledger VAT reports, or you need expenses to appear in the Periodic Supplier Statement), then do not record the expense in an Expense record. Instead, record it as a Purchase Invoice and use a Payment Term in which the Type is "Employee". Please refer to the Registering Expenses Using Purchase Invoices page for more details.
- Specifying a Supplier will have no consequences in the Purchase Ledger. If you need there to be consequences in the Purchase Ledger (e.g. you need an expense with a VAT element that is paid by an employee to be included in Purchase Ledger VAT reports, or you need expenses to appear in the Periodic Supplier Statement), then do not record the expense in an Expense record. Instead, record it as a Purchase Invoice and use a Payment Term in which the Type is "Employee". Please refer to the Registering Expenses Using Purchase Invoices page for more details.
- Identifier
- The Supplier's VAT Reg. No. will be brought in to this field when you specify a Supplier in the field above. You can also enter the VAT Reg. No. from the supporting receipt or invoice yourself.
- Supplier Name
- The Supplier's Name will be brought in to this field when you specify a Supplier in the field above.
- Document No.
- If an Expense claim is supported by a receipt or invoice, enter the receipt or invoice number here.
- When you save an Expense record, a check will be made that you have not already used the Document No. with the same Supplier in a previous Expense record or Purchase Invoice (as the Supp. Inv. No.). If you have, you will be warned "Document with this number already exists", but the record will still be saved. If you want to prevent the saving of such an Expense record altogether, use the Disallow Invoices with Same Supp. Invoice No. option in the Account Usage P/L setting in the Purchase Ledger. This will help reduce the risk of entering the same document more than once, as a Purchase Invoice and/or as part of an Expense claim.
Flip D
- Mileage
- Paste Special
Mileage register, Expenses module
- Use this field when you need to support an expense claim for mileage with the details of the journeys you have made. First, enter the journey details in a new record in the Mileage register. Then, enter the Number of the Mileage record here. The Total, Cost and Total, Miles/Kilometers from the Mileage footer will be brought in to the Amount Incl VAT field on flip A and the Qty field on flip B respectively. The Tag/Object from the Mileage header will be brought in to the Tags/Objects field on flip A. The VAT Code will be brought in from the Item specified in the Mileage Settings setting, from the Item Group to which that Item belongs or from the Account Usage P/L setting. The A/C will be taken from that Item's Domestic Cost Account or from the Mileage Settings setting. Finally, the Description will be brought in from the Item in the Mileage Settings setting, and the Item itself will be brought in to the Item field on flip B. If you have not specified an Item in the Mileage Settings setting, the Purpose Description in the Mileage record or, if that is blank, the Comment in the Mileage record will be brought in.
- If the Mileage record has been connected to a Project or Projects, those Projects will be brought in as described in the description of the Project field on flip B.
- If the Item and Qty fields remain empty after you have specified a Mileage record, the probable cause is that you have not entered an Item in the Mileage Settings setting.
- If the Mileage record has been connected to a Project or Projects, those Projects will be brought in as described in the description of the Project field on flip B.
- Tax Auth. ID, Tax Auth. ID CC
- These fields are used in Bolivia. If an Expense claim is supported by a receipt or invoice, enter the Tax Authority ID and Control Code of the document in these fields. This information will be included in the VAT Report Purchases (Bolivia) report and in the file created by the 'P/L VAT Invoices (Bolivia)' export function, both in the Purchase Ledger. This report and export function will only be available when the VAT Law in the Company Info setting is "Bolivian".
Flip E
- Reference
- In most countries, this field allows you to add a comment to an expense claim.
- In Mexico, the Reference will be included in the VAT Purchases Report (Mexico) if you produce it using the Include Expenses and IETU Purchase Report Format options. This report will only be available when the VAT Law in the Company Info setting is "Mexican".
- In Mexico, the Reference will be included in the VAT Purchases Report (Mexico) if you produce it using the Include Expenses and IETU Purchase Report Format options. This report will only be available when the VAT Law in the Company Info setting is "Mexican".
- DA No.
- Paste Special
Daily Allowance register, Expenses module
- Use this field when you are submitting an expense claim for Daily Allowances that you have become entitled to while travelling. First, enter the details of the Daily Allowances you are claiming in a new record in the Daily Allowance register. Then, enter the Number of the Daily Allowance record here. The TOTAL from the Daily Allowance footer will be brought in to the Amount Incl VAT field on flip A, while the Project from the Daily Allowance header will be brought in to the Project field on flip B. The Account, VAT Code, Qty and Item will be brought in from the Daily Allowance Settings setting. Finally, the Description will be brought in from the Daily Allowance record or from the Account.
- Note that the Daily Allowance record does not have a Currency field. Therefore you should take care when connecting a Daily Allowance record to a row in an Expense row that the Currency used by the row is correct (i.e. that the Currency on flip F of the Expense row or, if that is blank, the Currency in the Expense header is correct).
Flip F
- Sum
- The Sum field is the same field as Amount Incl. VAT on flip A.
- B. Cur.
- Paste Special
Currency register, System module
- Specify the Currency of the expense claim here, if it is different to the Currency in the header. This allows you to claim expenses in different Currencies in the same record.
- Exchange Rates and Base Currency Rates for the Date specified on flip C will be brought in to the fields on the right.
- You can leave this field blank if the row is to use the Currency specified in the header. However, if you have specified a Date on flip C, you will need to enter a Currency here, even if it is the same as the header Currency.
- Please refer to the Expenses in Currency page for more details.
- Exchange Rates and Base Currency Rates for the Date specified on flip C will be brought in to the fields on the right.
Footer
- No. of Documents
- Enter here the number of receipts or other documents that you have in support of this expense claim. This is for information only. If you need this information to be printed on Expense forms, include the "Number of Other Papers" field in your Form Template design.
- Base VAT
- The VAT sum, calculated from the Expense rows, expressed in Base Currency 1.
- VAT
- The VAT sum, calculated from the Expense rows, expressed in the header Currency.
- Base TOTAL
- The total value of the Expense claim, including any taxes, expressed in Base Currency 1.
- TOTAL
- The total value of the Expense claim, including any taxes, expressed in the header Currency.
The Expense register in Standard ERP:
- Introduction
- Entering an Expense record, including:
- Header
- 'Cost' card
- 'Currency' card
- 'Misc' card
- Header
- Inspecting Expense records, Marking as OK and Posting to the Nominal Ledger
- Expenses in Currency
- Error Messages
- Invalidating Expenses
- Registering Expenses Using Purchase Invoices
- Operations menu
- Create menu
- Home page for Expenses module manual
- Home page for Standard ERP manual
Entering an Expense Record - Currency Card
This page describes the fields on the 'Currency' card of the Expense record. Please follow the links below for descriptions of the other cards:---

- Currency
- Paste Special
Currency register, System Module
- Default taken from Default Base Currency
- The Currency of the Expense claim, also shown in the header. You can record an expense claim in any Currency, and you can specify a different Currency and/or Exchange Rate in an individual Expense row (flip F).
- The Currency of the Expense claim, also shown in the header. You can record an expense claim in any Currency, and you can specify a different Currency and/or Exchange Rate in an individual Expense row (flip F).
- Exchange Rates
- Default taken from
Base Currency Rates setting and/or Exchange Rate register, System module
- The exchange rates for the specified Currency for the Transaction Date of the Expense record will be entered here when you specify the Currency.
- One of two conversion methods will be used. The Dual-Base system will be useful for companies that have offices in two countries that need to report in both Currencies, for companies operating in countries where there is a second Currency (usually the US Dollar or Euro) in common use in addition to the national one, and for companies in the Euro zone who retain their old national Currency for comparison purposes. The second method is a simple conversion from the foreign Currency to the home Currency, applicable to the majority of worldwide Currency transactions. These are described below.
- Exchange Rates (Dual-Base System)
- If you are using the Dual-Base system, the Base Currency 1 and 2 fields on the left will show in the form of a ratio the exchange rate between the two base Currencies (taken from the record in the Base Currency Rates setting applying on the Transaction Date).
- If the Currency is not Base Currency 1 or 2, the Rate and right-hand Base Currency 1 or Base Currency 2 fields will show the exchange rate between that Currency and Base Currency 1 or 2.
- Note that European Monetary Union (EMU) regulations specify that the ratios must always show how many units of the home or foreign Currency can be bought with one Euro.
- If the Currency is not Base Currency 1 or 2, the Rate and right-hand Base Currency 1 or Base Currency 2 fields will show the exchange rate between that Currency and Base Currency 1 or 2.
- Exchange Rates (Simple Currency Conversion System)
- In the case of a simple currency conversion system, the Rate and right-hand Base Currency 1 fields will show a simple exchange rate between the foreign and home Currencies.
- One of two conversion methods will be used. The Dual-Base system will be useful for companies that have offices in two countries that need to report in both Currencies, for companies operating in countries where there is a second Currency (usually the US Dollar or Euro) in common use in addition to the national one, and for companies in the Euro zone who retain their old national Currency for comparison purposes. The second method is a simple conversion from the foreign Currency to the home Currency, applicable to the majority of worldwide Currency transactions. These are described below.
The Expense register in Standard ERP:
- Introduction
- Entering an Expense record, including:
- Inspecting Expense records, Marking as OK and Posting to the Nominal Ledger
- Expenses in Currency
- Error Messages
- Invalidating Expenses
- Registering Expenses Using Purchase Invoices
- Operations menu
- Create menu
- Home page for Expenses module manual
- Home page for Standard ERP manual
Entering an Expense Record - Misc Card
This page describes the fields on the 'Misc' card of the Expense record. Please follow the links below for descriptions of the other cards:- Header
- 'Cost' card
- 'Currency' card
- 'Misc' card

- Approval Status
- You can use the Approval Rules register in the Business Alerts module to configure an approval process that Expense records must pass through. For example, particular managers may need to check and approve every Expense record in which the TOTAL is greater than a certain value. If you are using such an approval process, this field will display the stage in the process that a particular Expense record has reached.
If an Expense record needs to pass through an approval process, the following functions will be disabled until the approval process has been completed:
- Printing the Expense record.
- Marking the Expense record as OK.
- Creating a Mail from the Expense record.
In brief, the Approval Status of an Expense record can be any of the following:
- Not Required
- The Expense record does not need to pass through an approval process, so the functions listed above will be available immediately.
- Not Requested
- The Expense record does need to pass through an approval process, and you have not yet started that process. To start the process, save any changes and then choose 'Request Approval' from the Operations menu (Windows/Mac OS X) or Tools menu (iOS/Android).
- Pending
- The Expense record has been entered into the approval process, and is waiting to be approved or rejected. If you need to check the progress of the approval process, select Expense Status' from the Operations or Tools menu.
- If the Status of the Expense record is Pending, you will usually not be able to modify it. If you need certain users to be able to modify Pending records, use Access Groups to grant them Full access to the 'Change Record Header when Approval Status is Pending' and/or 'Change Record Matrix when Approval Status is Pending' Actions.
- If the Status of the Expense record is Pending, you will usually not be able to modify it. If you need certain users to be able to modify Pending records, use Access Groups to grant them Full access to the 'Change Record Header when Approval Status is Pending' and/or 'Change Record Matrix when Approval Status is Pending' Actions.
- Approved
- The approval process has been completed and the Expense record has been approved. The functions listed above will be available.
- Rejected
- The approval process has been completed and the Expense record has been rejected.
Please refer here for full details.
- Printing the Expense record.
The Expense register in Standard ERP:
- Introduction
- Entering an Expense record, including:
- Header
- 'Cost' card
- 'Currency' card
- 'Misc' card
- Header
- Inspecting Expense records, Marking as OK and Posting to the Nominal Ledger
- Expenses in Currency
- Error Messages
- Invalidating Expenses
- Registering Expenses Using Purchase Invoices
- Operations menu
- Create menu
- Home page for Expenses module manual
- Home page for Standard ERP manual
Inspecting Expense records, Marking as OK and Posting to the Nominal Ledger
After entering an Expense record and checking that it is correct, you should mark it as OK and save it. If so defined in the Sub Systems setting in the Nominal Ledger and in the Number Series - Expenses setting, the Expense will be posted to the Nominal Ledger (i.e. a Nominal Ledger Transaction will be generated from it automatically, posting to the Cost and VAT Accounts and the Person's Account for advances and settlements). The Expense record will then be locked, so that you will no longer be able to make any changes.There are two ways to mark an Expense record as OK:
- When viewing an Expense record, tick the OK check box and then save the record; or
- Highlight an Expense record in the 'Expenses: Browse' window and select 'OK' from the Operations menu (Windows/Mac OS X) or Tools menu (iOS/Android). If you are using Windows or Mac OS X, you can highlight a batch of Expense records to mark as OK at a single stroke by holding down the Shift key while clicking. If you need to apply the function to a number of Expense records that aren't in a range, highlight them while holding the Ctrl (Windows) or ⌘ (Mac OS X) keys before selecting the function. If you are using iOS or Android, you can only highlight a single Expense record at a time, by searching for it, so you can only mark a single Expense record as OK at a time.
You can use Access Groups to prevent certain users from marking Expense records as OK using either method. To do this, deny them access to the 'OK Expenses' Action.
If you need Expenses to pass through an approval process before you can mark them as OK, you can configure such a process using the Approval Rules register in the Business Alerts module. Please refer to the description of the Approval Status field on the 'Misc' card for brief details about the approval process and here for full details.
An example Nominal Ledger Transaction created from an Expense record is shown below. The Transaction will include separate debit postings corresponding to the rows in the Expense record, while the full value of the Expense record will be credited to the Account specified in the Person record of the Person submitting the expense claim (i.e. the Person mentioned in the header of the Expense record). If appropriate, the Transaction will also include debit postings to VAT Input Account(s).
Tags/Objects on the debit side will be taken from the corresponding row in the Expense record, while those on the credit side will be taken from the 'Accounts' card of the Person record.
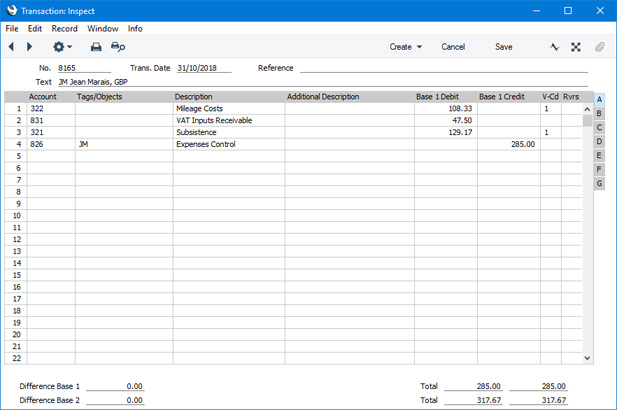
As shown in the illustration above, the VAT Code will be copied to the Transaction rows debiting the Cost Accounts. If you would like it to be copied to the Transaction row debiting the VAT Input Account as well, use the Add VAT Code to VAT A/C rows option in the Transaction Settings setting in the Nominal Ledger.
---
The Expense register in Standard ERP:
- Introduction
- Entering an Expense record
- Inspecting Expense records, Marking as OK and Posting to the Nominal Ledger
- Expenses in Currency
- Error Messages
- Invalidating Expenses
- Registering Expenses Using Purchase Invoices
- Operations menu
- Create menu
- Home page for Expenses module manual
- Home page for Standard ERP manual
Expenses in Currency
When you enter an Expense record in Currency, the Currency and Exchange Rate in the header will by default be applied to every row in the Expense record. However, you can change the Exchange Rate or even the Currency in a particular row.One issue that will often arise is that the Exchange Rate on the 'Currency' card of an Expense record (i.e. the Exchange Rate applying on the Transaction Date of the Expense, which will often be the date when the expense claim was submitted) will not be the same as the Exchange Rate on the date when a transaction listed in the Expense record took place.
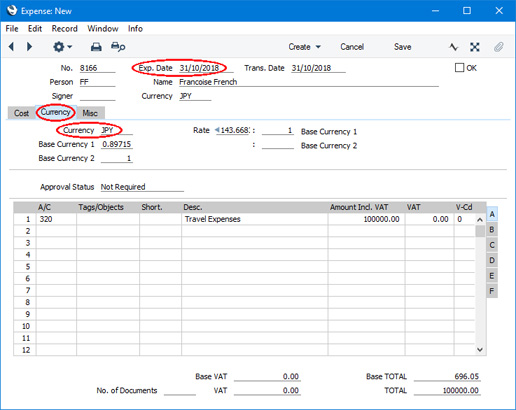
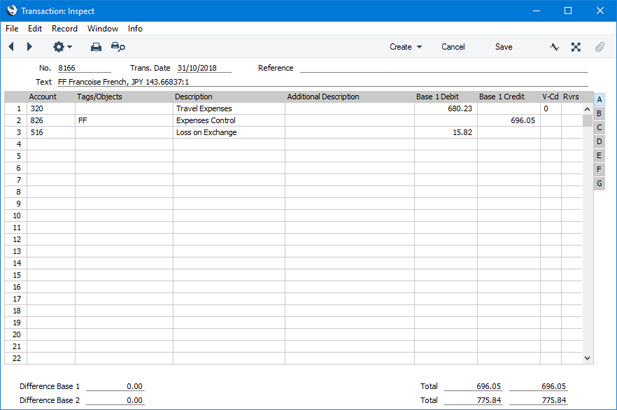
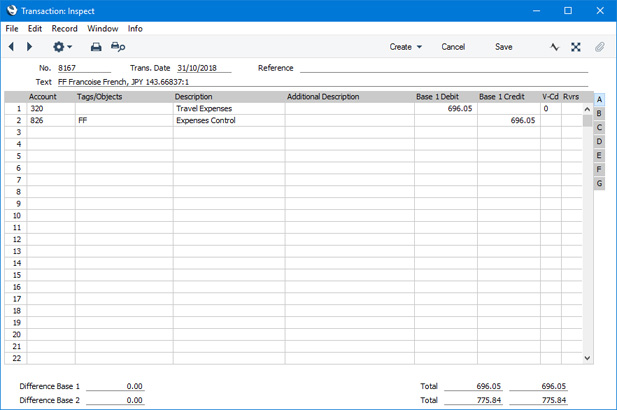
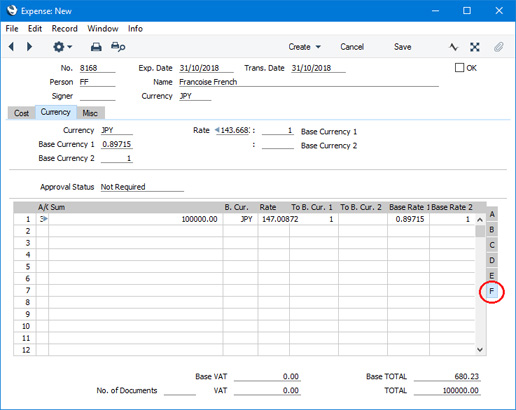
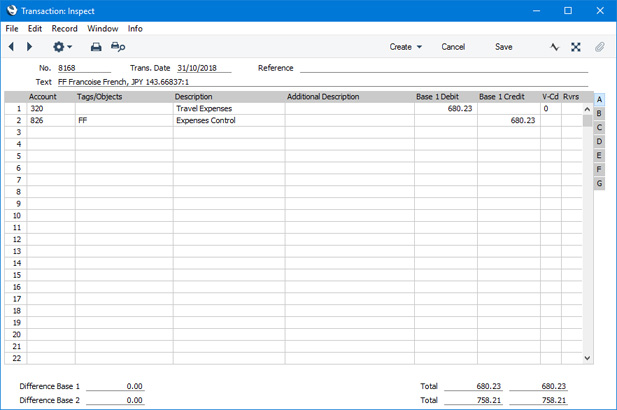
For example, an employee submits an expense claim dated Oct 31. The claim includes a receipt for JPY 100000 (Japanese Yen) dated Oct 15, when JPY 147.00872 buys one GBP (Base Currency 1). So, the receipt was worth GBP 680.23 when it was issued. However, on Oct 31 (the date of the expense claim), one GBP buys JPY 143.66837, so JPY 100000 will then convert to GBP 696.05.
Enter the Expense record as shown below. Enter the date of the expense claim (Oct 31) and the Currency (JPY) in the header:
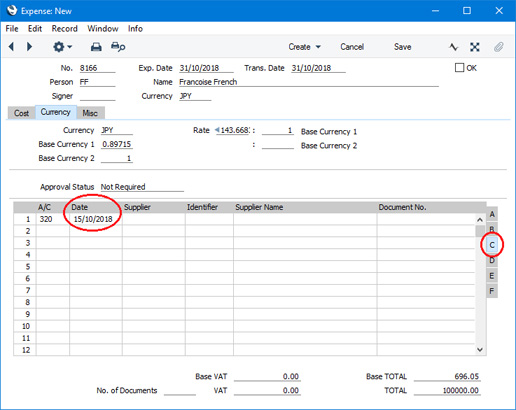
When you mark the Expense record as OK and save it, the value of the postings in the resulting Nominal Ledger Transaction will depend on the Expense Date Rate for Cost Accounting option in the Expense Settings setting. If you are using this option, the liability to the employee (Account 826 in the example) will be calculated using the Exchange Rate for the date of the expense claim (Oct 31), while the amount posted to the Cost Account (320 in the example) will be calculated using the Exchange Rate for the date of the receipt (Oct 15). The difference will be posted to the Rate Gain Account or Rate Loss Account (as appropriate) from the 'Exchange Rate' card of the Account Usage P/L setting:
If you mix Currencies in an Expense record, you can only do so by specifying Currencies on flip F. Therefore, the Expense Date Rate for Cost Accounting option will again be bypassed.
---
The Expense register in Standard ERP:
- Introduction
- Entering an Expense record
- Inspecting Expense records, Marking as OK and Posting to the Nominal Ledger
- Expenses in Currency
- Error Messages
- Invalidating Expenses
- Registering Expenses Using Purchase Invoices
- Operations menu
- Create menu
- Home page for Expenses module manual
- Home page for Standard ERP manual
Error Messages
Whenever you save an Expense record, a number of checks will be carried out, in order to help reduce errors. If an Expense record fails any of these tests, an error message will appear. For example, you cannot save an Expense record if any of the following apply:- The Person field is empty or contains a Signature that doesn't exist in the Person register.
- An Account has not been specified on the 'Accounts' card in the relevant Person record (this check will only be carried out when saving an Expense record that has been marked as OK).
- The A/C field in any row in which you have entered an Amount Incl. VAT is empty or contains an Account Number that doesn't exist in the Account register.
- The V-Cd field in any row contains a VAT Code that doesn't exist in the VAT Codes setting.
- The Tags/Objects field in any row contains an Object Code that doesn't exist in the Object register.
- If you are using Number Series, the No. does not belong to a number sequence that is valid for the Transaction Date.
- Depending on the options you are using, the Document No. may be checked to ensure you haven't already used it with the same Supplier, in another Expense record or in a Purchase Invoice.
The program cannot post to non-existent Accounts, to prevent accounting errors.
---
The Expense register in Standard ERP:
- Introduction
- Entering an Expense record
- Inspecting Expense records, Marking as OK and Posting to the Nominal Ledger
- Expenses in Currency
- Error Messages
- Invalidating Expenses
- Registering Expenses Using Purchase Invoices
- Operations menu
- Create menu
- Home page for Expenses module manual
- Home page for Standard ERP manual
Invalidating Expenses
This page describes invalidating Expense records.---
In some circumstances it can be appropriate to invalidate an Expense record. To do this, open the Expense in a record window and select 'Invalidate' from the Record menu (which has a 'cog' icon if you are using iOS or Android). This function will remove the Expense record from all reports; and any associated Nominal Ledger Transaction will be removed from the Nominal Ledger as well. An invalidated Expense record is easily distinguished because all fields have red lines drawn through them. These red lines are also shown in the 'Expenses: Browse' window.
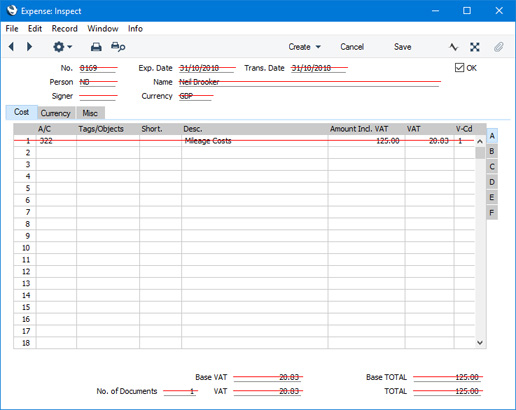
If a Project Transaction has been created from the Expense record, it will be deleted when you invalidate the Expense record. You will not be able to invalidate the Expense record if the Project Transaction has been invoiced.
You can use Access Groups to prevent certain users from invalidating Expense records. To do this, deny them access to the 'Invalidate Expenses' Action.
---
The Expense register in Standard ERP:
- Introduction
- Entering an Expense record
- Inspecting Expense records, Marking as OK and Posting to the Nominal Ledger
- Expenses in Currency
- Error Messages
- Invalidating Expenses
- Registering Expenses Using Purchase Invoices
- Operations menu
- Create menu
- Home page for Expenses module manual
- Home page for Standard ERP manual
Registering Expenses Using Purchase Invoices
If an employee pays and claims an expense that should be assigned to a Supplier, you can process it in two ways:- You can record the expense in an Expense record and specify the Supplier and Invoice Number on flip C (use the Document No. field for the Invoice Number).
- You can record the expense in a Purchase Invoice.
- Create a Payment Term in which the Type is "Employee":
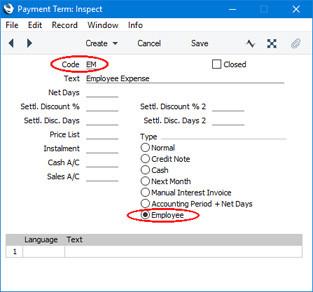
- Enter a new Purchase Invoice and specify the Supplier and cost in the usual way.
- Specify the Payment Term from step (i). A row will be added to the Purchase Invoice where you can enter the Signature of the Person who paid the Invoice:
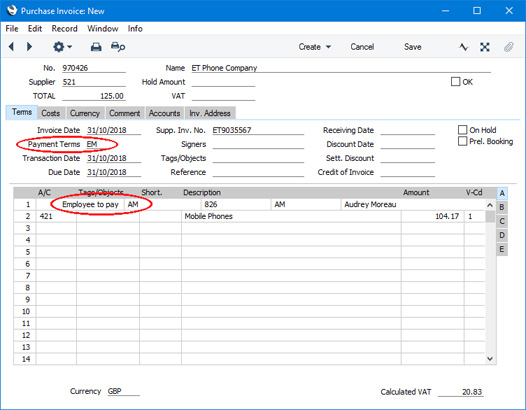
- When you mark the Purchase Invoice as OK and save, the resulting Nominal Ledger Transaction will credit the Account from the relevant Person record ('Accounts' card). The Person's Tag/Object will be assigned to the credit posting(s).
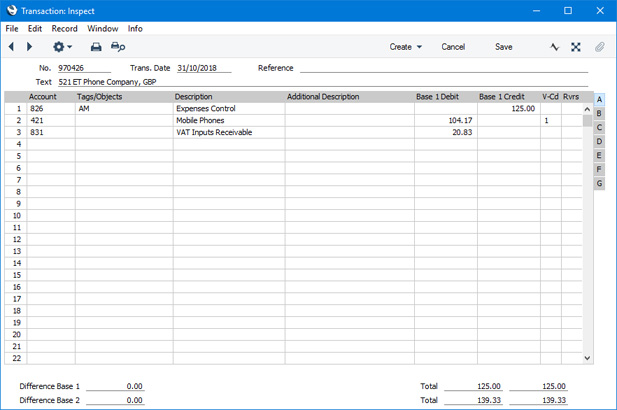
- As suggested by the Nominal Ledger Transaction, the Purchase Invoice will immediately be treated as paid so in that respect it is similar to a Cash Note.
- The Purchase Invoice will be included in the Periodic Personnel Statement for the Person (marked as "P/INV") and in the Periodic Supplier Statement for the Suppler (marked as "CASH"). It will also be included in Purchase Ledger VAT reports.
The Expense register in Standard ERP:
- Introduction
- Entering an Expense record
- Inspecting Expense records, Marking as OK and Posting to the Nominal Ledger
- Expenses in Currency
- Error Messages
- Invalidating Expenses
- Registering Expenses Using Purchase Invoices
- Operations menu
- Create menu
- Home page for Expenses module manual
- Home page for Standard ERP manual
Operations Menu - Expenses

If you are using Windows or Mac OS X, you can open the Operations menu by clicking the button with the 'cog' icon (shown highlighted in the illustration above). If you are using iOS or Android, you can access the Operations menu functions through the Tools menu (with 'wrench' icon).
Before using the functions on the Operations menu in the 'Expenses: Browse' window, you should highlight a record or records in the browse window. The function will then be applied to that record or records. If you are using Windows or Mac OS X, you can highlight several Expenses in the list by holding down the Shift key while clicking. If you need to apply a function to a number of Expenses that aren't in a range, highlight them while holding the Ctrl (Windows) or ⌘ (Mac OS X) keys before selecting the function. If you are using iOS or Android, you can highlight a single record in the browse window by searching for it, so you can only apply these functions to a single record at a time.
Please follow the links below for details about each function on the Operations menu:
- OK
- Open NL Transaction
- Authorise
- Expense Status
- Connect to Personnel Payment
- Request Approval
- Cancel Approval Request
The Expense register in Standard ERP:
- Introduction
- Entering an Expense record
- Inspecting Expense records, Marking as OK and Posting to the Nominal Ledger
- Expenses in Currency
- Error Messages
- Invalidating Expenses
- Registering Expenses Using Purchase Invoices
- Operations menu
- Create menu
- Home page for Expenses module manual
- Home page for Standard ERP manual
Operations Menu - Expenses - OK
This page describes the 'OK' function on the Operations menu in the 'Expenses: Browse' window. If you are using iOS or Android, the 'OK' function is on the Tools menu (with 'wrench' icon).---
The 'OK' command is only available on the Operations menu in the 'Expenses: Browse' window. It allows you to mark Expense records as OK from the 'Expenses: Browse' window.
If you are using Windows or Mac OS X, you can use this function to mark Expense records as OK in batches. Simply highlight a range of Expense records in the browse window and select the function. To highlight a range of Expense records, click the top one in the range and then hold down the Shift key and click the last one. If you need to apply the function to a number of Expense records that aren't in a range, highlight them while holding the Ctrl (Windows) or ⌘ (Mac OS X) keys before selecting the function.
If you are using iOS or Android, you can only highlight a single Expense record at a time, by searching for it, so you can only mark a single Expense record as OK at a time.
When you select the function, each highlighted Expense record will be marked as OK immediately. Remember that, if so defined in the Sub Systems setting in the Nominal Ledger and in the Number Series - Expenses setting, this action will cause Nominal Ledger Transactions to be created for each Expense record in the selection and that therefore once it has been carried out you will no longer be able to modify those Expense records.
If you are using the Signer Required option in the Expense Settings setting, any highlighted Expense records in which the Signer field is empty will not be marked as OK, and messages will appear to let you know. To fill the Signer field in an Expense record, a Person with sufficient access privileges should open the record and select 'Authorise' from the Operations or Tools menu. The Person's Signature will be placed in the Signer field, and it will now be possible to mark the Expense record as OK.
You can use Access Groups to prevent certain users from marking Expense records as OK. To do this, deny them access to the 'OK Expenses' Action.
Messages will also appear if any of the Expense records you have selected need to pass through an approval process before you can mark them as OK, to let you know that the function has ignored such Expense records. You can configure approval processes using the Approval Rules register in the Business Alerts module. Please refer to the description of the Approval Status field on the 'Misc' card for brief details about the approval process and here for full details.
---
The Expense register in Standard ERP:
- Introduction
- Entering an Expense record
- Inspecting Expense records, Marking as OK and Posting to the Nominal Ledger
- Expenses in Currency
- Error Messages
- Invalidating Expenses
- Registering Expenses Using Purchase Invoices
- Operations menu, including:
- OK
- Open NL Transaction
- Authorise
- Expense Status
- Connect to Personnel Payment
- Request Approval
- Cancel Approval Request
- OK
- Create menu
- Home page for Expenses module manual
- Home page for Standard ERP manual
Operations Menu - Expense - Open NL Transaction
This page describes the 'Open NL Transaction' function on the Operations menu in the Expense record window. If you are using iOS or Android, the 'Open NL Transaction' function is on the Tools menu (with 'wrench' icon).---
When you mark an Expense record as OK and save it, a Nominal Ledger Transaction will be created (if so defined in the Sub Systems setting in the Nominal Ledger and in the Number Series - Expenses setting),. The 'Open NL Transaction' function allows you to view that Transaction from the Expense record.
When you select the function from the Operations menu (Windows/Mac OS X) or Tools menu (iOS/Android, the Transaction will be opened in a new window.
You can use Access Groups to prevent certain users from opening Nominal Ledger Transactions from Expense records. To do this, deny them access to the 'Open Transactions from Operations Menu' Action or to the Nominal Ledger altogether.
---
The Expense register in Standard ERP:
- Introduction
- Entering an Expense record
- Inspecting Expense records, Marking as OK and Posting to the Nominal Ledger
- Expenses in Currency
- Error Messages
- Invalidating Expenses
- Registering Expenses Using Purchase Invoices
- Operations menu, including:
- OK
- Open NL Transaction
- Authorise
- Expense Status
- Connect to Personnel Payment
- Request Approval
- Cancel Approval Request
- OK
- Create menu
- Home page for Expenses module manual
- Home page for Standard ERP manual
Operations Menu - Expense - Authorise
This page describes the 'Authorise' function on the Operations menu in the Expense record window. If you are using iOS or Android, the 'Authorise' function is on the Tools menu (with 'wrench' icon).---
Once you have entered an Expense record, you can authorise it before marking it as OK. If you need it to be mandatory that Expense records are authorised before they can be marked as OK, select the Signer Required option in the Expense Settings setting. To authorise an Expense record, open it in a record window and select 'Authorise' from the Operations menu (Windows/Mac OS X) or Tools menu (iOS/Android). Your Signature will be placed in the Signer field in the header. Then, tick the OK box and save by clicking the [Save] button (Windows/Mac OS X) or tapping √ (iOS/Android).
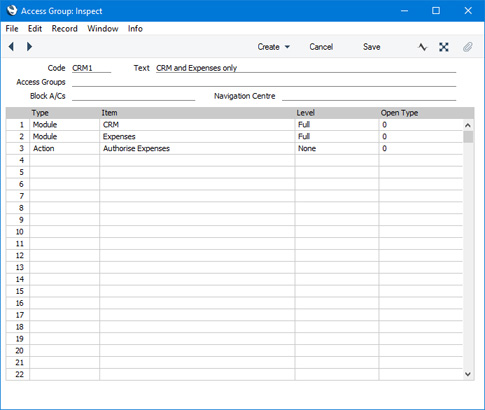
You can use the Access Groups setting in the System module to restrict the use of the 'Authorise' function to certain members of staff. To do this, first move to the System module using the [Switch Module] button in the Navigation Centre and then open a record in the Access Groups setting. If the Access Group will be assigned to Persons whose Start Access Level is "No Access", you should use the grid to allow members of that Access Group to use particular features:
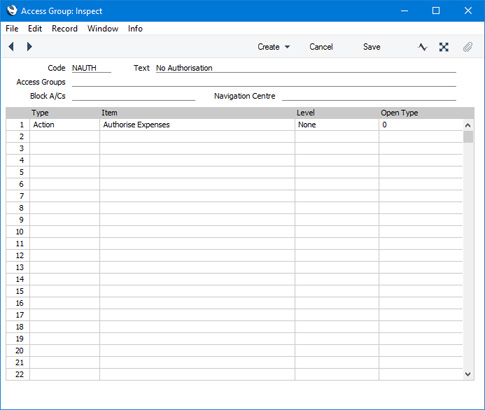
If the Access Group will be assigned to Persons whose Start Access Level is "Full Access", you should use the grid to prevent members of that Access Group from using particular features:
---
The Expense register in Standard ERP:
- Introduction
- Entering an Expense record
- Inspecting Expense records, Marking as OK and Posting to the Nominal Ledger
- Expenses in Currency
- Error Messages
- Invalidating Expenses
- Registering Expenses Using Purchase Invoices
- Operations menu, including:
- OK
- Open NL Transaction
- Authorise
- Expense Status
- Connect to Personnel Payment
- Request Approval
- Cancel Approval Request
- OK
- Create menu
- Home page for Expenses module manual
- Home page for Standard ERP manual
Operations Menu - Expense - Expense Status
This page describes the 'Expense Status' function on the Operations menu in the Expense record window. If you are using iOS or Android, the 'Expense Status' function is on the Tools menu (with 'wrench' icon).---
The 'Expense Status' command will be useful when an Expense record needs to go through an approval process before you can mark it as OK or print it. If you need to monitor the approval process for a particular Expense record, open the Expense record in a record window and then select 'Expense Status' from the Operations menu (Windows/Mac OS X) or Tools menu (iOS/Android). A report will be printed to screen, listing any Approval Request Activities that have been created from the Expense record and the status of each one. Please refer to the description of the Approval Status field on the 'Misc' card of the Expense window for brief details about the approval process and here for full details.
---
The Expense register in Standard ERP:
- Introduction
- Entering an Expense record
- Inspecting Expense records, Marking as OK and Posting to the Nominal Ledger
- Expenses in Currency
- Error Messages
- Invalidating Expenses
- Registering Expenses Using Purchase Invoices
- Operations menu, including:
- OK
- Open NL Transaction
- Authorise
- Expense Status
- Connect to Personnel Payment
- Request Approval
- Cancel Approval Request
- OK
- Create menu
- Home page for Expenses module manual
- Home page for Standard ERP manual
Operations Menu - Expense - Connect to Personnel Payment
This page describes the 'Connect to Personnel Payment' function on the Operations menu in the Expense record window. If you are using iOS or Android, the 'Connect to Personnel Payment' function is on the Tools menu (with 'wrench' icon).---
If you have used a Personnel Payment to issue a payment to an employee before receiving their expense claim, you can use the 'Connect to Personnel Payment' function to connect the Personnel Payment and the expense claim. Follow these steps:
- Enter the Personnel Payment in the usual way, mark it as Ordered and OK and save.
- Enter the Expense record, again in the usual way, ensuring you specify a Person in the header.
- When the Expense record is complete (i.e. when you have added every row and amount), select 'Connect to Personnel Payment' from the Operations menu (Windows/Mac OS X) or Tools menu.
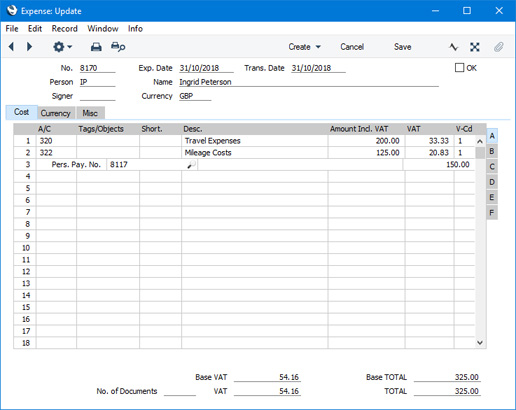
- The Expense record will be saved, and a new row will be added, containing the phrase "Pers. Pay. No.":
From the field to the right of this phrase, use 'Paste Special' to bring up a list of open Personnel Payments issued to the Person in the Expense record. An open Personnel Payment is one that has not yet been fully allocated to an Expense. If a Personnel Payment record contains more than one payment to the Person, the payments will be listed individually in the 'Paste Special' window.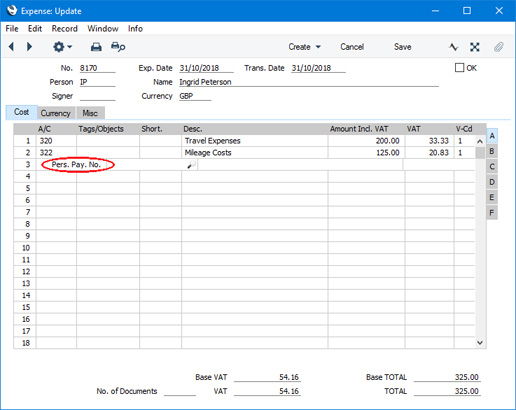
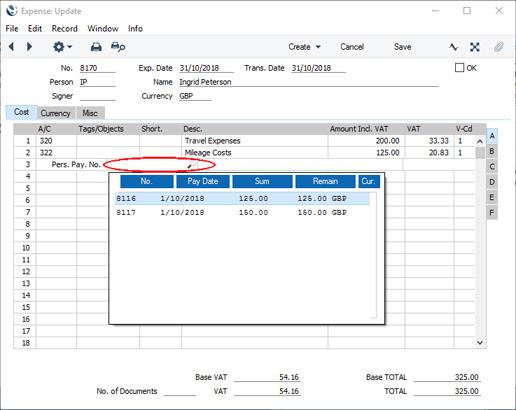
- Select a Personnel Payment from the list. The Personnel Payment Number will be added to the special Personnel Payment row, as will the open value of the Personnel Payment or the TOTAL from the Expense footer, whichever is the lower:
- Note that if a Personnel Payment record contains more than one payment to the Person, you will only have connected to one of those payments i.e. you will have connected to one row in the Personnel Payment. Repeat steps 4-5 if you want to connect to a second row in the Personnel Payment, or if you want to connect to a row in a second, different, Personnel Payment.
- After saving the Expense record again, it will no longer be possible to change the Person in the header. This will ensure the Expense record and the connected Personnel Payment remain related to the same Person.
- When you mark the Expense record as OK and save, the open value of the Personnel Payment will be reduced by the value in the special Personnel Payment row.
Note that it is important to ensure that the Expense record is complete before selecting the 'Connect to Personnel Payment' function. If the Expense record is incomplete when you select the function to the extent that the TOTAL is not the full value, this will be the amount that will be placed in the special Personnel Payment row. When you mark the Expense record as OK and save it, the open value of the Personnel Payment will be reduced by this value.
If you select 'Connect to Personnel Payment' before the Expense is complete (it may be that a late change is required) you can either change the amount shown in the special Personnel Payment row or you can delete the special Personnel Payment row and use 'Connect to Personnel Payment' once again. If you choose the former option, you will be prevented from entering an amount that is greater than the open value of the Personnel Payment, or greater than the TOTAL of the Expense record.
The Expense register in Standard ERP:
- Introduction
- Entering an Expense record
- Inspecting Expense records, Marking as OK and Posting to the Nominal Ledger
- Expenses in Currency
- Error Messages
- Invalidating Expenses
- Registering Expenses Using Purchase Invoices
- Operations menu, including:
- OK
- Open NL Transaction
- Authorise
- Expense Status
- Connect to Personnel Payment
- Request Approval
- Cancel Approval Request
- OK
- Create menu
- Home page for Expenses module manual
- Home page for Standard ERP manual
Operations Menu - Expense - Request Approval
This page describes the 'Request Approval' function on the Operations menu in the Expense record window. If you are using iOS or Android, the 'Request Approval' function is on the Tools menu (with 'wrench' icon).---
If an Expense record has to pass through an approval process before you can mark it as OK or print it, use this function to begin that approval process. Please refer to the description of the Approval Status field on the 'Misc' card of the Expense window for brief details about the approval process and here for full details.
---
The Expense register in Standard ERP:
- Introduction
- Entering an Expense record
- Inspecting Expense records, Marking as OK and Posting to the Nominal Ledger
- Expenses in Currency
- Error Messages
- Invalidating Expenses
- Registering Expenses Using Purchase Invoices
- Operations menu, including:
- OK
- Open NL Transaction
- Authorise
- Expense Status
- Connect to Personnel Payment
- Request Approval
- Cancel Approval Request
- OK
- Create menu
- Home page for Expenses module manual
- Home page for Standard ERP manual
Operations Menu - Expense - Cancel Approval Request
This page describes the 'Cancel Approval Request' function on the Operations menu in the Expense record window. If you are using iOS or Android, the 'Cancel Approval Request' function is on the Tools menu (with 'wrench' icon).---
If an Expense record needs to go through an approval process before you can mark it as OK or print it and you have started that approval process by selecting 'Request Approval' from the Operations menu (Windows/Mac OS X) or Tools menu (iOS/Android), you will no longer be able to modify the Expense record. So, if you realise the Expense record contains an error, you must cancel the approval process before you can correct the error. To do this, open the Expense record and choose 'Cancel Approval Request' from the Operations or Tools menu. You will now be able to amend the Expense record and then restart the approval process by once again choosing 'Request Approval'.
If you cannot cancel the approval process, the probable reasons are:
- The Approval Status of the Expense record (visible on the 'Misc' card) is not Pending.
- You may have configured the approval process (using the Approval Rules register in the Business Alerts module) so that it does not allow cancellation.
- You cannot cancel the approval process if at least one Approval Person has approved the Expense record.
---
The Expense register in Standard ERP:
- Introduction
- Entering an Expense record
- Inspecting Expense records, Marking as OK and Posting to the Nominal Ledger
- Expenses in Currency
- Error Messages
- Invalidating Expenses
- Registering Expenses Using Purchase Invoices
- Operations menu, including:
- OK
- Open NL Transaction
- Authorise
- Expense Status
- Connect to Personnel Payment
- Request Approval
- Cancel Approval Request
- OK
- Create menu
- Home page for Expenses module manual
- Home page for Standard ERP manual
Create Menu - Expenses

'New' and 'Duplicate' are standard functions that are provided on every Create and + menu. Use these functions to create new records, in this case in the Expense register. Please follow the links below for details about the other functions:
The Expense register in Standard ERP:
- Introduction
- Entering an Expense record
- Inspecting Expense records, Marking as OK and Posting to the Nominal Ledger
- Expenses in Currency
- Error Messages
- Invalidating Expenses
- Registering Expenses Using Purchase Invoices
- Operations menu
- Create menu
- Home page for Expenses module manual
- Home page for Standard ERP manual
Create Menu - Expense - Workflow Activity
This page describes the 'Workflow Activity' function on the Create menu in the Expense record window. If you are using iOS or Android, the 'Workflow Activity' function is on the + menu.---
Creating an Activity from an Expense record can be useful when you need to schedule a follow-up task related to that record.
You can create an Activity from an Expense record using the following methods:
- Open the Expense record in a record window and select 'Workflow Activity' from the Create or + menu. Save any changes you have made to the Expense record before selecting the function.
- Open the Expense record in a record window and then open the 'Workflow Manager' window. Click or tap the [+] button in this window to create a new Activity.
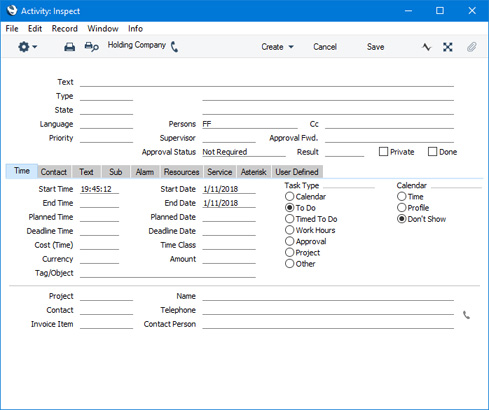
The new Activity will contain the following information:
- No default Activity Type will be offered.
- The Task Type will be To Do.
- The Calendar Type will be Don't Show.
- The Symbol will be Other.
- The Start Date and Time of the Activity will be the current date and time.
- The Person will be the current user. As the Task Type will be To Do, the Activity will be placed in the current user's Task Manager.
The Expense record and the Activity will be connected to each other through the Link Manager and Workflow Manager. When reviewing the Activity, you can return to the Expense record quickly and easily using the Link Manager in the Activity, while you can open the Activity from the Expense record using the Workflow Manager.
You must save an Expense record at least once before you can create an Activity from it. This is to ensure that the links mentioned in the previous paragraph can be established.
The 'Activity: Inspect' window is fully described here.
---
The Expense register in Standard ERP:
- Introduction
- Entering an Expense record
- Inspecting Expense records, Marking as OK and Posting to the Nominal Ledger
- Expenses in Currency
- Error Messages
- Invalidating Expenses
- Registering Expenses Using Purchase Invoices
- Operations menu
- Create menu, including:
- Workflow Activity
- Workflow Activity
- Home page for Expenses module manual
- Home page for Standard ERP manual
Create Menu - Expense - Email
This page describes the 'Email' function on the Create menu in the Expense record window. If you are using iOS or Android, the 'Email' function is on the + menu.---
The 'Email' function allows you to create a Mail from an Expense record.
To create a Mail from an Expense record, first open the Expense record in a record window and then select 'Email' from the Create menu (Windows/Mac OS X) or + menu (iOS/Android). The following window will appear, where you can create a new Mail:
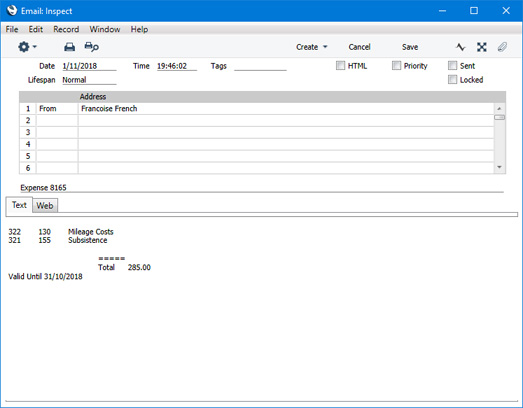
- The sender of the Mail will be the current user.
- No default recipient will be offered.
- The Subject and Text of the Mail will be taken from the fields in the header of the record in the Mail Texts setting in the Email and Conferences module in which the Form is "Expenses", as follows:
- The Subject in the mail will be composed from the Subject in the Mail Text record (which should have a trailing space), the text "Expense" and the Expense Number. For example, if the Subject in the Mail Text record is "Please find attached " (with trailing space), the Subject of the Mail will be "Please find attached Expense XXXX" (where XXXX is the Expense Number).
- The Text of the Mail will be built up as follows:
- The initial text will be taken from the Standard Text record quoted in the First Text field in the Mail Text record.
- Depending on the Do not put Record Details in Mail Body option in the Mail Text record, the rows in the Expense record will then be listed, followed by the Expense TOTAL.
- The final text will be taken from the Standard Text record quoted in the Last Text field in the Mail Text record. It is recommended that the first line in this Standard Text record should be a carriage return, to ensure that the text in the mail is neatly spaced.
If either Standard Text record is in HTML format, the Mail will be in HTML format as well.
If there is no suitable record in the Mail Texts setting, the Subject of the Mail will be "Expense XXXX" (where XXXX is the Expense Number). The Text of the Mail will contain the rows in the Expense record, followed by the Expense TOTAL.
Note that the Expense record does not have a Language field. Therefore, if you enter a record in the Mail Texts setting in which the Form is "Expenses", you only need fill in the fields in the header of that record. Any rows with different Languages that you add to the matrix will not be used when creating Mails.
- A PDF version of the Expense record will be attached to the Mail, accessible through the Document Manager. This requires you to have designed a Form Template to be used when printing Expense records, and to have assigned that Form Template to the Expense form using the 'Define Form' function. When you design the Form Template, you may need to use Styles that will embed fonts in PDF files (this will depend on the fonts you use). You may also need to choose a code page and page setup, which you can do in the Form Template Properties. Please refer here designing Form Templates.
- The Expense record itself will also be connected to the Mail through its Link Manager, and similarly the Mail will be connected to the Expense. This allows you to open the Mail quickly and easily when reviewing the Expense, or to open the Expense record from the Mail.
- The Subject in the mail will be composed from the Subject in the Mail Text record (which should have a trailing space), the text "Expense" and the Expense Number. For example, if the Subject in the Mail Text record is "Please find attached " (with trailing space), the Subject of the Mail will be "Please find attached Expense XXXX" (where XXXX is the Expense Number).
If the function does not create a Mail, the probable causes are:
- The current user does not have a Mailbox.
- The Expense record has not been saved.
- The Approval Status of the Expense record does not allow a Mail to be created from it. If you need Expense records to pass through an approval process before you can create Mails from them, you can configure such a process using the Approval Rules register in the Business Alerts module. Please refer to the description of the Approval Status field on the 'Misc' card of the Expense record for brief details about the approval process and here for full details.
---
The Expense register in Standard ERP:
- Introduction
- Entering an Expense record
- Inspecting Expense records, Marking as OK and Posting to the Nominal Ledger
- Expenses in Currency
- Error Messages
- Invalidating Expenses
- Registering Expenses Using Purchase Invoices
- Operations menu
- Create menu, including:
- Workflow Activity
- Workflow Activity
- Home page for Expenses module manual
- Home page for Standard ERP manual