Introduction
The Service Orders module has the following settings: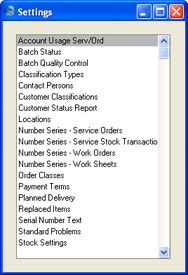
Account Usage Service Order
This page describes the Account Usage Service Order setting in the Service Orders module.---
The Account Usage Service Order setting contains some miscellaneous options controlling the behaviour of various aspects of the Service Orders module.
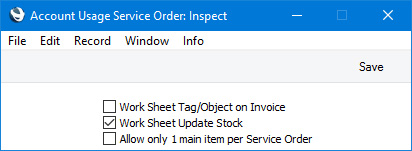
- Work Sheet Tag/Object on Invoice
- This option controls how Tags/Objects will be copied from Services Orders and/or Work Sheets to the resulting Invoices.
- If you do not select this option, Tags/Objects from the Service Order will be copied to the header of the Invoice ('Terms' card), and Tags/Objects from a Work Sheet row will be copied to the corresponding Invoice row (flip B).
- If you select this option, the Tag/Object specified in the Person record for the Salesman in the Service Order will be copied to the header of the Invoice ('Terms' card), and Tags/Objects from the header of the Work Sheet ('Date' card) and from a Work Sheet row (flip E) will be copied together to the corresponding Invoice row. Usually the Tags/Objects in the Work Sheet header will have been copied from the originating Service Order.
- If you do not select this option, Tags/Objects from the Service Order will be copied to the header of the Invoice ('Terms' card), and Tags/Objects from a Work Sheet row will be copied to the corresponding Invoice row (flip B).
- Work Sheet Update Stock
- Use this option to specify the default setting of the Update Stock check box on the 'Date' card in each Work Sheet. By default you will not be able to override the default setting in an individual Work Sheet: if you need particular users to be able to do this, assign them to Access Groups in which you have granted Full access to the 'Change Update Stock Flag on Work Sheet' Action.
- If the Update Stock option is selected in a Work Sheet, marking the Work Sheet as OK and saving will have the following consequences:
- The stock level of each Stocked Item in the Work Sheet will be reduced by the appropriate quantity. It is recommended that you also use the Do Not Allow Over Delivery option in the Stock Settings setting in the Stock module, as this will ensure that stock levels will be checked whenever you save a Work Sheet, and will prevent saving if you have insufficient stock for the quantity used.
- A Nominal Ledger Transaction will be created from the Work Sheet (providing you have also selected the Work Sheets option in the Sub Systems setting in the Nominal Ledger). This Transaction will contain the necessary Cost of Sales postings to update the Nominal Ledger stock valuation to reflect the removal from stock of the Stocked Items used in the Work Sheet.
- The Cost of Sales postings will depend on the Cost of Sales Posting option that you have selected in the Cost Accounting setting in the Stock module, as follows:
- From Deliveries
- Cost of Sales postings will be included in the Nominal Ledger Transactions created from Work Sheets. A Cost of Sales Account will be debited and a Stock Account will be credited.
- From Invoices (no posting from Deliveries)
- If you are using the From Invoices (no posting from Deliveries) option, you should select the Work Sheet Update Stock option, but you should not select the Work Sheets option in the Sub Systems setting in the Nominal Ledger. Selecting the Work Sheet Update Stock option will mean that stock levels of the Stocked Items in Work Sheets will be reduced by the appropriate quantity. Not selecting the Work Sheets option in the Sub Systems setting will prevent Cost of Sales from being posted twice.
- From Invoices with Accrual from Deliveries
- The posting of Cost of Sales, will be a two-stage process. The Nominal Ledger Transactions created from Work Sheets will include debit postings to a Cost of Sales Accruals Account and credit postings to a Stock Account. The Nominal Ledger Transactions created from Invoices will credit the Cost of Sales Accruals Account and debit a Cost of Sales Account.
- You can optionally specify dedicated Service Invoiceable Cost, Service Warranty Cost, Service Contract Cost and Service Goodwill Cost Account fields in your Item or Item Group records. These Accounts will be used in place of the standard Cost Accounts in Cost of Sales postings originating from Work Sheets. The choice of Service Cost Account will depend on the Item Type specified on flip B of the Work Sheet row. For example, if the Item Type is "Warranty", the Service Warranty Cost Account will be debited. If the Item Type is "Goodwill", the Service Goodwill Cost Account will be debited. If you specified that Cost of Sales postings will be made from Invoices with Accruals from Deliveries, it is particularly important that you specify Service Warranty Cost, Service Contract Cost and Service Goodwill Cost Accounts because otherwise costs from Warranty, Contract and Goodwill Work Sheets will not be posted correctly, because these Work Sheets will not be invoiced.
- If you have not specified Service Cost Accounts in the Item record or in the Item Group, then Cost Accounts for spare parts and other Stocked Items used in Work Sheets will be chosen in the same way as in other removals from stock (e.g. Deliveries and Invoices) i.e. they will be chosen as described here.
- If the Update Stock option is selected in a Work Sheet, marking the Work Sheet as OK and saving will have the following consequences:
- Allow only 1 main item per Service Order
- Select this option if you need Service Orders to contain no more than one main Item. A main Item is a row in a Service Order in which the Item Type is "Main Item".
Go back to:
- Home page for Settings in the Service Orders module
- Home page for Service Orders manual
- Home page for Standard ERP manual
Batch Quality Control, Batch Status
These settings allow you to to prevent the selling of Items after their Best Before Dates.First, use the Batch Status setting to define the warnings that will be displayed when attempts are made to sell Items after their Best Before Dates. Once this has been done, you will be able to assign a Status to each Batch Quality Control record.
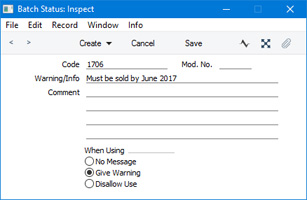
- Code
- Enter the unique code by which the Batch Status record is to be identified from elsewhere in Hansa. The Code can consist of up to twenty characters, and both numbers and letters can be used.
- Mod. No.
- If appropriate, enter a modification number here. This will be shown in the 'Batch Status: Browse' window and the 'Paste Special' list. This can be useful when products have to pass through a sequence of quality control tests and need to be moved on to the next Status in the sequence after each test.
- Warning/Info
- Enter the comment or warning that is to be displayed whenever an attempt is made to use a Serial Number that has been given this Status.
- Comment
- Enter any explanatory comments about the Batch Status record here.
- When Using
- Use these options to specify how and when you will be able to use Serial Numbers that have been given this Status.
- No Message
- You will be able to be able to use the Serial Number freely and with no warning.
- Give Warning
- Whenever the Serial Number is used in a sales transaction (e.g. Sales Order, Delivery, Invoice, Work Sheet), the text in the Warning/Info field above will be issued as a warning. You will be able to save and complete the transaction.
- Disallow Use
- Whenever the Serial Number is used in a sales transaction (e.g. Sales Order, Delivery, Invoice, Work Sheet), the text in the Warning/Info field above will be issued as a warning. You will not be able to save and complete the transaction.
- No Message
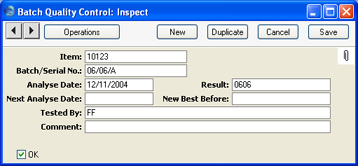
- Item
- Paste Special
Item register
- Enter the Item Number of the Item here.
- Batch/Serial No
- Paste Special
Serial Numbers of Items in stock
- Enter the Serial Number of the Item or batch of Items. Note that only existing Serial Numbers should be used: these should originate in the Goods Receipt or Production registers.
- Analyse Date
- Paste Special
Choose date
- The date of the Batch Control record. In the case of Items that need to be tested before they can be sold, the date of the test can be entered here.
- If you have entered several Batch Quality Control records for the same Item/Serial Number combination, the record with the latest Analyse Date will used to issue a warning on sale, or to prevent sale altogether.
- If you have entered several Batch Quality Control records for the same Item/Serial Number combination, the record with the latest Analyse Date will used to issue a warning on sale, or to prevent sale altogether.
- Result
- Paste Special
Batch Status setting, Service Orders module
- Use this field to link the Batch Quality Control record to the Batch Status setting. When the Item/Serial Number combination is used in a sales transaction, the Batch Status record quoted here will cause a warning to be issued or will prevent sale altogether.
- The latest Batch Status can be shown in the 'Paste Special' list opened from any Serial Number field. To do this, switch on the Show Batch Status option in the Item Settings setting in the Sales Ledger.
- The latest Batch Status can be shown in the 'Paste Special' list opened from any Serial Number field. To do this, switch on the Show Batch Status option in the Item Settings setting in the Sales Ledger.
- Next Analyse Date
- Paste Special
Choose date
- In the case of Items that need to be tested periodically before they can be sold, the date of the next test can be entered here.
- New Best Before
- Paste Special
Choose date
- Enter a new Best Before Date here if necessary. This will become the new Best Before Date for the Item/Serial Number. When the Item/Serial Number is sold, this Best Before Date will be copied to the Delivery. If you leave this field empty, the Best Before Date in the Goods Receipt will remain valid.
- Note: if there already is a Batch Quality Control record for an Item/Serial Number with a Best Before Date, you must enter a Best Before Date in all subsequent Batch Quality Control records. Otherwise, when you use the Item/Serial Number in a Delivery, the Best Before Date from the original Goods Receipt will be used.
- Note: if there already is a Batch Quality Control record for an Item/Serial Number with a Best Before Date, you must enter a Best Before Date in all subsequent Batch Quality Control records. Otherwise, when you use the Item/Serial Number in a Delivery, the Best Before Date from the original Goods Receipt will be used.
- Tested By
- When the Batch Quality Control record is first created, the initials of the current user will be placed here automatically and cannot be changed.
- Comment
- Record any further notes about the Batch Status Control record here.
- OK
- Check this box to approve the Batch Status Control record. After you have saved it, you will no longer be able to make any changes. The Batch Status Control record must be approved before Hansa will use it to issue a warning on sale, or to prevent sale altogether.
- Note: you must save the record before you can check the OK box.
- You can prevent a particular user or group of users from checking the OK box in Batch Quality Control records using Access Groups. To do this, deny access to the 'Sign Quality Control' Action:

- When the time comes for the record to be approved by someone with access to the 'Sign Quality Control' Action, that Person should first save all changes and then select 'Sign Tested By' from the Operations menu. That Person's initials will then be placed in the Tested By field, in addition to those of the Person that created the record. They should then save the record again, and then they will be able to approve it.
- Note: you must save the record before you can check the OK box.
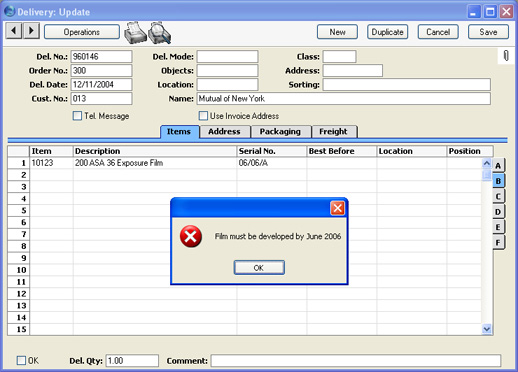
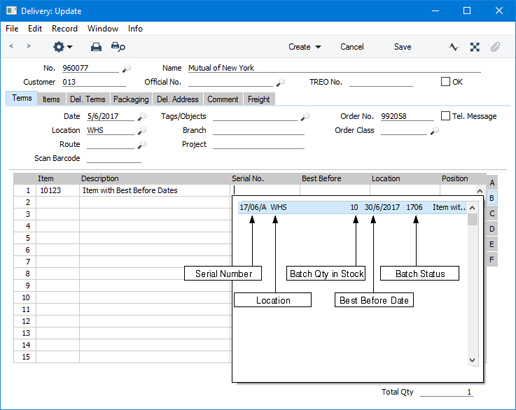
To help choose Items on the basis of their Best Before date, you can have Best Before dates shown in the 'Paste Special' list opened from any Serial Number field. To do this, switch on the Show Best Before Dates option in the Item Settings setting in the Sales Ledger. The Show Batch Status option in the same setting will cause the latest Batch Status to be shown in the 'Paste Special' list as well. If the latest Batch Status has been marked as Disallow Use, the Serial Number will not be shown in the 'Paste Special' list. The example 'Paste Special' list below shows the Serial Number ("06/06/A"), the quantity of the batch still in stock (10), the Best Before date and the latest Batch Status:

- Item
- Paste Special
Item register
- Specify the Item for which you want to create new Batch Quality Control records.
- Serial No. Range
- Range Reporting
Alpha
- Specify the Serial Number (or range of Serial Numbers separated by a colon) for which you want to create new Batch Quality Control records.
- If you leave this field empty, new Batch Quality Control records will be created for all Serial Numbers, including those that have already been sold. This can be useful in certain situations, for example where a product is one that is continually being updated. Each time there is a new update, create a new Batch Status record and then run this function. Use the fields at the bottom of the window to create To Do Activities that you can then use as a call list to call existing Customers about the update. Customer information will be copied from the Known Serial Number register to the new Activities. One Activity will be created for each new Batch Quality Control record, so this feature will be of most use with Unit Serial Numbers rather than Batch Serial Numbers.
- Beware of entering Serial Numbers in this field without specifying an Item Number in the field above. Doing so will have the same result as leaving both fields empty: new Batch Quality Control records being created for every Serial Number both in stock and sold.
- If you leave this field empty, new Batch Quality Control records will be created for all Serial Numbers, including those that have already been sold. This can be useful in certain situations, for example where a product is one that is continually being updated. Each time there is a new update, create a new Batch Status record and then run this function. Use the fields at the bottom of the window to create To Do Activities that you can then use as a call list to call existing Customers about the update. Customer information will be copied from the Known Serial Number register to the new Activities. One Activity will be created for each new Batch Quality Control record, so this feature will be of most use with Unit Serial Numbers rather than Batch Serial Numbers.
- Old Batch Status
- Paste Special
Batch Status setting, Service Orders module
- If the purpose of creating the new Batch Quality Control records is to copy old ones, enter the Batch Status (i.e. the Result) of the Batch Quality Control records that are to be copied. The Batch Quality Control records will only be copied if they have been approved.
- For example, a shop sells films. Some films have recently arrived into stock, some are approaching their Best Before Dates and some can no longer be used. The films that are approaching their Best Before Dates need to have their Batch Status changed so that warnings are issued when they are sold. They all have the same Batch Status but various Serial Numbers. In this case, leave the Serial No. Range above empty and enter the appropriate Batch Status here. New Batch Quality Control records will be created for the films that are approaching their Best Before Dates.
- For example, a shop sells films. Some films have recently arrived into stock, some are approaching their Best Before Dates and some can no longer be used. The films that are approaching their Best Before Dates need to have their Batch Status changed so that warnings are issued when they are sold. They all have the same Batch Status but various Serial Numbers. In this case, leave the Serial No. Range above empty and enter the appropriate Batch Status here. New Batch Quality Control records will be created for the films that are approaching their Best Before Dates.
- New Batch Status
- Paste Special
Batch Status setting, Service Orders module
- Specify here the Batch Status (Result) that is to be used in the new Batch Quality Control records. You must enter a New Batch Status, otherwise the function will have no effect.
- Analyse Date
- Paste Special
Choose date
- Specify here the Analyse Date that is to be used in the new Batch Quality Control records. You must enter an Analyse Date, otherwise the function will have no effect.
- OK
- Check this box if you want the new Batch Quality Control records to be approved immediately.
- Note that this function does not place Best Before Dates in the new Batch Quality Control records. Depending on circumstances, you may want to enter Best Before Dates before approving the new records.
- This check box will have no effect if you have logged in to Hansa as someone that does not have clearance to use the 'Sign Quality Control' Action, as described earlier on this page.
- Note that this function does not place Best Before Dates in the new Batch Quality Control records. Depending on circumstances, you may want to enter Best Before Dates before approving the new records.
- Type
- Paste Special
Activity Types setting, CRM module
- If you want the function to create an Activity for each new Batch Quality Control record, specify here the Activity Type that is to be used in the new Activities. No Activities will be created if you do not specify an Activity Type.
- Creating an Activity for each new Batch Quality Control record is useful in two circumstances. First, the product might be one that is being continually updated as described above and you want to create a To Do list of Customers to call about the update. Second, you are not approving the Batch Quality Control records immediately and you want to notify the appropriate Person that this task needs to be done.
- Many details will be copied from the New Batch Status record to each new Activity. The Warning/Info of the New Batch Status will be copied to the Text field in the header, and the four lines of Comment in the New Batch Status will be copied to the 'Text' card. In the case of Serial Numbers that have been sold, Customer details will be copied to the new Activities from the Known Serial Number register. This requires you to be using the Update Known Serial Number Register option in the Stock Settings setting, which makes sure the Known Serial Number register is updated whenever an Item with Serial Numbers is sold.
- The Task Type of each new Activity will be To Do and the Symbol will be Other. The Start and End Dates will be the current date, and the Start Time will be the current time.
- Each new Activity will contain an Attachment link to the Batch Quality Control record from which it was generated. When viewing an Activity, you will be able to open the connected Batch Quality Control record by clicking the button with the paper clip image and following the link from there.
- Creating an Activity for each new Batch Quality Control record is useful in two circumstances. First, the product might be one that is being continually updated as described above and you want to create a To Do list of Customers to call about the update. Second, you are not approving the Batch Quality Control records immediately and you want to notify the appropriate Person that this task needs to be done.
- For
- Paste Special
Person register, System module
- If you want the function to create an Activity for each new Batch Quality Control record, specify here the Person (or Persons, separated by commas) for whom the new Activities are to be created.
- Priority
- Specify here the Priority that is to be used in the new Activities. This will be shown in the field on the 'Persons' card of each new Activity, and will be visible in the Task Manager.
Batch Status
This page describes the Batch Status setting in the Service Orders module. After entering your Batch Status records, please refer to the Batch Quality Control page for details about using a Batch Status in a Batch Quality Control record.---
You will use the Batch Status setting in the Service Orders module in two circumstances:
- An Item/Serial Number with a Best Before Date might have a life cycle with several stages. In an example life cycle with three stages, you will at first be able to sell the Serial Number freely.Before Date approaches, you may wish to be warned about this when you sell the Serial Number. When the Best Before Date has passed, you should be prevented from selling the Serial Number. For each stage, you should assign a status to the Serial Number that will determine whether it can be sold and if so whether a warning will be shown. Use the Batch Status setting to define these statuses. In this example, you will need to create three records, but you may need more if you want different warnings to be displayed depending on the Item or if an Item has more than three stages in its life cycle.
- If you need to control the sale of an Item/Serial Number using quality control tests. The ability to sell an Item/Serial Number will depend on the test result. When you carry out a test, you should assign a status to the Serial Number based on the test result that will determine whether it can be sold. Use the Batch Status setting to define these statuses. You should create separate records for each test result.
- Code
- Enter the unique code by which the Batch Status record is to be identified from elsewhere in Standard ERP. The Code can consist of up to twenty characters, and you can use both numbers and letters.
- Mod. No.
- If appropriate, enter a modification number here. This will be shown in the 'Batch Status: Browse' window and the 'Paste Special' list. This can be useful when products have to pass through a sequence of quality control tests and need to be moved on to the next Status in the sequence after each test.
- Warning/Info
- Enter the comment or warning that is to be displayed whenever you try to use a Serial Number that has been given this Status.
- Comment
- Enter any explanatory comments about the Batch Status record here.
- When Using
- Use these options to specify how and when you will be able to use Serial Numbers that have been given this Status.
- No Message
- You will be able to be able to use a Serial Number with this Status freely and with no warning.
- Give Warning
- If you use a Serial Number with this Status in record that can lead to an outgoing stock transaction (i.e. a Delivery, Opportunity, POS Invoice, Production, Production Operation, Quotation, Returned Goods record, Returned Goods to Supplier record, Sales Invoice, Sales Order, Stock Depreciation, Stock Movement Stock Revaluation, Stocktaking record or Work Sheet), the text in the Warning/Info field above will be shown as a warning. You will be able to save and complete the transaction.
- Disallow Use
- If you try to use a Serial Number with this Status in an outgoing stock transaction (i.e. a Delivery, Production, Production Operation, Sales Invoice, Sales Order, Stock Movement or Work Sheet), the text in the Warning/Info field above will be shown as a warning. You will not be able to save and complete the transaction. Using the Serial Number in some transactions (e.g. Returned Goods to Supplier, Stock Depreciations) will not be prevented, to allow you to depreciate or dispose of the Serial Number.
- No Message
---
Batch Quality Settings in Standard ERP:
- Introduction
- Batch Status
- Batch Quality Control Tests
- Batch Quality Control Templates
- Batch Quality Control Rules
- Batch Quality Control
- Introduction
- Batch Quality Settings
- Classification Types
- Contact Classifications
- Info in Customer Status Report
- Locations
- Number Series - Service Orders
- Number Series - Service Stock Transactions
- Number Series - Work Orders
- Number Series - Work Sheets
- Order Classes
- Payment Terms
- Planned Delivery
- Replaced Items
- Serial Number Text
- Standard Problems
- Stock Settings
- Home page for Service Orders manual
- Home page for Standard ERP manual
Batch Quality Control Tests
This page describes the Batch Quality Control Tests setting in the Service Orders module. After entering your Batch Quality Control Test records, please refer to the Batch Quality Control Template page for details about gathering Tests together in Groups.---
If you need to control the sale of an Item/Serial Number using quality control tests, the first configuration step is to use the Batch Quality Control Tests setting to list the tests that can be carried out by the quality control department.
To enter a new Batch Quality Control Test record, first move into the Service Orders module using the [Switch Module] button in the Navigation Centre. Then, if you are using Windows or Mac OS X, click the [Settings] button in the Navigation Centre and then double-click 'Batch Quality Control Tests' in the resulting list. If you are using iOS or Android, select 'Settings' from the Tools menu (with 'wrench' icon) and then tap 'Batch Quality Control Tests' in the 'Settings' list. When the 'Batch Quality Control Tests: Browse' window appears, select 'New' from the Create menu (Windows/Mac OS X) or from the + menu (iOS/Android) to create a new record. Once entered, click [Save] (Windows/Mac OS X) or tap √ (iOS/Android) to save the record.
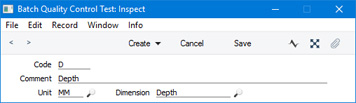
- Code
- Enter the unique code by which the Batch Quality Control Test record is to be identified from elsewhere in Standard ERP. The Code can consist of up to ten characters, and you can use both numbers and letters
- Comment
- Enter the name for the Batch Quality Control Test record. This comment will be shown in the 'Batch Quality Control Tests: Browse' window and the 'Paste Special' list and so should be clear enough to make the selection of the correct Test easy for all users.
- Unit
- Paste Special
Units setting, Sales Ledger
- Specify the unit of measure that is to be used for the Test. For example, if the Dimension (below) is "Volume", a suitable unit might be millilitres or litres.
- Dimension
- Paste Special
Choices of possible entries
- Each Test should consist of the measurement of one property or dimension of the Item. Use 'Paste Special' to choose the dimension here.
- The 'Paste Special' list includes the options "User Defined Value 1", "User Defined Value 2" and "User Defined Value 3". These refer to the three User Defined Value fields that you can add to the 'User Values' card of the Item record.
---
Batch Quality Settings in Standard ERP:
- Introduction
- Batch Status
- Batch Quality Control Tests
- Batch Quality Control Templates
- Batch Quality Control Rules
- Batch Quality Control
- Introduction
- Batch Quality Settings
- Classification Types
- Contact Classifications
- Info in Customer Status Report
- Locations
- Number Series - Service Orders
- Number Series - Service Stock Transactions
- Number Series - Work Orders
- Number Series - Work Sheets
- Order Classes
- Payment Terms
- Planned Delivery
- Replaced Items
- Serial Number Text
- Standard Problems
- Stock Settings
- Home page for Service Orders manual
- Home page for Standard ERP manual
Batch Quality Control Templates
This page describes the Batch Quality Control Templates setting in the Service Orders module. After entering your Batch Quality Control Template records, please refer to the Batch Quality Control Rules page for details about assigning Templates to Items.---
If you need to control the sale of an Item/Serial Number using quality control tests, the first configuration step is to use the Batch Quality Control Tests setting to list the tests that can be carried out by the quality control department. You can then gather the Tests together in groups. For example, a particular Item will require one group of Tests, while a second Item will require a second group of Tests. A group of Tests is known as a "Batch Quality Control Template".
To enter a new Batch Quality Control Template, first ensure you are in the Service Orders module using the [Switch Module] button in the Navigation Centre. Then, if you are using Windows or Mac OS X, click the [Settings] button in the Navigation Centre and then double-click 'Batch Quality Control Templates' in the resulting list. If you are using iOS or Android, select 'Settings' from the Tools menu (with 'wrench' icon) and then tap 'Batch Quality Control Templates' in the 'Settings' list. When the 'Batch Quality Control Templates: Browse' window appears, select 'New' from the Create menu (Windows/Mac OS X) or from the + menu (iOS/Android) to create a new record. Once entered, click [Save] (Windows/Mac OS X) or tap √ (iOS/Android) to save the record.

- Code
- Enter the unique code by which the Batch Quality Control Template record is to be identified from elsewhere in Standard ERP. The Code can consist of up to ten characters, and you can use both numbers and letters
- Comment
- Enter the name for the Batch Quality Control Template record. This comment will be shown in the 'Batch Quality Control Templates: Browse' window and the 'Paste Special' list and so should be clear enough to make the selection of the correct Template easy for all users.
- Test
- Paste Special
Batch Quality Control Tests setting, Service Orders module
- Use 'Paste Special' to choose a Test from the Batch Quality Control Tests setting.
- Comment
- The Comment from the Batch Quality Control Test record will be copied here.
- Unit
- Paste Special
Units setting, Sales Ledger
- The Unit from the Batch Quality Control Test record will be copied here. This provides a reminder of the unit of measure that is to be used for the Test.
- From, To
- If the Test will be passed when the result is within a range of values, use these fields to specify that range.
- As a range of values may be Item-specific, you may need to create separate Batch Quality Control Templates for each Item.
---
Batch Quality Settings in Standard ERP:
- Introduction
- Batch Status
- Batch Quality Control Tests
- Batch Quality Control Templates
- Batch Quality Control Rules
- Batch Quality Control
- Introduction
- Batch Quality Settings
- Classification Types
- Contact Classifications
- Info in Customer Status Report
- Locations
- Number Series - Service Orders
- Number Series - Service Stock Transactions
- Number Series - Work Orders
- Number Series - Work Sheets
- Order Classes
- Payment Terms
- Planned Delivery
- Replaced Items
- Serial Number Text
- Standard Problems
- Stock Settings
- Home page for Service Orders manual
- Home page for Standard ERP manual
Batch Quality Control Rules
This page describes the Batch Quality Control Rules setting in the Service Orders module.---
If you need to control the sale of an Item/Serial Number using quality control tests, you should first list the tests that can be carried out by the quality control department in the Batch Quality Control Tests setting. You can then gather the Tests together in groups, using the Batch Quality Control Templates setting. Finally, you should assign a group of Tests to each Item, using the Batch Quality Control Rules setting. You can assign more than one Template to a particular Item, to be used in different circumstances. For example, you may need to carry out different sets of Tests when receiving an Item into stock for the first time and when receiving an Item back into stock that has been returned by a Customer. You can also specify that different sets of Test will be carried out depending on the Location.
To work with Batch Quality Control Rules, first ensure you are in the Service Orders module. Then, if you are using Windows or Mac OS X, open the settings list by clicking the [Settings] button in the Navigation Centre or using the Ctrl-S/⌘-S keyboard shortcut and then double-click 'Batch Quality Control Rules' in the list. If you are using iOS or Android, select 'Settings' from the Tools menu (with 'wrench' icon) and tap 'Batch Quality Control Rules' in the 'Settings' list. The 'Batch Quality Control Rules: Inspect' window will be opened, showing any Rules that you have previously entered. Each row in the matrix contains a separate Batch Quality Control Rule.
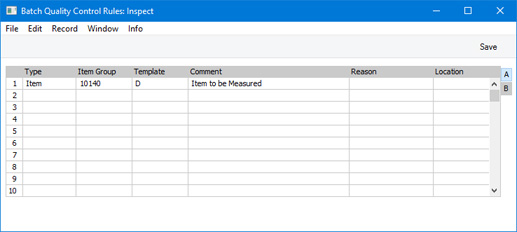
After entering a Goods Receipt, Production, Production Operation, Returned Goods record, Returned Goods to Supplier record, Stock Depreciation record or Stock Movement, you will be able to create Batch Quality Control records from the transaction for any of the Serial Numbers in the transaction. Each of these Batch Quality Control records will contain a Batch Quality Control Template, and the Tests included in the Template will be listed in the Batch Quality Control record. You can then enter the results of each Test as you carry them out. The Template in a new Batch Quality Control record will be chosen by checking the Batch Quality Control Rules setting for a row with the Item/Location/Register combination and taking the Template specified in that row.
When entering Batch Quality Control Rules, you should therefore ensure you enter a separate Rule (i.e. a separate row) for each Item/Location/Register. You can leave the Location and/or Register fields empty if the same Rule is to apply to every Location and/or Register.
The information required for each Batch Quality Control Rule record is as follows:
Flip A
- Type
- Paste Special
Choices of possible entries
- This field can contain one of two entries: "Item" or "Item Group". Use it to indicate whether the Item Group field immediately to the right contains or will contain an Item or an Item Group. Use 'Paste Special' to increase input speed.
- Item Group
- Paste Special
Item or Item Group registers
- Specify the Item or Item Group that is to be subject to the Tests contained in the Batch Quality Control Template that you specify to the right.
- If you enter an Item here, set the Row Type to "Item". If you enter an Item Group, set the Row Type to "Item Group". If you set the Row Type before entering an Item or Item Group, this will determine whether the 'Paste Special' window will list Items or Item Groups when you open it from this field.
- If you enter an Item here, set the Row Type to "Item". If you enter an Item Group, set the Row Type to "Item Group". If you set the Row Type before entering an Item or Item Group, this will determine whether the 'Paste Special' window will list Items or Item Groups when you open it from this field.
- Template
- Paste Special
Batch Quality Control Templates setting, Service Orders module
- Choose a Batch Quality Control Template using 'Paste Special'.
- When you create a Batch Quality Control record from a Goods Receipt, Production, Production Operation, Returned Goods record, Returned Goods to Supplier record, Stock Depreciation record or Stock Movement, the Template specified in the row in this setting for the Item/Location/Register combination will be copied to the new Batch Quality Control record. The Tests in the Template will be copied to the Batch Quality Control record.
- When you create a Batch Quality Control record from a Goods Receipt, Production, Production Operation, Returned Goods record, Returned Goods to Supplier record, Stock Depreciation record or Stock Movement, the Template specified in the row in this setting for the Item/Location/Register combination will be copied to the new Batch Quality Control record. The Tests in the Template will be copied to the Batch Quality Control record.
- Comment
- The Name or Description of the Item Group or Item that you specify in the field to the left will be brought in to this field automatically.
- Location
- Paste Special
Locations setting, Stock module
- If you need to apply a different Template of Tests to the Item or Item Group depending on the Location, enter separate rows with each Location specified in this field. You can also enter a row in which the Location field is blank, to act as the default. Alternatively, enter a single row with a blank Location if the same Template of Tests is to be used in every Location.
Flip B
- Register
- Paste Special
Choices of possible entries
- If you need a different Template of Tests to be copied to a Batch Quality Control record depending on the register from which you create that record, enter separate rows with each Register specified in this field. You can also enter a row in which the Register field is blank, to act as the default. Alternatively, enter a single row with a blank Register if the same Template is to be copied to every Batch Quality Control record.
- For example, you may need to carry out different sets of Tests when receiving an Item into stock for the first time and when receiving an Item back into stock that has been returned by a Customer. In this case, enter two rows for the same Item, one in which the Register is "Goods Receipts" and one in which the Register is "Return Goods". If you enter a third row for the Item in which the Register is blank, the Template in that row will be used in all other circumstances (i.e. when you create Batch Quality Control records from Productions, Production Operations, Stock Depreciations and Returned Goods to Supplier records).
---
Batch Quality Settings in Standard ERP:
- Introduction
- Batch Status
- Batch Quality Control Tests
- Batch Quality Control Templates
- Batch Quality Control Rules
- Batch Quality Control
- Introduction
- Batch Quality Settings
- Classification Types
- Contact Classifications
- Info in Customer Status Report
- Locations
- Number Series - Service Orders
- Number Series - Service Stock Transactions
- Number Series - Work Orders
- Number Series - Work Sheets
- Order Classes
- Payment Terms
- Planned Delivery
- Replaced Items
- Serial Number Text
- Standard Problems
- Stock Settings
- Home page for Service Orders manual
- Home page for Standard ERP manual
Batch Quality Control
This page describes the Batch Quality Control setting in the Service Orders module.---
Standard ERP allows you to control the sale of perishable goods and of goods that require quality control testing. This control can be on one of two levels:
- You can control the sale of Items based on their Best Before Dates.
- You can control the sale of Items using quality control tests.
When you need to specify whether a unit or batch can be sold, you will enter a record for that unit or batch in the Batch Quality Control setting in the Service Orders module. In this Batch Quality Control record, you should enter a Best Before Date and/or the results of the quality control tests, and you should also specify a Batch Status. The Batch Status will control whether the unit or batch can be sold.
A Batch Status can have one of three statuses:
- No Message
- The unit or batch can be sold or otherwise removed from stock freely.
- Give Warning
- A warning will be shown when you try to sell the unit or batch or otherwise remove it from stock, but you will be able to proceed.
- Disallow Use
- You will not be able to sell the unit or batch or, in some circumstances, remove it from stock (you will be able to remove it from stock using a Stock Depreciation or Returned Goods to Supplier record).
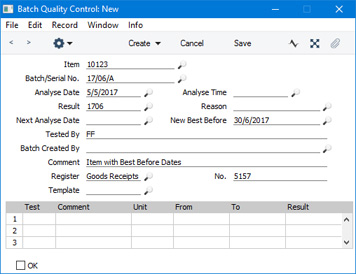
Batch Quality Control records and Best Before Dates
If you need to control the sale of Items with Best Before Dates, you can use the Batch Quality Control setting to determine when these Items can be sold.An example cycle might include the following stages:
- When you receive an Item with a Best Before Date into stock, you might immediately enter a Batch Quality Control record that will allow you to sell the Item freely. You should therefore assign a "No Message" Batch Status to the Batch Quality Control record.
When you receive the Item into stock, you can specify a Best Before Date and a Batch Status in the Goods Receipt row (flip B). If you specify a Batch Status, a Batch Quality Control record will be created automatically when you mark the Goods Receipt as OK and save. The Batch Quality Control record will be marked as OK automatically, meaning that it has been activated.
You can also use a more manual method to create the Batch Quality Control record, by selecting 'Quality Control' from the Create menu (Windows/Mac OS X) or + menu (iOS/Android). If you received the Item into stock using a Production or Production Operation, you can create the Batch Quality Control record, by selecting 'Quality Control' from the Row menu (Windows/Mac OS X) or Tools menu (iOS/Android). You can also enter the Batch Quality Control record directly to the Batch Quality Control setting in the Service Orders module.
- As the Best Before Date approaches, you might enter a second Batch Quality Control record with a "Give Warning" Status.
You can use the Best Before List report in the Stock module to find units and batches with Best Before Dates in a particular period.
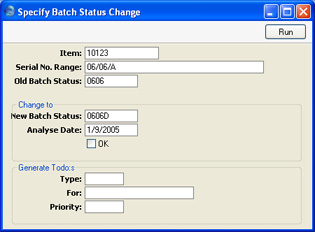
If you have many Items with the same Best Before Date, you can create new Batch Quality Control records in batches using the 'Batch Status Change' Maintenance function in the Service Orders module.
- Finally, when the Best Before Date has passed, you might enter a third record with a "Disallow Use" Status. This will prevent further sales of Items belonging to the batch.
- Item
- Paste Special
Item register
- Enter the Item Number of the Item here.
- Batch/Serial No
- Paste Special
Serial Numbers of Items in stock
- Enter the Serial Number of the Item or batch of Items. Note that you can only use existing Serial Numbers (i.e. Serial Numbers that originated in the Goods Receipt, Production or Production Operation registers.
- Analyse Date
- Paste Special
Choose date
- The date of the Batch Control record i.e. the date when you checked the unit or batch.
- If you have entered several Batch Quality Control records for the same Item/Serial Number combination, the record with the latest Analyse Date will used to issue a warning on sale, or to prevent sale altogether.
- If you have entered several Batch Quality Control records for the same Item/Serial Number combination, the record with the latest Analyse Date will used to issue a warning on sale, or to prevent sale altogether.
- Analyse Time
- Paste Special
Current time
- The time when you checked the unit or batch.
- Result
- Paste Special
Batch Status setting, Service Orders module
- Use this field to connect the Batch Quality Control record to a record in the Batch Status setting. After you mark the Batch Quality Control record as OK and save, this Batch Status record will determine whether you will be warned when using the Item/Serial Number combination in an outgoing stock transaction, or whether you will be prevented from using the Item/Serial Number altogether.
- If you would like the latest Batch Status to be shown in the 'Paste Special' list opened from any Serial Number field, switch the Show Batch Status option in the Item Settings setting in the Sales Ledger.
- If you would like the latest Batch Status to be shown in the 'Paste Special' list opened from any Serial Number field, switch the Show Batch Status option in the Item Settings setting in the Sales Ledger.
- Reason
- Paste Special
Standard Problems setting, Sales Ledger/Service Orders module
- Specify here a Standard Problem to describe the result of the quality control test.
- Next Analyse Date
- Paste Special
Choose date
- If the Item is one that need to be tested periodically until it is sold, enter the date of the next test here.
- New Best Before
- Paste Special
Choose date
- Enter a new Best Before Date here if necessary.
- When you mark the Batch Quality Record as OK and save, this date will be copied to the record for the Item/Serial Number in the Batch Specifications setting in the Stock module (if there is no Batch Specification record for the Item/Serial Number, one will be created automatically). From there, it will become the new Best Before Date for the Item/Serial Number. When you deliver the Item/Serial Number, this Best Before Date will be copied to the Delivery. If you leave this field empty, the Batch Specification record will not be updated so the previously recorded Best Before Date will remain valid.
- If you would like the Best Before Date to be shown in the 'Paste Special' list opened from any Serial Number field, select the Show Best Before Dates option in the Item Settings setting in the Sales Ledger.
- When you mark the Batch Quality Record as OK and save, this date will be copied to the record for the Item/Serial Number in the Batch Specifications setting in the Stock module (if there is no Batch Specification record for the Item/Serial Number, one will be created automatically). From there, it will become the new Best Before Date for the Item/Serial Number. When you deliver the Item/Serial Number, this Best Before Date will be copied to the Delivery. If you leave this field empty, the Batch Specification record will not be updated so the previously recorded Best Before Date will remain valid.
- Tested By
- When the Batch Quality Control record is first created, the Signature of the current user will be placed here automatically and cannot be changed.
- You will only be able to mark the record as OK if your Signature is included in this field. If you are not the creator of the record, you can add your Signature by saving any changes and then selecting 'Sign Tested By' from the Operations menu (Windows/Mac OS X) or Tools menu (iOS/Android).
- You will only be able to mark the record as OK if your Signature is included in this field. If you are not the creator of the record, you can add your Signature by saving any changes and then selecting 'Sign Tested By' from the Operations menu (Windows/Mac OS X) or Tools menu (iOS/Android).
- Batch Created By
- Paste Special
Person register, System module and Global User register, Technics module
- Enter the Signature of any other user connected with the Batch Quality Control test. You can enter the Signatures of more than one user, separated by commas. This is for information only.
- Comment
- Record any further notes about the Batch Status Control record here.
- If the Batch Quality Control record was created from another record (e.g. a Goods Receipt), the Item Description will be placed in this field.
- If the Batch Quality Control record was created from another record (e.g. a Goods Receipt), the Item Description will be placed in this field.
- Register, No.
- If the Batch Quality Control record was created from another record (e.g. a Goods Receipt), the register and No. of that record will be shown in these fields.
- OK
- Check this box to approve the Batch Quality Control record. After you have saved it, you will no longer be able to make any changes.
- Marking a Batch Status Control record as OK and saving will also activate that record. This means that from that moment the Batch Status record quoted in the Result field will determine whether you will be warned when selling the Item/Serial Number, or whether you will be prevented from selling the Item/Serial Number altogether. The record will replace any earlier Batch Quality Control records in this role.
- You must save the record before you can tick the OK box. You will then only be able to tick the OK box if your Signature is included in the Tested By field. If your Signature is not in the Created By field, you can add it by saving the record and then selecting 'Sign Tested By' from the Operations menu (Windows/Mac OS X) or Tools menu (iOS/Android). You should then save the record again, then tick the OK box.
- You can prevent particular users from ticking the OK box in Batch Quality Control records using Access Groups. To do this, deny them access to the 'Sign Quality Control' Action. This will also prevent those users from using the 'Sign Tested By' function.
- If you need to see a list of Batch Quality Control records that have not yet been marked as OK, run the Batch Quality Control Tests report in the Service Orders module. A similar report, Batch Quality Control Results, lists Batch Quality Control records that have been marked as OK.
- Marking a Batch Status Control record as OK and saving will also activate that record. This means that from that moment the Batch Status record quoted in the Result field will determine whether you will be warned when selling the Item/Serial Number, or whether you will be prevented from selling the Item/Serial Number altogether. The record will replace any earlier Batch Quality Control records in this role.
Batch Quality Control records and Quality Control Tests
If you need to control the sale of Items using Quality Control Tests, you can use the Batch Quality Control setting to record the results of the tests and to determine when these Items can be sold. To make full use of this feature, you should first list the tests in the Batch Quality Control Tests setting, grouped the tests together to form Batch Quality Control Templates and specified which Template should be used for each Item/Location/Register combination using the Batch Quality Control Rules setting .When you receive an Item that requires a quality control test into stock or use it in another stock transaction, you will be able to create a Batch Quality Control record from the stock transaction, as follows:
- If the stock transaction is a Goods Receipt, select the row containing the Item/Serial Number and select 'Quality Control' from the Create menu (Windows/Mac OS X) or + menu (iOS/Android).
- If the stock transaction is a Production, Production Operation, Returned Goods record, Returned Goods to Supplier record, Stock Depreciation record or Stock Movement, select the row containing the Item/Serial Number and select 'Quality Control' from the Row menu (Windows/Mac OS X) or Tools menu (iOS/Android).
If you created the Batch Quality Control record from a stock transaction, the new record will be opened in a window entitled 'Batch Quality Control: New'. This means that the record has not been saved:
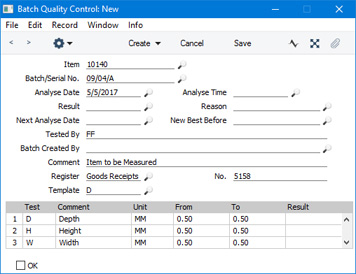
- If there is a row in the Batch Quality Control Rules setting for the Item/Location/Register combination, the Template in that row will be used.
- If there is a row in the Batch Quality Control Rules setting for the Item//Register combination in which the Location is blank, the Template in that row will be used.
- If there is a row in the Batch Quality Control Rules setting for the Item in which the Location or the Register is blank, the Template in that row will be used.
Again as previously described, ensure your Signature is in the Tested By field or add it by saving any changes and then selecting 'Sign Tested By' from the Operations menu (Windows/Mac OS X) or Tools menu (iOS/Android). Save the record again, then tick the OK box and save again to activate the Batch Quality Control record. Access to the 'Sign Tested By' function and the OK box is governed by the 'Sign Quality Control' Access Group Action.
Controlling Outgoing Stock Transactions using Batch Quality Control records
When you enter a Serial Number in an outgoing stock transaction (e.g. a Delivery), the Batch Quality Control setting will be checked for the latest record (determined by Analyse Date) with that Serial Number that has been as OK. If this Batch Quality Control record has a "Give Warning" or "Disallow Use" Batch Status, the Warning/Info from the related Batch Status record will be displayed:
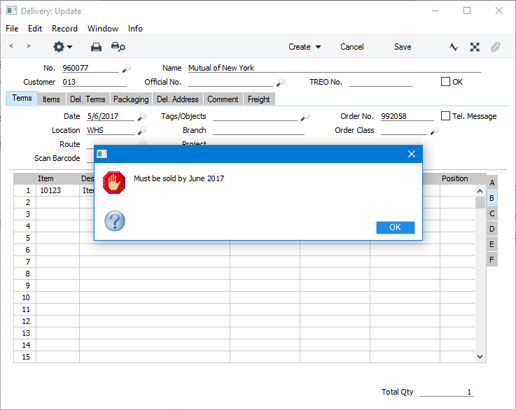
If you are using Best Before Dates and the outgoing stock transaction is a Delivery, the correct Best Before Date will be brought in. This will be the Best Before Date specified in the Batch Quality Control record or in the original Goods Receipt. To help choose Items on the basis of their Best Before Date, you can have Best Before Dates shown in the 'Paste Special' list opened from any Serial Number field. To do this, select the Show Best Before Dates option in the Item Settings setting in the Sales Ledger. The Show Batch Status option in the same setting will cause the latest Batch Status to be shown in the 'Paste Special' list as well. If the latest Batch Status has been marked as "Disallow Use", the Serial Number will not be shown in the 'Paste Special' list. The example 'Paste Special' list below shows the Serial Number ("17/06/A"), the quantity of the batch still in stock (10), the Best Before Date and the latest Batch Status:
The 'Batch Status Change' Maintenance function
As described above, the Batch Status specified in the latest Batch Quality Control record for a particular Serial Number will determine whether you can remove that Serial Number from stock and if so whether a warning will be issued. As you cannot change a Batch Quality Control record that has been marked as OK, you will need to create a new Batch Quality Control record if you need to change the Batch Status of a particular Serial Number. If you need to change the Batch Status of several Serial Numbers, you can create new Batch Quality Control records in batches using the 'Batch Status Change' Maintenance function in the Service Orders module.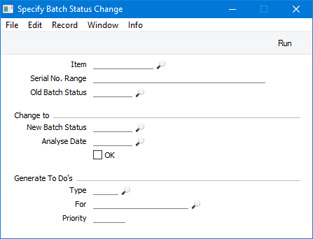
- Item
- Paste Special
Item register
- Specify the Item for which you want to create new Batch Quality Control records.
- Serial No. Range
- Range Reporting
Alpha
- Specify the Serial Number (or range of Serial Numbers separated by a colon) for which you want to create new Batch Quality Control records.
- If you leave this field empty, new Batch Quality Control records will be created for every Serial Number, including those that have already been sold. This can be useful in certain situations, for example where a product is one that is continually being updated. Each time there is a new update, create a new Batch Status record and then run this function. Use the fields at the bottom of the window to create To Do Activities that you can then use as a call list to call existing Customers about the update. Customer information will be copied from the Known Serial Number register to the new Activities. One Activity will be created for each new Batch Quality Control record, so this feature will be of most use with Unit Serial Numbers rather than Batch Serial Numbers.
- Beware of entering Serial Numbers in this field without specifying an Item Number in the field above. Doing so will have the same result as leaving both fields empty: new Batch Quality Control records being created for every Serial Number both in stock and sold.
- If you leave this field empty, new Batch Quality Control records will be created for every Serial Number, including those that have already been sold. This can be useful in certain situations, for example where a product is one that is continually being updated. Each time there is a new update, create a new Batch Status record and then run this function. Use the fields at the bottom of the window to create To Do Activities that you can then use as a call list to call existing Customers about the update. Customer information will be copied from the Known Serial Number register to the new Activities. One Activity will be created for each new Batch Quality Control record, so this feature will be of most use with Unit Serial Numbers rather than Batch Serial Numbers.
- Old Batch Status
- Paste Special
Batch Status setting, Service Orders module
- If the purpose of creating the new Batch Quality Control records is to copy old ones, enter the Batch Status (i.e. the Result) of the Batch Quality Control records that are to be copied. The Batch Quality Control records will only be copied if they have been marked as OK.
- New Batch Status
- Paste Special
Batch Status setting, Service Orders module
- Specify here the Batch Status (Result) that is to be used in the new Batch Quality Control records. You must enter a New Batch Status, otherwise the function will have no effect.
- Analyse Date
- Paste Special
Choose date
- Specify here the Analyse Date that is to be used in the new Batch Quality Control records. You must enter an Analyse Date, otherwise the function will have no effect.
- OK
- Check this box if you want the new Batch Quality Control records to be marked as OK immediately.
- Note that this function does not place Best Before Dates in the new Batch Quality Control records. Depending on circumstances, you may want to enter Best Before Dates before marking the new records as OK.
- Selecting this option will have no effect if the Person running the function has been denied access to the 'Sign Quality Control' Action, as described earlier on this page.
- Note that this function does not place Best Before Dates in the new Batch Quality Control records. Depending on circumstances, you may want to enter Best Before Dates before marking the new records as OK.
- Type
- Paste Special
Activity Types setting, CRM module
- If you want the function to create an Activity for each new Batch Quality Control record, specify here the Activity Type that is to be used in the new Activities. No Activities will be created if you do not specify an Activity Type.
- Creating an Activity for each new Batch Quality Control record is useful in two circumstances. First, the product might be one that is being continually updated as described above and you want to create a To Do list of Customers to call about the update. Second, you are not marking the Batch Quality Control records as OK immediately and you want to notify the appropriate Person that this task needs to be done.
- Many details will be copied from the New Batch Status record to each new Activity. The Warning/Info of the New Batch Status will be copied to the Text field in the header, and the four lines of Comment in the New Batch Status will be copied to the 'Text' card. In the case of Serial Numbers that have been sold, Customer details will be copied to the new Activities from the Known Serial Number register. This requires you to be using the Update Known Serial Number Register option in the Stock Settings setting, which makes sure the Known Serial Number register is updated whenever an Item with Serial Numbers is sold.
- The Task Type of each new Activity will be To Do and the Symbol will be Other. The Start Date will be the Analyse Date specified in the field above, and the Start Time will be the current time.
- Each new Activity will be connected to the Batch Quality Control record from which it was generated, through its Link Manager. When viewing an Activity, you will be able to open the connected Batch Quality Control record by opening the Link Manager and following the link from there.
- Creating an Activity for each new Batch Quality Control record is useful in two circumstances. First, the product might be one that is being continually updated as described above and you want to create a To Do list of Customers to call about the update. Second, you are not marking the Batch Quality Control records as OK immediately and you want to notify the appropriate Person that this task needs to be done.
- For
- Paste Special
Person register, System module
- If you want the function to create an Activity for each new Batch Quality Control record, specify here the Person (or Persons, separated by commas) for whom the new Activities are to be created.
- Priority
- Specify here the Priority that is to be used in the new Activities. This will be shown in the field in the header of each new Activity, and will be visible in the Task Manager.
Batch Quality Settings in Standard ERP:
- Introduction
- Batch Status
- Batch Quality Control Tests
- Batch Quality Control Templates
- Batch Quality Control Rules
- Batch Quality Control
- Introduction
- Batch Quality Settings
- Classification Types
- Contact Classifications
- Info in Customer Status Report
- Locations
- Number Series - Service Orders
- Number Series - Service Stock Transactions
- Number Series - Work Orders
- Number Series - Work Sheets
- Order Classes
- Payment Terms
- Planned Delivery
- Replaced Items
- Serial Number Text
- Standard Problems
- Stock Settings
- Home page for Service Orders manual
- Home page for Standard ERP manual
Classification Types
Please click here for full details of this setting.Customer Classifications
Please click here for full details of this setting.Customer Status Report
Please click here for full details of this setting.Locations
Please click here for full details of this setting.Number Series - Service Orders
Each Service Order record has its own unique identifying number, based on a sequential series. When you enter a new record, the next number in the series is used. If you have not entered any Number Series, Service Order Numbers will start at 1 and continue consecutively.If you wish to use your own sequences, enter them in this setting. You can enter any number of series for different years or for different departments. The different series should not overlap.
When you enter a Service Order, the next number in the first Number Series entered to this setting will be used as a default; change to the next number in any other Number Series using 'Paste Special'.
On double-clicking 'Number Series - Service Orders' in the Settings list, the following window appears:
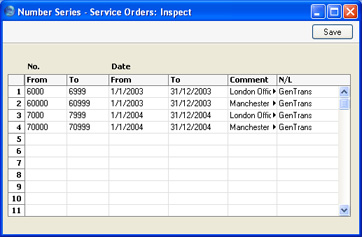
The N/L field common to all Number Series settings is not used in this instance.
Number Series - Service Stock Transactions
Use this setting to define the number sequences for records in the Service Stock Transaction register. It operates in the same manner as the Number Series - Service Orders setting.Number Series - Work Orders
Use this setting to define the number sequences for Work Orders. It operates in the same manner as the Number Series - Service Orders setting.Number Series - Work Sheets
Use this setting to define the number sequences for Work Sheets. It operates in the same manner as the Number Series - Service Orders setting.Order Classes
Please click here for full details of this setting.Payment Terms
Please click here for full details of this setting.Planned Delivery
Please click here for full details of this setting.Replaced Items
The Replaced Items setting keeps a record of the occasions both when the repair of an Item proved not to be possible and it was exchanged for a new one and those when it was necessary to send an Item back to its manufacturer for repair or exchange.When such an Item is signed into your workshops, as soon as it becomes apparent that repair is not possible (or is uneconomic), follow these steps:
- It should be sent back to its Supplier, for exchange or credit. Do this using a record in the Service Stock Transaction register with an Out Quantity of one and a Supplier specified on flip D.
If there is no need in reality to send the Item back to a Supplier (perhaps because it is clearly no longer operational and its warranty has expired), it may be appropriate to create a dummy Supplier record in the Customer register for this purpose. A Supplier must be quoted on flip D if this sequence is to be followed.
- When you approve and save this record, the Item is signed out of your service stock and a record is created in the Replaced Items setting, as shown below:
It is not possible to enter records directly to the Replaced Items setting: they can only be created remotely when records in the Service Stock Transaction register with Out Quantities and Suppliers are approved and saved.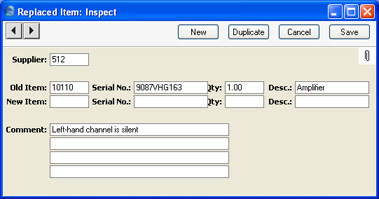
- When the Item has been sent back to the Supplier for repair, on its return to your company you should enter a new record should be created in the Service Stock Transaction register signing it back into service stock. You should then open the appropriate record in the Replaced Items setting and copy the Item Number and Serial Number from the fields on the first row to those on the second. You can enter an appropriate comment if necessary. Finally, you should use a further record in the Service Stock Transaction register to sign the Item out of your workshop when it is returned to the Customer.
- When the Item has been sent back to the Supplier for exchange, on the arrival in your workshop of its replacement, you should enter a new record in the Service Stock Transaction register signing it into service stock and carrying a record of its Serial Number. You should copy this Serial Number to the new Serial No. field (on the second row) of the appropriate record in the Replaced Items setting. You can enter an appropriate comment if necessary. Finally, you should use a further record in the Service Stock Transaction register to sign the Item out of your workshop when it is handed over to the Customer.
- If the Item has in reality been discarded and is being replaced with a new Item from your stock, review the appropriate Replaced Item record and enter the Item Number of the new Item in the New-Item field, using 'Paste Special' if necessary. Move to the new Serial No. field: 'Paste Special' here will give a list of Serial Numbers for that Item currently in stock (i.e. in stock for resale, not in service stock). Select one, enter a Quantity of one in the next field and save the record. Note that the Replaced Items setting is purely archival: it has no effect on stock levels. You will therefore need to raise a Delivery from a Sales Order (or raise an Invoice, according to your normal practice) for the Item/Serial Number that your company is supplying so that stock levels are amended accordingly.
Serial Number Text
Use this setting to record comments and notes about individual Serial Numbered Items. These comments will be shown where appropriate in the Service Order Status report, obtainable from the Operations menu of the Service Order screen.The 'Serial Number Texts: Browse' window lists the records that have already been saved in this setting: double-click to modify or click [New] to create a new item.
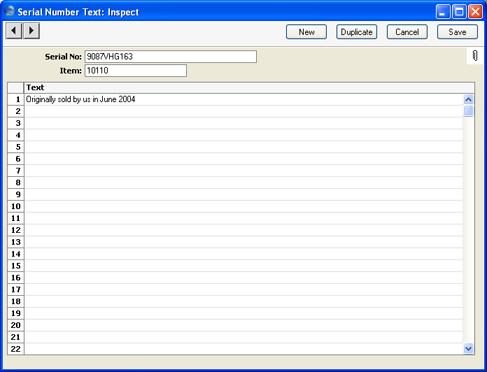
- Serial No
- Paste Special
Serial Numbers of sold Items and of Repair Items (Known Serial Number register)
- Specify the Serial Number of the Item about which comments are being recorded.
- If the Item is one originally sold by your business, the Item Number will be brought in to the field below as soon as the Serial Number is specified.
- Hansa will not allow more than one record in the Serial Number Text setting for a particular Serial Number/Item combination.
- The 'Paste Special' list shows the contents of the Known Serial Number register. This contains Serial Numbers previously used in the Service Stock Transaction register and, optionally, Serial Numbers of Items originally sold by your company.
- If the Item is one originally sold by your business, the Item Number will be brought in to the field below as soon as the Serial Number is specified.
- Item
- Paste Special
Item register
- The Item Number of the Item. If the Item is one originally sold by your business, the Item Number will be brought in as soon as the Serial Number is specified.
- Text
- Up to thirteen lines of notes can be recorded for an individual Item.
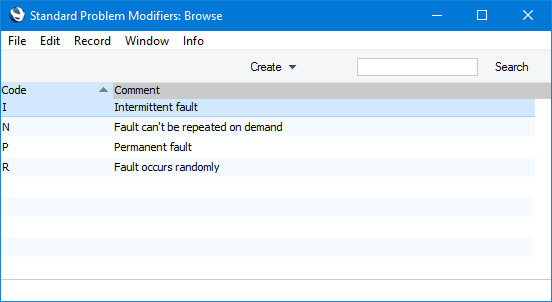
Standard Problem Modifiers
This page describes the Standard Problem Modifiers setting in the Service Orders module.---
When you enter a Service Order in order to begin the process of repairing an Item, you will classify the Item's fault by specifying a Standard Problem. You can then provide a further level of classification by specifying a Standard Problem Modifier. For example, you could use a Standard Problem to classify the fault and a Standard Problem Modifier to specify whether the fault is continuous or intermittent.
The Standard Problem Modifiers setting allows you to construct a look-up table that you can then use when you need to specify Modifiers in Service Orders.
To open the Standard Problem Modifiers setting, first ensure you are in the Service Orders module. Then, if you are using Windows or macOS, click the [Settings] button in the Navigation Centre or use the Ctrl-S/⌘-S keyboard shortcuts and then double-click 'Standard Problem Modifiers' in the 'Settings' list. If you are using iOS or Android, select 'Settings' from the Tools menu (with 'wrench' icon) and tap 'Standard Problem Modifiers' in the 'Settings' list. The 'Standard Problem Modifiers: Browse' window will open, listing the Standard Problem Modifiers that you have previously entered.
Go back to:
- Home page for Settings in the Service Orders module
- Home page for Service Orders manual
- Home page for Standard ERP manual
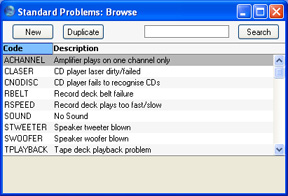
Standard Problems
The Standard Problem is a means of categorising problems and faults for reporting or prioritising. When you enter a Service Order, each item can be assigned a Standard Problem. This will be copied to all Work Orders created from the Service Order, and it is also printed in the Service Order Stock report.The 'Standard Problems: Browse' window lists the available Problems: double-click to modify or click [New] to create a new item.
Stock Settings
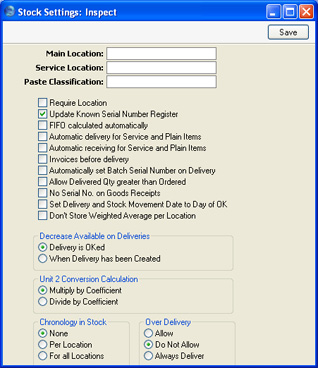
- Update Known Serial Number Register
- This option will be useful if the Items repaired by your business were probably also originally sold by you.
- The Known Serial Number register is a list of Serial Numbers for Items sold by your company. If this option is switched on, this register will be updated whenever an Invoice is approved and will be made available to the Service Orders module. When such an Item is subsequently brought in for repair, this register will allow Hansa to determine whether it is still under warranty using the Invoice Date and the Warranty Months field on the 'Recipe' card of the Item screen.
- The Known Serial Number register is updated when an Invoice is approved, not when a Delivery is issued. The warranty period begins with the Invoice Date, not the Delivery Date.
- The Known Serial Number register is a list of Serial Numbers for Items sold by your company. If this option is switched on, this register will be updated whenever an Invoice is approved and will be made available to the Service Orders module. When such an Item is subsequently brought in for repair, this register will allow Hansa to determine whether it is still under warranty using the Invoice Date and the Warranty Months field on the 'Recipe' card of the Item screen.
- Service Location
- Paste Special
Locations setting, Service Orders/Stock modules
- When receiving into service stock Items belonging to Customers which you are to repair (using the Service Stock Transaction register), they will be stored by default in the Location specified here.