Service Order Example and Work Flow
The Service Orders module in Standard ERP is equally suitable for use in businesses that specialise in servicing only and in companies that supply and then service their products. Starting on this page, we describe using an example the process of administering a Service Order from initial registration through to invoicing for a piece of equipment that will be repaired by the company from whom it was originally purchased.Service Order Example and Work Flow:
- Introduction
- Linking Items Sold to the Service Orders Module
- Entering Service Orders
- Taking Responsibility for Repair Items
- Instructing Technicians - Raising Work Orders
- Labour and Spare Parts - Work Sheets
- Creating Purchase Orders for Spare Parts
- Work Sheet Transactions
- Invoicing
- Returning Repair Items to Customers
Go back to:
- Home page for Service Orders manual
- Home page for Standard ERP manual
Service Order Example and Work Flow - Page 1 - Linking Items Sold to the Service Orders Module
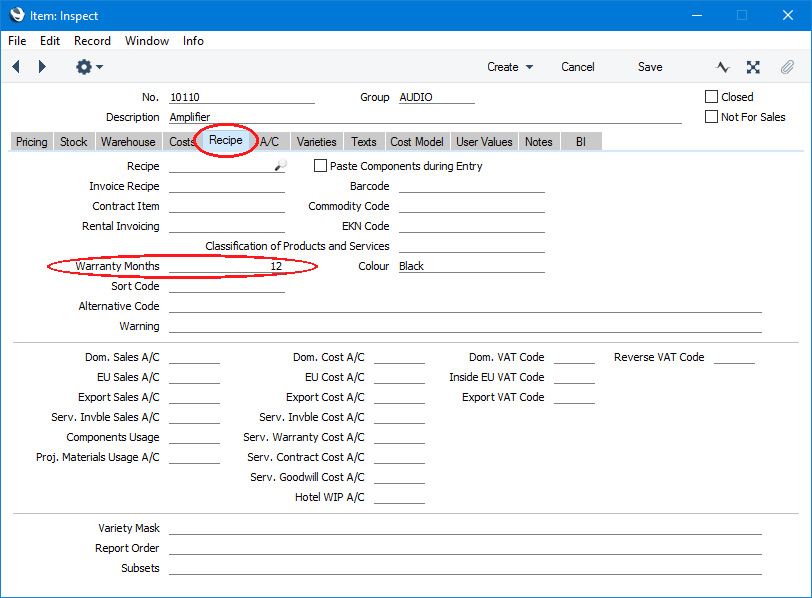
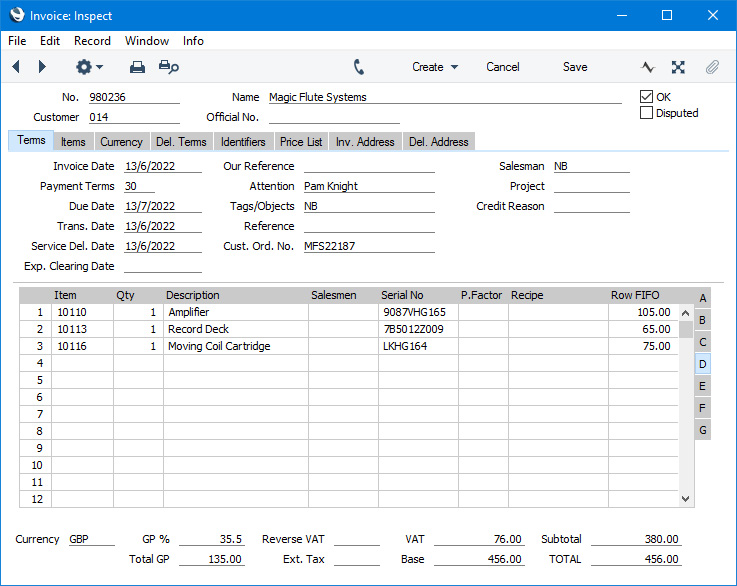
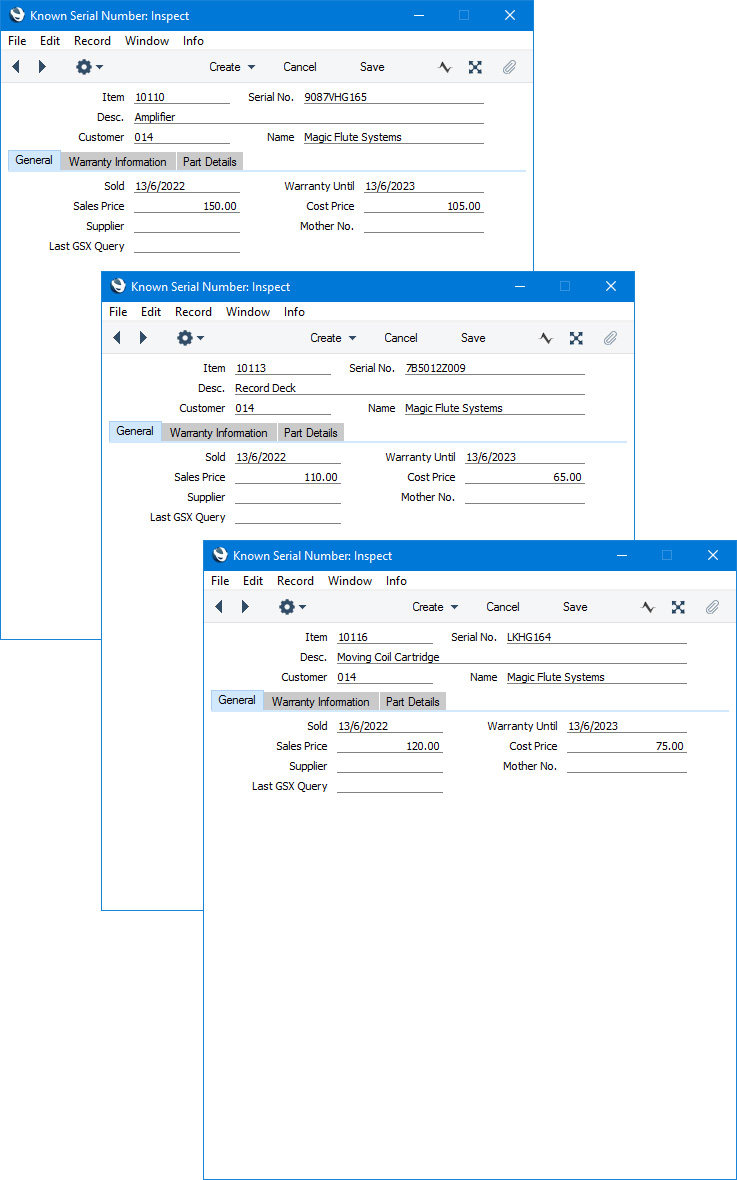
This example describes the recording of warranty information about Items sold by your company.---
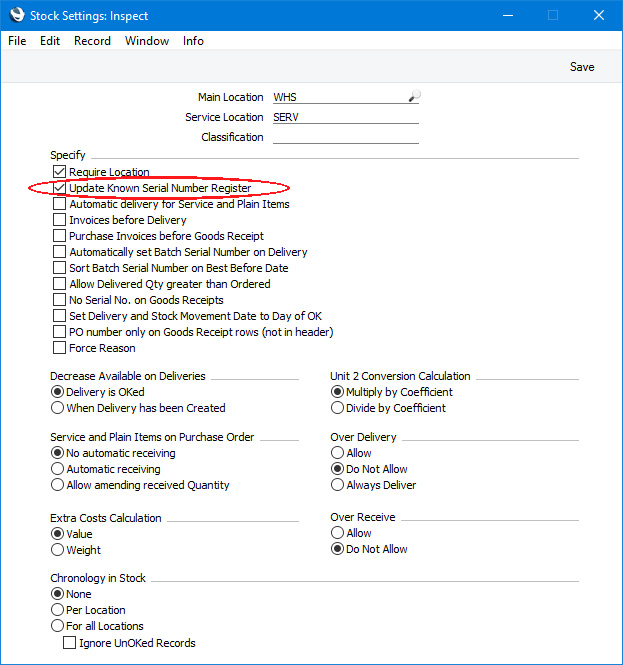
Before you start using the Service Orders module, one option to consider is to create a link between the Service Orders module and the Sales Ledger. If you choose to use this link, service personnel will have access to a list of all the serial numbered Items sold by your company together with the dates on which they were sold. To establish this link, open the Stock Settings setting (available in the Service Orders and Stock modules) and select the Update Known Serial Number Register option.
- Introduction
- Linking Items Sold to the Service Orders Module
- Entering Service Orders
- Taking Responsibility for Repair Items
- Instructing Technicians - Raising Work Orders
- Labour and Spare Parts - Work Sheets
- Creating Purchase Orders for Spare Parts
- Work Sheet Transactions
- Invoicing
- Returning Repair Items to Customers
Go back to:
- Home page for Service Orders manual
- Home page for Standard ERP manual
Service Order Example and Work Flow - Page 2 - Entering Service Orders
This example describes the first step in the Service Order process - entering a Service Order. In this example the Customer has purchased the Item requiring servicing from your company, as described here.---
In December 2022, the Customer returns the Amplifier because it has developed a fault. In the Service Orders module, start by creating a new Service Order:
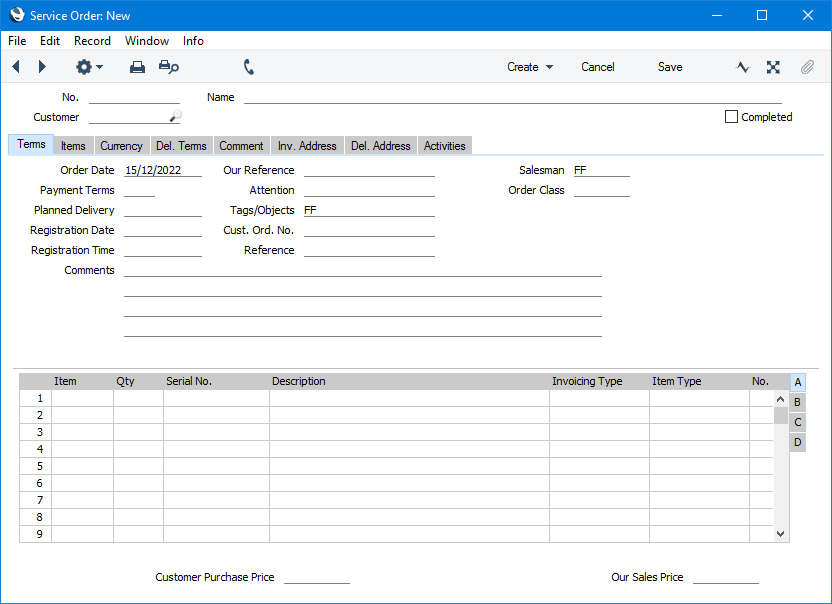
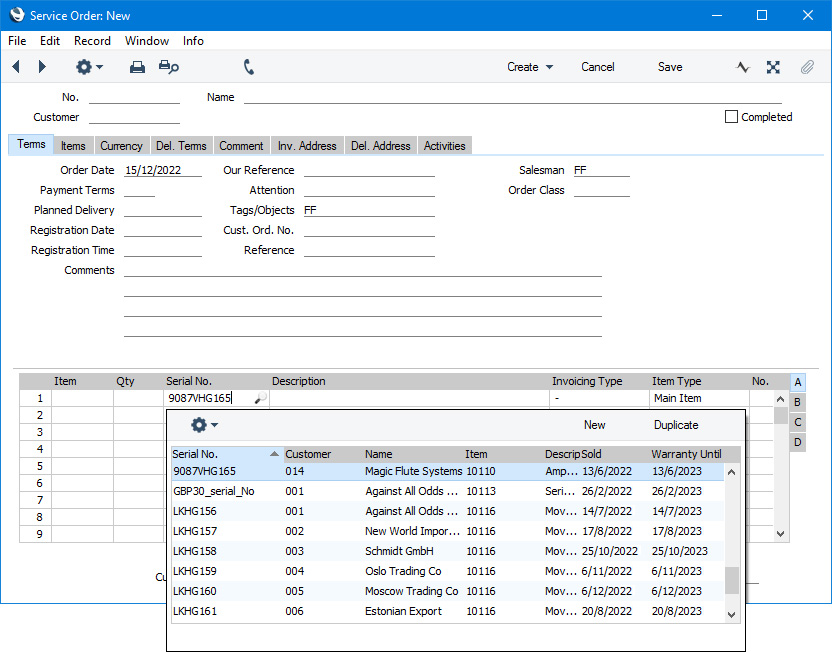
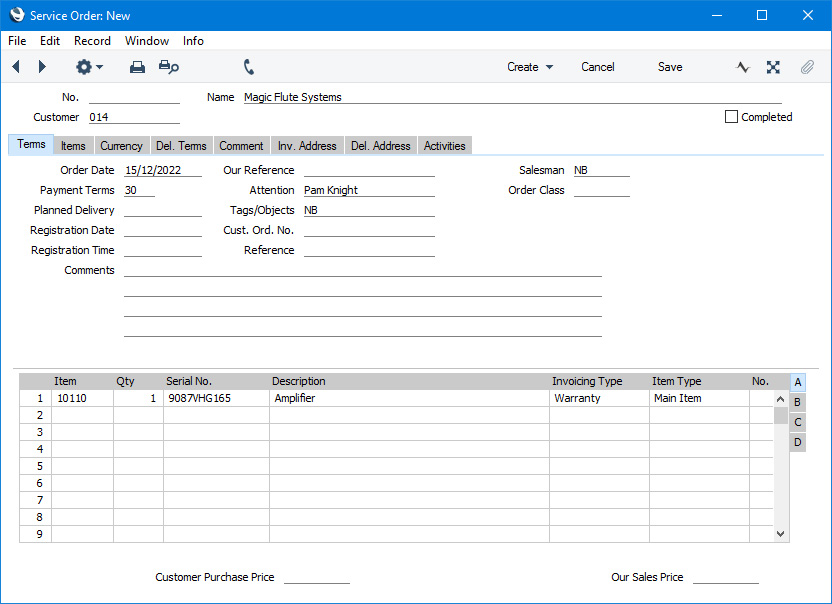
If the Item to be repaired is not one originally sold by your business, you will not be able to use the link to the Known Serial Number register to bring Customer and Item information into the Service Order. You should therefore enter this yourself. After specifying the Serial Number of the Item, open 'Paste Special' from the Invoicing Type field in the same row to specify whether the Item is under warranty. If you do not know yet, enter "-" as the Invoicing Type.
Service Order Example and Work Flow:
- Introduction
- Linking Items Sold to the Service Orders Module
- Entering Service Orders
- Taking Responsibility for Repair Items
- Instructing Technicians - Raising Work Orders
- Labour and Spare Parts - Work Sheets
- Creating Purchase Orders for Spare Parts
- Work Sheet Transactions
- Invoicing
- Returning Repair Items to Customers
Go back to:
- Home page for Service Orders manual
- Home page for Standard ERP manual
Service Order Example and Work Flow - Page 3 - Taking Responsibility for Repair Items
This example describes receiving an Item requiring servicing into your workshop. Before doing so, create a Service Order as described here.---
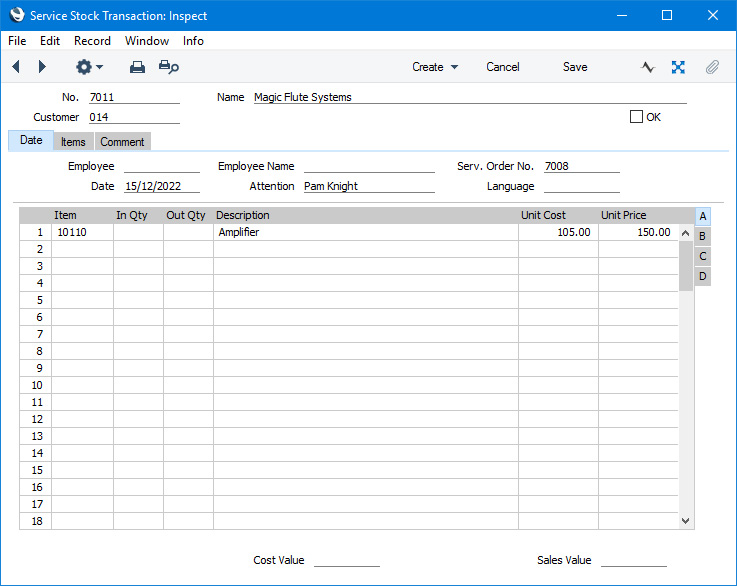
After saving the Service Order, you can receive the Amplifier in to the workshop. This signifies that it is now the company's responsibility. To do this, select 'Service Stock Transaction' from the Create menu (Windows/macOS) or + menu (iOS/Android). This creates a record in the Service Stock Transaction register, which is opened in a new window:
In addition or as an alternative to the Service Stock Transaction, if you are subscribing to the Internal Stock module you can create an Items In record to receive the Item that is to be repaired into your workshop or Service Location. The Items In record will add the Item being repaired to your internal stock so you will be able to use the Internal Stock List report in the Internal Stock module to list the Items you currently have in for repair. To do this, go back to the Service Order window and select 'Items In' from the Create or + menu. This creates a record in the Items In register (in the Internal Stock module), which is opened in a new window:
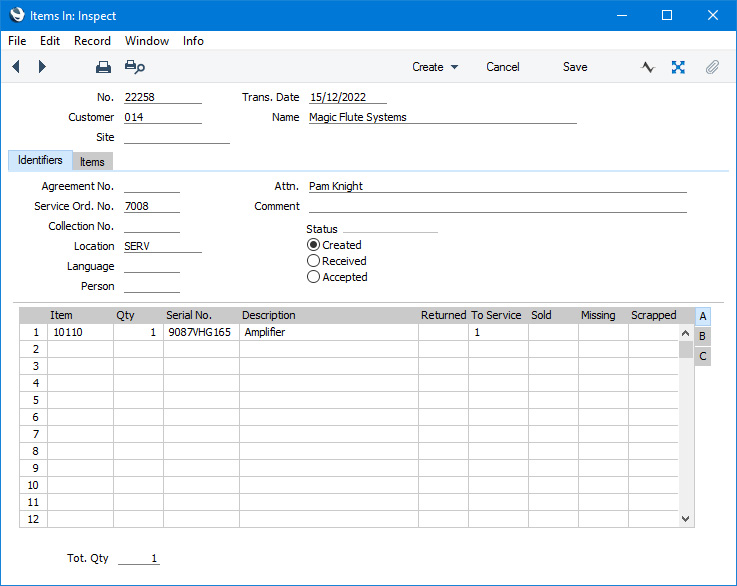
If the Item to be repaired is not one originally sold by your business, the Service Stock Transaction or the Items In record (whichever one you mark as OK or Accepted first) will create a record for the Item/Serial Number in the Known Serial Number register. Warranty information will be copied from an Items In record to the Known Serial Number record. It will not be copied from a Service Stock Transaction but you can add this information to a Known Serial Number record yourself.
Service Order Example and Work Flow:
- Introduction
- Linking Items Sold to the Service Orders Module
- Entering Service Orders
- Taking Responsibility for Repair Items
- Instructing Technicians - Raising Work Orders
- Labour and Spare Parts - Work Sheets
- Creating Purchase Orders for Spare Parts
- Work Sheet Transactions
- Invoicing
- Returning Repair Items to Customers
Go back to:
- Home page for Service Orders manual
- Home page for Standard ERP manual
Service Order Example and Work Flow - Page 4 - Instructing Technicians - Raising Work Orders
This example describes creating a Work Order to issue instructions to a technician after receiving an Item into the workshop for repair.---
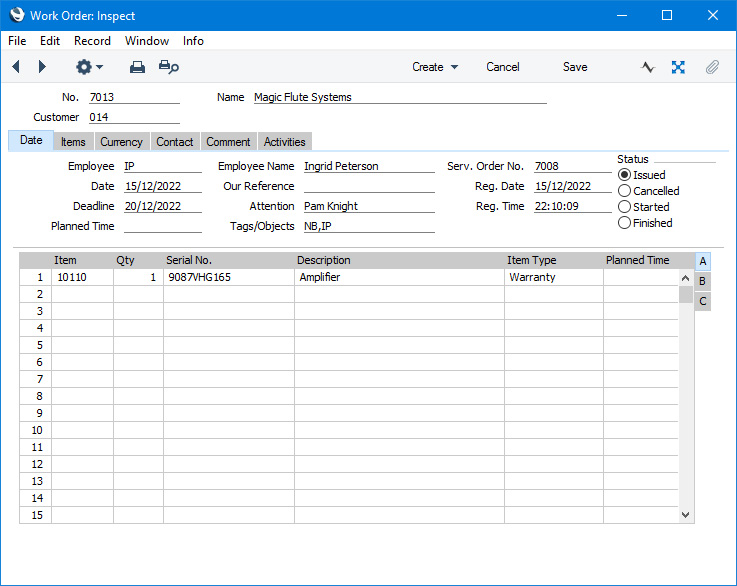
After creating the Service Order and receiving the Item to be repaired in to the workshop, an optional step is to generate a Work Order. Creating a Work Order is a mechanism that you can use to notify a technician that an Item has been received in for repair, together with details of the fault. In a smaller workshop, you may not need to use Work Orders.
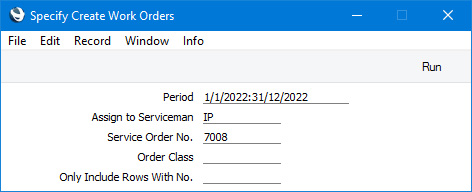
Return to the Service Order and choose 'Work Orders' from the Create menu (Windows/macOS) or + menu (iOS/Android). The following window appears, allowing you to assign the job to a particular technician (in this case, Ingrid Peterson):

- Introduction
- Linking Items Sold to the Service Orders Module
- Entering Service Orders
- Taking Responsibility for Repair Items
- Instructing Technicians - Raising Work Orders
- Labour and Spare Parts - Work Sheets
- Creating Purchase Orders for Spare Parts
- Work Sheet Transactions
- Invoicing
- Returning Repair Items to Customers
Go back to:
- Home page for Service Orders manual
- Home page for Standard ERP manual
Service Order Example and Work Flow - Page 5 - Labour and Spare Parts - Work Sheets
This example describes using Work Sheets to register time and spare parts against a Service Order.---
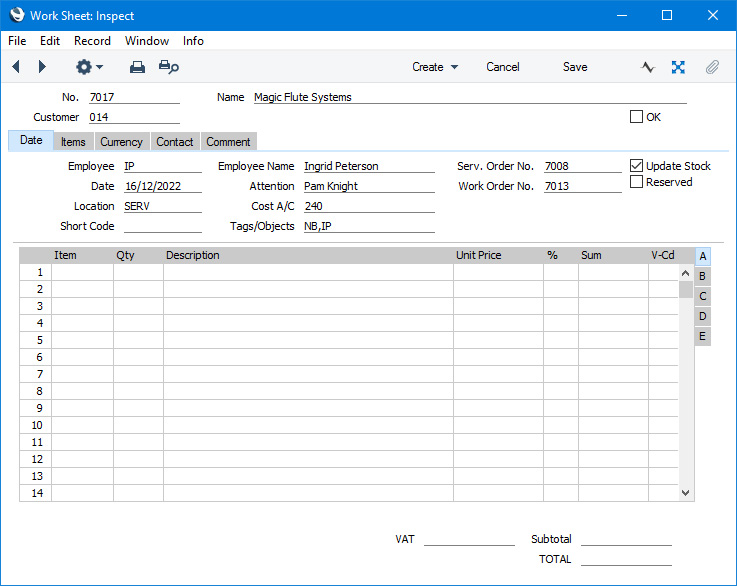
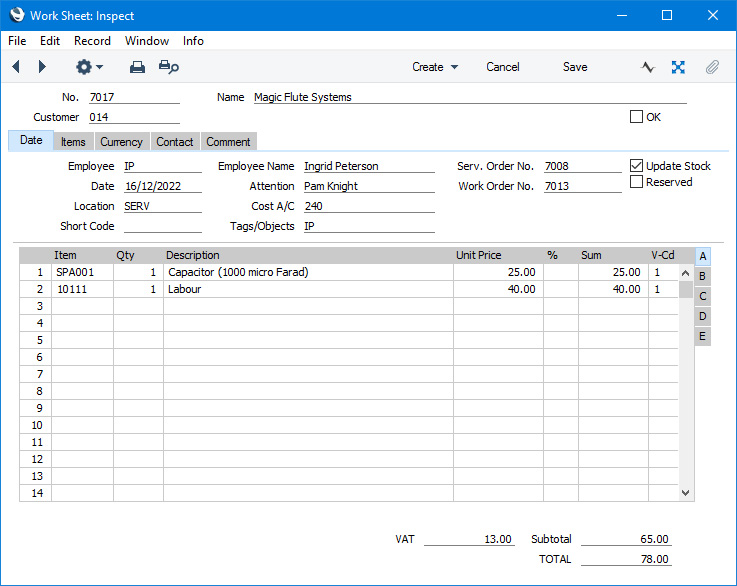
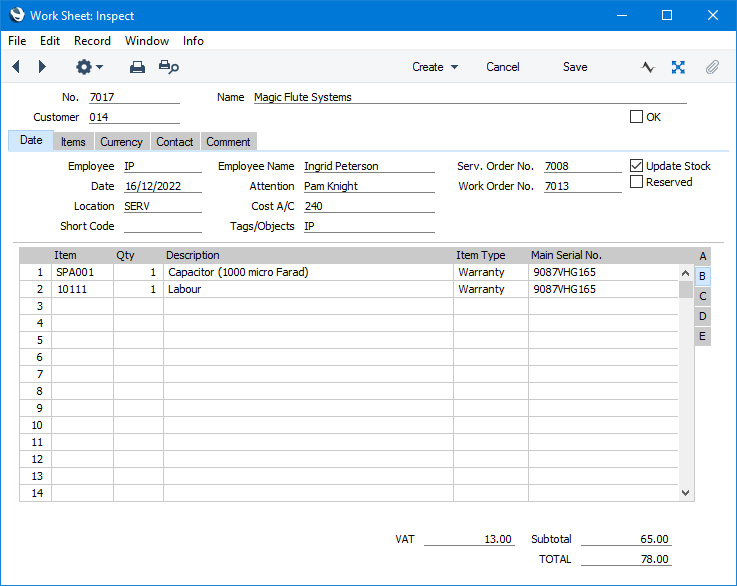
Whenever you spend time on a particular Service Order, you should create or update a record in the Work Sheet register to account for the time spent (even though, in this instance, the work is under warranty and so is not chargeable) and to list the spare parts used In many ways, Work Sheets are similar to Time Sheets in the Job Costing module in that they record the labour and any spare parts used in the completion of the repair.
You can create a Work Sheet directly from a Service Order. This will be most useful if you have not created any Work Orders from the Service Order. If you have created Work Orders, you can also create Work Sheets from those Work Orders. This allows you to organise service work around Work Orders or Service Orders. If you are working from Work Orders, an advantage of creating Work Sheets from Work Orders is that you will be able to create a single Purchase Order from a Work Order that includes Items on all connected Work Sheets.
To create a Work Sheet, open the Service Order or Work Order as appropriate and select 'Work Sheet' from the Create menu (Windows/macOS) or + menu (iOS/Android). A new record will be created in the Work Sheet register and opened immediately. In this example, the Work Sheet was created from the Work Order:
- Introduction
- Linking Items Sold to the Service Orders Module
- Entering Service Orders
- Taking Responsibility for Repair Items
- Instructing Technicians - Raising Work Orders
- Labour and Spare Parts - Work Sheets
- Creating Purchase Orders for Spare Parts
- Work Sheet Transactions
- Invoicing
- Returning Repair Items to Customers
Go back to:
- Home page for Service Orders manual
- Home page for Standard ERP manual
Service Order Example and Work Flow - Page 6 - Creating Purchase Orders for Spare Parts
This example describes creating spare parts for the spare parts that are needed for a repair.---
If you need to create a Purchase Order for the spare parts that you have listed on a Work Sheet, you can do so using either of the following methods:
- You can create the Purchase Order from the Work Sheet. This method will create Purchase Orders for the quantities in the Work Sheet without checking stock levels first. It will check the Purchase Item register and create Purchase Orders for the Suppliers in the relevant Default Purchase Item records.
- If you have created more than one Work Sheet from a Work Order, you can create a Purchase Order from the Work Order. The resulting Purchase Order will include the spare parts on each connected Work Sheet. This method will check stock levels and will only create a Purchase Order for the Items of which you have insufficient stock.
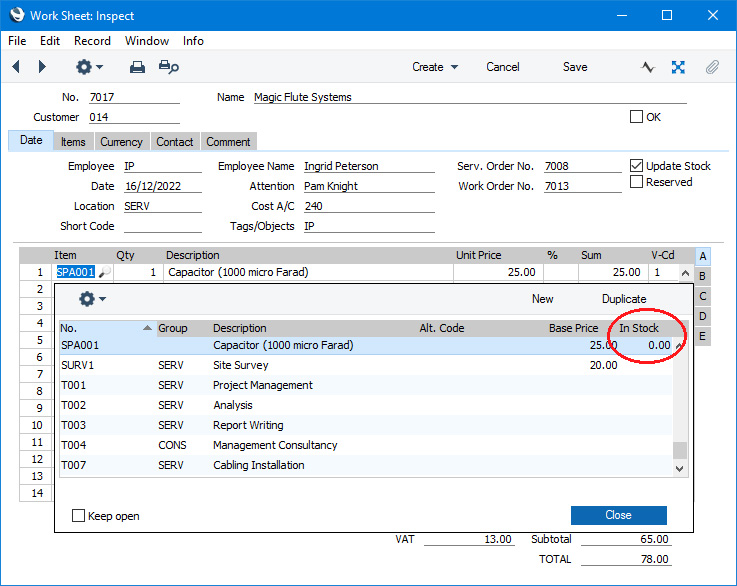
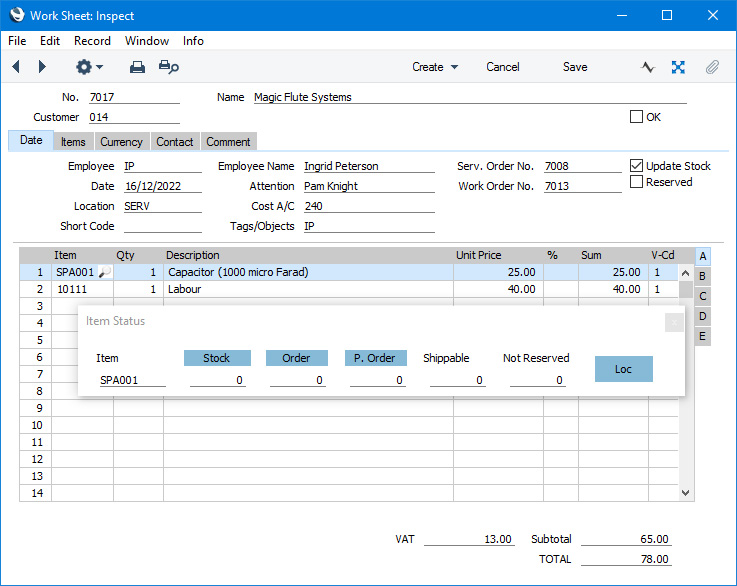
If you enter a Work Sheet before carrying out the work that it represents, you can check the stock levels of any of the Stocked Items (i.e. spare parts) you have added to the Work Sheet. Use any of the following methods to check stock levels:
- Click or tap in the Item Number field in any row and open 'Paste Special'. The right-hand column of the 'Paste Special' window will display the current stock level of each Item.
- If you are using Windows or macOS, you can use the 'Item Status' function. First click in any field in the Work Sheet row containing the Item you are interested in. Then open the Row menu by right-clicking (Windows) or ctrl-clicking (macOS) the row number and select the 'Item Status' function. The 'Item Status' window will be opened. Amongst other figures, this window will display the current stock level of the Item in the selected row.
- If you have prevented Over Delivery using the option in the Stock Settings setting, you will not be able to mark a Work Sheet as OK if there is insufficient stock of any of the listed Items.
- Return to the Work Order from which you created the Work Sheet. The easiest way to do this is to select 'Open Work Order' from the Operations menu (Windows/macOS) or Tools menu (iOS/Android).
- On the Create or + menu in the Work Order there is a 'Create Purchase Order' function. This looks at all Work Sheets related to the Work Order, compares their spare part requirement (i.e. Stocked Item requirement) with stock levels and generates a Purchase Order for the difference. This Purchase Order will then be opened in a new window:
The Number of the Work Order from which it was generated is shown on the 'Del. Terms' card while each row is linked to a Work Sheet as shown on flip C.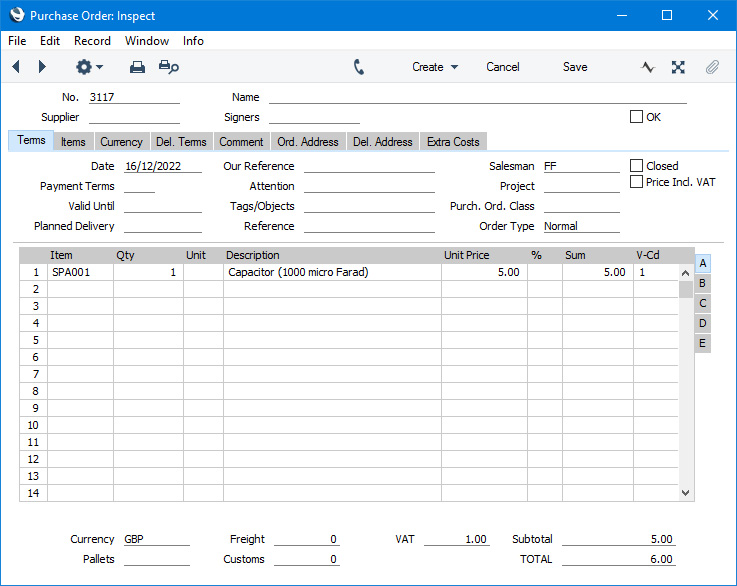
- Specify the appropriate Supplier and process the Purchase Order in the normal way. When the spare parts arrive, sign them in to stock using the Goods Receipt register, again in the normal fashion.
Service Order Example and Work Flow:
- Introduction
- Linking Items Sold to the Service Orders Module
- Entering Service Orders
- Taking Responsibility for Repair Items
- Instructing Technicians - Raising Work Orders
- Labour and Spare Parts - Work Sheets
- Creating Purchase Orders for Spare Parts
- Work Sheet Transactions
- Invoicing
- Returning Repair Items to Customers
Go back to:
- Home page for Service Orders manual
- Home page for Standard ERP manual
Service Order Example and Work Flow - Page 7 - Work Sheet Transactions
This example describes the consequences of marking a Work Sheet as OK.---
After receiving the spare parts into stock and carrying out the repair, you can mark the Work Sheet as OK and save it. This can have a number of consequences:
- If you selected the Update Stock option in the Work Sheet, the spare parts used (in this example, the capacitor) will be removed from stock (i.e. stock levels will be amended). Unless you have enabled doing so using Access Groups, you can't change the Update Stock option in a Work Sheet. It will be selected if you have also selected the Work Sheet Update Stock option in the Account Usage Service Order setting.
- If you are maintaining a stock valuation in the Nominal Ledger (cost accounting), a Nominal Ledger Transaction will be created, representing the removal from stock of the spare parts.
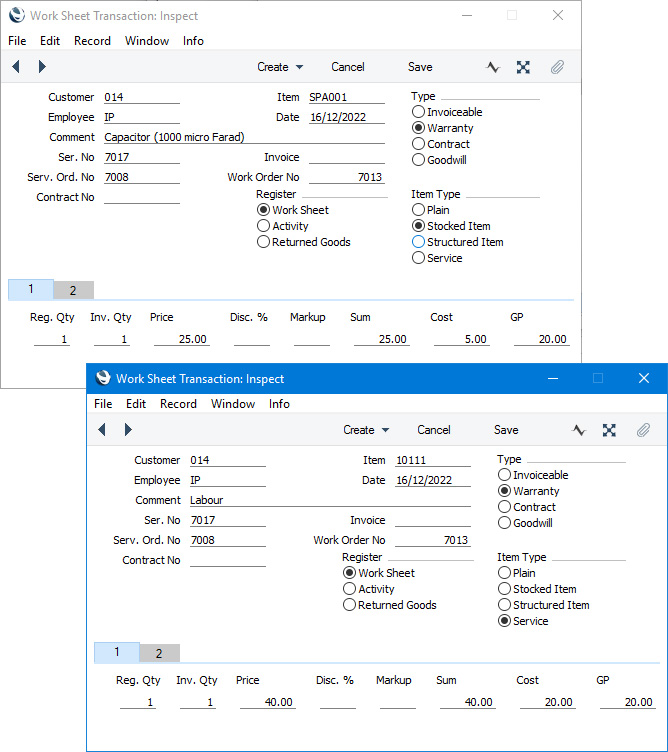
- Separate records will be created in the Work Sheet Transaction register for each row on the Work Sheet. The Work Sheet Transaction register is the mechanism by which instructions are conveyed to the invoicing routine as to how the work represented by the Work Sheet is to be charged. In the example, the Work Sheet Transaction shows that the work has been carried out under warranty, so no Invoice will result:
- Introduction
- Linking Items Sold to the Service Orders Module
- Entering Service Orders
- Taking Responsibility for Repair Items
- Instructing Technicians - Raising Work Orders
- Labour and Spare Parts - Work Sheets
- Creating Purchase Orders for Spare Parts
- Work Sheet Transactions
- Invoicing
- Returning Repair Items to Customers
Go back to:
- Home page for Service Orders manual
- Home page for Standard ERP manual
Service Order Example and Work Flow - Page 8 - Invoicing
This example describes creating an Invoice from a Service Order.---
After you have marked the Work Sheets relating to a particular repair as OK and saved them, the remaining tasks will be to raise the Invoice (where appropriate) and to return the repaired item to the Customer.
To raise an Invoice, open the parent Service Order and choose the 'Invoice' function from the Create menu (Windows/macOS) or + menu (iOS/Android). In the example that we have been following, the repair was carried out under warranty so no Invoice will result.
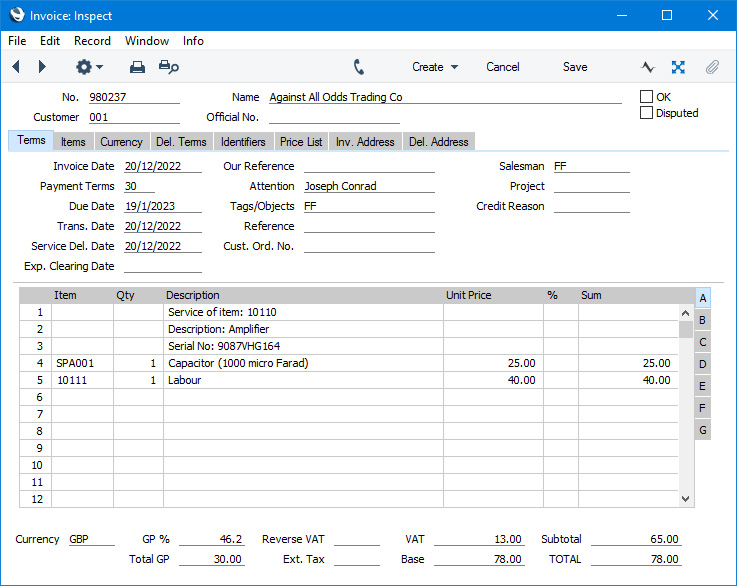
Where a repair is invoiceable, the function will search for all uninvoiced Work Sheet Transactions and include them in a new Invoice which will then be opened for checking. A sample is shown below:
If it transpires that you will need to carry out more work to complete the repair, create new Work Sheets as required and mark them as OK as you complete the work. You can then run the 'Create Invoice' function once again from the parent Service Order. Only the Work Sheet Transactions representing this additional work (i.e. the ones created from the later Work Sheets) will be included on the second Invoice.
Service Order Example and Work Flow:
- Introduction
- Linking Items Sold to the Service Orders Module
- Entering Service Orders
- Taking Responsibility for Repair Items
- Instructing Technicians - Raising Work Orders
- Labour and Spare Parts - Work Sheets
- Creating Purchase Orders for Spare Parts
- Work Sheet Transactions
- Invoicing
- Returning Repair Items to Customers
Go back to:
- Home page for Service Orders manual
- Home page for Standard ERP manual
Service Order Example and Work Flow - Page 9 - Returning Repair Items to Customers
This example describes returning an Item to the Customer after repair.---
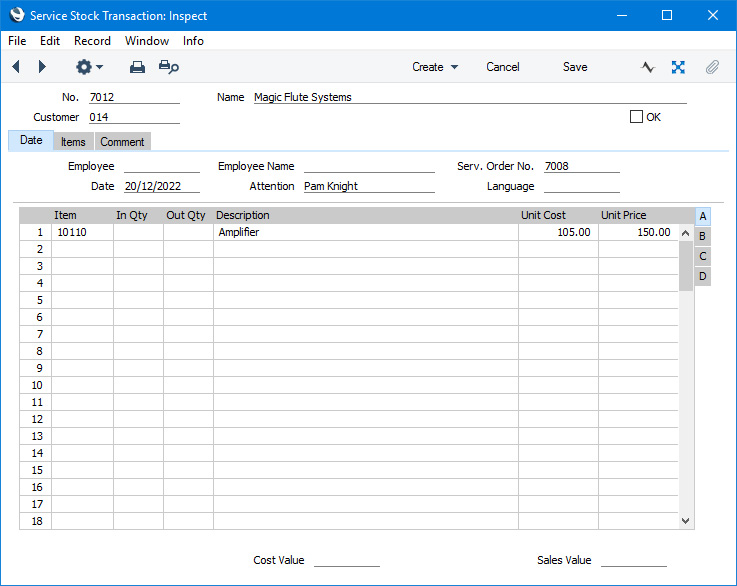
After you have processed the Invoice for a repair and closed the Invoice window, the top, active, window will once again contain the Service Order. You can now sign the repaired Amplifier out of the workshop, signifying that it is once again the responsibility of its owner. To do this, chooses 'Create Service Stock Transaction' from the Create menu (Windows/macOS) or + menu (iOS/Android). This will create a record in the Service Stock Transaction register, which will be opened in a new window:
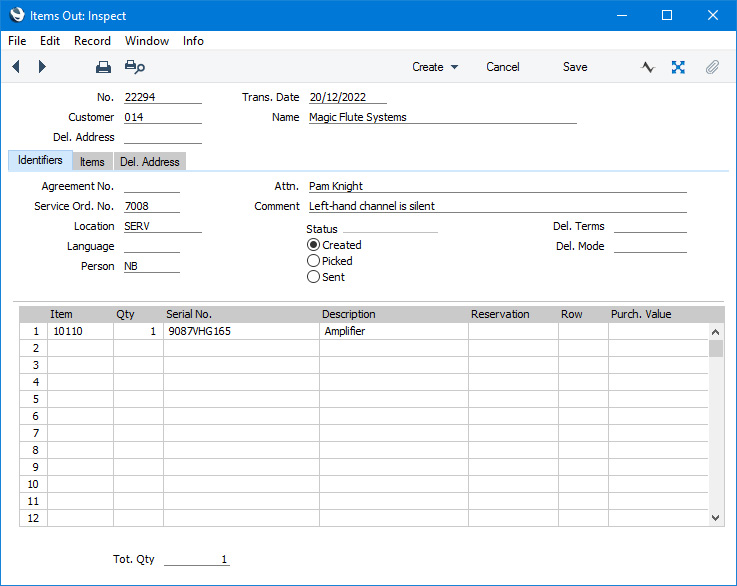
If you initially created an Items In record to receive the Item that is to be repaired into your workshop or Service Location (i.e. to add the Item being repaired to your internal stock), you should now create an Items Out record to remove it from internal stock. This will remove it from the Internal Stock List report. To do this, go back to the Service Order window and select 'Items Out' from the Create or + menu. This creates a record in the Items Out register (in the Internal Stock module), which is opened in a new window:
Finally, mark the Service Order as Completed, and save it. You will not be able to save unless you have marked all connected Work Orders as Finished or Cancelled, all connected Work Sheets as OK and all connected Activities as Done.
Service Order Example and Work Flow:
- Introduction
- Linking Items Sold to the Service Orders Module
- Entering Service Orders
- Taking Responsibility for Repair Items
- Instructing Technicians - Raising Work Orders
- Labour and Spare Parts - Work Sheets
- Creating Purchase Orders for Spare Parts
- Work Sheet Transactions
- Invoicing
- Returning Repair Items to Customers
Go back to:
- Home page for Service Orders manual
- Home page for Standard ERP manual