Introduction to the Item Group Register
The Item Group is a means of classifying and organising Items. By assigning Items of a similar nature to an Item Group, you can ensure those Items will use the same Sales and Cost Accounts, Stock Account and VAT Codes, saving you the work of having to specify these for each Item individually. Defining and assigning Item Groups also makes modification easier: if you need to change the Cost Account, for example, you only need make one change (to the Item Group), rather than many (to each of the Items). If necessary you can of course specify an Account or VAT Code in an individual Item record: this will take precedence over the Account or VAT Code specified in the Item Group.Assigning Items to Item Groups can also help with reporting. Many reports in Standard ERP allow you to list Items belonging to a particular Item Group.
If you need every Item to be assigned to an Item Group, select the Demand Item Group option in the Item Settings setting in the Sales Ledger. You can also specify a Default Item Group in the same setting: this will be copied to each new Item record.
---
The Item Group register in Standard ERP:
- Home page for Items and Pricing manual
- Home page for Standard ERP manual
Entering an Item Group
You can work with Item Groups using the Item Group register in the Sales Ledger or the Item Groups setting in the Pricing and Job Costing modules.To open the Item Group register, first ensure you are in the Sales Ledger or in the Pricing or Job Costing modules. Then, if you are using Windows or Mac OS X, click the [Registers] button (Sales Ledger) or the [Settings] button (Pricing and Job Costing modules) in the Navigation Centre and double-click 'Item Groups' in the resulting list. If you are using iOS or Android, tap the [Registers] button in the Navigation Centre (Sales Ledger) or select 'Settings' from the Tools menu (with 'wrench' icon, Pricing and Job Costing modules) and then tap 'Item Groups' in the resulting list.
Alternatively, if you are in the Pricing or Job Costing modules, click or tap the [Settings] button in the Navigation Centre and double-click or tap 'Item Groups' in the subsequent list.
To enter a new Item Group, select 'New ' from the Create menu (Windows/Mac OS X) or the + menu (iOS/Android). You can also use the Ctrl-N (Windows) or ⌘-N (Mac OS X) keyboard shortcut. Alternatively, highlight an Item Group similar to the one you want to enter and select 'Duplicate' from the same menu. If you don't want to open the 'Item Groups: Browse' window before creating a new record, you can also use the + menu in the Navigation Centre (all platforms).
Complete the Item Group record as appropriate, then save it using the [Save] button (Windows/Mac OS X) or by tapping √ (iOS/Android) and close the window by clicking the close box (Windows/Mac OS X) or by tapping < (iOS/Android). Then, close the browse window using the close box or < again.
Since the amount of information stored about each Item Group will not fit on a single screen, the Item Group window has been divided into six cards (if you have access to the BI module, there will be seven cards). At the top of each is the header. This contains the Item Group Number, Name and Class. Types fields. There are six (or seven) named buttons ('tabs') in the header.

If you are using iOS or Android, there will only be two tabs, marked 'Items' and 'Details'. If you tap 'Details', you will see every card except 'Texts' arranged vertically on screen. You can scroll down to see each one, or you can jump to any card by tapping on any tab and selecting the tab you want to go to.
Please follow the links below for descriptions of each card in the Item Group register:
- Header
- 'A/C' card
- 'Credit A/C' card
- 'Service A/C' card
- 'Cost Model' card
- 'Freight' card
- 'Texts' card
- 'BI' card
The Item Group register in Standard ERP:
- Introduction
- Entering an Item Group
- Deleting an Item Group
- Assisted Item Classification Entry
- Home page for Items and Pricing manual
- Home page for Standard ERP manual
Entering an Item Group - Header
This page describes the fields in the Header of the Item Group record. Please follow the links below for descriptions of the other cards:- Header
- 'A/C' card
- 'Credit A/C' card
- 'Service A/C' card
- 'Cost Model' card
- 'Freight' card
- 'Texts' card
- 'BI' card
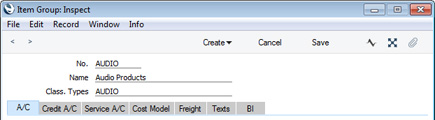
- No.
- Enter the code or number identifying the Item Group. You can use any combination of letters and numbers. There is a maximum of five characters.
- Name
- Enter the name or description of the Item Group.
- The Name will be shown in the 'Paste Special' list that you will use when assigning Item Groups to Items and elsewhere, so it should be descriptive enough to make the selection of the correct Item Group easy for all users.
- The Name will be shown in the 'Paste Special' list that you will use when assigning Item Groups to Items and elsewhere, so it should be descriptive enough to make the selection of the correct Item Group easy for all users.
- Class. Types
- Paste Special
Classification Types setting, Sales Ledger/CRM module
- If you enter a Classification Type (or several Classification Types separated by commas) here, you will then have to specify an Item Classification belonging to that Type or Types in every Item that belongs to the Item Group. If you forget to enter a Classification belonging to a required Classification Type, the following message will be shown when you try to save the Item record:
If you have assigned an Item to the Item Group before specifying a Classification Type in the Item Group, you will be asked to enter an appropriate Classification the next time you save the Item record.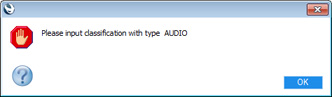
- Please refer here for more details about Item Classifications.
- This field also controls the Assisted Item Classification Entry feature, described here.
- Please refer here for more details about Item Classifications.
The Item Group register in Standard ERP:
- Introduction
- Entering an Item Group, including:
- Header
- 'A/C' card
- 'Credit A/C' card
- 'Service A/C' card
- 'Cost Model' card
- 'Freight' card
- 'Texts' card
- 'BI' card
- Header
- Deleting an Item Group
- Assisted Item Classification Entry
- Home page for Items and Pricing manual
- Home page for Standard ERP manual
Entering an Item Group - A/C Card
This page describes the fields on the 'A/C' card of the Item Group record. Please follow the links below for descriptions of the other cards:- Header
- 'A/C' card
- 'Credit A/C' card
- 'Service A/C' card
- 'Cost Model' card
- 'Freight' card
- 'Texts' card
- 'BI' card
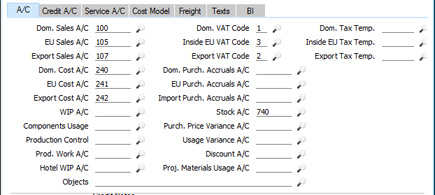
- Dom. Sales A/C, EU Sales A/C, Export Sales A/C
- Paste Special
Account register, Nominal Ledger/System module
- A Sales Account will be credited whenever you sell an Item, allowing you to record the levels of sales of different types of Items in the Nominal Ledger.
- Use these fields to specify Sales Accounts for each VAT Zone, to be used when you sell Items belonging to the Item Group when you have not specified Sales Accounts at the Item level. Please refer here for more details about how a Sales Account will be chosen when you sell an Item (i.e. when you specify an Item in a row in an Invoice, Order, Quotation or other sales transaction).
- If you need to use a dedicated Sales Account in the special case where an Invoice was created from a Service Order, specify that Account using the Service Invoiceable Sales Account field on the 'Service A/C' card.
- You can change the name of the EU Sales A/C field if it is not suitable. Using the VAT Zone Label setting in the Sales Ledger, you can replace the string "EU" with your own string (for example "SACU" in South Africa).
- Use these fields to specify Sales Accounts for each VAT Zone, to be used when you sell Items belonging to the Item Group when you have not specified Sales Accounts at the Item level. Please refer here for more details about how a Sales Account will be chosen when you sell an Item (i.e. when you specify an Item in a row in an Invoice, Order, Quotation or other sales transaction).
- Domestic VAT Code, EU VAT Code, Export VAT Code
- Paste Special
VAT Codes setting, Nominal Ledger
- On the sales side, the VAT Code will determine the Output VAT Account to be credited whenever you sell an Item and the rate at which VAT will be charged.
- On the purchase side, if you will be creating Purchase Invoices from Purchase Orders or Goods Receipts, the VAT Code will determine the Input VAT Account to be debited whenever you buy an Item and the rate at which VAT will be charged.
- Use these fields to specify VAT Codes for each VAT Zone, to be used when you sell and buy Items belonging to the Item Group when you have not specified VAT Codes at the Item level. Please refer here for more details about how a VAT Code will be chosen when you sell an Item (i.e. when you specify an Item in a row in an Invoice, Order, Quotation or other sales transaction) and here for more details about how a VAT Code will be chosen when you purchase an Item (i.e. when you specify an Item in a row in a Purchase Order or Goods Receipt).
- On the purchase side, if you will be creating Purchase Invoices from Purchase Orders or Goods Receipts, the VAT Code will determine the Input VAT Account to be debited whenever you buy an Item and the rate at which VAT will be charged.
- Dom. Tax Temp., Inside EU Tax Temp., Export Tax Temp.
- Paste Special
Tax Templates setting, Nominal Ledger
- In some countries, Tax Templates are used instead of VAT Codes to determine the rate at which VAT or sales tax will be charged whenever you sell an Item and the Output VAT Account(s) that will be credited with the VAT or sales tax value. VAT Codes should be used where each sales and purchase transaction (e.g. each row in an Invoice) is taxed at a single rate, while Tax Templates should be used where different taxes and/or several tax rates are applied to one transaction (e.g. to one row.
- If you need to use Tax Templates, you should select the Use Tax Templates for Tax Calculation option in the Transaction Settings setting in the Nominal Ledger. Wherever a VAT Code field would appear, this option will cause a Tax Template field to appear instead.
- On the purchase side, if you will be creating Purchase Invoices from Purchase Orders or Goods Receipts, the Tax Template will determine the Input VAT Account(s) to be debited whenever you buy an Item and the rate at which VAT or other tax will be charged.
- Use these fields to specify Tax Templates for each VAT Zone, to be used when you purchase Items belonging to the Item Group when you have not specified Tax Templates at the Item level. Please refer here for more details about how a Tax Template will be chosen when you sell an Item (i.e. when you specify an Item in a row in an Invoice, Order, Quotation or other sales transaction) and here for more details about how a Tax Template will be chosen when you purchase an Item (i.e. when you specify an Item in a row in a Purchase Order or Goods Receipt).
- If you need to use Tax Templates, you should select the Use Tax Templates for Tax Calculation option in the Transaction Settings setting in the Nominal Ledger. Wherever a VAT Code field would appear, this option will cause a Tax Template field to appear instead.
- Dom. Cost A/C, EU Cost A/C, Export Cost A/C
- Paste Special
Account register, Nominal Ledger/System module
- If you are maintaining stock valuations in the Nominal Ledger, a Cost of Sales Account will be debited with the calculated cost of goods whenever you sell a Stocked Item.
- Please refer here for full details about how the Cost of Sales Account will be chosen in an individual transaction.
- If you need Cost Accounts to be taken from Item Groups, select the Use Item Groups for Cost Accounts option in the Cost Accounting setting in the Stock module. If you select this option, it is recommended that you assign every Stocked Item to an Item Group and that you specify Cost, Purchase Accruals and Stock Accounts in every Item Group.
- In all cases, the correct Cost Account for the VAT Zone of the Customer will be used, so be sure to specify a Cost Account for each Zone.
- If you need to use dedicated Cost Accounts in the special case where the Cost of Sales postings are being made from Work Sheets, specify them using the Service Invoiceable Cost, Service Warranty Cost, Service Contract Cost and Service Goodwill Cost Account fields on the 'Service A/C' card.
- Similarly, if you need to use a dedicated Cost Account in Cost of Sales postings made from Deliveries that have been connected to Projects, specify that Account using the Proj. Materials Usage A/C field (described towards the end of this page).
- The cost of goods will be calculated using the Cost Model chosen on the 'Cost Model' card or in the Cost Accounting setting.
- As with all Accounts on this screen, make sure that the Account you want to use exists in the Account register (available in the Nominal Ledger and the System module) to ensure that Nominal Ledger Transactions will be generated without difficulty: no attempt will be made to post to non-existent Accounts.
- Please refer here for full details about how the Cost of Sales Account will be chosen in an individual transaction.
- Dom. Purch. Accruals A/C, EU Purch. Accruals A/C, Import Purch. Accruals A/C
- Paste Special
Account register, Nominal Ledger/System module
- If you are maintaining stock valuations in the Nominal Ledger, a Purchase Accruals Account will be credited whenever you receive a Stocked Item into stock and debited when you receive the Purchase Invoice for that Item.
- Please refer here for full details about how the Purchase Accruals Account will be chosen in each Purchase Order and Goods Receipt row.
- If you need Purchase Accruals Accounts to be taken from Item Groups, select the Use Item Groups for Cost Accounts option in the Cost Accounting setting in the Stock module. If you select this option, it is recommended that you assign every Stocked Item to an Item Group and that you specify Cost, Purchase Accruals and Stock Accounts in every Item Group.
- In all cases, the appropriate Purchase Accruals Account for the VAT Zone of the Supplier will be used, so be sure to specify a Purchase Accruals Account for each Zone.
- When you create a Purchase Invoice from a Purchase Order, the Purchase Accruals Accounts in the Purchase Order will be copied to the Purchase Invoice for debiting, providing you are using the Transfer Each Row Separately option in the Purchase Invoice Settings setting in the Purchase Ledger. But if you are using the Consolidate By Items And Project option, the Purchase Accruals Accounts in the Purchase Order will not be copied to the Purchase Invoice and instead they will be taken from these fields in the relevant Item Groups (if you are using the Use Item Groups for Cost Accounts option) or from the Account Usage Stock setting.
- Please refer here for full details about how the Purchase Accruals Account will be chosen in each Purchase Order and Goods Receipt row.
- WIP A/C
- Paste Special
Account register, Nominal Ledger/System module
- Production Operations allow you to carry out Productions in stages. You will be able to remove components from stock at any stage, and add the final Item to stock when the final stage is completed. Apart from the final stage, you will not be adding to stock, but you will need to account for the work carried out so far. The Work in Progress Account is used for this purpose. This Account will be debited with the value of each intermediate Production Operation, and credited with the value of the final Production Operation. Work in Progress postings will only be made if you are using the Per Production Operation option in the Account Usage Production setting in the Production module.
- In Transactions created from intermediate Production Operations, the Work In Progress Account will be taken from the Item Groups to which the component Items belong (if you are using the Use Item Groups for Cost Accounts option in the Cost Accounting setting in the Stock module) or from the Account Usage Production setting. In the Transaction created from the final Production Operation, the Work In Progress Account will be taken from the Item Group to which the Output Item belongs (if you are using the Use Item Groups for Cost Accounts option) or from the Account Usage Production setting.
- In Transactions created from intermediate Production Operations, the Work In Progress Account will be taken from the Item Groups to which the component Items belong (if you are using the Use Item Groups for Cost Accounts option in the Cost Accounting setting in the Stock module) or from the Account Usage Production setting. In the Transaction created from the final Production Operation, the Work In Progress Account will be taken from the Item Group to which the Output Item belongs (if you are using the Use Item Groups for Cost Accounts option) or from the Account Usage Production setting.
- Stock A/C
- Paste Special
Account register, Nominal Ledger/System module
- If you are maintaining stock valuations in the Nominal Ledger, a Stock Account will be credited with the calculated cost of goods whenever you sell a Stocked Item or otherwise remove it from stock. A Stock Account will also be debited whenever you receive a Stocked Item into stock. This Stock Account will be chosen in this order:
- It will be taken from the Location.
- It will be taken from these fields in the Item Group (only if you are using the Use Item Groups for Cost Accounts option in the Cost Accounting setting in the Stock module).
- The Stock Account in the Account Usage Stock setting will be used.
- If you are using the Use Item Groups for Cost Accounts option as mentioned in point 2 above, it is recommended that you assign every Stocked Item to an Item Group and that you specify Cost, Purchase Accruals and Stock Accounts in every Item Group.
- When you remove an Item from stock, the cost of goods will be calculated using the Cost Model chosen on the 'Cost Model' card or in the Cost Accounting setting in the Stock module.
- It will be taken from the Location.
- Components Usage, Production Control
- Paste Special
Account register, Nominal Ledger/System module
- The standard Nominal Ledger Transaction from a Production or Production Operation will credit the value of the components to a Stock Account, credit the Work Cost to a Production Components Account, and debit the value of the final Item to a Stock Account.
- This Transaction therefore simply removes the value of the components from stock and adds the value of the final Item to stock. It will therefore not be possible to distinguish the value of Items removed from stock to be used in Productions from the value of Items removed from stock for other purposes (e.g. delivered Items, depreciated Items). If you need to make such a distinction, specify Components Usage and Production Control Accounts in the Production Settings setting in the Production module, in the Item records for the components and/or in the Item Groups to which the components belong. If you do so, the Transaction will contain additional postings, debiting the value of the components to the Components Usage Account and crediting that value to the Production Control Account.
- The Components Usage and Production Control Accounts will both be taken from the Item Group to which the component Item belongs (if you are using the Use Item Groups for Cost Accounts option in the Cost Accounting setting in the Stock module), from the component Item (in the case of the Components Usage Account only) or from the Production Settings setting.
- This Transaction therefore simply removes the value of the components from stock and adds the value of the final Item to stock. It will therefore not be possible to distinguish the value of Items removed from stock to be used in Productions from the value of Items removed from stock for other purposes (e.g. delivered Items, depreciated Items). If you need to make such a distinction, specify Components Usage and Production Control Accounts in the Production Settings setting in the Production module, in the Item records for the components and/or in the Item Groups to which the components belong. If you do so, the Transaction will contain additional postings, debiting the value of the components to the Components Usage Account and crediting that value to the Production Control Account.
- Purch. Price Variance A/C
- Paste Special
Account register, Nominal Ledger/System module
- Please refer to the 'Price Variances' page for details about this Account.
- Usage Variance A/C
- Paste Special
Account register, Nominal Ledger/System module
- In normal circumstances, when you create a Goods Receipt or Stock Depreciation using the 'Stocktaking Comparison' Maintenance function, the result will be a credit to the Stock Gain Account (from the Goods Receipt) or a debit to the Stock Loss Account (from the Stock Depreciation). These Accounts will be taken from the Account Usage Stock setting.
- However, if the Type of the Location is "Production", if the Item belongs to an Item Group and if you are using the Use Item Groups for Cost Accounts option in the Cost Accounting setting, the Account specified here will be used in place of the Stock Gain and Stock Loss Accounts. In the case of Stock Depreciations, this Account will record wastage incurred during the Production process.
- However, if the Type of the Location is "Production", if the Item belongs to an Item Group and if you are using the Use Item Groups for Cost Accounts option in the Cost Accounting setting, the Account specified here will be used in place of the Stock Gain and Stock Loss Accounts. In the case of Stock Depreciations, this Account will record wastage incurred during the Production process.
- Prod. Work A/C
- Paste Special
Account register, Nominal Ledger/System module
- The Production Work Cost Account specified in the Account Usage Stock setting in the Stock module will usually be credited with the total Work Cost whenever you mark a Production record as Finished and save it. Usually, this will be the cost of labour required to build the assembled Items. However, if you are using the Use Item Groups for Cost Accounts option in the Cost Accounting setting and you enter the Work Cost in a row in the Production with an Item belonging to an Item Group in which you have specified a Prod. Work (Production Work Cost) Account, then that Account will be used instead.
- Discount A/C
- Paste Special
Account register, Nominal Ledger/System module
- If you sell an Item for a discounted price, the discounted price will usually be credited to the Sales Account.
- If you would like the full sales price of the Item to be credited to the Sales Account and the value of the discount to be debited to a separate Account, specify that separate Account here. You must also select the Post Discount option in the Account Usage S/L setting in the Sales Ledger (for most Invoices) or in the Hotel Settings setting in the Hotel module (for Invoices created from Hotel Reservations).
- If you do not specify a Discount Account in an Item Group, the Invoice Discount Account specified in the Account Usage S/L setting will be used.
- If you would like the full sales price of the Item to be credited to the Sales Account and the value of the discount to be debited to a separate Account, specify that separate Account here. You must also select the Post Discount option in the Account Usage S/L setting in the Sales Ledger (for most Invoices) or in the Hotel Settings setting in the Hotel module (for Invoices created from Hotel Reservations).
- Hotel WIP A/C
- Paste Special
Account register, Nominal Ledger/System module
- In the Hotel module, the 'Nightly Maintenance' Maintenance function has a Work in Progress Transaction option. This option will create a Nominal Ledger Transaction recording uninvoiced room occupation and extras, together with a second Transaction dated a day later that reverses the first Transaction. The value of the uninvoiced room occupation and extras will be posted to a WIP Account taken from the relevant Item records or from the Item Groups to which those Items belong. If no WIP Account is found, the WIP N/L Control A/C specified in the Hotel Settings setting will be used. The VAT element in these Transactions will be posted to the Hotel WIP A/C specified for the relevant VAT Codes. If a VAT Code does not have a Hotel WIP A/C, the VAT element will be posted to the standard Output A/C.
- Proj. Materials Usage A/C
- Paste Special
Account register, Nominal Ledger/System module
- This field allows you to specify a dedicated Account that will be debited with the calculated cost of Stocked Items when you remove them from stock using Deliveries that are connected to Projects.
- This can be useful when carrying out long-term Projects (e.g. building or construction Projects) where the Invoices will not be detailed and will not individually list the Items and materials that were used. In this circumstance, it can be desirable to post the costs of the materials to an Account dedicated to materials used for Projects rather than a Cost of Sales Account.
- The Project Materials Usage Account will be chosen as follows:
- It will be taken from the Item record.
- If you are using the Use Item Groups for Cost Accounts option in the Cost Accounting setting in the Stock module, it will be taken from this field in the Item Group to which the Item belongs.
- It will be taken from the Account Usage Stock setting.
- Note that the Project Materials Usage Account will not be used if you are posting Cost of Sales from Invoices with Accruals from Deliveries. It will only be used if you are posting Cost of Sales from Deliveries (or from Invoices, but using this option if not recommended if you are supplying Stocked Items using Deliveries that are connected to Projects).
- This can be useful when carrying out long-term Projects (e.g. building or construction Projects) where the Invoices will not be detailed and will not individually list the Items and materials that were used. In this circumstance, it can be desirable to post the costs of the materials to an Account dedicated to materials used for Projects rather than a Cost of Sales Account.
- Objects
- Paste Special
Object register, Nominal Ledger/System module
- You can assign up to 20 Objects to each Item Group, separated by commas. You might define separate Objects to represent different departments, cost centres or product types. This provides a flexible method of analysis that can be used in Nominal Ledger reports.
- If you need the same Objects to be used with every Item belonging to an Item Group, you can specify them in this field in the Item Group instead of in each Item individually.
- When you specify the Item in any transaction (e.g. in a Quotation, Order or Invoice), the Objects that you specify here will be copied in automatically if the Objects field in the Item record is empty.
- If you need the same Objects to be used with every Item belonging to an Item Group, you can specify them in this field in the Item Group instead of in each Item individually.
The Item Group register in Standard ERP:
- Introduction
- Entering an Item Group, including:
- Header
- 'A/C' card
- 'Credit A/C' card
- 'Service A/C' card
- 'Cost Model' card
- 'Freight' card
- 'Texts' card
- 'BI' card
- Header
- Deleting an Item Group
- Assisted Item Classification Entry
- Home page for Items and Pricing manual
- Home page for Standard ERP manual
Entering an Item Group - Credit A/C Card
This page describes the fields on the 'Credit A/C' card of the Item Group record. Please follow the links below for descriptions of the other cards:- Header
- 'A/C' card
- 'Credit A/C' card
- 'Service A/C' card
- 'Cost Model' card
- 'Freight' card
- 'Texts' card
- 'BI' card

Please refer to the description of the 'A/C' card for details about Sales Accounts and VAT Codes.
If you would like to use the same VAT Codes in Credit Notes but have them post to different Output VAT Accounts, you can specify those Output VAT Accounts on flip D in the VAT Codes setting. There is no need to select the Use Credit Sales Accounts option in this case.
If you do not specify a credit Sales Account or VAT Code for an Item Group, those on the 'Credit' card of the Account Usage S/L setting will be used. If any of these fields is blank, the standard Account or VAT Code from the 'Sales' card of the Account Usage S/L setting will be used instead.
---
The Item Group register in Standard ERP:
- Introduction
- Entering an Item Group, including:
- Header
- 'A/C' card
- 'Credit A/C' card
- 'Service A/C' card
- 'Cost Model' card
- 'Freight' card
- 'Texts' card
- 'BI' card
- Header
- Deleting an Item Group
- Assisted Item Classification Entry
- Home page for Items and Pricing manual
- Home page for Standard ERP manual
Entering an Item Group - Service A/C Card
This page describes the fields on the 'Service A/C' card of the Item Group record. Please follow the links below for descriptions of the other cards:- Header
- 'A/C' card
- 'Credit A/C' card
- 'Service A/C' card
- 'Cost Model' card
- 'Freight' card
- 'Texts' card
- 'BI' card

- Serv. Invoiceable Sales A/C
- Paste Special Account register, Nominal Ledger/System module
- This field allows you to specify a dedicated Account to be used as the Sales Account when you sell Items belonging to the Item Group in Invoices created from Service Orders.
- In such an Invoice, the Service Invoiceable Sales Account will be taken from the Item record or from the Item Group to which the Item belongs, as follows:
- If you are using the Use Item Groups for Cost Accounts option in the Cost Accounting setting in the Stock module, the Service Invoiceable Sales Account will be taken from the Item Group to which the Item belongs. If that is blank or the Item does not belong to an Item Group, the Service Invoiceable Sales Account will be taken from the Item record.
- If you are not using the Use Item Groups for Cost Accounts option, the Service Invoiceable Sales Account will be taken from the Item record. If that is blank, the Service Invoiceable Sales Account will be taken from the Item Group to which the Item belongs.
- This field allows you to specify a dedicated Account to be used as the Sales Account when you sell Items belonging to the Item Group in Invoices created from Service Orders.
- Serv. Invoiceable Cost A/C, Serv. Warranty Cost A/C, Serv. Contract Cost A/C, Serv. Goodwill Cost A/C
- Paste Special
Account register, Nominal Ledger/System module
- These fields allow you to specify dedicated Accounts that will be debited with the calculated cost of Stocked Items when you remove them from stock using Work Sheets (in the Service Orders module). Usually these Stocked Items will be spare parts that you use in repairs and maintenance.
- When you remove an Item from stock using a Work Sheet, the choice of Service Cost Account will depend on the Item Type specified on flip B of the Work Sheet row. For example, if the Item Type is "Warranty", the Service Warranty Cost Account will be debited. If the Item Type is "Goodwill", the Service Goodwill Cost Account will be debited.
- The Service Cost Account of the appropriate type will be taken from the Item record or from the Item Group to which the Item belongs, as follows:
- If you are using the Use Item Groups for Cost Accounts option in the Cost Accounting setting in the Stock module, the Service Cost Account will be taken from the Item Group to which the Item belongs. If that is blank or the Item does not belong to an Item Group, the Service Cost Account will be taken from the Item record.
- If you are not using the Use Item Groups for Cost Accounts option, the Service Cost Account will be taken from the Item record. If that is blank, the Service Cost Account will be taken from the Item Group to which the Item belongs.
- When you remove an Item from stock using a Work Sheet, the choice of Service Cost Account will depend on the Item Type specified on flip B of the Work Sheet row. For example, if the Item Type is "Warranty", the Service Warranty Cost Account will be debited. If the Item Type is "Goodwill", the Service Goodwill Cost Account will be debited.
The Item Group register in Standard ERP:
- Introduction
- Entering an Item Group, including:
- Header
- 'A/C' card
- 'Credit A/C' card
- 'Service A/C' card
- 'Cost Model' card
- 'Freight' card
- 'Texts' card
- 'BI' card
- Header
- Deleting an Item Group
- Assisted Item Classification Entry
- Home page for Items and Pricing manual
- Home page for Standard ERP manual
Entering an Item Group - Cost Model Card
This page describes the fields on the 'Cost Model' card of the Item Group record. Please follow the links below for descriptions of the other cards:- Header
- 'A/C' card
- 'Credit A/C' card
- 'Service A/C' card
- 'Cost Model' card
- 'Freight' card
- 'Texts' card
- 'BI' card
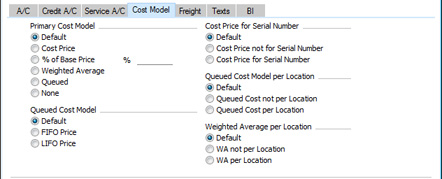
- Primary Cost Model
- The Cost Model is the method that will be used to calculate the value of the Items that you hold in stock.
- For example, if you are maintaining stock valuations in the Nominal Ledger ("cost accounting"), the Cost Model is the valuation method that will be used to calculate the value to be debited to the Cost Account and credited to the Stock Account whenever you sell an Item or otherwise remove it from stock. In other words, the Cost Model will be used to calculate the Item's Cost of Sales value. You can specify the Cost and Stock Accounts on the 'A/C' card.
- The Cost Model will also be used by the Stock List report to calculate the value of your stock.
- Whenever it is necessary to calculate the stock value of an Item, the Cost Model will be chosen as follows:
- The Cost Model will be taken from the 'Cost Model' card of the Item record.
- If the Cost Model in the Item is Default, if you are using the Use Item Groups for Cost Model option in the Cost Accounting setting in the Stock module and if the Item belongs to an Item Group, the Cost Model will be determined by these options in the Item Group.
- In all other cases (e.g. the Cost Model in the Item Group is Default, you are not using the Use Item Groups for Cost Model option and/or the Item does not belong to an Item Group), the Cost Model will be taken from the Cost Accounting setting.
- Please refer to the description of the Cost Accounting setting for details about each Cost Model.
- For example, if you are maintaining stock valuations in the Nominal Ledger ("cost accounting"), the Cost Model is the valuation method that will be used to calculate the value to be debited to the Cost Account and credited to the Stock Account whenever you sell an Item or otherwise remove it from stock. In other words, the Cost Model will be used to calculate the Item's Cost of Sales value. You can specify the Cost and Stock Accounts on the 'A/C' card.
- Queued Cost Model
- If you set the Primary Cost Model (above) to Queued, use these options to choose whether you want Items belonging to the Item Group to use the default (set in the Cost Accounting setting), FIFO (First In First Out) or LIFO (Last In First Out) queue.
- As with the Primary Cost Model itself, the choice of Queue will be made as follows:
- The Queue will be taken from the 'Cost Model' card of the Item record.
- If the choice of Queue in the Item is Default, if you are using the Use Item Groups for Cost Model option in the Cost Accounting setting in the Stock module and if the Item belongs to an Item Group, the Queue will be determined by these options in the Item Group.
- In all other cases (e.g. the choice of Queue in the Item Group is Default, you are not using the Use Item Groups for Cost Model option and/or the Item does not belong to an Item Group), the Queue will be taken from the Cost Accounting setting.
- FIFO
- When you deliver an Item belonging to the Item Group or otherwise remove it from stock, the individual unit that you received into stock first will be the unit that you deliver first. In the Stock List report, Items will be valued in chronological order.
- LIFO
- When you deliver an Item belonging to the Item Group or otherwise remove it from stock, the individual unit that you received into stock last will be the unit that you deliver first. In the Stock List report, Items will be valued in reverse chronological order.
- When you deliver an Item belonging to the Item Group or otherwise remove it from stock, the individual unit that you received into stock first will be the unit that you deliver first. In the Stock List report, Items will be valued in chronological order.
- As with the Primary Cost Model itself, the choice of Queue will be made as follows:
- Cost Price for Serial Number
- The Cost Price for Serial Number option is in effect an additional Cost Model that you can use with Serial Numbered Items. It allows you to ensure an individual Serial Number remains connected to its exact Cost Price from the moment you receive it into stock until the time you remove it from stock. Please refer to the description of the Cost Accounting setting for full details.
- As with the Primary Cost Model and Queue options above, you can enable or disable this option at the Item level, at the Item Group level (if you are using the Use Item Groups for Cost Model option in the Cost Accounting setting) or at the default level (set in the Cost Accounting setting).
- As with the Primary Cost Model and Queue options above, you can enable or disable this option at the Item level, at the Item Group level (if you are using the Use Item Groups for Cost Model option in the Cost Accounting setting) or at the default level (set in the Cost Accounting setting).
- Queued Cost Model per Location
- If you are using Locations, two FIFO/LIFO queues will be maintained for each Item. The first will be a single overall FIFO/LIFO queue for each Item, Second, separate queues will be maintained for each Item for each Location.
- Use these options to decide which of the two queues will be used to calculate stock values in the Stock List and to calculate the value of outward cost accounting transactions. Please refer to the description of the Cost Accounting setting for full details.
- You can enable or disable this option at the Item level, at the Item Group level (if you are using the Use Item Groups for Cost Model option in the Cost Accounting setting) and/or at the default level (set in the Cost Accounting setting).
- Use these options to decide which of the two queues will be used to calculate stock values in the Stock List and to calculate the value of outward cost accounting transactions. Please refer to the description of the Cost Accounting setting for full details.
- Weighted Average per Location
- If you are using Locations, two Weighted Average figures will be maintained for each Item. The first will be a single overall Weighted Average figure for an Item, visible on the 'Costs' card of each Item record. Second, separate Weighted Average figures will be maintained for each Item in each Location. These figures will be visible in the Weighted Average setting.
- Use these options to decide which of the two Weighted Average figures will be used to calculate stock values in the Stock List and to calculate the value of outward cost accounting transactions. Please refer to the description of the Cost Accounting setting for full details.
- You can enable or disable this option at the Item level, at the Item Group level (if you are using the Use Item Groups for Cost Model option in the Cost Accounting setting) and/or at the default level (set in the Cost Accounting setting).
- Use these options to decide which of the two Weighted Average figures will be used to calculate stock values in the Stock List and to calculate the value of outward cost accounting transactions. Please refer to the description of the Cost Accounting setting for full details.
The Item Group register in Standard ERP:
- Introduction
- Entering an Item Group, including:
- Header
- 'A/C' card
- 'Credit A/C' card
- 'Service A/C' card
- 'Cost Model' card
- 'Freight' card
- 'Texts' card
- 'BI' card
- Header
- Deleting an Item Group
- Assisted Item Classification Entry
- Home page for Items and Pricing manual
- Home page for Standard ERP manual
Entering an Item Group - Freight Card
This page describes the fields on the 'Freight' card of the Item Group record. Please follow the links below for descriptions of the other cards:- Header
- 'A/C' card
- 'Credit A/C' card
- 'Service A/C' card
- 'Cost Model' card
- 'Freight' card
- 'Texts' card
- 'BI' card
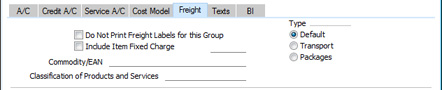
- Do Not Print Freight Labels for this Group
- You can prevent the printing of Freight Labels for certain Items. To do so, place these Items in an Item Group in which you have selected the Do Not Print Freight Labels for this Group option. This is useful for Service Items such as labour.
- Please refer here for details about printing Freight Labels.
- Please refer here for details about printing Freight Labels.
- Type
- Use these options to indicate the type of Item that is likely to belong to the Item Group.
When you design the Form Templates that will be used when printing Orders and Invoices, you can include the following fields if you want to print subtotals for each Type:
- Total Goods
- Prints the total value excluding VAT of Items belonging to Item Groups in which the Type is "Default" and of Items not belonging to Item Groups.
- Total Transport Cost
- Prints the total value excluding VAT of Items belonging to Item Groups in which the Type is "Transport".
- Total for Packages Item
- Prints the total value excluding VAT of Items belonging to Item Groups in which the Type is "Packages".
- Subtotal without packages
- Prints Total Goods + Total Transport Cost
- Total Discount without packages
- Prints the total discount offered on Items belonging to Item Groups in which the Type is "Default" or "Transport" and of Items not belonging to Item Groups.
- Total Goods
- Commodity/EAN
- Paste Special
Commodity Code register, Customs module/Commodity Codes setting, Hotel module
- This field is used by the Regional Sales Tax and Regional Perception Tax calculations in Argentina. In configuring these taxes using the Regional Sales Taxes and Regional Perception Taxes settings in the Sales Ledger, you can specify separate tax rates for each Commodity Code. When you sell an Item (i.e. include it in an Invoice or Order row), the appropriate tax rate will be applied to the Item depending on the Commodity Code in the Item record or, if blank, in the Item Group to which the Item belongs. Please refer to your local HansaWorld representative for more details.
- You should not use this field to record Commodity Codes for Intrastat reporting in the EU. Instead, use the Commodity field in each Item record.
- You should not use this field to record Commodity Codes for Intrastat reporting in the EU. Instead, use the Commodity field in each Item record.
- Classification of Products and Services
- This field is used in Brazil and Kenya. In Brazil, a Classification of Products and Services code for each Item on an Invoice should be included when sending the Invoice as an eInvoice (in the <NCM> tag). In Kenya, a Classification of Products and Services code for each Item should be included in the iTax (Kenya) report. In both cases, the Classification of Products and Services code will be taken from the Item record or, if blank, from the Item Group to which the Item belongs.
The Item Group register in Standard ERP:
- Introduction
- Entering an Item Group, including:
- Header
- 'A/C' card
- 'Credit A/C' card
- 'Service A/C' card
- 'Cost Model' card
- 'Freight' card
- 'Texts' card
- 'BI' card
- Header
- Deleting an Item Group
- Assisted Item Classification Entry
- Home page for Items and Pricing manual
- Home page for Standard ERP manual
Entering an Item Group - Texts Card
This page describes the fields on the 'Texts' card of the Item Group record. Please follow the links below for descriptions of the other cards:- Header
- 'A/C' card
- 'Credit A/C' card
- 'Service A/C' card
- 'Cost Model' card
- 'Freight' card
- 'Texts' card
- 'BI' card
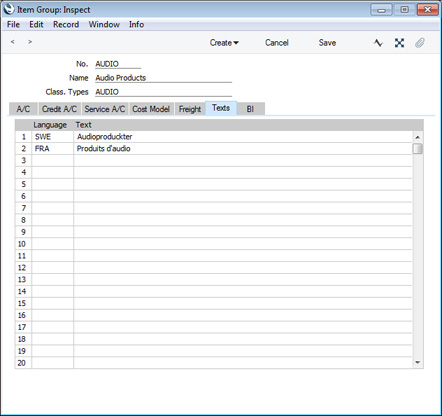
Please refer to the description of the 'Texts' card of the Item record for an illustrated example.
The translation of the Item Group Name will also be printed in the Price List report, if you specify a Language in the report specification report, choose the External option and sort the report by Item Group.
If you are using iOS or Android, tap the 'Items' tab at the top of the Item Group window to go to the 'Texts' card. Add a row by tapping the + button below the matrix. To remove a row, long tap on the row number on the left of the row and select 'Delete Row' from the resulting menu. To insert a row, long tap on the row number where the insertion is to be made and select 'Insert Row' from the resulting menu.
---
The Item Group register in Standard ERP:
- Introduction
- Entering an Item Group, including:
- Header
- 'A/C' card
- 'Credit A/C' card
- 'Service A/C' card
- 'Cost Model' card
- 'Freight' card
- 'Texts' card
- 'BI' card
- Header
- Deleting an Item Group
- Assisted Item Classification Entry
- Home page for Items and Pricing manual
- Home page for Standard ERP manual
Entering an Item Group - BI Card
This page describes the 'BI' card of the Item Group record. Please follow the links below for descriptions of the other cards:- Header
- 'A/C' card
- 'Credit A/C' card
- 'Service A/C' card
- 'Cost Model' card
- 'Freight' card
- 'Texts' card
- 'BI' card
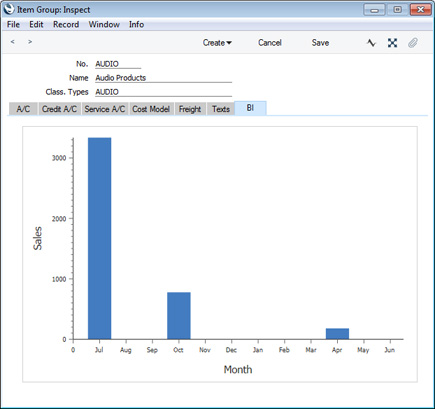
---
The Item Group register in Standard ERP:
- Introduction
- Entering an Item Group, including:
- Header
- 'A/C' card
- 'Credit A/C' card
- 'Service A/C' card
- 'Cost Model' card
- 'Freight' card
- 'Texts' card
- 'BI' card
- Header
- Deleting an Item Group
- Assisted Item Classification Entry
- Home page for Items and Pricing manual
- Home page for Standard ERP manual
Deleting an Item Group
You can delete an Item Group at any time. Follow these steps:- Open the Item Group register as described on the Entering an Item Group page.
- In the 'Item Groups: Browse' window, find the Item Group you want to remove, and open it by double-clicking (Windows/Mac OS X) or tapping (iOS/Android).
- Select 'Delete' from the Record menu (which has a 'cog' icon if you are using iOS or Android).
The Item Group will be removed permanently, and the window will now show the preceding Item Group.
- Close the window using the close box (Windows/Mac OS X) or by tapping < (iOS/Android).
! | You cannot undo the deletion of an Item Group. |
---
The Item Group register in Standard ERP:
- Introduction
- Entering an Item Group
- Deleting an Item Group
- Assisted Item Classification Entry
- Home page for Items and Pricing manual
- Home page for Standard ERP manual
Assisted Item Classification Entry
There are two methods that you can use to organise records in the Item register: Item Groups and Item Classifications. You can only assign an Item to a single Item Group, but you can give an Item more than one Classification. Classifications are therefore more versatile, allowing you to categorise your Items in several different ways. For example, you can use Classifications to specify various specifications for televisions.If you are using both Item Groups and Classifications, the Assisted Item Classification Entry feature will help you choose the correct Classifications when entering Item records, as follows:
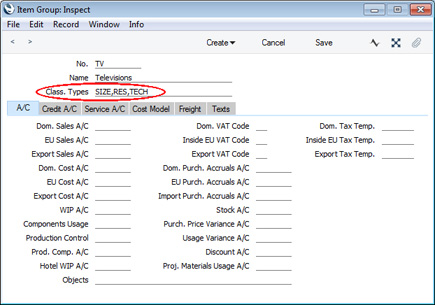
- The header of the Item Group record has a Class. Types field. If you enter a Classification Type (or several Classification Types separated by commas) in that field and then assign the Item Group to an Item record, you will then have to specify a Classification belonging to that Type or Types in that Item record before you can save it. For example, all Items belonging to the Item Group illustrated below must have Classifications belonging to the SIZE, RES and TECH Classification Types:
- When you enter an Item record belonging to the Item Group, activate the 'Paste Special' feature using Ctrl-Enter or ⌘-Enter from the Classification field as usual. Because you have assigned an Item Group containing some compulsory Classification Types to the Item, the 'Assisted Item Classification Entry' window will open instead of the usual 'Paste Special' list:
The illustration of the Item Group earlier on this page shows that it requires Classifications belonging to two different Classification Types. As a result, the 'Assisted Item Classification Entry' window has two fields, one for each required Classification Type. (The maximum number of Classification Types that can be required by a particular Item Group is eight.)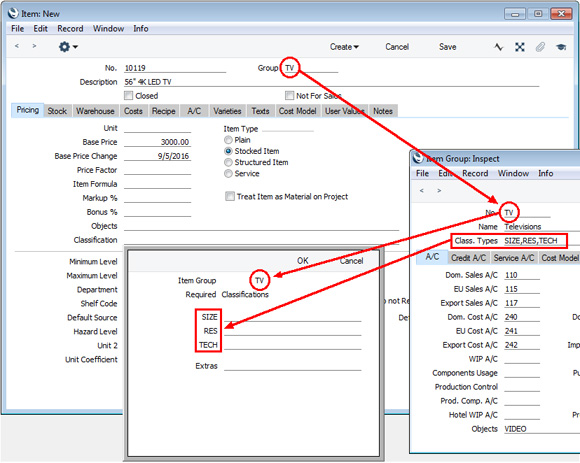
- Using 'Paste Special' in the usual way, enter a Classification belonging to each Type in the appropriate field. 'Paste Special' here will only list the Classifications belonging to the Type in question. Use the Extras field if you want to add another Classification belonging to a third Type.
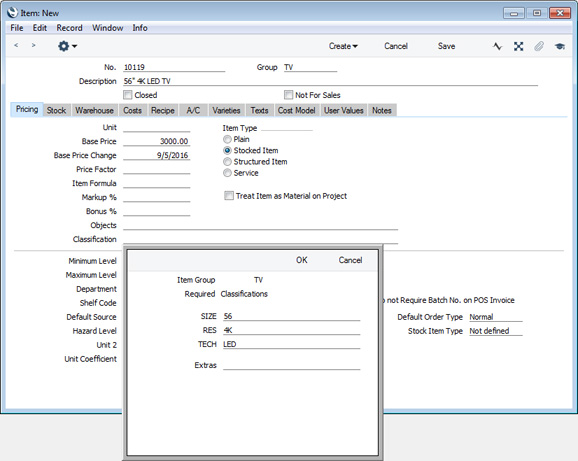
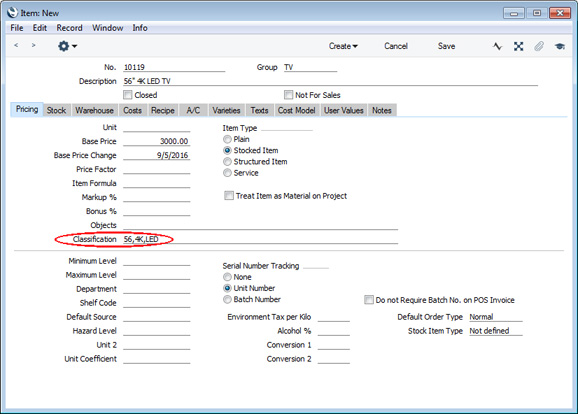
- If you close the 'Assisted Item Classification Entry' window by clicking (Windows/Mac OS X) or tapping (iOS/Android) the [OK] button, the Classifications will be added to anything previously in the Classification field in the Contact record.
The Item Group register in Standard ERP:
- Introduction
- Entering an Item Group
- Deleting an Item Group
- Assisted Item Classification Entry
- Home page for Items and Pricing manual
- Home page for Standard ERP manual