Back-uper
När du har arbetat klart med HansaWorld för dagen så rekommenderar vi att en man gör en databastextbackup. Det kan verka onödigt att göra en backup varje dag men då det tar så lite tid så är det en bra investering för framtiden. Det är även en bra idé att spara undan backuper på ett annat ställe än på den dator eller server som HansaWorld körs på om det händer något med hårdvaran.Eftersom Hansa är ett affärssystem som ofta hanterar all ekonomisk information om ett företag, så är det extra viktigt att backa upp servern. Om du skulle förlora all din data och information så som fakturor, inbetalningar och verifikat, kan du hamna i besvärliga situationer gentemot myndigheter och liknande. Se till så att du gör en backup varje gång du arbetar i ditt system och döp dina backuper så att du lätt kan hitta tillbaka till rätt datum och återställa databasen om olyckan skulle vara framme.
Om du får ett virus på din dator måste du börja med att försöka få fram vilket datum som din dator infekterades. Om du måste återskapa din HansaWorlddatabas så ska du göra det med en backup skapad innan datorn blev infekterad. Om du inte gör det så löper du större risk att få en smittad dator igen.
HansaWorlds tillvägagångssätt för att göra backuper är både snabb och ekonomisk. Datan sparas som en backupfil som tar väldigt liten plats och en stor fördel med backupfilerna är att de är versionsoberoende. Självklart kan du alltid göra en kopia av databasfilen så som den är på servern men detta är inte ekonomiskt ur den synvinkel att en sådan kopia tar mycket större plats. Dessutom är databasen och dess kopia versionsberoende så du kan inte använda denna för en nyare version av HansaWorld, om det skulle vara så att den version som du tidigare har använt har gått ur tiden.
! | Använd HansaWorlds inbyggda backupfunktion för en garanterad återuppbyggnad av databasen. |
Följ dessa steg för att skapa en databasbackup:
- Välj "System" från modulmenun.
- Öppna "Rutiner" från huvudmenyn och välj "Exporter". Exportalternativen från Systemmodulen visas nu i exportfönstret.

- Dubbelklicka på "Databastextbackup" om du vill göra en export av hela databasen och dubbelklicka på "Företagstextbackup" om du enbart vill göra en backup av det företag som du är inloggad i. I urvalsfönstret kan du fylla i en backupkommentar om du önskar och sedan trycka på [Kör] för att spara ner backupen. I sparafönstret väljer du själv vad du vill döpa backupen till samt var du vill placera den. Genom att trycka på [Spara] så startar backupen.
Vanligtvis så rekommenderar vi att användarna ska göra en databastextbackup, och inte enbart en företagsbackup då denna inte gör en backup på hela databasen. Om du oftast gör företagsbackuper så bör du med jämna mellanrum utföra en databastextbackup, ifall olyckan skulle vara framme. Vissa register och inställningar, så som det mesta i modulen System Avancerat och Brevlådor, följer inte med vid företagstextbackupen, de sparas nämligen på databasnivån och inte på företagsnivå. Även om din databas består av ett enda företag så kommer dessa inställningar inte att följa med. Anledningen till att företagsbackup finns som ett val är framförallt om man är i behov av att flytta eller få ut information om ett separat företag, tex i samband med sammanslagningar av databaser.
I ett fleranvändarsystem kan en databastextbackup inte köras från en klient utan kan endast startas från en serverklient. Dessutom så tillåter HansaWorld inte att några användare är påloggade på servern när backupen ska köras. Om servern körs i grafiskt läge så gå in under Arkiv och välj "Avsluta, ta bort serverläge vid omstart". Starta sedan HansaWorld igen och följ stegen som beskrivits ovan.
Om servern inte har ett grafiskt gränssnitt så kan du använda den tidsinställda backupen eller skapa en backupfil från terminalfönstret genom att skriva:
- ./hansa --backup
- Fönstret där du kan fylla i en backupkommentar kommer visa sig och du har 40 tecken på dig att beskriva din backup. Om det blir nödvändigt att läsa in en backup så kommer backupkommentaren att synas i fönstret där du väljer importfil och kan på så sätt hjälpa dig att välja rätt fil.
SKriv in en kommentar och tryck [Kör].
- Om du har valt att köra en backup på hela databasen och du har mer än ett företag, kommer du att ombedas logga in i de företag som du inte redan har loggat in i. Av säkerhetsskäl så kommer du inte att kunna köra en backup om du inte är inloggad i alla företag.
- Hansa öppnar en dialogruta där du kan döpa och spara din backupfil. Skriv in namnet på filen och spara den på lämpligt ställe. Namnet på filen bör innehålla det aktuella datumet så att du vet när den skapades. Om du använder WindowsNT version 3 så kan filnamnet vara max 8. Tryck sedan på [Spara] så startar backupen.
Det rekommenderas att backuper sparas i katalogen "Backup" som finns i HansaWorld katalogen. De filer som ligger här kommer nämligen att komma upp som alternativa importfiler om man måste göra en återläsning av databasen.
En meddelanderuta kommer att informera dig om hur backupen fortskrider.
! | Du bör inte under några omständigheter redigera i en backupfil med ett annat program. |
Text Back-uper
The "text back-up" method of backing up will copy the data in your database to a separate back-up file. You will always be able to recreate your database from such a back-up file, even if you have updated the version of your HansaWorld Enterprise application since making the back-up.To create a text back-up file, follow these steps:
- Use the [Module] button in the Master Control panel or the Ctrl-0 (zero) (Windows and Linux) or ⌘-0 (Mac OS X) keyboard shortcut to go into the System module.
- Click the [Routines] button in the Master Control panel and then [Exports]. Alternatively, use the Ctrl-E (Windows and Linux) or ⌘-E (Mac OS X) keyboard shortcut. The Exports window is shown:
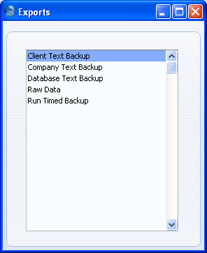
- Double-click 'Company Text Backup' (if you wish to back up the data in the database relating to the single Company currently selected) or 'Database Text Backup' (if you wish to back up the whole database) from the 'Exports' window.
Usually, you should use the 'Database Text Backup' option, as this is the only choice that backs up the entire database. You must use it regularly for your safety and peace of mind. Some registers and settings (e.g. the Configuration setting, Mailboxes and Conferences) are stored at database level, not Company level. These will not be exported by the 'Company Text Backup' option, even if your database only contains a single Company. Attachments also will not be exported by the 'Company Text Backup' option. This option is intended for use in the situation where you need to move all the information relating to a specific Company from one database to another.
In a multi-user system, you cannot use the 'Database Text Backup' option on a client machine (it will not be included in the 'Exports' list illustrated in step 2). You can only use it on the server machine, when no other user is logged in and when you access the server database using the GUI application. If it is not convenient to work from the server, use the automatic timed back-up feature from a client.
If you are using the command line server application (Mac OS X or Linux), you can use the automatic timed back-up feature from a client, or you can create a back-up file on the server by typing into the Terminal:
- ./HansaWorld --backup
If you are using the service application (Windows), you will need to place the --backup parameter in a "parameters.txt" file before launching the application, as described in the 'Launching the Server with Parameters ' section on the Loading an Existing Database and Company page. When the back-up file is complete, the application will quit (you may need to monitor the log file (named "hansa.log") to see when the application quits). Remove the --backup parameter from the "parameters.txt" file before restarting the application.
- The 'Specify Text Backup' window appears. This offers you 40 characters with which to describe the back-up file that you are about to create. If it becomes necessary to restore from a back-up, this description will be shown in the list of importable files to help you select the correct one.
Enter an appropriate description and click [Run].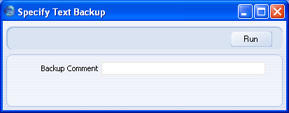
- If you have chosen to back up the whole database and you have more than one Company, you will now be asked to log in to any that you have not yet used in this work session. For reasons of security, if you are not able to log in to every Company, the back-up procedure will be halted. After logging in to every Company, return to the 'Specify Text Backup' window illustrated in step 4 to continue the backing-up procedure (the 'Specify Text Backup' window will be hidden behind the Master Control panel).
- A dialogue box will open, allowing you to name and place the export file. Enter the name of the file in the filename area and locate it in the appropriate directory in the usual way. The name of the back-up should include the date the back-up was made. For ease of importing later, it is recommended that you do not include spaces or other non-alphabetic characters in the name of your back-up file, and that you give it a .txt extension. More details are on this page. Then, click [Save].
It is recommended that you save the back-up file in a folder or directory named "Backup" which should be in the folder or directory containing the HansaWorld Enterprise application. All back-up files in this folder will be shown in a list of importable files if it becomes necessary to restore from a back-up.
A message window informs you about the progress of the export.
! | Under no circumstances should you edit or change a back-up file with another program. |
---
In this chapter:
- Introduction
- Text Back-ups
- Automatic Timed Back-ups
- Backing Up Using Specialist Back-up Software
- Database Duplication
- Journaling
- Restoring from a Back-up
- Restoring from a Raw Data Export
- Updating to New Versions of HansaWorld Enterprise
Automatiserade tidsback-uper
The importance of establishing a regular routine for backing up cannot be emphasised enough. Because, like all financial systems, HansaWorld Enterprise uses a single file database in which all your data about customers, invoices, nominal ledger etc. is stored, if you lose that file, you have lost not just a single document, but all your accounting and customer information.To make this task easier, HansaWorld Enterprise contains a timed back-up feature allowing a database text back-up file to be created automatically every day. To specify when the back-up files are to be created, and where they are to be stored, follow the steps outlined below.
- Select 'Technics' using the [Module] button in the Master Control panel or the Ctrl-0 (zero) (Windows and Linux) or ⌘-0 (Mac OS X) keyboard shortcut. In multi-user systems, if you are working from a client machine, you should log in as a system administrator (i.e. as a Person that has access to the Technics module) as described here).
If 'Technics' is not available when you click the [Module] button in a single-user system, this will probably be because you have not granted yourself access to the Server module in the Configuration setting.
- Click the [Settings] button in the Master Control panel or use the Ctrl-S or ⌘-S keyboard shortcut. Double-click 'Timed Operations'. The following window appears:
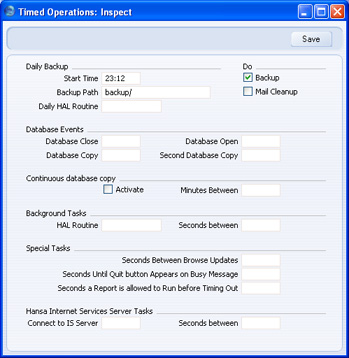
- Set the Start Time (the time when the backup is to take place) to the appropriate time, when it is likely that no-one will be using HansaWorld Enterprise. Use the 24-hour clock, and place a colon (:) between the hour and the minute. The back-up file will be created at the specified time, even if there are still users logged in to your HansaWorld Enterprise system. However, such users will find the speed of operation to be much reduced while the back-up is being carried out. It is therefore highly recommended that you specify a time that is outside working hours, to minimise such inconvenience.
- Specify the Database Backup Path, which determines where on the server's hard disk the back-up files are to be saved. If you leave this field blank, the back-up files will be saved in the folder containing the HansaWorld Enterprise application.
The following examples show the correct syntax for the Database Backup Path. You can use either \ or / as a separator between folder names under Windows, Linux and Mac OS X. Note that the separator appears as the final character in the path.
It is recommended that you save the back-up file in a folder or directory named "Backup" which should be in the folder or directory containing the HansaWorld Enterprise application. All back-up files in this folder will be shown in a list of importable files if it becomes necessary to restore from a back-up. You can do this using a relative path:
- Backup/
- Windows
- c:/samplefolder1/samplefolder2/Backup/
- Mac OS X
- /samplefolder1/samplefolder2/Backup/
- Click the [Save] button in the Button Bar to save the back-up specifications.
---
In this chapter:
- Introduction
- Text Back-ups
- Automatic Timed Back-ups
- Backing Up Using Specialist Back-up Software
- Database Duplication
- Journaling
- Restoring from a Back-up
- Restoring from a Raw Data Export
- Updating to New Versions of HansaWorld Enterprise
Remote Back-ups
The timed back-up feature in Enterprise by HansaWorld means that a database text back-up file will be created automatically every day. The remote back-up feature provides additional security by ensuring an extra copy of each daily back-up file will be stored off-site on a remote server. It is always recommended that you store back-up files on more than one hard disk and in more than one location. While you can use the remote back-ups feature as a tool to help with this, you should of course keep your own copies of your back-up files and not rely solely on the remote server.The remote back-ups feature is a chargeable cloud service provided by HansaWorld. Please refer to your local HansaWorld representative for information about pricing and for details about registering for the service.
To start using remote back-ups, follow these steps:
- Follow the instructions on the Automatic Timed Back-ups page to set up the timed back-up feature. This is necessary because whenever a back-up file is created using the timed back-up feature, it will be copied automatically to the remote server. Back-up files created using the 'Database Text Backup' option will not be copied to the remote server. In any case, the 'Database Text Backup' option cannot be used from a client machine in a multi-user system.
- Select 'System' using the [Module] button in the Master Control panel or the Ctrl-0 (zero) (Windows and Linux) or ⌘-0 (Mac OS X) keyboard shortcut.
- Click the [Settings] button in the Master Control panel or use the Ctrl-S or ⌘-S keyboard shortcut. Double-click 'Backup Settings'. The following window appears:
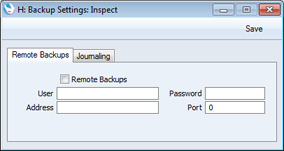
- When you register for the remote back-ups service, you will be provided with User, Password, Address and Port information. Enter that information here and check the Remote Backups box.
- Click the [Save] button in the Button Bar to save the back-up specifications.
- In a single-user system, close your Enterprise by HansaWorld database and restart. If you are working on a client in a multi-user system, ignore this step.
- After you have followed the steps above, each time a timed back-up file is created, it will first be saved on your hard disk and then uploaded to the remote server. The Job Status setting in the System module will show you the progress of the upload.
- If you need to retrieve a back-up file from the remote server, you must use a single-user database. You cannot do so from a client in a multi-user system. It is assumed that you need to retrieve the back-up file because your main system has become damaged or lost.
To create a new single-user database, place your Enterprise by HansaWorld application and "hob" folder in a new folder together with the "dbdef.txt" and "default.txt" files and launch the application. When the 'Welcome to HansaWorld' window appears, click the [Single User Database] button and follow the instructions on the Creating a New Database - Single-user page.
- Enter your details in the Backup Settings setting as described in steps 4-6 above.
- Open the Remote Backups setting in the System module. The 'Remote Backups' window will open, listing the back-up files that are on the remote server:
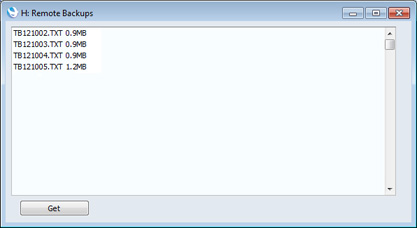
- Click on the most recent back-up file (or the most recent back-up file that you know is undamaged) and click the [Get] button. The back-up file will be downloaded to your computer, to a folder named "Downloads" that will be inside the folder or directory containing your Enterprise by HansaWorld application. You can monitor the progress of the download using the Job Status setting, as mentioned in step 7.
- Please refer to the Restoring from a Back-up page for details about recreating your database from the back-up file.
In this chapter:
- Introduction
- Text Back-ups
- Automatic Timed Back-ups
- Remote Back-ups
- Backing Up Using Specialist Back-up Software
- Database Duplication
- Journaling
- Restoring from a Back-up
- The Raw Data Export
- Updating to New Versions of Enterprise by HansaWorld
- Home page for Introduction and Installation manual
- Home page for Enterprise by HansaWorld manual
Back-up genom att använda mjukvara för back-uper
As described here, we strongly recommend that you use the text back-up or database duplication facilities built in HansaWorld Enterprise as the main part of your back-up strategy. The text back-up feature in particular is more economical in terms of disk space and is more reliable in that the success of a restoration is guaranteed even if the version of your HansaWorld Enterprise application has changed. The database duplication feature allows you to continue using your database while it is being backed up.However, some users may prefer to rely on specialist back-up software such as Retrospect to produce back-up tapes that can be stored off-site. Such software can sometimes fail to create a back-up file if the files being backed up are still in use. For example, a user may have gone home having forgotten to log off (or having left their machine producing a report) and this may cause the back-up to fail.
To cater for this eventuality, you can change the state of the database at the time when it will be backed up so that, as far as the back-up software is concerned, it appears not to be in use. To do this, follow these steps:
- Select 'Technics' using the [Module] button in the Master Control panel or the Ctrl-0 (zero) (Windows and Linux) or ⌘-0 (Mac OS X) keyboard shortcut. Then, click the [Settings] button in the Master Control panel or use the Ctrl-S or ⌘-S keyboard shortcut.
- Double-click 'Timed Operations'. The following window appears:
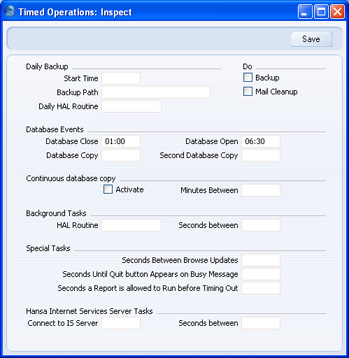
- Set the Database Closing Time to a few minutes before the moment the back-up software is scheduled to start work. Use the 24-hour clock, and place a colon (:) between the hour and the minute.
- Set the Database Opening Time to a few minutes after the moment the back-up software is scheduled to finish work.
- If you have specified an Operation Time as well, this should not be between the Database Opening and Closing Times. The database is dormant during this period, so the Operation Time will have no effect.
- Click the [Save] button in the Button Bar to save the changes.
---
In this chapter:
- Introduction
- Text Back-ups
- Automatic Timed Back-ups
- Backing Up Using Specialist Back-up Software
- Database Duplication
- Journaling
- Restoring from a Back-up
- Restoring from a Raw Data Export
- Updating to New Versions of HansaWorld Enterprise
Databaskopiering
In some circumstances, it may not be practical to create text back-up files every day using either the back-up facilities built in HansaWorld Enterprise or specialist back-up software. If the database is very large and/or 24-hour access is required, it may not be convenient to slow the speed of operation or to prevent users logging in altogether while back-up files are created. In this situation you can use the database duplication feature to create copies of the database file (the "HANSA.HDB" file) automatically.Remember that you will no longer be able to use an old "HANSA.HDB" file if you have updated the version of your HansaWorld Enterprise application. Therefore, while database duplication can play an important role in your back-up routine, you must still create a text back-up when you are about to update to a new version, and if you want to create an archive copy of your database that you want to be able to read in the future. Updating is described here. You can of course use a script to move the duplicate database to another machine, rename it "HANSA.HDB", start the command line server application and create a text back-up. To create a true back-up, the script should also move the other contents of the folder containing your HansaWorld Enterprise application, especially the "Attach" folder.
If you are using journaling, you must do so in combination with the database duplication feature.
The database duplication feature will create a copy of your database and store it in the folder containing your HansaWorld Enterprise application. This process will result in the following files being created:
- While the first copy is being created, the file will be named "HANSA.HDB.TEMP".
- When the copy is complete, the file will be renamed "HANSA.HDB.COPY".
- When the second copy begins, a second file named "HANSA.HDB.TEMP" will be created.
- When the second copy is complete, the file will be renamed "HANSA.HDB.COPY". The previous "HANSA.HDB.COPY" will be renamed "HANSA.HDB.OLD". If there already is a "HANSA.HDB.OLD", it will be deleted.
Follow these steps to configure the database duplication feature:
- Select 'Technics' using the [Module] button in the Master Control panel or the Ctrl-0 (zero) (Windows and Linux) or ⌘-0 (Mac OS X) keyboard shortcut. Then, click the [Settings] button in the Master Control panel or use the Ctrl-S or ⌘-S keyboard shortcut.
- Double-click 'Timed Operations'. The following window appears:
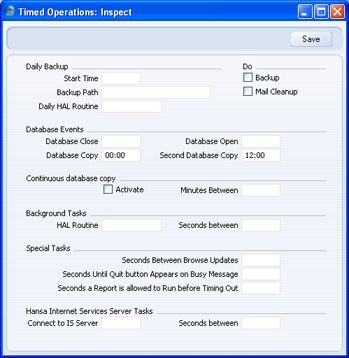
- Enter in the Database Copy field the time when you want the database to be copied. Use the 24-hour clock, and place a colon (:) between the hour and the minute. If you would like the database to be copied twice a day, enter the second time in the Second Database Copy field (this must be later than the first copy time).
If you are also using the Backup option to create a daily text back-up, make sure the text back-up is created at a different time to the copy. They should not be created at the same time.
- If two copies a day are not enough, use the Continuous Database Copy feature. Check the Activate box and enter the number of minutes between copies. This is the number of minutes between the moment the last copy finished and the beginning of the next copy.

- Click the [Save] button in the Button Bar to save the changes. If you activated the Continuous Database Copy feature, the first copy will begin immediately.
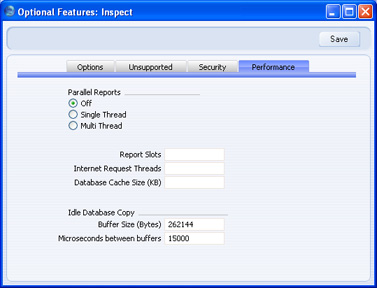
To change the database copy speed, open the Optional Features setting in the System module and go to the 'Performance' card:
---
In this chapter:
- Introduction
- Text Back-ups
- Automatic Timed Back-ups
- Backing Up Using Specialist Back-up Software
- Database Duplication
- Journaling
- Restoring from a Back-up
- Restoring from a Raw Data Export
- Updating to New Versions of HansaWorld Enterprise
Journaling
A busy system where many users are constantly saving large numbers of records can cause problems for a back-up strategy that relies on a text back-up file being created once a day and/or on copying the database twice a day. The volume of new records means that the text back-up file or database copy quickly becomes out-of-date. If you need to revert to a back-up, it will be difficult and time-consuming if not impossible to recreate the records entered since the text back-up or database copy was made. The journaling feature is designed to address this problem. If you are using this feature, every new record and every modification will be saved in the database and in a separate journal file. If you need to revert to an older copy of the database, you will be able to "apply" the journal. "Applying" the journal means importing the recent new records and modifications to the older copy of the database from the journal file. This will be much faster and more complete than recreating the recent records manually, or extracting them from the damaged database.You must use the journal feature together with the database duplication feature. If your database becomes damaged, you should revert to the most recent (undamaged) duplicate and apply the journal. It is not possible to revert to a text back-up and apply the journal. Therefore, if you are using journaling, you must make sure you are duplicating the database regularly. The text back-up will play a much less important role in your back-up strategy.
The journal file will grow in size very quickly, especially if you import large amounts of data while journaling is running. Therefore, you must take special care to monitor the level of free hard disk on the server if you are using this feature.
---
In this section:
- Introduction to Journaling
- Starting Journaling
- Applying the Journal
- Managing Journal Files
- Introduction to Backing Up
- Text Back-ups
- Automatic Timed Back-ups
- Backing Up Using Specialist Back-up Software
- Database Duplication
- Restoring from a Back-up
- The Raw Data Export
- Updating to New Versions of HansaWorld Enterprise
Påbörja Journaling
- You can start the journal feature using one of two methods:
- Launch the command line application on the server by typing:
- ./HansaWorld --start-journaling &
- Starts the HansaWorld Enterprise server application and marks the database as journaled. A new folder named "journal" will be created in the folder containing the HansaWorld Enterprise server application, and in that folder a journal file named "J0000001.HJN" will be created.
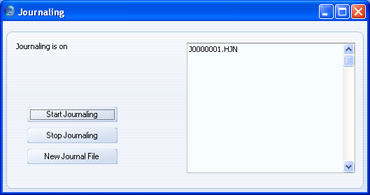
- If the server is already running and you don't want to restart it, log in from a client, change to the System module and open the Journaling setting:
Click the [Start Journaling] button. A new folder named "journal" will be created in the folder containing the HansaWorld Enterprise server application, and a journal file named "J0000001.HJN" will be created in that folder.
You can also use the Journaling setting to start journaling in a single-user system.
- Launch the command line application on the server by typing:
- Referring to the Database Duplication page, establish a regular database duplication routine. If you need to revert to an old database, you must do so to one that was created after you started journaling. You cannot revert to a text back-up.
- Log on from clients in the usual way and begin work. Every change will be saved in the database and in the "J0000001.HJN" file.
- The next time you launch the command line or service application on the server, do so in the usual way (i.e. there is no need to use the --start-journaling parameter again). A message will be shown in the Terminal (Mac OS X and Linux) and in the log file as a reminder that journaling is in operation. You can also monitor this from a client by referring to the Journaling setting in the System module.
!
Never move, edit or rename the journal file or the "journal" folder. Make a copy of the journal file if you want to back it up.
- If you need to update to a new version of HansaWorld Enterprise, you must do so by creating a text back-up from the old version, creating a new database using the new version and importing the text back-up. Full details are on the Updating to New Versions of HansaWorld Enterprise page. A side effect of importing a text back-up will be that journaling will be switched off. Therefore, after updating you must restart journaling as described above in steps 1-3 above. Before doing so, make sure that the "journal" folder in the folder containing the HansaWorld Enterprise server application is empty or removed altogether.
In this section:
- Introduction to Journaling
- Starting Journaling
- Applying the Journal
- Managing Journal Files
- Introduction to Backing Up
- Text Back-ups
- Automatic Timed Back-ups
- Backing Up Using Specialist Back-up Software
- Database Duplication
- Restoring from a Back-up
- Restoring from a Raw Data Export
- Updating to New Versions of HansaWorld Enterprise
Journaling - Applying the Journal
If you need to revert to an old database, follow these steps:- The old database must be one that was created after you started journaling. If you are using the database duplication feature, the most recent database copy will be named "HANSA.HDB.COPY".
Before reverting to this old database, you may wish to check that it does not contain the damage that caused you to revert to it. You must carry out this check using a copy of the "HANSA.HDB.COPY" file and a copy of the "J0000001.HJN" journal file. If you use the "HANSA.HDB.COPY" file itself for this check, you will no longer be able to apply the journal successfully because you will break the synchronicity between the database and the journal. You must not even open the "HANSA.HDB.COPY" file or log in to it, let alone save any records before applying the journal.
To carry out this check, place a copy of the "HANSA.HDB.COPY" database in the folder containing the HansaWorld Enterprise server application and ensure it is named "HANSA.HDB". As this database was created after you started journaling, a "J0000001.HJN" journal file must be present in the "journal" folder when testing. This must be a copy of the journal file, because anything that you save when testing will be added to this file.
!
Make sure you have an untouched "HANSA.HDB" file and journal file at all times.
- When you are sure that the "HANSA.HDB.COPY" file does not contain any damage, place it in the folder containing the HansaWorld Enterprise server application and ensure it is named "HANSA.HDB". Remember that this must be a database that is untouched by any testing. Similarly, the "J0000001.HJN" journal file in the "journal" folder must also be one untouched by any testing. It is recommended that you keep copies of both files, at least until you are sure the journal has been applied successfully, in case of a power failure or hardware problem occurring while the journal is being applied. Then, launch the command line application on the server by typing:
- ./HansaWorld --apply-journal &
- Starts the HansaWorld Enterprise server application and imports everything in the journal file that is not already in the database. The application will then quit.
!
You must apply the journal immediately after reverting to the copy. If you open the copy and allow users to log in before applying the journal, the data in both the database and the journal file will be corrupted.
- Restart the command line or service application in the usual way. After logging on from clients, every change will, as before, be saved in the database and in the “J0000001.HJN” file.
In this section:
- Introduction to Journaling
- Starting Journaling
- Applying the Journal
- Managing Journal Files
- Introduction to Backing Up
- Text Back-ups
- Automatic Timed Back-ups
- Backing Up Using Specialist Back-up Software
- Database Duplication
- Restoring from a Back-up
- The Raw Data Export
- Updating to New Versions of HansaWorld Enterprise
Journaling - Managing Journal Files
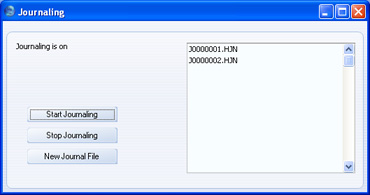
In a busy system with many users, it is likely that the journal file will grow in size very quickly. To prevent journal files becoming too large, you can use the Journaling setting in the System module to create new journal files periodically. Large journal files, as well as being cumbersome, will increase the time required to apply the journal.To create a new journal file, first open the Journaling setting. The journal file(s) that are currently in the "journal" folder will be listed on the right. In this example, we are still using the first journal file "J0000001.HJN":
It may be that you establish a routine for creating new journal files, for example creating a new one once a week. As you will also be duplicating your database regularly, such a routine will allow you to discard the older journal files, thus ensuring that they do not take up too much hard disk space. The older journal files will become redundant because the work they contain will also be stored in the more recent duplicate databases. But careful management is required, to ensure that you can combine each duplicate database with the required journal files. For example, let us assume you have the following journal files:
| Journal File | Date Created |
| J0000001.HJN | June 1 |
| J0000002.HJN | June 8 |
| J0000003.HJN | June 15 |
| J0000004.HJN | June 22 |
| J0000005.HJN | June 29 |
| J0000006.HJN | July 5 |
| J0000007.HJN | July 12 |
If the most recent database copy is from July 5, a date on which a new journal file was created, you should assume that "J0000005.HJN" will also be required when you apply the journal, because this may be the "current" journal file for that database. The "current" journal file is the one in which the last record was stored. When you create "J0000006.HJN", "J0000005.HJN" will remain the "current" journal file for the brief period until the next record is saved. This will be saved in "J0000006.HJN", which will then become the "current" journal file. If the database copy was made in the brief period before that record was saved, then "J0000005.HJN" will still be the "current" journal file in that database and so must be present in the "journal" folder when you apply the journal.
When you apply the journal, a message stating that "Current journal file not last file in journal folder J0000XXX.HJN" will be shown in the Terminal (Mac OS X and Linux) and in the log. In this message, "J0000XXX.HJN" is the "current" journal file for the database copy i.e. the earliest journal file that must be present in the "journal" folder. In the example, if you are reverting to a database copy created on July 10, this will be "J0000006.HJN". If "J0000006.HJN" is present in the "journal" folder, the journal will be applied. If it is not present, the journal will not be applied, and the Terminal and log will contain further messages, including "hole detected in journal". You should place "J0000006.HJN" in the "journal" folder and re-apply the journal.
The latest possible version of each journal file must be present in the "journal" folder when you apply the journal. As already mentioned, in the example, if you are reverting to a database copy created on July 10, you will need "J0000006.HJN" and "J0000007.HJN". This means the final version of "J0000006.HJN" as it was on July 12 at the moment that you created "J0000007.HJN", not any copy that you may have created on July 10 at the time of copying the database. A July 10 copy of "J0000006.HJN" will not be complete.
---
In this section:
- Introduction to Journaling
- Starting Journaling
- Applying the Journal
- Managing Journal Files
- Introduction to Backing Up
- Text Back-ups
- Automatic Timed Back-ups
- Backing Up Using Specialist Back-up Software
- Database Duplication
- Restoring from a Back-up
- The Raw Data Export
- Updating to New Versions of HansaWorld Enterprise
Återställa efter en back-up
In the unlikely event that your database becomes damaged, you will need to attempt to recreate it. As part of this process, you should revert to a text back-up or database copy, and begin to use it as quickly as possible, to keep the interruption to your company's daily work to a minimum. Also as part of this process, you should attempt to recover any data that was entered to the damaged database after the text back-up or database duplicate was created.If you are using journaling, please refer to this page for details about how to proceed. If you are not using journaling, the recommended course of action is as follows:
- Revert to the most recent undamaged text back-up or database duplicate, as follows:
- If you need to revert to a text back-up, follow the procedure described later on this page. In large systems, reverting to a text back-up will take some time.
- If you are able to revert to a database duplicate, simply copy the duplicate into the folder containing the HansaWorld Enterprise server application and rename it to "HANSA.HDB". Log in to check that the duplicate is undamaged.
- If you need to revert to a text back-up, follow the procedure described later on this page. In large systems, reverting to a text back-up will take some time.
- The database that results from step 1 will become your "live" database. You should now make room in this database for the recent data that you will recover from the damaged database.
Open all relevant Number Series settings and in each case create a new number sequence that leaves a large gap after the last used number. In the case of Contacts and Items, you can do this in the Number Series Defaults setting in the System module.
- Allow users to log in to the database and to start work, but ensure they only carry out the most essential tasks. You may feel the need to restrict access to the less frequently used tasks using Access Groups.
- You can now attempt to recreate any data that was entered to the damaged database after the last text back-up or database duplicate was made. This may require you to attempt to create a Database Text Back-up or Raw Data export file from the damaged database. Then, import the information in this file to a test database. Find the recently entered data in this test database and export it using the relevant Export routine in the Integration module. The Transaction Registers Export will be particularly useful, as it allows you to export a specified range of records from every Sub System. Finally, import this data to the database created in step 1 (the new "live" database). The Raw Data feature is described here, while using the Export routines is described here.
If you are unable to create a Database Text Back-up or Raw Data export from the damaged database, you will need to refer to any paper records and to enter the data manually to the new "live" database.
Note that if you are using journaling, applying the journal to the most recent database duplicate will be a much faster and more certain method of recreating the data that was entered to the damaged database after the last text back-up or database duplicate was made. You will therefore not need to run both "live" and test systems side-by-side as described in steps 2-4 above, unless you feel the need to ascertain that you have recreated all the data.
We will now describe in detail how to restore a database from a text back-up file, as mentioned in step 1i above. For reasons of speed, it is recommended that you carry out the process of restoring from a back-up on the server machine in multi-user systems, using the command line (Linux or Mac OS X) or service (Windows) application. If this is not possible, use a single client machine and then copy the database file (named "HANSA.HDB") to the server. If you have separate back-up files for different Companies, they should be imported individually. Attempting to import them simultaneously using different client machines could result in data being lost.
Restoring from a back-up is done in the following way:
- Move the old database (named "HANSA.HDB") away from the folder or directory containing the HansaWorld Enterprise application. Rename it so that you know what it contains.
- Delete the database file "HANSA.HDB" from the folder or directory containing your HansaWorld Enterprise application. Double-clicking the application now will force it to create a new database, as described here.
!
It is important to restore to a new, empty database, to avoid mixing the restored data with the old, damaged database.
The "DBDEF.TXT" and "DEFAULT.TXT" files should always be present in the same directory/folder as the HansaWorld Enterprise application. They contain some important data used when setting up the new database and creating new Companies. If these files are missing, your HansaWorld Enterprise application may not work the way you expect it to do!
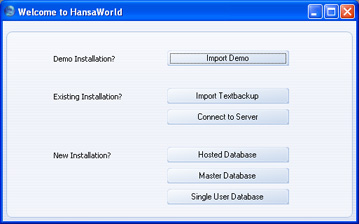
- It is recommended for reasons of speed that you use the command line or service application to import the text back-up file. Proceed to step 10 below. If this is not possible, launch the GUI HansaWorld Enterprise application as normal. When the 'Welcome to HansaWorld' window appears, click the [Import Textbackup] button:
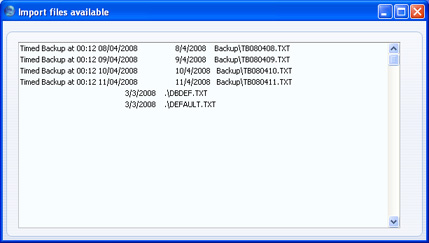
- The 'Import files available' window opens. This is a list of text back-up files. To be included in this list, a text back-up file must be stored in the folder or directory containing the HansaWorld Enterprise application or in the "Backup" or "Setup" folders inside that folder. It must also have a .txt extension.
In the list, the filename of each text back-up file is shown together with the date it was saved and any description added when it was created (see step 4 on this page).
- Highlight the file you want to import (the back-up to which you wish to revert) and press the Enter key (or double-click on the name of the file). The back-up data will be imported.
- If it is still open, close the list of available import files using the close box.
- The 'Select Company' window is shown: double-click the top line in the list (marked "1"), or press the Return or Enter key.
- When the Master Control panel opens, change to the System module and use the Ctrl-Shift-I/⌘-Shift-I keyboard shortcut to open the 'Imports' window:
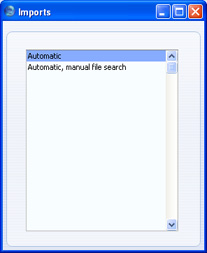
- Select 'Automatic, manual file search' and press the Enter key (or double-click on 'Automatic, manual file search').
When the 'Open File' dialogue box opens, locate and open the back-up file in the normal way.
The back-up data will be imported.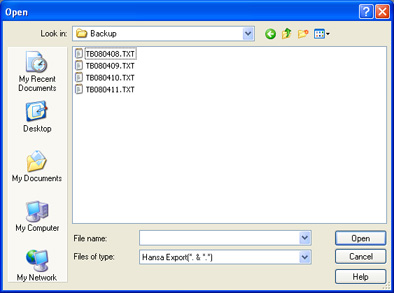
- If you are working on a Linux or Mac OS X server using the command line application, launch the application by typing:
- ./HansaWorld Backup/TBXXXXXX.TXT &
- Starts the HansaWorld Enterprise server application and imports the back-up or example data file TBXXXXXX.TXT. In this example, this file is in the "Backup" folder inside the folder containing the HansaWorld Enterprise server application.
- ./HansaWorld &
If your machine has sufficient RAM, the back-up file will be imported significantly more quickly if you use the "Massive Cache" feature to increase the size of the memory cache. You can do this by placing an extra parameter in the command line or in the "parameters.txt" file, as follows:
- ./HansaWorld --db-cache=1G Backup/TBXXXXXX.TXT
By default, the HansaWorld Enterprise server application uses a cache size of 3.2 Mb. By increasing the size of this cache, you will improve the speed of operation because data that is in the cache can be accessed much more quickly than data on disk. Data in the cache is data that has already been used during the work session. The optimum size of the cache will vary, depending on the server type, RAM size and operating system, and can only be established through experimentation. A good guideline, especially for Windows servers and for servers with smaller RAM sizes, is never to assign more than 40% of the machine's RAM size to the cache. If the cache is too large, the memory available for other tasks may not be enough. If the machine then runs out of memory, it will start using its hard disk as extra memory. This will cause it to slow down significantly and may also increase instability. If the server is a 32-bit machine, the maximum cache size is between 1 and 3.5 Gb, depending on machine and operating system. If the server is a 64-bit machine with a 64-bit capable operating system (Mac OS X or Linux) and a large amount of RAM and if you are using the 64-bit version of HansaWorld Enterprise, then the 40% guideline becomes less important. For example, if the server has 12 Gb RAM, you could assign up to 10 Gb to the cache.
If you do increase the cache size significantly, there will be a pause between the import finishing and the application closing. During this time, the cache contents will be written to disk. The larger the cache, the longer this will take.
- ./HansaWorld Backup/TBXXXXXX.TXT &
In this chapter:
- Introduction
- Text Back-ups
- Automatic Timed Back-ups
- Backing Up Using Specialist Back-up Software
- Database Duplication
- Journaling
- Restoring from a Back-up
- Restoring from a Raw Data Export
- Updating to New Versions of HansaWorld Enterprise
Återställa efter en rådataexport
If your database somehow becomes damaged while you are using it, you will be prompted to create a Raw Data export. You should do so, using the Raw Data Export function in the System module or, if you are working on the server, by launching the server application with the --rawdata parameter. The Raw Data option exports data in byte order, while the Database Text Backup option exports data in record order, on a register-by-register basis. When a database is damaged, the Raw Data option may create an export file where the Database Text Backup option fails. However, because the database is damaged, restoration from a Raw Data export is not guaranteed. Therefore, if the Raw Data option successfully creates an export file, you should then attempt to create a Database Text Backup, to make a successful restoration more likely.If you need to restore a database from a Raw Data file, use the GUI application to follow these steps:
- Make sure the folder or directory containing your HansaWorld Enterprise application does not contain a "HANSA.HDB" file and launch the application.
- When the 'Welcome to HansaWorld' window appears, click the [Master Database] or [Single User Database] button as appropriate. Follow the instructions on the Creating a New Database - Server or the Creating a New Database - Single-user pages respectively.
- Referring to the 'Single-user' section on the Changing and Adding Companies page, create all the Companies as they were in the damaged database (in particular, the Codes must be the same as they were in the damaged database).
- Create all Fiscal Years exactly as they were in the damaged database (in every Company).
- In every Company, configure the Company Date and Numeric Format setting in the System module as follows:
- Date Order
- Month, Day, Year
- All three check boxes
- ticked
- Date separator
- / or -
- Decimal Separator
- . (a single full stop, not a comma)
- Thousand separator
- space (one single space)
- Date Order
- Ensure you are in the System module and use the Ctrl-Shift-I/⌘-Shift-I keyboard shortcut to open the 'Imports' window. Choose one of the options depending on where the Raw Data file is located and import it.
If the Raw Data file is large, you may prefer to use the command line (Linux or Mac OS X) or service (Windows) application for this step, as the speed benefit will be significant.
- Even if the Raw Data file is imported successfully, the database will not be useable because no indexes will be created. Therefore, you must immediately create a Database Text Backup and import that file to a new database. This will ensure the data is properly indexed. Again, you may prefer to use the command line (Linux or Mac OS X) or service (Windows) application to import the file.
- As mentioned in the introduction to this section, restoration from a Raw Data export is not guaranteed to be successful. In many cases, the damage in the original database will be confined to the indexes. This damage will usually be fixed by the process described above. However, it may be that the damage has caused records to be lost. To ascertain whether anything has been lost, you should print the reports that you commonly use and compare them with the most reports produced from the damaged database. Such reports will probably include the Trial Balance, Profit & Loss and Balance Sheet from the Nominal Ledger, the Sales Ledger report and the Open Invoice and Periodic Customer Statements from the Sales Ledger, the Purchase Ledger report and the Open Invoice and Periodic Supplier Statements from the Purchase Ledger, the Stock List and Item History from the Stock module, journals for commonly used registers such as the Invoice Journal and the Transaction Journal, and the main reports from any other important modules. If you know the last records that were entered to the original database before it was damaged, you can see if these records are also in the new database. You may also find it useful regularly to produce the Record Count report in the Technics module, which lists the number of records in each register. Comparing this report produced from the new database with the last one produced from the old database before it was damaged may give an idea of the number of records lost.
In this chapter:
- Introduction
- Text Back-ups
- Automatic Timed Back-ups
- Backing Up Using Specialist Back-up Software
- Database Duplication
- Journaling
- Restoring from a Back-up
- Restoring from a Raw Data Export
- Updating to New Versions of HansaWorld Enterprise
Uppdatera till en ny version av HansaWorld Enterprise
The latest version of HansaWorld Enterprise is always available for downloading at www.hansaworld.com/downloads/hwindex.htm. Clicking the [HansaWorld.com] button in the Master Control panel will take you to www.hansaworld.com. Click the "Products" link and then "Downloads" to go to the 'Downloads' page.Inevitably, new versions will incorporate significant structural changes. Because of this, it cannot be guaranteed that they will be able to use database files ("HANSA.HDB" files) created by previous versions. You must export a text back-up file from the old database and import it to a new database created using the new version of the program.
Before updating, you should first check that the new version is compatible with your hardware and operating system(s). You should then set up a test environment where you will be able to run the existing version and the new version side-by-side. Create new databases using both versions, and import the same text back-up to both new databases. This will allow you to print the most important reports from both versions and compare them accurately, since both versions contain the same data. You should then ensure that every user logs in to the new version to check that their main processes are operating as expected, and to get used to any changes in workflow that may be required. Test every step including printing documents, creating Nominal Ledger Transactions from Sub Systems and reporting. When you are satisfied with the data integrity of the new version and that every user is familiar with it, you can update the live system.
To update to a new version of HansaWorld Enterprise, follow these steps:
- Create a Database Text Backup from your live system as usual using the old application.
- Install the new version of the application in the test environment, create a new database and import the text back-up file as follows:
- Follow the procedure described on the Installation page to download the new version of HansaWorld Enterprise and install it on the server and clients in your test environment.
- Ensure that the folder or directory containing the new application on the test server also contains the "DBDEF.TXT" and "DEFAULT.TXT" files, but not a "HANSA.HDB" file. Ensure it also contains a folder or directory named "Backup" which in turn contains the text back-up file created in step 1, and that the name of this file has a .txt extension.
- Copy the following folders and their contents from the HansaWorld folder on your live server to the folder containing the new application on the test server: "Attach"; "Halcust"; "Shared"; "Tmp"; "Web"; and "Webcust". You may not have all of these folders in your installation: if so, copy the ones that you do have and don't worry about those that are missing. Copy logo files as well. Do NOT copy the "Hob" folder.
In particular, you must make sure you copy the "Attach" folder to the new HansaWorld folder before you proceed to step 2iv. The way in which attached files are named was changed in HansaWorld Enterprise version 5.3 070723. If you are updating to this version or newer from an older version, the files in the "Attach" folder will be renamed by the updating process to comply with the new naming convention. If you do not copy the "Attach" folder to the new HansaWorld folder until after updating, the files in that folder will not be renamed and therefore the Attachment links will be broken (you will not be able to open attached files from the [Attachments] button with the paper clip icon). In this case, repeat the update ensuring the "Attach" folder is in place first. Please click here for more details about Attachments.
If you have a "Halcust" folder, it will contain bespoke code that changes the way HansaWorld Enterprise operates. You should not assume that this bespoke code will be compatible with new versions of the program. Therefore, before updating you must consult with HansaWorld Support to ensure compatibility and to have the code re-written if necessary. You can find the telephone number of your local office at www.hansaworld.com/countries/hwindex.htm. Having done this, ensure the "Halcust" folder is in the new HansaWorld folder before you proceed to step 2iv. Bespoke code can change the structure of the database. If you do not copy the "Halcust" folder to the new HansaWorld folder until after updating, the new "HANSA.HDB" file will given a standard database structure and may crash when you try to use it with the "Halcust" folder present.
- Referring to the Restoring from a Back-up page, launch the new HansaWorld Enterprise application to create a new database as follows:
- If you choose to create the new database using the GUI application, when the 'Welcome to HansaWorld' window appears, click the [Import Textbackup] button to import the back-up created by the previous version of HansaWorld Enterprise.
- If you choose to create the new database using the command line application (Linux or Mac OS X), launch the application by typing:
- ./HansaWorld Backup/TBXXXXXX.TXT &
- If you choose to create the new database using the service application (Windows), place the path and name of the back-up file (Backup/TBXXXXXX.TXT in this example) in a "parameters.txt" file before launching the application, as described in the ' Launching the Server with Parameters ' section on the Loading an Existing Database and Company page. When the import finishes, the application will quit (you may need to monitor the log file (named "hansa.log") to see when the application quits). Remove the path and name of the back-up file from the "parameters.txt" file and then restart the application in the usual way.
If your machine has sufficient RAM, the back-up file will be imported significantly more quickly if you increase the cache size. Please refer to step 10 on the Restoring from a Back-up page for details.
- If you choose to create the new database using the GUI application, when the 'Welcome to HansaWorld' window appears, click the [Import Textbackup] button to import the back-up created by the previous version of HansaWorld Enterprise.
- If you have not done so already install the new HansaWorld Enterprise application on the client machines that will be part of the test system. If you have any Client Text Backup files, import them to the new databases on the relevant machines as per step 2iv above. Then, open the Company register on each client and enter the IP address of the test server. If you did not import a Client Text Backup file, use the [Connect to Server] button in the 'Welcome to HansaWorld' window to locate and connect to the test server.
- If the new version includes one or more of the revisions listed at the end of this page, update your data as required. You may find it advantageous to increase the cache size while updating your data.
- Follow the procedure described on the Installation page to download the new version of HansaWorld Enterprise and install it on the server and clients in your test environment.
- Install your existing version of the application in the test environment, create a new database and import the text back-up file as follows:
- Create a new folder or directory on the test server (or on a separate test server) and copy into it from the HansaWorld folder on your live server the old version of the application and the "Attach", "Halcust", "Tmp", "Web" and "Webcust" folders. This time copy the "Hob" folder as well.
- Ensure that the folder or directory containing the old application on the test server also contains "DBDEF.TXT" and "DEFAULT.TXT" files, but not a "HANSA.HDB" file. Ensure it also contains a folder or directory named "Backup" which in turn contains the back-up file created in step 1, and that the name of this file has a .txt extension.
- Import this back-up as described in step 2iv above, but note that you will not be able to use the "parameters.txt" method if your old version is older than 5.4.
- Running two databases on the same server machine is usually not recommended or supported for reasons of speed, but this is less important in a test environment. If you do have both the old and new applications on the same server machine, you should change the Port Number in one of the databases, to enable the clients to log in to the correct one. Please refer to the Program Mode Register page for details.
- If you have not done so already, install the old HansaWorld Enterprise application on the client machines that will be part of the test system. If you have any Client Text Backup files, import them to the new databases on the relevant machines as per step 2iv above. Then, open the Company register on each client and enter the IP address of the test server (and the Port Number if you changed it on the server in step 3iv above). If you did not import a Client Text Backup file, use the [Connect to Server] button in the 'Welcome to HansaWorld' window to locate and connect to the test server (note that the 'Welcome to HansaWorld' window was introduced in HansaWorld Enterprise version 5.2).
- Create a new folder or directory on the test server (or on a separate test server) and copy into it from the HansaWorld folder on your live server the old version of the application and the "Attach", "Halcust", "Tmp", "Web" and "Webcust" folders. This time copy the "Hob" folder as well.
- Print the reports you usually use from both the old and new versions and compare them. At a minimum, you should print and compare the Trial Balance, Profit & Loss and Balance Sheet from the Nominal Ledger, the Sales Ledger report (with and without a recent date) and the Open Invoice and Periodic Customer Statements from the Sales Ledger, the Purchase Ledger report (with and without a recent date) and the Open Invoice and Periodic Supplier Statements from the Purchase Ledger, and the Stock List (with and without a recent date) and Item History from the Stock module. If you are using the Job Costing module, print the Project Status report as well. You only need print the longer reports to show the most commonly used Customers, Suppliers and Items. If a report contains a new option in the new version, turn it off so that you can compare like with like.
You may also want to print and compare the Record Count report in the Technics module. This report lists the number of records in each register. However, be careful when interpreting this report: it includes support registers (hidden registers whose contents are not included in text back-up files but recalculated on import). The structure of support registers may change from version to version, so the number of records they contain may vary. Support registers are shown with zeroes in the Imp/Exp Level column in the report.
For the comparison to be accurate, you should not have worked in either system after importing the text back-up. This will ensure the data in the old and new databases is identical.
- When you are satisfied with the reports, you should now ensure that every user logs in to the new version to check that their main processes are operating as expected, and to get used to any changes in workflow that may be required. Test every step including printing documents, creating Nominal Ledger Transactions from Sub Systems and reporting. This is especially imperative if you have a "Halcust" folder, in which case you should test the bespoke code as much as possible.
- When you are sure that the new version is operating as expected, create a new Database Text Backup from your live system and repeat step 2 above to update your live system.
If you are using the service application on a Windows server, installing a new version will automatically update the service registry, removing the old version from the list and replacing it with the new version.
- In the new live system, open the Timed Operations setting in the Technics module. Check that all times are correct and are expressed using the 24-hour clock. If you are using the automatic timed back-up feature, make sure the Backup Path is correct.
- If you are using the journaling feature, you will need to start journaling after updating to a new version. Ensure the folder containing the application does not also contain a "journal" folder and start journaling as described on the Journaling page.
- If you need to remove the old version of the application and you are using Windows, be sure to do so using the Add or Remove Programs Control Panel.
| Version | Revision | More Information |
| 3.8 | Assets module: Fixed Asset register replaced by Asset register | Description of Export to new Fixed Assets Module function |
| 4.1 | Customers and Suppliers combined into a single register | Combining Customers and Suppliers page |
| 4.1 | Definition of Key Financial Ratio and VAT Reports: change in syntax used in formulae | Defining Key Financial Ratios page |
| 5.0 | Customers/Suppliers and Contact Persons combined into a single register | Combining Customers and Contact Persons page |
| 5.1 | Stock module rewritten | Description of Rebuild Stock function |
| 5.3 070723 | Change in naming convention for attached files | Point 2iii above (update is automatic, requiring no user intervention) |
---
In this chapter:
- Introduction
- Text Back-ups
- Automatic Timed Back-ups
- Backing Up Using Specialist Back-up Software
- Database Duplication
- Journaling
- Restoring from a Back-up
- Restoring from a Raw Data Export
- Updating to New Versions of HansaWorld Enterprise
Updating to New Versions of Enterprise by HansaWorld - Updating Clients Automatically
When you update to a new version of Enterprise by HansaWorld, you should ensure that you are update to the same new version on the server and on all client machines. If you have many client machines in your network, updating them manually can be a laborious job. To make this task easier, you can use the auto update feature that will cause the version on the client machines to be updated automatically the next time they connect to the server.To configure the auto update feature, follow these steps:
- By default, the auto update feature will transfer the new client applications through port 80 on the server. Opening this port might be undesirable and also requires superuser privilege in many systems. If you want to use a different port, create a text file named "serverip.dat" that contains the server's IP address and Web Port in the following format, on a single line:
- IP address:port
You can find the server's Web Port by opening the Program Mode register in the Technics module and going to the 'Web' card. If you need to specify a Web Port on the server or change the one that is there, you will need to restart the server for the change to take effect.
- Place the "serverip.dat" file in the "Hob" folders on every client.
- Set up a new Enterprise by HansaWorld installation on a client machine, with no database (no .hdb file). Create a folder or directory named "clientmp" and place it in the folder containing the Enterprise by HansaWorld application.
- Inside "clientmp", create one sub-folder or sub-directory for each client platform that you need, as follows:
This feature is not supported on Windows 7 clients.Folder For Client Application Name books Books Mac Books.app hansaraamaosx HansaRaama Mac (only used in Estonia) HansaRaama.app hansaraamawin HansaRaama Windows (only used in Estonia) HansaRaama.EXE hansaraamawindowsnet HansaRaama Windows .Net (only used in Estonia) HansaRaama.EXE linuxxt Linux XT HansaWorld linuxwine Linux Wine HansaWorld.EXE macosx Mac OS X Cocoa HansaWorld.app win98 Windows 98/NT HansaWorld.EXE wince Windows CE HansaWorld.EXE windows Windows 2000/XP HansaWorld.EXE windowsnet Windows .Net HansaWorld.EXE
- Copy the following files into the sub-folders or sub-directories from step 4:
- The "DBDEF.TXT" and "DEFAULT.TXT" files;
- The new version of the relevant Enterprise by HansaWorld application for the operating system. This must be named as shown in the list in step 4 (the names are case-sensitive). Depending on how you have configured your operating system, the file extensions may not be visible.
- The new "Hob" folder (which should contain the "serverip.dat" file from step 1, as this will ensure you don't need to repeat step 1 each time you update); and
- (optionally) a file named "AUTOUPDATEIMPORT.TXT", which can contain information that will be imported to each client database.
- The "windowsnet" folder should also contain the following files: "Boo.HtmlEditor.Shared.dll", "ColorPicker.dll" and "HtmlAgilityPack.dll".
- The "DBDEF.TXT" and "DEFAULT.TXT" files;
- Create a folder or directory named "clients" in the folder containing the Enterprise by HansaWorld application that you are using.
- Start the Enterprise by HansaWorld application, change to the Database Maintenance module. To gain access to the Database Maintenance module, grant yourself full access to it in your Access Group and log in again.
Run the 'Create Autoupdate Clients' Maintenance function:
Tick the Client options that you need (each option should have its own folder as listed in step 4), specify the Folder (if different to step 6) and click the [Run] button.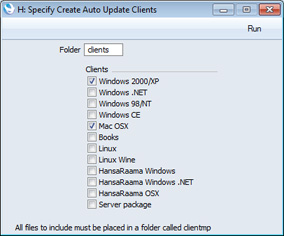
The Maintenance function will create separate .ha files for each Client options, saving them in the "clients" folder (for example, "windows.ha", "windowsnet.ha" and "macosx.ha").
- On the server machine, create a folder or directory named "web" in the folder containing the Enterprise by HansaWorld server application.
- Copy the entire "clients" folder (containing the .ha files) into the "web" folder created in the previous step.
- Update your Enterprise by HansaWorld server application to the new version as described here, and then launch this application as normal.
- Log in from a client using the new version and change to the Technics module. To do this, you should be working on a client and you should have logged in as a system administrator (i.e. as a Person that has access to the Technics module) as described here.
Open the Available Client Version setting in the Technics module:
Enter the version number of the server application in one or both of the fields. When a client logs in using a version that is earlier than the one specified in these fields, the client will be asked to update. If the client version is earlier than the Minimum Client Version, the update will be mandatory. If the client version is earlier than the Available Client Version, the update will not be mandatory.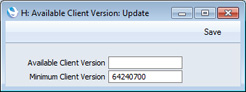
In most cases, it is recommended that you make updates mandatory, as shown in the illustration. This will ensure that all client machines are using the same version.
If the new version contains structural changes compared to the old, the update will be set as mandatory automatically, irrespective of the field that you use in this setting.
The version number of the server will be shown in the Terminal window when you launch the server and will be written to the log file at the same time.
- On a client machine, launch the old Enterprise by HansaWorld client application.
- After choosing the company, you will be told that a newer client is available, and whether the update is mandatory:
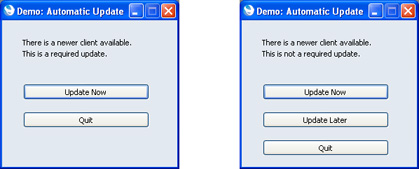
- Click the [Update Now] button. Your client application will be updated, as follows:
- Your client database will be backed up;
- The new client application, "Hob" folder and any other files will be downloaded to your client folder;
- The old client application, "Hob" folder, database and other files will be moved to a folder named "oldver"; and
- The new client application will be launched and the client text back-up imported.
- Your client database will be backed up;
- Log in as normal.
In this chapter:
- Introduction
- Text Back-ups
- Automatic Timed Back-ups
- Remote Back-ups
- Backing Up Using Specialist Back-up Software
- Database Duplication
- Journaling
- Restoring from a Back-up
- The Raw Data Export
- Updating to New Versions of Enterprise by HansaWorld, including:
- Updating Clients Automatically
- Major Updates
- Updating Clients Automatically
- Home page for Introduction and Installation manual
- Home page for Enterprise by HansaWorld manual
Updating to New Versions of Enterprise by HansaWorld - Major Updates
Listed below are some major revisions that have been made to Enterprise by HansaWorld. When you update for the first time to a version that contains one of these revisions, you will need to update your data, usually by running a Maintenance function.| Version | Revision | More Information |
| 3.8 | Assets module: Fixed Asset register replaced by Asset register | Description of Export to new Fixed Assets Module function |
| 4.1 | Customers and Suppliers combined into a single register | Combining Customers and Suppliers page |
| 4.1 | Definition of Key Financial Ratio and VAT Reports: change in syntax used in formulae | Defining Key Financial Ratios page |
| 5.0 | Customers/Suppliers and Contact Persons combined into a single register | Combining Customers and Contact Persons page |
| 5.1 | Stock module rewritten | Description of Rebuild Stock function |
| 5.3 070723 | Change in naming convention for attached files | Point 2iii above (update is automatic, requiring no user intervention) |
| 6.1 090510 | Currency added to Job Costing module | Use the 'Change Project Currency' Maintenance function in the Job Costing module to add Currencies to existing Projects |
---
In this chapter:
- Introduction
- Text Back-ups
- Automatic Timed Back-ups
- Remote Back-ups
- Backing Up Using Specialist Back-up Software
- Database Duplication
- Journaling
- Restoring from a Back-up
- The Raw Data Export
- Updating to New Versions of Enterprise by HansaWorld, including:
- Updating Clients Automatically
- Major Updates
- Updating Clients Automatically
- Home page for Introduction and Installation manual
- Home page for Enterprise by HansaWorld manual