Introduction to the Delivery Register
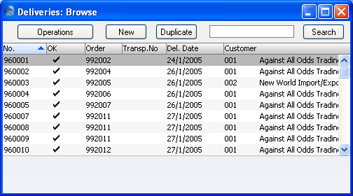
This register holds one record per Delivery. A Delivery is always connected with a Sales Order, and it can be either a full (final) Delivery or a part Delivery.To view Deliveries already entered, ensure you are in the Stock module and click the [Deliveries] button in the Master Control panel. The 'Deliveries: Browse' window is opened:
Entering a Delivery
You must create new Deliveries from Sales Orders. With a Sales Order open, select the 'Create Delivery' command from the Operations menu. This creates a new Delivery record. For the command to have any effect, you must first save all changes to the Sales Order (use the [Save] button). You can also create a Delivery by dragging an Order from the 'Orders: Browse' window to the 'Deliveries: Browse' window.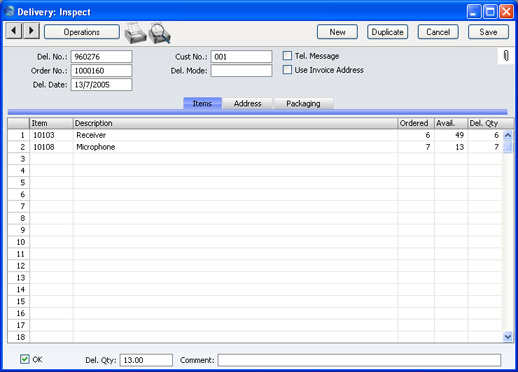
Entering a Delivery - Header
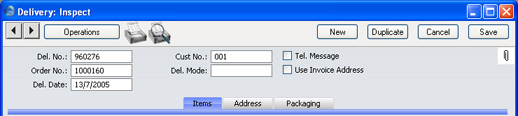
- Del. No.
- Paste Special
Select from another Number Series
- The serial number of the current Delivery. The default is the next unused number from the number sequence specified in the Number Series Defaults setting or from the first number sequence in the Number Series - Deliveries setting. You can change this number, but not to one that has already been used.
- Cust. No.
- The Customer Number from the Order. This field cannot be changed.
- Tel. Message
- If it is necessary to remind your warehouse or delivery staff to call the Customer to arrange this Delivery, check this box. Depending on how you have designed your delivery documentation, an X can be printed on the Delivery Note or Picking List to ensure this task is carried out.
- Order No.
- The serial number for the Sales Order from which the Delivery record was created. This field cannot be changed.
- Del. Mode
- Paste Special
Delivery Modes setting, Sales Support module
- The Delivery Mode from the Order. Examples might be Post or Courier, or might specify the name of the courier that you will use to supply the goods on the Order.
- If you have the Currencies, Languages and Advanced Pricing Value Pack, please click here for details about printing the Delivery Note document using different Forms depending on the Delivery Mode.
- If you have the Currencies, Languages and Advanced Pricing Value Pack, please click here for details about printing the Delivery Note document using different Forms depending on the Delivery Mode.
- Use Invoice Address
- When you print a Delivery Note, Picking List or Freight Label for a Delivery, the address that will be printed will usually be the one shown on the 'Address' card of the Delivery record. Check this box if you would like the Invoice Address (from the 'Inv. Address' card of the originating Order) to be printed instead.
- Del. Date
- Paste Special
Choose date
- The date of the Delivery. The current date is entered by FirstOffice as a default.
- If you are using the FIFO stock valuation method, either in the Stock List or in the Nominal Ledger, you must make certain that you enter all stock transactions in strict chronological order. Failure to do this may cause your FIFO values to become incorrect. Do not, for example, enter a Delivery with yesterday's date if you have already entered one with today's. It is also recommended that you always approve Deliveries when you save them for the first time. Do not, for example, go back to an earlier unapproved Delivery and approve it if there are later approved ones, unless you change the date as well.
Entering a Delivery - Items Card
- Item
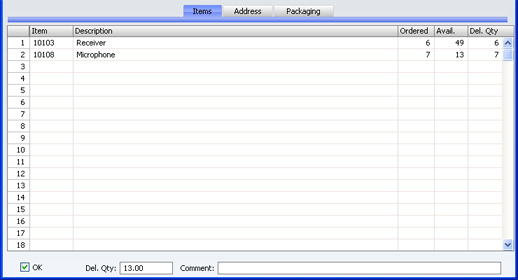
- The Item Number from the Order. This field cannot be changed.
- Description
- The Item Name from the Order.
- Ordered
- The ordered quantity. This field cannot be changed.
- Avail.
- The quantity available in stock at the moment when the Delivery is created. The field will be blank for Plain Items (Items for which a stock history is not maintained), as for these there is no stock balance figure. This field cannot be changed.
- The calculation of this figure is controlled by the Decrease Available on Deliveries options in the Stock Settings setting. The free stock figure for each Item can be reduced by the quantities on previous Deliveries when you create them or when you approve them. So, if you are using the second option, the figure in this field will include delivery quantities from previous unapproved Deliveries.
- The calculation of this figure is controlled by the Decrease Available on Deliveries options in the Stock Settings setting. The free stock figure for each Item can be reduced by the quantities on previous Deliveries when you create them or when you approve them. So, if you are using the second option, the figure in this field will include delivery quantities from previous unapproved Deliveries.
- Del. Qty
- As a default, FirstOffice assumes you wish to ship as many Items as possible. Therefore, for Stocked Items, if the stock balance is greater than the ordered quantity, the ordered quantity is suggested. If the balance is less than ordered quantity, the stock balance is suggested. If the balance is zero or negative, zero will be entered. For Plain Items, as no stock balance figure is kept, the ordered quantity is always suggested.
- You can change this figure if necessary: the change will also be recorded in the Del 1 and Del 2 fields of the relevant Order row.
- If you wish to prevent the shipping of a quantity greater than that in stock (i.e. if you do not want to allow negative stock), switch on the Do Not Allow Over Delivery option in the Stock Settings setting.
- If you would like the default value always to be the ordered quantity, even if there is insufficient stock, use the Always Deliver option in the Stock Settings setting.
- You can change this figure if necessary: the change will also be recorded in the Del 1 and Del 2 fields of the relevant Order row.

- OK
- Check this box to approve the Delivery. When you save the approved Delivery, you will no longer be able to change it. Stock levels may be amended, depending on the Decrease Available on Deliveries options in the Stock Settings setting (they are otherwise amended when you create the Delivery). If you have determined that cost accounting transactions are to be created at the point of delivery, stock transactions in the Nominal Ledger will now be raised (they may otherwise be raised after invoicing). Cost accounting transactions from Deliveries are described here.
- You must approve the Delivery before you can raise an Invoice for it from the Order.
- You can use Access Groups to control who can approve Deliveries. To do this, deny access to the 'OKing Deliveries' Action.
- References in these web pages to approved Deliveries are to those whose OK check box is on.
- You must approve the Delivery before you can raise an Invoice for it from the Order.
- Del. Qty
- This shows the total number of Items delivered.
- Comment
- Any comment that you enter here can be printed on the Freight Label.
Entering a Delivery - Address Card
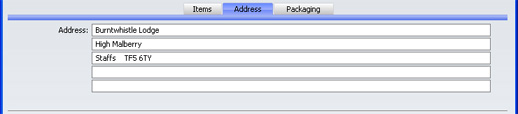
- Address
- Default taken from
Sales Order
- The Delivery Address, taken from the 'Del. Address' card of the Order which, in turn, is taken from the 'Delivery' card of the Customer. It can be changed for this Delivery if necessary.
Entering a Delivery - Packaging Card

- Packages
- An optional field to register the number of packages used to make up the Delivery. This information can be printed on the Freight Label.
- Transport No.
- An optional transport number, e.g. bill of lading number or consignment note number. This information can be printed on the Freight Label and is shown in the 'Deliveries: Browse' window.
- Weight
- Default taken from
Items
- This field will contain a calculated value based on the Delivery Quantity and the Weight of the Items. If you change the Weight of one of the Items or if this figure becomes inaccurate for any other reason, use the 'Calculate Weight' function on the Operations menu to update this field.
- Volume
- Default taken from
Items
- This field will contain a calculated value based on the Delivery Quantity and the Volume of the Items. If you change the Volume of one of the Items or if this figure becomes inaccurate for any other reason, use the 'Calculate Weight' function on the Operations menu to update this field.
- From City
- If appropriate, specify here the city from which the Delivery is to be made. This information can appear on delivery documentation.
- To City
- If appropriate, specify here the city to which the Delivery is to be made. This information can appear on delivery documentation.
- From Dock
- If appropriate, specify here the port or airport from which the Delivery is to be made. This information can appear on delivery documentation.
- To Dock
- If appropriate, specify here the port or airport to which the Delivery is to be made. This information can appear on delivery documentation.
- Transport Directives
- If appropriate, enter any special handling instructions for the Delivery here. This information can appear on delivery documentation.
Nominal Ledger Transactions from Deliveries
When you approve and save a Delivery record, a Nominal Ledger Transaction will be generated automatically if you have so determined in the Sub Systems setting in the Nominal Ledger, if you have chosen a Cost Model and if at least one of the Items on the Delivery is a Stocked Item. Please refer to the Cost Accounting page for full details of this Transaction.Once the Transaction has been generated, you can look at it straight away using the 'Open NL Transaction' function on the Operations menu.
Inspecting and Approving Deliveries
Before a Delivery goes out you need to prepare it and approve it. The first step is to print the Picking List. You can do this by clicking the Printer icon in the Button Bar. When the Delivery is finally OK, click the OK check box and press the [Save] button. Once you have done this, you will no longer be able to modify the Delivery. You will then be able to create an Invoice for the Delivery (from the Order screen).You can also approve several Delivery records at once by highlighting them in the 'Deliveries: Browse' window and selecting 'OK' from the Operations menu. To highlight several Delivery records, click on the first Delivery to be approved, hold down the Shift key and click on the last.
On approval, stock levels may be amended, depending on the Decrease Available on Deliveries options in the Stock Settings setting (they are otherwise amended when the Delivery is created). Also, if defined in the Sub Systems setting in the Nominal Ledger, a cost accounting Transaction will be created in the Nominal Ledger. Please refer to the Cost Accounting page for details of the Accounts used by this Transaction.
You can use Access Groups to control who can approve Deliveries. To do this, deny access to the 'OKing Deliveries' Action.
Deliveries from the Sales Ledger
It is possible to deliver goods from stock without a Delivery. You can do this by entering Invoices directly to the Invoice register (i.e. without first entering a related Sales Order). On the 'Delivery' card of the Invoice, there is an Update Stock check box, which will be on by default if the Invoices Update Stock option in the Account Usage S/L setting, is on. If it is on, an Invoice for a Stocked Item will generate an "invisible" Delivery transaction. The result of such an event is that the stock balance of the Item will be altered, but there will be no Delivery transaction generated in the Delivery register. The result of the stock change will be visible in the Item History report in the Stock module. If you are using cost accounting (maintaining stock values in the Nominal Ledger), stock postings (the equivalent of those in Transactions generated from Deliveries) will be included in the Transaction created from the Invoice. Please click here for details about printing delivery documentation from Invoices.The Invoices Update Stock check box is only relevant for Deliveries issued from an Invoice (i.e. when there is no related Sales Order).
Printing Picking Lists and Delivery Notes
If you click the Printer icon in the Button Bar of a Delivery window, a document will be printed. If the Delivery is not approved, a Picking List is printed. If the Delivery is approved, a Delivery Note is printed. If you want to print to screen, click the Preview icon.To print Delivery Notes or Picking Lists in batches, click the [Documents] button in the Master Control panel or select 'Documents' from the File menu. Double-click 'Delivery Notes' or 'Picking Lists' in the 'Documents' list window. Indicate the Delivery Number (or range of Delivery Numbers) to be printed and press [Run].
Delivery Notes can also be printed automatically on approval. This is controlled using the Auto Actions setting in the System module.
However Picking Lists or Delivery Notes are printed, the Forms used are determined as follows:
- Using the Form register in the System module, design the Delivery Note or Picking List as appropriate and name it "DELIVERY_NOTE" or "PICKING_LIST". Use the 'Properties' function on the Operations menu to assign Document Types of "Delivery Note" and "Picking List" respectively. Samples are supplied with FirstOffice: these can be modified to suit your requirements. Full instructions for using the Form register can be found here.
- Select the Stock module using the [Select Module] button in the Master Control panel or the Ctrl-0 (Windows and Linux) or ⌘-0 (Macintosh) keyboard shortcut.
- Click the [Documents] button in the Master Control panel or select 'Documents' from the File menu. The 'Documents' list window is opened: highlight 'Delivery Notes'.
- Select 'Define Document' from the Operations menu.
- In the subsequent window, enter "DELIVERY_NOTE" in the Form field of the first row (you can use 'Paste Special' to ensure the spelling is correct).
- Click [Save] to save the Form definition.
- Repeat steps 3-6 above, this time highlighting 'Picking Lists' in the 'Documents' list window and entering "PICKING_LIST" in the 'Define Document' window. From now on, the Forms that you have designed will be used, from the 'Documents' function and from the Printer and Preview icons. "PICKING_LIST" will be used when a Delivery is not approved, otherwise "DELIVERY_NOTE" will be used.
Operations Menu

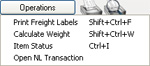
Operations Menu - OK
This command is available on the Operations menu only from the 'Deliveries: Browse' window. It allows you to approve a Delivery and is therefore the equivalent of checking the OK box in the Delivery record. You can also select several Deliveries (hold down the Shift key to select a range of Deliveries in the list) and approve them all at once. Remember that, if so defined in the Sub Systems setting in the Nominal Ledger, this action causes Nominal Ledger Transactions to be created for each Delivery in the selection and that therefore once it has been carried out you will no longer be able to modify those Deliveries. Stock levels may be amended, depending on the Decrease Available on Deliveries options in the Stock Settings setting (they are otherwise amended when the Delivery is created).You can use Access Groups to control who can approve Deliveries. To do this, deny access to the 'OKing Deliveries' Action.
Operations Menu - Print Freight Labels
Select this command to print Freight Labels for the current Delivery. You can also print Freight Labels using the 'Documents' function.Operations Menu - Calculate Weight
When you create a Delivery from a Sales Order, its total Weight and Volume, calculated from the Delivery Quantity and from the Item records, is shown on the 'Packaging' card. If you change the Weight or Volume of an Item or if these figures become inaccurate for any other reason, you can recalculate them using this function.Operations Menu - Item Status
This function provides instant feedback for the Item shown in the Delivery row containing the cursor or highlighted in the 'Paste Special' window listing Items. Information displayed in a new window includes the quantity in stock, the quantity on order and the quantity shippable.Please click here for full details.
Operations Menu - Open NL Transaction
When you approve and save a Delivery, if so defined in the Sub Systems setting in the Nominal Ledger, a Nominal Ledger Transaction will be created. This function allows you to view that Transaction.On selecting the function, the Transaction will be opened in a new window.