Ievads
Reģistrā Avansa norēķini tiek reģistrēti darbinieku avansa norēķinu pieprasījumi. Parasti par katra darbinieka avansa norēķinu pieprasījumu tiek izveidots jauns ieraksts (piem., reizi mēnesī par katru darbinieku).Ja avansa norēķina pieprasījumā vēlaties norādīt arī veikto braucienu attālumus, vispirms reģistrā Ceļazīmes jāizveido jauns ieraksts un jānorāda informācija par braucienu. Šo informāciju pēc tam varat reģistrēt avansa norēķina ieraksta D sadaļā. Ceļazīmes ieraksta kopējās izmaksas avansa norēķinā tiks ievietotas automātiski, bet konts, PVN kods un apraksts tiks ievietots no sagatavošanas Ceļazīmju parametri.
Lai atvērtu reģistru, Avansa norēķinu modulī no izvēlnes Reģistri izvēlieties ‘Avansa norēķini’ vai Bāzes logā noklikšķiniet uz [Avansa norēķini].
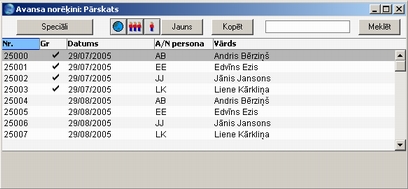
Tiks atvērts logs ‘Avansa norēķini: Pārskats’ ar ievadīto avansa norēķinu sarakstu. Apstiprināto avansa norēķinu (to, kas iegrāmatoti Finanšu modulī) kolonnā Gr. tiks rādīts ķeksītis.
Avansa norēķinu ievadīšana
Lai izveidotu jaunu avansu norēķinu, atveriet reģistru, kā aprakstīts šeit, pēc tam pogu joslā noklikšķiniet uz [Jauns] vai nospiediet taustiņu kombināciju Ctrl-N (Windows un Linux) vai ⌘-N (Macintosh) Varat arī iezīmēt līdzīgu ierakstu tam, kādu vēlaties izveidot, un noklikšķināt uz [Kopēt].Tiks atvērts logs ‘Avansa norēķins: Jauns’, tas būs tukšs, ja noklikšķinājāt uz [Jauns], vai iezīmētā avansa norēķina kopija.

- Augšējā sadaļa
- Nr.
- Ievietot Speciāli
izvēlieties numuru sēriju
- Avansa norēķina ieraksta numurs. Izveidojot jaunu ierakstu, HansaWorld Enterprise ievietos pirmo brīvo numuru no pirmās sagatavošanā Numuru sērijas - Avansa norēķini ievadītās numuru sērijas. Varat to mainīt, taču tas nedrīkst būt jau izmantos. Vairāklietotāju sistēmās pirmais brīvais numurs tiks piešķirts tikai pēc ieraksta saglabāšanas.
- Datums
- Ievietot Speciāli
izvēlieties datumu
- Darbinieka avansa norēķina pieprasījuma iesniegšanas datums.
- Grām. datums
- Ievietot Speciāli
izvēlieties datumu
- Avansa norēķinu prasības datums: tas tiks izmantots, veidojot Finanšu moduļa grāmatojumu. Pēc noklusējuma tiks ievietots avansa norēķina pieprasījuma datums.
- Persona
- Ievietot Speciāli
Sistēmas moduļa reģistrs Personas
- Pēc noklusējuma no pašreizējais datums
- Ievadiet personas iniciāļus vai izmantojiet funkciju ‘Ievietot Speciāli’. Nospiežot Enter, labās puses laukā Vārds tiks ievietots personas vārds un uzvārds.
- Ievadiet personas iniciāļus vai izmantojiet funkciju ‘Ievietot Speciāli’. Nospiežot Enter, labās puses laukā Vārds tiks ievietots personas vārds un uzvārds.
- Vārds
- Tas tiks ievietots laukā, kad būsit norādījuši iniciāļus.
- Paraksts
- Šajā laukā tiek rādīti tās personas iniciāļi, kura apstiprināja ierakstu. Ja sagatavošanā Avansu norēķinu ievadīšana atzīmēta izvēles rūtiņa ‘Pieprasīt parakstu’, šis lauks jāaizpilda pirms ieraksta apstiprināšanas.
- Lauku nevar aizpildīt manuāli. Pašreizējā programmas lietotāja iniciāļi tiks ievietoti automātiski, kad no izvēlnes Speciāli izvēlēsities funkciju 'Apstiprināt'.
- Varat izmantot Sistēmas moduļa sagatavošanu Personu grupas, lai ierobežotu to darbinieku skaitu, kuriem pieejama funkcija 'Apstiprināt'.
- Lauku nevar aizpildīt manuāli. Pašreizējā programmas lietotāja iniciāļi tiks ievietoti automātiski, kad no izvēlnes Speciāli izvēlēsities funkciju 'Apstiprināt'.
- Valūta
- Ievietot Speciāli
Sistēmas moduļa reģistrs Valūtas
- Pēc noklusējuma no noklusējuma bāzes valūtas
- Avansa norēķinu prasības var ievadīt jebkurā valūtā, taču vienā ierakstā var izmantot tikai vienu valūtu. Norādot valūtu, sadaļā 'Valūta' tiek ievietots pareizais grāmatojuma datuma valūtas kurss, kuru, ja nepieciešams, var mainīt tikai konkrētajam ierakstam.
- Visas avansa norēķina summas jānorāda valūtā: izveidojot grāmatojumu, tās tiks konvertētas nacionālajā valūtā.
- Avansa norēķinu prasības var ievadīt jebkurā valūtā, taču vienā ierakstā var izmantot tikai vienu valūtu. Norādot valūtu, sadaļā 'Valūta' tiek ievietots pareizais grāmatojuma datuma valūtas kurss, kuru, ja nepieciešams, var mainīt tikai konkrētajam ierakstam.
- Sadaļa 'Norēķins'

A sadaļa
- Konts
- Ievietot Speciāli
Sistēmas/Finanšu moduļa reģistrs Konti
- Norādiet izmaksu kontu, kurā debetēt summu, no avansa norēķina izveidojot grāmatojumu Finanšu modulī. Ievadot konta numuru, laukā Apraksts tiks automātiski ievietots konta nosaukums. Izmantojiet funkciju ‘Ievietot Speciāli’, lai nepieciešamo kontu varētu izvēlēties no kontu plāna.
- Kontu var ievietot arī kolonnā Kods, ievadot konta kodu.
- Šajā laukā var norādīt arī autogrāmatojuma kodu. Autogrāmatojumi tiek izmantoti, lai automātiski izveidotu bieži izmantotus grāmatojumus, kas ne tikai ietaupa darbu, bet arī nodrošina pareizu kontu izmantošanu. Autogrāmatojums, piemēram, varētu būt tāds, kas sadala avansa norēķina izmaksas pa vairākiem objektiem, balstoties uz procentiem.
- Ja D sadaļā norādīta ceļazīme, tad šajā laukā tiks automātiski ievietots sagatavošanā Ceļazīmju parametri norādītais artikula izmaksu konts vai, ja tāda nebūs, tās pašas sagatavošanas kopējais ieraksta konts.
- Kontu var ievietot arī kolonnā Kods, ievadot konta kodu.
- Objekti
- Ievietot Speciāli
Finanšu/Sistēmas moduļa reģistrs Objekti
- Vienai rindai var piesaistīt līdz 20 objektiem, atdalītiem ar komatu. Tie tiks grāmatoti debeta pusē no šī ieraksta izveidotajā Finanšu moduļa grāmatojumā, un tos var izmantot peļņas centra atskaitēs. Varat definēt atsevišķus objektus, kas attēlotu dažādus departamentus, izmaksu centrus vai preču tipus. Tas ļauj Finanšu moduļa atskaitēs izmantot elastīgu analīzes metodi.
- Ievērojiet, ka objektus var piesaistīt katram reģistrā Personas ievadītajam darbiniekam. Tie automātiski tiks grāmatoti kredīta pusē, no ieraksta izveidojot konkrētā avansa norēķina pieprasījuma grāmatojumu.
- Ja B sadaļā norādīts projekts un tam ir piesaistīts objekts, tad šis objekts tiks nokopēts šajā ailē automātiski. Objekts tiks ievietots ailē arī tad, ja kolonnā Kods norādīsit konta kodu.
- Ja D sadaļā norādīta ceļazīme, šeit automātiski tiks ievietots ceļazīmes ieraksta augšējā daļā norādītie objekti.
- Ievērojiet, ka objektus var piesaistīt katram reģistrā Personas ievadītajam darbiniekam. Tie automātiski tiks grāmatoti kredīta pusē, no ieraksta izveidojot konkrētā avansa norēķina pieprasījuma grāmatojumu.
- Kods
- Ievietot Speciāli
Finanšu moduļa sagatavošana Kontu kodi
- Izmantojot kodus, tiek samazināta kļūdas iespējamība kontu un objektu atlasē. Varat izmantot kodus arī tad, ja nevēlaties, lai citiem darbiniekiem būtu liegta iespēja ienākošajos rēķinos un avansa norēķinos ievietot kontus un objektus (kas nozīmē, ka viņiem nebūs pieejas reģistiem Konti un Objekti, kā arī funkcijai ‘Ievietot Speciāli’ ). Ievadiet kodu, lai ierakstā ievietotu atbilstošu kontu un objektu(-s).
- Apraksts
- Pēc noklusējuma no
konta
- Konta nosaukums tiek ievadīts automātiski, tiklīdz norādīts konta numurs. Ja nepieciešams, to var mainīt.
- Ja D sadaļā norādīta ceļazīme, šeit automātiski tiks ievietots sagatavošanas Ceļazīmju parametri norādītais konta nosaukums.
- Ja D sadaļā norādīta ceļazīme, šeit automātiski tiks ievietots sagatavošanas Ceļazīmju parametri norādītais konta nosaukums.
- Summa ar PVN
- Ievadiet summu, kurā ir iekļauts PVN. Ja norādīta valūta, arī šai summai jābūt attiecīgajā valūtā.
- Ja D sadaļā norādīta ceļazīme, šeit automātiski tiks ievietots ceļazīmes ieraksta apakšējā daļā norādītā kopējā summa.
- Ja D sadaļā norādīta ceļazīme, šeit automātiski tiks ievietots ceļazīmes ieraksta apakšējā daļā norādītā kopējā summa.
- PVN
- Katras rindas PVN tiek aprēķināts no ailēm Summas ar PVN un PVN kd (sk. tālāk).
- PVN kd
- Ievietot Speciāli
Finanšu moduļa sagatavošana PVN kodi
- Šeit ievadītais PVN kods attiecas uz Finanšu moduļa sagatavošanā PVN kodi ievadīto ierakstu. Tas nosaka PVN procentu likmi, kāda tiks piemērota konkrētam avansu norēķina ierakstam, un PVN kontu, uz kuru summa tiks debetēta.
- Pēc noklusējuma tiks piedāvāts kods no konta kartiņas vai Piegādātāju moduļa sagatavošanas Kontējumu sastādīšana sadaļas ‘PVN’. Ja D sadaļā norādāt ceļazīmi, pēc noklusējuma tiks ievietots vietējais PVN kods no sagatavošanas Ceļazīmju parametri norādītā artikula.
- Artikuls
- Ievietot Speciāli
reģistrs Artikuli
- Norādiet nopirktā artikula numuru. Ja avansa norēķinu esat piesaistījuši projektam, šī informācija tiks izmantota Resursu plānošanas modulī.
- Ja D sadaļā norādīta ceļazīme, šajā ailē no sagatavošanas Ceļazīmes automātiski tiks nokopēts artikuls. Tas A sadaļā noteiks kontu un PVN kodus.
- Ja D sadaļā norādīta ceļazīme, šajā ailē no sagatavošanas Ceļazīmes automātiski tiks nokopēts artikuls. Tas A sadaļā noteiks kontu un PVN kodus.
- Daudzums
- Norādiet iepirkto artikulu daudzumu.
- Ja D sadaļā ir norādīta ceļazīme, šajā ailē no ceļazīmes ieraksta apakšējā lauka Kopā, km automātiski tiks nokopēts kopējais attālums.
- Ja D sadaļā ir norādīta ceļazīme, šajā ailē no ceļazīmes ieraksta apakšējā lauka Kopā, km automātiski tiks nokopēts kopējais attālums.
- Proj.
- Ievietot Speciāli
Projektu kalkulācijas moduļa (ja instalēts) reģistrs Projekti
- Tā projekta numurs, kuram jāpiesaista avansa norēķina rinda. Apstiprinot avansa norēķinu, katrai rindai, kurā norādīts projekta numurs, artikula numurs un daudzums, tiks izveidots projekta grāmatojums. Tas nodrošinās to, ka avansa norēķina summa tiks pievienota projekta izmaksām un ka no klientiem, ar kuriem uzsākts projekts, tiks iekasēta avansa norēķina rindas summa, ja tā noteikts projekta cenu struktūrā. Sīkāku informāciju skatiet šeit.
- Ja projektam ir piesaistīts objekts, tas tiks nokopēts automātiski no avansa norēķina A sadaļas lauka Objekts.
- Ja D sadaļā ir norādīta ceļazīme, šajā ailē no ceļazīmes ieraksta augšējās daļas tiks automātiski nokopēts projekta numurs.
- Ja projektam ir piesaistīts objekts, tas tiks nokopēts automātiski no avansa norēķina A sadaļas lauka Objekts.
C sadaļas laukus var izmantot, ja avansa norēķiniem ir pievienoti maksājumi vai rēķini. Laukā Dok. Nr. var norādīt maksājuma vai rēķina numuru, kā arī atbilstoši aizpildīt laukus Datums un Piegādātājs. Laukā Piegādātājs ir pieejams funkcijas ‘Ievietot Speciāli’ saraksts. Šim laukam ir informatīva nozīme: tas neietekmē Piegādātāja moduļa informāciju. Ja ievadāt avansa norēķinu valūtā, tad svarīgi ir aizpildīt lauku Datums. Ja šajā laukā un augšējā daļā norādīto datumu valūtas kursi nesakrīt un ja sagatavošanā Avansa norēķinu izveidošana ir atzīmēta izvēles rūtiņa ‘Izmaksām norēķinu datuma kurss’, starpība tiks grāmatota sagatavošanas Kontējumu sastādīšana sadaļā ‘Valūtu kursi’ norādītajā noapaļošanas kontā. Sīkāku informāciju un piemēru skatiet sadaļā Avansa norēķini valūtā.
D sadaļa
- Ceļazīme
- Ievietot Speciāli
Avansa norēķini moduļa reģistrs Ceļazīmes
- Izmantojiet šo lauku, lai avansa norēķina pieprasījumā par attālumu norādītu sīkāku informāciju par veiktajiem braucieniem. Vispirms ievadiet šo informāciju jaunā reģistra Ceļazīmes ierakstā. Pēc tam šajā ailē norādiet šīs ceļazīmes numuru. Informācija no ceļazīmes ieraksta apakšējās daļas laukiem ‘Kopējā summa’ un ‘Kopā, km’ tiks ievietota attiecīgi A sadaļas kolonnas ailē ‘Summa ar PVN’ un B sadaļas ailē ‘Daudzums’. Avansa norēķina A sadaļas ailē ‘Objekts’ un B sadaļas ailē ‘Projekts’ tiks nokopēta informācija no ceļazīmes ieraksta augšējās daļas laukiem ‘Objekts’ un ‘Projekts’. PVN kods tiks ievietots no artikula, kas norādīts sagatavošanā Ceļazīmju parametri. Konts tiks ievietots no šim artikulam norādītā izmaksu konta vai no tās pašas sagatavošanas. Apraksts tiks nokopēts no sagatavošanas Ceļazīmju parametri.
- Ja, norādot ceļazīmes numuru, ailes ‘Summa ar PVN’, ‘Daudzums’, ‘Konts’, ‘Objekts’ un ‘Apraksts’ netiek aizpildītas, iespējams, sagatavošanā Ceļazīmju parametri neesat norādījuši artikulu. Ja šādā veidā vēlaties sasaistīt avansa norēķinu un ceļazīmes, šajā sagatavošanā jāizveido ieraksts par konkrēto artikulu.
- Grāmatot
- Atzīmējot šo izvēles rūtiņu un saglabājot ierakstu, avansa norēķins tiek apstiprināts un Finanšu modulī tiek izveidots tā grāmatojums. Pēc tam šajā ierakstā vairs nevarēs veikt izmaiņas.
- Par apstiprinātiem avansa norēķiniem šajā nodaļā tiks uzskatīti tie, kuriem atzīmēta izvēles rūtiņa ‘Grāmatot’.
- Par apstiprinātiem avansa norēķiniem šajā nodaļā tiks uzskatīti tie, kuriem atzīmēta izvēles rūtiņa ‘Grāmatot’.
- Dokumentu skaits
- Ievadiet maksājumu vai citu dokumentu skaitu, kas ir ievadīti šajā avansa norēķinā. Tas nepieciešams tikai informatīviem nolūkiem.
- PVN
- PVN summa, kas tiek aprēķināta no avansa norēķina rindām.
- KOPĀ
- Kopējā avansa norēķina summa, ieskaitot visus nodokļus un summu attiecīgajā valūtā.
- Sadaļa 'Valūtas'

- Valūta
- Ievietot Speciāli
Sistēmas moduļa reģistrs Valūtas
- Pēc noklusējuma no noklusējuma bāzes valūtas
- Avansa norēķinu var ievadīt jebkurā no definētajām valūtām. Vienā ierakstā var izmantot tikai vienu valūtu.
- Visām avansa norēķina summām jābūt valūtā: no šī ieraksta izveidotajā Finanšu moduļa grāmatojumā tiks rādītas summas gan ārvalstu, gan nacionālajā valūtā (arī Bāzes Valūtā 2, ja tāda ir).
- Avansa norēķinu var ievadīt jebkurā no definētajām valūtām. Vienā ierakstā var izmantot tikai vienu valūtu.
- Kurss
- Pēc noklusējuma no
Sistēmas moduļa sagatavošanas Bāzes valūtu kursi un/vai reģistra Valūtu kursi
- Programma automātiski ievietos norādītās valūtas kursu grāmatojuma datumā.
- Tiks izmantota viena no divām konvertēšanas metodēm. Divu bāzes valūtu sistēma būs noderīga tiem uzņēmumiem, kuru biroji atrodas divās valstīs un kuriem jāveido atskaites abās valūtās, arī to valstu uzņēmumiem, kur papildus nacionālajai valūtai parasti tiek izmantota otra valūta (parasti dolāri vai eiro), un Eiropas Savienības valstu uzņēmumiem, kuri salīdzināšanas nolūkiem ir saglabājuši iepriekšējo valūtu. Otrā metode ir vienkāršā konvertēšana no ārvalstu valūtas nacionālajā valūtā, un tā ir piemērota lielākajai pasaules valstu izmantotajiem valūtu grāmatojumiem. Tie aprakstīti tālāk.
- Valūtu kursi (Divu bāzes valūtu sistēma)
- Ja izmantojat divu bāzes valūtu sistēmu, kreisās puses laukos Bāzes valūta 1 un 2 rāda abu bāzes valūtu savstarpējo kursu likmes formā (ievietots no jaunākā sagatavošanas Bāzes valūtu kursi ieraksta).
- Ievērojiet, ka Ekonomiskās un Monetārās savienības (EMS) likumdošana nosaka to, ka kursam jāatspoguļo nacionālās vai ārzemju valūtas daudzums, kuru var iegādāties par 100 eiro.
- Valūtu kursi (Vienkāršā konvertēšanas sistēma)
- Ja izmantojat vienkāršo konvertēšanas sistēmu, laukā Kurss un labās puses laukā Bāzes valūta 1 tiek rādīts ārvalstu un nacionālās valūtas kurss.
Entering an Expense Record - Misc Card
This page describes the fields on the 'Misc' card of the Expense record. Please follow the links below for descriptions of the other cards:
- Header
- 'Cost' card
- 'Currency' card
- 'Misc' card

- Approval Status
- You can use the Approval Rules register in the Business Alerts module to configure an approval process that Expense records must pass through. For example, particular managers may need to check and approve every Expense record in which the TOTAL is greater than a certain value. If you are using such an approval process, this field will display the stage in the process that a particular Expense record has reached.
If an Expense record needs to pass through an approval process, the following functions will be disabled until the approval process has been completed:
- Printing the Expense record.
- Marking the Expense record as OK.
- Creating a Mail from the Expense record.
In brief, the Approval Status of an Expense record can be any of the following:
- Not Required
- The Expense record does not need to pass through an approval process, so the functions listed above will be available immediately.
- Not Requested
- The Expense record does need to pass through an approval process, and you have not yet started that process. To start the process, save any changes and then choose 'Request Approval' from the Operations menu (Windows/Mac OS X) or Tools menu (iOS/Android).
- Pending
- The Expense record has been entered into the approval process, and is waiting to be approved or rejected. If you need to check the progress of the approval process, select Expense Status' from the Operations or Tools menu.
- If the Status of the Expense record is Pending, you will usually not be able to modify it. If you need certain users to be able to modify Pending records, use Access Groups to grant them Full access to the 'Change Record Header when Approval Status is Pending' and/or 'Change Record Matrix when Approval Status is Pending' Actions.
- If the Status of the Expense record is Pending, you will usually not be able to modify it. If you need certain users to be able to modify Pending records, use Access Groups to grant them Full access to the 'Change Record Header when Approval Status is Pending' and/or 'Change Record Matrix when Approval Status is Pending' Actions.
- Approved
- The approval process has been completed and the Expense record has been approved. The functions listed above will be available.
- Rejected
- The approval process has been completed and the Expense record has been rejected.
Please refer here for full details.
- Printing the Expense record.
The Expense register in Standard ERP:
- Introduction
- Entering an Expense record, including:
- Header
- 'Cost' card
- 'Currency' card
- 'Misc' card
- Header
- Inspecting Expense records, Marking as OK and Posting to the Nominal Ledger
- Expenses in Currency
- Error Messages
- Invalidating Expenses
- Registering Expenses Using Purchase Invoices
- Operations menu
- Create menu
- Home page for Expenses module manual
- Home page for Standard ERP manual
Avansa norēķinu skatīšana un apstiprināšana
Ja, ievadot avansa norēķina ierakstu, tas netika apstiprināts, tas jāapstiprina vēlāk, lai Finanšu modulī tiktu izveidots grāmatojums. Apstiprinot ierakstu, tas tiek slēgts, tāpēc to vairs nevar mainīt.
Avansa norēķinu ierakstu var apstiprināt divējādi:
- Atvērtā avansa norēķina ierakstā atzīmējiet izvēles rūtiņu ‘Grāmatot’;
- Logā ‘Avansa norēķini: Pārskats’ iezīmējiet vienu vai vairākus ierakstus un no izvēlnes Speciāli izvēlieties funkciju ‘Grāmatot’.
Debeta puses objekti būs tādi, kādi ievadīti attiecīgajā avansa norēķina rindā, bet kredīta puses objekti tiks ievietoti no personas kartiņas lauka ‘Prēmija’.
Izveidoto grāmatojumu varat uzreiz apskatīt, no izvēlnes Speciāli izvēloties funkciju 'Atvērt grāmatojumu'.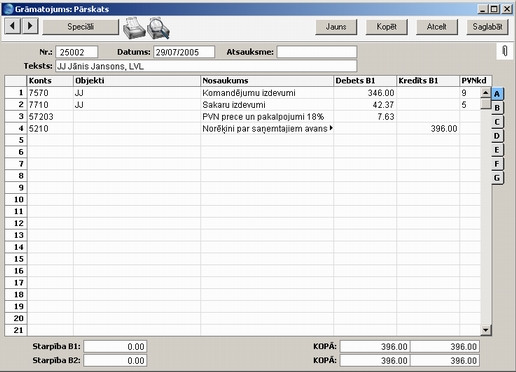
Avansa norēķini valūtā
Ievadot avansa norēķinus valūtā, valūta un valūtas kurss attieksies uz visām ieraksta rindām. Katrai valūtai un valūtas kursam jāizmanto atsevišķi ieraksti.
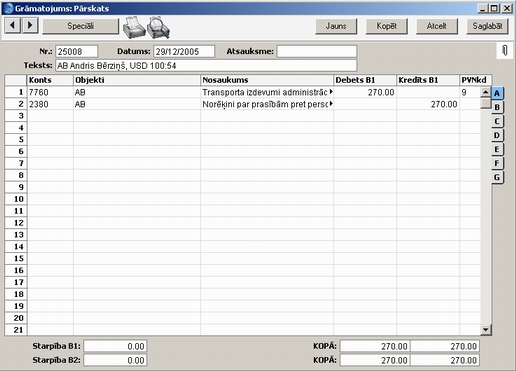
Piemēram, darbinieks iesniedz avansa norēķinu pieprasījumu, kas datēts ar 25. februāri. Tajā ietilpst maksājums par USD 500 (ASV dolāriem), datēts ar 18. decembri, kad par USD 0,53 varēja nopirkt vienu latu (Bāzes valūta 1). Tātad maksājuma vērtība tā izrakstīšanas laikā nacionālajā valūtā bija 265 lati. Taču 29. decembrī (avansa norēķina pieprasījuma laikā), par vienu LVL varēja nopirkt USD 0,54, tādējādi USD 500, konvertējot uz 270.
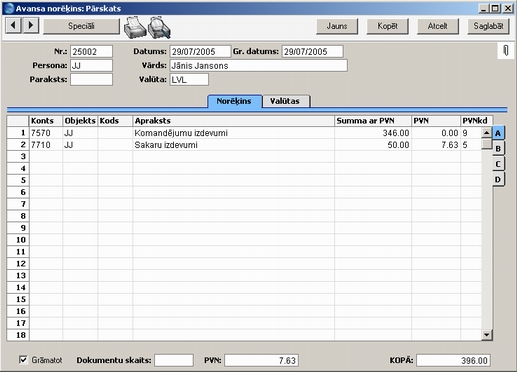
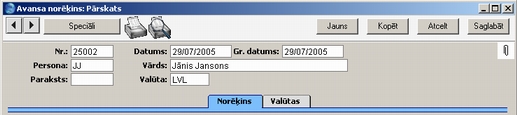
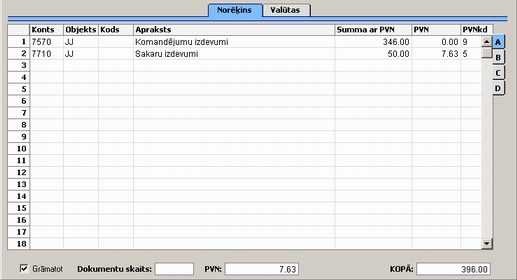
Avansa norēķins tiek ievadīts kā parādīts nākamajā attēlā. Avansa norēķina pieprasījuma datums (29. decembris) ir ievadīts augšējā daļā, laukā 'Valūta' ievadīts USD:
C sadaļā ir ievadīts maksājuma datums: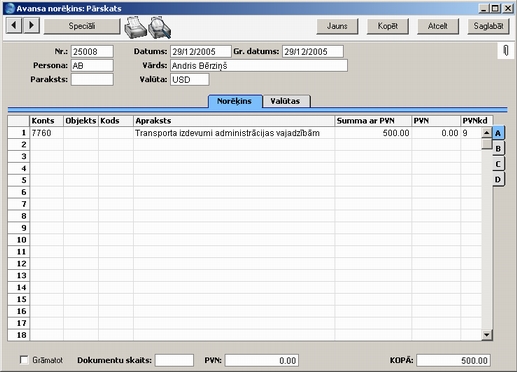
Attēlā parādīts arī valūtas kurss sadaļā ‘Valūtas’, kas atbilst 29. decembra kursam. Šajā piemērā avansa norēķina izrakstīšanas un grāmatošanas datumi sakrīt. Ja tie atšķiras, tiek izmantots grāmatojuma datuma valūtas kurss.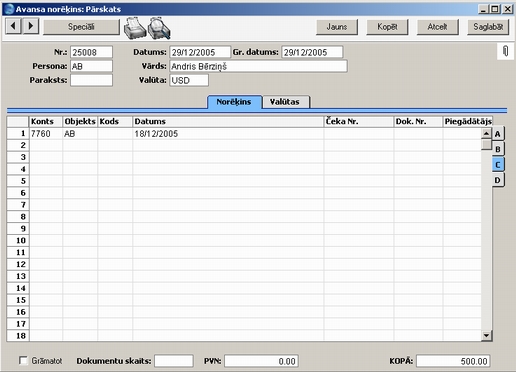
Apstiprinot un saglabājot avansa norēķinu, grāmatojuma izskats būs atkarīgs no sagatavošanā Avansa norēķinu ievadīšana izvēles rūtiņas ‘Izmaksām norēķinu datuma kurss’. Ja rūtiņa ir atzīmēta, saistības pret darbinieku (attēlā konts 2380) tiks aprēķinātas, izmantojot avansa norēķina pieprasījuma datuma valūtas kursu (29. decemrbrī), bet izmaksu kontā grāmatotā summa (piemērā 7760) tiks aprēķināta, izmantojot maksājuma datuma valūtas kursu (18. decembrī). Summas atšķirības tiks grāmatotas valūtas kursu svārstību kontā, kas norādīts sagatavošanas R/M konti 2. sadaļā:
Ja izvēles rūtiņa ‘Izmaksām norēķinu datuma kurss' nav atzīmēta, gan saistības pret darbinieku, gan izmaksu kontā grāmatotā summa tiks aprēķināta, izmantojot avansa norēķina izrakstīšanas datuma valūtas kursu (29. decembris):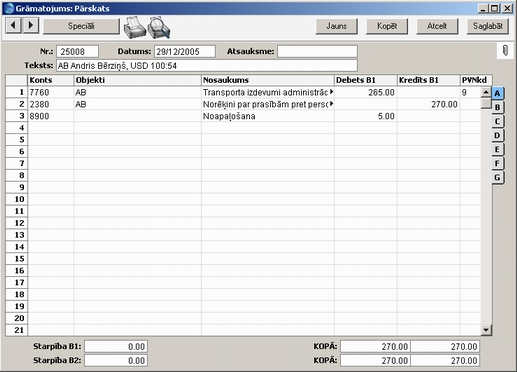
Kļūdas paziņojumi
Apstiprinot avansa norēķinus, Finanšu modulī tiek automātiski izveidoti grāmatojumi un ievietoti Grāmatojumu žurnālā.
Ja tiek parādīts kļūdas paziņojums, tas nozīmē, ka ir nepareizi norādīts konts vai citi parametri. Visiem avansa norēķinos izmantotajiem kontu numuriem jābūt ievadītiem Sistēmas moduļa reģistrā Konti. Jābūt definētiem arī izmantotajiem PVN kodiem. Tā darbinieka, kas iesniedzis avansa norēķina pieprasījumu, personas kartiņas sadaļas 'Prēmijas' laukā ‘Konts’ jānorāda nepieciešamais konts. Tajā tiks kreditēta Finanšu moduļa grāmatojuma summa.
Atvērtā avansa norēķina ierakstā varat izlabot kļūdu, Sistēmas moduļa reģistrā Konti pievienojot trūkstošo kontu(-us) vai attiecīgi mainot parametrus.
Lai nepieļautu kļūdas, programma neveiks grāmatošanu neesošos kontos.
Izsvītrot avansa norēķinus
Dažos gadījumos var noderēt avansa norēķina svītrošana, logā ‘Avansa norēķins: Pārskats’ izmantojot izvēlnes Ieraksts funkciju 'Izsvītrot'. Šī funkcija izdzēsīs avansa norēķina ierakstu no visām atskaitēm; arī visi ar to saistītie grāmatojumi no Finanšu moduļa tiks izsvītroti. Atceltie avansa norēķini būs viegli atpazīstami, jo visiem to laukiem būs pārvilktas sarkanas līnijas. Tās tiek rādītas arī logā ‘Avansa norēķini: Pārskats’.
Avansa norēķinu nevar izsvītrot, ja tas nav apstiprināts vai arī ja tā datums ir agrāks par Sistēmas moduļa sagatavošanā Slēgšana laukā ‘Slēgt citus ierakstus’ norādīto datumu.
Ja projekta ieraksts ir izveidots no avansa norāķina, to izsvītrojot, projekta grāmatojums tiks izdzēsts. Ja projektam jau būs izrakstīts rēķins, avansa norēķina ierakstu izsvītrot nebūs iespējams.
Registering Expenses Using Purchase Invoices
If an employee pays and claims an expense that should be assigned to a Supplier, you can process it in two ways:
- You can record the expense in an Expense record and specify the Supplier and Invoice Number on flip C (use the Document No. field for the Invoice Number).
- You can record the expense in a Purchase Invoice.
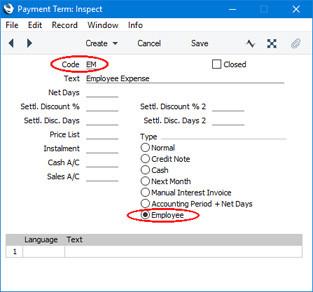
- Create a Payment Term in which the Type is "Employee":
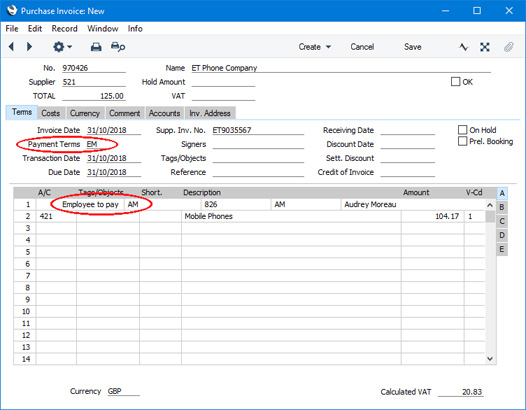
- Enter a new Purchase Invoice and specify the Supplier and cost in the usual way.
- Specify the Payment Term from step (i). A row will be added to the Purchase Invoice where you can enter the Signature of the Person who paid the Invoice:
- When you mark the Purchase Invoice as OK and save, the resulting Nominal Ledger Transaction will credit the Account from the relevant Person record ('Accounts' card). The Person's Tag/Object will be assigned to the credit posting(s).
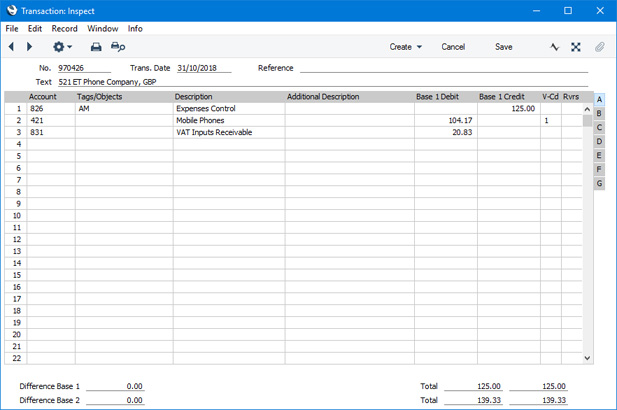
- As suggested by the Nominal Ledger Transaction, the Purchase Invoice will immediately be treated as paid so in that respect it is similar to a Cash Note.
- The Purchase Invoice will be included in the Periodic Personnel Statement for the Person (marked as "P/INV") and in the Periodic Supplier Statement for the Suppler (marked as "CASH"). It will also be included in Purchase Ledger VAT reports.
The Expense register in Standard ERP:
- Introduction
- Entering an Expense record
- Inspecting Expense records, Marking as OK and Posting to the Nominal Ledger
- Expenses in Currency
- Error Messages
- Invalidating Expenses
- Registering Expenses Using Purchase Invoices
- Operations menu
- Create menu
- Home page for Expenses module manual
- Home page for Standard ERP manual
Izvēlne Speciāli

Attēlos parādītas avansa norēķinos pieejamās izvēlnes Speciāli. Kreisajā pusē parādīta logā 'Avansa norēķini: Pārskats’ pieejamā funkcija: sarakstā iezīmējiet vienu vai vairākus ierakstus (klikšķiniet, turot nospiestu taustiņu Shift) un izvēlieties funkciju. Labajā pusē attēlota logos ‘Avansa norēķins: Jauns’ un ‘Avansa norēķins: Pārskats’ pieejamā izvēlne.
Grāmatot
Šī funkcija ir pieejama tikai logā ‘Avansa norēķini: Pārskats’. Tā ļauj apstiprināt avansa norēķinus un tādējādi ir identiska izvēles rūtiņas ‘Grāmatot’ atzīmēšanai avansa norēķinu ierakstā. Neaizmirstiet, ka šī darbība izveido Finanšu moduļa grāmatojumu katram iezīmētajam avansa norēķinam un pēc tam tajos vairs nebūs iespējams veikt izmaiņas.Atvērt grāmatojumu
Apstiprinot un saglabājot avansa norēķinu ierakstu, tiks izveidots Finanšu moduļa grāmatojums, ja tas definēts Sistēmas moduļa sagatavošanā Apakšsistēmas. Šī funkcija ļauj apskatīt šo grāmatojumu.Izvēloties šo funkciju, grāmatojums tiks atvērts jaunā logā.
Apstiprināt
Ievadot avansa norēķinu, to var apstiprināt pirms grāmatošanas. Ja sagatavošanā Avansa norēķinu ievadīšana ir atzīmēta izvēles rūtiņa ‘Pieprasīt parakstu’, avansa norēķinu ieraksti jāapstiprina pirms grāmatošanas.
Lai to izdarītu, no izvēlnes Speciāli izvēlieties funkciju 'Apstiprināt'. Loga augšējās daļas laukā 'Paraksts' tiks ievadīti jūsu iniciāļi. Pēc tam atzīmējiet izvēles rūtiņu ‘Grāmatot’ un saglabājiet, noklikšķinot uz pogas [Saglabāt]. Sistēmas moduļa sagatavošanā Personu grupas varat ierobežot to personu skaitu, kam pieejama funkcija ‘Apstiprināt’. Lai to izdarītu, atveriet Sistēmas moduli un no sagatavošanu saraksta izvēlieties ‘Personu grupas’. Ja ‘Sākt ar’ ir atzīmēta opcija ‘Nekādu tiesību’, tabulā attiecīgajai personu grupai jāatļauj noteiktās funkcijas izmantošana:
Attēlā “ADM” personu grupas lietotājiem ir atļauta pilna pieeja Avansa norēķinu modulim tā, lai tie varēti ievadīt savus avansa norēķinus. Bet tiem ir aizliegta pieeja izvēlnes Speciāli funkcijai ‘Apstiprināt’.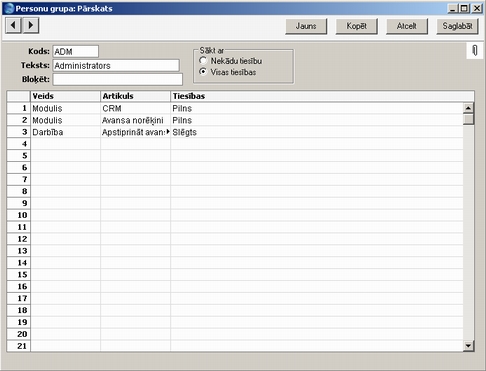
Ja ‘Sākt ar’ atzīmēta funkcija ‘Visas tiesības’, tabulā attiecīgajai personu grupai jāaizliedz pieeja noteiktajai funkcijai:
Abos gadījumos, ja tabulā nav atzīmēta izvēlnes Speciāli funkcija ‘Apstiprināt avansa norēķinus’, pieeja būs atkarīga no izvēlētās ???Sākt ar’ opcijas. Ja atzīmēta ‘Nekādu tiesību’, personu grupas pārstāvji nevarēs apstiprināt avansa norēķinu ierakstus. Ja tā būs ‘Visas tiesības’, viņiem būs pieejama apstiprināšanas funkcija.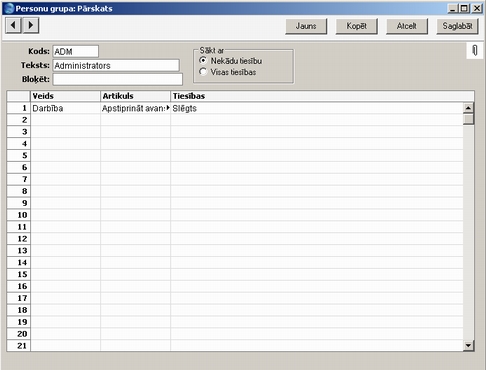
Operations Menu - Expense - Expense Status
This page describes the 'Expense Status' function on the Operations menu in the Expense record window. If you are using iOS or Android, the 'Expense Status' function is on the Tools menu (with 'wrench' icon).
---
The 'Expense Status' command will be useful when an Expense record needs to go through an approval process before you can mark it as OK or print it. If you need to monitor the approval process for a particular Expense record, open the Expense record in a record window and then select 'Expense Status' from the Operations menu (Windows/Mac OS X) or Tools menu (iOS/Android). A report will be printed to screen, listing any Approval Request Activities that have been created from the Expense record and the status of each one. Please refer to the description of the Approval Status field on the 'Misc' card of the Expense window for brief details about the approval process and here for full details.
---
The Expense register in Standard ERP:
- Introduction
- Entering an Expense record
- Inspecting Expense records, Marking as OK and Posting to the Nominal Ledger
- Expenses in Currency
- Error Messages
- Invalidating Expenses
- Registering Expenses Using Purchase Invoices
- Operations menu, including:
- OK
- Open NL Transaction
- Authorise
- Expense Status
- Connect to Personnel Payment
- Request Approval
- Cancel Approval Request
- OK
- Create menu
- Home page for Expenses module manual
- Home page for Standard ERP manual
Operations Menu - Expense - Connect to Personnel Payment
This page describes the 'Connect to Personnel Payment' function on the Operations menu in the Expense record window. If you are using iOS or Android, the 'Connect to Personnel Payment' function is on the Tools menu (with 'wrench' icon).
---
If you have used a Personnel Payment to issue a payment to an employee before receiving their expense claim, you can use the 'Connect to Personnel Payment' function to connect the Personnel Payment and the expense claim. Follow these steps:
- Enter the Personnel Payment in the usual way, mark it as Ordered and OK and save.
- Enter the Expense record, again in the usual way, ensuring you specify a Person in the header.
- When the Expense record is complete (i.e. when you have added every row and amount), select 'Connect to Personnel Payment' from the Operations menu (Windows/Mac OS X) or Tools menu.
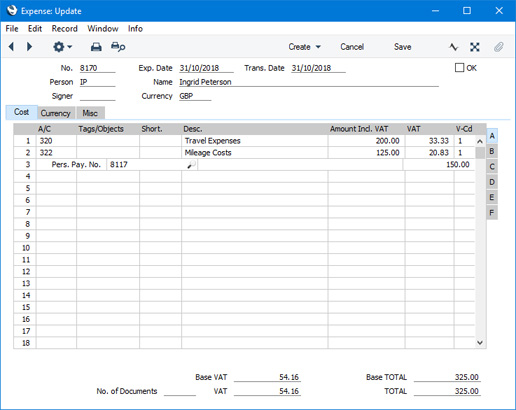
- The Expense record will be saved, and a new row will be added, containing the phrase "Pers. Pay. No.":
From the field to the right of this phrase, use 'Paste Special' to bring up a list of open Personnel Payments issued to the Person in the Expense record. An open Personnel Payment is one that has not yet been fully allocated to an Expense. If a Personnel Payment record contains more than one payment to the Person, the payments will be listed individually in the 'Paste Special' window.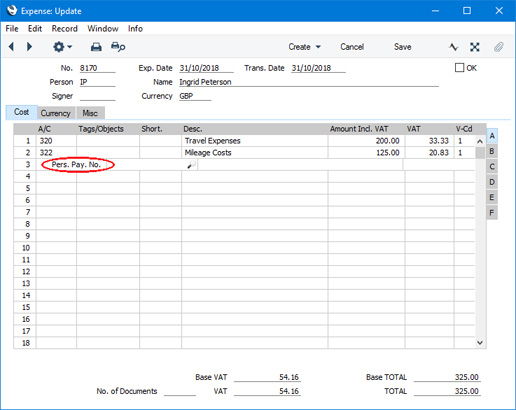
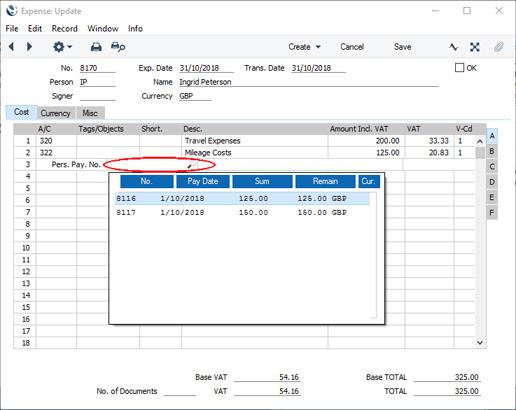
- Select a Personnel Payment from the list. The Personnel Payment Number will be added to the special Personnel Payment row, as will the open value of the Personnel Payment or the TOTAL from the Expense footer, whichever is the lower:
- Note that if a Personnel Payment record contains more than one payment to the Person, you will only have connected to one of those payments i.e. you will have connected to one row in the Personnel Payment. Repeat steps 4-5 if you want to connect to a second row in the Personnel Payment, or if you want to connect to a row in a second, different, Personnel Payment.
- After saving the Expense record again, it will no longer be possible to change the Person in the header. This will ensure the Expense record and the connected Personnel Payment remain related to the same Person.
- When you mark the Expense record as OK and save, the open value of the Personnel Payment will be reduced by the value in the special Personnel Payment row.
Note that it is important to ensure that the Expense record is complete before selecting the 'Connect to Personnel Payment' function. If the Expense record is incomplete when you select the function to the extent that the TOTAL is not the full value, this will be the amount that will be placed in the special Personnel Payment row. When you mark the Expense record as OK and save it, the open value of the Personnel Payment will be reduced by this value.
If you select 'Connect to Personnel Payment' before the Expense is complete (it may be that a late change is required) you can either change the amount shown in the special Personnel Payment row or you can delete the special Personnel Payment row and use 'Connect to Personnel Payment' once again. If you choose the former option, you will be prevented from entering an amount that is greater than the open value of the Personnel Payment, or greater than the TOTAL of the Expense record.
The Expense register in Standard ERP:
- Introduction
- Entering an Expense record
- Inspecting Expense records, Marking as OK and Posting to the Nominal Ledger
- Expenses in Currency
- Error Messages
- Invalidating Expenses
- Registering Expenses Using Purchase Invoices
- Operations menu, including:
- OK
- Open NL Transaction
- Authorise
- Expense Status
- Connect to Personnel Payment
- Request Approval
- Cancel Approval Request
- OK
- Create menu
- Home page for Expenses module manual
- Home page for Standard ERP manual
Operations Menu - Expense - Request Approval
This page describes the 'Request Approval' function on the Operations menu in the Expense record window. If you are using iOS or Android, the 'Request Approval' function is on the Tools menu (with 'wrench' icon).
---
If an Expense record has to pass through an approval process before you can mark it as OK or print it, use this function to begin that approval process. Please refer to the description of the Approval Status field on the 'Misc' card of the Expense window for brief details about the approval process and here for full details.
---
The Expense register in Standard ERP:
- Introduction
- Entering an Expense record
- Inspecting Expense records, Marking as OK and Posting to the Nominal Ledger
- Expenses in Currency
- Error Messages
- Invalidating Expenses
- Registering Expenses Using Purchase Invoices
- Operations menu, including:
- OK
- Open NL Transaction
- Authorise
- Expense Status
- Connect to Personnel Payment
- Request Approval
- Cancel Approval Request
- OK
- Create menu
- Home page for Expenses module manual
- Home page for Standard ERP manual
Operations Menu - Expense - Cancel Approval Request
This page describes the 'Cancel Approval Request' function on the Operations menu in the Expense record window. If you are using iOS or Android, the 'Cancel Approval Request' function is on the Tools menu (with 'wrench' icon).
---
If an Expense record needs to go through an approval process before you can mark it as OK or print it and you have started that approval process by selecting 'Request Approval' from the Operations menu (Windows/Mac OS X) or Tools menu (iOS/Android), you will no longer be able to modify the Expense record. So, if you realise the Expense record contains an error, you must cancel the approval process before you can correct the error. To do this, open the Expense record and choose 'Cancel Approval Request' from the Operations or Tools menu. You will now be able to amend the Expense record and then restart the approval process by once again choosing 'Request Approval'.
If you cannot cancel the approval process, the probable reasons are:
- The Approval Status of the Expense record (visible on the 'Misc' card) is not Pending.
- You may have configured the approval process (using the Approval Rules register in the Business Alerts module) so that it does not allow cancellation.
- You cannot cancel the approval process if at least one Approval Person has approved the Expense record.
---
The Expense register in Standard ERP:
- Introduction
- Entering an Expense record
- Inspecting Expense records, Marking as OK and Posting to the Nominal Ledger
- Expenses in Currency
- Error Messages
- Invalidating Expenses
- Registering Expenses Using Purchase Invoices
- Operations menu, including:
- OK
- Open NL Transaction
- Authorise
- Expense Status
- Connect to Personnel Payment
- Request Approval
- Cancel Approval Request
- OK
- Create menu
- Home page for Expenses module manual
- Home page for Standard ERP manual
Create Menu - Expenses
The Create menus for Expenses are shown above. On the left is the Create menu for the 'Expenses: Browse' window. On the right is the Create menu for the 'Expense: New' and 'Expense: Inspect' windows. If you are using iOS or Android, you can access the Create menu functions through the + menu.
'New' and 'Duplicate' are standard functions that are provided on every Create and + menu. Use these functions to create new records, in this case in the Expense register. Please follow the links below for details about the other functions:
---
The Expense register in Standard ERP:
- Introduction
- Entering an Expense record
- Inspecting Expense records, Marking as OK and Posting to the Nominal Ledger
- Expenses in Currency
- Error Messages
- Invalidating Expenses
- Registering Expenses Using Purchase Invoices
- Operations menu
- Create menu
- Home page for Expenses module manual
- Home page for Standard ERP manual
Create Menu - Expense - Workflow Activity
This page describes the 'Workflow Activity' function on the Create menu in the Expense record window. If you are using iOS or Android, the 'Workflow Activity' function is on the + menu.
---
Creating an Activity from an Expense record can be useful when you need to schedule a follow-up task related to that record.
You can create an Activity from an Expense record using the following methods:
- Open the Expense record in a record window and select 'Workflow Activity' from the Create or + menu. Save any changes you have made to the Expense record before selecting the function.
- Open the Expense record in a record window and then open the 'Workflow Manager' window. Click or tap the [+] button in this window to create a new Activity.
The new record will be opened in a window entitled 'Activity: Inspect'. This means that it has already been saved and is being opened for checking.
The new Activity will contain the following information:
- No default Activity Type will be offered.
- The Task Type will be To Do.
- The Calendar Type will be Don't Show.
- The Symbol will be Other.
- The Start Date and Time of the Activity will be the current date and time.
- The Person will be the current user. As the Task Type will be To Do, the Activity will be placed in the current user's Task Manager.
The Expense record and the Activity will be connected to each other through the Link Manager and Workflow Manager. When reviewing the Activity, you can return to the Expense record quickly and easily using the Link Manager in the Activity, while you can open the Activity from the Expense record using the Workflow Manager.
You must save an Expense record at least once before you can create an Activity from it. This is to ensure that the links mentioned in the previous paragraph can be established.
The 'Activity: Inspect' window is fully described here.
---
The Expense register in Standard ERP:
- Introduction
- Entering an Expense record
- Inspecting Expense records, Marking as OK and Posting to the Nominal Ledger
- Expenses in Currency
- Error Messages
- Invalidating Expenses
- Registering Expenses Using Purchase Invoices
- Operations menu
- Create menu, including:
- Workflow Activity
- Workflow Activity
- Home page for Expenses module manual
- Home page for Standard ERP manual
Create Menu - Expense - Email
This page describes the 'Email' function on the Create menu in the Expense record window. If you are using iOS or Android, the 'Email' function is on the + menu.
---
The 'Email' function allows you to create a Mail from an Expense record.
To create a Mail from an Expense record, first open the Expense record in a record window and then select 'Email' from the Create menu (Windows/Mac OS X) or + menu (iOS/Android). The following window will appear, where you can create a new Mail:
The new record will be opened in a window entitled 'Mail: Inspect'. This means that it has already been saved and is being opened for checking. The details in the Mail will be as follows: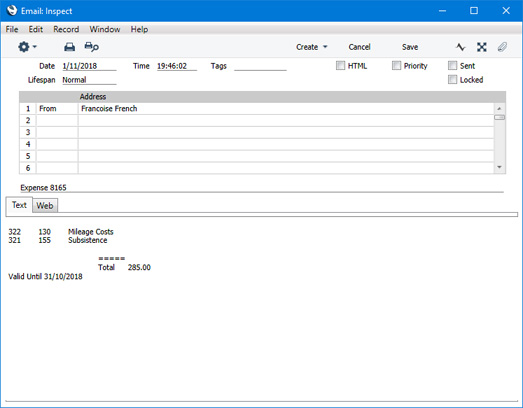
- The sender of the Mail will be the current user.
- No default recipient will be offered.
- The Subject and Text of the Mail will be taken from the fields in the header of the record in the Mail Texts setting in the Email and Conferences module in which the Form is "Expenses", as follows:
- The Subject in the mail will be composed from the Subject in the Mail Text record (which should have a trailing space), the text "Expense" and the Expense Number. For example, if the Subject in the Mail Text record is "Please find attached " (with trailing space), the Subject of the Mail will be "Please find attached Expense XXXX" (where XXXX is the Expense Number).
- The Text of the Mail will be built up as follows:
- The initial text will be taken from the Standard Text record quoted in the First Text field in the Mail Text record.
- Depending on the Do not put Record Details in Mail Body option in the Mail Text record, the rows in the Expense record will then be listed, followed by the Expense TOTAL.
- The final text will be taken from the Standard Text record quoted in the Last Text field in the Mail Text record. It is recommended that the first line in this Standard Text record should be a carriage return, to ensure that the text in the mail is neatly spaced.
If either Standard Text record is in HTML format, the Mail will be in HTML format as well.
If there is no suitable record in the Mail Texts setting, the Subject of the Mail will be "Expense XXXX" (where XXXX is the Expense Number). The Text of the Mail will contain the rows in the Expense record, followed by the Expense TOTAL.
Note that the Expense record does not have a Language field. Therefore, if you enter a record in the Mail Texts setting in which the Form is "Expenses", you only need fill in the fields in the header of that record. Any rows with different Languages that you add to the matrix will not be used when creating Mails.
- A PDF version of the Expense record will be attached to the Mail, accessible through the Document Manager. This requires you to have designed a Form Template to be used when printing Expense records, and to have assigned that Form Template to the Expense form using the 'Define Form' function. When you design the Form Template, you may need to use Styles that will embed fonts in PDF files (this will depend on the fonts you use). You may also need to choose a code page and page setup, which you can do in the Form Template Properties. Please refer here designing Form Templates.
- The Expense record itself will also be connected to the Mail through its Link Manager, and similarly the Mail will be connected to the Expense. This allows you to open the Mail quickly and easily when reviewing the Expense, or to open the Expense record from the Mail.
- The Subject in the mail will be composed from the Subject in the Mail Text record (which should have a trailing space), the text "Expense" and the Expense Number. For example, if the Subject in the Mail Text record is "Please find attached " (with trailing space), the Subject of the Mail will be "Please find attached Expense XXXX" (where XXXX is the Expense Number).
If the function does not create a Mail, the probable causes are:
- The current user does not have a Mailbox.
- The Expense record has not been saved.
- The Approval Status of the Expense record does not allow a Mail to be created from it. If you need Expense records to pass through an approval process before you can create Mails from them, you can configure such a process using the Approval Rules register in the Business Alerts module. Please refer to the description of the Approval Status field on the 'Misc' card of the Expense record for brief details about the approval process and here for full details.
---
The Expense register in Standard ERP:
- Introduction
- Entering an Expense record
- Inspecting Expense records, Marking as OK and Posting to the Nominal Ledger
- Expenses in Currency
- Error Messages
- Invalidating Expenses
- Registering Expenses Using Purchase Invoices
- Operations menu
- Create menu, including:
- Workflow Activity
- Workflow Activity
- Home page for Expenses module manual
- Home page for Standard ERP manual
- Tiks izmantota viena no divām konvertēšanas metodēm. Divu bāzes valūtu sistēma būs noderīga tiem uzņēmumiem, kuru biroji atrodas divās valstīs un kuriem jāveido atskaites abās valūtās, arī to valstu uzņēmumiem, kur papildus nacionālajai valūtai parasti tiek izmantota otra valūta (parasti dolāri vai eiro), un Eiropas Savienības valstu uzņēmumiem, kuri salīdzināšanas nolūkiem ir saglabājuši iepriekšējo valūtu. Otrā metode ir vienkāršā konvertēšana no ārvalstu valūtas nacionālajā valūtā, un tā ir piemērota lielākajai pasaules valstu izmantotajiem valūtu grāmatojumiem. Tie aprakstīti tālāk.