Introduction to Customer Documents
Customer documents can be printed from the Sales Ledger. Use the Modules menu to ensure you are in the Sales Ledger and then select 'Documents' from the File menu or click [Documents] in the Master Control panel. Then, double-click the appropriate item in the list. A specification window will then appear, where you can decide the Customers for which documents are to be printed. Click [Run] to print the documents.It is often possible to report on a selection range, such as a range of Customers. To do this, enter the lowest and highest values of the range, separated by a colon. For example, to report on Customers 001 to 010, enter "001:010" in the Customer field. Depending on the field, the sort used might be alpha or numeric. In the case of an alpha sort, a range of 1:2 would also include 100, 10109, etc.
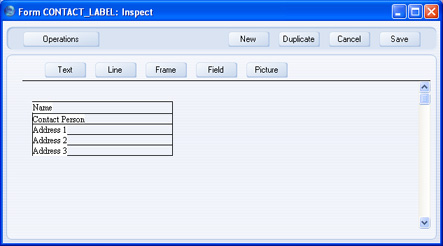
To determine which Form is printed, follow this procedure (when Hansa is supplied, a sample Form will be printed):
- Design a Form (or change the sample Form supplied to reflect your own requirements) using the Form register in the System module. This process is fully described here. The sample Form supplied has the Form Code "CUST_LABEL".
- Change to the Sales Ledger module and open the 'Documents' window using the 'Documents' item on the File menu or by clicking the [Documents] button in the Master Control panel.
- Highlight the item in the list and select 'Define Document' from the Operations menu. The subsequent window is used to assign a Form (or more than one Form) to the document and is fully described here. In this instance, enter "CUST_LABEL" in the Form field of the first line.
- The 'Define Document' function only needs to be used once. After this has been done, Form selection will be automatic.
Kontaktisikute sedelid
Selle Kliendihalduse mooduli dokumendiga trükitakse sedelid Kontaktisikute nimede ja aadressidega. Olenevalt sellest, millise välja oled lisanud vastavale dokumendimallile, trükitakse kas Kontaktisiku Arve aadress ('Kontakti' kaardilt) või Lähetusaadress ('Lähetuse' kaardilt). Aadress võetakse Kontaktisiku kaardilt või, kui seal ei ole aadressi näidatud, Kliendi või Hankija kaardilt, kus Kontaktisik töötab. Sedelite trükkimiseks Klientide ja Hankijate kohta kasuta Kliendi/Hankija sedelite dokumenti.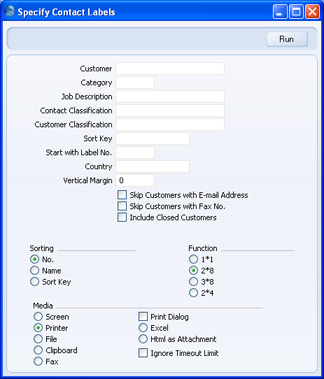
- Klient
- Ctrl-Enter
Kliendid, Hankijad ja Kontaktisikud Kontaktide registris
- Vahemik Tähestikuline
- Sisesta Kliendi, Hankija või Kontaktisiku kood või koodide vahemik. Trükitakse sedelid kõikide Kontaktisikute kohta vahemikus ning kõikide Kontaktisikute kohta, kes on seotud valitud Klientide ja Hankijatega. Sedeleid ei trükita Klientide ja Hankijate kohta, kellel ei ole Kontaktisikuid. Samuti ei trükita sedeleid suletud Kontaktisikute kohta ega tühistatud Kliendiseose kaartidega Kontaktisikute kohta.
- Vaikimisi näed Ctrl-Enter nimekirjas Kliente. Hankijate vaatamiseks kliki nimekirja ülaosas Hankijad või Kõik kontaktid, kui soovid näha kõiki Kontaktide registris olevaid kaarte.
- Sisesta Kliendi, Hankija või Kontaktisiku kood või koodide vahemik. Trükitakse sedelid kõikide Kontaktisikute kohta vahemikus ning kõikide Kontaktisikute kohta, kes on seotud valitud Klientide ja Hankijatega. Sedeleid ei trükita Klientide ja Hankijate kohta, kellel ei ole Kontaktisikuid. Samuti ei trükita sedeleid suletud Kontaktisikute kohta ega tühistatud Kliendiseose kaartidega Kontaktisikute kohta.
- Kliendiklass
- Ctrl-Enter
Kliendiklasside seadistus, Müügireskontro
- Võid trükkida sedelid teatud Klassi kuuluvate Klientide Kontaktisikute kohta.
- Ametikirjeldus
- Ctrl-Enter
Ametikirjelduste seadistus, Kliendihalduse moodul
- Võid trükkida sedelid teatud Ametikirjeldusega Kontaktisikute kohta.
- Kontakti klassif.
- Ctrl-Enter
Kontakti klassifikaatorite seadistus, Kliendihalduse moodul
- Võid trükkida sedelid teatud Kontakti klassifikaatorit kandvate Kontaktisikute kohta.
- Customer Classification
- Ctrl-Enter
Kontakti klassifikaatorite seadistus, Kliendihalduse moodul
- Vali Kontakti klassifikaator. Sedelid trükitakse kõigi antud Klassifikaatorit kandvate Klientide ja Hankijate Kontaktisikute kohta. Kui sisestad mitu komadega eraldatud Klassifikaatorit, trükitakse sedelid vaid antud Klassifikaatorite kombinatsiooni kandvate Klientide ja Hankijate Kontaktisikute kohta.
- Sort. indeks
- Vahemik
Tähestikuline
- Võid trükkida sedelid teatud Sorteerimisindeksit kandvate Klientide ja Hankijate Kontaktisikute kohta.
- Alusta sedeliga nr.
- Kui Sa trükid sedelid osaliselt kasutatud sedelilehtedele, määra siin, mis kohast lehel soovid printimist alustada.
- Riik
- Ctrl-Enter
Riikide seadistus, Üldine moodul
- Võid trükkida sedelid teatud Riigi Klientide ja Hankijate Kontaktisikutele.
- Vertikaalne mõõt
- Võid trükkida sedelid mittestandardse vertikaalse mõõduga (vertikaalne vahe sedelite vahel). Määra siin soovitud mõõt. Kui jätad välja tühjaks, kasutatakse alljärgnevaid standardmõõte:
Pane tähele, et kui oled määranud standardmõõdust väga erineva vertikaalse mõõdu, võib olla välja trükitavate sedelite hulk oodatust väiksem.Sedeli formaat Vertikaalne mõõt 2 x 8 103 3 x 8 103 1 x 1 1 2 x 4 206
- V.a. e-mailiaadressiga kliendid
- Märgi see valik, kui Sa ei soovi trükkida sedeleid meiliaadressi omavate Klientide ja Hankijate Kontaktisikute kohta.
- V.a. faksinumbriga kliendid
- Märgi see valik, kui Sa ei soovi trükkida sedeleid faksi omavate Klientide ja Hankijate Kontaktisikute kohta.
- K.a. suletud kliendid
- Tavaliselt ei trükita sedeleid suletud Klientide ja Hankijate ('Tingimuste' kaardil on märgitud valik Suletud) Kontaktisikute kohta. Märgi see valik, kui soovid ka neile sedelid trükkida. Suletud Kontaktisikute kohta sedeleid ei trükita.
- Järjestus
- Sedelid järjestatakse kas Kliendi/Hankija koodi, nime või Sorteerimisindeksi järgi. Kui Kliendil või Hankijal on mitu Kontaktisikut, järjestatakse need alati Kontaktisiku nime järgi.
- Esitus
- Vali, millist sedeli neljast standardformaadist soovid kasutada.
Kui soovid sedelitele printida mingi muutumatu teksti (st väljade sisu kirjelduse, nagu näiteks ’Kliendi nimi???), toimi alljärgnevalt:
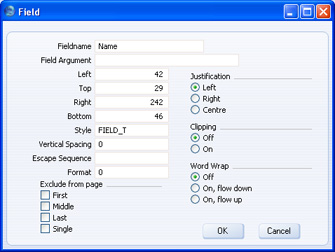
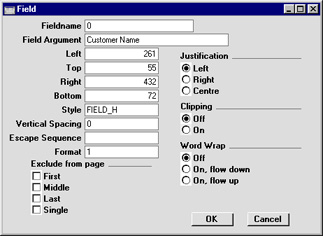
- Kliki Väli ja joonista nelinurk soovitud kohale sedelil.
- Avanenud aknas jäta Välja nimi määramata ja sisesta soovitud tekst Välja argumendi väljale.
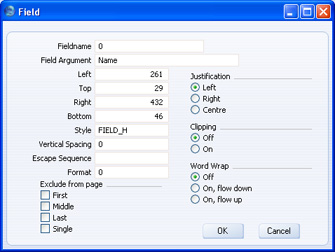
- Salvestamiseks kliki OK.
- Taolise teksti lisamiseks ära kasuta Teksti nuppu, kuna sel viisil sisestatud tekst prinditakse vaid esimesele sedelile.
Customer Labels
This document prints name and address labels to Customers. The Invoice Address from the 'Contact' card of the Customer screen is used.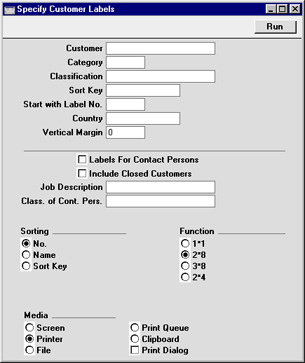
- Customer
- Paste Special
Customer register
- Range Reporting Alpha
- Enter the Customer Number or range of Numbers for which you want the labels printed.
- Enter the Customer Number or range of Numbers for which you want the labels printed.
- Category
- Paste Special
Customer Categories setting, Sales Ledger
- Select a Customer Category. Labels will be printed for all Customers in that Category.
- Classification
- Paste Special
Customer Classifications setting, CRM module
- Select a Customer Classification. Labels will be printed for all Customers in that Classification. If you enter a number of Classifications separated by commas, labels will only be printed for those Customers featuring all the Classifications listed.
- Sort Key
- Enter a Sort Key. Labels will be printed for all Customers with that Sort Key.
- Start with Label No.
- If you will be printing to a sheet of labels, some of which have already been used, specify here where on the sheet you wish to begin printing.
- Country
- Paste Special
Countries setting, System module
- To print labels for Customers in a particular Country, enter that Country here.
- Vertical Margin
- If you want the labels to be printed with a non-standard vertical margin (vertical spacing between the labels), specify the margin that you want to be used here. The standard margins (which will be used if you leave this field empty) are:
Label Format Vertical Margin 2 x 8 103 3 x 8 103 1 x 1 1 2 x 4 206 - Labels for Contact Persons
- If you have the CRM module and wish to print labels for all Contact Persons for the Customers in the selection (or for Contact Persons selected using the two options below), switch on this check box.
- Include Closed Customers
- Usually, labels will not be printed for Closed Customers (Customers whose Closed box on the 'Terms' card is checked). If you want to include such Customers in your label printing run, check this box.
- Job Description
- Paste Special
Job Descriptions setting, CRM module
- If you have the CRM module and wish to print labels for Contact Persons with a particular Job Description, enter that Job Description here.
- Class. of Cont. Pers.
- Paste Special
Customer Classifications setting, CRM module
- Select a Customer Classification. Labels will be printed for all Contact Persons with that Classification.
- Sorting
- The labels can be sorted by Customer Number, Customer Name or Sort Key.
- Function
- Choose which of the four standard label formats you would like to use.

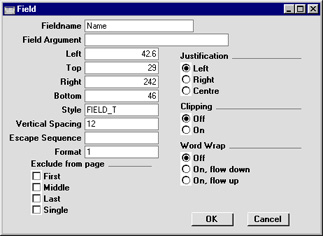
If you want static text to be printed on your labels (i.e. text that identifies the information on the labels, such as "Customer Name"), follow these steps:
- Click the [Field] button and draw a rectangle where you want the static text to appear. The Field dialogue box opens.
- Leave the Fieldname blank and enter the static text in the Field Argument field.
- Click [OK] to save.
- Do not use the [Text] button for this purpose: any text entered this way will be printed for the first label only.