Introducción al Registro Formularios
HansaWorld Enterprise posee un editor de formularios incorporado que te permite diseñar los formularios para todos los documentos. Para abrir el registro Formularios, pulsa el botón [Formularios] desde el Panel de Control: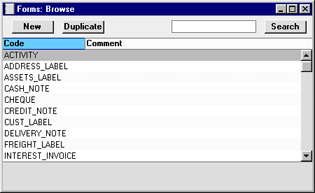
En el área de edición, cada uno de los elementos integrantes de un Formulario aparece como un rectángulo o como un texto. Para abrir la ventana de diálogo de un elemento, haz doble clic sobre él. Para ajustar el tamaño y la posición, usa el botón derecho del Mouse como en la mayoría de los programas de diseño.
Edición de Objetos
Para abrir la ventana de diálogo de un elemento dentro de un formulario y comenzar a editar, haz doble clic sobre él. La ventana de diálogo de cada uno de los elementos de un formulario se describe por separado. Usa los siguientes vínculos para abrir la página respectiva: Texto, Línea y Marco, Campo, Imagen.En todos los casos, los campos ‘Izquierda’, ‘Derecha’, ‘Arriba’ y ‘Abajo??? en la ventana de diálogo, indican la ubicación en píxeles de las cuatro esquinas de cada elemento.
Las alternativas de Justificación te permiten justificar el texto según tus preferencias.
Los Estilos evocan la opción Estilos (módulo Sistema) en la que puedes establecer la fuente, el tamaño de fuente y el estilo de fuente.
- Texto
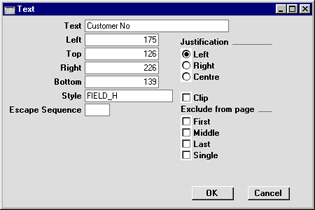
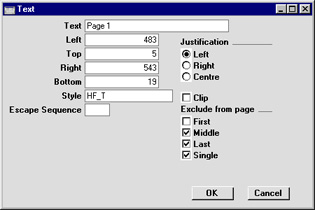
Para agregar un texto a un Formulario, pulsa el botón [Texto] y delimita (sosteniendo el botón derecho del Mouse) el lugar y el espacio del elemento (no del texto en sí).Tan pronto levantes el dedo del botón derecho del Mouse, aparecerá la siguiente ventana de diálogo:
- Texto
- En este campo debes escribir el texto que se ha de imprimir en el formulario (máx. 80 caracteres limitados a un renglón). Si deseas crear un texto que use más de un renglón, simplemente debes crear por separado la cantidad de textos que sea necesaria (uno tras otro).
- Izquierda, Arriba, Derecha, Abajo
- Estos campos sirven para especificar el tamaño y posición del área donde irá inscrito el texto. Las medidas por defecto se colocarán en estos campos dependiendo del área que delimitaste al arrastrar el Mouse.
- Estilo
- Pegado Especial
opción Estilos, módulo Sistema
- Este campo sirve para asignar una fuente y un estilo de fuente al texto. Si dejas este campo en blanco, el sistema usará el primer estilo inscrito en la opción ‘Estilos’ (módulo Sistema).
- Secuencia
- La Secuencia se usa para la impresión de recibos de efectivo. Por favor, consulta tu representante HansaWorld local para más detalles de esto.
- Justificación
- Estas alternativas sirven para especificar qué tipo de especificación se aplicará al texto.
- Excluir de Página
- Por favor, revisa la página Formularios de Página Simple y de Múltiples Páginas para más detalles de estas alternativas.
Después de esto, podrás de todas formas modificar la posición y las dimensiones del elemento (no del texto en sí) usando el Mouse.
Para realizar ajustes posteriores al elemento, haz doble clic sobre él para reabrir su ventana de diálogo.
- Línea y Marco
Estos botones sirven para agregar líneas y marcos respectivamente dentro de un Formulario.Pulsa [Línea] o [Marco] y luego delimita el lugar y espacio de la línea o el marco.
Tan pronto levantes el dedo del botón derecho del Mouse, se abrirá la ventana de diálogo respectiva en donde podrás especificar el ancho (en píxeles) y las páginas en las que se imprimirá el elemento (línea o marco)
- Campos
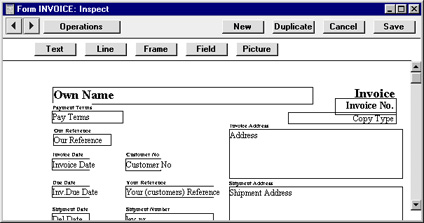
Un campo es un área en donde se imprime información que proviene estrictamente de la Base de Datos.Veamos el siguiente ejemplo de una Factura:

Encima de cada campo, podemos ver que existe un elemento de texto que sirve para identificar la información que aparecerá en el campo (esto no será necesario si el formulario se imprime como documento preliminar).
Para agregar un campo, pulsa el botón [Campo] y delimita la posición del elemento. Tan pronto levantes el dedo del botón derecho del Mouse, se abrirá la siguiente ventana de diálogo:
Luego, especifica un estilo en el campo ‘Estilo’.
Toma en cuenta que algunos campos constan de más de un renglón (ej. Cartas y Mails - campo para el lista de ítems en Cotizaciones, Órdenes y Facturas). En este sentido, si es necesario, puedes modificar el espacio entre renglones (en píxeles) usando el campo ???Remarcar Línea’. Lo más normal será especificar el mismo número de píxeles del tamaño de fuente. Si dejas este campo en blanco, existe el riesgo que los renglones se impriman unos sobre otros.
Finalmente, pulsa el botón [OK].
Como ya mencionamos, una forma de facilitar la búsqueda del nombre de campo es especificando previamente el Tipo de Documento. Esto es parte de las 'Propiedades' de los Formularios (menú Operaciones).
Notas y Comentarios
Por lo general, cada campo colocado en un formulario corresponde a un campo en el registro original. Por ejemplo, el campo ‘Customer No’ en la anterior ilustración mostrará el código de Cliente en cada Factura. Una excepción a esto es el campo “Nota???, puesto que si incluyes este campo en tu formulario, lo que se imprimirá será la primer nota o comentario adjuntado al registro original.
- Imagen
El botón [Imagen] sirve para incluir una imagen en tu diseño de formulario. Al igual que los demás elementos, tan pronto levantes el dedo del botón derecho del Mouse, se abrirá la ventana respectiva de diálogo.En el campo ‘Nombre Imagen’, debes usar Pegado Especial para asegurarte que el nombre de la imagen sea exactamente igual como está guardado en tu disco duro.
Toma en cuenta también que la imagen deberá estar guardada en la misma carpeta de tu aplicación HansaWorld.
En instalaciones multi-usuario, la imagen deberá estar tanto en el servidor como en las máquinas cliente. Para Windows, se reconocen imágenes en formato BMP. Para Macintosh se reconocen imágenes en formato EPS y PICT.
Si existe un formulario que será enviado mediante el servidor de fax, considera que todas las imágenes serán omitidas.
Adding and Editing Objects in Form Templates - Page Sums
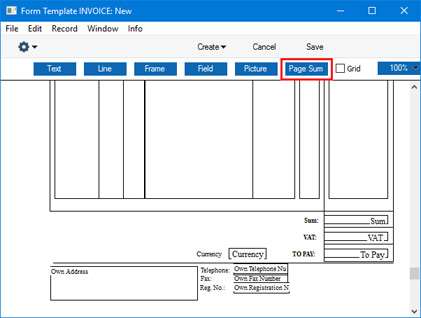
This page describes adding page sums to a Form Template.---
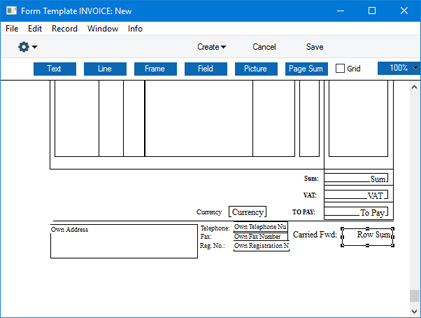
A page sum will print a running total for a particular Matrix or row field on each page.
To add a page sum to a Form Template, click the [Page Sum] button at the top of the Form Template window:
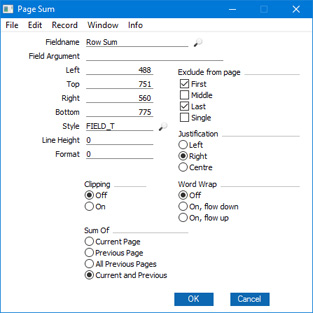
- Fieldname
- Paste Special
Fields for the Form Type
- Use 'Paste Special' to choose the field for which a running total is to be printed. This must be a numeric matrix field (for example, the "Row Sum" field in Quotations, Orders and Invoices). You should add the field to the Form Template before adding the page sum, otherwise the page sum won't be printed.
- Field Argument
- If the field is one where you can specify a Field Argument (e.g. to specify the number of decimal places that will be printed), you can specify the same Field Argument for that field's page sum. If you do specify a Field Argument for a page sum, it will also be used in the field itself, overruling any Field Argument that you may have specified there.
- Left, Top, Right, Bottom
- Use these fields to specify the size and position of the page sum on the page. When you add a new row sum to a Form Template, the measurements of the box that you have just drawn will appear here.
- Style
- Paste Special
Styles setting, System module
- Use this field to assign a font and font style to the page sum. If you do not enter a Style here, the first record in the Styles setting will be used.
- Line Height
- There will usually be no need to specify a Line Height in page sums.
- Format
- The Format should usually be 0 in page sums (if you set the Format to 1, the figures that make up the page sum will be printed individually.
- Exclude from page
- Please refer to the Single- and Multi-Page Forms page for details about these options. Usually, you would exclude a page sum from Single pages and, depending on the Sum Of options below, from Last pages.
- Justification
- Use these options to specify where the text will be printed inside the field.
- Clipping
- These options control how the text in a page sum will be printed if the field is not wide enough to contain it. If Clipping is On, the text will be truncated (i.e. only the text that fits inside the field will be printed). If Clipping is Off, the text will not be truncated so part of it will be printed outside the field.
- An alternative to clipping is to use the Word Wrap options below.
- An alternative to clipping is to use the Word Wrap options below.
- Word Wrap
- Use these options to control how the contents of a field will be printed if the field is not wide enough.
- Off
- The contents will be truncated to fit the width of the field.
- On
- The contents will be printed on several lines, with the width of the field being preserved. You must make the field deep enough to accommodate the possibility that more than one line will be printed. You should only use Word Wrap in Header fields.
- Off
- Sum Of
- Use these options to specify how the running total will be calculated.
- Current Page
- The running total will be the total for the current page.
- Previous Page
- The running total will be the total for the previous page.
- All Previous Pages
- The running total will be the total for all previous pages.
- Current and Previous
- The running total will be the total for the current and all previous pages.
- Current Page
- Text Objects
- Lines and Frames
- Fields
- Pictures
- Page Sums
The Form Template register in Standard ERP:
- Introduction to Form Templates
- Adding and Editing Objects
- Operations menu
- Single- and Multi-Page Form Templates
- Printing Forms
- Page Setup
- Standard Fields for inclusion in all Form Templates
- Home page for System Module manual
- Home page for Standard ERP manual
Menú Operaciones
Operations Menu - Form Templates - Remove Page Setup
Please refer to the Page Setup page for details about this function.---
The Form Template register in Standard ERP:
- Introduction to Form Templates
- Adding and Editing Objects
- Operations menu, including:
- Remove Page Setup
- Properties
- PC Printer
- Copies
- Send to Back
- View All, First Only, Middle Only, Last Only, Single Page Only
- Row Styles
- Remove Page Setup
- Single- and Multi-Page Form Templates
- Printing Forms
- Page Setup
- Standard Fields for inclusion in all Form Templates
- Home page for System Module manual
- Home page for Standard ERP manual
- Propiedades
Este comando abre la ventana de diálogo ‘Propiedades Formulario’ en donde se pueden registrar las especificaciones básicas de un Formulario.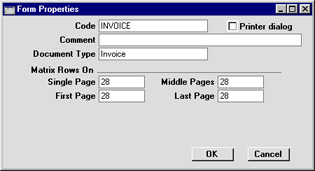
- Cód.
- Este debe ser un código único de identificación. Si creaste un Formulario al copiar una plantilla, debes especificar aquí un nuevo código y recién guardar.
- Comentario
- Aquí puedes especificar una descripción del formulario (ej. Factura).
- Filas en Matriz
- Por favor, revisa la página sobre Formularios de Página Simple y de Múltiples Páginas para comprender mejor estos campos.
- Tipo Documento
- Desde este campo, puedes usar Pegado Especial para desplegar una lista de documentos disponibles. Una vez hecho esto, será mucho más fácil especificar el nombre de un campo puesto que la lista Pegado Especial de ese elemento mostrará solo campos disponibles para un Tipo de Documento (aquel especificado aquí).
- Diálogo Impres.
- Tilda esta casilla para hacer que aparezca el diálogo de impresora cada vez que imprimas un formulario.
- Imp. PC
Si utilizas una impresora matricial, usa este comando para establecer el tamaño de página: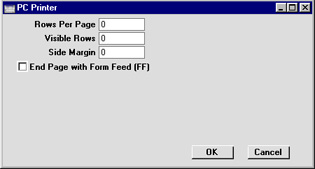
Si imprimes formularios de manera preliminar, deberás definir la cantidad de filas por página, la cantidad de filas visibles y el margen lateral.
- Copias
Este comando te permite definir el número de copias cada vez que imprimas el formulario. Asimismo, este comando te permite definir los encabezados respectivos y la bandeja de impresión de cada copia.Si deseas que se impriman los encabezados, asegúrate de incluir el campo ‘Tipo Copia’ en tu diseño de formulario.
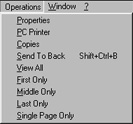
- Enviar Atrás
Si deseas que ciertos elementos de tu formulario aparezcan detrás de otros, selecciónalos y luego utiliza este comando.- Ver Todo/Sólo Primero/Sólo Medio/Sólo Último/Sólo una Pág
Estos comandos se describen respectivamente en la página Formularios de Página Simple y de Múltiples Páginas.Operations Menu - Form Template - Row Styles
This page describes the 'Row Styles' function on the Operations menu in the Form Template record window.---
In some records (Opportunities, Project Budgets, Quotations, Sales Orders, Sales Invoices and Stock Movement Invoices), the matrix can contain rows of different types. Examples are the rows containing the Items, "Header" rows, "Subtotal" rows, rows connecting Invoices to Prepayments, and rows in Credit Notes connecting them to Invoices.
When you design the Form Templates that will be used to print these records, you can specify that the rows of various types will be printed with different Styles and Line Heights. For example, you may want "Subtotal" rows to be printed in a larger font and with a larger line spacing.
To set the Styles and Line Heights for the different row types, select the 'Row Styles' function from the Operations menu. If you use this feature, you should still set Line Heights and Styles in the fields themselves.
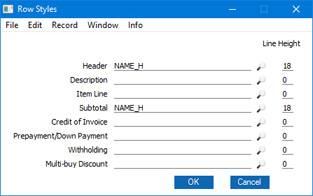
You don't need to specify a Style and Line Height for every row type: leave both fields empty to use the Styles and Line Heights that are specified in the fields.
If you only want to change the Line Height for a particular row type, do not leave the Style empty. Instead, specify the same Style that is in the fields. Leaving the Style empty will mean that the changed Line Height won't be used.
Usually a "normal" row will be printed using the Item Line Style and Line Height. If a row does not have an Item Number or a Sum, it will be printed using the Description Line Style and Line Height.
Row Styles are only used when printing Opportunities, Project Budgets, Quotations, Sales Orders, Sales Invoices and Stock Movement Invoices. Entering Row Styles in the Form Templates that will be used to print other records and documents will have no effect.
Press the [OK] button to assign the changes to the Form Template. Note that the changes won't be saved permanently until you save the Form Template itself.
---
The Form Template register in Standard ERP:
- Introduction to Form Templates
- Adding and Editing Objects
- Operations menu, including:
- Remove Page Setup
- Properties
- PC Printer
- Copies
- Send to Back
- View All, First Only, Middle Only, Last Only, Single Page Only
- Row Styles
- Remove Page Setup
- Single- and Multi-Page Form Templates
- Printing Forms
- Page Setup
- Standard Fields for inclusion in all Form Templates
- Home page for System Module manual
- Home page for Standard ERP manual
Formularios de Página Simple y de Múltiples Páginas
Al diseñar un formulario, debes considerar aquellos documentos que necesitan más de una página. Existen dos alternativas:- ”formulario de página simple” donde se usa el mismo diseño para cada una de las páginas.
- ”formulario de múltiples páginas” que permite el uso de hasta 4 diseños:
- Primera Página
- Será la primer página de un documento con múltiples páginas.
- Páginas Medias
- Serán las páginas que quedan entre la primer página y la última página.
- Última Página
- Será la última página de un documento con múltiples páginas.
- Página Única
- Será la página única de un documento con una sola página.
- Primera Página
El número de páginas a ser impresas varía dependiendo del registro original (y de las filas cargadas en la matriz). Por ejemplo, una Factura que contiene un Ítem en su matriz se imprime en una sola página (usando los elementos cuya casilla ‘Único’ no está tildada). En cambio, una Factura con 100 ítems cargados en su matriz se imprime en varias páginas. En este sentido, puedes especificar la cantidad máxima de filas (de una matriz) que se pueden imprimir en cada página. Para esto, selecciona ‘Propiedades’ desde el menú Operaciones:

Asumiendo que en un Formulario de Factura, los campos ‘Primera Página’ y ‘Página Única’ están ajustados a “5”; el campo ‘Páginas Medias’ está ajustado a “6” y el campo ‘Última Página’ está ajustado a 7, las Facturas se imprimirán según la siguiente lógica (dependiendo del número de filas cargadas en su matriz):
| Filas en Matriz de Factura | Páginas | Tipo de Página |
| Hasta 5 | 1 | Única |
| 5-12 | 2 | Primera y Última |
| 13-19 | 3 | Primeras, Medias y Última |
| 19-25 | 4 | Primera, 2 x Medias, Última |
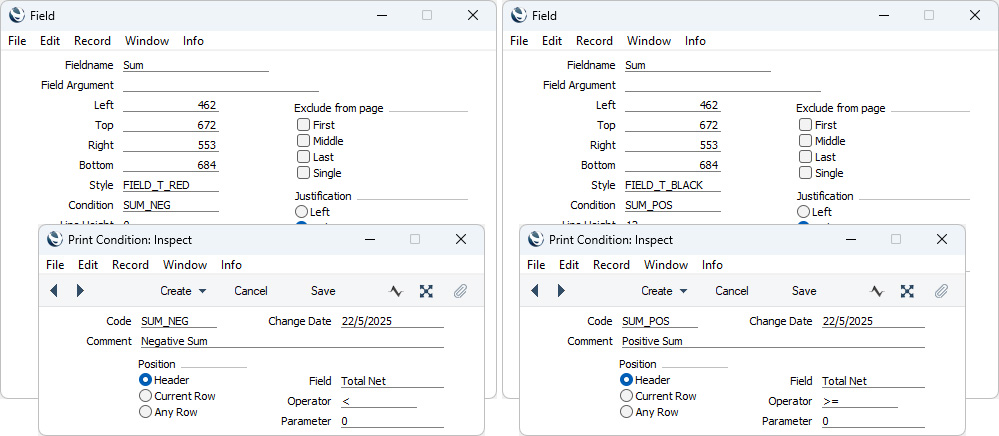
Conditional Printing of Elements (Print Conditions)
This page describes using Print Conditions to determine whether information will be printed in forms.---
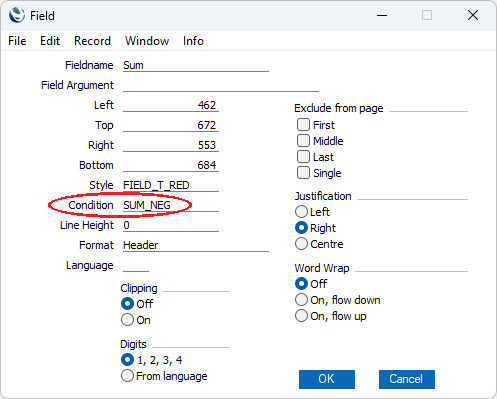
When you add any element (e.g. a text element, line, frame, field or picture) to a Form Template, you can specify that it will only be printed if a particular condition is met. The condition will be that a specified field in the record being printed contains or does not contain a particular value. To do this, first create a record in the Print Conditions setting in the System module in which you have defined the condition, and then assign the Print Condition to the Form Template element.
The Print Condition record contains the following fields:
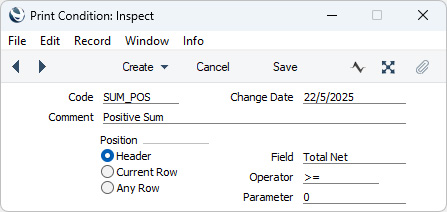
- Code
- Enter a unique Code for the Print Condition. The Code can consist of up to ten characters, and you can use both numbers and letters.
- Comment
- Enter a descriptive name for the Print Condition. This will be shown in the 'Print Conditions: Browse' window and the 'Paste Special' list and so should be clear enough to make the selection of the correct Print Condition easy for all users.
- Position
- A Print Condition is a test that a particular field in the record being printed contains or does not contain a specified value. As well as defining the test itself (which you will do using the Field, Operator and Parameter fields below), you should specify the Position of the test field, as follows:
- Header
- The test field is a header field (i.e. it is not a field in a matrix).
- You can use a "Header" Print Condition in any element in a Form Template.
- You can use a "Header" Print Condition in any element in a Form Template.
- Current Row
- The test field is a field in a matrix, and it will only be tested in the row currently being printed.
- You can only use a "Current Row" Print Condition in a Field in which the Format is "Matrix" i.e. in a row field.
- You can only use a "Current Row" Print Condition in a Field in which the Format is "Matrix" i.e. in a row field.
- Any Row
- The test field is a field in a matrix, and it will be tested in every row in the record currently being printed.
- You can use an "Any Row" Print Condition in any element in a Form Template.
- Some fields can exist both in the header of a record and in the matrix. For example, the Invoice, Order and Quotation records have Location and Tag/Object fields in the header and in the matrix. The Receipt and Payment records have Payment Mode fields in the header and in the matrix. Usually, if the field in a row is empty, the value in the header field will be used. For example, if the Location field in a row in an Invoice is empty, the row will use the Location specified in the header (the Item specified in the row will be taken from the Location specified in the header). However, Print Conditions do not have the fall-back to the header field. If the test field is Location and the Position is "Current Row" or "Any Row", only the Location field in the matrix will be tested.
- It is possible to choose an illogical Position in a Print Condition. For example, in a Print Condition that will be used when printing Invoices, it is possible to specify that the test field is Item Code and the Position is "Header". This is illogical because Item Code only exists as a row field in Invoices. Such a Print Condition will be failed and the element depending on it will not be printed. Instead, an entry will be added to the log file (server log in server-client systems) as follows:
- PRINTCOND Field not found register:position:field
- For example:
- PRINTCOND Field not found IVVc:h:ArtCode
where "h" signifies that the Position in the illogical Print Condition is "Header" and "r" signifies that the Position is "Current Row" or "Any Row".
- Header
- Change Date
- The Change Date will be updated automatically when you change any of the fields in the Print Condition record.
- Field, Operator, Parameter
- A Print Condition is a test that a particular field in the record being printed contains or does not contain a specified value. Use these fields to define the test (i.e. to specify the condition). You can use 'Paste Special' to specify the Field and the Operator.
- For example, if you need a particular element to be printed on an Invoice if the TOTAL in the Invoice is greater than 100.00, enter Total Gross as the Field, > as the Operator and 100.00 as the Parameter (you should also choose "Header" as the Position because the TOTAL in an Invoice is a field in the header not the matrix). If you need the element to be printed if the Subtotal in the Invoice is less than 100.00, enter Total Net as the Field, < as the Operator and 100.00 as the Parameter (and again "Header" as the Position).
- Use == as the Operator if the Field is to equal or match the Parameter, and <> if the Field is not to equal or match the Parameter. There is no need to specify a Parameter if you have specified "blank" or "not blank" as the Operator.
- The following table connects the options that you can specify as the Field in a Print Condition record ("Option" column) with the fields in the records being printed that will be tested ("Field that is tested" column):
Option Position Record being printed Field that is tested Comment/Description Header Agreement Comment ('Del. Terms' card) Contract Comment ('Del. Terms' card) Payment Comment Row All with matrix with Description field Description Payment Text Receipt Comment (flip H) Recipe Specification Total Net Header All with Subtotal field Subtotal Hotel Reservation Agreed Price Returned Goods to Supplier TOTAL Total Gross Header All with TOTAL field except Returned Goods to Supplier TOTAL Asset Purch. Value Credit Agreement Total Sum Payment Withdrawn Receipt Deposited Rental Reservation Periodic Price ('Periodic Charges' card) Reservation Quotation Total for Agent Service Order Our Sales Price Row Sum Row All with matrix with Sum field Sum Purchase Invoice Amount Location Header All with Location field Location Stock Movement From Location Reservation Quotation Room Location Row All with matrix with Location field Location Item Code Row All with matrix with Item field Item Item Group Row All with matrix with Item field Item Group to which the Item belongs Tag/Object Header All with Tag/Object or Tags/Objects field Tag/Object or Tags/Objects Row All with matrix with Tag/Object or Tags/Objects field Tag/Object or Tags/Objects Discount Header Rental Reservations % ('Periodic Charges' card) Row All with matrix with % field % Language Header All with Language field Language Reason Header Invoice Credit Reason Returned Goods to Supplier Reason Row Bar Tab Void Reason Country Header Delivery Country ('Del. Address' card) Invoice Country ('Inv. Address' card) Order Country ('Inv. Address' card) Tag Number Header POS Invoice Tag Number (used with Planet Tax in UAE) Payment Term Header All with Payment Terms field Payment Terms Payment Mode Header All with Payment Mode field Payment Mode Row Bar Tab Payment Mode (this field is only in rows representing payments) Invoice Payment Mode (this field is only in rows representing Cash and Credit Card Payments) Payment P. Mode (flip C) POS Invoice Payment Mode (this field is only in rows representing payments) Receipt P. Mode (flip C)
As the table above suggests, you can only use Print Conditions in forms that print individual records, not in forms that print lists of records (e.g. statements). - For example, if you need a particular element to be printed on an Invoice if the TOTAL in the Invoice is greater than 100.00, enter Total Gross as the Field, > as the Operator and 100.00 as the Parameter (you should also choose "Header" as the Position because the TOTAL in an Invoice is a field in the header not the matrix). If you need the element to be printed if the Subtotal in the Invoice is less than 100.00, enter Total Net as the Field, < as the Operator and 100.00 as the Parameter (and again "Header" as the Position).
The Form Template register in Standard ERP:
- Introduction to Form Templates
- Adding and Editing Design Elements
- Operations menu
- Single- and Multi-Page Form Templates
- Conditional Printing of Elements
- Printing Text in Different Languages
- Printing Forms
- Page Setup
- Standard Fields for inclusion in all Form Templates
- Home page for System Module manual
- Home page for Standard ERP manual
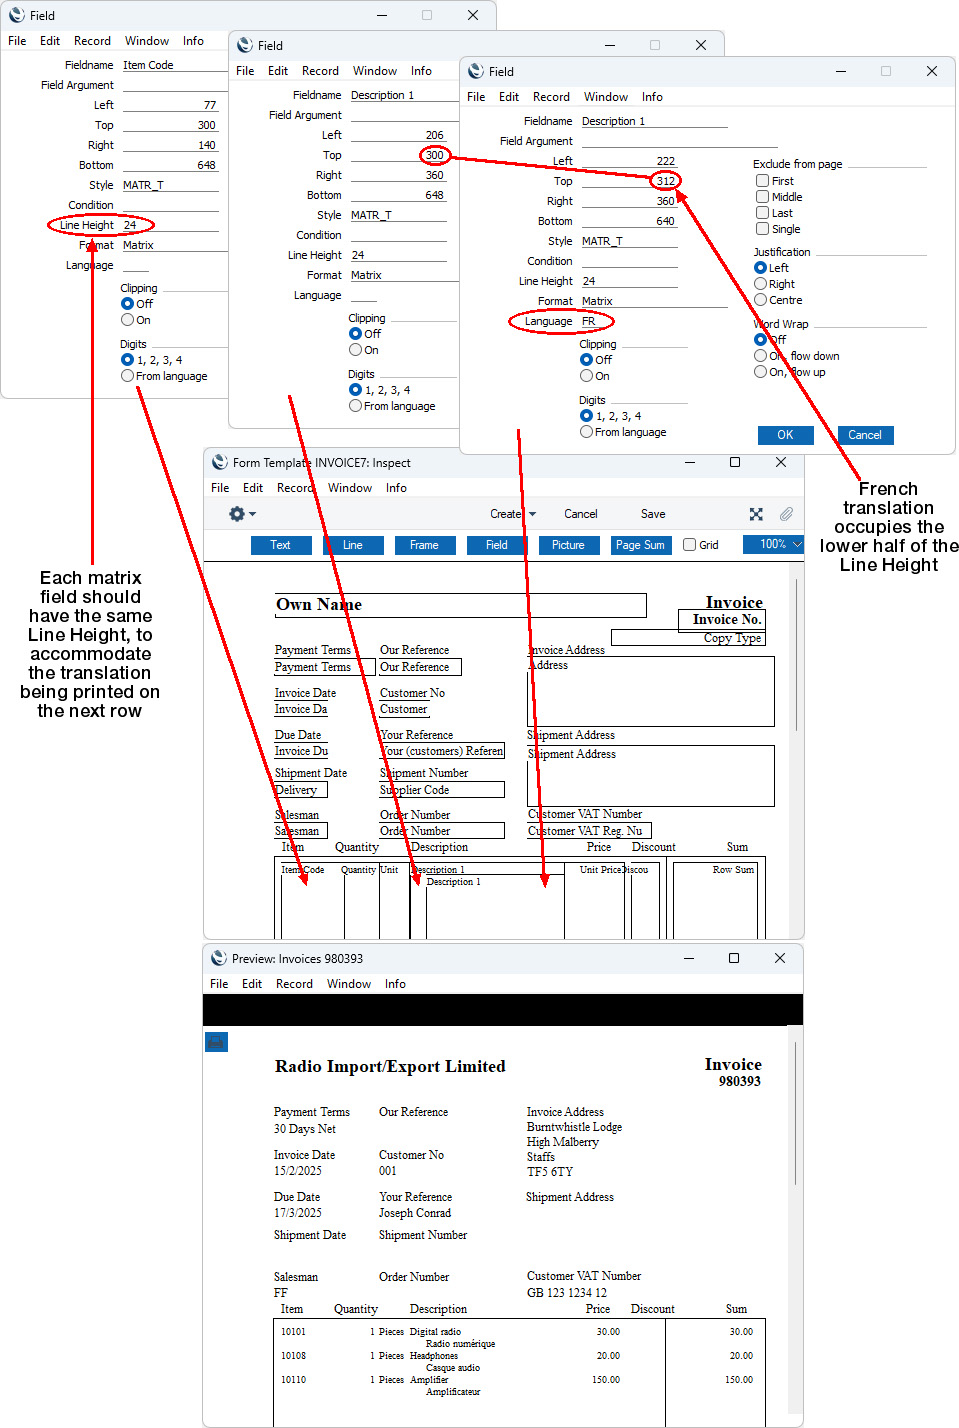
Printing Text in Different Languages
This page describes printing text in various Languages on a form---
When you print a form, the text printed by each field in the form will be in a particular Language. Usually this will be the Language specified in the record being printed, the Language in the current user's Person record or the Language in the Company Info setting. For example, when printing an Invoice in which the Language is Swedish, the "Delivery Mode Text", "Delivery Term Text" and "Payment Terms" fields will print the Swedish translations of the Delivery Mode, Delivery Term and Payment Term respectively, assuming you have entered Swedish translations in the relevant records.
Some fields allow you to specify a Language when you add them to your Form Template designs. These fields will print text in that Language, which may not be the Language in the record being printed. By adding these fields more than once with different Languages to a particular Form Template, you can have a particular text string printed in different Languages on the same document. For example, in a store with an international clientele, you may wish to have Item Names printed in different Languages on each Invoice.
You can use this feature with the following fields in particular forms, as follows:
- "Amount in Text" and "To Pay in Text" fields in Invoices of all kinds (i.e. including Cash Notes, Credit Notes, Interest Invoices, Proforma Invoices and Project Invoices), POS Invoices, Bar Tabs of all kinds (i.e. including Bar Tab Kitchen Orders and Bar Tab Receipts), Receipt Forms and Payment Forms. Using Languages with these fields is described on the Printing Amounts in Words in Forms page.
- The "Description 1" field that prints Item Names in Invoices of all kinds, POS Invoices and Bar Tabs of all kinds. Using Languages with this field is described on this page.
When designing the Form Templates that will be used when printing Invoices, POS Invoices and Bar Tabs, you will add a "Description 1" field to print the name of each Item. If you do not specify a language for the "Description 1" field, it will print the Item Descriptions as entered in each row in an Invoice or POS Invoice (i.e. the correct translations for the Language of the Invoice or POS Invoice that are already visible on screen as mentioned in the previous paragraph). If you changed the Item Description in a particular row, the "Description 1" field will print the changed Description. When printing a Bar Tab, the "Description 1" field will print the correct translations for the Language of the Bar Tab, fetching them at the time of printing (i.e. what is printed may not match what was shown on screen).
If you do specify a Language for the "Description 1" field, it will print the following for each Item:
- The relevant translation from the 'Texts' card in the Item record.
- The relevant translation from the 'Texts' card in the Item Group to which the Item belongs (if the 'Texts' card in the Item record does not have a row with the relevant Language).
- Nothing (if the 'Texts' card in the Item Group record does not have a row with the relevant Language).
An example is shown in the illustration below:
- Introduction to Form Templates
- Adding and Editing Design Elements
- Operations menu
- Single- and Multi-Page Form Templates
- Conditional Printing of Elements (Print Conditions)
- Printing Text in Different Languages
- Printing Forms
- Page Setup
- Standard Fields for inclusion in all Form Templates
- Home page for System Module manual
- Home page for Standard ERP manual
Impresión de Formularios
Luego de diseñar un Formulario, debes indicarle al sistema cuándo se utilizará. Para esto, debes especificar el código del formulario en la matriz de la ventana de definición del documento respectivo (ej. Facturas). Esto será necesario cuando cambies el código de un formulario usando el campo respectivo en la ventana 'Propiedades: Formulario'.Debes saber que HansaWorld Enterprise viene con una serie de formularios estándar. Por ejemplo, cuando imprimas una factura, el sistema usará por defecto el Formulario "INVOICE". Es más, si usaste este formulario como la base para diseñar tu propio formulario de facturas y no cambiaste el Código (en sus propiedades), el sistema usará automáticamente el formulario que ajustaste. Pero, si cambiaste el Código del formulario "INVOICE" y pusiste por ejemplo "INVOICE1", deberás indicarle al sistema que ese es el formulario que deseas usar para impresión de Facturas.
El procedimiento es el siguiente:
- Ve al módulo Ventas.
- Abre la lista de Documentos y resalta ‘Facturas’.
- Selecciona ‘Definir Documento’ desde el menú Operaciones.
- En la primera fila de la matriz, verás que aparece "INVOICE", por lo tanto, cambia esto y coloca "INVOICE1" (usa Pegado Especial si es necesario).
- Pulsa el botón [Guardar] para guardar la definición.
A partir de ese momento, cada vez que imprimas Facturas, se usará el formulario "INVOICE1".
La definición de documentos está disponible para la mayoría de los documentos. Esto otorga gran flexibilidad para la producción de documentos impresos.
Opciones Relacionadas
La opción Impresoras (módulo Sistema) sirve para que el sistema reconozca las diferentes impresoras de tu instalación. Una vez hecho esto, puedes especificar – en la 'Definición de Documento' – la impresora que se usará para la impresión de un formulario en particular.La opción Estilos (módulo Sistema) se utiliza para definir los diferentes tipos de fuente, tamaños de fuente, etc.
Standard Fields
There are a number of standard fields that you can include in the Forms that will be used by almost every document. These fields are:| Field in Form | Prints |
| These fields print information from the Company Info setting: | |
| Chief Accountant | Chief Accountant |
| Copy Type | When you design a Form, you can use the 'Copies' function on the Operations menu to specify that more than one copy will be printed, and that each copy will be marked with specified text (e.g. "Office Copy", "Customer Copy", etc). This field will print the specified text |
| Date | The date when the document was printed |
| Invalid Invoice | Prints the phrase "Document not valid as an invoice" (prints blank in Sales Cash Notes, Sales Credit Notes, Sales Interest Invoices, Sales Internal Invoices, Sales Invoices, Sales Proforma Invoices and Project Invoices) |
| Manager / CEO | CEO |
| Own Address | Company Name and Address. This information will be printed on separate lines, so you should specify a Line Height for this field |
| Own Address 2 | Address. This information will be printed on separate lines, so you should specify a Line Height for this field |
| Own ANA Code | ANA Code |
| Own Bank 1 | Bank 1 |
| Own Bank 2 | Bank 2 |
| Own Bank Code | Bank Code. This information will only be printed if there is a record in the Banks setting in the Purchase Ledger for the Bank Code specified in the Company Info setting |
| Own Bank Customer ID | Bank Customer ID |
| Own Business Name | Business Name |
| Own Commercial Registration Number | Commercial Reg. No. |
| Own Country Code | Country |
| Own E-mail | |
| Own Fax Number | Fax |
| Own Home Community | Home Community |
| Own Line of Business | Line of Business |
| Own Name | Company Name |
| Own Registration Number | Reg. No. |
| Own Share Capital | Share Capital |
| Own Telephone Number | Telephone. If you enter "N" as the Field Argument, the Telephone Number will be printed without spaces or other non-numeric characters. |
| Own VAT Reg. Number | VAT Reg. No. |
| Own WWW Address | WWW Address |
| Page Number | Page number |
| Period | The period from the document's specification window |
| Product Name | The name of the product you are using (i.e. Enterprise by HansaWorld) |
| Short Underline | _______________ |
| Time | The time when the document was printed |
| These fields print information from the record in the Banks setting in the Purchase Ledger for the Bank Code specified in the Company Info setting: | |
| Own Bank Account (IBAN) | Account (IBAN) |
| Own Bank Address | Address. This information will be printed on separate lines, so you should specify a Line Height for this field |
| Own Bank Address 1 | First line of the Address |
| Own Bank Address 2 | Second line of the Address |
| Own Bank Address 3 | Third line of the Address |
| Own Bank Address 4 | Fourth line of the Address |
| Own Bank Address 5 | Fifth line of the Address |
| Own Bank BIC (SWIFT) | BIC (SWIFT) |
| Own Bank Corr. Acc. | Corr. Account |
| Own Bank Clearing | Clearing |
| Own Bank Name | Name |
| Own Bank Sorting | Sort Key |
---
In this chapter:
- Introduction to Form Templates
- Adding and Editing Objects
- Operations menu, including:
- Properties
- PC Printer
- Copies
- Send to Back
- View All, First Only, Middle Only, Last Only, Single Page Only
- Properties
- Single- and Multi-Page Form Templates
- Printing Form Templates
- Related Items
- Standard Fields for inclusion in all Form Templates
- Home page for System Module manual
- Home page for Standard ERP manual