Introducción
Esta sección contiene las siguientes páginas:- Descripción de las Empresas y bases de datos en el contexto de Hansa.
- Comenzando con Hansa cuando exista una Empresa y una Base de Datos (por ej. el proceso que será realizado cuando Hansa está en uso diario).
- Comenzando con Hansa, cuando no existe ninguna Empresa o Base de Datos (por ej. el proceso que se seguirá cuando se comience a utilizar Hansa por primera vez). Este incluye:
- Crear una Nueva Base de Datos;
- Importar desde un Back-up;
- Crear una Nueva Empresa;
- Ingresar el Nombre y Dirección de su Empresa (para la impresión de sus documentos);
- Registrar el número de Empresas que necesita;
- Ingresar Empresas en el registro Empresas; y;
- Solicitar una Clave Enabler.
- Crear una Nueva Base de Datos;
- Comenzar con Hansa en un sistema multi-usuario dónde no hay Empresas o Bases de Datos (por ej. el proceso que se debe seguir cuando se comience a utilizar Hansa por primera vez en un sistema multi-usuario).
Empresas y Bases de Datos
Los componentes más importantes de un sistema Hansa son la aplicación y la base de datos. La aplicación, o programa, posee el siguiente símbolo en la ventana de directorio (Windows) o en el Finder (Macintosh):
Considere que deberá utilizar esta funcionalidad para diferenciar departamentos si pretende llevar la contabilidad de cada uno por separado. Si va a utilizar un solo plan de cuentas para toda su organización, solo necesita tener una Empresa en su base de datos.
La base de datos será mostrada con símbolo de documento:

! | La base de datos debe llevar el nombre de "Hansa.HDB" y estar presente en la misma carpeta o directorio que la aplicación Hansa. Si la base de datos es renombrada o se modifica su ubicación, la próxima vez que inicie Hansa, una nueva base de datos será creada. |
Loading an Existing Database and Company
Single-userStart Hansa just like any other Windows or Macintosh application, by double-clicking the program icon. Hansa will load the database named "Hansa.HDB". If this is not present in the folder or directory, a new database will be created automatically.
The 'Select Company' window opens, where you should select a Company to work with.
If you have only one Company in your database, you may find that having to select it every time you start Hansa is unnecessary. For instructions about bypassing the 'Select Company' window, please refer to the Program Mode page.
Multi-user
In a multi-user installation, launch Hansa on the server first. If your server has a graphical interface, follow the procedure described in the 'Single-user' section above: choose any Company when the 'Select Company' window appears. Users will then be able to log on to work with any of the Companies stored within that database.
Select 'Server' from the Modules menu. The 'Server Status' screen appears. This can be used to monitor network activity.
The server can now be left alone.
Servers with no Graphical Interface
If your server is a Linux or Macintosh OS X machine, you must first put it into "Terminal" mode before you can launch the Hansa server application. Instructions can be found on the Linux and Macintosh OS X Server Installation page.
When the Terminal window opens, and assuming you have retained the default directory structure, type:
- cd /Applications/Hansa/HansaFinancialsServ (Linux), or
- cd /Applications/Hansa/HansaFinancialsOSXServ (OS X)
- ./hansa &
- cd /Applications/Hansa/HansaFinancialsOSXServ (OS X)
- starts the Hansa server application. The & is optional: it allows you to run the program in the background and to use the Terminal window for other tasks.
- This assumes the application is named "hansa". If this is not the case, type the application name after "./"
Creating a New Database
Click the links for details about launching Hansa for the first time, when you have no database.- Creating a new database - multi-user
- Logging in to a new database from a client for the first time
- Creating a new database - single-user
- Servidor
Las aplicaciones de HansaWorld Enterprise no tienen interfaz gráfico. Por tanto, según lo indicado en la página Instalación – Multi - Usuario, se recomienda utilizar una aplicación GUI para crear y configurar una nueva base de datos. Puedes realizar esto en una máquina servidor si tienes acceso o en una máquina local (lógicamente deberás copiar la base de datos al servidor cuando finalices la configuración).- Asegúrate que no haya ningún otro archivo con el nombre "HANSA.HDB" en la carpeta que contiene la aplicación HansaWorld Enterprise y luego ábrela con doble clic.
Los archivos de texto "DBDEF.TXT" y "DEFAULT.TXT" deben estar presentes en la misma carpeta de la aplicación al momento de crear la nueva Base de Datos. HansaWorld Enterprise utilizará estos archivos para colocar algunas preferencias iniciales en la nueva Base de Datos.
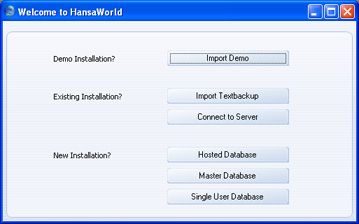
La primera ventana en aparecer te dará las alternativas para que le indiques a tu máquina cómo quieres utilizar la aplicación:

- Haz clic en el botón [Base de Datos Principal] si estás iniciando HansaWorld Enterprise por primera vez; o haz clic en el botón [Importar Backup de Texto] si has estado utilizando HansaWorld Enterprise y deseas importar un archivo back-up a una nueva base de datos. La primer alternativa se describe en esta página, la segunda se describe en la página Restarurar desde un Back-Up.
- Aparecerá una ventana en la que podrás especificar una Clave.
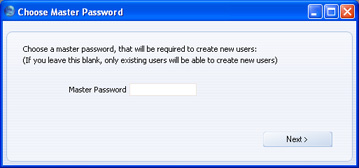
- Ingresa la Clave y haz clic en [Siguiente].
Cuando utilices una máquina cliente para conectarte al servidor, podrás hacerlo como un usuario existente o podrás utilizar el botón [Nuevo Usuario] para crear una nueva Cuenta de Usuario en la base de datos del servidor. Cuando hagas esto, se te pedirá que ingreses tu Clave antes de crear una nueva Cuenta de Usuario.
Puedes decidir no especificar una Clave (aún), sin embargo deberás conectarte como un usuario existente antes de crear nuevas Cuentas de Usuario. Si no especificas una Clave, podrás hacerlo después si es necesario (esto se describe en la sección ‘Cambiar Clave de Acceso’ de la página Modo Programa).
El proceso para crear una nueva Cuenta de Usuario desde una máquina cliente se describe más ampliamente en la página Creación de una Base de Datos nueva - cliente.
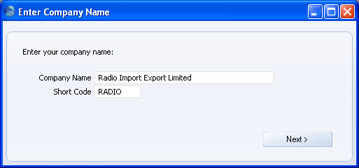
- Aparecerá la ventana ‘Ingresar Nombre de Empresa’ para que puedas ingresar el nombre de tu empresa. Haz esto y también ingresa una abreviación (10 caracteres máx.) y luego haz clic en el botón [Siguiente].
- Así se abrirá la ventana ‘Crear Nuevo Usuario’ para que puedas ingresar tus detalles personales y generar tú mismo una Cuenta de Usuario. Antes de pasar al siguiente nivel, deberás ingresar tu Nombre de Usuario y tu Nombre Completo (los otros datos son opcionales). El Nombre de Usuario será el nombre que utilizarás como tu código identificador de logueo cada vez que ingreses a HansaWorld Enterprise. Carga tus detalles de logueo y haz clic en el botón [Finalizar]. De este modo habrás creado tu Cuenta de Usuario.
La ventana ‘Loguear’ aparecerá con tu Nombre de Usuario cargado en el campo respectivo: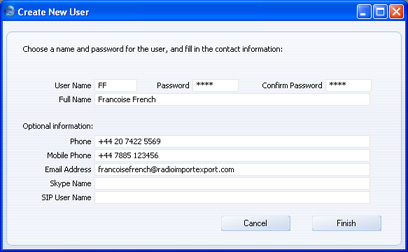
Ingresa tu Contraseña y luego haz clic en [OK]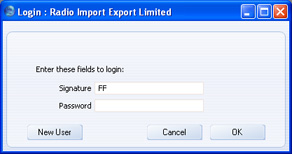
- Si no especificaste una contraseña en el paso 5, ahora deberás hacerlo:
Ingresa la Contraseña en el campo ‘Nueva Contraseña’ y ‘Escribir Contraseña nuevamente’ y luego haz clic en [Guardar].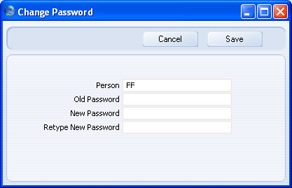
- Igualmente, si no especificaste una contraseña en el paso 5, ahora deberás indicar si deseas que HansaWorld Enterprise te recuerde tu Firma (nombre) y tu Contraseña para que no tengas que ingresarlas cada vez que te conectes al sistema.
Considerando que la Contraseña es un mecanismo de seguridad, deberás presionar [Sí] solo si estás seguro que nadie más usará tu computadora. Si presionas [Sí] pero luego cambias de opinión, podrás desactivar el logueo automático seleccionando 'Detener Logueo Automático' desde el menú Archivo.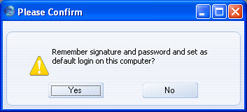
- Luego de esto, aparecerá el Panel de Control con tu nombre en el borde superior de la ventana (esto se ilustra en la página Área de Trabajo).
- Si estás utilizando Skype, éste software te preguntará si deseas permitir que HansaWorld Enterprise utilice Skype. Por favor, revisa la página Interacción con Skype para más detalles
- HansaWorld te recomienda que ejecutes este trabajo de configuración (descrito en esta y las anteriores páginas) en la máquina servidor. Esto incluye los datos completos de tu empresa, Ingreso de Empresas extra en caso que requieras más de una, Importación de datos estándar y solicitud de una Clave de Internet. Debes realizar esto antes de avanzar al paso 12. Si quieres ejecutar el trabajo de configuración desde una máquina cliente, avanza ahora al paso 12.
- Por defecto cuando inicies la aplicación desde el servidor (pasos 14 y 15 más adelante), el sistema esperará que hayan clientes que se conecten utilizando el Puerto 1200. Si deseas cambiar el Puerto, revisa la página Modo Programa para más detalles.
- Cierra la aplicación seleccionando ‘Salir’ desde el menú Archivo (Windows y Linux) o desde el menú HansaWorld (Mac OS X). También puedes utilizar Alt-F4 (Windows) o ⌘-Q (Mac OS X) desde el teclado.
- Si estás trabajando en la máquina servidor, deberás levantar la aplicación HansaWorld Enterprise (línea de comando o servicio) según lo descrito en la página Cargar una Base de Datos existente y Empresa.
- Si no estás trabajando en la máquina servidor, entonces copia la base de datos (cuyo nombre es "HANSA.HDB") al directorio situado en el servidor el cual contiene la aplicación. Luego, levanta la aplicación según lo descrito en la página Cargar una Base de Datos existente y Empresa.
- La siguiente etapa consiste en conectar el servidor a un cliente. Por favor, revisa la página Creación de una Base de Datos nueva - Cliente para más detalles.
Creating a New Database (Multi-user) - Logging on from a Client
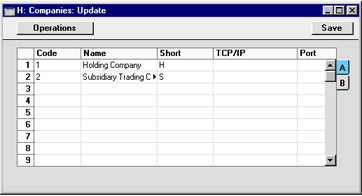
On each client, a new database should now be created. Its sole task will be to enable you to log on to the server: little information will be saved on the client machines. Again, essentially the same steps as those described here need be followed. Ensure that there is no database file with the name "Hansa.HDB" in the same folder as the Hansa application, and launch the application by double-clicking. However, make sure that the "DBDef.txt" and "Default.txt" files are present. A new database with the name "Hansa.HDB" will be created.Once again, the first task is to ensure the correct Companies have been entered. To do this use the Company register as described on the Creating a New Company page. Make sure that the "Default.txt" file is present if you need to create new Companies. All that it is necessary to do here is to enter once again the Companies that you have previously entered to the database on the server. This will enable you to log in to them.
In the Code field (the left-hand field of the grid), enter the same Code(s) that you entered on the server. The TCP/IP and Port fields now become relevant. In the TCP/IP field, enter the IP address of the server machine. This can be obtained from the TCP/IP control software on the server and is used to enable the client copy of Hansa to locate the correct server on the network. In the Port field, enter the value that you entered to the Server Port field on the Program Mode screen on the server. This is used to enable the client Hansa to locate the correct copy of Hansa on the server. If the server does not have a graphical interface, use the Port Number that you typed as part of the command to start the server application.
If you entered an Encryption Key to the Company on the server, you should enter the same one to all Companies on the client that will be used to log on to that server. Click the button marked "B" on the right-hand side of the 'Companies: Inspect' window to do this.
When you have entered all relevant Companies, click [Save].
The 'Companies' list will now appear allowing you to inform Hansa which Company you wish to use. Double-click the appropriate Company in the list, or highlight it and press the Enter key. If the result is that Hansa displays an error message "User Limit on Server reached" and you are certain this is not the case, the probable cause is that the Company Code of the chosen Company (in the first column of the Company register) does not match that of any of the Companies that were entered on the server.
In typical multi-user installations, the next task will be to enter details of each member of your staff that will be using Hansa. You might wish to limit each person to areas of Hansa relevant to their job and to give each one a password, to prevent unauthorised access. To do this, you will be using the Person register in the System module.
Once this task has been completed, please refer to the Setting up a Basic Accounts System page for details covering the setting up of a basic accounts system. It is recommended that this set-up work is carried out either from a single client machine or from the server itself. Until it has been completed, no other users should be allowed to log on.
Creating a New Database (Single-user)
In the event that you need to create a new database, simply ensure there is no database file with the name "Hansa.HDB" in the same folder as the Hansa application when launching. A new database will be created automatically.The "DBDef.txt" and "Default.txt" text files must be present in the same folder as the application when a new database is created. Hansa will use these files to set some initial preferences in the new database.
! | The installation will not be correct if the "DBDef.txt" file is missing. |
Importing from a Back-up
Hansa will now open a window listing back-up files which can be imported. Hansa looks in the folder or directory containing the application for folders named "Backup" and "Setup". Any files in these folders in the correct format are listed in this window.
Note that if the list of back-up files does not appear at this point, this will be because your example of the "DBDef.txt" file has not instructed Hansa to create a new Company and so you should do this yourself. In this case, turn now to the Creating a New Company page and follow its instructions. Then return here to continue with the set-up sequence.
- If you are launching Hansa for the first time, you will not have any back-up files to be imported. If you do not wish to import the example database or the sample Chart of Accounts, close the window using the close box and refer to the Work Area page.
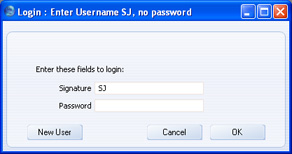
- If you are launching Hansa for the first time and wish to import the example database or the sample Chart of Accounts, double-click the file to be imported, or highlight it and press the Enter key. If you choose to import the example database, Hansa will quit when it has finished importing the file. Restart Hansa and log in as SJ with no password.
- If you are creating a new Hansa database which is to be based on your existing data (perhaps you are restoring from a back-up because your previous database has become damaged or because you are upgrading to a new version), double-click the back-up file to be imported, or highlight it and press the Enter key. For full details of this process, please refer to the Restoring from a Back-up page.
If the list of back-up files did not appear as expected and as described above, this will be because your example of the "DBDef.txt" file did not instruct Hansa to create a new Company automatically. So, you should do this yourself, as described on this page. When you have done this, turn back to the page and continue with the set-up sequence from there.
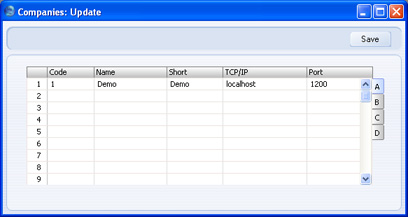
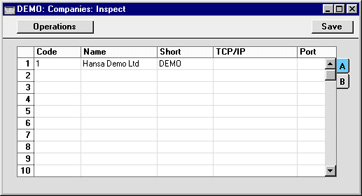
When creating a new database, the first task is to enter a new Company. If the "DBDef.txt" file did not instruct Hansa to do this automatically, Hansa will open the 'Companies: Inspect' window so that you can carry out this task.
The following fields are present in this window:
- Code
- Enter a unique code. This can be a numeric code greater than 0 or an alpha code of up to five characters.
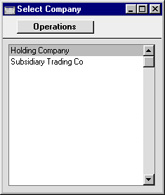
- Name
- Enter a name by which this company or department will be identified in the 'Select Company' window (illustrated at the end of this section). When you log in to Hansa, this window allows you to choose the Company you want to work with.
- Short
- If you have more than one Company in your database it is possible to switch between Companies in a work session, leaving windows from each Company open. This Short Code appears as part of every window title to indicate the Company to which the information in the window belongs.
- TCP/IP
- This field is described on the Creating a New Database - Multi-user page. It need not be considered in single-user systems.
- Port
- This field is described on the Creating a New Database - Multi-user page. It need not be considered in single-user systems.
- Encryption Key
- This field becomes visible if you click the button marked "B" on the right-hand side of the 'Companies: Inspect' window. Again, this field is used in multi-user systems and need not be considered in single-user systems.
You should now inform Hansa that you wish to use the Company you have just created. The 'Select Company' list window will appear automatically:
- Demo
Una Base de Datos Demo te permite testear funcionalidades nuevas o poco frecuentes. Esto se realiza recomendablemente antes de salir en una base de datos “en vivo”. La Base de Datos Demo es completamente funcional salvo los Servicios de Internet (los cuales permanecen desactivados). Puedes utilizar una Base de Datos en modo Demo durante 30 días, periodo tras el cual se configurará automáticamente en Modo Restringido. Después de los 30 días, solamente podrás visualizar reportes y documentos en pantalla, no así pasarlos a impresión, pasarlos a un archivo o algún otro medio. Nota: El hecho de realizar una exportación desde una base de datos demo hacia una Base de Datos nueva antes de los 30 días, hará que la nueva Base de Datos se configure inmediatamente en Modo Restringido.- Inicia normalmente HansaWorld Entrerprise con doble clic en su icono para desplegar una ventana que te dará las alternativas para que decidas cómo quieres usar la aplicación:

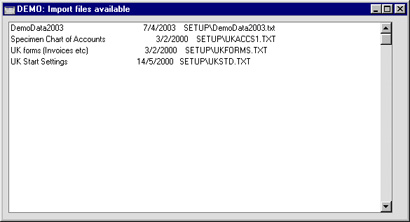
- Haz clic en el botón [Importar Demo] para abrir una ventana que contiene archivos demo:
Estos archivos demo se incluyen dentro del paquete de instalación HansaWorld Enterprise y cada uno de ellos contiene Empresas “ficticias” con transacciones habituales. Por tanto, escoge uno de estos archivos demo con doble clic para realizar la importación hacia una nueva Base de Datos.
- Luego aparecerá la ventana ???Escoger Empresa’ en la que solo tendrás una sola alternativa:

- Ingresa a esta empresa como SJ sin ingresar una contraseña:

- Luego de esto, aparecerá una ventana que te recuerda que estás dentro de una Base de Datos en modo Demo.
La anterior ventana aparecerá cada vez que ingreses a la Base de Datos Demo como un recordatorio para que siempre tengas en cuenta que su objetivo es manejar datos de prueba y no datos reales. Haz clic en el botón [Continuar usando una base demo] para comenzar a trabajar. Finalmente aparecerá el Panel de Control (esto se ilustra en la página Área de Trabajo). Si pulsas el botón [Eliminar la base de Datos y comenzar de nuevo], la base de datos demo se borrará de tu disco duro y aparecerá nuevamente la ventana ‘Bienvenido a HansaWorld’ para que puedas crear una nueva Base de Datos.
- Si estás utilizando Skype, este software te preguntará si deseas permitir que HansaWorld Enterprise utilice Skype. Por favor, revisa la página Interacción con Skype para más detalles.
- Demo Multi-usuario
Una base de datos en modo de demostración te permite testear funcionalidades nuevas o poco frecuentes. Esto se realiza recomendablemente antes de salir en una Base de Datos “en vivo”. Una Base de Datos en modo de demostración es completamente funcional con excepción de los Servicios de Internet (los cuales permanecen desactivados). Puedes usar una Base de Datos Demo por 30 días, periodo tras el cual se configurará automáticamente en Modo Restringido. Después de los 30 días, solamente podrás visualizar reportes y documentos en pantalla no así pasarlos a impresión, ni a un archivo o algún otro medio. El hecho de intentar realizar una exportación desde una Base de Datos Demo hacia una Base de Datos nueva antes de los 30 días, hará que las nueva Base de Datos se configure inmediatamente en Modo Restringido.En este apartado describiremos la configuración de una Base de Datos en modo demostración con la aplicación del servidor y el cliente en la misma máquina. Esta configuración será solo para prueba y demostración, no para usarla en “vivo”.
- Según lo indicado en la página Instalación Multi-usuario, descarga apropiadamente las aplicaciones para servidor y cliente respectivamente.
- Instala la aplicación en servidor de la siguiente manera:
- Si estás usando una máquina Windows, instala la versión “servicio” ejecutando el instalador (cuyo nombre es "hw-install-server.msi"). El directorio de instalación por defecto es: C:\Archivos de Programa\HansaWorld Enterprise 5.4 XXXXXX\ (XXXXXX es la fecha de la versión HansaWorld Enterprise que estás instalando). Para simplificar esta especificación, puedes cambiar el directorio dejándolo así: C:\Archivos de Programa \HansaWorld\.
- Si estás usando una máquina Mac OS X, abre el archivo .dmg del servidor (cuyo nombre es "hw-install-server.dmg") y luego copia la carpeta respectiva a la carpeta Aplicaciones. Para simplificar esta especificación, puedes colocar "HansaWorld" en lugar de "HansaWorld Enterprise Servidor"..
- Si estás usando Linux, debes expandir el archivo .tgz (cuyo nombre es "hw-install-server-linux.tgz" (Intel) o "hw-install-servidor-linuxppc.tgz" (PowerPC)) y luego copia la carpeta respectiva a la carpeta Aplicaciones. Para simplificar esta especificación, puedes colocar "HansaWorld" en lugar de "hansaworld-linux-server".
- Si estás usando una máquina Windows, instala la versión “servicio” ejecutando el instalador (cuyo nombre es "hw-install-server.msi"). El directorio de instalación por defecto es: C:\Archivos de Programa\HansaWorld Enterprise 5.4 XXXXXX\ (XXXXXX es la fecha de la versión HansaWorld Enterprise que estás instalando). Para simplificar esta especificación, puedes cambiar el directorio dejándolo así: C:\Archivos de Programa \HansaWorld\.
- La carpeta “HansaWorld” contendrá una sub-carpeta o directorio con el nombre “Demo” la cual deberás abrir. Luego, copia el archivo "DemoDataGeneral2008-01.txt" en la carpeta “HansaWorld” (al mismo nivel que la aplicación en servidor). Nota: Nuevamente, puedes simplificar la especificación de esta carpeta colocando por ej. "Demodata.txt".
Si no existe ningún archivo con el nombre "DemoDataGeneral2008-01.txt", usa el archivo cuyo nombre demuestre ser el más genérico.
- Si estás usando una máquina Windows, deberás reiniciar el servidor de la siguiente manera:
- Usa el programa Notepad o un programa similar de texto para crear un archivo de texto con el nombre "parameters.txt". Guarda este archivo en el directorio HansaWorld al mismo nivel de la aplicación en servidor. El texto que crees deberá contener una sola línea de texto:
- Demodata.txt
- Iniciar la aplicación en servidor. Para esto, reinicia la máquina para hacer que el “servicio” se levante automáticamente. Si no deseas reiniciar, abre el Panel de Control de tu máquina y haz doble clic al icono de Agregar o Quitar Programas. Encuentra ‘HansaWorld Enterprise 6.0 Servicio’ y configura debidamente para que hincar el servicio. Una vez iniciado, obedecerá a las instrucciones en el archivo "parameters.txt" y efectuará la importación de datos de demostración extraídos del archivo "Demodata.txt".
- Cuando finalice la importación, el sistema se cerrará por razones de seguridad (probablemente deberás monitorear el archivo “log” (hansa.log) para ver el momento en que se cierre el sistema). Luego, limpia o renombra el archivo "parameters.txt" y después reinicia la aplicación según lo descrito en la página “Cargar una Base de Datos existente y Empresa” (de lo contrario, los datos serán importados nuevamente).
- Usa el programa Notepad o un programa similar de texto para crear un archivo de texto con el nombre "parameters.txt". Guarda este archivo en el directorio HansaWorld al mismo nivel de la aplicación en servidor. El texto que crees deberá contener una sola línea de texto:
- Si estás usando una máquina Mac OS X o Linux, debes iniciar la aplicación en servidor de la siguiente manera:
- Abre la aplicación de Terminal usando el icono del Terminal en el Panel (o desde la carpeta "Utilidades" que está en la carpeta "Aplicaciones").
- Ve al directorio HansaWorld usando la siguiente especificación:
- cd /Applications/HansaWorld
- Escribe:
- ./HansaWorld Demodata.txt
- Cuando finalice la importación, la aplicación se cerrará por razones de seguridad. Tu máquina te informará esto a través de la ventana de la Terminal. Luego de esto, deberás reiniciar la aplicación escribiendo:
- ./HansaWorld
- Abre la aplicación de Terminal usando el icono del Terminal en el Panel (o desde la carpeta "Utilidades" que está en la carpeta "Aplicaciones").
- Ubica el instalador de cliente que descargaste en el paso 1 e instálalo. Si eres usuario de Windows, ejecuta el instalador ofrecido por esta plataforma. Si eres usuario de Mac OS X y Linux, abre el archivo .dmg o expande el archivo .tgz. En todos los casos, se recomienda instalar el cliente en una carpeta o directorio cuyo nombre sea "HansaWorld Client" en tu directorio de "Archivos de Programa " o tu carpeta “Aplicaciones”.
- Ahora, puedes iniciar la aplicación HansaWorld Enteprise en el cliente. Solo debes hacer doble clic en el icono respectivo. La primera ventana que aparece te dará las alternativas para que le indiques a tu máquina cómo usar la aplicación:
- Haz clic en el botón [Conectar a Servidor] para desplegar la ventana ‘Dirección de Servidor: Ver’. Esta ventana listará todos los servidores disponibles dentro de la instalación establecida para tu red:
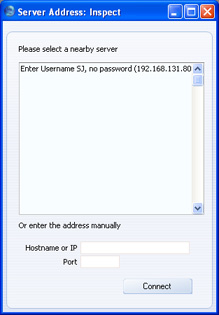
- Haz doble clic en el Servidor al cual deseas conectar la máquina o haz clic una vez y luego presiona el botón [Conectar].
Si estás utilizando la versión “servicio” de Windows como tu aplicación en servidor para HansaWorld Enteprise, esto no aparecerá en tu lista de servidores disponibles. En este caso, si el servidor es la misma máquina, deberás especificar "localhost" como la dirección IP ya sea en el campo ‘Hostname’ o ???IP’; de lo contrario, especifica su dirección IP. Toma en cuenta que el número del Puerto es "1200".
- Así se abrirá la ventana ‘Elegir Empresa’:
Si no aparece la anterior ventana y asumes que tu máquina no puede conectarse el servidor, la razón más probable es que olvidaste resaltar el Servidor antes de pulsar el botón [Conectar]. En tal circunstancia, la ventana ‘Empresas: Ver’ aparecerá pero estará vacía. De manera sencilla, podrás rellenar los datos respectivos (ver ilustración siguiente) y luego pulsar el botón [Guardar]: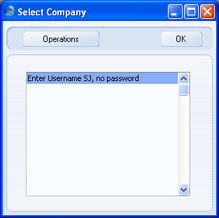
- Regístrate como SJ sin contraseña:
- Aparecerá una ventana como recordatorio de que estás usando una Base de Datos en modo de demostración:
La anterior ventana aparecerá cada vez que abras la aplicación. Así sabrás que solo puedes usar la base de datos para prueba no para datos reales. Haz clic en el botón [Continuar Usando Base de Datos Demo] para iniciar tu trabajo. Solo entonces aparecerá el Panel de Control de tu sistema (ver ilustración en la página Área de Trabajo).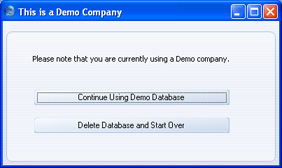
- Si estás utilizando Skype, este software te preguntará si deseas permitir que HansaWorld Enterprise utilice Skype. Por favor, revisa la página de Interacción con Skype para más detalles.
Creating a New Database (Single-user) - The Work Area
Whether or not a back-up file was imported, the Hansa work area will now appear. This will be the basis for all your work in Hansa and is fully described in the Work Area section of these web pages. It is illustrated below to enable you to identify the various parts of the screen mentioned in the following sections.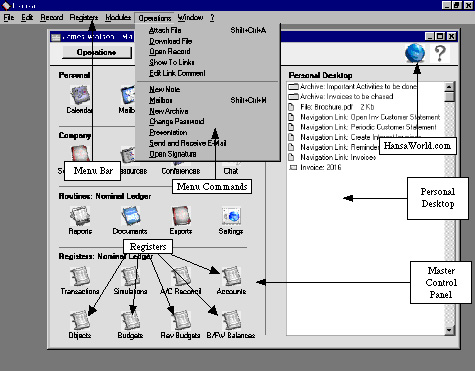
Interacción con Skype
Tan pronto abras HansaWorld Enterprise, el sistema comenzará a interactuar con Skype (siempre y cuando esté instalado). Cuando ingreses a HansaWorld por primera vez, Skype te preguntará si deseas permitir que HansaWorld utilice este software.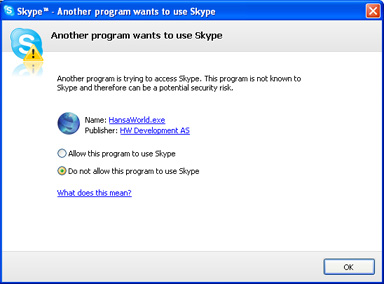
Si decides no permitir que HansaWorld utilice Skype, no podrás realizar ninguna de las anteriores actividades a través de Skype. Si cambias de opinión, debes cerrar HansaWorld Enterprise por un momento y luego:
- En Windows, escoge ‘Opciones’ desde el menú de Herramientas y luego haz clic en [Avanzado]. Luego haz clic en ‘Administrar otros programas’ – acceso a Skype.
- En Mac OS X, escoge 'Administrar Clientes API' desde el menú Cuenta (disponible en Skype 2.6.0.137 o posteriores).
Dependiendo de la versión de Skype que estés manejando, podría haber una tercera alternativa que no aparece en nuestra ilustración, esta es “Permitir que este programa use Skype, pero volver a preguntar después”. Si seleccionas esta opción, el sistema te preguntará cada vez si deseas permitir que HansaWorld Enterprise use Skype.
El siguiente paso en la configuración de una Base de Datos es registrar los detalles completos de tu empresa en tu sistema HansaWorld Enterprise. Por favor, haz clic aquí para detalles de esto.
Creating a New Database (Single-user) - Settings
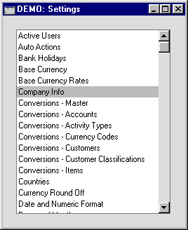
Each module contains a number of settings which can be used to control how that module operates. They are accessed using the 'Settings' item on the File menu or the [Settings] button in the Master Control panel. Before you start working with each module, you should consider its settings, since its functions depend on the settings being correct.Many settings take the form of options or preferences. Others, such as Company Info, that will be considered next, require information or a number of records to be entered.
Changing the Company Name
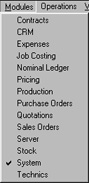
The System module is where settings used throughout the Hansa system are determined. You will now use it to enter company name, address and other information to be used in reports and documents such as Invoices. Select 'System' from the Modules menu.
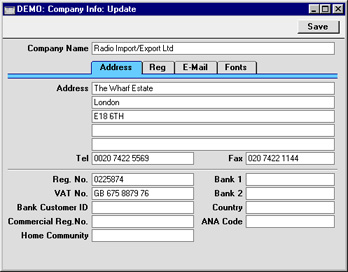
The Bank Customer ID is an ID number used for automatic (modem) communication with certain credit institutions in some countries.
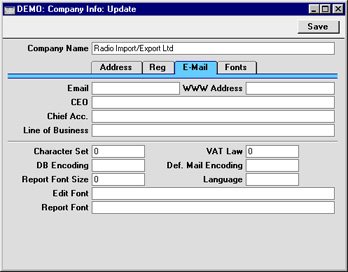
Click the [E-Mail] button towards the top centre of the window to see the other fields in this setting.

| Byelorussia | 46 |
| Denmark | 7 |
| Estonia | 27 |
| Finland | 13 |
| France | 1 |
| Germany | 2 |
| Hungary | 26 |
| Iceland | 15 |
| Ireland (Republic of) | 35 |
| Italy | 3 |
| Latvia | 28 |
| Lithuania | 24 |
| Netherlands | 4 |
| Norway | 9 |
| Poland | 25 |
| Portugal | 8 |
| Russia | 32 |
| Spain | 6 |
| Sweden | 5 |
| Ukraine | 45 |
| United Kingdom | 0 (zero) |
Details of the other fields can be found on the Company Info page. When you have completed the window, click the [Save] button in top right-hand corner to save the changes and close the window.
Creating a New Database (Single-user) - Modules, Users and Companies
The next task is to ensure that you have been granted access to the appropriate modules and that the correct numbers of users and Companies have been registered. If you no longer have the 'Settings' list on screen, select 'Settings' from the File menu or click the [Settings] button in the Master Control panel once again. Select 'System Usage' by double-clicking. The 'System Usage: Inspect' window appears: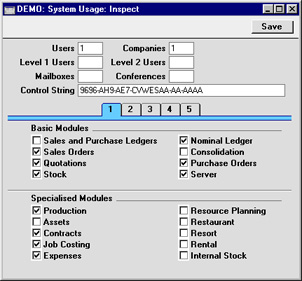
The number of Companies should only be changed if your business is one where there are separate departments or subsidiary companies that keep separate accounts. These can be set up as separate accounting entities in Hansa. Each department or subsidiary is termed a 'Company'. If you set up more than one Company in Hansa, each will be completely separate: usually, there will be no common information, although it is possible to copy from one to another using the export and import functions or by dragging and dropping. Separate account balances will be maintained, and each Company within a database can be backed up separately or together.
Note that you should only use this feature to differentiate between different departments if you intend to account for each of them separately. If you keep a single set of accounts covering your whole organisation, you only need have a single Company in your database.
In the remaining sections of the window, select the modules that you require by clicking the check box next to each one so that a tick appears. Click the five numbered buttons to see more modules. Finally, click [Save]. The Modules menu will now contain the modules selected. These tasks should be completed before applying for a database key. Details about applying for an Enabler Key are here.
Creating a New Database (Single-user) - Changing and Adding Companies
If you want to change the company identifier that appears in the title bar of each window, and/or you need more than one Company, you can do this now. Click [Companies], the first button in the 'Registers' section of the Master Control panel:
To create more Companies, click in the Code field in the first blank row and enter information as described on the Creating a New Company page. Remember, this should only be done for parts of your business which are completely separate accounting entities to the first Company entered.
If you are creating a new Company, the "Default.txt" text file must be present in the same folder as the Hansa application. Hansa will use this file to import some basic settings to the new Company.
It is advisable to enter as many Companies as you need now, so that you only need apply for a database key once. You will be able to enter all set up information such as a Chart of Accounts to one Company and then to export those settings to the other Companies (or to transfer them by dragging and dropping). Remember that each Company will maintain completely separate accounts, so there is no need to create separate Companies for departments that are part of the same accounting whole.
For security reasons, Hansa will shut down after any changes or additions have been made in the Company register. Restart the program to continue working.
For each Company added, you should now repeat the process described on this page, entering the correct company name and address, and on this page, ensuring that access has been granted to the correct modules. To change Companies, select 'Companies' from the File menu and choose another Company in the list that appears. This work should be completed before applying for a database key.
Creating a New Database - Setting up a Basic Accounts System
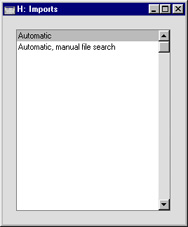
Hansa is supplied with a basic accounts template which you can use as a basis for your own system if necessary. It includes VAT Codes, Fiscal Years, a Chart of Accounts, report definitions and so on.If you did not import this template when creating your database (as described on the Creating a New Database - Single User page), you can do so at any time. To import this template, ensure you are in the System module using the Modules menu and select 'Imports' from the File menu. The 'Imports' window is shown:
The file will be imported. A message window informs you about the progress of the import.
When the import is finished, repeat the process, selecting "UKForms.TXT" and then "UKStd.TXT" to import template forms and other settings. Then, close the 'Imports' list window using the close box.
Your Hansa database is now ready to be used. You are free to change any aspect of the model Chart of Accounts, but note that some of the default settings in Hansa presume that the model chart is being used in an unmodified form. If you alter the chart, you must also alter these defaults wherever they occur. For example, if you change the Account Code of the VAT Outputs Payable Account, remember to alter all the VAT Code records accordingly as well.
If you do not wish to use the template supplied...
You are also free to implement your own accounting set-up. If you choose to do this, please first refer to the 'Accounting Principles' section of these web pages where some basic accounting principles are outlined. Then, you will need to set up VAT Codes in the Nominal Ledger before creating your Chart of Accounts and defining Fiscal Years, in the System module. Ensure the correct Accounts have been defined for use by various functions using the Account Usage S/L and Account Usage P/L settings. The Item Group register and Payment Modes setting should also be checked. Finally, define the Balance Sheet, the Key Financial Ratios report, the Profit & Loss Report and the VAT Report.
Importing your own Chart of Accounts
If you are changing to Hansa from another computerised accounts program, you may be able to import the accounts set-up from that program. This will have three advantages: the import procedure is relatively fast (compared to entering the accounts manually), the possibility of data entry errors is reduced and you will be able to use a Chart of Accounts with which you are already familiar.
If you wish to follow this procedure, please follow the import instructions described above to import your text file. For details of the composition of the text file, please refer to your Hansa representative.
Entering Data and Opening Balances
Your Hansa database is now ready for the entry of data and of opening balances. Please refer to the 'Starting Work' section of these web pages for full details of how to proceed. The 'Work Area' pages will enable you to familiarise yourself with Hansa's tools, windows and method of working, while the 'Accounting Principles' pages describe some of the accounting concepts used by Hansa.
Creating a New Database (Single-user) - If the "DBDef.txt" file is missing
If you attempt to create a new database as described on the Creating a New Database - Single User page but without a "DBDef.txt" file present in the same folder or directory as the Hansa application, that database will be created successfully. However, the process will deviate from the path outlined in two respects:- The list of possible back-up files which can be imported will not be shown.
- You will only have access to the System module.
- Close Hansa using the 'Quit' command on the File menu.
- Delete the "Hansa.HDB" file.
- Locate the "DBDef.txt" file and move it to the folder or directory containing the Hansa application. Also, ensure that the 'Default.txt' file is present.
- Launch Hansa again and follow the procedure described on the Creating a New Database - Single User page.
- Ensure the "Default.txt" file is present in the same folder or directory as the Hansa application and enter a single Company to the 'Companies: Update' window. This window is described on the Creating a New Company page. Click the [Save] button to save.
- On closing this window, the 'Select Company' window will open. Double-click the Company that you wish to work with.
- The System module will be the only module available. The next step should be to remedy this. Select 'System' from the Modules menu and 'Imports' from the File menu. Double-click 'Automatic, manual file search' in the subsequent list. Locate the "DBDef.txt" file and import it. You will now have access to all modules.
- Return to the Settings page to resume the process.
Creating a New Database (Multi-user) - The Program Mode Register
The next stage is to make this database available to the network. Select 'Technics' from the Modules menu and click the [Prog Mode] button in the bottom left-hand corner of the Master Control panel (or select 'Program Mode' from the Registers menu).
Header
- Program Name
- If you are using Hansa under Windows, you can specify the name of the window in which Hansa appears and of the application's button in the Taskbar (Windows 95/98/2000). Enter that name here.
- Server Port
- This field is for TCP/IP communication with Hansa clients. Enter an arbitrary four-digit code to identify this database. If you have more than one server machine running Hansa, or more than one copy of Hansa running different databases on the same machine (not recommended), each must feature a unique Server Port number.
- If you change the Server Port or put one in for the first time, you must quit Hansa and restart for the change to take effect.
- If you change the Server Port or put one in for the first time, you must quit Hansa and restart for the change to take effect.
- Default Company
- If you would like a particular Company to be used by default when you launch Hansa, specify that Company here. The next time Hansa is used, the Company specified here will be opened automatically and the 'Select Company' window will not appear.
- This field can be used in single-user systems to ensure a particular Company is always used. This is the only field that can be used in this register in a single-user system.
- This field can be used in single-user systems to ensure a particular Company is always used. This is the only field that can be used in this register in a single-user system.
- Server at Startup
- Switch this check box on if you would like the Server module to be selected by default when you launch Hansa.
- Usually, it will not be necessary to use this check box. When the time comes to shut down the server, two options are available on the File menu. If you choose 'Quit', Hansa will automatically go into server mode the next time it is used, even if the Server at Startup is not checked. If you choose 'Quit, Remove Autoserver', it will not, allowing you to work on the server machine itself.
The remaining fields in this register are only used in the specialised situations when setting up the Web Shop, FTP server and Print and Fax servers and when establishing an open TCP/IP link with Hansa. They can be left blank when setting up a data server.
For details about setting up an FTP server, please refer to the Setting up an FTP Server page. For details about setting up Print and Fax servers, please refer to the description of the Printers setting. For details about setting up a Web Shop and about establishing an open TCP/IP link with Hansa, please refer to your local Hansa representatives.
Once the 'Server' card of this register is complete, click the [Save] button in the Button Bar to save. If you have entered a Server Port number for the first time (or changed the one that was already there), quit Hansa and restart to allow the change to take effect.
! | Complete the Program Mode screen before applying for a database key. |
The final task is to select 'Server' from the Modules menu. The 'Server Status' screen appears. This can be used to monitor network activity.
The server can now be left alone.
Creating a New Database - Allowing Logging in from a Browser (Web Client)
This page describes logging in to your Standard ERP server from a browser, also sometimes termed "using a Web Client". Please refer here for details about logging in to your server using the Standard ERP client application.---
If you installed your server application as described here, the necessary files should already be in place to allow users to log on to your server from a browser.
The following configuration steps are required:
- Log in to your server and open the Program Mode register as described here.
- Specify a Web Port on the 'Web' card in the Program Mode register:

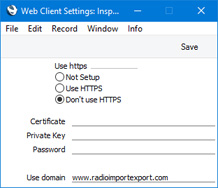
- Specify whether web clients will connect over http or https, using the Web Client Settings setting, also in the Technics module. If web clients are to connect over https, specify the paths to the certificate files, which should be located on the server. Please refer here for details about obtaining and configuring certificate files. If you have a domain name pointing to the server's IP address and would like users to use that domain name when connecting with a web client, enter that domain name in the Use domain field. The Use domain field will be used with both http and https connections (in the case of https connections, it must be a domain that is connected to the certificates).
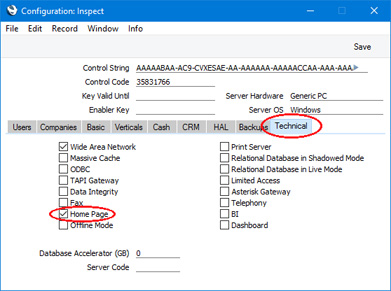
- Depending on your installation, you may also need to ensure the Home Page option is ticked in the Configuration setting:
- server IP address:web port/startwebclient
- 10.211.55.2:8033/startwebclient
- www.usedomain.com:8033/startwebclient
Multi-user Installation:
- Installation
- Create a new database
- Enter your company's name address VAT and company registration numbers and other details into the new database
- Import set-up data
- Connect from a client
- Create the Cloud Node
- Appoint an Administrator for MyStandard
- Apply for an Enabler Key
- Home page for Introduction and Installation manual
- Home page for Standard ERP manual
Creando una base de datos - Instalando Cloud Node
Instalar un Cloud Node le permitirá controlar su servidor a través de MyStandard (por ejemplo desde cualquier browser). MyStandard es un portal personalizado que le permite controlar y administrar su servidor independientemente donde esté situado y desde cualquier dispositivo. Debe instalar un Cloud Node si su servidor está en sus instalaciones o en un cloud que no pertenece a HansaWorld. No instale un Cloud Node si su servidor está en el cloud de HansaWorld o si está utilizando Standard ERP con una instalación tipo mono-usuario.Siga los siguientes pasos:
- Asegúrese que en el firewall de su servidor los siguientes dominios posean los puertos abiertos únicamente para mensajes salientes:
- http://hansaworld.com:80
- https://lookup.hansaworld.com:443
- https://validate.hansaworld.com:443
- http://validate.hansaworld.com:1401
- http://downloads.hansaworld.com:80
- https://cloudcontroller.hansaworld.net:444 (en Australia. Abra https://cloudcontroller.aus.hansaworld.net:444; en Finlandia, abra https://cloudcontroller.fin.hansaworld.net:500; ó en Letonia abra https://cloudcontroller.lat.hansaworld.net:444)
- https://cloudcontroller.hansaworld.net:2000 (en Australia. Abra https://cloudcontroller.aus.hansaworld.net:2000; en Finland, abra https://cloudcontroller.fin.hansaworld.net:2000; ó en Letonia abra https://cloudcontroller.lat.hansaworld.net:2000)
- https://lookup.hansaworld.com:443
- http://hansaworld.com:80
- Desactive cualquier software antivirus que se esté ejecutando en su servidor hasta que se haya completado la instalación del Cloud Node.
- Si está controlando su servidor usando un script como por ejemplo run-hansa.sh, cierre el servidor, deshabilite el script e inicie el servidor sin él. Esto previene que el script y el Cloud Node intenten tomar control del servidor al mismo tiempo.
- Conéctese a su servidor desde un cliente. Inicie sesión como usuario con acceso al módulo Técnico.
- Ingrese en Solicitud de claves por internet en las opciones del modulo Sistemas y asegúrese de que al menos los campos Registrado en y código del cliente estén completos. Si conoce su número de contrato en HansaWorld, completelo.
- Cambie al módulo Técnico e ingrese en Registros, seleccione Modo Programa.
- Asegúrese de haber especificado un puerto web en el tag 'Web'. Si no hay un puerto Web, especifique uno y luego reinicie el servidor.
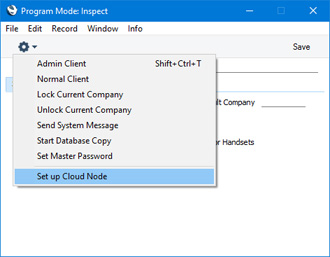
- Seleccione ‘Configurar Cloud Node’ en el menú de Operaciones:
- La ventana ‘Configurar Cloud Node' aparecerá: presione el botón configurar para continuar:
La información de esta ventana se tomará del Modo Programa en Registros y no debería modificarse. La dirección IP se utilizará principalmente para el log-in. No se utilizará para conectarse a su servidor, dado que el Cloud Node se conectará a MyStandard llamando desde su servidor. Esto le permite cambiar la dirección IP de su servidor en cualquier momento y/o proteger el servidor mediante un firewall con una IP dinámica externa, evitando que el servidor pueda perder conexión con MyStandard.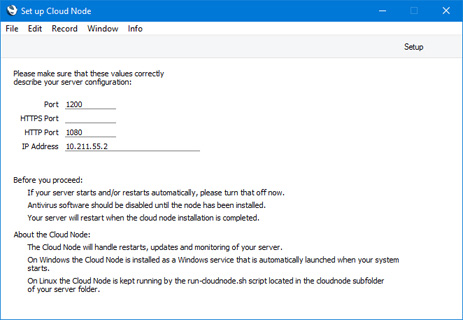
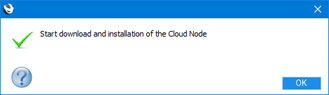
- Finalmente, presione el botón [OK] cuando esté listo para iniciar la instalación del Cloud Node:
- Se agregará una carpeta denominada "cloudnode" a la carpeta que contiene la aplicación servidor Standard ERP.
- Se cerrará la aplicación servidor Standard ERP. Como resultado, el cliente que está utilizando perderá la conexión.
- Si su servidor corre bajo MS Windows, el servidor Standard ERP se eliminará del registro de servicios, y se agregará el Cloud Node (con el nombre "Standard Cloud Node”).
- Se iniciará el Cloud Node.
- El Cloud Node ejecutará la aplicación del servidor Standard ERP automáticamente, por lo que podrá iniciar sesión nuevamente.
- Si tiene más de un servidor Standard ERP instalado en un servidor individual y ya ha instalado un Cloud Node desde uno de los servidores, el proceso de instalación cuando corre desde un servidor posterior, conectará ese servidor a un Cloud Node existente. (siempre que las bases de datos estén registradas en el mismo país)
Instalación multi usuario:
- Installation
- Create a new database
- Enter your company's name address VAT and company registration numbers and other details into the new database
- Import set-up data
- Connect from a client
- Create the Cloud Node
- Appoint an Administrator for MyStandard
- Apply for an Enabler Key
- Página inicio del manual: Introduction and Installation manual
- Página inicio del manual: Standard ERP manual
Creating a New Database - Appointing an Administrator for MyStandard
After your server has been connected to MyStandard (automatically if your server is in the HansaWorld cloud, or through the creation of a Cloud Node if your server is in a non-HansaWorld cloud or on your premises), you should appoint a user to be responsible for the server on MyStandard. This user will have full access ("Admin Access") to the server on MyStandard, and will grant access on MyStandard to other users as necessary. To do this, log in to the server from a client, open the Person record of the user who will be the master user and tick the User is MyStandard Admin check box: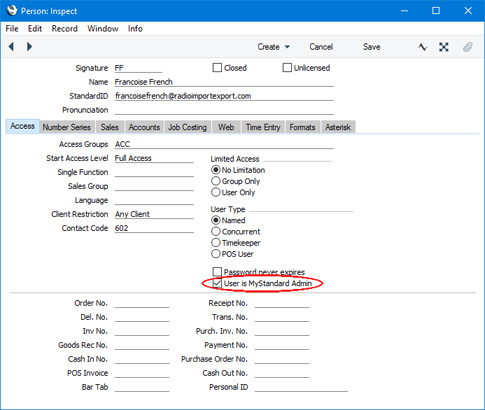
The User is MyStandard Admin check box will only be visible after you have installed the Cloud Node. When the user logs in to their MyStandard page using their StandardID and password, they will have full access to your server. If you appoint a user as the MyStandard administrator immediately after installing the Cloud Node, that user may need to wait about 15 minutes for the server to appear on their MyStandard page. Subsequent appointments will be reflected in MyStandard immediately. If a user is already logged in to their MyStandard page when you appoint them as an administrator, they might need to log out of MyStandard and back in again to see the new server. Please refer to the following pages for more details about MyStandard:
- Introduction to MyStandard
- Access Rights on MyStandard (including Admin Access)
Multi-user Installation:
- Installation
- Create a new database
- Enter your company's name address VAT and company registration numbers and other details into the new database
- Import set-up data
- Connect from a client
- Create the Cloud Node
- Appoint an Administrator for MyStandard
- Apply for an Enabler Key
- Home page for Introduction and Installation manual
- Home page for Standard ERP manual
Creating a New Database (Single-user) - The Enabler Key
The next stage is to inform Hansa that you have a full licence for its use.A Hansa licence normally gives you the right to use the program for a single database. Each database will normally require its own database key provided to you on application by your local Hansa distributor. When Hansa is first purchased, this key is absent but Hansa will be fully operational for 30 days after installation, allowing time for the set-up work described here. After 30 days, if the key has not been applied for, Hansa will change to demonstration mode: it will remain fully functional, but printing will be disabled. The key can be applied for at any time (before or after the 30 day point), but before doing so you should ensure you have registered the number of Companies that you need, them all in the Company register, named them all in the Company Info setting, and given yourself access to the required modules and entered the number of users in the System Usage setting.
On closing the System Usage window, Hansa calculates a Control String based on the modules selected and the number of users and Companies entered. This will be visible if the System Usage window is reopened and will be copied by Hansa to a second setting, the Enabler setting, where it is used to calculate a Control Code, an eight-digit number.
At this point, where a Control String and Control Code are known to Hansa, the database will enter its demonstration mode 30 days from installation. To gain full use of the program, a database key needs to be acquired and entered. To do this, follow this procedure:
- Use the Modules menu to ensure you are in the System module and select 'Settings' from the File menu. In the list, double-click 'Enabler'. The 'Enabler: Inspect' window appears.
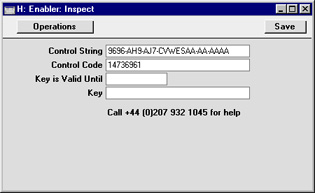
- Enter the expiry date of your Hansa contract in the Key is Valid Until field. Click the [Save] button in the Button Bar to save and close the Enabler.
- Contact your local Hansa representative during normal working hours and quote the Control String, Control Code and contract expiry date. You may be asked to produce a Company Info report. You will then be given a key.
- Enter the key and click [Save] to save the Enabler. This will inform Hansa that you have a full licence for its use.
If a new Company is added to the database, the Valid Until date is changed in the Enabler setting or the Company Name is changed in the Company Info setting of any existing Company, this will also cause Hansa to go into demonstration mode. In this case, however, full use of Hansa can only be regained by applying for a new key.
A record of your database key should be kept in a safe place: you will need to enter it again if you ever create a new database by restoring from a back-up file.
! | Set up your Companies and define the System Usage and Company Info settings for each before applying for a database key. |
Setting up an FTP Server
The File Transfer Protocol (FTP) is a means of transferring files between two connected computers. One computer is configured as an FTP server and the other connects to it as a client. Working from the client machine, files can be copied to the server ("uploaded") and copied from the server ("downloaded"). In large installations, it can be convenient to have an FTP server running permanently. It can be used as a central store of important files such as marketing materials, document templates and so on.Hansa can be configured to act as your FTP server software. Once this has been done, members of staff (known as "Persons" in Hansa) can log in using proprietary FTP client software such as Fetch or Transmit. If required, Customers can log in as well.
If you are already using a Hansa multi-user system, the copy of Hansa that is acting as your data server can also act as your FTP server. This means that your data server computer will also be your FTP server computer. However, if FTP usage is likely to be heavy, a separate machine can be used. In this case it will have a separate database, so you will need to enter once again those Persons and Customers that are to have FTP access.
To set up a Hansa FTP server on a dedicated machine, follow the steps below in full. If you have already set up your Hansa data server and would like it to act as an FTP server as well, work on that machine and follow the steps below starting with step 2.
- Create a new database on the machine that is to act as your dedicated FTP server following the instructions on the Creating a New Database - Multi-user page. Only one Company is necessary.
- In the System Usage setting in the System module, ensure that the box marked "Server" has been selected (i.e. it contains a tick). Then, go to card 5 (click the tab marked "5") and do the same for the box marked "FTP Server". Click the [Save] button in the Button Bar to save and close. This may result in you needing to apply for a new database key.
- Select 'Technics' from the Modules menu and click the [Prog Mode] button in the bottom left-hand corner of the Master Control panel (or select 'Program Mode' from the Registers menu).
In the case of a dedicated FTP server, only the fields on the 'FTP' card need be completed, as illustrated and described below. If the FTP server is a data server as well, the fields on the 'Server' card should also be completed, as described here.
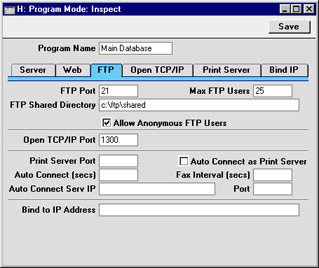
- FTP Port
- Enter an arbitrary code here to represent the server socket that will be used for FTP communications. This must be different to the Server and Web Ports above. When logging on, Customers and Persons will add this to the IP address for your server machine (usually in the format IP address:Port number).
- Note that the most commonly used FTP Port number is 21, and some FTP client applications may have difficulty establishing a connection if a different number is used.
- If you change the FTP Port, you must quit Hansa and restart for the change to take effect.
- Note that the most commonly used FTP Port number is 21, and some FTP client applications may have difficulty establishing a connection if a different number is used.
- Max FTP Users
- Enter here the maximum number of Customers and Persons that you anticipate will be logged on to your Hansa FTP server at any one time.
- FTP Shared Directory
- Specify here the name of the folder that is to be made available as the root directory to everyone logging on to your Hansa FTP server. This folder will contain the files that will be copied to and from the server by FTP users. Any folders inside this folder will also be available to FTP users.
- In the following example showing the correct syntax for Windows and Macintosh users, the shared folder is called "Shared" and it is situated inside the "FTP" folder on the hard disk. The \ character is used as a separator between folder names under Windows, Linux and Mac OS X while : is used on Mac OS 9.
- Windows
- c:\FTP\shared
- Mac OS 9
- hard disk:FTP:shared
- If the "Shared" folder is inside the folder containing the Hansa server application, there is no need to specify the full path name (except under Mac OS 9, when you can only use an absolute path).
- An entry must be made to this field otherwise FTP users will not be able to log on. Take care not to make any mistakes when typing the folder path (and make sure that the folder you specify exists), otherwise you might make more files available to FTP users than you intend.
- In the following example showing the correct syntax for Windows and Macintosh users, the shared folder is called "Shared" and it is situated inside the "FTP" folder on the hard disk. The \ character is used as a separator between folder names under Windows, Linux and Mac OS X while : is used on Mac OS 9.
- Allow Anonymous FTP Users
- Check this box if you would like FTP users to be able to log on to your FTP server without specifying a user name or a password.
- If this box is not checked, you will be able to restrict access to your FTP server using the Allow FTP Access box for each Person and Customer. Only Persons and Customers whose Allow FTP Access box has been checked will be able to log on. Persons (i.e. members of staff with their own record in the Person register) will use their initials as their Login ID and will use their normal Hansa password. Customers will use their Customer Number as their Login ID. They can be allocated a password using the 'Change Password' function on the Operations menu of the 'Customers: Browse' window. They will use the same password for FTP and Web Shop access. Customers are fully described here, while Persons are described here.
- FTP Port
- Once the 'FTP' card of the Program Mode register is complete, click the [Save] button in the Button Bar to save. If you have entered an FTP Port number for the first time (or changed the one that was already there), quit Hansa and restart to allow the change to take effect.
- If your FTP server is separate to your data server, you will now need to enter once again those Persons and Customers that are to have FTP access.
- The final task is to select 'Server' from the Modules menu. The 'Server Status' screen appears. The FTP server can now be left alone, and FTP clients will be able to log on.
- If you will be allowing users to access your FTP server through a modem connection, don't forget to make any necessary adjustments to your firewall.
Shutting Down
Remember to make a back-up before shutting Hansa down. Back-ups are described here.Single-user
To shut Hansa down, select 'Quit' from the File menu. Macintosh OS X users can find the 'Quit' command on the Hansa OS X menu. The keyboard shortcut Alt-F4 (Windows and Linux) or ⌘-Q (Macintosh OS 9 and OS X) can be used. All open windows will be closed, and you will be asked if you want to keep any changes that have not yet been changed.
Multi-user
Hansa clients can be shut down in the same way as Hansa single-user: by selecting 'Quit' from the File or Hansa OS X menu.
Two methods are available by which the server can be shut down, if it has a graphical interface:
- If 'Quit' on the File menu is used, the server will automatically enter server mode the next time it is started up.
- If 'Quit, remove autoserver' on the File menu is used, the server will not go into enter server mode the next time it is started up. This option should be used if you want to do some work on the server.
- ps
- This displays the process IDs for each Terminal process
- kill pid
- (where pid is the process ID for the server process)
If you need to close the server down and there are some clients logged in, you can send a warning message. To do this, you should be working on a client and you should have logged in as a Person that has access to the Technics module (controlled using Access Groups). Follow these steps:
- Select 'Technics' from the Modules menu.
- Click the [Maintenance] button in the Master Control panel or select 'Maintenance' from the File menu.
- When the 'Maintenance' list window appears, double-click 'System Message'. The following window appears:
Complete the window as follows: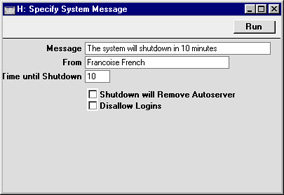
- Message
- Type in the message that you want all users to read.
- From
- Type in the author of the message: this will also be shown to all users. Your name (i.e. the name of the current user) will appear here by default.
- Time until Shutdown
- Specify here the number of minutes that you want to wait until the server shuts down. This should be sufficient time to allow the other users to save their work and quit Hansa.
- If this field contains a value, the server will be shut down automatically after the specified period of time. If this field does not contain a value, the server will not shut down. This means this function can also be used to send a message to all users at any time.
- If this field contains a value, the server will be shut down automatically after the specified period of time. If this field does not contain a value, the server will not shut down. This means this function can also be used to send a message to all users at any time.
- Shutdown will Remove Autoserver
- If the Time until Shutdown field above contains a value, the server will be shut down automatically after the specified period of time. Check this box if you want the server to be shut down in the same way as if the 'Quit, remove autoserver' option had been used. Do not check this box if you want it to be shut down in the same way as if the 'Quit' option had been used.
- Disallow Login
- Check this box if you want to prevent new users logging in during the Time until Shutdown.
- Message
- Click the [Run] button in the Button Bar. The Message will be shown to all users.
- Close your own Hansa client.
- The server will shut down automatically after the specified time.