Starting Standard ERP
This section contains the following pages:- a description of Companies and databases in the context of Standard ERP.
- Starting Standard ERP when there is an existing database containing at least one Company (i.e. the process to be followed when Standard ERP is already in daily use).
- Starting Standard ERP when there is no Company and database (i.e. the process to be followed when starting to use Standard ERP for the first time). This includes:
- Creating a new database - server;
- Logging in to a new database from a client for the first time;
- Creating a new database - single-user;
- Creating a new database - sample;
- Entering your company name and address (to be printed on your documents);
- Registering the number of Companies that you need;
- Entering extra Companies in the Company register;
- Importing set-up data;
- Applying for an Enabler Key;
- Shutting down; and
- Backing up, restoring and updating to new versions
- Creating a new database - server;
- Home page for Introduction and Installation manual
- Home page for Standard ERP manual
Companies and Databases
The key components of a Standard ERP system are the application and the database. The application, or program, has the following symbol in the directory window (Windows) or in the Finder (Mac OS X):
You should only use this feature to differentiate between different departments if you intend to account for each of them separately. If you keep a single set of accounts covering your whole organisation, you only need have a single Company in your database.
! | The database file must have the name "HANSA.HDB" and be present in the same folder or directory as the Standard ERP application. If you move the database file or rename it, a new database will be created the next time you use the program. |
---
See also:
- Home page for Introduction and Installation manual
- Home page for Standard ERP manual
Loading an Existing Database and Company
Follow the procedures described on this page when you need to launch the Standard ERP application when you already have an existing database containing at least one Company.Server - Command Line and Service Applications
In a multi-user installation, launch Standard ERP on the server first.If your server is a Linux or Mac OS X machine, make sure it is in "Terminal" mode. Type the following into the Terminal window (the examples assume you have retained the default directory structure):
- cd /Applications/StandardERPServer
- ./StandardERPServer & (Linux 32-bit),
- ./StandardERPServer64 & (Linux 64-bit) or
- ./StandardERPServer & (Mac OS X)
- Starts the Standard ERP server application. The & is optional: it allows you to run the program in the background and to use the Terminal window for other tasks.
- This assumes the application is named "StandardERPServer" or "StandardERPServer64". If this is not the case, type the application name after "./"
- ./StandardERPServer & (Linux 32-bit),
If your server is a Windows machine, the Standard ERP server application is a service that by default will be launched automatically when you start up the server machine. If for some reason the service does not start automatically, open the Control Panel and double-click 'Administrative Tools' and then 'Services'. Find and select 'Standard ERP Server (32-bit)' or 'Standard ERP Server (64-bit)' in the list as appropriate and choose to start the service. (The name may vary slightly, depending on the precise version of Standard ERP you are using.)
Users will now be able to log on to work in any of the Companies stored in the database on the server. To log in, follow the procedure described in the 'Single-user and Client' section immediately below.
You can now leave the server alone.
For details about shutting down the server, please refer to the Shutting Down page.
Launching the Server with Parameters
There will be occasions when you need to launch the server application with parameters. You will need to use a parameter when you want to instruct the server application to carry out a specific task. For example, if you launch the command line server (Mac OS X and Linux) using the --backup parameter as shown below, the Standard ERP server application will open, create a back-up file and then quit:- ./StandardERPServer --backup (Linux 32-bit)
- ./StandardERPServer64 --backup (Linux 64-bit) or
- ./StandardERPServer --backup (Mac OS X)
- ./StandardERPServer64 --backup (Linux 64-bit) or
An alternative method that you can use to launch the server application with parameters is to place the parameter in a text file named "parameters.txt" and save this file in the same folder or directory as the server application. Then, launch the server application as described towards the beginning of this page. You should only place the parameter (--backup in this example) in the "parameters.txt" file: do not include "./StandardERPServer" or "./StandardERPServer64" in the file.
You can place more than one parameter in the "parameters.txt" file. You can place the parameters on the same line in the file, or you can use separate lines. If you do not want the task launched by a particular parameter to be repeated the next time you launch the application, remember to remove that parameter from the "parameters.txt" file once the task has been completed.
You can use the "parameters.txt" file with every version of the Standard ERP application (i.e. the command line application (Mac OS X and Linux), the service application (Windows) and the GUI applications). In the case of the service application, the "parameters.txt" file is the only way to launch the server application with parameters. In the case of Linux, which is case-sensitive, the filename "parameters.txt" should be in lowercase as written here.
Single-user and Client
Start Standard ERP just like any other Windows, Linux or Mac OS X application, by double-clicking the program icon. Standard ERP will load the database named "HANSA.HDB". If this is not present in the folder or directory, a new database will be created automatically.If you have a single Company in your database, it will be loaded by default and you will be asked to log in. Your log-in ID (known as your "Signature") will be shown in the 'Login' window automatically.
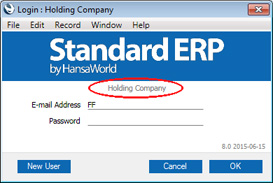
If you have more than one Company, the last Company you used will be loaded by default and you will be asked to log in. The 'Login' window will show you which Company this is ("Holding Company" in this example):
---
See also:
- Entering your company name and address (to be printed on your documents);
- Registering the number of Companies that you need;
- Entering extra Companies in the Company register;
- Importing set-up data;
- Applying for an Enabler Key
- Shutting down
- Backing up
- Home page for Introduction and Installation manual
- Home page for Standard ERP manual
Creating a New Database
Click the links for details about launching Standard ERP for the first time, when you have no database.- Creating a new database - server
- Logging in to a new database from a client for the first time
- Creating a new database - single-user
- Creating a new database - sample
- Home page for Introduction and Installation manual
- Home page for Standard ERP manual
Creating a New Database - Server
The Standard ERP server applications do not have graphical interfaces. As described on the Installation - Multi-user page, it is recommended that you use the GUI application to create and configure a new database. You can do this on the server machine itself if it is accessible. Otherwise, work on a local machine and copy the database to the server when you have finished, as described in that section.- Ensure there is no database file with the name "HANSA.HDB" in the folder containing the Standard ERP application, then start it by double-clicking the application icon.
The "DBDEF.TXT" and "DEFAULT.TXT" text files must be present in the same folder as the application when you create a new database. Standard ERP will use these files to set some initial preferences in the new database.
The first window to appear will ask how you want to use the application:
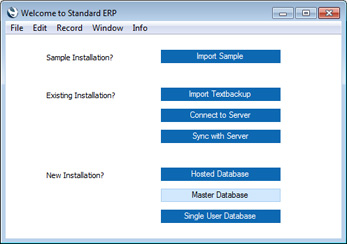
- Click the [Master Database] button if you are starting Standard ERP for the first time, or the [Import Textbackup] button if you have already been using Standard ERP and you need to import a back-up file to a new database. The first option is described here: for details of the second, please refer to the Restoring from a Back-up page.
- A window will appear where you can specify a Master Password.
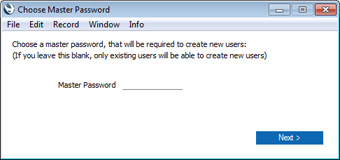
- Choose and enter a Master Password, and click [Next].
When you use a client machine to log in to the server, you will be able to log in as an existing user, or you will be able to use a [New User] button to create a new User Account in the server database. When you do this, you will be asked to enter the Master Password before you can create the new User Account.
You can choose not to specify a Master Password at this stage, in which case you will have to log in as an existing user before creating new User Accounts (i.e. you will not be able to use the [New User] button in the 'Login' window). If you do not specify a Master Password now, you will be able to specify one later if necessary: this is described in the 'Changing the Master Password' section on the Program Mode page.
The process of creating a User Account from a client computer is described in more detail in the Creating a New Database - Client page.
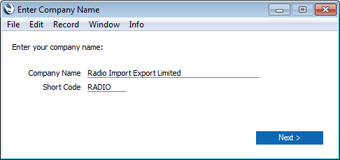
- The 'Enter Company Name' window will appear, asking for your company name. Enter your company name and a shortened version of it (up to ten characters), then click the [Next] button.
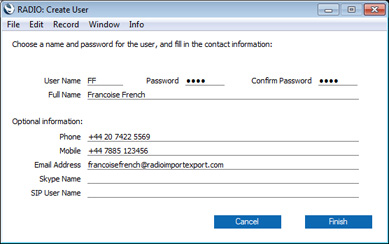
- The 'Create User' window will be opened. Here you can enter your personal details, to create a User Account for yourself. You must enter your User Name and Full Name before you can progress to the next step and you should also specify an Email Address, but the other information is optional. The User Name is the name that you will use as your log-in identity code each time you log in to Standard ERP. Enter your log-in details and click the [Finish] button at the bottom of the window. Your User Account will be created.
Note that if you are using Windows, you cannot include special characters such as *, å, ä, ö in passwords. Bear this in mind if you are creating the User Account on a Mac OS X machine but you will need to be able to log in on either platform.
- If you specified a Password, the 'Login' window will appear, with your User Name already entered:
Enter your Password and click [OK].
If you did not specify a Password, the 'Login' window will not appear and you will be logged in automatically.
- If you specified an Email Address, a message will appear informing you that an email address validation mail has been sent to that address. If you did not specify an Email Address, you will now be asked to do so:
Enter an Email Address and click the [Save] button. An email address validation mail will be sent to the address that you specify.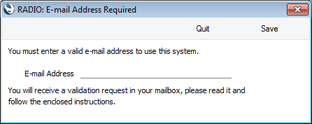
When you receive the email address validation mail, click the link in the mail or copy it to a browser window to confirm that the email address is valid.
- If you specified a Password in step 5, you will be asked if you want Standard ERP to remember your Signature and Password, so that you do not have to enter them yourself each time you log in.
Bearing in mind that the Password is a security feature, it is recommended that you only click the [Yes] button if you are absolutely sure no-one other than yourself will have access to your computer. If you click the [Yes] button and then change your mind, you can turn off the feature by choosing 'Stop Auto Login' from the File menu.
- The Navigation Centre will appear, with your name shown in the title bar. This is illustrated on the Work Area page.
- If the computer is connected to the internet, the 'Choose Your Country: Inspect' window will open each time you start the application, providing a reminder that you need to register. This window is the first step in the Registration Wizard: please refer to the Enabler Key page for more details about registering.
- It is recommended that you carry out the configuration work described in this manual on the server, effectively working single-user. This includes recording your full company details, entering extra Companies if you need them, importing set-up data and applying for an Enabler Key. Do this now before proceeding to step 12. Otherwise, if you want to carry out the configuration work from a client machine, proceed now to step 12.
- By default, when you start the application as a server (steps 14 and 15 below), it will expect clients to connect through Port 1200. If you want to change the Port, refer to the Program Mode page.
- Quit the application by selecting 'Quit' from the File menu (Windows) or from the Standard ERP menu (Mac OS X). You can also use the Ctrl-Q (Windows) or ⌘-Q (Mac OS X) keyboard shortcuts.
- If you are working on the server machine, launch the command line or service version of the Standard ERP server application as described on the Loading an Existing Database and Company page.
- If you are not working on the server machine, copy the database (named "HANSA.HDB") to the directory on the server containing the command line or service server application. If the "Attach" folder is not empty, copy that as well. Then, launch the command line or service application as described on the Loading an Existing Database and Company page.
- The next stage is to connect to the server from a client. Please refer to the Creating a New Database - Client page for details.
Go back to:
- Home page for Introduction and Installation manual
- Home page for Standard ERP manual
Creating a New Database - Client
Having configured the server as described here, you can now configure Standard ERP on each client computer. The server should be running while you are doing this.- Working on a client computer, ensure there is no database file with the name "HANSA.HDB" in the folder containing the Standard ERP application, then start it by double-clicking the application icon.
The "DBDEF.TXT" and "DEFAULT.TXT" text files must be present in the same folder as the application when you create a new database. Standard ERP will use these files to set some initial preferences in the new database.
The first window to appear will ask how you want to use the application:

- Click the [Connect to Server] button. The 'Server Address: Inspect' window will appear, listing the available servers in the same subnet as your client computer:
Double-click the server in the list that you want to log in to, or click once and then click the [Connect] button.
If the server is not listed, the probable reasons are:
- The server is in the same subnet as your client machine but it is not discoverable by the client using the Bonjour service discovery protocol. In this case, enter the IP address of the server and port in the Hardware or IP and Port fields. The Port will be 1200 unless you changed it as described in step 11 on the Creating a New Database - Server page.
- The server is not in the same subnet as your client machine. In this case, first make sure you have ticked the Wide Area Network box in the Configuration setting on the server (as described here) and then proceed as described in step i immediately above.
If you do not know the IP address and Port, you can use the [Locate My Server] feature. This feature requires you to have registered your server database as described on the Enabler Key page and so it can't be used with a brand new server database. Click the [Locate My Server] button to open the following window:
Enter the Company Code and Name, your VAT registration number and your country of registration. In the last case, press Ctrl-Enter (Windows) or ⌘-Enter (Mac OS X) to choose from a list of options. Then, click the [Save] button.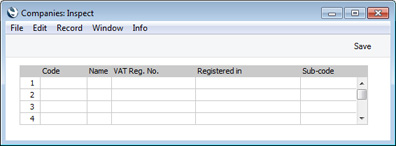
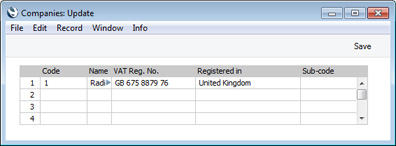
In all cases, the server details will be saved in the Company register in the Standard ERP client database.
- The server is in the same subnet as your client machine but it is not discoverable by the client using the Bonjour service discovery protocol. In this case, enter the IP address of the server and port in the Hardware or IP and Port fields. The Port will be 1200 unless you changed it as described in step 11 on the Creating a New Database - Server page.
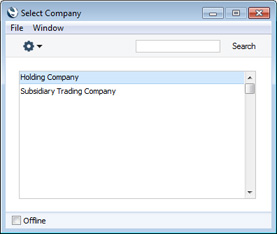
- The 'Select Company' window will appear, containing your company name, as specified in step 4 on the Creating a New Database - Server' section page:
Double-click the company name, or highlight it and press the Enter key on your keyboard.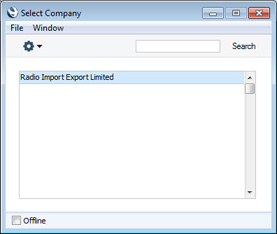
If the 'Select Company' window does not appear and instead your client is unable to connect to the server, this will be because the "DBDEF.TXT" and "DEFAULT.TXT" files were missing when you created the database. Please refer to page. An early indication of this problem will be the server not appearing in the list of available servers in the previous step.
- The login window will appear:
Enter the User Name and the Password and click [OK].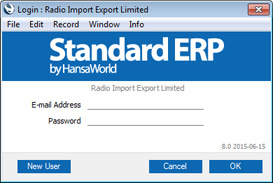
- If you specified an Email Address, a message will appear informing you that an email address validation mail has been sent to that address. If you did not specify an Email Address, you will now be asked to do so:
Enter an Email Address and click the [Save] button. An email address validation mail will be sent to the address that you specify.
When the person receives the email address validation mail, they should click the link in the mail or copy it to a browser window to confirm that the email address is valid.
- If you specified a Password in step 6, you will be asked if you want Standard ERP to remember the Signature and Password, so that the person will not have to enter them themselves each time they log in using the particular client computer.
Bearing in mind that the Password is a security feature, it is recommended that you only click the [Yes] button if you are absolutely sure no-one other than yourself will have access to your computer. If you click the [Yes] button and then change your mind, you can turn off the feature by choosing 'Stop Auto Login' from the File menu.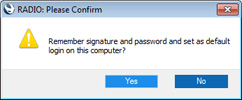
- The Navigation Centre will appear, with your name shown in the title bar. This is illustrated on the Work Area page.
- If the computer is connected to the internet, a window will open reminding you that you need to register. If you click the [Register this Product] button, the 'Choose Your Country: Inspect' window will open. This window is the first step in the Registration Wizard: please refer to the Enabler Key page for more details about registering.
- Repeat the sequence for Standard ERP on each client computer, creating User Accounts for each person that will use Standard ERP. In step, you can log in as each person and specify a Passwords for them. Each user will be able to change their password later. If you are installing Standard ERP on a new client computer and do not need to create a new User Account, log in as an existing user in step 4 to proceed to the Navigation Centre.
- If you will be carrying out the configuration work described in this manual working on a client machine, you can now record your full company details, enter extra Companies if you need them, import set-up data and apply for an Enabler Key.
Go back to:
- Home page for Introduction and Installation manual
- Home page for Standard ERP manual
Creating a New Database - Single-user
To create a new single-user database, follow these steps:- Ensure there is no database file with the name "HANSA.HDB" in the folder containing the Standard ERP application, then launch the application by double-clicking. A new database will be created automatically.
The "DBDEF.TXT" and "DEFAULT.TXT" text files must be present in the same folder as the application when you create a new database. Standard ERP will use these files to set some initial preferences in the new database.
!
The installation will not be correct if the "DBDEF.TXT" file is missing.
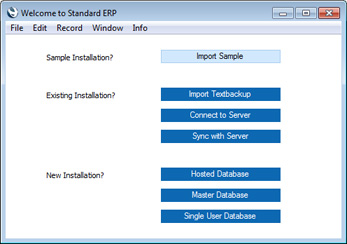
- The 'Welcome to Standard ERP' window will appear, asking you how you want to use the application:
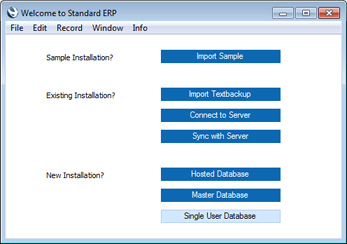
- Click the [Single User Database] button if you are starting Standard ERP for the first time, or the [Import Textbackup] button if you have already been using Standard ERP and you need to import a back-up file to a new database. The first option is described here: for details of the second, please refer to the Restoring from a Back-up page.
- Create a new Company and User Account for yourself, as described in steps 4-9 on the Creating a New Database - Server page, and log in. The Navigation Centre will appear, with your name shown in the title bar. This is illustrated on the Work Area page.
- You can now record your full company details, enter extra Companies if you need them, import set-up data and apply for an Enabler Key.
Go back to:
- Home page for Introduction and Installation manual
- Home page for Standard ERP manual
Creating a New Database - Sample
The Standard ERP installation package includes a set of sample data that you can use to create a sample database. This will allow you to test new or unfamiliar Standard ERP features before using them in your "live" database. A sample database is fully functional with the exception that Cloud Services are disabled. You can use a sample database for 30 days, after which it will go into restricted mode. From that time onwards, you will only be able to print reports and documents to screen, not to a printer, to file or to any other medium. Exporting from a sample database and importing to a new database before the 30-day point will cause the new database to go to restricted mode immediately.To create a sample database, follow these steps:
- Start Standard ERP by double-clicking the application icon. The first window to appear will ask how you want to use the application:
- Click the [Import Sample] button. A new database will be created, the sample data will be imported, and you will be logged in automatically (if the 'Login' window appears, log in as SJ with no password).
- After logging in, the Navigation Centre will appear, as illustrated below on the Work Area page but with one difference. The window title of the Navigation Centre will contain the phrase "(SAMPLE)" as a suffix. This is to remind you that you have logged in to a sample database that you should use for testing only and not for real data.
- Immediately after the Navigation Centre appears, a 'Task Manager' window will also open. This window opens because you have been logged in to the sample database as a user who has some scheduled tasks that are still outstanding. If you need to close the 'Task Manager' window, click the close box. Otherwise, please refer to the Task Manager page for more details.
- If you are logged in to Skype, Skype may now ask you if you will allow Standard ERP to use Skype. Please refer to the Interaction with Skype page for details.
Go back to:
- Home page for Introduction and Installation manual
- Home page for Standard ERP manual
Creating a New Database - Multi-user Sample
The Standard ERP installation package includes a set of sample data that you can use to create a sample database. This will allow you to test new or unfamiliar Standard ERP features before using them in your "live" database. A sample database is fully functional with the exception that Cloud Services are disabled. You can use a sample database for 30 days, after which it will go into restricted mode. From that time onwards, you will only be able to print reports and documents to screen, not to a printer, to file or to any other medium. Exporting from a sample database and importing to a new database before the 30-day point will cause the new database to go to restricted mode immediately.In this section, we describe configuring a multi-user Standard ERP sample database in which the server and client application both reside on the same machine. This configuration is for trial and demonstration purposes only and is not supported for "live" databases. Follow these steps:
- Referring to the Multi-user Installation page, download the server and client applications that are appropriate for your test machine.
- Install the server application as follows:
- If you are using a Windows machine, install the service version by running the server installer (named "standarderp.x32.server.msi" (32-bit version) or "standarderp.x64.server.msi" (64-bit version)). The default installation path is C:\Program Files (x86)\HansaWorld\Standard ERP Server\ (32-bit) or C:\Program Files\HansaWorld\Standard ERP Server\ (64-bit).
- If you are using Mac OS X, open the server .dmg file (named "standarderp.server.dmg") by double-clicking, and then copy the folder it contains to the 'Applications' folder.
- If you are using Linux, expand the server .tgz file (named "standarderp.server.tgz") by double-clicking, and then copy the folder it contains to the 'Applications' folder.
- If you are using a Windows machine, install the service version by running the server installer (named "standarderp.x32.server.msi" (32-bit version) or "standarderp.x64.server.msi" (64-bit version)). The default installation path is C:\Program Files (x86)\HansaWorld\Standard ERP Server\ (32-bit) or C:\Program Files\HansaWorld\Standard ERP Server\ (64-bit).
- If you are using a Windows machine, start the server application as follows:
- Use Notepad or a similar text-editing program to create a text file named "parameters.txt". Save this file in the "Standard ERP Server" directory, on the same level as the server application. The file should contain a single line of text:
- Sample/GBR-Sample.TXT
- Start the server application. To do this, restart the machine: the service will be launched automatically. If you do not want to restart, open the Control Panel and double-click 'Administrative Tools' and then 'Services'. Find and select 'Standard ERP Server (32-bit)' or 'Standard ERP Server (64-bit)' in the list and choose to start the service. (The name will vary slightly, depending on the precise version of Standard ERP you are using.) When it starts, it will obey the instruction in the "parameters.txt" file and import sample data from the "GBR-Sample.TXT" file.
- When the import finishes, for security reasons the service will quit (you may need to monitor the log file (named "hansa.log") to see when the service quits). Empty or rename the "parameters.txt" file and then restart the application as described in (ii) above (if you do not empty or rename the "parameters.txt" file, the sample data will be imported again).
- Use Notepad or a similar text-editing program to create a text file named "parameters.txt". Save this file in the "Standard ERP Server" directory, on the same level as the server application. The file should contain a single line of text:
- If you are using a Mac OS X or Linux machine, start the server application as follows:
- Launch the Terminal application using the Terminal icon in the Panel or Dock (or from the "Utilities" folder in the "Applications" folder).
- Change to the "StandardERPServer" directory by typing:
- cd /Applications/StandardERPServer
- Type:
- ./StandardERPServer Sample/GBR-Sample.TXT (Linux 32-bit)
- ./StandardERPServer64 Sample/GBR-Sample.TXT (Linux 64-bit) or
- ./StandardERPServer Sample/GBR-Sample.TXT (Mac OS X)
- ./StandardERPServer64 Sample/GBR-Sample.TXT (Linux 64-bit) or
- ./StandardERPServer Sample/GBR-Sample.TXT (Linux 32-bit)
- When the import finishes, for security reasons the application will quit. You will be informed when this happens in the Terminal window. Restart the application by typing:
- ./StandardERPServer (Linux 32-bit)
- ./StandardERPServer64 (Linux 64-bit) or
- ./StandardERPServer
- ./StandardERPServer64 (Linux 64-bit) or
- ./StandardERPServer (Linux 32-bit)
- Launch the Terminal application using the Terminal icon in the Panel or Dock (or from the "Utilities" folder in the "Applications" folder).
- Locate the client installer that you downloaded in step 1, and install it. In the case of Windows, run the installer application. In the case of Mac OS X and Linux, open the .dmg file or expand the .tgz archive. In all cases, it is recommended that you install the client in a folder or directory named "Standard ERP Client" in your "Program Files" directory or "Applications" folder.
- Start the Standard ERP client application by double-clicking the application icon. The first window to appear will ask how you want to use the application:
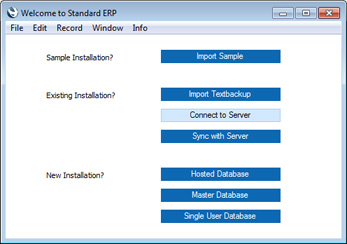
- Click the [Connect to Server] button. The 'Server Address: Inspect' window will appear, listing the available servers in the same subnet as your client computer:
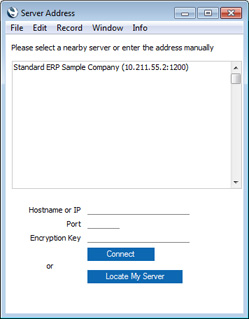
- Double-click the server in the list that you want to log in to, or click once and then click the [Connect] button.
- The 'Select Company' window appears: select the single option by double-clicking:

- Log in as SJ with no password:

- After logging in, the Navigation Centre will appear, as illustrated below on the Work Area page but with one difference. The window title of the Navigation Centre will contain the phrase "(SAMPLE)" as a suffix. This is to remind you that you have logged in to a sample database that you should use for testing only and not for real data.
- Immediately after the Navigation Centre appears, a 'Task Manager' window will also open. This window opens because you have been logged in to the sample database as a user who has some scheduled tasks that are still outstanding. If you need to close the 'Task Manager' window, click the close box. Otherwise, please refer to the Task Manager page for more details.
- If you are logged in to Skype, Skype may now ask you if you will allow Standard ERP to use Skype. Please refer to the Interaction with Skype page for details.
Go back to:
- Home page for Introduction and Installation manual
- Home page for Standard ERP manual
Creating a New Database - The Work Area
After you log in to your Standard ERP system, the first window to appear will be the Navigation Centre. This will be the basis for all your work in Standard ERP and is fully described here. It is illustrated below to enable you to identify the various parts of the screen mentioned in the following sections.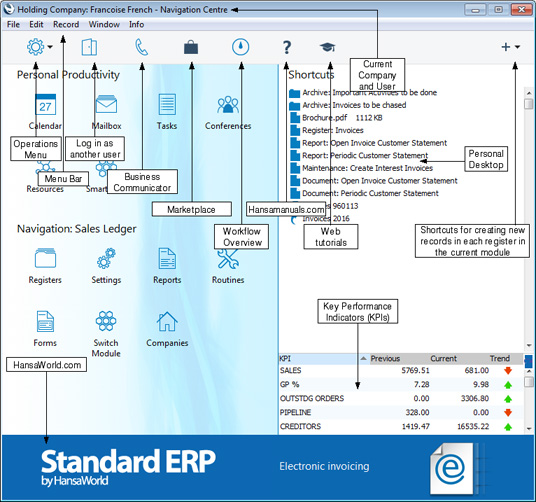
---
Go back to:
- Home page for Introduction and Installation manual
- Home page for Standard ERP manual
Creating a New Database - Interaction with Skype
If you use Skype, you can initiate Skype chats and Skype calls from Standard ERP. This requires Skype and Standard ERP to communicate with each other.Note that from 2014 onwards, Skype began to reduce the level of communication their product has with other applications. Therefore, depending on the version of Skype you are using, you may find that some of the features described in this manual are no longer valid.
To establish communication between Standard ERP and Skype, follow the steps described below. In a single-user system, follow all the steps as described. In a multi-user system, you only need complete steps 1-3 on a single machine. If you have more than one Company in your database, you only need follow these steps once, from any Company. You should then follow steps 4-8 on every client machine on which Skype is used.
- Click the [Switch Module] button in the Navigation Centre or use the Ctrl-0 (zero) (Windows) or ⌘-0 (Mac OS X) keyboard shortcut to open the list of modules. Find 'Technics' in the list and double-click. An easy way to find it is to start typing "Technics".
If the list of modules is very short, a possible reason is that the "DBDEF.TXT" and "DEFAULT.TXT" files were missing when you created the database. Please refer to this page.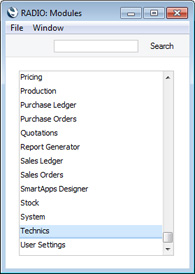
In a single-user system, if 'Technics' is not included in the list of modules when you click the [Switch Module] button, this will probably be because you have not granted yourself access to the Server module in the Configuration setting.
In a multi-user system, 'Technics' will only be included in the list of modules if you have logged in as a system administrator (i.e. as a Person that has access to the Technics module), as described here.
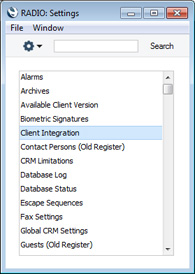
- Click the [Settings] button in the Navigation Centre or use the Ctrl-S/⌘-S keyboard shortcut. Find 'Client Integration' in the list and double-click (again, you can type the first few characters of "Client Integration" to find it).
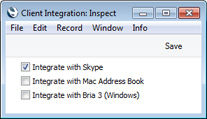
- A window entitled 'Client Integration: Inspect' will open. Select the Integrate with Skype option and then click the [Save] button in the top right-hand corner of the window.
- In a multi-user system, follow the remaining steps including this one separately on every client machine on which Skype is used.
Using the method described in step 1, change to the User Settings module.
- Using the method described in step 2, open the Local Machine setting.
- A window entitled 'Local Machine: Inspect' will open. Click the button marked 'Integrations' towards the top centre of the window:
The window contains a set of options marked Connect to Skype:
Choose the Yes option, and then click the [Save] button in the top right-hand corner of the window.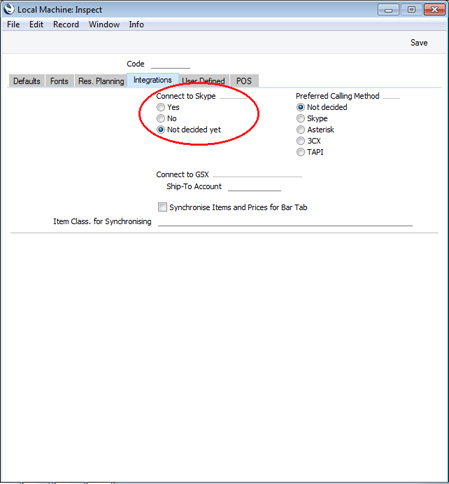
- The next time you start Standard ERP, it will start communicating with Skype, if that application is running. When you log in to Standard ERP for the first time, Skype will ask you if you will allow Standard ERP to use Skype:
If you choose the Allow access option, you will allow Standard ERP to use Skype, and you will not be asked again (unless you install a new version of Standard ERP). This means that you will be able to initiate Skype calls and chats from the 'Business Communicator' window, and that all incoming and outgoing Skype calls will be added to the contact history of the relevant Customers and Suppliers.
If you choose the Deny access option, you will prevent Standard ERP from using Skype, and you will therefore not be able to make or receive Skype calls or chats from Standard ERP. If you choose this option and then change your mind, quit Standard ERP, and then, in Skype:
- Under Windows, choose 'Options' from the Tools menu, then click the [Advanced] button in the list down the left-hand side. Click on 'Manage other programs' access to Skype' at the bottom of the page.
- On Mac OS X, choose 'Manage API Clients' from the Skype menu.
Remove all HansaWorld entries from the list, and then restart Standard ERP.
Depending on your operating system and the version of Skype you are using, there may be a third option not shown in the illustration, Allow this program to use Skype, but ask again in the future. If you choose this option, you will be asked to allow Standard ERP to use Skype each time you start Standard ERP.
- Under Windows, choose 'Options' from the Tools menu, then click the [Advanced] button in the list down the left-hand side. Click on 'Manage other programs' access to Skype' at the bottom of the page.
The next step in configuring a new database is to record your full company details in your copy of Standard ERP. Please click here for details.
---
Go back to:
- Home page for Introduction and Installation manual
- Home page for Standard ERP manual
Creating a New Database - Settings - Entering your Company Name and Address
Each Standard ERP module contains a number of settings that you can use to control how that module operates. Before you start working with each module, you should check its settings, to tailor its behaviour to your requirements. Some settings have an impact that goes beyond a single module, in fact affecting your entire Standard ERP system. You can find these settings in the System module.You will now use one of these settings, the Company Info setting, to enter company name, address and other information that will then be printed in reports and documents such as Invoices. Follow these steps:
- Click the [Switch Module] button in the Navigation Centre or use the Ctrl-0 (zero) (Windows) or ⌘-0 (Mac OS X) keyboard shortcut. This list of modules appears:
Choose the System module by double-clicking.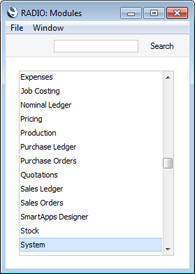
In all list windows such as this one, you can navigate to and select an option using the keyboard if you so prefer. Type the first few characters of the name of the option you want (in this case, "sys" for example) and then press the Enter or Return key twice.
- Click the [Settings] button in the Navigation Centre or use the Ctrl-S (Windows) or ⌘-S (Mac OS X) keyboard shortcut to bring up a list of the settings in the System module:
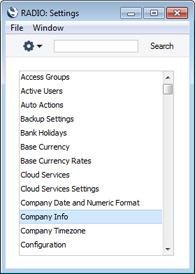
- Double-click the 'Company Info' option. The 'Company Info: Inspect' window appears.
The Company Name that you entered in the 'Enter Company Name' window (step 4 on the Creating a New Database - Server page or the Creating a New Database - Single-user page) will be shown in the first field. Use the Business Name field if your company has two names (for example, a registered name and a commercial name). It is mandatory to enter a Business Name (i.e. registered name) in Portugal. Enter your address and contact information as shown in the example illustration below.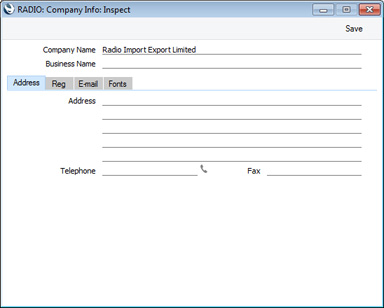
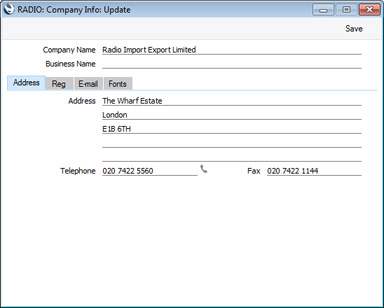
- Click the [Reg] button towards the top centre of the window to see the other important fields in this setting.
Here you can enter your company registration number and VAT Number:
Make sure the company name and telephone number (on the 'Address' card) and the company registration number and VAT number (on the 'Reg' card) are exactly as written and spelt in your HansaWorld contract, as this information will be used when you register the software. This information will also be printed on the documents such as Invoices and Purchase Orders that you send to your Customers and Suppliers. You should also check that the Company Type is correct, as this will also be used during the registration process:
- Multi User
- Choose this option if more than one person will have access to the company (i.e. the company will be stored in the database on a server machine). You should choose this option if you clicked the [Master Database] button in the 'Welcome to Standard ERP' window as described here.
- Consolidated
- Choose this option if the information in the company will be included in consolidated reports. Please refer here for more information.
- Single User
- This option means that only one user will be able to log in to the company at any one time. You should choose this option if you clicked the [Single User Database] button in the 'Welcome to Standard ERP' window as described here.
The Bank Customer ID is required when issuing payment instructions to banks in some countries. In Norway, you should enter here your company's VAT number with non-numeric characters removed. For example, if your company's VAT number is NO 987654321 MVA, enter 987654321. In Sweden, if you have a PlusGirot account, enter your Customer Number at PlusGirot in this field.
In Portugal, you must also enter information required for SAF-T reporting in the following two fields:
- Commercial Reg. No.
- Enter the commercial registration number of your company.
- Home Community
- Enter the region or district in which your company is located.
- Multi User
- Click the [E-mail] button towards the top centre of the window to see the other fields in this setting.
The Edit and Report Font fields allow you to select different fonts for use on screen and in reports respectively. If you leave these fields empty, default fonts selected for maximum readability will be used. You should only change them if you have good reasons to do so. In non-English versions of Standard ERP, use these fields to select fonts with special character sets.
VAT Law and Character Set are used to ensure the behaviour of Standard ERP conforms to certain local conventions of the country in which it is being used. To choose the correct VAT Law and Character Set for your location, place the cursor in one of these fields and then press the Ctrl-Enter (Windows) or ⌘-Enter (Mac OS X) key combination. A selection list will appear in which you can choose an option by double-clicking. In the case of the VAT Law field, if your country is not listed in the selection list, choose the "Default" option.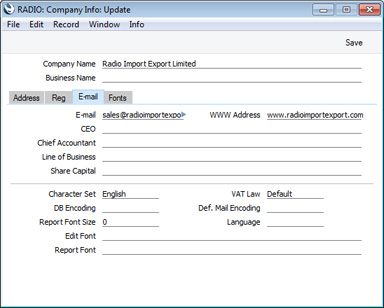
Details of the other fields in this setting can be found on the Company Info page.
- When you have completed the window, click the [Save] button in top right-hand corner to save the changes and close the window.
---
Go back to:
- Home page for Introduction and Installation manual
- Home page for Standard ERP manual
Creating a New Database - Modules, Users and Companies
The next task is to ensure that you have been granted access to the appropriate modules and that the correct numbers of users and Companies have been registered. If you no longer have the 'Settings' list on screen, open it using the Ctrl-S/⌘-S keyboard shortcut or by clicking the [Settings] button in the Navigation Centre once again. Select 'Configuration' by double-clicking. The 'Configuration: Inspect' window appears: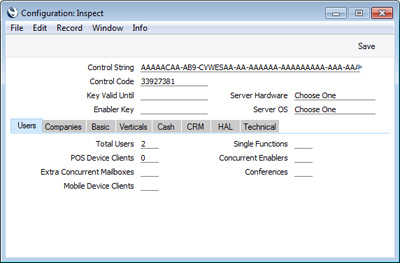
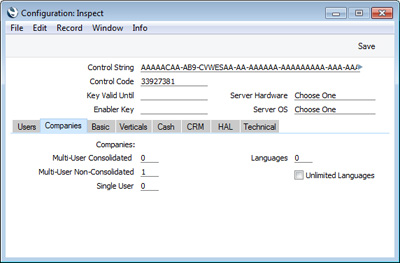
If you need more than one Company, click the button marked 'Companies' towards the left-centre of the window. The fields in the lower part of the window will change:
In the remaining sections of the window (visible by clicking the six buttons marked 'Basic', 'Verticals', etc), select the modules that you require by clicking the check box next to each one so that a tick appears. Choose the options that describe your hardware most accurately in the Server Hardware and Server OS fields (in a single-user system, choose the options that apply to the machine on which you will be using Standard ERP). To choose an option, place the cursor in one of these fields and press the Ctrl-Enter (Windows) or ⌘-Enter (Mac OS X) key combination. A selection list will appear in which you can choose an option by double-clicking.
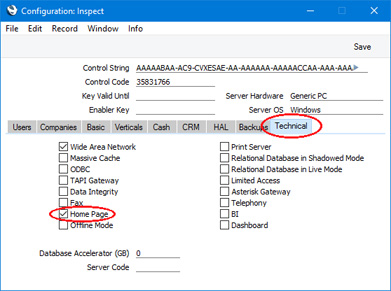
If your server is not in the same subnet as the clients, make sure you tick the Wide Area Network option on the 'Technical' card. To be in the same subnet, the first three sections of the IP addresses of the server and clients must be the same.
When the Configuration setting is complete, click the [Save] button.
If you intend applying for an Enabler Key using the 'Automatic Internet Enabler' method, you only need specify your Server Hardware and Server OS in the Configuration setting. All other information will be downloaded to this setting from the HansaWorld server together with the Enabler. However, before applying for an Enabler you should select the modules that you need so that you can carry out any necessary configuration work. If you will use one of the other methods to apply for an Enabler Key, you must make sure the Configuration setting is complete and correct before applying. Details about applying for an Enabler Key are here.
---
See also:
- Entering extra Companies if you need them
- Importing set-up data
- Home page for Introduction and Installation manual
- Home page for Standard ERP manual
Creating a New Database - Changing and Adding Companies
When you create a new database, it will contain a single Company, created for you automatically. If you need to create extra Companies, you can do this now. You should only create extra Companies if your business is one where there are separate departments or subsidiary companies that keep separate accounts, as described on the Companies and Databases page.Changing and Adding Companies - Single-user
Follow these steps:- If you will be adding extra Companies and you have not already done so, make sure you have entered the correct number of Companies in the Configuration setting, as described on the Modules, Users and Companies page.
- Click the [Companies] button in the 'Navigation' section of the Navigation Centre:

- The 'Select Company' window opens. In the top left-hand corner, there is an [Operations] button with the following icon:
Click this button to open the Operations drop-down menu:
Select the 'Open Companies Setting' option. The 'Companies: Inspect' window is opened: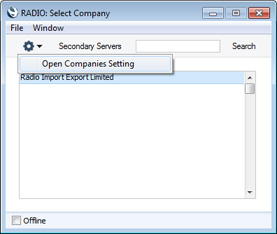
The Company Name and Short Code in the first Company are both taken from the 'Enter Company Name' window (step 4 on the Creating a New Database - Single-user page). If these are not suitable, change them now.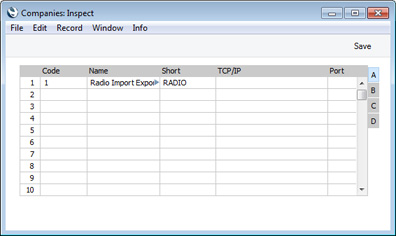
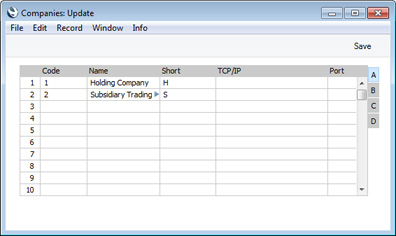
- To create more Companies, click in the Code field in the first blank row and enter information as described below. Remember, this should only be done for parts of your business that are completely separate accounting entities to the first Company.
- Code
- Enter a unique code. This must be a numeric code between 1 and 99.
- Name
- Enter a name by which this company or department will be identified in the 'Select Company' window. This window is where you will choose the Company you want to work with each time you log in to Standard ERP.
- Short
- If you have more than one Company in your database, you can switch between Companies in a work session, leaving windows from each Company open. This Short Code will appear at the beginning of every window title to indicate the Company to which the information in the window belongs. If you only have one Company, you don't need to specify a Short Code, in which case window titles will not include a Company indicator.
- TCP/IP
- You should only use this field on client machines in multi-user systems. Leave it empty in single-user systems.
- Port
- You should only use this field on client machines in multi-user systems. Leave it empty in single-user systems.
If you are creating a new Company, the "DEFAULT.TXT" text file must be present in the folder containing the Standard ERP application. Standard ERP will use this file to import some basic settings to the new Company.
It is advisable to enter as many Companies as you need now, so that you only need apply for an Enabler Key once. You will be able to enter all set up information such as a Chart of Accounts to one Company and then to export those settings to the other Companies (or to transfer them by dragging and dropping). Remember that each Company will maintain completely separate accounts, so there is no need to create separate Companies for departments that are part of the same accounting whole.
- Code
- When the entry is complete, click the [Save] button in the top right-hand corner of the Company screen.
- After creating each new Company, log in to it and then enter the correct name and address details as described on this page. You should do this in each Company before applying for an Enabler Key. To change Companies during a work session, simply use the Ctrl-O (alpha O) (Windows) or ⌘-O (Mac OS X) keyboard shortcut to open the 'Select Company' window to choose a different Company.
- You should also enter a new User Account for yourself with a password in each Company. Please refer here for details.
Changing and Adding Companies - Multi-user
In a multi-user installation, all data is stored in the database on the server. There will also be a small database on each client, containing almost no data. If you are working on a client and you create a new record (e.g. a new Invoice) and save it, it will be saved in the server database only. This is the case for most records, but not for Companies. If you are working on a client and you create a new Company, it will be saved in the client database, not on the server. This is because the Companies in the server database and the Companies in each client database are distinct. The Companies in the server database are used to store the data relating to each Company. The Companies in a client database allow you to find a Company on the server, connect to it and log in to it.Adding a new Company in a multi-user system is therefore a two-stage process. You need first to create the Company in the server database. Then you need to add the Company to the databases on each client so that they will be able to log in to the new Company on the server.
To create the Company in the server database, you must make sure you are the only user logged into the system, and you should be logged in as a system administrator as described here. You may find it easier to work on the server itself for steps 1-7 using the GUI application.
Follow these steps:
- If you will be adding extra Companies and you have not already done so, make sure you have entered the correct number of Companies in the Configuration setting, as described on the Modules, Users and Companies page.
- You should only carry out this step if you have logged in from a client as a system administrator. Do not do it if you are working on the server machine itself. Please refer here for details about logging in as a system administrator.
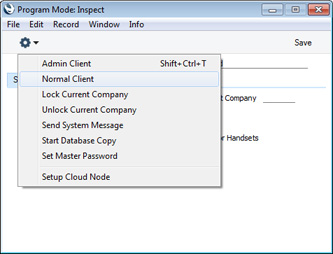
Use the Ctrl-0 (zero) (Windows) or ⌘-0 (Mac OS X) keyboard shortcut to open the list of modules, and double-click 'Technics'. Click the [Registers] button in the Navigation Centre and double-click 'Program Mode' in the resulting list. Choose 'Admin Client' from the Operations menu (with "cog" icon):
Selecting 'Admin Client' ensures that when you create the new Company as described in steps 4-7, you will save it in the server database. If you do not choose 'Admin Client', the new Company will be saved in the database on your client machine. The phrase "Admin Client" will be added as a suffix to the window title of the Navigation Centre.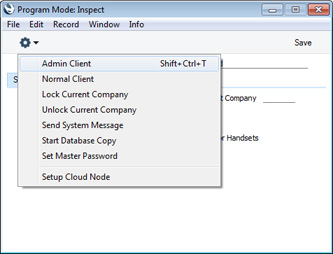
- Click the [Companies] button in the 'Navigation' section of the Navigation Centre:
- The 'Select Company' window opens. Click the [Operations] button to open the Operations drop-down menu:
Select the 'Open Companies Setting' option. The 'Companies: Inspect' window is opened:
The Company Name and Short Code in the first Company are both taken from the 'Enter Company Name' window (step 4 on the Creating a New Database - Server page). If these are not suitable, change them now.
- To create more Companies, click in the Code field in the first blank row and enter information as described in step 5 in the 'Single-user' section above. As described in that section, leave the TCP/IP and Port fields empty.
If you are creating a new Company, the "DEFAULT.TXT" text file must be present in the folder on the server containing the Standard ERP application. Standard ERP will use this file to import some basic settings to the new Company.
It is advisable to enter as many Companies as you need now, so that you only need apply for an Enabler Key once. You will be able to enter all set up information such as a Chart of Accounts to one Company and then to export those settings to the other Companies (or to transfer them by dragging and dropping). Remember that each Company will maintain completely separate accounts, so there is no need to create separate Companies for departments that are part of the same accounting whole.
- When the entry is complete, click the [Save] button in the top right-hand corner of the Company screen.
- If you were working from a client, you should now leave "Admin Client" mode. You can either restart the client application or you can return to the 'Program Mode' window as described in step 2 and choose 'Normal Client' from the Operations menu:
- You should now update the Company register on each client. On a client, the purpose of the Company register is to allow you to find, connect to and log in to each Company on the server.
Simply remove the "Hansa.HDB" file from that client and then to restart the client application. When the 'Welcome to Standard ERP' window appears, choose the [Connect to Server] option. On connecting to the server, the Companies in the server database will be copied to the client database.
- After creating each new Company, log in to it and then enter the correct name and address details as described on this page. You should do this in each Company before applying for an Enabler Key . To change Companies during a work session, simply use the Ctrl-O (alpha O) (Windows) or ⌘-O (Mac OS X) keyboard shortcut to open the 'Select Company' window to choose a different Company.
- You should also enter new User Accounts with passwords in each Company. Please refer here for details.
---
Go back to:
- Home page for Introduction and Installation manual
- Home page for Standard ERP manual
Creating a New Database - Importing Set-up Data
The Standard ERP installation package includes a number of files containing set-up data, such as Form Template designs and a chart of Accounts. You can import some or all of this set-up data to your database and then modify it to suit your own requirements. Depending on those requirements, it may be easier to do this than to start from scratch. This is especially recommended in the case of Form Template designs.The following files are included in the installation package:
| File | Content |
| UKACCS1.TXT | Chart of Accounts |
| Definition of Balance Sheet report | |
| Definition of Profit & Loss report | |
| Definition of VAT report (VAT Return) | |
| Account Usage S/L setting (sets defaults for Accounts used in the Sales Ledger) | |
| Account Usage P/L setting (sets defaults for Accounts used in the Purchase Ledger) | |
| Account Usage Stock setting (sets defaults for Accounts used in the Stock module) | |
| VAT Codes | |
| Payment Modes (payment methods) | |
| UKForms.txt | Form Template designs |
| Form Definitions (specifying when each Form Template will be printed) | |
| Styles (various text attributes e.g. font, size, bold, italic etc) | |
| UKSTD.TXT | Various settings e.g. Payment Terms, Reporting Periods |
| ItemButtonsBlock.txt | Sample Item buttons for touch-screen Invoice |
| LocalLoginBlock.txt | Sample Login Shortcuts that specify the screens shown to users on logging in |
| LocalLoginOptBlock.txt | Displays buttons and keypad in the 'Login' window (suitable for use with touch-screen) |
- In a multi-user system, ensure you are the only user logged in. Importing is disabled if there are two or more users working in the system.
- Ensure you are in the System module using the Ctrl-0 (zero) (Windows) or ⌘-0 (Mac OS X) keyboard shortcut or the [Switch Module] button in the Navigation Centre.
- Click the [Routines] button in the Navigation Centre and then click [Imports]. Alternatively, use the Ctrl-Shift-I (Windows) or ⌘-Shift-I (Mac OS X) keyboard shortcut. The 'Imports' window is shown:

- Double-click 'Automatic', or click once and press the Enter key. The 'Import files available' window opens, listing importable files (with .txt extension) in the "Backup" and "Setup" folders in the folder containing the Standard ERP application (client application in multi-user systems):
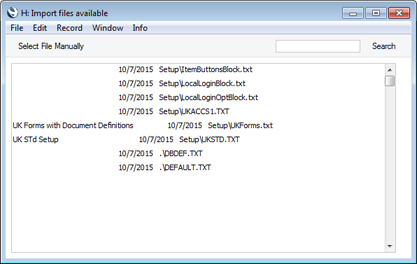
- Double-click an item in the list to import it.
The file will be imported. A message window informs you about the progress of the import.
If you import the sample Chart of Accounts, you can then change it to make it more suitable for your requirements. But note that the other settings imported from the UKACCS1.TXT file presume you are using the sample chart in an unmodified form. So, if you alter the chart, you must also alter these other settings. For example, if you change the Account Code of the VAT Outputs Payable Account, remember to alter all the VAT Code records and the definition of the VAT Report accordingly as well.
Please refer here for more information about importing information into Standard ERP.
If you do not wish to use the templates supplied...
You are free not to use the templates supplied and to implement your own accounting set-up. If you choose to do this, please first refer to the 'Accounting Principles' section of these web pages where some basic accounting principles are outlined. Then, you will need to create your Chart of Accounts and define some Fiscal Years, in the Nominal Ledger. Then, set up VAT Codes, again in the Nominal Ledger. Ensure the correct Accounts have been defined for use by various functions using the Account Usage S/L, Account Usage P/L and Account Usage Stock settings. You should also check the Item Group register and the Payment Modes setting. Finally, define the Balance Sheet, the Key Financial Ratios report, the Profit & Loss Report and the VAT Report.Importing your own Chart of Accounts
If you are changing to Standard ERP from another computerised accounts program, you may be able to import the accounts set-up from that program. This will have three advantages: the import procedure is relatively fast (compared to entering the accounts manually), the possibility of data entry errors is reduced and you will be able to use a Chart of Accounts with which you are already familiar.To import your own Chart of Accounts, copy it into a text file and then follow the import instructions at the top of this page. For details of the composition of the text file (i.e. field order), please refer to your local HansaWorld representative.
The next step in configuring a new database is to apply for an Enabler Key.
---
Go back to:
- Home page for Introduction and Installation manual
- Home page for Standard ERP manual
Creating a New Database - If the "DBDEF.TXT" and "DEFAULT.TXT" files are missing
If you attempt to create a new database as described on the Creating a New Database - Server or Creating a New Database - Single User pages but without the "DBDEF.TXT" and/or "DEFAULT.TXT" files present in the folder or directory containing the Standard ERP application, that database will be created successfully. However, the process will deviate from the path outlined in two respects:- If you are creating a new server database, it will have no Port Number, and therefore no clients will be able to log in.
- If you click the [Switch Module] button in the Navigation Centre or use the Ctrl-0/⌘-0 keyboard shortcuts, you will see that you will only have access to the System and User Settings modules.
- Close Standard ERP using the 'Quit' command on the File menu (or the Standard ERP menu if you are using Mac OS X).
- Delete the "HANSA.HDB" file.
- Locate the "DBDEF.TXT" file and move it to the folder or directory containing the Standard ERP application. Also, ensure that the "DEFAULT.TXT" file is present.
- Launch Standard ERP again and follow the procedure described on the Creating a New Database - Server or Creating a New Database - Single User pages as appropriate.
- Click the [Switch Module] button in the Navigation Centre and double-click 'System' in the subsequent list. Click the [Routines] button in the Navigation Centre and then the [Imports] button in the 'Routines' window. Double-click 'Manual file search' in the subsequent list. Locate the "DBDEF.TXT" file and import it. You will now have access to all modules, and Port 1200 will be assigned to the application. You will need to restart the application to open the Port before clients can log in.
- Repeat the previous step, this time importing the "DEFAULT.TXT" file.
- Return to the Entering your Company Name and Address page to resume the configuration process.
Go back to:
- Home page for Introduction and Installation manual
- Home page for Standard ERP manual
Creating a New Database - The Program Mode Register
The Program Mode register allows you to control the operation of the server. It is in the Technics module, so if you working from a client you must make sure you are the only user logged into the system, and you should be logged in as a system administrator as described here. You can also work on the server itself using the GUI application.Use the [Switch Module] button in the Navigation Centre or the Ctrl-0/⌘-0 keyboard shortcut to go into the Technics module, then click the [Registers] button, also in the Navigation Centre. Double-click 'Program Mode' in the resulting list.
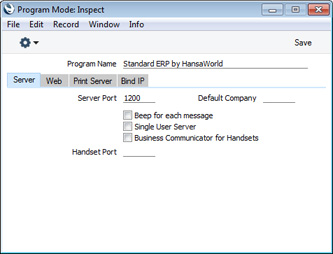
Server Card
- Server Port
- Specify the Port that you want to be used for TCP/IP communication between the Standard ERP server and its clients. The default is 1200. If you have more than one copy of Standard ERP running different databases on the same server (not recommended), each must feature a unique Server Port number.
- If you change the Server Port or put one in for the first time, you must quit Standard ERP and restart for the change to take effect.
- If you change the Server Port or put one in for the first time, you must quit Standard ERP and restart for the change to take effect.
- Default Company
- If you have more than one Company in your database and you would like a particular one to be used by default when you launch Standard ERP, enter the Code of that Company here. The next time you launch Standard ERP, the Company specified here will be opened automatically and the 'Select Company' window will not appear. If you need to work in a different Company, click the [Cancel] button when the 'Login' window appears.
- This field is the only field in this register that only applies to single-user systems.
Bind IP Card
- Bind to IP Address
- Use this field if your server machine has several network cards/interfaces with separate IP addresses. Specify here which one of those IP addresses you want to use for communication between the Standard ERP server application and its clients.
Other Cards
The remaining fields in this register are only used in the specialised situations when setting up the Web Shop and Print and Fax servers. You can leave them blank when setting up a standard data server (unless you want to allow access to your database from a browser, in which case you should specify a Web Port on the 'Web' card).For details about setting up Print and Fax servers, please refer to the description of the Printers setting. For details about setting up a Web Shop, please refer to your local HansaWorld representative.
Once the 'Server' card of this register is complete, click the [Save] button in the Button Bar to save. If you have entered a Server Port number for the first time (or changed the one that was already there), quit Standard ERP and restart to allow the change to take effect.
Changing the Master Password
When you use a client machine to log in to the server, you will be able to log in as an existing user, or you will be able to use a [New User] button to create a new User Account in the server database. When you do this, you will be asked to enter the Master Password before you can create the new User Account. If you have not specified a Master Password, you will not be able to use this feature.If you need to specify a Master Password for the first time, or want to change the Master Password, follow these steps:
- Open the Program Mode register as described above.
- Choose 'Set Master Password' from the Operations menu. The 'Choose Master Password' window opens:
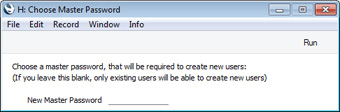
- Enter the new Master Password and click the [Run] button.
Allowing Logging in from a Browser (Web Client)
If you installed your server application as described here , the necessary files should already be in place to allow users to log on to your server from a browser. In the folder containing the server application, there will be a “webclient” folder that contains a “web” folder that itself contains a second “webclient” folder. This contains the necessary web files (java scripts, stylesheets and images). If this directory/folder structure is missing from your server application folder, refer to the original installer file. The Mac OS X server folder shown below illustrates this directory/folder structure: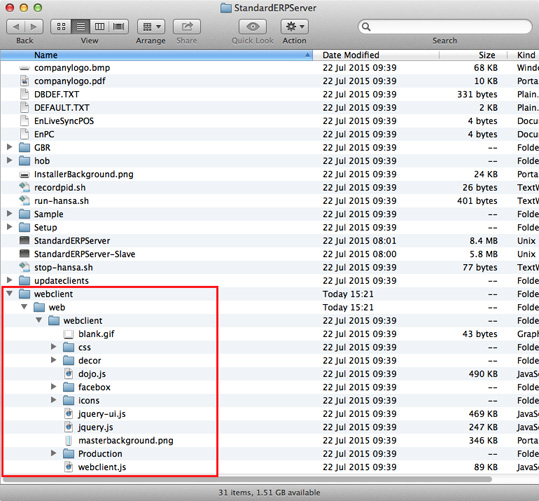
- server IP address:web port/startwebclient
- 10.211.55.2:8033/startwebclient
Go back to:
- Home page for Introduction and Installation manual
- Home page for Standard ERP manual
Creating a New Database - Allowing Logging in from a Browser (Web Client)
This page describes logging in to your Standard ERP server from a browser, also sometimes termed "using a Web Client". Please refer here for details about logging in to your server using the Standard ERP client application.---
If you installed your server application as described here, the necessary files should already be in place to allow users to log on to your server from a browser.
The following configuration steps are required:
- Log in to your server and open the Program Mode register as described here.
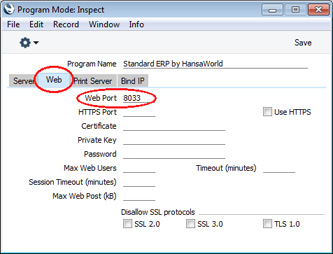
- Specify a Web Port on the 'Web' card in the Program Mode register:

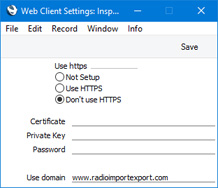
- Specify whether web clients will connect over http or https, using the Web Client Settings setting, also in the Technics module. If web clients are to connect over https, specify the paths to the certificate files, which should be located on the server. Please refer here for details about obtaining and configuring certificate files. If you have a domain name pointing to the server's IP address and would like users to use that domain name when connecting with a web client, enter that domain name in the Use domain field. The Use domain field will be used with both http and https connections (in the case of https connections, it must be a domain that is connected to the certificates).
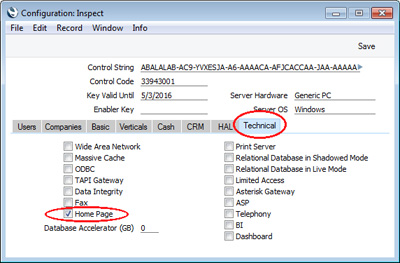
- Depending on your installation, you may also need to ensure the Home Page option is ticked in the Configuration setting:
- server IP address:web port/startwebclient
- 10.211.55.2:8033/startwebclient
- www.usedomain.com:8033/startwebclient
Multi-user Installation:
- Installation
- Create a new database
- Enter your company's name address VAT and company registration numbers and other details into the new database
- Import set-up data
- Connect from a client
- Create the Cloud Node
- Appoint an Administrator for MyStandard
- Apply for an Enabler Key
- Home page for Introduction and Installation manual
- Home page for Standard ERP manual
Creando una base de datos - Instalando Cloud Node
Instalar un Cloud Node le permitirá controlar su servidor a través de MyStandard (por ejemplo desde cualquier browser). MyStandard es un portal personalizado que le permite controlar y administrar su servidor independientemente donde esté situado y desde cualquier dispositivo. Debe instalar un Cloud Node si su servidor está en sus instalaciones o en un cloud que no pertenece a HansaWorld. No instale un Cloud Node si su servidor está en el cloud de HansaWorld o si está utilizando Standard ERP con una instalación tipo mono-usuario.Siga los siguientes pasos:
- Asegúrese que en el firewall de su servidor los siguientes dominios posean los puertos abiertos únicamente para mensajes salientes:
- http://hansaworld.com:80
- https://lookup.hansaworld.com:443
- https://validate.hansaworld.com:443
- http://validate.hansaworld.com:1401
- http://downloads.hansaworld.com:80
- https://cloudcontroller.hansaworld.net:444 (en Australia. Abra https://cloudcontroller.aus.hansaworld.net:444; en Finlandia, abra https://cloudcontroller.fin.hansaworld.net:500; ó en Letonia abra https://cloudcontroller.lat.hansaworld.net:444)
- https://cloudcontroller.hansaworld.net:2000 (en Australia. Abra https://cloudcontroller.aus.hansaworld.net:2000; en Finland, abra https://cloudcontroller.fin.hansaworld.net:2000; ó en Letonia abra https://cloudcontroller.lat.hansaworld.net:2000)
- https://lookup.hansaworld.com:443
- http://hansaworld.com:80
- Desactive cualquier software antivirus que se esté ejecutando en su servidor hasta que se haya completado la instalación del Cloud Node.
- Si está controlando su servidor usando un script como por ejemplo run-hansa.sh, cierre el servidor, deshabilite el script e inicie el servidor sin él. Esto previene que el script y el Cloud Node intenten tomar control del servidor al mismo tiempo.
- Conéctese a su servidor desde un cliente. Inicie sesión como usuario con acceso al módulo Técnico.
- Ingrese en Solicitud de claves por internet en las opciones del modulo Sistemas y asegúrese de que al menos los campos Registrado en y código del cliente estén completos. Si conoce su número de contrato en HansaWorld, completelo.
- Cambie al módulo Técnico e ingrese en Registros, seleccione Modo Programa.
- Asegúrese de haber especificado un puerto web en el tag 'Web'. Si no hay un puerto Web, especifique uno y luego reinicie el servidor.
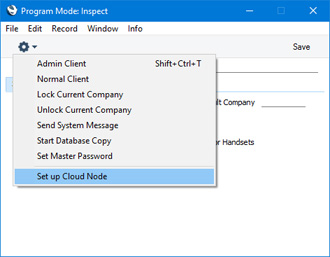
- Seleccione ‘Configurar Cloud Node’ en el menú de Operaciones:
- La ventana ‘Configurar Cloud Node' aparecerá: presione el botón configurar para continuar:
La información de esta ventana se tomará del Modo Programa en Registros y no debería modificarse. La dirección IP se utilizará principalmente para el log-in. No se utilizará para conectarse a su servidor, dado que el Cloud Node se conectará a MyStandard llamando desde su servidor. Esto le permite cambiar la dirección IP de su servidor en cualquier momento y/o proteger el servidor mediante un firewall con una IP dinámica externa, evitando que el servidor pueda perder conexión con MyStandard.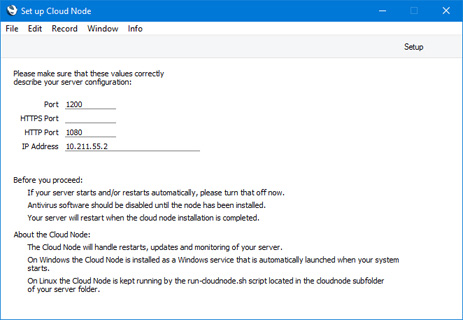
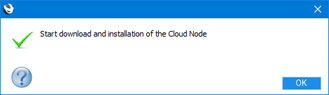
- Finalmente, presione el botón [OK] cuando esté listo para iniciar la instalación del Cloud Node:
- Se agregará una carpeta denominada "cloudnode" a la carpeta que contiene la aplicación servidor Standard ERP.
- Se cerrará la aplicación servidor Standard ERP. Como resultado, el cliente que está utilizando perderá la conexión.
- Si su servidor corre bajo MS Windows, el servidor Standard ERP se eliminará del registro de servicios, y se agregará el Cloud Node (con el nombre "Standard Cloud Node”).
- Se iniciará el Cloud Node.
- El Cloud Node ejecutará la aplicación del servidor Standard ERP automáticamente, por lo que podrá iniciar sesión nuevamente.
- Si tiene más de un servidor Standard ERP instalado en un servidor individual y ya ha instalado un Cloud Node desde uno de los servidores, el proceso de instalación cuando corre desde un servidor posterior, conectará ese servidor a un Cloud Node existente. (siempre que las bases de datos estén registradas en el mismo país)
Instalación multi usuario:
- Installation
- Create a new database
- Enter your company's name address VAT and company registration numbers and other details into the new database
- Import set-up data
- Connect from a client
- Create the Cloud Node
- Appoint an Administrator for MyStandard
- Apply for an Enabler Key
- Página inicio del manual: Introduction and Installation manual
- Página inicio del manual: Standard ERP manual
Creating a New Database - Appointing an Administrator for MyStandard
After your server has been connected to MyStandard (automatically if your server is in the HansaWorld cloud, or through the creation of a Cloud Node if your server is in a non-HansaWorld cloud or on your premises), you should appoint a user to be responsible for the server on MyStandard. This user will have full access ("Admin Access") to the server on MyStandard, and will grant access on MyStandard to other users as necessary. To do this, log in to the server from a client, open the Person record of the user who will be the master user and tick the User is MyStandard Admin check box: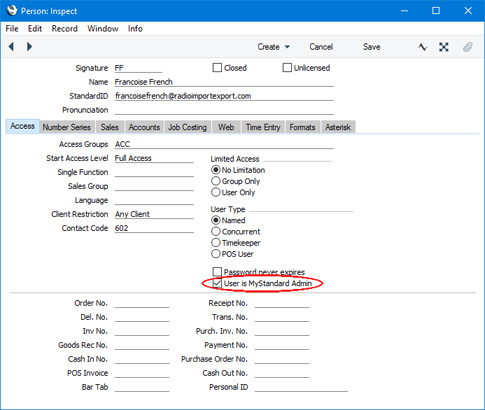
The User is MyStandard Admin check box will only be visible after you have installed the Cloud Node. When the user logs in to their MyStandard page using their StandardID and password, they will have full access to your server. If you appoint a user as the MyStandard administrator immediately after installing the Cloud Node, that user may need to wait about 15 minutes for the server to appear on their MyStandard page. Subsequent appointments will be reflected in MyStandard immediately. If a user is already logged in to their MyStandard page when you appoint them as an administrator, they might need to log out of MyStandard and back in again to see the new server. Please refer to the following pages for more details about MyStandard:
- Introduction to MyStandard
- Access Rights on MyStandard (including Admin Access)
Multi-user Installation:
- Installation
- Create a new database
- Enter your company's name address VAT and company registration numbers and other details into the new database
- Import set-up data
- Connect from a client
- Create the Cloud Node
- Appoint an Administrator for MyStandard
- Apply for an Enabler Key
- Home page for Introduction and Installation manual
- Home page for Standard ERP manual
Creating a New Database - The Enabler Key
After installing Standard ERP, you should register it with HansaWorld. This registration process will provide you with an Enabler Key. When you install Standard ERP, this Key will be absent. The program will be fully operational for 30 days after installation, with the exception that Cloud Services will be disabled. This allows time for the set-up work described here. After 30 days, if you have not registered to apply for your Key, Standard ERP will change to restricted mode: it will remain fully functional, but printing will be disabled.You can apply for the Key at any time (before or after the 30-day point), but before doing so you should ensure you have registered the number of Companies that you need, them all in the Company register, named them all and assigned to them the correct Company Type in the Company Info setting, and, depending on the method you will use to apply for an Enabler Key, given yourself access to the required modules and entered the number of users in the Configuration setting. You should also have specified your server hardware and operating system (or standalone hardware and OS), also in the Configuration setting.
Before you have registered and if the computer is connected to the internet, the 'Choose Your Country: Inspect' window will begin to open each time you start the application, providing a reminder that you need to register. This window is the first step in the Registration Wizard: you can open the Wizard at any time from the Internet Enablers setting. Please refer to step 2c in the 'Automatic Internet Enablers' section below for more details about the Wizard.
Once you have obtained a Key, you should not change the Valid Until Date or the numbers of users, mailboxes or conferences in the Configuration setting, give yourself access to different modules, add a new Company to the database, or change the Company Name in the Company Info setting in any existing Company. Any of these changes will cause Standard ERP to go into restricted mode (printing will be disabled). You can regain full use of the program by applying for a new Enabler Key in the Internet Enablers setting.
You should keep a record of your Enabler Key in a safe place: you may need to enter it again if you ever create a new database by restoring from a back-up file.
! | Set up your Companies and define the Configuration and Company Info settings in each one before applying for an Enabler Key. |
If you need to call HansaWorld Support for help obtaining an enabler, you can find the telephone number of your local office at www.hansaworld.com/countries/.
Automatic Internet Enablers
The Automatic Internet method requires the computer (server, client or single-user machine) containing Standard ERP to be connected to the internet. If you use this method to apply for an Enabler Key, you will first instruct your copy of Standard ERP to connect to and register with the customer database on the HansaWorld server. This database contains details of your contract (modules and number of users purchased, etc). Immediately upon registration, a Key will be downloaded from the HansaWorld server, and subsequent Keys will be downloaded automatically every month. As well as the Key, the number of users, module access and other information will also be downloaded to the Configuration setting. Everything previously in this setting will be overwritten. Unlike the other methods, therefore, you do not need to ensure the Configuration setting is complete or accurate before applying for a Key using this method. All you need do is make sure you have specified your Server Hardware and Server OS. You should also make sure you have recorded your company name, company type, company registration number and VAT registration number in the Company Info setting.To obtain Enabler Keys using the Automatic Internet method, follow these steps:
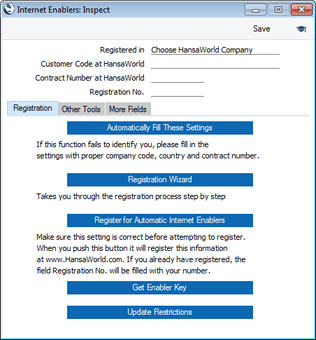
- Ensure you are in the System module and open the 'Settings' list by clicking the [Settings] button in the Navigation Centre or using the Ctrl-S/⌘-S keyboard shortcut. Select 'Internet Enablers' by double-clicking:
- In this step, you will ensure your copy of Standard ERP will be able to identify itself to the customer database on the HansaWorld server. You can do this using one of three methods:
- Fill in the three fields at the top of the window as follows:
- Registered in
- Enter the country where your company is registered. To choose an option, place the cursor in this field and press the Ctrl-Enter (Windows) or ⌘-Enter (Mac OS X) key combination. A selection list will appear in which you can choose an option by double-clicking.
- Customer Code at HansaWorld
- Enter the Customer Code allocated to your company by HansaWorld. This can be found on your HansaWorld invoice.
- Contract Number at HansaWorld
- Enter the Contract Number allocated to your company by HansaWorld. This can be found on your HansaWorld invoice.
- Registered in
- If you do not have enough information to fill in the three fields described in point (a) above (e.g. you do not know your Customer Code at HansaWorld), click the [Automatically Fill These Settings] button. Assuming you are connected to the internet, your copy of Standard ERP will connect to the customer database on the HansaWorld server. It will then search the customer database for your company name as entered in the Company Info setting. The two names must match exactly: an extra space, for example, will mean that a match will not be found. If it does not find a match, it will search for your VAT Number, telephone number and company registration number, again as entered in the Company Info setting.
If no match is found in the HansaWorld customer database, a message will ask you to check that the information in the Company Info setting is correct or to fill in the three fields described in point (a) yourself. Call HansaWorld Support if you cannot fill in these fields.
If a match is found, information will be downloaded to the three fields described in point (a) from the HansaWorld customer database, and the Internet Enablers setting will be saved and closed.
- If you are not sure if your Company is registered in the HansaWorld customer database, click the [Registration Wizard] button. The 'Choose Your Country: Inspect' window appears:
Enter the country where your company is registered or located. To choose an option, place the cursor in this field and press the Ctrl-Enter (Windows) or ⌘-Enter (Mac OS X) key combination. A selection list will appear in which you can choose an option by double-clicking. Then, click the [Next] button.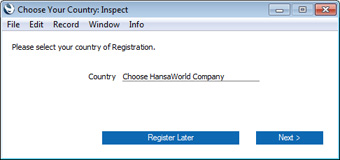
The 'Search for Existing Registration' window appears:
If your company is not registered in the HansaWorld customer database, leave both fields empty and click [Next]. The 'Company Information: Inspect' window will open, containing your company name and address, taken from the Company Info setting. Check the details are correct and click the [Next] button. The next window will confirm that your company has been registered in the HansaWorld customer database, and you will be given a Customer Code that will be saved in the Internet Enablers setting. You will now need to contact HansaWorld to sign a contract and have it entered in the HansaWorld customer database before you can proceed to step 3.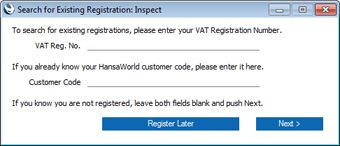
If you think your Company is registered in the HansaWorld customer database, enter your VAT Number and click [Next]. The 'Company Information: Inspect' window will open. If your Company is registered in the HansaWorld customer database, this will contain your company name and address, taken from that database. Your Customer Code at HansaWorld will also be saved in the Internet Enablers setting. If you have a contract with HansaWorld, re-open the Internet Enablers setting and proceed to step 3. If not, contact HansaWorld to sign a contract and have it entered in the HansaWorld customer database before proceeding to step 3. If your Company is not registered in the HansaWorld customer database, the fields in the 'Company Information: Inspect' window will all be empty. Close the window by clicking the [Register Later] button and then repeat the process, ending up in the previous paragraph.
- Fill in the three fields at the top of the window as follows:
- In this step, you will register for Automatic Internet Enablers and receive your first Enabler Key. Re-open the Internet Enablers setting and click the [Register for Automatic Internet Enablers] button. Your copy of Standard ERP will again connect to the HansaWorld customer database, which will recognise the Customer and Contract Numbers. It will then obtain a Registration Number and save it in the Internet Enablers setting, registering you for Automatic Internet Enablers. It will also obtain an Enabler Key and a Valid Until date for that Key, which will be saved in the in the Configuration setting. The Valid Until date will be set to three months from the current date or to the end date of your contract, whichever is the nearer.
When the Key is obtained, everything previously in the Configuration setting will be overwritten (i.e. the number of users and Companies, module access and so on will be downloaded from the HansaWorld server together with the Key). For this reason, apart from the Server Hardware and OS, you do not need to ensure the Configuration setting is complete or accurate before applying for a Key. It is therefore recommended that you check the Configuration setting once you have obtained your Key. Call HansaWorld Support if you think the new settings are wrong.
- Once a month your copy of Standard ERP will connect to the HansaWorld server automatically to get a new Enabler Key. The new Key will add one month to the Valid Until date.
- If for some reason the automatic connection described in step 4 fails and your copy of Standard ERP is unable to obtain a new Key, it will attempt to connect once a day for the next two months. After this period, if it is still unable to obtain a new Key, your copy of Standard ERP will go into restricted mode. If you want to activate the monthly connection and obtain the next Enabler Key yourself, open the Internet Enablers setting and click the [Get Enabler Key] button. The next automatic connection will occur one month later.
In multi-user systems, it will be your Standard ERP server that attempts to connect on a monthly basis. If your server is not connected to the internet, you will need to use the [Get Enabler Key] button once a month from a client.
If your copy of Standard ERP is repeatedly unable to obtain a new Key and the Valid Until date is approaching, you should call HansaWorld Support to bring their attention to the situation. They may advise you to obtain an Emergency Key. To do this, open the Internet Enablers setting, go to the 'Other Tools' card and click the [Emergency Key] button. This will give you a new Key that will last for five days, during which time your inability to obtain an automatic Key will be investigated and resolved. In order to qualify for an Emergency Key, the three fields in the Internet Enablers setting described in step 2a must contain the correct information and you must have obtained at least one Key as described in steps 3 and 4 above. You cannot apply for two Emergency Keys in succession.
- As mentioned above, when you create a new database, you will be able to use it for 30 days before it goes into restricted mode. The 'Choose Your Country: Inspect' window will open each time you start the application, providing a reminder that you need to register. This window is the first window of the Registration Wizard: please refer to step 2c above for details.
If your application for an Enabler Key is unsuccessful, the probable reasons are:
- The company name, VAT number, company registration number and/or telephone number in the Company Info setting are not exactly the same as those in the HansaWorld customer database.
- If you entered the country, Customer Number and Contract Number in the Internet Enablers setting yourself as described in step 2a, you did not then save, close and re-open the setting before going on to click the [Register for Automatic Internet Enablers] button in step 3.
- The HansaWorld customer database is down. In this case, wait for www.hansaworld.com to respond to your browser and then try again.
- You do not have a valid HansaWorld maintenance contract, or payments are not up-to-date.
- A "server not responding" message is usually caused by your firewall. Check that your firewall allows the Standard ERP application to use port 80 for outgoing communications. A browser works in the same way, so if your browser can access the internet from the server machine, you should be able to obtain Enabler Keys. If you cannot, there may be a software block on the Standard ERP application, preventing it sending through port 80. The Standard ERP application does not require port 80 to be open for incoming communications.
- The company name, VAT number, company registration number and/or telephone number in the Company Info setting are not exactly the same as those in the HansaWorld customer database.
HansaWorld.com Website Enablers
If you have an internet connection but your copy of Standard ERP is not on a computer that is connected to the internet, you can obtain an Enabler Key through the www.hansaworld.com website. This method uses the Control String and Control Code in the Configuration setting to determine the Enabler Key. So, if you are using this method, you must make sure you have created all the Companies that you need and that you have defined the Configuration and Company Info settings in each one before applying for an Enabler Key.Follow these steps:
- If you are using Internet Explorer, you will need to check your internet security settings and add www.hansaworld.com as a trusted site.
- Ensure you are the only person logged in to your Standard ERP system and open the Configuration setting.
- Enter the expiry date of your HansaWorld contract in the Key Valid Until field. This date should be the last date of your maintenance contract with HansaWorld, which can be no later than one year from the current date. Make sure the setting is otherwise complete and accurate, and click the [Save] button in the Button Bar to save and close it.
- Quit and restart your Standard ERP system. If you are working on a client machine in a multi-user system, you only need restart the client, not the server. This will force the Control String and Control Code to be recalculated.
- Produce a Company Info report.
- Go to www.hansaworld.com and, using the link in the top right-hand corner of the screen marked "Global", choose the country in which you are located. Then, click the "Products" link followed by "Standard ERP" and finally "Get enabler".
- If you do not have a password, click the "Forgot Password" link. A new password will be sent to you by email. Your Customer Number can be found on your HansaWorld invoice.
- Enter your Customer Number and password and follow the instructions on screen.
If your application for an Enabler Key is unsuccessful, the probable reasons are:
- The "Unknown Log in", "No valid contract" or "You are not properly registered with us" messages mean you entered your Customer Number and/or password incorrectly, or you have not signed and returned your maintenance agreement.
- The "Enabler failed" message means that the information in your Configuration setting does not match the information in the customer database on the HansaWorld server. You will be sent an email listing what should and what should not be included in your Configuration setting according to your contract with HansaWorld. Update your Configuration to match the email and follow the sequence above from step 4, or call HansaWorld Support if you think the email is wrong.
Manual Enablers
If you do not have an internet connection at all, you can obtain an Enabler Key by telephone or fax. This method uses the Control String and Control Code in the Configuration setting to determine the Enabler Key. So, if you are using this method, you must make sure you have created all the Companies that you need and that you have defined the Configuration and Company Info settings in each one before applying for an Enabler Key.Follow these steps:
- Ensure you are the only person logged in to your Standard ERP system and open the Configuration setting.
- Enter the expiry date of your HansaWorld contract in the Key Valid Until field. This date should be the last date of your maintenance contract with HansaWorld, which can be no later than one year from the current date. Make sure the setting is otherwise complete and accurate, and click the [Save] button in the Button Bar to save and close it.
- Quit and restart your Standard ERP system. If you are working on a client machine in a multi-user system, you only need restart the client, not the server. This will force the Control String and Control Code to be recalculated.
- Contact your local HansaWorld representative during normal working hours and quote the Control String, Control Code and contract expiry date. You may be asked to produce a Company Info report. You will then be given a Key.
- Open the Configuration setting, enter the Key in the Enabler Key field and click [Save]. This will inform your copy of Standard ERP that you have a full licence for its use.
Go back to:
- Home page for Introduction and Installation manual
- Home page for Standard ERP manual
Setting up an FTP Server
This feature was removed in version 4.2.---
Go back to:
- Home page for Introduction and Installation manual
- Home page for Standard ERP manual
Shutting Down
Remember to make a back-up before shutting Standard ERP down. Backing up is described here.Single-user
To shut Standard ERP down, select 'Quit' from the File menu. Mac OS X users can find the 'Quit' command on the Standard ERP menu. You can also use the Ctrl-Q (Windows) or ⌘-Q (Mac OS X) keyboard shortcuts. All open windows will be closed, and you will be asked if you want to keep any changes that have not yet been saved.Multi-user
You can close Standard ERP clients as described in the 'Single-user' section immediately above: by selecting 'Quit' from the File or Standard ERP menus.If you are using the command line server application on Mac OS X or Linux and if you are not running the server process in the background, bring the Terminal window to the front and press the Ctrl-C key combination. Alternatively, open a new Terminal window and type the following:
- ps
- Displays the process IDs for each Terminal process
- kill pid
- (where pid is the process ID for the server process)
If you are using the service application (Windows), open the Control Panel and double-click 'Administrative Tools' and then 'Services'. Find and select 'Standard ERP Server 8.0 (32-bit)' or 'Standard ERP Server (64-bit)' (or similar) in the list and choose to stop the service.
If you need to close the server down and there are some users logged in, you can send a warning message. To do this, you should be working on a client and you should have logged in as a system administrator (i.e. as a Person that has access to the Technics module), as described here. Follow these steps:
- Select 'Technics' using the [Switch Module] button in the Navigation Centre.
- Click the [Routines] button in the Navigation Centre and click [Maintenance].
- When the 'Maintenance' list window appears, double-click 'System Message'. The following window appears:
Complete the window as follows: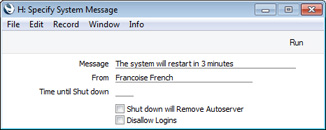
- Message
- Type in the message that you want every user to read.
- From
- Type in the author of the message: this will also be shown to all users. Your name (i.e. the name of the current user) will appear here by default.
- Time until Shut down
- Specify here the number of minutes that you want to wait until the server shuts down. This should be sufficient time to allow the other users to save their work and quit Standard ERP.
- If this field contains a value, the server will be shut down automatically after the specified period of time. If this field does not contain a value, the server will not shut down. This means that you can also use this function to send a message to all users at any time.
- If this field contains a value, the server will be shut down automatically after the specified period of time. If this field does not contain a value, the server will not shut down. This means that you can also use this function to send a message to all users at any time.
- Shut down will Remove Autoserver
- If you shut down the server and then open the database using the GUI application, you may find that the database opens in a server mode. Use this option to prevent this happening i.e. if you intend to open the database using the GUI application.
- Disallow Logins
- Check this box if you want to prevent users logging in during the Time until Shut down.
- Message
- Click the [Run] button in the Button Bar. The Message will be shown to all users.
- Close your own Standard ERP client.
- The server will shut down automatically after the specified time.
- After shutting down the server, open the database using the GUI application. The database will open in a server mode, displaying the 'Server Status' window. Choose 'Quit, Remove Autoserver' from the File menu or use the Ctrl-M/⌘-M keyboard shortcut (Windows users must use the Ctrl-M shortcut). The application will close and then restart automatically. This time it will not be in server mode, allowing you to carry out the work as necessary.
- If you have not yet shut down the server, you can do so using the 'System Message' function described immediately above, by selecting the Shut down will Remove Autoserver option. You can then open the database using the GUI application.
If the server closes unexpectedly (e.g. it crashes or is force quit), you can have a notification text (SMS) message sent automatically to a specified mobile number. Please refer to the description of the Internal System Alerts setting here for details about this feature.
---
Go back to:
- Home page for Introduction and Installation manual
- Home page for Standard ERP manual