Introducción a Informes en Contabilidad
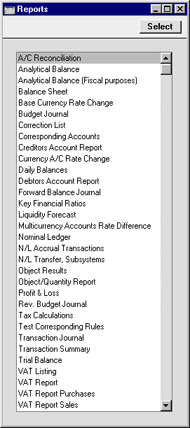
Al igual que en todos los módulos, para imprimir desde Contabilidad, haz clic en el botón [Informes] del Panel de Control. El acceso rápido del teclado Ctrl-R or ⌘-R también se puede utilizar. Luego, haz doble clic en el ítem requerido de la lista.Están disponibles los siguientes informes en el modulo Contabilidad:
Muchas veces hay la posibilidad de informar en base a un rango de selección, tal como un rango de Cuentas o un rango de Ítems. Para hacer esto, ingresa el valor más bajo y el más alto del rango separados por dos puntos (:). Por ejemplo, para informar sobre las Cuentas 001 a 010, ingresa “001:010” en el campo Cuenta. Dependiendo del campo, el orden usado podría ser alfa o numérico. Para el caso de un orden alfa, un rango de 1:2 incluiría también 100,10109, etc.
El uso de las casillas al pie de la ventana de especificación, determinará el destino de impresión del informe (el ajuste por defecto es pasar a pantalla). Inicialmente, puedes pasar a pantalla y consecuentemente enviar el informe a una impresora usando el icono de Impresora. Por otro lado, puedes transferir el informe a un disco como un archivo de texto. Esto será ventajoso cuando quieras diseñar el informe según tus preferencias antes de imprimir.
Una vez ingresado el criterio de informe y habiendo escogido un destino de impresión, haz clic en [Ejecutar].
Definición de Informes Contables
La presentación y el formato de algunos informes Contables pueden modificarse para cumplir con requerimientos específicos. Esto se conoce como la definición del informe. Los informes para los cuales existe esta funcionalidad son el Balance, Ratios Financieros Clave, Estado de Resultados e Informe IVA.Para cambiar la definición de un informe, primero selecciona ‘Opciones’ estando en módulo Contabilidad y haz clic en ‘Opciones de Informes’ de la lista resultante. Luego, resalta el nombre de un informe en la lista de la izquierda y haz clic en el botón [Definición]. Las ventanas resultantes de definición se describen en las secciones que detallan los informes individualmente.
! | Si has modificado el Plan de Cuentas estándar o si has importado tu propio plan de cuentas, deberás cambiar las definiciones de informes Contables en función a esto. |
Drill-down
Hansa tiene una característica única de drill-down en algunos informes cuando se pasan a pantalla. Por ejemplo, cuando tienes un Estado de Resultados en pantalla, puedes abrir con el mouse cualquiera de los números de Cuenta en el informe. Esta función estará sujeta a contar con los derechos de acceso necesarios y así el informe Mayor se abrirá para la misma Cuenta y periodo dentro de una ventana separada. Éste informe listará los Asientos que contribuyen al balance de cuenta en el Estado de Resultados. Por tanto, si presionas el mouse en uno de los Números de Asiento dentro de informe Mayor, se abrirá el registro de Asientos mostrando todos los detalles registrados para el movimiento. Este ejemplo se ilustra abajo: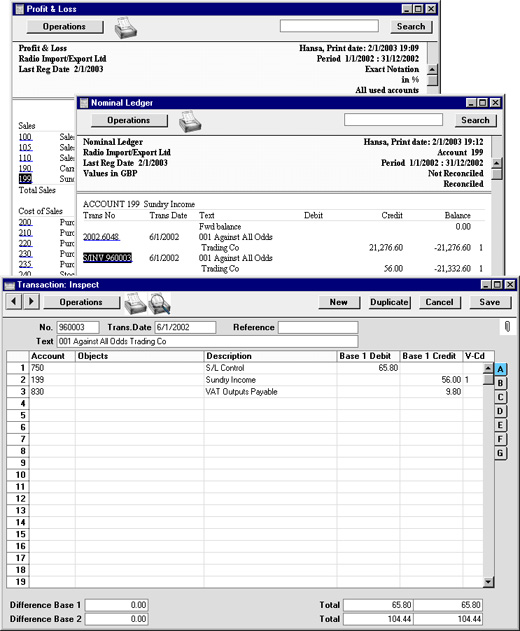
Menú Operaciones

Conciliaciones
Este informe se utiliza comúnmente para ayudar en la tarea de conciliación bancaria. Se ejecuta usando el registro Conciliaciones. El informe es una lista de Asientos (ej. registros contables individuales) para el periodo de informe el cual muestra la Cuenta, el Número de Asiento, la Fecha y el Monto en cualquiera de las Monedas Base (seleccionada), Monto en Moneda extranjera (cuando corresponda) y si éstos han sido conciliados o no.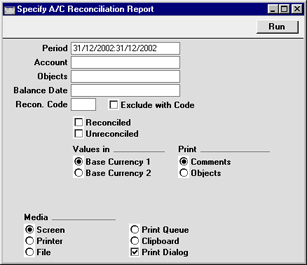
- Periodo
- Pegado Especial
opción Periodos de Informe, módulo Sistema
- Todas la líneas de Asiento cuya fecha caiga dentro del periodo ingresado aquí, serán incluidas en el informe. El valor por defecto es el primer periodo en la opción Periodos de Informe.
- Cuentas
- Pegado Especial
registro de Cuentas, módulos Contabilidad/Sistema
- Rango de Informe Alfa
- Utiliza este campo a fin de limitar lo registros de la líneas de Asiento, en función a cierta Cuenta, o rango de Cuentas. Por lo general, tendrás que especificar tu Cuenta Bancaria u otra Cuenta Conciliable aquí; de lo contrario, el informe será más extenso de lo necesario.
- Utiliza este campo a fin de limitar lo registros de la líneas de Asiento, en función a cierta Cuenta, o rango de Cuentas. Por lo general, tendrás que especificar tu Cuenta Bancaria u otra Cuenta Conciliable aquí; de lo contrario, el informe será más extenso de lo necesario.
- Objetos
- Pegado Especial
registro de Objetos, módulos Contabilidad/Sistema
- Especifica un Objeto para listar en el informe sólo aquellos Asientos que cuenten con ese Objeto. Si ingresas un número de Objetos separados por comas, sólo aparecerán aquellos Asientos que cuenten con los Objetos listados.
- Fecha de Balance
- Pegado Especial
Fecha Actual
- Para cada Cuenta se muestra dos totales; el total conciliado durante el periodo de informe y el total conciliado antes de cierta fecha. Especifica esa fecha aquí.
- Cód. Conc. Excluir con Código
- Si deseas listar las transacciones con un Código de Conciliación particular (cargado en la pestaña D de la pantalla de Conciliaciones), ingresa ese Código de Conciliación aquí. Para listar todas las Transacciones excepto aquellas con un Código de Conciliación particular, tilda la casilla Excluir con Código.
- Este campo y esta casilla no tienen efecto si sólo estás listando Asientos no conciliados.
- Este campo y esta casilla no tienen efecto si sólo estás listando Asientos no conciliados.
- Conciliado
- Tilda esta casilla para incluir Asientos conciliados en el informe.
- Sin Conciliar
- Tilda esta casilla para incluir Asientos no conciliados en el informe. Debe estar tildada al menos una de las casillas Conciliado o Sin Conciliar, o el informe estará en blanco.
- Valores en
- Si estás usando el sistema de Base-dual, los valores en este informe se podrán mostrar en ambas Monedas Base. Utiliza estas opciones para escoger la Moneda a ser empleada en esta ocasión.
- Si no estás usando el sistema de Base-dual, utiliza la opción Moneda Base 1 para producir un informe en tu Moneda local.
- Si no estás usando el sistema de Base-dual, utiliza la opción Moneda Base 1 para producir un informe en tu Moneda local.
- Imprimir
- Puedes decidir mostrar Códigos de Objeto o Comentarios en el informe. Si se escoge la opción Comentario, la Descripción desde la línea del Asiento irá junto al Texto desde el encabezado del Asiento.
Devengamientos/Aprovisionamientos Periódicos
Este informe es una lista de aquellas Facturas con un Asiento Devengado que figura en la pestaña C (en caso de Facturas de Compra) o en la pestaña B (en caso de Facturas de Venta). Para cada Factura, la alineación en este reporte estará conformada por movimientos devengados que no hayan sido debitados de Cuentas de Compra o abonados a Cuentas de Venta. Por tanto, este informe provee una orientación sobre el valor de estos registros devengados y también proporciona una noción del momento en que estos registros devengados serán transferidos desde Cuentas Devengadas a Cuentas de Compra o Venta. Para más detalles sobre los Asientos Devengados, por favor haz clic aquí.Cuando se encuentra en pantalla, este informe posee la funcionalidad Drill-down de HansaWorld Enterprise. Haz clic en un Número de Factura para abrir el Asiento en función a esa Factura. Así podrás abrir la Factura en sí al seleccionar 'Abrir Registro de Sub-diario' desde el menú Operaciones. También podrás abrir una Simulación.
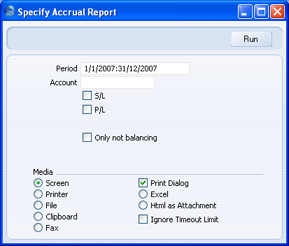
- Periodo
- Pegado Especial
opción Periodos de Informe, modulo Sistema
- El informe listará Facturas de Compra y Venta cuyas Fechas de Transacción caigan en el periodo especificado aquí – todas estarán sujetas a tener un Asiento Devengado especificado en la pestaña C (en caso de Facturas de Compra) o en la pestaña B (en caso de Facturas de Venta).
- Cuenta
- Pegado Especial
registro Cuentas, módulos Contabilidad/Sistema
- Rango de Informe Alfa
- Si especificas aquí una Cuenta (o un rango de Cuentas), el informe listará Facturas que empleen dicha Cuenta como una Cuenta Devengada. Esta será la Cuenta que se cita en el registro de Asiento Devengado especificado en la pestaña C de un Factura devengada de Compra o en la pestaña B de una Factura devengada de Venta.
- Si especificas aquí una Cuenta (o un rango de Cuentas), el informe listará Facturas que empleen dicha Cuenta como una Cuenta Devengada. Esta será la Cuenta que se cita en el registro de Asiento Devengado especificado en la pestaña C de un Factura devengada de Compra o en la pestaña B de una Factura devengada de Venta.
- Ventas
- Tilda esta casilla si deseas que se liste Facturas devengadas de Venta en el informe.
- Compras
- Utiliza esta opción si deseas que se liste Facturas devengadas de Compra en el informe.
- Solo sin Equilibrar
- Por defecto, toda Factura devengada en el Libro seleccionado y desde el periodo especificado, se listará en el informe. Si utilizas esta opción, sólo se listará aquellas Facturas donde el valor devengado sea menor al valor de la Factura. Esto se refiere a Facturas donde se ha creado al menos un Asiento desde datos que equiparan en la Simulación devengada; consiguientemente, se moverá parte del valor de la Factura desde la Cuenta Devengada hacia la Cuenta de Compra o Venta.
Balance Analítico
Este informe es similar al Balance de Prueba, pero con la adición de los balances Haber y Debe para cada Cuenta. El documento impreso además muestra los balances acumulados de la gestión.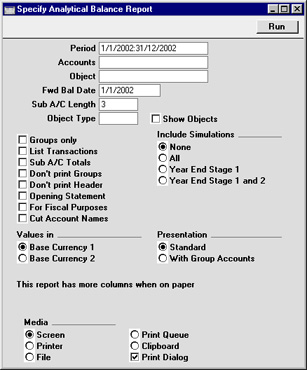
- Periodo
- Pegado Especial
opción Periodos de Informe, módulo Sistema
- Ingresa un periodo a ser abarcado por el informe. El periodo por defecto es el primer periodo en la opción Periodos de Informe.
- Cuentas
- Pegado Especial
registro de Cuentas, módulos Contabilidad/Sistema
- Rango de Informe Alfa
- Limita el informe a una sola Cuenta o rango de Cuentas.
- Limita el informe a una sola Cuenta o rango de Cuentas.
- Objeto
- Pegado Especial
registro de Objetos, módulos Contabilidad/Sistema
- Ingresa un Objeto aquí para que los balances en el informe, se calculen en función a los Asientos con ese Objeto solamente. Si ingresas un número de Objetos separados por comas, los balances se calcularán sólo en función a aquellos Asientos con los Objetos listados.
- Fecha As. Apertura
- Especifica aquí la fecha para los cuales se calculará los Balances Apertura. La fecha por defecto es la fecha del periodo especificada para el informe.
- Longitud Sub. Cta.
- Este campo se utiliza conjuntamente con la casilla Subtotales de Cta. Por favor, revisa la descripción de esa casilla más abajo para obtener detalles.
- Tipo de Objeto
- Pegado Especial
opción Tipos de Objeto, módulo Contabilidad
- Ingresa un Tipo de Objeto aquí para que los balances sean calculados en función a los Asientos con Objetos pertenecientes sólo a cierto Tipo de Objeto.
- Mostrar Objetos
- Por lo general, el informe muestra los totales de balance para el Haber y el Debe en cada Cuenta. Tilda esta casilla si deseas mostrar los balances subtotales para cada Objeto.
- Solo Grupos
- Con esta casilla tildada, el informe mostrará solamente los subtotales para grupos de Cuentas asociados usando el primer dígito del Código de Cuenta. Si la opción no está tildada, se mostrará los balances para cada Cuenta conjuntamente con los subtotales de grupo.
- Listar Transacciones
- Con esta casilla tildada, se listará los Números de Asiento de todas las Transacciones que caigan dentro del periodo de informe, a su vez junto con los totales de haber y debe. Éstos registros aparecerán en la parte de abajo del informe.
- Sub-Cta. Totales
- Esta casilla transporta el grupo de los totales descritos en la casilla ???Solo Grupos’, hacia otra etapa. Despliega los subtotales para los grupos de Cuenta con los mismos dígitos iniciales. La cantidad de dígitos iniciales ingresa en el campo Longitud Sub-Cta. Por ejemplo, si la Longitud Sub-Cta. es 3, los balances para las Cuentas 4011, 4012 y 4014 aparecerán como un subtotal. El total del grupo de un solo dígito (para las Cuentas que comienzan con 4 en el ejemplo) aparecerá también.
- Sin Imprimir Grupos
- Por defecto, el informe lista los balances para cada Cuenta conjuntamente con los subtotales de grupo (subtotales de balances de Cuentas con el mismo dígito inicial). Si no deseas imprimir los subtotales de grupo, tilda esta casilla.
- Sin Imprimir Encabezados
- Tilda esta casilla si deseas que el informe se imprima sin el encabezado.
- Declaración de Apertura
- Esta casilla sólo se utiliza de la mano con la opción ‘Con Grupo de Cuentas’ descrita abajo. Esta combinación produce un informe que muestra únicamente Balances de Cuentas.
- Para Fines Fiscales
- Esta casilla hace que se impriman las cifras sin separador de mil (ej. 1,000.00 se imprime como 1000.00). Este formato es un requisito para las autoridades fiscales en Portugal.
- Cortar Nombre de Ctas.
- Esta casilla imprime versiones abreviadas de cada Nombre de Cuenta
- Valores en
- Si estás usando el sistema de Base-dual, los valores en este informe se pueden mostrar en cualquiera de las Monedas Base. Utiliza estas opciones para escoger la Moneda a emplearse en esta ocasión.
- Si no estás usando el sistema de Base-dual, utiliza la opción de Moneda Base 1 para producir un informe en tu Moneda local.
- Si no estás usando el sistema de Base-dual, utiliza la opción de Moneda Base 1 para producir un informe en tu Moneda local.
- Incluir Simulaciones
- Escoge una de estas opciones para incluir asientos simulados en el informe. Si escoges la opción ‘Todas’, no se incluirá simulaciones con estado “Invalidado” o “Transferido”.
- Presentación
- Se puede producir dos versiones de este informe:
- Estándar
- Esta versión del informe muestra solamente Cuentas estándar.
- Con Grupo Cuentas
- Esta versión del informe está diseñada para manejo en Portugal. Incluye los encabezados jerárquicos (con subtotales) definidos usando la casilla Grupo de Cuenta en la pantalla de Cuenta. Por favor, haz clic aquí para mayores detalles.
- Si la casilla ‘Declaración de Apertura’ está tildada, el informe mostrará sólo Balances de Cuenta.
Balance Analítico (Fines Fiscales)
Este informe es igual al Balance Analítico que tiene seleccionada la opción 'Para Fines Fiscales. Por favor, revisa la descripción del informe Balance Analítico para mayores detalles.Balance
El Balance muestra los bienes de uso, pasivos y el capital de la empresa sobre un punto dado en el tiempo. Puedes usar el modelo de Balance proporcionado por Hansa, o puedes definir uno personal, posiblemente editarás la definición estándar para satisfacer tus requerimientos.
Por favor, haz clic para detalles sobre:
- La definición del Balance;
- Impresión del Balance;
- Funciones Especiales del Balance.
- Definición
Puedes definir la estructura del Balance para cumplir tus requerimientos. El siguiente ejemplo ilustra el proceso de configuración de esto:
Para cambiar la definición de informe del Balance, primero selecciona ‘Opciones de Informe’ y luego resalta ‘Balance’ en la lista resultante. Ahora haz clic en el botón [Definición]. Se abrirá la ventana ‘Definición de Balance: Hojear’.
La ventana muestra el Balance línea por línea, como se lo ha presentado hasta ahora. Las líneas están enumeradas 10,50, etc, de modo que existe espacio para insertar nuevas líneas.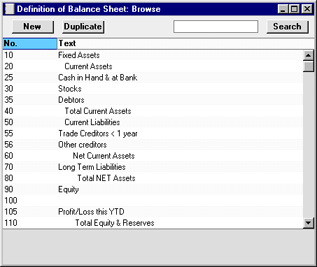
Haz doble clic en la primera línea, "10: Activos Fijos".
Se abrirá la ventana ‘Definición de Balance: Ver’ mostrando la definición actual de la línea.
El número identifica la línea en el Balance y el Texto “Activos Fijos” se imprime como encabezado para un grupo de Cuentas cuando el informe sea pasado a pantalla o a la impresora.
En el campo Cuentas habrá ingresado una secuencia de números de Cuenta. Se emplea un orden alfa, en el ejemplo arriba sería, "600:69999" que efectivamente significa que todas las Cuentas cuyo primer dígito sea ???6” se van a usar.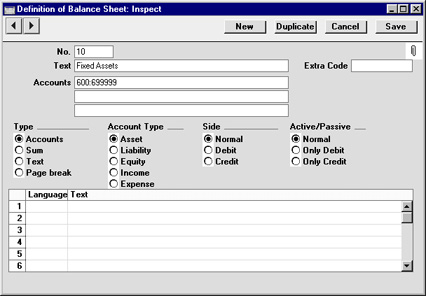
Se habrá seleccionado “Cuentas” de las cuatro opciones de Tipo, para indicar que cada una de la Cuentas del intervalo, se presentará individualmente. Se imprimirá un total para el grupo tras la última Cuenta en el grupo.
El Tipo de Cuenta es “Activo”. Te explicamos el concepto de Tipo de Cuenta aquí.
Las opciones de Lado y Activo/Pasivo se describen en la página de Funciones Especiales del Balance.
La tabla se puede utilizar para ingresar distintas traducciones del Texto (ej. el encabezado o subtítulo del informe). Debes especificar un Idioma en la primera columna usando ‘Pegado Especial’ si fuese necesario. Luego se coloca la traducción apropiada en la segunda columna. No hay necesidad de ingresar una línea para tu Idioma nacional. Cuando se imprima un informe, puedes especificar el Idioma a emplearse.
El Código Extra se utiliza en Rusia, donde se imprime el Balance usando un diseño de informe estándar que incluye números de línea; usa este campo para especificar el número correcto de línea para este espacio del informe. El Código Extra sólo aparece en el informe cuando se éste es producido usando la casilla ‘Sin Comparación’.
El campo Cuentas posee tres líneas con espacio para una definición de 300 caracteres. Como alternativas para especificar un rango de Cuentas, puedes especificar un número de Cuentas individuales, o rango de Cuentas separados por comas. Si un rango de Cuentas ingresa con el número más alto primero, las Cuentas de ese rango serán presentadas en orden inverso. Por ejemplo, la secuencia "605:601,626,651:655" aparecerá en el informe impreso de la siguiente manera:
Si pulsas el botón [Siguiente Registro] (izquierda), se mostrará la definición posterior, número 25, “Efectivo en Caja&Banco”. Esta definición contiene un rango de Cuentas: 700 a 739999. Esta línea es de tipo “Cuentas”, y del Tipo de Cuenta “Activo”.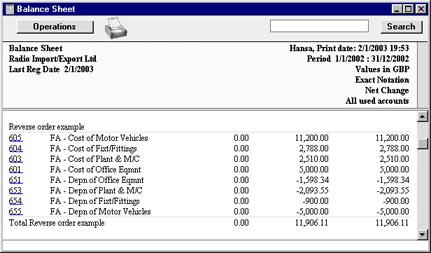
!
Si te desplazas de registro en registro mediante los botones [Siguiente] o [Anterior], recuerda que cualquier cambio que hagas se guardará. Si no deseas guardar los cambios, debes usar la casilla cerrar o haz clic en [Cancelar].
Avanza hacia el número 40, “Total de Activos Actuales”. Aquí, los valores de la línea 25,30 y 35 se agregan juntos, y el resultado aparece en la línea 40 con el encabezado “Total de Activos Actuales”. El tipo es “Suma” y el Tipo de Cuenta sigue siendo “Activo”.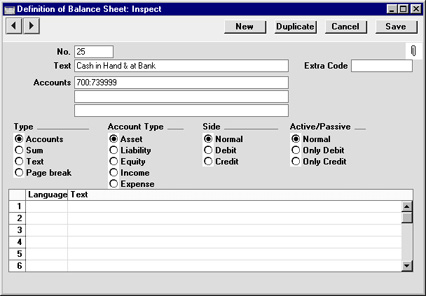
De este modo el Balance está diseñado línea por línea.
Cuando hayas acabado con la última línea, guarda los cambios con el botón [Guardar], o también cierra la ventana con la casilla cerrar. Luego, cierra la lista de definiciones usando la casilla cerrar otra vez.
Ahora el nuevo Balance está listo para imprimir.
!
Hansa viene con un Plan de Cuentas estándar y una serie de Definiciones de Informe. Es adecuado sin ningún cambio para la mayoría de las pequeñas o medianas empresas, pero también de fácil modificación, ya sea por ti mismo o por tu asesor financiero.
Si optas por la estructura del Plan de Cuentas (evitando poner Cuentas de Pasivos entre los Activos), no habrá necesidad de alterar las definiciones. Sin embargo, recuerda que es una muy buena idea imprimir un Balance de prueba para ver si tus definiciones producen lo que se espera.
Insertar una Línea en el Balance
- Asegúrate de estar en el módulo Contabilidad, luego abre la lista ‘Opciones’ y haz doble clic en ‘Opciones de Informe’ dentro la lista resultante. Resalta ‘Balance’ en la lista de la izquierda y haz clic en el botón [Definición].
Se abrirá la ventana ‘Definición de Balance: Hojear’.
- Haz clic en [Crear] o resalta un línea similar a la que quieres crear y haz clic en [Duplicar]. Se abrirá un formulario en blanco o una copia de la línea resaltada.
- Carga la información para la nueva línea. Recuerda colocar un número a la línea el cual la insertará en el debido lugar dentro del Balance. (ej. Si quieres insertar una línea entre la 30 y la 40, puedes usar 35)
- Haz clic en [Guardar] y cierra la ventana. Retornarás a la ventana ‘Definición de Balance: Hojear’ donde podrás observar la línea que creas en su lugar apropiado dentro de la lista.
- Asegúrate de estar en el módulo Contabilidad, luego abre la ventana ‘Opciones’ y haz clic en ‘Opciones de Informe??? dentro de la ventana resultante. Resalta ‘Balance’ en la lista de la izquierda y haz clic en el botón [Definición].
Se abrirá la ventana ‘Definición de Balance: Hojear’.
- Haz doble clic sobre la línea que quieres borrar para mostrar su ventana de definición.
- Selecciona ‘Borrar’ desde el menú Operaciones. Entonces, se borrará la línea del Balance y en su lugar aparecerá la definición de la línea contigua.
- Cierra la ventana. Retornarás a la ventana ‘Definición de Balance: Hojear???.
!
No Podrás deshacer el borrado de una línea en el Balance.
- Definiciones Múltiples de Balance
En algunas empresas existe el requerimiento de definiciones múltiples de Balance. Es por eso que HansaWorld Enteprise te permite adicionar hasta 15 informes de Balance en el Libro Mayor. Cada uno de estos informes puede tener su propia definición.
- Para adicionar un nuevo Balance, sigue estos pasos:
- Haz clic en el botón [Opciones] del Panel de Control y en la lista resultante, haz doble clic en ‘Opciones Informes’.
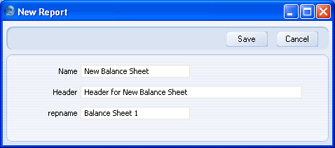
- Cuando se abra la ventana ‘Opciones de Informe???, haz clic en el botón [Crear]. Así se abrirá la ventana ‘Nuevo Informe’:
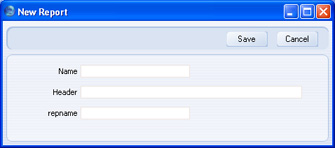
- Nombre
- Ingresa un nombre para el informe. Este nombre aparecerá en la lista ???Informes’.
- Encabezado
- Ingresa un segundo nombre para el informe. Este nombre se imprimirá en el encabezado del informe y también aparecerá en la barra de título en la ventana del informe cuando se encuentre en pantalla.
- repname
- Pegado Especial
Alternativas de datos posibles
- Puedes crear hasta 15 informes de Balance, 15 informes Estado de Resultados y 15 informes Ratios Financieros. Utiliza este campo para especificar el tipo de informe (ej. Balance, Estado de Resultados, Ratios Financieros), y también el número del informe (ej. Cuál de los quince te encuentras creando en la ocasión).
- Nombre
- Haz clic en [Guardar] para guardar el nuevo informe. La ventana ???Nuevo Informe’ se cerrará y el nuevo informe se agregará al final de la lista en las ‘Opciones de Informe’ (el nuevo informe usará el nombre especificado en la ventana ‘Nuevo Informe’):
En caso que necesites modificar el informe (tal vez por error de escritura o por ser un nombre temporal), resalta el nombre del informe en la lista y luego haz clic en el botón [Abrir]. Así se abrirá el informe en la ventana ‘Nuevo Informe’ ilustrada en el paso 2.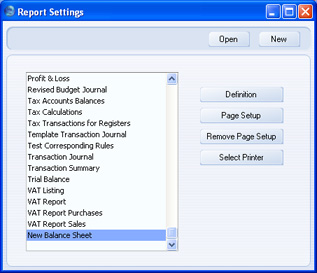
- Habiendo creado el nuevo informe, deberás ingresar una definición para él. Resáltalo en la lista ???Opciones de Informe’ y haz clic en el botón [Definición]. Este proceso es el mismo que para el Balance ‘estándar’ y está descrito en la página sobre Definición de Balance.
Si la definición del nuevo informe es similar a la del Balance ‘estándar’ u otro Balance existente, podrás arrastrar las líneas de la definición existente hacia la nueva. Resalta cada informe por separado y luego haz clic en el botón [Definición]. Entonces, tendrás dos ventanas abiertas de definición de informe:
En la anterior ilustración, la ventana ‘Definición de Balance: Hojear’ contiene la definición del Balance ???estándar’, mientras que la ventana ‘Definición de Balance 1: Hojear’ está vacía en espera del traspaso de la otra definición. El número ???1” en el título de ventana corresponde al “Balance 1” en el campo ‘Nombre’ de la ventana ‘Nuevo Informe’ (ilustrada en paso 2).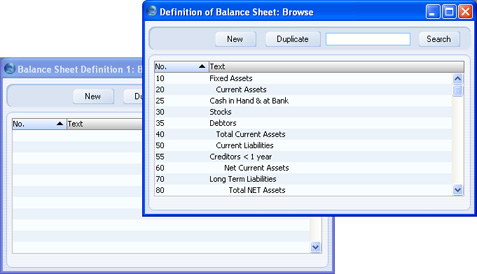
Podrás arrastrar líneas individualmente desde una ventana hacia otra, o puedes resaltar muchas líneas a la vez y arrastrarlas todas.
- Para imprimir el nuevo informe, abre la ventana ‘Informes’ como es normal. Este informe aparecerá al final de la lista usando el Nombre especificado en la ventana ‘Nuevo Informe’:
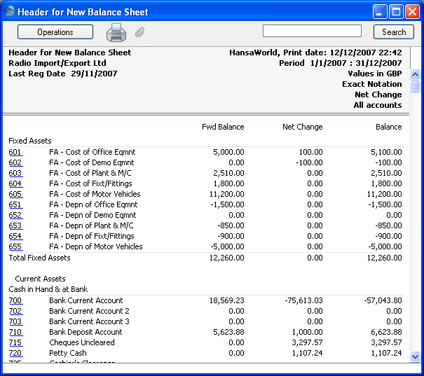
Haz doble clic en el nombre del informe y luego imprímelo del modo normal. La ventana de especificación para el informe será la misma que para el Balance ‘estándar’ y se describe a continuación en la sección ‘Impresión de Balance’. El texto situado en la barra de título y el título de informe (“Encabezado de Nuevo Balance”), serán tomados del campo ‘Encabezado’ (ventana ‘Nuevo Informe’- paso 2).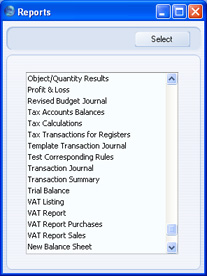
- En caso que necesites eliminar el nuevo informe, abre la lista ‘Informes’ como indica el paso 5 y luego haz clic en el nombre del informe. Posteriormente, selecciona ‘Limpiar’ del menú Editar.
- Impresión
Abre la lista ‘Informes’ y haz doble clic en ???Balance’. Se abrirá la ventana ‘Especificar Balance’.
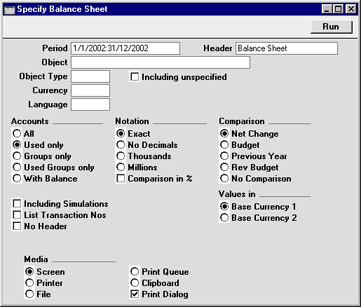
- Periodo
- Pegado Especial
opción Periodos de Informe, módulo Sistema
- Ingresa el periodo para el Balance que deseas imprimir. Hansa te sugerirá por defecto el primer periodo de la opción Periodos de Informe.
- Encabezado
- Especifica aquí un título para el informe.
- Objeto
- Pegado Especial
registro de Objetos, módulos Contabilidad/Sistema
- Ingresa un Código de Objeto en este campo para limitar el informe en función a Transacciones con cierto Objeto. Si el campo estuviere vacío, se incluirá todas las Transacciones con o sin Objeto. Si ingresas un número de Objetos separados por comas, sólo aparecerán aquellas Transacciones que presenten los Objetos listados.
- Tipo de Objeto
- Pegado Especial
opción Tipos de Objeto, módulo Contabilidad
- Ingresa un Código Tipo de Objeto en este campo para limitar el informe en función a transacciones para Objetos de un cierto Tipo de Objeto.
- Incluir no Especificado
- Tilda esta casilla para mostrar una cifra en el balance en función a Transacciones para Objetos de cierto Tipo de Objeto (para cada Cuenta), y un segundo balance para todas las demás Transacciones.
- Moneda
- Pegado Especial
registro Moneda, módulo Sistema
- Si se ingresa una Moneda aquí, todos los montos serán convertidos a la Moneda especificada, usando el Tipo de Cambio de la Fecha de Asiento.
- Se deberá ingresar una Moneda extranjera aquí. Deja este campo en blanco y escoge la Moneda Base a emplearse para así poder producir un informe con cifras en Moneda Base 1 o 2. Para esto, utiliza las opciones ‘Valores en’.
- Se deberá ingresar una Moneda extranjera aquí. Deja este campo en blanco y escoge la Moneda Base a emplearse para así poder producir un informe con cifras en Moneda Base 1 o 2. Para esto, utiliza las opciones ‘Valores en’.
- Idioma
- Pegado Especial
opción Idiomas, módulo Sistema
- El Balance puede ser generado en diferentes Idiomas; ingresa el Código Idioma requerido aquí. La traducción apropiada para cada Nombre de Cuenta será extraída de la solapa 'Textos' en el registro Cuentas; y para cada encabezado de informe y subtítulo provendrá de la definición de informe.
- Cuentas
- Selecciona cómo deseas que se impriman las Cuentas en el informe.
- Todas
- Esta opción mostrará todas las Cuentas que han sido incluidas en las definiciones del Balance.
- Sólo Usadas
- Esta opción sólo mostrará Cuentas que hayan sido usadas. Esto incluye Cuentas que tienen balances apertura correspondiente a periodos anteriores, pero no han sido usadas en el periodo de informe.
- Sólo Grupos
- Esta opción no muestra balances para Cuentas individuales. Por el contrario, sencillamente muestra un balance general para cada línea ingresada en las definiciones de Balance.
- Sólo Grupos Usados
- Esta opción sólo muestra balances para las líneas ingresadas en las definiciones del Balance que han sido usadas.
- Todas
- Notación
- Selecciona el formato de impresión para los valores en el Balance.
- Exacta
- Muestra los balances como están almacenados en las Transacciones.
- Sin Decimales
- Redondea los balances al número entero más cercano.
- Miles, Millones
- Divide los balances en 1,000 o 1,000,000.
- Comparación %
- Únicamente es válido si el Presupuesto o Presupuesto Revisado está seleccionado con la opción Comparación.
- Exacta
- Comparación
- Escoge comparar con el Cambio Neto, Presupuesto, Presupuesto Revisado o año previo.
- Si estás usando la opción de Presupuesto o Presupuesto Revisado. Los registros de Presupuesto o Presupuesto Revisado sólo serán incluidos en el informe si al menos tienen un dato cargado en el área de la matriz, con su fecha también.
- La opción ‘Sin Comparación’ sólo muestra los balances apertura y aquellos para el periodo de informe. Es adecuado para los usuarios en Rusia donde el Balance se imprime usando un diseño estándar de informe incluyendo números de línea. Los números de línea se especifican usando el campo Código Extra en las Definiciones del Balance.
- Si estás usando la opción de Presupuesto o Presupuesto Revisado. Los registros de Presupuesto o Presupuesto Revisado sólo serán incluidos en el informe si al menos tienen un dato cargado en el área de la matriz, con su fecha también.
- Incluir Simulaciones
- Tilda esta casilla para incluir asientos simulados en el informe. No se incluirá líneas de Simulación con Estado ???Inválido” o “Transferido”.
- Listar Nro. Trans.
- Tildando esta casilla, se listará los Números de Asiento de todas las Transacciones que caigan dentro del periodo de informe conjuntamente con los totales de haber y debe. Éstos aparecerán al pie del informe.
- Sin Encabezado
- Tilda esta casilla si deseas que el informe se imprima sin un encabezado.
- Valores en
- Si estás usando el sistema de Base-dual, los valores en este informe pueden mostrarse en cualquier Moneda Base. Usa estas opciones para escoger la Moneda a emplearse en esta ocasión.
- Si no estás usando el sistema de Base-dual, utiliza la Moneda Base 1 para producir un informe en tu Moneda local.
- Si se ingresa una Moneda extranjera en el campo Moneda, estas opciones serán ignoradas y los montos en el informe serán convertidos a la Moneda especificada usando el Tipo de Cambio de la Fecha de Asiento.
- Si no estás usando el sistema de Base-dual, utiliza la Moneda Base 1 para producir un informe en tu Moneda local.
Cuando se pase a pantalla, el Balance poseerá la función Drill-down de Hansa. Haz clic en el Número de cualquier Cuenta en el informe para abrir el informe Mayor en relación a la misma Cuenta y mismo periodo. Desde el informe Mayor, puedes abrir cualquier registro individual de Asiento, para esto haz clic en el Número de Asiento.
-Funciones Especiales
Esta sección no tiene relevancia para aquellas compañías que emplean procesamientos convencionales occidentales.
En la definición de Balance, existen dos grupos de opciones que requieren de un análisis especial. Este diseño ha sido realizado para facilitar ciertos requerimientos contables y esquemáticos en varios países. La forma más fácil de explicar la utilidad de estas funcionalidades es con la ayuda de un ejemplo. En la mayoría de las empresas, se tiene un conjunto de cuentas de conciliación o inciertas, ya sea activos o pasivos, las cuales pueden contener balances de haber y deber alternadamente. Los procesamientos contables convencionales en algunos países, solamente permiten cuentas de haber o debe “puras”, y cuando se produce un balance, se hace necesario mover cuentas individuales de aquí para allá entre los grupos de activo o pasivo, dependiendo del balance positivo o negativo vigente.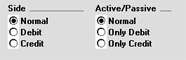
Para complicar las cosas aún más, en algunos países se acostumbra diferenciar cuatro “estados” distintos de un dato: Debe+, Debe-, Haber+ y Haber-. En los sistemas contables modernos de occidente, un dato a ingresar es tanto debe como haber, si importar la clase de cuenta, ej. nosotros tenemos una definición aritmética simple de los balances.
En esos entornos donde se manejan todas estas reglas especiales, la preparación de informes de balance tiende a volverse complicada y exhaustiva. En este sentido, las funciones especiales de Hansa, permiten la automatización de muchas de estas rutinas dejando atrás los otros procedimientos. Así es como funciona.
Permítanos empezar con el siguiente informe Mayor que muestra el balance real de haber y debe para dos Cuentas.
Cuenta 702 – Cuenta Bancaria Actual 2:
Cuenta 703 – Cuenta Bancaria Actual 3: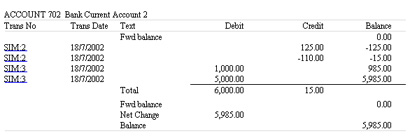
la Cuenta no. 703 está definida como un activo y actualmente tiene un balance en haber. El Debe Total durante el periodo es 15, y el Total Haber es 1000. La cuenta no. 702 tiene un balance de Debe normal; sin embargo en esta última cuenta, se han ingresado dos valores negativos, uno en Haber y otro en Debe. Si las Cuentas se emplean en una definición de informe normalmente, mediante los botones Lado:Normal y Activo/Pasivo:Normal, seleccionados; el balance de la Cuenta no. 703 aparecerá como un valor negativo.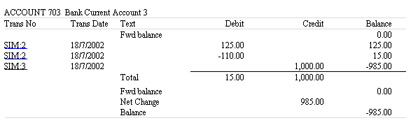
Seleccionando los botones Lado:Debe y Activo/Pasivo:Sólo opciones Debe; la columna de total Debe para la Cuenta 702 aparecerá, por cuanto el balance de Cuenta está en Debe;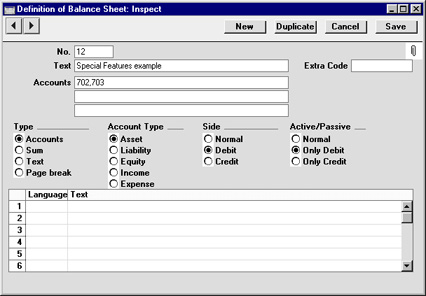
Seleccionando Lado:Haber y Activo/Pasivo:Sólo Haber; aparecerán los balances en las columnas de ambas Cuentas, por cuanto ambas son negativas.
Seleccionando Lado:Haber y Activo/Pasivo:Sólo Debe; no aparecerá nada, por cuando la columna Haber de la Cuenta 702 tiene un valor positivo y la 703 tiene un balance global de debe.
Seleccionando Lado:Debe y Activo/Pasivo:Sólo Haber; igualmente no aparecerá nada.
La combinación: Lado:Haber y Activo/Pasivo:Normal muestra balances de la columna Haber para ambas Cuentas:

Conciliación Bancaria
Este informe lista todos los registros no conciliados de la Cuenta Bancaria y los divide en tres grupos: Pagos Pendientes, Recibos Pendientes y Cobros Bancarios. Este último incluye todos los registros que no se vinculan a los dos primeros (ej. intereses de banco, transferencias entre cuentas bancarias, pagos de salario).
El informe entonces tomará el saldo cierre de tu último extracto bancario y calculará un nuevo balance que toma en cuenta los registros sin conciliar. Este nuevo balance luego será comparado con el balance actual en función a la Cuenta Banco de tu base de datos. Si los dos balances son diferentes, la razón probable puede que sea la existencia de al menos un registro sin conciliar, el cual puede ser conciliado con el extracto bancario.
Cuando se encuentra en pantalla, el informe Conciliación Bancaria posee la funcionalidad Drill-down de HansaWorld Enterprise. Haz clic en un Número de Sub-diario (ej. Número de Factura) para abrir el Asiento correspondiente desde donde podrás abrir también la Factura en sí. Para abrir la Factura subyacente, utiliza el comando 'Abrir Registro de Sub-diario' desde el menú Operaciones en la ventana del informe.

- Periodo
- Pegado Especial
opción Periodos de Informe, módulo Sistema
- Especifica el periodo de informe. Esto deberá ser suficiente para incluir todos los registros sin conciliar en la Cuenta Banco.
- Forma Pago
- Pegado Especial
opción Formas de Pago, módulos Ventas/Compras
- Ingresa una Forma de Pago; el informe mostrará todos los registros sin conciliar de la Cuenta que aparece en la pestaña A de esta Forma de Pago.
- El informe quedará vacío si no especificas una Forma de Pago.
- El informe quedará vacío si no especificas una Forma de Pago.
- Equilibrar
- Ingresa el balance cierre de tu último extracto bancario. El informe calculará un nuevo balance que toma en cuenta los registros sin conciliar. Este nuevo balance por tanto, será comparado con el balance actual en función a la Cuenta de la Forma de Pago especificada arriba.
- Valores en
- Si estás usando el sistema de Base-dual, los valores en este informe aparecerán en cualquiera de las Monedas Base. En este sentido, usa estos radio botones para escoger la Moneda a emplearse en esta ocasión.
- Si no estás usando el sistema de Base-dual, utiliza la opción Moneda Base 1 para que puedas producir un informe en tu Moneda local.
Extracto Bancario
Este informe lista los registros de Pagos, Recibos, Asientos y Pagos de Personal de la Cuenta Banco o Efectivo especificada durante el periodo respectivo. Además aparecerá un balance final.
Comparado con otros informes Contables (Cuenta y Saldos), el Extracto Bancario lista cada transacción individualmente y también muestra información del Cliente y Proveedor. En adición, habrá la opción de usar la función Drill-down de HansaWorld Entreprise para activar un Recibo, Pago o Pago de Personal (usando su número) y abrir el registro de Subdiario correspondiente; toma en cuento que no ser tratará el Asiento vinculado que usualmente se abre desde otros informes Contables.
También podrás producir este informe usando la función ‘Extracto Bancario’ del menú Operaciones en las ventanas de: Recibos, Anticipos y Pagos de Personal.
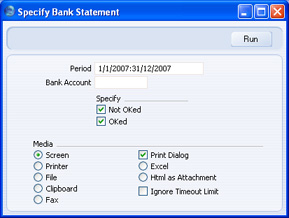
- Periodo
- Pegado Especial
opción Periodos de Informe, módulo Sistema
El informe listará los registros contables de la Cuenta Banco o Efectivo durante el periodo especificado aquí.
- Cta. Banco
- Pegado Especial
registro Cuentas, módulos Contabilidad/Sistema
- Especifica la Cuenta cuyas transacciones y saldo deseas ver. Deberás especificar una Cuenta, de lo contrario el informe quedará vacío.
- Especificar
- Utiliza estas casillas para determinar si el informe contendrá Recibos, Anticipos y Pagos de Personal aprobados o no aprobados. No obstante, siempre se mostrará Asientos sin importar las alternativas seleccionadas aquí.
Transacciones Bancarias
Este informe es una lista de los datos contenidos en el Extracto Bancario. Si tu base de datos está registrada en Estonia y estás usando el Servicio Electrónico de Extracto Bancario SEB, este reporte contendrá extractos bancarios recibidos electrónicamente desde el Banco SEB. Cada dato alineado en las distintas columnas del informe, representará una sola transacción o extracto. Si necesitas verificar que el extracto está correcto, podrás imprimir este informe y luego compararlo con la Conciliación Contable o el informe Mayor.
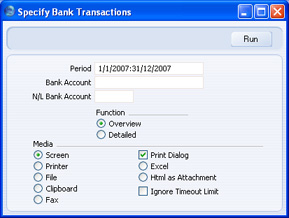
- Periodo
- Pegado Especial
opción Periodos de Informe, módulo Sistema
- Ingresa la fecha inicio y la fecha fin del periodo cuyas Transacciones Bancarias van a ser presentadas en el informe. Por defecto se ofrece el primer archivo de la opción ‘Periodos de Informe’. Se incluirá también un Asiento Bancario si la Fecha de Trans. en la solapa ‘Destinatario’ cae en el periodo especificado aquí.
- Cta. Bancaria
- Si tienes varias cuentas bancarias, podrás usar el Servicio Electrónico de Extracto Bancario SEB para recibir extractos electrónicos en relación a más de una de esas cuentas. De ser así, podrás usar este campo para restringir el informe de Transacciones Bancarias y remitirte sólo a una Cuenta Bancaria. El informe contendrá aquellas Transacciones Bancarias donde el Tipo sea “D” y donde la Cuenta respectiva esté especificada en la solapa ‘Destinatario’.
- Cta. Cont. Banco
- Pegado Especial
registro Cuentas, módulos Contabilidad/Sistema
- Si ingresas aquí una Cuenta que representa a tu cuenta bancaria en tu Plan de Cuentas, el informe incluirá el saldo abierto para esa Cuenta y un balance teórico que incluye las Transacciones Bancarias.
- Función
- Utiliza estas alternativas para decidir el nivel de detalle a presentarse en el informe.
- Resumido
- El informe contendrá una sola línea para cada Transacción Bancaria y mostrará la Fecha de Trans., el Número de Trans., la Moneda, el monto (aparecerá como Debe si el Tipo es “D”, o como Haber si el Tipo es “C”) y el Comentario.
- Detallado
- En adición a la información mostrada en la versión resumida, el informe mostrará los nombres del Pago y el Destinatario, las Referencias del Pagador y Destinatario y Nro. Registro Pagador 1.
- Resumido
Tipo de Cambio Moneda Base
Por favor, haz clic aquí para detalles completos de este informe.Diario de Presupuestos
Este informe lista los archivos en el registro de Presupuesto.

- Cuenta
- Pegado Especial
registro de Cuentas, módulos Contabilidad/Sistema
- Rango de Informe Alfa
- Especifica la Cuenta o el rango de Cuentas para los cuales se imprimirá Presupuestos.
- Especifica la Cuenta o el rango de Cuentas para los cuales se imprimirá Presupuestos.
- Periodo
- Pegado Especial
opción Periodos de Informe, módulo Sistema
- Ingresa la fecha inicio y la fecha fin del periodo cuyos Presupuestos aparecerán en el informe.
Se utilizará el primer registro de la opción Periodos de Informe como por defecto.
- Todos los Presupuestos que son pertinentes al periodo de informe serán listados en el informe. Por ejemplo, si el periodo de informe es 1ro de Junio al 30 de Junio, se incluirá Presupuestos que comiencen o terminen en Junio, y los Presupuestos que comiencen antes de Junio y terminen después de Junio también serán mostrados.
- Todos los Presupuestos que son pertinentes al periodo de informe serán listados en el informe. Por ejemplo, si el periodo de informe es 1ro de Junio al 30 de Junio, se incluirá Presupuestos que comiencen o terminen en Junio, y los Presupuestos que comiencen antes de Junio y terminen después de Junio también serán mostrados.
- Objeto
- Pegado Especial
registro de Objetos, módulos Contabilidad/Sistema
- Para listar Presupuestos con un Objeto particular, ingresa ese Objeto aquí.
- Función
- Utiliza estas opciones para determinar el nivel de detalle a ser incluido en el informe.
- Resumido
- Esta opción nos presentará un informe con un línea por Presupuesto mostrando el Número de Cuenta, Nombre de Cuenta, Objeto, Fecha Inicio/Fin y Suma.
- Detallado
- En adición a la información desplegada en el Resumen, esta opción también lista los totales mensuales o trimestrales en cada Presupuesto.
- Resumido
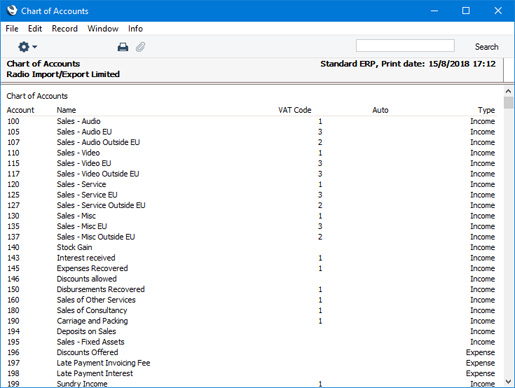
Plan de Cuentas
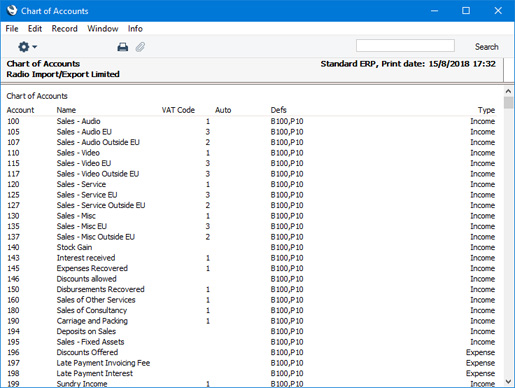
Esta página describe el informe Plan de cuentas en el módulo de Contabilidad.
---
Utilice el informe Plan de cuentas cuando necesite imprimir una lista de las cuentas en el registro Cuentas Contables. También puede generar este informe ejecutando el informe Documentación del Sistema en el módulo Sistema utilizando las opciones Plan de cuentas o Plan de Cuentas c/ Definiciones de Informes.
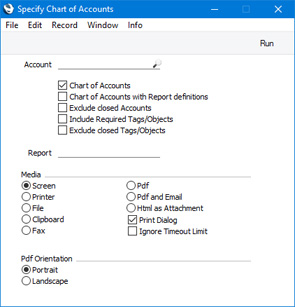
- Cuentas Contables
Registro- Pegado especial
Cuentas Contables, Módulo Contabilidad/ Sistema
- Rango del Informe Alfa
- Ingrese un número de cuenta o un rango de números separados por dos puntos (:) aquí si desea que se muestren cuentas específicas en el informe.
- Ingrese un número de cuenta o un rango de números separados por dos puntos (:) aquí si desea que se muestren cuentas específicas en el informe.
- Plan de Cuentas
- Esta opción imprime la lista de las cuentas en el registro de cuentas contables, en orden por número de cuenta. Muestra el número y nombre de la cuenta, el código de IVA, la transacción automática y el tipo de cuenta.
- Plan de Cuentas c/ Definiciones de Informes
- Esta opción agrega una columna adicional al informe que muestra las definiciones de informe en las que se ha utilizado cada cuenta.
- Por ejemplo, si la cuenta 11110 aparece en la fila 1020 del balance general, la columna adicional de este informe mostrará "B1020", donde "B" significa el balance general y "1020" significa el número de fila. Si tiene más de una definición de Balance, se utilizará el mismo código "B" para cada una, por lo que no será posible distinguir entre diferentes definiciones. Si desea que el informe muestre el uso de la cuenta en una sola definición de informe, especifique ese informe en el campo Informe a continuación.
- Por ejemplo, si la cuenta 11110 aparece en la fila 1020 del balance general, la columna adicional de este informe mostrará "B1020", donde "B" significa el balance general y "1020" significa el número de fila. Si tiene más de una definición de Balance, se utilizará el mismo código "B" para cada una, por lo que no será posible distinguir entre diferentes definiciones. Si desea que el informe muestre el uso de la cuenta en una sola definición de informe, especifique ese informe en el campo Informe a continuación.
- Excluir Cuentas Cerradas
- Seleccione esta opción si desea omitir las cuentas que se marcaron como cerradas del informe.
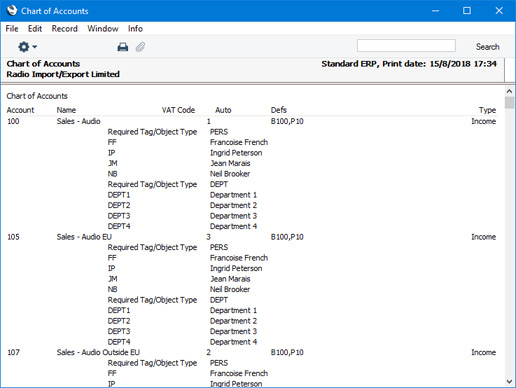
- Incluir etiquetas/objetos requeridos
- Seleccione esta opción si desea que el informe muestre las etiquetas/objetos que se deben usar con cada cuenta, como se especifica en la configuración de control de tipo de etiqueta/objeto.
- Excluir etiquetas/objetos cerrados
- Si seleccionó la opción anterior Incluir etiquetas/objetos necesarios, seleccione esta opción también si necesita que los objetos que se han marcado como cerrados se excluyan del informe.
- Informe
- Pegado especial
Definiciones de informes en Opciones Informes, Contabilidad
- Si seleccionó la opción Plan de cuentas c/ definiciones de informe arriba y necesita que el informe muestre las cuentas que se utilizan en una sola definición de informe, especifique ese informe aquí.
Informes Módulo Contabilidad:
- Introcucción
- Definición Reportes de Contabilidad
- Drill-down
- Menu Operaciones
- Conciliación de Cuenta
- Reporte de Devengamientos/Aprovisionamientos
- Balance Analitico
- Balance Cuentas Impositivas
- Balance
- Conciliacion Bancaria
- Extracto Bancario
- Reporte Transacciones Bancarias
- Diferencias T.C. en Moneda Base
- Diario de Presupuesto
- Plan de Cuentas
- Lista de Correcion
- EOAF Contra Cuentas
- Cuentas Acreedores
- Diferencias T.C. en Moneda de Cta.
- Balances Diarios
- Cuenta Deudores
- Diario de Balance de Apertura
- Libro de Ingresos y Gastos
- Ratios Financieros
- Pronostico de Liquidez CashFlow)
- Diferencias T.C. Ctas. Multimoneda
- Transacciones p/Devengamientos
- Transferencias de Asientos Contable
- Libro Mayor
- Estado de Resultados
- Diario de Presupuestos Rev.
- Diario de Simulación
- Resultados de Objeto
- Resultado de Objetos/Cantidades
- Saldo Cuentas Impositivas
- Especificar Cálculos de Impuestos
- Transacciones Impuestos para Registros
- Diario Modelos de Transacciones
- Test Reglas para Contra-Cuentas
- Diarios de Asientos
- Resumen de Asientos
- Balance de Prueba
- Lista de IVA
- Informe IVA
- IVA Facturas de Compra
- IVA Facturas de Venta
- Diario de Transacciones IVA
- Informe XBRL
Volver a:
- Página principal a manual Contabilidad
- Página principal a manual Standard ERP
Lista de Corrección
La Lista de Corrección recopila los Asientos corregidos que caen en el periodo especificado (usando la función 'Marca de Corrección') o que han sido actualizados (usando la función 'Marca de Actualización'). No puedes cambiar la definición de este informe.
Cuando se pase a pantalla, la Lista de Corrección posee la función Drill-down de Hansa. Haz clic en cualquier Número de Asiento en el informe para abrir un registro individual de Asiento.
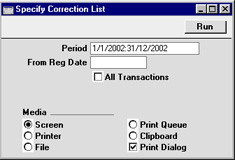
Con doble clic en ‘Lista de Corrección’ se abrirá la siguiente ventana:
- Periodo
- Pegado Especial
opción Periodos de Informe, módulo Sistema
- Ingresa el periodo de informe con formato 01-02-02:28-02-02. Si estás usando años de cuatro dígitos como en la ilustración, se insertará automáticamente los dígitos principales. Si tu periodo de informe es un solo día, ingresa la fecha y automáticamente éste se convertirá en un formato de periodo. La primera línea de la opción Periodos de Informe se ofrece por defecto.
- Desde Fecha Reg.
- Esta es la fecha de registración (fecha de ingreso), no la Fecha de Asiento.
- Todas las Transacciones
- Por defecto, este informe únicamente muestra Asientos corregidos o actualizados que caen dentro del periodo de informe. Si quisieses listar todos los asientos, a lo mejor para obtener una impresión de la proporción que ha sido modificada, debes tildar esta casilla.
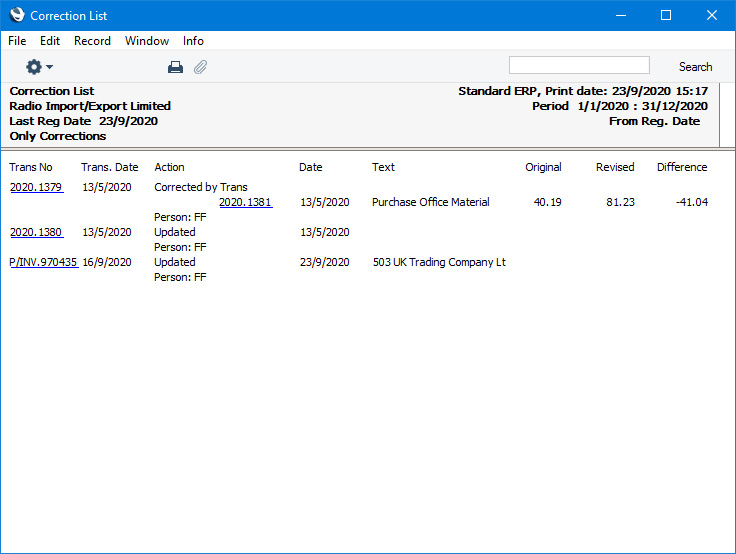
Correction List
This page describes the Correction List report in the Nominal Ledger.
---
The Correction List is a list of corrections and updates that you have made to Transactions from a specified period. You can make a correction to a Transaction by opening it in a record window and selecting 'Correction Mark' from the Operations menu (Windows/macOS) or Tools menu (iOS/Android), while you can make an update using the 'Update Mark' function on the same menu. The report will also include Transactions created from Sub System records that you have invalidated. You cannot change the definition of this report.
You can also produce this report from the Consolidation module. In this case, the report will list corrections and updates made to Transactions in every Company in the database.
When printed to screen, the Correction List has the Standard ERP Drill-down feature. Click (Windows/macOS) or tap (iOS/Android) on any Transaction Number in the report to open an individual Transaction record.
Selecting 'Correction List' from the 'Reports' list in the Nominal Ledger or the Consolidation module will open the following window:
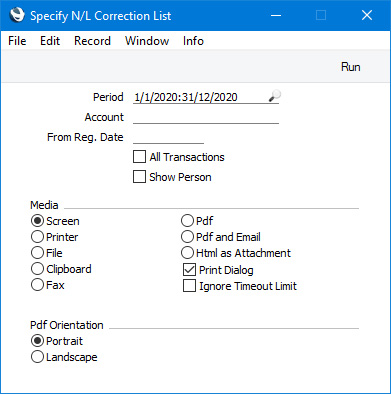
- Period
- Paste Special
Reporting Periods setting, System module
- Enter the report period. The report will list corrected and updated Transactions that were originally entered during the period that you specify here. The corrections and updates themselves may have been made after this period.
- If you need the period to be a single day, just enter the date once and this will be converted to the period format automatically.
- The first row of the Reporting Periods setting will be used as the default value.
- If you need the period to be a single day, just enter the date once and this will be converted to the period format automatically.
- Account
- Paste Special
Account register, Nominal Ledger/System module
- Range Reporting Alpha
- Enter an Account here if you need the report to list corrected and updated Transactions featuring a particular Account in at least one row.
- Enter an Account here if you need the report to list corrected and updated Transactions featuring a particular Account in at least one row.
- From Reg. Date
- Enter a date here if you need the report to list corrections and updates made on or after a particular date.
- All Transactions
- By default, the report will only list Transactions that have been corrected or updated. For each Transaction, it will show the Transaction Number, the Transaction Date, the action (i.e. correction or update) and date of the action. In the case of a corrected Transaction, the Number of the correcting Transaction will also be shown. If you select this option, every Transaction, including those that have not been corrected or updated, will be listed in the report, together with their registration dates. You might use this option to gain an impression of the proportion of Transactions that have been changed, or to get an idea of how long it takes for updates and corrections to be made.
- If you use this option and also enter an Account in the field above, the report will list all Transactions that post to that Account, with and without corrections and updates. Other updates and corrections will not be shown.
- If you use this option and also enter an Account in the field above, the report will list all Transactions that post to that Account, with and without corrections and updates. Other updates and corrections will not be shown.
- Show Person
- If a Transaction was corrected, the Signature of the correcting Person will be included in the report if you have selected this option. If a Transaction was updated or invalidated, the Signature will always be shown.
- 2020.1379
- Transaction corrected by Transaction 2020.1381.
- 2020.1380
- Transaction updated.
- P/INV.970435
- Transaction created from a Sub System record (Purchase Invoice 970435) that was invalidated.
---
Reports in the Nominal Ledger:
- Introduction
- Definition of Nominal Ledger Reports
- Drill-down
- The Operations Menu
- Account Reconciliation
- Accrual Report
- Analytical Balance
- Analytical Balance (Fiscal purposes)
- Balance Sheet
- Bank Reconciliation
- Bank Statement
- Bank Transactions
- Base Currency Rate Change
- Budget Journal
- Cash Flow
- Chart of Accounts
- Correction List
- Corresponding Accounts
- Creditors Account
- Currency A/C Rate Change
- Daily Balances
- Debtors Account
- Forward Balance Journal
- Income & Expense Book
- Key Financial Ratios
- Liquidity Forecast
- Multicurrency Accounts Rate Difference
- N/L Accrual Transactions
- N/L Transfer, Subsystems
- Nominal Ledger
- Profit & Loss
- Revised Budget Journal
- Simulation Journal
- Tag/Object Results
- Tag/Object/Quantity Results
- Tax Account Balances
- Tax Calculations
- Tax Transactions for Registers
- Template Transaction Journal
- Test Corresponding Rules
- Transaction Journal
- Transaction Summary
- Trial Balance
- VAT Listing
- VAT Report
- VAT Report Purchases
- VAT Report Sales
- VAT Transaction Journal
- XBRL Report
Go back to:
- Home page for Nominal Ledger manual
- Home page for Standard ERP manual
Contra Cuentas
Este informe muestra la manera en que cada Cuenta es equilibrada en el periodo seleccionado. Por ejemplo, donde una Cuenta haya sido usada en el lado de Haber del Asiento, este informe mostrará las Cuentas usadas en el lado del Debe (registrando los montos). Las Cuentas equilibradas son catalogadas como ‘EOAF Contra Cuentas’.
En transacciones complejas donde, por ejemplo, las dos primeras líneas son Cuentas Debe y por eso hay varias líneas de Haber, la correlatividad se establece manualmente usando el campo ‘Contra’ en cada línea del Asiento.
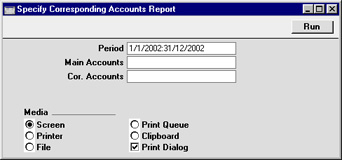
- Periodo
- Pegado Especial
opción Periodos de Informe, módulo Sistema
- Especifica el periodo a ser abarcado por el informe.
- Cta. Principal
- Pegado Especial
registro de Cuentas, módulos Contabilidad/Sistema
- Rango de Informe Alfa
- Especifica aquí las Cuentas cuya correlatividad deseas analizar.
- Especifica aquí las Cuentas cuya correlatividad deseas analizar.
- Contra Cuenta
- Pegado Especial
registro de Cuentas, módulos Contabilidad/Sistema
- Rango de Informe Alfa
- Utiliza este campo si solamente te interesa ver Contra Cuentas específicas.
- Utiliza este campo si solamente te interesa ver Contra Cuentas específicas.
- Sólo Saldos
- Con esta casilla tildada para cada Cuenta principal, se listará cada Contra Cuenta en una sola línea conteniendo los saldos de Haber y Debe apropiados para el periodo de Informe. Si no se tilda la casilla, todas las Transacciones para cada Contra Cuenta aparecerán individualmente.
- Listar Nro. Trans.
- Con esta casilla tildada, se listará los Números de Asiento de todas las Transacciones que caigan dentro del periodo de informe conjuntamente con los totales de Haber y Deber; éstos aparecerán al pie del informe.
Informe Cuenta Acreedores
Este informe satisface un requerimiento específico para usuarios en Rusia. Por favor, consulta tu representante Hansa local para más detalles.Diferencias T.C. en Moneda de Cta.
Por favor, haz clic aquí para detalles completos sobre este informe.Balances Diarios
Este informe proporciona saldos de Debe, Haber y global diarios para todas las Cuentas usadas.
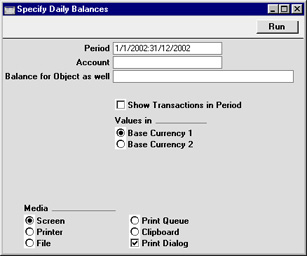
- Periodo
- Pegado Especial
opción Periodos de Informe, módulo Sistema
- Especifica aquí el periodo a ser abarcado por el informe. Para obtener balances para un día particular, simplemente ingresa la fecha.
- Si se ingresa un periodo de informe mayor a un día, se mostrará saldos para cada Cuenta individual pero sólo en función a aquellos en que se usó la Cuenta.
- Si se ingresa un periodo de informe mayor a un día, se mostrará saldos para cada Cuenta individual pero sólo en función a aquellos en que se usó la Cuenta.
- Cuenta
- Pegado Especial
registro de Cuentas, módulos Contabilidad/Sistema
- Rango de Informe Alfa
- Especifica la Cuenta o rango de Cuentas cuyos saldos aparecerán en el informe.
- Especifica la Cuenta o rango de Cuentas cuyos saldos aparecerán en el informe.
- Balance por Objeto
- Pegado Especial
registro de Objetos, módulos Contabilidad/Sistema
- Si necesitas mostrar para cada Cuenta un balance en función a un Objeto particular, especifica ese Objeto aquí. Si ingresas un número de Objetos separados por comas, se mostrará un solo balance para las transacciones pertenecientes a los Objetos listados.
- Mostrar Asientos en Periodo
- Con esta casilla tildada, se lístará los Números de Asiento de todas las Transacciones que caigan dentro del periodo de informe conjuntamente con los totales de Haber y Debe. Éstos aparecerán al pie del informe.
- Valores en
- Si estás usando el sistema de Base-dual, los valores en este informe se podrán mostrar en cualquier Moneda Base. Utiliza estas opciones para escoger la Moneda a emplearse en esta ocasión.
- Si no estás usando el sistema de Base-dual, utiliza la Moneda Base 1 para producir un informe en tu Moneda local.
Informe Cuenta Deudores
Este informe satisface un requerimiento específico para usuarios en Rusia. Por favor, consulta tu representante Hansa local para más detalles.Diario de Balance de Apertura
Este informe lista los archivos en el registro Balance Apertura.
Para cada registro, este informe muestra el Número de Serie, la Fecha, el Objeto y la Descripción. También los datos individuales respecto al Haber y Debe para cada Cuentas estarán listados aquí, conjuntamente con las Monedas de los balances.
Cuando se pase a pantalla, el Diario de Balance de Apertura posee la función Drill-down de Hansa. Haz clic en cualquier número de serie en el informe para abrir un registro individual del Balance Apertura.
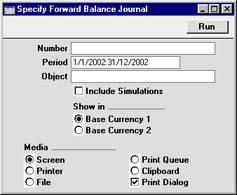
- Número
- Rando de Informe
Numérico
- Ingresa un Número de Serie o un rango de Números para mostrar registros particulares del Balance Apertura, o deja en blanco para incluir todos los registros.
- Periodo
- Pegado Especial
opción Periodos de Informe, módulo Sistema
- Ingresa la fecha inicio y fecha fin del periodo cuyos registro de Balance Apertura van a ser mostrados en el informe. El primer registro de la opción Periodos de Informe se utiliza como por defecto.
- Objeto
- Pegado Especial
registro de Objeto, módulos Contabilidad/Sistema
- Para listar Presupuestos con un Objeto particular, ingresa ese Objeto aquí.
- Incluir Simulaciones
- Tilda esta casilla para incluir en el informe, registros de Balances Apertura cuyas casillas de Simulación hayan sido tildadas. Estos registros serán marcados como Simulaciones en el informe.
- Mostrar en
- Si estás usando el sistema de Base-dual, los valores en este informe podrán mostrarse en cualquier Moneda Base. Utiliza estas opciones para escoger la Moneda a emplearse en esta ocasión.
- Si no estás usando el sistema de Base-dual, utilize la Moneda Base 1 para producir un informe en tu Moneda local.
Income & Expense Book
This page describes the Income & Expense Book report in the Nominal Ledger.
---
The Income and Expense Book report is a list of postings made during a specified period, sorted by date and classified by the type of Account. The report uses six Account classifications: Income Sales; Income Other; Purchases; Expense; Expense Cash and Expense Other.
Before running the report, you should use the Income & Expense Book setting in the Nominal Ledger to classify each Account. Usually you will need to enter a separate record to this setting for each classification, but you can enter more than one record for a particular classification if necessary.
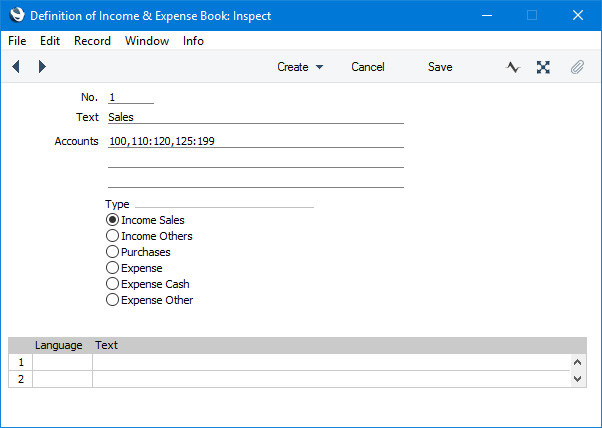
- No.
- Enter a unique code to identify each record in the Income & Expense Book setting. The code must be numeric.
- Text
- Use this field to assign a descriptive name to each record in the Income & Expense Book setting. This will be shown in the browse window.
- Accounts
- Paste Special
Account register, Nominal Ledger/System module
- Enter an Account or a range of Account numbers separated by a colon (:). You can also enter a number of individual Accounts, or ranges of Accounts, separated by commas, as shown in the illustration above.
- These Accounts should all have the same classification for the purposes of the Income & Expense Book report (e.g. they should all be income Accounts, or they should all be expense Accounts)
- The Accounts field consists of three rows, each allowing 100 characters, thus allowing for a definition 300 characters long.
- These Accounts should all have the same classification for the purposes of the Income & Expense Book report (e.g. they should all be income Accounts, or they should all be expense Accounts)
- Type
- Choose an option to specify the type or classification of the Accounts listed above for the purposes of the Income & Expense Book report.
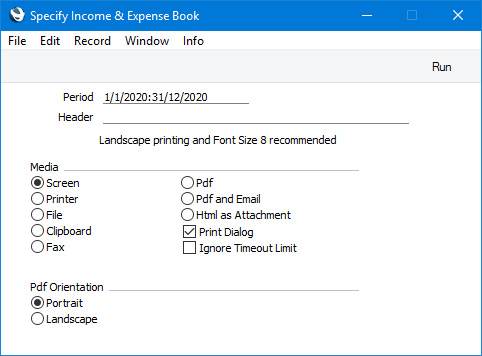
- Period
- Paste Special
Reporting Periods setting, System module
- The report will list postings from the period that you specify here. The first period in the Reporting Periods setting will be offered as a default.
When printed to screen, the Income & Expense Book report has the Standard ERP Drill-down feature. Click (Windows/macOS) or tap (iOS/Android) on any Transaction Number to open an individual Transaction record.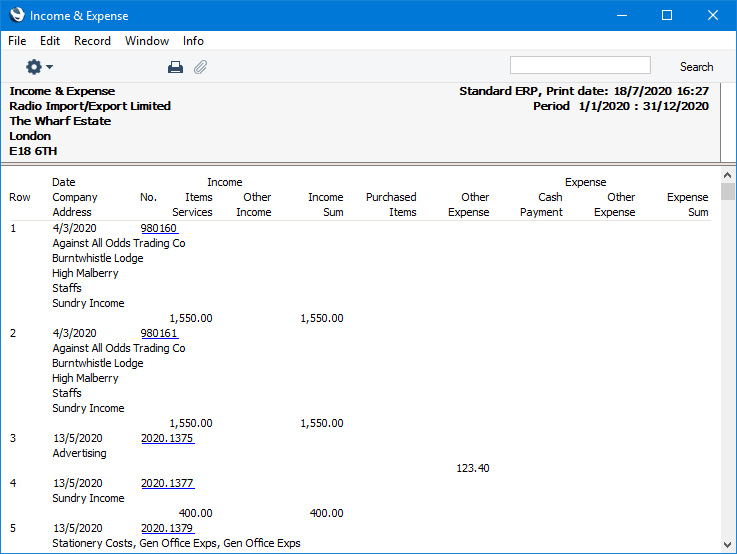
For each posting, the report will display the following information depending on the origin of the posting:
- Invoice
- The Customer Name, the Invoice Address (from the Invoice) and the Description from the Transaction row (or, if blank, the Text from the Transaction header). If the Invoice has been invalidated, the date and value will be shown struck through with red lines, the date of the invalidation and the Signature of the invalidator will be displayed, and the value will not be included in the report totals.
- Purchase Invoice
- The Supplier Name, the Invoice Address (from the Contact record for the Supplier) and the Description from the Transaction row (or, if blank, the Text from the Transaction header). Both the Supp. Inv. No. and the Purchase Invoice Number will be displayed, with the Purchase Invoice Number in brackets. If the Purchase Invoice has been invalidated, the date and value will be shown struck through with red lines, the date of the invalidation and the Signature of the invalidator will be displayed, and the value will not be included in the report totals.
- If the Purchase Invoice and Transaction Dates in a Purchase Invoice are different, the Purchase Invoice Date will be displayed in the report, but the inclusion of the Purchase Invoice in the report period will depend on the Transaction Date.
- If the Purchase Invoice and Transaction Dates in a Purchase Invoice are different, the Purchase Invoice Date will be displayed in the report, but the inclusion of the Purchase Invoice in the report period will depend on the Transaction Date.
- Other
- The Description from the Transaction row (or, if blank, the Text from the Transaction header).
Reports in the Nominal Ledger:
- Introduction
- Definition of Nominal Ledger Reports
- Drill-down
- The Operations Menu
- Account Reconciliation
- Accrual Report
- Analytical Balance
- Analytical Balance (Fiscal purposes)
- Balance Sheet
- Bank Reconciliation
- Bank Statement
- Bank Transactions
- Base Currency Rate Change
- Budget Journal
- Cash Flow
- Chart of Accounts
- Correction List
- Corresponding Accounts
- Creditors Account
- Currency A/C Rate Change
- Daily Balances
- Debtors Account
- Forward Balance Journal
- Income & Expense Book
- Key Financial Ratios
- Liquidity Forecast
- Multicurrency Accounts Rate Difference
- N/L Accrual Transactions
- N/L Transfer, Subsystems
- Nominal Ledger
- Profit & Loss
- Revised Budget Journal
- Simulation Journal
- Tag/Object Results
- Tag/Object/Quantity Results
- Tax Account Balances
- Tax Calculations
- Tax Transactions for Registers
- Template Transaction Journal
- Test Corresponding Rules
- Transaction Journal
- Transaction Summary
- Trial Balance
- VAT Listing
- VAT Report
- VAT Report Purchases
- VAT Report Sales
- VAT Transaction Journal
- XBRL Report
Go back to:
- Home page for Nominal Ledger manual
- Home page for Standard ERP manual
Ratios Financieros
Cuando se evalúa la situación y las perspectivas de una empresa, el informe de Ratios Financieros Clave es una herramienta muy útil.
Hansa te permite crear tus propios Ratios Clave para mejorar el análisis. Los ejemplos de esto pueden ser ventas por salidas minoritarias, o la relación entre los salarios y tiempo debitado por los consultores. Algunos Ratios Clave se utilizan en otros informes: la opción ‘% Facturac.’ en el informe Estado de Resultados, requiere que haya un Ratio que defina ‘facturac.’, por ejemplo.
Por favor, haz clic para detalles sobre:
- La Definición del informe Ratios Financieros Clave;
- Impresión de Ratios Financieros Clave.
- Definición
- Para cambiar la definición de informe de los Ratios Financieros, haz doble clic en ‘Opciones de Informe’ del módulo Contabilidad. Luego resalta ‘Ratios Financieros’ en la lista de la izquierda y pulsa el botón [Definición]. Se abrirá la ventana ‘Definición de Ratios Financieros: Ver’.
- Ingresa las definiciones para tus Ratios.
La siguiente ilustración muestra una lista hipotética de Ratios definidos. En esta lista, todas las funciones disponibles en la Definición de Ratios, están ilustradas.
Los campos en pantalla son los siguientes: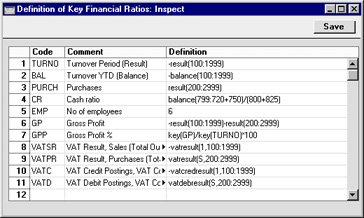
- Línea
- Cada Ratio está definido en su propia línea numerada dentro de esta ventana.
- Código
- Un código único que identifica cada Ratio; éste se puede utilizar para referirse al Ratio cuando se calculen otros (ver ilustración).
- Comentario
- El nombre del Ratio a ser presentado en el informe.
- Definición
- La fórmula utilizada para calcular el valor de este Ratio.
Habrá varios comandos disponibles para usarlos por la fórmula en el campo de Definición. Éstos no son sensibles al caso.
- RESULTADO(Código de Cuenta)
- Este comando devuelve el cambio neto durante el periodo en función a la Cuenta especificada en los brackets. Algunos ejemplos del uso de este comando son los siguientes:
- RESULTADO(100)
- Devuelve el cambio neto en la Cuenta 100 en función al periodo especificado.
- RESULTADO(100:1999)
- Devuelve la suma de los cambios netos en las cuentas 100 a la 1999 en función al periodo especificado. Las Cuentas usadas se determinan utilizando un orden alfa y no numérico. Por tanto, la Cuenta 1000001 será incluida en el rango, mientras que la Cuenta 200 no.
- RESULTADO(100:1999)
- Como en el anterior ejemplo, pero con el signo de la última cifra cambiado. Esto es ventajoso cuando se despliega cifras para ventas las cuales se almacenan como cantidades negativas en Hansa. Con el prefijo RESULTADO conteniendo un signo menos, se logrará desplegar las ventas como cantidades positivas en el informe.
- RESULTADO(100+120:1999)
- Toma en cuenta el cambio neto en la Cuenta 100 y lo agrega a la suma de los cambios netos en la Cuentas 120 a la 1999.
- RESULTADO(100)
- BALANCE(Código de Cuenta)
- Este comando devuelve un balance de cierre en función a la Cuenta especificada. Por lo tanto, difiere del RESULTADO puesto que los balances de apertura de anteriores periodos son tomados en cuenta.
- El comando puede devolver la suma de los balances de las Cuentas especificadas, de la misma manera que en el RESULTADO; por favor, revisa la descripción del comando RESULTADO para ejemplos.
- El comando puede devolver la suma de los balances de las Cuentas especificadas, de la misma manera que en el RESULTADO; por favor, revisa la descripción del comando RESULTADO para ejemplos.
- CLAVE(Código)
- Se puede incluir el valor de otro Ratio en el Cálculo. El Ratio convocado deberá haber sido definido. Si no está definido, se usará el valor cero. Por tanto, en la ilustración de ejemplo, la línea GPP debe aparecer por debajo de las líneas GP y TURNO.
- Notemos que aunque el comando CLAVE no es sensible al caso, la referencia a otro Ratio sí lo es. Por tanto, en la ilustración serán pertinentes clave(TURNO) Y CLAVE(TURNO), pero clave(turno) no.
- Notemos que aunque el comando CLAVE no es sensible al caso, la referencia a otro Ratio sí lo es. Por tanto, en la ilustración serán pertinentes clave(TURNO) Y CLAVE(TURNO), pero clave(turno) no.
- RESULTADOIVA(Código IVA, Código de Cuenta)
- Este comando es similar a RESULTADO pero cuando se calculen el cambioneto durante el periodo en función a la Cuenta especificada, sólo se tomará en cuenta los registros con el Código IVA especificado.
- La referencia al Código IVA no es sensible al caso.
- El comando puede devolver la suma de los balances de las Cuentas especificadas de la misma manera que al comando RESULTADO; por favor, revisa la descripción del comando RESULTADO para ejemplos.
- La referencia al Código IVA no es sensible al caso.
- BALANCEIVA(Código IVA, Código de Cuenta)
- Este comando devuelve el balance de cierre en función a la Cuenta especificada, tomando en cuenta sólo las Transacciones con el Código IVA especificado. Por tanto, difiere del comando RESULTADOIVA puesto que los balances de apertura de periodos anteriores son tomados en cuenta.
- RESULTADOIVACRED(Código IVA, Código de Cuenta)
- Este comando devuelve el total de haber a la Cuenta especificada durante el periodo, tomando en cuenta sólo las transacciones con el Código IVA especificado.
- RESULTADOIVADEB(Código IVA, Código de Cuenta)
- Este comando devuelve el total del Debe a la Cuenta especificada durante el periodo, tomando en cuenta sólo las transacciones con el Código IVA especificado.
- APDUE(Número de días)
- Este comando devuelve el total en el Libro Mayor de Compras que está con fecha de expiración vencida en relación al número de días especificado. El último día del periodo de informe se emplea como la fecha tope. Por ejemplo, APDUE(20) devolverá el total que se venció con 20 días o más antes del fin del periodo de informe (ej. que se venció con al menos 20 días al último día del periodo). Se debe especificar un número: utiliza APDUE(0) si el total es para incluir todas las Facturas de Compra vencidas.
- ARDUE(Número de días)
- Este comando es el equivalente a APDUE en el módulo Ventas.
- Línea
- Cuando hayas acabado de definir los Ratios, haz clic en [Guardar]. Regresarás a la ventana ‘Informes’.
Dado que el cálculo utiliza los valores internos de Hansa, los balances en (ej. Cuentas de Venta) aparecerán como negativos puesto que normalmente están en columna Haber. Puedes resolver esto muy fácil, revierte el signo de tales cálculos; un ejemplo de esto es en el Ratio Nro. 1 en la ilustración. Los ejemplos también muestran el modo de agrupar diferentes Cuentas.
El valor de un Plan de Cuentas bien estructurado es muy notorio. Si todos los ingresos relacionados a Cuentas se encuentran en series consecutivas, totalizarlos se hace muy sencillo.
Key Financial Ratios - Example - Key Ratios for Different Periods
This page uses an example Key Financial Ratios report to describe using the fields on flip B of the 'Key Financial Ratios Report Definition' window. These fields allow you to have the same Key Ratios printed for different periods. Please refer here for descriptions of the commands you can include in a Key Ratios report definition.
---
To begin the example, we have created the simple report illustrated below in which we have used the RESULT command to print the net sales for the report period. The RESULT command will print the net change in the Account balance(s) over the report period, and Accounts 100:199 are the Sales Accounts. The report was printed with the month of August as the period:
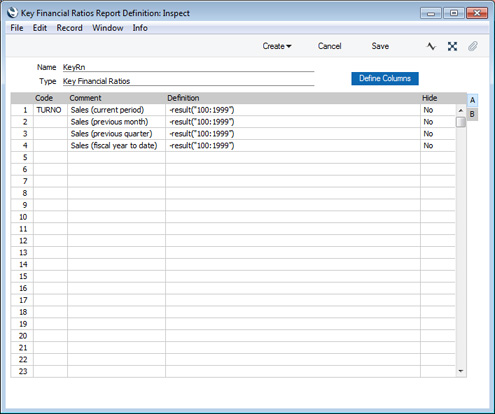
One way to extend the report is to have the same Key Ratio printed for different periods. Follow these steps: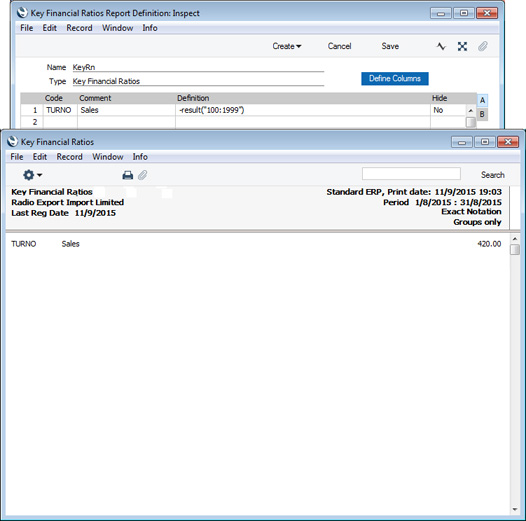
- Place the same formula on each line in the definition:
- To set the period for each Key Ratio, go to flip B and use the Period, Offset and Length fields:
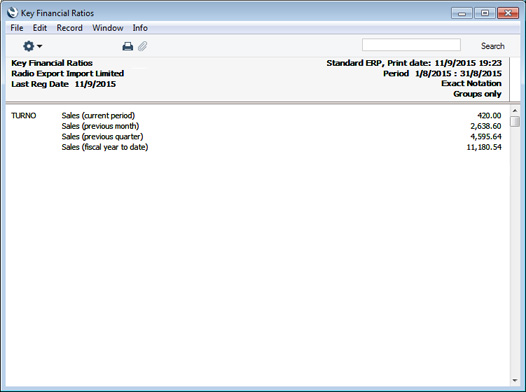
This the resulting report: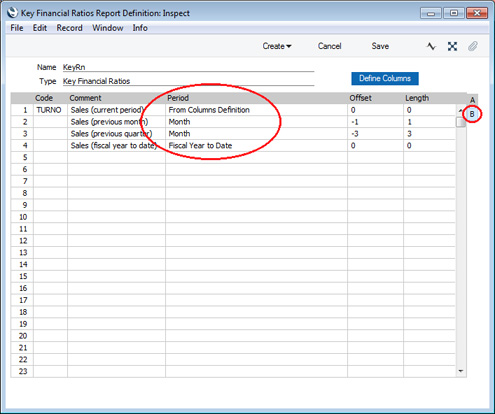
- From Columns Definition
- Select this option if you would like the period for the Key Ratio to be the same as the report period.
- In the example illustrated above, the period specified in the report specification window is August, so the Key Ratio in row 1 will print the sales figures for August.
- The Offset and Length fields are not used with this option.
- In the example illustrated above, the period specified in the report specification window is August, so the Key Ratio in row 1 will print the sales figures for August.
- Month
- Use this option if you would like the period for the Key Ratio to be a particular calendar month or months.
- Use the Offset field to specify when the Key Ratio period is to start. For example, if the Offset is 0, the Key Ratio period will begin on the same date as the report period. If the Offset is -1, the Key Ratio period will begin one month before the start of the report period. If the Offset is 1, the Key Ratio period will begin one month after the start of the report period.
- If the Offset is not 0, you must also specify a Length. The Length is the number of months in the Key Ratio period. For example, if the Offset is -3 and the Length is 3, the Key Ratio period will begin three months before the report period and will be three months in duration. In the example illustrated above, if the report period is August, the period for the Key Ratio in row 3 will run from May 1 to July 31. If the Offset is 0 and you do not specify a Length, the Length will be assumed to be 1 (i.e. the Key Ratio period will be the first month in the report period).
- Use the Offset field to specify when the Key Ratio period is to start. For example, if the Offset is 0, the Key Ratio period will begin on the same date as the report period. If the Offset is -1, the Key Ratio period will begin one month before the start of the report period. If the Offset is 1, the Key Ratio period will begin one month after the start of the report period.
- Year
- Use this option if you would like the period for the Key Ratio to be a particular calendar year or years.
- Use the Offset field to specify when the Key Ratio period is to start. For example, if the Offset is 0, the Key Ratio period will begin on the same date as the report period. If the Offset is -1, the Key Ratio period will begin one year before the start of the report period. If the Offset is 1, the Key Ratio period will begin one year after the start of the report period.
- You must also specify a Length (i.e. the Length should not be 0). The Length is the number of years in the Key Ratio period. For example, if the Offset is -3 and the Length is 3, the Key Ratio period will begin three years before the report period and will be three years in duration. If the report period is the month of August, the Key Ratio period will begin in August three years previously and end the day before the report period begins.
- Use the Offset field to specify when the Key Ratio period is to start. For example, if the Offset is 0, the Key Ratio period will begin on the same date as the report period. If the Offset is -1, the Key Ratio period will begin one year before the start of the report period. If the Offset is 1, the Key Ratio period will begin one year after the start of the report period.
- Fiscal Year to Date
- If you select this option, the period for the Key Ratio will run from the beginning of the fiscal year in which the start date in the report period falls to the end of the report period.
- In the example illustrated above, if the report period is August, and fiscal years begin on January 1, the period for the Key Ratio in row 4 will run from January 1 to August 31.
- You can use the Offset field to move the beginning of the period to a different year. For example, if the Offset is -1, the start of the period will be the beginning of the previous fiscal year (January 1 in the previous year in the example). The end of the Key Ratio period will always be the same as the end of the report period, so positive Offsets are not useful.
- The Length field is not used with this option.
- In the example illustrated above, if the report period is August, and fiscal years begin on January 1, the period for the Key Ratio in row 4 will run from January 1 to August 31.
- Fiscal Year
- Select this option if the period for the Key Ratio is to be the fiscal year in which the start date in the report period falls.
- For example, if the report period is August and fiscal years begin on January 1, the period for the Key Ratio will run from January 1 to December 31 in the same year as the report period.
- You can use the Offset field to choose a different year, and the Length field to choose the number of years in the period. For example, if the Offset is -1 and the Length is 1, the period will be the fiscal year before the report period. If the Offset is 0 and the Length is 3, the period will be the three fiscal years starting with the fiscal year in which the start date in the report period falls.
- If you specify an Offset, you must also specify a Length.
- For example, if the report period is August and fiscal years begin on January 1, the period for the Key Ratio will run from January 1 to December 31 in the same year as the report period.
---
Pages describing the Key Financial Ratios report:
- Introduction
- The Definition of the Key Financial Ratios report
- Example - Key Ratios for Different Periods
- Example - Adding Columns to the report
- Example - Objects
- Additional Column Options
- Assisted Formula Entry
- Multiple Key Ratio Report Definitions
- Printing the Key Financial Ratios Report
Reports in the Nominal Ledger:
- Introduction
- Definition of Nominal Ledger Reports
- Drill-down
- The Operations Menu
- Account Reconciliation
- Accrual Report
- Analytical Balance
- Analytical Balance (Fiscal purposes)
- Balance Sheet
- Bank Reconciliation
- Bank Statement
- Bank Transactions
- Base Currency Rate Change
- Budget Journal
- Correction List
- Corresponding Accounts
- Creditors Account
- Currency A/C Rate Change
- Daily Balances
- Debtors Account
- Forward Balance Journal
- Income & Expense Book
- Key Financial Ratios
- Liquidity Forecast
- Multicurrency Accounts Rate Difference
- Nominal Ledger
- N/L Accrual Transactions
- N/L Transfer, Subsystems
- Object Results
- Object/Quantity Results
- Profit & Loss
- Revised Budget Journal
- Simulation Journal
- Tax Account Balances
- Tax Calculations
- Tax Transactions for Registers
- Template Transaction Journal
- Test Corresponding Rules
- Transaction Journal
- Transaction Summary
- Trial Balance
- VAT Listing
- VAT Report
- VAT Report Purchases
- VAT Report Sales
- VAT Transaction Journal
- XBRL Report
Go back to:
- Home page for Nominal Ledger manual
- Home page for Standard ERP manual
Key Financial Ratios - Example - Adding Columns to the Report
This page describes adding columns to a Key Financial Ratios report. Please refer here for descriptions of the commands you can include in a Key Ratios report definition.
---
If you have many Key Ratios, listing them with various periods as described in the previous example might result in a long report in which comparison between the various periods is not easy. An alternative is to add column definitions to the report. This will allow you to display information from different periods in columns.
To add column definitions, click the [Define Columns] button in the 'Key Financial Ratios Report Definitions' window (in this illustration we have removed rows 2-4 from the previous example as they are no longer needed):
The 'Column Definition: New' window opens: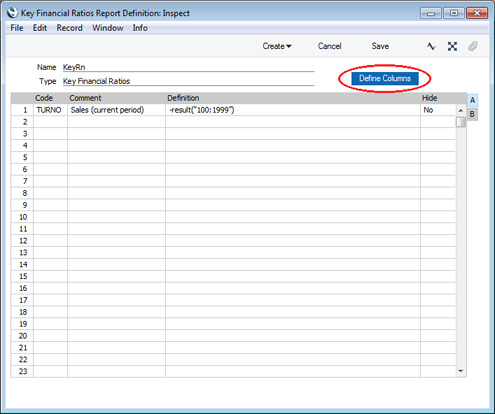
Most of the 'Column Definition: New' window is taken up by a matrix. Each row in the matrix will cause a separate column to be printed in the Key Financial Ratios report.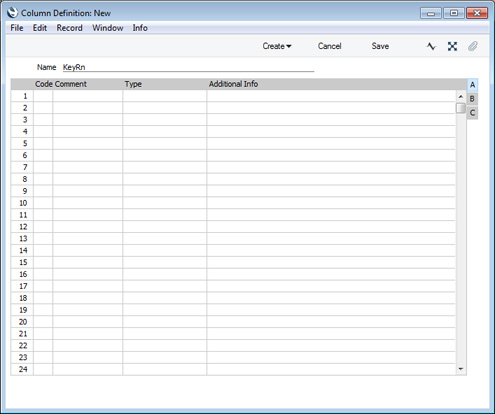
In its standard form and as shown in the illustrations so far, the Key Ratios report will contain three columns: the Code, Comment and Value columns. When you use the 'Column Definition' window to add columns to the report, you should first add three columns to represent the three that are already there:
For each column, enter the following information: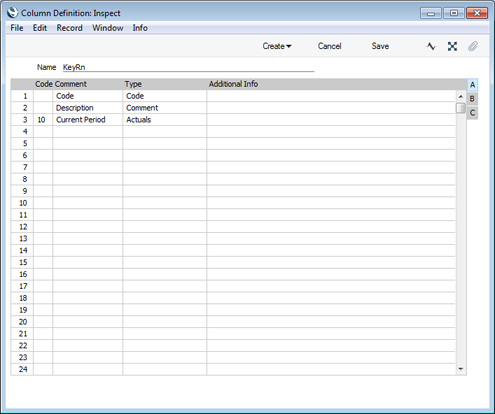
- Code
- Enter a Code for each column. There's no need to specify a Code if the Type (below) is "Code" or "Comment", but you must do so otherwise. If the columns in a report all contain the same figures or do not contain any figures at all, the probable reason is that the columns do not have Codes.
- Comment
- Enter the column heading of each column here.
- Type
- Paste Special
Choice of possible entries
The column type will determine what will be printed in the column, as follows:
- Code
- The Key Ratio Code (i.e. the Code in the row in the 'Key Financial Ratios Report Definitions' window) will be printed.
- Comment
- The Key Ratio Comment will be printed.
- Actuals
- Figures calculated using the Key Ratio formula will be printed.
- Columns Sumup
- Allows you to apply mathematical operations to values in previous columns (e.g. to add the values in various columns together, to subtract the value in one column from the value in another, or to express the value in one column as a percentage of the value in another). Enter the mathematical operation in the Additional Info field to the right using the format column("Code") (e.g. column("10")+column("20")+column("30"), column("10")-column("20"), column("10")/column("20")*100).
- Budget
- Budget figures for the Account(s) used in the Key Ratio formula will be printed.
- Revised Budget
- Revised Budget figures for the Account(s) used in the Key Ratio formula will be printed.
- Purchase Order Commitments
- Will print the total value of open Purchase Order rows in which the Purch. A/C is one of the Accounts used in the Key Ratio formula. An open Purchase Order row is one where the Recvd. OK figure is less than the Qty (i.e. you have ordered but not yet received the Items). Only rows in Purchase Orders that have been marked as OK and that are not Closed will be included.
- For example, if the Key Ratio formula is RESULT("820") and there is an open Purchase Order row in which the Purch A/C is 820, the value of this row will be included in the column figure.
- For example, if the Key Ratio formula is RESULT("820") and there is an open Purchase Order row in which the Purch A/C is 820, the value of this row will be included in the column figure.
- Goods Receipt Accruals
- Will print the total value of uninvoiced Purchase Order rows in which the Purch. A/C is one of the Accounts used in the Key Ratio formula. An uninvoiced Purchase Order row is one where the Invoiced figure is less than the Recvd. OK figure (i.e. you have received the Items but not yet been invoiced for them). Only rows in Purchase Orders that have been marked as OK and that are not Closed will be included.
By default, the page will be right-justified, with the last column (row 3 in the example definition) being placed on the right-hand side of the page. To move the columns to the left-hand side of the page and adjust the column widths, go to flip C in the 'Column Definition' window and use the Position field. You can enter the following special values in this field: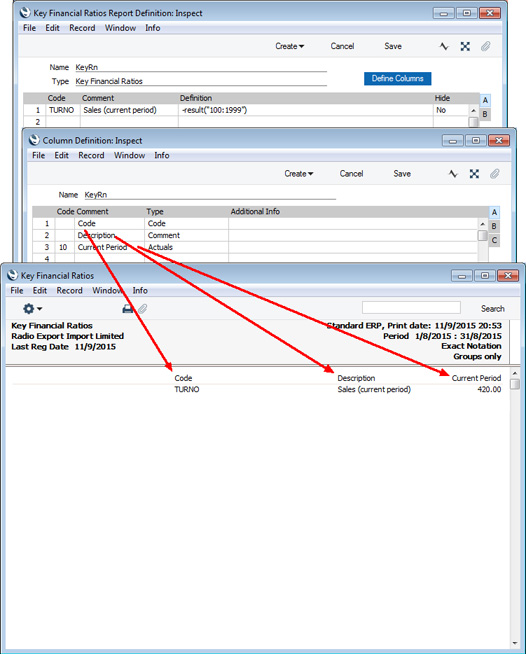
- 0
- The column will be placed on the left-hand side of the report.
- 1
- The column will be placed on the right-hand side of the report.
To add more columns, enter a Code and Comment for each new one and choose a Type using 'Paste Special'. In this example we need the report to display sales figures for various periods, so we've set the Type to "Actuals" in each case (meaning that the figures will be calculated using the Key Ratio formula i.e. the formula in the row in the 'Key Financial Ratios Report Definitions' window):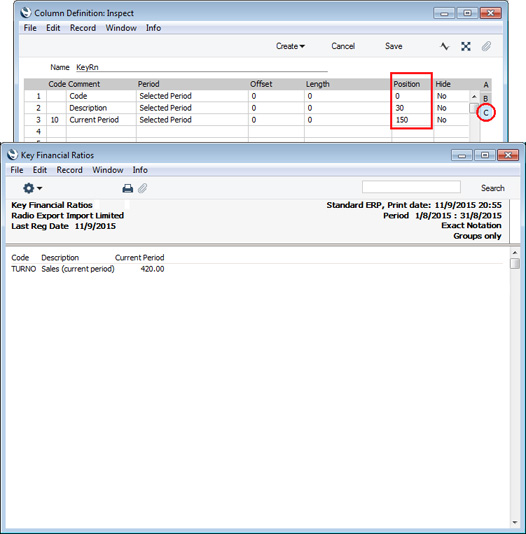
On flip C, use the Period, Offset and Length fields to specify the periods for each column. Use these fields in the same way as the similar fields on flip B of the 'Key Financial Ratios Report Definitions: Inspect' window (described on the Example page). Again, you can choose the Period using 'Paste Special': the options are the same as previously described, with the exception that the first option is named 'Selected Period'. This means that the period will be taken from the report specification window. Also as in the 'Key Financial Ratios Report Definitions' window, you can hide a particular column if necessary.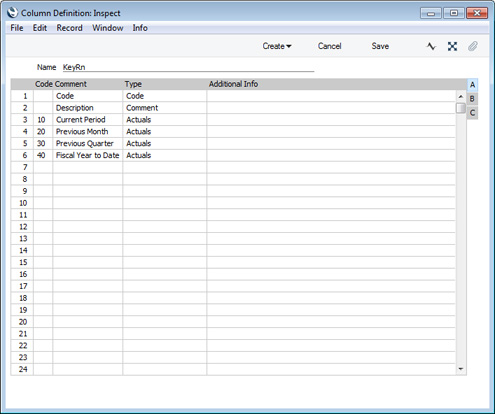
This is the resulting report (in the example we did not use the Position field for the new columns so they are right-justified):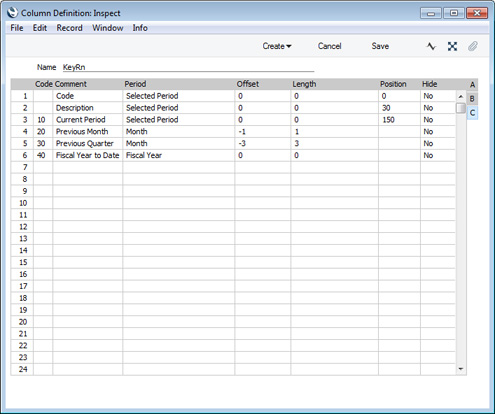
If we now add a second Key Ratio in the 'Key Financial Ratios Report Definitions' window, the columns will be applied to the new Key Ratio automatically: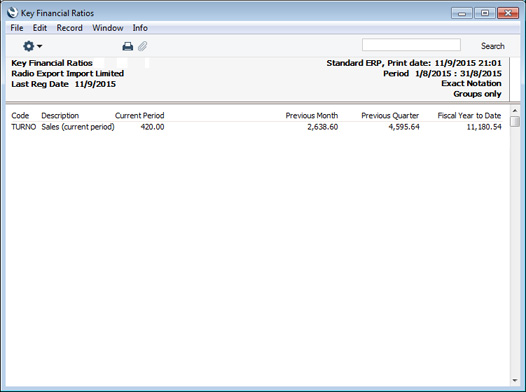
The report now displays actual figures for four different periods. As well as columns displaying actual figures, you can add columns displaying Budget and Revised Budget figures. In the next example, we've added a column in that will display Budget figures (the Type is "Budget"). A column displaying Revised Budget figures would be similar, except the Type would be "Revised Budget".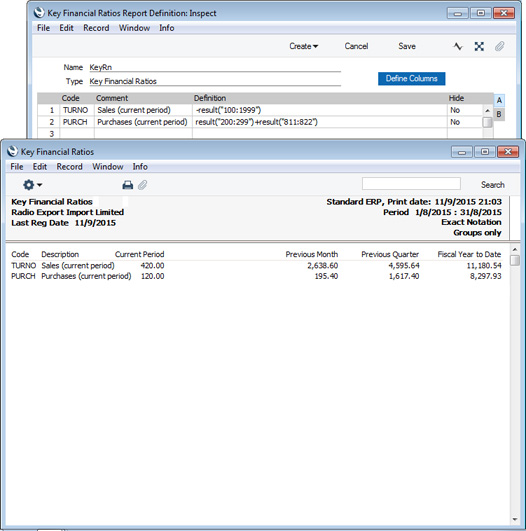
As the first Key Ratio is -RESULT(100:1999), the Budget column will display the total Budgeted amount for all the Accounts in the range 100:1999. For the second Key Ratio, the Budget column will similarly display the total Budgeted amount for Accounts 200:299 and 811:822.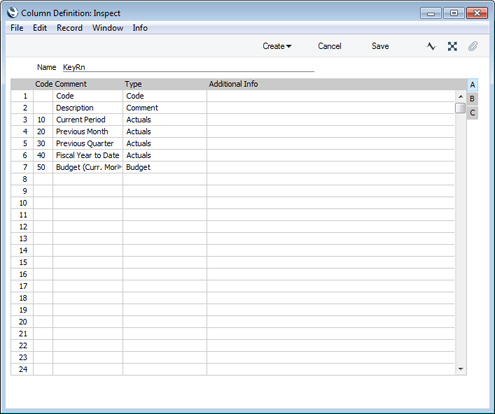
The Period on flip C of the Budget column definition is "Selected Period", so the total Budgeted amounts will be calculated from Budget rows with dates falling in the period in the report specification window. For example:
- If you have monthly Budget figures and the report period is one month, the Budget figure for that month will be included in the report.
- If you have quarterly Budget figures and the report period is one month, a pro rata amount calculated from the Budget figure for the relevant quarter will be included in the report.
This is the resulting report:
So far, the columns in the example have all printed information extracted from the database. You can also add columns that will display figures calculated from those in previous columns. To do this, add a column in which the Type is "Columns Sumup" and enter the calculation formula in the Additional Info field. In the formula, the syntax for referring to previous columns is COLUMN("CODE"), where "CODE" is the Code of the column you are referring to.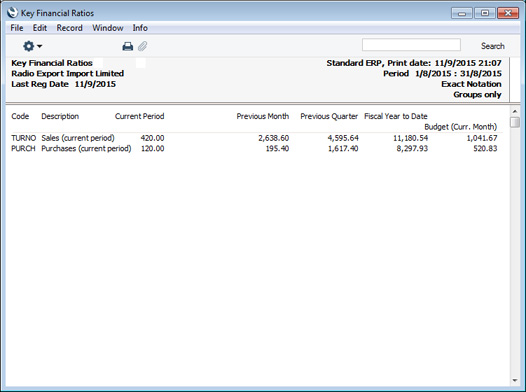
In the example illustrated below, we've added two columns comparing actual and Budget figures. In the first one (row 8), the formula is:
- COLUMN("10")-COLUMN("50")
When you need to enter a calculation formula in the Additional Info field, you can type it directly into the field, or you can use the Assisted Formula Entry feature to have the formula constructed for you. This feature will be helpful when you don't remember the correct syntax.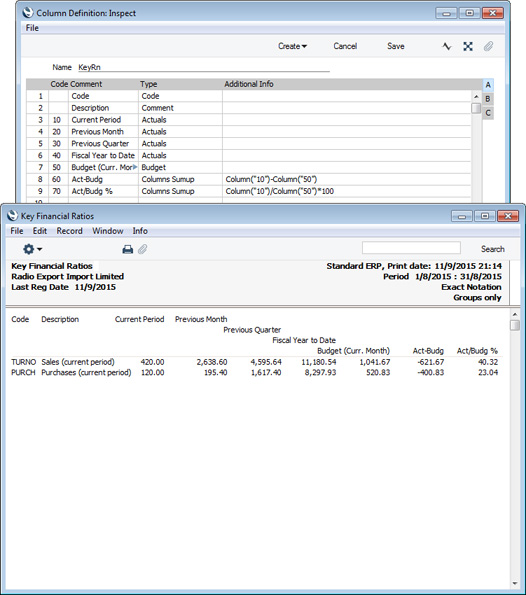
To use the Assisted Formula Entry feature, follow these steps:
- Simply activate 'Paste Special' from the Additional Info field in the relevant row:
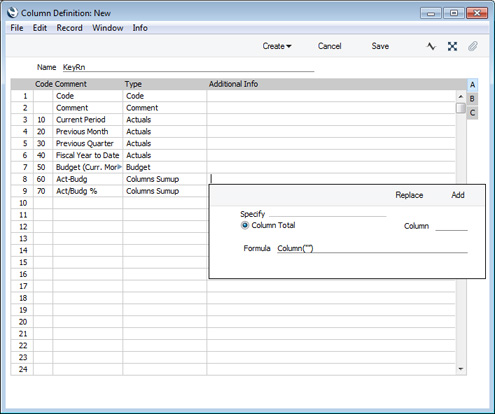
- Enter the Code of the previous column in the Column field:
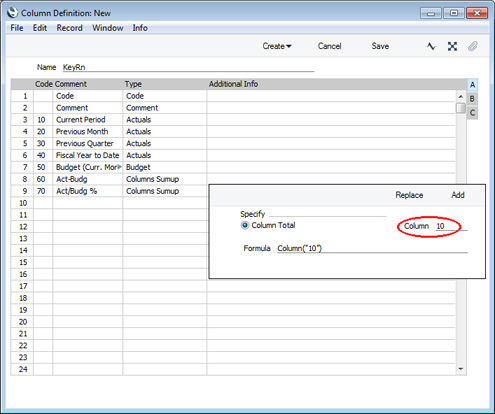
- Then click the [Replace] or [Add] buttons as follows:
- Replace
- The new formula will be placed in the Additional Info field, replacing what was previously there.
- Add
- The new formula will be placed in the Additional Info field, in addition to what is already there.
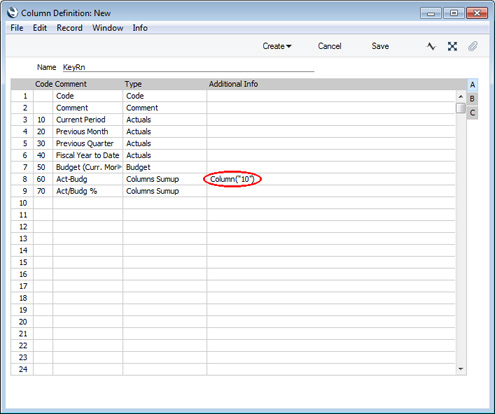
- Replace
- Type a mathematical operator in the Additional Info field.
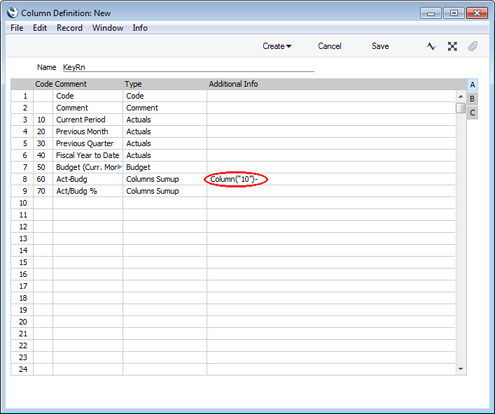
- Type in a second column reference or open 'Paste Special' once again, enter a Column Code and click the [Add] button to have the column reference added to the formula.
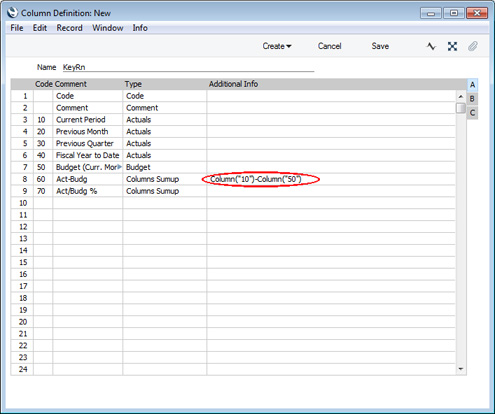
---
Pages describing the Key Financial Ratios report:
- Introduction
- The Definition of the Key Financial Ratios report
- Example - Key Ratios for Different Periods
- Example - Adding Columns to the report
- Example - Objects
- Additional Column Options
- Assisted Formula Entry
- Multiple Key Ratio Report Definitions
- Printing the Key Financial Ratios Report
Reports in the Nominal Ledger:
- Introduction
- Definition of Nominal Ledger Reports
- Drill-down
- The Operations Menu
- Account Reconciliation
- Accrual Report
- Analytical Balance
- Analytical Balance (Fiscal purposes)
- Balance Sheet
- Bank Reconciliation
- Bank Statement
- Bank Transactions
- Base Currency Rate Change
- Budget Journal
- Correction List
- Corresponding Accounts
- Creditors Account
- Currency A/C Rate Change
- Daily Balances
- Debtors Account
- Forward Balance Journal
- Income & Expense Book
- Key Financial Ratios
- Liquidity Forecast
- Multicurrency Accounts Rate Difference
- Nominal Ledger
- N/L Accrual Transactions
- N/L Transfer, Subsystems
- Object Results
- Object/Quantity Results
- Profit & Loss
- Revised Budget Journal
- Simulation Journal
- Tax Account Balances
- Tax Calculations
- Tax Transactions for Registers
- Template Transaction Journal
- Test Corresponding Rules
- Transaction Journal
- Transaction Summary
- Trial Balance
- VAT Listing
- VAT Report
- VAT Report Purchases
- VAT Report Sales
- VAT Transaction Journal
- XBRL Report
Go back to:
- Home page for Nominal Ledger manual
- Home page for Standard ERP manual
Key Financial Ratios - Example - Objects
This page describes adding two- and three-dimensional Object analysis to a Key Financial Ratios report definition. Please refer here for descriptions of the commands you can include in a Key Ratios report definition.
---
The first step is to use the OBJRESULT command in Key Ratio definitions. This command will print the net change over the report period for a specified Account or Accounts, only including postings with a particular Object. In this example in which Accounts 100:199 are Sales Accounts, we have created Key Ratios to compare the sales figures of various product types. Each product type has its own Object:
The second step is to create columns to provide a second level of analysis. For example, you might want to analyse sales of the various product types by salesman, or by the business types of the customers. To do this, add the columns as described here and then go to flip B of the 'Column Definition' window to specify the Objects for each column. In this example, we have created columns for each salesperson. Each salesperson also has their own Object: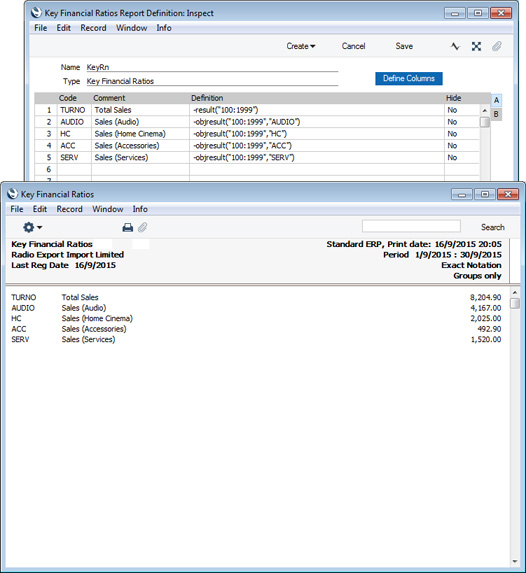
If necessary, you can add a third level of Object analysis. For example, in addition to the breakdown by product type and salesperson, you might want to see the type of customers being sold to (e.g. business type or area). In the specification window for the Key Financial Ratios report, you can specify an Object Type. In this example, we have specified BUS (i.e. business types):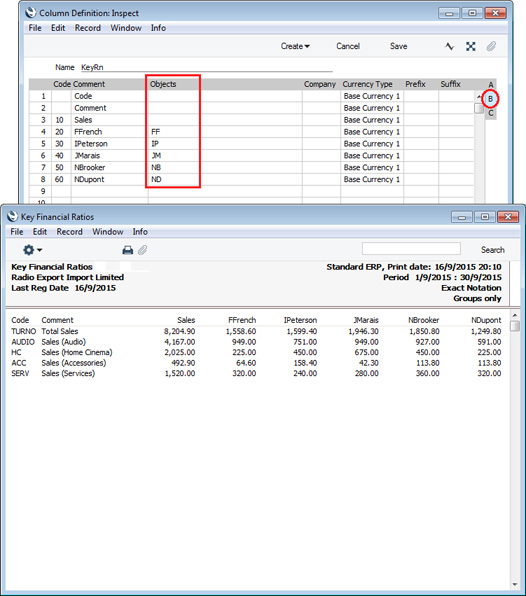
The report will contain separate sections for each Object belonging to the BUS Object Type: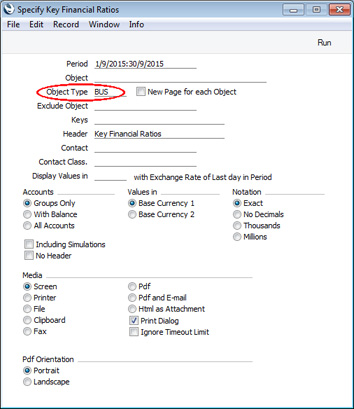
---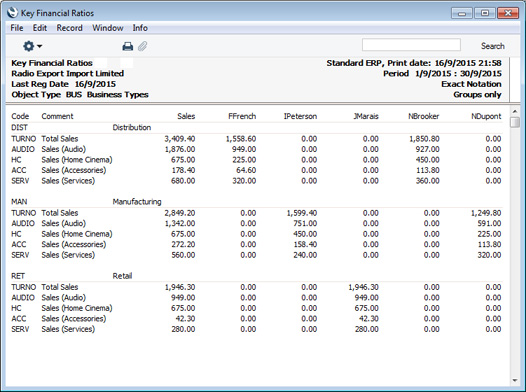
Pages describing the Key Financial Ratios report:
- Introduction
- The Definition of the Key Financial Ratios report
- Example - Key Ratios for Different Periods
- Example - Adding Columns to the report
- Example - Objects
- Additional Column Options
- Assisted Formula Entry
- Multiple Key Ratio Report Definitions
- Printing the Key Financial Ratios Report
Reports in the Nominal Ledger:
- Introduction
- Definition of Nominal Ledger Reports
- Drill-down
- The Operations Menu
- Account Reconciliation
- Accrual Report
- Analytical Balance
- Analytical Balance (Fiscal purposes)
- Balance Sheet
- Bank Reconciliation
- Bank Statement
- Bank Transactions
- Base Currency Rate Change
- Budget Journal
- Correction List
- Corresponding Accounts
- Creditors Account
- Currency A/C Rate Change
- Daily Balances
- Debtors Account
- Forward Balance Journal
- Income & Expense Book
- Key Financial Ratios
- Liquidity Forecast
- Multicurrency Accounts Rate Difference
- Nominal Ledger
- N/L Accrual Transactions
- N/L Transfer, Subsystems
- Object Results
- Object/Quantity Results
- Profit & Loss
- Revised Budget Journal
- Simulation Journal
- Tax Account Balances
- Tax Calculations
- Tax Transactions for Registers
- Template Transaction Journal
- Test Corresponding Rules
- Transaction Journal
- Transaction Summary
- Trial Balance
- VAT Listing
- VAT Report
- VAT Report Purchases
- VAT Report Sales
- VAT Transaction Journal
- XBRL Report
Go back to:
- Home page for Nominal Ledger manual
- Home page for Standard ERP manual
Key Financial Ratios - Additional Column Options
This page describes various options on Flip B of the Key Ratio Column Definition window. Please refer here for more details about adding columns to a Key Ratio report definition.
---
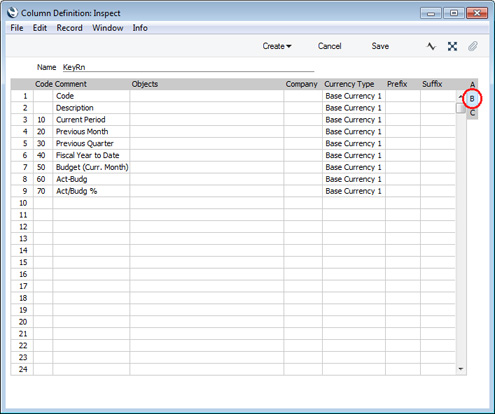
- Company
- Paste Special
Companies in the database
- If you have more than one Company in your database, you can use this field if you need the column to display figures from a particular Company. Leave the field empty to display figures from the Company you are in (i.e. the Company in which the Key Ratio report definition is stored).
- Currency Type
- Paste Special
Choice of possible entries
- Use this field to specify whether the figures in the column will be in Base Currency 1 or 2, as follows:
- Base Currency 1
- Choose this option if the figures are to be in Base Currency 1.
- Base Currency 2
- Choose this option if the figures are to be in Base Currency 2.
- From Specification
- Choose this option if you would like to choose the Base Currency when printing the report, using the Values in options in the report specification window.
- Base Currency 1
- Prefix
- If you would like every figure in the column to be printed with a prefix, specify that prefix here.
- Suffix
- If you would like every figure in the column to be printed with a suffix, specify that suffix here.
Pages describing the Key Financial Ratios report:
- Introduction
- The Definition of the Key Financial Ratios report
- Example - Key Ratios for Different Periods
- Example - Adding Columns to the report
- Example - Objects
- Additional Column Options
- Assisted Formula Entry
- Multiple Key Ratio Report Definitions
- Printing the Key Financial Ratios Report
Reports in the Nominal Ledger:
- Introduction
- Definition of Nominal Ledger Reports
- Drill-down
- The Operations Menu
- Account Reconciliation
- Accrual Report
- Analytical Balance
- Analytical Balance (Fiscal purposes)
- Balance Sheet
- Bank Reconciliation
- Bank Statement
- Bank Transactions
- Base Currency Rate Change
- Budget Journal
- Correction List
- Corresponding Accounts
- Creditors Account
- Currency A/C Rate Change
- Daily Balances
- Debtors Account
- Forward Balance Journal
- Income & Expense Book
- Key Financial Ratios
- Liquidity Forecast
- Multicurrency Accounts Rate Difference
- Nominal Ledger
- N/L Accrual Transactions
- N/L Transfer, Subsystems
- Object Results
- Object/Quantity Results
- Profit & Loss
- Revised Budget Journal
- Simulation Journal
- Tax Account Balances
- Tax Calculations
- Tax Transactions for Registers
- Template Transaction Journal
- Test Corresponding Rules
- Transaction Journal
- Transaction Summary
- Trial Balance
- VAT Listing
- VAT Report
- VAT Report Purchases
- VAT Report Sales
- VAT Transaction Journal
- XBRL Report
Go back to:
- Home page for Nominal Ledger manual
- Home page for Standard ERP manual
Key Financial Ratios - Assisted Formula Entry
As described on the Defining Key Ratios page, there are a number of commands that you can use when defining Key Ratio formulae. You can type these commands directly into the Definition field in the 'Key Financial Ratios Report Definition' window, or you can use the Assisted Formula Entry feature to have the command constructed for you. This feature will be helpful when you don't remember a Key Ratio command or the correct syntax.
To use the Assisted Formula Entry feature, simply activate 'Paste Special' from the Definition field in the Key Ratio row:
Each of the radio button options on the left-hand side of the window represents one of the Key Ratio commands. When you choose one of these options, the equivalent Key Ratio command will be placed in the Formula field at the bottom of the window. Depending on the command, you should then specify additional details on the right-hand side of the window: these will be added to the formula in the Formula field. For example, if you select the Account Result option on the left, you should then specify an Account or Accounts on the right.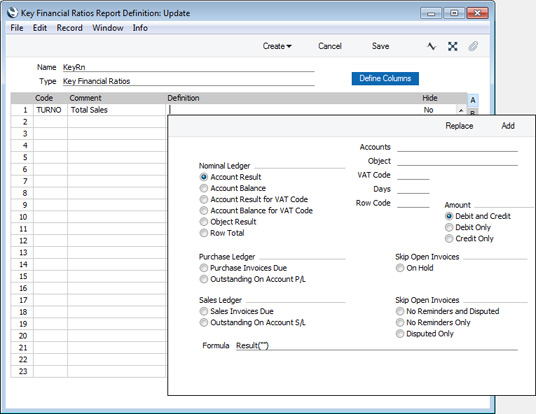
When the formula is complete, click the [Replace] or [Add] buttons as follows:
- Replace
- The new formula will be placed in the Definition field in the Key Ratio row, replacing what was previously there.
- Add
- The new formula will be placed in the Definition field in the Key Ratio row, in addition to what is already there. This will be useful if you are constructing a Definition that will contain more than one Key Ratio command.
- Nominal Ledger
- Choose one of these options if you need the Key Ratio to print information from the Nominal Ledger.
- Account Result
- Prints the net change over the report period in the balance of a particular Account or Accounts.
- Additional details required:
- Specify an Account, range of Accounts separated by a colon or individual Accounts separated by commas in the Accounts field. Use 'Paste Special' to choose the Accounts if necessary.
- Select the Debit Only option if you only need the debit result to be printed.
- Select the Credit Only option if you only need the credit result to be printed.
- Additional details required:
- Account Balance
- Prints the balance of a particular Account or Accounts on the last day of the report period.
- Additional details required:
- Specify an Account, range of Accounts separated by a colon or individual Accounts separated by commas in the Accounts field. Use 'Paste Special' to choose the Accounts if necessary.
- Select the Debit Only option if you only need the debit balance to be printed.
- Select the Credit Only option if you only need the credit balance to be printed.
- Additional details required:
- Account Result for VAT Code
- Prints the net change over the report period in the balance of a particular Account or Accounts, only taking postings with a particular VAT Code into account.
- Additional details required:
- Specify an Account, range of Accounts separated by a colon or individual Accounts separated by commas in the Accounts field. Use 'Paste Special' to choose the Accounts if necessary.
- Specify a VAT Code in the VAT Code field. Use 'Paste Special' to choose the VAT Code if necessary.
- Select the Debit Only option if you only need the debit result to be printed.
- Select the Credit Only option if you only need the credit result to be printed.
- Additional details required:
- Account Balance for VAT Code
- Prints the balance of a particular Account or Accounts on the last day of the report period, only taking postings with a particular VAT Code into account.
- Additional details required:
- Specify an Account, range of Accounts separated by a colon or individual Accounts separated by commas in the Accounts field. Use 'Paste Special' to choose the Accounts if necessary.
- Specify a VAT Code in the VAT Code field. Use 'Paste Special' to choose the VAT Code if necessary.
- Select the Debit Only option if you only need the debit balance to be printed.
- Select the Credit Only option if you only need the credit balance to be printed.
- Additional details required:
- Object Result
- Prints the net change over the report period in the balance of a particular Account or Accounts, only taking postings with a particular Object into account.
- Additional details required:
- Specify an Account, range of Accounts separated by a colon or individual Accounts separated by commas in the Accounts field. Use 'Paste Special' to choose the Accounts if necessary.
- Specify an Object in the Object field. Use 'Paste Special' to choose the Object if necessary.
- Select the Debit Only option if you only need the debit result to be printed.
- Select the Credit Only option if you only need the credit result to be printed.
- Additional details required:
- Row Total
- Select this option to include the result of another Key Ratio calculation in the formula.
- Additional details required:
- Enter the Code of the other Key Ratio in the Row Code field.
- Additional details required:
- Account Result
- Purchase Ledger
- Choose one of these options if you need the Key Ratio to print information from the Purchase Ledger.
- Purchase Invoices Due
- Prints the total amount in the Purchase Ledger that is overdue for payment on the last day of the report period.
- Additional details required:
- If you need to see how much is overdue by more than a particular number of days on the last day of the report period, enter that number of days in the Days field.
- If you want to exclude Purchase Invoices that have been marked as On Hold, select the On Hold option.
- Equivalent Key Ratio commands: APDue, APOHDue
- Additional details required:
- Outstanding On Account P/L
- Prints the On Account balance in the Purchase Ledger on the last day of the report period (including open On Account Payments and Prepayments).
- Equivalent Key Ratio command: APOnAcc
- Purchase Invoices Due
- Sales Ledger
- Choose one of these options if you need the Key Ratio to print information from the Sales Ledger.
- Sales Invoices Due
- Prints the total amount in the Sales Ledger that is overdue for payment on the last day of the report period.
- Additional details required:
- If you need to see how much is overdue by more than a particular number of days on the last day of the report period, enter that number of days in the Days field.
- If you want to exclude Invoices that have been marked as Disputed, select the Disputed Only option.
- If you want to exclude Invoices that have been marked as No Reminders, select the No Reminders Only option.
- If you want to exclude Invoices that have been marked as Disputed, and Invoices that have been marked as No Reminders, select the No Reminders and Disputed option.
- Equivalent Key Ratio commands: ARDue, ARDPDue, ARNRDue, ARDPNRDue
- Additional details required:
- Outstanding On Account S/L
- Prints the On Account balance in the Sales Ledger on the last day of the report period (including open On Account Receipts and Prepayments).
- Equivalent Key Ratio command: AROnAcc
- Sales Invoices Due
---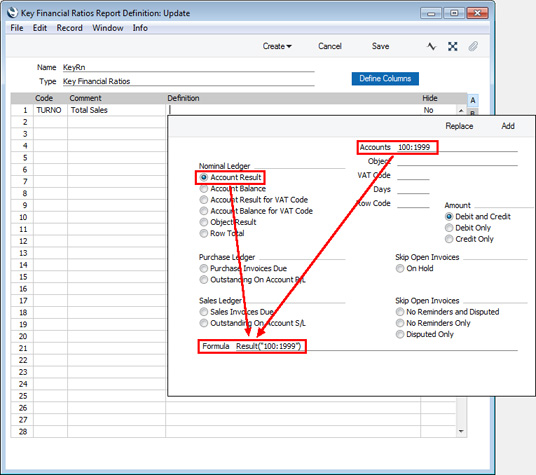
Pages describing the Key Financial Ratios report:
- Introduction
- The Definition of the Key Financial Ratios report
- Example - Key Ratios for Different Periods
- Example - Adding Columns to the report
- Example - Objects
- Additional Column Options
- Assisted Formula Entry
- Multiple Key Ratio Report Definitions
- Printing the Key Financial Ratios Report
Reports in the Nominal Ledger:
- Introduction
- Definition of Nominal Ledger Reports
- Drill-down
- The Operations Menu
- Account Reconciliation
- Accrual Report
- Analytical Balance
- Analytical Balance (Fiscal purposes)
- Balance Sheet
- Bank Reconciliation
- Bank Statement
- Bank Transactions
- Base Currency Rate Change
- Budget Journal
- Correction List
- Corresponding Accounts
- Creditors Account
- Currency A/C Rate Change
- Daily Balances
- Debtors Account
- Forward Balance Journal
- Income & Expense Book
- Key Financial Ratios
- Liquidity Forecast
- Multicurrency Accounts Rate Difference
- Nominal Ledger
- N/L Accrual Transactions
- N/L Transfer, Subsystems
- Object Results
- Object/Quantity Results
- Profit & Loss
- Revised Budget Journal
- Simulation Journal
- Tax Account Balances
- Tax Calculations
- Tax Transactions for Registers
- Template Transaction Journal
- Test Corresponding Rules
- Transaction Journal
- Transaction Summary
- Trial Balance
- VAT Listing
- VAT Report
- VAT Report Purchases
- VAT Report Sales
- VAT Transaction Journal
- XBRL Report
Go back to:
- Home page for Nominal Ledger manual
- Home page for Standard ERP manual
- Definiciones Múltiples de Ratios
Puedes crear hasta 15 informes propios de Ratios Financieros según te parezca. Por favor, revisa la página de Definiciones Múltiples de Balance para detalles completos sobre la creación de nuevos informes. Luego de crear un nuevo informe, deberás ingresar una definición para él – esto se describe en la página de Definición de Ratios Financieros.- Impresión
Abre la ventana de lista ‘Informes’ y haz doble clic en ‘Ratios Financieros’. Se abrirá la ventana ‘Especificar Ratio’.
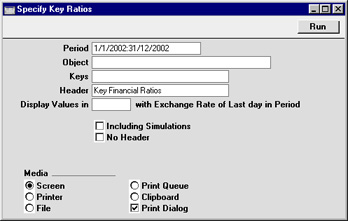
- Periodo
- Pegado Especial
opción Periodos de Informe, módulo Sistema
- Ingresa el periodo de informe con el formato "01-02-02:28-02-02". Si estás usando años de cuatro dígitos como en la ilustración, los primeros dígitos serán insertados automáticamente. Si tu periodo de informe es un solo día, simplemente ingresa la fecha y automáticamente ésta será convertida a un formato de periodo. La primera línea en la opción Periodos de Informe se ofrece por defecto.
- Objeto
- Pegado Especial
registro de Objetos, módulos Contabilidad/Sistema
- Ingresa el Objeto (si existe) para el cual deseas calcular Ratios.
- Claves
- Si no deseas mostrar todos los Ratios en el informe, especifica aquellos que serán incluidos. Si se especifica más de uno, deberán estar separados por comas (ej. "TURNO,CR,EMP").
- Encabezado
- Especifica un título para el informe aquí.
- Mostrar Valores en
- Pegado Especial
registro Monedas, módulo Sistema
- Especifica la Moneda a emplearse en el informe. Deja el campo en blanco para emplear la Moneda local (Moneda Base 1).
- Incluir Simulaciones
- Tilda esta casilla si deseas incluir asientos simulados en tu informe. Las líneas de la Simulación con Estado “Inválido” o “Transferido”, no serán incluidas.
- Sin Encabezado
- Tilda esta casilla para que el informe se imprima sin un encabezado.
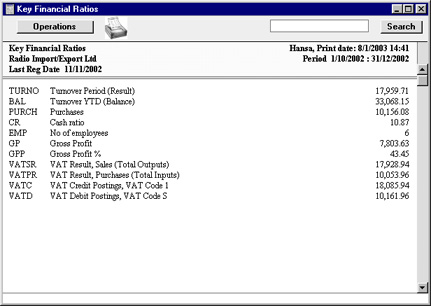
Pronóstico de Liquidez
Este informe presenta un pronóstico de todos los pagos actuales y futuros hacia y desde la empresa durante el periodo especificado. El pronóstico está basado en las Fechas de Expiración de Factura de Compra y Venta. En adición, van incluidos cualquier archivo en el registro de Simulaciones con algún efecto en las Cuentas de Efectivo y Banco dentro de la opción Formas de pago en los módulo Compras y Ventas. Estos asientos simulados ingresarían con anticipación para reflejar los pagos que no proceden en los módulos Compras y Ventas, por tanto, se interpreta con mayor precisión este informe. Tales Simulaciones pueden ser convertidas fácilmente en Asientos en el momento adecuado usando la función 'Crear Asiento' en el menú Operaciones de la ventana ‘Simulaciones: Hojear’. Si cuentas con el módulo ???Cheques’, también puedes tomar en cuenta Cheques o Cheques Propios.
Cuando se pasa a pantalla, este informe posee la funcionalidad Drill-down de Hansa. Haz clic en cualquier Número de Asiento para abrir el Asiento. Se mostrará las Facturas en una ventana ‘Factura: Ver’ y las Facturas de Compra en una ventana ‘Facturas de Compra: Ver’.
Al accionar ‘Pronóstico de Liquidez’ en la lista ‘Informes’ del módulo ‘Caja’, se abrirá la siguiente ventana:
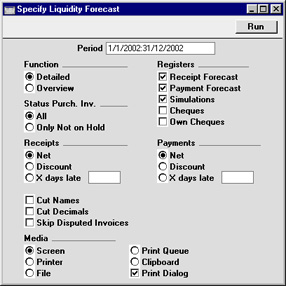
- Periodo
- Pegado Especial
opción Periodos de Informe, módulo Sistema
- Ingresa el periodo de informe con el formato "01-02-02:28-02-02". Si estás usando años de cuatro dígitos como en la ilustración, los números principales serán insertados automáticamente. Si tu periodo de informe es un solo día, simplemente ingresa la fecha y automáticamente ésta será convertida a un formato de periodo. La primara línea de la opción Periodos de Informe se ofrece por defecto.
- Función
- Decide si usar la opción Detallada, la cual muestra cada Transacción; o la opción Resumida que muestra un resumen de una sola línea en relación a cada Transacción.
- Registros
- Por defecto, el informe contiene los pronósticos de ‘Deudores y Acreedores’ y las Simulaciones que contienen cualquiera de las Cuentas usadas en la opción Formas de pago. Puedes excluir cualquiera de las secciones del informe empleando estas casillas. Si cuentas con el módulo Cheques, puedes también incluir secciones para Cheques y Cheques Propios.
- Estado Fac. de Compra
- Puedes decidir excluir aquellas Facturas de Compra para las que se hubiese impedido pagos (aquellas cuya casilla Retenido haya sido tildada).
- Recibos, Pagos
- Selecciona una alternativa para el modelo de pago a emplearse cuando se calcule el horario del Recibo y el Pago.
- Neto
- Esta opción asume que el pago será recibido o emitido sobre la Fecha Tope.
- Descuento
- Esta opción que las facturas con un descuento en efectivo serán pagadas en la Fecha de Descuento para calificar como descuento en efectivo.
- X días demora
- Esta opción te permite asumir que todas las Facturas serán pagadas en promedio según la cantidad de días después de la Fecha Tope.
- Neto
- Cortar Nombres
- Si estás usando la opción Detallada, el nombre del Cliente o Proveedor aparecerá en cada Factura; también se imprimirá completamente cada comentario de Simulación. Tilda esta casilla si quisieses cortar estos Nombres y Comentarios para que se impriman sólo los primeros 25 caracteres.
- Cortar Decimales
- Tilda esta casilla si deseas que aparezcan sólo números enteros en el informe. Por ejemplo, un monto de 5.88 aparecerá como 5 si esta casilla estuviera tildada.
- Omitir Fac. Cuestionadas
- Tilda esta casilla para excluir del informe aquellas Facturas de Venta marcadas como Cuestionadas.
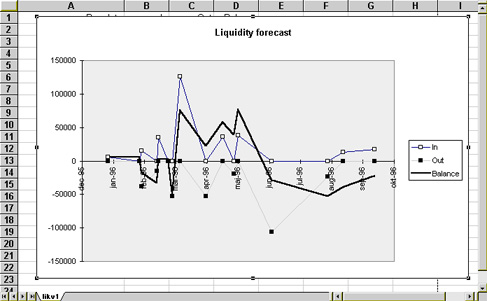
Multicurrency Accounts Rate Difference
This page describes the Multicurrency Accounts Rate Difference report in the Nominal Ledger.
---
The Multicurrency Accounts Rate Difference report summarises the postings made to a particular Account in a specified Currency or in all Currencies (except Base Currencies 1 and 2). Three versions of each balance will be shown: in the original Currency; in Base Currency 1 using the Exchange Rate at the time of each posting; and in Base Currency 1 using the Exchange Rate for a specified date. The report will also show the difference between the two Base Currency figures. The report will therefore show the losses or gains that will result from applying the Exchange Rate to old Transactions.
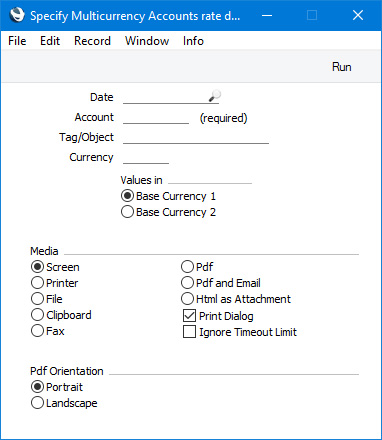
- Date
- Paste Special
Choose date
- The report will use the date that you specify here for the following purposes:
- The first two columns in the report will display the total postings to the specified Account up to this date in two Currencies: the Currency of the posting and Base Currency 1 (your home Currency).
- The third column in the report will display the Currency balance of each Account converted to Base Currency 1 using the Exchange Rate applying on this date.
- You must specify a date, otherwise the report will be empty.
- The first two columns in the report will display the total postings to the specified Account up to this date in two Currencies: the Currency of the posting and Base Currency 1 (your home Currency).
- Account
- Paste Special
Account register, Nominal Ledger/System module
- The report will summarise the postings made to the Account that you specify here. For example, if you have posted to a particular Account in Currencies JPY and USD, the report will contain two lines, one for the JPY postings and one for the USD postings. If you only need one of those lines, specify the relevant Currency in the field below. Postings made after the date specified above will not be included.
- You must specify a single Account, otherwise the report will be empty.
- You must specify a single Account, otherwise the report will be empty.
- Tag/Object
- Paste Special
Tag/Object register, Nominal Ledger/System module
- If you only need postings with a particular Tag/Object to be included in the report, specify that Tag/Object here.
- Currency
- Paste Special
Currency register, System module
- By default, the report will summarise the postings made to the Account specified above, with each Currency that you have used occupying a separate line in the report. If you only need the report to contain a single line for a particular Currency, specify that Currency here.
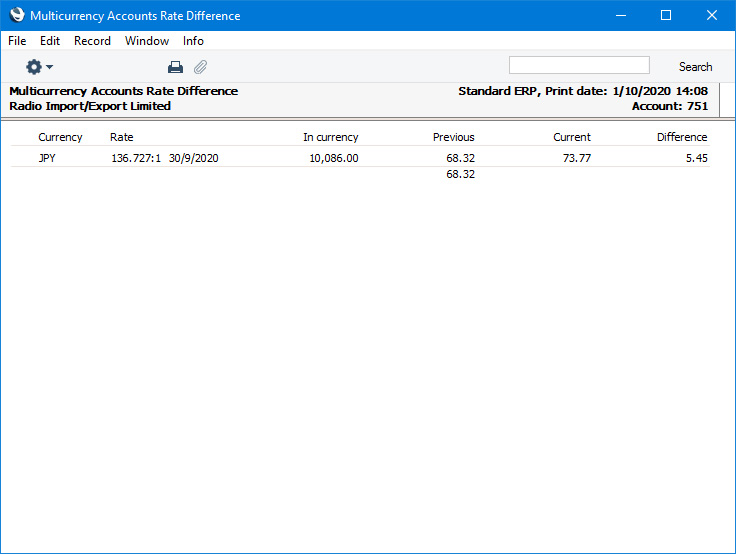
- In currency
- The total value posted to the Account up to the specified date expressed in JPY.
- Previous
- The total value posted to the Account up to the specified date expressed in Base Currency 1, using the values converted and stored at the time of posting.
- Current
- The total value posted to the Account up to the specified date expressed in Base Currency 1, converted using the Exchange Rate from 30 September 2020.
- Difference
- The difference between the Previous and Current figures.
Reports in the Nominal Ledger:
- Introduction
- Definition of Nominal Ledger Reports
- Drill-down
- The Operations Menu
- Account Reconciliation
- Accrual Report
- Analytical Balance
- Analytical Balance (Fiscal purposes)
- Balance Sheet
- Bank Reconciliation
- Bank Statement
- Bank Transactions
- Base Currency Rate Change
- Budget Journal
- Cash Flow
- Chart of Accounts
- Correction List
- Corresponding Accounts
- Creditors Account
- Currency A/C Rate Change
- Daily Balances
- Debtors Account
- Forward Balance Journal
- Income & Expense Book
- Key Financial Ratios
- Liquidity Forecast
- Multicurrency Accounts Rate Difference
- N/L Accrual Transactions
- N/L Transfer, Subsystems
- Nominal Ledger
- Profit & Loss
- Revised Budget Journal
- Tag/Object Results
- Tag/Object/Quantity Results
- Tax Account Balances
- Tax Calculations
- Tax Transactions for Registers
- Template Transaction Journal
- Test Corresponding Rules
- Transaction Journal
- Transaction Summary
- Trial Balance
- VAT Listing
- VAT Report
- VAT Report Purchases
- VAT Report Sales
- VAT Transaction Journal
- XBRL Report
Go back to:
- Home page for Nominal Ledger manual
- Home page for Standard ERP manual
Asientos Devengados
Este informe se utiliza para revisar los Asientos que van a ser creados por la subsecuente ejecución de la función de Mantenimiento 'Generar Asientos Devengados'. La ventana de especificación para el informe y la función de Mantenimiento es la misma; por favor, revisa la descripción de la función de Mantenimiento 'Generar Asientos Devengados' para más detalles.Sub Sistemas, Transferencia
La integración entre los distintos módulos de Hansa significa que los Asientos pueden ser generados automáticamente desde otros Libros y módulos (‘Subsistemas’). Por ejemplo, la aprobación de una Factura en el módulo Ventas puede provocar la creación automática de un Asiento debitando de una Cuenta Deudor y Abonando una Cuenta de Ventas y, si fuese apropiado, una Cuenta IVA. Esta función se controla usando la opción Sub Sistemas.
Si no estás usando esta opción, el informe que enlista los asientos dentro del registro seleccionado o Subsistema (ej. Facturas ingresadas en el módulo Ventas), puede ser empleado como una base para ingresar manualmente asientos equivalentes.
El informe muestra todos los asientos del tipo especificado en el periodo indicado, sin referencia a Asientos equivalentes ingresados previamente. Sólo se mostrarán asientos aprobados.
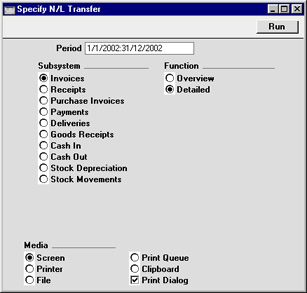
- Periodo
- Pegado Especial
opción Periodos de Informe, módulo Sistema
- Ingresa la fecha inicio y la fecha fin del periodo de informe separadas por dos puntos (:).
- Sub Sistemas
- Selecciona un subsistema para el informe.
- Función
- Utiliza estas opciones controlar el nivel de detalle presentado en el informe.
- Resumido
- Esta casilla producirá un listado con una sola línea para cada transacción (Factura, Pago, etc.) incluyendo un monto total para cada una. En el final se imprimirá una lista respecto a las combinaciones Cuenta/Objeto usadas por las transacciones; ésta mostrará los montos totales de Haber y Debe para cada una. Esto permite sintetizar las transacciones dentro de un solo Asiento.
- Detallado
- Esta casilla muestra las combinaciones Cuenta/Objeto usadas por cada transacción, posibilitando el ingreso de un Asiento separado para cada asiento de Sub Sistema. Al igual que la casilla ???Resumido’, aparecerá un resumen de los movimientos en cada combinación Cuenta/Objeto al final del informe.
- Resumido
Informe Mayor
El informe Mayor es una lista de las líneas de Asiento ingresadas durante el periodo de informe (ej. es una lista de los montos entregados a cada Cuenta en ese periodo).
Este informe ofrece de manera excepcional un poderoso análisis de Objeto a multi-nivel. Puedes buscar asientos con diferentes Objetos y puedes controlar los subtotales. Por ejemplo, si tienes Tipos de Objeto de DEPT (Departamentos) y PERS (Personas), puedes crear un informe con línea ordenadas por Cuenta y departamento más los subtotales por personas dentro de cada departamento. Estas funcionalidades se ilustran detalladamente en la pagina de Ejemplos.
Cuando se pasa a pantalla, el informe Mayor posee la funcionalidad Drill-down de Hansa. Haz clic en cualquier Número de Asiento para abrir un registro individual de Asiento.
Haz doble clic en ‘Mayor’ de la lista ‘Informes’ para abrir la siguiente ventana:
Encabezado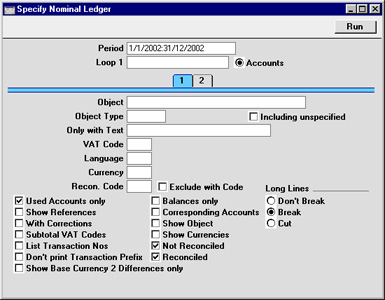
- Periodo
- Pegado Especial
opción Periodos de Informe, módulo Sistema
- Especifica el periodo de informe con el formato "01-02-02:28-02-02". Si estas usando años de cuatro dígitos como en la ilustración, los números principales serán insertados automáticamente. Si tu periodo de informe es un solo día, simplemente ingresa la fecha y automáticamente ésta será convertida a formato de periodo. La primera línea de la opción Periodos de Informe se ofrece por defecto.
- Orden 1, Orden 2, Orden 3
- (Orden 2 y Orden 3 están en la solapa 2.)
- Puedes ingresar un rango de Cuentas, un rango de Objetos o un Tipo de Objeto en cada uno de estos campos. Los siguientes ejemplos ilustran el modo de usar estos campos:
Eg Dato Informe contiene 1 Orden 1: 100:199 (Cuentas) Datos de líneas de Asiento para Cuentas en el rango 100:199, ordenadas por Cuenta 2 Orden 1: VENTAS (Objetos) Líneas de Asiento con el Objeto VENTAS, ordenadas por Objeto 3 Orden 1: DEPT (Tipo de Objeto) Líneas de Asiento con Objetos que pertenencen al Tipo de Objeto DEPT, ordenadas por Objeto 4 Orden 1: 100:199 (Cuentas) Orden 2: DEPT (Tipo de Objeto) Líneas de Asiento con Objetos que pertenecen al Tipo de Objeto DEPT y registran par alas Cuentas en el rango 100:199, ordenadas por Cuenta luego Objeto 5 Orden 1: DEPT (Tipo de Objeto) Orden 2: 100:199 (Cuentas) Como en la 4 pero ordenadas por Objeto y luego Cuenta 6 Orden 1: 100:199 (Cuentas) Orden 2: DEPT (Tipo de Objeto) Orden 3: PERS (Tipo de Objeto) Líneas de Asiento con Objetos que pertenencen al Tipo de Objeto DEPT y al Tipo de Objeto PERS; registran para las Cuentas en el rango 100:199, ordenadas por Cuenta, por Objetos DEPT y finalmente por Objetos PERS - Deberás cargar algún dato en el campo Orden 1 antes de usar Orden 2 y 3, sino el informe saldrá en blanco.
- Por favor, revisa la página de Ejemplos para más información sobre el uso de estos campos.
- Puedes ingresar un rango de Cuentas, un rango de Objetos o un Tipo de Objeto en cada uno de estos campos. Los siguientes ejemplos ilustran el modo de usar estos campos:
- Cuentas
- Al lado de cada Campo ‘Orden’, hay un botón de radio Cuentas. Se deberá seleccionar este botón si deseas ingresar una Cuenta o rango de Cuentas en el campo Contra Orden. Esto es por dos razones:
- Si se selecciona el botón radio Cuentas, Hansa asumirá que lo que se ingresó en el campo Orden es una Cuenta o un rango de Cuentas y buscará, de acuerdo a esto, líneas de Asiento resultantes. Si el botón radio Cuentas no está seleccionado, Hansa asumirá que el campo Orden contiene un Objeto, un rango de Objetos o un Tipo de Objeto.
- Si se selecciona el botón radio Cuentas, puedes usar ???Pegado Especial’ desde el campo Orden para abrir una lista de Cuentas desde la que puede seleccionar una adecuada. Si el botón radio Cuentas no está seleccionado, ‘Pegado Especial’ abrirá una lista de los Objetos.
- Si se selecciona el botón radio Cuentas, Hansa asumirá que lo que se ingresó en el campo Orden es una Cuenta o un rango de Cuentas y buscará, de acuerdo a esto, líneas de Asiento resultantes. Si el botón radio Cuentas no está seleccionado, Hansa asumirá que el campo Orden contiene un Objeto, un rango de Objetos o un Tipo de Objeto.
- Objeto
- Pegado Especial
registro de Objetos, módulos Contabilidad/Sistema
- Ingresa un Código de Objeto en este campo si deseas que el informe enliste líneas de Asiento en función a cierto Objeto. Si el campo queda vacío, se incluirán todas las líneas de Asiento, con o sin Objetos. Si ingresas un número de Objetos separados por comas, se mostrará sólo aquellas líneas de Asiento con los Objetos listados.
- Tipo de Objeto
- Pegado Especial
opción Tipos de Objeto, módulo Contabilidad
- Ingresa un Código Tipo de Objeto en este campo si deseas que el informe enliste las líneas de Asiento con Objetos pertenecientes a cierto Tipo de Objeto.
- Incluir sin Especificación
- Tilda esta casilla si deseas mostrar líneas de Asiento con Objetos pertenecientes al Tipo de Objeto especificado arriba e igualmente todas las demás líneas de Asiento. También, deberás tildar la casilla Mostrar Objeto, par que aquellos asientos con Objetos pertenecientes al Tipo de Objeto elegido, puedan distinguirse de las demás.
- Sólo con Texto
- Ingresa un renglón en este campo para listar las líneas de Asiento con ciertas Descripciones. Por ende, se asumirá que se ha usado los datos por defecto en el campo Descripción y podrás ingresar un Nombre de Cuenta aquí para informar sobre los registros hacia esa Cuenta. Notemos que no debes ingresar en renglón de texto completo: “Ventas” encuentra “Tipo Ventas 1???, “Tipo Ventas 2”, etc.
- Código IVA
- Pegado Especial
opción Códigos IVA, módulo Contabilidad
- Ingresa un Código IVA aquí para listar líneas de Asiento con un Código IVA particular.
- Idioma
- Pegado Especial
opción Idiomas, módulo Sistema
- Se puede producir el informe Mayor en diferentes Idiomas. Ingresa el Código del Idioma requerido aquí. Se extraerá la traducción apropiada para cada Nombre de Cuenta desde la solapa 'Textos' del registro de Cuentas.
- Moneda
- Pegado Especial
registro de Moneda, módulo Sistema
- Si se ingresa una Moneda aquí, el informe sólo listará aquellos asientos con esa Moneda seleccionada en la pestaña C. Los montos presentados en el informe serán tomados de la pestaña C de esos Asientos; ej. estarán en la Moneda elegida. Si el campo queda en blanco, se incluirá en el informe todas las líneas de Asiento con sus montos provenientes de los campos Base 1 o Base 2 Haber o Debe en la pestaña B (escoge la Moneda Base a emplearse usando las opciones ‘Valores en’ descritas abajo).
- Cód. Conc., Excluir con Código
- Si deseas listar Asientos conciliados con un Código Conciliación particular (cargado en la pestaña D de la ubicación Cuentas Conciliadas), ingresa ese Código aquí. Para listar todos los Asientos Conciliados excepto aquellos con un Código Conciliación particular, tilda también la casilla ‘Excluir con Código’.
- La casilla Conciliado (abajo) debe tildarse si quieres utilizar este campo y esta casilla.
- La casilla Conciliado (abajo) debe tildarse si quieres utilizar este campo y esta casilla.
- Sólo Ctas. Usadas
- Tilda esta casilla para excluir Cuentas que no fueron usadas durante el periodo de informe. Se mostrará Cuentas no usadas pero con un balance de apertura.
- Mostrar Referencias
- Por defecto, el informe muestra el Texto de cada Asiento. Utiliza esta opción si deseas mostrar la Referencia y el Texto.
- Con Correcciones
- Tilda esta casilla si deseas mostrar todas las correcciones en los Asientos.
- Subtotal Códigos IVA
- Tilda esta casilla si deseas mostrar los montos totales de Haber y Debe para cada Código IVA; éstos aparecerán al pie del informe.
- Mostrar Nros. Asientos
- Con esta casilla tildada, se listará los Números de Asiento de todas las transacciones que caigan dentro del periodo de informe conjuntamente con los totales de Haber y Debe. Éstos aparecerán al pie del informe.
- No Imprimir Prefijo de As.
- Los Números de Asiento generalmente aparecen en el informe conjuntamente con sus prefijos al igual que en la ventana ‘Asientos: Hojear’. Los asientos ingresados directamente al Libro Mayor, por ejemplo aparecerán como "2002.3", mientras que aquellos creados desde un Subsistema aparecerán como "S/INV.020003". Si no deseas que aparezcan estos prefijos, tilda esta casilla.
- Mostrar Sólo Diferencias en Moneda Base 2
- Si esta casilla está tildada, el informe contará con una lista de aquellos Asientos en donde el valor de la Moneda Base 2 no está correcto según el Tipo de Cambio en relación a la Fecha de Asiento. Esto podría darse debido al uso previo de un Tipo de Cambio ad hoc para el Asiento en cuestión, o debido a que un Tipo de Cambio fue cambiado poco después de haber ingresado. No se recomienda esta última acción.
- No se puede usar esta opción para calcular valores en Moneda Base 2 aplicando Tipos de Cambio y Base para líneas de Asiento antiguas. Para hacer esto, utiliza el informe Moneda Base Tipo de Cambio.
- No se puede usar esta opción para calcular valores en Moneda Base 2 aplicando Tipos de Cambio y Base para líneas de Asiento antiguas. Para hacer esto, utiliza el informe Moneda Base Tipo de Cambio.
- Sólo Saldos
- Utiliza esta casilla para mostrar sólo un saldo en cada Cuenta, en vez de tener cada línea de Asiento listada.
- Mostrar Contra Cuentas
- Tilda esta casilla para imprimir en el informe las Contra Cuentas de cada línea de Asiento.
- Mostrar Objeto
- Tilda esta casilla para imprimir los Objetos usados en cada línea de Asiento.
- Mostrar Monedas
- En caso de Asientos en un Moneda Extranjera (no en Moneda Base 1 o 2), tilda eta casilla para mostrar los montos en una Moneda igual a la Moneda local.
- Sin Conciliar
- Tilda esta casilla para incluir en el informe Asientos que no han sido conciliados usando el registro Conciliación de Cuenta.
- Conciliados
- Tilda esta casilla para incluir en el informe Asientos que han sido conciliados usando el registro de Conciliación de Cuenta.
- Líneas Largas
- Hay tres opciones disponibles para manejar descripciones largas cuando se imprime. La opción ???No quebrar’ siempre se usa para pasar a pantalla. Para vista preliminar del informe, selecciona ???Recalcular e Imprimir’ desde el menú Operaciones para acogerse a la opción de Líneas Largas (si pulsar el icono de Impresora).
- Si se utiliza una configuración de página paisaje y/o si se reduce la ampliación de la página, se incrementará el espacio disponible para descripciones largas (la anchura de la columna de descripción).
- No Quebrar
- La longitud completa de la descripción se imprime en una línea. Si interfiriese con las cifras en la siguiente columna, éstas serán trasladadas a la siguiente línea.
- Quebrar
- Se imprime la longitud completa de la descripción, expandida a varias líneas si es necesario.
- Cortar
- Los últimos caracteres de la descripción no se imprimirán para se enmarque en una línea dentro de la columna asignada.
- Si se utiliza una configuración de página paisaje y/o si se reduce la ampliación de la página, se incrementará el espacio disponible para descripciones largas (la anchura de la columna de descripción).
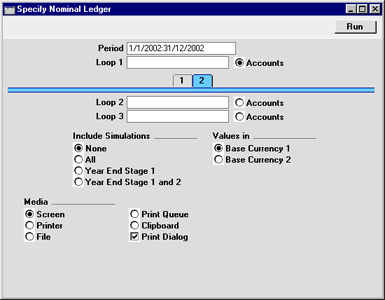
- Incluir Simulaciones
- Escoge una de estas opciones si quieres incluir asientos simulados en el informe. Si escoges la opción ‘Todas’, no se incluirán Simulaciones con Estado “Inválido” o “Transferido”.
- Valores en
- Si estás usando el sistema de Base-dual, los valores en este informe aparecen en cualquiera de las Monedas Base. Utiliza estas opciones para escoger la Moneda a emplearse en esta ocasión.
- Si no estás usando el sistema de Base-dual, utiliza la opción Moneda Base 1 para producir un informe en tu Moneda local.
- Si se ingresa una Moneda extranjera en el campo arriba, los montos en el informe estarán en esa Moneda.
- Si no estás usando el sistema de Base-dual, utiliza la opción Moneda Base 1 para producir un informe en tu Moneda local.
- Ejemplos
En esta sección ilustraremos las funcionalidades ofrecidas por el informe Mayor, usando los Asientos resultantes de una Jornada de Facturación. Cada Factura lleva un Objeto que representa el vendedor y otro que representa la oficina que hace la venta. Los Objetos que representan a los vendedores pertenecen al Tipo de Objeto “PERS”, mientras que aquellos que representan a las oficinas pertenecen al Tipo de Objeto “OFF”.
Los Asientos involucrados en esto son los siguientes:
Nro. Asiento Cuenta Objetos Debe Haber 5013 750 S/L Control 408.50 110 Tipo de Ventas 2 NB,TALL 64.00 100 Tipo de Ventas 1 NB,TALL 284.00 830 Débito IVA Pagable 60.50 5014 750 S/L Control 306.68 110 Tipo de Ventas 2 IP,TALL 48.00 100 Tipo de Ventas 1 IP,TALL 213.00 830 Débito IVA Pagable 45.68 5015 750 S/L Control 715.58 110 Tipo de Ventas 2 JM,LOND 112.00 100 Tipo de Ventas 1 JM,LOND 497.00 830 Débito IVA Pagable 106.58 5016 750 S/L Control 102.23 110 Tipo de Ventas 2 FF,LOND 16.00 100 Tipo de Ventas 1 FF,LOND 71.00 830 Débito IVA Pagable 15.23 Primero, el informe Mayor se utiliza para listar el diario de registros para cada Cuenta de Ventas (para listar los asientos con Cuentas de Venta):
El rango de Cuentas Ventas (100:199) ingresa en el campo Orden 1 del encabezado. Se puede usar ‘Pegado Especial’. Así como todos los ejemplos en esta página, la casilla ‘Mostrar Objeto’ ha sido tildada para que aparezcan Objetos en las ilustraciones.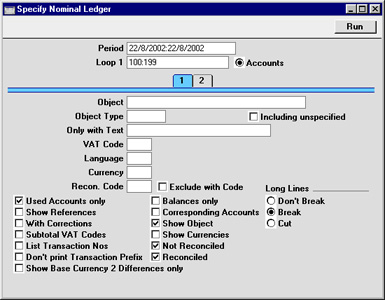
Este sería el informe resultante:
El informe es una lista de Cuentas, los balances de apertura y cierre aparecen junto con el cambio neto para el periodo de informe. Los registros en cada Cuenta están listados por orden de fecha.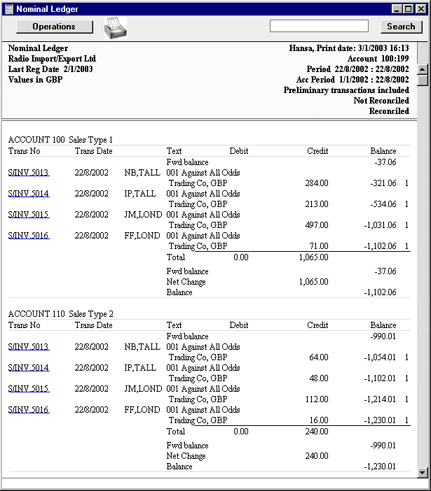
En el siguiente ejemplo, se listan las líneas de Asiento con Objetos pertenecientes a un Tipo de Objeto particular. El rango Cuenta Ventas otra vez ingresa en el campo Orden 1 y el Objeto “PERS” ingresa en el campo Tipo de Objeto con el propósito de listar todos los asientos que tienen un Objeto representando a un vendedor:
Siendo que cada Asiento en este ejemplo, tiene un Objeto perteneciente al Tipo de Objeto “PERS”, el resultado es el mismo que en el primer informe: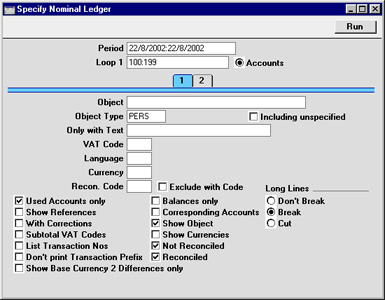
Si quieres los subtotales para cada Objeto perteneciente al Tipo de Objeto “PERS”, no uses el campo Tipo de Objeto. Por el contrario, abre la solapa 2 en la ventana de especificación e ingresa “PERS” en el campo Orden 2:
De cierta forma, ingresar “PERS” en el campo Orden 2, es lo mismo que ingresar esto en el campo Tipo de Objeto (anterior ejemplo); se garantiza que sólo se listará en el informe asientos con Objetos pertenecientes al Tipo de Objeto “PERS”. Pero en adición, se le indica a Hansa que dentro de cada Cuenta, los datos serán ordenados por vendedor. Esto quiere decir que los subtotales serán proporcionados para cada vendedor dentro de cada Cuenta.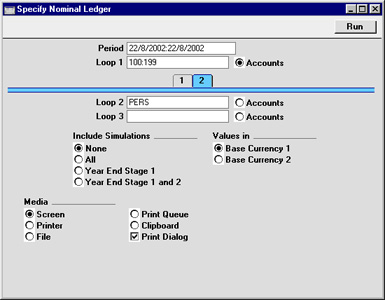
En términos generales, Orden 1, 2 y 3 se utilizan para imponer un tipo de orden en el informe. El rango de Cuenta habrá ingresado en el campo Orden 1, así que éste será el nivel máximo de ordenación. El Tipo de Objeto “PERS” habrá ingresado en el campo Orden 2, así que el segundo nivel de ordenación es en función a Objetos pertenecientes a ese Tipo. Los subtotales son proporcionados como nivel inferior de ordenación. De modo que, en este caso el informe se ordena por Cuenta y luego por Objeto con los subtotales para cada Objeto:
El campo Orden 3 se puede emplear para ordenar según los tres niveles. Por ejemplo, al informar eventualmente sobre el rango de Cuentas Ventas por oficina con los subtotales por vendedor dentro de cada oficina. El Tipo de Objeto “OFF” (Objetos que representan a las oficinas) ingresa en el campo Orden 2, y el Tipo de Objeto “PERS” ingresa en el campo Orden 3: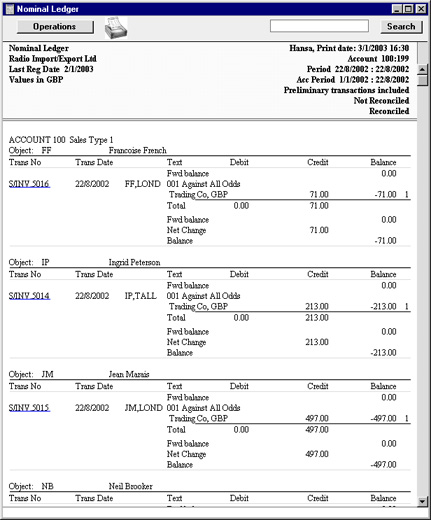
Los campos Orden 2 y Orden 3 se utilizan bajo criterios de búsqueda (sólo asientos con Objetos pertenecientes a ambos Tipos de Objeto se listarán en el informe). En este sentido, ya que se ha cargado dato(s) en el campo Orden 3, los subtotales serán proporcionados en este nivel.
Nuevamente, el informe resultante estará estructurado sobre una base Cuenta por Cuenta (el nivel de ordenación es en función a Cuentas). Esta vez, dentro de cada Cuenta, los datos se ordenan primero al nivel del Orden 2 (por oficina) y luego al nivel del Orden 3 (por vendedor).
Dentro de cada Objeto en Orden 2 (dentro de cada oficina), los subtotales son proporcionados para cada Objeto en Orden 3 (para cada vendedor):
Finalmente, puedes cambiar la estructura del informe de (Cuenta por Cuenta) a (Objeto por Objeto). Esta vez, dentro de cada Objeto, los subtotales son proporcionados para cada Cuenta. En el ejemplo, esto tiene el efecto de enlistar las Cuentas Ventas usadas por cada vendedor para que se pueda ver lo cada uno vendió. Para hacer esto, ingresa el Tipo de Objeto “PERS” en el campo Orden 1 y el rango de Cuentas Ventas en el campo Orden 2. Selecciona el botón radio Cuentas junto al campo Orden 2 puesto que éste ahora contiene Números de Cuenta y no Objetos: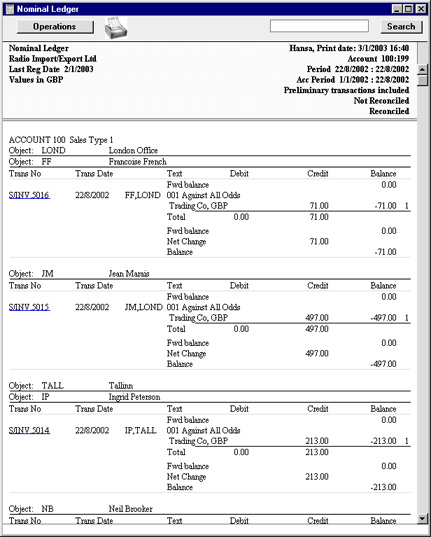
Este sería el informe, ordenado por Objeto (nivel 1) y luego por Cuenta (nivel 2), con los subtotales proporcionados para cada Cuenta dentro de cada Objeto: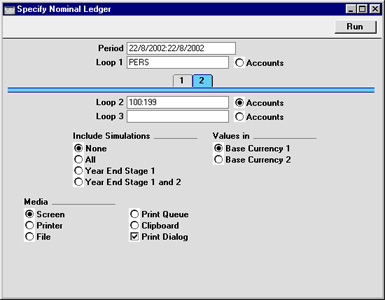
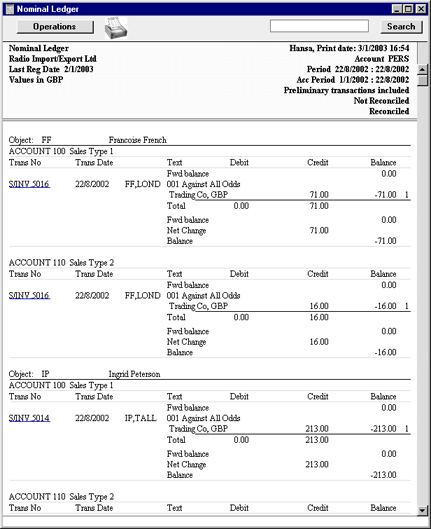
Estado de Resultados
El informe Estado de Resultados muestra el volumen de ventas conseguido por tu empresa en un periodo específico. También, este informe muestra el costo total de las ventas y por tanto, la ganancia bruta con los gastos generales; consecuentemente, tendremos la ganancia neta de tu negocio.
Cuando se pasa a pantalla, el informe Estado de Resultado posee la funcionalidad Drill-down de Hansa. Haz clic sobre cualquier Núemero de Cuenta en el informe para abrir el Informe Mayor en relación a la misma Cuenta y mismo periodo. Estando en el informe Mayor, puedes abrir un Asiento individual pulsando cualquier Número de Asiento.
Por favor, haz clic para detalles sobre:
- La Definición del informe Estado de Resultados;
- Impresión del informe Estado de Resultados.
- Definición
El contenido del informe Estado de Resultados se define del mismo modo que el Balance. Por favor, revisa la página de Definición de Balance para detalles completos.- Impresión
Abre la ventana de lista ‘Informes’ y haz doble clic en ‘Estado de Resultados’. Se abrirá la ventana ‘Especificar Estado de Resultados’.

- Periodo
- Pegado Especial
opción Periodos de Informe, módulo Sistema
- Será el periodo de informe; debes ingresar la primera y última fecha del periodo. El primer periodo de la opción Periodos de Informe se ofrece por defecto.
- Encabezado
- Ingresa un título propio para el informe.
- Objetos
- Pegado Especial
registro de Objetos, módulos Contabilidad/Sistema
- Ingresa un Código de Objeto para reducir el alcance del informe. Si el campo queda en blanco, se incluirá todos los Asientos con o sin Objetos. Si ingresas un número de Objetos separados por comas, sólo se incluirá aquellos Asientos que contengan los Objetos listados.
- Tipo de Objeto
- Pegado Especial
opción Tipos de Objeto, módulo Contabilidad
- Ingresa un Código Tipo de Objeto en este campo para limitar el informe sólo a Asientos para Objetos con cierto Tipo de Objeto.
- Incluir no Especificado
- Tilda esta casilla para mostrar un saldo para Asientos de Objetos con cierto Tipo de objeto; y un segundo saldo para todos los demás Asientos.
- Moneda
- Pegado Especial
registro de Moneda, módulo Sistema
- Si se ingresa una Moneda aquí, el informe Estado de Resultados será calculado usando sólo aquellos Asientos con la Moneda especificada en la pestaña C. Los montos mostrados en el informe serán extraídos desde la pestaña C de esos Asientos; estarán en la Moneda seleccionada. Si el campo está vacío, se incluirá todos los Asientos en el informe con sus montos extraídos desde los campos Base 1 o Base 2 Debe o Haber en la pestaña A (escoge la Moneda Base a emplearse usando las opciones de ‘Valores en’).
- Idioma
- Pegado Especial
opción Idiomas, módulo Sistema
- El informe Estado de Resultados puede ser producido en Idiomas. Ingresa aquí el Código requerido de Idioma. La traducción apropiada para Nombre de Cuenta será extraída de la solapa 'Textos' en el registro de Cuentas y la traducción para cada encabezado o sub-encabezado del informe provendrá de la definición del informe (por favor, revisa la página de Definición de Balance para detalles completos).
- Cuentas
- Selecciona el modo de impresión de las Cuentas en el informe.
- Todas
- Esta opción mostrará todas las Cuentas que hayan sido incluidas en las definiciones del Informe Estado de Resultados.
- Sólo usadas
- Esta casilla sólo mostrará Cuentas que han sido usadas. Esto incluye Cuentas que tengan balances de apertura para un periodo anterior, pero que no han sido usadas en el periodo de informe.
- Sólo Grupos
- Esta casilla no muestra saldos para Cuentas individuales. Por el contrario, simplemente muestra un balance global para cada línea según lo ingresado en las definiciones del informe Estado de Resultados.
- Sólo Grupos Usados
- Esta casilla muestra sólo saldos para líneas según lo ingresado en las definiciones del informe Estado de Resultados. Sólo sin estas líneas han sido usadas.
- Todas
- Notación
- Hay seis opciones para controlar la presentación de los montos en el informe.
- Exacta
- Muestra los saldos como están almacenados en los Asientos.
- Sin Decimales
- Redondea los balances hacia el número entero más cercano.
- Miles, Millones
- Divide el balances entre 1,000 o 1,000,000.
- % Facturac.
- Muestra cada saldo como un porcentaje global de ventas. Esta casilla requiere que ‘facturac.’ sea definido como un Ratio usando el código “TURNO”. Por favor, revisa la página que describe la Definición del informe Ratios Financieros para detalles sobre el modo de manejar esto.
- Comparación en %
- Sólo es válido si se elige Presupuesto o Presupuesto Revisado como la opción de Comparación.
- Exacta
- Comparación
- Selecciona una opción de la columna Comparación para aplicar al informe.
- Acumulado
- Esta opción compara el periodo de informe con el Año hasta la Fecha.
- Año Anterior
- Esta opción compara el periodo de informe con el mismo periodo del año anterior.
- Resultado Anterior
- Esta opción compra el periodo de informe con la anterior gestión.
- Presup. Presup. Rev.
- Estas opciones comparan el periodo de informe con las cifras de Presupuesto o Presupuesto Revisado para el mismo periodo. Notemos que para cada registro de Presupuesto o Presupuesto Revisado debe cargarse al menos un dato en el área de la matriz indicando la fecha. Esto debe realizarse antes de que se incluyan en el informe.
- Comparación en %
- Esta opción en el área de Notación, hará que los valores de comparación se expresen como porcentajes.
- Acumulado
- Incluir Simulaciones
- Tilda esta casilla para incluir asientos simulados en el informe. Las simulaciones con Estado “Inválido” o “Transferido??? no serán incluidas.
- Listar Nro. Trans.
- Con esta casilla tildada, se listará los Números de Asiento de todas las transacciones que caigan dentro del periodo de informe conjuntamente con sus totales de Haber y Debe. Éstos aparecerán al pie del informe.
- Sin Encabezado
- Tilda esta casilla para imprimir el informe sin un encabezado.
- Valores en
- Si estás usando el sistema de Base-dual, los valores en este informe aparecerán en cualquiera de las Monedas Base. Utiliza estas opciones para escoger la Moneda a emplearse en esta ocasión.
- Si no estás usando el sistema de Base-dual, utiliza la opción Moneda Base 1 para producir un informe en tu Moneda local.
- Si se ingresa una Moneda extranjera en el campo Moneda, los montos en el informe estarán en esa Moneda.
- Si no estás usando el sistema de Base-dual, utiliza la opción Moneda Base 1 para producir un informe en tu Moneda local.
Diario de Presup. Revisado
Este informe lista los archivos en el registro de Presupuesto Revisado.
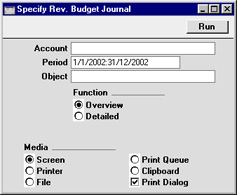
- Cuenta
- Pegado Especial
registro de Cuentas, módulos Contabilidad/Sistema
- Rango de Informe Alfa
- Especificar la Cuenta o rango de Cuentas para el cual se imprimirán los Presupuestos Revisados.
- Especificar la Cuenta o rango de Cuentas para el cual se imprimirán los Presupuestos Revisados.
- Periodo
- Pegado Especial
opción Periodos de Informe, módulo Sistema
- Ingresar la fecha inicio y fecha fin del periodo cuyos Presupuestos Revisados aparecerán en el informe. El primer registro de la opción Periodos de Informe se ofrece por defecto.
- Todos los Presupuestos Revisados que sean pertinentes al periodo de informe, serán listados en el informe. Por ejemplo, si el periodo de informe es 1ro de Junio hasta 30 de Junio, se incluirá los Presup. Revisados que comiencen en Junio o acaben en Junio; y los Presup. Revisados que comiencen antes de Junio y acaben después de Junio aparecerán también.
- Todos los Presupuestos Revisados que sean pertinentes al periodo de informe, serán listados en el informe. Por ejemplo, si el periodo de informe es 1ro de Junio hasta 30 de Junio, se incluirá los Presup. Revisados que comiencen en Junio o acaben en Junio; y los Presup. Revisados que comiencen antes de Junio y acaben después de Junio aparecerán también.
- Objeto
- Pegado Especial
registro de Objetos, módulos Contabilidad/Sistema
- Para listar Presupuestos Revisados con un Objeto particular, ingresa ese Objeto aquí.
- Función
- Utiliza estas opciones para determinar el nivel de detalle a incluirse en el informe.
- Resumindo
- Esta opción nos presentará una informe con una línea por Presup. Revisado. Se mostrará el Número y Nombre de Cuenta, Objeto, la Fecha Inicio/Fin y la Suma.
- Detallado
- En adición a la información presentada en el modo Resumido, esta opción también listará los totales mensuales o trimestrales en cada Presup. Revisado.
- Resumindo
Simulation Journal
This page describes the Simulation Journal report in the Nominal Ledger.
---
The Simulation Journal is a list of the records in the Simulation register.
When printed to screen, the Simulation Journal has the Standard ERP Drill-down feature. Click (Windows/macOS) or tap (iOS/Android) on any Simulation Number in the report to open an individual Simulation record.
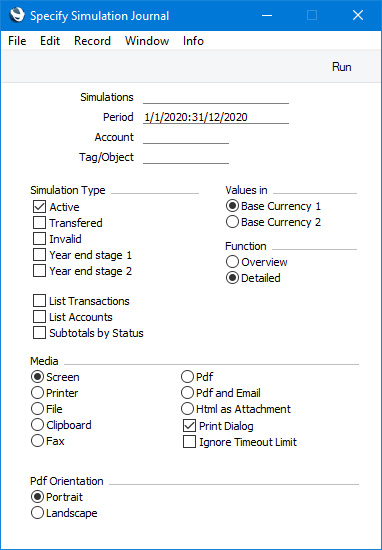
- Simulations
- Range Reporting
Numeric
- Enter a Simulation Number or a range of Numbers separated by a colon (:) here if you would like specific Simulations to be shown in the report.
- Period
- Paste Special
Reporting Periods setting, System module
- Enter the report period. The report will list Simulations whose Transaction Dates fall in the period specified here. The first period listed in the Reporting Periods setting will be used as a default.
- Account
- Paste Special
Account register, Nominal Ledger/System module
- Use this field if you want to list Simulations in which a particular Account has been used in at least one row.
- If you produce the report using the Overview option, the figures in the report for each Simulation will be calculated from the rows with the specified Account. If you use the Detailed option, only the rows with the specified Account will be listed.
- If you produce the report using the Overview option, the figures in the report for each Simulation will be calculated from the rows with the specified Account. If you use the Detailed option, only the rows with the specified Account will be listed.
- Tag/Object
- Paste Special
Tag/Object register, Nominal Ledger/System module
- Use this field if you want to list Simulations in which a particular Tag/Object has been used in at least one row. If you enter a number of Tags/Objects separated by commas, a Simulation will only be included in the report if it has at least one row featuring all the Tags/Objects.
- If you produce the report using the Overview option, the figures in the report for each Simulation will be calculated from the rows with the specified Tag/Object(s). If you use the Detailed option, only the rows with the specified Tag/Object(s) will be listed.
- If you produce the report using the Overview option, the figures in the report for each Simulation will be calculated from the rows with the specified Tag/Object(s). If you use the Detailed option, only the rows with the specified Tag/Object(s) will be listed.
- Simulation Type
- Select one or more of these options if you need to list Simulations in which there is at least one row with a particular Status.
- List Accounts
- If you select this option, each Account used in the Simulations in the report, together with debit and credit totals, will be listed at the end of the report.
- Subtotals by Status
- This option will list each Status used in the Simulations in the report, together with debit and credit totals.
- Values in
- If you are using the Dual-Base system, use these options to specify whether the values in the report are to be shown in Base Currency 1 or 2.
- If you are not using the Dual-Base system, use the Base Currency 1 option to produce a report in your home Currency.
- If you are not using the Dual-Base system, use the Base Currency 1 option to produce a report in your home Currency.
- Function
- Use these options to specify the level of detail required in the report.
- Overview
- This choice produces a report with a single line for each Simulation, showing the Simulation Number, Transaction Date, Reference, Text, Signature of the user who created the Simulation and debit and credit totals.
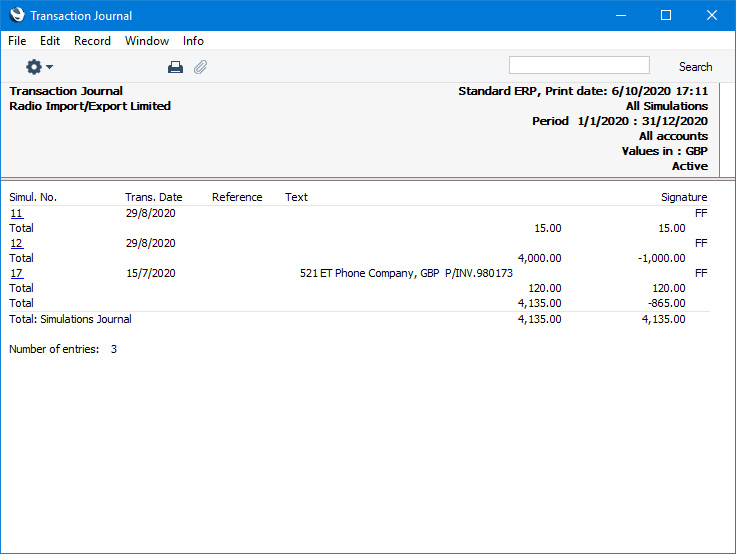
- Detailed
- In addition to the information shown in the Overview, this option lists the Simulation rows individually, showing the Account, Tags/Objects, Transaction Date, Description, Debit or Credit Value and VAT Code.
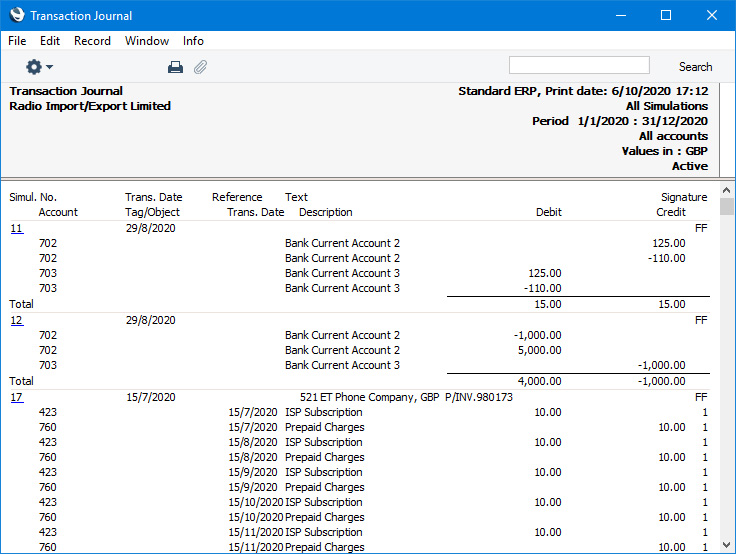
- Overview
Reports in the Nominal Ledger:
- Introduction
- Definition of Nominal Ledger Reports
- Drill-down
- The Operations Menu
- Account Reconciliation
- Accrual Report
- Analytical Balance
- Analytical Balance (Fiscal purposes)
- Balance Sheet
- Bank Reconciliation
- Bank Statement
- Bank Transactions
- Base Currency Rate Change
- Budget Journal
- Cash Flow
- Chart of Accounts
- Correction List
- Corresponding Accounts
- Creditors Account
- Currency A/C Rate Change
- Daily Balances
- Debtors Account
- Forward Balance Journal
- Income & Expense Book
- Key Financial Ratios
- Liquidity Forecast
- Multicurrency Accounts Rate Difference
- N/L Accrual Transactions
- N/L Transfer, Subsystems
- Nominal Ledger
- Profit & Loss
- Revised Budget Journal
- Simulation Journal
- Tag/Object Results
- Tag/Object/Quantity Results
- Tax Account Balances
- Tax Calculations
- Tax Transactions for Registers
- Template Transaction Journal
- Test Corresponding Rules
- Transaction Journal
- Transaction Summary
- Trial Balance
- VAT Listing
- VAT Report
- VAT Report Purchases
- VAT Report Sales
- VAT Transaction Journal
- XBRL Report
Go back to:
- Home page for Nominal Ledger manual
- Home page for Standard ERP manual
Resultados de Objeto
Este informe muestra la ganancia/pérdida en relación a los Objetos seleccionados. Es posible una comparación con el anterior mes, trimestre o año.
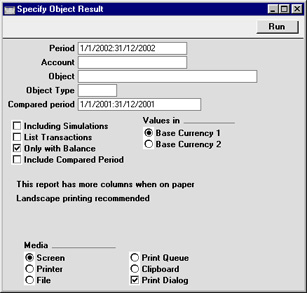
- Periodo
- Pegado Especial
opción Periodos de Informe, módulo Sistema
- Ingresa la primera y la última fecha del periodo de informe separadas por dos puntos (:).
- Cuenta
- Pegado Especial
registro de Cuentas, módulos Contabilidad/Sistema
- Rango de Informe Alfa
- Selecciona una Cuenta, un rango de Cuentas, o deja el campo en blanco para incluir todas las Cuentas.
- Selecciona una Cuenta, un rango de Cuentas, o deja el campo en blanco para incluir todas las Cuentas.
- Objeto
- Pegado Especial
registro de Objetos, módulos Contabilidad/Sistema
- Rango de Informe Alfa
- Ingresa un Código de Objeto para limitar el informe sólo a un Objeto.
- Ingresa un Código de Objeto para limitar el informe sólo a un Objeto.
- Tipo de Objeto
- Pegado Especial
opción Tipos de Objeto, módulo Contabilidad
- Ingresa un Tipo de Objeto para limitar el informe en función al Objeto de ese grupo.
- Periodo Comparado
- Pegado Especial
opción Periodos de Informe, módulo Sistema
- Si quieres que el informe incluya una comparación con un periodo diferente, ingresa ese periodo aquí. Por defecto se ofrece un periodo un año antes del periodo de informe principal. La casilla ‘Incluir Periodo Comparado debe estar tildada.
- Incluir Simulaciones
- Tilda esta casilla para incluir Simulacioens en el informe. Las Simulaciones con Estado ???Inválido” o “Transferido” no serán incluidas.
- Listar Asientos
- Con esta casilla tildada, se listará los Números de Asiento de todas las transacciones que caigan dentro del periodo de informe conjuntamente con los totales de Haber y Debe. Éstos aparecerán al pie del informe. Se listará todos los Asientos sin hacer referencia al manejo del Objeto.
- Solo con Saldo
- Sólo se listará Objetos usados en el periodo.
- Incluir Periodo Comparado
- Si deseas que el informe incluya una comparación con un periodo diferente, tilda esta casilla y especifica ese periodo en el campo Periodo Comparado.
- Valores en
- Si estás usando el sistema de Base-dual, los valores en este informe aparecerán en cualquiera de las Monedas Base. Utiliza estas opciones para escoger la Moneda a emplearse en esta ocasión.
- Si no estás usando el sistema de Base-dual, utiliza la opción Moneda Base 1 para producir un informe en tu Moneda local.
Resultados de Objetos/Cantidades
Este informe proporciona un análisis detallado del manejo de Objeto durante el periodo de informe. Se ordena por Objeto y muestra saldos para cada combinación Objeto/Cuenta en el periodo de informe. Para fines de comparación, también aparecerán las cifras de Presupuesto y Presupuesto Revisado en el periodo de informe.

- Periodo
- Pegado Especial
opción Periodos de Informe, módulo Sistema
- El periodo de informe; ingresa la primera y última fecha separadas por dos puntos (:).
- Objeto
- Pegado Especial
registro de Objetos, módulos Contabilidad/Sistema
- Rango de Informe Alfa
- Ingresa un Código de Objeto para limitar el informe sólo a un Objeto.
- Ingresa un Código de Objeto para limitar el informe sólo a un Objeto.
- Tipo de Objeto
- Pegado Especial
opción Tipos de Objeto, módulo Contabilidad
- Ingresa un Tipo de Objeto para limitar el informe en relación a Objetos en ese grupo.
- Longitud de Grupo de Objeto
- Este campo se utiliza junto con la casilla Mostrar Grupo Sub Cuenta. Por favor, revisa a continuación la descripción de esta opción para detalles.
- Mostrar Sub Cuentas
- Este informe puede mostrar subtotales para grupos de Cuentas u Objetos con la misma caracteres iniciales. Utiliza esta opción para controlar esta función.
- No Mostrar
- Utiliza esta opción si no deseas utilizar la función de subtotales por grupo.
- Mostrar Sub Cuentas
- Utiliza esta opción para mostrar sutotales para grupos Cuentas asociados empleando el primer carácter del Código de Cuenta.
- Por ejemplo, si tu Cuentas Ventas están en el rango 100-199, el informe mostrará un balance separado para cada Cuenta y un saldo para todas las Cuentas Ventas (por cuanto comparten el mismo carácter inicial “1”). Estos saldos son todos en función a Objetos (por Objeto).
- Por ejemplo, si tu Cuentas Ventas están en el rango 100-199, el informe mostrará un balance separado para cada Cuenta y un saldo para todas las Cuentas Ventas (por cuanto comparten el mismo carácter inicial “1”). Estos saldos son todos en función a Objetos (por Objeto).
- Mostrar Grupos Sub Cuentas
- Utiliza esta opción para mostrar subtotales para grupos de Objetos asociados empleando el carácter inicial del Código de Objeto. Especifica el número de caracteres iniciales que se usarán mediante el campo Longitud de Grupo Objeto.
- Por ejemplo, si la Longitud de Grupo Objeto es 2, el informe contendrá secciones individuales para Objetos 010, 011, 012 etc. y un sección separada para éstos Objetos agrupados (todos los Objetos con el carácter inicial “1”).
- Esta opción también proporciona subtotales para grupos de Cuentas como se describe para la opción Sub Cuentas.
- Por ejemplo, si la Longitud de Grupo Objeto es 2, el informe contendrá secciones individuales para Objetos 010, 011, 012 etc. y un sección separada para éstos Objetos agrupados (todos los Objetos con el carácter inicial “1”).
- No Mostrar
- Valores en
- Si estás usando el sistema de Base-dual, los valores en este informe aparecerán in cualquiera de las Monedas Base. Utiliza estas opciones para escoger la Moneda a emplearse en esta ocasión.
- Si no estás usando el sistema de Base-dual, utiliza la opción Moneda Base 1 para producir un informe en tu Moneda local.
- Si no estás usando el sistema de Base-dual, utiliza la opción Moneda Base 1 para producir un informe en tu Moneda local.
- Nueva Página por Objeto
- Tilda esta casilla para tener una página separada en función a cada Objeto. Esto se aplica únicamente cuando el informe pasa a impresora.
Balances Cuentas Impositivas
Este informe se utiliza en Rusia. Por favor, consulta tu representante HansaWorld local para detalles.Listar Reportes Gerenciales
Por favor, haz clic aquí para obtener una descripción de este informe.Transacciones Impuestos para Registros
Este informe se utiliza en Rusia. Por favor, consulta tu representante HansaWorld local para detalles.Diario de Modelos de Asiento
Este informe lista las plantillas contables creadas en la opción Modelos de Asientos
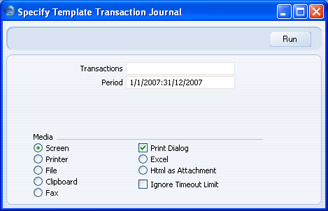
- Asientos
- Rango de Informe
Numérico
- Especifica aquí un Modelo de Asiento (código) o un rango de códigos (de Modelos de Asientos) para determinar cuáles se incluyen en el informe.
- Periodo
- Pegado Especial
opción Periodos de Informe, módulo Sistema
- Ingresa la fecha inicio y la fecha fin del periodo cuyos Modelos de Asientos han de ser contenidos en informe. El primer periodo de la opción ‘Periodos de Informe’ se ofrecerá por defecto.
Probar Reglas Contra Cuentas
Hansa contiene una funcionalidad mediante la que Cuentas usadas a cada lado (haber/debe) de un Asiento, pueden estar sujetas a ciertas reglas (reglas de contra cuentas). Éstas se describen en detalle en la página sobre la opción Opciones Asientos. Estas reglas garantizan que los registros de Haber estén claramente equilibrados con los registros de Debe en cada Asiento. Si no estas usando esta funcionalidad, puedes emplear este informe para listar Asientos que no se enmarcan en estas reglas (ej. aquellos que no podrían ser permisibles estando en uso la opción).
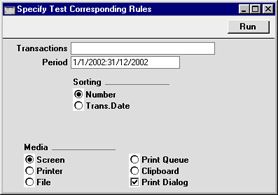
- Asientos
- Rango de Informe
Numérico
- Si deseas imprimir sólo cierto rango de Asientos, ingresa el primer y el último número de asiento separados por dos puntos. Si dejas el campo en blanco, se imprimirá todo el diario.
- El Número de Asiento debe incluir el prefijo igual que en la ventana ‘Asientos: Hojear’. Para imprimir un Asiento que ingresó directamente en el Libro mayor, ingresa por ejemplo, "2002.3" o, para un rango, "2002.3:2002.10". Para imprimir un Asiento que fue creado desde un Subsistema, ingresa por ejemplo, "S/INV.020003" o, para un rango, "S/INV.020003:S/INV.020010".
- El Número de Asiento debe incluir el prefijo igual que en la ventana ‘Asientos: Hojear’. Para imprimir un Asiento que ingresó directamente en el Libro mayor, ingresa por ejemplo, "2002.3" o, para un rango, "2002.3:2002.10". Para imprimir un Asiento que fue creado desde un Subsistema, ingresa por ejemplo, "S/INV.020003" o, para un rango, "S/INV.020003:S/INV.020010".
- Periodo
- Pegado Especial
opción Periodos de Informe, módulo Sistema
- Especifica el periodo a ser abarcado por el informe.
- Ordenar por
- El informe puede ser ordenado por Número de Asiento o por Fecha.
Diario de Asientos
El Diario de Asientos (también llamado Libro Mayor de Asientos) es un resumen de todos los datos ingresados en el libro mayor. No se podrá cambiar su definición.
La realización de Informes en Hansa es no-destructible. Esto significa que se puede crear e imprimir un informe cuantas veces gustes. Algunos programas contables están diseñados sólo para permitir la impresión de diarios directamente en conexión con el ingreso de datos. Hansa no tiene esta limitación.
Abre la ventana de lista ‘Informes’ y haz doble clic en ‘Diario de Asientos’. Se abrirá la ventana ‘Especificar Diario de Asientos’.
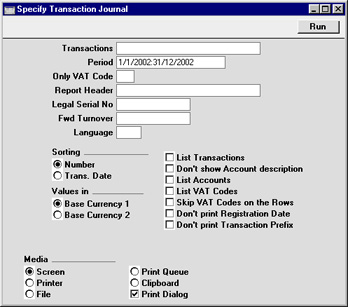
- Asientos
- Rango de Informe
Numérico
- Si deseas imprimir sólo cierto rango de Asientos, ej. aquellos ingresados hoy, puedes seleccionar este rango usando el campo Asientos. Ingresa el primer y último Número de Asiento separados por dos puntos (:). Si dejas el campo en blanco, se imprimirá todos los archivos en el registro de Asientos en relación al periodo seleccionado.
- El Número de Asiento debe incluir el prefijo igual que en la ventana ‘Asientos: Hojear’. Para imprimir un Asiento que ingresó directamente en el Libro Mayor, ingresa por ejemplo, "2002.3" o, para un rango, "2002.3:2002.10". para imprimir un Asiento que fue creado desde un Subsistema, ingresa por ejemplo, "S/INV.020003" o, para un rango, "S/INV.020003:S/INV.020010".
- El Número de Asiento debe incluir el prefijo igual que en la ventana ‘Asientos: Hojear’. Para imprimir un Asiento que ingresó directamente en el Libro Mayor, ingresa por ejemplo, "2002.3" o, para un rango, "2002.3:2002.10". para imprimir un Asiento que fue creado desde un Subsistema, ingresa por ejemplo, "S/INV.020003" o, para un rango, "S/INV.020003:S/INV.020010".
- Periodo
- Pegado Especial
opción Periodos de Informe, módulo Sistema
- Ingresa el periodo a ser abarcado por el informe.
- Sólo Cód. IVA
- Pegado Especial
opción Códigos IVA, módulo Contabilidad
- Puedes limitar el informe a Asientos que incluyan datos con un Código IVA particular.
- Encabezado de Informe
- Especifica aquí el título del informe. Si no hay nada especificado, se utiliza ‘Diario de Asiento’.
- Nro. Serie Legal
- En algunos países es obligatorio que todos los Asientos mantengan un solo número de serie sin importar su naturaleza. Si este es el caso, ingresa el primer número de la serie aquí y tilda la casilla ‘No Imprimir Prefijo de Transacción’. Se dará un número a cada Asiento con la serie especificada, en lugar de típico Número de Asiento.
- Ventas Pronosticadas
- Si ingresas un monto en este campo, éste se agregará al total de facturación ubicado al píe del informe.
- Idioma
- Pegado Especial
opción Idioma, módulo Sistema
- El Diario de Asientos puede ser producido en diferentes Idiomas; ingresa el Código de Idioma requerido aquí. La traducción apropiada para cada Nombre de cuenta se extraerá de la solapa 'Textos' en el registro de Cuentas.
- Ordenar por
- El informe puede ser ordenado por Número de Asiento o por Fecha de Asiento.
- Valores en
- Si estás usando el sistema de Base-dual, los valores en este informe aparecerán en cualquiera de las Monedas Base. Utiliza estas opciones para escoger la Moneda a emplearse en esta ocasión.
- Si no estás usando el sistema de Base-dual, utiliza la opción Moneda Base 1 para producir un informe en tu Moneda local.
- Si no estás usando el sistema de Base-dual, utiliza la opción Moneda Base 1 para producir un informe en tu Moneda local.
- Listar Transacciones
- Con esta casilla tildada, se listará cada Asiento usado por el informe junto con los totales de Haber y Debe. Éstos aparecerán al píe del informe. Si el alcance del informe ha sido restringido usando cualquiera de los campos aquí, sólo se listará aquellos Asientos incluidos en el informe.
- No Mostrar Descripción de Cuenta
- Utiliza esta opción si no deseas que se muestre las Descripciones de Cuenta para cada Asiento.
- Listar Cuentas
- Con esta casilla tildada, se listará en el informe cada Cuenta usada por el Asiento junto con los totales de Haber y Debe. Éstas aparecerán al pie del informe. Si el alcance del informe ha sido restringido usando cualquiera de los campos aquí, sólo se listará aquellas Cuentas afectadas por los Asientos mostrados.
- Listar Cód. IVA
- Con esta casilla tildada, se listará en el informe cada Código IVA usado por los Asientos junto con los totales de Haber y Debe. Éstos aparecerán al pie del informe. Si el alcance del informe ha sido restringido usando cualquiera de los campos aquí, sólo se listará aquellos Códigos IVA afectados por los Asientos mostrados.
- Omitir Código IVA en Filas
- Si una línea de Asiento posee un Código IVA, generalmente esto aparecerá en el informe. Tilda esta casilla si esto fuese innecesario.
- No Imprimir Fecha de Registro
- El informe usualmente muestra tanto la Fecha de Asiento (en el encabezado del asiento) como la Fecha de Registro (fecha en que el Asiento ingresó a Hansa). Si no deseas mostrar la Fecha de Registro, tilda esta casilla.
- No Imprimir Prefijo de Transacción
- Los Números de Asiento generalmente aparecen en el informe junto con sus prefijos homologados en la ventana ‘Asientos: Hojear’. Los Asientos ingresados directamente al Libro Mayor, por ejemplo aparecerán como "2002.3", mientras que aquellos creados desde un Subsistema aparecerán, por ejemplo como "S/INV.020003". Si no deseas que estos prefijos aparezcan en el informe (ej. en los ejemplos, omitiendo "2002." y "S/INV.", tilda esta casilla.
- Si esta casilla estuviese tildada y se carga un dato en el campo Nro. Serie Legal, se dará un número a cada Asiento con la secuencia que comienza con el Nro. de Serie Legal, en lugar del típico Número de Asiento.
Resumen de Asientos
Este informe es muy similar al Diario de Asientos. Ambos informes listan cada Asiento en el periodo de informe y muestran las Cuentas debitadas y abonadas junto con los montos.
A diferencia del Diario de Asientos, este informe no muestra los típicos Números de Asiento. En lugar de estos, se asigna un número secuencial a cada Asiento con un solo número de serie, sin importar su naturaleza.
De igual modo se listará los Asientos en el periodo de informe y se podrá imprimir hasta cuatro secciones de resumen el final del informe. Éstas mostrarán los totales de Haber y Debe para cada Cuenta usada en los Asientos resultantes de Facturas, Recibos, Facturas de Compra y/o Pagos en el periodo de informe.
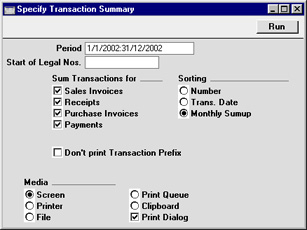
- Periodo
- Pegado Especial
opción Periodos de Informe, módulo Sistema
- Ingresa el periodo a ser abarcado por el informe.
- Inicio Nro. Legal
- Este informe no muestra Números de Asiento como están almacenados en el registro de Asientos. En vez de eso, los Asientos son renumerados para mantener un solo número de serie, sin importar su naturaleza. Ingresa el primer número de la serie aquí. Si no se ingresa ningún número, la secuencia empezará en 1.
- Sumar Asientos para
- Se puede imprimir hasta cuatro secciones de resumen al final del informe, mostrando los totales de Haber y Debe para cada Cuenta usada en los Asientos resultantes de Facturas, Recibos, Facturas de Compra y/o Pagos en el periodo de informe. Utiliza estas opciones para escoger las secciones de resumen que se van a imprimir.
- Ordenar por
- Se ofrecen tres opciones de ordenación:
- Número
- Los Asientos se listan por orden del Número almacenado en el registro de Asientos. Si esto se incluye en el informe, se imprimirá las cuatro secciones de resumen al final.
- Fecha Asien.
- Los Asientos se listan por orden de Fecha. Si esto se incluye en el informe, se imprimirá las cuatro secciones de resumen al final.
- Resumen Mensual
- Los Asientos se listan por orden de Fecha. Sin embargo, en vez de imprimirse las cuatro secciones de resumen al final, esta opción habilita esos resúmenes por mes y los imprime en lugares apropiados de la lista.
- Número
- No imprimas Prefijos de Asiento
- Cuando se enumeran los Números de Asiento en la ventana ‘Asientos: Hojear’, éstos aparecerán junto con prefijos que indican el tipo de asiento. Los Asientos ingresados directamente al Libro Mayor, por ejemplo aparecerán como "2002.3", mientras que aquellos creados desde un Subsistema aparecerán, por ejemplo como "S/INV.020003".
- Aunque este informe no imprime Números de Asiento, los prefijos se imprimirán para indicar el tipo de Asiento. Si no deseas que estos prefijos aparezcan en el informe, tilda esta casilla.
Balance de Prueba
El Balance de Prueba es un informe que muestra todos los saldos de Cuentas individuales. Mayormente se lo utiliza para conciliaciones. No podrás alterar la definición de este informe, pero podrás determinar los Asientos a ser incluidos.
Cuando se pasa a pantalla, el Balance de Prueba posee la funcionalidad Drill-down de Hansa. Haz clic sobre cualquier Número de Cuenta para abrir el informe Mayor en relación a la misma Cuenta y mismo periodo. Estando en el informe Mayor, puedes abrir cualquier registro individual de Asiento pulsando el Número de Asiento.
Cada uno de los totales en las tres columnas deberá ser cero. Esto significa que en tus cuentas, los totales de Haber y Debe son iguales. Si no es así, podría haber un error en uno o más Asientos, los cuales deberían ser corregidos inmediatamente.
Abre la ventana de lista ‘Informes’ y haz doble clic en ‘Balance de Prueba’. Se abrirá la ventana ‘Especificar Balance de Prueba’.
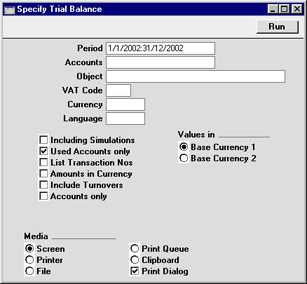
- Periodo
- Pegado Especial
opción Periodos de Informe, módulo Sistema
- Ingresa el periodo para el cual deseas producir el Balance de Prueba. El primer periodo de la opción Periodos de Informe se ofrece por defecto.
- Cuentas
- Pegado Especial
registro de Cuentas, módulos Contabilidad/Sistema
- Rango de Informe Alfa
- Limita el informe en función a cierta Cuenta o cierto rango de Cuentas
- Limita el informe en función a cierta Cuenta o cierto rango de Cuentas
- Objeto
- Pegado Especial
registro de Objetos, módulos Contablidad/Sistema
- Indica un Objeto para limitar el alcance del informe.
- Código IVA
- Pegado Especial
opción Códigos IVA, módulo Contabilidad
- Ingresa un Código IVA aquí para restringir el informe en función a cierto Código IVA.
- Moneda
- Pegado Especial
registro de Moneda, módulo Sistema
- Si se ingresa una Moneda aquí, todos los montos en el informe serán convertidos a esa Moneda usando el Tipo de Cambio de la Fecha de Asiento.
- Se debe ingresar aquí una Moneda extranjera. Cuando se cree un informe con cifras en Moneda Base 1 o 2, deja este campo en blanco y selecciona la Moneda Base a emplearse utilizando las opciones de ‘Valores en’.
- Se debe ingresar aquí una Moneda extranjera. Cuando se cree un informe con cifras en Moneda Base 1 o 2, deja este campo en blanco y selecciona la Moneda Base a emplearse utilizando las opciones de ‘Valores en’.
- Idioma
- Pegado Especial
opción Idiomas, módulo Sistema
- El Balance de Prueba puede ser producido en diferentes Idiomas; ingresa el Código de Idioma requerido aquí. La traducción apropiada para cada Nombre de Cuenta será extraída desde la solapa 'Textos' en el registro de Cuentas.
- Incluir Simulaciones
- Tilda eta casilla para incluir asientos simulados en el informe. Las Simulaciones con Estado ???Inválido” o “Transferido” no serán incluidas.
- Sólo Cuentas Usadas
- Con esta casilla tildada, el informe sólo mostrará Cuentas con Asientos registrados durante el periodo y/o con balances de apertura de un periodo anterior.
- Listar Nros. Transacciones
- Con esta casilla tildada, se listará los Números de Asiento de todas las transacciones que caigan dentro del periodo de informe conjuntamente con sus totales de Haber y Debe. Éstos aparecerán al pie del informe. Se listará todos los Asientos sin importar las restricciones hechas mediante los otros campos aquí.
- Importes en Moneda
- Con esta casilla tildada, se mostrará al pie del informe, resúmenes de totales en cada Moneda usada en el Asiento seleccionado.
- Incluir Total Ventas
- La versión estándar de este informe tiene tres columnas que muestran los balances de apertura para cada Cuenta, también el cambio neto durante el periodo de informe y el balance final. Tilda esta casilla para incluir dos columnas adicionales que muestren el total con respecto a los datos de Haber y Debe en función a cada Cuenta.
- Sólo Cuentas
- La versión estándar de este informe otorga subtotales por grupos de Cuentas asociados usando el primer carácter del Código de Cuenta. Por ejemplo, si tus Cuentas Ventas están en el rango 100-199, el informe mostrará cifras para cada Cuenta y para todas la Cuentas Ventas (por cuanto comparten el mismo carácter inicial “1???).
- Tilda esta casilla si no deseas incluir en el informe, subtotales por grupos de Cuenta.
- Tilda esta casilla si no deseas incluir en el informe, subtotales por grupos de Cuenta.
- Valores en
- Si estas usando el sistema de Base-dual, los valores en este informe aparecerán en cualquiera de las Monedas Base. Utiliza estas opciones para escoger la Moneda a emplearse en esta ocasión.
- Si no estás usando el sistema de Base-dual, utiliza la opción Moneda Base 1 para producir un informe en tu Moneda local.
- Si se ingresa una Moneda extranjera aquí, estas opciones serán ignoradas y los montos en el informe serán convertidos a la Moneda indicada usando el Tipo de Cambio de la Fecha de Asiento.
- Si no estás usando el sistema de Base-dual, utiliza la opción Moneda Base 1 para producir un informe en tu Moneda local.
Lista de Códigos IVA
Este informe lista los asientos usados al calcular la Devolución IVA (generada con el uso del Informe IVA). Se despliega el total con IVA incluido y con IVA exento, el porcentaje global IVA y la Moneda en función a cada asiento.
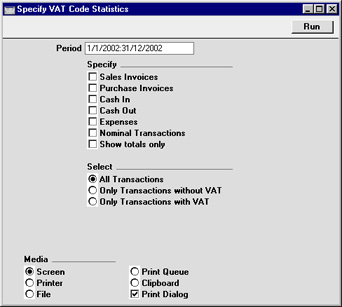
- Periodo
- Pegado Especial
opción Periodos de Informe, módulo Sistema
- Ingresa el periodo a ser abarcado en el informe. El primer periodo de la opción Periodos de Informe se ofrece por defecto.
- Especificar
- Puedes decidir tener en el informe un listado de Facturas de Venta y Compra, Gastos, Entradas/Salidas de Caja o Asientos Contables. Se debe elegir al menos una sección o sino el informe saldrá en blanco. Para cada sección, la lista de transacciones estará seguida de una lista de Códigos IVA usados por dichas transacciones junto con los subtotales. Si no necesitas que se listen las transacciones, mas deseas obtener una sola línea de resumen para cada sección, utiliza la opción Mostrar Solo Subtotales.
- Seleccionar
- El informe puede mostrar todos los Asientos o solo aquellos con o sin IVA.
VAT Report
Whenever a VAT Return is due you have to print a VAT Report. The report is used both as a transaction document for the ledger and as the basis for payment.
The report summarises the Input and Output VAT Accounts for the specified period, and also shows the total Inputs (purchases) and Outputs (sales). A positive total indicates that you are liable for VAT, a negative one signifies that you are owed money by the VAT authority.
Once a VAT Return has been printed for a given period, it is recommended that you enter a Transaction in the Transaction register transferring the VAT amount payable/receivable into the VAT Payments Account (835 in the Chart of Accounts supplied with Hansa). This Transaction would debit the VAT Outputs Payable Account (830) and credit the VAT Inputs Receivable Account (831), with a balancing posting to the VAT Payments Account. This Transaction must be entered within the period it concerns, preferably as the last Transaction of the period. The amount payable/receivable can then be transferred to your bank account with a further Transaction when payment is made/received.
In certain circumstances only, you can print different VAT Reports for specific Objects, which is useful if your Objects represent different departments with different VAT Numbers. For you to be able to do this, each VAT entity must have its own database or Company. For each, carry out a Consolidation Export, specifying a unique Object in the Cons. Object field. Import these files to a database or Company representing your consolidated accounts and then print a VAT Report for each Cons. Object.
There are two reasons why this procedure must be followed:
- When Nominal Ledger Transactions are created from Sub Systems, any Objects used are not attached to the VAT posting. The Consolidated Export can impose an Object on each VAT posting for use by the consolidated Company.
- If hierarchical Object structures are used in a single Company, producing separate VAT Returns for each Object would be prone to error.
- The definition of the VAT Report;
- Printing the VAT Report.
- Definición
Puedes definir el Informe IVA para determinar las Cuentas que deben ser incluidas.
Para cambiar la definición del Informe IVA, haz doble clic en ‘Opciones Informes’ dentro de la lista ‘Opciones’ del módulo Contabilidad. Luego, resalta ‘IVA’ en la lista de la izquierda y pulsa el botón [Definición]. Se abrirá la ventana ‘Definición de Informe IVA: Ver’
La anterior definición es un Informe IVA estándar para el Reino Unido usando el Plan de Cuentas y las definiciones proporcionadas por HansaWorld Enterprise. Puede modificarse para cumplir tus requerimientos específicos; necesitarás cambiarla si hubieras modificado el Plan de Cuentas o en caso de haber importado uno propio. También necesitarás modificarlo cuando hayas tildado las casillas ‘Reg. IVA Recibos’, ‘Reg. IVA Anticipos’ y/o ‘Reg. IVA Pagos’, para calcular el IVA desde Recibos y Anticipos, no desde Facturas ni Facturas de Compras. De ser así, deberás reemplazar las Cuentas de Crédito y Débito en el formulario con las Cuentas I/O y I/S especificadas en la opción Códigos IVA.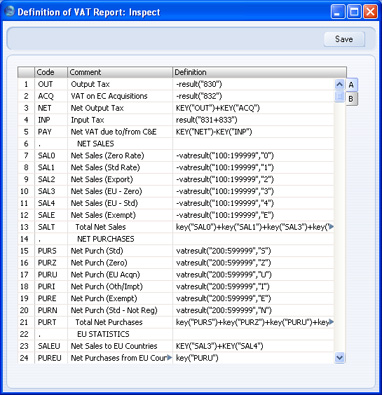
Cada fila en la lista de definición representa una línea en el Informe IVA. Se puede agregar, insertar o borrar filas según sea necesario. Para insertar una fila, resalta la anterior (haz clic en el número) y presiona la tecla Enter. Para borrar una fila, resáltala y luego presiona la tecla Espacio atrás.
El campo derecho en cada fila contiene una fórmula para calcular la cifra a ser mostrada. Esta fórmula utiliza el mismo idioma de definición que los Ratios Financieros. Por favor, revisa la página que describe la Definición del Informe de Ratios para obtener una descripción completa de los comandos disponibles.
Si es el caso de usuarios existentes de HansaWorld Enterprise que están pasando a la versión 4.1 u posterior, toma en cuenta que la sintaxis usada en las fórmulas de Ratios cambió en esta versión. Todos los parámetros ahora deberán adjuntarse dentro de comillas. El orden de los parámetros para los comandos RESULTADOIVA, BALANCEIVA, RESULTADOIVACRED y RESULADOIVADEB ha sido invertido.
- Fila
- Cada fila del informe se define dentro de su propia línea numeral.
- Código
- Un código que identifica la fila y que podría usarse en las definiciones de otras filas.
- Comentario
- Un texto descriptivo que identifica la línea en el informe concluido.
- Definición
- La definición de la fila en el informe, ej. las Cuentas que se usarán en el cálculo de la cifra a mostrar y la fórmula del cálculo.
Cuando hayas finalizado de definir el Informe IVA, haz clic en [Guardar].
VAT Report - Example VAT Report Definitions
This page describes and illustrates some example VAT Report Definitions. Please follow the links below for more details about the VAT Report:
- Introduction
- Definition of the VAT Report
- Example VAT Report Definitions
- Printing the VAT Report
Example - Standard VAT
A VAT Report definition suitable for use in the UK is illustrated below:
In essence, we are using the RESULT command to calculate the VAT to be paid or reclaimed and the VATRESULT command to calculate turnover figures. The RESULT command will print the net change in a specified Account over the report period i.e. the net amount posted to the Account. The VATRESULT command will print the net amount posted with a specified VAT Code to the Account.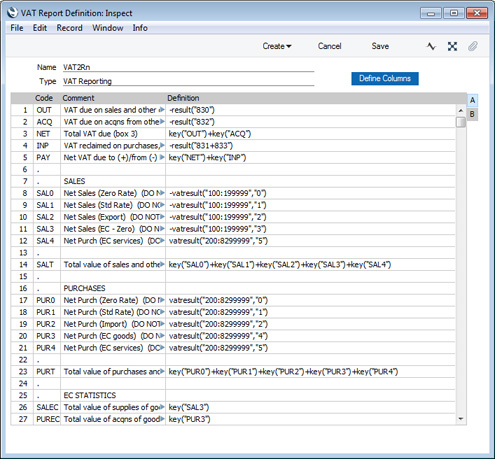
In more detail the calculations in this report definition are as follows:
Row 1 OUT
-RESULT("830") 830 is the Output VAT Account, so this row prints the total output VAT on domestic sales made during the report period. Sales figures are stored as negative figures in Standard ERP, so the negative sign will convert them to positive. This figure should be placed in Box 1 on the UK VAT Return. If you have more than one Output VAT Account, you can include them all in the formula (e.g. -RESULT("830+8300")), or you can print the net change in each Account on separate lines and then add them together using the KEY command.
Row 2 ACQ
-RESULT("832") 832 is the Account for output VAT on EU acquisitions of goods, so this row will print the VAT due on acquisitions of goods from other EU member states. This figure should be placed in Box 2 on the UK VAT Return. Please refer to the Reverse Charge VAT example towards the end of this page for more details about EU acquisitions. Row 3 NET
KEY("OUT")+KEY("ACQ") Prints the total Output VAT due, calculated by adding the previous two figures together. This figure should be placed in Box 3 on the UK VAT Return. Row 4 INP
-RESULT("831+833") 831 is the Input VAT Account and 833 is the Account for input VAT on EU acquisitions of goods. This row will therefore print the VAT reclaimable on purchases and other inputs (including acquisitions from the EU). The result will be printed as a negative figure. This figure should be placed in Box 4 on the UK VAT Return. Row 5 PAY
KEY("NET")+KEY("INP") Prints the net VAT to be paid or reclaimed, calculated by adding the figure in row 3 to the (negative) figure in row 4. A positive figure indicates that you are liable for VAT, a negative one signifies that you are owed money by the VAT authority. This figure should be placed in Box 5 on the UK VAT Return. Rows 8-12 SAL0-SAL4
-VATRESULT("100:1999999","0") -VATRESULT("100:1999999","1")
-VATRESULT("100:1999999","2")
-VATRESULT("100:1999999","3")
-VATRESULT("200:8299999","5")
Accounts 100:199 are the Sales Accounts. These rows print the total values of sales made with each VAT Code. If you sell non-digital services to customers in the EU who are not registered for VAT, you will need to charge VAT at the relevant domestic rate for the type of Item. Place these Customers in the Inside EU (Post VAT) Zone and use the standard VAT Code. This will ensure these sales will be included in the Box 1 figure (row 1) and in the relevant sales turnover figure here.
Row 12 will print the value of purchases of services from Suppliers in the Inside EU Zone. This will ensure this figure is included in Box 6 (row 14 below).
Row 14 SALT
KEY("SAL0") + KEY("SAL1") + KEY("SAL2") + KEY("SAL3") + KEY("SAL4") Prints the sum of rows 8-12 i.e. the total value of sales and all other outputs excluding VAT. This figure should be placed in Box 6 on the UK VAT Return.
Rows 17-21 PUR0-PUR4
-VATRESULT("200:8299999","0") -VATRESULT("200:8299999","1")
-VATRESULT("200:8299999","2")
-VATRESULT("200:8299999","4")
-VATRESULT("200:8299999","5")
Accounts 200:829 all represent items that can be purchased by the business. These rows print the total values of purchases made with each VAT Code. The range does not include the VAT Accounts (830:835). If you are using the Add VAT Code to VAT A/C rows option in the Transaction Settings setting, the appropriate VAT Code will be copied to the V-Cd field in each Transaction row posting to a VAT Account, as well as to the V-Cd field in the rows posting to a Sales or Cost Account. If the range included the VAT Accounts, the resulting figures would include VAT when they should exclude it.
Row 23 PURT
KEY("PUR0") + KEY("PUR1") + KEY("PUR2") + KEY("PUR3") + KEY("PUR4") Prints the sum of rows 17-21 i.e. the total value of purchases and all other inputs excluding VAT. This figure should be placed in Box 7 on the UK VAT Return. Row 26 SALEC
KEY("SAL3") Prints the total value of sales made with VAT Code 3 i.e. the total value of sales to other EU member states. This assumes that sales made to other EU member states will always carry VAT Code 3, and that VAT Code 3 is not used for any other sales. This figure should be placed in Box 8 on the UK VAT Return. (Box 8 should not include sales of services, so a different VAT Code would need to be used for such sales.) Row 27 PUREC
KEY("PUR3") Prints the total value of purchases made with VAT Code 4 i.e. the total value of purchases of goods from other EU member states. This assumes that purchases of goods made from other EU member states will always carry VAT Code 4, and that VAT Code 4 is not used for any other purchases. This figure should be placed in Box 9 on the UK VAT Return. (Box 9 should not include purchases of services. In the example, VAT Code 5 would be used for such purchases.)
As previously mentioned, the VAT Report definition illustrated and described above uses the Chart of Accounts and VAT Codes that are supplied with Standard ERP. You will need to amend the VAT Report definition (or start one from scratch) if you have modified the standard Chart of Accounts and/or VAT Codes, or created your own. For example, in the sample Chart of Accounts, the Output VAT Account is 830 and the standard VAT Code is 1. If your Output VAT Account is not 830 (e.g. it is 83010), you must replace every instance of "830" in the report definition with "83010". If your standard VAT Code is not 1 (e.g. it is S), you must replace every instance of "1" in the report definition with "S". It may be for example that you use different VAT Codes for sales and purchases.
Example - Cash VAT
In some countries, you can account for output VAT on the basis of the payments you receive, rather than on the Invoices you issue. Similarly, you can account for input VAT on the basis of the payments you issue, rather than on the Purchase Invoices that you receive. This is sometimes known as accounting for VAT on a cash basis or, in the UK, Cash Accounting.
If you need to account for VAT on a cash basis, follow these steps:
- On the sales side, the Account Usage S/L contains two options that you should select, depending on your requirements:
- Select the Post Receipt VAT option if you need VAT to be posted from normal Receipts (i.e. Receipts in which you are receiving payment against Invoices) and On Account Receipts.
- Select the Post Prepayment VAT option if you would like VAT to be posted from Prepayment Receipts. You will also need to specify a Prepayment VAT Account in the same setting.
- Select the Post Receipt VAT option if you need VAT to be posted from normal Receipts (i.e. Receipts in which you are receiving payment against Invoices) and On Account Receipts.
- Similarly, on the purchase side, the Account Usage P/L contains two options that you should select, depending on your requirements:
- Select the Post Payment VAT option if you need VAT to be posted from normal Payments (i.e. Payments in which you are issuing payment against Purchase Invoices) and On Account Payments.
- Select one of the Post Prepayment VAT options if you would like VAT to be posted from Prepayment Payments. You will also need to specify On Account VAT and Prepayment VAT Accounts in the same setting and, depending on your requirements, you may also need to select the Prepayment amount excluding VAT option.
- Select the Post Payment VAT option if you need VAT to be posted from normal Payments (i.e. Payments in which you are issuing payment against Purchase Invoices) and On Account Payments.
- If you need to account for VAT on a cash basis, Sales Invoices will still post to an Output VAT Account as normal, and Purchase Invoices will still post to an Input VAT Account. However, these Accounts will now be treated as preliminary VAT Accounts. When a Customer pays an Invoice, the Transaction from the Receipt will include an extra VAT element in which the VAT is moved from the Output VAT Account to a final Account, known as the O/P Account. On the purchase side, when you pay a Purchase Invoice, the Transaction from the Payment will include an extra VAT element in which the VAT is moved from the Input VAT Account to a final Account, known as the I/P Account.
The next step is to specify the O/P and I/P Accounts, which you should do in the VAT Codes setting:
Note in the rows for VAT Codes 4 and 5 that the Output and O/P Accounts are the same, and the Input and I/P Accounts are the same. VAT Codes 4 and 5 are used for acquisitions from the EU, and in the UK such transactions cannot be included in the Cash Accounting scheme. Standard ERP still requires O/P and I/P Accounts to be specified: using the same Accounts in effect means that acquisition VAT will be immediately be posted to the final Account, without passing through a preliminary Account.
- Finally, you should change the definition of the VAT Report so that the VAT to be paid or reclaimed will be calculated using the O/P and I/P Accounts instead of the Output and Input Accounts. In the illustration below, we have changed rows 1 and 4:
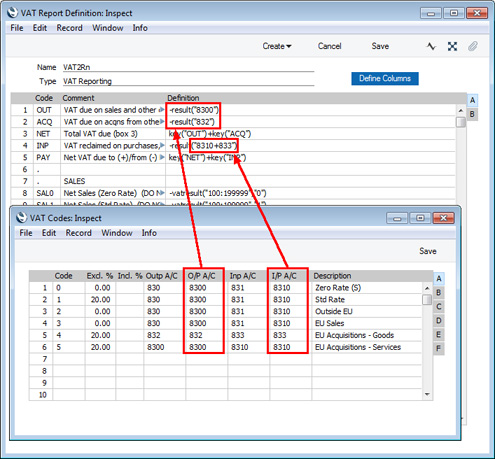
- Illustrated below is an example Invoice together with its Nominal Ledger Transaction. The VAT is posted to the Output Account as normal:
When the Customer pays the Invoice a month later, the Nominal Ledger Transaction shows the VAT being moved from the Output Account to the O/P Account: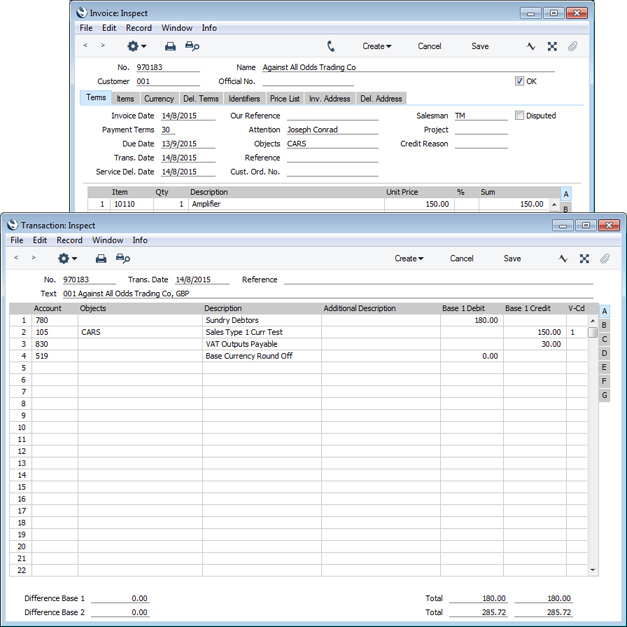
The VAT Report for the month when the Invoice was paid includes the VAT in the payable figure: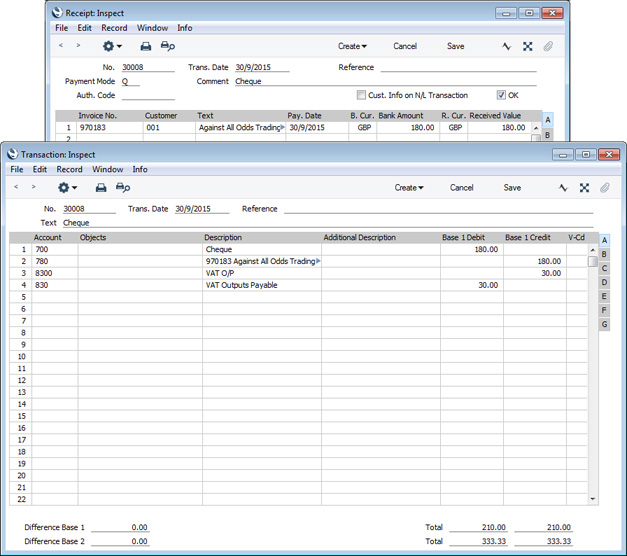
Note that the Invoice is not included in rows 8-11 and 14 (SAL0-SAL3 and SALT). As previously described, these rows use the VATRESULT command to print the total values of sales and purchases made with each VAT Code. For example, VATRESULT("100";"1") will print the value of sales posted from Invoices to Account 100 with VAT Code 1. The date when such a sale is posted is the Invoice date.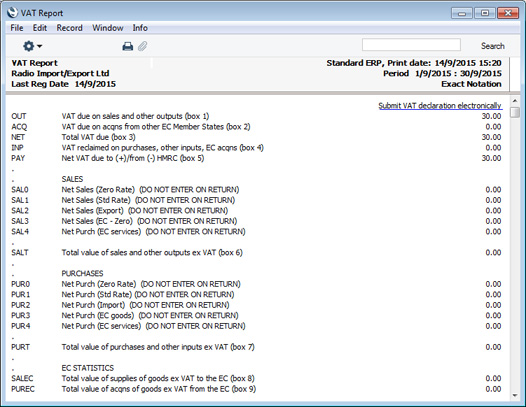
When you are accounting for VAT on a cash basis, you need to be able to establish the total value of sales and purchases by payment date, not by Invoice date. This information is not held in the Nominal Ledger and so cannot be retrieved by the VATRESULT command.
Instead, you can obtain this information from the VAT Code Statistics report in the Sales Ledger and the P/L VAT Code Statistics report in the Purchase Ledger. These reports each include a summary section in which the Base column will list the total values excluding VAT of sales and purchases made with each VAT Code. When you are using the Post Receipt VAT and Post Payment VAT options, the information in this summary section will be compiled by Receipt/Payment Date, not by Invoice Date:
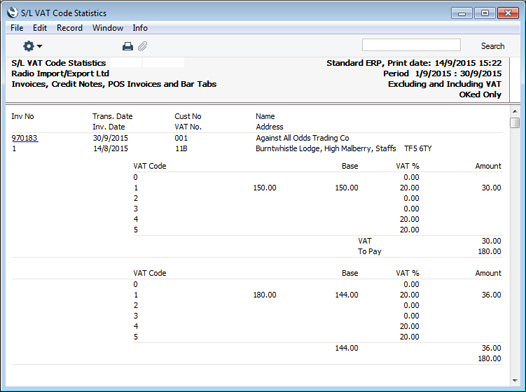
Example - Reverse Charge VAT
In a normal transaction, the Supplier should account to the tax authorities for the VAT that is due on the supply. However, in certain situations, it is the Customer who must account for any VAT that is due. If you are the customer in such a situation, you will not pay VAT to the Supplier but instead will pay VAT to the tax authorities at the domestic rate that would apply had you purchased the Items from a local Supplier. This is sometimes known as the "reverse charge" procedure. You can reclaim this VAT, if the purchase relates to VAT taxable supplies that you will go on to make.
One situation when you need to use the reverse charge procedure is when you purchase Items from VAT-registered Suppliers in other countries in the EU. Items that you purchase from other countries in the EU are usually known as "acquisitions" or "arrivals" (the term "imports" usually refers to Items purchased from other countries outside the EU). One method for handling VAT on acquisitions using the reverse charge procedure is described below. An alternative method is to create Internal Invoices from Purchase Invoices for EU Acquisitions. Please refer here for more details.
To include EU Acquisition VAT in the VAT Report, follow these steps:
- In the VAT Codes setting in the Nominal Ledger, create two VAT Codes for VAT on EU Acquisitions. Two VAT Codes are needed because purchases of goods and purchases of services need to be reported differently on the UK VAT Return.
VAT Code 4 in the example illustration below will be used for purchases of goods. VAT will be debited to the Input Account in this VAT Code and credited to the Output Account. It is recommended that you use an Output Account that is not used in any other VAT Code.
VAT Code 5 in the example will be used for purchases of services. In this case, you can use the standard Output and Input Accounts (although you can use dedicated Accounts if you prefer).
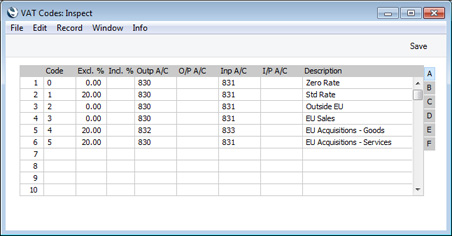
- In a Purchase Invoice for goods received from a Supplier in the Inside EU VAT Zone, enter the total charged by the Supplier (i.e. without VAT) in the TOTAL field and the Amounts in the rows using the VAT Code 4 from step 1. The Calculated VAT field in the footer will be updated automatically. In this example, the Currency in the Invoice is the Euro:
The VAT Code in each row will be chosen as follows: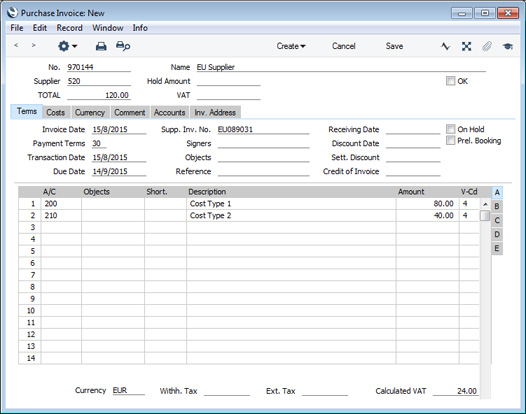
- The Purch. VAT Code for the Supplier will be used.
- It will be taken from the Account record.
- The VAT Code on the 'VAT' card of the Account Usage P/L setting will be used.
In the case of point (ii), you can only specify a single VAT Code in each Account record. It is therefore recommended that you use dedicated Accounts for purchases of goods from the EU, to ensure that the correct VAT Code will be offered as the default. If you use the same Account for non-EU and EU purchases, there is a risk that the wrong VAT Code will be offered by default and that you don't change it.
In the last case, the appropriate VAT Code for the Zone of the Supplier will be used.
- The Purch. VAT Code for the Supplier will be used.
- When you mark the Purchase Invoice as OK and save it, the total charged by the Supplier will be posted to the Creditor Account. Because the Supplier is in the Inside EU VAT Zone, VAT will be debited to the Input Account of the selected VAT Code and credited to the Output Account (EUR figures are shown in the Base 2 Debit and Credit fields, with figures in Base Currency 1 in the Base 1 Debit and Credit fields):
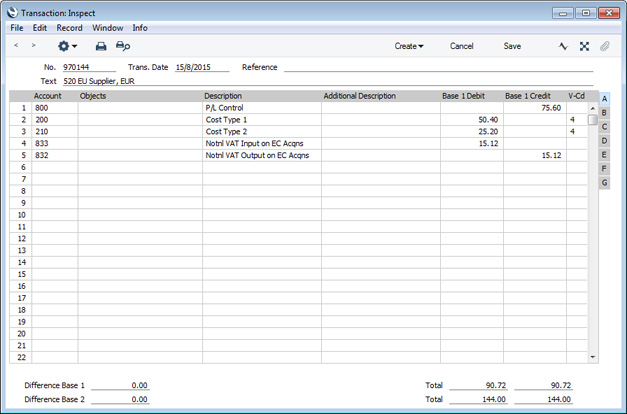
- In the VAT report, you will need to include acquisition VAT when calculating the output VAT that is payable. You will also be able to include it when calculating the input VAT that is reclaimable, if the acquisitions relate to VAT taxable supplies that you make.
In the UK, the output VAT payable on EU goods acquisitions should be included in the VAT report as a separate figure. This has been done in row 2 in the example VAT Report definition illustrated below. In this row, the RESULT command will return the net change in the Output VAT Account used in VAT Code 4, hence the recommendation that this be an Output Account that is not used in any other VAT Code. From there the output VAT will be included in the total output VAT figure in row 3.
It is not necessary to include the input VAT as a separate figure. So, in row 4 the RESULT of the Input VAT Account has been added to that of the domestic Input VAT Account to produce a total figure.
Row 20 uses the VATRESULT command to print the total value of EU acquisitions with VAT Code 4. This figure is then used in rows 23 and 27 (Boxes 7 and 9 on the UK VAT Return).
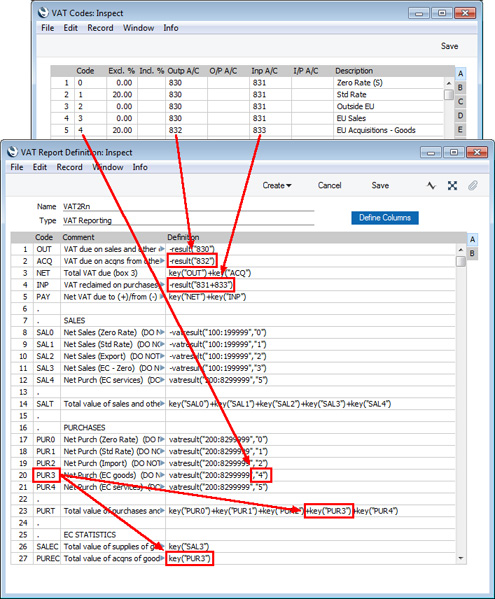
- Using this definition, the Purchase Invoice illustrated above will be included in the VAT Report as shown below:
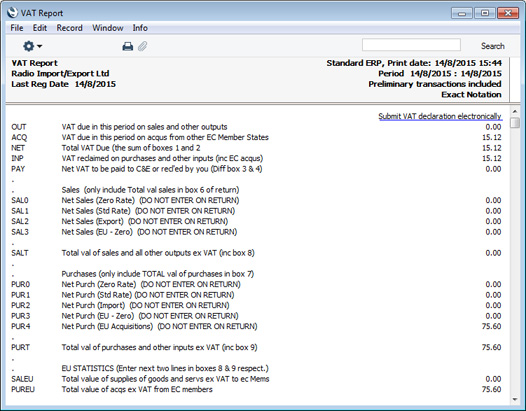
Follow these steps:
- The procedure for entering a Purchase Invoice for services is the same as that for entering a Purchase Invoice for goods. Enter the total charged by the Supplier (i.e. without VAT) in the TOTAL field and the Amounts in the rows using VAT Code 5. Again, it is therefore recommended that you use dedicated Accounts for purchases of services from the EU, to ensure that the correct VAT Code will be offered as the default The Calculated VAT field in the footer will be updated automatically. In this example, the Currency in the Invoice is the Euro:
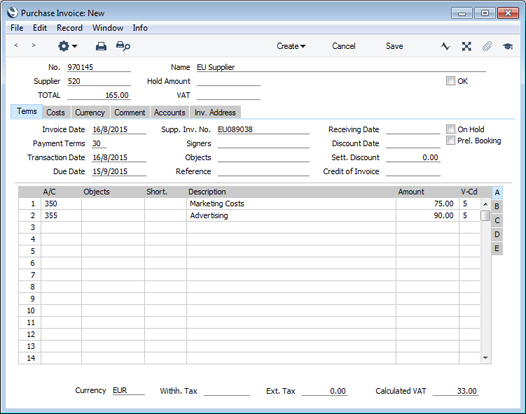
- When you mark the Purchase Invoice as OK and save it, the total charged by the Supplier will be posted to the Creditor Account. Because the Supplier is in the Inside EU VAT Zone, VAT will be debited to the Input Account of the selected VAT Code and credited to the Output Account (EUR figures are shown in the Base 2 Debit and Credit fields, with figures in Base Currency 1 in the Base 1 Debit and Credit fields):
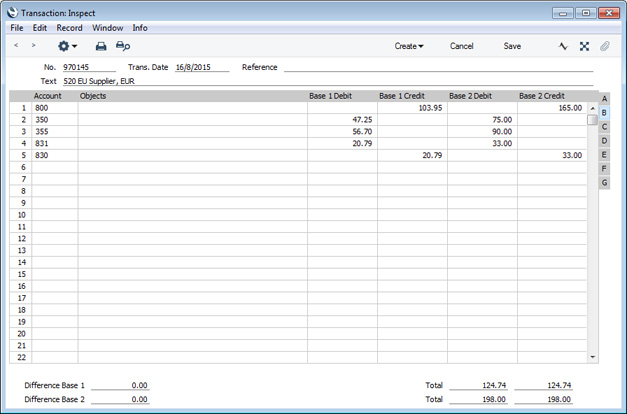
- In the VAT report, you will need to include acquisition VAT when calculating the output VAT that is payable. You will also be able to include it when calculating the input VAT that is reclaimable, if the acquisitions relate to VAT taxable supplies that you make. In this respect, reporting services is similar to reporting goods.
However, in the UK, the output VAT payable on EU services acquisitions should not be included in the VAT report as a separate figure (unlike EU goods acquisitions) i.e. it should be included in box 1 in the UK VAT Return and not box 2. As with goods, the input VAT should be included in box 4. This allows you to use the standard Output and Input Accounts, as in this example. You can use dedicated Accounts if you prefer, but if you do, be sure to include them in the RESULT commands that calculate the Output VAT and Input VAT totals in your VAT Report Definition (rows 1 and 4 in the example).
Purchase of services from Suppliers in the EU VAT Zone need to be included in both the sales totals and the purchase totals on the UK VAT Return (boxes 6 and 7). Using a dedicated VAT Code (VAT Code 5 in the example) will allow you to do this. Rows 12 and 21 in the example VAT Report definition use the VATRESULT command to print the total value of EU acquisitions with VAT Code 5. This figure is then used in rows 14 and 23.
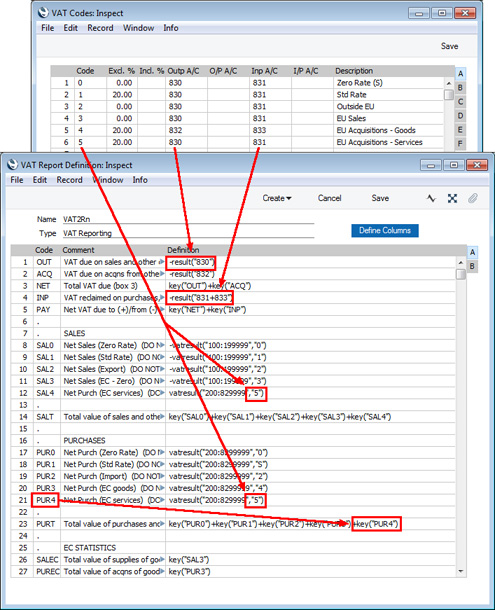
- Using this definition, the Purchase Invoice illustrated above will be included in the VAT Report as shown below:
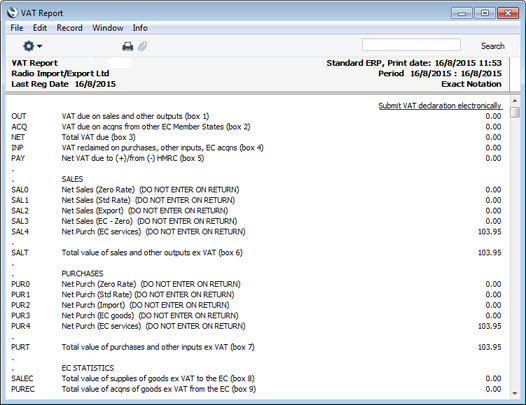
- Create a new record in the Tax Rules setting in the Nominal Ledger. In the VAT Type field, choose "Reversed" using 'Paste Special':
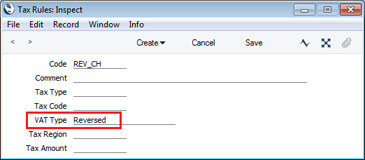
- In the VAT Codes setting, create a VAT Code for reverse charge VAT. Specify Input and Output Accounts and the VAT rate and, in the Tax Rules field on flip B, enter the Tax Rule record that you created in step 10:
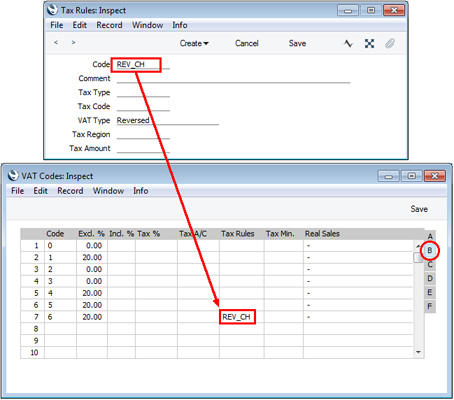
- In a Purchase Invoice that is to be subject to the reverse charge procedure, enter the total charged by the Supplier (i.e. without VAT) in the TOTAL field and the Amounts in the rows using the VAT Code from step 11:
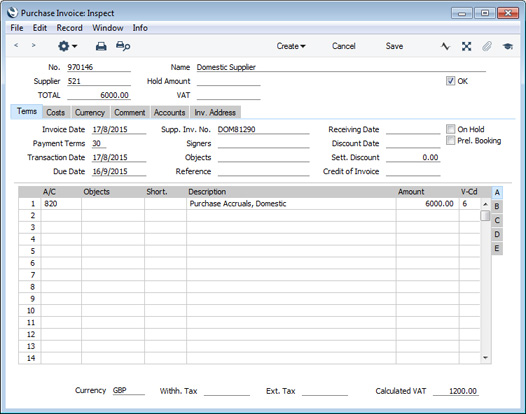
- When you mark the Purchase Invoice as OK and save it, the total charged by the Supplier will be posted to the Creditor Account. Because the Tax Rule in the VAT Code is "Reversed", VAT will be debited to the Input Account of the selected VAT Code and credited to the Output Account:
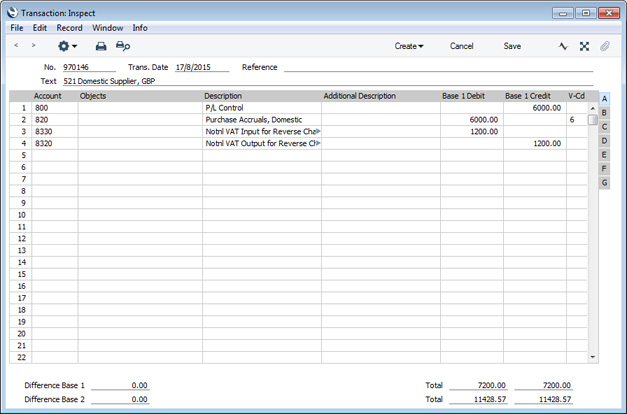
- In the VAT report, you will need to include reverse charge VAT when calculating the output VAT that is payable. Subject to the normal rules, you will also be able to include it when calculating the input VAT that is reclaimable.
In the UK, you must include the output tax payable on purchases under the reverse charge in the output VAT total (box 1 in the UK VAT Return). This has been done in row 1 in the example VAT Report definition illustrated below. In this row, the RESULT command will return the total net change in the standard Output VAT Account (Account 830) and in the Output VAT Account used in VAT Code 6 (Account 8320). From there the output VAT will be included in the total output VAT figure in row 3.
You should not include the VAT exclusive value of the purchases (box 6 on the UK VAT Return). So, rows 8-12 do not include a VATRESULT calculation for VAT Code 6.
If you will reclaim input VAT, you should include it in the input VAT total. In row 4 the RESULT of the Input VAT Account has been added to those of the domestic Input VAT Account and the EU Acquisitions Input Account to produce a total figure.
Row 22 uses the VATRESULT command to the total value of reverse charge purchases with VAT Code 5. This figure is then used in row 24 (Box 7 on the UK VAT Return).
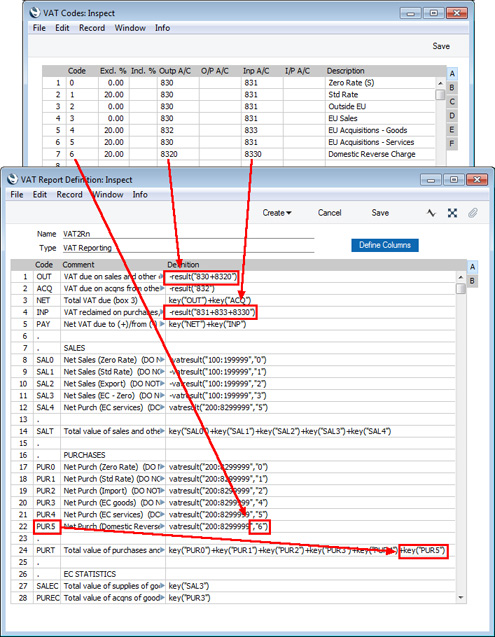
- Using this definition, the Purchase Invoice illustrated above will be included in the VAT Report as shown below:
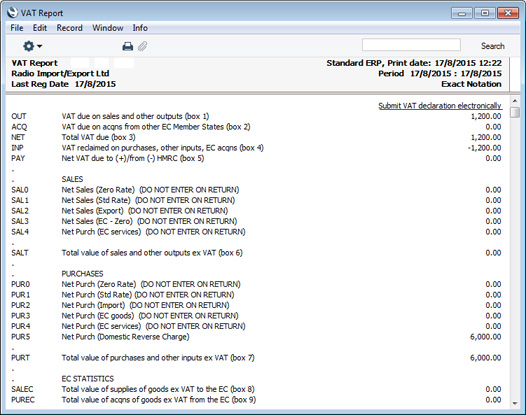
Please click for details about:
- Introduction to the VAT Report
- Definition of the VAT Report
- Example VAT Report Definitions
- Printing the VAT Report
- Submitting the VAT Report electronically (UK only)
Reports in the Nominal Ledger:
- Introduction
- Definition of Nominal Ledger Reports
- Drill-down
- The Operations Menu
- Account Reconciliation
- Accrual Report
- Analytical Balance
- Analytical Balance (Fiscal purposes)
- Balance Sheet
- Bank Reconciliation
- Bank Statement
- Bank Transactions
- Base Currency Rate Change
- Budget Journal
- Correction List
- Corresponding Accounts
- Creditors Account
- Currency A/C Rate Change
- Daily Balances
- Debtors Account
- Forward Balance Journal
- Income & Expense Book
- Key Financial Ratios
- Liquidity Forecast
- Multicurrency Accounts Rate Difference
- Nominal Ledger
- N/L Accrual Transactions
- N/L Transfer, Subsystems
- Object Results
- Object/Quantity Results
- Profit & Loss
- Revised Budget Journal
- Simulation Journal
- Tax Account Balances
- Tax Calculations
- Tax Transactions for Registers
- Template Transaction Journal
- Test Corresponding Rules
- Transaction Journal
- Transaction Summary
- Trial Balance
- VAT Listing
- VAT Report
- VAT Report Purchases
- VAT Report Sales
- VAT Transaction Journal
- XBRL Report
Go back to:
- Home page for Nominal Ledger manual
- Home page for Standard ERP manual
VAT Report - Example VAT Report Definitions - Standard VAT
This page describes an example VAT Report definition that is suitable for use in the UK. Please refer to the following pages for more details about the VAT Report in Standard ERP:
- Introduction
- Definition of the VAT Report
- Example VAT Report Definitions, including:
- Standard VAT
- Cash VAT
- Reverse Charge VAT
- Standard VAT
- Printing the VAT Report
A VAT Report definition suitable for use in the UK is illustrated below:
In essence, we are using the RESULT command to calculate the VAT to be paid or reclaimed and the VATRESULT command to calculate turnover figures. The RESULT command will print the net change in a specified Account over the report period i.e. the net amount posted to the Account. The VATRESULT command will print the net amount posted with a specified VAT Code to the Account.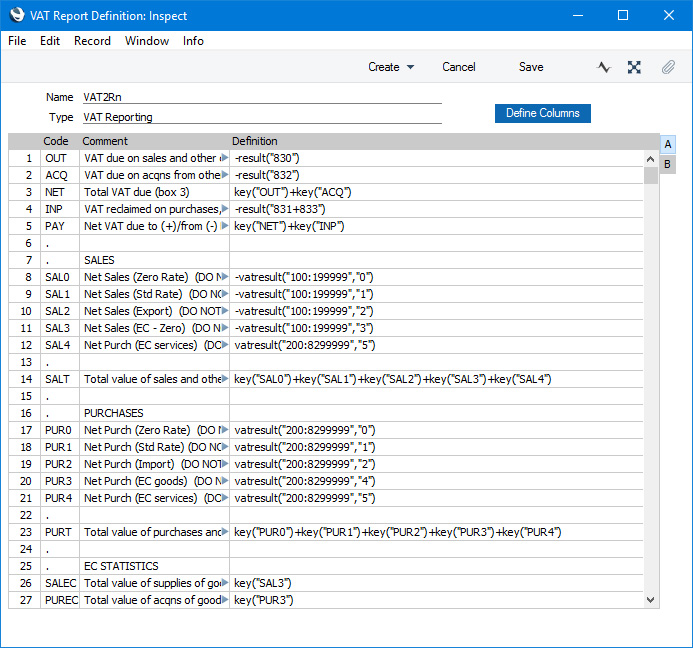
In more detail the calculations in this report definition are as follows:
Row 1 OUT
-RESULT("830") 830 is the Output VAT Account, so this row prints the total output VAT on domestic sales made during the report period. Sales figures are stored as negative figures in Standard ERP, so the negative sign will convert them to positive. This figure should be placed in Box 1 on the UK VAT Return. If you have more than one Output VAT Account, you can include them all in the formula (e.g. -RESULT("830+8300")), or you can print the net change in each Account on separate lines and then add them together using the KEY command.
Row 2 ACQ
-RESULT("832") 832 is the Account for output VAT on EU acquisitions of goods, so this row will print the VAT due on acquisitions of goods from other EU member states. This figure should be placed in Box 2 on the UK VAT Return. Please refer to the Reverse Charge VAT example towards the end of this page for more details about EU acquisitions. Row 3 NET
KEY("OUT")+KEY("ACQ") Prints the total Output VAT due, calculated by adding the previous two figures together. This figure should be placed in Box 3 on the UK VAT Return. Row 4 INP
-RESULT("831+833") 831 is the Input VAT Account and 833 is the Account for input VAT on EU acquisitions of goods. This row will therefore print the VAT reclaimable on purchases and other inputs (including acquisitions from the EU). The result will be printed as a negative figure. This figure should be placed in Box 4 on the UK VAT Return. Row 5 PAY
KEY("NET")+KEY("INP") Prints the net VAT to be paid or reclaimed, calculated by adding the figure in row 3 to the (negative) figure in row 4. A positive figure indicates that you are liable for VAT, a negative one signifies that you are owed money by the VAT authority. This figure should be placed in Box 5 on the UK VAT Return. Rows 8-12 SAL0-SAL4
-VATRESULT("100:1999999","0") -VATRESULT("100:1999999","1")
-VATRESULT("100:1999999","2")
-VATRESULT("100:1999999","3")
-VATRESULT("200:8299999","5")
Accounts 100:199 are the Sales Accounts. These rows print the total values of sales made with each VAT Code. If you sell non-digital services to customers in the EU who are not registered for VAT, you will need to charge VAT at the relevant domestic rate for the type of Item. Place these Customers in the Inside EU (Post VAT) Zone and use the standard VAT Code. This will ensure these sales will be included in the Box 1 figure (row 1) and in the relevant sales turnover figure here.
Row 12 will print the value of purchases of services from Suppliers in the Inside EU Zone. This will ensure this figure is included in Box 6 (row 14 below).
Row 14 SALT
KEY("SAL0") + KEY("SAL1") + KEY("SAL2") + KEY("SAL3") + KEY("SAL4") Prints the sum of rows 8-12 i.e. the total value of sales and all other outputs excluding VAT. This figure should be placed in Box 6 on the UK VAT Return.
Rows 17-21 PUR0-PUR4
-VATRESULT("200:8299999","0") -VATRESULT("200:8299999","1")
-VATRESULT("200:8299999","2")
-VATRESULT("200:8299999","4")
-VATRESULT("200:8299999","5")
Accounts 200:829 all represent items that can be purchased by the business. These rows print the total values of purchases made with each VAT Code. The range does not include the VAT Accounts (830:835). If you are using the Add VAT Code to VAT A/C rows option in the Transaction Settings setting, the appropriate VAT Code will be copied to the V-Cd field in each Transaction row posting to a VAT Account, as well as to the V-Cd field in the rows posting to a Sales or Cost Account. If the range included the VAT Accounts, the resulting figures would include VAT when they should exclude it.
Row 23 PURT
KEY("PUR0") + KEY("PUR1") + KEY("PUR2") + KEY("PUR3") + KEY("PUR4") Prints the sum of rows 17-21 i.e. the total value of purchases and all other inputs excluding VAT. This figure should be placed in Box 7 on the UK VAT Return. Row 26 SALEC
KEY("SAL3") Prints the total value of sales made with VAT Code 3 i.e. the total value of sales to other EU member states. This assumes that sales made to other EU member states will always carry VAT Code 3, and that VAT Code 3 is not used for any other sales. This figure should be placed in Box 8 on the UK VAT Return. (Box 8 should not include sales of services, so a different VAT Code would need to be used for such sales.) Row 27 PUREC
KEY("PUR3") Prints the total value of purchases made with VAT Code 4 i.e. the total value of purchases of goods from other EU member states. This assumes that purchases of goods made from other EU member states will always carry VAT Code 4, and that VAT Code 4 is not used for any other purchases. This figure should be placed in Box 9 on the UK VAT Return. (Box 9 should not include purchases of services. In the example, VAT Code 5 would be used for such purchases.)
As previously mentioned, the VAT Report definition illustrated and described above uses the Chart of Accounts and VAT Codes that are supplied with Standard ERP. You will need to amend the VAT Report definition (or start one from scratch) if you have modified the standard Chart of Accounts and/or VAT Codes, or created your own. For example, in the sample Chart of Accounts, the Output VAT Account is 830 and the standard VAT Code is 1. If your Output VAT Account is not 830 (e.g. it is 83010), you must replace every instance of "830" in the report definition with "83010". If your standard VAT Code is not 1 (e.g. it is S), you must replace every instance of "1" in the report definition with "S". It may be for example that you use different VAT Codes for sales and purchases.
Please follow the links below for more details about the VAT Report:
- Introduction to the VAT Report
- Definition of the VAT Report
- Example VAT Report Definitions, including:
- Standard VAT
- Cash VAT
- Reverse Charge VAT
- Standard VAT
- Printing the VAT Report
- Submitting the VAT Report electronically (UK only)
Reports in the Nominal Ledger:
- Introduction
- Definition of Nominal Ledger Reports
- Drill-down
- The Operations Menu
- Account Reconciliation
- Accrual Report
- Analytical Balance
- Analytical Balance (Fiscal purposes)
- Balance Sheet
- Bank Reconciliation
- Bank Statement
- Bank Transactions
- Base Currency Rate Change
- Budget Journal
- Cash Flow
- Chart of Accounts
- Correction List
- Corresponding Accounts
- Creditors Account
- Currency A/C Rate Change
- Daily Balances
- Debtors Account
- Forward Balance Journal
- Income & Expense Book
- Key Financial Ratios
- Liquidity Forecast
- Multicurrency Accounts Rate Difference
- N/L Accrual Transactions
- N/L Transfer, Subsystems
- Nominal Ledger
- Profit & Loss
- Revised Budget Journal
- Simulation Journal
- Tag/Object Results
- Tag/Object/Quantity Results
- Tax Account Balances
- Tax Calculations
- Tax Transactions for Registers
- Template Transaction Journal
- Test Corresponding Rules
- Transaction Journal
- Transaction Summary
- Trial Balance
- VAT Listing
- VAT Report
- VAT Report Purchases
- VAT Report Sales
- VAT Transaction Journal
- XBRL Report
Go back to:
- Home page for Nominal Ledger manual
- Home page for Standard ERP manual
VAT Report - Example VAT Report Definitions - Cash VAT
This page describes an example VAT Report definition that is suitable for use when using the Post Receipt VAT and Post Payment VAT options, with particular reference to the Cash VAT scheme in the UK. Please refer to the following pages for more details about the VAT Report in Standard ERP:
- Introduction
- Definition of the VAT Report
- Example VAT Report Definitions, including:
- Standard VAT
- Cash VAT
- Reverse Charge VAT
- Standard VAT
- Printing the VAT Report
In some countries, you can account for output VAT on the basis of the payments you receive, rather than on the Invoices you issue. Similarly, you can account for input VAT on the basis of the payments you issue, rather than on the Purchase Invoices that you receive. This is sometimes known as accounting for VAT on a cash basis or, in the UK, Cash Accounting.
If you need to account for VAT on a cash basis, follow these steps:
- On the sales side, the Account Usage S/L contains two options that you should select, depending on your requirements:
- Select the Post Receipt VAT option if you need VAT to be posted from normal Receipts (i.e. Receipts in which you are receiving payment against Invoices) and On Account Receipts.
- Select the Post Prepayment VAT option if you would like VAT to be posted from Prepayment Receipts. You will also need to specify a Prepayment VAT Account in the same setting.
In the UK only (i.e. when the VAT Law in the Company Info setting is "Default"), you should also specify VAT Base and VAT Base Opposite Accounts. When an Invoice is paid, the VAT Base Account will be credited with the Invoice turnover (i.e. value excluding VAT). The V-Cd field in this posting will be filled in. The purpose of this posting is to allow the Invoice turnover to be added to the value of sales and all other outputs excluding VAT (the Box 6 figure on the UK VAT Return) on the payment date rather than on the Invoice Date. The purpose of the VAT Base Opposite Account is solely to balance the VAT Base Account.
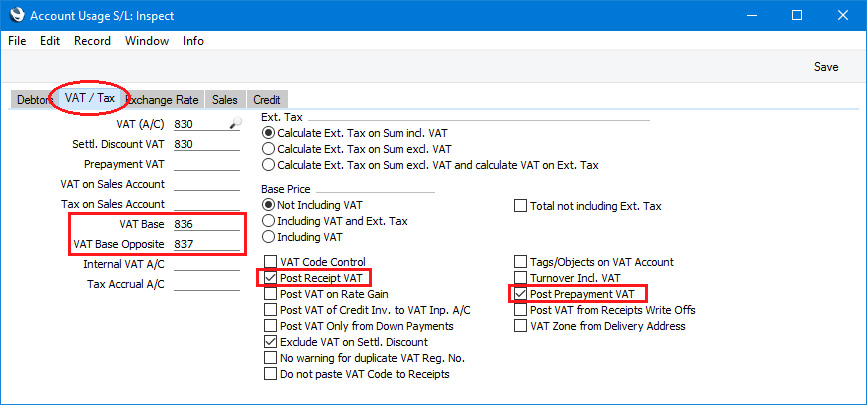
- Select the Post Receipt VAT option if you need VAT to be posted from normal Receipts (i.e. Receipts in which you are receiving payment against Invoices) and On Account Receipts.
- Similarly, on the purchase side, the Account Usage P/L contains two options that you should select, depending on your requirements:
- Select the Post Payment VAT option if you need VAT to be posted from normal Payments (i.e. Payments in which you are issuing payment against Purchase Invoices) and On Account Payments.
- Select one of the Post Prepayment VAT options if you would like VAT to be posted from Prepayment Payments. You will also need to specify On Account VAT and Prepayment VAT Accounts in the same setting and, depending on your requirements, you may also need to select the Prepayment amount excluding VAT option.
In the UK only, you should also specify VAT Base and VAT Base Opposite Accounts. When you pay a Purchase Invoice, the VAT Base Account will be debited with the Invoice turnover (i.e. value excluding VAT). The V-Cd field in this posting will be filled in. The purpose of this posting is to allow the Purchase Invoice turnover to be added to the value of purchases and all other inputs excluding VAT (the Box 7 figure on the UK VAT Return) on the payment date rather than on the Invoice Date. The purpose of the VAT Base Opposite Account is solely to balance the VAT Base Account.
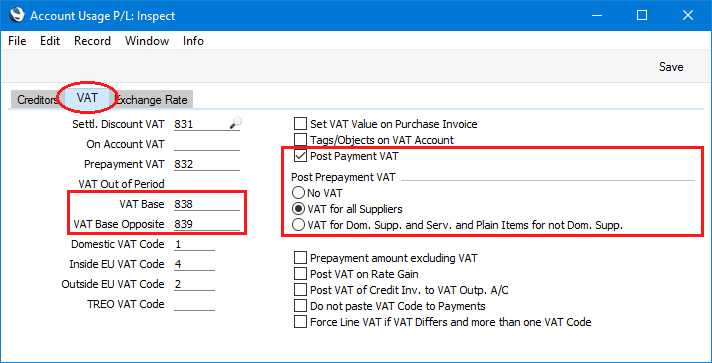
- Select the Post Payment VAT option if you need VAT to be posted from normal Payments (i.e. Payments in which you are issuing payment against Purchase Invoices) and On Account Payments.
- If you need to account for VAT on a cash basis, Sales Invoices will still post to an Output VAT Account as normal, and Purchase Invoices will still post to an Input VAT Account. However, these Accounts will now be treated as preliminary VAT Accounts. When a Customer pays an Invoice, the Transaction from the Receipt will include an extra VAT element in which the VAT is moved from the Output VAT Account to a final Account, known as the O/P Account. On the purchase side, when you pay a Purchase Invoice, the Transaction from the Payment will include an extra VAT element in which the VAT is moved from the Input VAT Account to a final Account, known as the I/P Account.
The next step is to specify the O/P and I/P Accounts, which you should do in the VAT Codes setting:
Note in the rows for VAT Codes 4 and 5 that the Output and O/P Accounts are the same, and the Input and I/P Accounts are the same. VAT Codes 4 and 5 are used for acquisitions from the EU, and in the UK such transactions cannot be included in the Cash Accounting scheme. Standard ERP still requires O/P and I/P Accounts to be specified: using the same Accounts in effect means that acquisition VAT will be immediately be posted to the final Account, without passing through a preliminary Account.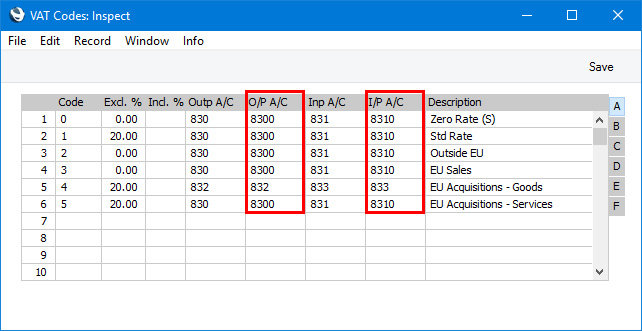
- Finally, you should make two changes to the definition of the VAT Report (in this example, we will add the changes to the example standard VAT Report definition described here). The first change is to ensure that the VAT to be paid or reclaimed will be calculated using the O/P and I/P Accounts instead of the Output and Input Accounts. In the illustration below, we have changed rows 1 and 4:
The second change is to ensure that the values of sales and purchases are calculated from the two VAT Base Accounts. Postings to the sales and cost Accounts should still be included in the calculations, because the value of Invoices that are Cash Notes (i.e. Invoices that are immediately paid and so will not have corresponding Receipts and Payments) will not be posted to the VAT Base Account: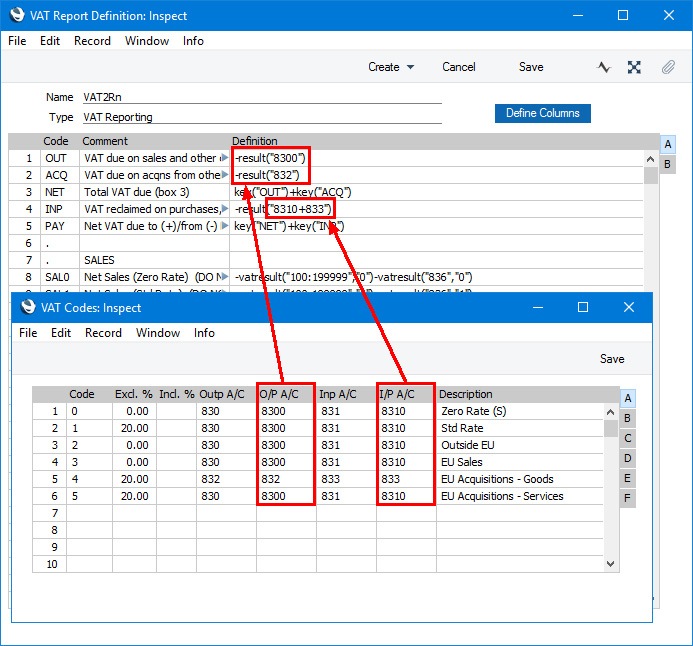
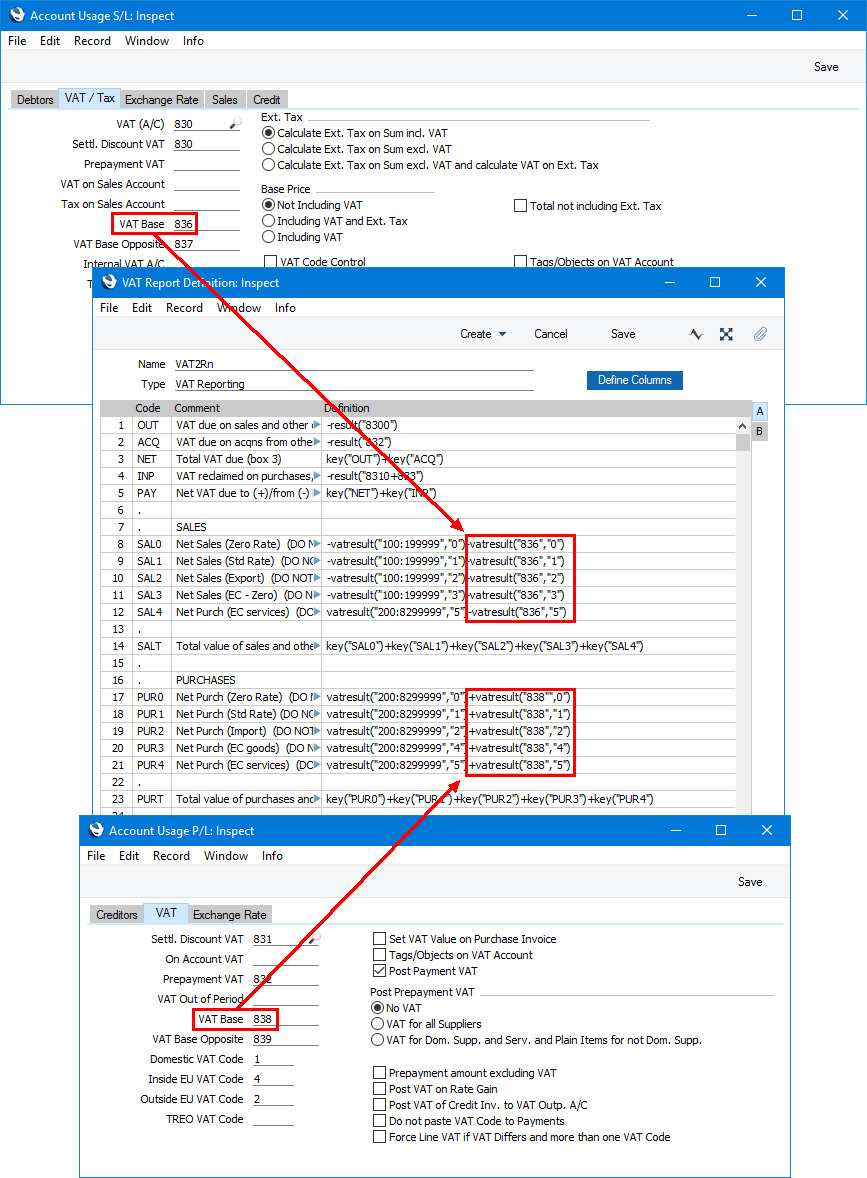
- Illustrated below is an example Invoice together with its Nominal Ledger Transaction. The VAT is posted to the Output Account as normal (row 3), but the posting to the Sales Account (row 2) does not include a VAT Code (V-Cd):
When the Customer pays the Invoice a month later, the Nominal Ledger Transaction shows the VAT being moved from the Output Account to the O/P Account. The sales value excluding VAT is credited to the VAT Base Account and debited to the VAT Base Opposite Account. The posting to the VAT Base Account includes the VAT Code: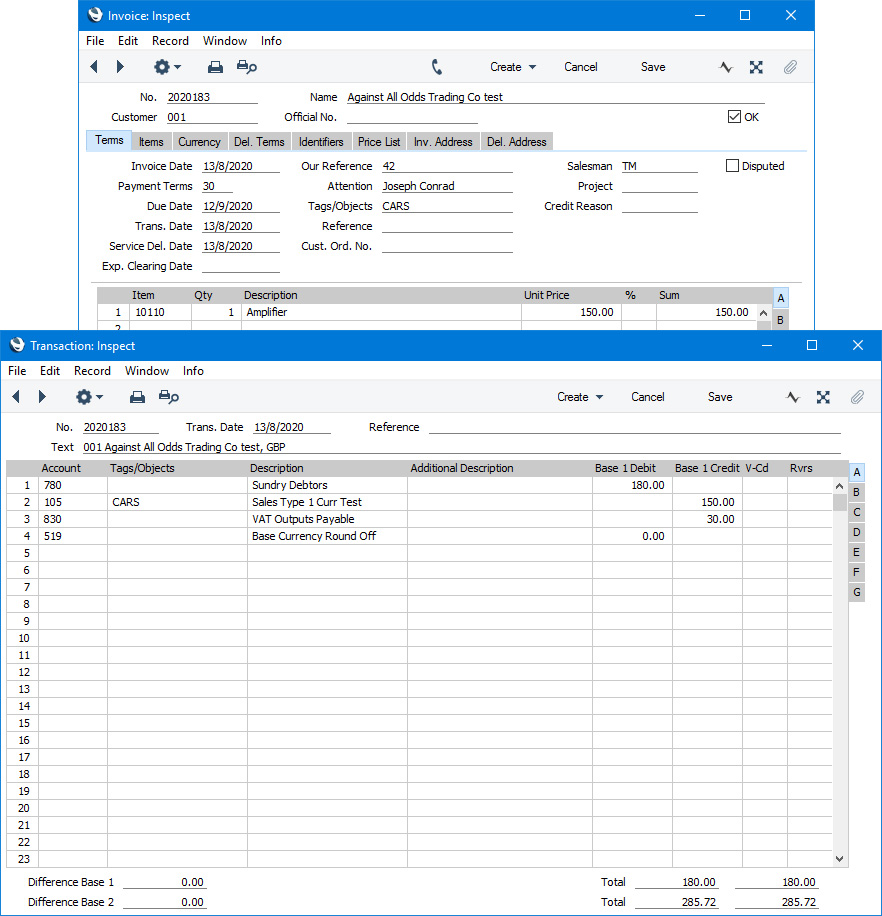
The VAT Report for the month when the Invoice was paid includes the VAT in the payable figure: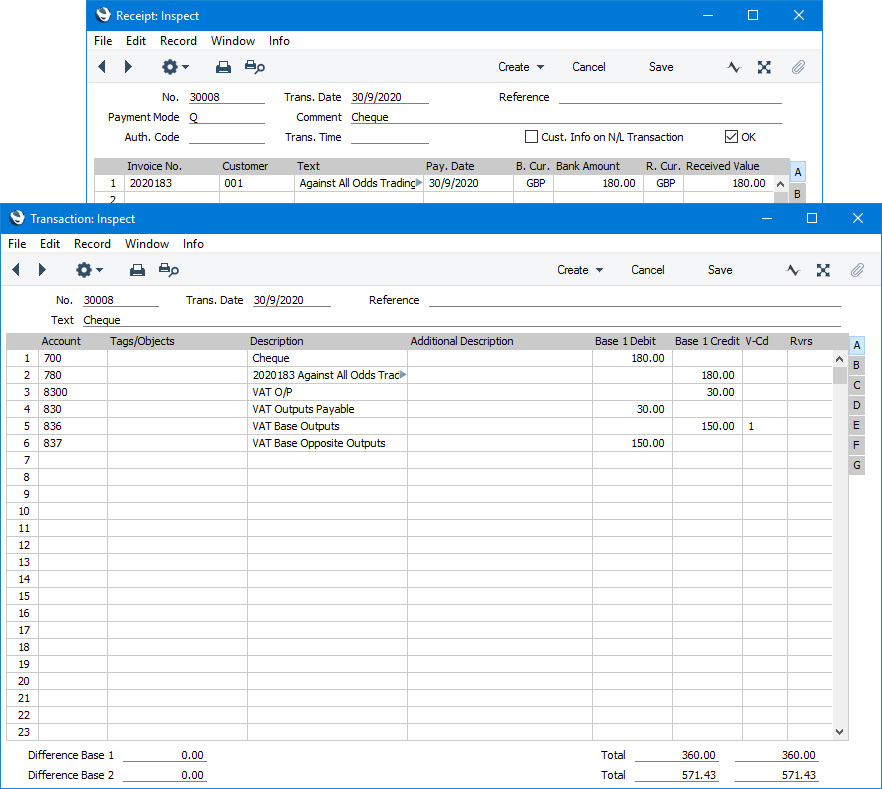
The value of the Invoice is included in rows 8-11 and 14 (SAL0-SAL3 and SALT). As previously described, these rows use the VATRESULT command to print the total values of sales and purchases made with each VAT Code. For example, VATRESULT("100";"1") will print the value of sales posted from Invoices to Account 100 with VAT Code 1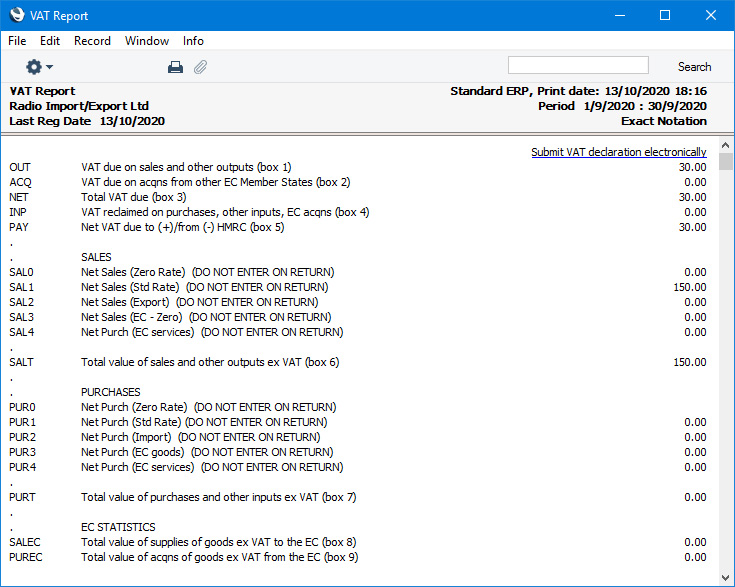
When you are accounting for VAT on a cash basis, you need to be able to establish the total value of sales and purchases by payment date, not by Invoice date. To this end, the VAT Code field in postings to Sales and Cost Accounts in Transactions created from Sales and Purchase Invoices will be empty. Transactions created from Receipts and Payments will include postings to VAT Base Accounts, and VAT Codes will be assigned to these postings. This allows you to use the VATRESULT command to establish the total value of sales and purchases by payment date.
- The next illustration shows an Invoice with a "Cash" Type Payment Term (i.e. a Cash Note) together with its Nominal Ledger Transaction. As the Invoice is a Cash Note there will be no Receipt, so the VAT is posted directly to the O/P Account (row 3) and the posting to the Sales Account (row 2) does include a VAT Code (V-Cd):
On recalculating the VAT Report previously illustrated, it will now include the Cash Note. The value of the Cash Note is included in rows 8-11 and 14 (SAL0-SAL3 and SALT because the figures in these rows are calculated by applying the VATRESULT command to the Sales Accounts as well as to the VAT Base Account: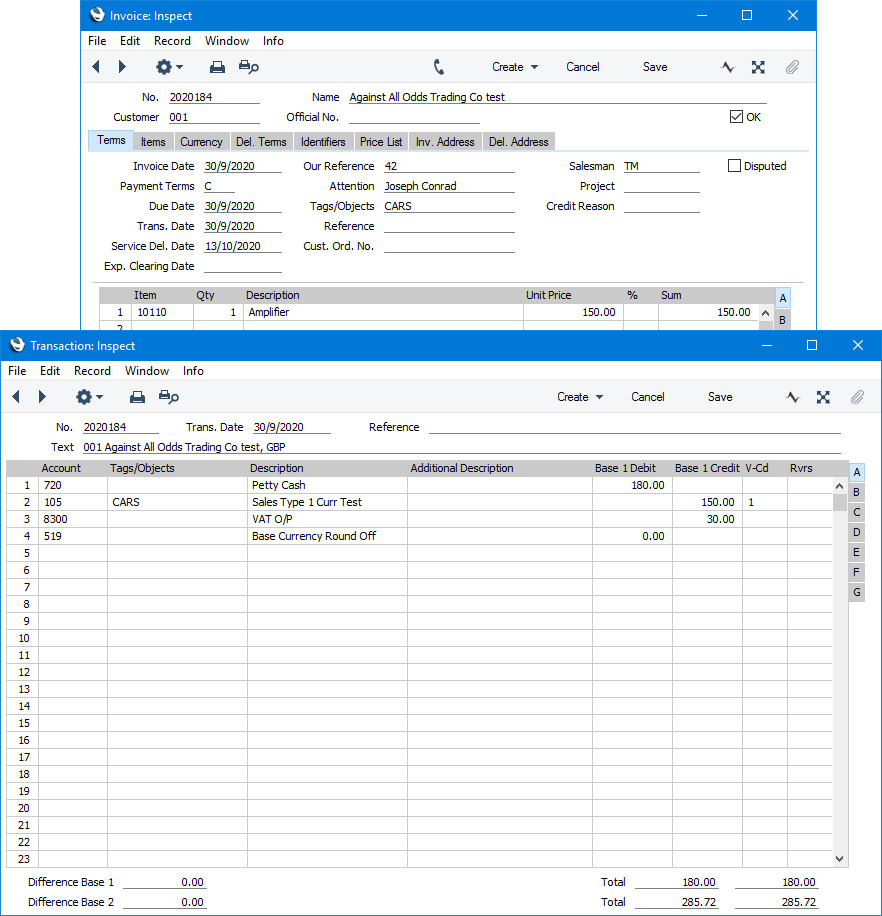
Please follow the links below for more details about the VAT Report: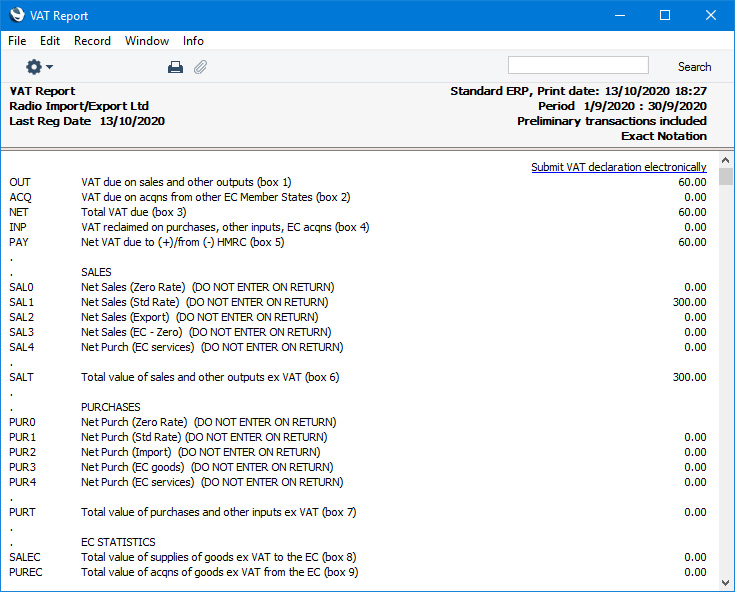
- Introduction to the VAT Report
- Definition of the VAT Report
- Example VAT Report Definitions, including:
- Standard VAT
- Cash VAT
- Reverse Charge VAT
- Standard VAT
- Printing the VAT Report
- Submitting the VAT Report electronically (UK only)
Reports in the Nominal Ledger:
- Introduction
- Definition of Nominal Ledger Reports
- Drill-down
- The Operations Menu
- Account Reconciliation
- Accrual Report
- Analytical Balance
- Analytical Balance (Fiscal purposes)
- Balance Sheet
- Bank Reconciliation
- Bank Statement
- Bank Transactions
- Base Currency Rate Change
- Budget Journal
- Cash Flow
- Chart of Accounts
- Correction List
- Corresponding Accounts
- Creditors Account
- Currency A/C Rate Change
- Daily Balances
- Debtors Account
- Forward Balance Journal
- Income & Expense Book
- Key Financial Ratios
- Liquidity Forecast
- Multicurrency Accounts Rate Difference
- N/L Accrual Transactions
- N/L Transfer, Subsystems
- Nominal Ledger
- Profit & Loss
- Revised Budget Journal
- Simulation Journal
- Tag/Object Results
- Tag/Object/Quantity Results
- Tax Account Balances
- Tax Calculations
- Tax Transactions for Registers
- Template Transaction Journal
- Test Corresponding Rules
- Transaction Journal
- Transaction Summary
- Trial Balance
- VAT Listing
- VAT Report
- VAT Report Purchases
- VAT Report Sales
- VAT Transaction Journal
- XBRL Report
Go back to:
- Home page for Nominal Ledger manual
- Home page for Standard ERP manual
VAT Report - Example VAT Report Definitions - Reverse Charge VAT
This page describes an example VAT Report definition that is suitable for use with Reverse Charge VAT. Please refer to the following pages for more details about the VAT Report in Standard ERP:
- Introduction
- Definition of the VAT Report
- Example VAT Report Definitions, including:
- Standard VAT
- Cash VAT
- Reverse Charge VAT
- Standard VAT
- Printing the VAT Report
- Submitting the VAT Report electronically (UK only)
In a normal transaction, the Supplier should account to the tax authorities for the VAT that is due on the supply. However, in certain situations, it is the Customer who must account for any VAT that is due. If you are the customer in such a situation, you will not pay VAT to the Supplier but instead will pay VAT to the tax authorities at the domestic rate that would apply had you purchased the Items from a local Supplier. This is sometimes known as the "reverse charge" procedure. You can reclaim this VAT, if the purchase relates to VAT taxable supplies that you will go on to make.
One situation when you need to use the reverse charge procedure is when you purchase Items from VAT-registered Suppliers in other countries in the EU. Items that you purchase from other countries in the EU are usually known as "acquisitions" or "arrivals" (the term "imports" usually refers to Items purchased from other countries outside the EU). One method for handling VAT on acquisitions using the reverse charge procedure is described below. An alternative method is to create Internal Invoices from Purchase Invoices for EU Acquisitions. Please refer here for more details.
To include EU Acquisition VAT in the VAT Report, follow these steps:
- In the VAT Codes setting in the Nominal Ledger, create two VAT Codes for VAT on EU Acquisitions. Two VAT Codes are needed because purchases of goods and purchases of services need to be reported differently on the UK VAT Return.
VAT Code 4 in the example illustration below will be used for purchases of goods. VAT will be debited to the Input Account in this VAT Code and credited to the Output Account. It is recommended that you use an Output Account that is not used in any other VAT Code.
VAT Code 5 in the example will be used for purchases of services. In this case, you can use the standard Output and Input Accounts (although you can use dedicated Accounts if you prefer).
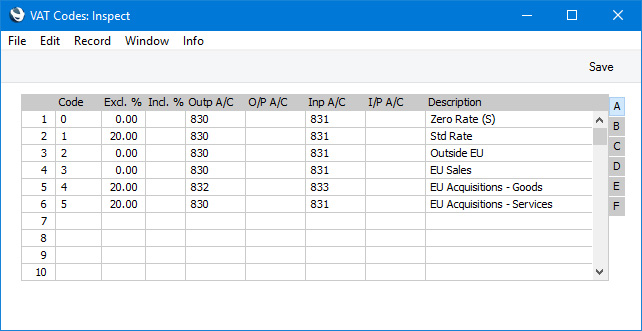
- In a Purchase Invoice for goods received from a Supplier in the Inside EU VAT Zone, enter the total charged by the Supplier (i.e. without VAT) in the TOTAL field and the Amounts in the rows using the VAT Code 4 from step 1. The Calculated VAT field in the footer will be updated automatically. In this example, the Currency in the Invoice is the Euro:
The VAT Code in each row will be chosen as follows: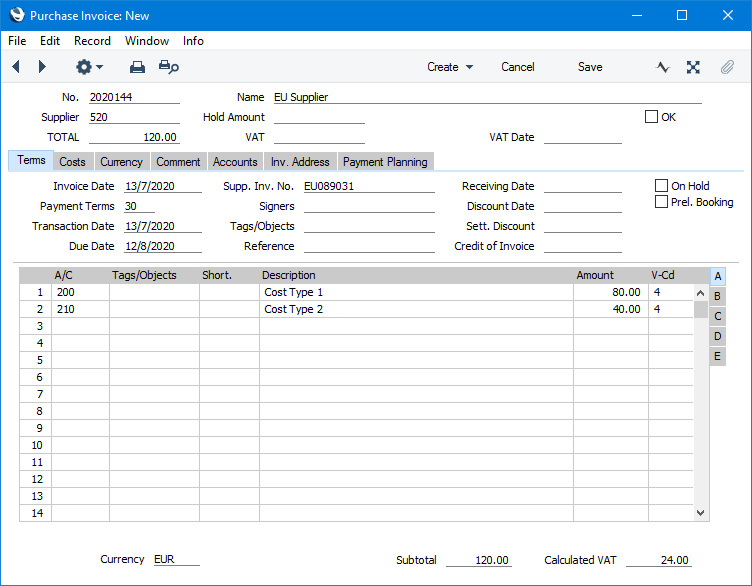
- The Purch. VAT Code for the Supplier will be used.
- It will be taken from the Account record.
- The VAT Code on the 'VAT' card of the Account Usage P/L setting will be used.
In the case of point (ii), you can only specify a single VAT Code in each Account record. It is therefore recommended that you use dedicated Accounts for purchases of goods from the EU, to ensure that the correct VAT Code will be offered as the default. If you use the same Account for non-EU and EU purchases, there is a risk that the wrong VAT Code will be offered by default and that you don't change it.
In the last case, the appropriate VAT Code for the Zone of the Supplier will be used.
- The Purch. VAT Code for the Supplier will be used.
- When you mark the Purchase Invoice as OK and save it, the total charged by the Supplier will be posted to the Creditor Account. Because the Supplier is in the Inside EU VAT Zone, VAT will be debited to the Input Account of the selected VAT Code and credited to the Output Account (EUR figures are shown in the Base 2 Debit and Credit fields, with figures in Base Currency 1 in the Base 1 Debit and Credit fields):
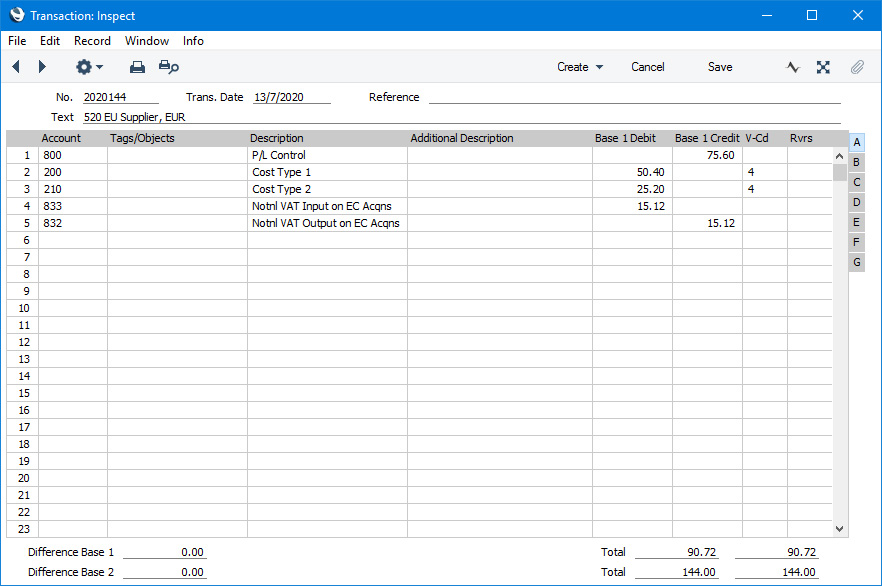
- In the VAT report, you will need to include acquisition VAT when calculating the output VAT that is payable. You will also be able to include it when calculating the input VAT that is reclaimable, if the acquisitions relate to VAT taxable supplies that you make.
In the UK, the output VAT payable on EU goods acquisitions should be included in the VAT report as a separate figure. This has been done in row 2 in the example VAT Report definition illustrated below. In this row, the RESULT command will return the net change in the Output VAT Account used in VAT Code 4, hence the recommendation that this be an Output Account that is not used in any other VAT Code. From there the output VAT will be included in the total output VAT figure in row 3.
It is not necessary to include the input VAT as a separate figure. So, in row 4 the RESULT of the Input VAT Account has been added to that of the domestic Input VAT Account to produce a total figure.
Row 20 uses the VATRESULT command to print the total value of EU acquisitions with VAT Code 4. This figure is then used in rows 23 and 27 (Boxes 7 and 9 on the UK VAT Return).
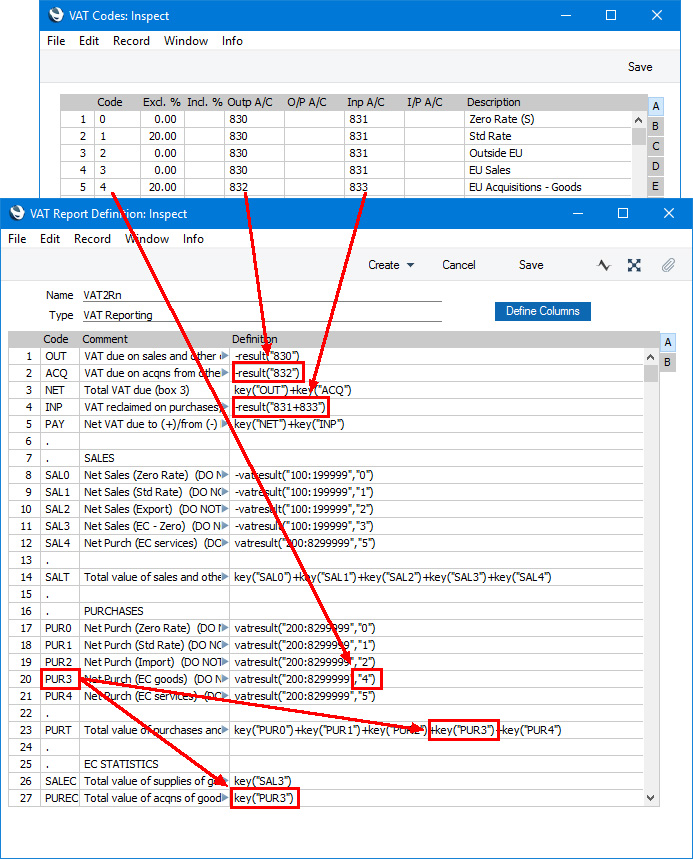
- Using this definition, the Purchase Invoice illustrated above will be included in the VAT Report as shown below:
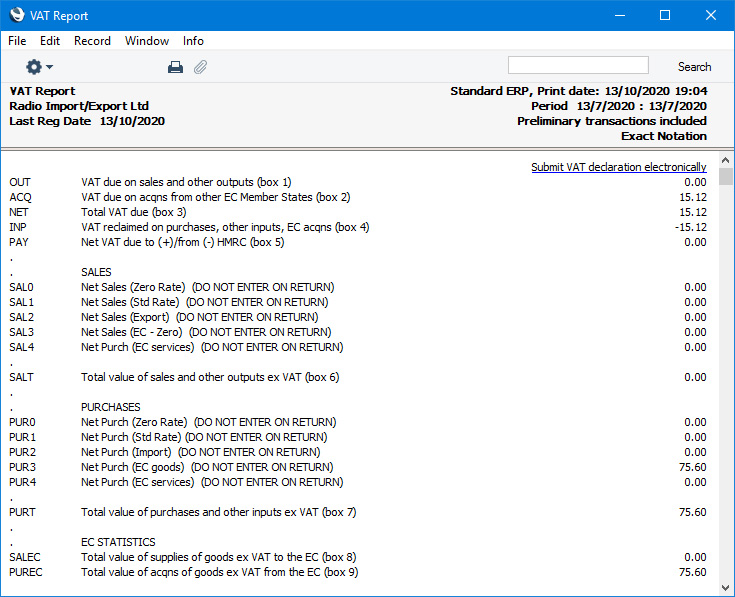
Follow these steps:
- The procedure for entering a Purchase Invoice for services is the same as that for entering a Purchase Invoice for goods. Enter the total charged by the Supplier (i.e. without VAT) in the TOTAL field and the Amounts in the rows using VAT Code 5. Again, it is therefore recommended that you use dedicated Accounts for purchases of services from the EU, to ensure that the correct VAT Code will be offered as the default. The Calculated VAT field in the footer will be updated automatically. In this example, the Currency in the Invoice is the Euro:
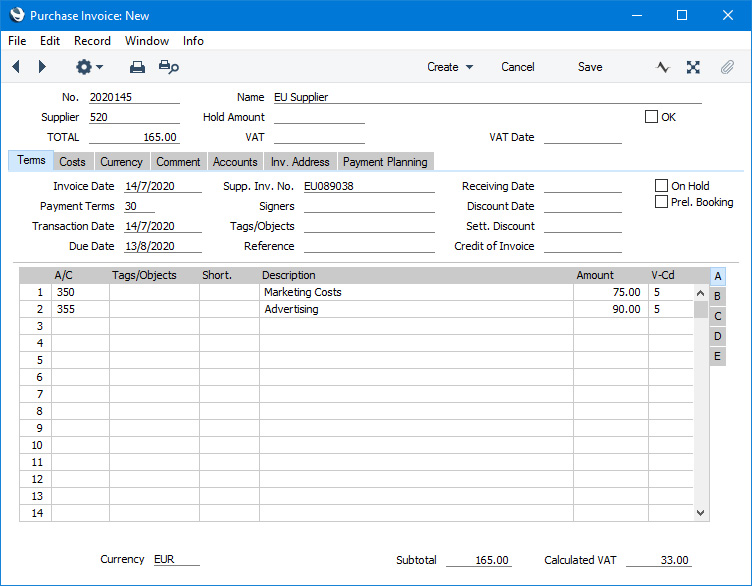
- When you mark the Purchase Invoice as OK and save it, the total charged by the Supplier will be posted to the Creditor Account. Because the Supplier is in the Inside EU VAT Zone, VAT will be debited to the Input Account of the selected VAT Code and credited to the Output Account (EUR figures are shown in the Base 2 Debit and Credit fields, with figures in Base Currency 1 in the Base 1 Debit and Credit fields):
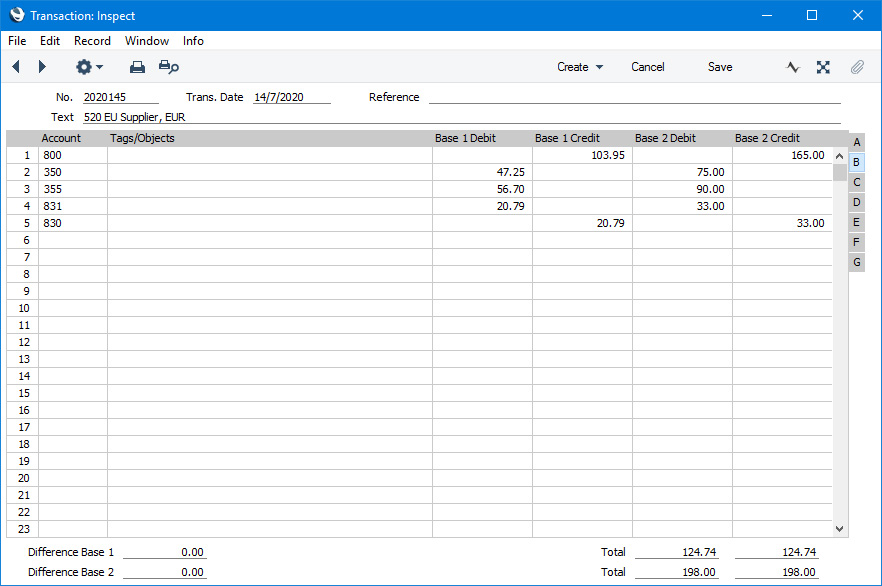
- In the VAT report, you will need to include acquisition VAT when calculating the output VAT that is payable. You will also be able to include it when calculating the input VAT that is reclaimable, if the acquisitions relate to VAT taxable supplies that you make. In this respect, reporting services is similar to reporting goods.
However, in the UK, the output VAT payable on EU services acquisitions should not be included in the VAT report as a separate figure (unlike EU goods acquisitions) i.e. it should be included in box 1 in the UK VAT Return and not box 2. As with goods, the input VAT should be included in box 4. This allows you to use the standard Output and Input Accounts, as in this example. You can use dedicated Accounts if you prefer, but if you do, be sure to include them in the RESULT commands that calculate the Output VAT and Input VAT totals in your VAT Report Definition (rows 1 and 4 in the example).
Purchase of services from Suppliers in the EU VAT Zone need to be included in both the sales totals and the purchase totals on the UK VAT Return (boxes 6 and 7). Using a dedicated VAT Code (VAT Code 5 in the example) will allow you to do this. Rows 12 and 21 in the example VAT Report definition use the VATRESULT command to print the total value of EU acquisitions with VAT Code 5. This figure is then used in rows 14 and 23.
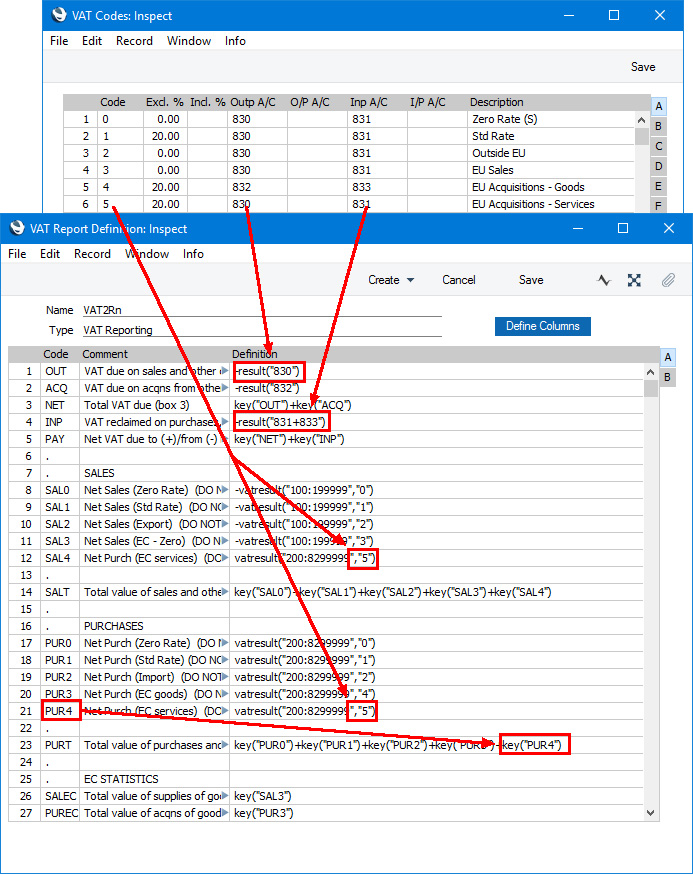
- Using this definition, the Purchase Invoice illustrated above will be included in the VAT Report as shown below:
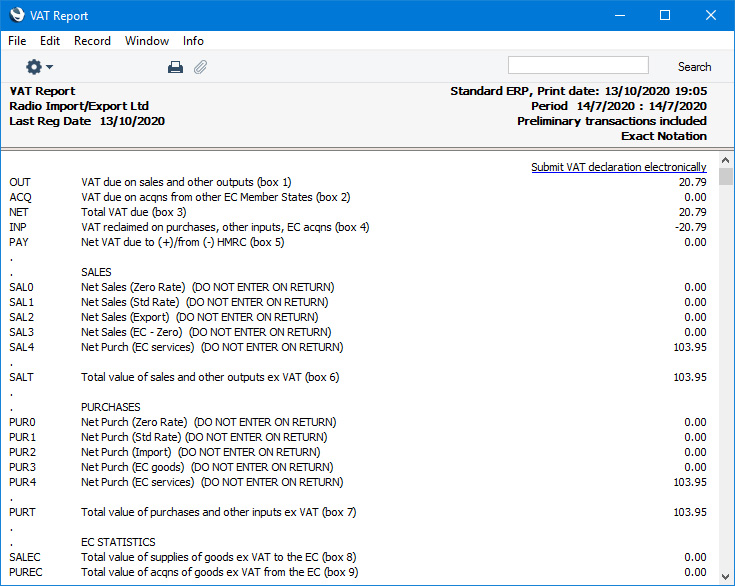
- Create a new record in the Tax Rules setting in the Nominal Ledger. In the VAT Type field, choose "Reversed" using 'Paste Special':
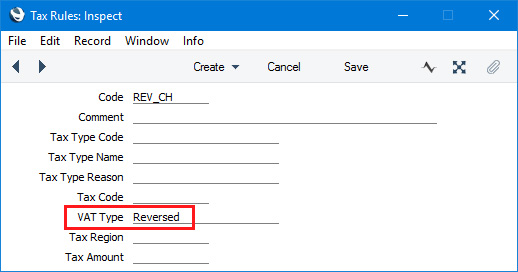
- In the VAT Codes setting, create a VAT Code for reverse charge VAT. Specify Input and Output Accounts and the VAT rate and, in the Tax Rules field on flip B, enter the Tax Rule record that you created in step 10:
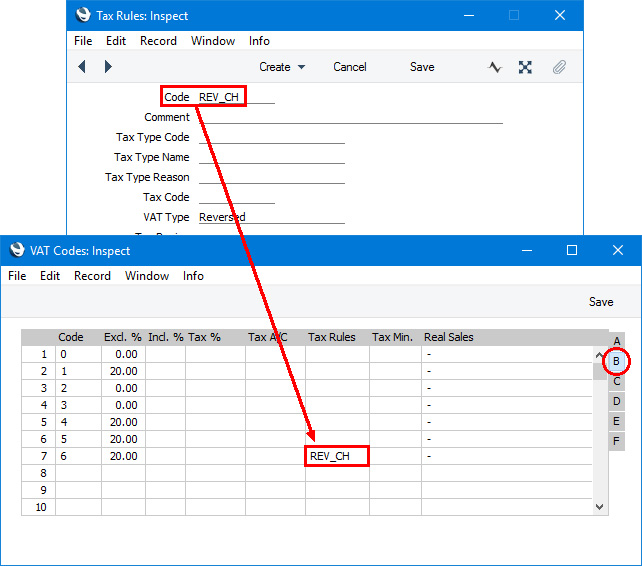
- In a Purchase Invoice that is to be subject to the reverse charge procedure, enter the total charged by the Supplier (i.e. without VAT) in the TOTAL field and the Amounts in the rows using the VAT Code from step 11:
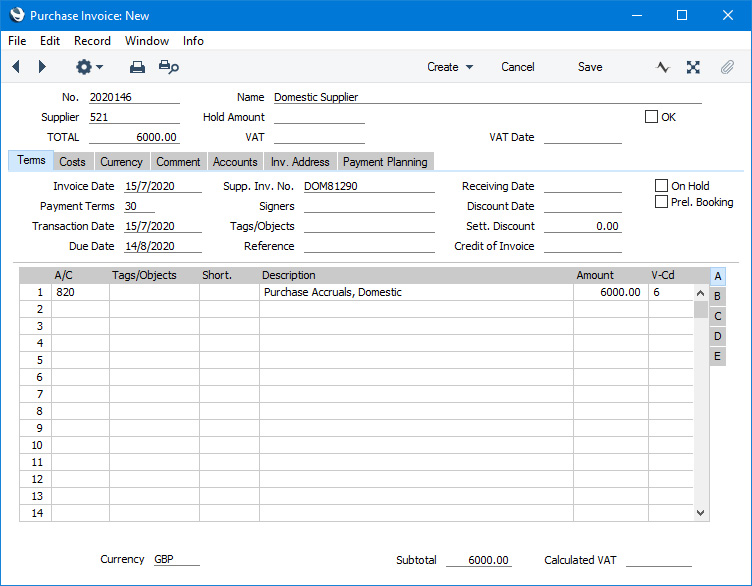
- When you mark the Purchase Invoice as OK and save it, the total charged by the Supplier will be posted to the Creditor Account. Because the Tax Rule in the VAT Code is "Reversed", VAT will be debited to the Input Account of the selected VAT Code and credited to the Output Account, and the VAT Code will be placed in the Rvrs field in the row posting to the Cost Account instead of the V-Cd field:

- In the VAT report, you will need to include reverse charge VAT when calculating the output VAT that is payable. Subject to the normal rules, you will also be able to include it when calculating the input VAT that is reclaimable.
In the UK, you must include the output tax payable on purchases under the reverse charge in the output VAT total (box 1 in the UK VAT Return). This has been done in row 1 in the example VAT Report definition illustrated below. In this row, the RESULT command will return the total net change in the standard Output VAT Account (Account 830) and in the Output VAT Account used in VAT Code 6 (Account 8320). From there the output VAT will be included in the total output VAT figure in row 3.
You should not include the VAT exclusive value of the purchases (box 6 on the UK VAT Return). So, rows 8-12 do not include a VATRESULT calculation for VAT Code 6.
If you will reclaim input VAT, you should include it in the input VAT total. In row 4 the RESULT of the Input VAT Account has been added to those of the domestic Input VAT Account and the EU Acquisitions Input Account to produce a total figure.
Row 22 uses the VATRESULT command to calculate the total value of reverse charge purchases with VAT Code 5 (in calculating this figure, VATRESULT will check both the V-Cd and Rvrs fields in Transaction rows). This figure is then used in row 24 (Box 7 on the UK VAT Return).
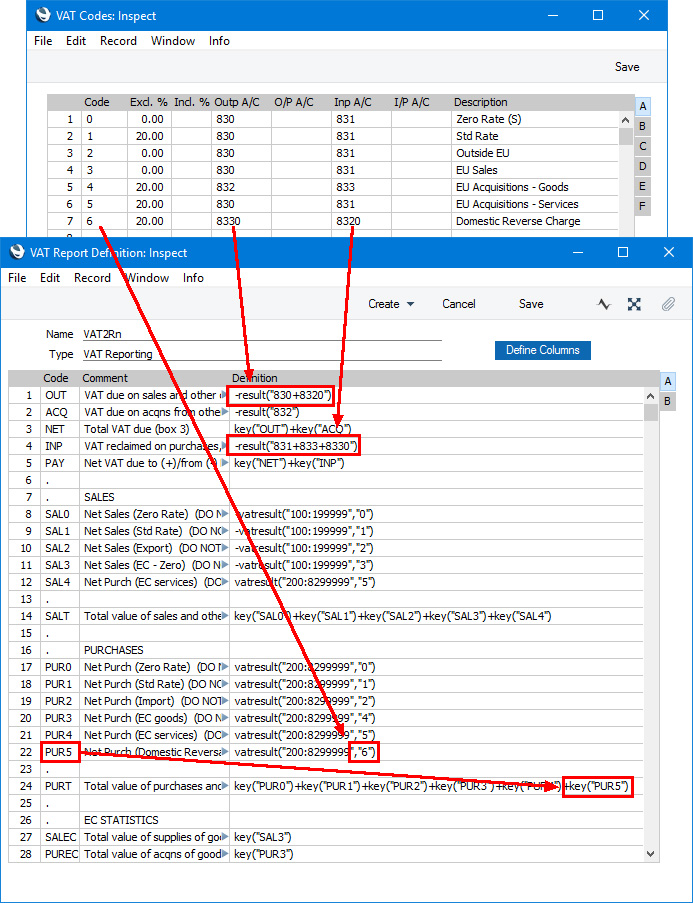
- Using this definition, the Purchase Invoice illustrated above will be included in the VAT Report as shown below:
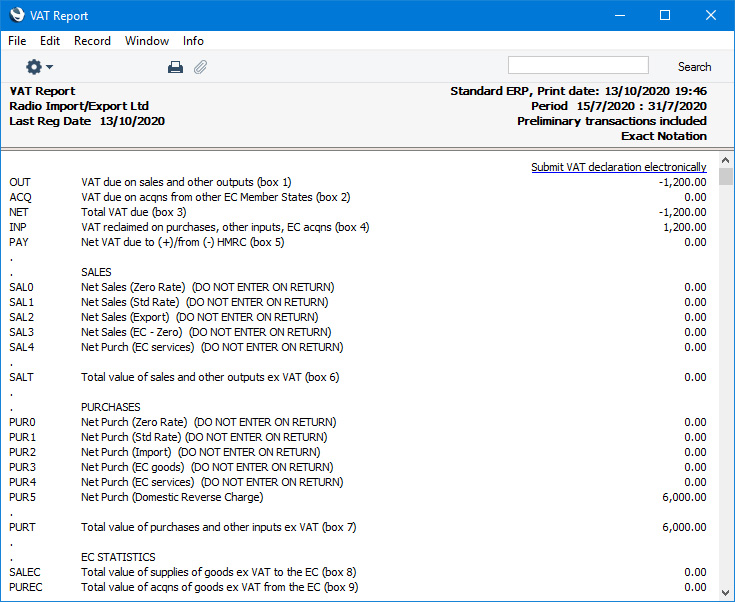
- Introduction to the VAT Report
- Definition of the VAT Report
- Example VAT Report Definitions, including:
- Standard VAT
- Cash VAT
- Reverse Charge VAT
- Standard VAT
- Printing the VAT Report
- Submitting the VAT Report electronically (UK only)
Reports in the Nominal Ledger:
- Introduction
- Definition of Nominal Ledger Reports
- Drill-down
- The Operations Menu
- Account Reconciliation
- Accrual Report
- Analytical Balance
- Analytical Balance (Fiscal purposes)
- Balance Sheet
- Bank Reconciliation
- Bank Statement
- Bank Transactions
- Base Currency Rate Change
- Budget Journal
- Cash Flow
- Chart of Accounts
- Correction List
- Corresponding Accounts
- Creditors Account
- Currency A/C Rate Change
- Daily Balances
- Debtors Account
- Forward Balance Journal
- Income & Expense Book
- Key Financial Ratios
- Liquidity Forecast
- Multicurrency Accounts Rate Difference
- N/L Accrual Transactions
- N/L Transfer, Subsystems
- Nominal Ledger
- Profit & Loss
- Revised Budget Journal
- Simulation Journal
- Tag/Object Results
- Tag/Object/Quantity Results
- Tax Account Balances
- Tax Calculations
- Tax Transactions for Registers
- Template Transaction Journal
- Test Corresponding Rules
- Transaction Journal
- Transaction Summary
- Trial Balance
- VAT Listing
- VAT Report
- VAT Report Purchases
- VAT Report Sales
- VAT Transaction Journal
- XBRL Report
Go back to:
- Home page for Nominal Ledger manual
- Home page for Standard ERP manual
VAT Report - Printing
Open the 'Reports' list window and double-click 'VAT Report'. The 'Specify VAT Report' window is opened.

- Period
- Paste Special
Reporting Periods setting, System module
- Enter the period for which you want to print the report in the format 01/02/02:28/02/02. If you are using four-digit years as in the illustration, the leading digits will be inserted automatically. The first period in the Reporting Periods setting is the default value.
- Object
- Paste Special
Object register, Nominal Ledger/System module
- Enter one or more Objects to limit the scope of the report.
- Values in
- If you are using the Dual-Base system, values in this report can be shown in either Base Currency. Use these options to choose which Currency is to be used on this occasion.
- If you are not using the Dual-Base system, use the Base Currency 1 option to produce a report in your home Currency.
- If you are not using the Dual-Base system, use the Base Currency 1 option to produce a report in your home Currency.
- Including Simulations
- Check this box to include Simulations in the report. Simulation rows of "Invalid" and "Transferred" Status will not be included.
- List Transactions
- With this box checked, the Transaction Numbers of all Transactions that fall within the reporting period, together with debit and credit totals, will be listed at the bottom of the report.
- No Header
- Check this box if you want the report to be printed without a header.
Impuestos de Facturas de Compra
Este informe que también se encuentra en el Módulo Compras, satisface un requerimiento específico para Informe IVA mensual en Polonia. Por favor, consulta tu representante Hansa para más detalles.Impuestos de Facturas de Venta
Este informe que también se encuentra en el Módulo Ventas, satisface un requerimiento específico para Informe IVA mensual en Polonia. Por favor, consulta tu representante Hansa para más detalles.VAT Transaction Journal
This page describes the VAT Transaction Journal report in the Nominal Ledger.
---
The VAT Transaction Journal is a list of journal postings (i.e. Transaction rows) that have VAT Codes. The list is sorted by Account and then by date. The report shows the Transaction Number (including fiscal year or Sub System prefix), the debit or credit value (with debits being shown as negative, the VAT value and total. This report should not be used if it will include Transaction rows with reverse VAT (e.g. in Transactions created from Purchase Invoices for goods in the Inside EU VAT Zone).
When printed to screen, the VAT Transaction Journal has the Standard ERP Drill-down feature. Click (Windows/macOS) or tap (iOS/Android) an Account Number in the report to open an Account record, or on a Transaction Number to open an individual Transaction record.

- Period
- Paste Special
Reporting Periods setting, System module
- Specify here a period for the report. The report will list rows with VAT Codes from Transactions dated during this period.
- Accounts
- Paste Special
Account register, Nominal Ledger/System module
- Range Reporting Alpha
- If you need the report to list Transaction rows posting to a particular Account, specify that Account here. You can also enter a range of Accounts separated by a colon (:).
- If you need the report to list Transaction rows posting to a particular Account, specify that Account here. You can also enter a range of Accounts separated by a colon (:).
- Tag/Object
- Paste Special
Tag/Object register, Nominal Ledger/System module
- If you need the report to list Transaction rows with a particular Tag/Object, specify that Tag/Object here. You can also enter a number of Tags/Objects separated by commas, in which case the report will list Transaction rows with all the Tags/Objects listed.
- Transactions
- Range Reporting
Numeric
- If you need the report to list rows with VAT Codes from Transactions in a particular range, enter the first and the last Transaction Numbers in the range, separated by a colon (:). If you leave the field blank, rows from every Transaction from the specified period will be included in the report.
- When entering a Transaction Number here, you must include the fiscal year or Sub System prefix (as shown in the 'Transactions: Browse' window. To include a Transaction that you entered directly to the Transaction register in the report, enter, for example, "2020.3" or, for a range, "2020.3:2020.10". To include a Transaction that was created from a Sub System in the report, enter, for example, "S/INV.200003" or "S/INV.200003:S/INV.200010" for a range.
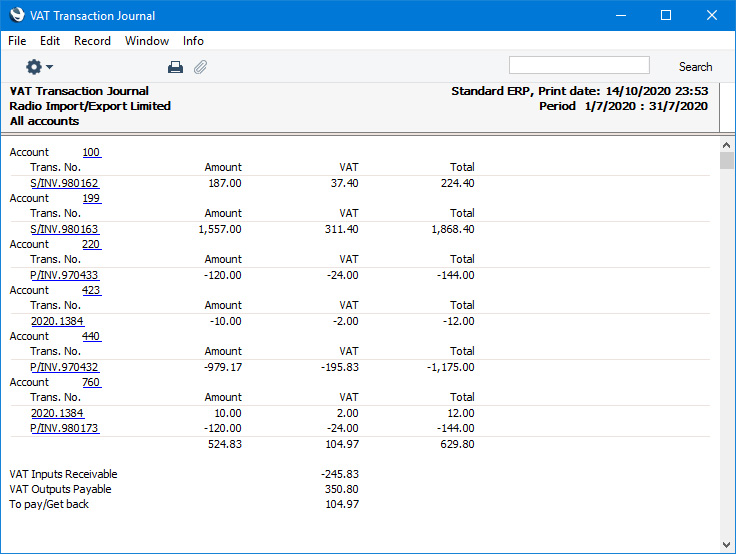
- When entering a Transaction Number here, you must include the fiscal year or Sub System prefix (as shown in the 'Transactions: Browse' window. To include a Transaction that you entered directly to the Transaction register in the report, enter, for example, "2020.3" or, for a range, "2020.3:2020.10". To include a Transaction that was created from a Sub System in the report, enter, for example, "S/INV.200003" or "S/INV.200003:S/INV.200010" for a range.
Reports in the Nominal Ledger:
- Introduction
- Definition of Nominal Ledger Reports
- Drill-down
- The Operations Menu
- Account Reconciliation
- Accrual Report
- Analytical Balance
- Analytical Balance (Fiscal purposes)
- Balance Sheet
- Bank Reconciliation
- Bank Statement
- Bank Transactions
- Base Currency Rate Change
- Budget Journal
- Cash Flow
- Chart of Accounts
- Correction List
- Corresponding Accounts
- Creditors Account
- Currency A/C Rate Change
- Daily Balances
- Debtors Account
- Forward Balance Journal
- Income & Expense Book
- Key Financial Ratios
- Liquidity Forecast
- Multicurrency Accounts Rate Difference
- N/L Accrual Transactions
- N/L Transfer, Subsystems
- Nominal Ledger
- Profit & Loss
- Revised Budget Journal
- Simulation Journal
- Tag/Object Results
- Tag/Object/Quantity Results
- Tax Account Balances
- Tax Calculations
- Tax Transactions for Registers
- Template Transaction Journal
- Test Corresponding Rules
- Transaction Journal
- Transaction Summary
- Trial Balance
- VAT Listing
- VAT Report
- VAT Report Purchases
- VAT Report Sales
- VAT Transaction Journal
- XBRL Report
Go back to:
- Home page for Nominal Ledger manual
- Home page for Standard ERP manual
XBRL Report
Please refer to the description of the two XBRL Reporting settings for details about the XBRL Report.
---
Reports in the Nominal Ledger:
- Introduction
- Definition of Nominal Ledger Reports
- Drill-down
- The Operations Menu
- Account Reconciliation
- Accrual Report
- Analytical Balance
- Analytical Balance (Fiscal purposes)
- Balance Sheet
- Bank Reconciliation
- Bank Statement
- Bank Transactions
- Base Currency Rate Change
- Budget Journal
- Cash Flow
- Chart of Accounts
- Correction List
- Corresponding Accounts
- Creditors Account
- Currency A/C Rate Change
- Daily Balances
- Debtors Account
- Forward Balance Journal
- Income & Expense Book
- Key Financial Ratios
- Liquidity Forecast
- Multicurrency Accounts Rate Difference
- N/L Accrual Transactions
- N/L Transfer, Subsystems
- Nominal Ledger
- Profit & Loss
- Revised Budget Journal
- Simulation Journal
- Tag/Object Results
- Tag/Object/Quantity Results
- Tax Account Balances
- Tax Calculations
- Tax Transactions for Registers
- Template Transaction Journal
- Test Corresponding Rules
- Transaction Journal
- Transaction Summary
- Trial Balance
- VAT Listing
- VAT Report
- VAT Report Purchases
- VAT Report Sales
- VAT Transaction Journal
- XBRL Report
Go back to:
- Home page for Nominal Ledger manual
- Home page for Standard ERP manual
- Introduction to the VAT Report
- In the VAT Codes setting in the Nominal Ledger, create two VAT Codes for VAT on EU Acquisitions. Two VAT Codes are needed because purchases of goods and purchases of services need to be reported differently on the UK VAT Return.
- Asientos
- Estándar