Introducción a las Exportaciones del Módulo Ventas
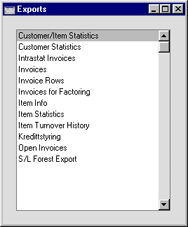
La función de 'Exportaciones' permite exportar cierto tipo de información en archivos de texto delimitados por tabulaciones, los cuales pueden ser incorporados en programas procesadores de palabras para fusión de mails, en hojas de cálculo para un análisis estadístico más profundo o en programas de diseño para la incorporación de material de publicidad o reportajes publicados. Además, también puede ser importado a otras bases de datos Hansa o Empresas utilizando las funciones de importación 'Automática' y 'Automática Búsqueda Manual de Archivo' en el módulo Sistema. Recuerde que los Informes también pueden ser guardados en el disco, de forma que la información almacenada en Hansa está disponible para otras aplicaciones via el archivo de texto.La función es seleccionada usando el Ítem 'Exportaciones' del menú Archivo o por medio de clicks en el botón [Exportaciones] del Panel de Control. Al seleccionar la función, la ventana siguiente aparecerá. Esta lista las Exportaciones que pueden realizarse desde el módulo Ventas. Doble-click en el ítem deseado de la lista. Una ventana de especificación aparecerá, dónde Ud. puede escoger el contenido de los archivos a exportar. Click en [Ejecutar] y un cuadro de diálogo 'Guardar Archivo' aparecerá, en este puede nombrar al archivo y determinar el destino en que será guardado.
Analytical Cash Flow
The 'Analytical Cash Flow' Export function in the Sales Ledger creates a file containing a forecast of future payments that it is anticipated will be issued and received during a specified period. The forecast will be based on the Due Dates of Purchase and Sales Invoices. You can specify whether the file will contain daily, weekly or monthly predictions. This Export function may therefore be a very useful tool for cash flow forecasting.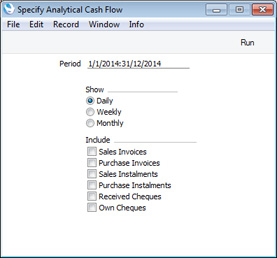
- Period
- Paste Special
Reporting Periods setting, System module
- Specify the period to be covered by the export. Please refer to the descriptions below for more details.
- Show
- Use these options to specify the number of lines that will be included in the export file, as follows:
- Daily
- The export file will contain separate lines for each day in the report period.
- Weekly
- The export file will contain separate lines for each week in the report period. The first column should contain week numbers: if it contains zeros, the probable reason is that there is no record in the Weeks setting in the System module, or the record that is there is incomplete. This setting should contain at least one record in which the Country Code is the same as that on the 'Reg' card of the Company Info setting.
- Monthly
- The export file will contain separate lines for each month in the report period.
- Daily
- Include
- Use these options to specify the types of transaction that should be exported.
- The first column in the export file will contain the day/week/month identifier. This will be followed by separate columns for each of the Include options that you choose. There will then be columns for incoming and outgoing totals and the balance (incoming - outgoing). Outgoings will be shown as negative.
- These options will add columns to the export file containing daily/weekly monthly figures calculated from following:
- Sales Invoices
- Open (i.e. unpaid) Sales Invoices with Due Dates in the specified period.
- Purchase Invoices
- Open (i.e. unpaid) Purchase Invoices with Due Dates in the specified period.
- Sales Instalments
- Open (i.e. unpaid) Sales Invoice instalments with instalment Due Dates in the specified period. Invoices that are payable in instalments will not be exported if you choose the Sales Invoices option above, to avoid double-counting. Invoices are payable in instalments if they have Payment Terms that are connected to records in the Instalments setting.
- Purchase Instalments
- Open (i.e. unpaid) Purchase Invoice instalments with instalment Due Dates in the specified period. As on the sales side, Purchase Invoices that are payable in instalments will not be exported if you choose the Purchase Invoices option above, to avoid double-counting.
- Received Cheques
- Cheques whose Status is "Accepted" and with Estimated Cl. Dates in the specified period.
- Own Cheques
- Own Cheques whose Status is "Issued" and with Effect Dates in the specified period.
- The first column in the export file will contain the day/week/month identifier. This will be followed by separate columns for each of the Include options that you choose. There will then be columns for incoming and outgoing totals and the balance (incoming - outgoing). Outgoings will be shown as negative.
---
Export functions in the Sales Ledger and Integration modules:
- Introduction
- Analytical Cash Flow
- Customer Statistics
- Customer Turnover History
- Customer/Item Statistics
- Direct Debit to Hansabank
- Intrastat Invoices
- Intrastat Invoices (UK)
- Invoice Rows
- Invoices
- Invoices for Factoring
- Item Statistics
- Item Turnover History
- Items to Fiscal Printer Fi550
- Open Invoices
- Home page for Sales Ledger manual
- Home page for Standard ERP manual
Estadísticas Cliente
Este comando exporta los valores de ventas mensuales por cada Cliente especificado para el año financiero en curso.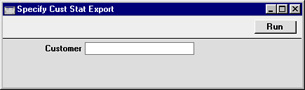
Customer Turnover History
This function in the Sales Ledger is similar to the 'Customer Statistics' function described immediately above in that it exports monthly sales totals for each specified Customer, compiled from Invoices, POS Invoices and Bar Tabs. Compared to the 'Customer Statistics' function, this function offers a much greater range of selection criteria, and will also export more Customer information (Customer Number, Name, Customer Category, Classification(s) and Salesman).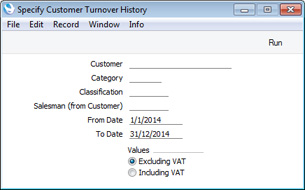
- Customer
- Paste Special
Customers in Contact register
- Range Reporting Alpha
- If necessary, enter here the Customer Number of the Customer (or range of Customers) you wish to have included in the export file.
- If necessary, enter here the Customer Number of the Customer (or range of Customers) you wish to have included in the export file.
- Category
- Paste Special
Customer Categories setting, Sales Ledger
- If you only want to include Customers belonging to a particular Customer Category in the export file, specify that Category here.
- Classification
- Paste Special
Contact Classifications setting, CRM module (if installed)
- Enter a Classification Code in this field if you want Customers with a certain Classification to be included in the export file. If the field is empty, all Customers, with and without Classification, will be exported. If you enter a number of Classifications separated by commas, only those Customers featuring all the Classifications listed will be exported. If you enter a number of Classifications separated by plus signs (+), all Customers featuring at least one of the Classifications listed will be exported. If you enter a Classification preceded by an exclamation mark (!), all Customers featuring any Classification except the one listed will be exported.
- For example:
- 1,2
- Exports Customers with Classifications 1 and 2 (including Customers with Classifications 1, 2 and 3).
- 1+2
- Exports Customers with Classifications 1 or 2.
- !2
- Exports all Customers except those with Classification 2.
- 1,!2
- Exports Customers with Classification 1 but excludes those with Classification 2 (i.e. Customers with Classifications 1 and 2 are not exported). Note the comma before the exclamation mark in this example.
- !1,!2
- Exports all Customers except those with Classification 1 or 2 or both. Again, note the comma.
- !(1,2)
- Exports all Customers except those with Classifications 1 and 2 (Customers with Classifications 1, 2 and 3 will not be exported).
- !1+2
- Exports Customers without Classification 1 and those with Classification 2 (Customers with Classifications 1 and 2 will be exported).
- (1,2)+(3,4)
- Exports Customers with Classifications 1 and 2, and those with Classifications 3 and 4.
- 1*
- Exports Customers with Classifications beginning with 1 (e.g. 1, 10, 100).
- 1*,!1
- Exports Customers with Classifications beginning with 1 but not 1 itself.
- *1
- Exports Customers with Classifications ending with 1 (e.g. 1, 01, 001).
- 1*,*1
- Exports Customers with Classifications beginning and ending with 1.
- For example:
- Salesman (from Customer)
- Paste Special
Person register, System module
- If you only need Customers with a particular Salesman to be included in the export file, enter that Salesman's Signature here.
- From Date, To Date
- Paste Special
Choose date
- Use these fields to specify the start and end dates for the export. The defaults will be taken from the first row of the Reporting Periods setting.
- The export file will contain a separate column for each month in the period specified here, containing monthly sales totals for each Customer. So, only the month and year in the start and end dates will be used when determining the period: the day will be ignored. For example, if you enter a period of 31 August:1 September, the export file will contain figures for the whole of August and the whole of September.
- The export file will contain a separate column for each month in the period specified here, containing monthly sales totals for each Customer. So, only the month and year in the start and end dates will be used when determining the period: the day will be ignored. For example, if you enter a period of 31 August:1 September, the export file will contain figures for the whole of August and the whole of September.
- Values
- Use these options to specify whether the monthly sales figures in the export file should include or exclude VAT.
---
Export functions in the Sales Ledger and Integration modules:
- Introduction
- Analytical Cash Flow
- Customer Statistics
- Customer Turnover History
- Customer/Item Statistics
- Direct Debit to Hansabank
- Intrastat Invoices
- Intrastat Invoices (UK)
- Invoice Rows
- Invoices
- Invoices for Factoring
- Item Statistics
- Item Turnover History
- Items to Fiscal Printer Fi550
- Open Invoices
- Home page for Sales Ledger manual
- Home page for Standard ERP manual
Estadísticas Cliente/Ítem
Esta exportación puede ser usada para análisis estadísticos en una aplicación de software externa. Ingrese una combinación de Cliente y Códigos de Ítem, y especifique un período de tiempo. El resultado es un archivo separado por tabulaciones con tres columnas por mes por cada combinación Cliente/Ítem. Estas columnas son cantidad vendida, valor y ganancia bruta.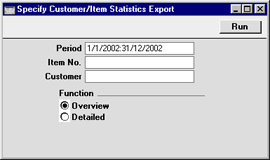
Direct Debit to Hansabank
This function in the Sales Ledger is used in Estonia to export Invoices in a format required by Hansabank. Please refer to your local HansaWorld representative for more details.
- Period
- Paste Special
Reporting Periods setting, System module
- Enter a start and end date for the report. Invoices from the period specified here will be included in the export file.
- Invoices
- Range Reporting
Numeric
- Enter an Invoice Number or a range of Numbers separated by a colon (:) here if you would like specific Invoices to be included in the export file.
- Customer
- Paste Special
Customers in Contact register
- Range Reporting Alpha
- Enter a Customer Number or a range of Numbers separated by a colon (:) here if you would like Invoices issued to particular Customers to be included in the export file.
- Enter a Customer Number or a range of Numbers separated by a colon (:) here if you would like Invoices issued to particular Customers to be included in the export file.
- Pay Term
- Paste Special
Payment Terms setting, Sales/Purchase Ledger
- Use this field to restrict the export to Invoices with a particular Payment Term.
---
Export functions in the Sales Ledger and Integration modules:
- Introduction
- Analytical Cash Flow
- Customer Statistics
- Customer Turnover History
- Customer/Item Statistics
- Direct Debit to Hansabank
- Intrastat Invoices
- Intrastat Invoices (UK)
- Invoice Rows
- Invoices
- Invoices for Factoring
- Item Statistics
- Item Turnover History
- Items to Fiscal Printer Fi550
- Open Invoices
- Home page for Sales Ledger manual
- Home page for Standard ERP manual
Facturas Intrastat
Esta función puede ser utilizada para exportar la información de Facturas emitidas a Clientes Dentro Zona UE para satisfacer los requerimientos del informe Intrastat. Por favor revise la descripción del documento Intrastat Ventas. Si va a utilizar esta función, asegúrese de que ha registrado el nombre de su Empresa, ID Tributario y Número de Registro Comercial en la opción Info Empresa del módulo Sistema.Intrastat Invoices (UK)
Use this function to export Intrastat information in the format required by HM Revenue and Customs (HMRC) in the UK (CSV02).If you will be using this function, you should carry out the following configuration work to ensure the correct information is included in the export files:
- In the Company Info setting, make sure you have recorded your Company Name, VAT Number and Commercial Registration Number. You can include non-numeric characters such as spaces and a "GB" prefix in the VAT Number, as these will be removed automatically by the export process. The Commercial Registration Number should be a three-digit branch identifier, only required if you will be submitting Intrastat returns from different branches using the same VAT Number.
- In the Contact records for each Customer:
- Enter the country where the Customer is located in the Country field In the case of domestic Customers (i.e. Customers in the UK), enter "GB" (do not leave the field empty) to ensure their transactions will not be exported. If a Customer has a separate Delivery Address (on the 'Delivery' card), specify a Country there as well (again, enter "GB" for addresses in the UK). HMRC requires you to use two-character ISO Country Codes: you can find a list in their Notice 60 document, available from https://www.uktradeinfo.com/Intrastat/IntrastatServices/Pages/Notice60.aspx.
- Enter Sales Del. Terms for each Customer. You can find a list of Delivery Terms acceptable to HMRC in their Notice 60 document.
- Ensure each Customer is in the correct Zone.
- Enter the country where the Customer is located in the Country field In the case of domestic Customers (i.e. Customers in the UK), enter "GB" (do not leave the field empty) to ensure their transactions will not be exported. If a Customer has a separate Delivery Address (on the 'Delivery' card), specify a Country there as well (again, enter "GB" for addresses in the UK). HMRC requires you to use two-character ISO Country Codes: you can find a list in their Notice 60 document, available from https://www.uktradeinfo.com/Intrastat/IntrastatServices/Pages/Notice60.aspx.
- In the Item register:
- HMRC requires you to classify goods using commodity codes listed in the Intrastat Classification Nomenclature (ICN), available at https://www.uktradeinfo.com/TradeTools/ICN/Pages/ICNhome.aspx, with further help available in HMRC's Notice 600, "Classifying your Imports and Exports". In each Item record, enter the ICN commodity code in the Commodity Code field on the 'Recipe' card: Items without Commodity Codes will not be exported.
- Ensure each Item has a Weight (in kg).
- HMRC requires you to classify goods using commodity codes listed in the Intrastat Classification Nomenclature (ICN), available at https://www.uktradeinfo.com/TradeTools/ICN/Pages/ICNhome.aspx, with further help available in HMRC's Notice 600, "Classifying your Imports and Exports". In each Item record, enter the ICN commodity code in the Commodity Code field on the 'Recipe' card: Items without Commodity Codes will not be exported.
- In the Delivery Addresses setting in the Sales Orders module, ensure you have specified a Country in each record.
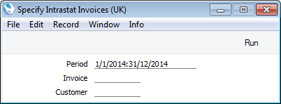
- Period
- Paste Special
Reporting Periods setting, System module
- Specify the export period. Invoices with Transaction Dates that fall within the period specified here will be included in the export file (providing they satisfy the criteria listed under "Invoice No." below).
- The period must consist of a calendar month, or a number of calendar months, otherwise no Invoices will be exported.
- The period must consist of a calendar month, or a number of calendar months, otherwise no Invoices will be exported.
- Invoice No.
- Range Reporting
Numeric
- If necessary, enter here the Number of an Invoice that you wish to have included in the export file. You can also enter a range of Numbers separated by a colon (:).
For an Invoice to be exported, it must meet the following conditions:
- If the Invoice has a Delivery Address on the 'Del. Address' card (i.e. if the second line of the Delivery Address is not blank), the Country on the Del. Address' card must not be "GB".
- If the Invoice does not have a Delivery Address, the Country on the 'Inv. Address' card must not be "GB".
- The Invoice must be from the Inside EU or Inside EU (Post VAT) Zones.
- If the Invoice has a Delivery Address on the 'Del. Address' card (i.e. if the second line of the Delivery Address is not blank), the Country on the Del. Address' card must not be "GB".
- Customer
- Paste Special
Customers in Contact register
- Range Reporting Alpha
- Specify a Customer here if you only need to export Invoices issued to that Customer. You can also enter a range of Customers separated by a colon (:).
---
Export functions in the Sales Ledger and Integration modules:
- Introduction
- Analytical Cash Flow
- Customer Statistics
- Customer Turnover History
- Customer/Item Statistics
- Direct Debit to Hansabank
- Intrastat Invoices
- Intrastat Invoices (UK)
- Invoice Rows
- Invoices
- Invoices for Factoring
- Item Statistics
- Item Turnover History
- Items to Fiscal Printer Fi550
- Open Invoices
- Home page for Sales Ledger manual
- Home page for Standard ERP manual
Filas Facturas
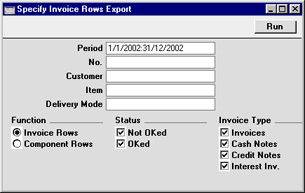
Facturas
Esta exportación genera un archivo separado por tabulaciones que contiene el Número Factura, Cliente, Objeto, Valor Neto, Monto IVA y Monto Total por cada Factura de la selección.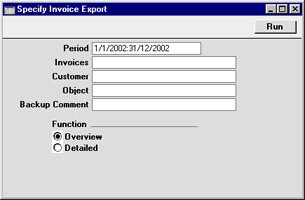
Use el Comentario de Backuo para describir el archivo de back-up (se permiten hasta 40 caracteres). Esta descripción será mostrada en la lista de archivos para importar con la función de importación 'Automática' en el módulo Sistema.
Facturas para Factoring
Esta exportación permite una exportación especial con detalles de Factura para que sea enviado a una empresa de Factoring para su pago. Cada empresa de factoring requiere que el archivo de exportación tenga un formato en particular: este es escogido en la opción Archivo de Factoring. Por favor contáctese con su representante Hansa para mayores detalles.Invoices for Factoring - Danish Banks
This page contains some guidance about where to enter information in order for it to be included correctly in Invoices for Factoring export files when they are produced using the following Factoring Banks: NORD finans (DK).NORD finans (DK)
Configuration- In the Factoring Export setting, ensure the Contract Number is correct and that the field isn't blank.
- In the Contact records for each Customer:
- Specify the Customer's VAT Registration Number.
- Enter the address using the first three Address fields. The third field should contain the four-digit postal code (in "XXXX" format) and the town, separated by a space. The address will be copied to each Invoice and exported from there.
- Ensure the country and telephone number are correct.
- The maximum number of characters that you can use in Customer Numbers is six.
- Enter the Customer's bank account number in the Bank Account field.
- Mark the No Factoring box for any Customer whose Invoices are not to be exported.
- Specify the Customer's VAT Registration Number.
- You should also choose "NORD finans (DK)" as the Bank on the 'OCR' card of the Bank Transfer setting in the Purchase Ledger. This will ensure the KID Codes in the export files will be in the correct format.
- The maximum number of digits that you can use in Invoice Numbers is six.
- If you specify a Cust. Ord. No. in an Invoice, it will be included in the export file.
- You should only export Invoices that you issued in local Currency (i.e. DKK).
Export functions in the Sales Ledger and Integration modules:
- Introduction
- Analytical Cash Flow
- Customer Statistics
- Customer Turnover History
- Customer/Item Statistics
- Direct Debit to Hansabank
- Intrastat Invoices
- Intrastat Invoices (UK)
- Invoice Rows
- Invoices
- Invoices for Factoring, including:
- Danish Banks (includes NORD finans (DK))
- Finnish Banks (includes Finvoice (FIN), Handelsbanken (FIN), Nordea (FIN), Osuus Pankki (FIN) and Sampo (FIN))
- Norwegian Banks (includes Bedriftsfinans, eCredit, Factoring Finans (NOR), Gjensidige Bank (NOR), Kredittstyring, NORD finans, Nordea Finans and SG Finans (NOR))
- Swedish Banks (includes Faktab Finans, Handelsbanken (SWE), Intrum Justicia, Nordea (SWE) and SEB)
- Danish Banks (includes NORD finans (DK))
- Item Statistics
- Item Turnover History
- Items to Fiscal Printer Fi550
- Open Invoices
- Home page for Sales Ledger manual
- Home page for Standard ERP manual
Invoices for Factoring - Finnish Banks
This page contains some guidance about where to enter information in order for it to be included correctly in Invoices for Factoring export files when they are produced using the following Factoring Banks: Finvoice (FIN), Handelsbanken (FIN), Nordea (FIN), Osuus Pankki (FIN) and Sampo (FIN).Finvoice (FIN)
Configuration- In the Banks setting in the Purchase Ledger, create a record for your Factoring Bank and enter the following information:
- Name.
- Address, using the first, second and third Address fields (street in the first field, town in the second field and past code in the third).
- VAT Reg. No. (will be exported in the <FactoringPartyIdentifier> tag).
- Factoring Type Code (will be exported in the <FactoringTypeCode> tag).
- In the Contact Code field, use 'Paste Special' to choose a Contact record in which you have specified an ANA Code (on the 'Terms' card). This should be the Bank's organisation unit (OVT-tunnus) and will be exported in the <eb:PartyId> tag for the Receiver (inside the <eb:To> tag).
- Name.
- Again in the Banks setting, create a record for your own Bank. Specify the BIC (SWIFT) and the Account (IBAN).
- In the Company Info setting:
- Ensure the Company Name, telephone and fax numbers, email address and www address are correct.
- Enter your company's address in the first two Address fields (street in the first field, post code and town in the second field) and the Country field. The Country must use the two-character ISO 3166 format (i.e. "FI"), and should be connected to a record in the Countries setting that will supply the Country Name. Any text in the third Address field will be exported in the <SellerPostOfficeBoxIdentifier> tag.
- Enter your company Registration Number in the Reg. No. field.
- Enter your Company VAT Registration Number in the VAT Reg. No. field.
- Enter your company's organisation unit (OVT-tunnus) in the ANA Code field. This will be exported in the <SellerOrganisationUnitNumber> tag.
- In the Bank Code field, choose the Bank from step 2 using 'Paste Special',
- If you enter the town where your company is located in the Home Community field, it will be exported in the <SellerHomeTownName> tag.
- Ensure the Company Name, telephone and fax numbers, email address and www address are correct.
- In the Factoring Export setting:
- Ensure the Contract Number is correct and that the field isn't blank.
- In the Bank field, choose the Factoring Bank from step 1 using 'Paste Special'.
- In the Factoring Text field, choose a Standard Text record using 'Paste Special'. The Text in this record will be exported in the <FactoringFreeText> tag.
- Ensure the Contract Number is correct and that the field isn't blank.
- In the Contact records for each Customer:
- Specify the Customer's VAT Registration Number. This will be copied to each Invoice and exported from there.
- Enter the Customer's Company Registration Number in the Reg. No. 1 field. If specified, this will be exported in the <BuyerOrganisationTaxCode> tag. If not, the Customer's VAT Registration Number will be exported in the same tag.
- Enter the address using the second and third Invoice Address fields (street in the second field, post code and town in the third field) and the Country field (Country must use the two-character ISO 3166 format and should be connected to a record in the Countries setting that will supply the Country Name). Any text in the first Invoice Address field will be exported in the <BuyerSiteCode> tag, while text in the fourth field will be exported in the <BuyerPostOfficeBoxIdentifier> tag. In all cases, this information will be copied to each Invoice and exported from there.
- Enter the Customer's organisation unit (OVT-tunnus) in the ANA Code field (on the 'Terms' card). This will be exported in the <BuyerOrganisationUnitNumber> tag.
- Ensure the telephone number and email address are correct.
- If a Customer is a private individual, set the Type to "Person" (on the 'Company' card).
- Mark the No Factoring box for any Customer whose Invoices are not to be exported.
- Specify the Customer's VAT Registration Number. This will be copied to each Invoice and exported from there.
- The Finvoice Settings setting in the Sales Ledger is only available if the VAT Law in the Company Info setting is set to "Finnish". In this setting:
- If you outsource your invoicing to an accounting bureau, the BIC (SWIFT) of the bank of the accounting bureau should appear in the <eb:PartyId> tag for the Intermediator (inside the <eb:From> tag), instead of the BIC (SWIFT) from your own bank (step 2). Enter the BIC (SWIFT) of the bank of the accounting bureau in the Intermediator field.
- If you issue an Invoice to a private individual, the export file should contain an <EpiPaymentInstructionId> tag for that Invoice, containing text that you have agreed with your bank. Enter this text in the Beneficiary ID field: it will be included in the export file if the Type in the Contact record for a Customer is "Person" (step 5f above).
- Choose the version of Finvoice supported by the Factoring Bank.
- If you outsource your invoicing to an accounting bureau, the BIC (SWIFT) of the bank of the accounting bureau should appear in the <eb:PartyId> tag for the Intermediator (inside the <eb:From> tag), instead of the BIC (SWIFT) from your own bank (step 2). Enter the BIC (SWIFT) of the bank of the accounting bureau in the Intermediator field.
- If you enter an Our Reference in an Invoice, it will be included in the export file (in the <SellerContactPersonName> and <SellerReferenceIdentifier> tags). The Our Reference field will take its default from the Person record of the user who creates an Invoice.
- If you enter a Contact Person in the Attention field in an Invoice, it will be included in the export file (in the <BuyerContactPersonName> tag).
- If you specify a Cust. Ord. No. in an Invoice, it will be included in the export file in the <OrderIdentifier> tag. If there is no Cust. Ord. No. but there is an Order No. (i.e. the Invoice was created from a Sales Order or a Delivery), this will be exported instead.
- If you do not specify a Currency in the specification window, Invoices in EUR will be exported (only).
Handelsbanken (FIN), Nordea (FIN), Osuus Pankki (FIN), Sampo (FIN)
Configuration- In the Company Info setting:
- Ensure the Company Name is correct.
- Enter your Company Registration Number in the Reg. No. field.
- Ensure the Company Name is correct.
- In the Factoring Export setting, ensure the Contract Number is correct and that the field isn't blank.
- In the Contact records for each Customer:
- Specify the Customer's VAT Registration Number (non-numeric characters will be removed by the export process).
- If the Customer is one to whom you will send E-Invoices (i.e. if the All Customers option is selected on the 'E-Invoices' card in the Electronic Invoices Settings setting in the System module, or the Customer has a record in the Electronic Invoices Customers Data setting in the Sales Ledger), enter the address using the second and third Invoice Address fields (street in the second field, post code and town in the third field). Otherwise, enter the address using the first and second Invoice Address fields.
- Ensure the country and telephone and fax numbers are correct. For Nordea (FIN) and Handelsbanken (FIN) only, the country should be connected to a record in the Countries setting that will supply the Country Name.
- Customer Numbers should contain a maximum of six characters (Handelsbanken and Nordea) or ten characters (Osuus Pankki and Sampo).
- Mark the No Factoring box for any Customer whose Invoices are not to be exported.
- Specify the Customer's VAT Registration Number (non-numeric characters will be removed by the export process).
- The maximum number of digits that you can use in Invoice Numbers is ten.
- If you enter a Contact Person in the Attention field in an Invoice, it will be included in the export file.
- If you do not specify a Currency in the specification window, Invoices in EUR will be exported (only).
- In addition to the main export file for the Factoring Bank, a second text file summarising the content of the main file will be saved in the folder containing your Standard ERP application.
Export functions in the Sales Ledger and Integration modules:
- Introduction
- Analytical Cash Flow
- Customer Statistics
- Customer Turnover History
- Customer/Item Statistics
- Direct Debit to Hansabank
- Intrastat Invoices
- Intrastat Invoices (UK)
- Invoice Rows
- Invoices
- Invoices for Factoring, including:
- Danish Banks (includes NORD finans (DK))
- Finnish Banks (includes Finvoice (FIN), Handelsbanken (FIN), Nordea (FIN), Osuus Pankki (FIN) and Sampo (FIN))
- Norwegian Banks (includes Bedriftsfinans, eCredit, Factoring Finans (NOR), Gjensidige Bank (NOR), Kredittstyring, NORD finans, Nordea Finans and SG Finans (NOR))
- Swedish Banks (includes Faktab Finans, Handelsbanken (SWE), Intrum Justicia, Nordea (SWE) and SEB)
- Danish Banks (includes NORD finans (DK))
- Item Statistics
- Item Turnover History
- Items to Fiscal Printer Fi550
- Open Invoices
- Home page for Sales Ledger manual
- Home page for Standard ERP manual
Invoices for Factoring - Norwegian Banks
This page contains some guidance about where to enter information in order for it to be included correctly in Invoices for Factoring export files when they are produced using the following Factoring Banks: Bedriftsfinans, eCredit, Factoring Finans (NOR), Gjensidige Bank (NOR), Kredittstyring, NORD finans, Nordea Finans and SG Finans (NOR).Bedriftsfinans
Configuration- In the Contact records for each Customer:
- Specify the Customer's VAT Registration Number.
- Enter the address using the first three Address fields. The third field should contain the four-digit postal code (in "XXXX" format) and the town, separated by a space.
- Ensure the address, country and telephone number are correct.
- The maximum number of characters that you can use in Customer Numbers is eleven.
- Specify the Customer's VAT Registration Number.
- The maximum number of digits that you can use in Invoice Numbers is eleven.
- Credit Notes should be allocated to previous Invoices, so it is recommended that you use the Do not allow Credit Invoices without No. option in the Account Usage S/L setting.
eCredit
Configuration- In the Factoring Export setting, ensure the Contract Number is correct and that the field isn't blank.
- In the Contact records for each Customer:
- Specify the Customer's VAT Registration Number.
- Enter the address using the first three Address fields. The third field should contain the four-digit postal code (in "XXXX" format) and the town, separated by a space.
- Ensure the country and telephone and fax numbers are correct.
- The maximum number of characters that you can use in Customer Numbers is ten.
- Specify the Customer's VAT Registration Number.
- You should also choose "eCredit" as the Bank on the 'OCR' card of the Bank Transfer setting in the Purchase Ledger. This will ensure the KID Codes in the export files will be in the correct format.
- If you enter an Our Reference in an Invoice, it will be included in the export file. The Our Reference field will take its default from the Person record of the user who creates an Invoice.
Factoring Finans (NOR), Gjensidige Bank (NOR), Kredittstyring, NORD finans, SG Finans (NOR)
Configuration- In the Factoring Export setting, ensure the Contract Number is correct and that the field isn't blank.
- In the Contact records for each Customer:
- Specify the Customer's VAT Registration Number.
- Enter the address using the first three Address fields. The third field should contain the four-digit postal code (in "XXXX" format) and the town, separated by a space. Usually the first and third fields will be exported (Factoring Finans (NOR) will export all three lines). In the case of NORD finans, the address will be exported from the Invoice instead of the Contact record.
- Ensure the country and telephone number are correct. For Gjensidige Bank (NOR) and SG Finans (NOR) only, the country should be connected to a record in the Countries setting that will supply the Country Name.
- The maximum number of characters that you can use in Customer Numbers is six (NORD finans), seven (Factoring Finans), eight (Kredittstyring) or nine (Gjensidige Bank, SG Finans).
- Enter the Customer's bank account number in the Bank Account field (NORD finans only).
- Mark the No Factoring box for any Customer whose Invoices are not to be exported.
- Specify the Customer's VAT Registration Number.
- If the Factoring Bank is NORD finans, then you should also choose "NORD finans" as the Bank on the 'OCR' card of the Bank Transfer setting in the Purchase Ledger. This will ensure the KID Codes in the export files will be in the correct format.
- The maximum number of digits that you can use in Invoice Numbers is six (NORD finans), seven (Factoring Finans), eight (Gjensidige Bank, SG Finans) or twelve (Kredittstyring).
- If you specify a Cust. Ord. No. in an Invoice, it will be included in the export file.
- If the Factoring Bank is Factoring Finans (NOR), you should not include Invoices that you issued in different Currencies in the same export file.
- If the Factoring Bank is NORD finans, you should only export Invoices that you issued in local Currency (i.e. NOK).
Nordea Finans
Configuration- In the Factoring Export setting, ensure the Contract Number is correct and that the field isn't blank.
- In the Contact records for each Customer:
- Customer Numbers should contain a maximum of seven characters.
- Mark the No Factoring box for any Customer whose Invoices are not to be exported.
- Customer Numbers should contain a maximum of seven characters.
- The maximum number of digits that you can use in Invoice Numbers is seven.
- If you do not specify a Currency in the specification window, Invoices in NOK and Invoices with no Currency specified will be exported (only).
- Use the Type options to specify whether the export file should contain Invoices or Credit Notes.
Export functions in the Sales Ledger and Integration modules:
- Introduction
- Analytical Cash Flow
- Customer Statistics
- Customer Turnover History
- Customer/Item Statistics
- Direct Debit to Hansabank
- Intrastat Invoices
- Intrastat Invoices (UK)
- Invoice Rows
- Invoices
- Invoices for Factoring, including:
- Danish Banks (includes NORD finans (DK))
- Finnish Banks (includes Finvoice (FIN), Handelsbanken (FIN), Nordea (FIN), Osuus Pankki (FIN) and Sampo (FIN))
- Norwegian Banks (includes Bedriftsfinans, eCredit, Factoring Finans (NOR), Gjensidige Bank (NOR), Kredittstyring, NORD finans, Nordea Finans and SG Finans (NOR))
- Swedish Banks (includes Faktab Finans, Handelsbanken (SWE), Intrum Justicia, Nordea (SWE) and SEB)
- Danish Banks (includes NORD finans (DK))
- Item Statistics
- Item Turnover History
- Items to Fiscal Printer Fi550
- Open Invoices
- Home page for Sales Ledger manual
- Home page for Standard ERP manual
Invoices for Factoring - Swedish Banks
This page contains some guidance about where to enter information in order for it to be included correctly in Invoices for Factoring export files when they are produced using the following Factoring Banks: Faktab Finans, Handelsbanken (SWE), Intrum Justicia, Nordea (SWE) and SEB.Faktab Finans
Configuration- In the Company Info setting, ensure the Company Name is correct.
- In the Factoring Export setting, ensure the Contract Number is correct and that the field isn't blank.
- In the Contact records for each Customer:
- Specify the Customer's VAT Registration Number. This will be copied to each Invoice and exported from there.
- Ensure the address and telephone number are correct. These will be copied to each Invoice and exported from there. For the address, use the first two Address fields. The second field should contain the postal code and the town, separated by a space.
- Specify the Customer's VAT Registration Number. This will be copied to each Invoice and exported from there.
- Invoice Numbers should contain a maximum of ten characters.
- If you enter a Contact Person in the Attention field in an Invoice, it will be included in the export file.
- If you enter a Delivery Address in an Invoice, it will be included in the export file.
- You should not include Invoices that you issued in different Currencies in the same export file.
Handelsbanken (SWE)
Configuration- In the Factoring Export setting, ensure the Contract Number is correct and that the field isn't blank.
- In the Contact records for each Customer:
- Enter the Customer's Company Registration Number in the Reg. No. 1 field.
- Enter the address using the first two Address fields. The second field should contain the five-digit postal code (in "XXX XX" format) and the town, separated by a space.
- Ensure the country and telephone number are correct.
- The maximum number of characters that you can use in Customer Numbers is thirteen.
- Enter the Customer's Company Registration Number in the Reg. No. 1 field.
Invoices
- The maximum number of digits that you can use in Invoice Numbers is ten.
- If you enter an Our Reference in an Invoice, it will be included in the export file. The Our Reference field will take its default from the Person record of the user who creates an Invoice.
- If you specify a Cust. Ord. No. in an Invoice, it will be included in the export file.
- You should only export Invoices that you issued in local Currency (i.e. SEK).
Intrum Justicia
Configuration- In the Factoring Export setting, ensure the Contract Number is correct and that the field isn't blank.
- In the Contact records for each Customer:
- Specify the Customer's VAT Registration Number.
- Enter the address using the first and third Address fields. The third field should contain the five-digit postal code (in "XXXXX" format) and the town, separated by a space.
- Ensure the address, country and telephone and fax numbers are correct.
- The maximum number of characters that you can use in Customer Numbers is twelve.
- Specify the Customer's VAT Registration Number.
- The maximum number of digits that you can use in Invoice Numbers is ten.
- You should only export Invoices that you issued in local Currency (i.e. SEK).
Nordea (SWE)
Configuration- In the Factoring Export setting, ensure the Contract Number is correct and that the field isn't blank.
- In the Contact records for each Customer:
- Specify the Customer's VAT Registration Number.
- Enter the address using the first two Address fields. The second field should contain the five-digit postal code (in "XXXXX" format) and the town, separated by a space.
- The maximum number of characters that you can use in Customer Numbers is ten.
- Specify the Customer's VAT Registration Number.
- The maximum number of digits that you can use in Invoice Numbers is seven.
- Use the Windows mode option in the specification window to choose the character set to be used in the export file. If you select this option, the character set will be the one specified in the Local Machine setting in the User Settings module. If you do not select this option, CP437 will be used.
SEB
Configuration- In the Company Info setting:
- Ensure the Company Name and telephone number are correct.
- Enter your Company Registration Number in the Reg. No. field.
- Ensure the Company Name and telephone number are correct.
- In the Factoring Export setting, ensure the Contract Number is correct and that the field isn't blank.
- In the Contact records for each Customer, enter the Customer's Company Registration Number in the Reg. No. 1 field.
- If you do not enter a Currency in the specification window, only Invoices without a Currency will be exported.
Export functions in the Sales Ledger and Integration modules:
- Introduction
- Analytical Cash Flow
- Customer Statistics
- Customer Turnover History
- Customer/Item Statistics
- Direct Debit to Hansabank
- Intrastat Invoices
- Intrastat Invoices (UK)
- Invoice Rows
- Invoices
- Invoices for Factoring, including:
- Danish Banks (includes NORD finans (DK))
- Finnish Banks (includes Finvoice (FIN), Handelsbanken (FIN), Nordea (FIN), Osuus Pankki (FIN) and Sampo (FIN))
- Norwegian Banks (includes Bedriftsfinans, eCredit, Factoring Finans (NOR), Gjensidige Bank (NOR), Kredittstyring, NORD finans, Nordea Finans and SG Finans (NOR))
- Swedish Banks (includes Faktab Finans, Handelsbanken (SWE), Intrum Justicia, Nordea (SWE) and SEB)
- Danish Banks (includes NORD finans (DK))
- Item Statistics
- Item Turnover History
- Items to Fiscal Printer Fi550
- Open Invoices
- Home page for Sales Ledger manual
- Home page for Standard ERP manual
Estadísticas de Ítem
Úsela para exportar las estadísticas de los distintos ítem de su empresa. El resultado es un archivo con resúmenes mensuales 12 + 12 para cada año financiero especificado. El primer grupo de 12 contiene cantidads y el segundo grupo de 12 contiene valores de ventas. Seleccione un Ítem o rango de Ítems, con el primer y último Ítem separados por dos puntos.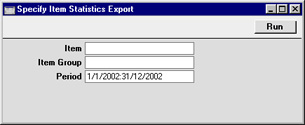
Historia Ventas por Ítem
Esta función exporta mensualmente las ventas totales (ya sea cantidades o valores) para los Ítems en la selección de un año específico.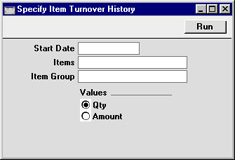
- Fecha Inicio
- Pegado Especial
Fecha Actual
- El archivo de exportación contendrá un cifra de ingresos por separado para cada mes del año comenzando con la fecha especificada en este campo. Esta fecha debería ser el primer día del mes.
- Ítems
- Pegado Especial
Registro Ítem
- Rango de Informe Alfa
- Use este campo para limitar la exportación a un solo Ítem, o rango de Ítems.
- Use este campo para limitar la exportación a un solo Ítem, o rango de Ítems.
- Grupo Ítem
- Pegado Especial
Registro Grupo Ítem, Módulo Ventas
- Para limitar la exportación a un solo Grupo de Ítem, ingrese aquí el Código del Grupo de Ítem.
- Si se ha especificado tanto un Grupo Ítem como un rango de Ítems, el informe considerará solo aquellos Ítems del rengo cuyos elementos esten en el Grupo Ítem definido.
- Si se ha especificado tanto un Grupo Ítem como un rango de Ítems, el informe considerará solo aquellos Ítems del rengo cuyos elementos esten en el Grupo Ítem definido.
- Valores
- Escoja si desea exportar cifras que muestren cantidades vendidas por mes o ingresos por mes por cada Ítem.
Items to Fiscal Printer Fi550
A fiscal printer is a device that prints receipts from point-of-sale and cash transactions, as well as recording those transactions in an internal memory. This information can later be read by tax authorities to ensure that a shop's sales have been registered and reported correctly. In countries where fiscal printers are used, they should be attached to every cash machine and till in a point-of-sale environment.The Galeb FP-550 is a fiscal printer that is used in Serbia. It is not possible for a POS application such as Standard ERP to communicate directly with FP-550 fiscal printers. Intermediary software known as "Fi-550" is required. Fi-550 can only be used on cash machines and tills that run on Windows.
All files sent from Standard ERP (i.e. Invoices, Item information and instructions for the printer) will be saved in a specified directory on a cash machine or till. Running in the background, the Fi-550 application will pick up each file when it is saved and sent it to the FP-550 printer.
Before recording sales on an FP-550 fiscal printer, you must ensure that details of each Item that you sell (Item Number, Description, VAT Code and Price Including VAT) are stored in the FP-550's memory. If an Invoice contains an Item that is not in the FP-550's memory, that Item will not be printed on the receipt. Use this export function to create the file containing the relevant details of each Item.
To configure Standard ERP to work with FP-550 fiscal printers, follow these steps:
- Connect Galeb FP-550 fiscal printers to each client machine (i.e. each cash machine or till) as necessary.
- On each cash machine or till, create a directory named "Fi550" (e.g. C:\Fi550). Inside this directory, create two directories named "Print" (e.g. C:\Fi550\Print) and "Log" (e.g. C:\Fi550\Log).
All files sent from Standard ERP (i.e. Invoices, Item information and instructions for the printer) will be saved in the "Print" directory. The Fi-550 application will send the files in that directory to the FP-550 printer, and it will then save the printer's responses in the "Log" directory.
- In Standard ERP and working on any desktop client machine, change to the Technics module and open the Local Machine Serial Port Devices setting. Enter a separate record for each cash machine or till as follows:
- Code
- Free of choice.
- Local Machine
- The Local Machine Code of the cash machine or till.
- Device Class
- Fiscal Printer.
- Device Model
- Choose "Fiscal Printer Fi-550 (Serbia)" using 'Paste Special'.
- Port
- Enter the path of the Fi550 directory from step 2 (e.g. C:\Fi550\, with separator as the final character).
- Codepage
- Windows codepage 1250 (Central Europe).
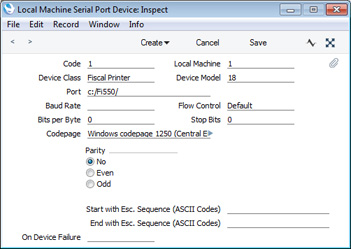
- Code
- Prices in Sales Ledger and POS Invoices printed by fiscal printers should include VAT. You should therefore use the Base Prices include VAT option in the Account Usage S/L setting. As described in step 6 below, the memory of the FP550 printer should contain the prices of each Item you sell. These prices should include VAT. You will use the 'Items to Fiscal Printer Fi550' Export function send your prices to the printer: this function will send the Base Price of each Item. The Base Price of each Item should therefore include VAT. If you have any Customers whose Invoices will not be printed by fiscal printers (e.g. wholesale Customers), assign them Price Lists that exclude VAT.
- Working in turn on each cash machine and till with live connections to the server, open the Local Machine setting in the User Settings module. Ensure the Code field in the header contains the correct Local Machine Code. Every cash machine and till connected to an FP-550 printer must have its own Local Machine Code.
- If the Local Machine Code field was previously empty, you should quit Standard ERP and restart.
- For cash machines and tills with live-sync connections to the server, you should not carry out this step on the cash machines and tills themselves. Instead, working on a desktop client, open the Local Settings setting in the Technics module, and enter separate records for each cash machine and till.
- Details of each Item that you sell should be stored in the FP-550's memory. If an Invoice contains an Item that is not in the FP-550's memory, that Item will not be printed.
To send the details of each Item that you sell to the FP-550, run the 'Items to Fiscal Printer Fi550' Export function in the Sales Ledger on each cash machine and till.
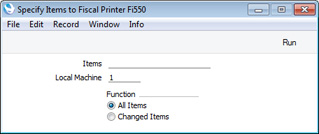
- Items
- Paste Special
Item register
- Range Reporting Alpha
- Specify the Item or range of Items that you want to send to the FP-550 printer, or leave blank to send all Items.
- Specify the Item or range of Items that you want to send to the FP-550 printer, or leave blank to send all Items.
- Local Machine
- Paste Special
Local Machines setting, Point of Sales/Restaurant/Technics module
- The Local Machine Code of the cash machine and till you are working on will be placed here by default and should not be changed.
- Function
- Use these options to specify whether you want to send every Item in the specified range to the FP-550 printer, or only new and updated Items.
- The first time you run the 'Items to Fiscal Printer Fi550' Export on a particular cash machine or till, it is recommended that you use the Changed Items option. This will export every Item and also set a sequence number. Subsequently, each time you run the Export using the Changed Items option, the sequence number will ensure that only new or updated Items will be exported. The sequence number will then be updated.
- The All Items option will always export every Item, and will not set a sequence number.
- The first time you run the 'Items to Fiscal Printer Fi550' Export on a particular cash machine or till, it is recommended that you use the Changed Items option. This will export every Item and also set a sequence number. Subsequently, each time you run the Export using the Changed Items option, the sequence number will ensure that only new or updated Items will be exported. The sequence number will then be updated.
- Items
- When you press the [Run] button, a text file named "DAThhmmss.txt" will be saved in the "Print" directory from step 2, where hhmmss is the current time. This file will contain the Item Number, VAT Code, Base Price and Description of each Item, and a command for the Fi-550 application. The Fi-550 application will send this file to the FP-550 printer, updating the Item listing in the printer's memory.
- You should run the 'Items to Fiscal Printer Fi550' Export function separately on each cash machine and till connected to an FP550 printer. Each time you add a new Item to the Item register, or change an existing Item (e.g. change its Base Price), you should again run the Export function on each cash machine and till, to ensure the FP550 contains the latest information.
Export functions in the Sales Ledger and Integration modules:
- Introduction
- Analytical Cash Flow
- Customer Statistics
- Customer Turnover History
- Customer/Item Statistics
- Direct Debit to Hansabank
- Intrastat Invoices
- Intrastat Invoices (UK)
- Invoice Rows
- Invoices
- Invoices for Factoring
- Item Statistics
- Item Turnover History
- Items to Fiscal Printer Fi550
- Open Invoices
- Home page for Sales Ledger manual
- Home page for Standard ERP manual
Facturas Abiertas
Este comando exportará todas las Facturas aprobadas sin pagar del sistema. El archivo puede ser usado en combinación con un cambio de sistemas financieros o cuando se está creando una nueva bases de datos al inicio del año financiero.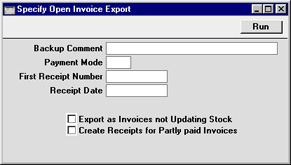
Cuando se importe el archivo en una nueva base de datos, las Facturas serán mostradas como aprobadas, pero no se generará ninguna Transacción Contable (la apertura de balances deberá ser ingresada por separado en el módulo Contabilidad). Si seleccionó la opción Crear Recibos por Facturas con Pagos Parciales antes de crear el archivo de exportación, los Recibos aprobados también serán creados en la nueva base de datos por los montos pagados de las Facturas pagadas parcialmente (una vez más sin la respectiva Transacción Contable). Si escoje esta opción, deberá especificar la Forma de Pago (usando 'Pegado Especial' si es necesario), Fecha Recibo y el primer Número del Recibo que será utilizado en los nuevos Recibos. Los Números de Recibos son generados por la función de exportación, no cuando el archivo es importado, por tanto asegúrese de escoger un Primer Número Recibo que no provoque conflictos con los demás Recibos que ya están en la nueva Base de Datos. Considere que los Recibos a Cuenta no serán transferidos a la nueva base de datos.
Si alguno de los montos están en Moneda, asegúrese de importar todos los archivos de Monedas y Tipos de Cambio a la nueva base de datos antes de importar las Facturas.
Si la opción de Exportación Facturas No Actualizan Stock es usada, los niveles de stock de los Ítems en la nueva base de datos no serán afectados por la importación de las Facturas abiertas. Si esta opción no está siendo usada, los niveles de stock si serán modificados, pero solo los Ítems de Stock que ya estén en la nueva base de datos. Si un Ítem usado en una Factura abierta no exisite en la nueva base de datos antes de la importación de las Facturas Abiertas, este será creado como un Ítem Simple en el registro de Ítem con un nivel de stock de zero. Los Clientes también serán creados por el proceso de importación de acuerdo a los requerimientos.