Introduction to Reports in the Stock Module
As with all modules, to print a report in the Stock module, click (Windows/Mac OS X) or tap (iOS/Android) the [Reports] button in the Navigation Centre or use the Ctrl-R (Windows) or ⌘-R (Mac OS X) keyboard shortcuts. The 'Reports' window will open, listing the reports that are available in the Stock module:
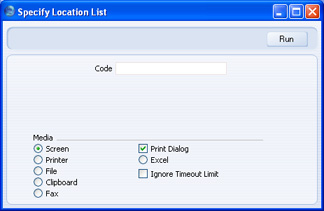
You can often report on a selection range, such as a range of Customers, or a range of Items. To do this, enter the lowest and highest values of the range, separated by a colon. For example, to report on Customers 001 to 010, enter "001:010" in the Customer field. Depending on the field, the sort used might be alpha or numeric. In the case of an alpha sort, a range of 1:2 would also include 100, 10109, etc.
Use the Media options at the bottom of the specification window to determine the print destination of the report. The default is to print to screen. You can initially print to screen and subsequently send the report to a printer by clicking the Printer icon at the top of the report window (Windows/Mac OS X) or by selecting 'Recalculate and Print' from the Operations menu. If you are using iOS or Android, you will find this function on the Tools menu (with 'wrench' icon).
Once you have entered the reporting criteria and have chosen a print destination, click [Run].
If you print a report to screen, you can use the 'Recalculate' command on the Operations menu of the report window to update the report after making alterations to background data. The 'Reopen Report Specification' command on the same menu allows you to produce a new report using different reporting criteria. If you are using iOS or Android, the 'Recalculate' function will be on the Tools menu. There will be no 'Reopen Report Specification' command: tap < to go back to the specification window instead.
---
Please follow the links below for details about each report:
- Introduction
- Aged Stock Analysis
- Best Before List
- Cost Price Analysis
- Credit Notes, Updating Stock
- Deficiency List
- Deficiency List per Location
- Delivery Journal
- Delivery List
- Goods Receipt Journal
- Item Group List
- Item History
- Item History per Location
- Item/Delivery Mode Statistics
- Items at Position
- Location List
- Recipe List (Made of)
- Returned Goods Journal
- Returned Goods to Supplier Journal
- Serial Number History
- Source List
- Stock Depreciation Journal
- Stock In Journal
- Stock List
- Stock List Comparison
- Stock Movement Journal
- Stock Out Journal
- Stock Revaluation Journal
- Stocktaking Comparison
- Stocktaking Journal
- Stocktaking List
- Supplier/Item Statistics
- Varieties Enquiry
- Varieties in Stock
- Weighted Average
- Home page for Stock module manual
- Home page for Standard ERP manual
Análisis de Stock p/Antigüedad
Este informe llamado ‘Análisis de Stock p/Antigüedad’ muestra el tiempo que cada Ítem ha estado en stock. Los datos de este informe se calculan sobre una base FIFO. La información dentro de este reporte incluye Número de Ítem, Nombre, nivel de stock total y nivel de stock para cada periodo de antigüedad. Este informe acepta hasta seis periodos de antigüedad.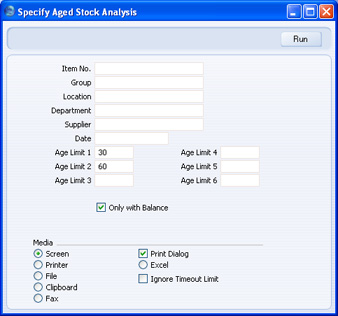
- Cód. Ítem
- Pegado Especial
registro Ítems
- Rango de Informe Alfa
- Ingresa un Número de Ítem (o un rango de números) para producir el informe según los Ítems especificados en este campo. Utiliza dos puntos (:) para separar el primer y el último número.
- Solo se mostrará Ítems de Stock dentro del rango (no se incluirán Ítems Simples, de Servicio o Compuestos).
- Ingresa un Número de Ítem (o un rango de números) para producir el informe según los Ítems especificados en este campo. Utiliza dos puntos (:) para separar el primer y el último número.
- Grupo
- Pegado Especial
registro Grupos de Ítem, módulo Ventas
- Rango de Informe Alfa
- Ingresa un Grupo de Ítem para producir un informe que abarque todos los Ítems de Stock pertenecientes a un Grupo de Ítem particular.
- Ingresa un Grupo de Ítem para producir un informe que abarque todos los Ítems de Stock pertenecientes a un Grupo de Ítem particular.
- Ubicación
- Pegado Especial
opción Ubicaciones, módulo Stock
- Para producir un informe de stock por antigüedad en función a una Ubicación, ingresa aquí el Código de esa Ubicación.
- Departamento
- Pegado Especial
opción Departamentos, módulos Bienes de Uso/Sistema
- Ingresa el Código de un Departamento para incluir solo Ítems asignados a un Departamento particular (el cual está especificado en la solapa 'Stock' del Ítem).
- Proveedor
- Pegado Especial
Proveedores en registro Contactos
- Si cargas el Código de un Proveedor aquí, entonces solo se incluirá aquellos Ítems cuyos Ítems de Compra por Defecto contengan ese Proveedor.
- Fecha
- Pegado Especial
Escoger Fecha
- Ingresa la fecha en que va a iniciar el cálculo de antigüedad. Si dejas este campo vacío, se utilizará la fecha actual.
- Año Límite 1-6
- Utiliza estos campos para definir los periodos de antigüedad.
- Por defecto (tal cual se muestra en la ilustración), el Año Límite 1 será colocado en 30 y el Año Límite 2 será colocado en 60. Esto arrojará un informe con tres columnas que muestran stock con antigüedad de 0-30 días, 31-60 días y luego de 61 días en adelante.
- Si deseas que la primera columna del informe muestre el stock que arribó hoy (o en la Fecha especificada en el campo ‘Fecha’), ingresa 0 como Año Límite 1. Si ingresas 30 como Año Límite 2, la segunda columna del informe mostrará el stock existente con antigüedad entre 1 a 30 días.
- La antigüedad del stock es extraída de la fecha correspondiente a la Mercadería Recibida. Si tienes algún ítem devuelto, su antigüedad dependerá del uso del radio botón ‘Insertar en Posición Original en Costo Lineal’ (opción Contabilidad de Costos.
- Por defecto (tal cual se muestra en la ilustración), el Año Límite 1 será colocado en 30 y el Año Límite 2 será colocado en 60. Esto arrojará un informe con tres columnas que muestran stock con antigüedad de 0-30 días, 31-60 días y luego de 61 días en adelante.
- Sólo con Saldo
- Utiliza esta casilla para asegurar que solo se tome en cuenta aquellos Ítems que tienen stock (ya sea positivo o negativo).
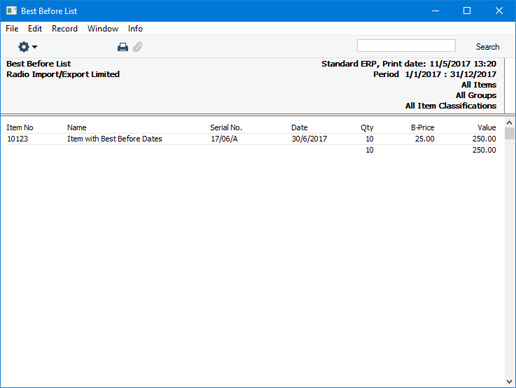
Best Before List
The Best Before List report is a list of the Serial Numbers with Best Before Dates that are currently in stock. It includes Items that are Serial Numbered at the unit and batch levels. The Best Before Dates will be taken from the Batch Specifications setting. Serial Numbered Items that do not have Best Before Dates will not be included in the report.For each Serial Number, the report shows the Item Number and Name, Serial or Batch Number, Best Before Date, quantity in stock, unit sales or purchase price and value (quantity in stock * unit price).
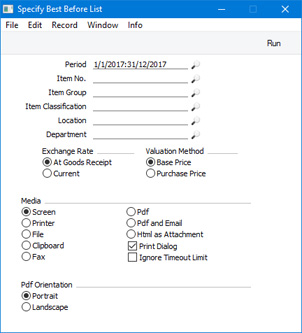
- Period
- Paste Special
Reporting Periods setting, System module
- Enter the start and end dates of the reporting period. The report will list the Serial Numbers that are in stock and that have Best Before Dates that fall within this period.
- Item No
- Paste Special
Item register
- Range Reporting Alpha
- To restrict the report to particular Items, enter an Item Number or a range of Item Numbers separated by a colon (:) here.
- To restrict the report to particular Items, enter an Item Number or a range of Item Numbers separated by a colon (:) here.
- Item Group
- Paste Special
Item Group register, Sales Ledger
- Range Reporting Alpha
- If you need Items belonging to a particular Item Group to be listed in the report, specify that Item Group here. You can also enter a range of Item Groups.
- If you need Items belonging to a particular Item Group to be listed in the report, specify that Item Group here. You can also enter a range of Item Groups.
- Item Classification
- Paste Special
Item Classifications setting, Sales Ledger
- Enter a Classification Code in this field if you only need Items with a certain Classification to be included in the report. If the field is empty, all Items, with and without Classification, will be included. If you enter a number of Classifications separated by commas, only those Items featuring all the Classifications listed will be shown. If you enter a number of Classifications separated by plus signs (+), all Items featuring at least one of the Classifications listed will be shown. If you enter a Classification preceded by an exclamation mark (!), all Items featuring any Classification except the one listed will be shown.
- For example:
- 1,2
- Lists Items with Classifications 1 and 2 (including Items with Classifications 1, 2 and 3).
- 1+2
- Lists Items with Classifications 1 or 2.
- !2
- Lists all Items except those with Classification 2.
- 1,!2
- Lists Items with Classification 1 but excludes those with Classification 2 (i.e. Items with Classifications 1 and 2 are not shown). Note the comma before the exclamation mark in this example.
- !1,!2
- Lists all Items except those with Classification 1 or 2 or both. Again, note the comma.
- !(1,2)
- Lists all Items except those with Classifications 1 and 2 (Items with Classifications 1, 2 and 3 will not be listed).
- !1+2
- Lists Items without Classification 1 and those with Classification 2 (Items with Classifications 1 and 2 will be listed).
- (1,2)+(3,4)
- Lists Items with Classifications 1 and 2, and those with Classifications 3 and 4.
- 1*
- Lists Items with Classifications beginning with 1 (e.g. 1, 10, 100).
- 1*,!1
- Lists Items with Classifications beginning with 1 but not 1 itself.
- *1
- Lists Items with Classifications ending with 1 (e.g. 1, 01, 001).
- 1*,*1
- Lists Items with Classifications beginning and ending with 1.
- For example:
- Location
- Paste Special
Locations setting, Stock module
- If you need the report to list the Serial Numbers that are in stock in a specific Location, specify that Location here.
- Department
- Paste Special
Departments setting, Assets module/System module
- Enter a Department Code if you need the report to list the Items that you have assigned to a particular Department (using the Department field on the 'Stock' card of each Item record).
- Exchange Rate
- These options are only used if the Valuation Method (below) is "Purchase Price", and with Serial Numbers that were received into stock using Goods Receipts and Returned Goods records in Currency (i.e. not with Serial Numbers that were received into stock using Productions or with Serial Numbers that were moved from one Location to another using Stock Movements).
- If you received a Serial Number into stock using a Goods Receipt or Returned Goods record in Currency, these options will specify whether its purchase price in the report will be converted to your home Currency using either the Exchange Rate from the time of receipt (FIFO principle) or the Exchange Rate at the time of the report. The time of receipt is recommended, because it will show the same values as the FIFO value.
- If you received a Serial Number into stock using a Goods Receipt or Returned Goods record in Currency, these options will specify whether its purchase price in the report will be converted to your home Currency using either the Exchange Rate from the time of receipt (FIFO principle) or the Exchange Rate at the time of the report. The time of receipt is recommended, because it will show the same values as the FIFO value.
- Valuation Method
- Use these options to specify whether the report should show the sales price of each Serial Number (i.e. the Item's Base Price, from the 'Pricing' card of the Item record) or its purchase price (from the Goods Receipt, Production, Returned Goods record or Stock Movement).
Reports in the Stock module:
- Introduction
- Aged Stock Analysis
- Best Before List
- Cost Price Analysis
- Credit Notes, Updating Stock
- Deficiency List
- Deficiency List per Location
- Delivery Journal
- Delivery List
- Goods Receipt Journal
- Item Group List
- Item History
- Item History per Location
- Item/Delivery Mode Statistics
- Items at Position
- Location List
- Recipe List (Made of)
- Returned Goods Journal
- Returned Goods to Supplier Journal
- Serial Number History
- Source List
- Stock Depreciation Journal
- Stock In Journal
- Stock List
- Stock List Comparison
- Stock Movement Journal
- Stock Out Journal
- Stock Revaluation Journal
- Stocktaking Comparison
- Stocktaking Journal
- Stocktaking List
- Supplier/Item Statistics
- Varieties Enquiry
- Varieties in Stock
- Weighted Average
- Home page for Stock module manual
- Home page for Standard ERP manual
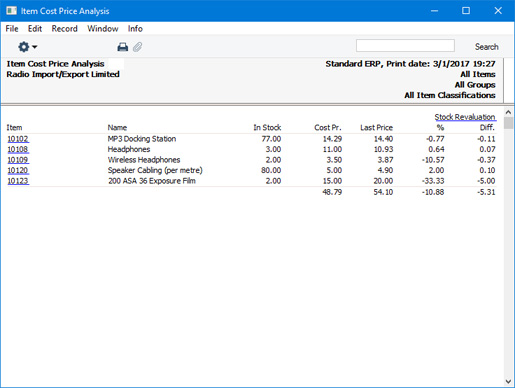
Cost Price Analysis
If the Cost Price of an Item changes, there may be circumstances where you need to change the value of the examples of that Item that you hold in stock. If so, you can run the Cost Price Analysis report to see which Items are affected, before using the 'Cost Price Analysis Revaluation' Maintenance function to create a record in the Stock Revaluation register to implement the change in value. If you print the report to screen, you can activate the Maintenance function by clicking (Windows/Mac OS X) or tapping (iOS/Android) the [Stock Revaluation] text link at the top of the report. The specifications that you used when running the report will be copied to the specification window for the Maintenance function..
- Item No.
Paste Special Item register
- Range Reporting Alpha
If you need a particular Item to be included in the report, enter its Item Number here. You can also enter a range of Item Numbers separated by a colon (:).
- To be included in the report, an Item must be a Stocked Item, it must be in stock and there must be a difference between its Cost Price and its Last Purchase Cost or Weighted Average (as specified using the Comparison options below).
- To be included in the report, an Item must be a Stocked Item, it must be in stock and there must be a difference between its Cost Price and its Last Purchase Cost or Weighted Average (as specified using the Comparison options below).
- Group
- Paste Special
Item Group register, Sales Ledger
- If you need Items belonging to a particular Item Group to be included in the report, specify that Item Group here.
- Item Classification
- Paste Special
Item Classifications setting, Sales Ledger
- Enter a Classification Code in this field if you only need Items with a certain Classification to be included in the report. If the field is empty, all Items, with and without Classification, will be included (subject to the conditions listed under Item No. above). If you enter a number of Classifications separated by commas, only those Items featuring all the Classifications listed will be shown. If you enter a number of Classifications separated by plus signs (+), all Items featuring at least one of the Classifications listed will be shown. If you enter a Classification preceded by an exclamation mark (!), all Items featuring any Classification except the one listed will be shown.
- For example—
- 1,2
- Lists Items with Classifications 1 and 2 (including Items with Classifications 1, 2 and 3).
- 1+2
- Lists Items with Classifications 1 or 2.
- !2
- Lists all Items except those with Classification 2.
- 1,!2
- Lists Items with Classification 1 but excludes those with Classification 2 (i.e. Items with Classifications 1 and 2 are not shown). Note the comma before the exclamation mark in this example.
- !1,!2
- Lists all Items except those with Classification 1 or 2 or both. Again, note the comma.
- !(1,2)
- Lists all Items except those with Classifications 1 and 2 (Items with Classifications 1, 2 and 3 will not be listed).
- !1+2
- Lists Items without Classification 1 and those with Classification 2 (Items with Classifications 1 and 2 will be listed).
- (1,2)+(3,4)
- Lists Items with Classifications 1 and 2, and those with Classifications 3 and 4.
- 1*
- Lists Items with Classifications beginning with 1 (e.g. 1, 10, 100).
- 1*,!1
- Lists Items with Classifications beginning with 1 but not 1 itself.
- *1
- Lists Items with Classifications ending with 1 (e.g. 1, 01, 001).
- 1*,*1
- Lists Items with Classifications beginning and ending with 1.
- For example—
- %
- By default, an Item will be included in the report if its Last Purchase Cost or Weighted Average (as specified below) is different to its Cost Price. If you need this difference to be at least as much as a particular percentage of the Cost Price, enter that percentage here.
- The sign of the difference will be ignored. For example, if you enter "10" in this field, an Item will be included in the report if its Last Purchase Cost or the Weighted Average is 10% higher than its Cost Price or 10% lower than its Cost Price.
- The sign of the difference will be ignored. For example, if you enter "10" in this field, an Item will be included in the report if its Last Purchase Cost or the Weighted Average is 10% higher than its Cost Price or 10% lower than its Cost Price.
- Comparison
- To determine whether an Item will be included in the report, its Last Purchase Cost (incl. extras), its Weighted Average or its Last Purchase Cost (excl. extras) will be compared with its Cost Price to see if there is a difference. Use these options to specify which of these figures will be compared with the Cost Price.
- Only with Balance
- Select this option if you only need Items that are in stock to be included in the report.
---
Reports in the Stock module:
- Introduction
- Aged Stock Analysis
- Best Before List
- Cost Price Analysis
- Credit Notes, Updating Stock
- Deficiency List
- Deficiency List per Location
- Delivery Journal
- Delivery List
- Goods Receipt Journal
- Item Group List
- Item History
- Item History per Location
- Item/Delivery Mode Statistics
- Items at Position
- Location List
- Recipe List (Made of)
- Returned Goods Journal
- Returned Goods to Supplier Journal
- Serial Number History
- Source List
- Stock Depreciation Journal
- Stock In Journal
- Stock List
- Stock List Comparison
- Stock Movement Journal
- Stock Out Journal
- Stock Revaluation Journal
- Stocktaking Comparison
- Stocktaking Journal
- Stocktaking List
- Supplier/Item Statistics
- Varieties Enquiry
- Varieties in Stock
- Weighted Average
- Home page for Stock module manual
- Home page for Standard ERP manual
Notas de Créidto, Actualización de Stock
Este informe lista las Notas de Crédito y a su vez intenta ayudar a verificar que los niveles de stock y las revaluaciones se hayan actualizado correctamente siguiendo la sincronía de las Notas de Crédito.Este informe también está disponible en el módulo Ventas. Por favor, haz clic aquí para mayores detalles.
Lista de Faltantes
Este informe presenta un listado de todos los Ítems cuyo stock es inferior al momento de requerir una nueva Orden. Por favor, haz clic aquí para mayores detalles.Deficiency List per Location
An Item is said to be in deficiency if its stock level after all outstanding Sales, Purchase and Production Orders have been fulfilled is less than a specified stock level.Standard ERP contains two reports that list Items in deficiency: the Deficiency List (in the Purchase Orders and Stock modules); and the Deficiency List per Location (in the Stock module). The differences between these reports are as follows:
- The Deficiency List report lists overall deficiency figures for each Item. If you have more than one Location, these deficiency figures will be calculated by adding the deficiencies in each Location together.
- The Deficiency List per Location report lists the deficiencies in each Location separately. From this report you can add Items to the Deficiency Stock list, a shopping list from which you can create Purchase Orders. Please refer here for more details about Deficiency Stock.
- Minimum Stock Level - stock balance + unfulfilled Sales Orders - unfulfilled Purchase Orders + unfulfilled Production Orders
A deficiency is not necessarily the same as a purchasing suggestion. A purchasing suggestion takes the requirements of the Supplier into account. For example, if the Minimum Stock Level of an Item is 10 and there is only one in stock, the deficiency is nine. But if the Supplier has a minimum order requirement of 15, the deficiency will still be nine, but the purchasing requirement will be 15.
As their names suggest, the Deficiency List and Deficiency List per Location reports display deficiency figures for each Item. The Purchase Suggestion report in the Purchase Orders module shows purchasing suggestions, while the Reordering Requirements report also in the Purchase Orders module shows purchasing suggestions that take future sales predictions into account.
To make full use of the Deficiency Stock per Location report, set Minimum Stock Levels for each Item as follows:
- If you are not using Locations, specify a Minimum Stock Level for each Item using the Minimum Level field in the Item record.
- If you have a single Location (i.e. you have a single record in the Locations setting and you have specified a Main Location in the Stock Settings setting), specify a Minimum Stock Level for each Item by creating separate records in the Minimum Stock Levels setting in the Stock module for each Item. Specify the Location in these records.
- If you have more than one Location, specify a Minimum Stock Level for each Item by creating separate records in the Minimum Stock Levels setting in the Stock module. You should enter separate Minimum Stock Level records for each Item for each Location.
If you will use the Deficiency Stock per Location report to add Items to the Deficiency Stock list, prepare Purchase Items as follows:
- If you are not using Locations or you have a single Location (i.e. you have a single record in the Locations setting and you have specified a Main Location in the Stock Settings setting), ensure each Item has a related Default Purchase Item.
- If you have more than one Location, you can enter separate Default Purchase Items for each Location. If so, enter a Default Purchase Item with a blank Location as well, to be used if there is no Default Purchase Item for a particular Location.
When printed to screen, the Deficiency List per Location report has the Standard ERP Drill-down feature. Click (Windows/Mac OS X) or tap (iOS/Android) on any Item Number to open an individual Item record, and on a figure in the "Defncy" column to add an Item to the Deficiency Stock list.
- Item No.
- Paste Special
Item register
- Range Reporting Alpha
- Use this field to restrict the report to a particular Item or range of Items. Only Stocked Items will be shown in the report. Closed Items will not be shown.
- Use this field to restrict the report to a particular Item or range of Items. Only Stocked Items will be shown in the report. Closed Items will not be shown.
- Group
- Paste Special
Item Group register, Sales Ledger
- Range Reporting Alpha
Use this field to restrict the report to Items belonging to a particular Item Group or range of Groups.
- Item Classification
- Paste Special
Item Classifications setting, Sales Ledger
- Enter a Classification Code in this field if you want to list Items with a certain Classification. If the field is empty, all Items, with and without Classification, are included. If you enter a number of Classifications separated by commas, only those Items featuring all the Classifications listed will be shown. If you enter a number of Classifications separated by plus signs (+), all Items featuring at least one of the Classifications listed will be shown. If you enter a Classification preceded by an exclamation mark (!), all Items featuring any Classification except the one listed will be shown.
- For example:
- 1,2
- Lists Items with Classifications 1 and 2 (including Items with Classifications 1, 2 and 3).
- 1+2
- Lists Items with Classifications 1 or 2.
- !2
- Lists all Items except those with Classification 2.
- 1,!2
- Lists Items with Classification 1 but excludes those with Classification 2 (i.e. Items with Classifications 1 and 2 are not shown). Note the comma before the exclamation mark in this example.
- !1,!2
- Lists all Items except those with Classification 1 or 2 or both. Again, note the comma.
- !(1,2)
- Lists all Items except those with Classifications 1 and 2 (Items with Classifications 1, 2 and 3 will not be listed).
- !1+2
- Lists Items without Classification 1 and those with Classification 2 (Items with Classifications 1 and 2 will be listed).
- (1,2)+(3,4)
- Lists Items with Classifications 1 and 2, and those with Classifications 3 and 4.
- 1*
- Lists Items with Classifications beginning with 1 (e.g. 1, 10, 100).
- 1*,!1
- Lists Items with Classifications beginning with 1 but not 1 itself.
- *1
- Lists Items with Classifications ending with 1 (e.g. 1, 01, 001).
- 1*,*1
- Lists Items with Classifications beginning and ending with 1.
- For example:
- Classification Type
- Paste Special
Classification Types setting, CRM module
- Enter a Classification Type in this field if you want to list Items with a Classification belonging to that Type. If the field is empty, all Items, with and without Classification, are included. If you enter a number of Classification Types separated by commas, Items featuring a Classification belonging to any of those Types will be shown.
- Department
- Paste Special
Departments setting, Assets module/System module
- If the report is to list Items belonging to a particular Department (specified on the 'Stock' card of the Item record), enter that Department here.
- Sorting
- You can sort the report by Item Number, Item Group or Description.
- Skip Items without Balance
- This option excludes from the report Items for which the stock balance after all Sales, Purchase and Production Orders have been fulfilled will be zero. If you use this option, any Item with a zero balance that has a Minimum Stock Level will not be listed in the report, even though this Item has a deficiency. Therefore, you should not use this option if you want to list every Item with a deficiency.
- Skip Items without Deficiency
- Select this option if you want the report only to list the Items that you need to purchase (i.e. the Items of which you have a deficiency). There is a deficiency if the stock balance after all Sales, Purchase and Production Orders have been fulfilled is less than the Minimum Stock Level.
- If you deselect both the Skip Items without Balance and Skip Items without Deficiency options, the report will list every Item/Location combination individually.
- If you deselect both the Skip Items without Balance and Skip Items without Deficiency options, the report will list every Item/Location combination individually.
- Show Varieties
- If an Item is one that has Varieties, the report will usually display a deficiency figure for the Item as a whole. Select this option if you would like it to display deficiency figures for each Variety individually.
- If you need to use this option, you should consider how to specify the Minimum Stock Levels for each Variety. If you are not using Locations and if the Minimum Stock Level for each Variety is the same, you can enter it in the Item record (in the Minimum Level field on the 'Stock' card). If you need different Minimum Stock Levels for each Variety, enter separate records in the Minimum Stock Levels setting for each one. Otherwise (i.e. if you have one or more Locations), you should enter separate records in the Minimum Stock Levels setting for each Variety/Location combination.
- This option will be ticked by default if you are using the Default to 'Show Varieties' in all Reports option in the Variety Settings setting in the Stock module.
- If you need to use this option, you should consider how to specify the Minimum Stock Levels for each Variety. If you are not using Locations and if the Minimum Stock Level for each Variety is the same, you can enter it in the Item record (in the Minimum Level field on the 'Stock' card). If you need different Minimum Stock Levels for each Variety, enter separate records in the Minimum Stock Levels setting for each one. Otherwise (i.e. if you have one or more Locations), you should enter separate records in the Minimum Stock Levels setting for each Variety/Location combination.
Please follow the links below for details about each report:
- Introduction
- Aged Stock Analysis
- Best Before List
- Cost Price Analysis
- Credit Notes, Updating Stock
- Deficiency List
- Deficiency List per Location
- Delivery Journal
- Delivery List
- Goods Receipt Journal
- Item Group List
- Item History
- Item History per Location
- Item/Delivery Mode Statistics
- Items at Position
- Location List
- Recipe List (Made of)
- Returned Goods Journal
- Returned Goods to Supplier Journal
- Serial Number History
- Source List
- Stock Depreciation Journal
- Stock In Journal
- Stock List
- Stock List Comparison
- Stock Movement Journal
- Stock Out Journal
- Stock Revaluation Journal
- Stocktaking Comparison
- Stocktaking Journal
- Stocktaking List
- Supplier/Item Statistics
- Varieties Enquiry
- Varieties in Stock
- Weighted Average
- Home page for Stock module manual
- Home page for Standard ERP manual
Diario de Entregas
El Diario de Entregas produce un listado de las Entregas provenientes del registro Entregas.
- Nro. Ent.
- Rango de Informe
Numérico
- Especifica un rango de Entregas para que sean incluidas en el informe. Utiliza dos puntos (:) para separar el primer del último número.
- Periodo
- Pegado Especial
opción Periodos de Informe, módulo Sistema
- Ingresa la fecha inicio y la fecha fin del periodo cuyas Entregas han de ser incluidas en el informe. Por defecto se ofrece el primer archivo de la opción ‘Periodos de Informe’.
- Cliente
- Pegado Especial
Cliente en registro Contactos
- Rango de Informe Alfa
- Para delimitar el informe en función a un solo Cliente, ingresa el Número de ese Cliente aquí.
- Para delimitar el informe en función a un solo Cliente, ingresa el Número de ese Cliente aquí.
- Nro. Orden
- Rango de Informe
Numérico
- Para delimitar el informe en función a Entregas desde un rango particular de Órdenes, ingresa aquí los Números de Orden. Utiliza dos puntos (:) para separar el primer y el último número.
- For. Ent. (Forma de Entrega)
- Pegado Especial
opción Formas de Entrega, módulo Órdenes de Venta
- Utiliza este campo para delimitar el informe en función a Entregas con una sola Forma de Entrega.
- Ubicación
- Pegado Especial
opción Ubicaciones, módulo Stock
- Para delimitar el informe en función a una sola Ubicación, ingresa el código de esa Ubicación aquí. Este dato se refiere a la Ubicación cargada al nivel de la Entrega, no aquellas ingresadas para cada una de las filas en una Entrega.
- Función
- Utiliza estas alternativas para determinar el nivel de detalle a presentarse en el informe.
- Resumido
- Esta alternativa arroja un informe con una fila por Entrega; además muestra el Número de Entrega, la Fecha, Nro. de Orden, Nro. y Nombre del Cliente y el valor de la Entrega.
- Detallado
- Esta alternativa arroja un informe que lista cada Ítem de una Entrega con sus cantidades y precios unitarios. También muestra la Dirección Completa de Entrega. Esta versión del informe puede servir como un documento de archivo en lugar de una copia de cada Entrega.
- Resumido
- Especificar
- Utiliza estas casillas para especificar si el informe incluirá Entregas aprobadas y/o sin aprobar.
- Página Nueva por Cliente
- Tilda esta casilla para crear una página nueva para cada Cliente.
- Este informe por lo general está ordenado según el Número de Entrega. Por tanto al tildar esta casilla, el informe se ordenará por Número de Cliente y luego por Número de Entrega.
Lista de Entregas
Este informe es similar al Diario de Entregas. Sin embargo la diferencia es que en vez de mostrar las Entregas que caen dentro de cierto periodo, este informe hace un listado de las Entregas que han sido emitidas para Órdenes en ese Periodo.
- Periodo
- Pegado Especial
opción Periodos de Informe, módulo Sistema
- Ingresa la fecha inicio y la fecha fin del periodo cuyas Órdenes han de ser abarcadas por el informe. Por defecto se ofrece el primer archivo de la opción ‘Periodos de Informe’.
- Nro. Ent.
- Rango de Informe
Numérico
- Para delimitar el informe en función a una Entrega particular o rango de Entregas, ingresa aquí sus Números de Entrega.
- Cliente
- Pegado Especial
Clientes en registro Contactos
- Ingresa un Número de Cliente para delimitar el informe en función a Entregas hechas a ese Cliente.
- Nro. Orden
- Rango de Informe
Numérico
- Ingresa un Número de Orden o rango de números para delimitar el alcance del informe.
- Forma Ent.
- Pegado Especial
opción Formas de Entrega, módulo Órdenes de Venta
- Utiliza este campo para delimitar el informe en función a Entregas con una sola Forma de Entrega.
- Objeto Orden
- Pegado Especial
registro Objetos, módulos Contabilidad/Sistema
- Ingresa un Código de Objeto para delimitar el informe en función a Órdenes con ese Objeto. Esto se refiere a Objetos a nivel de la Orden, no aquellos ingresados al nivel de Ítem.
- Vendedor
- Pegado Especial
registro Personas, módulo Sistema
- Ingresa las iniciales de una Persona para indicar quién creo las Entregas para las respectivas Órdenes.
- Función
- Utiliza estas alternativas para controlar el nivel de detalle a presentarse en el informe.
- Resumido
- Esta alternativa arrojará un informe con una fila por Entrega. Además mostrará el Número y Fecha de Entrega, Número de Orden, Número y Nombre de Cliente y valor de la Entrega.
- Detallado
- Esta alternativa arrojará un informe que lista cada Ítem de la Entrega con sus respectivas cantidades y precios unitarios. Además mostrará la Dirección Completa de Entrega.
- Por Ítem
- Esta alternativa simplemente muestra una sola línea por Ítem. Muestra la Cantidad de la Orden, la Cantidad Entregada y el Valor Entregado.
- Resumido
- Especificar
- Utiliza estas casillas para especificar cuáles son las Entregas que serán incluidas en el informe.
Diario de Recepción de Mercaderías
Este informe muestra las Mercaderías Recibidas provenientes del registro Mercadería Recibida.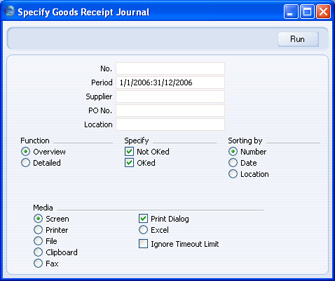
- Nro.
- Rango de Informe
Numérico
- Especifica el rango de Mercaderías Recibidas a ser incluidas en el informe. Utiliza dos puntos (:) para separar el primer y el último número.
- Periodo
- Pegado Especial
opción Periodos de Informe, módulo Sistema
- Ingresa la fecha inicio y la fecha fin del periodo cuyas Mercaderías Recibidas han de ser incluidas en el informe. Por defecto se ofrece el primer archivo de la opción ‘Periodos de Informe’.
- Proveedor
- Pegado Especial
Proveedores en registro Contactos
- Para delimitar el informe en función a un solo Proveedor, ingresa aquí el Número de ese Proveedor.
- Nro. OC
- Rango de Informe
Numérico
- Para delimitar el informe en función a Mercaderías Recibidas de un rango particular de Órdenes de Compra, ingresa los respectivos Números de Orden aquí. Utiliza dos puntos (:) para separar el primer y el último número.
- Ubicación
- Pegado Especial
opción Ubicaciones, módulo Stock
- Para delimitar el informe en función a una sola Ubicación, ingresa aquí el código de esa Ubicación. Esto se refiere a la Ubicación cargada al nivel de Mercadería Recibida, no aquellas ubicaciones cargadas en las filas de una Mercadería Recibida.
- Función
- Utiliza estas alternativas para controlar el nivel de detalle a presentarse en el informe.
- Resumido
- Esta alternativa arrojará un informe con una línea por Mercadería Recibida (archivo). Además mostrará el Número y Fecha de Merc. Recibida, Proveedor, Comentario y Valor.
- Detallado
- Esta alternativa producirá un informe que lista cada Ítem de la Mercadería Recibida con sus respectivas cantidades y precios unitarios. También mostrará cualquier costo extra como ser transporte o aduanas.
- Resumido
- Especificar
- Utiliza estas casillas para especificar si el informe incluirá Mercaderías Recibidas aprobadas y/o no aprobadas.
- Ordenar por
- Aquí se puede determinar el orden en que se listarán las Mercaderías Recibidas dentro del informe.
Lista de Grupo de Ítem
Por favor, haz clic aquí para ver detalles completos de este informe.Historia de Ítem
El informe Historia de Ítem lista cada una de las entradas y salidas de mercaderías correspondientes a Ítems particulares.Cuando se encuentra en pantalla, este informe posee la funcionalidad Drill-down de HansaWorld Enterprise. Haz clic en cualquier número de asiento (por ej. un Número de Entrega, Nro. de Mercadería Recibida o un Nro. de Factura) para abrir el archivo respectivo.
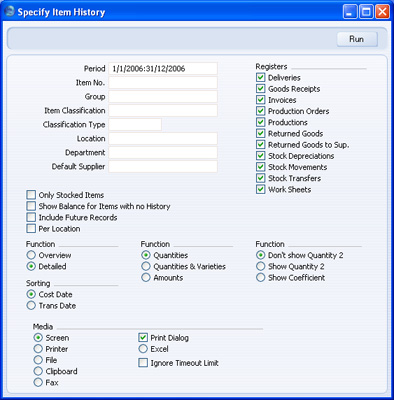
- Periodo
- Pegado Especial
opción Periodos de Informe, módulo Sistema
- Ingresa la fecha inicio y la fecha fin del periodo separándolas por dos puntos (:).
- Cód. Ítem
- Pegado Especial
registro Ítems
- Rango de Informe Alfa
- Para delimitar el informe en función a Ítems particulares, ingresa un Número de Ítem o un rango de números aquí.
- Para delimitar el informe en función a Ítems particulares, ingresa un Número de Ítem o un rango de números aquí.
- Grupo
- Pegado Especial
registro Grupos de Ítem, módulo Órdenes de Venta
- Ingresa un Grupo de Ítem para incluir solo aquellos Ítems que pertenezcan a ese Grupo de Ítem.
- Clasificación Ítem
- Pegado Especial
opción Clasificaciones de Ítem, módulo Stock
- Ingresa un Código de Clasificación en este campo para listar Ítems que pertenezcan a cierta Clasificación. Si este campo queda vacío, entonces se incluirá todos los Ítems (con o sin Clasificación). Si ingresas cierto rango de Clasificaciones separadas por comas, se incluirá solo aquellos Ítems que correspondan a las Clasificaciones especificadas. Si ingresas un rango de Clasificaciones separadas por el signo (+), entonces se incluirá a los Ítems que correspondan al menos a una de la Clasificaciones especificadas. Si ingresas una Clasificación precedida del signo de exclamación (!), entonces todos los Ítems correspondientes a cualquier Clasificación serán incluidos, excepto aquellos que pertenezcan a la Clasificación citada en este campo.
- Por ejemplo:
- 1,2
- Listará Ítems con Clasificaciones 1 y 2 (incluyendo Ítems con Clasificaciones 1, 2 y 3).
- 1+2
- Listará Ítems con Clasificaciones 1 o 2.
- !2
- Listará todos los Ítems excepto aquellos con Clasificación 2.
- 1,!2
- Listará Ítems con Clasificación 1 pero excluirá aquellos con Clasificación 2 (no se mostrará Ítems con Clasificaciones 1 y 2). Notemos el uso de la coma antes del signo de exclamación.
- !1,!2
- Listará todos los Ítems excepto aquellos con Clasificación 1 o 2 o ambas. Nuevamente notemos el uso de la coma.
- !(1,2)
- Listará todos los Ítems excepto aquellos con Clasificaciones 1 y 2 (no se listará Ítems con Clasificaciones 1, 2 y 3).
- !1+2
- Listará Ítems sin Clasificación 1 y aquellos con Clasificación 2 (se listará Ítems con Clasificaciones 1 y 2).
- (1,2)+(3,4)
- Listará Ítems con Clasificaciones 1 y 2 más aquellos con Clasificaciones 3 y 4.
- Por ejemplo:
- Tipo Clasificación
- Pegado Especial
opción Tipos de Clasificación, módulo CRM
- Ingresa un Tipo de Clasificación para listar Ítems que pertenezcan a Clasificaciones correspondientes a ese Tipo. Si este campo queda vacío, se incluirá todos los Ítems (con o sin Clasificación). Si ingresas un rango de Tipos de Clasificación separados por comas, entonces solo se incluirá Ítems que presenten alguna Clasificación perteneciente a cualquier de los Tipos de Clasificación listados.
- Ubicación
- Pegado Especial
opción Ubicaciones, módulo Stock
- Para delimitar el informe en función a una Ubicación específica, ingresa aquí el código de esa Ubicación.
- Departamento
- Pegado Especial
opción Departamentos, módulo Bienes de Uso/Sistema
- Rango de Informe Alfa
- Ingresa un Código de Departamento para incluir solamente Ítems asignados a ese Departamento (especificado en la solapa 'Stock' del Ítem).
- Ingresa un Código de Departamento para incluir solamente Ítems asignados a ese Departamento (especificado en la solapa 'Stock' del Ítem).
- Proveedor p/Def.
- Pegado Especial
Proveedores en registro Contactos
- Si cargas aquí un Código de Proveedor, entonces solo se incluirán aquellos Ítems cuyos Ítems de Compra por Defecto respondan a ese Proveedor.
- Registros
- Selecciona una o más de estas casillas (las cuales se refieren a los tipos de transacción) para influir en la recopilación de los datos por parte del informe.
- Sólo Ítems en Stock
- Tilda esta casilla para excluir Ítems Simples, Compuestos y de Servicio.
- Mostrar Saldo para Ítems Sin Historia
- Por defecto, solo aquellos Ítems para los cuales se creó un asiento de stock durante el periodo de informe, serán incluidos en el informe. Es decir, que los Ítems que hayan sido recibidos en stock antes del periodo de informe (y no fueron sujetos a ningún movimiento posterior), serán excluidos del informe. Pero si deseas incluir tales Ítems en el informe junto con cifras de saldo apertura, tilda esta casilla.
- Incluir Archivos Futuros
- Usualmente, el informe no incluirá Órdenes de Venta o Compra puesto que éstas no inciden directamente en ningún movimiento de stock (es decir, que sus implicaciones en stock se representan más correctamente por las Entregas y Mercaderías Recibidas).
- Tilda esta casilla para incluir ciertas Órdenes de Venta o Compra dentro del informe. Esto podría ayudar a planificar requerimientos futuros respecto a Ítems particulares. En este sentido, para ser incluidas en el informe, las Órdenes de Venta o Compra deben estar sin completar y deben tener una Fecha de Entrega Planificada que caiga dentro del periodo de informe. El campo para la fecha de entrega planificada debe usar el formato de Fecha configurado en la opción Entregas Planificadas del módulo Órdenes de Venta.
- Tilda esta casilla para incluir ciertas Órdenes de Venta o Compra dentro del informe. Esto podría ayudar a planificar requerimientos futuros respecto a Ítems particulares. En este sentido, para ser incluidas en el informe, las Órdenes de Venta o Compra deben estar sin completar y deben tener una Fecha de Entrega Planificada que caiga dentro del periodo de informe. El campo para la fecha de entrega planificada debe usar el formato de Fecha configurado en la opción Entregas Planificadas del módulo Órdenes de Venta.
- Por Ubicación
- Por defecto, el informe es un listado de Ítems. Para cada Ítem, los asientos de stock están listados según la Fecha Costo o la Fecha de Asiento (determinado por las alternativas de ordenación). Es decir, los asientos no se ordenan según la Ubicación.
- En este sentido si tildas esta casilla, el informe será una lista de Ubicaciones. Para cada Ubicación, habrá una lista de Ítems. Y para cada Ítem, los asientos de stock estarán listados según la Fecha Costo o Fecha de Asiento.
- En este sentido si tildas esta casilla, el informe será una lista de Ubicaciones. Para cada Ubicación, habrá una lista de Ítems. Y para cada Ítem, los asientos de stock estarán listados según la Fecha Costo o Fecha de Asiento.
- Función
- Utiliza estas alternativas para controlar el nivel de detalle a presentarse en el informe.
- Resumido
- El informe contendrá una fila por Ítem y mostrará respectivamente su cantidad recibida y la cantidad trasladada desde stock durante el periodo de informe. Si el Ítem en cuestión fuese un componente que ha sido utilizado en una Baja de Stock como parte de un Ítem Compuesto, estos movimientos aparecerán por separado.
- Detallado
- Para cada Ítem, el informe listará todos los asientos de stock durante el periodo. También mostrará las Ubicaciones.
- Resumido
- Función
- Utiliza estas alternativas para determinar las cifras que han de mostrarse en el informe.
- Cantidades
- El informe contendrá únicamente cantidades de stock.
- Valores
- El informe mostrará valores de stock y, si la alternativa ‘Detallado’ está activada, también mostrará cantidades.
- Cantidades
- Función
- Utiliza estas alternativas cuando tengas algunos Ítems para los cuales es posible expresar los niveles de stock usando diferentes unidades de medida. (ej. metros y yardas, litros y galones, etc.). Estos Ítems serán configurados con una Unidad principal en la solapa 'Precios'; y una Unidad 2 ( Unidad secundaria) y un Coeficiente (es decir, la relación entre las dos Unidades) los cuales están configurados en la solapa 'Stock'. Por ejemplo, un Ítem vendido en litros y galones deberá tener “LITRO” como Unidad principal, “GALÓN” como la Unidad 2 y “0.22” será el coeficiente. La Cantidad 2 en ese informe será la cantidad medida en galones.
- Solo podrás utilizar estas alternativas con la versión ‘Detallado’ y cuando también hayas activado el radio botón ‘Cantidades’.
- No Mostrar Cantidad 2
- Esta alternativa sirve para expresar las cantidades de stock usando la unidad principal de medida (litros en nuestro ejemplo).
- Mostrar Cantidad 2
- Utiliza esta alternativa para expresar las cantidades en stock usando ambas unidades de medida (litros y galones). Las cifras de la Cantidad 2 solo aparecerán para los Ítems que tengan una Unidad 2 y un Coeficiente especificado en la solapa 'Stock'. No podrás utilizar esta alternativa para la versión ‘Detallado’ del informe y cuando hayas activado el radio botón ‘Valores’.
- Mostrar Coeficiente
- Utiliza esta alternativa para expresar las cantidades de stock usando la unidad principal de medida conjuntamente con los Coeficientes donde corresponda. No podrás utilizar esta alternativa para la versión ‘Detallado’ del informe y cuando hayas activado el radio botón ‘Valores’.
- Solo podrás utilizar estas alternativas con la versión ‘Detallado’ y cuando también hayas activado el radio botón ‘Cantidades’.
- Ordenado por
- Utiliza estas alternativas para especificar el criterio de ordenación de los asientos de stock dentro del informe. Usualmente, la Fecha Costo y la Fecha de Asiento serán las mismas, pero eventualmente serán diferentes cuando tengas algunas Devoluciones de Mercaderías y hayas activado el radio botón ‘Insertar en Posición Original en Costo Lineal’ (opción Contabilidad de Costos). En este caso, la Fecha de Asiento será la fecha del archivo Devolución de Mercadería, mientras que la Fecha Costo será la fecha de la Merc. Recibida originalmente.
Hist. Ítem p/Ubicación
Este informe fue incorporado al informe Historia de Ítem en la versión 5.1 de HansaWorld Enterprise. Para más detalles, por favor revisa la descripción de la casilla ‘Por Ubicación’ en el informe Historia de Ítem.Estadísticas Ítem/Forma de Entrega
Este informe analiza las Entregas según su Forma de Entrega y muestra el valor de las mercaderías entregadas usando cada Forma de Entrega en el periodo de informe.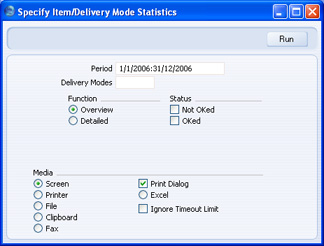
- Periodo
- Pegado Especial
opción Periodos de Informe, módulo Sistema
- Ingresa la fecha inicio y la fecha fin del periodo de informe separadas por dos puntos (:). Por defecto se ofrece el primer archivo de la opción ‘Periodos de Informe’.
- Formas de Entrega
- Pegado Especial
opción Formas de Entrega, módulo Órdenes de Venta
- Rango de Informe Alfa
- Especifica aquí las Formas de Entrega a ser incluidas en el informe.
- Especifica aquí las Formas de Entrega a ser incluidas en el informe.
- Estado
- Utiliza estas casillas para especificar si el informe incluirá Entregas aprobadas y/o no aprobadas.
Ítems en Ubicación
Utiliza este informe para saber el sitio en el que se encuentra guardado un Ítem dentro de tu almacén (ej. su Posición dentro de una Ubicación); o para saber los contenidos de una Posición en particular. El informe constituye un listado de las Posiciones mostrando el Nombre de la Posición, Ubicación, Número/Nombre de Ítem, la cantidad del Ítem en los Movimientos de Stock (ya sea dirigiéndose a la Posición o saliendo de ella) y la cantidad en la Posición.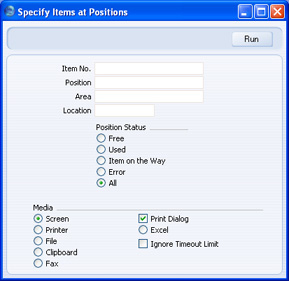
- Cód. Ítem
- Pegado Especial
registro Ítems
- Especifica un Número de Ítem para averiguar dónde se encuentra ese Ítem dentro de tu almacén.
- Posición
- Pegado Especial
registro Posiciones, módulo Administración de Almacenes
- Especifica aquí una Posición para averiguar su contenido. No se mostrará ninguna Posición que esté vacía.
- Área
- Pegado Especial
registro Ubicaciones, módulo Administración de Almacenes
- Especifica una Ubicación de Área para listar los contenidos de cada Posición correspondiente a esa Área. No se mostrará ninguna Posición que esté vacía.
- Ubicación
- Pegado Especial
opción Ubicaciones, módulo Stock
- Especifica una Ubicación para listar los contenidos de cada Posición en esa Ubicación. No se mostrará Posiciones que estén vacías.
- Estado Posición
- Puedes escoger uno o más de estos estados que se refieren a la Posición. No se mostrará Posiciones que estén vacías. Las Posiciones deberán tener un estado “libre” de modo que si el informe contiene cualquiera de ellas, habrá surgido un error en alguna parte. En este sentido, el informe revelará estas Posiciones para que puedas corregir sus estados.
Lista de Ubicación
Este informe es una lista de Ubicaciones de stock cargadas a través de la opción Ubicaciones y muestra el nombre, el nombre del gerente, la dirección, etc.
- Código
- Pegado Especial
opción Ubicaciones, módulo Stock
- Rango de Informe Alfa
- Si necesitas imprimir los detalles de una Ubicación particular o un rango de Ubicaciones, ingresa aquí su respectivo código.
Lista de Recetas (Componentes)
Por favor, haz clic aquí para detalles completos de este informe.Returned Goods Journal
This page describes the Returned Goods Journal report in the Stock module.
---
The Returned Goods Journal is a list of records in the Returned Goods register.
When printed to screen, the Returned Goods Journal has the Standard ERP Drill-down feature. Click (Windows/macOS) or tap (iOS/Android) on any Returns Number or Order Number to open the corresponding record.
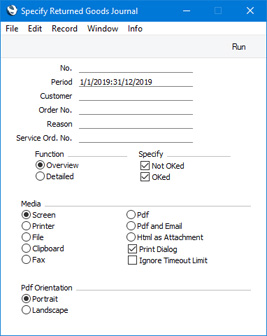
- No.
- Range Reporting
Numeric
- Enter a Return Number or a range of Numbers separated by a colon (:) here if you would like specific Returned Goods records to be shown in the report.
- Period
- Paste Special
Reporting Periods setting, System module
- Enter the start and end date of the period whose Returns are to be shown in the report. The first record in the Reporting Periods setting will be used as a default.
- Customer
- Paste Special
Customers in Contact register
- Range Reporting Alpha
- If you need the report to list Returns received from a particular Customer, enter their Customer Number here. You can also enter a range of Customer Numbers.
- If you need the report to list Returns received from a particular Customer, enter their Customer Number here. You can also enter a range of Customer Numbers.
- Order No.
- Range Reporting
Numeric
- If you need to list the Returns that are connected to a particular range of Orders, enter their Order Numbers here.
- Reason
- Paste Special
Standard Problems setting, Sales Ledger/Service Orders module
- Use this field if you need to list Returns with a particular Reason.
- Service Ord. No.
- Range Reporting
Numeric
- If you need to list the Returns that are connected to a particular range of Service Orders, enter their Service Order Numbers here.
- Function
- Use these options to specify the level of detail that is to be shown in the report.
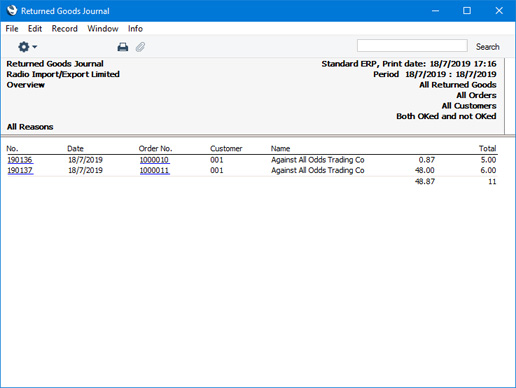
- Overview
- This choice produces a report with a single line for each Return, showing Return Number and Date, Order Number, the Customer Number and Name, total stock value and total quantity.
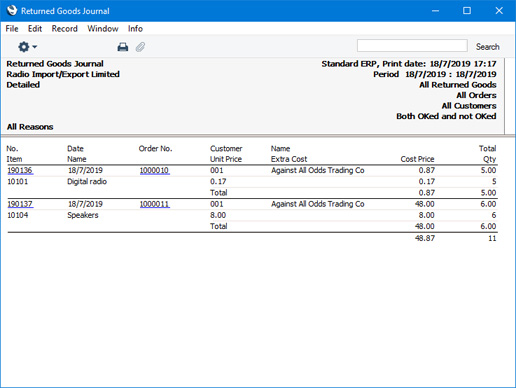
- Detailed
- This option gives a report listing each Item on the Return with quantities, cost prices and any extra costs. You can use this report as an archive file instead of printing a copy of each Return.
- Overview
- Specify
- Use these options to specify whether Returned Goods records that have been marked as OK, Returned Goods that have not been marked as OK or both are to be included in the report. You must select at least one option or the report will be empty.
Reports in the Stock module:
- Introduction
- Aged Stock Analysis
- Best Before List
- Cost Price Analysis
- Credit Notes, Updating Stock
- Deficiency List
- Deficiency List per Location
- Delivery Journal
- Delivery List
- Goods Receipt Journal
- Item Group List
- Item History
- Item History per Location
- Item/Delivery Mode Statistics
- Items at Position
- Location List
- Recipe List (Made of)
- Returned Goods Journal
- Returned Goods to Supplier Journal
- Serial Number History
- Source List
- Stock Depreciation Journal
- Stock In Journal
- Stock List
- Stock List Comparison
- Stock Movement Journal
- Stock Out Journal
- Stock Revaluation Journal
- Stocktaking Comparison
- Stocktaking Journal
- Stocktaking List
- Supplier/Item Statistics
- Varieties Enquiry
- Varieties in Stock
- Weighted Average
- Home page for Stock module manual
- Home page for Standard ERP manual
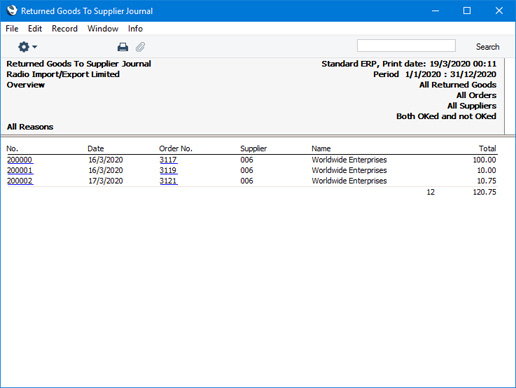
Returned Goods to Supplier Journal
The Returned Goods to Supplier Journal is a list of records in the Returned Goods to Supplier register.
When printed to screen, the Returned Goods to Supplier Journal has the Standard ERP Drill-down feature. Click (Windows/macOS) or tap (iOS/Android) on any Returns Number or Purchase Order Number to open the corresponding record.
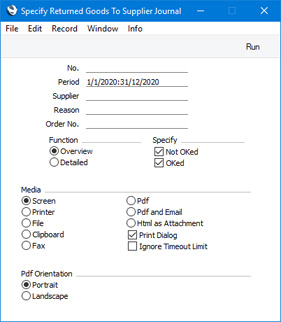
- No.
- Range Reporting
Numeric
- Enter a Return Number or a range of Numbers separated by a colon (:) here if you would like specific Returned Goods to Supplier records to be shown in the report.
- Period
- Paste Special
Reporting Periods setting, System module
- Enter the start and end date of the period whose Returns are to be shown in the report. The first record in the Reporting Periods setting will be used as a default.
- Supplier
- Paste Special
Suppliers in Contact register
- Range Reporting Alpha
- If you need the report to list Returns issued to a particular Supplier, enter their Supplier Number here. You can also enter a range of Supplier Numbers.
- If you need the report to list Returns issued to a particular Supplier, enter their Supplier Number here. You can also enter a range of Supplier Numbers.
- Reason
- Paste Special
Standard Problems setting, Sales Ledger/Service Orders module
- Use this field if you need to list Returns with a particular Reason.
- Order No.
- Range Reporting
Numeric
- If you need to list the Returns that are connected to a particular range of Purchase Orders, enter their Purchase Order Numbers here.
- Function
- Use these options to specify the level of detail that is to be shown in the report.
- Overview
- This choice produces a report with a single line for each Return, showing Return Number and Date, Purchase Order Number, the Supplier Number and Name and total stock value (sum of the figures in the Row FIFO field in each row).
- Detailed
- This option produces a report listing each Item on a Return with quantities and FIFO and Row FIFO figures.
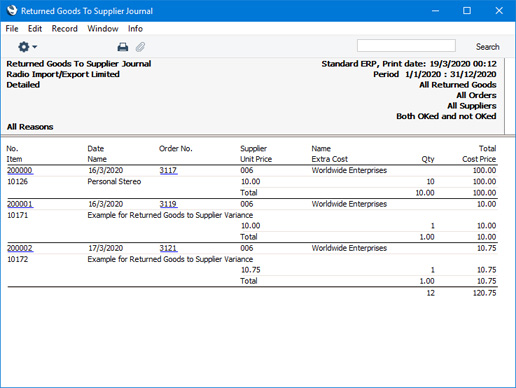
- Overview
- Specify
- Use these options to specify whether Returned Goods to Supplier records that have been marked as OK, Returns that have not been marked as OK or both are to be included in the report. You must select at least one option or the report will be empty.
Reports in the Stock module:
- Introduction
- Aged Stock Analysis
- Best Before List
- Cost Price Analysis
- Credit Notes, Updating Stock
- Deficiency List
- Deficiency List per Location
- Delivery Journal
- Delivery List
- Goods Receipt Journal
- Item Group List
- Item History
- Item History per Location
- Item/Delivery Mode Statistics
- Items at Position
- Location List
- Recipe List (Made of)
- Returned Goods Journal
- Returned Goods to Supplier Journal
- Serial Number History
- Source List
- Stock Depreciation Journal
- Stock In Journal
- Stock List
- Stock List Comparison
- Stock Movement Journal
- Stock Out Journal
- Stock Revaluation Journal
- Stocktaking Comparison
- Stocktaking Journal
- Stocktaking List
- Supplier/Item Statistics
- Varieties Enquiry
- Varieties in Stock
- Weighted Average
- Home page for Stock module manual
- Home page for Standard ERP manual
Historia Números de Serie
Para los Ítems con número de serie, este informe identifica el movimiento de Ítems realizado tanto de manera individual como grupal (por lote).
Cuando se encuentra en pantalla, el informe ‘Historia Números de Serie’ posee la funcionalidad Drill-down de HansaWorld Enterprise. Haz clic en cualquier número de asiento (ej. Nro. Entrega, Nro. Mer. Recibida o Nro. de Factura) para abrir el archivo correspondiente.
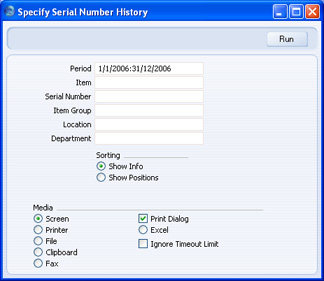
- Periodo
- Pegado Especial
opción Periodos de Informe, módulo Sistema
- Ingresa la fecha inicio y la fecha fin del periodo a ser abarcado por el informe.
- Ítem
- Pegado Especial
registro Ítems
- Rango de Informe Alfa
- Para delimitar el informe en función a Ítems particulares, ingresa aquí el Número de Ítem o rango de números.
- Para delimitar el informe en función a Ítems particulares, ingresa aquí el Número de Ítem o rango de números.
- Número Serie
- Pegado Especial
Números de Serie de Ítems en stock
- Si necesitas vincular un Ítem a un Número de Serie particular, entonces ingresa ese Número de Serie aquí.
- Si el campo Ítem (arriba) queda vacío, la lista ‘Pegado Especial’ contendrá los Números de Serie de todos los Ítems; pero si contiene un solo Ítem, la lista ‘Pegado Especial’ contendrá los Números de Serie solo para ese Ítem.
- Si el campo Ítem (arriba) queda vacío, la lista ‘Pegado Especial’ contendrá los Números de Serie de todos los Ítems; pero si contiene un solo Ítem, la lista ‘Pegado Especial’ contendrá los Números de Serie solo para ese Ítem.
- Grupo Ítem
- Pegado Especial
registro Grupos de Ítem, módulo Ventas
- Ingresa un Código de Grupo Ítem para incluir solo aquellos Ítems que pertenezcan a ese Grupo.
- Ubicación
- Pegado Especial
opción Ubicaciones, módulo Stock
- Ingresa una Ubicación aquí para delimitar el informe en función a archivos de cualquier tipo vinculados a esa Ubicación.
- Departamento
- Pegado Especial
opción Departamentos, módulos Bienes de Uso/Sistema
- Rango de Informe Alfa
- Ingresa un Código de Departamento para incluir solo aquellos Ítems asignados a ese Departamento (especificado en la solapa 'Stock' del Ítem).
- Ingresa un Código de Departamento para incluir solo aquellos Ítems asignados a ese Departamento (especificado en la solapa 'Stock' del Ítem).
- Función
- Este informe es una lista de asientos de stock y dentro de los cuales se ha utilizado Números de Serie. Además se incluye la fecha, tipo de asiento, Número de Asiento, Ubicación, Número de Serie y cantidad. Si optas por ‘Mostrar Info.’ también se mostrará el Número de Cliente o Proveedor. Si optas por ‘Mostrar Posiciones’ entonces se mostrará solo la Posición.
Lista de Orígenes
Este informe es una lista de archivos que contienen el Origen (opción Origen). Este informe muestra el Nombre de Origen, Nombre de Contacto, dirección, etc.
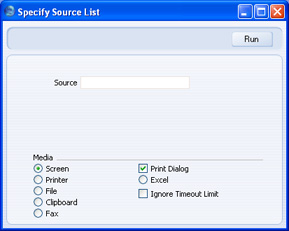
- Origen
- Pegado Especial
opción Origen, módulo Stock
- Rango de Informe Alfa
- Si necesitas imprimir los detalles de un Origen en particular o un rango de ellos, ingresa su código respectivo aquí.
Diario de Bajas de Stock
Este informe muestra archivos seleccionados del registro Bajas Stock.
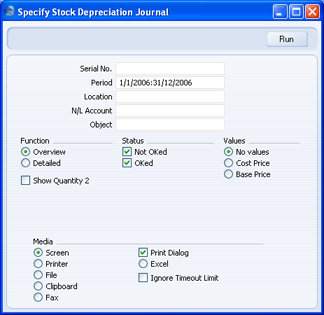
- Nro. Serie
- Rango de Informe
Numérico
- Especifica un rango de Bajas de Stock que han de incluirse en el informe. Utiliza dos puntos (:) para separar el primer y el último número.
- Periodo
- Pegado Especial
opción Periodos de Informe, módulo Stock
- Ingresa la fecha inicio y la fecha fin del periodo a ser abarcado por el informe.
- Ubicación
- Pegado Especial
opción Ubicaciones, módulo Stock
- Para obtener un informe sobre Bajas de Stock que están vinculadas a una Ubicación particular, ingresa aquí el código de esa Ubicación.
- Cuenta
- Pegado Especial
registro Cuentas, módulo Contabilidad/Sistema
- Rango de Informe Alfa
- Para obtener un informe sobre Bajas de Stock que debitan de una Cuenta particular, ingresa el Número de esa Cuenta. Esto se refiere a las Cuentas Costos ingresadas en el encabezado de las Bajas de Stock, no aquellas que probablemente se encuentran dentro de sus filas.
- Para obtener un informe sobre Bajas de Stock que debitan de una Cuenta particular, ingresa el Número de esa Cuenta. Esto se refiere a las Cuentas Costos ingresadas en el encabezado de las Bajas de Stock, no aquellas que probablemente se encuentran dentro de sus filas.
- Objeto
- Pegado Especial
registro Objetos, módulo Contabilidad/Sistema
- Para obtener un informe sobre las Bajas de Stock que utilizan un Objeto en particular, ingresa el código de ese Objeto aquí. Esto se refiere a los Objetos ingresados en el encabezado de las Bajas de Stock, no aquellos que probablemente se encuentran en sus filas.
- Función
- Utiliza estas alternativas para controlar el nivel de detalle a presentarse en el informe.
- Resumido
- Esta alternativa arrojará un informe con una fila por Baja de Stock (por archivo). Además mostrará el Número de Serie, la Fecha, la Cuenta Costo (extraída del encabezado respectivo), la Ubicación, los Objetos y el Comentario.
- Detallado
- Al igual que la información desplegada en la versión resumida, este informe listará cada Ítem contenido en cada Baja de Stock y mostrará su Número y Nombre, la Cuenta Costo, la Cantidad y el valor. Esta versión del informe puede servir como un archivo en lugar de imprimir una copia de cada Baja de Stock.
- Resumido
- Estado
- Utiliza estas casillas para especificar si el informe incluirá Bajas de Stock aprobadas o sin aprobar.
- Valores
- Utiliza estas alternativas para especificar los valores que serán incluidos en el informe.
- Sin Valores
- No aparecerá ningún valor en el informe.
- Precio Contab.
- Hará que el informe despliegue los valores FIFO provenientes de la pestaña D en cada Baja de Stock.
- Precio Base
- Hará que el informe despliegue los Precios Base provenientes de la pestaña C en cada Baja de Stock.
- Sin Valores
- Mostrar Cantidad 2
- Utiliza esta casilla para expresar cantidades de stock usando dos unidades de medida diferentes. Esto solo será aplicable para Ítems que tienen una Unidad 2 y un Coeficiente Unitario especificado en la solapa 'Stock'.
Diario Entradas de Stock
Este informe lista todas las entradas de stock realizadas en un periodo dado.
Cuando se encuentra en pantalla, el informe ‘Diario Entradas de Stock’ posee la funcionalidad Drill-down de HansaWorld Enterprise. Haz clic en cualquier número de asiento de stock (ej. Nro. de Entrega, Movimiento de Stock o Devolución) para abrir el archivo correspondiente.
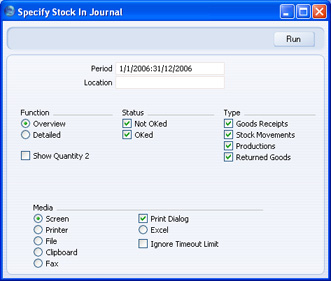
- Periodo
- Pegado Especial
opción Periodos de Informe, módulo Sistema
- Ingresa la fecha inicio y la fecha fin del periodo a ser abarcado por el informe.
- Ubicación
- Pegado Especial
opción Ubicaciones, módulo Stock
- Rango de Informe Alfa
- Ingresa un Código de Ubicación para delimitar el informe en función a una Ubicación específica.
- Ingresa un Código de Ubicación para delimitar el informe en función a una Ubicación específica.
- Función
- Utiliza estas alternativas para controlar el nivel de detalle a presentarse en el informe.
- Resumido
- Esta alternativa arrojará un informe con una sola línea por asiento. Además mostrará el tipo de asiento, el número de serie y el Proveedor. Para Movimientos de Stock, la ‘De Ubicación’ se colocará en la columna Proveedor.
- Detallado
- Esta alternativa mostrará un informe que contiene los Ítems implicados en el asiento junto con sus cantidades y valores.
- Resumido
- Estado
- Utiliza estas casillas para especificar si el informe incluirá asientos aprobados y/o sin aprobar.
- Tipo
- El ingreso de archivos hacia cualquiera de los tres registros implicados puede causar que los niveles de stock se incrementen. Para este informe, utiliza estas casillas a fin de especificar los asientos que serán incluidos.
- Mostrar Cantidad 2
- Tilda esta casilla para expresar las cantidades de stock usando dos unidades de medida diferentes. Esto es aplicable solo para Ítems que tienen una Unidad 2 y un Coeficiente Unitario especificado en su solapa 'Stock'.
Lista de Stock
Este informe muestra la situación de stock, los saldos, etc. ya sea para Ítems, Ubicaciones u otros. Existen varios modelos de valuación de stock para el cálculo de valores de stock. Debes ser cauteloso al comparar los resultados de este informe con el saldo de la Cuenta Stock en la Contabilidad puesto que esta Cuenta Stock podría estar basada en una valuación de stock diferente a la indicada para este informe.
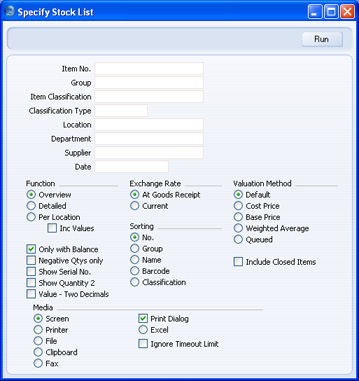
- Cód. Ítem
- Pegado Especial
registro Ítems
- Rango de Informe Alfa
- Ingresa un Número de Ítem (o rango de números) para producir una Lista de Stock que contenga Ítems específicos. Utiliza dos puntos (:) para separar el primer y último número.
- Solo se tomará en cuenta Ítems de Stock (no Ítems Simples, de Servicio o Compuestos).
- Ingresa un Número de Ítem (o rango de números) para producir una Lista de Stock que contenga Ítems específicos. Utiliza dos puntos (:) para separar el primer y último número.
- Grupo
- Pegado Especial
registro Grupos de Ítems, módulo Ventas
- Rango de Informe Alfa
- Ingresa un Grupo de Ítem para producir un informe que involucre a todos los Ítems de Stock pertenecientes a ese Grupo particular.
- Ingresa un Grupo de Ítem para producir un informe que involucre a todos los Ítems de Stock pertenecientes a ese Grupo particular.
- Clasificación Ítem
- Pegado Especial
opción Clasificaciones de Ítem, módulo Ventas
- Ingresa un Código de Clasificación para listar Ítems que pertenezcan a esa Clasificación. Si este campo queda vacío, entonces todos los Ítems serán incluidos (con o sin Clasificación). Si ingresas un rango de Clasificaciones separadas por comas, solo se incluirán aquellos Ítems que correspondan a todas las Clasificaciones especificadas. Si ingresas un rango de Clasificaciones separadas por el signo (+), entonces se incluirá a los Ítems que correspondan por lo menos a una de las Clasificaciones especificadas. Si ingresas una Clasificación precedida del signo (!), se incluirá todos los Ítems excepto aquellos que correspondan a la Clasificación especificada.
- Por ejemplo:
- 1,2
- Listará Ítems con Clasificaciones 1 y 2 (incluyendo Ítems con Clasificaciones 1, 2 y 3).
- 1+2
- Listará Ítems con Clasificaciones 1 o 2.
- !2
- Listará todos los Ítems excepto aquellos con Clasificación 2.
- 1,!2
- Listará Ítems con Clasificación 1 pero excluirá aquellos con Clasificación 2 (es decir, aquellos Ítems con Clasificaciones 1 y 2 no serán incluidos). Notemos el uso de la coma antes del signo de exclamación.
- !1,!2
- Listará todos los Ítems excepto aquellos con Clasificación 1 o 2 o ambas. Nuevamente notemos el uso de la coma.
- !(1,2)
- Listará todos los Ítems excepto aquellos con Clasificaciones 1 y 2 (es decir, Ítems con Clasificaciones 1, 2 y 3 no serán incluidos).
- !1+2
- Listará Ítems sin Clasificación 1 y aquellos con Clasificación 2 (es decir, Ítems con Clasificaciones 1 y 2 serán incluidos).
- (1,2)+(3,4)
- Listará Ítems con Clasificaciones 1 y 2 y aquellos con Clasificaciones 3 y 4.
- Por ejemplo:
- Tipo Clasificación
- Pegado Especial
opción Tipos de Clasificación, módulo CRM
- Ingresa un Tipo de Clasificación para listar solamente Ítems con una Clasificación perteneciente a ese Tipo. Si el campo queda blanco, entonces todos los Ítems serán incluidos (con o sin Clasificación). Si ingresas un rango de Tipos de Clasificación separados por comas, solo se incluirá aquellos Ítems que tengan una Clasificación perteneciente a cualquiera de los Tipos de Clasificación especificados.
- Ubicación
- Pegado Especial
opción Ubicaciones, módulo Stock
- Para producir una Lista de Stock en función a una sola Ubicación, ingresa aquí el código de esa Ubicación.
- Departamento
- Pegado Especial
opción Departamentos, módulos Bienes de Uso/Sistema
- Ingresa un Código de Departamento para incluir solo aquellos Ítems asignados a ese Departamento (especificado en la solapa 'Stock' del Ítem).
- Proveedor
- Pegado Especial
Proveedores en registro Contactos
- Si ingresas el Código de un Proveedor aquí, entonces solo se incluirá aquellos Ítems cuyos Ítems de Compra por Defecto presenten ese Proveedor.
- Fecha
- Pegado Especial
Escoger Fecha
- Ingresa una fecha para producir una Lista de Stock según una fecha específica. Si dejas este campo en blanco, se utilizará la fecha actual.
- Función
- Utiliza estas alternativas para controlar el nivel de detalle a presentarse en el informe.
- Resumido
- Esta alternativa arrojará un informe con una línea por Ítem. Además mostrará respectivamente la cantidad, costo unitario y valor.
- Detallado
- Esta alternativa arrojará un informe que muestra el momento en que cada Ítem ingresó a stock; conjuntamente con su valor FIFO.
- Por Ubicación
- Esta alternativa arrojará un informe similar a la versión resumida, pero también mostrará cantidades por Ítem para cada Ubicación.
- Incl. Valores
- Si optas por la alternativa ‘Por Ubicación’, tilda también esta casilla para mostrar tanto valores como cantidades.
- Resumido
- Sólo con Saldo
- Tilda esta casilla para obtener solo un listado de aquellos Ítems que tienen stock (positivo o negativo).
- Sólo Cant. Negativas
- Tilda esta casilla para listar solamente Ítems con stock negativo. Esto te ayudará a encontrar fácil y rápidamente irregularidades en los niveles de stock.
- Mostrar Nro. Ser.
- Tilda esta casilla si necesitas mostrar Números de Serie en el informe.
- Mostrar Cantidad 2
- Tilda esta casilla para expresar cantidades de stock usando dos unidades de medida diferentes. Esto solo será aplicable para Ítems que tienen una Unidad 2 y un Coeficiente Unitario especificado en la solapa 'Stock'.
- Valor ??? Dos Decimales
- Tilda esta casilla para que siempre se muestre el valor total de stock perteneciente a cada Ítem (ej. el valor unitario multiplicado por la cantidad) pero con dos decimales. Si el Método de Valuación es FIFO, esto sobrescribirá lo indicado en la opción Redondeo del módulo Sistema.
- Tipo Cambio
- Cuando recibes mercaderías con precios y valores en Monedas extranjeras, el valor de stock puede ser calculado usando el Tipo de Cambio al momento de la recepción (principio FIFO) o el Tipo de Cambio al momento de generar el informe. Se recomienda utilizar el Tipo de Cambio al momento de la recepción puesto que así el informe mostrará valores que coinciden con el valor FIFO.
- Ordenar
- Utiliza estas alternativas de ordenación según tus requerimientos.
- Método Valuación
- Estas alternativas controlan el modo de valorar el stock.
- Por Defecto
- Selecciona esta alternativa para calcular el valor de stock usando el Modelo de Costo especificado para cada Ítem; o cuando hayas tildado la casilla ‘Usar Grupos de Ítem para Modelo Costo’ (opción Contabilidad de Costos. Si ese Modelo de Costo no aparece, se utilizará el Modelo de Costo Primario de la opción Contabilidad de Costos. El encabezado del informe mostrará el Modelo de Costo especificado en la opción Contabilidad de Costos (no será pertinente para todos los Ítems).
- Precio Costo
- Selecciona esta alternativa para calcular el saldo de stock usando el Precio Costo mostrado en la solapa 'Costos' situada en el archivo del Ítem.
- % Porcentaje de Precio Base
- Selecciona esta alternativa para producir un saldo de stock calculado mediante la aplicación de un porcentaje sobre el Precio Base (precio venta) (especificado en el registro Ítems). Este porcentaje será extraído de la solapa 'Modelo Costo' en el arhivo del Ítem; o desde el Grupo de Ítem al que pertenece el Ítem (en tanto hayas tildado la casilla ‘Usar Grupos de Ítem para Modelo de Costo’ ??? opción Contabilidad de Costos).
- Promedio Ponderado
- Selecciona esta alternativa para calcular el saldo de stock usando el Promedio Ponderado que se indica en la solapa 'Costos' del Ítem. Se tomará en cuenta la alternativa ‘Promedio Ponderado por Ubicación’ en cada Ítem, en cada Grupo de Ítem según la opción Contabilidad de Costos.
- Costo Lineal
- Esta alternativa calculará el valor de los Ítems según el costo lineal FIFO o LIFO. El uso de FIFO o LIFO variará de un Ítem a otro; dependerá también del Grupo de Ítem al que pertenece el Ítem (cuando hayas tildado la casilla ‘Usar Grupos de Ítem para Modelo de Costo’ - opción Contabilidad de Costos). Por otro lado, el número de decimales a utilizarse en el valor unitario y el valor total, es algo que se determina usando la opción Redondeo en el módulo Sistema.
- Por Defecto
- Incluir Ítems Cerrados
- Tilda esta casilla para incluir Ítems Cerrados dentro del informe. A veces sucede que existe aún stock de Ítems Cerrados, en ese sentido puedes utilizar esta casilla especialmente cuando estás produciendo una Lista de Stock para una fecha pasada.
Comparación de Lista de Stock
Este informe muestra las cifras de stock actuales y las cantidades de Órdenes sin completar ya sea para todos o algunos Ítems dentro de dos Ubicaciones específicas. Si la segunda Ubicación posee stock insuficiente para suplir las Órdenes asignadas a ella, el informe también denotará si es que existe stock disponible en la primera Ubicación (para poder realizar una transferencia).
Para cada Ítem, este informe tiene seis columnas:
- Pedido 1
- La cantidad de la orden abierta en función a la Ubicación 1.
- Ubicación 1
- El nivel de stock actual correspondiente al Ítem en la Ubicación 1.
- Pedido 2
- La cantidad de la orden abierta en función a la Ubicación 2.
- Ubicación 2
- El nivel de stock actual correspondiente al Ítem en la Ubicación 2.
- 1->2
- Si la Ubicación no tiene stock suficiente para satisfacer el pedido del Ítem y así suplir todas la Órdenes abiertas, esta cifra será la cantidad disponible que se transferirá desde la Ubicación 1 para así rectificar esta situación. Si la Ubicación 1 también tiene Órdenes abiertas, entonces se asumirá que éstas serán suplidas primero.
- Ubic. 1/Ord. 1
- Será la cantidad disponible en la Ubicación 1 (ej. columna 2 – columna 1).
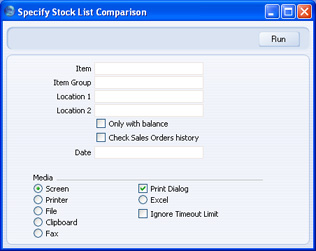
- Ítem
- Pegado Especial
registro Ítems
- Rango de Informe Alfa
- Ingresa un Número de Ítem (o rango de números) para producir una Lista de Stock que contenga Ítems específicos. Utiliza dos puntos (:) para separar el primer y el último número.
- Solo se tomará en cuenta Ítems de Stock dentro del rango (no Ítems Simples, de Servicio o Compuestos).
- Ingresa un Número de Ítem (o rango de números) para producir una Lista de Stock que contenga Ítems específicos. Utiliza dos puntos (:) para separar el primer y el último número.
- Grupo Ítem
- Pegado Especial
registro Grupos de Ítem, módulo Ventas
- Rango de Informe Alfa
- Ingresa un Grupo de Ítem para producir un informe que involucre a todos los Ítems de Stock pertenecientes a ese Grupo.
- Ingresa un Grupo de Ítem para producir un informe que involucre a todos los Ítems de Stock pertenecientes a ese Grupo.
- Ubicación 1
- Pegado Especial
opción Ubicaciones, módulo Stock
- Especifica aquí la Ubicación desde donde se transferirá el stock. Ésta será la ‘Desde Ubicación’ en el Movimiento de Stock posterior.
- Ubicación 2
- Pegado Especial
opción Ubicaciones, módulo Stock
- Especifica aquí la Ubicación hacia donde será transferido el stock a fin de suplir cualquier Orden abierta. Ésta será la ‘A Ubicación’ en el Movimiento de Stock posterior.
- Solo con Saldo
- Tilda esta casilla para excluir aquellos Ítems cuya cifra en la columna 5 es cero. Esta cifra será cero cuando exista stock suficiente en la Ubicación 2 para suplir todas las Órdenes abiertas; o cuando no exista nada de stock en la Ubicación 1 para ser transferido.
Diario de Movimientos de Stock
Este informe muestra los Movimientos de Stock internos realizados entre las distintas Ubicaciones. Estos movimientos están deberán estar inscritos en el registro Movimientos de Stock.
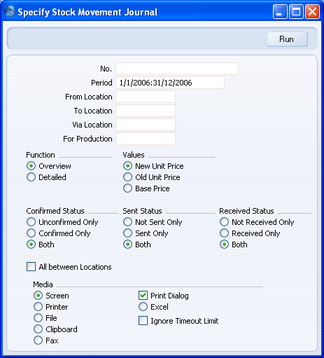
- Nro.
- Rango de Informe
Numérico
- Si necesitas mostrar los detalles de un Movimiento de Stock particular o de un rango de Movimientos de Stock, ingresa aquí sus respectivos Números.
- Periodo
- Pegado Especial
opción Periodos de Informe, módulo Sistema
- Ingresa la fecha inicio y la fecha fin del periodo a ser abarcado por el informe.
- De Ubicación, A Ubicación, Vía Ubicación
- Pegado Especial
opción Ubicaciones, módulo Stock
- Para obtener un informe sobre Movimientos de Stock que trasladan stock desde, vía o hacia una Ubicación particular, ingresa aquí el Código de esa Ubicación. Si cargas tanto una ‘De Ubicación’ y una ‘A Ubicación’, el informe listará solamente aquellos Movimientos de Stock que respondan a estos dos datos. Si deseas obtener un listado de Movimientos de Stock en donde una Ubicación particular es ya sea la ‘De Ubicación’ o la ???A Ubicación’, ingresa el Código de Ubicación en cualquiera de estos campo y luego tilda la casilla ‘Todos entre Ubic.’ (más abajo).
- Para Producción
- Pegado Especial
registro Producción, módulo Producción
- Utiliza este campo para mostrar una lista de Movimientos de Stock vinculados a un archivo de Producción particular. Esto resultará ventajoso cuando utilices Movimientos de Stock para trasladar componentes hacia una Ubicación particular donde serán utilizados para diseñar un Ítem final.
- Función
- Utiliza estas alternativas para controlar el nivel de detalle a presentarse en el informe.
- Resumido
- Esta alternativa arrojará un informe con una fila por Movimiento de Stock. Además mostrará Número y Fecha del Movimiento, Comentario, ‘De Ubicación’, ‘A Ubicación’, Cantidad y valor.
- Detallado
- Al igual que la versión resumida, este informe también mostrará la Moneda y el tipo de cambio pero además de eso, listará cada Ítem dentro de cada Movimiento de Stock mostrando el Número y Nombre del Ítem, Número de Serie, la Cantidad y el valor. Esta versión del informe puede servir como archivo en lugar de imprimir una copia de cada Movimiento de Stock.
- Resumido
- Valores
- Utiliza estas alternativas para especificar lo valores que serán incluidos en el informe:
- Nuevo Precio Unit.
- El ‘R. Nueva Unidad Pr.’ de cada Ítem será incluido en el informe.
- Precio Unitario Ant.
- El ‘R. Vieja Unidad Pr.’ de cada ítem dentro de cada Movimiento de Stock, se incluirá en el informe.
- Precio Base
- Mostrará los Precios Base provenientes de la pestaña B en cada Movimiento de Stock.
- Nuevo Precio Unit.
- Estado Confirmado
- Especifica si lo que deseas es listar Movimientos de Stock que no han sido Confirmados, o aquellos que ya han sido Confirmados, o ambos.
- Enviar Estado
- Especifica si deseas que el informe liste Movimientos de Stock que no han sido Enviados, o aquellos que ya han sido Enviados, o ambos.
- Estado Recibido
- Especifica si deseas que el informe liste Movimientos de Stock que no han sido Recibidos, o aquellos que ya han sido Recibidos, o ambos.
- Todos entre Ubic.
- Si indicas una ‘De Ubicación’ y también una ‘A Ubicación’ en los campos respectivos dentro de esta ventana, el informe listará solamente aquellos Movimientos de Stock que respondan a estos dos datos. Pero, si deseas que el informe liste Movimientos de Stock en donde una Ubicación particular es ya sea la ‘De Ubicación??? o la ‘A Ubicación’, ingresa el Código de Ubicación en cualquiera de estos campos y luego tilda esta casilla.
Diario Salidas de Stock
Este informe lista todas las salidas de stock en un periodo dado.
Cuando se encuentra en pantalla, el informe ‘Diario Salidas de Stock’ posee la funcionalidad Drill-down de HansaWorld Enterprise. Haz clic en cualquier número de asiento de stock (ej. Nro. Mercadería Recibida, Movimiento de Stock o Baja de Stock) para abrir el archivo correspondiente.
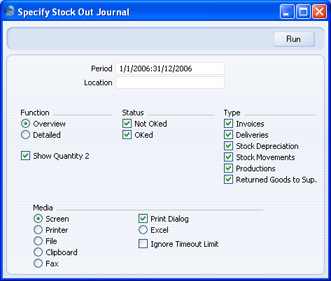
- Periodo
- Pegado Especial
opción Periodos de Informe, módulo Sistema
- Ingresa la fecha inicio y la fecha fin del periodo a ser abarcado por el informe.
- Ubicación
- Pegado Especial
opción Ubicaciones, módulo Stock
- Rango de Informe Alfa
- Ingresa un Código de Ubicación para delimitar el informe en función a una Ubicación específica.
- Ingresa un Código de Ubicación para delimitar el informe en función a una Ubicación específica.
- Función
- Utiliza estas alternativas para controlar el nivel de detalle a presentarse en el informe.
- Resumido
- Esta alternativa arrojará un informe con una sola línea para cada asiento. Además mostrará el tipo de asiento, el número de serie y el Cliente. Para Movimientos de Stock, la ‘A Ubicación’ se colocará en la columna Cliente.
- Detallado
- Esta alternativa mostrará los Ítems implicados en los asientos junto con sus cantidades y valores.
- Resumido
- Estado
- Utiliza estas casillas para especificar si el informe incluirá asientos aprobados y/o sin aprobar.
- Tipo
- El ingreso de archivos hacia cualquiera de los tres registros implicados puede causar que los niveles de stock se incrementen. En este sentido, utiliza estas casillas a fin de especificar los asientos que serán incluidos.
- Mostrar Cantidad 2
- Tilda esta casilla para expresar las cantidades de stock usando dos unidades de medida diferentes. Esto es aplicable solo para Ítems que tienen una Unidad 2 y un Coeficiente Unitario especificado en su solapa 'Stock'.
Stock Revaluation Journal
The Stock Revaluation Journal report lists selected records from the Stock Revaluation register.
When printed to screen, the Stock Revaluation Journal has the Standard ERP Drill-down feature. Click (Windows/Mac OS X) or tap (iOS/Android) on any Stock Revaluation Number in the report to open an individual Stock Revaluation record.
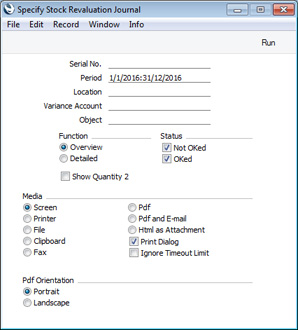
- Serial No. Range Reporting Numeric
Enter a Stock Revaluation Number or a range of Numbers separated by a colon (:) here if you would like specific Stock Revaluations to be shown in the report.
- Period
- Paste Special
Reporting Periods setting, System module
- Period
- Enter the start and end dates of the period to be covered by the report. A Stock Revaluation record will be included in the report if its Transaction Date falls in the period specified here.
- Location
- Paste Special
Locations setting, Stock module
- Range Reporting Alpha
- Entering a Location in the field will restrict the report to Stock Revaluation records with that Location specified in the header. You can also enter a range of Locations separated by a colon (:).
- Entering a Location in the field will restrict the report to Stock Revaluation records with that Location specified in the header. You can also enter a range of Locations separated by a colon (:).
- Variance Account
- Paste Special
Account register, Nominal Ledger/System module
- Range Reporting Alpha
- To report on Stock Revaluations with a particular Variance Account, enter the Account Number here. This refers to the Variance Accounts entered in the headers of the Stock Revaluation records, not to those that might have been entered in the rows.
- To report on Stock Revaluations with a particular Variance Account, enter the Account Number here. This refers to the Variance Accounts entered in the headers of the Stock Revaluation records, not to those that might have been entered in the rows.
- Object
- Paste Special
Object register, Nominal Ledger/System module
- To report on Stock Revaluations that use a particular Object, enter the Object Code here. This refers to the Objects entered in the headers of the Stock Revaluation records, not to those that might have been entered in the rows.
- Function
- Use these options to control the level of detail shown in the report.
- Overview
- This choice produces a report with one row per Stock Revaluation record, showing Serial Number and Date, Location, Variance Account, Objects and Comment. The Location, Variance Account and Objects will be taken from the header of each record.
- Detailed
- As well as the information shown in the Overview, this report lists each Item in each Stock Revaluation record, showing the Item Number, Serial Number and Name, Variance Account, Objects, Quantity, Old and New Total Values and the Difference. You can use this report as an archive file instead of printing a copy of each Stock Revaluation record.
- Overview
- Status
- Specify here whether Stock Revaluations that have been marked as OK, Stock Revaluations that have not been marked as OK or both are to be included in the report.
- Show Quantity 2
- If you select this option, an extra column will be added to the Detailed version of the report, displaying stock quantities using a second unit of measurement. This is only appropriate for Items that have a Unit 2 and a Unit Coefficient specified on the 'Stock' card.
Reports in the Stock module:
- Introduction
- Aged Stock Analysis
- Best Before List
- Cost Price Analysis
- Credit Notes, Updating Stock
- Deficiency List
- Deficiency List per Location
- Delivery Journal
- Delivery List
- Goods Receipt Journal
- Item Group List
- Item History
- Item History per Location
- Item/Delivery Mode Statistics
- Items at Position
- Location List
- Recipe List (Made of)
- Returned Goods Journal
- Returned Goods to Supplier Journal
- Serial Number History
- Source List
- Stock Depreciation Journal
- Stock In Journal
- Stock List
- Stock List Comparison
- Stock Movement Journal
- Stock Out Journal
- Stock Revaluation Journal
- Stocktaking Comparison
- Stocktaking Journal
- Stocktaking List
- Supplier/Item Statistics
- Varieties Enquiry
- Varieties in Stock
- Weighted Average
- Home page for Stock module manual
- Home page for Standard ERP manual
Stocktaking Comparison
When you carry out a stocktake, you should enter the results to a new record in the Stocktaking register. After you have marked this record as OK and saved, you can print a Stocktaking Comparison report to compare the Counted quantities of each Stocked Item in the Stocktaking record with the stock levels in the same record or in your Standard ERP database. Any discrepancies between the Counted quantities and stock levels will be shown as "Adjustment Quantities" in the report. You should adjust stock levels by entering Stock Depreciation records, Goods Receipts or Stock Movements, depending on the reason for the discrepancy. You can enter these records yourself or you can use the 'Stocktaking Comparison' Maintenance function to have them created for you. If you will enter the new records yourself, you can use the Stocktaking Comparison report as a guide. If you will use the 'Stocktaking Comparison' function, the report will show you the Items and quantities that will be included in the new records that the function will create.
This description uses the following terminology:
- Stocktaking record
- To be included in the report, a Stocktaking record must have been marked as OK. All references to Stocktaking records on this page therefore are to Stocktaking records that have been marked as OK.
- Counted quantity
- The Counted quantity is the number of units of an Item that you counted when you carried out the stocktake. In other words, it is the number of units in physical stock in your warehouse.
- In stock, Stock level
- The quantity in stock is the number of units that are recorded as being in stock in your Standard ERP database.
- Discrepancy, Adjustment Quantity
- The discrepancy is the difference between the Counted quantity and the quantity in stock. This figure is shown in the report in a column headed "Adjust." (Adjustment Quantity). If the discrepancy/Adjustment Quantity for an Item is zero, you need take no action. If the discrepancy is positive, you should create a Goods Receipt for the Item to bring the quantity in stock up to the Counted quantity. If the discrepancy is negative, you should create a Stock Depreciation to bring the quantity in stock down to the Counted quantity.

- Item No.
- Paste Special
Item register
- Range Reporting Alpha
- Enter an Item Number (or range of numbers) if you need specific Item(s) to be included in the report. Use a colon (:) to separate the first and last numbers in the range.
- Only Stocked Items in the range will be shown (not Plain, Service or Structured Items).
- Enter an Item Number (or range of numbers) if you need specific Item(s) to be included in the report. Use a colon (:) to separate the first and last numbers in the range.
- Group
- Paste Special
Item Group register, Sales Ledger
- Range Reporting Alpha
- Enter an Item Group Code if you need the report to cover the Stocked Items that belong to a particular Item Group. You can also enter a range of Item Groups, but as the field will only accept five characters you may need to enter an alphabetical range (e.g. "A:M").
- Enter an Item Group Code if you need the report to cover the Stocked Items that belong to a particular Item Group. You can also enter a range of Item Groups, but as the field will only accept five characters you may need to enter an alphabetical range (e.g. "A:M").
- Item Classification
- Paste Special
Item Classifications setting, Sales Ledger
- Enter a Classification Code in this field if you want Items with a certain Classification to be shown in the report. If you enter a number of Classifications separated by commas, only those Items featuring all the Classifications listed will be included in the report. If you enter a number of Classifications separated by plus signs (+), all Items featuring at least one of the Classifications listed will be included. If you enter a Classification preceded by an exclamation mark (!), all Items featuring any Classification except the one listed will be included.
- For example:
- 1,2
- Lists Items with Classifications 1 and 2 (including Items with Classifications 1, 2 and 3).
- 1+2
- Lists Items with Classifications 1 or 2.
- !2
- Lists all Items except those with Classification 2.
- 1,!2
- Lists Items with Classification 1 but excludes those with Classification 2 (i.e. Items with Classifications 1 and 2 are not shown). Note the comma before the exclamation mark in this example.
- !1,!2
- Lists all Items except those with Classification 1 or 2 or both. Again, note the comma.
- !(1,2)
- Lists all Items except those with Classifications 1 and 2 (Items with Classifications 1, 2 and 3 will not be listed).
- !1+2
- Lists Items without Classification 1 and those with Classification 2 (Items with Classifications 1 and 2 will be listed).
- (1,2)+(3,4)
- Lists Items with Classifications 1 and 2, and those with Classifications 3 and 4.
- 1*
- Lists Items with Classifications beginning with 1 (e.g. 1, 10, 100).
- 1*,!1
- Lists Items with Classifications beginning with 1 but not 1 itself.
- *1
- Lists Items with Classifications ending with 1 (e.g. 1, 01, 001).
- 1*,*1
- Lists Items with Classifications beginning and ending with 1.
- For example:
- Classification Type
- Paste Special
Classification Types setting, CRM module
- Enter a Classification Type in this field if you want to list Items with a Classification belonging to that Type to be included in the report. If the field is empty, every Item, with and without Classifications, will be included. If you enter a number of Classification Types separated by commas, Items featuring a Classification belonging to any of those Types will be included in the report.
- Location
- Paste Special
Locations setting, Stock module
- To produce a report for one stock Location, specify that Location here. The report will be compiled from Stocktaking records with this Location specified in the header, and from Stocktaking rows in which this Location has been specified.
- If you specify a Location in which you have selected the Require Position option, the report will contain a separate line for each Item/Position combination. For example, if you have stock of an Item stored in three Positions in the warehouse, the report will contain three lines for that Item, one for each Position.
- If you leave this field empty and you have more than one Location, the report will contain a single line for each Item, displaying aggregate stock and Counted quantities for all Locations.
- If you specify a Location in which you have selected the Require Position option, the report will contain a separate line for each Item/Position combination. For example, if you have stock of an Item stored in three Positions in the warehouse, the report will contain three lines for that Item, one for each Position.
- Position
- Paste Special
Position register, Warehouse Management module
- To produce a report for one Position in a Location, specify that Position here (and leave the Location field above empty).
- Date
- Paste Special
Choose date
- Specify the date for which the Stocktaking comparison is to be carried out. If there is a Stocktaking record with the specified date, the report will compare the stock levels and the Counted quantities in that Stocktaking record and will display any discrepancies between those figures. If you do not enter a date here, the Stocktaking record for the current date will be used.
- If you created the Stocktaking record with the specified date using the 'Create Stocktaking Records' Maintenance function, the In Stock column in the matrix will contain the stock level of each Item as it was at the moment when the record was created. The report will take both the stock level and the Counted quantity of each Item from the Stocktaking record. If you created the Stocktaking record by entering it yourself, the In Stock column in the matrix will be empty. In this case, stock levels for the specified date will be calculated when you run the report and only the Counted quantity will be taken from the Stocktaking record.
- If you specify a date for which more than one Stocktaking record exists, Counted quantities will be taken from every Stocktaking record with that date (they will added together if you have used the same Item in more than one Stocktaking record).
- If you specify a date for which no Stocktaking record exists, the first record after the specified date will be used. If there is no Stocktaking record later than the specified date, all Counted quantities will be zero. Stock figures will not be zero because they will be calculated for the specified date as mentioned at the end of the previous paragraph. This will mean that the discrepancies between the stock levels and Counted quantities in the report will not be correct.
- You should not specify a future date.
- Please refer to the 'Example' section towards the end of this page for more details.
- If you created the Stocktaking record with the specified date using the 'Create Stocktaking Records' Maintenance function, the In Stock column in the matrix will contain the stock level of each Item as it was at the moment when the record was created. The report will take both the stock level and the Counted quantity of each Item from the Stocktaking record. If you created the Stocktaking record by entering it yourself, the In Stock column in the matrix will be empty. In this case, stock levels for the specified date will be calculated when you run the report and only the Counted quantity will be taken from the Stocktaking record.
- Value Variance >
- If you only need an Item to be included in the report if there is a discrepancy between its stock level and its Counted quantity and the value of that discrepancy is greater than a certain value, enter that value here. The value of the discrepancy will be calculated using the Cost Price of the Item (discrepancy * Cost Price). If you need the value of the discrepancy to be shown in the report, select the Show Prices option below.
- If there are some Items with large discrepancies, you can use this field to produce a report that only shows those Items. You can then use the report as a guide to double-check those Items.
- If there are some Items with large discrepancies, you can use this field to produce a report that only shows those Items. You can then use the report as a guide to double-check those Items.
- If Item Not Registered on Stocktaking Records of Specified Date
- A Stocked Item will be included in the report if it meets the criteria specified above and if it satisfies any of the following requirements:
- It is included in at least one Stocktaking record(s) for the specified date.
- It is included in a Stocktaking record that is later than the specified date. Please refer to the 'Example' section below for more details about this point.
- It is not included in any Stocktaking records for the specified date or later, but it is recorded in your database as being in stock on the specified date.
- Assume Counted Quantity is zero
- If you select this option, the Counted quantity of an Item that is in stock in your database but not listed in the Stocktaking records will be assumed to be zero. In other words, this option assumes that the reason you didn't enter the Item in a Stocktaking record was because you counted no units during the stocktake. The report will therefore suggest that you create a Stock Depreciation transaction, writing off the units that are in stock in your database.
- Use this option if you have carried out a complete stocktake for the Location (not a partial one).
- Use this option if you have carried out a complete stocktake for the Location (not a partial one).
- Assume Adjusted Quantity is zero
- If you select this option, it will be assumed that an Item that is not listed in the Stocktaking records has no discrepancy, so no adjustment is needed (i.e. there is no need to enter a Stock Depreciation or a Goods Receipt).
- You might use this option in the situation where you have not finished with the stocktaking process, so you do not want discrepancies shown for Items that you have not counted yet.
- You might use this option in the situation where you have not finished with the stocktaking process, so you do not want discrepancies shown for Items that you have not counted yet.
- Do Not Show Item in the Report
- This is similar to the second option described above. Whereas that option will show a zero Adjustment Quantity for an Item that is not listed in the Stocktaking records, this option will omit the Item from the report altogether. Another way to omit the Item from the report is to select the Assume Adjusted Quantity is zero option together with the Exclude Items if Adjusted Qty is zero option below.
- Again, you might use this option in the situation where you have not finished with the stocktaking process. Items that you have not counted yet will be omitted from the report, making it shorter and easier to read.
- It is included in at least one Stocktaking record(s) for the specified date.
- Sorting
- Use these options to specify whether you want Items in the report to be listed in Item Number order, in Item Group order or in Shelf Code order.
- Function
- Use these options to specify the information is to be shown in the report.
- In all cases, if the report displays a positive Adjustment Quantity for an Item, you should create a Goods Receipt for the Item with the Adjustment Quantity to bring the quantity in stock up to the Counted quantity. If there is a negative Adjustment Quantity, you should create a Stock Depreciation to bring the quantity in stock down to the Counted quantity.
- Show Quantities
- For each Item, this option displays the Count Day, the quantity in stock, the Counted quantity and the Adjustment Quantity (Counted quantity - quantity in stock).
- If you produce the report using the Per Serial Number option below, Serial Numbers will be shown in an additional column next to the Count Day.
- If you produced the report for a Location in which you have selected the Require Position option, Positions will be shown next to the Count Day (but if an Item is Serial Numbered and you are using the Per Serial Number option, the Serial Number will be shown instead of the Position).

- If you produce the report using the Per Serial Number option below, Serial Numbers will be shown in an additional column next to the Count Day.
- Show Prices
- This option will add Cost Prices (from the 'Costs' card of each Item record) to be shown in the report. Both unit and total (Cost Price x quantity in stock) Cost Prices will be shown, as will Adjustment totals (Cost Price x Adjustment Quantity). This option will not show Positions when you produce the report for a Location in which you have selected the Require Position option.

- Shelf Code
- This option is similar to the Show Quantities option above, with the exception that the Count Day column is replaced by a column showing the Shelf Code of each Item.
- In all cases, if the report displays a positive Adjustment Quantity for an Item, you should create a Goods Receipt for the Item with the Adjustment Quantity to bring the quantity in stock up to the Counted quantity. If there is a negative Adjustment Quantity, you should create a Stock Depreciation to bring the quantity in stock down to the Counted quantity.
- Show Quantity 2
- Selecting this option will add an extra column to the report that will display the quantity in stock using a second unit of measurement. This new column will only display figures for Items that have a Unit 2 and a Unit Coefficient specified on their 'Stock' cards. Please refer to the description of the Unit 2 and a Unit Coefficient fields here for more details.
- Exclude Items if Adjusted Qty is zero
- Select this option if you would like Items with no discrepancies to be excluded from the report (i.e. Items where the Counted quantity and the quantity in stock are the same).
- This option applies to every Item, while the Do Not Show Item in the Report option above only applies to Items that are in stock but are not included in Stocktaking records.
- This option applies to every Item, while the Do Not Show Item in the Report option above only applies to Items that are in stock but are not included in Stocktaking records.
- Per Serial Number (using today's Serial Number status)
- This option controls how Serial Numbered Items will be shown in the report. If you do not select this option, a Serial Numbered Item will be shown on a single line in the report with overall Counted, stock and discrepancy figures, and with no Serial Numbers. If you select this option, each batch and unit Serial Number will be listed individually.
- Note that if you select this option, the In Stock figure for each Serial Number in the report will not be taken from the In Stock column in the Stocktaking record for the specified date. Instead the In Stock figure will show the current status of each Serial Number at the moment you produce the report. So, if you select this option, you should enter the current date in the Date field above and you should have a Stocktaking record with the current date that includes the Serial Numbered Items
Example
A Stocked Item will be included in the report if it satisfies any of the following requirements:
- It is included in at least one Stocktaking record(s) for the specified date.
- It is included in a Stocktaking record that is later than the specified date.
- It is not included in any Stocktaking records for the specified date or later, but it is recorded in your database as being in stock on the specified date.
Item Stocktaking Date 1 January Counted Qty Stocktaking Date 8 January Counted Qty Stocktaking Date 15 January Counted Qty Stocktaking Date 22 January Counted Qty 10101 1 2 3 4 10102 1 2 10103 10104 1 2 3 4 10104 1 2 3 4 The Counted quantities shown in the Stocktaking Comparison report will depend on the Date entered in the specification window. If that Date is 1 January, the report will be as follows:
Item Counted Quantity Comment 10101 1 From record dated 1 January 10102 1 From record dated 15 January (closest one after report date) 10103 0 Not included in any Stocktaking record 10104 2 From two records dated 1 January, added together If the Date in the specification window is 16 January, the report will be as follows:
Item Counted Quantity Comment 10101 4 From record dated 22 January 10102 2 From record dated 22 January 10103 0 Not included in any Stocktaking record 10104 8 From two records dated 22 January, added together
If the Date in the specification window is 23 January (or later), all Counted quantities in the report will be zero. There is no Stocktaking record for 23 January and there are no later Stocktaking records to provide Counted quantities.
Taking information from Stocktaking records that are later than the specified date can be useful if the stocktaking process takes several days and you have entered separate Stocktaking records for each day. You can enter the date when the process started in the specification window and the later Stocktaking records will all be used in building up the report. But you should be sure that you complete the stocktaking process for one period before starting the process for the next period. If you start entering Stocktaking records for a second period before you have finished the process for the first period, you may render the first process inaccurate. To continue the example shown above, if you start entering Stocktaking records for February before you have run the Stocktaking Comparison for January, Items that you have received in stock for the first time in February will appear in January's Comparison.
If you created the Stocktaking records using the 'Create Stocktaking Records' Maintenance function, the stock level of each Item in the report will be chosen as described above, with stock levels being taken from the In Stock column in the Stocktaking records. If you added the Stocktaking records to the Stocktaking register yourself, the In Stock column will be blank, so stock levels for the specified date will be calculated using the same method as the Stock List report.
The purpose of the In Stock column in a Stocktaking record is to record stock levels at a particular point in time (the time when the stocktake was carried out). This will make the comparison between stock levels and Counted quantities more accurate, without the need to delay the processing of stock transactions until the stocktaking process has been completed. If the In Stock column in a Stocktaking record is empty, the 'Stocktaking Comparison' function will calculate stock levels for the same day. But, if there were any stock transactions between the stocktake and the end of the day (e.g. Deliveries or Goods Receipts), the resulting stock level figure will not be correct for the time when the stocktake was carried out. The comparison between stock levels and Counted quantities will then not be accurate, so the 'Stocktaking Comparison' function will create incorrect Goods Receipts or Stock Depreciation records that you will need to check and adjust.
---
Reports in the Stock module:
- Introduction
- Aged Stock Analysis
- Best Before List
- Cost Price Analysis
- Credit Notes, Updating Stock
- Deficiency List
- Deficiency List per Location
- Delivery Journal
- Delivery List
- Goods Receipt Journal
- Item Group List
- Item History
- Item History per Location
- Item/Delivery Mode Statistics
- Items at Position
- Location List
- Recipe List (Made of)
- Returned Goods Journal
- Returned Goods to Supplier Journal
- Serial Number History
- Source List
- Stock Depreciation Journal
- Stock In Journal
- Stock List
- Stock List Comparison
- Stock Movement Journal
- Stock Out Journal
- Stock Revaluation Journal
- Stocktaking Comparison
- Stocktaking Journal
- Stocktaking List
- Supplier/Item Statistics
- Varieties Enquiry
- Varieties in Stock
- Weighted Average
- Home page for Stock module manual
- Home page for Standard ERP manual
Stocktaking Journal
This report is a list of the records in the Stocktaking register. For each Stocktaking record, it shows the Stocktaking Number, Date and Location, and then lists the Items in the Stocktaking record, showing the Item Number and Name, Quantity in stock as recorded in the Stocktaking record, Base Price and Value (Quantity x Base Price).
When printed to screen, the Stocktaking Journal has the Standard ERP Drill-down feature. Click (Windows/Mac OS X) or tap (iOS/Android) on any Stocktaking Number in the report to open an individual Stocktaking record.

- Código
- Stocktaking
- Range Reporting
Numeric
- If you need to print the details of a particular Stocktaking record or range of Stocktaking records, enter the Stocktaking Number(s) here.
- Location
- Paste Special
Locations setting, Stock module
- If you need the report to print a list of Stocktaking records relating to a particular Location, specify that Location here. This refers to the Location entered in the header of each Stocktaking record, not to any Locations entered in the Stocktaking rows.
- Date
- Paste Special
Choose date
- If you need to print the details of the Stocktaking records for a particular date, enter that date here.
- Show Quantity 2
- Selecting this option will add an extra column to the report that will display the Counted quantity using a second unit of measurement. This new column will only display figures for Items that have a Unit 2 and a Unit Coefficient specified on their 'Stock' cards. Please refer to the description of the Unit 2 and a Unit Coefficient fields here for more details.
Reports in the Stock module:
- Introduction
- Aged Stock Analysis
- Best Before List
- Cost Price Analysis
- Credit Notes, Updating Stock
- Deficiency List
- Deficiency List per Location
- Delivery Journal
- Delivery List
- Goods Receipt Journal
- Item Group List
- Item History
- Item History per Location
- Item/Delivery Mode Statistics
- Items at Position
- Location List
- Recipe List (Made of)
- Returned Goods Journal
- Returned Goods to Supplier Journal
- Serial Number History
- Source List
- Stock Depreciation Journal
- Stock In Journal
- Stock List
- Stock List Comparison
- Stock Movement Journal
- Stock Out Journal
- Stock Revaluation Journal
- Stocktaking Comparison
- Stocktaking Journal
- Stocktaking List
- Supplier/Item Statistics
- Varieties Enquiry
- Varieties in Stock
- Weighted Average
- Home page for Stock module manual
- Home page for Standard ERP manual
Stocktaking List
The Stocktaking List report is a list of Items that you can use as a basis for stocktaking. It contains a single line for each Item, showing the number recorded as being in stock (if you produce the report using the Show Quantity option) and a space in which you can write the actual quantity in stock.One method of carrying out a stocktake is to print this report on paper and to write in the quantities as you count them in the warehouse. You can then enter these results in a new record in the Stocktaking register. You can enter this record yourself, or you can create it using the 'Create Stocktaking Records' Maintenance function. Then, print these results using the Stocktaking Comparison report. Once you have checked this report, you can adjust stock levels to take any discrepancies into account using the Stock Depreciation, Goods Receipt or Stock Movement registers (depending on the nature of the discrepancy). Again, you can do this yourself or you can use the 'Stocktaking Comparison' Maintenance function.
- Item No.
- Paste Special
Item register
- Range Reporting Alpha
- If you need a particular Item to be listed in the report, enter its Item Number here. You can also enter a range of Item Numbers, separated by a colon (:). If you leave the field blank, every Item will be included in the report.
- Only Stocked Items in the range will be shown in the report. Closed Items will not be included.
- If you need a particular Item to be listed in the report, enter its Item Number here. You can also enter a range of Item Numbers, separated by a colon (:). If you leave the field blank, every Item will be included in the report.
- Shelf Code
- Range Reporting
Alpha
- Enter a Shelf Code (or range of Shelf Codes) if you need the report to list the Items with a particular Shelf Code. You can assign a Shelf Code to an Item using the Shelf Code field on the 'Stock' card of the Item record.
- Item Group
- Paste Special
Item Group register, Sales Ledger
- Range Reporting Alpha
- If you need the report to list the Items that belong to a particular Item Group, enter that Item Group here. You can also enter a range of Item Groups, but as the field will only accept five characters you may need to enter an alphabetical range (e.g. "A:M").
- If you need the report to list the Items that belong to a particular Item Group, enter that Item Group here. You can also enter a range of Item Groups, but as the field will only accept five characters you may need to enter an alphabetical range (e.g. "A:M").
- Item Classification
- Paste Special
Item Classifications setting, Sales Ledger
- If you need the report to list the Items that have a particular Item Classification, enter that Classification here. If you enter a number of Classifications separated by commas, only those Items featuring all the Classifications listed will be shown. If you enter a number of Classifications separated by plus signs (+), all Items featuring at least one of the Classifications listed will be shown. If you enter a Classification preceded by an exclamation mark (!), all Items featuring any Classification except the one listed will be shown.
- For example:
- 1,2
- Lists Items with Classifications 1 and 2 (including Items with Classifications 1, 2 and 3).
- 1+2
- Lists Items with Classifications 1 or 2.
- !2
- Lists all Items except those with Classification 2.
- 1,!2
- Lists Items with Classification 1 but excludes those with Classification 2 (i.e. Items with Classifications 1 and 2 are not shown). Note the comma before the exclamation mark in this example.
- !1,!2
- Lists all Items except those with Classification 1 or 2 or both. Again, note the comma.
- !(1,2)
- Lists all Items except those with Classifications 1 and 2 (Items with Classifications 1, 2 and 3 will not be listed).
- !1+2
- Lists Items without Classification 1 and those with Classification 2 (Items with Classifications 1 and 2 will be listed).
- (1,2)+(3,4)
- Lists Items with Classifications 1 and 2, and those with Classifications 3 and 4.
- 1*
- Lists Items with Classifications beginning with 1 (e.g. 1, 10, 100).
- 1*,!1
- Lists Items with Classifications beginning with 1 but not 1 itself.
- *1
- Lists Items with Classifications ending with 1 (e.g. 1, 01, 001).
- 1*,*1
- Lists Items with Classifications beginning and ending with 1.
- For example:
- Location
- Paste Special
Locations setting, Stock module
- If you select the Show Quantity option below, the report will display the quantity of each Item that you have in stock. By default, the total quantity of each Item in stock in every Location will be shown. If you need the report to show the quantity in stock in a particular Location, specify that Location here. Similarly, the Show Items In Stock Only option can operate at an overall level or at the level of a particular Location.
- Position
- Paste Special
Position register, Warehouse Management module
- If you are using Positions you can use this field to fine-tune further the Show Quantity and Show Items In Stock Only options so that they refer to a particular Position in a warehouse. If you specify a Position here, you should also specify a Location in the field above, otherwise all stock levels in the report will be zero.
- Sorting
- Use these options to specify whether the Items in the report will be listed in Item Number or Shelf Code order.
- Show Quantity
- Select this option if you need the current stock quantity of each Item to be shown in the report.
- By default, this option will display the overall quantity in stock of each Item (i.e. the total quantity in every Location). If you need to see stock figures for a particular Location (or for a particular Position in a Location), specify a Location (and Position) in the field(s) above.
- By default, this option will display the overall quantity in stock of each Item (i.e. the total quantity in every Location). If you need to see stock figures for a particular Location (or for a particular Position in a Location), specify a Location (and Position) in the field(s) above.
- Show Serial Numbers
- Use this option if you need Serial Numbers to be shown in the report.
- Show Items in Stock only
- By default, every Stocked Item will be included in the report. Use this option if you only want the Items that you have stock to be listed.
- By default, an Item will be included in the report if it is in stock in any Location. If you need the report to list the Items that you have in stock in a particular Location (or in a particular Position in a Location), specify a Location (and Position) in the field(s) above.
- By default, an Item will be included in the report if it is in stock in any Location. If you need the report to list the Items that you have in stock in a particular Location (or in a particular Position in a Location), specify a Location (and Position) in the field(s) above.
- Variety Items as Matrix
- By default, Items with Varieties are treated in the same way as other Items in the report. An Item with Varieties will be shown on a single line in which you can write in the total quantity in stock (i.e. a single figure that includes every Variety). If you would like each Variety to be listed separately so you can record the quantity of each Variety individually, select this option.
Reports in the Stock module:
- Introduction
- Aged Stock Analysis
- Best Before List
- Cost Price Analysis
- Credit Notes, Updating Stock
- Deficiency List
- Deficiency List per Location
- Delivery Journal
- Delivery List
- Goods Receipt Journal
- Item Group List
- Item History
- Item History per Location
- Item/Delivery Mode Statistics
- Items at Position
- Location List
- Recipe List (Made of)
- Returned Goods Journal
- Returned Goods to Supplier Journal
- Serial Number History
- Source List
- Stock Depreciation Journal
- Stock In Journal
- Stock List
- Stock List Comparison
- Stock Movement Journal
- Stock Out Journal
- Stock Revaluation Journal
- Stocktaking Comparison
- Stocktaking Journal
- Stocktaking List
- Supplier/Item Statistics
- Varieties Enquiry
- Varieties in Stock
- Weighted Average
- Home page for Stock module manual
- Home page for Standard ERP manual
Estadísticas Ítem/Proveedor
Este informe también está disponible en el módulo Órdenes de Compra. Por favor, haz clic aquí para detalles completos.Control de Variedades
Por favor, haz clic aquí para detalles completos de este informe.Variedades en Stock
Por favor, haz clic aquí para detalles completos de este informe.Promedio Ponderado
Este informe es una lista de los archivos cargados en la opción Promedio Ponderado.
- Ítems
- Pegado Especial
registro Ítems
- Rango de Informe Alfa
- Ingresa los Números de aquellos Ítems que han de ser incluidos en el informe; o puedes dejar el campo en blanco para mostrar todos.