Introduction to the Goods Receipt Register
This register holds records of deliveries received into stock, for Stocked Items. Normally, the information for the Goods Receipt record is taken from the Supplier's delivery note. In many cases, the Invoice from the Supplier is not available at the time of delivery, and therefore full information about the cost of different Items may not be available. The stock value in Hansa is based on the information recorded in the Goods Receipt register.Goods Receipt records can be created directly in the Stock module. If the Purchase Orders module is installed, they can also be created from Purchase Orders, in a similar manner to that in which Deliveries are created from Sales Orders.
If the Production module is installed, entering a record in the Production register will update stock through an "invisible" goods receipt transaction. The result of "finishing" a Production transaction in the Production module is to update the stock levels of the input and output Items specified in the Recipe used. No Goods Receipt transaction will be generated in the Goods Receipt register, but the result of the stock change will, however, be visible in the Item History report in the Stock module.
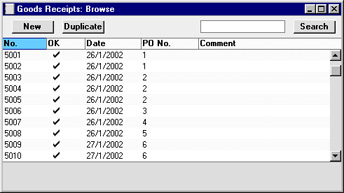
In the Stock module, select 'Goods Receipts' from the Registers menu, or click the [Goods Receipts] button in the Master Control panel. The 'Goods Receipts: Browse' window is opened, showing Goods Receipts already entered:
Entering a Goods Receipt
Goods Receipts can be entered in two ways:- From the 'Goods Receipts: Browse' window, click the [New] button in the Button Bar to open a new Goods Receipt transaction.
- Open the Purchase Order against which the Items are being received. The Supplier's delivery note will usually contain your Purchase Order Number, enabling the Purchase Order to be found easily. Select 'Goods Receipt' from the Operations menu. A new Goods Receipt transaction is created. The advantage of this method is that the purchase price agreed for the Items for the particular Purchase Order will be transferred to the Goods Receipt: this information will not normally be present on the Supplier's delivery note.
Note that Goods Receipts created in this way will be presented in a 'Goods Receipt: Inspect' window. This means that the record will already have been created and saved into the register. To delete it you must choose 'Delete' on the Record menu.
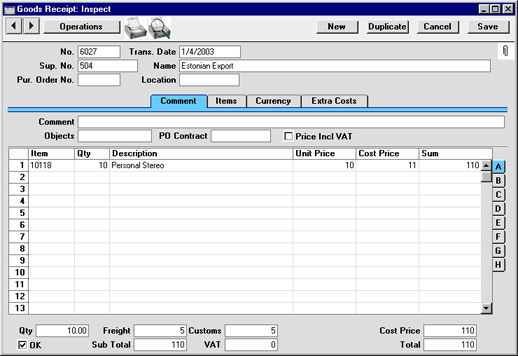
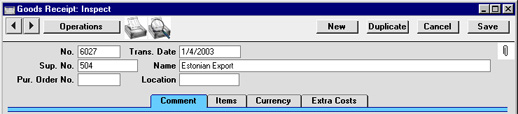
Entering a Goods Receipt - Header
- No.
- Paste Special
Select from another Number Series
- The number of the Goods Receipt: Hansa will enter the next unused number from the first number sequence allocated on the 'Ser Nos' card of the user's Person record or from the Number Series - Goods Receipts setting. You may change this number, but not to one that has already been used.
- Trans. Date
- Paste Special
Current Date
- The date of the receipt. The default is the current date.
- Sup. No.
- Paste Special
Supplier register
- Enter the Supplier Number. When you press Return, the Supplier's name will be entered to the field on the right.
- Name
- The Supplier's Name is entered from the Supplier register after you have entered the Supplier Number.
- Pur. Ord. No.
- If the Goods Receipt has been created from a Purchase Order, the Purchase Order Number will be placed in this field by Hansa. It is not modifiable.
- Location
- Paste Special
Locations setting, Stock module
- The stock Location where the goods are to be stored.
- If a Main Location has been specified in the Stock Settings setting, leave this field blank if the goods are to be stored in that Location. However, if, in the same setting, the Require Location option is on, this field must contain a value.
Entering a Goods Receipt - Comment Card

- Comment
- A comment regarding the current Goods Receipt.
- Objects
- Paste Special
Object register, System module
- Default taken from Supplier
- Up to 20 Objects separated by commas can be allocated to each Goods Receipt. They allow detailed analysis by department or cost centre.
- These will be assigned to the credit posting to the Purchase Control Account when a Nominal Ledger Transaction is generated from the Goods Receipt. If the Supplier Object on Stock A/C option on card 1 of the Account Usage P/L setting in the Purchase Ledger is being used, they will be assigned to the debit posting to the Stock Account as well.
- Up to 20 Objects separated by commas can be allocated to each Goods Receipt. They allow detailed analysis by department or cost centre.
- PO Contract
- If the Goods Receipt was created from a Purchase Order that in turn was created from a Purchase Order Contract, the Contract Number will appear here. This field cannot be changed.
- Price Incl. VAT
- Default taken from
Purchase Order
- Check this box if the prices entered for the goods received include VAT. For each Item, VAT will be calculated using the VAT Code from the Item, the Item Group or from card 3 of the Account Usage P/L setting.
Entering a Goods Receipt - Items Card
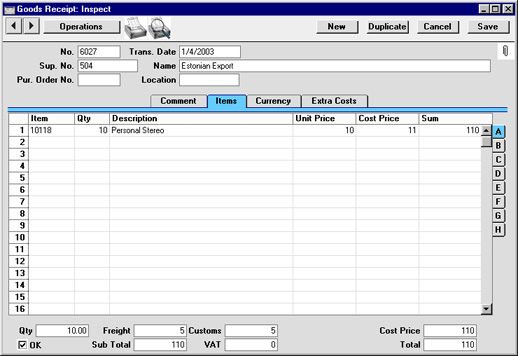

To add rows to a Goods Receipt, click in any field in the first blank row and enter appropriate text. To remove a row, click on the row number on the left of the row and press the Backspace key. To insert a row, click on the row number where the insertion is to be made and press Return.
In the case of Goods Receipts created from Purchase Orders, the assumption is usually made that all Items not yet received are on the current shipment. The exception is if the Set Goods Receipt Quantity to Zero option in the Purchase Order Settings setting is being used, in which case the default Quantity for all Items will be zero. The Quantity of one or more rows on the Goods Receipt screen can be amended as appropriate. You can also remove entire rows, by clicking on the row number to the left and pressing the Backspace key. You can receive into stock a greater Quantity than was ordered. In the case of Items which are Serial Numbered, you will be prompted to enter Serial Numbers before saving.
Flip A
- Item
- Paste Special
Item register
- Enter the Item Number of the Item received. A warning will appear if you use an Item that is not a Stocked Item.
- Qty
- Received quantity, to be added to stock. Negative values are not accepted.
- Description
- The Item description is brought in from the Item register by Hansa. It may be altered.
- Unit Price
- The normal purchase price in the Currency of the Receipt, from the Purchase Order, the Purchase Item for the Item/Supplier combination or from the Cost Price field in the Item register. This figure excludes any extra costs such as delivery or customs duties, but includes VAT if the Price Incl. VAT box on the 'Comment' card is checked. The price may be changed for a particular transaction. If the Item in question can have its Cost Price updated on Purchase (set using the options on 'Costs' card of the Item record), any change in price here will be fed back to the Item record automatically.
- If the Currency and/or Exchange Rate of the Goods Receipt is changed, the figure in this field will not be recalculated. Instead, it will be treated as being in the new Currency and the Cost Price (below) will be recalculated.
- If the Currency and/or Exchange Rate of the Goods Receipt is changed, the figure in this field will not be recalculated. Instead, it will be treated as being in the new Currency and the Cost Price (below) will be recalculated.
- Cost Price
- The Unit Price of the Item in the home Currency (or in Base Currency 1 as defined in the Base Currency setting in the System module), including any freight and other additional costs. If the Price Incl. VAT box on the 'Comment' card is checked, the figure in this field will be the only one in the Goods Receipt not to include VAT.
- Sum
- The row total, including any additional costs in the home Currency (or in Base Currency 1 as defined in the Base Currency setting in the System module).
- Serial No.
- The Serial or Batch Number of the Item.
- In the case of Items with unique Serial Numbers, these must be entered on separate rows, each with a Quantity of one.
- If a large quantity of a Serial Numbered Item is received into stock, the 'Generate Serial Nos' function on the Operations menu can aid the entry of consecutive Serial Numbers. This will be most useful for companies that generate their own Serial Numbers. Enter the Item Number in the appropriate number of rows and specify the lowest Serial Number for the first one. Then select the function: the remaining rows will gain a Serial Number, each incremented by one.
- By default, if an Item is one that uses Serial Numbers, you must specify a Serial Number here before the Goods Receipt can be saved. If the Serial Number is not known at this stage, you should use the No Serial No. on Goods Receipts option in the Stock Settings setting. This will allow you to save Goods Receipts without Serial Numbers, but you will still have to specify them in goods out transactions.
- Note that Serial Numbers cannot contain spaces, and that the same Serial or Batch Number cannot be used more than once in the same Goods Receipt.
- In the case of Items with unique Serial Numbers, these must be entered on separate rows, each with a Quantity of one.
- Best Before
- If the Item is perishable, enter a Best Before date here.
- If you have entered a Serial or Batch Number as well, when the Goods Receipt is approved and saved, a record will be created in the Dates are entered using the Batch Specifications setting recording the Best Before date of the Item or Batch. You can view this record immediately by selecting 'Open Batch Specification' from the Operations menu.
- When the Item is sold, the Best Before date will be brought in to the Delivery record. It can then be printed on delivery documentation if necessary. If you want to prevent the sale of Items that have passed their Best Before date, use the Batch Status and Batch Quality Control settings, as described here.
- If you have entered a Serial or Batch Number as well, when the Goods Receipt is approved and saved, a record will be created in the Dates are entered using the Batch Specifications setting recording the Best Before date of the Item or Batch. You can view this record immediately by selecting 'Open Batch Specification' from the Operations menu.
- Fr. Cost
- An optional Freight Cost (per unit) to be added to the total Cost Price for the Goods Receipt. This figure is in the home Currency (or in Base Currency 1 as defined in the Base Currency setting in the System module). A value can be entered manually for each row, or it can be calculated automatically by Hansa. The automatic calculation starts with the Freight field in the footer area of the window: enter the Freight amount for the total shipment here. When you move to the next field, Hansa will distribute the total Freight amount to the different Item rows according to the cost value of each row.
- In the case of Goods Receipts raised from Purchase Orders, the value will be taken from the Purchase Cost field on the 'Terms' card of the Purchase Order (distributed proportionally to the different rows).
- If a Nominal Ledger Transaction is generated from this Goods Receipt (this is determined using the Sub Systems setting in the Nominal Ledger), any Freight costs are credited to the Purchase Freight Cost Account specified on card 5 of the Account Usage S/L setting.
- In the case of Goods Receipts raised from Purchase Orders, the value will be taken from the Purchase Cost field on the 'Terms' card of the Purchase Order (distributed proportionally to the different rows).
- Customs
- This field works in the same manner as the Freight fields, using the Cust. field in the footer area. It refers to any customs charges attached to the Goods Receipt.
- This value will default to the Purchase Cost from the relevant Purchase Item (multiplied by the quantity).
- If a Nominal Ledger Transaction is generated from this Goods Receipt, any Customs costs are credited to the Customs Cost Account specified on card 5 of the Account Usage S/L setting.
- This value will default to the Purchase Cost from the relevant Purchase Item (multiplied by the quantity).
- Cost
- Any additional cost (per unit) for the Item. It will be shown added to the Unit Price in the Cost Price column to the right. Enter either an amount in the home Currency (or in Base Currency 1 as defined in the Base Currency setting in the System module), or a percentage followed by the % character. The percentage is applied to the Unit Price of the Item in the home Currency.
- This value will default to the Extra Cost from the 'Costs' card of the relevant Item (multiplied by the quantity).
- If a Nominal Ledger Transaction is generated from this Goods Receipt (this is determined using the Sub Systems setting in the Nominal Ledger), any costs in this field are credited to the Extra Costs Account specified on card 5 of the Account Usage S/L setting.
- This value will default to the Extra Cost from the 'Costs' card of the relevant Item (multiplied by the quantity).
- Sup Item No
- The Code allocated to the Item by the Supplier. If the Goods Receipt was created from a Purchase Order, Hansa will enter the Supplier's Item Number automatically.
- Coeff.
- Default taken from
Item
- The Unit Coefficient of the Item is shown here, taken from the 'Stock' card of the Item. If you are maintaining stock quantities using different units of measurement, this coefficient is the ratio between those units of measurement.
- Base Price
- This field shows the unit Base Price (retail price) of the Item in the home Currency, taken from the Item record.
- Stock Acc
- Paste Special
Account register, Nominal Ledger/System module
- The Account entered here will be debited in any Nominal Ledger Transaction created when the Goods Receipt is approved. If this field is blank, the Stock Account for the Location, the Stock Account for the Item Group or the Stock Account in the Account Usage S/L will be debited.
- Usually, no default Account will be offered, unless the Goods Receipt has been created from a Purchase Order and the Transfer Account and Object to Goods Receipt option in the Purchase Order Settings setting is in use. In this case, a default Account will be taken from the Purchase Control Account in the Purchase Order row to which the Goods Receipt row corresponds. This will be the Purchase Control Account for the Item Group to which the Item belongs or from the Account Usage S/L setting.
- Usually, no default Account will be offered, unless the Goods Receipt has been created from a Purchase Order and the Transfer Account and Object to Goods Receipt option in the Purchase Order Settings setting is in use. In this case, a default Account will be taken from the Purchase Control Account in the Purchase Order row to which the Goods Receipt row corresponds. This will be the Purchase Control Account for the Item Group to which the Item belongs or from the Account Usage S/L setting.
- Purch. Acc
- Paste Special
Account register, Nominal Ledger/System module
- The Account entered here will be credited in any Nominal Ledger Transaction created when the Goods Receipt is approved.
- No default will be offered to this field. If it is left blank, the Purchase Control Account from the Item Group to which the Item belongs or from the Account Usage S/L setting will be credited.
- No default will be offered to this field. If it is left blank, the Purchase Control Account from the Item Group to which the Item belongs or from the Account Usage S/L setting will be credited.
- Objects
- Paste Special
Object register, Nominal Ledger/System module
- Default taken from Item
- Up to 20 Objects, separated by commas, can be assigned to this Item and all transactions generated from it. You might define separate Objects to represent different departments, cost centres or product types. This provides a flexible method of analysis that can be used in Nominal Ledger reports.
- In any Nominal Ledger Transactions generated from this Goods Receipt, any Objects specified here will be assigned to the debit posting.
- In the case of Goods Receipts created from Purchase Orders, the Objects entered here will be taken from the Purchase Order row to which the Goods Receipt row corresponds if the Transfer Account and Object to Goods Receipt option in the Purchase Order Settings setting is in use.
- Up to 20 Objects, separated by commas, can be assigned to this Item and all transactions generated from it. You might define separate Objects to represent different departments, cost centres or product types. This provides a flexible method of analysis that can be used in Nominal Ledger reports.
- Customs No.
- This field can be used to record any consignment or customs number of the incoming shipment for this Item. In Russia, an entry in this field is required by law for imported Items.
- Country of O.
- Paste Special
Countries setting, System module
- Record the Country of origin of the Item here. In Russia, an entry in this field is required by law for imported Items.
- Position
- Paste Special
Positions setting, Stock module
- If the Location specified in the header is a large one that has been sub-divided into Positions, enter here the Position where the Item is to be stored. An entry must be made to this field if the Require Position option is in use for the Location in question.
- Width, Height, Depth
- Default taken from
Item
- These fields contain the dimensions of the Item.
- If the Item is one that is purchased by area or volume, you can have the Quantity calculated by multiplying the dimensions together. If you would like to use this feature, first check the Enable Quantity Calculation box in the Item Settings setting in the Sales Ledger. Then, check the Calculate Quantity box for the Unit that has been assigned to the Item. If the Item is purchased by area, choose the Two Dimensions option in the Unit record, and the Quantity will be calculated once you have entered the Width and Height. If the Item is purchased by volume, choose the Three Dimensions option in the Unit record, and the Quantity will be calculated once you have entered the Width, Height and Depth. Please refer to the page describing the Units setting for details and an example.
- Costs 1-5
- These fields can be used for any additional costs (per unit) for the Item. They will be shown added to the Unit Price in the Cost Price column on flip A. Enter an amount in the home Currency (or in Base Currency 1 as defined in the Base Currency setting in the System module).
- You can also enter total additional cost figures for the whole Goods Receipt on the 'Extra Costs' card: Hansa will then distribute the total amount to the various Item rows according to the cost value of each row.
- If a Nominal Ledger Transaction is generated from this Goods Receipt (this is determined using the Sub Systems setting in the Nominal Ledger), any costs in these fields are credited to the corresponding PU Cost Account specified on card 6 of the Account Usage S/L setting.
- You can also enter total additional cost figures for the whole Goods Receipt on the 'Extra Costs' card: Hansa will then distribute the total amount to the various Item rows according to the cost value of each row.

- Qty
- This field records the total number of items of all types on the Goods Receipt.
- Freight
- Please refer to the description of the Fr. Cost field on flip C for details of this field. This figure is in the home Currency (or in Base Currency 1 as defined in the Base Currency setting in the System module). In the case of Goods Receipts raised from Purchase Orders, this value will be taken from the Purchase Cost field on the 'Terms' card of the Purchase Order (reduced proportionally in the case of partial Goods Receipts).
- Customs
- Please refer to the description of the Customs field on flip C for details of this field. This figure is in the home Currency (or in Base Currency 1 as defined in the Base Currency setting in the System module) and by default is the sum of the Purchase Costs from card 1 of the relevant Purchase Items (multiplied by the quantity).
- Cost Price
- This field records the total value of the Goods Receipt, in Currency and including all shipping and other additional costs.
- OK
- Check this box to approve the Goods Receipt. After approving the transaction, it may not be changed. Stock levels will be amended accordingly.
- If you have so determined in the Sub Systems setting in the Nominal Ledger, a Nominal Ledger Transaction will be created in the Transaction register. The nature of this Transaction is described on the Nominal Ledger Transactions from Goods Receipts page.
- If you cannot save a Goods Receipt after checking the OK box, the probable cause is that you will not have specified Freight, Customs and Extra Cost Accounts on card 5 of the Account Usage S/L setting (in the Sales Ledger). These Accounts must be specified, even if the Goods Receipt does not include any of these costs.
- The Goods Receipt must be approved before a Purchase Invoice can be created from the Purchase Order.
- References in these web pages to approved Goods Receipts are to those whose OK check box is on.
- If you have so determined in the Sub Systems setting in the Nominal Ledger, a Nominal Ledger Transaction will be created in the Transaction register. The nature of this Transaction is described on the Nominal Ledger Transactions from Goods Receipts page.
- Subtotal
- The total for the Goods Receipt, excluding VAT.
- VAT
- The VAT total for the Goods Receipt.
- Total
- The total for the Goods Receipt, including VAT.
Pie

- OK
- Tilda esta casilla para aprobar la Mercadería Recibida. Después de hacer esto, no podrás modificar el archivo. Los niveles de stock serán corregidos según corresponda.
- Si has determinado la creación de Asientos en la opción Subsistemas del módulo Sistema y en la opción Nros. de Serie – Mercaderías Recibidas, se creará un Asiento respectivo en el registro Asientos. La características de este Asiento está descrita en la página llamada Asientos Contable desde Mercaderías Recibida.
- Deberás aprobar la Mercadería Recibida antes de crear una Factura de Compra desde una Orden.
- Podrás utilizar los Grupos de Acceso para controlar y determinar quién aprueba las Mercadería Recibidas. Para realizar esto, deberás negar acceso a la acción ‘Dar OK a Mercaderías Recibidas’.
- Las menciones hechas en esta página sobre Mercaderías Recibidas aprobadas, corresponden a aquellas cuya casilla OK ha sido tildada.
- Si has determinado la creación de Asientos en la opción Subsistemas del módulo Sistema y en la opción Nros. de Serie – Mercaderías Recibidas, se creará un Asiento respectivo en el registro Asientos. La características de este Asiento está descrita en la página llamada Asientos Contable desde Mercaderías Recibida.
- Cant.
- Este campo registra el número total de Ítems sin importar su tipo los cuales están contenidos en la Mercadería Recibida. Este dato se actualiza automáticamente.
- Flete
- Por favor, revisa la descripción de la columna ‘C. Flete’ ubicada en la pestaña H, para obtener más detalles de este campo. Esta cifra está expresada en Moneda local (o en Moneda Base 1 según lo definido en la opción Moneda Base del módulo Sistema). Para el caso de Mercaderías Recibidas creadas desde Órdenes de Compra, este valor será extraído del campo ‘Flete’ ubicado al pie de la Orden de Compra; o si éste estuviese en blanco, entonces provendrá del campo Costo Compra de su solapa 'Otro'.
(Claro que reducido proporcionalmente en caso de una Mercadería Recibida parcialmente).
- Aduanas
- Por favor, revisa la descripción de la columna ‘Aduanas’ en la solapa H, para obtener más detalles de este campo. Esta cifra está expresada en Moneda local (o en Moneda Base 1 según lo definido en la opción Moneda Base del módulo Sistema); y por defecto corresponde a la suma de los Costos Compra provenientes de la solapa 'Precio' en el archivo respectivo del Ítem Compra (multiplicado por la cantidad).
- Precio Costo
- Este campo registra el valor total de la Mercadería Recibida (expresado en Moneda local). Esta cifra incluye todos los envíos y otros costos adicionales.
- Además, la cifra de este campo está redondeada conforme a las reglas de redondeo sobre Valor Costo, las cuales están determinadas en la opción Redondeo del módulo Sistema (se aceptan máximo dos decimales).
- Además, la cifra de este campo está redondeada conforme a las reglas de redondeo sobre Valor Costo, las cuales están determinadas en la opción Redondeo del módulo Sistema (se aceptan máximo dos decimales).
- Imp. Ext.
- Cuando defines los Códigos IVA usando la opción respectiva el módulo Contabilidad, puedes instruirle al sistema que imponga también algún gravamen adicional como ser, impuesto ambiental. Cuando el Código IVA en cualquiera de las filas de una Mercadería Recibida, ha sido definido para incluir un impuesto adicional, entonces el monto de ese impuesto aparecerá en este campo (expresado en la Moneda de la Mercadería Recibida). Tal monto será recalculado a medida que agregues Ítems a la Mercadería Recibida. Así, cuando crees y apruebes una Factura de Compra desde la Mercadería Recibida, este Impuesto Extra será debitado de la Cuenta Impositiva especificada para el Código IVA en cuestión. Si has especificado un Impuesto Mínimo (monto mínimo de Imp. Extra) para un Código IVA sin embargo el Impuesto Extra en la Merc. Recibida es menor a ese monto mínimo, entonces este campo quedará en blanco.
- Subtotal
- Será el total de la Mercadería Recibida excluyendo IVA.
- Esta cifra será redondeada conforme a las reglas sobre Valor Costo establecidas en la opción Redondeo del módulo Sistema (máximo hasta dos decimales).
- Esta cifra será redondeada conforme a las reglas sobre Valor Costo establecidas en la opción Redondeo del módulo Sistema (máximo hasta dos decimales).
- IVA
- Será total de IVA correspondiente a la Mercadería Recibida.
- Esta cifra será redondeada conforme a las reglas de redondeo establecidas para la Moneda (opción Redondeo de Moneda – módulo Sistema). Si la Mercadería Recibida no tiene una Moneda o si la Moneda en cuestión no ha sido cargada en la opción ‘Redondeo de Moneda???, entonces la reglas de redondeo serán extraídas de la opción Redondeo – módulo Sistema.
- Esta cifra será redondeada conforme a las reglas de redondeo establecidas para la Moneda (opción Redondeo de Moneda – módulo Sistema). Si la Mercadería Recibida no tiene una Moneda o si la Moneda en cuestión no ha sido cargada en la opción ‘Redondeo de Moneda???, entonces la reglas de redondeo serán extraídas de la opción Redondeo – módulo Sistema.
- Total
- Será el total de la Mercadería Recibida incluyendo IVA.
- Esta cifra será redondeada conforme a las reglas de redondeo establecidas para la Moneda (opción Redondeo de Moneda – módulo Sistema) (redondeo total). Si la Mercadería Recibida no tiene una Moneda o si la Moneda en cuestión no ha sido cargada en la opción ‘Redondeo de Moneda’, entonces la reglas de redondeo serán extraídas de la opción Redondeo – módulo Sistema (redondeo de Valor Costo).
Entering a Goods Receipt - Currency Card

- Currency
- Paste Special
Currency register, System module
- Default taken from Purchase Order, Supplier or Default Base Currency
- The Supplier's invoicing Currency (if not the home Currency). The stock value of the Items on the Goods Receipt will be recorded in the Currency specified here.
- The Supplier's invoicing Currency (if not the home Currency). The stock value of the Items on the Goods Receipt will be recorded in the Currency specified here.
- Exchange Rates
- Default taken from
Base Currency Rates setting and/or Exchange Rate register, System module
- In the case of Goods Receipts entered directly to the Goods Receipt record, the current Exchange Rate will be entered by Hansa. In the case of Goods Receipts created from Purchase Orders, the Exchange Rate from the Purchase Order will be entered here.
- One of two conversion methods will be used. The Dual-Base system will be useful for companies that have offices in two countries that need to report in both Currencies, for companies operating in countries where there is a second Currency (usually the US Dollar or Euro) in common use in addition to the national one, and for companies in the Euro zone who retain their old national Currency for comparison purposes. The second method is a simple conversion from the foreign Currency to the home Currency, applicable to the majority of worldwide Currency transactions. These are described below.
- Exchange Rates (Dual-Base System)
- If the Dual-Base system is being used, the Base Currency 1 and 2 fields on the left show in the form of a ratio the exchange rate between the two base Currencies (taken from the latest record in the Base Currency Rates setting).
- Note that European Monetary Union (EMU) regulations specify that the ratios must always show how many units of the home or foreign Currency can be bought with one Euro.
- Note that European Monetary Union (EMU) regulations specify that the ratios must always show how many units of the home or foreign Currency can be bought with one Euro.
- Exchange Rates (Simple Currency Conversion System)
- In the case of a simple currency conversion system, the Rate and right-hand Base Currency 1 fields are used to show a simple exchange rate between the foreign and home Currencies.
- One of two conversion methods will be used. The Dual-Base system will be useful for companies that have offices in two countries that need to report in both Currencies, for companies operating in countries where there is a second Currency (usually the US Dollar or Euro) in common use in addition to the national one, and for companies in the Euro zone who retain their old national Currency for comparison purposes. The second method is a simple conversion from the foreign Currency to the home Currency, applicable to the majority of worldwide Currency transactions. These are described below.
Entering a Goods Receipt - Extra Costs Card

- Extra Cost 1-5
- Use these fields to enter any total additional cost figures that may apply to the whole Goods Receipt. Hansa will then distribute the total amount to the Cost 1-5 fields on flip H of the 'Items' card according to the cost value of each row.
- If a Nominal Ledger Transaction is generated from this Goods Receipt (this is determined using the Sub Systems setting in the Nominal Ledger), any costs in these fields are credited to the corresponding PU Cost Account specified on card 6 of the Account Usage S/L setting.
Solapa Flete
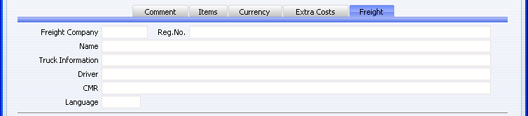
- Em. Transporte
- Pegado Especial
opción Empresas de Transporte, módulo Stock
- Este campo se refiere a un archivo proveniente de la opción ‘Empresas de Transporte’ en el cual se guarda información respecto a los servicios externos de transporte y mensajería que utiliza tu empresa.
- Ingresa la Empresa de Transporte (su código) que se utilizará para la Mercadería Recibida en cuestión. Así, se cargará el Nro. Reg. el Nombre, la Información del Camión, el Conductor y el Texto CMR respectivamente desde la opción ‘Empresas de Transporte’. Podrás modificar estos datos únicamente para la Mercadería Recibida que está en pantalla. Para más detalles de estos campos, por favor revisa la página que describe la opción ‘Empresas de Transporte’ (aquí).
- Ingresa la Empresa de Transporte (su código) que se utilizará para la Mercadería Recibida en cuestión. Así, se cargará el Nro. Reg. el Nombre, la Información del Camión, el Conductor y el Texto CMR respectivamente desde la opción ‘Empresas de Transporte’. Podrás modificar estos datos únicamente para la Mercadería Recibida que está en pantalla. Para más detalles de estos campos, por favor revisa la página que describe la opción ‘Empresas de Transporte’ (aquí).
- Idioma
- Pegado Especial
opción Idiomas, módulo Sistema
- Dato extraído por defecto de Contactos o la Orden de Compra
- El Código de Idioma determina el texto que será transferido desde los distintos archivos y opciones (por ej. el Nombre de Ítem y la selección del formulario). Si dejas este campo en blanco, entonces se utilizará el Idioma local.
- También puedes utilizar el Idioma para determinar el Formulario que se usará cuando imprimas la Mercadería Recibida, así como la impresora para realizar esta acción. Esto puede incluir el envío del documento a una máquina de fax (en tanto tu hardware reconozca esta funcionalidad). Esto se realiza en la ventana ‘Definir Documento’ (Documento Mercadería Recibida) según lo descrito aquí. Podrás cambiar el Idioma aún luego de haber aprobado el archivo; así garantizarás que se imprima en la máquina correcta de impresión o fax.
- El Código de Idioma determina el texto que será transferido desde los distintos archivos y opciones (por ej. el Nombre de Ítem y la selección del formulario). Si dejas este campo en blanco, entonces se utilizará el Idioma local.
Checking and Approving Goods Receipts
Once a Goods Receipt has been entered, it needs to be checked and approved, in order to confirm amounts and values. Click in the OK click box to approve it, and save the approval by pressing the [Save] button in the Button Bar. You will no longer be able to change a Goods Receipt once it has been approved.On approval, stock levels will be amended and, if so defined in the Sub Systems setting in the Nominal Ledger, a cost accounting Transaction will be created in the Nominal Ledger. Please refer to the Nominal Ledger Transactions from Goods Receipts page for details of the Accounts used by this Transaction.
If you are unable to save a Goods Receipt after you have checked the OK box, the probable cause is that you will not have specified Freight, Customs and Extra Cost Accounts on card 5 of the Account Usage S/L setting (in the Sales Ledger). These Accounts must be specified, even if the Goods Receipt does not include any of these costs.
Nominal Ledger Transactions from Goods Receipts
When a Goods Receipt record is approved and saved, a Nominal Ledger Transaction can be generated automatically if you have so determined in the Sub Systems setting in the Nominal Ledger. Please refer here for full details of this Transaction.No Items that are Plain or Service Items will be included in the Nominal Ledger Transaction. Although stock quantities for such Items are maintained, stock values are not.
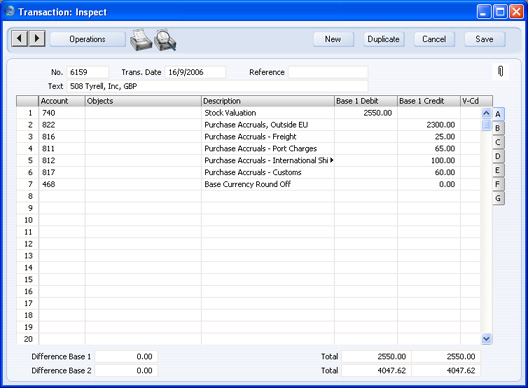
Shown below is an example Nominal Ledger Goods Receipt Transaction:

As shown in the illustration, any Freight, Customs and Extra Costs specified on flip C will be credited to separate Accounts specified on card 5 of the Account Usage S/L setting. Even if the flip C fields are blank, valid Accounts must be specified before the Goods Receipt can be approved. Failure to do so will cause Hansa to display the error message "Transaction could not be generated. Check settings" when an attempt is made to approve and save the Goods Receipt.
If a Goods Receipt contains several Items that use the same Purchase Control and/or Stock Account, the resulting Nominal Ledger Transaction can contain separate double-sided postings for each Item, or a single accumulated posting. If you would like to use the first method, check the Separate Transaction rows per Item box in the Cost Accounting setting.
Stock Adjustments
From time to time the stock balances need to be adjusted for returned goods etc. Such adjustments can be entered as Goods Receipt transactions. This method will be useful for goods that are being returned where there was no original Sales Order (i.e. there was an Invoice only). In this case, entering and approving the Credit Note will not usually update stock levels because of the difficulty of obtaining a FIFO valuation. Instead, the goods should be returned to stock through the medium of a Goods Receipt. Be careful that the cost prices are set correctly, in agreement with the stock valuation method you have selected: you will probably need to find out the true value of the Item from flip C of the original Invoice. The stock valuation in the Nominal Ledger will be updated from the Goods Receipt if you are using Hansa's cost accounting facilities.The entering of Credit Notes is described here while a discussion of the stock implications of Credit Notes can be found here. Cost accounting is described here. If there is an original Sales Order, the stock implications of a return are catered for using the Returned Goods register.
Invalidar una Merc. Recibida
En algunas circunstancias podría resultar conveniente invalidar una Mercadería Recibida. Para esto, utiliza el comando ‘Invalidar’ desde el menú ‘Registro’ estando en la ventana ‘Recepción de Mercaderías: Ver’. Esta función eliminará los Ítems de stock a contenidos en la Mercadería Recibida y por tanto, cualquier Asiento asociado a esto también será eliminado. Es fácil distinguir una Mercadería Recibida que ha sido invalidada puesto que todos sus campos están atravesados por líneas rojas (también es posible ver esto en la ventana ‘Recepción de Mercadería: Hojear???).No se puede invalidar una Mercadería Recibida que contiene algún Ítem cuyo Modelo de Costo es Promedio Ponderado; o cuando todo el archivo no esté aprobado; o cuando su Fecha sea anterior a la fecha de ‘Otros Bloqueos’ (opción Bloquear – módulo Sistema).
Variaciones de Precio
Las Variaciones de Precio pueden sobrevenir cuando se reciben mercaderías en stock cuyos precios son valores estimados. Es decir que no es posible saber a cabalidad los montos de precios extra como ser transporte, aduanas, cobros portuarios, impuestos etc. al momento de colocar la Orden de Compra (por lo general, esto sucede en mercaderías importadas). En algunos casos, el monto exacto de costos extra de las mercaderías simplemente no podrá ser conocido. Por tanto, necesitarás realizar una estimación de estos costos cuando emitas la Orden de Compra. Llegado el momento de recibir las mercaderías en stock, aún no podrás conocer cuánto cuestan, de modo que estas mercaderías serán anotadas en stock usando las cifras estimativas provenientes de la Orden de Compra. Cuando llegue la Factura de Compra, seguramente existirán diferencias con los precios reales (en la Factura) y las estimaciones (de los Ítems recibidos en stock y destinados a las diferentes Cuentas de Provisión). En este sentido, cualquiera de estas diferencias (Variaciones de Precio entre la Factura Compra y la Merc. Recibida) será destinada a las Cuentas de Variaciones (ya sea desde la Factura de Compra o desde la Mercadería Recibida – cualquiera que llegue última). Estas diferencias aparecerán por tanto en el informe ‘Estado de Resultados’ juntamente con el costo de las mercaderías vendidas. Esta funcionalidad permite registrar datos en las distintas Cuentas de Provisión tanto desde Facturas de Compra como Mercaderías Recibidas para así equilibrar (balancear) debidamente ya que las Variaciones se mantienen por separado.Procede según las siguientes indicaciones para configurar Variaciones de Precio:
- Tilda la casilla ‘Contab. Variaciones Precio’ situada en la solapa 'Variaciones' de la opción ‘Manejo de Cuentas de Stock’.
- En la misma solapa ‘Variaciones’, debes especificar Cuentas para Variación Compra, Flete, Aduana y cada uno de los Costos Extra:
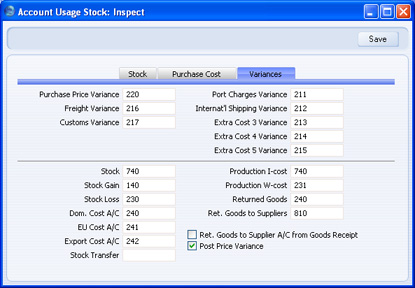
- Puedes definir una Cuenta separada de Variación Precio de Compra dentro de un archivo perteneciente a un Grupo de Ítem (en tanto el Grupo de Ítem no vaya a utilizar el ajuste indicado en el paso 2). Debes por otro lado, tildar la casilla ‘Usar Grupos de Ítem para Contab. Costos’ en la opción Contabilidad de Costos si deseas utilizar las Cuentas de Variaciones para Grupos de Ítems.
- Tilda la Casilla ‘Transferir cada línea por separado’ en la opción Opciones Factura de Compra – módulo Compras. No deberás tildar la casilla ‘Siempre usar toda la cant. Órdenes de Compra’ dentro de la misma opción.
- Si necesitas contabilizar Variaciones de Aduana, Flete y otros Costos Extra, entonces tilda la casilla ‘Facturas de Costos Extra desde distintos Proveedores’ en las Opciones de Órdenes de Compra – módulo Órdenes de Compra. Si no tildas esta casilla, solamente podrás contabilizar Variaciones en precios de Ítems.
- Si existe una probabilidad importante de ingresar Facturas de Compra antes de haber recibido las mercaderías, entonces tilda la casilla ‘Factura de Compra antes de Merc. Recibida??? en las Opciones de Stock. Esto tildará por defecto la casilla ‘Facturar antes de Entregar’ en las nuevas Órdenes de Compra (visible en las solapa ‘Moneda’). Si no tildas la casilla ‘Factura de Compra antes de Merc. Recibida’, podrás tildar la casilla ‘Facturar antes de Entregar’ para cada Orden de Compra cuando sea necesario.
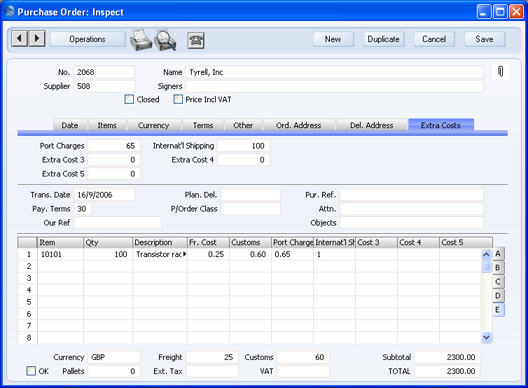
- Para comenzar, carga una Orden de Compra del modo normal. Si desconoces los costos correspondientes a Ítems, Flete, Aduana y/u otro Costo Extra, entonces deberás realizar una estimación de estos valores para que puedas imprimir y emitir la Orden de Compra. Notemos que el Flete, las Aduanas y los Costos Extras no están incluidos en el total de la Orden Compra; esto se debe a que estos montos no serán pagados al Proveedor especificado para esta Orden de Compra sino a una empresa de transporte o la agencia estatal recaudadora de impuestos.
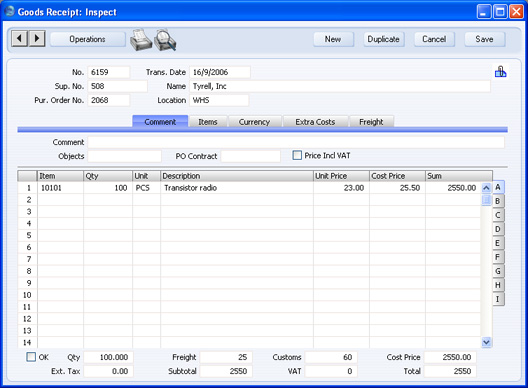
- Cuando lleguen las mercaderías, abre la Orden de Compra y selecciona 'Crear Mercadería Recibida' desde el menú Operaciones. Así, todos los precios serán copiados desde la Orden de Compra hacia la Mercadería Recibida (esta vez todos los costos adicionales serán incluidos en el total). Por lo general, la documentación que acompaña a las mercaderías no revelará ningún precio por tanto el personal de almacén solo podrá ingresar cantidades y no precios. Sin embargo, si la información de los precios está disponible, será posible actualizar la cifras en la Mercadería Recibida si fuese necesario.
- Al aprobar y guardar la Mercadería Recibida se creará un Asiento Contable que debitará de la Cuenta Stock y abonará la Cuenta correspondiente de Provisión de modo normal (en el ejemplo, serán las Cuentas de Provisión Compras, Aduana, Flete y Costos Extra 1 y 2):
- Los datos suscritos en la Cuenta Stock incluyen los Costos Extra. Cuando se vende el Ítem, el valor de la columna ‘Costo Venta’ incluirá los Costos Extra en tanto tu Modelo de Costo sea Promedio Ponderado, FIFO o LIFO ( o Costo Precio cuando éste sea actualizado automáticamente para el Promedio Ponderado o Último Costo Compra).
- Cuando llegue la Factura de Compra, coloca la Orden nuevamente en pantalla y selecciona 'Crear Factura de Compra' desde el menú Operaciones. Como has tildado la casilla ‘Facturas de Costos Extra desde distintos Proveedores’ (Opciones de Órdenes de Compra, la Factura de Compra no será creada inmediatamente sino que aparecerá la siguiente casilla de diálogo:
Procede de la siguiente manera (dependiendo de los criterios incluidos en la Factura de Compra):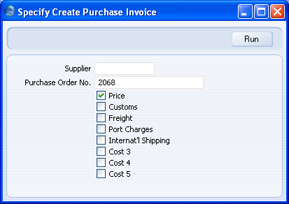
- Si la Factura de Compra incluye los Ítems de la Orden de Compra, entonces deja en blanco el campo ‘Proveedor’ (ya que el Proveedor será extraído desde la Orden de Compra). Si la Factura incluye algún Costo Extra, entonces tilda la casilla ‘Precio’ y también tilda otras casillas que sean necesarias. Luego, haz clic en el botón [Ejecutar].
- Si la Factura de Compra no incluye los Ítems de la Orden de Compra (es decir que solamente es para uno o más de los Costos Extra), entonces especifica el Proveedor usando ‘Pegado Especial’, especifica también los Costos Extra según corresponda, quita el tilde de la casilla ‘Precio’ y haz clic en el botón [Ejecutar].
Por cuanto existe la posibilidad de que recibas Facturas separadas para los Ítems y los Costos Extra, podrás regresar en cualquier momento a la Orden de Compra para crear las diferentes Facturas.
No podrás crear más de una Factura para el Ítem o los Ítems.
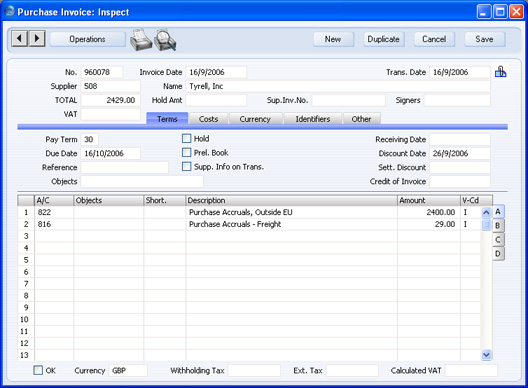
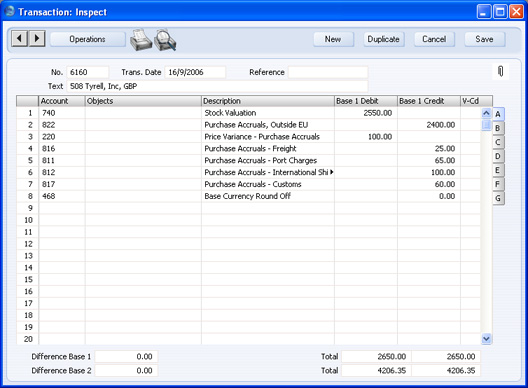
El ejemplo que tenemos abajo nos muestra una Factura para los Ítems y para el Flete:
- Si la Factura de Compra incluye los Ítems de la Orden de Compra, entonces deja en blanco el campo ‘Proveedor’ (ya que el Proveedor será extraído desde la Orden de Compra). Si la Factura incluye algún Costo Extra, entonces tilda la casilla ‘Precio’ y también tilda otras casillas que sean necesarias. Luego, haz clic en el botón [Ejecutar].

- Los valores del Ítem y de Flete son extraídos de la Orden de Compra. La Cuenta de Provisión Compras (para los Ítems) se escoge normalmente según el uso de la casilla ‘Transferir cada Ítem por separado’ (por favor, revisa la descripción de la función 'Crear Factura de Compra' para más detalles). La Cuenta de Provisión Flete es extraída desde la opción 'Manejo de Cuentas de Stock'.
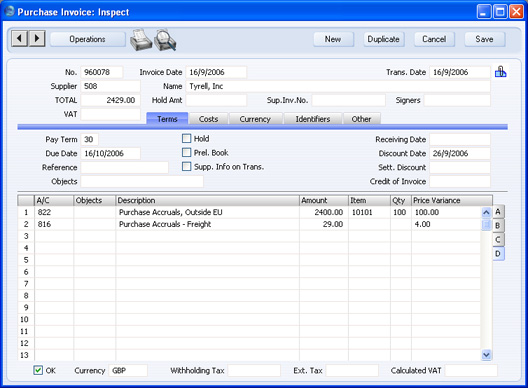
- Si los montos en la Factura de Compra (documento impreso) son diferentes a los ajustes por defecto, entonces puedes cambiarlos apropiadamente:
- Cuando la Factura esté correcta, apruébala de la forma usual. Las diferencias entre los montos de la Mercadería Recibida y la Factura de Compra se copiarán a la columna ‘Variación Precio’ de la pestaña D (de modo que si realizaste algún cambio a las cifras de la Mercadería Recibida – paso 2, éstos serán incluidos en la cifras de variación):
- Dentro del Asiento resultante, el monto de Variación para el/los Ítems será destinado a la Cuenta Variación Precio Compra la cual está especificada en el Grupo de Ítem que agrupa a los Ítems correspondientes (en tanto hayas tildado la casilla ‘Usar Grupos de Ítem p/Contabilidad Costos’ en la opción Contabilidad de Costos. Si no has tildado esta casilla; o si el Ítem no pertenece a un Grupo de Ítem; o si el Grupo de Ítem no tiene su propia Cuenta Variación, entonces se empleará la Cuenta Variación Precio Compra especificada en la opción ‘Manejo de Cuentas de Stock’. Los montos de Variación para los Costos Extra serán destinados a las Cuentas apropiadas de Variación las cuales están especificadas igualmente en la opción ‘Manejo de Cuentas de Stock’:
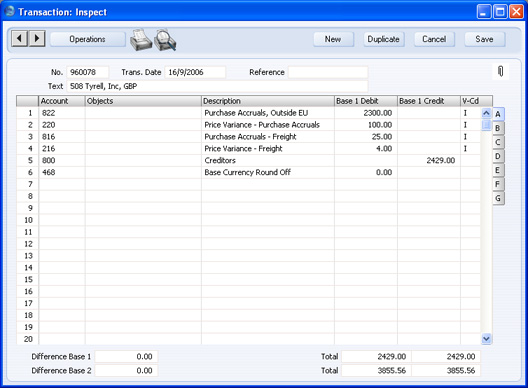
- Por tanto, en el ejemplo vemos que la Mercadería Recibida abonó 1000 a la Cuenta de Provisión Compras; y la Factura de Compra equilibró esto debitando el mismo monto. Si hubieses utilizado Variaciones de Precio, la Factura de Compra hubiera debitado 1100 de la Cuenta de Provisión Compras creando un desequilibrio de 100 que tendría que haber sido ajustado manualmente.
- En algunos casos, podrías recibir la Factura de Compra antes que las mercaderías. En este caso, debes tildar la casilla ‘Facturar antes de Entregar’ en la solapa 'Términos' de la Orden Compra. Así, se tildará por defecto cuando también hayas tildado la casilla ‘Facturas de Compra antes de Merc. Recibidas’ en las Opciones de Stock. Esto te permitirá crear la Factura de Compra desde la Orden de Compra del modo normal, pero deberá ser antes de recibir alguna mercadería. Las cifras contenidas en la Factura de Compra serán copiadas desde la Orden de Compra y podrás cambiarlas si fuese necesario. El Asiento resultante no contendrá ningún dato destinado a las Cuentas de Variación:
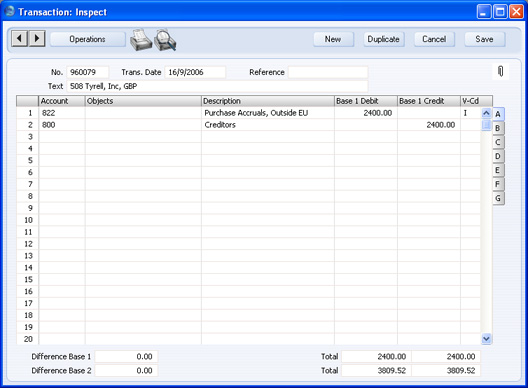
- Cuando lleguen las mercaderías, coloca la Orden de Compra en pantalla y selecciona 'Crear Mercadería Recibida' desde el menú Operaciones. Nuevamente, todos los precios serán copiados desde la Orden de Compra hacia la Mercadería Recibida. Por lo general, la documentación que acompaña a las mercaderías no revelará ningún precio por tanto el personal de almacén solo podrá ingresar cantidades y no precios. Sin embargo, podrás cambiar estas cifras si fuese necesario.
Cuando apruebes la Mercadería Recibida, el Asiento resultante contendrá columnas para las Cuentas de Variación respectivas. El segundo Asiento (en este caso proveniente de la Merc. Recibida; o proveniente de la Factura de Compra en el primer ejemplo), siempre contendrá los datos de Variación:
- Si necesitases devolver un Ítem a su Proveedor, entonces deberás crear una archivo en el registro Dev. Mercaderías a Proveedores. Cuando llegue el momento de ingresar una Nota de Crédito, podrás realizar tal acción desde la ventana ‘Dev. Mercaderías a Proveedor’ (seleccionando Crear Nota de Crédito' desde el menú Operaciones). Si existiese una diferencia en el valor del Ítem devuelto en la Dev. de Mecadería a Proveedor y la Nota de Crédito, esto será registrado como una Variación.
Consignment Stock
A Consignment Stock Item is one that you receive from a Supplier that will remain the property of the Supplier until you sell it. The Supplier will therefore not issue a Purchase Invoice until you sell the Item. The Item never belongs to you: it remains the property of the Supplier until you sell it.As you do not own a Consignment Stock Item, you cannot include it in your stock valuation. So, when you receive the Item, a dedicated Consignment Stock Account should be debited, and when you move it out of stock the same Account should be credited.
If you will hold Items in Consignment Stock, follow these configuration steps:
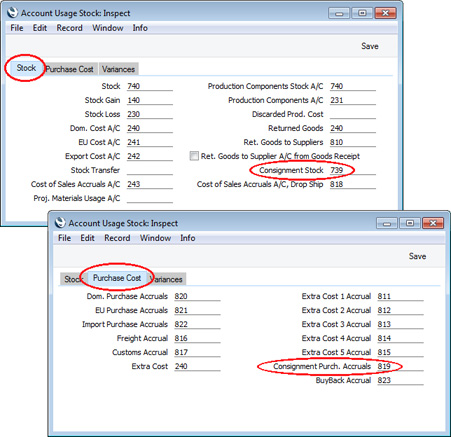
- In the Account Usage Stock setting in the Stock module, specify a Consignment Stock Account (on the 'Stock' card) and a Consignment Purch. Accruals Account (on the 'Purchase Cost' card).
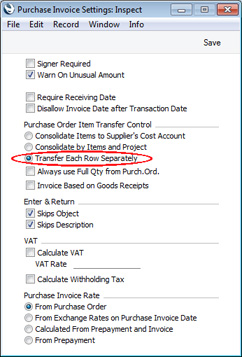
- In the Purchase Invoice Settings setting, ensure you are using the Transfer Each Row Separately option:
- An Item that you hold in Consignment Stock must be Serial Numbered:
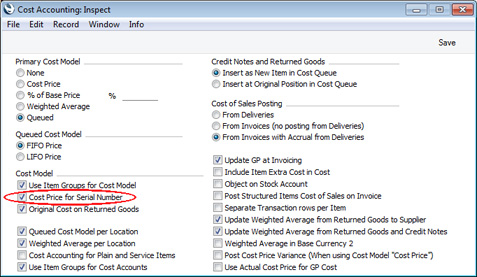
You must also ensure the Item uses the Cost Price for Serial Number option, which you can set on the 'Cost Model' card of the Item or Item Group or in the Cost Accounting setting: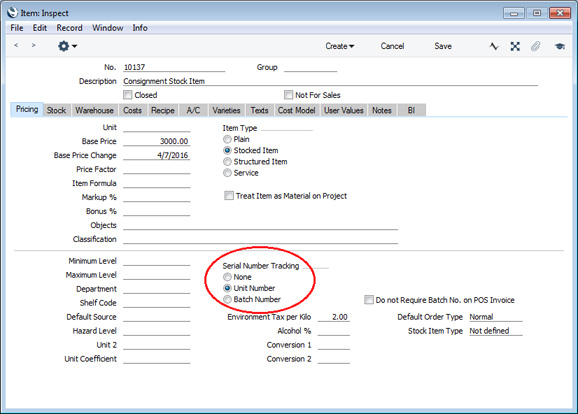
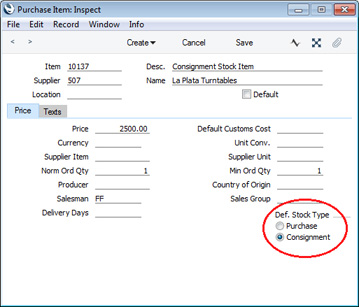
- If an Item is one that you will usually or always hold in Consignment Stock, create a Purchase Item for it and choose "Consignment" as the Def. Stock Type:
- If you will create Invoices from Sales Orders, select the Invoice Based on Delivery option in the Order Settings setting:
Selecting the Invoice Based on Delivery option will cause Serial Numbers to be transferred from Deliveries to any Invoices that you create from Orders. This is important for two reasons: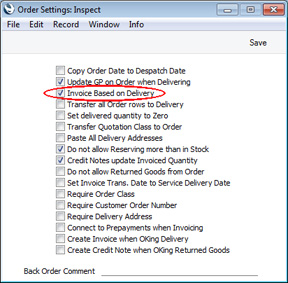
- It will ensure that the Serial No. Item Sales Statistics report is updated correctly. This report will list the individual Serial Numbered Items you have sold during a specified period, connecting them to their original Suppliers. If you are not using the Invoice Based on Delivery option, Serial Numbers will not be transferred from Deliveries to Invoices, and so will not be included in the report.
- If you have specified in the Cost Accounting setting that cost of sales postings will be made from Invoices with no posting from Deliveries, the inclusion of Serial Numbers in Invoices will ensure that the correct Stock Account will be credited. The Serial Number is one means of separating "normal" stock from Consignment Stock. Without a Serial Number in an Invoice, the "normal" Stock Account will be credited from that Invoice instead of the Consignment Stock Account.
If you will be creating Invoices from Deliveries (instead of from Orders) there is no need to select the Invoice Based on Delivery option, although it is still recommended that you do so as a safety measure. - It will ensure that the Serial No. Item Sales Statistics report is updated correctly. This report will list the individual Serial Numbered Items you have sold during a specified period, connecting them to their original Suppliers. If you are not using the Invoice Based on Delivery option, Serial Numbers will not be transferred from Deliveries to Invoices, and so will not be included in the report.
- Create a Purchase Order in the usual way.
When you specify the Item in a Purchase Order row, change the Stock Type on flip D in that row to "Consignment":
Changing the Stock Type will cause the Purch A/C on flip B to change to the Consignment Purch. Accruals Account that you specified in the Account Usage Stock setting (step 1 above).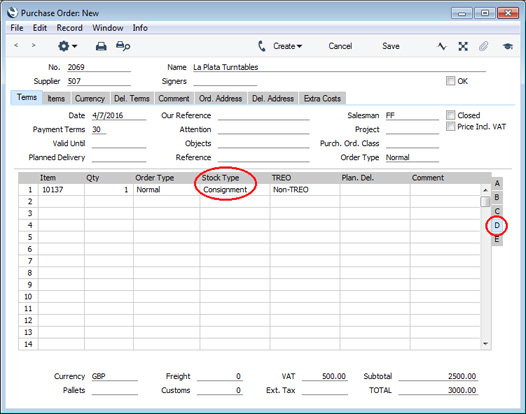
If you created a Purchase Item for the Item in the name of the Supplier (step 4 above), the Stock Type will be copied from that Purchase Item and the Purch A/C will be set appropriately.
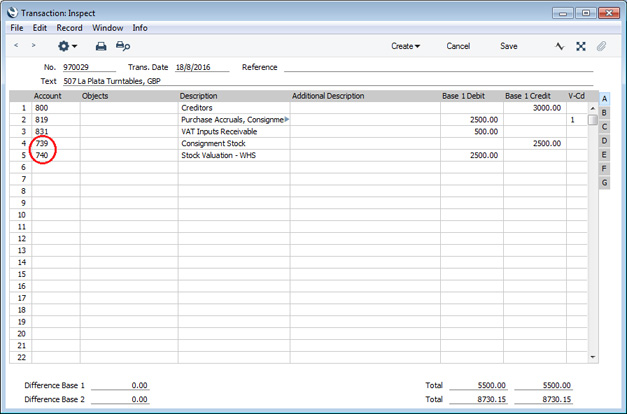
- When you receive the Item, create a Goods Receipt from the Purchase Order in the usual way by choosing 'Goods Receipt' from the Create (Windows/Mac OS X) or + (iOS/Android) menu. The Stock Type and Purch A/C will be copied from the Purchase Order, and the Consignment Stock Account that you specified in the Account Usage Stock setting will be brought in as the Stock A/C (all are visible on flip E):
Specify a Serial Number for the Item, mark the Goods Receipt as OK and save, all as normal.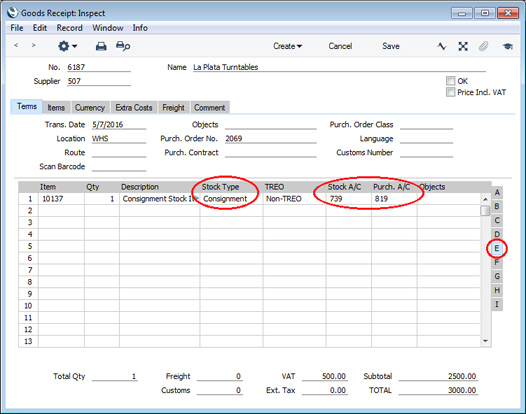
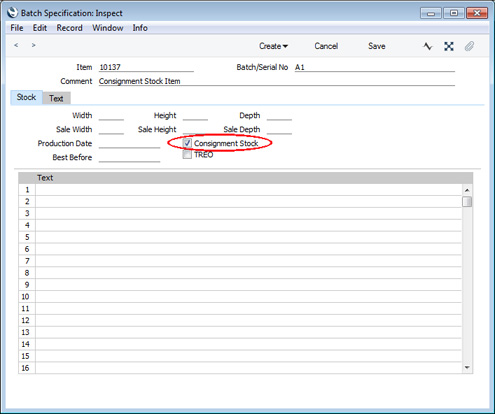
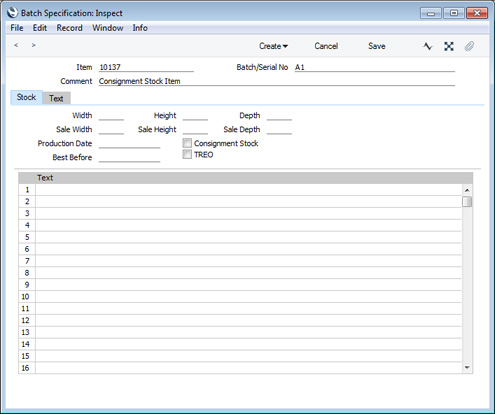
- A record for the Serial Number will be created automatically in the Batch Specifications setting in the Stock module. In this record, the Consignment Stock box will be ticked, signifying that you are holding the Serial Number on Consignment:
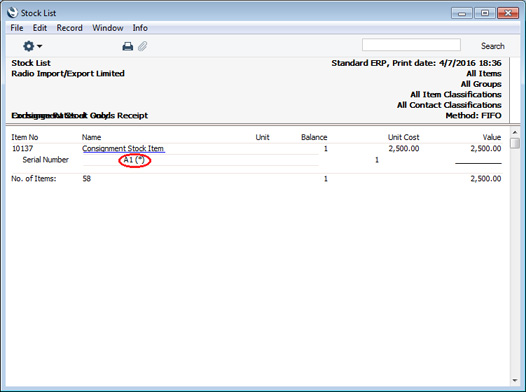
- If you need a list of Items that you hold on Consignment, produce a Stock List report and select the Consignment Stock Only option:
If you also select the Show Serial No. option, Serial Numbers that you are holding on Consignment will be marked with an asterisk (*):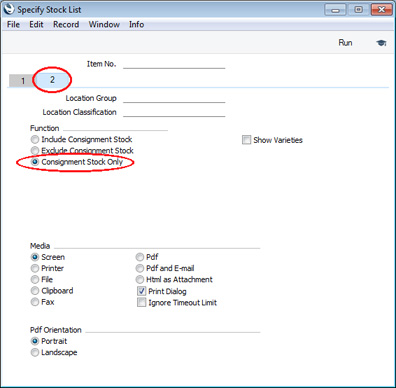
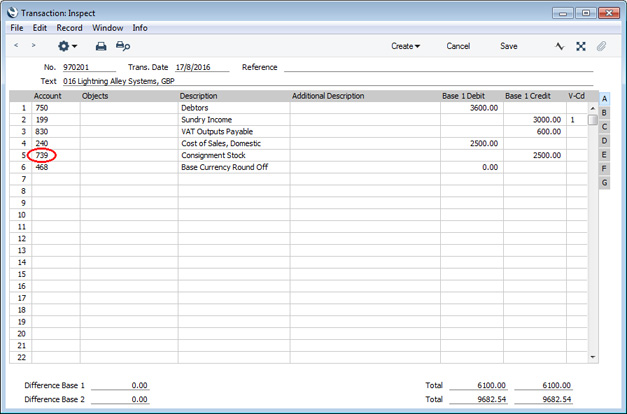
- When you sell an Item you are holding on Consignment, the Consignment Stock Account will be credited as part of the cost of sales postings (instead of the "normal" Stock Account):
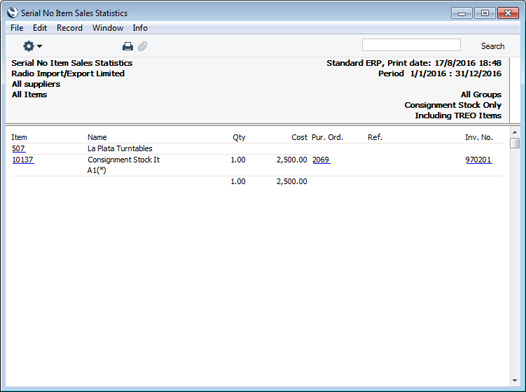
- Usually you will not receive a Purchase Invoice for an Item that you hold on Consignment until you sell it. If you need a list of the Consignment Stock Items that you have sold, produce a Serial No. Item Sales Statistics report from the Sales Ledger, selecting the Consignment Stock Only option:
With this option selected, the report will list the Consignment Stock Items you have sold during a specified period. There will be a separate section for each Supplier, so each Serial Number will be connected to its original Supplier. The report therefore provides you with the information you need in order to notify a Supplier that you have sold an Item that you are holding on Consignment.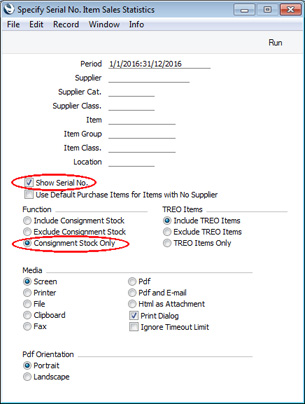
As in the Stock List report, if you also select the Show Serial No. option, Serial Numbers that you are holding on Consignment will be marked with an asterisk (*):
- When the time comes to create a Purchase Invoice, you must do so from the Goods Receipt not the Purchase Order. Create the Purchase Invoice in the usual way by choosing 'Purchase Invoic'' from the Create or + menu. As you are using the Transfer Each Row Separately option in the Purchase Invoice Settings setting (step 2 above), the Consignment Purch. Accruals Account will be copied to the Purchase Invoice from the Goods Receipt row:
- When you mark the Purchase Invoice as OK and save, the Batch Specification record (step iii above) will be updated, with the Consignment Stock box being unticked:
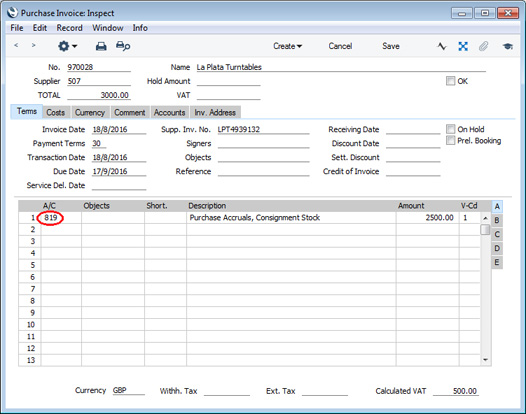
- It may happen that the Supplier sends you the Purchase Invoice before you sell the Item. If so, this signifies that ownership has been transferred to you i.e. you are no longer holding the Item on Consignment.
Again create the Purchase Invoice from the Goods Receipt. When you mark the Purchase Invoice as OK and save, the Batch Specification record will be updated as described in step ix, to reflect the change in ownership. The Nominal Ledger Transaction will include two extra postings that credit the Consignment Stock Account and debit the Stock Account. These postings transfer the Item from Consignment Stock to "normal" stock, again reflecting the change in ownership:
The Goods Receipt register in Standard ERP:
- Introduction
- Entering a Goods Receipt
- Checking and Approving Goods Receipts
- Nominal Ledger Transactions from Goods Receipts
- Stock Adjustments
- Invalidating Goods Receipts
- Price Variances
- Consignment Stock
- Operations menu
- Home page for Stock Module manual
- Home page for Standard ERP manual
Operations Menu
Operations Menu - Print Labels
The 'Print Labels' command will print a label document, used to identify a particular shipment from a Supplier.To print labels in batches, click the [Documents] button in the Master Control panel or select 'Documents' from the File menu. Double-click 'Purchase Labels' in the 'Documents' list window, or highlight it and press the Enter key. Indicate the Goods Receipt Number (or range of Numbers) to be printed and press [Run].
Whether printing singly or in batches, the Form used is determined as follows:
- Using the Form register in the System module, design the Label and name it "PUR_LABEL". A sample is supplied with Hansa: this can be modified to suit your requirements.
- Select the Stock module using the Modules menu.
- Click the [Documents] button in the Master Control panel or select 'Documents' from the File menu. The 'Documents' list window is opened: highlight 'Purchase Labels'.
- Select 'Define Document' from the Operations menu.
- In the subsequent window, enter "PUR_LABEL" in the Form field of the first line (you can use 'Paste Special' to ensure the spelling is correct).
- Click [Save] to save the Form definition. From now on, the Form that you have designed will be used, from the 'Documents' function and from the Operations menu item.
Operations Menu - Update Prices
This command can be used to update the Cost Prices of the Items used in the current Goods Receipt. It can also be used to update any Price Lists that are calculated by adding a margin to the Items' Cost Prices.The Cost Price affected is that shown on the 'Costs' card of the Item record. Cost Prices for Purchase Items are unaffected by this function: these can subsequently be changed using the 'Update Purchase Items' Maintenance function in the Purchase Orders module.
The function should only be used once the Goods Receipt has been saved by clicking the [Save] button in the Button Bar. It is not necessary to approve the Goods Receipt.
Selecting the function opens the dialogue box shown below. Complete it as described and click the [Run] button in the Button Bar. Price changes will then be made, as directed.
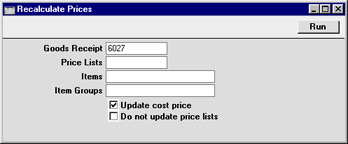
- Goods Receipt
- This field provides a reminder of the number of the Goods Receipt from which the changed prices are taken. It cannot be changed.
- Price Lists
- Paste Special
Price List register, Pricing module
- Specify a particular Price List whose prices are to be recalculated by the function. If left blank, all Price Lists that include Items on the Goods Receipt will be affected.
- Only those Price Lists that are calculated by adding a margin to the Items' Cost Prices will be affected.
- Only those Price Lists that are calculated by adding a margin to the Items' Cost Prices will be affected.
- Items
- Paste Special
Item register
- Range Reporting Alpha
- Specify a particular Item (which must be one on the Goods Receipt) whose Cost Price is to be changed. If left blank, all Items on the Goods Receipt will be affected.
- Specify a particular Item (which must be one on the Goods Receipt) whose Cost Price is to be changed. If left blank, all Items on the Goods Receipt will be affected.
- Item Groups
- Paste Special
Item Group register, Sales Ledger
- Range Reporting Alpha
- Specify a particular Item Group, the Items of which are to have their Cost Price changed. Only members of the Item Group shown on the Goods Receipt will be affected. If left blank, all Items on the Goods Receipt will be affected.
- Specify a particular Item Group, the Items of which are to have their Cost Price changed. Only members of the Item Group shown on the Goods Receipt will be affected. If left blank, all Items on the Goods Receipt will be affected.
- Update cost price
- Switch on this option if you want to change the Cost Prices of the Items on the Goods Receipt, using figures taken from the Goods Receipt.
- Do not update price lists
- Switch on this option if you do not want Price Lists to be recalculated.
Operations Menu - Generate Serial Nos
This function can be useful when a large quantity of a Serial Numbered Item is received into stock and it is necessary to enter many consecutive Serial Numbers. It will be used most often by companies that generate their own serial numbers.Enter the Item Number in the appropriate number of rows and specify the lowest Serial Number for the first one. Then select the function: the remaining rows will gain a Serial Number, each incremented by one. If no lowest Serial Number is entered, the function will find the last one used and increment from there.
Operations Menu - Create Purchase Invoice
To raise a Purchase Invoice from a Goods Receipt, select 'Create Purchase Invoice' from the Operations menu. For the function to have any effect, all changes to the Goods Receipt must first have been saved (use the [Save] button), although there is no need for it to be approved. The function can only be used for Goods Receipts whose Purchase Order Number field is blank (i.e. those which were entered independently, not created from a Purchase Order). To create a Purchase Invoice for a Goods Receipt with a Purchase Order Number, open the Purchase Order and use the 'Invoice' function on the Operations menu.On selecting the function, a new record is created in the Purchase Invoice register (in the Purchase Ledger). It is opened in a new window, entitled 'Purchase Invoice: Inspect'. This means that it has been created and saved and is being opened for amendment and approval.
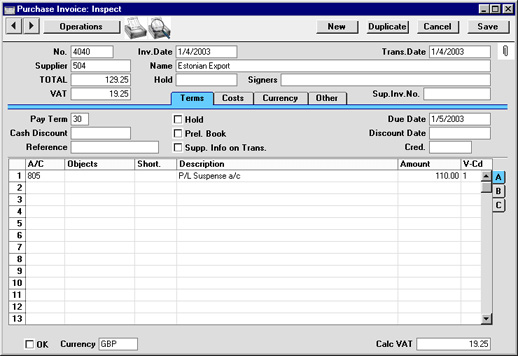
If the Calculate VAT box is checked in the Purchase Invoice Settings setting in the Purchase Ledger, VAT will be calculated backwards from the overall value of the Purchase Invoice using the VAT Rate in that setting. This figure will be placed in the VAT field in the header, and may differ from that in the Calc VAT field in the footer if the Items have different VAT Codes. You will need to correct the header field before you can approve the Invoice. For this reason, it is recommended that the Calculate VAT option is only used in countries where there is a single VAT rate.
The Amount in each Purchase Invoice row will include any extra costs from flips C and H of the Goods Receipt. You can change the Amount of one or more rows on the Invoice screen as appropriate. You can also add more rows.
When the Purchase Invoice has been checked, click the OK check box. This signifies that the Purchase Invoice has been approved. Associated Transactions in the Nominal Ledger will now be raised (if so defined in the Sub Systems setting in the Nominal Ledger) and you will no longer be able to modify the Invoice.
Please click here for a full description of the screen, including detailed information about approving the Invoice and Nominal Ledger Transactions.
Operations Menu - Open NL Transaction
Once a Goods Receipt has been approved and saved, if so defined in the Sub Systems setting in the Nominal Ledger, a Nominal Ledger Transaction is created. This function allows you to view that Transaction.On selecting the function, the Transaction will be opened in a new window.
Operations Menu - Open Batch Specification
Once a Goods Receipt has been approved and saved, a separate record will be created in the Batch Specifications setting for every Goods Receipt row with a Serial Number and Best Before date. This function allows you to view one of those Batch Specification records.First, place the cursor in a Goods Receipt row that has a Serial Number and Best Before date. Then, on selecting the function, the Batch Specification record will be opened in a new window.
Crear Devolución de Mercaderías
Utiliza esta función cuando necesites devolver un Ítem a tu Proveedor. En este caso, abre la Mercadería Recibida y selecciona ‘Crear Devolución de Mercaderías’ desde el menú Operaciones. No obstante, para que la función tenga efecto deberás guardar primero todos los cambios hechos a la Merc. Recibida y ésta tendrá que estar aprobada. Un método alternativo (en tanto no hayas tildado la casilla ‘Costo Original en Dev. Merc. a Proveedor’ – opción Contabilidad de Costos; o no hayas tildado la casilla ‘No Permitir Dev. Merc desde Orden’ en las Opciones de Órdenes de Compra) consiste en abrir la Orden de Compra desde donde se creó la Mercadería Recibida y seleccionar 'Crear Devolución de Mercadería' desde el menú Operaciones. Si no creaste la Mercadería Recibida desde una Orden de Compra, entonces no podrás usar la función ‘Crear Devolución de Mercadería’. En este caso, deberás retirar el Ítem devuelto a stock usando el registro Bajas de Stock.Cuando selecciones la función descrita en esta página, se creará un nuevo archivo en el registro Dev. Merc. a Proveedores (devolución de mercaderías a Proveedores) (módulo Stock). Este archivo se abrirá en una nueva ventana llamada ‘Devolución de Mercadería a Proveedores: Ver’. Esto significa que ha sido creado/guardado y está abierto para su respectiva enmienda y aprobación.
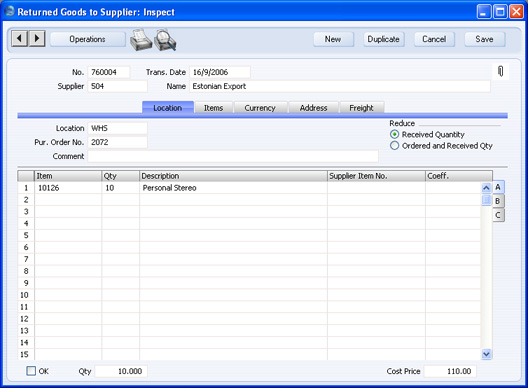
Ingresa la Cantidad devuelta para cada Ítem y elimina cualquier Ítem no devuelto resaltando su fila desde el número y luego presionando la tecla Espacio Atrás. No podrás ingresar una cantidad mayor a la cantidad originalmente recibida o existente en stock (o existente en stock en tanto las cantidades recibidas originalmente hayan sido entregadas a un Cliente o sino retiradas de stock).
Si las mercaderías hubiesen sido devueltas por ser defectuosas (ej. cuando se requiera un reemplazo), entonces debes decidir reducir la Cantidad Recibida en la Orden de Compra subyacente. Esto se realizará usando las alternativas situadas a la derecha de la pantalla. Luego, en tanto se haya procedido con la respectiva aprobación de la Devolución de Mercadería a Proveedor y cuando hayas recibido un reemplazo por el Ítem, podrás reabrir la Orden de Compra y crear otra Mercadería Recibida para registrar la cantidad apropiada.
Alternativamente, en caso que devuelvas las mercaderías a tu Proveedor sin requerir un reemplazo (quizás porque el Cliente devolvió las mercaderías y canceló la Orden). En este caso, deberás decidir reducir la cantidad ordenada y la cantidad recibida. Cuando revises la Orden de Compra subyacente luego de aprobar la Devolución de Merc. a Proveedor, se habrán reducido tanto a Cantidad de la Orden como la Cantidad Recibida. Si la Orden de Compra ha sido facturada seleccionando 'Crear Factura de Compra' desde el menú Operaciones, nuevamente se creará una Factura por una cantidad negativa la cual efectivamente abonará la Factura original. También puedes abonar la Factura de Compra abriendo tal Factura y seleccionando 'Crear Nota de Crédito' desde el menú Operaciones (podrás localizar la Factura original desde la Merc. Recibida o desde la Orden de Compra a través de la facilidad de los archivos Adjuntos). Esto creará una Nota de Crédito con los Términos de Pago apropiados y una referencia de la Factura que será abonada. Un método alternativo es utilizar la función 'Crear Nota de Crédito' pero desde el menú Operaciones de la Devolución de Mercadería a Proveedor en tanto se haya creado una sola Factura de Compra desde la Orden de Compra.
Cuando la Devolución de Mercadería a Proveedor esté completa, haz clic en la casilla OK. Esto significa que la Devolución habrá sido aprobada. Después de esto y de haber guardado la Devolución, ya no podrás modificar este archivo. No podrás crear una Nota de Crédito para las mercaderías que han sido devueltas (hasta que el archivo correspondiente haya sido aprobado). Se creará un asiento de stock en la Contabilidad general si así lo has determinado en la opción Subsistemas del módulo Contabilidad y en la opción Nros. de Serie – Devolución de Mercaderías a Prov. (módulo Stock).
Por favor, haz clic aquí para obtener una descripción completa incluyendo información detallada sobre los Asientos Contables creados al aprobar una Devolución.
Finalmente, para cerrar la ventana y volver a la Mercadería Recibida, haz clic en la casilla cerrar. Habrá la alternativa de guardar los cambios o no. Las columnas Rec. 1 y Rec. 2 en la Orden de Compra subyacente (visibles en la pestaña C), serán actualizadas automáticamente al igual que la Cantidad de la Orden (si así lo has determinado).
Dividir Fila
Es imperativo cargar Ítems con Número de Serie a nivel de Unidad dentro de filas separadas en una Mercadería Recibida. Cada una de estas filas deberá tener la cantidad de uno. Las Mercaderías Recibidas creadas desde Órdenes de Compra contendrán la cantidad apropiada de filas para estos Ítems dependiendo de la Cantidad en la Orden de Compra.Puedes registrar Ítems con Número de Serie a nivel de Lote dentro de una sola fila en la Merc. Recibida; aquí la Cantidad será igual al tamaño del lote. Una Mercadería Recibida creada desde una Orden de Compra, contendrá solamente una línea para tales Ítems y mostrará la cantidad copiada de la Orden de Compra. En caso que recibas más de un lote, deberás colocar el cursor en la fila y luego activar esta función para dividirla en dos. Luego podrás cargar las cantidades necesarias y los Números de Serie en ambas filas. Esto garantizará que esas dos filas permanezcan conectadas a la fila respectiva en la Orden de Compra. Así, las Cantidades Recibidas en esa fila serán correctas. Si recibes varios lotes, puedes aplicar esta función a la fila original cuantas veces sea necesario.
Crear Transferencia de Stock
Esta función será aplicable cuando estés utilizando los módulos Alquileres y/o Stock Interno. Si los Ítems contenidos en la Mercadería Recibida no están destinados a ser revendidos sino que son para uso interno o alquiler, entonces procede a aprobar y guardar la Mercadería Recibida como es usual y luego selecciona esta función. Esto creará un nuevo archivo en el registro Transferencia de Stock del módulo Stock Interno. Cuando apruebes este archivo de Transferencia de Stock, los Ítems serán retirados del stock de ventas y se colocarán dentro del stock interno. Si estás manteniendo una revaluación de stock en la Contabilidad, entonces se creará un Asiento Contable que retirará el valor de los Ítems desde la revaluación de Stock. Este valor será extraído desde la Mercadería Recibida y por tanto, no será calculado mediante el Modelo de Costo usual para los Ítems.Aceptar Movimientos de Stock del Almacén
Esta función será aplicable cuando estés utilizando el módulo Administración de Almacenes. En este caso, al momento de aprobar Mercaderías Recibidas se crearán automáticamente Movimientos de Stock para trasladar los Ítems recibidos desde la Posición en la Merc. Recibida (ej. rampa de salida de Almacén) hacia sus Posiciones de almacenaje en el Almacén (ambas Posiciones aparecerán en la pestaña F de la Mercadería Recibida). En este sentido, utiliza esta función para marcar estos Movimientos de Stock como Recibidos.