Introduction to Settings in the Stock Module
The following settings are available in the Stock module:
To edit a setting when you are using iOS or Android, ensure you are in the Stock module using the [Switch Module] button in the Navigation Centre. Select 'Settings' from the Tools menu (with 'wrench' icon). A list similar to the one shown above appears. Then, tap the item that you need in the list.
---
Please follow the links below for details about each setting:
- Introduction
- Account Usage Stock
- Barcodes
- Base Price Changes
- Batch Specifications
- Cost Accounting
- Freight Companies
- Item Varieties
- Item Variety Groups
- Location Accounts
- Locations
- Minimum Stock Levels
- Number Series - Deliveries
- Number Series - Goods Receipts
- Number Series - Returned Goods
- Number Series - Returned Goods to Supplier
- Number Series - Stock Depreciations
- Number Series - Stock Movements
- Number Series - Stock Revaluations
- Number Series - Stocktaking
- Pack Types
- Recipes
- Returned Goods Settings
- Sources
- Stock Movement Durations
- Stock Revaluation Settings
- Stock Settings
- Structured Items
- User Defined Fields - Extra Costs
- Variety Masks
- Variety Sets
- Variety Settings
- Variety Subsets
- Weighted Average
- Winedi
- Home page for Stock module manual
- Home page for Standard ERP manual
Account Usage Stock
You should use the Account Usage Stock setting to choose the Accounts that will be used as defaults in your stock transactions. These defaults will be used in the absence of Accounts being specified elsewhere (for example, for the Items or Item Groups used in the transactions). Take care to ensure that the Accounts that you specify here exist in the Account register, otherwise Standard ERP will not be able to create transactions.If you have imported the sample Chart of Accounts supplied with Standard ERP, you will find that some of the fields in the Account Usage Stock setting contain suggested values. If you have modified this Chart of Accounts or have used your own, you must ensure that you replace these values with the correct Accounts.
To open the Account Usage Stock setting, first ensure you are in the Stock module. Then, if you are using Windows or Mac OS X, click the [Settings] button in the Navigation Centre and then double-click 'Account Usage Stock' in the 'Settings' list. If you are using iOS or Android, select 'Settings' from the Tools menu (with 'wrench' icon) and tap 'Account Usage Stock' in the 'Settings' list. Fill in the fields as described below. Then, to save changes and close the window, click the [Save] button (Windows/Mac OS X) or tap √ (iOS/Android). To close the window without saving changes, click the close box (Windows/Mac OS X) or tap < (iOS/Android).
The Account Usage Stock setting is spread over three cards. To view specific cards, click or tap one of the three named tabs:

- 'Stock' card
- 'Purchase Cost' card
- 'Variances' card
Settings in the Stock module:
- Introduction
- Account Usage Stock
- Barcodes
- Base Price Changes
- Batch Specifications
- Cost Accounting
- Freight Companies
- Item Varieties
- Item Variety Groups
- Location Accounts
- Locations
- Minimum Stock Levels
- Number Series - Deliveries
- Number Series - Goods Receipts
- Number Series - Returned Goods
- Number Series - Returned Goods to Supplier
- Number Series - Stock Depreciations
- Number Series - Stock Movements
- Number Series - Stock Revaluations
- Number Series - Stocktaking
- Pack Types
- Recipes
- Returned Goods Settings
- Sources
- Stock Movement Durations
- Stock Revaluation Settings
- Stock Settings
- Structured Items
- User Defined Fields - Extra Costs
- Variety Masks
- Variety Sets
- Variety Settings
- Variety Sets
- Weighted Average
- Winedi
- Home page for Stock module manual
- Home page for Standard ERP manual
Account Usage Stock - Stock Card
This page describes the fields on the 'Stock' card of the Account Usage Stock setting. Please follow the links below for descriptions of the other cards:- 'Stock' card
- 'Purchase Cost' card
- 'Variances' card
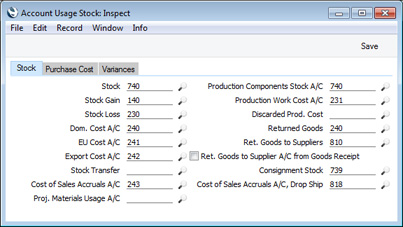
- Stock
- The stock control Account. If you are using maintaining stock values in the Nominal Ledger ('cost accounting'), this Account will be debited when you receive goods into stock and credited when you remove them from stock, if no Stock Account has been specified for the appropriate Location or Item Group.
- Please refer to the Cost Accounting page for full details about this feature.
- Please refer to the Cost Accounting page for full details about this feature.
- Stock Gain, Stock Loss
- These Accounts are used by the Stock Movement register to book value differences resulting from internal stock transfers between stock Locations. The Stock Loss Account will also be debited by default from Stock Depreciation records, while the Stock Gain Account will be credited by default from Goods Receipts created by the 'Stocktaking Comparison' Maintenance function.
- Dom. Cost A/C, EU Cost A/C, Export Cost A/C
- Cost (Cost of Sales) Account used when shipping goods from stock. If you are using cost accounting, this Account will be debited upon Invoice or Delivery, if the equivalent field for the appropriate Item Group is blank. You should specify three separate Cost Accounts, one for each Zone.
- Please refer to the Cost Accounting Transactions from Deliveries and Invoices page for full details about how the Cost of Sales Account will be chosen in an individual transaction.
- You can change the name of the EU Cost A/C field if it is not suitable. Using the VAT Zone Label setting in the Sales Ledger, you can replace the string "EU" with your own string (for example "SACU" in South Africa).
- Please refer to the Cost Accounting Transactions from Deliveries and Invoices page for full details about how the Cost of Sales Account will be chosen in an individual transaction.
- Stock Transfer
- This Account is used by the Stock Transfer register in the Internal Stock module to book value differences from internal stock transfers between stock Locations.
- Cost of Sales Accruals A/C
- If you are using the Sales Orders module, you will usually issue a Delivery to remove the ordered Items from stock, and then issue an Invoice. Using the Cost of Sales Posting options in the Cost Accounting setting, you can specify whether the cost of sales postings will be made from the Invoices, from the Deliveries or from the Invoices with Accruals from the Deliveries.
- If you choose the Invoices with Accruals from the Deliveries option, the posting of cost of sales will be a two-stage process. The Stock Account will be credited by the Delivery, and a Cost of Sales Accrual Account will be debited. From the Invoice, the Cost of Sales Accrual Account will be credited, and the Cost of Sales Account will be debited. Specify here the Cost of Sales Accrual Account that you need to be used in this process.
- If you choose the Invoices with Accruals from the Deliveries option, the posting of cost of sales will be a two-stage process. The Stock Account will be credited by the Delivery, and a Cost of Sales Accrual Account will be debited. From the Invoice, the Cost of Sales Accrual Account will be credited, and the Cost of Sales Account will be debited. Specify here the Cost of Sales Accrual Account that you need to be used in this process.
- Proj. Materials Usage A/C
- This field allows you to specify a dedicated Account that will be debited with the calculated cost of Stocked Items when you remove them from stock using Deliveries that are connected to Projects.
- This can be useful when carrying out long-term Projects (e.g. building or construction Projects) where the Invoices will not be detailed and will not individually list the Items and materials that were used. In this circumstance, it can be desirable to post the costs of the materials to an Account dedicated to materials used for Projects rather than a Cost of Sales Account.
- The Project Materials Usage Account will be chosen as follows:
- It will be taken from the IItem record.
- If you are using the Use Item Groups for Cost Accounts option in the Cost Accounting setting in the Stock module, it will be taken from the Item Group to which the Item belongs.
- It will be taken from this field in the Account Usage Stock setting.
- This can be useful when carrying out long-term Projects (e.g. building or construction Projects) where the Invoices will not be detailed and will not individually list the Items and materials that were used. In this circumstance, it can be desirable to post the costs of the materials to an Account dedicated to materials used for Projects rather than a Cost of Sales Account.
- Production Components Stock A/C
- The Account specified here will be credited by the total Input Cost and debited by the total Output Cost whenever you mark a Production record as Finished, providing no Stock Accounts have been specified for the relevant Location or Item Groups. Production records (used to assemble Stocked Items from components) are fully described here, and Nominal Ledger Transactions from Productions are described here.
- Production Work Cost A/C
- The Account specified here will usually be credited with the total Work Cost whenever you mark a Production record as Finished and save it. Usually, this will be the cost of labour required to build the assembled Items. However, if you are using the Use Item Groups for Cost Accounts option in the Cost Accounting setting and you enter the Work Cost in a row in the Production with an Item belonging to an Item Group in which you have specified a Prod. Work Account, then that Account will be used instead.
- Discarded Prod. Cost
- This Account will be debited with the costs of a Production when you mark it as Finished but Discarded. The Production Components Stock Account will still be credited with the Input Costs and the Production Work Cost Account with the Work Cost as described above.
- Returned Goods
- When a Customer returns an Item, you will place it back in stock by creating a record in the Returned Goods register. When you mark the Returned Goods record as OK and save, the Accounts specified on flip B of each row will be credited in the subsequent Nominal Ledger Transaction. If you remove the Account from flip B in any row, this Returned Goods Account will be credited instead.
- Ret. Goods to Suppliers
- When you return an Item to its Supplier, you will record the return in the Returned Goods to Supplier register. When you mark the Returned Goods to Supplier record as OK and save, the subsequent Nominal Ledger Transaction can debit a dedicated Returned Goods to Supplier Account, or it can debit the Purchase Accruals Account credited by that original Goods Receipt. If you would like it to debit a dedicated Account, specify that Account here and do not select the Ret. Goods to Supplier A/C from Goods Receipt option immediately below.
- If you then create a Credit Note from the Returned Goods to Supplier record, this Account will be used in place of the standard Purchase Accruals Account in that Credit Note, and will be credited from the Credit Note.
- If you then create a Credit Note from the Returned Goods to Supplier record, this Account will be used in place of the standard Purchase Accruals Account in that Credit Note, and will be credited from the Credit Note.
- Ret. Goods to Supplier A/C from Goods Receipt
- When you return an Item to its Supplier, you will record the return in the Returned Goods to Supplier register. Usually, you will create a Returned Goods to Supplier record from the Goods Receipt that you used to receive the Item into stock. When you mark the Returned Goods to Supplier record as OK and save, the subsequent Nominal Ledger Transaction can debit a dedicated Returned Goods to Supplier Account (specified above), or it can debit the Purchase Accruals Account credited by that original Goods Receipt. If you want to credit the original Purchase Accruals Account, select this option.
- If you then create a Credit Note from the Returned Goods to Supplier record, the original Purchase Accruals Account will be the Cost Account in the Credit Note.
- If you then create a Credit Note from the Returned Goods to Supplier record, the original Purchase Accruals Account will be the Cost Account in the Credit Note.
- Consignment Stock
- A Consignment Stock Item is one that you receive from a Supplier that will remain the property of the Supplier until you sell it. The Supplier will therefore not issue a Purchase Invoice until you sell the Item. The Item never belongs to you: it remains the property of the Supplier until you sell it.
- As you do not own a Consignment Stock Item, you cannot include it in your stock valuation. So, when you receive the Item, a dedicated Consignment Stock Account should be debited, and when you move it out of stock the same Account should be credited.
- If you need to use the Consignment Stock feature, use this field to specify which Account is to be used as the dedicated Consignment Stock Account. Please refer here for more details about the Consignment Stock feature.
- As you do not own a Consignment Stock Item, you cannot include it in your stock valuation. So, when you receive the Item, a dedicated Consignment Stock Account should be debited, and when you move it out of stock the same Account should be credited.
- Cost of Sales Accruals A/C, Drop Ship
- If you receive a Sales Order from a Customer for an Item that you do not have in stock, you will need to order the Item from your Supplier. Usually, the Supplier will deliver the Item to you and you will then deliver it to the Customer, but an alternative is to have the Supplier deliver the Item directly to the Customer. This is known as "Drop Shipping".
- If you arrange a Drop Shipment, the Items in question will not pass through your stock system. Instead of a Delivery, you will need to create a separate transaction known as a "Shipment Notification" to register that the Items have been delivered directly to the Customer.
- If you have specified in the Cost Accounting setting in the Stock module that cost of sales postings will be created from Deliveries, cost of sales postings for Drop Shipments will be made from Shipment Notifications, with the Cost of Sales Account being chosen as normal. However, if you have specified that cost of sales postings will be created from Invoices or from Invoices with Accruals from Deliveries, cost of sales postings for Drop Shipments will be made in two stages. First, the Cost of Sales Accruals A/C, Drop Ship that you specify here will be debited from each Shipment Notification. Then, from the Invoice, the Cost of Sales Accruals A/C, Drop Ship will be credited, and the usual Cost of Sales Account will be debited.
- Please refer here for more details about Drop Shipments and Shipment Notifications.
- If you arrange a Drop Shipment, the Items in question will not pass through your stock system. Instead of a Delivery, you will need to create a separate transaction known as a "Shipment Notification" to register that the Items have been delivered directly to the Customer.
Settings in the Stock module:
- Introduction
- Account Usage Stock, including:
- 'Stock' card
- 'Purchase Cost' card
- 'Variances' card
- 'Stock' card
- Barcodes
- Base Price Changes
- Batch Specifications
- Cost Accounting
- Freight Companies
- Item Varieties
- Item Variety Groups
- Location Accounts
- Locations
- Minimum Stock Levels
- Number Series - Deliveries
- Number Series - Goods Receipts
- Number Series - Returned Goods
- Number Series - Returned Goods to Supplier
- Number Series - Stock Depreciations
- Number Series - Stock Movements
- Number Series - Stock Revaluations
- Number Series - Stocktaking
- Pack Types
- Recipes
- Returned Goods Settings
- Sources
- Stock Movement Durations
- Stock Revaluation Settings
- Stock Settings
- Structured Items
- User Defined Fields - Extra Costs
- Variety Masks
- Variety Sets
- Variety Settings
- Variety Sets
- Weighted Average
- Winedi
- Home page for Stock module manual
- Home page for Standard ERP manual
Account Usage Stock - Purchase Cost Card
This page describes the fields on the 'Purchase Cost' card of the Account Usage Stock setting. Please follow the links below for descriptions of the other cards:- 'Stock' card
- 'Purchase Cost' card
- 'Variances' card
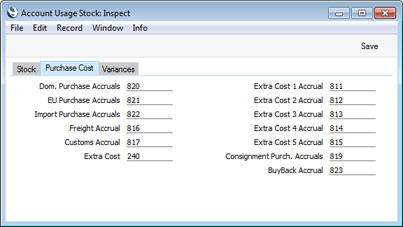
- Dom. Purchase Accruals, EU Purchase Accruals, Import Purchase Accruals
- If you are maintaining stock valuations in the Nominal Ledger, the value of the goods that you receive into stock will be held in a Purchase Accrual Account until you receive and enter the relevant Purchase Invoice. The Purchase Accruals Account will be credited from Goods Receipts and debited from Purchase Invoices that you create from Purchase Orders and Goods Receipts (depending on the Purchase Order Item Transfer Control option that you are using in the Purchase Invoice Settings setting in the Purchase Ledger).
- Use these fields to specify Purchase Accruals Accounts for each VAT Zone, to be used if you have not specified Purchase Accruals Accounts at the Item Group level. Please refer here for details about how the Purchase Accruals Account will be chosen in each Purchase Order and Goods Receipt row, here for details about how Accounts will be chosen in Purchase Invoices created from Goods Receipts and here for details about how Accounts will be chosen in Purchase Invoices created from Purchase Orders.
- You can change the name of the EU Purchase Accruals A/C field if it is not suitable. Using the VAT Zone Label setting in the Sales Ledger, you can replace the string "EU" with your own string (for example "SACU" in South Africa).
- Use these fields to specify Purchase Accruals Accounts for each VAT Zone, to be used if you have not specified Purchase Accruals Accounts at the Item Group level. Please refer here for details about how the Purchase Accruals Account will be chosen in each Purchase Order and Goods Receipt row, here for details about how Accounts will be chosen in Purchase Invoices created from Goods Receipts and here for details about how Accounts will be chosen in Purchase Invoices created from Purchase Orders.
- Freight Accrual, Customs Accrual
- If you are maintaining stock valuations in the Nominal Ledger, the value of any Freight and Customs charges in Goods Receipts will be held in separate Freight and Customs Accrual Account until you receive and enter the relevant Purchase Invoice.
- Specify here the Freight and Customs Accrual Accounts that are to be credited from Goods Receipts and debited from Purchase Invoices that you create from Purchase Orders and Goods Receipts.
- You can add an overall Freight and/or Customs charge to a Goods Receipt using the Freight and Customs fields in the footer of the 'Items' card, or you can add a charge to an individual Goods Receipt row using the Freight or Customs field on flip H of that row.
- Specify here the Freight and Customs Accrual Accounts that are to be credited from Goods Receipts and debited from Purchase Invoices that you create from Purchase Orders and Goods Receipts.
- Extra Cost
- If you incur any Extra Costs when receiving Items into stock, you can include those Extra Costs in Goods Receipts (and Returned Goods records). They will then be credited to the Expense Account that you specify in this field.
- To add an Extra Cost to a Goods Receipt, use the Extra Cost field on flip C of each row in the Goods Receipt record. Note that this Extra Cost will not be accrued i.e. it will not be included in any Purchase Invoices that you create from the Goods Receipt or from the originating Purchase Order. Hence the need to specify an Expense Account not an Accrual Account in this field. If you need Extra Costs to be accrued, you should record them using different fields in the Goods Receipt from where they will be posted to the Freight or Customs Accrual Accounts described immediately above or the Extra Cost 1-5 Accrual Accounts described immediately below.
- To add an Extra Cost to a Goods Receipt, use the Extra Cost field on flip C of each row in the Goods Receipt record. Note that this Extra Cost will not be accrued i.e. it will not be included in any Purchase Invoices that you create from the Goods Receipt or from the originating Purchase Order. Hence the need to specify an Expense Account not an Accrual Account in this field. If you need Extra Costs to be accrued, you should record them using different fields in the Goods Receipt from where they will be posted to the Freight or Customs Accrual Accounts described immediately above or the Extra Cost 1-5 Accrual Accounts described immediately below.
- Extra Cost 1-5 Accrual
- If you are maintaining stock valuations in the Nominal Ledger, the value of any invoiceable Extra Costs in Goods Receipts will be held in an Extra Cost Accrual Account until you receive and enter the relevant Purchase Invoice.
- Specify here the Extra Cost Accrual Accounts that are to be credited from Goods Receipts and debited from Purchase Invoices that you create from Purchase Orders and Goods Receipts.
- You can add an overall Extra Cost to a Goods Receipt using any of the five fields on the 'Extra Costs' card, or you can add an Extra Cost to an individual Goods Receipt row using one of the five fields on flip H of that row).
- The five Extra Cost fields allow you to record Extra Costs of different kinds separately if necessary. If you want to give a name to each of the Extra Cost Accounts so that you always enter the same kind of Extra Cost in the same field, use the User Defined Field Labels - Extra Costs setting in the Stock module.
- Specify here the Extra Cost Accrual Accounts that are to be credited from Goods Receipts and debited from Purchase Invoices that you create from Purchase Orders and Goods Receipts.
- Consignment Purch. Accruals
- A Consignment Stock Item is one that you receive from a Supplier that will remain the property of the Supplier until you sell it. The Supplier will therefore not issue a Purchase Invoice until you sell the Item. The Item never belongs to you: it remains the property of the Supplier until you sell it.
- As you do not own a Consignment Stock Item and it may remain on your premises for some time, you may wish to have its value included in a dedicated Purchase Accruals Account. This Account will be credited when you receive the Item and debited when you do receive the Purchase Invoice.
- If you need to use the Consignment Stock feature, use this field to specify which Account is to be used as the dedicated Consignment Purchase Accruals Account. Please refer here for more details about the Consignment Stock feature.
- As you do not own a Consignment Stock Item and it may remain on your premises for some time, you may wish to have its value included in a dedicated Purchase Accruals Account. This Account will be credited when you receive the Item and debited when you do receive the Purchase Invoice.
- BuyBack Accrual
- The BuyBack Accrual Account is used by the BuyBack feature: please refer to the pages describing the Configuration of this feature and its Workflow for details.
Settings in the Stock module:
- Introduction
- Account Usage Stock, including:
- 'Stock' card
- 'Purchase Cost' card
- 'Variances' card
- 'Stock' card
- Barcodes
- Base Price Changes
- Batch Specifications
- Cost Accounting
- Freight Companies
- Item Varieties
- Item Variety Groups
- Location Accounts
- Locations
- Minimum Stock Levels
- Number Series - Deliveries
- Number Series - Goods Receipts
- Number Series - Returned Goods
- Number Series - Returned Goods to Supplier
- Number Series - Stock Depreciations
- Number Series - Stock Movements
- Number Series - Stock Revaluations
- Number Series - Stocktaking
- Pack Types
- Recipes
- Returned Goods Settings
- Sources
- Stock Movement Durations
- Stock Revaluation Settings
- Stock Settings
- Structured Items
- User Defined Fields - Extra Costs
- Variety Masks
- Variety Sets
- Variety Settings
- Variety Sets
- Weighted Average
- Winedi
- Home page for Stock module manual
- Home page for Standard ERP manual
Account Usage Stock - Variances Card
This page describes the fields on the 'Variances' card of the Account Usage Stock setting. Please follow the links below for descriptions of the other cards:- 'Stock' card
- 'Purchase Cost' card
- 'Variances' card
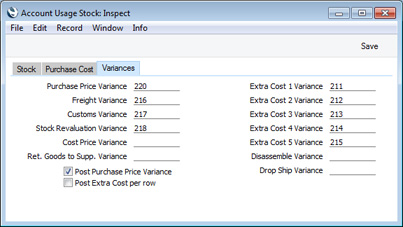
It is recommended that you specify Variance Accounts even if you are not using the Price Variances feature. If you enter a Goods Receipt with Freight and/or Customs charges in the footer and/or Extra Costs on the 'Extra Costs' card and these extra costs cannot be distributed to the various Item rows without an amount being left over, that left-over amount will be posted to the appropriate Variance Account when you mark the Goods Receipt as OK and save it.
If you want to give a name to each of the Extra Cost Variance Accounts, use the User Defined Field Labels - Extra Costs setting in the Stock module.
- Stock Revaluation Variance
- Paste Special
Account register, Nominal Ledger/System module
- If you specify a Stock Revaluation Variance Account here, it will be offered as the default Variance Account in each new Stock Revaluation record.
- In the Nominal Ledger Transaction that results from a Stock Revaluation, any increase in the value of the Items in the Stock Revaluation will be debited to the relevant Stock Account and credited to the Variance Account. Any decrease in the value of the Items will be credited to the relevant Stock Account and debited to the Variance Account.
- Please refer here for full details about Stock Revaluations.
- In the Nominal Ledger Transaction that results from a Stock Revaluation, any increase in the value of the Items in the Stock Revaluation will be debited to the relevant Stock Account and credited to the Variance Account. Any decrease in the value of the Items will be credited to the relevant Stock Account and debited to the Variance Account.
- Cost Price Variance
- Paste Special
Account register, Nominal Ledger/System module
- You should specify a Cost Price Variance Account if you are using the Post Cost Price Variance (When using Cost Model "Cost Price") option in the Cost Accounting setting. Please refer to the description of this option here for details.
- Ret. Goods to Supp. Variance
- Paste Special
Account register, Nominal Ledger/System module
- When you return an Item to a Supplier, the calculation of the cost value of that Item should ideally satisfy two requirements:
- The cost should be the same as the original purchase cost. This will be the value of any Credit Note that the Supplier sends you, and is the value that will allow the Purchase Accruals Account to balance,
- Returning an Item to its Supplier is one way of removing that Item from stock. The value of all removals from stock should be calculated using the usual Cost Model.
- The cost should be the same as the original purchase cost. This will be the value of any Credit Note that the Supplier sends you, and is the value that will allow the Purchase Accruals Account to balance,
- Post Extra Cost per row
- If a Goods Receipt contains more than one row and you have entered an extra cost on flip H, the resulting Nominal Ledger Transaction will usually contain a single posting to the relevant extra cost Accrual Account for the total value of the extra cost. For example, a Goods Receipt with four rows with Freight and Customs charges will generate a single posting to the Freight Accrual Account and a single posting to the Customs Accrual Account. No Objects will be assigned to these postings.
- However, if you select this option, separate postings for each Object will be made to the relevant extra cost Accrual Account.
- However, if you select this option, separate postings for each Object will be made to the relevant extra cost Accrual Account.
- Disassemble Variance
- Paste Special
Account register, Nominal Ledger/System module
- When you disassemble an Item that you have constructed using a Production record, the assembled Item will be removed from stock, and the components will be returned to stock.
- There may be a difference in the value of the assembled Item in the original Production and in the disassembling Production. The value of the assembled Item in the disassembling Production will be calculated using the usual Cost Model. If there is a difference, it will be debited (if the value has increased) or credited (if it has decreased) to the Disassemble Variance Account that you specify here.
Settings in the Stock module:
- Introduction
- Account Usage Stock, including:
- 'Stock' card
- 'Purchase Cost' card
- 'Variances' card
- 'Stock' card
- Barcodes
- Base Price Changes
- Batch Specifications
- Cost Accounting
- Freight Companies
- Item Varieties
- Item Variety Groups
- Location Accounts
- Locations
- Minimum Stock Levels
- Number Series - Deliveries
- Number Series - Goods Receipts
- Number Series - Returned Goods
- Number Series - Returned Goods to Supplier
- Number Series - Stock Depreciations
- Number Series - Stock Movements
- Number Series - Stock Revaluations
- Number Series - Stocktaking
- Pack Types
- Recipes
- Returned Goods Settings
- Sources
- Stock Movement Durations
- Stock Revaluation Settings
- Stock Settings
- Structured Items
- User Defined Fields - Extra Costs
- Variety Masks
- Variety Sets
- Variety Settings
- Variety Sets
- Weighted Average
- Winedi
- Home page for Stock module manual
- Home page for Standard ERP manual
Códigos de Barra
Esta opción te permite registrar Códigos de Barra separados para Ítems de Variedades. Por favor, revisa la página sobre Variedades y Códigos de Barras para más detalles.Cambios de Precio Base
Por favor, haz clic aquí para mayores detalles de esta opción.Especificaciones de Lote
Puedes utilizar esta opción para administrar las Fechas de Vencimiento correspondientes a mercaderías perecederas.Cuando existen Ítems comprados que estén destinados a ser revendidos, se puede crear automáticamente archivos de Especificación de Lote desde el registro Mercaderías Recibidas. Esto sucederá cuando especifiques una fecha de Vencimiento en la Mercadería Recibida, sin embargo solamente se incluirá Ítems con Número de Serie (ya sea al nivel de Lote o a nivel de Unidad).
Cuando existan Ítems producidos o ensamblados por tu empresa, entonces deberás primeramente estructurar estos Ítems en el registro Producción (módulo Producción) dentro del cual puedes asignarles Números de Serie “auto-generados”. Posteriormente, puedes cargar esta opción manualmente con las fechas de Vencimiento según corresponda. Los Ítems implicados deben poseer Números de Serie puesto que este dato asociará una fecha de Vencimiento a un Ítem individual o a un lote de Ítems.
Cuando llegue el momento de entregar Ítems perecederos a tus Clientes y en tanto se haya creado Especificaciones de Lote usando cualquiera de los métodos descritos (Nro. de Serie en una Entrega), entonces se cargará automáticamente la fecha de Vencimiento según corresponda. Si deseas imprimir esta fecha en la documentación de la entrega, debes incluir el campo Fecha de Vencimiento en el diseño de tu Formulario. Si quieres impedir que se venda algún Ítem que ha excedido su fecha de Vencimiento, debes utilizar las opciones
Estado por Lotes y Control de Calidad de Procesos dentro del módulo Órdenes de Servicio. Para facilitar la selección de los Ítems que no han llegado a su fecha de Vencimiento, puedes decidir mostrar las respectivas fechas de Vencimiento en la lista ‘Pegado Especial’ desplegada desde el campo ‘Nro. Serie’. Para realizar esto, tilda la casilla ‘Mostrar Vencimientos’ dentro de las Opciones de Ítem en el módulo Ventas.
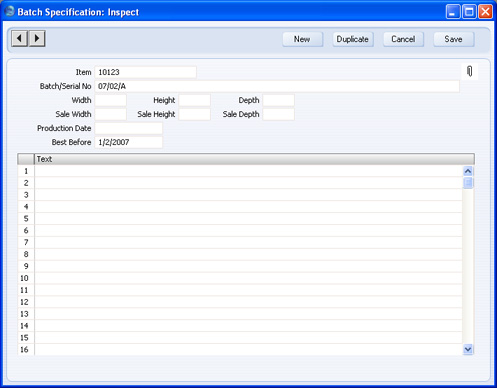
- Ítem
- Pegado Especial
registro Ítems
- Se debe cargar aquí el Número del Ítem.
- Lote/Nro. Ser.
- Pegado Especial
Nros. de Serie de Ítems en stock
- Ingresa el Número de Serie del Ítem o del Lote en cuestión. Notemos que solamente se debe utilizar Números de Ítems existentes (estos se deben originar en los archivos respectivos de Mercadería Recibida o Producción.
- Ancho, Alto, Profundidad
- Si la Especificación de Lote fue creada desde una Mercadería Recibida donde se indica el ancho, la Longitud y/o Profundidad (pestaña G), entonces estas dimensiones se copiarán aquí.
De lo contrario, debes ingresar las dimensiones apropiadamente. Este procedimiento se aplica mayormente a Ítems que se compraron y luego fueron vendidos por área o volumen (ej. tela o áridos).
- Ancho Venta, Alto Venta, Prof. Venta
- Estos campos pueden servir en Portugal bajo ciertas circunstancias. Por favor, consulta tu representante HansaWorld local para más detalles.
- Fecha Producción
- Si es apropiado, debes ingresar aquí la fecha en que el Ítem fue fabricado.
- Vencimiento
- Dato por defecto extraído desde
la Mercadería Recibida
- Ingresa aquí la fecha de Vencimiento. Ésta será transferida a una Entrega según la selección del Número de Serie. Si deseas evitar la venta de mercaderías después de su fecha de Vencimiento, entonces utiliza la opción Control de Calidad de Procesos en el módulo Órdenes de Servicio.
- Texto
- Cualquier comentario ingresado aquí será visible en las Facturas impresas.
Cost Accounting - Part 1
The Cost Accounting setting is where you can specify the costing method that you want to use to calculate stock valuations and the value of outgoing stock transactions, together with associated options.To open the Cost Accounting setting, first ensure you are in the Stock module. Then, if you are using Windows or Mac OS X, click the [Settings] button in the Navigation Centre and then double-click 'Cost Accounting' in the 'Settings' list. If you are using iOS or Android, select 'Settings' from the Tools menu (with 'wrench' icon) and tap 'Cost Accounting' in the 'Settings' list. Fill in the fields as described below. Then, to save changes and close the window, click the [Save] button (Windows/Mac OS X) or tap √ (iOS/Android). To close the window without saving changes, click the close box (Windows/Mac OS X) or tap < (iOS/Android).
This page describes the Primary Cost Model options, the Queued Cost Model options and the Cost Model options in this setting. Please refer here for details about the other options.
- Primary Cost Model
- The Cost Model is the method that will be used to calculate the value of the Items that you hold in stock.
- For example, if you are maintaining stock valuations in the Nominal Ledger ("cost accounting"), when you mark an outgoing stock transaction (e.g. Invoice, Delivery, Work Sheet or Stock Depreciation) as OK and save, a Nominal Ledger Transaction will be created automatically, debiting the value of the goods to a Cost Account and crediting it to a Stock Account. The Cost Model is the valuation method that will be used to calculate the value of the goods removed from stock.
- The Cost Model will also be used by the Stock List report to calculate the value of your stock.
- Whenever it is necessary to calculate the stock value of an Item, the Cost Model will be chosen as follows:
- The Cost Model will be taken from the 'Cost Model' card in the relevant Item record.
- If the Cost Model in the Item is Default, if you are using the Use Item Groups for Cost Model option described below and if the Item belongs to an Item Group, the Cost Model will be taken from the Item Group to which the Item belongs.
- In all other cases (e.g. the Cost Model in the Item Group is Default, you are not using the Use Item Groups for Cost Model option and/or the Item does not belong to an Item Group), the Primary Cost Model that you choose here will be used.
The chosen Cost Model will sometimes be bypassed if you are using the Cost Price for Serial Number option in the relevant Item or Item Group record or in this setting (described below). This option will ensure individual Cost Prices and Serial Numbers will be linked. When you sell an Item with a particular Serial Number, the appropriate Cost Price for that Serial Number will be used in the resulting cost accounting transaction. The Stock List report will use the appropriate Cost Prices for the Serial Numbers in stock. In effect, Cost Price for Serial Number is a Cost Model that can only be used with Items with Serial Numbers.
The following Cost Model options are available:
- None
- Select this option if you do not wish to use a Cost Model. Outward cost accounting transactions will not be created. You will need to choose a Cost Model each time you produce a Stock List report, otherwise it will not contain a valuation (you can do this in the report specification window).
- Cost Price
- This option will use the Cost Price of each Item (visible on the 'Costs' card of the Item record) as the unit cost value in outgoing stock transactions and the unit value in the Stock List.
- This option will be most useful with Items whose Cost Prices do not change. If Cost Prices do change, the stock valuation in the Stock List report will be different to that in the Nominal Ledger (unless you adjust the stock valuation in the Nominal Ledger yourself by journal i.e. by entering a Nominal Ledger Transaction manually). You may also consider using the Post Cost Price Variance (When using Cost Model "Cost Price") option in this setting (described here, in case you receive an Item into stock at a cost that is different to its Cost Price. If you choose this option, it is recommended that you also choose "None" as the Update Cost Price at Goods Receipt options (also on the 'Costs' card of the Item), to ensure the Cost Price remains constant. If an Item's Cost Price does change, you can change it yourself and will therefore be aware of the need to update the stock valuation in the Nominal Ledger.
- This option will be most useful with Items whose Cost Prices do not change. If Cost Prices do change, the stock valuation in the Stock List report will be different to that in the Nominal Ledger (unless you adjust the stock valuation in the Nominal Ledger yourself by journal i.e. by entering a Nominal Ledger Transaction manually). You may also consider using the Post Cost Price Variance (When using Cost Model "Cost Price") option in this setting (described here, in case you receive an Item into stock at a cost that is different to its Cost Price. If you choose this option, it is recommended that you also choose "None" as the Update Cost Price at Goods Receipt options (also on the 'Costs' card of the Item), to ensure the Cost Price remains constant. If an Item's Cost Price does change, you can change it yourself and will therefore be aware of the need to update the stock valuation in the Nominal Ledger.
- % of Base Price
- This option calculates the unit cost value in outgoing cost accounting transactions and the unit value in the Stock List by applying a specified percentage to the Base Price (i.e. the retail price) of each Item. Specify the percentage in the % field immediately to the right. You can use this option in cases where a consistent gross margin is required. If you do not set a percentage (i.e. if you leave the % field blank), it will be assumed to be 100%.
- Weighted Average
- The unit cost in outgoing cost accounting transactions and the unit value in the Stock List will be the Weighted Average Cost Price of each Item (i.e. the average unit price of all previous purchases). The overall Weighted Average value of an Item is visible on the 'Costs' card of the Item record, while separate Weighted Averages for each Item in each Location are stored in the Weighted Average setting in the Stock module.
- The Weighted Average of an Item will be updated each time you receive a unit into stock, using the following formula:
WA = ((Qty in stock x Current WA) + (Qty on GR x Unit Pr. on GR)) (Qty in stock + Qty on GR) - (where GR means Goods Receipt).
- If you have more than one Location, you can choose whether the overall Weighted Average figure for all Locations or the Weighted Average for the Location in question will be used to calculate cost values. Please refer to the description of the Weighted Average per Location option here for details.
- If you let the stock of an Item to fall to zero, its Weighted Average will be reset the next time you receive units into stock.
- The Weighted Average of an Item will be updated each time you receive a unit into stock, using the following formula:
- Queued
- This option calculates the unit cost value in outgoing cost accounting transactions and the unit value in the Stock List using a FIFO (First In First Out) or LIFO (Last In First Out) queue. The cost values in the queue will be the cost prices recorded in the Goods Receipts that brought the Items into stock. Choose FIFO or LIFO using the Queued Cost Model options below.
- The Queued Cost Model can provide a very precise stock valuation, especially for Items with variable Cost Prices. However, this precision also requires discipline. As their names suggest, First In First Out and Last In First Out require that you must make certain that you enter all stock transactions in strict chronological order. Failure to do this may cause your FIFO or LIFO values to become incorrect. Do not, for example, enter a Goods Receipt with yesterday's date if you have already entered one with today's. This applies to Deliveries and Stock Depreciations as well. It is also recommended that you always mark stock transactions as OK when you save them for the first time. Do not, for example, go back to an earlier Goods Receipt and mark it as OK if there are later ones that you have already marked as OK, unless you change the date as well. You can use options such as Chronology in Stock in the Stock Settings setting and Force Chronology for Invoice in the Account Usage S/L setting to help ensure you do not break this rule.
- If you have more than one Location, you can choose whether the overall FIFO or LIFO figure for all Locations or the figure for the Location in question will be used to calculate cost values. Please refer to the description of the Queued Cost Model per Location option here for details.
- The Queued Cost Model can provide a very precise stock valuation, especially for Items with variable Cost Prices. However, this precision also requires discipline. As their names suggest, First In First Out and Last In First Out require that you must make certain that you enter all stock transactions in strict chronological order. Failure to do this may cause your FIFO or LIFO values to become incorrect. Do not, for example, enter a Goods Receipt with yesterday's date if you have already entered one with today's. This applies to Deliveries and Stock Depreciations as well. It is also recommended that you always mark stock transactions as OK when you save them for the first time. Do not, for example, go back to an earlier Goods Receipt and mark it as OK if there are later ones that you have already marked as OK, unless you change the date as well. You can use options such as Chronology in Stock in the Stock Settings setting and Force Chronology for Invoice in the Account Usage S/L setting to help ensure you do not break this rule.
!
If you choose the Cost Price or % of Base Price options, make sure that the appropriate field contains values for each Item. Otherwise, cost accounting Transactions and Stock List valuations with zero amounts may result.
- For example, if you are maintaining stock valuations in the Nominal Ledger ("cost accounting"), when you mark an outgoing stock transaction (e.g. Invoice, Delivery, Work Sheet or Stock Depreciation) as OK and save, a Nominal Ledger Transaction will be created automatically, debiting the value of the goods to a Cost Account and crediting it to a Stock Account. The Cost Model is the valuation method that will be used to calculate the value of the goods removed from stock.
- Queued Cost Model
- If you set the Primary Cost Model (above) to Queued, use these options to choose whether you want to use a FIFO (First In First Out) or LIFO (Last In First Out) queue.
- FIFO
- When you deliver an Item or otherwise remove it from stock, the individual unit that you received into stock first will be the unit that you deliver first. In the Stock List report, Items will be valued in chronological order.
- LIFO
- When you deliver an Item or otherwise remove it from stock, the individual unit that you received into stock last will be the unit that you deliver first. In the Stock List report, Items will be valued in reverse chronological order.
- When you deliver an Item or otherwise remove it from stock, the individual unit that you received into stock first will be the unit that you deliver first. In the Stock List report, Items will be valued in chronological order.
- FIFO
- Cost Model
- Use these options to specify how the Cost Model should behave in certain specific circumstances.
- Use Item Groups for Cost Model
- When outgoing cost accounting transactions are generated from Deliveries, Invoices, Stock Depreciations, Stock Movements and Work Sheets, the value of those transactions will be calculated using the Cost Model specified in each Item record. If the Cost Model in an Item record is Default and you are using this option, the Cost Model will be taken from the Item Group to which the Item belongs. If that Cost Model again is Default, the Primary Cost Model described above will be used. If the Cost Model in an Item record is Default and you are not using this option, the Primary Cost Model described above will be used (i.e. the Cost Model in the Item Group will be ignored).
- If you are using this option, it is recommended that all Stocked Items belong to Item Groups and that all Item Groups have Cost Models specified.
- If you are using this option, it is recommended that all Stocked Items belong to Item Groups and that all Item Groups have Cost Models specified.
- Cost Price for Serial Number
- The Cost Price for Serial Number option is in effect an additional Cost Model that you can use with Serial Numbered Items. It allows you to ensure an individual Serial Number remains connected to its exact Cost Price from the moment you receive it into stock until the time you remove it from stock.
- If you choose not to use the Cost Price for Serial Number option, Cost Prices will be independent of Serial Numbers. When you remove a Serial Numbered Item from stock, the deduction from the stock valuation and, if you are using cost accounting, the value of the cost accounting transaction will be calculated using the Cost Model specified in the Item or Item Group or in this setting. For example, if you are using the Queued FIFO Cost Model, the Item with the oldest Cost Price will be removed from stock. This will happen irrespective of whether the Serial Number that you choose in the stock transaction is the oldest one.
- If you select this option, Cost Prices and Serial Numbers will be linked. When you remove a Serial Numbered Item from stock, the exact Cost Price of the chosen Serial Number will be deducted from the stock valuation, and this will be the value of any cost accounting transaction. This will not necessarily be the correct Cost Price that would be selected by the Cost Model.
- An example situation where using the Cost Price for Serial Number option can be advantageous is the one where stock can be purchased at special prices. An example might be the purchase of Items at special rates for sale to educational establishments or for demonstration purposes. When you move demonstration stock from stock to showroom or from showroom to showroom using Stock Movements or Stock Transfers, this method ensures that the special demonstration price remains connected to the Serial Numbers in question.
- Once you have made a decision whether to use the Cost Prices for Serial Number option, you should not change the state of this check box. If you switch the option on or off once you have started using the Stock module, it is very likely that inaccuracies will be introduced to the FIFO/LIFO queue and Weighted Average figures. If you do change the status of this check box, you should immediately run the 'Rebuild Stock' Maintenance function in the Technics module. This will rebuild the FIFO/LIFO queue and Weighted Average figures, but it will not change existing stock records (e.g. Deliveries) or the resulting Nominal Ledger Transactions. So, you may need to adjust the stock valuation in the Nominal Ledger yourself by journal (i.e. by entering a Nominal Ledger Transaction manually).
- You can override the option chosen here for an individual Item or, if you are using the Use Item Groups for Cost Model option above, Item Group.
- You must use the Cost Price for Serial Number option if you will use the Serial No. Item Sales Statistics report in the Sales Ledger. This option will allow Serial Numbers to be linked correctly to Suppliers in the report.
- If you choose not to use the Cost Price for Serial Number option, Cost Prices will be independent of Serial Numbers. When you remove a Serial Numbered Item from stock, the deduction from the stock valuation and, if you are using cost accounting, the value of the cost accounting transaction will be calculated using the Cost Model specified in the Item or Item Group or in this setting. For example, if you are using the Queued FIFO Cost Model, the Item with the oldest Cost Price will be removed from stock. This will happen irrespective of whether the Serial Number that you choose in the stock transaction is the oldest one.
- Original Cost on Returned Goods
- One specific way in which you can receive an Item into stock is to receive a previously delivered Item back from a Customer. You can do this by creating a record in the Returned Goods register from the original Delivery or Sales Order.
- When you receive an Item into stock in this way, you may want to use the standard Cost Price of the Item from the Item register, or you may want to use the actual cost of that Item from the original Delivery. Select this option if you want to use the second method.
- For example, you are using the FIFO Cost Model and you have three Items in stock with costs 100, 200 and 300. The Cost Price in the Item record is 150. When you sell an Item, 100 will be removed from your Nominal Ledger stock value, since that was the value of the first Item received into stock (i.e. as calculated using the FIFO Cost Model). If the Customer returns the Item, you would find the original Delivery and create a Returned Goods record from it. If you are not using this option, the Item Cost and Unit Cost in the Returned Goods will be 150, the Cost Price from the Item. If you are using this option, the Item Cost and Unit Cost in the Returned Goods will be 100, since that was the precise cost of the returned Item in the Delivery.
- If you are not using this option, you can create a record in the Returned Goods register from the original Delivery or Sales Order using the 'Returned Goods' function on the Create menu. If you are using this option, you can only create the Returned Goods record from the original Delivery.
- If you are using a Queued Cost Model (FIFO or LIFO), the decision whether to use this option and the choice whether Returned Goods will return Items to their original position in the cost queue or to a new position (a choice made using the Credit Notes and Returned Goods options described here) may be mutually dependent.
- When you receive an Item into stock in this way, you may want to use the standard Cost Price of the Item from the Item register, or you may want to use the actual cost of that Item from the original Delivery. Select this option if you want to use the second method.
- Use Item Groups for Cost Model
---
Settings in the Stock module:
- Introduction
- Account Usage Stock
- Barcodes
- Base Price Changes
- Batch Specifications
- Cost Accounting
- Freight Companies
- Item Varieties
- Item Variety Groups
- Location Accounts
- Locations
- Minimum Stock Levels
- Number Series - Deliveries
- Number Series - Goods Receipts
- Number Series - Returned Goods
- Number Series - Returned Goods to Supplier
- Number Series - Stock Depreciations
- Number Series - Stock Movements
- Number Series - Stock Revaluations
- Number Series - Stocktaking
- Pack Types
- Recipes
- Returned Goods Settings
- Sources
- Stock Movement Durations
- Stock Revaluation Settings
- Stock Settings
- Structured Items
- User Defined Fields - Extra Costs
- Variety Masks
- Variety Sets
- Variety Settings
- Variety Sets
- Weighted Average
- Winedi
- Home page for Stock module manual
- Home page for Standard ERP manual
Cost Accounting - Part 2
Please refer here for details about the Primary Cost Model options, the Queued Cost Model options and the Cost Model options in this setting.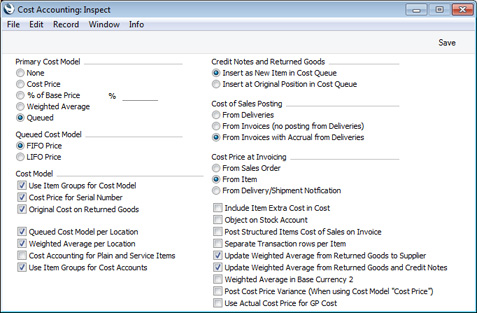
- Queued Cost Model per Location
- If you are using Locations, two FIFO/LIFO queues will be maintained for each Item. The first will be a single overall FIFO/LIFO queue for an Item. Second, separate queues will be maintained for each Item for each Location..
- If you are using the Queued Cost Model, this option will determine which of the two queues will be used to calculate stock values in the Stock List and to calculate the value of outward cost accounting transactions.
- If you choose not to use this option, the overall FIFO/LIFO queue will be used, irrespective of the number of Locations. This method might be appropriate in situations where there are no Locations, or where the Locations represent different rooms or shelves in the same building. When you remove an Item from stock, the oldest (FIFO) or newest (LIFO) individual unit will always be removed, irrespective of the Location in which it is stored or specified in the outgoing stock transaction (e.g. Delivery or Invoice).
- If you choose to use this option, the separate FIFO/LIFO queues for each Location will be used. This method will be appropriate where the Locations represent separate buildings or warehouses. When you remove an Item from stock, the oldest (FIFO) or newest (LIFO) unit in the specified Location will be removed.
- Once you have made a decision whether to use the Queued Cost Model per Location feature, you should not change the state of this check box. If you switch the option on or off once you have started using the Stock module, it is very likely that inaccuracies will be introduced to the FIFO/LIFO queue. If you do change the status of this check box, you should immediately run the 'Rebuild Stock' Maintenance function in the Technics module. This will rebuild the FIFO/LIFO queue and Weighted Average figures, but it will not change existing stock records (e.g. Deliveries) or the resulting Nominal Ledger Transactions. So, if you are using a Queued Cost Model and you change this check box, you may need to adjust the stock valuation in the Nominal Ledger yourself by journal (i.e. by entering a Nominal Ledger Transaction manually).
- If you are using a Queued Cost Model together with this option, it is recommended that you also use the Chronology Per Location option in the Stock Settings setting. If you are using a Queued Cost Model without this option, it is recommended that you also use the Chronology For All Locations option in the same setting.
- If you are not using a Queued Cost Model, you may still wish to use this option if you have more than one Location (e.g. if your usual Cost Model is Weighted Average, and you are using the corresponding Weighted Average per Location option). You can produce Stock Lists calculated using your usual Cost Model or using an alternative. If you will ever need to produce the Stock List using a Queued Cost Model, using this option will give you the equivalent reporting options to those offered with your usual Cost Model.
- You can override the option chosen here for an individual Item or, if you are using the Use Item Groups for Cost Model option above, Item Group.
- If you are using the Queued Cost Model, this option will determine which of the two queues will be used to calculate stock values in the Stock List and to calculate the value of outward cost accounting transactions.
- Weighted Average per Location
- If you are using Locations, two Weighted Average figures will be maintained for each Item. The first will be a single overall Weighted Average figure for an Item, visible on the 'Costs' card of each Item record. Second, separate Weighted Average figures will be maintained for each Item in each Location. These figures will be visible in the Weighted Average setting.
- If you are using the Weighted Average Cost Model, this option will determine which of the two figures will be used to calculate stock values in the Stock List and to calculate the value of outward cost accounting transactions. If you do not select this option, the single overall Weighted Average figure will be used. Otherwise, the separate Weighted Average figures for each Location will be used.
- For example, you receive two Items costing 100 and 150 into Location 1, and two costing 150 and 200 into Location 2. The overall Weighted Average is 150, the Weighted Average for Location 1 is 125, and the Weighted Average for Location 2 is 175. If you are not using this option, the value in the Stock List will be 4 x 150, and the value of an outgoing cost accounting transaction will be 150 irrespective of Location. If you are using this option, the value in the Stock List will be (2 x 125) + (2 x 175), and the value of an outgoing cost accounting transaction will be 125 or 175, depending on the Location.
- If you move an individual Item from one Location to another using a Stock Movement, any Extra Cost incurred by the movement will be included in the single overall Weighted Average figure for the Item. If you are using this option, the Extra Cost will be included in the separate Weighted Average figure for the destination Location as well.
- Once you have made a decision whether to use the Weighted Average per Location feature, you should not change the state of this check box. If you switch the option on or off once you have started using the Stock module, it is very likely that inaccuracies will be introduced to the Weighted Average schedules. If you do change the status of this check box, you should immediately run the 'Rebuild Stock' Maintenance function in the Technics module.
- If you are not using a Weighted Average Cost Model, you may still wish to use this option if you have more than one Location (e.g. if your usual Cost Model is Queued, and you are using the corresponding Queued Cost Model per Location option). You can produce Stock Lists calculated using your usual Cost Model or using an alternative. If you will ever need to produce the Stock List using a Weighted Average Cost Model, using this option will give you the equivalent reporting options to those offered with your usual Cost Model.
- You can override the option chosen here for an individual Item or, if you are using the Use Item Groups for Cost Model option above, Item Group.
- If you are using the Weighted Average Cost Model, this option will determine which of the two figures will be used to calculate stock values in the Stock List and to calculate the value of outward cost accounting transactions. If you do not select this option, the single overall Weighted Average figure will be used. Otherwise, the separate Weighted Average figures for each Location will be used.
- Cost Accounting for Plain and Service Items
- Usually incoming and outgoing cost accounting transactions will only be created for Stocked Items. Select this option if you want them to be created for Plain and Service Items as well.
- You cannot use every Cost Model with Plain and Service Items. If you try to use a Queued Cost Model with these Items, the Cost Price Cost Model will be used instead. If you try to use the Weighted Average per Location Cost Model, the Weighted Average not per Location Cost Model will be used instead. If you are using the Weighted Average Cost Model and an individual Plain or Service Item does not have a Weighted Average figure, its Cost Price will be used instead.
- The Over Delivery options in the Stock Settings setting do not apply to Plain and Service Items and so there will be no check to prevent negative stock.
- Plain and Service Items will not be included in the Stock List. Therefore, in order for the Stock List valuation to agree with the balance on the Stock Account, it is recommended that you assign Plain and Service Items to Item Groups in which you have specified dedicated Stock Accounts. On the sales side, for example, an Item Group could post to an Account for royalties. But be careful if you are using Locations, because the Location Stock Account has priority over the Item Group Stock Account.
- You cannot use every Cost Model with Plain and Service Items. If you try to use a Queued Cost Model with these Items, the Cost Price Cost Model will be used instead. If you try to use the Weighted Average per Location Cost Model, the Weighted Average not per Location Cost Model will be used instead. If you are using the Weighted Average Cost Model and an individual Plain or Service Item does not have a Weighted Average figure, its Cost Price will be used instead.
- Use Item Groups for Cost Accounts
- If you select this option, priority will be given to the Accounts entered in each Item Group when Nominal Ledger Transactions are generated from incoming and outgoing stock transactions such as Goods Receipts, Deliveries, Invoices and Work Sheets.
- If you are using this option, it is recommended that all Stocked Items belong to Item Groups and that all Item Groups have Cost and Stock Accounts specified.
- If you are using this option, it is recommended that all Stocked Items belong to Item Groups and that all Item Groups have Cost and Stock Accounts specified.
- Credit Notes and Returned Goods
- Whenever you receive Items into stock, they will be placed in a queue. When you deliver the Items or otherwise remove them from stock, it will be in queue order (i.e. the order in which you received them) (FIFO) or in reverse queue order (LIFO). These options control where in the queue an Item will be placed when it is returned to you by a Customer.
- If you are not using a Queued Cost Model, you must use the option to Insert as New Item in Cost Queue. Otherwise, the Stock List may not be correct. If you are using a Queued Cost Model but choose to produce the Stock List using a different Model for comparison purposes, bear in mind that it may be inaccurate if you are using the Original Position option.
- Insert as New Item in Cost Queue
- Each returned Item will be placed at the end of the queue (FIFO) or the beginning of the queue (LIFO). The Returned Goods record therefore acts in the same way as a new Goods Receipt. This option is the recommended one, in the interests of strict FIFO/LIFO accuracy.
- Insert at Original Position in Cost Queue
- Each returned Item will be placed in its original position in the queue, sorted by date. If you are using FIFO, therefore, it will be placed at the front of the queue and will be the next Item that you deliver.
- If you choose this option, you will have to create Returned Goods records from Deliveries (i.e. you will not be able to create them from Sales Orders).
- If you originally delivered an Item to the Customer using an Invoice without a Sales Order, the best way to ensure you receive it back into stock with the correct value is to create a Goods Receipt. This will always place the Item at the end of the queue (FIFO) or the beginning of the queue (LIFO), irrespective of the option chosen above.
- If you disassemble a Production, you will receive the component Items (the "Input Items") that you used in the Production back into stock. These components will always be placed at the end of the queue (FIFO) or the beginning of the queue (LIFO), irrespective of the option chosen above.
- If you are not using a Queued Cost Model, you must use the option to Insert as New Item in Cost Queue. Otherwise, the Stock List may not be correct. If you are using a Queued Cost Model but choose to produce the Stock List using a different Model for comparison purposes, bear in mind that it may be inaccurate if you are using the Original Position option.
- Cost of Sales Posting
- If you are using the Sales Orders module, you will usually issue a Delivery to remove the ordered Items from stock, and then issue an Invoice. These options allow you to specify whether the cost of sales postings will be made from the Invoices, from the Deliveries or from the Invoices with Accruals from the Deliveries. If you are using Service Orders, these options will also control whether cost of sales postings for spare parts will be created from Work Sheets or from Invoices.
- The options are:
- From Deliveries
- A delivered Item will be removed from Stock when you issue the Delivery, and the stock valuation in the Nominal Ledger will be updated from the Delivery as well (i.e. the cost of sales postings will be made from the Delivery). This will help ensure that the valuation in the Stock List report always agrees with the stock valuation in the Nominal Ledger. However, if you do not create Invoices for Deliveries immediately, it may be that the dates of sales transactions and related cost of sales postings will not be the same.
- If you are using this option, it is not necessary to select the Invoices Update Stock option in the Account Usage S/L setting, but it is recommended that you do so, just in case you sell a Stocked Item from an Invoice without a Sales Order (i.e. where there is no Delivery). You should also select the Deliveries option in the Sub Systems setting in the Nominal Ledger. If you are using the Service Orders module, you should select the Work Sheets Update Stock option in the Account Usage Service Order setting and the Work Sheets option in the Sub Systems setting.
- If you are using this option, it is not necessary to select the Invoices Update Stock option in the Account Usage S/L setting, but it is recommended that you do so, just in case you sell a Stocked Item from an Invoice without a Sales Order (i.e. where there is no Delivery). You should also select the Deliveries option in the Sub Systems setting in the Nominal Ledger. If you are using the Service Orders module, you should select the Work Sheets Update Stock option in the Account Usage Service Order setting and the Work Sheets option in the Sub Systems setting.
- From Invoices (no posting from Deliveries)
- A delivered Item will be removed from Stock when you issue the Delivery, but the stock valuation in the Nominal Ledger will not be updated until you issue the Invoice (i.e. the cost of sales postings will be made from the Invoice).
- Choosing this option will satisfy the requirement in some countries (e.g. the UK) that sales transactions and related cost of sales postings should have the same dates. Stock levels will still be updated from Deliveries so, if you issue a Delivery with an earlier date than the Invoice, there will be a period where the valuation in the Stock List report will not match that in the Nominal Ledger.
- If you choose this option, you should also select the Invoices Update Stock option in the Account Usage S/L setting but turn off the Deliveries option in the Sub Systems setting in the Nominal Ledger. If you are using the Service Orders module, select the Work Sheets Update Stock option in the Account Usage Service Order setting but do not select the Work Sheets option in the Sub Systems setting.
- You should not choose to have cost of sales postings created from Invoices if you will be creating Invoices from Projects in the Job Costing module.
- Choosing this option will satisfy the requirement in some countries (e.g. the UK) that sales transactions and related cost of sales postings should have the same dates. Stock levels will still be updated from Deliveries so, if you issue a Delivery with an earlier date than the Invoice, there will be a period where the valuation in the Stock List report will not match that in the Nominal Ledger.
- From Invoices with Accruals from Deliveries
- Choosing this option will satisfy both requirements: that the valuation in the Stock List report always agrees with the stock valuation in the Nominal Ledger; and that the dates of sales transactions and related cost of sales postings will be the same.
- When you deliver an Item, the stock valuation in the Nominal Ledger will be updated in two stages. The Stock Account will be credited by the Delivery, and a Cost of Sales Accrual Account will be debited. From the Invoice, the Cost of Sales Accrual Account will be credited, and the Cost of Sales Account will be debited.
- If you are using this option, you should select the Invoices Update Stock option in the Account Usage S/L setting, and you should specify a Cost of Sales Accruals Account in the Account Usage Stock setting. You should also select the Deliveries option in the Sub Systems setting in the Nominal Ledger. If you are using the Service Orders module, you should also select the Work Sheets Update Stock option in the Account Usage Service Order setting and the Work Sheets option in the Sub Systems setting.
- When you deliver an Item, the stock valuation in the Nominal Ledger will be updated in two stages. The Stock Account will be credited by the Delivery, and a Cost of Sales Accrual Account will be debited. From the Invoice, the Cost of Sales Accrual Account will be credited, and the Cost of Sales Account will be debited.
- The options are:
- Cost Price at Invoicing
- Use these options to specify how the Cost Price of an Item (and therefore its gross profit) will be chosen in Invoices when you create them from Orders and Deliveries. The following options are available:
- From Sales Order
- The Cost Price of each Item on an Invoice will be taken from the originating row in the Order.
- From Item
- The Cost Price of each Item on the Invoice will be calculated by adding the Item's Cost Price to its Extra Cost.
- If you are routinely updating Items' Cost Prices from Goods Receipts and are using back-to-back Purchase Orders, this option will cause the latest Cost Price to be used in Invoices. In this situation, you will probably enter a Sales Order and create a Purchase Order from it, and the subsequent Goods Receipt will update the Cost Price in the Item record, all before creating the Invoice. If you are using this option, this latest Cost Price will be copied from the Item record to the Invoice when you do create it.
- If you are routinely updating Items' Cost Prices from Goods Receipts and are using back-to-back Purchase Orders, this option will cause the latest Cost Price to be used in Invoices. In this situation, you will probably enter a Sales Order and create a Purchase Order from it, and the subsequent Goods Receipt will update the Cost Price in the Item record, all before creating the Invoice. If you are using this option, this latest Cost Price will be copied from the Item record to the Invoice when you do create it.
- From Delivery/Shipment Notification
- The Cost Price of each Item on the Invoice will be its actual cost of sales value (calculated using the Cost Model e.g. FIFO, LIFO or Weighted Average value), taken from the relevant row in the Delivery or Shipment Notification.
- If you create a Delivery from a Sales Order while using the Update Cost Price on Order when Delivering option in the Order Settings setting in the Sales Orders module, the actual cost of sales value (calculated using the Cost Model e.g. FIFO, LIFO or Weighted Average value) of each Item will be copied back from the Delivery to the Cost Price field in each Order row. So, if you are using the Update Cost Price on Order when Delivering option, the From Sales Order and From Delivery Shipment/Notification options will produce similar results (i.e. the Cost Prices in an Order row and related Invoice row will both be the actual cost of sales value taken from the Delivery). If you are not using the Update Cost Price on Order when Delivering option, the Cost Price in an Invoice row will be taken from the Delivery, but the Cost Price in the Order will not be updated.
- From Sales Order
- Include Item Extra Cost in Cost
- When you specify an Item in a sales transaction (e.g. a Quotation, Order or Invoice), the Cost Price of the Item will be brought in to the Cost Price field on flip C of the sales transaction row. This figure will then be used in Gross Profit and Margin calculations. If you need the figure that is brought in to the sales transaction to be the Cost Price of the Item plus its Extra Cost, select this option.
- This option does not apply to Project Budgets, where an Item's Extra Cost will always be included.
- This option does not apply to Project Budgets, where an Item's Extra Cost will always be included.
- Object on Stock Account
- When you approve a Delivery or a Work Sheet, any Objects specified in a row (on flip E in both cases) will be assigned to the debit posting to the Cost of Sales Account in the resulting Nominal Ledger Transaction. Select this option if you would like them assigned to the credit posting to the Stock Account as well. The Objects specified in the header of a Delivery or Work Sheet will also be assigned to the posting to the Stock Account if you are using this option, unless you are using the Skip Header A/C Objects on Sales and COS A/C option in the Account Usage S/L setting in the Sales Ledger.
- From a Returned Goods record, any Objects specified on flip B will be assigned to the credit posting to the Cost of Sales Account in the resulting Nominal Ledger Transaction. Select this option if you would like them assigned to the debit posting to the Stock Account as well.[CT1] Objects specified in the header of a Return will also be assigned to the posting to the Stock Account if you are using this option, unless you are using the Skip Header A/C Objects on Cost A/C option in the Account Usage P/L setting in the Purchase Ledger.
- From a Stock Depreciation, any Objects specified in the header and on flip A will be assigned to the debit postings to the Cost Account(s) (Stock Loss Account). If you are using this option, these Objects will be assigned to the credit postings to the Stock Account as well.
- From a Stock Revaluation, any Objects specified in the header and on flip D will only be assigned to the debit and credit postings if you are using this option.
- From a Returned Goods record, any Objects specified on flip B will be assigned to the credit posting to the Cost of Sales Account in the resulting Nominal Ledger Transaction. Select this option if you would like them assigned to the debit posting to the Stock Account as well.[CT1] Objects specified in the header of a Return will also be assigned to the posting to the Stock Account if you are using this option, unless you are using the Skip Header A/C Objects on Cost A/C option in the Account Usage P/L setting in the Purchase Ledger.
- Post Structured Items Cost of Sales on Invoice
- This option controls the creation of cost of sales postings when you sell Structured Items in some circumstances.
- A Structured Item will always be included in outward cost accounting transactions (cost of sales transactions) created from Deliveries, Similarly, a Structured Item whose Paste Components During Entry box is ticked will always be included in outward cost accounting transactions created from Invoices.
- However, if a Structured Item is one whose Paste Components During Entry box is not ticked, it will only be included in outward cost accounting transactions created from Invoices if you have selected this option. Otherwise, a Structured Items whose Paste Components During Entry box is not ticked will not be included in outward cost accounting transactions created from Invoices (i.e. the Nominal Ledger stock valuations for the components will not be updated from Invoices as there will be no cost of sales postings).
- A Structured Item will always be included in outward cost accounting transactions (cost of sales transactions) created from Deliveries, Similarly, a Structured Item whose Paste Components During Entry box is ticked will always be included in outward cost accounting transactions created from Invoices.
- Separate Transaction rows per Item
- If an incoming or outgoing stock transaction contains several Items that use the same Cost, Purchase Accruals and/or Stock Account, the resulting Nominal Ledger Transaction can contain separate double-sided postings for each Item, or a single accumulated posting. Select this option to use the first method.
- Update Weighted Average from Return Goods to Supplier
- Use this option if you would like the Weighted Average values of your Items to be updated from the Returned Goods to Supplier register (i.e. when you return goods to your Suppliers).
- A return to a Supplier is treated as a normal removal from stock. So, if you are using a Weighted Average Cost Model, the cost of the returned unit will be the Weighted Average. There will be no effect on the Weighted Average value of the remaining units. But if you are using a different Cost Model, there might be an effect. For example, you purchase two Items for 100.00 and 200.00. The Item's Weighted Average is now 150.00. You then return one of the Items to the Supplier. If you are using the FIFO Cost Model, 100.00 will be credited to the Stock Account. If you want the Weighted Average to remain 150.00, do not use this option. If you want the Weighted Average to be changed to the value of the remaining Item (200.00 in this example), select this option.
- A return to a Supplier is treated as a normal removal from stock. So, if you are using a Weighted Average Cost Model, the cost of the returned unit will be the Weighted Average. There will be no effect on the Weighted Average value of the remaining units. But if you are using a different Cost Model, there might be an effect. For example, you purchase two Items for 100.00 and 200.00. The Item's Weighted Average is now 150.00. You then return one of the Items to the Supplier. If you are using the FIFO Cost Model, 100.00 will be credited to the Stock Account. If you want the Weighted Average to remain 150.00, do not use this option. If you want the Weighted Average to be changed to the value of the remaining Item (200.00 in this example), select this option.
- Update Weighted Average from Return Goods and Credit Notes
- Use this option if you would like the Weighted Average values of your Items to be updated from the Returned Goods register (i.e. when goods are returned to you from Customers). If you would like Weighted Averages to be updated from Credit Notes, you should use this option and you should also select the Credit Notes Update Stock option in the Optional Features setting in the System module.
- For example, you purchase an Item for 100.00 and deliver it to a Customer. You then purchase a second example of the Item, this time for 200.00. The Item's Weighted Average is now 200.00 (it is reset to zero when the stock level is zero). The Customer then returns the Item. If you want the Weighted Average to remain 200.00, do not use this option. If you want the Weighted Average to be changed to 150.00 (the average of 100.00 and 200.00) and if you want any Extra Costs in the Returned Goods record to affect the Weighted Average, select this option.
- For example, you purchase an Item for 100.00 and deliver it to a Customer. You then purchase a second example of the Item, this time for 200.00. The Item's Weighted Average is now 200.00 (it is reset to zero when the stock level is zero). The Customer then returns the Item. If you want the Weighted Average to remain 200.00, do not use this option. If you want the Weighted Average to be changed to 150.00 (the average of 100.00 and 200.00) and if you want any Extra Costs in the Returned Goods record to affect the Weighted Average, select this option.
- Weighted Average in Base Currency 2
- When you create an outward cost accounting Transaction (e.g. from a Delivery or Invoice), the value in Base Currency 1 in that Transaction will be calculated using the Cost Model. This figure will usually then be converted to Base Currency 2 using the current rate.
- If you use this option, the value in Base Currency 1 will be calculated using the Cost Model as normal. But this figure will not be converted to Base Currency 2: instead the Base Currency 2 figure in the cost accounting Transaction will be taken from the Weighted Av., Base 2 field on the 'Costs' card of the Item record(this figure will also be shown on flip C of the Delivery).
- If you are using the Weighted Average Cost Model, this option will mean your stock valuation in the Nominal Ledger will be correct in both Base Currencies.
- If you use this option, the value in Base Currency 1 will be calculated using the Cost Model as normal. But this figure will not be converted to Base Currency 2: instead the Base Currency 2 figure in the cost accounting Transaction will be taken from the Weighted Av., Base 2 field on the 'Costs' card of the Item record(this figure will also be shown on flip C of the Delivery).
- Post Cost Price Variance (When using Cost Model "Cost Price")
- If you are using the Cost Price Cost Model, the Cost Price of each Item (visible on the 'Costs' card of the Item record) will be used as the unit cost value in outgoing cost accounting transactions and the unit value in the Stock List.
- If you receive a unit into stock at a different cost, this may cause the stock valuation in the Stock List report to be different to that in the Nominal Ledger. For example, if an Item's Cost Price is 22.00 and you receive a unit into stock at 21.00, it will be valued at 22.00 in the Stock List but 21.00 will be debited to the Stock Account.
- If you select this option, you should also specify a Cost Price Variance Account in the Account Usage Stock setting. This option will cause the Item's Cost Price to the debited to the Stock Account and the difference will be posted to the Cost Price Variance Account. In the example, 22.00 will be debited to the Stock Account and 1.00 will be credited to the Cost Price Variance Account. If you receive a unit into stock at a higher cost (e.g. at 23.00), the difference will be debited to the Cost Price Variance Account.
- If you receive a unit into stock at a different cost, this may cause the stock valuation in the Stock List report to be different to that in the Nominal Ledger. For example, if an Item's Cost Price is 22.00 and you receive a unit into stock at 21.00, it will be valued at 22.00 in the Stock List but 21.00 will be debited to the Stock Account.
- Use Actual Cost Price for GP Cost
- Whenever you add an Item to a Sales Order or Sales Invoice, the Cost Price on flip C of the 'Items' card will be taken from the Item record (Cost Price field, plus Extra Cost if you are using the Include Item Extra Cost in Cost option above). This Cost Price is used in Gross Profit and Margin calculations.
- In the special case of an Item that is Serial Numbered at the Batch or Unit level and using the Cost Price for Serial Number option, the Cost Price on flip C can instead be the appropriate Cost Price for the Serial Number, brought in when you specify a Serial Number on flip D (Order) or flip E (Invoice). Tick this box if you would like to use this option.
Settings in the Stock module:
- Introduction
- Account Usage Stock
- Barcodes
- Base Price Changes
- Batch Specifications
- Cost Accounting
- Cost Accounting Part 2
- Freight Companies
- Item Varieties
- Item Variety Groups
- Location Accounts
- Locations
- Minimum Stock Levels
- Number Series - Deliveries
- Number Series - Goods Receipts
- Number Series - Returned Goods
- Number Series - Returned Goods to Supplier
- Number Series - Stock Depreciations
- Number Series - Stock Movements
- Number Series - Stock Revaluations
- Number Series - Stocktaking
- Pack Types
- Recipes
- Returned Goods Settings
- Sources
- Stock Movement Durations
- Stock Revaluation Settings
- Stock Settings
- Structured Items
- User Defined Fields - Extra Costs
- Variety Masks
- Variety Sets
- Variety Settings
- Variety Sets
- Weighted Average
- Winedi
- Home page for Stock module manual
- Home page for Standard ERP manual
Empresas de Transporte
Si tu empresa utiliza servicios de mensajería, encomiendas o transporte para entregar mercaderías, recibirlas en stock o para trasladarlas de una Ubicación a otra, puedes cargar estas empresas dentro de esta opción. Cuando ingresas Entregas, Merc. Recibidas, Dev. Merc. a Proveedores o Movimientos de Stock, puedes especificar una Empresa de Transporte en la solapa ‘Flete’ para que la información de esta opción se imprima como documentación. En algunos países esto constituye un requisito legal que se aplica a las entregas.Haz clic en el botón [Opciones] dentro del Panel de Control. Luego haz doble clic en ‘Empresas de Transportes??? para abrir la ventana ‘Empresas de Transporte: Hojear’ la cual lista todas las Empresas de Transporte que han sido cargadas. Haz nuevamente doble clic en una de las empresas para modificarla o pulsa el botón [Crear] para crear una nueva. Cuando el archivo esté completo, haz clic en el botón [Guardar] para guardar los cambios y cerrar la ventana. De lo contrario haz clic otra vez en la casilla cerrar.
- Código
- Ingresa el código único que permitirá identificar la Empresa de Transporte desde cualquier sitio en HansaWorld Enterprise. El Código puede constar hasta de 5 caracteres alfanuméricos.
- Nombre
- Indica aquí el nombre de la Empresa de Transporte.
- Nro. Reg.
- Este será el Número de Registro de la Empresa de Transporte.
- Información Camión
- Utiliza este campo para indicar cualquier información pertinente con respeto al vehículo de entrega (su número de registro, patente y/o placa).
- Chofer
- Ingresa aquí el nombre del chofer.
- Texto CMR
- Si vas a utilizar la Empresa de Transporte en combinación con la Forma de Entrega “CMR”, debes entonces ingresar aquí el texto correspondiente a la nota de envío.
Item Varieties
This page describes the Item Varieties setting in the Stock module.—
Before working with the Item Varieties setting, you should enter some Item Variety Groups as described here. You can then use the Item Varieties setting to list the Varieties themselves i.e. to list the different Varieties that you sell.
To define a new Item Variety, first ensure you are in the Stock module using the [Switch Module] button in the Navigation Centre. Then, if you are using Windows or Mac OS X, click the [Settings] button that's also in the Navigation Centre and double-click 'Item Varieties' in the resulting list. If you are using iOS or Android, select 'Settings' from the Tools menu (with 'wrench' icon) and tap 'Item Varieties' in the 'Settings' list. The 'Item Varieties: Browse' window will appear, showing the Item Varieties that you have previously entered. You can add a new record by selecting 'New' from the Create menu (Windows/Mac OS X) or the + menu (iOS/Android). When the record is complete, save it by clicking the [Save] button (Windows/Mac OS X) or tapping √ (iOS/Android) in the Button Bar. To close it without saving changes, click the close box (Windows/Mac OS X) or tap < (iOS/Android).
- Code
- Enter a code by which the Item Variety can be identified.
- If you specified a number of characters in the Code Length field in the parent Variety Group, you should enter a Code consisting of exactly that number of characters. The example Variety shown above belongs to the Variety Group illustrated on the Item Variety Groups page and so has a three-character Code. When entering the Variety Group in the field to the right, the required number of characters will be shown in the 'Paste Special' list as a reminder.
- If you entered a full stop in the Code Length field in the parent Variety Group, you can enter up to five characters here (the exact number will not matter).
- If you specified a number of characters in the Code Length field in the parent Variety Group, you should enter a Code consisting of exactly that number of characters. The example Variety shown above belongs to the Variety Group illustrated on the Item Variety Groups page and so has a three-character Code. When entering the Variety Group in the field to the right, the required number of characters will be shown in the 'Paste Special' list as a reminder.
- Group
- Paste Special
Item Variety Groups setting, Stock module
- Specify here the Variety Group to which the Variety belongs.
- Name
- Specify a name for the Variety. This will be included in the Item description whenever you use the Variety in transactions (e.g. in Invoices, Orders and Goods Receipts).
- Language, Text
- Use the table in the lower part of the window if you need to enter translations of the name of the Item Variety. Specify a Language in the first column using 'Paste Special' if necessary, and the appropriate translation in the second column. There is no need to enter a row for your home Language.
- When you specify the Variety in a transaction (e.g. in an Order or Invoice), the Language of the transaction will determine which translation will be included in the Item Description. If a transaction does not have a Language or has a Language with no translation listed in this table, the Name (above) will be used.
---
Varieties in Standard ERP:
- Introduction
- Defining Varieties, including:
- Item Variety Groups
- Item Varieties
- Variety Sets
- Variety Subsets
- Variety Masks
- Variety Settings
- Item Variety Groups
- Item Numbers of Items with Varieties
- Using Items with Varieties in Transactions
- Varieties and Reports
- Varieties and Barcodes
- Home page for Items and Pricing manual
- Home page for Standard ERP manual
Item Variety Groups
This page describes the Item Variety Groups setting in the Stock module.—
The first step in configuring Varieties is to list the types of Variety that you sell, using the Item Variety Groups setting. Examples might be Colour, Size, Style, Veneer or Finish.
Do not enter the Varieties themselves in this setting. For example, when selling clothes, an appropriate Item Variety Group might be Size: you should enter the sizes themselves (e.g. Small, Medium, Large, etc) in the Item Varieties setting.
To define a new Item Variety Group, first move into the Stock module using the [Switch Module] button in the Navigation Centre. Then, if you are using Windows or Mac OS X, click the [Settings] button that's also in the Navigation Centre and double-click 'Item Variety Groups' in the resulting list. If you are using iOS or Android, select 'Settings' from the Tools menu (with 'wrench' icon) and tap 'Item Variety Groups' in the 'Settings' list. The 'Item Variety Groups: Browse' window will appear, showing the Item Variety Groups that you have previously entered. You can add a new record by selecting 'New' from the Create menu (Windows/Mac OS X) or the + menu (iOS/Android). When the record is complete, save it by clicking the [Save] button (Windows/Mac OS X) or tapping √ (iOS/Android) in the Button Bar. To close it without saving changes, click the close box (Windows/Mac OS X) or tap < (iOS/Android).
- Code
- Enter a code by which the Item Variety Group can be identified. You can use up to five alphanumeric characters.
- Code Length
- When you use an Item that has Varieties in a transaction of any kind, you will use a combined Item/Variety Number. This consists of the Item Number itself, from the Item register, and a suffix that indicates the Variety. This suffix is divided into sections, one for each Variety Group.
- If you need the section of the combined Item/Variety Number that represents this Variety Group always to contain a certain number of characters, enter that number here. If the number of characters will vary, enter a full stop or a number of characters here.
- If you enter a number of characters, you must also enter a number of characters (not necessarily the same number) as the Length in all other Variety Groups that will be used by a particular Item. You should also enter a numeric Length in all Variety Masks that will use the Variety Group. Similarly, if you enter a full stop, you should also enter a full stop in other Variety Groups and Variety Masks.
- If you enter a number of characters, every Variety that belongs to this Variety Group should have a Code that consists of exactly this number of characters. In the example Variety Group illustrated above, all Colours should have three-character Codes.
- If you enter a full stop, the number of characters in each Variety Code will not matter.
- Please refer to the Item Numbers of Items with Varieties page for more details and an example.
- If you need the section of the combined Item/Variety Number that represents this Variety Group always to contain a certain number of characters, enter that number here. If the number of characters will vary, enter a full stop or a number of characters here.
- Comment
- Specify a name for the Variety Group.
—
Varieties in Standard ERP:
- Introduction
- Defining Varieties, including:
- Item Variety Groups
- Item Varieties
- Variety Sets
- Variety Subsets
- Variety Masks
- Variety Settings
- Item Variety Groups
- Item Numbers of Items with Varieties
- Using Items with Varieties in Transactions
- Varieties and Reports
- Varieties and Barcodes
- Home page for Items and Pricing manual
- Home page for Standard ERP manual
Location Accounts
The Location Accounts setting allows you to set different Purchase Accruals, Cost and Sales Accounts for each Location. You can also set a Stock Account for each Location, but you should do this in the Location record itself.To work with the Location Accounts setting, first ensure you are in the Stock module. Then, if you are using Windows or Mac OS X, click the [Settings] button in the Navigation Centre to open the 'Settings' list and double-click 'Location Accounts' in this list. If you are using iOS or Android, select 'Settings' from the Tools menu (with 'wrench' icon) and tap 'Location Accounts' in the 'Settings' list. In both cases, the 'Location Accounts: Inspect' window illustrated below will open. Fill in the fields as described below the illustration. Then, to save changes and close the window, click the [Save] button (Windows/Mac OS X) or tap √ (iOS/Android). To close the window without saving changes, click the close box (Windows/Mac OS X) or tap < (iOS/Android).
To edit a row, simply click or tap in the field to be changed and overtype the existing entry. If you are using Windows or Mac OS X, you can add a new row by clicking in the Code field in the first blank line and entering appropriate text. To remove a row, click on the row number on the left of the row and press the Backspace key. To insert a new row, click on the row number and press the Return key. If you are using iOS or Android, you can add rows by tapping the + button below the matrix. To remove a row, long tap on the row number on the left of the row and select 'Delete Row' from the resulting menu. To insert a row, long tap on the row number where the insertion is to be made and select 'Insert Row' from the resulting menu.
The Location Accounts setting is spread over three flips. To view specific flips, click (Windows/Mac OS X) or tap (iOS/Android) one of the three flip tabs (marked A-C) on the right of (Windows/Mac OS X) or under (iOS/Android) the matrix.
Flip A
- Code
- Paste Special
Locations setting, Stock module
- Use 'Paste Special' to specify the Location for which you need to set dedicated Purchase Accruals, Cost and/or Sales Accounts.
- Dom. Purch. Accruals, EU Purch. Accruals, Export Purch. Accruals
- Paste Special
Account register, Nominal Ledger/System module
- If you are maintaining stock valuations in the Nominal Ledger, a Purchase Accruals Account will be credited whenever you receive a Stocked Item into stock and debited when you receive the Purchase Invoice for that Item.
- Use these fields if you need to set dedicated Purchase Accruals Accounts for the Location specified in the Code field to the left. You should specify a separate Account for each Zone. These Purchase Accruals Accounts will be used in preference to those specified in Item Groups or in the Account Usage Stock setting. Please refer here for more details about how the Purchase Accruals Account will be chosen in each Purchase Order and Goods Receipt row.
- You can change the name of the EU Purch. Accruals field if it is not suitable. Using the VAT Zone Label setting in the Sales Ledger, you can replace the string "EU" with your own string (for example "SACU" in South Africa). This also applies to the EU Cost A/C on flip B and the EU Sales A/C on flip C.
- Use these fields if you need to set dedicated Purchase Accruals Accounts for the Location specified in the Code field to the left. You should specify a separate Account for each Zone. These Purchase Accruals Accounts will be used in preference to those specified in Item Groups or in the Account Usage Stock setting. Please refer here for more details about how the Purchase Accruals Account will be chosen in each Purchase Order and Goods Receipt row.
Flip B
- Dom. Cost A/C, EU Cost A/C, Export Cost A/C
- Paste Special
Account register, Nominal Ledger/System module
- If you are maintaining stock valuations in the Nominal Ledger, a Cost of Sales Account will be debited with the calculated cost of goods whenever you sell a Stocked Item.
- Use these fields if you need to set dedicated Cost Accounts for the Location specified in the Code field to the left. You should specify a separate Account for each Zone. These Cost Accounts will usually be used in preference to those specified in Item Groups, in Item records or in the Account Usage Stock setting. Please refer here for full details about how the Cost of Sales Account will be chosen in an individual transaction.
Flip C
- Dom. Sales A/C, EU Sales A/C, Export Sales A/C
- Paste Special
Account register, Nominal Ledger/System module
- A Sales Account will be credited whenever you sell an Item, allowing you to record the levels of sales of different types of Items in the Nominal Ledger.
- You can use these fields to specify dedicated Sales Accounts to be used when you make sales from the Location specified in the Code field to the left. Please refer here for full details about how a Sales Account will be chosen when you sell an Item (i.e. when you specify an Item in a row in an Invoice, Order, Quotation or other sales transaction).
Settings in the Stock module:
- Introduction
- Account Usage Stock
- Barcodes
- Base Price Changes
- Batch Specifications
- Cost Accounting
- Freight Companies
- Item Varieties
- Item Variety Groups
- Location Accounts
- Locations
- Minimum Stock Levels
- Number Series - Deliveries
- Number Series - Goods Receipts
- Number Series - Returned Goods
- Number Series - Returned Goods to Supplier
- Number Series - Stock Depreciations
- Number Series - Stock Movements
- Number Series - Stock Revaluations
- Number Series - Stocktaking
- Pack Types
- Recipes
- Returned Goods Settings
- Sources
- Stock Movement Durations
- Stock Revaluation Settings
- Stock Settings
- Structured Items
- User Defined Fields - Extra Costs
- Variety Masks
- Variety Sets
- Variety Settings
- Variety Sets
- Weighted Average
- Winedi
- Home page for Stock module manual
- Home page for Standard ERP manual
Ubicaciones
HansaWorld Enterprise permite guardar stock en diferentes Ubicaciones. Los saldos de stock para Ítems se mantienen por Ubicación y por total.Si tienes al menos una Ubicación, debes especificar una Ubicación Principal en las Opciones de Stock. Esto evitará que el stock no tenga ninguna Ubicación y así cuando olvides especificar una Ubicación en cualquier asiento de stock, ese asiento adicionará stock o lo retirará de la Ubicación Principal. Esto resulta ventajoso cuando solo tienes una sola Ubicación. Si tienes más de una Ubicación, a lo mejor decidirás utilizar la casilla ‘Requiere Ubicación’ dentro de las mismas opciones (???Opciones de Stock); de esto modo se indicará siempre una Ubicación en cualquier Asiento de Stock.
También puedes especificar Ubicaciones por defecto en la opción ‘Máquina Local’ del módulo Seteos de Usuario y en la solapa 'Ventas' (campo ‘Comisión’) de cada Persona. La primera Ubicación será utilizada por defecto en todos los asientos de stock que sean cargados en una máquina cliente, mientras que la segunda Ubicación será utilizada por defecto en todos los asientos de stock cargados por un usuario en particular.
Para abrir la opción ‘Ubicaciones’, asegúrate de estar en el módulo Stock y luego haz clic en el botón [Opciones]. Haz doble clic en ‘Ubicaciones’ para desplegar la ventana ‘Ubicaciones: Hojear???. Esta ventana mostrará las Ubicaciones existentes.
Para cargar una nueva Ubicación, haz clic en el botón [Nuevo] o alternativamente, puedes resaltar una existente y luego pulsar el botón [Duplicar] para modificarla.
La ventana ‘Ubicación: Crear’ se abrirá y estará vacía si pulsaste [Crear] o conteniendo un duplicado de la Ubicación resaltada si pulsaste [Duplicar].

- Cta. Stock
- La Cuenta Stock especificada en este campo será debitada cada vez que se reciban Ítems dentro de la Ubicación en cuestión y se abonará cuando el stock sea entregado (en tanto hayas especificado esto en la opción Sub Sistemas y en la opción respectiva de Nros de Serie, para que se creen Asientos al aprobar Mercaderías Recibidas y Entregas). Si no especificas una Cuenta Stock en la Ubicación, entonces se usará la Cuenta Stock para el Grupo de Ítem al que pertenece el Ítem o la Cuenta Stock especificada en la opción Manejo de Cuentas de Stock.
- Objeto
- Pegado Especial
Registro Objetos, módulos Contabilidad/Sistema
- Puedes asignar hasta 20 Objetos a una Ubicación (separándolos por comas). Estos Objetos serán copiados a la solapa 'Comentario' de todas la Mercaderías Recibidas y al encabezado de todas las Bajas de Stock con esta Ubicación (aquellas creadas por la función de Mantenimiento 'Comparación de Inventario'). Desde las Mercaderías Recibidas, los Objetos serán destinados a la columna Haber de la Cuenta Stock (+) (y a la columna Debe de la Cuenta Stock cuando hayas tildado la casilla ‘Objeto Proveedor a Cta. Stock’ – opción (módulo Compras). Desde las Bajas de Stock, los Objetos serán destinados a la columna Haber de la Cuenta Stock (-) (y a la columna Debe de la Cuenta Stock cuando hayas tildado la casilla ‘Objeto en Cuenta de Stock’ - opción Contabilidad de Costos (módulo Stock). Estos Objetos no serán copiados a otras Mercaderías Recibidas o Bajas de Stock para que así puedas analizar las ganancias de stock y las pérdidas según cada Ubicación arrojada por el proceso de verificación.
- Ignorar Cronología
- HansaWorld Enterprise contiene una funcionalidad cronológica que sirve para mejorar la exactitud de los valores FIFO/LIFO. Esto permite organizar el ingreso de asientos de stock en orden cronológico. Esta funcionalidad se controla mediante el uso de las alternativas en ‘Cronología Stock’ dentro de las Opciones de Stock. Si estás usando esta funcionalidad, no podrás aprobar asientos de stock (ej.
Merc. Recibidas, Entregas, Movimientos de Stock, Devoluciones de Merc. o Bajas de Stock) cuando existan asientos de stock sin aprobar (en cualquiera de los registros mencionados) conteniendo una Fecha de Asiento anterior y/o asientos aprobados pero con una Fecha de Asiento posterior. Puedes desactivar esta revisión cronológica para una Ubicación particular. Esto se hará tildando la casilla ‘Ignorar Cronología’.
- Solicitar Posición
- Si la Ubicación posee distintas Posiciones y tú deseas especificar siempre una Posición cuando utilices la Ubicación, entonces tilda esta casilla.
- Debes tildar esta casilla cuando estés usando el módulo Administración de Almacenes y cuando la Ubicación corresponda a tu Almacén (según lo especificado en el registro ‘Opciones Administración de Bodega’ – módulo Administración de Almacenes).
- Si no estás utilizando el módulo Administración de Almacenes, se recomienda no tildar esta casilla.
- Debes tildar esta casilla cuando estés usando el módulo Administración de Almacenes y cuando la Ubicación corresponda a tu Almacén (según lo especificado en el registro ‘Opciones Administración de Bodega’ – módulo Administración de Almacenes).
- Tipo
- Estas alternativas tienen que ver con la selección de las Cuentas de Ganancia o Pérdida Stock utilizadas cuando ejecutas la función 'Comparación de Inventario' para la Ubicación en cuestión.
- Otro
- Activa este radio botón para Ubicaciones estándar. Si la función de Mantenimiento 'Comparación de Inventario' crea una Mercadería Recibida para un Ítem de esta Ubicación, entonces la Cuenta Stock (+) será extraída desde la opción Manejo de Cuentas de Stock. Si la función crea una Baja de Stock, entonces la Cuenta Stock (-) será también extraída de la opción Manejo de Cuentas de Stock.
- Producción
- Si la función 'Comparación de Inventario' crea una Mercadería Recibida para un Ítem de esta Ubicación (siendo que el Ítem pertenece a un Grupo de Ítem y has tildado la casilla ‘Usar Grupos de Ítem p/Contabilidad Costos’ en la opción Contabilidad de Costos, entonces la Cuenta Stock (+) será la Cuenta “Manejo Cta. Variaciones” del Grupo de Ítem. De lo contrario, será extraída de la opción Manejo de Cuentas de Stock. De manera similar, si la función crea una Baja de Stock y sucede lo mismo que en el anterior caso, la Cuenta Stock (-) será la Cuenta “Manejo Cta. Variaciones??? del Grupo de Ítem. De lo contrario, será extraída de la opción Manejo de Cuentas de Stock.
- Otro
Niveles Mínimos de Stock
Puedes utilizar el campo ‘Nivel Mín.’ en la solapa 'Stock' de cada Ítem para especificar la cantidad mínima que puede tener el Ítem en stock. Si necesitas especificar un nivel mínimo de stock para cada Ubicación, debes entonces utilizar este opción.La función 'Crear Órdenes de Compra' en el módulo Órdenes de Compra (menú Operaciones de la ventana ‘Órdenes de Compra: Hojear’) crea Órdenes de Compra que contienen cantidades suficientes las cuales no contradicen el nivel mínimo de stock. Es decir que el saldo de stock para cada Ítem solo puede descender hasta el nivel mínimo de stock y toma en cuenta las cantidades en las Órdenes de Venta que no pueden ser entregadas desde stock. Este nivel mínimo de stock se calcula conforme a todos los archivos de Nivel Mínimo de Stock correspondientes al Ítem. Si no existen archivos existentes en la opción ‘Niveles Mínimos de Stock’, entonces el nivel mínimo de stock será extraído del archivo del Ítem. Por esta razón, si estás usando la opción ‘Niveles Mínimos de Stock’, se recomienda dejar vacío el campo ???Nivel Mín.’ (en cada Ítem).
Esta opción también se utiliza en los informes Lista de Faltantes y Sugerencia de Compra, los cuales producen propuestas de compras y consecuentemente te dan una proyección de las Órdenes de Compra que serán creadas por la función descrita en el anterior párrafo. Si no especificas una Ubicación cuando produces estos informes, el nivel mínimo de stock cargado para cada Ítem será la cifra destinada para todas la Ubicaciones. Si es que no has especificado una Ubicación, el nivel mínimo de stock (del Ítem) será la cifra para la Ubicación es cuestión. Si no existe ningún archivo cargado en la opción ‘Niveles Mínimos de Stock’, entonces el nivel mínimo de stock será extraído desde el archivo del Ítem.
Nros. de Serie - Entregas
Utiliza esta opción para definir la secuencia numérica de Entregas. Esta forma de definir la secuencia numérica es muy similar a la descrita para Mercaderías Recibidas.Nros. de Serie - Mercadería Recibida
Cada Mercadería Recibida posee su propio número único de identificación el cual está basado en series secuenciales. Cuando cargas una Mercadería Recibida, se usa el número contiguo de esta serie. Si se requiere, es posible hacer que cierto rango de secuencias se ejecute simultáneamente, quizás para representar diferentes años, departamentos, o tipos de orden.Debes utilizar esta opción para definir estas secuencias o Números de Serie. Los Números de Serie no deben superponerse por ningún motivo. Si dejas esta opción en blanco, la numeración de las Mercaderías Recibidas iniciará en 1 y continuará sucesivamente.
Cuando hayas definido una secuencia numérica para las Mercaderías Recibidas, podrás asignar una secuencia específica a un usuario particular utilizando el campo ‘Nro. Merc. Rec.’ en la solapa 'Nros. de Serie' (módulo Sistema). Así, cuando ese usuario ingrese una nueva Mercadería Recibida, el Número de este archivo será el primero sin usar dentro de la secuencia específica. También puedes colocar una secuencia universal por defecto en la opción Nros. de Serie por Defecto (módulo Sistema). Si no asignas una secuencia específica para un usuario particular o no cargas una serie universal por defecto, entonces la numeración de las Mercaderías Recibidas será extraída de la primera secuencia válida situada en esta opción. El usuario autorizado está habilitado para cambiar y colocar el primer número sin usar dentro de una Mercadería Recibida. Esto es fácil de hallar mediante ‘Pegado especial’.
Para cada número de serie existe una medida de control que define la creación automática de Asientos Contables cuando se aprueban Mercaderías Recibidas. Utiliza ‘Pegado Especial’ desde el campo ‘As.’ para abrir una lista que contiene dos opciones: “Generar Asiento” y “No generar Asiento”. En este sentido, debes seleccionar la primera cuando vayas a generar Asientos. Utiliza la segunda opción cuando no se requiera la creación de ningún Asiento. Efectivamente, esta funcionalidad es exclusivista puesto que solo puedes elegir crear o no crear Asientos Contables. Si la preferencia general (la cual se va armando en la opción Sub Sistemas) consiste en crear Asientos, entonces no se puede pretender que éstos se creen para una sola secuencia.
Con doble clic en ‘Nros. de Serie – Mercadería Recibida’ dentro de la lista ‘Opciones’, aparecerá la siguiente ventana:
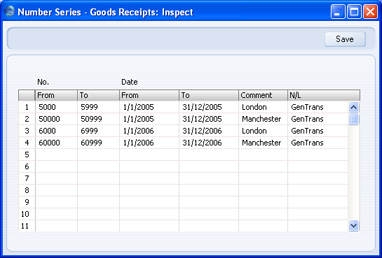
Nros. de Serie - Dev. Mercadería
Utiliza esta opción para definir la secuencia numérica que se aplicará a los archivos en el registro Devolución Mercaderías. Este procedimiento es semejante al descrito para Mercaderías Recibidas.Nros. de Serie - Dev. Mercadería a Proveedor
Utiliza esta opción para definir la secuencia numérica que se aplicará a los archivos en el registro Dev. Merc. a Proveedores. Este procedimiento es semejante al descrito para Mercaderías Recibidas.Nros. de Serie - Bajas de Stock
Utiliza esta opción para definir la secuencia numérica que se aplicará a los archivos en el registro Bajas de Stock. Este procedimiento es semejante al descrito para Mercaderías Recibidas.Nros. de Serie - Movimientos de Stock
Utiliza esta opción para definir la secuencia numérica que se aplicará a los archivos en el registro Movimientos de Stock. Este procedimiento es semejante al descrito para Mercaderías Recibidas.Number Series - Stock Revaluations
Each record in the Stock Revaluation register has its own unique identifying number, based on a sequential series. When you enter a new record, the next number in the sequence will be used. If required, you can have a number of such sequences running concurrently, perhaps representing different years or different departments.Use this setting to define these sequences, or Number Series. The different series should not overlap. If you leave the setting empty, Stock Revaluation Numbers will start at 1 and continue consecutively.
When you enter a Stock Revaluation, the next number in the first valid Number Series entered to this setting will be used as a default; change to the first unused number in any other valid Number Series using 'Paste Special'.
When you open the Number Series - Stock Revaluations setting, the following window will appear:
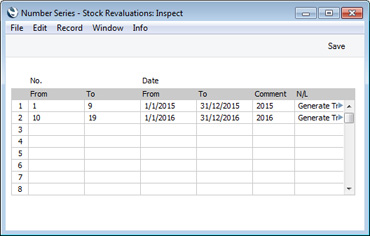
The N/L field gives you a measure of control over whether Nominal Ledger Transactions will be generated automatically when you mark Stock Revaluations in a particular sequence as OK and save them. Using 'Paste Special' from the N/L field brings up a selection list containing two options: "GenTrans" and "Do Not GenTrans". Select the first option if Nominal Ledger Transactions are to be generated and the second if they are not. In effect, this feature is an exclusionary one in that you can only choose to not have Nominal Ledger Transactions created for a particular number sequence. If the overall preference (set in the Sub Systems setting in the Nominal Ledger) is to not have such transactions created, you cannot decide to have them created for a single sequence.
When the setting is complete, click the [Save] button (Windows/Mac OS X) or tap √ (iOS/Android) to save the changes. To close the window without saving changes, click the close box (Windows/Mac OS X) or tap < (iOS/Android).
---
Settings in the Stock module:
- Introduction
- Account Usage Stock
- Barcodes
- Base Price Changes
- Batch Specifications
- Cost Accounting
- Freight Companies
- Item Varieties
- Item Variety Groups
- Location Accounts
- Locations
- Minimum Stock Levels
- Number Series - Deliveries
- Number Series - Goods Receipts
- Number Series - Returned Goods
- Number Series - Returned Goods to Supplier
- Number Series - Stock Depreciations
- Number Series - Stock Movements
- Number Series - Stock Revaluations
- Number Series - Stocktaking
- Pack Types
- Recipes
- Returned Goods Settings
- Sources
- Stock Movement Durations
- Stock Revaluation Settings
- Stock Settings
- Structured Items
- User Defined Fields - Extra Costs
- Variety Masks
- Variety Sets
- Variety Settings
- Variety Sets
- Weighted Average
- Winedi
- Home page for Stock module manual
- Home page for Standard ERP manual
Nros. de Serie - Inventario
Utiliza esta opción para definir la secuencia numérica que se aplicará a los archivos en el registro de Inventario. Este procedimiento es semejante al descrito para Mercaderías Recibidas.Tipos de Empaque
Utiliza esta opción para almacenar información respecto a los diversos tipos de empaque utilizados por tu empresa para las entregas. Algunos de estos tipos pueden ser envolturas, sobres y cajas de varios tamaños. Si deseas que esta información se imprima en la documentación de la Entrega (para que el Cliente confirme rápidamente que se ha entregado la cantidad requerida y en los empaques correctos), debes incluir los campos “Empaques – Fila”, “Empaque Descripción – Fila” y “Nro. de Empaques” en tu diseño de Formulario. El primer campo contendrá el número de empaques de una fila en la Entrega, mientras que el último campo contendrá la cantidad total de empaques en la Entrega.La ventana ‘Tipos de Paquete: Hojear’ mostrará los tipos de empaque disponibles. Haz doble clic sobre uno de ellos para modificarlo o haz clic en [Crear] para crear uno nuevo.
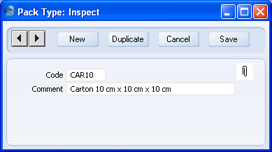
Posiciones
La opción 'Posiciones' fue trasladada al módulo Manejo de Almacenes - registro 'Posiciones' en la versión 4.2 de HansaWorld Enterprise.Recetas
Los Ítems ensamblados son aquellos construidos por tu empresa utilizando otros Ítems (sus componentes). Existen dos clases diferentes de Ítems ensamblados dependiendo del uso del módulo Producción:- Ítems Compuestos
- Si no estás utilizando el módulo Producción, debes entonces cargar un Ítem ensamblado como si fuese un Ítem Compuesto (usando los campos en la solapa ‘Precios’ del Ítem) y no manteniendo los niveles de stock. Se asume que los Ítems Compuestos serán estructurados al momento de realizar la Entrega. En este punto, los niveles de stock de los componentes serán reducidos.
- Ítems de Stock
- El módulo Producción crea “Producciones”. Éste concepto normalmente corresponde al resultado de una orden de producción. Cuando marcas una Producción como "Terminada" (cuando activas el botón ‘Terminada’), los niveles de stock de los Ítems implicados se reduce y el stock de los Ítems de entrega se incrementa consecuentemente. Para garantizar que esta acción se efectúe, tú debes cargar todos los Ítems de entrega incluyendo solamente Ítems de Stock. Tales Ítems pueden ser únicamente estructurados utilizando el módulo Producción. Estos Ítems se estructuran y se mantienen en stock anticipándose a la entrega respectiva.
- Un Ítem de insumo puede ser enfáticamente uno de sub-categoría. En este sentido, deberá ser un Ítem de Stock que esté estructurado en el registro Producciones en el módulo Producción. De esta manera, los niveles de stock fluctuarán como unidades y luego serán usados como sub-categorías. En este sentido, para utilizar sub-categorías, deberá estar instalado el módulo Producción.
Supongamos que tú ensamblas un sistema de estéreo utilizando ciertos componentes como ser el ecualizador, los amplificadores, etc., sin embargo este producto es comercializado como un solo Ítem. Para empezar debes ingresar “Sistema de Estéreo” en el registro Ítems y luego activar el botón Ítem Compuesto en la solapa ???Precios’.
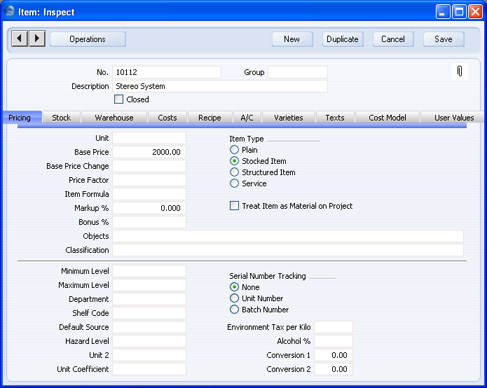
Al definir la Receta para el Sistema de Estéreo, debes cerciorarte que utilices el mismo Código de Receta que fue cargado en la solapa 'Receta' del Ítem. Para definir una Receta, primero asegúrate de estar en el módulo Stock y luego selecciona ‘Opciones’. Haz doble clic a ‘Recetas’ y pulsa el botón [Crear] para poder crear una nueva Receta.
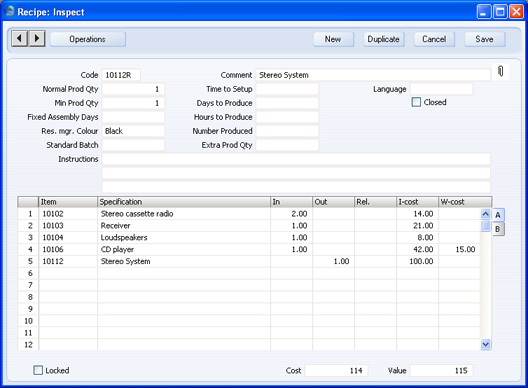
- Código
- El Código de la Receta puede contener hasta 20 caracteres. Se recomienda que el Código de la Receta sea similar al Número y/o Código del Ítem ensamblado.
- Comentario
- Será una descripción del ensamblaje y/o los componentes del producto.
- Cant. Normal Prod.
- Este campo solo es pertinente cuando está instalado el módulo Producción (ej. cuando el resultado de la Receta es un Ítem de Stock). Por favor, haz clic aquí para obtener una descripción de esto.
- Hora para Instalar, Cant. Mín. Prod., Días para Producir, Días Ensamblaje, Horas a Producir, Color Recurso, Nro. Producido, Lote Estándar, Cant. Adic. p/Prod., Routing por Defecto
- Estos campos serán pertinentes solo si el módulo Producción está instalado.
- Cerrado
- Tilda esta casilla para indicar que la Receta ya no será utilizada. Si el resultado de la Receta es un Ítem Compuesto el cual es utilizado dentro de una Orden, Factura u otros asientos de ventas o stock, entonces ya no podrás guardar el asiento. Por tanto, se recomienda marcar como Cerrado tal Ítem Compuesto para así retirarlo de la lista ‘Pegado Especial’ correspondiente al Ítem (para evitar errores); o podrías asignar una Receta diferente al Ítem Compuesto.
- Instrucciones
- Utiliza estas tres líneas para indicar algunas instrucciones sobre el manejo de la Receta.
Pestaña A
- Ítem
- Pegado Especial
registro de Ítems
- Ingresa el Número de Ítem correspondiente a cada uno de los componentes. Luego, en la última fila, debes ingresar el Número de Ítem del producto final o producto acabado.
- Especificación
- Será el Nombre del Ítem proveniente del registro de Ítems. Este dato se cargará aquí automáticamente cuando ingreses el Número de Ítem.
- Insumo
- Ingresa la cantidad de cada componente requerido para fabricar/armar/diseñar el producto acabado. No debes ingresar ningún Ítem de ensamblaje en la última línea.
- Resul.
- Será la cantidad de Ítems ensamblados que pueden ser creados desde los componentes listados. Por lo general, esa cantidad será 1 y deberá ser 1 cuando la Receta se refiera a un Ítem.
- Rel.
- Relatividad: este campo solo sirve cuando existe más de un Ítem de ensamblaje. Por lo general, será el caso de algún Ítem finalizado (producto acabado) que sea Ítem de Stock (Ítems que serán armados usando el registro Producciones). Dentro de cada fila que representa a un Ítem finalizado, debes ingresar una cifra porcentual. Cuando utilices la Receta en una Producción, el costo total de los componentes será distribuido conforme a los porcentajes cargados aquí.
- Costo-I
- Costo del Insumo: si la fila contiene el monto de un Ítem, entonces debes ingresar el Precio Costo de una unidad (del Ítem). Por defecto será el Precio Costo del Ítem. El costo mostrado en este campo NO es igual al valor de stock calculado usando el Modelo de Costo usual. Podrás actualizar este costo mediante la función de Mantenimiento 'Actualizar Recetas'.
- Si la fila contiene un Ítem finalizado (un producto acabado), entonces debes ingresar el costo de ese Ítem. Esto será por lo general la suma de los Precios Costo de los Ítems de Insumo y tomará en cuenta las cantidades. Nuevamente, por defecto será el Precio Costo de Ítem.
- Los costos totales de los Ítems de insumo aparecerán en el campo ‘Costo Ítems-Ins.’ (pie de la ventana), mientras que los costos de los Ítems finalizados, aparecerán en el campo ‘Valor Ítems- Res.’
- Si la fila contiene un Ítem finalizado (un producto acabado), entonces debes ingresar el costo de ese Ítem. Esto será por lo general la suma de los Precios Costo de los Ítems de Insumo y tomará en cuenta las cantidades. Nuevamente, por defecto será el Precio Costo de Ítem.
- Costo-T
- Costo de Trabajo (por unidad producida): Carga un costo trabajo en función a los Ítems de insumos y aquellos ensamblados. Por lo general, este será el costo de la fuerza laboral requerida para armar el Ítem ensamblado.
- Únicamente deberás especificar un costo trabajo cuando el resultado de la Receta sea un Ítem de Stock armado usando el registro Producciones. Si el resultado es un Ítem Compuesto, el costo trabajo será ignorado.
- Deberás cargar el costo trabajo en una fila que presente un Ítem de Insumo (según se muestra en la ilustración anterior). Esto garantizará que el costo trabajo sea correctamente abonado en la Cuenta de Producción-Costo Trabajo dentro de cualquier Asiento Contable resultante de los archivos de Producción los cuales empleen la Receta en cuestión. Si cargas el costo trabajo en una fila de Ítem finalizado, éste será debitado de la Cuenta Producción-Costo Trabajo.
- Las cifras correspondientes al Costo Trabajo serán incluidas tanto en los campos ‘Costo Ítems-Ins.’ como ‘Valor Ítems-Res.’ en el pie de la ventana.
- Únicamente deberás especificar un costo trabajo cuando el resultado de la Receta sea un Ítem de Stock armado usando el registro Producciones. Si el resultado es un Ítem Compuesto, el costo trabajo será ignorado.
- Descripción
- Aquí se puede anotar algunos detalles sobre el Ítem.
- Receta
- Este campo muestra si el Ítem es un Ítem ensamblado (es decir, uno con su Receta especificada en su solapa 'Receta'). Esto se actualizará automáticamente y no podrá ser modificado.
- Bloqueado
- Cuando te encuentres seguro que la Receta está correcta, tilda esta casilla para evitar cambios posteriores. Una vez hayas utilizado una Receta en un Asiento (Entrega o Producción), esta no debe ser modificada, especialmente si el resultado es un Ítem Compuesto cuya casilla ???Pegar Componentes durante Ingreso’ no está tildada. En este caso, la modificación de la Receta incidirá en fallas dentro de los archivos de stock, de modo que ésta será marcada como ‘Bloqueada’ cuando sea utilizada en una Entrega la primera vez.
- Si luego se hace necesario modificar una Receta, no deberás hacerlo arbitrariamente (no se debe). Por el contrario, debes crear una nueva Receta y agregarla a un nuevo Ítem de Stock o Compuesto).
!
No debes cambiar una Receta luego de haberla utilizado en un asiento de stock.
- Si luego se hace necesario modificar una Receta, no deberás hacerlo arbitrariamente (no se debe). Por el contrario, debes crear una nueva Receta y agregarla a un nuevo Ítem de Stock o Compuesto).
- Costo Ítems-Ins.
- Este campo contiene la sumatoria de los costos correspondientes a los Ítems de Insumo (Costo-T + (Costo-I x Cant. In.)). Si el Ítem ensamblado es un Ítem de Stock, entonces deberás transferir este valor al campo ‘Precio Costo??? situado en la solapa 'Costos' del Ítem (ya sea manualmente o mediante la función de Mantenimiento 'Actualizar Recetas' (módulo Producción).
- Valor Ítems-Res.
- Este campo contiene la sumatoria de los costos correspondientes a los Ítems finalizados (productos acabados) (Cost-T + (Costo-I * Cant. Res.)).
Opciones p/Devolución de Bienes
Este seteo contiene opciones que controlan el comportamiento de distintos aspectos en los registros Devolución Mercaderías y Dev. Merc. a Proveedores.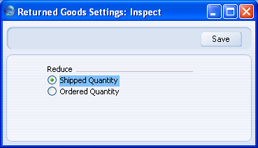
- Disminuir
- Especifica una de estas alternativas para disminuir por defecto los movimientos contenidos en archivos de Devolución de Mercaderías y/o Dev. Mercaderías a Proveedores. Para obtener una descripción de las dos alternativas de esta opción, por favor revisa las páginas correspondientes a las solapas 'Ubicación' dentro de Devoluciones de Mercaderías y Dev. Mercaderías a Proveedores respectivamente.
Origen
Esta opción sirve para registrar nombres y direcciones de los fabricantes originales de los Ítems (manufactureros, fabricantes, importadores, etc.). Puedes cargar un Origen en la solapa 'Stock' de cada Ítem desde donde se transferirá a Órdenes (pestaña F) y a Entregas (pestaña D).La ventana ???Orígenes: Hojear’ muestra todos los archivos existentes de este tipo. Haz doble clic para modificar uno existente o pulsa [Crear] para crear un nuevo archivo.
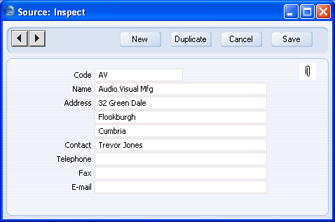
Duración de Mov. de Stock
Si posees Ubicaciones situadas a cierta distancia unas de otras y es necesario recorrer esa distancia para trasladar los Ítems, lo cual te obliga a utilizar Movimientos de Stock, puedes utilizar esta opción para registrar los tiempos frecuentes de traslados. De esta manera podrás obtener una estimación del tiempo empleado para completar cada Movimiento de Stock.Para abrir la opción ???Duración de Mov. de Stock’, primero asegúrate de estar en el módulo Stock y luego haz clic en el botón [Opciones]. Posteriormente, selecciona ???Duración de Mov. de Stock’ para abrir la ventana ‘Duraciones Mov. de Stock: Hojear’ la cual mostrará los archivos existentes.
Para cargar una nueva Duración de Movimiento de Stock, haz clic en [Crear] o alternativamente, resalta un archivo existente y luego pulsa el botón [Duplicar].
Así se abrirá la ventana ‘Duración Mov. de Stock: Crear’ y estará vacía si pulsaste [Crear] o conteniendo un duplicado su pulsaste [Duplicar].
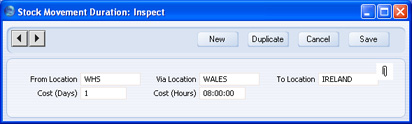
- De Ubicación
- Pegado Especial
opción Ubicaciones, módulo Stock
- Será la Ubicación desde donde van a ser trasladados los Ítems (la Ubicación donde inicia el recorrido que da lugar a un Movimiento de Stock).
- Vía Ubicación
- Pegado Especial
opción Ubicaciones, módulo Stock
- Si el recorrido pasa por un Ubicación de tránsito, entonces debes especificar esa Ubicación aquí. En algunas situaciones, la ‘Vía Ubicación’ podría referirse al camión que transporta los Ítems desde la ‘De Ubicación’ hacia la ‘A Ubicación’. Este campo puede quedar vacío.
- A Ubicación
- Pegado Especial
opción Ubicaciones, módulo Stock
- Será la Ubicación donde los Ítems van a ser trasladados (la Ubicación donde concluye el recorrido de un Movimiento de Stock).
- Costo (Días), Costo (Horas)
- Utiliza estos campos para especificar el tiempo empleado por un recorrido entre la Ubicación origen y la Ubicación destino. Se asume un día con una duración de 24 horas, así que el recorrido ilustrado en el ejemplo durará 32 horas (1 día (24 horas) + 8 horas).
Stock Revaluation Settings
This setting contains some miscellaneous options controlling the behaviour of various aspects of the Stock Revaluation register.
- Force same Cost for same Item
- If you hold stock in more than one Location (or you hold stock of Serial Numbered Items), you may want to be able to use Stock Revaluations to revalue an Item differently depending on Location (or depending on Serial Number). On the other hand, you may need to ensure that an Item is always revalued with the same value, irrespective of Location or Serial Number. If you need the latter option, select this option.
Settings in the Stock module:
- Introduction
- Account Usage Stock
- Barcodes
- Base Price Changes
- Batch Specifications
- Cost Accounting
- Freight Companies
- Item Varieties
- Item Variety Groups
- Location Accounts
- Locations
- Minimum Stock Levels
- Number Series - Deliveries
- Number Series - Goods Receipts
- Number Series - Returned Goods
- Number Series - Returned Goods to Supplier
- Number Series - Stock Depreciations
- Number Series - Stock Movements
- Number Series - Stock Revaluations
- Number Series - Stocktaking
- Pack Types
- Recipes
- Returned Goods Settings
- Sources
- Stock Movement Durations
- Stock Revaluation Settings
- Stock Settings
- Structured Items
- User Defined Fields - Extra Costs
- Variety Masks
- Variety Sets
- Variety Settings
- Variety Sets
- Weighted Average
- Winedi
- Home page for Stock module manual
- Home page for Standard ERP manual
Opciones de Stock
Este seteo contiene algunas opciones variadas que controlan el comportamiento de distintos aspectos en el módulo Stock.
- Ubicación Principal
- Pegado Especial
opción Ubicaciones, módulo Stock
- Si especificas aquí una Ubicación, ésta será utilizada por defecto cada vez que se requiera una Ubicación y el campo respectivo sea dejado en blanco. Por ejemplo, los Ítems en una Mercadería Recibida que no tengan una Ubicación serán tratados como si estuviesen almacenados en la Ubicación Principal.
Si tienes al menos una Ubicación, entonces debes especificar aquí una Ubicación Principal. Esto evitará que tengas stock que no está suscrito a una Ubicación. También será ventajoso cuando solo tengas una Ubicación existente. Si tienes más de una, quizás decidirás tildar la casilla ‘Requiere Ubicación’ (más abajo) para garantizar que especifiques una Ubicación en cada asiento de stock.
- Si no tildas la casilla ‘Requiere Ubicación’ y además cambias la Ubicación Principal, deberás crear un archivo backup e importarlo hacia una nueva base de datos antes de seguir cargando otros asientos de stock. Esto tendrá el efecto de trasladar todo el stock desde la antigua Ubicación Principal a una nueva, puesto que todos los asientos de stock con una Ubicación en blanco serán tratados como si pertenecieran a una nueva Ubicación Principal. Si en realidad el stock de la antigua Ubicación Principal permanece ahí, entonces deberás devolverlo a esa Ubicación usando Movimientos de Stock.
- Un caso especial de esto sobreviene al momento de especificar una Ubicación Principal la primera vez. En este caso, el stock que ha sido cargado sin tener ninguna Ubicación será tratado como si estuviese en la Ubicación Principal luego de haber completado el procedimiento de actualización descrito arriba.
- Si omites algún detalle en el proceso de actualización cuando cambies la Ubicación Principal y trasladas stock desde la antigua Ubicación Principal hacia la nueva (usando un Movimiento de Stock), entonces los niveles de stock serán interpretados de manera imprecisa la próxima vez que crees un backup y lo importes a una nueva base de datos (ej. cuando migres a una nueva versión de HansaWorld Enterprise). Sin embargo, podrás corregir estas fallas revocando el Movimiento de Stock. No obvies el proceso de actualización tratando de evitar que se traslade algún stock innecesario según tu parecer. En realidad esto sucederá de todas formas cuando importes nuevamente un backup.
!
Si no tildas la casilla ‘Requiere Ubicación’ pero decides cambiar la Ubicación Principal, debes crear un archivo backup e importarlo de inmediato a una nueva base de datos.
- Si no tildas la casilla ‘Requiere Ubicación’ y además cambias la Ubicación Principal, deberás crear un archivo backup e importarlo hacia una nueva base de datos antes de seguir cargando otros asientos de stock. Esto tendrá el efecto de trasladar todo el stock desde la antigua Ubicación Principal a una nueva, puesto que todos los asientos de stock con una Ubicación en blanco serán tratados como si pertenecieran a una nueva Ubicación Principal. Si en realidad el stock de la antigua Ubicación Principal permanece ahí, entonces deberás devolverlo a esa Ubicación usando Movimientos de Stock.
- Ubicación Servicio
- Pegado Especial
opción Ubicaciones, módulo Stock
- Este campo es operable cuando está instalado el módulo Órdenes de Servicio. En síntesis, cuando recibes Ítems de servicio (en stock) de parte de Clientes los cuales solicitan reparación, se almacenará los Ítems implicados por defecto dentro de la Ubicación especificada aquí.
- Pegar Clasificación
- Pegado Especial
opción Clasificaciones de Ítems, módulo Ventas
- Por favor, haz clic aquí para mayores detalles de este campo.
- Requiere Ubicación
- Si tildas esta casilla, tendrás que especificar una Ubicación en todos los asientos de stock (como ser Entregas, Mercaderías Recibidas y Facturas). Si no tildas esta casilla y tampoco especificas una Ubicación en un asiento, tal asiento será tratado como si afectará la Ubicación cargada en al campo ‘Ubicación Principal’.
- Si posees más de una Ubicación, se recomienda tildar esta casilla. De esta manera, no habrá riesgo de olvidar especificar una Ubicación en un asiento y por tanto será imposible agregar o retirar stock por error desde la Ubicación Principal.
- Si posees más de una Ubicación, se recomienda tildar esta casilla. De esta manera, no habrá riesgo de olvidar especificar una Ubicación en un asiento y por tanto será imposible agregar o retirar stock por error desde la Ubicación Principal.
- Actualizar Registros Nros. Serie Conocidos
- Debes tildar esta casilla cuando estés manejando el módulo Órdenes de Servicio y desees habilitar una lista de Números de Serie empleados por los Ítems vendidos. Cuando se solicite la reparación de algún Ítem, esta lista permitirá que HansaWorld Enterprise determine si el Ítem en cuestión está todavía bajo garantía. Para esto, HansaWorld Enterprise utilizará la Fecha de Factura y el campo ‘Meses Garantía’ ubicados en la solapa 'Receta' del Ítem.
- Entrega Automática Ítems de Servicio y Simples
- Cuando crees Facturas desde Órdenes de Venta, generalmente solo aquellos Ítems ubicados en Entregas aprobadas serán incluidos. Esto significa que deberás emitir una Entrega aprobada desde una Orden de Venta antes de crear una Factura. Esto podría resultar inapropiado si la Orden de Venta no incluye ningún Ítem de Stock o Compuesto (ej. un Ítem que no tiene implicaciones en su nivel de stock). Si deseas crear una Factura sin tener que emitir una Entrega previamente en tales Órdenes, entonces tilda esta casilla.
- Si decidiste tildar esta casilla siendo que tienes una Orden de Venta que incluye un Ítem Simple o de Servicio, entonces las Cantidades Ent.1 y Ent.2 se convertirán en la Cantidad de Orden cuando guardes tal Orden. Por tanto, los Ítems Simples y de Servicio no serán incluidos en Entregas creadas desde la Orden. Esto también significa que no podrás disminuir la Cantidad de la Orden para tales Ítems luego de haberla guardado.
- Si decidiste tildar esta casilla, asegúrate de no crear Facturas de anticipo accidentalmente para servicios como ser entregas, trabajo, etc., desde Órdenes que contengan Ítems de Stock.
- No debes tildar esta casilla cuando tengas Órdenes de Venta conectadas a Proyectos. No podrás crear Facturas desde estas Órdenes de Venta sino que harás esto desde Asientos de Proyecto creados desde Entregas. Si has tildado esta casilla, no se transferirán Ítems de Servicio o Simples desde Órdenes hacia Asientos de Proyecto vía Entregas (porque no existirán Entregas).
- Si decidiste tildar esta casilla siendo que tienes una Orden de Venta que incluye un Ítem Simple o de Servicio, entonces las Cantidades Ent.1 y Ent.2 se convertirán en la Cantidad de Orden cuando guardes tal Orden. Por tanto, los Ítems Simples y de Servicio no serán incluidos en Entregas creadas desde la Orden. Esto también significa que no podrás disminuir la Cantidad de la Orden para tales Ítems luego de haberla guardado.
- Recepción Automática Ítems Servicio y Simples
- Cuando crees Facturas de Compra desde Órdenes de Compra, usualmente se incluirá solo aquellos Ítems contenidos en Mercaderías Recibidas que están aprobadas. Esto significa que deberás haber creado una Mercadería Recibida aprobada desde una Orden de Compra antes de crear la Factura. Esto resultará inapropiado cuando la Orden de Compra no incluya ningún Ítem de Stock o Compuesto (un Ítem que no tiene implicaciones en su nivel de stock). Si deseas crear Facturas sin tener que ingresar previamente Mercaderías Recibidas desde tales Órdenes de Compra, pues entonces tilda esta casilla.
- Si decidiste tildar esta casilla siendo que tienes una Orden de Compra que incluye un Ítem Simple o de Servicio, entonces la Cantidad Recibida se convertirá en la Cantidad de la Orden cuando guardes tal Orden. Por tanto, los Ítems Simples y de Servicio no serán incluidos en Mercaderías Recibidas creadas desde la Orden de Compra. Esto también significa que no podrás disminuir la Cantidad de la Orden para tales Ítems luego de haberla guardado.
- Si decidiste tildar esta casilla siendo que tienes una Orden de Compra que incluye un Ítem Simple o de Servicio, entonces la Cantidad Recibida se convertirá en la Cantidad de la Orden cuando guardes tal Orden. Por tanto, los Ítems Simples y de Servicio no serán incluidos en Mercaderías Recibidas creadas desde la Orden de Compra. Esto también significa que no podrás disminuir la Cantidad de la Orden para tales Ítems luego de haberla guardado.
- Factura antes de Entrega
- Cuando crees Facturas desde Órdenes de Venta, usualmente se incluirán solo aquellos Ítems ubicados en Entregas aprobadas. Esto significa que deberás emitir una Entrega aprobada desde una Orden de Venta antes de crear la Factura. Si deseas crear una Factura desde Órdenes antes de emitir alguna Entrega, entonces debes tildar esta casilla. Si has decidido crear contabilidad de costos (asientos de este tipo) al nivel de entregas, entonces de todas formas se generarán asientos de stock en la Contabilidad general cuando apruebes y guardes la Entrega (nota: el uso de la casilla ‘Factura antes de Entrega’ no afecta para nada la contabilidad de costos). Sin embargo, si has decidido crear contabilidad de costos (asientos de este tipo) desde Facturas, entonces no se generarán asientos de stock en la Contabilidad general. Cuando crees una Factura, el valor del Ítem entregado no será revelado puesto que la Entrega no existirá todavía. En este caso, deberás registrar este asiento manualmente en la Contabilidad.
- Si no has tildado esta casilla, podrás activarla para una Orden individual. Esto se hará mediante la casilla ‘Facturar antes de Entregar’ ubicada en la solapa 'Térm. Entr.' de la Orden.
- Si no has tildado esta casilla, podrás activarla para una Orden individual. Esto se hará mediante la casilla ‘Facturar antes de Entregar’ ubicada en la solapa 'Térm. Entr.' de la Orden.
- Factura de Compra antes de Merc. Recibida
- Cuando crees Facturas de Compra desde Órdenes de Compra, usualmente solo se incluirán aquellos Ítems ubicados en Mercaderías Recibidas que estén aprobadas. Esto significa que deberás haber creado una Mercadería Recibida aprobada desde una Orden de Compra antes de crear una Factura. Si deseas crear Facturas de Compra desde Órdenes de Compra (por el valor completo de la Orden) antes de crear Mercaderías Recibidas, pues entonces debes tildar esta casilla.
- Si no has tildado esta casilla, puedes activarla de todas formas para una Orden de Compra individual. Esto se hará mediante la casilla ‘Facturar antes de Entregar??? ubicada en la solapa 'Términos' en la Orden de Compra).
- La casilla ‘Siempre usar toda la cant. Órdenes de Compra’ (Opciones Factura de Compra permite también crear Facturas de Compra desde Órdenes de Compra antes de crear Mercaderías Recibidas. Esta casilla permite igualmente la creación de una Factura de Compra por el valor total de la orden (cuando existe una Mercadería Recibida parcialmente); mientras que el uso de la casilla ‘Factura de Compra antes de Merc. Recibida’ creará una Factura de Compra por el valor de una Mercadería Recibida parcialmente.
- Si no has tildado esta casilla, puedes activarla de todas formas para una Orden de Compra individual. Esto se hará mediante la casilla ‘Facturar antes de Entregar??? ubicada en la solapa 'Términos' en la Orden de Compra).
- Configurar Nro. de Lotes en Entregas Automáticamente, Ordenar Nro. Serie/Lote por Fechas Venc.
- Cuando crees Entregas para Ítems con números de serie, por lo general deberás ingresar personalmente los Números de Serie puesto que no existirá una asignación automática basada en valores FIFO o LIFO. Sin embargo, en caso que los Ítems tengan Números de Serie a nivel de lote (únicamente), entonces aparecerán automáticamente los Números de Serie y las Fechas de Vencimiento cuando tildes esta casilla.
- Si la Cantidad de Orden es mayor al tamaño del lote, entonces la Entrega contendrá la cantidad apropiada de filas con los diferentes Números de Serie. Por ejemplo, supongamos que tienes un lote de 10 ítems con Número de Serie 1 y también tienes un lote de otros 10 ítems con Número de Serie 2; luego recibes una Orden solicitando 11. Esta opción creará una Entrega que muestre dos filas: la primera con una Cantidad de Entrega de diez y un Número de Serie que es 1; la segunda con una Cantidad de Entrega de 1 y un Número de Serie que es 2.
- Los Números de Serie más bajos del lote serán utilizados en primer lugar (el Número de Serie 1 se ofrecerá antes que el Número de Serie 2; el Número de Serie A antes que el Número de Serie B, y así respectivamente).
Sin embargo, si tildas la casilla ‘Ordenar Nro. Serie/Lote por Fechas Venc.’, entonces los Números de Serie con Fechas de Vencimiento más cercanas serán utilizados primero. No se utilizará ningún Número de Serie que no tenga Fecha de Vencimiento (es decir, anticipándose a aquellos con sus fechas).
- Si no apruebas una Entrega inmediatamente, tendrás la posibilidad de actualizar sus Número de Serie/Lote mediante la función 'Llenar Ítems con Nro. Lote' desde el menú Operaciones.
- Si la Cantidad de Orden es mayor al tamaño del lote, entonces la Entrega contendrá la cantidad apropiada de filas con los diferentes Números de Serie. Por ejemplo, supongamos que tienes un lote de 10 ítems con Número de Serie 1 y también tienes un lote de otros 10 ítems con Número de Serie 2; luego recibes una Orden solicitando 11. Esta opción creará una Entrega que muestre dos filas: la primera con una Cantidad de Entrega de diez y un Número de Serie que es 1; la segunda con una Cantidad de Entrega de 1 y un Número de Serie que es 2.
- Permitir Cant. Entrega mayor a Cant. Orden
- Cuando crees Entregas desde Órdenes, generalmente se te impedirá que entregues una cantidad mayor a la ordenada. En este sentido, tilda esta casilla para poder realizar esto. Esto se aplica a todos los Tipos de Ítem, incluyendo Ítems Simples y de Servicio.
- Sin Nro. Serie en Mercadería Recibida
- Por defecto, cuando recibes en stock un Ítem que emplea un Número de Ítem, no podrás guardar la Mercadería Recibida sin ingresar un Número de Serie. Lo propio sucederá cuando vendas el Ítem puesto que deberás corroborar un Número de Serie válido (uno en vigencia dentro de stock) en la Entrega o Factura.
- Si consideras que estas normas son muy estrictas, entonces tilda esta casilla. Así, podrás guardar Mercaderías Recibidas sin especificar Números de Serie. Eso sí, aún deberás especificar Números de Serie en asientos referentes a salidas de mercaderías (ej. Entregas, Facturas, Bajas de Stock) sin embargo no habrá ninguna verificación para constatar que son válidos (que están en vigencia dentro de stock). No existiendo la obligación de cargar Números de Serie en Mercaderías Recibidas, no será posible saber si un Número de Serie en particular es válido o no. Por esta misma razón, no habrá ninguna lista de ‘Pegado Especial’ desde el campo ‘Nro. Serie’ en aquellos asientos de mercaderías salientes.
- Si consideras que estas normas son muy estrictas, entonces tilda esta casilla. Así, podrás guardar Mercaderías Recibidas sin especificar Números de Serie. Eso sí, aún deberás especificar Números de Serie en asientos referentes a salidas de mercaderías (ej. Entregas, Facturas, Bajas de Stock) sin embargo no habrá ninguna verificación para constatar que son válidos (que están en vigencia dentro de stock). No existiendo la obligación de cargar Números de Serie en Mercaderías Recibidas, no será posible saber si un Número de Serie en particular es válido o no. Por esta misma razón, no habrá ninguna lista de ‘Pegado Especial’ desde el campo ‘Nro. Serie’ en aquellos asientos de mercaderías salientes.
- Poner Fecha de Entrega y Mov. de Stock al Fecha del OK
- Si estás utilizando el Modelo de Costo Lineal, deberás cerciorarte de cargar todos los asientos de stock en orden cronológico. Si existiese alguna falla en esta ordenación, el resultado será que los valores FIFO/LIFO se tornarán incorrectos. No debes ingresar por ejemplo, una Entrega con la fecha de ayer habiendo cargado antes un asiento de stock saliente (ej. Entrega, Baja de Stock) con la fecha actual. También se recomienda aprobar siempre los asientos de stock al momento de guardarlos por primera vez. No retrocedas hacia un asiento sin aprobar para intentar aprobarlo cuando existan otros aprobados en fechas posteriores (a menos que cambies la fecha también). Para ayudarte a asegurar la precisión de los valores FIFO/LIFO (Modelo de Costo Lineal), se recomienda tildar esta casilla. Esto cambiará la Fecha de Entrega y colocará la fecha actual automáticamente cuando la apruebes. También tendrá el efecto de cambiar la Fecha de Enviado en un Movimiento de Stock colocando la fecha actual cuando lo marques como Enviado y lo guardes; la Fecha de Recibido será colocada como si fuese la fecha actual cuando lo marques como Recibido y lo guardes.
- Disminuir Disponibles en Entregas
- Utiliza estas alternativas para determinar el momento exacto que los Ítems entregados serán trasladados desde stock (es decir, para determinar el momento en que los niveles de stock serán reducidos). Este será el caso cuando crees Entregas o cuando las apruebes.
- Podrás revisar rápidamente el nivel de stock disponible de un Ítem cualquiera en una Ubicación particular. Para esto deberás utilizar las funciones ‘Estado de Ítem’ o ‘Informe de Estado de Ítem’ desde el menú Operaciones (disponibles en varias ventanas de HansaWorld Enterprise). El nivel de stock disponible también aparecerá en el campo ‘Disponible’ dentro de una Entrega. En definitiva, estas alternativas te permiten decidir si las cifras de nivel de stock incluirán cantidades de Entregas sin aprobar (anteriores) o no.
- Por favor, revisa las páginas correspondientes a 'Estado de Ítem' e 'Informe Estado de Ítem' (funciones del Menú Operaciones).
- Podrás revisar rápidamente el nivel de stock disponible de un Ítem cualquiera en una Ubicación particular. Para esto deberás utilizar las funciones ‘Estado de Ítem’ o ‘Informe de Estado de Ítem’ desde el menú Operaciones (disponibles en varias ventanas de HansaWorld Enterprise). El nivel de stock disponible también aparecerá en el campo ‘Disponible’ dentro de una Entrega. En definitiva, estas alternativas te permiten decidir si las cifras de nivel de stock incluirán cantidades de Entregas sin aprobar (anteriores) o no.
- Conversión a Unidad 2
- Existen muchos informes en el módulo Stock que ofrecen la opción de incluir la Cantidad 2. Estas alternativas te permiten expresar cantidades de stock utilizando dos unidades de medida diferentes. Esto será adecuado únicamente para Ítems que tienen una Unidad 2 y un Coeficiente de Unidad especificados en la solapa 'Stock'.
- Puedes indicar que la Cantidad 2 sea calculada ya sea multiplicando o dividiendo la cantidad estándar frente a la Unidad Coeficiente. Para esto, utiliza una de las dos alternativas ofrecidas aquí. Si cambias tu criterio respecto a esta sección, deberás realizar un Backup de Texto de Empresa para importarlo en una nueva base de datos y así actualizar los informes.
- Puedes indicar que la Cantidad 2 sea calculada ya sea multiplicando o dividiendo la cantidad estándar frente a la Unidad Coeficiente. Para esto, utiliza una de las dos alternativas ofrecidas aquí. Si cambias tu criterio respecto a esta sección, deberás realizar un Backup de Texto de Empresa para importarlo en una nueva base de datos y así actualizar los informes.
- Cronología Stock
- Puedes utilizar la cronología para mejorar la exactitud de los valores FIFO/LIFO. Así asegurarás el ingreso de asientos de stock que sigan una secuencia cronológica. Si estás utilizando esta funcionalidad, no podrás aprobar asientos de stock (ej. Mercaderías Recibidas, Entregas, Movimientos de Stock, Devolución de Mercaderías o Bajas de Stock) en tanto existan asientos de stock sin aprobación (provenientes de cualquiera de los registros mencionados) que tengan una fecha anterior o asientos de stock aprobados con una Fecha posterior. Se recomienda enfáticamente utilizar esta funcionalidad cuando estés utilizando el Modelo de Costo Lineal.
- Activa el ratio botón ‘Todas las Ubicaciones’ cuando desees que todos los asientos de stock sean tomados en cuenta en la verificación; o activa el botón ‘Por Ubicación’ para delimitar la funcionalidad en relación a asientos de stock que afectan la Ubicación del nuevo archivo.
- Puedes desactivar la verificación cronológica en relación a una Ubicación particular. Para esto, tilda la casilla ‘Ignorar Cronología’ estando en la pantalla de la Ubicación.
!
Si utilizas esta funcionalidad, no olvides que nunca debes cargar un asiento de stock con una fecha posterior. En caso de hacerlo, ya no podrás cargar ningún asiento con la fecha actual.
- Activa el ratio botón ‘Todas las Ubicaciones’ cuando desees que todos los asientos de stock sean tomados en cuenta en la verificación; o activa el botón ‘Por Ubicación’ para delimitar la funcionalidad en relación a asientos de stock que afectan la Ubicación del nuevo archivo.
- Sobre Entregas
- Utiliza estas alternativas para controlar lo que sucede cuando creas Entregas desde Órdenes cuando existe stock insuficiente para suplir esas Órdenes. Los Ítems Simples y de Servicio no son afectados por estas alternativas aún cuando tildes la casilla ‘Contab. de Costos para Ítems Simples y de Servicio’ en la opción Contabilidad de Costos.
- Si estás utilizando el Modelo de Costo Lineal (FIFO o LIFO) para calcular la contabilidad de costos, entonces activa el botón ‘No Permitir’. Pero si activas los botones ‘Permitir??? o ‘Siempre Entregar’ y luego intentas entregar un Ítem que no está en stock, entonces se generará un stock negativo y el valor FIFO/LIFO quedará como una incógnita. Consecuentemente, el valor de la contabilidad de costos no será correcto.
- Permitir
- Esta alternativa te permite entregar más unidades de un Ítem de Stock (una mayor cantidad de la que existe en stock). Sin embargo, cuando crees Entregas desde Órdenes de Venta, la cantidad por defecto será la cantidad en stock cuando la cantidad de la orden sea mayor.
- No Permitir
- Utiliza esta alternativa para delimitar la entrega de una mayor cantidad (por unidad) de un Ítem de Stock (una mayor cantidad de la que existe actualmente en stock).
- Siempre Entregar
- Esta alternativa te permite entregar más unidades de un Ítem de Stock (una mayor cantidad de la que existe en stock). La diferencia con la alternativa ‘Permitir’ es que cuando crees Entregas desde Órdenes de Venta, la cantidad por defecto siempre será la cantidad de la orden, aún cuando exista stock insuficiente.
- Si estás utilizando el Modelo de Costo Lineal (FIFO o LIFO) para calcular la contabilidad de costos, entonces activa el botón ‘No Permitir’. Pero si activas los botones ‘Permitir??? o ‘Siempre Entregar’ y luego intentas entregar un Ítem que no está en stock, entonces se generará un stock negativo y el valor FIFO/LIFO quedará como una incógnita. Consecuentemente, el valor de la contabilidad de costos no será correcto.
- Sobre Recibido
- Utiliza estas alternativas para especificar si se podrá o no incrementar la Cantidad en una Mercadería Recibida hacia una cifra mayor en la Orden de Compra subyacente.
Stock Settings - Part 2
This page describes the radio button options in the Stock Settings setting in the Stock module. Please refer here for details about the fields and check boxes.---
- Decrease Available on Deliveries
- When you create a Delivery from an Order, the Avail. field in the Delivery will display the number of units that you have in stock that are available for delivery. This will be the number of units that you have in stock less any that have been reserved.
- Use these options to determine exactly when delivered Items are to be removed from the Avail. figure (i.e. to determine the moment when a unit is said to be no longer available because it has been allocated to a Delivery). This can be when you create Deliveries or when you mark them as OK and save.
- For example, you have ten units of an Item in stock. If you receive an Order for one unit and create a Delivery, the Avail. figure in the Delivery will be ten. Before you mark that Delivery as OK, you receive a second Order for the same Item and create a Delivery from that Order. The Avail. figure in the second Delivery will depend on these options, as follows:
- Delivery is OKed
- The Avail. figure in the second Delivery will be ten. As the first Delivery hasn't been marked as OK yet, the unit in that Delivery is still available to be used in other Deliveries.
- When Delivery has been Created
- The Avail. figure in the second Delivery will be nine. The unit in the first Delivery is no longer available to be used in other Deliveries. If you delete the first Delivery, the unit will once again be made available for use by another Delivery.
- These options will also affect the Stock, Order and Shippable figures in the 'Item Status' window. Continuing the example, if you are using the Delivery is OKed option, these figures at each stage will be:
Action Stock Order Shippable Before Order 10 0 10 Create Order 10 1 9 Create Delivery 10 1 9 OK Delivery 9 0 9
If you are using the When Delivery has been Created option, these figures at each stage will be:
Action Stock Order Shippable Before Order 10 0 10 Create Order 10 1 9 Create Delivery 9 0 9 OK Delivery 9 0 9
- Please refer here for details about the 'Item Status' window.
- Use these options to determine exactly when delivered Items are to be removed from the Avail. figure (i.e. to determine the moment when a unit is said to be no longer available because it has been allocated to a Delivery). This can be when you create Deliveries or when you mark them as OK and save.
- Unit 2 Conversion Calculation
- Several reports in the Stock module offer the option to include Quantity 2. This option allows you to express stock quantities using two different units of measurement. You can only use this option with Items that have a Unit 2 and a Unit Coefficient specified on the 'Stock' card.
- You can specify that the Quantity 2 figure (i.e. the figure expressed using the second unit of measurement) is to be calculated by multiplying or dividing the standard quantity by the Unit Coefficient. Make this choice using these options. If you change your choice, you should run the 'Rebuild Stock' Maintenance function in the Technics module selecting both check box options in order to update the reports.
- You can specify that the Quantity 2 figure (i.e. the figure expressed using the second unit of measurement) is to be calculated by multiplying or dividing the standard quantity by the Unit Coefficient. Make this choice using these options. If you change your choice, you should run the 'Rebuild Stock' Maintenance function in the Technics module selecting both check box options in order to update the reports.
- Service and Plain Items on Purchase Order
- When you create a Purchase Invoice from a Purchase Order, the Purchase Invoice will usually only contain the Items from the Purchase Order that you have received into stock. This means that you must have created at least one Goods Receipt from the Purchase Order and marked it as OK before you can create an Invoice. This might not be appropriate if the Purchase Order does not include any Stocked or Structured Items (i.e. it has no stock implications). If you would like to be able to create a Purchase Invoice without previously entering a Goods Receipt from such a Purchase Order, select one of the following options.
- Automatic Receiving
- If you select this option, when you include a Plain or Service Item in a Purchase Order, the Rcvd. and Rcvd. OK quantities on flip C will be changed to the Order Quantity automatically when you save the Purchase Order. Therefore Plain and Service Items will not be included in Goods Receipts created from the Purchase Order. This also means that you will not be able to remove such Items once you have saved the Purchase Order if you added them by mistake.
- Allow amending received Quantity
- If you include a Plain or Service Item in a Purchase Order, you will be able to enter a Rcvd. OK quantity on flip C yourself (usually this field is not modifiable). If you enter the full Order Quantity in this field, the Item will not be included in Goods Receipts created from the Purchase Order. As the Rcvd. field will remain empty, you will be able to remove the row if you added the Item to the Purchase Order by mistake.
- Automatic Receiving
- Over Delivery
- Use these options to control what happens when you create Deliveries from Orders when there is insufficient stock to satisfy those Orders in full. Plain and Service Items are not affected by these options, even if you are using the Cost Accounting for Plain and Service Items option in the Cost Accounting setting.
- If you are using the Queued Cost Model (FIFO or LIFO) to calculate cost of sales values, you must use the Do Not Allow option. If you are using the Allow or Always Deliver options and you try to deliver an Item that is not in stock, negative stock will be created, but the FIFO/LIFO value of the Item will not be known and so the value of the cost of sales transaction will not be correct.
- Allow
- This option will allow you to deliver more units of a Stocked Item than you have in stock. However, when you create Deliveries from Sales Orders, the default quantity will be the quantity in stock if the Order Quantity is greater.
- Do Not Allow
- Use this option to prevent the delivery of more units of a Stocked Item than you have in stock.
- Always Deliver
- This option will allow you to deliver more units of a Stocked Item than you have in stock. It differs from the Allow option in that when you create Deliveries from Sales Orders, the default quantity will always be the Order Quantity, even if there is insufficient stock.
- If you are using the Queued Cost Model (FIFO or LIFO) to calculate cost of sales values, you must use the Do Not Allow option. If you are using the Allow or Always Deliver options and you try to deliver an Item that is not in stock, negative stock will be created, but the FIFO/LIFO value of the Item will not be known and so the value of the cost of sales transaction will not be correct.
- Chronology in Stock
- You can use the chronology feature to help improve the accuracy of the FIFO/LIFO queue as it will ensure that you enter stock transactions in date sequence. If you are using this feature, you will not be able to mark a stock transaction (i.e. Goods Receipt, Delivery, Stock Movement, Returned Goods record, Returned Goods to Supplier record, Work Sheet, Invoice that updates stock or Stock Depreciation) as OK or invalidate an Invoice that updates stock if there is a later stock transaction (in any of those registers) that you have marked as OK. By default, you will also not be able to mark a stock transaction as OK if there is an earlier stock transaction that you have not yet marked as OK, but you can disable this by selecting the Ignore UnOKed Records option. It is strongly recommended that you use the chronology feature if you are using the Queued Cost Model.
- Use the For all Locations option if you need every stock transaction to be considered by the chronology check, or the Per Location option to restrict the feature to stock transactions affecting the Location of the new record. For example, you have a Goods Receipt for Location 1 dated 1st May and one for Location 2 dated 2nd May. If you are using the For all Locations option, a new Goods Receipt for Location 1 must be dated 2nd May or later, because it cannot be earlier than the latest Goods Receipt in any Location. If you are using the Per Location option, it can be dated 1st May, because it cannot be earlier than the latest Goods Receipt in Location 1 only.
- If you are using the Queued Cost Model Per Location option in the Cost Accounting setting (i.e. you are maintaining separate FIFO/LIFO Queues for each Location), it is likely you will need to use the Chronology Per Location option. Otherwise (i.e. you are maintaining a single FIFO/LIFO Queue for all Locations), you should use the For all Locations option.
- You can turn off the chronology check for a particular Location using the Ignore Chronology check box in the Location record.
- If you are using the Chronology feature, take care never to enter a stock transaction with a future date. If you do this, you will no longer be able to enter any transactions with the current date. You can prevent this situation by selecting the Disallow creating new records with trans. dates later than current date option in the Locking setting in the System module.
- Use the For all Locations option if you need every stock transaction to be considered by the chronology check, or the Per Location option to restrict the feature to stock transactions affecting the Location of the new record. For example, you have a Goods Receipt for Location 1 dated 1st May and one for Location 2 dated 2nd May. If you are using the For all Locations option, a new Goods Receipt for Location 1 must be dated 2nd May or later, because it cannot be earlier than the latest Goods Receipt in any Location. If you are using the Per Location option, it can be dated 1st May, because it cannot be earlier than the latest Goods Receipt in Location 1 only.
- Over Receive
- Use these options to specify whether you will be able to increase the Quantity in a Goods Receipt to a figure greater than that on the originating Purchase Order.
- Extra Costs Calculation
- When entering a Purchase Order or a Goods Receipt, you will be able to enter any total additional cost figures that may apply to the entire transaction in the Extra Cost 1-5 fields on the 'Extra Cost' card or in the Freight and Customs fields in the footer. These additional costs will then be distributed to each row proportionally, based on the Quantity and Unit Price or the Quantity and Item Weight in each row. Use these options to specify whether this distribution should by default be based on the Unit Price or on the Item Weight. You will be able to override this default in an individual Purchase Order or Goods Receipt.
---
Settings in the Stock module:
- Introduction
- Account Usage Stock
- Barcodes
- Base Price Changes
- Batch Specifications
- Cost Accounting
- Freight Companies
- Item Varieties
- Item Variety Groups
- Location Accounts
- Locations
- Minimum Stock Levels
- Number Series - Deliveries
- Number Series - Goods Receipts
- Number Series - Returned Goods
- Number Series - Returned Goods to Supplier
- Number Series - Stock Depreciations
- Number Series - Stock Movements
- Number Series - Stock Revaluations
- Number Series - Stocktaking
- Pack Types
- Recipes
- Returned Goods Settings
- Sources
- Stock Movement Durations
- Stock Revaluation Settings
- Stock Settings
- Stock Settings Part 2
- Structured Items
- User Defined Fields - Extra Costs
- Variety Masks
- Variety Sets
- Variety Settings
- Variety Sets
- Weighted Average
- Winedi
- Home page for Stock module manual
- Home page for Standard ERP manual
Ítems Compuestos
Un Ítem Compuesto es aquel que está conformado por componentes al momento de su entrega al Cliente. Existen varias opciones que controlan la apariencia de los Ítem Compuestos tanto en pantalla como en los documentos impresos como (Notas de Entrega y Listas de Recolección). Si estuviese tildada la casilla ‘Pegar Componentes durante Ingreso’ (en el archivo de un Ítem Compuesto – solapa 'Receta'), entonces sus componentes serán listados en pantalla dentro de Cotizaciones, Órdenes y Facturas. Además se imprimirá estos componentes en Notas de Entrega y Listas de Recolección. Si la casilla ‘Pegar Componentes durante Ingreso’ no estuviese tildada, entonces podrás todavía hacer que los componentes se impriman en Notas de Entrega y Listas de Recolección. Todo esto se controla mediante esta opción.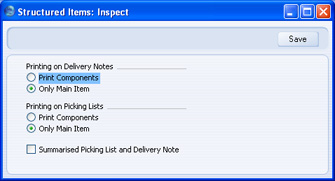
- Imprimir Componentes
- Al activar esto botón, los Ítems Compuestos serán impresos en Notas de Entrega (Remitos de Entrega) y Listas de Recolección. Los respectivos componentes serán listados en líneas separadas mostrando nombres y cantidades.
- Solo Ítem Principal
- Los Ítems Compuestos serán impresos en Notas de Entrega (Remitos de Entrega) y Listas de Recolección. Los respectivos componentes no serán listados esta vez.
- Resumir Lista de Recolección y Nota de Entrega
- Esta casilla se aplica tanto a Ítems Compuestos como a Ítems de Stock y sirve en caso de haber utilizado un Ítem particular más de una vez en una Entrega (ej. cuando aparezca en más de una fila). Tildando esta casilla, los documentos impresos correspondientes a las Notas de Entrega y Listas de Recolección contendrán una sola fila para ese Ítem con una cantidad total. Aquellos Ítems con Números de Serie serán normalmente listados de manera individual.
Supersession Items
This page describes the Supersession Items setting in the Stock module.---
The Supersession Items feature is one that you can use when an Item becomes obsolete and is replaced by a new Item, and you still have examples of the old Item in stock.
Follow these steps:
- To enable the Supersession Items feature, select the Use Supersession Items option in the Item Settings setting in the Sales Ledger:

- After receiving the first units of the replacement Item into stock, remain in the Stock module and add a record to the Supersession Items setting as follows:
- Old Item Code
- Paste Special
Item register
- Specify the Item Number of the old (obsolete) Item.
- New Item Code
- Paste Special
Item register
- Specify the Item Number of the new (replacement) Item.
- Closed
- Tick this box when you no longer need the Supersession Item record to be used. You can also delete the record, but you may prefer to keep it for historical audit purposes.
- Comment
- Use this field to record notes about the record. The Comment will be shown in the 'Supersession Items: Browse' window.
- Old Item Code
- After completing the previous steps, the obsolete Item will not by default be included in the Stock List report. Instead, the remaining quantity and value in stock will be included in the figures for the replacement Item:
If the obsolete Item is not shown in the Stock List report and the remaining quantity and value in stock have not been included in the figures for the replacement Item, the probable reason is that you do not have any units of the replacement Item in stock. As mentioned in step 2, you should not create a Supersession record until you have the new Item in stock.
If you produce the report with the Show with Supersessions option selected, both Items will be included in the report, with the obsolete Item indented under the replacement Item:
- In the 'Item Status' window, figures for the obsolete Item will be included when viewing the Item Status of the replacement Item:
Figures for the obsolete Item will only be included in this way when viewing the Item Status from the Opportunity, Purchase Order, Quotation and Sales Order windows. Figures for the obsolete Item will not be included when viewing the Item Status from other windows (e.g. the Delivery, Goods Receipt, Internal Order, Invoice, Production, Production Operation, Project Budget, Stock Depreciation, Stock Movement, Stock Revaluation and Work Sheet windows).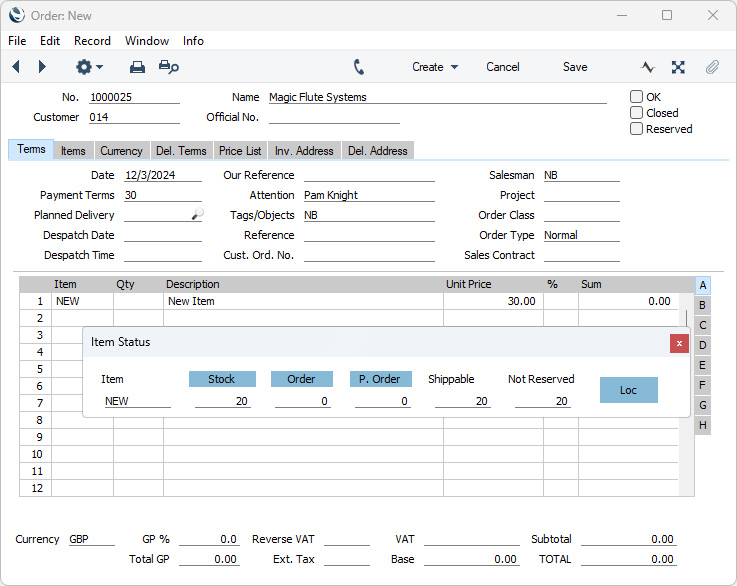
- If you create a Delivery from an Order for the replacement Item and you do not have sufficient stock of the replacement Item to satisfy the Order, an extra line will be added to the Delivery attempting to make up the shortfall using the units of the obsolete Item that you have in stock. As the Item is obsolete, the assumption is that you will not want to keep these units in stock.
If you mark the Delivery as OK and save, the Del. and Del. OK figures in the Order row will be updated to include the delivery of both Items. If you don’t want to deliver any units of the obsolete Item to the Customer, remove the row from the Delivery before marking it as OK. In this case, the Del. and Del. OK figures in the Order row will only be updated to include the units of the replacement Item i.e. the Order row will be treated as partially delivered.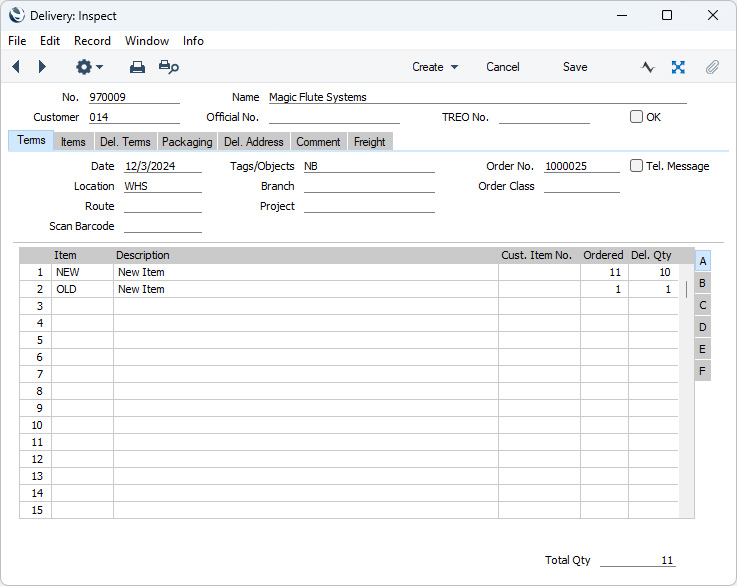
Go back to:
- Home page for Settings in the Stock module
- Home page for Stock manual
- Home page for Standard ERP manual
Campos a Def. p/Usuario - Costos Extra
Cualquier Mercadería Recibida contiene cinco campos que sirven para registrar algún “costo extra” (solapa 'C. Extra'). Cualquier monto situado en estos campos será abonado a la Cuenta de Provisión para Costos Extra respectiva (situada en la solapa 'Costo Compra' – opción ‘Manejo de Cuentas de Stock’) cuando apruebes la Mercadería Recibida. En este sentido, debes utilizar esta opción para asignar nombres a estos Costos Extra de modo que cada usuario sepa lo que se debe ingresar dentro de cada uno de ellos.Utiliza el botón [Módulos] para ingresar al módulo Stock y luego selecciona ‘Opciones’ desde e Panel de Control. Haz doble clic en ‘Campos Def. p/Usuario – Costos Extra’ para abrir la ventana ‘Campos Def. p/Usuario: Etiquetas – Costos Extra: Ver’. Realiza los cambios necesarios y luego haz clic en el botón [Guardar] para guardar los cambios y cerrar la ventana. Sino haz clic en la casilla cerrar para cerrar la ventana sin guardar los cambios.
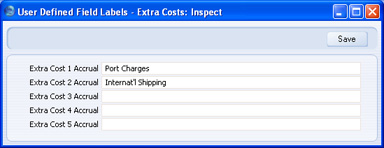
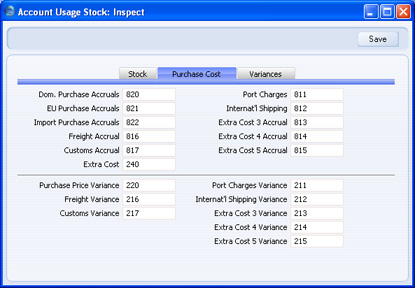
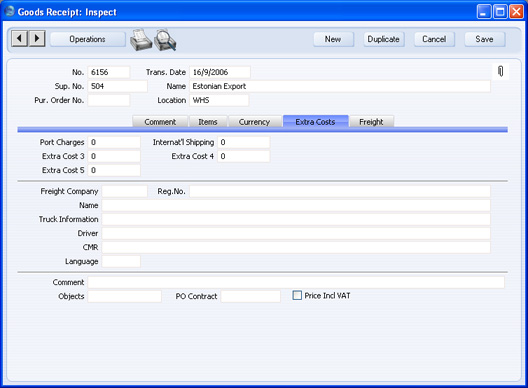
Variety Masks
This page describes the Variety Masks setting in the Stock module.—
After entering your Item Variety Groups and Item Varieties, you should specify which Variety Groups can be used with each Item. The set of Variety Groups that can be used with an Item is known as the Item's "Variety Mask". For example, Variety Groups that can be used with trousers might be Waist Size, Fit and Leg Length, so, "Waist Size, Fit, Leg Length" will be the Variety Mask for trousers. The Variety Mask for shirts might be "Shirt Size, Sleeve Style, Colour".
Use the Variety Masks setting to specify a Variety Mask for each Item. The setting allows you to specify that the same Variety Mask is to be used with a range of Items. You can also specify a Variety Mask for an individual Item using the 'Varieties' card in the Item record.
Once you have entered a Variety Mask for a particular Item using either method, and have then used the Item in at least one sales or stock transaction, you should not change the Mask. Doing so will cause your stock records to become inaccurate. If the Mask contains an error, or the specification of the Item changes, you should not change or remove the Mask. Instead, you should enter a new Item and Mask. However, you can change the Report Order on flip B and the Subsets on flip C if necessary.
! | Do not change a Variety Mask once you have used an Item. |
To edit Variety Masks, ensure you are in the Stock module, open the 'Settings' list and double-click (Windows/Mac OS X) or tap (iOS/Android) 'Variety Masks'. The following window appears:
If you are using Windows or Mac OS X, you can add a new Variety Mask record simply by typing in the first blank line. If you are using iOS or Android, you can add rows by tapping the + button below the matrix.
The information required for each Variety Mask record is as follows:
Flip A
- From Item, To Item
- Paste Special
Item register
- Use these two fields to specify the range of Items that will use the Mask.
- Item Group
- Paste Special
Item Group register, Sales Ledger
- If every Item belonging to a particular Item Group will use the same Mask, specify that Item Group here.
- If you have specified a range of Items in the fields to the left, any Item Group that you specify as well will be ignored. Any Items in the range that do not belong to the Item Group will use the Mask.
- If you have specified a range of Items in the fields to the left, any Item Group that you specify as well will be ignored. Any Items in the range that do not belong to the Item Group will use the Mask.
- Length
- When you use an Item that has Varieties in a transaction of any kind, you will use a combined Item/Variety Number. This consists of the Item Number itself, from the Item register, and a suffix that indicates the Variety. This suffix is divided into sections, one for each Variety Group.
- You can separate the various constituent parts of a combined Item/Variety Number using full stops, or you can specify the length (number of characters) of each part. Depending on which option you want to use for the section of the combined Item/Variety Number that represents the Item Number, enter a full stop or a number of characters here.
- If you enter a number of characters, every Item in the range specified in the From Item and To Item fields should have an Item Number that consists of exactly this number of characters. In the example illustration, the Items in the first three rows should all have five-character Codes.
- If you enter a full stop (as in the fourth row in the illustration), the number of characters in each Item Number will not matter.
- If you enter a number of characters, you must also enter a number of characters (not necessarily the same number) as the Length in all the Variety Groups that you specify in the Mask field to the right. Similarly, if you enter a full stop, you should also enter a full stop in the Variety Groups.
- Please refer to the Item Numbers of Items with Varieties page for more details and an example.
- You can separate the various constituent parts of a combined Item/Variety Number using full stops, or you can specify the length (number of characters) of each part. Depending on which option you want to use for the section of the combined Item/Variety Number that represents the Item Number, enter a full stop or a number of characters here.
- Mask
- Paste Special
Variety Sets setting, Stock module
- Specify here the Variety Groups that should be used with the Items in the range.
- You can enter as many Variety Groups as necessary, separated by commas.
- Use 'Paste Special' to bring in a pre-defined set of Variety Groups from the Variety Sets setting.
- In the example illustration, we have specified that the first three Items should all be used with the Variety Groups "COL" (Colour), "SIZ" (Size) and "STY" (Style). This means that whenever we buy or sell these Items, we must specify a colour, a size and a style, in that order. So, for example, we will not be able to sell any of these Items without knowing the size.
- Once you have entered a Variety Mask for a particular Item, and have then used the Item in at least one sales or stock transaction, you should not change the Mask. Doing so will cause your stock records to become inaccurate.
- If you need to specify a Variety Group that can be used with an Item but want to prevent the use of a particular Variety (e.g. a shirt is only available in black and white), use the Subsets field on flip C.
- You can enter as many Variety Groups as necessary, separated by commas.
Flip B
- Report Order
- Paste Special
Variety Sets setting, Stock module
- Out of the Variety Groups listed in the Mask field on flip A, specify here which ones you would like to be included in the Varieties in Stock report. You must make an entry here, otherwise the report will be empty. Please refer to the description of the Varieties in Stock report for details and an example.
- Use 'Paste Special' to bring in a pre-defined set of Variety Groups from the Variety Sets setting.
Flip C

- Subsets
- Paste Special
Variety Subsets setting, Stock module
- Considering each Variety Group in the order in which they were entered in the Mask field on flip A, you should use this field to list the Varieties that can be used with the Items in the range.
- Start by listing the allowable Varieties for the first Variety Group. Separate these Varieties with commas. Then, enter a semi-colon (;) to mark the division between the first and second Variety Groups. Then enter the allowable Varieties for the second Variety Group, again separated by commas, and so on.
- If every Variety in a particular Group can be used, enter an asterisk (*). If every Variety in every Group can be used, you can leave the field blank.
- In the example illustrated above, the first three Items have the same Mask: "COL" (Colour), "SIZ" (Size) and "STY" (Style). The Subset for the first Item has been left blank, meaning it is available in all colours, sizes and styles. The second Item has a Subset of "BLA;*;*", so it can only be sold in black, but in any size and style. The Subset of the third Item is "BLA,WHI;SM,LA;*". This Item is available in black and white, small and large, and in any style.
- Unlike the Mask, you can change the Subset after having used the Item in a transaction.. For example, if the second Item becomes available in white as well, you can change the Subset from "BLA;*;*" to "BLA,WHI;*;*". Similarly, if the black version is discontinued, you can change again to "WHI;*;*", but you will only be able to make this change if you have no black versions in stock.
- Use 'Paste Special' to bring in a pre-defined set of allowable Varieties from the Variety Subsets setting.
- Start by listing the allowable Varieties for the first Variety Group. Separate these Varieties with commas. Then, enter a semi-colon (;) to mark the division between the first and second Variety Groups. Then enter the allowable Varieties for the second Variety Group, again separated by commas, and so on.

---
Varieties in Standard ERP:
- Introduction
- Defining Varieties, including:
- Item Numbers of Items with Varieties
- Using Items with Varieties in Transactions
- Varieties and Reports
- Varieties and Barcodes
- Home page for Items and Pricing manual
- Home page for Standard ERP manual
Variety Sets
The Variety Sets setting will be useful if you have many Items that use the same set of Variety Groups (i.e. the same Variety Mask). For example, you might sell many different styles of trousers (e.g. jeans, slacks, chinos, suit trousers). Each style of trouser will have its own Item record. All styles of trousers will have the same three Variety Groups (Waist Size, Fit and Leg Length). If you enter a record in the Variety Sets setting in which you list the three Variety Groups, you won't need to remember them each time a new style of trouser becomes available and you need to enter a new Item record. Instead, you can choose the relevant Variety Set using 'Paste Special' from the Variety Mask field in the Item record. This will ensure all three Variety Groups will be attached to the new style of trouser in the correct order. Similarly, when creating a new Variety Mask, you can choose the relevant Variety Set using 'Paste Special' from the Mask field.To define a new Variety Set, first ensure you are in the Stock module using the [Switch Module] button in the Navigation Centre. Then, if you are using Windows or Mac OS X, click the [Settings] button that's also in the Navigation Centre and double-click 'Variety Sets' in the resulting list. If you are using iOS or Android, select 'Settings' from the Tools menu (with 'wrench' icon) and tap 'Variety Sets' in the 'Settings' list. The 'Variety Sets: Browse' window will appear, showing the Variety Sets that you have previously entered. You can add a new record by selecting 'New' from the Create menu (Windows/Mac OS X) or the + menu (iOS/Android). When the record is complete, save it by clicking the [Save] button (Windows/Mac OS X) or tapping √ (iOS/Android) in the Button Bar. To close it without saving changes, click the close box (Windows/Mac OS X) or tap < (iOS/Android).

- Code
- Enter a code by which the Variety Set can be identified. You can use up to ten characters.
- Mask
- Paste Special Item Variety Groups setting, Stock module
- List here the Variety Groups that are to be included in the Variety Set.
- You can enter as many Variety Groups as necessary, separated by commas. If you need to use 'Paste Special' to enter several Variety Groups, type the comma before opening the 'Paste Special' list. This will cause the next Variety Group to be added to those already entered. Otherwise, the previous Variety Group will be overwritten.
- In the example illustration, we have defined a Variety Set to be used with trousers, consisting of three Variety Groups: Fit, Leg Length and Waist Size. Whenever we enter a new Item record for a new type of trouser, we can access this Variety Set using 'Paste Special' from the Variety Mask field. This will bring these three Variety Groups into the new Item record, helping ensure the correct Variety Groups are there and in the correct order.
- List here the Variety Groups that are to be included in the Variety Set.
- Comment
- Specify a name for the Variety Set. This name will be shown in the 'Paste Special' list: it should therefore be descriptive enough to make the selection of the correct Variety Set easy for all users.
Varieties in Standard ERP:
- Introduction
- Defining Varieties, including:
- Item Numbers of Items with Varieties
- Using Items with Varieties in Transactions
- Varieties and Reports
- Varieties and Barcodes
- Home page for Items and Pricing manual
- Home page for Standard ERP manual
Variety Settings
This page describes the Variety Settings setting in the Stock module.—
The Variety Settings setting contains some options allowing you to specify how you will work with Varieties.
To work with this setting, ensure you are in the Stock module, open the 'Settings' list and double-click (Windows/Mac OS X) or tap (iOS/Android) 'Variety Settings'. The following window appears:
- Automatically Open Varieties Matrix Entry
- When you specify an Item that requires one or two Varieties in a transaction (e.g. in a Quotation, Order or Invoice), you can activate 'Paste Special' from the Qty field to open a matrix (the 'Variety Matrix Entry' window) where you can specify the quantity of each Variety as appropriate. When you press the [Paste] button or the Shift-Enter key combination, each Variety will be added to the transaction in a separate row with the specified quantity. Select this option if you would like the 'Variety Matrix Entry' window to open automatically. The 'Variety Matrix Entry' window is illustrated in step 5 on the Using 'Paste Special' with Items with Varieties page.
- Use Data from Previous Row Instead of Pasting New
- This option can be useful if you need to enter an Item with many different Varieties (e.g. many different styles of shirt) in a transaction, and you need to change one of the values. In this situation, you can enter one of the Varieties in the transaction, change the value (e.g. change the Unit Price or the Sales Account), and then use the 'Variety Matrix Entry' window from the next row to bring in the other Varieties. If you are using this option, the second and subsequent rows will have the new value (in this example, the new Unit Price or Sales Account). If you are not using this option, the second and subsequent rows will have the standard value (in this example, the standard Unit Price or Sales Account brought in from the relevant Price List or from the Item record).
- A second effect of using this option will occur after you choose Varieties in the 'Variety Matrix Entry' window. A check will be made to see if you have already added the same Varieties to the transaction. For example, you add a Blue Long-Sleeved Shirt to a transaction with quantity 5. Then from a later row you open the ‘Variety Matrix Entry’ window where you specify the Blue Long-Sleeved Shirt with quantity 6 and a Green Long-Sleeved Shirt with quantity 1. If you are using this option, the quantity in the original row with the Blue Long-Sleeved Shirt will be changed from 5 to 6. If you are not using this option, the original row will be unchanged and a second row for the Blue Long-Sleeved Shirt with quantity 6 will be added to the transaction.
- This option will not be used in Goods Receipts.
- Please refer here for more details about the 'Variety Matrix Entry' window.
- A second effect of using this option will occur after you choose Varieties in the 'Variety Matrix Entry' window. A check will be made to see if you have already added the same Varieties to the transaction. For example, you add a Blue Long-Sleeved Shirt to a transaction with quantity 5. Then from a later row you open the ‘Variety Matrix Entry’ window where you specify the Blue Long-Sleeved Shirt with quantity 6 and a Green Long-Sleeved Shirt with quantity 1. If you are using this option, the quantity in the original row with the Blue Long-Sleeved Shirt will be changed from 5 to 6. If you are not using this option, the original row will be unchanged and a second row for the Blue Long-Sleeved Shirt with quantity 6 will be added to the transaction.
- Automatically Create New Barcode
- Select this option if you would like a Barcode to be generated automatically for a Variety when you use it for the first time in a Quotation, Purchase Order or Sales Order and save the record. Please refer to the 'Varieties and Barcodes' page for more details.
- Automatically Create New Purchase Item
- Select this option if you would like a Purchase Item to be generated automatically for a Variety when you use it for the first time in a Quotation, Purchase Order or Sales Order and save the record.
- In the new Purchase Item, the Supplier will be the Default Supplier specified in the Purchase Order Settings setting. If you have not specified a Default Supplier and you first used the Variety in a Purchase Order, the Supplier in the Purchase Item will be copied from the Purchase Order. Otherwise, there will be no Supplier in the Purchase Item. If there is a Supplier, the Default box will be ticked. The Cost Price in the Item record will be copied to the Price field in the Purchase Item. The Normal and Minimum Order Quantities will both be set to 1.
- In the new Purchase Item, the Supplier will be the Default Supplier specified in the Purchase Order Settings setting. If you have not specified a Default Supplier and you first used the Variety in a Purchase Order, the Supplier in the Purchase Item will be copied from the Purchase Order. Otherwise, there will be no Supplier in the Purchase Item. If there is a Supplier, the Default box will be ticked. The Cost Price in the Item record will be copied to the Price field in the Purchase Item. The Normal and Minimum Order Quantities will both be set to 1.
- Default to 'Show Varieties' in all Reports
- Several reports offer a Show Varieties option, which allows you to display statistics at the Variety level rather than the Item level. For example, the Stock List will usually display the stock level of an Item as a whole, but if you produce it using the Show Varieties option it will display the stock levels of each Variety.
- The following reports offer the Show Varieties option: Customer/Item Statistics, Deficiency List, Deficiency List per Location, Item Sales Statistics, Item Turnover History, Price List, Reordering Requirements, Stock List, Stock Reservations and Supplier/Item Statistics.
- Select this option if you would like the Show Varieties option to be selected by default when producing any of the reports listed above.
- The following reports offer the Show Varieties option: Customer/Item Statistics, Deficiency List, Deficiency List per Location, Item Sales Statistics, Item Turnover History, Price List, Reordering Requirements, Stock List, Stock Reservations and Supplier/Item Statistics.
---
Varieties in Standard ERP:
- Introduction
- Defining Varieties, including:
- Item Variety Groups
- Item Varieties
- Variety Sets
- Variety Subsets
- Variety Masks
- Variety Settings
- Item Variety Groups
- Item Numbers of Items with Varieties
- Using Items with Varieties in Transactions
- Varieties and Reports
- Varieties and Barcodes
- Home page for Items and Pricing manual
- Home page for Standard ERP manual
Variety Subsets
This page describes the Variety Subsets setting in the Stock module.—
A Variety Subset is a list of the Varieties that can be used with a particular Item. For example, an Item might have "COL,SIZ,STY" (Colour, Size, Style) as its Mask. Using a Subset would allow you to specify that the Item is only available in certain colours such as black and white, and will help prevent you using other colours with the Item by mistake. In this example, a suitable Subset might be "BLA,WHI;*;*", signifying that the Item is available in black or white, in all sizes and in any style.
As Subsets can be fairly complex strings, you may prefer to enter them in the Variety Subsets setting if it is likely you will use them with more than one Item or more than one Variety Mask. When you enter a new Item, you can choose the relevant Variety Subset using 'Paste Special' from the Variety Subsets field in the Item record. Similarly, when creating a new Variety Mask, you can choose the relevant Variety Subset using 'Paste Special' from the Subsets field on flip C in the Variety Masks setting.
To define a new Variety Subset, first ensure you are in the Stock module using the [Switch Module] button in the Navigation Centre. Then, if you are using Windows or Mac OS X, click the [Settings] button that's also in the Navigation Centre and double-click 'Variety Subsets' in the resulting list. If you are using iOS or Android, select 'Settings' from the Tools menu (with 'wrench' icon) and tap 'Variety Subsets' in the 'Settings' list. The 'Variety Subsets: Browse' window will appear, showing the Variety Subsets that you have previously entered. You can add a new record by selecting 'New' from the Create menu (Windows/Mac OS X) or the + menu (iOS/Android). When the record is complete, save it by clicking the [Save] button (Windows/Mac OS X) or tapping √ (iOS/Android) in the Button Bar. To close it without saving changes, click the close box (Windows/Mac OS X) or tap < (iOS/Android).
- Code
- Enter a code by which the Variety Subset can be identified. You can use up to ten characters.
- Subset
- Paste Special
Item Varieties setting, Stock module
- List here the Varieties that are to be included in the Variety Subset.
- The example illustrated above is a Subset that can be used with a Mask "COL,SIZ,STY" (Colour, Size, Style). Start by listing the allowable Varieties for the first Variety Group ("COL" in this case). Separate these Varieties with commas. Then, enter a semi-colon (;) to mark the division between the first and second Variety Groups. Then enter the allowable Varieties for the second Variety Group, again separated by commas, and so on. If every Variety in a particular Group can be used, enter an asterisk (*).
- In this example, the Subset is "BLA,WHI;SM,LA;*". The first part of this Subset (up to the first semi-colon) signifies that the only colours available are BLA and WHI (black and white). The second part signifies that the only sizes available are SM and LA (small and large). The final part is an asterisk, signifying that all styles are available.
- Whenever we enter a new Item record for which the Variety Subset is suitable, we can access it using 'Paste Special' from the Subsets field in the Item record. This will bring the Subset into the new Item record, helping ensure the correct Varieties are there and in the correct order.
- If you need to use 'Paste Special' to enter several Varieties, type the comma or semi-colon before opening the 'Paste Special' list. This will cause the next Variety to be added to those already entered. Otherwise, the previous Variety will be overwritten.
- The example illustrated above is a Subset that can be used with a Mask "COL,SIZ,STY" (Colour, Size, Style). Start by listing the allowable Varieties for the first Variety Group ("COL" in this case). Separate these Varieties with commas. Then, enter a semi-colon (;) to mark the division between the first and second Variety Groups. Then enter the allowable Varieties for the second Variety Group, again separated by commas, and so on. If every Variety in a particular Group can be used, enter an asterisk (*).
- Comment
- Specify a name for the Variety Subset. This name will be shown in the 'Paste Special' list: it should therefore be descriptive enough to make the selection of the correct Variety Subset easy for all users.
Varieties in Standard ERP:
- Introduction
- Defining Varieties, including:
- Item Variety Groups
- Item Varieties
- Variety Sets
- Variety Subsets
- Variety Masks
- Variety Settings
- Item Variety Groups
- Item Numbers of Items with Varieties
- Using Items with Varieties in Transactions
- Varieties and Reports
- Varieties and Barcodes
- Home page for Items and Pricing manual
- Home page for Standard ERP manual
Promedio Ponderado
Esta opción mantiene un registro del precio de compra promedio por unidad de cada Ítem.Haz doble clic en ‘Promedio Ponderado’ dentro de la lista de ‘Opciones’ en el módulo Stock. Así se abrirá la ventana ‘PPP por Ubicación: Ver??? la cual muestra los Promedios Ponderados que ya existen. Haz doble clic en un archivo de la lista para editarlo o agrega uno nuevo pulsando el botón [Crear]. Generalmente, no habrá necesidad de crear archivos puesto que éstos se crean automáticamente cuando las Mercaderías Recibidas son aprobadas y guardadas habiendo especificado una Ubicación para ellas. Si un Promedio Ponderado ya existe para una combinación particular de Ítem/Ubicación, entonces su precio de compra promedio será recalculado y tomará en cuenta la nueva Mercadería Recibida. Aquellas Mercaderías Recibidas que no tengan ninguna Ubicación, no afectarán los archivos suscritos en esta opción.
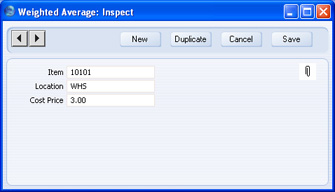
El precio costo promedio incluye cualquier costo extra como ser transporte y aduanas. En caso de estar creando un archivo Promedio Ponderado, también se tomará en cuenta todas las Mercaderías Recibidas que se registraron previamente en función a la combinación Ítem/Ubicación. Esta situación sobrevendrá cuando elimines el Promedio Ponderado precedente.
La información contenida en esta opción es utilizada para calcular tu saldo de stock en el informe Lista de Stock y también para calcular el valor de asientos salientes de stock cuando hayas decidido utilizar el Modelo de Costo Promedio Ponderado junto con la casilla ‘Promedio Ponderado por Ubicación’ (opción ‘Contabilidad de Costos’).
Winedi
Esta opción se utiliza en Noruega. Por favor, consulta tu representante HansaWorld local para más detalles.