Introduction to Settings in the Stock Module
The following settings are available in the Stock module:
Manejo de Cuentas de Stock
Esta opción te permite determinar las Cuentas que serán utilizadas por defecto en tus asientos de stock. Asegúrate que las Cuentas cargadas aquí existan en el registro Cuentas. En cada caso, podrás utilizar la función 'Pegado Especial' (Ctrl-Return o ⌘-Return) para escoger la Cuenta correcta.Solapa Stock
- Stock
- Se refiere a la Cuenta control de Stock. Si estás manteniendo los valores de stock en la contabilidad (contabilidad de costos), esta Cuenta será debitada cuando se reciban mercaderías en stock y será abonada por una Factura o Entrega (cuando el campo equivalente para la Ubicación apropiada o Grupo de Ítem, esté en blanco).
- Por favor, revisa la página sobre Contabilidad de Costos para mayores detalles de esta funcionalidad.
- Por favor, revisa la página sobre Contabilidad de Costos para mayores detalles de esta funcionalidad.
- Stock (+), Stock (-)
- Estas Cuentas son utilizadas por el registro Movimientos de Stock para indicar las diferencias en el valor las cuales provienen de transferencias internas de stock entre las distintas Ubicaciones. La Cuenta Stock (-) también será debitada por defecto desde los archivos de Bajas de Stock, mientras que la Cuenta Stock (+) será abonada por defecto desde Mercaderías Recibidas creadas por la función de Mantenimiento 'Comparación de Inventario'.
- Cta. Costo Local, Reg., Export.
- Se refieren a las Cuentas Costo utilizadas cuando se envían mercaderías desde stock. Si estás utilizando contabilidad de costos, estas Cuentas serán debitadas en función a Facturas o Entregas cuando el campo correspondiente para el Grupo de Ítem se encuentre vacío. Debes especificar tres Cuentas Costo por separado, una para cada Zona.
- Transf. Stock
- Esta Cuenta es utilizada por el registro Transferencia de Stock (módulo Stock Interno) y sirve para indicar las diferencias desde transferencias internas de stock pasando por las distintas Ubicaciones de stock.
- Costo-I Producción
- La Cuenta especificada aquí será abonada por el crédito total del costo y será debitada por el débito total del costo cada vez que se apruebe un archivo de Producción; así se hará cuando no haya ninguna Cuenta de Stock especificada para la Ubicación pertinente o para los Grupos de Ítem correspondientes. Los archivos de Producción (los cuales sirven para estructurar Ítems de Stock desde sus componentes) se describen mejor aquí.
- Costo-T Producción
- La Cuenta especificada aquí será abonada por el costo total de trabajo cada vez que se apruebe un archivo de Producción. Generalmente, este costo será el costo de trabajo empleado para construir los Ítems compuestos.
- Dev. Merc.
- Cuando un Cliente devuelva un Ítem, deberás incluir esta devolución en el registro Devolución de Mercaderías. Así, cuando apruebes y guardes la Devolución, esta Cuenta será abonada según el Asiento Contable resultante; a menos que el Ítem pertenezca a un Grupo de Ítem con una Cuenta Costos y tildes la casilla ‘Usar Grupos de Ítem p/Contabilidad Costos’ en la opción Contabilidad de Costos (módulo Stock).
- Dev. Merc. a Prov.
- Cuando devuelvas un Ítem a su Proveedor, deberás incluir esta devolución en el registro Dev. Merc. a Proveedores. Así, cuando apruebes y guardes la Dev. Mercadería a Proveedor, esta Cuenta será debitada según el Asiento Contable resultante (en tanto no hayas tildado la casilla ‘Cta. Dev. Merc. a Prov. desde Merc. Rec.??? – más abajo en esta misma ventana).
- Cta. Dev. Merc. a Prov. desde Merc. Rec.
- Cuando devuelvas un Ítem a su Proveedor, deberás incluir esta devolución en el registro Dev. Merc. a Proveedores. Generalmente, se creará una Dev. Mercadería a Proveedor desde una Mercadería Recibida que se utilizó para recibir los Ítems. Así, cuando apruebes y guardes la Dev. Mercadería a Proveedor, el Asiento Contable resultante podrá debitar de la Cuenta Dev. Merc. a Proveedores especificada anteriormente; o debitará de la Cuenta Compras Devengada la cual fue abonada por la Mercadería Recibida originalmente. Si deseas utilizar la segunda alternativa, debes tildar esta casilla.
- También puedes crear Dev. Mercaderías a Proveedores desde Órdenes de Compra. Si decides realizar esto y además tildas esta casilla, entonces el Asiento resultante debitará de la Cuenta Provisión Compras correspondiente al Grupo de Ítem al cual pertenece el Ítem en cuestión (si has tildado la casilla ‘Usar Grupos de Ítem p/Contabilidad Costos’ en Contabilidad de Costos); o debitará de la Cuenta Provisión Compras que está especificada en la solapa 'Costo Compra' de esta misma opción.
- También puedes crear Dev. Mercaderías a Proveedores desde Órdenes de Compra. Si decides realizar esto y además tildas esta casilla, entonces el Asiento resultante debitará de la Cuenta Provisión Compras correspondiente al Grupo de Ítem al cual pertenece el Ítem en cuestión (si has tildado la casilla ‘Usar Grupos de Ítem p/Contabilidad Costos’ en Contabilidad de Costos); o debitará de la Cuenta Provisión Compras que está especificada en la solapa 'Costo Compra' de esta misma opción.
- Stock Consignado
- Por favor, revisa la página de 'Variaciones' para obtener una descripción de esta opción.
Solapa Costo Compra
- Provisión Compras Locales, Reg. Import.
- Serán las Cuentas de provisión utilizadas para registrar mercaderías que fueron recibidas antes de recibir una Factura de Compra. Estas Cuentas son abonadas cuando los archivos en el registro Mercaderías Recibidas son aprobados (si el campo equivalente para el Grupo de Ítem está en blanco); y será debitada cuando Facturas de Compra creadas desde Órdenes de Compra sean aprobadas (dependiendo del uso de los botones en ‘Control Transferencia Ítems Orden de Compra’ dentro de las Opciones Factura de Compra en el módulo Compras). Es necesario también especificar tres Cuentas Provisión de Compra, una para cada Zona.
- Por favor, revisa la página de Contabilidad de Costos para mayores detalles.
- Por favor, revisa la página de Contabilidad de Costos para mayores detalles.
- Provisión Flete
- Es la Cuenta que se utiliza para registrar el costo de fletes vinculados la recepción de mercaderías. Esta Cuenta es abonada cuando los archivos en el registro Mercaderías Recibidas son aprobados.
- Provisión Aduana
- Es la Cuenta que se utiliza para registrar costos impositivos implicados en la recepción de mercaderías. Esta Cuenta es abonada cuando los archivos en el registro Mercaderías Recibidas son aprobados.
- Costo Extra
- Esta es una Cuenta especial de gastos que sirve para agrupar cualquier costo extra asociado a la recepción de mercaderías (cargada en la columna ‘Costo Extra’ en la pestaña C de cada fila en la Mercadería Recibida; y en la columna ‘Costo Extra’ en la Devolución de Mercadería). Esta Cuenta es abonada cuando se aprueban Mercaderías Recibidas y Devoluciones de Mercaderías.
- Provisión Costo Extra
- Estas Cuentas agruparán los costos extra asociados a la recepción de mercaderías (cargadas en las cinco columnas respectivas dentro de la solapa 'Costos Extra' de una Mercadería Recibida (pestaña H para cada fila). Estas Cuentas son abonadas cuando se aprueban las Mercaderías Recibidas. Si deseas darle un nombre a cada una de las Cuentas Costos Extra, utiliza la opción Campos a Def. p/Usuario – Costos Extra en el módulo Stock.
Solapa Variaciones
Por favor, revisa la página 'Variaciones de Precio' para más detalles de las cuentas en esta solapa.Se recomienda especificar Cuentas de Variación aún cuando no estés utilizando la Variaciones de Precio. Si ingresas Mercaderías Recibidas con cobros de Flete y/o Aduanas (pie) y/o Costos Extras en la solapa 'Costos Extra' y resulta que estos cobros no pueden ser distribuidos en las diferentes filas del Ítem sin que quede un monto restante, ese monto restante será destinado a la Cuenta Variación apropiada cuando apruebes y guardes la Mercadería Recibida.
Si deseas colocar un nombre a cada una de las cuentas de Variación Costos Extra, utiliza la opción Campos a Def. p/Usuario - Costos Extra en el módulo Stock.
Códigos de Barra
Esta opción te permite registrar Códigos de Barra separados para Ítems de Variedades. Por favor, revisa la página sobre Variedades y Códigos de Barras para más detalles.Base Price Changes
Please click here for full details of this setting.Batch Specifications
This setting is used to administer Best Before dates for perishable goods.In the case of Items purchased by your company for resale, Batch Specification records can be created automatically from the Goods Receipt register. This will occur if a Best Before date is specified in the Goods Receipt, but only for Items that are Serial Numbered, either at Batch level or at Unit level.
In the case of Items produced by your company, records can be entered to this setting manually. In such a situation, the Items should be Stocked Items and should first be constructed in the Production register (in the Production module), where a self-generated Serial Number should be allocated. The serial number is the means by which Hansa identifies which Best Before date applies to which individual item or batch of items.
When the time comes to deliver perishable Items to your Customers, if Batch Specification records have been created using either of the methods described above, when a Serial Number is entered to a Delivery record, the appropriate Best Before date will be brought in automatically. This can be printed on delivery documentation if necessary. Best Before dates can also be shown in the 'Paste Special' list opened from any Serial Number field. To do this, switch on the Show Best Before Dates option in the Item Settings setting in the Sales Ledger.
- Item
- Paste Special
Item register
- The Item Number of the Item should be entered here.
- Batch/Serial No
- Paste Special
Serial Numbers of Items in stock
- Enter the Serial Number of the Item or batch of Items. Note that only existing Serial Numbers should be used: these should originate in the Goods Receipt or Production registers.
- Width, Height, Depth
- If the Batch Specification record was created from a Goods Receipt row with Width, Height and/or Depth specified on flip G, those dimensions will be copied here. Otherwise, enter the dimensions as appropriate. This will be useful in the case of Items bought and sold by area or volume (e.g. cloth or stone).
- Sale Width, Sale Height, Sale Depth
- These fields can be used in certain circumstances in Portugal. Please refer to your local Hansa representative for details.
- Production Date
- If appropriate, enter the date the item was made here.
- Best Before
- Default taken from
Goods Receipt
- Enter the Best Before date here. It will be transferred to a Delivery record on selection of the Serial Number. If you want to prevent the sale of goods after their Best Before date, use the Batch Quality Control setting.
- Text
- Any comments entered here can be shown on printed Invoices.
Cost Accounting
This setting offers some options for controlling the costing method used by Hansa when generating Nominal Ledger cost accounting transactions from the Sales Orders module.
- Update GP at Invoicing
- When creating Invoices from Orders, the Cost Price of each Item on the Invoice (and therefore its gross profit) can be taken from the Order or from the sum of the Cost Price and the Extra Cost from the Item record. If you wish to use the latter alternative, switch this check box on. This can be more accurate if you are routinely updating Items' Cost Prices from Purchase Orders or Goods Receipts since these are likely to occur after the entry of the Sales Order.
- FIFO per Location
- Hansa offers two methods by which FIFO schedules can be maintained.
- In the first method, a single FIFO schedule is maintained, irrespective of the number of Locations. This method might be appropriate in situations where there are no Locations, or where the Locations represent different rooms or shelves in the same building. Therefore, when Items are removed from stock by Delivery or Invoice, the oldest Items are always removed, irrespective of the Location in which they are stored or specified on the Delivery or Invoice. Items can be moved from Location to Location by Stock Movements, but their value remains the same. To use this method, ensure this check box is switched off.
- The second method is to maintain separate FIFO schedules for each Location. This method will be appropriate where the Locations represent separate buildings or warehouses. Therefore, when Items are removed from stock by Delivery or Invoice, the oldest Items in the specified Location are removed. Items can be moved from Location to Location by Stock Movements, and their value can be changed, perhaps to reflect the cost of the transfer. To use this method, ensure this check box is switched on.
- It is recommended that this option be switched on if you will be using Hansa's Locations feature. It is also recommended that you either switch on the Require Location option or specify a Main Location (both in the Stock Settings setting in the Stock module). This will ensure that a Location is always specified when adding or removing stock.
- Once a decision has been made as to whether the FIFO per Location feature is to be used, the state of this check box should not be changed. If the option is switched on or off once use of the Stock module has started, it is very likely that inaccuracies will be introduced to the FIFO schedule. If you do wish to change the status of this check box, it is recommended that you do so in a new database created at a convenient time such as the beginning of a financial year.
- In the first method, a single FIFO schedule is maintained, irrespective of the number of Locations. This method might be appropriate in situations where there are no Locations, or where the Locations represent different rooms or shelves in the same building. Therefore, when Items are removed from stock by Delivery or Invoice, the oldest Items are always removed, irrespective of the Location in which they are stored or specified on the Delivery or Invoice. Items can be moved from Location to Location by Stock Movements, but their value remains the same. To use this method, ensure this check box is switched off.
- Object for Stock Account
- When approving Deliveries, any Objects specified on flip E will be assigned to the debit posting when a Nominal Ledger Transaction is generated. Check this box if you would like them assigned to the credit posting as well.
- Use Item Groups for Cost Accounts
- With this option selected, Hansa will give priority to the Accounts entered for each Item Group when Nominal Ledger Transactions are generated from a Delivery or Goods Receipt.
- If this option is in use, it is recommended that all Stocked Items belong to Item Groups and that all Item Groups have Cost and Stock Accounts specified.
- This option does not affect the choice of Cost Model.
- If this option is in use, it is recommended that all Stocked Items belong to Item Groups and that all Item Groups have Cost and Stock Accounts specified.
- Use Components Cost Accounts
- When a Structured Item is included in an outward cost accounting transaction created from an Invoice, this option controls whether the Accounts and values are taken from the Structured Item itself or from its components.
- This choice is most relevant if the Cost Model, Invoice is set to Cost Price. If a FIFO or Weighted Average Cost Model is being used, this option should be on because FIFO and Weighted Average values do not apply to Structured Items (assembled Items that are built the moment they are delivered).
- If this option is off, be sure to include Cost Prices for all your Structured Items. This means that the Show Components on Documents option in your Structured Items should also be off.
- When a Structured Item is included in an outward cost accounting transaction created from a Delivery, the only available Cost Model options are FIFO or Weighted Average. In that situation, therefore, this check box is always treated as being on.
- This choice is most relevant if the Cost Model, Invoice is set to Cost Price. If a FIFO or Weighted Average Cost Model is being used, this option should be on because FIFO and Weighted Average values do not apply to Structured Items (assembled Items that are built the moment they are delivered).
- Cost Price for Serial No
- When a Serial Numbered Item is sold, its Serial Number has to be entered to the Invoice or Delivery manually: a Serial Number is not selected automatically. Hansa offers two methods by which such a sale can affect your stock valuation.
- In the first method, Cost Prices are independent of Serial Numbers. When the Invoice or Delivery is approved, the stock valuation is adjusted on a FIFO basis, and, if you are using cost accounting, the value of the cost accounting transaction will also be calculated on a FIFO basis. In other words, the Item with the oldest Cost Price will be removed from stock. This will happen irrespective of whether the Serial Number chosen is the oldest one. To use this method, ensure this check box is switched off.
- The second method links Cost Prices and Serial Numbers. When the Invoice or Delivery is approved, the Cost Price of the chosen Serial Number is deducted from the stock valuation, and this will be the value of any cost accounting transaction. This will not necessarily be the oldest Cost Price and thus there is a departure from the FIFO principle. To use this method, ensure this check box is switched on.
- This method is recommended in situations where stock can occasionally be purchased at special prices. An example might be the purchase of Items at special rates for sale to educational establishments or for demonstration purposes. When demonstration stock is moved from stock to showroom or from showroom to showroom using Stock Movements (possibly in combination with Internal Orders), this method ensures that the special demonstration price remains connected to the Serial Number in question.
- Once a decision has been made as to whether Cost Prices and Serial Numbers are to be linked, the state of this check box should not be changed. If the option is switched on or off once use of the Stock module has started, it is very likely that inaccuracies will be introduced to the FIFO schedule. If you do wish to change the status of this check box, it is recommended that you do so in a new database created at a convenient time such as the beginning of a financial year.
- In the first method, Cost Prices are independent of Serial Numbers. When the Invoice or Delivery is approved, the stock valuation is adjusted on a FIFO basis, and, if you are using cost accounting, the value of the cost accounting transaction will also be calculated on a FIFO basis. In other words, the Item with the oldest Cost Price will be removed from stock. This will happen irrespective of whether the Serial Number chosen is the oldest one. To use this method, ensure this check box is switched off.
- Separate Transaction rows per Item
- If a goods in or goods out transaction contains several Items that use the same Cost, Purchase Control and/or Stock Account, the resulting Nominal Ledger Transaction can contain separate double-sided postings for each Item, or a single accumulated posting. Check this box to use the first method.
Contabilidad de Costos (2da Parte)
- Notas de Crédito y Dev. Mercadería
- Estas alternativas solo son operables con un Modelo de Costo Lineal (FIFO o LIFO). Siendo este el caso, cuando recibas Ítems dentro de stock éstos serán colocados formando una alineación. Cuando entregues los Ítems o cuando los saques de stock, estarán por orden de llegada (es decir, el orden en que los recibiste – FIFO) o en un orden invertido (LIFO). Estos botones controlan todo lo que sucede en esta alineación de Ítems en caso que un Cliente devuelva un Ítem que ya fue entregado.
- Si no estás usando un Modelo de Costo Lineal, debes activar el botón ‘Insertar como Ítem Nuevo en Costo Lineal???. De lo contrario, la Lista de Stock podría traer incorrecciones. Si estás usando un Modelo de Costo Lineal pero has decidido producir la Lista de Stock usando un Modelo diferente para fines comparativos, entonces debes considerar que podrías obtener un resultado impreciso si estás activas el botón para Posición Original.
- Insertar como Ítem Nuevo en Costo Lineal
- El Ítem devuelto se coloca al final de la alineación (FIFO) o al comienzo (LIFO). Por tanto, el archivo de Devolución de Mercadería actúa igual que una nueva Mercadería Recibida. Esta es la alternativa recomendada para hacer un cálculo estricto FIFO/LIFO.
- Insertar en Posición Original en Costo Lineal
- El Ítem devuelto se coloca en su posición original dentro de la alineación (ordenado por fechas). Si has seleccionado FIFO, se colocará por tanto al frente de la alineación y será el próximo Ítem en ser entregado.
- Si activas este botón, tendrás que crear Devoluciones de Mercaderías desde Entregas (no podrás crearlas desde Órdenes de Venta).
- Si originalmente el Ítem fue entregado al Cliente usando una Factura sin una Orden de Venta, entonces la mejor forma de devolverlo a stock con el valor correcto es crear una Mercadería Recibida. Esto colocará al Ítem siempre al final de la alineación (FIFO) o al comienzo (LIFO) sin importar el tildado de las demás casillas en esta opción.
- Si no estás usando un Modelo de Costo Lineal, debes activar el botón ‘Insertar como Ítem Nuevo en Costo Lineal???. De lo contrario, la Lista de Stock podría traer incorrecciones. Si estás usando un Modelo de Costo Lineal pero has decidido producir la Lista de Stock usando un Modelo diferente para fines comparativos, entonces debes considerar que podrías obtener un resultado impreciso si estás activas el botón para Posición Original.
- No Contabil. Costo desde Entregas
- En algunos países como el Reino Unido, los asientos de ventas y los datos de Costos Venta están obligados a tener la misma fecha. Si éste es tu caso y además necesitas crear contabilidad de costos desde Facturas, entonces debes tildar esta casilla. También debes retirar el tilde de la casilla ‘Entregas’ en la opción ‘Sub Sistemas’ (módulo Contabilidad) y a su vez tienes que tildar la casilla ‘Actualizar Stock’ en la opción ‘Manejo de Ctas. Ventas’. Si una de estas opciones no está configurada como se debe (según lo descrito), se corre el riesgo de que el sistema omita la creación de contabilidad de costos. Notemos que los niveles de stock serán todavía ajustados desde las Entregas. Así que cuando emitas Entregas con una fecha anterior a la Factura, entonces habrá un periodo en que la revaluación en la Lista de Stock no coincidirá con el dato respectivo en el Mayor de Contabilidad.
- Si deseas crear contabilidad de costos desde Entregas, entonces debes quitar el tilde de esta casilla y tildar la casilla ‘Entregas’ en la opción ‘Sub Sistemas???.
- Si deseas crear contabilidad de costos desde Entregas, entonces debes quitar el tilde de esta casilla y tildar la casilla ‘Entregas’ en la opción ‘Sub Sistemas???.
- Actualizar GB en Facturación
- Cuando generes Facturas desde Órdenes, el Precio Costo de cada Ítem en la Factura (y por tanto su ganancia bruta) puede ser extraído desde la Orden o desde la suma del Precio Costo y el Costo Extra del Ítem. Si deseas utilizar la última alternativa, debes tildar esta casilla. Esto puede ser aún más preciso cuando actualices periódicamente los Precios Costo de los Ítems desde las Mercaderías Recibidas; y cuando estés usando Órdenes de Compra homolagadas. En esta situación, es muy posible que se registre una Mercadería Recibida con el Precio Costo más reciente luego de ingresar la Orden de Venta; y esta Mercadería Recibida habrá actualizado al Ítem.
- Si has tildado la casilla ‘Actualizar GB de Orden en la Entrega??? (Opciones de Órdenes de Venta – módulo Órdenes de Venta) y creaste una Entrega desde una Orden de Venta, entonces el costo de venta actual (el cual se calculará usando el Modelo de Costo FIFO, LIFO o Promedio Ponderado) en función a cada Ítem, será copiado nuevamente desde la Entrega a la columna ‘Costo’ en cada fila de la Orden. De modo que si has tildado la casilla ‘Actualizar GB de Orden en la Entrega’, el costo unitario de venta para cada Ítem será copiado desde las Órdenes a las Facturas.
- Si has tildado la casilla ‘Actualizar GB de Orden en la Entrega??? (Opciones de Órdenes de Venta – módulo Órdenes de Venta) y creaste una Entrega desde una Orden de Venta, entonces el costo de venta actual (el cual se calculará usando el Modelo de Costo FIFO, LIFO o Promedio Ponderado) en función a cada Ítem, será copiado nuevamente desde la Entrega a la columna ‘Costo’ en cada fila de la Orden. De modo que si has tildado la casilla ‘Actualizar GB de Orden en la Entrega’, el costo unitario de venta para cada Ítem será copiado desde las Órdenes a las Facturas.
- Objeto en Cuenta de Stock
- Cuando apruebes una Entrega, se asignará cualquiera de los Objetos especificados en la pestaña E. Estos Objetos se asignarán a la columna Debe de la Cuenta Costos Ventas correspondiente al Asiento resultante. Debes tildar esta casilla para que los Objetos sean asignados a la columna del Haber también.
- Cuando apruebes una Baja de Stock, se asignará cualquiera de los Objetos especificados en el encabezado y en la pestaña A. Estos Objetos se asignarán a la columna Haber de la Cuenta Costos. Si has tildado esta casilla, entonces estos Objetos también serán asignados a la columna Haber de la Cuenta Stock.
- Cuando apruebes una Baja de Stock, se asignará cualquiera de los Objetos especificados en el encabezado y en la pestaña A. Estos Objetos se asignarán a la columna Haber de la Cuenta Costos. Si has tildado esta casilla, entonces estos Objetos también serán asignados a la columna Haber de la Cuenta Stock.
- Usar Grupos de Ítem p/Contabilidad Costos
- Si tildas esta casilla, HansaWorld Enterprise dará prioridad a las Cuentas respectivas de cada Grupo de Ítem cuando los Asientos vinculados se generen desde Entregas, Facturas, Planillas de Trabajo y Mercaderías Recibidas.
- Teniendo esta casilla tildada, es recomendable cerciorarse que todos los Ítems de Stock pertenezcan a Grupos de Ítem y que todos estos Grupos posean Cuentas Costos y Stock especificadas.
- Teniendo esta casilla tildada, es recomendable cerciorarse que todos los Ítems de Stock pertenezcan a Grupos de Ítem y que todos estos Grupos posean Cuentas Costos y Stock especificadas.
- Costo de Venta Ítems Compuestos en Factura
- Cuando se incluye un Ítem Compuesto en un asiento de contabilidad de costos el cual ha sido creado desde una Entrega, se extraerá las Cuentas, el Modelo de Costo y el stock desde cada componente. Sucederá algo semejante cuando el Ítem Estructurado tenga tildada su casilla ???Pegar Componentes durante Ingreso’ y vaya incluido en un asiento saliente de contabilidad de costos (desde una Factura). Es decir que las Cuentas, el Modelo de Costo y el stock serán extraídos de cada componente. Sin embargo, si el Ítem Compuesto no tiene tildada su casilla ‘Pegar Componentes durante Ingreso’ y va incluido en un asiento saliente de contabilidad de costos (desde una Factura), entonces las Cuentas, el Modelo de Costo y el stock serán extraídos de cada componente únicamente si tildas esta casilla. De lo contrario, no se incluirá Ítems Compuestos que no tengan tildada su casilla ‘Pegar Componentes durante Ingreso’ (las revaluaciones de Contabilidad en función a los componentes, no serán actualizadas).
- Contab. Costos para Ítems Simples y de Servicio
- Por lo general solo se crearán asientos de contabilidad de costos (salientes y entrantes) para Ítems de Stock. En este entendido, debes tildar esta casilla para crear asientos incluyendo Ítems Simples y de Servicio.
- Si tildas esta casilla, se recomienda no utilizar un Modelo de Costo Lineal para estos Ítems. Las alternativas de ‘Sobre Entegas’ –(Opciones de Stock) no se aplican a Ítems Simples y de Servicio, por tanto no habrá ninguna verificación para evitar un stock negativo.
Un stock negativo hará que se interprete mal los valores FIFO/LIFO.
- Si tildas esta casilla, se recomienda no utilizar un Modelo de Costo Lineal para estos Ítems. Las alternativas de ‘Sobre Entegas’ –(Opciones de Stock) no se aplican a Ítems Simples y de Servicio, por tanto no habrá ninguna verificación para evitar un stock negativo.
- Filas Separadas en Asiento por Ítems
- Si un asiento entrante o saliente de mercaderías contiene varios Ítems que utilizan la misma Cuenta Provisión de Compra o Cuenta Stock, entonces el Asiento Contable resultante contendrá columnas dobles para cada Ítem; o un solo dato acumulativo.
Tilda esta casilla para utilizar el primer método.
- Actualizar Promedio Ponderado desde Dev. Merc. Proveedores
- Utiliza esta casilla para hacer que el Promedio Ponderado de tus Ítems sea actualizado desde el registro Dev. Merc. a Proveedores (cuando devuelvas mercaderías a tus proveedores).
- Por ejemplo, supongamos que compraste dos Ítems en 100.00 y 200.00. El Promedio Ponderado es 150.00. Luego realizas la devolución del segundo Ítem a su Proveedor. Si deseas que el Promedio Ponderado se modifique y se ajuste al valor del Ítem restante (el cual dependerá del uso de la casilla ‘Costo Original en Dev. Merc. a Proveedor’), debes tildar esta casilla.
- Por ejemplo, supongamos que compraste dos Ítems en 100.00 y 200.00. El Promedio Ponderado es 150.00. Luego realizas la devolución del segundo Ítem a su Proveedor. Si deseas que el Promedio Ponderado se modifique y se ajuste al valor del Ítem restante (el cual dependerá del uso de la casilla ‘Costo Original en Dev. Merc. a Proveedor’), debes tildar esta casilla.
- Actualizar Promedio Ponderado desde Dev. Merc. y Notas Crédito
- Utiliza esta casilla para hacer que el Promedio Ponderado de tus Ítems sea actualizado desde el archivo respectivo de Mercaderías Recibidas (cuando un cliente te devuelva un Ítem). Si deseas que el Promedio Ponderado sea actualizado desde Facturas de Crédito, deberás utilizar esta casilla y también deberás tildar la casilla ‘Facturas de Crédito actualizan Stock’ (opción ‘Funcionalidades Opcionales’ – Módulo Sistema).
- Por ejemplo, suponiendo que pagas 100.00 por un Ítem y luego lo entregas a un Cliente. Luego compras un segundo Ítem igual, esta vez por 200.00. El Promedio Ponderado del Ítem es ahora 200.00 (se coloca en cero cuando el nivel de stock es cero), sin embargo, el Cliente decide devolver el Ítem. Por tanto, si deseas que el Promedio Ponderado continúe siendo 200.00, entonces no debes tildar esta casilla. Tildarás esta casilla cuando desees que el Promedio Ponderado cambie a 150.00 (el promedio de 100.00 y 200.00) y además que incluya cualquier Costo Extra en la Devolución de Mercadería (cualquier Costo Extra que afecte el Promedio Ponderado).
- Por ejemplo, suponiendo que pagas 100.00 por un Ítem y luego lo entregas a un Cliente. Luego compras un segundo Ítem igual, esta vez por 200.00. El Promedio Ponderado del Ítem es ahora 200.00 (se coloca en cero cuando el nivel de stock es cero), sin embargo, el Cliente decide devolver el Ítem. Por tanto, si deseas que el Promedio Ponderado continúe siendo 200.00, entonces no debes tildar esta casilla. Tildarás esta casilla cuando desees que el Promedio Ponderado cambie a 150.00 (el promedio de 100.00 y 200.00) y además que incluya cualquier Costo Extra en la Devolución de Mercadería (cualquier Costo Extra que afecte el Promedio Ponderado).
- Promedio Ponderado en Moneda Base 2
- Cuando generes un asiento saliente de contabilidad de costos (ej. desde una Entrega o Factura), el valor en Moneda Base 1 será calculado mediante el Modelo de Costo. Esta cifra generalmente será convertida a Moneda Base 2 mediante el tipo de cambio actual.
- Si tildas esta casilla, el valor en Moneda Base 1 será calculado normalmente mediante el Modelo de Costo. Pero esta cifra no será convertida a Moneda Base 2 sino que la Moneda Base 2 será extraída del campo ‘Prom. Ponderado, B2’ en la solapa 'Costos' del Ítem (esta cifra también será visible en la pestaña C de la Entrega).
- Si estás usando el Modelo de Costo Promedio Ponderado, el manejo de esta casilla determinará que tu revaluación de stock en la Contabilidad general, sea correcta en ambas Monedas Base.
- Si tildas esta casilla, el valor en Moneda Base 1 será calculado normalmente mediante el Modelo de Costo. Pero esta cifra no será convertida a Moneda Base 2 sino que la Moneda Base 2 será extraída del campo ‘Prom. Ponderado, B2’ en la solapa 'Costos' del Ítem (esta cifra también será visible en la pestaña C de la Entrega).
- Precio Costo por Nros. de Serie
- Cuando vendes un Ítem con su numeración de serie o cuando lo retiras de stock, debes ingresar manualmente su Número de Serie dentro de la Factura, Entrega o Baja de Stock. No se podrá seleccionar un Número de Serie automáticamente. HansaWorld Enterprise ofrece dos métodos con los cuales se puede retirar un Ítem desde stock e incidir en tus revaluaciones de stock.
- El primer método consiste en que los Precios Costo sean independientes de los Números de Serie. En este sentido, cuando apruebes una Factura, Entrega o Baja de Stock, tanto la revaluación de stock como el valor del asiento (si estás usando contabilidad de costos), serán calculados usando el Modelo de Costo especificado en el Ítem o Grupo de Ítem (o en este seteo). Por ejemplo, si estás usando el Modelo de Costo Lineal FIFO, entonces se eliminará de Stock al Ítem con el Precio Costo más antiguo. Esto sucederá sin importar que el Número de Serie seleccionado sea el más antiguo o no. Para utilizar este método, asegúrate de quitar el tilde a esta casilla.
- El Segundo método vincula Precios Costo y Números de Serie. Es decir que cuando apruebes una Factura o Entrega, entonces el Precio Costo del Número de Serie seleccionado, será descontado de la revaluación de stock y éste será el valor de cualquier asiento de contabilidad de costos. No necesariamente será el Precio Costo correcto determinado por el Modelo de Costo. Para utilizar este método, asegúrate de tildar esta casilla.
- Este método es recomendable en situaciones donde los Ítems pueden ser comprados (eventualmente) con precios especiales. Un ejemplo podría ser la compra de Ítems con precios módicos a favor de establecimientos educativos o para fines demostrativos. Cuando trasladas ítems demostrativos desde stock al sitio de demostración o cuando tales ítems van circulando por los diferentes sitios de demostración, tú vas creando Movimientos de Stock (posiblemente en combinación con Órdenes Internas), por tanto este método asegura que los precios especiales para fines demostrativos permanecerán conectados al Número de Serie pertinente.
- Una vez hayas tomado la decisión de vincular tanto Precios Costo como Números de Serie, no debes cambiar el estado de esta casilla. Si tildas o quitas el tilde a esta casilla luego de iniciar a manejar el módulo Stock, es muy probable que surjan fallas en las cifras de FIFO/LIFO y/o Promedio Ponderado. Si decides cambiar el estado de esta casilla, debes ejecutar inmediatamente la función de Mantenimiento 'Reconstruir Stock' en el módulo Técnico. Esto reconstruirá las cifras FIFO/LIFO y/o Promedio Ponderado, pero no cambiará los archivos de stock existentes (ej. Entregas) o los Asientos resultantes. Por tanto, quizás debas ajustar personalmente las revaluaciones de stock en el Mayor (ingresando manualmente un asiento).
- Puedes sobrescribir los seteos hechos aquí de manera individual para un Ítem particular o un Grupo de Ítem (si has tildado la casilla ‘Usar Grupos de Ítem para Modelo Costo’).
- El primer método consiste en que los Precios Costo sean independientes de los Números de Serie. En este sentido, cuando apruebes una Factura, Entrega o Baja de Stock, tanto la revaluación de stock como el valor del asiento (si estás usando contabilidad de costos), serán calculados usando el Modelo de Costo especificado en el Ítem o Grupo de Ítem (o en este seteo). Por ejemplo, si estás usando el Modelo de Costo Lineal FIFO, entonces se eliminará de Stock al Ítem con el Precio Costo más antiguo. Esto sucederá sin importar que el Número de Serie seleccionado sea el más antiguo o no. Para utilizar este método, asegúrate de quitar el tilde a esta casilla.
- Modelo Costo Lineal por Ubicación
- Si estás utilizando Ubicaciones y también un Modelo de Costo Lineal, HansaWorld Enterprise ofrece dos métodos que permiten mantener los Modelos de Costo Lineal FIFO/LIFO:
- El primer método consiste en mantener un solo FIFO/LIFO sin importar la cantidad de Ubicaciones. Este método resultará apropiado en situaciones donde no haya ninguna Ubicación; o donde las Ubicaciones representen diferentes ambientes o aparadores dentro de un mismo edificio. Cuando retires un Ítem de stock, el Ítem más antiguo (FIFO) o el más reciente (LIFO) será siempre afectado (retirado de stock) y no se tomará en cuenta la Ubicación en que está almacenado o el lugar especificado en el asiento saliente de stock (ej. Entrega o Factura). Para utilizar este método, asegúrate de retirar el tilde de esta casilla.
- El segundo método consiste en mantener FIFO/LIFO por separado para cada Ubicación. Este método resultará apropiado en situaciones donde las Ubicaciones representen edificios separados o almacenes. Cuando retires un Ítem de stock, el Ítem más antiguo (FIFO) o el más reciente (LIFO) especificado en la Ubicación, será afectado (retirado de stock). En este sentido, debes retirar el tilde de esta casilla.
- Una vez hayas tomado la decisión de utilizar el Modelo de Costo Lineal por Ubicación, no deberás cambiar el estado de esta casilla. Si tildas o quitas el tilde de esta casilla luego de haber iniciado a manejar el módulo Stock, es muy probable que surjan fallas en los valores FIFO/LIFO. Si decides cambiar el estado de esta casilla, deberás ejecutar inmediatamente la función de Mantenimiento 'Reconstruir Stock' en el módulo Técnico. Este reconstruirá los valores FIFO/LIFO y las cifras de Promedio Ponderado, pero no cambiará archivos de stock existentes (ej. Entregas) o Asientos resultantes. Por tanto, si estás usando un Modelo de Costo Lineal y cambias esta casilla, deberás ajustar personalmente la revaluación de stock en la Contabilidad general (ingresarás manualmente un Asiento).
- Si no estás utilizando un Modelo de Costo Lineal, quizás decidirás tildar de todas formas esta casilla para manejar más de una Ubicación (ej. si tu Modelo de Costo usual es Promedio Ponderado por Ubicación o Precio Costo por Ubicación). Podrás producir Listas de Stock que estén calculadas conforme a tu Modelo de Costo usual o empleando alguna alternativa. Si alguna vez requieres producir la Lista de Stock usando un Modelo de Costo Lineal, podrás hacerlo mediante el uso de esta casilla puesto que te dará las opciones equivalentes para armar un reporte.
- Puedes sobrescribir los seteos realizados aquí de manera individual para un Ítem particular o un Grupo de Ítem (si has tildado la casilla ‘Usar Grupos de Ítem para Modelo Costo).
- El primer método consiste en mantener un solo FIFO/LIFO sin importar la cantidad de Ubicaciones. Este método resultará apropiado en situaciones donde no haya ninguna Ubicación; o donde las Ubicaciones representen diferentes ambientes o aparadores dentro de un mismo edificio. Cuando retires un Ítem de stock, el Ítem más antiguo (FIFO) o el más reciente (LIFO) será siempre afectado (retirado de stock) y no se tomará en cuenta la Ubicación en que está almacenado o el lugar especificado en el asiento saliente de stock (ej. Entrega o Factura). Para utilizar este método, asegúrate de retirar el tilde de esta casilla.
- Promedio Ponderado por Ubicación
- Si estás utilizando Ubicaciones, HansaWorld Enterprise mantiene dos tipos de cifras Promedio Ponderado para cada Ítem. El primer tipo es una cifra global del Promedio Ponderado (el cual es visible en la solapa 'Costos' de cada Ítem). El segundo tipo implica mantener cifras separadas de Promedio Ponderado para cada Ítem en cada Ubicación. Estas cifras serán visibles en la opción Promedio Ponderado.
- Si estás utilizando el Modelo de Costo Promedio Ponderado, debes tildar esta casilla para determinar las cifras que se usarán en la Lista de Stock y en base a esto se calcularán los valores de stock y el valor de los asientos salientes (Contabilidad de Costos). Si no tildas esta casilla, se utilizará la cifra global de Promedio Ponderado. De lo contrario, se emplearán las cifras separadas de Promedio Ponderado para cada Ítem.
- Por ejemplo, suponiendo que recibes dos Ítems que cuestan 100 y 150 lo cuales están situados en la Ubicación 1; también recibes otros dos Ítems que cuestan 150 y 200 los cuales están en la Ubicación 2. El Promedio Ponderado global es 150, el Promedio Ponderado para la Ubicación 1 es 125. El Promedio Ponderado para la Ubicación 2 es 175. Si no tildas esta casilla, el valor en la Lista de Stock será 4 x 150; el valor de un asiento saliente de contabilidad de costos será 150 sin importar la Ubicación. Si has tildado esta casilla, el valor en la Lista de Stock será (2 x 125) + (2 x 175), y el valor de un asiento saliente de contabilidad de costos será 125 o 175 (dependiendo de la Ubicación).
- Si trasladas un Ítem individualmente desde una Ubicación a otra usando un Movimiento de Stock, entonces se incluirá cualquier Costo Extra incurrido por el movimiento (irá inmerso en la cifra global de Promedio Ponderado). Si has tildado esta casilla, el Costo Extra será incluido en la cifra separada de Promedio Ponderado según la Ubicación de destino.
- Una vez hayas tomado la decisión de utilizar el Promedio Ponderado por Ubicación, no deberás cambiar el estado de esta casilla. Si tildas y/o quitas el tilde a esta casilla luego de haber iniciado a manejar el módulo Stock, es muy posible que surjan fallas en los Promedios Ponderados. Si decides cambiar el estado de esta casilla, deberás ejecutar inmediatamente la función de Mantenimiento 'Reconstruir Stock' en el módulo Técnico.
- Si no estas usando un Modelo de Costo Promedio Ponderado, quizás decidirás tildar de todas formas esta casilla cuando tengas más de una Ubicación (ej. cuando tu Modelo de Costo usual sea Lineal o Precio Costo y además estés utilizando el Modelo de Costo Lineal correspondiente por Ubicación o Precio Costo por Ubicación). Podrás producir Listas de Stock que estén calculadas según tu Modelo de Costo usual o usando una alternativa. Si alguna vez requieres producir la Lista de Stock utilizando un Modelo de Costo Promedio Ponderado, el manejo de esta casilla te dará las alternativas equivalentes para armar un reporte.
- Puedes sobrescribir los seteos realizados aquí de manera individual para un Ítem particular o un Grupo de Ítem (cuando has tildado la casilla ‘Usar Grupos de Ítem para Modelo Costo’).
- Si estás utilizando el Modelo de Costo Promedio Ponderado, debes tildar esta casilla para determinar las cifras que se usarán en la Lista de Stock y en base a esto se calcularán los valores de stock y el valor de los asientos salientes (Contabilidad de Costos). Si no tildas esta casilla, se utilizará la cifra global de Promedio Ponderado. De lo contrario, se emplearán las cifras separadas de Promedio Ponderado para cada Ítem.
Freight Companies
If your company is one that uses courier or haulage companies to deliver goods to your Customers, those companies can be recorded in this setting. When entering a Delivery, a Freight Company can be recorded on the 'Freight' card of the Delivery record, and the information from this setting can be printed on Delivery documentation. This is a legal requirement in some countries.Click the [Settings] button in the Master Control panel or select 'Settings' from the File menu to open the 'Settings' list. Double-click 'Freight Companies' in the list. The 'Freight Companies: Browse' window lists the Freight Companies that have already been entered: double-click one to modify it or click [New] to create a new record. When the record is complete, click the [Save] button in the Button Bar to save changes and close it using the close box, or click the close box if you don't want to save changes.
- Code
- Enter the unique code by which the Freight Company is to be identified from elsewhere in Hansa. The Code may consist of up to five characters, and both numbers and letters can be used.
- Company
- Record the name of the Freight Company here.
- Registration No.
- The Company Registration Number of the Freight Company is entered here.
- Truck Info
- This field is used to record any relevant information regarding the Freight Company's delivery vehicle (e.g. its registration number).
- Driver
- Enter the name of the driver here.
- CMR Text
- If the Freight Company is used in combination with the "CMR" Delivery Mode, any text for the consignment note can be recorded here.
Item Varieties
Please click here for full details of this setting.Item Variety Groups
Please click here for full details of this setting.Location Accounts
The Location Accounts setting allows you to set different Purchase Accruals, Cost and Sales Accounts for each Location. You can also set a Stock Account for each Location, but you should do this in the Location record itself.To work with the Location Accounts setting, first ensure you are in the Stock module. Then, if you are using Windows or Mac OS X, click the [Settings] button in the Navigation Centre to open the 'Settings' list and double-click 'Location Accounts' in this list. If you are using iOS or Android, select 'Settings' from the Tools menu (with 'wrench' icon) and tap 'Location Accounts' in the 'Settings' list. In both cases, the 'Location Accounts: Inspect' window illustrated below will open. Fill in the fields as described below the illustration. Then, to save changes and close the window, click the [Save] button (Windows/Mac OS X) or tap √ (iOS/Android). To close the window without saving changes, click the close box (Windows/Mac OS X) or tap < (iOS/Android).
To edit a row, simply click or tap in the field to be changed and overtype the existing entry. If you are using Windows or Mac OS X, you can add a new row by clicking in the Code field in the first blank line and entering appropriate text. To remove a row, click on the row number on the left of the row and press the Backspace key. To insert a new row, click on the row number and press the Return key. If you are using iOS or Android, you can add rows by tapping the + button below the matrix. To remove a row, long tap on the row number on the left of the row and select 'Delete Row' from the resulting menu. To insert a row, long tap on the row number where the insertion is to be made and select 'Insert Row' from the resulting menu.
The Location Accounts setting is spread over three flips. To view specific flips, click (Windows/Mac OS X) or tap (iOS/Android) one of the three flip tabs (marked A-C) on the right of (Windows/Mac OS X) or under (iOS/Android) the matrix.
Flip A
- Code
- Paste Special
Locations setting, Stock module
- Use 'Paste Special' to specify the Location for which you need to set dedicated Purchase Accruals, Cost and/or Sales Accounts.
- Dom. Purch. Accruals, EU Purch. Accruals, Export Purch. Accruals
- Paste Special
Account register, Nominal Ledger/System module
- If you are maintaining stock valuations in the Nominal Ledger, a Purchase Accruals Account will be credited whenever you receive a Stocked Item into stock and debited when you receive the Purchase Invoice for that Item.
- Use these fields if you need to set dedicated Purchase Accruals Accounts for the Location specified in the Code field to the left. You should specify a separate Account for each Zone. These Purchase Accruals Accounts will be used in preference to those specified in Item Groups or in the Account Usage Stock setting. Please refer here for more details about how the Purchase Accruals Account will be chosen in each Purchase Order and Goods Receipt row.
- You can change the name of the EU Purch. Accruals field if it is not suitable. Using the VAT Zone Label setting in the Sales Ledger, you can replace the string "EU" with your own string (for example "SACU" in South Africa). This also applies to the EU Cost A/C on flip B and the EU Sales A/C on flip C.
- Use these fields if you need to set dedicated Purchase Accruals Accounts for the Location specified in the Code field to the left. You should specify a separate Account for each Zone. These Purchase Accruals Accounts will be used in preference to those specified in Item Groups or in the Account Usage Stock setting. Please refer here for more details about how the Purchase Accruals Account will be chosen in each Purchase Order and Goods Receipt row.
Flip B
- Dom. Cost A/C, EU Cost A/C, Export Cost A/C
- Paste Special
Account register, Nominal Ledger/System module
- If you are maintaining stock valuations in the Nominal Ledger, a Cost of Sales Account will be debited with the calculated cost of goods whenever you sell a Stocked Item.
- Use these fields if you need to set dedicated Cost Accounts for the Location specified in the Code field to the left. You should specify a separate Account for each Zone. These Cost Accounts will usually be used in preference to those specified in Item Groups, in Item records or in the Account Usage Stock setting. Please refer here for full details about how the Cost of Sales Account will be chosen in an individual transaction.
Flip C
- Dom. Sales A/C, EU Sales A/C, Export Sales A/C
- Paste Special
Account register, Nominal Ledger/System module
- A Sales Account will be credited whenever you sell an Item, allowing you to record the levels of sales of different types of Items in the Nominal Ledger.
- You can use these fields to specify dedicated Sales Accounts to be used when you make sales from the Location specified in the Code field to the left. Please refer here for full details about how a Sales Account will be chosen when you sell an Item (i.e. when you specify an Item in a row in an Invoice, Order, Quotation or other sales transaction).
Settings in the Stock module:
- Introduction
- Account Usage Stock
- Barcodes
- Base Price Changes
- Batch Specifications
- Cost Accounting
- Freight Companies
- Item Varieties
- Item Variety Groups
- Location Accounts
- Locations
- Minimum Stock Levels
- Number Series - Deliveries
- Number Series - Goods Receipts
- Number Series - Returned Goods
- Number Series - Returned Goods to Supplier
- Number Series - Stock Depreciations
- Number Series - Stock Movements
- Number Series - Stock Revaluations
- Number Series - Stocktaking
- Pack Types
- Recipes
- Returned Goods Settings
- Sources
- Stock Movement Durations
- Stock Revaluation Settings
- Stock Settings
- Structured Items
- User Defined Fields - Extra Costs
- Variety Masks
- Variety Sets
- Variety Settings
- Variety Sets
- Weighted Average
- Winedi
- Home page for Stock module manual
- Home page for Standard ERP manual
Locations
Hansa allows stocks to be kept at several different Locations. Stock balances for items are maintained both per Location and total.Click the [Settings] button in the Master Control panel or select 'Settings' from the File menu to open the 'Settings' list. Double-click 'Locations' in the list. The 'Locations: Browse' window is opened, showing existing Locations.
To enter a new Location, click the [New] button in the Button Bar. Alternatively, if one already exists that is similar to the one you are about to enter, find it in the list, highlight it and click [Duplicate].
The 'Location: New' window is opened, empty if you clicked [New] or containing a duplicate of the highlighted Location.
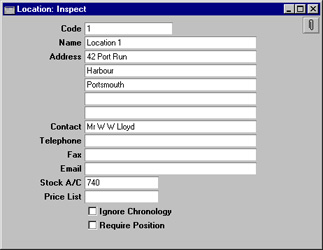
- Stock A/C
- The Stock Account specified in the final field will be debited whenever stock is received into the Location and credited when stock is delivered (providing that, in the Sub Systems setting in the Nominal Ledger, it has been determined that Nominal Ledger Transactions are to be created when Goods Receipts and Deliveries are approved). If no Stock Account is specified, the Stock Account for the Item Group to which the individual Item belongs or the Stock Account on card 5 of the Account Usage S/L setting will be used.
- Ignore Chronology
- Hansa contains a chronology feature which can be used to help improve the accuracy of FIFO valuations by ensuring that stock transactions are entered in date sequence. This feature is controlled using the Chronology in Stock options in the Stock Settings setting. If it is used, Hansa will not allow the approving of a stock transaction (i.e. Goods Receipt, Delivery, Stock Movement, Returned Goods record or Stock Depreciation) if there are unapproved stock transactions (in any of those registers) with an earlier Transaction Date, or approved stock transactions with a later Transaction Date. This chronology check can be turned off for a particular Location using the Ignore Chronology check box.
- Require Position
- If the Location is one that has Positions and you want to ensure that a Position is always entered to flip F of Goods Receipts with that Location, check this box.
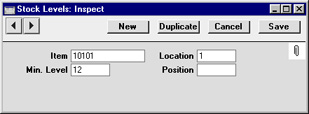
Minimum Stock Levels
You can use the Min. Level field on the 'Stock' card of each Item record to specify the minimum quantity of the Item that can be held in stock. If you need to specify a minimum stock level for each Location, use this setting.The 'Create Purchase Orders' function in the Purchase Orders module (on the Operations menu of the 'Purchase Orders: Browse' window) will create Purchase Orders with sufficient quantities to ensure that the stock balance for each Item is made up to the minimum stock level, taking into account quantities on Sales Orders that cannot be delivered from stock ("stocking" Orders). This minimum stock level will be calculated by adding the Minimum Stock Level records for the Item together. If there are no records in the Minimum Stock Levels setting for a particular Item, the minimum stock level will be taken from the Item record. For this reason, if you are using the Minimum Stock Levels setting, it is recommended that you leave the Min. Level field in each Item empty.
This setting is also used in the Deficiency List and Purchasing Suggestion reports, which produce purchase proposals and can be used to preview the Purchase Orders that will be created by the function described in the previous paragraph. If no Location is specified for these reports, the minimum stock level shown for each Item will be the figure for all Locations. If a Location is specified for these reports, the minimum stock level shown for each Item will be the figure for the Location in question. If there are no records in the Minimum Stock Levels setting for a particular Item, the minimum stock level will be taken from the Item record.
Number Series - Deliveries
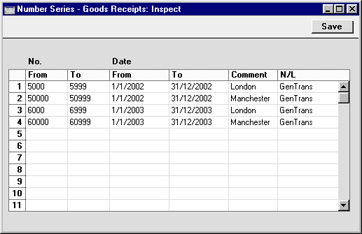
Use this setting to define the number sequences for Deliveries in a similar manner to that described for Goods Receipts.Number Series - Goods Receipts
Each Goods Receipt has its own unique identifying number, based on a sequential series. When entering a new Goods Receipt, the next number in the series is used. If required, you can have a number of such sequences running concurrently, perhaps representing different years, different departments or different order types.Use this setting to define these sequences, or Number Series. The different series should not overlap. If no Number Series have been defined, Goods Receipt Numbers will start at 1 and continue consecutively.
Once defined, Number Series can be allocated to individual users using the Person register in the System module ('Ser Nos' card). In the Goods Rec No field on that screen, enter the first number of the appropriate sequence for each user. If a particular user is not given a specific sequence, the first Number Series entered to this setting will be used. For a particular Goods Receipt, any user can change to the next number in any other Number Series using 'Paste Special'.
For each number sequence, you have a measure of control over whether Nominal Ledger Transactions are generated automatically when approving Goods Receipts in that sequence. Using 'Paste Special' from the N/L field brings up a selection list containing two options: "GenTrans" and "Do Not GenTrans". Select the first option if Nominal Ledger Transactions are to be generated and the second if they are not. In effect, this feature is an exclusionary one in that you can only choose to not have Nominal Ledger Transactions created for a particular number sequence. If the overall preference (set in the Sub Systems setting in the Nominal Ledger) is to not have such transactions created, you cannot decide to have them created for a single sequence.
On double-clicking 'Number Series - Goods Receipts' in the 'Settings' list, the following window appears:
Number Series - Returned Goods
Use this setting to define the number sequences for records in the Returned Goods register in a similar manner to that described for Goods Receipts.Nros. de Serie - Dev. Mercadería a Proveedor
Utiliza esta opción para definir la secuencia numérica que se aplicará a los archivos en el registro Dev. Merc. a Proveedores. Este procedimiento es semejante al descrito para Mercaderías Recibidas.Number Series - Stock Depreciations
Use this setting to define the number sequences for Stock Depreciation records in a similar manner to that described for Goods Receipts.Number Series - Stock Movements
Use this setting to define the number sequences for Stock Movements in a similar manner to that described for Goods Receipts.Number Series - Stock Revaluations
Each record in the Stock Revaluation register has its own unique identifying number, based on a sequential series. When you enter a new record, the next number in the sequence will be used. If required, you can have a number of such sequences running concurrently, perhaps representing different years or different departments.Use this setting to define these sequences, or Number Series. The different series should not overlap. If you leave the setting empty, Stock Revaluation Numbers will start at 1 and continue consecutively.
When you enter a Stock Revaluation, the next number in the first valid Number Series entered to this setting will be used as a default; change to the first unused number in any other valid Number Series using 'Paste Special'.
When you open the Number Series - Stock Revaluations setting, the following window will appear:
The N/L field gives you a measure of control over whether Nominal Ledger Transactions will be generated automatically when you mark Stock Revaluations in a particular sequence as OK and save them. Using 'Paste Special' from the N/L field brings up a selection list containing two options: "GenTrans" and "Do Not GenTrans". Select the first option if Nominal Ledger Transactions are to be generated and the second if they are not. In effect, this feature is an exclusionary one in that you can only choose to not have Nominal Ledger Transactions created for a particular number sequence. If the overall preference (set in the Sub Systems setting in the Nominal Ledger) is to not have such transactions created, you cannot decide to have them created for a single sequence.
When the setting is complete, click the [Save] button (Windows/Mac OS X) or tap √ (iOS/Android) to save the changes. To close the window without saving changes, click the close box (Windows/Mac OS X) or tap < (iOS/Android).
---
Settings in the Stock module:
- Introduction
- Account Usage Stock
- Barcodes
- Base Price Changes
- Batch Specifications
- Cost Accounting
- Freight Companies
- Item Varieties
- Item Variety Groups
- Location Accounts
- Locations
- Minimum Stock Levels
- Number Series - Deliveries
- Number Series - Goods Receipts
- Number Series - Returned Goods
- Number Series - Returned Goods to Supplier
- Number Series - Stock Depreciations
- Number Series - Stock Movements
- Number Series - Stock Revaluations
- Number Series - Stocktaking
- Pack Types
- Recipes
- Returned Goods Settings
- Sources
- Stock Movement Durations
- Stock Revaluation Settings
- Stock Settings
- Structured Items
- User Defined Fields - Extra Costs
- Variety Masks
- Variety Sets
- Variety Settings
- Variety Sets
- Weighted Average
- Winedi
- Home page for Stock module manual
- Home page for Standard ERP manual
Number Series - Stocktaking
Use this setting to define the number sequences for records in the Stocktaking register in a similar manner to that described for Goods Receipts.Pack Types
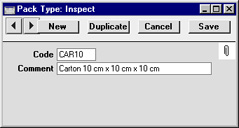
This setting is used to store the various types of package used by your company when making Deliveries. Examples might be envelopes, padded envelopes and boxes of various sizes. This information can be printed on Delivery documentation to allow the Customer to ascertain quickly that the correct number and type of packages has been delivered.The 'Pack Types: Browse' window lists the available Pack Types: double-click to modify or click [New] to create a new record.
Positions
Positions are distinct areas within Locations. When entering Goods Receipts, Items can be placed in Positions using the field on flip F. This can help with the organisation of large Locations, but has no accounting significance (stock valuations cannot be produced for a Position). Items can be moved to new Positions using Stock Movements.The 'Positions: Browse' window lists the available Positions: double-click to modify or click [New] to create a new record.
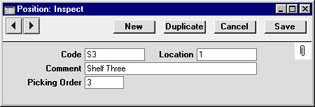
The Require Position option on the Location screen can be used to ensure that a Position must be entered to all Goods Receipts featuring a particular Location.
Recetas
Los Ítems ensamblados son aquellos construidos por tu empresa utilizando otros Ítems (sus componentes). Existen dos clases diferentes de Ítems ensamblados dependiendo del uso del módulo Producción:- Ítems Compuestos
- Si no estás utilizando el módulo Producción, debes entonces cargar un Ítem ensamblado como si fuese un Ítem Compuesto (usando los campos en la solapa ‘Precios’ del Ítem) y no manteniendo los niveles de stock. Se asume que los Ítems Compuestos serán estructurados al momento de realizar la Entrega. En este punto, los niveles de stock de los componentes serán reducidos.
- Ítems de Stock
- El módulo Producción crea “Producciones”. Éste concepto normalmente corresponde al resultado de una orden de producción. Cuando marcas una Producción como "Terminada" (cuando activas el botón ‘Terminada’), los niveles de stock de los Ítems implicados se reduce y el stock de los Ítems de entrega se incrementa consecuentemente. Para garantizar que esta acción se efectúe, tú debes cargar todos los Ítems de entrega incluyendo solamente Ítems de Stock. Tales Ítems pueden ser únicamente estructurados utilizando el módulo Producción. Estos Ítems se estructuran y se mantienen en stock anticipándose a la entrega respectiva.
- Un Ítem de insumo puede ser enfáticamente uno de sub-categoría. En este sentido, deberá ser un Ítem de Stock que esté estructurado en el registro Producciones en el módulo Producción. De esta manera, los niveles de stock fluctuarán como unidades y luego serán usados como sub-categorías. En este sentido, para utilizar sub-categorías, deberá estar instalado el módulo Producción.
Supongamos que tú ensamblas un sistema de estéreo utilizando ciertos componentes como ser el ecualizador, los amplificadores, etc., sin embargo este producto es comercializado como un solo Ítem. Para empezar debes ingresar “Sistema de Estéreo” en el registro Ítems y luego activar el botón Ítem Compuesto en la solapa ???Precios’.
Al definir la Receta para el Sistema de Estéreo, debes cerciorarte que utilices el mismo Código de Receta que fue cargado en la solapa 'Receta' del Ítem. Para definir una Receta, primero asegúrate de estar en el módulo Stock y luego selecciona ‘Opciones’. Haz doble clic a ‘Recetas’ y pulsa el botón [Crear] para poder crear una nueva Receta.
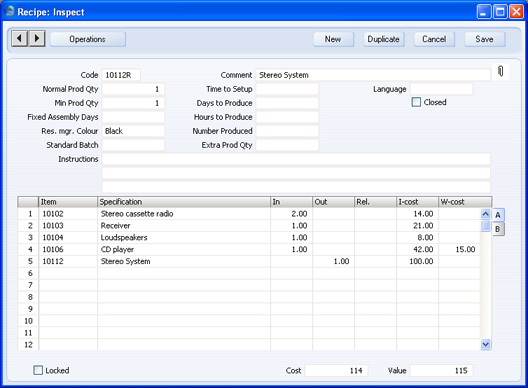
- Código
- El Código de la Receta puede contener hasta 20 caracteres. Se recomienda que el Código de la Receta sea similar al Número y/o Código del Ítem ensamblado.
- Comentario
- Será una descripción del ensamblaje y/o los componentes del producto.
- Cant. Normal Prod.
- Este campo solo es pertinente cuando está instalado el módulo Producción (ej. cuando el resultado de la Receta es un Ítem de Stock). Por favor, haz clic aquí para obtener una descripción de esto.
- Hora para Instalar, Cant. Mín. Prod., Días para Producir, Días Ensamblaje, Horas a Producir, Color Recurso, Nro. Producido, Lote Estándar, Cant. Adic. p/Prod., Routing por Defecto
- Estos campos serán pertinentes solo si el módulo Producción está instalado.
- Cerrado
- Tilda esta casilla para indicar que la Receta ya no será utilizada. Si el resultado de la Receta es un Ítem Compuesto el cual es utilizado dentro de una Orden, Factura u otros asientos de ventas o stock, entonces ya no podrás guardar el asiento. Por tanto, se recomienda marcar como Cerrado tal Ítem Compuesto para así retirarlo de la lista ‘Pegado Especial’ correspondiente al Ítem (para evitar errores); o podrías asignar una Receta diferente al Ítem Compuesto.
- Instrucciones
- Utiliza estas tres líneas para indicar algunas instrucciones sobre el manejo de la Receta.
Pestaña A
- Ítem
- Pegado Especial
registro de Ítems
- Ingresa el Número de Ítem correspondiente a cada uno de los componentes. Luego, en la última fila, debes ingresar el Número de Ítem del producto final o producto acabado.
- Especificación
- Será el Nombre del Ítem proveniente del registro de Ítems. Este dato se cargará aquí automáticamente cuando ingreses el Número de Ítem.
- Insumo
- Ingresa la cantidad de cada componente requerido para fabricar/armar/diseñar el producto acabado. No debes ingresar ningún Ítem de ensamblaje en la última línea.
- Resul.
- Será la cantidad de Ítems ensamblados que pueden ser creados desde los componentes listados. Por lo general, esa cantidad será 1 y deberá ser 1 cuando la Receta se refiera a un Ítem.
- Rel.
- Relatividad: este campo solo sirve cuando existe más de un Ítem de ensamblaje. Por lo general, será el caso de algún Ítem finalizado (producto acabado) que sea Ítem de Stock (Ítems que serán armados usando el registro Producciones). Dentro de cada fila que representa a un Ítem finalizado, debes ingresar una cifra porcentual. Cuando utilices la Receta en una Producción, el costo total de los componentes será distribuido conforme a los porcentajes cargados aquí.
- Costo-I
- Costo del Insumo: si la fila contiene el monto de un Ítem, entonces debes ingresar el Precio Costo de una unidad (del Ítem). Por defecto será el Precio Costo del Ítem. El costo mostrado en este campo NO es igual al valor de stock calculado usando el Modelo de Costo usual. Podrás actualizar este costo mediante la función de Mantenimiento 'Actualizar Recetas'.
- Si la fila contiene un Ítem finalizado (un producto acabado), entonces debes ingresar el costo de ese Ítem. Esto será por lo general la suma de los Precios Costo de los Ítems de Insumo y tomará en cuenta las cantidades. Nuevamente, por defecto será el Precio Costo de Ítem.
- Los costos totales de los Ítems de insumo aparecerán en el campo ‘Costo Ítems-Ins.’ (pie de la ventana), mientras que los costos de los Ítems finalizados, aparecerán en el campo ‘Valor Ítems- Res.’
- Si la fila contiene un Ítem finalizado (un producto acabado), entonces debes ingresar el costo de ese Ítem. Esto será por lo general la suma de los Precios Costo de los Ítems de Insumo y tomará en cuenta las cantidades. Nuevamente, por defecto será el Precio Costo de Ítem.
- Costo-T
- Costo de Trabajo (por unidad producida): Carga un costo trabajo en función a los Ítems de insumos y aquellos ensamblados. Por lo general, este será el costo de la fuerza laboral requerida para armar el Ítem ensamblado.
- Únicamente deberás especificar un costo trabajo cuando el resultado de la Receta sea un Ítem de Stock armado usando el registro Producciones. Si el resultado es un Ítem Compuesto, el costo trabajo será ignorado.
- Deberás cargar el costo trabajo en una fila que presente un Ítem de Insumo (según se muestra en la ilustración anterior). Esto garantizará que el costo trabajo sea correctamente abonado en la Cuenta de Producción-Costo Trabajo dentro de cualquier Asiento Contable resultante de los archivos de Producción los cuales empleen la Receta en cuestión. Si cargas el costo trabajo en una fila de Ítem finalizado, éste será debitado de la Cuenta Producción-Costo Trabajo.
- Las cifras correspondientes al Costo Trabajo serán incluidas tanto en los campos ‘Costo Ítems-Ins.’ como ‘Valor Ítems-Res.’ en el pie de la ventana.
- Únicamente deberás especificar un costo trabajo cuando el resultado de la Receta sea un Ítem de Stock armado usando el registro Producciones. Si el resultado es un Ítem Compuesto, el costo trabajo será ignorado.
- Descripción
- Aquí se puede anotar algunos detalles sobre el Ítem.
- Receta
- Este campo muestra si el Ítem es un Ítem ensamblado (es decir, uno con su Receta especificada en su solapa 'Receta'). Esto se actualizará automáticamente y no podrá ser modificado.
- Bloqueado
- Cuando te encuentres seguro que la Receta está correcta, tilda esta casilla para evitar cambios posteriores. Una vez hayas utilizado una Receta en un Asiento (Entrega o Producción), esta no debe ser modificada, especialmente si el resultado es un Ítem Compuesto cuya casilla ???Pegar Componentes durante Ingreso’ no está tildada. En este caso, la modificación de la Receta incidirá en fallas dentro de los archivos de stock, de modo que ésta será marcada como ‘Bloqueada’ cuando sea utilizada en una Entrega la primera vez.
- Si luego se hace necesario modificar una Receta, no deberás hacerlo arbitrariamente (no se debe). Por el contrario, debes crear una nueva Receta y agregarla a un nuevo Ítem de Stock o Compuesto).
!
No debes cambiar una Receta luego de haberla utilizado en un asiento de stock.
- Si luego se hace necesario modificar una Receta, no deberás hacerlo arbitrariamente (no se debe). Por el contrario, debes crear una nueva Receta y agregarla a un nuevo Ítem de Stock o Compuesto).
- Costo Ítems-Ins.
- Este campo contiene la sumatoria de los costos correspondientes a los Ítems de Insumo (Costo-T + (Costo-I x Cant. In.)). Si el Ítem ensamblado es un Ítem de Stock, entonces deberás transferir este valor al campo ‘Precio Costo??? situado en la solapa 'Costos' del Ítem (ya sea manualmente o mediante la función de Mantenimiento 'Actualizar Recetas' (módulo Producción).
- Valor Ítems-Res.
- Este campo contiene la sumatoria de los costos correspondientes a los Ítems finalizados (productos acabados) (Cost-T + (Costo-I * Cant. Res.)).
Returned Goods Settings
This setting contains some miscellaneous options controlling the behaviour of various aspects of the Returned Goods register.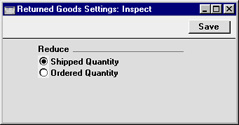
- Reduce
- Specify here which of the Reduce options is to be chosen by default in new Returned Goods records. For descriptions of the two options, please refer to this page describing the 'Location' card of the Returned Goods screen.
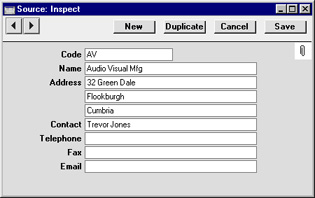
Sources
This setting can be used to store the names and addresses of the original producers of the Items that you sell (e.g. the manufacturers, producers or importers). These can be recorded on the 'Stock' card of each Item, from where they are transferred to Orders (flip F) and Deliveries (flip D).The 'Sources: Browse' window lists the available Sources: double-click to modify or click [New] to create a new record.
Duración de Mov. de Stock
Si posees Ubicaciones situadas a cierta distancia unas de otras y es necesario recorrer esa distancia para trasladar los Ítems, lo cual te obliga a utilizar Movimientos de Stock, puedes utilizar esta opción para registrar los tiempos frecuentes de traslados. De esta manera podrás obtener una estimación del tiempo empleado para completar cada Movimiento de Stock.Para abrir la opción ???Duración de Mov. de Stock’, primero asegúrate de estar en el módulo Stock y luego haz clic en el botón [Opciones]. Posteriormente, selecciona ???Duración de Mov. de Stock’ para abrir la ventana ‘Duraciones Mov. de Stock: Hojear’ la cual mostrará los archivos existentes.
Para cargar una nueva Duración de Movimiento de Stock, haz clic en [Crear] o alternativamente, resalta un archivo existente y luego pulsa el botón [Duplicar].
Así se abrirá la ventana ‘Duración Mov. de Stock: Crear’ y estará vacía si pulsaste [Crear] o conteniendo un duplicado su pulsaste [Duplicar].
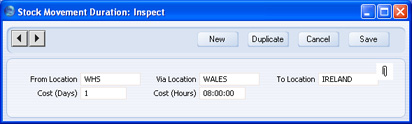
- De Ubicación
- Pegado Especial
opción Ubicaciones, módulo Stock
- Será la Ubicación desde donde van a ser trasladados los Ítems (la Ubicación donde inicia el recorrido que da lugar a un Movimiento de Stock).
- Vía Ubicación
- Pegado Especial
opción Ubicaciones, módulo Stock
- Si el recorrido pasa por un Ubicación de tránsito, entonces debes especificar esa Ubicación aquí. En algunas situaciones, la ‘Vía Ubicación’ podría referirse al camión que transporta los Ítems desde la ‘De Ubicación’ hacia la ‘A Ubicación’. Este campo puede quedar vacío.
- A Ubicación
- Pegado Especial
opción Ubicaciones, módulo Stock
- Será la Ubicación donde los Ítems van a ser trasladados (la Ubicación donde concluye el recorrido de un Movimiento de Stock).
- Costo (Días), Costo (Horas)
- Utiliza estos campos para especificar el tiempo empleado por un recorrido entre la Ubicación origen y la Ubicación destino. Se asume un día con una duración de 24 horas, así que el recorrido ilustrado en el ejemplo durará 32 horas (1 día (24 horas) + 8 horas).
Stock Revaluation Settings
This setting contains some miscellaneous options controlling the behaviour of various aspects of the Stock Revaluation register.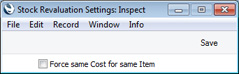
- Force same Cost for same Item
- If you hold stock in more than one Location (or you hold stock of Serial Numbered Items), you may want to be able to use Stock Revaluations to revalue an Item differently depending on Location (or depending on Serial Number). On the other hand, you may need to ensure that an Item is always revalued with the same value, irrespective of Location or Serial Number. If you need the latter option, select this option.
Settings in the Stock module:
- Introduction
- Account Usage Stock
- Barcodes
- Base Price Changes
- Batch Specifications
- Cost Accounting
- Freight Companies
- Item Varieties
- Item Variety Groups
- Location Accounts
- Locations
- Minimum Stock Levels
- Number Series - Deliveries
- Number Series - Goods Receipts
- Number Series - Returned Goods
- Number Series - Returned Goods to Supplier
- Number Series - Stock Depreciations
- Number Series - Stock Movements
- Number Series - Stock Revaluations
- Number Series - Stocktaking
- Pack Types
- Recipes
- Returned Goods Settings
- Sources
- Stock Movement Durations
- Stock Revaluation Settings
- Stock Settings
- Structured Items
- User Defined Fields - Extra Costs
- Variety Masks
- Variety Sets
- Variety Settings
- Variety Sets
- Weighted Average
- Winedi
- Home page for Stock module manual
- Home page for Standard ERP manual
Stock Settings
This setting contains some miscellaneous options controlling the behaviour of various aspects of the Stock module.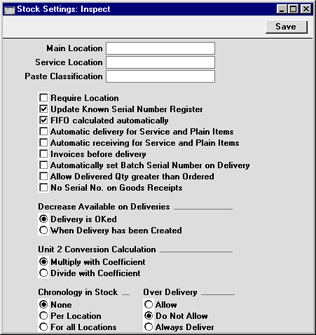
- Main Location
- Paste Special
Locations setting, Stock module
- If a Location is specified here, it will be used by default wherever a Location is required and left blank. For example, Items on a Goods Receipt record without a Location will be treated as being stored in the Main Location.
- If the Require Location box (below) is not checked and the Main Location is changed, you must create a back-up file and import it into a new database before entering any further stock transactions. This will have the effect of moving all stock from the old Main Location to the new one, because all stock transactions with a blank Location will then be treated as referring to the new Main Location. If in reality the stock in the old Main Location remains there, you should then move it back to that Location using Stock Movements.
- A special case of this is the specifying of a Main Location for the first time. In this case, stock that has previously been entered without a Location will be treated as being in the Main Location once the updating procedure described above has been completed.
- If this updating procedure is not followed when the Main Location is changed, and instead stock is moved from the old Main Location to the new one by Stock Movement, stock levels will be rendered inaccurate the next time you create a back-up file and import it into a new database (e.g. when upgrading to a new version of Hansa). This inaccuracy can be corrected by reversing the Stock Movement. Do not put off following the updating procedure because you do not want all stock to be moved from the old Main Location to the new one, as this will happen anyway the next time you import a back-up file into a new database (e.g. when upgrading).
!
If the Require Location box is not checked and the Main Location is changed, create a back-up file and import it into a new database straight away.
- If the Require Location box (below) is not checked and the Main Location is changed, you must create a back-up file and import it into a new database before entering any further stock transactions. This will have the effect of moving all stock from the old Main Location to the new one, because all stock transactions with a blank Location will then be treated as referring to the new Main Location. If in reality the stock in the old Main Location remains there, you should then move it back to that Location using Stock Movements.
- Service Location
- Paste Special
Locations setting, Stock module
- This field is used if you have the Service Orders module. When receiving into service stock Items belonging to Customers that you are to repair, they will be stored by default in the Location specified here.
- Paste Classification
- Paste Special
Item Classifications setting, Stock module
- Please click here for full details of this field.
- Require Location
- If this option is on, a Location must be entered to all stock transactions (such as Deliveries and Goods Receipts) and Invoices. If it is off and no Location is specified, any Location entered in the Main Location field above will be used.
- Update Known Serial Number Register
- This option will be used if you have the Service Orders module. If it is switched on, a list of Serial Numbers for Items sold by your company will be available to the Service Orders module. When such an Item is subsequently brought in for repair, this list will allow Hansa to determine whether it is still under warranty using the Invoice Date and the Warranty Months field on the 'Recipe' card of the Item screen.
- FIFO calculated automatically
- This option is only used if the Production module is present. When entering a Production record, a default Input Cost value for each component will be brought in from the Recipe: this is therefore a fixed figure and NOT the same as the FIFO stock value.
- If this option is on, FIFO stock values will be placed in the Input Cost field of each component (replacing the default value) when the Production record in marked as Finished and saved. The cost of the output Item is also changed accordingly. This will affect the resulting Nominal Ledger Transaction and therefore your stock valuation in the Nominal Ledger.
- If this option is on, FIFO stock values will be placed in the Input Cost field of each component (replacing the default value) when the Production record in marked as Finished and saved. The cost of the output Item is also changed accordingly. This will affect the resulting Nominal Ledger Transaction and therefore your stock valuation in the Nominal Ledger.
- Automatic delivery for Service and Plain Items
- When raising Invoices from Sales Orders, usually only those Items on approved Deliveries will be included. This means that a Delivery must be issued from a Sales Order before an Invoice can be raised. This might not be appropriate if the Sales Order does not include any Stocked or Structured Items (i.e. it has no stock level implications). If you would like to be able to raise an Invoice without previously issuing a Delivery from such Orders, check this box.
- If this box is checked, when a Plain or Service Item is included in a Sales Order, the Del 1 and Del 2 Quantities will be changed to the Order Quantity when the Order is saved. Therefore Plain and Service Items will not be included on Deliveries created from the Order. This also means that the Order Quantity for such Items cannot be reduced once the Order has been saved.
- If this option is being used, take care not to create premature Invoices accidentally for services such as delivery and labour from Orders that also include Stocked Items.
- This box should not be checked if you have Sales Orders that are connected to Projects. Invoices are not created directly from such Sales Orders: instead they are raised from Project Transactions which in turn are created from Deliveries. If this box is checked, Service and Plain Items (e.g. labour) will not be transferred from Orders to Project Transactions via Deliveries because the Deliveries will not exist.
- If this box is checked, when a Plain or Service Item is included in a Sales Order, the Del 1 and Del 2 Quantities will be changed to the Order Quantity when the Order is saved. Therefore Plain and Service Items will not be included on Deliveries created from the Order. This also means that the Order Quantity for such Items cannot be reduced once the Order has been saved.
- Automatic receiving of Service and Plain Items
- When creating Purchase Invoices from Purchase Orders, usually only those Items on approved Goods Receipts will be included. This means that a Goods Receipt must be received against a Purchase Order before an Invoice can be created. This might not be appropriate if the Purchase Order does not include any Stocked or Structured Items (i.e. it has no stock level implications). If you would like to be able to create Invoices without previously entering Goods Receipts from such Purchase Orders, check this box.
- If this box is checked, when a Plain or Service Item is included in a Purchase Order, the Received Quantity will be changed to the Order Quantity when the Purchase Order is saved. Therefore Plain and Service Items will not be included on Goods Receipts created from the Purchase Order. This also means that the Order Quantity for such Items cannot be reduced once the Purchase Order has been saved.
- If this box is checked, when a Plain or Service Item is included in a Purchase Order, the Received Quantity will be changed to the Order Quantity when the Purchase Order is saved. Therefore Plain and Service Items will not be included on Goods Receipts created from the Purchase Order. This also means that the Order Quantity for such Items cannot be reduced once the Purchase Order has been saved.
- Invoices before delivery
- When raising Invoices from Sales Orders, usually only those Items on approved Deliveries will be included. This means that a Delivery must be issued from a Sales Order before an Invoice can be raised. If you would like to raise Invoices from Orders (for the complete value of the Order) before issuing Deliveries, check this box. If you have determined that cost accounting transactions are to be created at the point of delivery, stock transactions in the Nominal Ledger will still be raised when the Delivery is approved (i.e. using the Invoices Before Delivery option does not affect cost accounting in any way).
- If you are not using this option, you can switch it on for an individual Order by checking the Invoice Before Delivery box ('Del Terms' card).
- If you are not using this option, you can switch it on for an individual Order by checking the Invoice Before Delivery box ('Del Terms' card).
- Automatically set Batch Serial Number on Delivery
- When Deliveries are created for Serial Numbered Items, usually you must enter the Serial Numbers yourself, because there is no automatic FIFO allocation of Serial Numbers. However, in the case of Items that have Serial Numbers at the batch level only, Serial Numbers and Best Before Dates will appear in Deliveries automatically if this box is checked.
- If the Order Quantity is greater than the size of a batch, the Delivery will contain an appropriate number of separate rows with different Serial Numbers. For example, you have a batch of ten Items with Serial Number 1 and a batch of ten with Serial Number 2, and you receive an Order for eleven. This option will create a Delivery with two rows: the first with a Delivery Quantity of ten and Serial Number 1; and the second with a Delivery Quantity of one and Serial Number 2.
- If a Delivery is not approved immediately, batch Serial Numbers can be updated using the 'Refill Batch No. Items' function on the Operations menu.
- If the Order Quantity is greater than the size of a batch, the Delivery will contain an appropriate number of separate rows with different Serial Numbers. For example, you have a batch of ten Items with Serial Number 1 and a batch of ten with Serial Number 2, and you receive an Order for eleven. This option will create a Delivery with two rows: the first with a Delivery Quantity of ten and Serial Number 1; and the second with a Delivery Quantity of one and Serial Number 2.
- Allow Delivered Qty greater than Ordered
- When creating Deliveries from Orders, you are usually prevented from delivering a quantity that is greater than that ordered. Use this option if you would like to be able to do this. This applies to all Item Types, including Plain and Service Items.
- No Serial No. on Goods Receipts
- By default, when you receive an Item that uses Serial Numbers into stock, you will not be able to save the Goods Receipt without entering a Serial Number. Similarly, when selling an Item, a valid Serial Number (i.e. one currently in stock) must be used in the Delivery or Invoice.
- If you find these rules to be too strict, use this option. If this box is checked, you will be able to save Goods Receipts without specifying Serial Numbers. You will still have to specify Serial Numbers in goods out transactions (e.g. Deliveries, Invoices, Stock Depreciation records), but no check will be made that they are valid (i.e. that they are currently in stock). Since it is not compulsory to enter Serial Numbers in Goods Receipts, it cannot be known if a particular Serial Number is valid. For the same reason, there will be no 'Paste Special' list available from the Serial Number field in goods out transactions.
- If you find these rules to be too strict, use this option. If this box is checked, you will be able to save Goods Receipts without specifying Serial Numbers. You will still have to specify Serial Numbers in goods out transactions (e.g. Deliveries, Invoices, Stock Depreciation records), but no check will be made that they are valid (i.e. that they are currently in stock). Since it is not compulsory to enter Serial Numbers in Goods Receipts, it cannot be known if a particular Serial Number is valid. For the same reason, there will be no 'Paste Special' list available from the Serial Number field in goods out transactions.
- Decrease Available on Deliveries
- Use these options to determine exactly when delivered Items are to be removed from stock. The available quantity of an Item in a particular Location can quickly be viewed using the 'Item Status' and 'Item Status Report' functions on the Operations menu, available in several areas of Hansa.
- These options control the calculation of the Available figure shown in a Delivery when it is created. They also control when the Stock and Order figures in the 'Item Status' window and Item Status Report are updated. In both cases, the figures can be reduced by the quantity delivered when Deliveries are created or when they are approved (i.e. the choice is whether these figures should include quantities on previous unapproved Deliveries). Please click for full details of the 'Item Status' and 'Item Status Report' functions.
- These options control the calculation of the Available figure shown in a Delivery when it is created. They also control when the Stock and Order figures in the 'Item Status' window and Item Status Report are updated. In both cases, the figures can be reduced by the quantity delivered when Deliveries are created or when they are approved (i.e. the choice is whether these figures should include quantities on previous unapproved Deliveries). Please click for full details of the 'Item Status' and 'Item Status Report' functions.
- Unit 2 Conversion Calculation
- Several reports in the Stock module offer the option to include Quantity 2. This option allows you to express stock quantities using two different units of measurement. This is only appropriate for Items that have a Unit 2 and a Unit Coefficient specified on the 'Stock' card.
- You can specify that the Quantity 2 figure is to be calculated by multiplying or dividing the standard quantity by the Unit Coefficient. Make this choice using these options. If you change your choice, you should create a Company Text Backup and import it into a new database in order to update the reports.
- You can specify that the Quantity 2 figure is to be calculated by multiplying or dividing the standard quantity by the Unit Coefficient. Make this choice using these options. If you change your choice, you should create a Company Text Backup and import it into a new database in order to update the reports.
- Chronology in Stock
- The chronology feature can be used to help improve the accuracy of FIFO valuations by ensuring that stock transactions are entered in date sequence. If it is used, Hansa will not allow the approving of a stock transaction (i.e. Goods Receipt, Delivery, Stock Movement, Returned Goods record or Stock Depreciation) if there are unapproved stock transactions (in any of those registers) with an earlier Transaction Date, or approved stock transactions with a later Transaction Date.
- Use the For all Locations option if all stock transactions are to be considered by the chronology check, or the Per Location option to restrict the feature to stock transactions affecting the Location of the new record.
- The chronology check can be turned off for a particular Location using the Ignore Chronology check box on the Location screen.
- Use the For all Locations option if all stock transactions are to be considered by the chronology check, or the Per Location option to restrict the feature to stock transactions affecting the Location of the new record.
- Over Delivery
- These options control Hansa's behaviour when creating Deliveries from Orders when there is not sufficient stock to fully satisfy those Orders. Plain and Service Items are not affected by these options.
- Allow
- This option will allow the delivery of more units of a Stocked Item than are in stock. However, when creating Deliveries from Sales Orders, the default quantity will be the quantity in stock if the order quantity is greater.
- Do Not Allow
- Use this option to prevent the delivery of more units of a Stocked Item than are actually in stock.
- Always Deliver
- This option will allow the delivery of more units of a Stocked Item than are in stock. It differs from the Allow option in that when creating Deliveries from Sales Orders, the default quantity will always be the order quantity, even if there is insufficient stock.
- Allow
Stock Settings - Part 2
This page describes the radio button options in the Stock Settings setting in the Stock module. Please refer here for details about the fields and check boxes.---
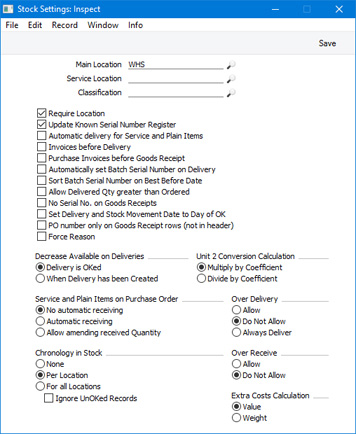
- Decrease Available on Deliveries
- When you create a Delivery from an Order, the Avail. field in the Delivery will display the number of units that you have in stock that are available for delivery. This will be the number of units that you have in stock less any that have been reserved.
- Use these options to determine exactly when delivered Items are to be removed from the Avail. figure (i.e. to determine the moment when a unit is said to be no longer available because it has been allocated to a Delivery). This can be when you create Deliveries or when you mark them as OK and save.
- For example, you have ten units of an Item in stock. If you receive an Order for one unit and create a Delivery, the Avail. figure in the Delivery will be ten. Before you mark that Delivery as OK, you receive a second Order for the same Item and create a Delivery from that Order. The Avail. figure in the second Delivery will depend on these options, as follows:
- Delivery is OKed
- The Avail. figure in the second Delivery will be ten. As the first Delivery hasn't been marked as OK yet, the unit in that Delivery is still available to be used in other Deliveries.
- When Delivery has been Created
- The Avail. figure in the second Delivery will be nine. The unit in the first Delivery is no longer available to be used in other Deliveries. If you delete the first Delivery, the unit will once again be made available for use by another Delivery.
- These options will also affect the Stock, Order and Shippable figures in the 'Item Status' window. Continuing the example, if you are using the Delivery is OKed option, these figures at each stage will be:
Action Stock Order Shippable Before Order 10 0 10 Create Order 10 1 9 Create Delivery 10 1 9 OK Delivery 9 0 9
If you are using the When Delivery has been Created option, these figures at each stage will be:
Action Stock Order Shippable Before Order 10 0 10 Create Order 10 1 9 Create Delivery 9 0 9 OK Delivery 9 0 9
- Please refer here for details about the 'Item Status' window.
- Use these options to determine exactly when delivered Items are to be removed from the Avail. figure (i.e. to determine the moment when a unit is said to be no longer available because it has been allocated to a Delivery). This can be when you create Deliveries or when you mark them as OK and save.
- Unit 2 Conversion Calculation
- Several reports in the Stock module offer the option to include Quantity 2. This option allows you to express stock quantities using two different units of measurement. You can only use this option with Items that have a Unit 2 and a Unit Coefficient specified on the 'Stock' card.
- You can specify that the Quantity 2 figure (i.e. the figure expressed using the second unit of measurement) is to be calculated by multiplying or dividing the standard quantity by the Unit Coefficient. Make this choice using these options. If you change your choice, you should run the 'Rebuild Stock' Maintenance function in the Technics module selecting both check box options in order to update the reports.
- You can specify that the Quantity 2 figure (i.e. the figure expressed using the second unit of measurement) is to be calculated by multiplying or dividing the standard quantity by the Unit Coefficient. Make this choice using these options. If you change your choice, you should run the 'Rebuild Stock' Maintenance function in the Technics module selecting both check box options in order to update the reports.
- Service and Plain Items on Purchase Order
- When you create a Purchase Invoice from a Purchase Order, the Purchase Invoice will usually only contain the Items from the Purchase Order that you have received into stock. This means that you must have created at least one Goods Receipt from the Purchase Order and marked it as OK before you can create an Invoice. This might not be appropriate if the Purchase Order does not include any Stocked or Structured Items (i.e. it has no stock implications). If you would like to be able to create a Purchase Invoice without previously entering a Goods Receipt from such a Purchase Order, select one of the following options.
- Automatic Receiving
- If you select this option, when you include a Plain or Service Item in a Purchase Order, the Rcvd. and Rcvd. OK quantities on flip C will be changed to the Order Quantity automatically when you save the Purchase Order. Therefore Plain and Service Items will not be included in Goods Receipts created from the Purchase Order. This also means that you will not be able to remove such Items once you have saved the Purchase Order if you added them by mistake.
- Allow amending received Quantity
- If you include a Plain or Service Item in a Purchase Order, you will be able to enter a Rcvd. OK quantity on flip C yourself (usually this field is not modifiable). If you enter the full Order Quantity in this field, the Item will not be included in Goods Receipts created from the Purchase Order. As the Rcvd. field will remain empty, you will be able to remove the row if you added the Item to the Purchase Order by mistake.
- Automatic Receiving
- Over Delivery
- Use these options to control what happens when you create Deliveries from Orders when there is insufficient stock to satisfy those Orders in full. Plain and Service Items are not affected by these options, even if you are using the Cost Accounting for Plain and Service Items option in the Cost Accounting setting.
- If you are using the Queued Cost Model (FIFO or LIFO) to calculate cost of sales values, you must use the Do Not Allow option. If you are using the Allow or Always Deliver options and you try to deliver an Item that is not in stock, negative stock will be created, but the FIFO/LIFO value of the Item will not be known and so the value of the cost of sales transaction will not be correct.
- Allow
- This option will allow you to deliver more units of a Stocked Item than you have in stock. However, when you create Deliveries from Sales Orders, the default quantity will be the quantity in stock if the Order Quantity is greater.
- Do Not Allow
- Use this option to prevent the delivery of more units of a Stocked Item than you have in stock.
- Always Deliver
- This option will allow you to deliver more units of a Stocked Item than you have in stock. It differs from the Allow option in that when you create Deliveries from Sales Orders, the default quantity will always be the Order Quantity, even if there is insufficient stock.
- If you are using the Queued Cost Model (FIFO or LIFO) to calculate cost of sales values, you must use the Do Not Allow option. If you are using the Allow or Always Deliver options and you try to deliver an Item that is not in stock, negative stock will be created, but the FIFO/LIFO value of the Item will not be known and so the value of the cost of sales transaction will not be correct.
- Chronology in Stock
- You can use the chronology feature to help improve the accuracy of the FIFO/LIFO queue as it will ensure that you enter stock transactions in date sequence. If you are using this feature, you will not be able to mark a stock transaction (i.e. Goods Receipt, Delivery, Stock Movement, Returned Goods record, Returned Goods to Supplier record, Work Sheet, Invoice that updates stock or Stock Depreciation) as OK or invalidate an Invoice that updates stock if there is a later stock transaction (in any of those registers) that you have marked as OK. By default, you will also not be able to mark a stock transaction as OK if there is an earlier stock transaction that you have not yet marked as OK, but you can disable this by selecting the Ignore UnOKed Records option. It is strongly recommended that you use the chronology feature if you are using the Queued Cost Model.
- Use the For all Locations option if you need every stock transaction to be considered by the chronology check, or the Per Location option to restrict the feature to stock transactions affecting the Location of the new record. For example, you have a Goods Receipt for Location 1 dated 1st May and one for Location 2 dated 2nd May. If you are using the For all Locations option, a new Goods Receipt for Location 1 must be dated 2nd May or later, because it cannot be earlier than the latest Goods Receipt in any Location. If you are using the Per Location option, it can be dated 1st May, because it cannot be earlier than the latest Goods Receipt in Location 1 only.
- If you are using the Queued Cost Model Per Location option in the Cost Accounting setting (i.e. you are maintaining separate FIFO/LIFO Queues for each Location), it is likely you will need to use the Chronology Per Location option. Otherwise (i.e. you are maintaining a single FIFO/LIFO Queue for all Locations), you should use the For all Locations option.
- You can turn off the chronology check for a particular Location using the Ignore Chronology check box in the Location record.
- If you are using the Chronology feature, take care never to enter a stock transaction with a future date. If you do this, you will no longer be able to enter any transactions with the current date. You can prevent this situation by selecting the Disallow creating new records with trans. dates later than current date option in the Locking setting in the System module.
- Use the For all Locations option if you need every stock transaction to be considered by the chronology check, or the Per Location option to restrict the feature to stock transactions affecting the Location of the new record. For example, you have a Goods Receipt for Location 1 dated 1st May and one for Location 2 dated 2nd May. If you are using the For all Locations option, a new Goods Receipt for Location 1 must be dated 2nd May or later, because it cannot be earlier than the latest Goods Receipt in any Location. If you are using the Per Location option, it can be dated 1st May, because it cannot be earlier than the latest Goods Receipt in Location 1 only.
- Over Receive
- Use these options to specify whether you will be able to increase the Quantity in a Goods Receipt to a figure greater than that on the originating Purchase Order.
- Extra Costs Calculation
- When entering a Purchase Order or a Goods Receipt, you will be able to enter any total additional cost figures that may apply to the entire transaction in the Extra Cost 1-5 fields on the 'Extra Cost' card or in the Freight and Customs fields in the footer. These additional costs will then be distributed to each row proportionally, based on the Quantity and Unit Price or the Quantity and Item Weight in each row. Use these options to specify whether this distribution should by default be based on the Unit Price or on the Item Weight. You will be able to override this default in an individual Purchase Order or Goods Receipt.
---
Settings in the Stock module:
- Introduction
- Account Usage Stock
- Barcodes
- Base Price Changes
- Batch Specifications
- Cost Accounting
- Freight Companies
- Item Varieties
- Item Variety Groups
- Location Accounts
- Locations
- Minimum Stock Levels
- Number Series - Deliveries
- Number Series - Goods Receipts
- Number Series - Returned Goods
- Number Series - Returned Goods to Supplier
- Number Series - Stock Depreciations
- Number Series - Stock Movements
- Number Series - Stock Revaluations
- Number Series - Stocktaking
- Pack Types
- Recipes
- Returned Goods Settings
- Sources
- Stock Movement Durations
- Stock Revaluation Settings
- Stock Settings
- Stock Settings Part 2
- Structured Items
- User Defined Fields - Extra Costs
- Variety Masks
- Variety Sets
- Variety Settings
- Variety Sets
- Weighted Average
- Winedi
- Home page for Stock module manual
- Home page for Standard ERP manual
Structured Items
This setting is used to determine how Structured Items are shown on Delivery Notes and Picking Lists (i.e. whether their components are to be listed). To determine whether components are to be listed on Quotations, Orders and Invoices, use the Show Components on Documents check box for each Item.
- Print Components
- Structured Items are printed on Delivery Notes and Picking Lists. Their components are listed on separate lines underneath, showing names and quantities.
- Only Main Items
- Structured Items are printed on Delivery Notes and Picking Lists. Their components are not listed.
- Summarised Picking List and Delivery Note
- This option applies both to Structured Items and to Stocked Items, and is used in the situation where a particular Item has been used more than once in a Delivery (i.e. it appears on more than one row). If you are using this option, the printed Delivery Notes and Picking Lists will contain a single row for this Item, with a total quantity. Items with Serial Numbers will still be listed individually.
- If you do not want to use this option every time you can still choose to do so when printing an individual Delivery Note or Picking List.
Supersession Items
This page describes the Supersession Items setting in the Stock module.---
The Supersession Items feature is one that you can use when an Item becomes obsolete and is replaced by a new Item, and you still have examples of the old Item in stock.
Follow these steps:
- To enable the Supersession Items feature, select the Use Supersession Items option in the Item Settings setting in the Sales Ledger:

- After receiving the first units of the replacement Item into stock, remain in the Stock module and add a record to the Supersession Items setting as follows:
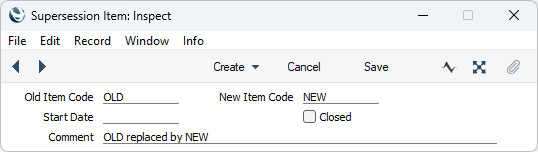
- Old Item Code
- Paste Special
Item register
- Specify the Item Number of the old (obsolete) Item.
- New Item Code
- Paste Special
Item register
- Specify the Item Number of the new (replacement) Item.
- Closed
- Tick this box when you no longer need the Supersession Item record to be used. You can also delete the record, but you may prefer to keep it for historical audit purposes.
- Comment
- Use this field to record notes about the record. The Comment will be shown in the 'Supersession Items: Browse' window.
- Old Item Code
- After completing the previous steps, the obsolete Item will not by default be included in the Stock List report. Instead, the remaining quantity and value in stock will be included in the figures for the replacement Item:
If the obsolete Item is not shown in the Stock List report and the remaining quantity and value in stock have not been included in the figures for the replacement Item, the probable reason is that you do not have any units of the replacement Item in stock. As mentioned in step 2, you should not create a Supersession record until you have the new Item in stock.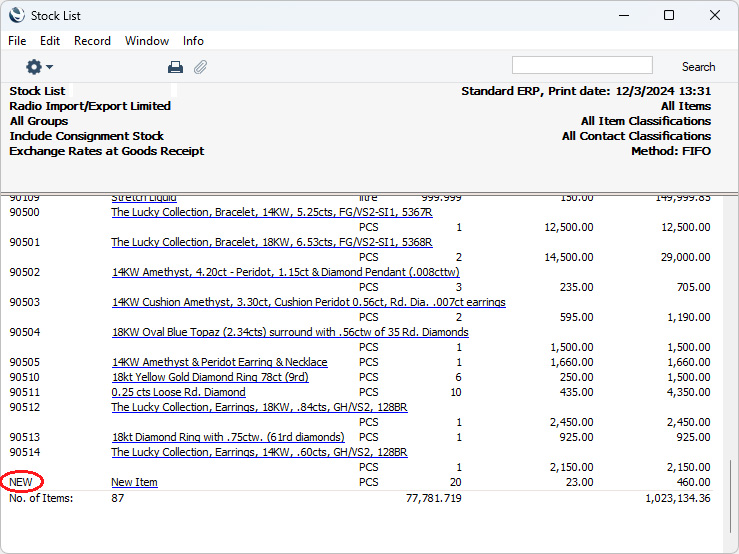
If you produce the report with the Show with Supersessions option selected, both Items will be included in the report, with the obsolete Item indented under the replacement Item:
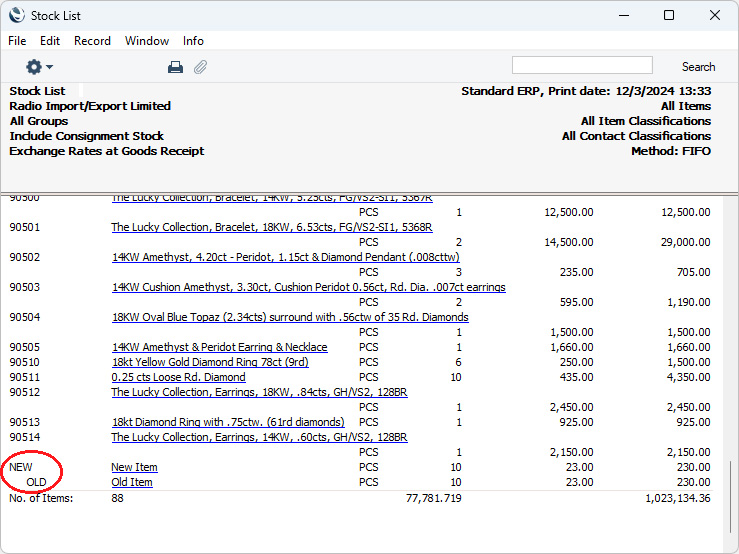
- In the 'Item Status' window, figures for the obsolete Item will be included when viewing the Item Status of the replacement Item:
Figures for the obsolete Item will only be included in this way when viewing the Item Status from the Opportunity, Purchase Order, Quotation and Sales Order windows. Figures for the obsolete Item will not be included when viewing the Item Status from other windows (e.g. the Delivery, Goods Receipt, Internal Order, Invoice, Production, Production Operation, Project Budget, Stock Depreciation, Stock Movement, Stock Revaluation and Work Sheet windows).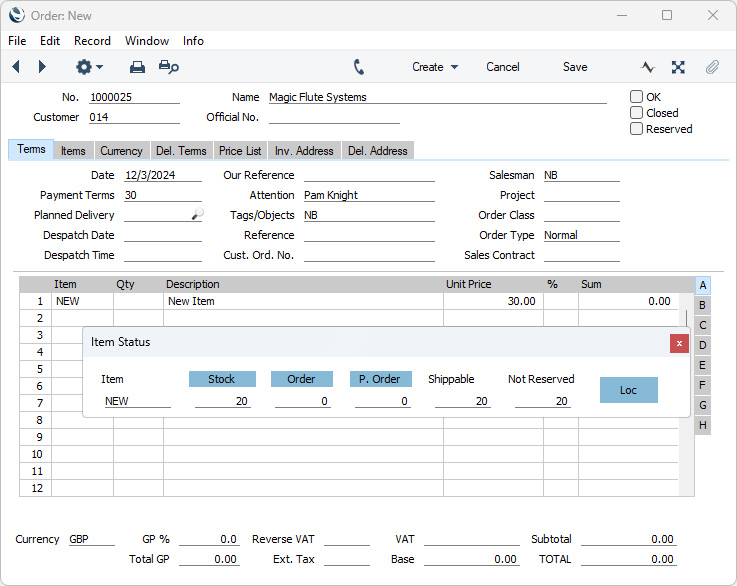
- If you create a Delivery from an Order for the replacement Item and you do not have sufficient stock of the replacement Item to satisfy the Order, an extra line will be added to the Delivery attempting to make up the shortfall using the units of the obsolete Item that you have in stock. As the Item is obsolete, the assumption is that you will not want to keep these units in stock.
If you mark the Delivery as OK and save, the Del. and Del. OK figures in the Order row will be updated to include the delivery of both Items. If you don’t want to deliver any units of the obsolete Item to the Customer, remove the row from the Delivery before marking it as OK. In this case, the Del. and Del. OK figures in the Order row will only be updated to include the units of the replacement Item i.e. the Order row will be treated as partially delivered.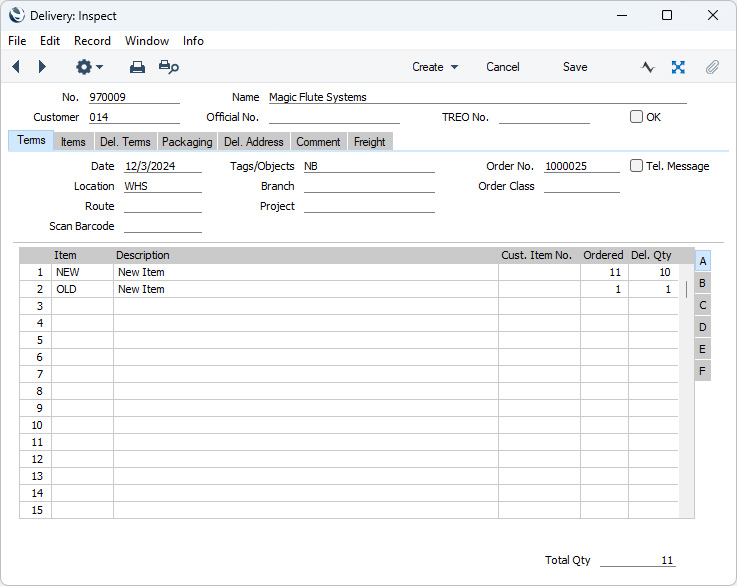
Go back to:
- Home page for Settings in the Stock module
- Home page for Stock manual
- Home page for Standard ERP manual
Campos a Def. p/Usuario - Costos Extra
Cualquier Mercadería Recibida contiene cinco campos que sirven para registrar algún “costo extra” (solapa 'C. Extra'). Cualquier monto situado en estos campos será abonado a la Cuenta de Provisión para Costos Extra respectiva (situada en la solapa 'Costo Compra' – opción ‘Manejo de Cuentas de Stock’) cuando apruebes la Mercadería Recibida. En este sentido, debes utilizar esta opción para asignar nombres a estos Costos Extra de modo que cada usuario sepa lo que se debe ingresar dentro de cada uno de ellos.Utiliza el botón [Módulos] para ingresar al módulo Stock y luego selecciona ‘Opciones’ desde e Panel de Control. Haz doble clic en ‘Campos Def. p/Usuario – Costos Extra’ para abrir la ventana ‘Campos Def. p/Usuario: Etiquetas – Costos Extra: Ver’. Realiza los cambios necesarios y luego haz clic en el botón [Guardar] para guardar los cambios y cerrar la ventana. Sino haz clic en la casilla cerrar para cerrar la ventana sin guardar los cambios.
Variety Masks
Please click here for full details of this setting.Conjunto de Variedad
Por favor, haz clic aquí para mayores detalles de esta opción.Opciones de Variedad
Por favor, haz clic aquí para mayores detalles de esta opción.Subconjuntos de Variedad
Por favor, haz clic aquí para mayores detalles de esta opción.Weighted Average
This setting is used to keep a record of the average purchase price per unit of each Item.Double-click 'Weighted Average' in the 'Settings' list in the Stock module to open the 'Weighted Average: Browse' window. This lists the existing Weighted Average records. Double-click a record in the list to edit it, or add a new record by clicking the [New] button in the Button Bar. Usually, you will not need to create records yourself because they are created automatically when Goods Receipts are approved and saved, providing the Goods Receipts have a Location. If a Weighted Average record already exists for a particular Item/Location combination, its average purchase price will be recalculated, taking the new Goods Receipt into account. Goods Receipts with no Location will not affect any of the records in this setting.
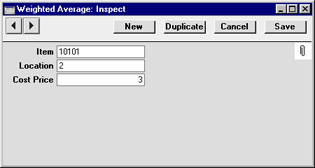
The average cost price includes any extra costs such as carriage and customs duties. In the case of a Weighted Average record being created, it also takes into account all previous Goods Receipts for the Item/Location combination. This situation will occur if the previous Weighted Average record was deleted.
The information in this setting will be used to value your stock balance when producing a Stock List report using the Weighted Average per Location valuation method.
Winedi
Esta opción se utiliza en Noruega. Por favor, consulta tu representante HansaWorld local para más detalles.