Introduction to the Sales Order Register
The foundation for a sales order system is of course the Orders you enter into your system. Use the Sales Order register in the Sales Orders module to enter or work with Orders.! | Before you start entering Orders, you must define the current accounting year using the Fiscal Years setting. You should also have defined your sequence of Order Numbers using the Number Series - Sales Orders setting. |
Entering a Sales Order
In the Sales Orders module, select 'Sales Orders' from the Registers menu, or click the [Orders] button in the Master Control panel.The 'Orders: Browse' window is opened, showing Orders already entered.
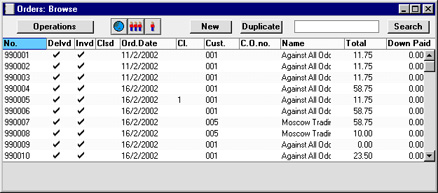
Also shown are indications that an Order has been shipped or invoiced, and the Customer number and name. A dash in the Invoiced column means that the order is filed, but that no further action has been taken. The Order may not be invoiced before a Delivery has been made and approved. If a partial Delivery and Invoice has been made from an Order, the Invoiced column will gain a tick while the Delivered column will be blank, signifying that Invoicing is up to date for the Deliveries made so far, but that the Order has not been completely fulfilled. The Cl. column shows the Order Class.
The functions on the Operations menu are described here.
To enter a new Order, click [New] in the Button Bar or use the Ctrl-N (Windows and Linux) or ⌘-N (Macintosh) keyboard shortcut. Alternatively, highlight an Order similar to the one you want to enter and click [Duplicate] on the Button Bar.
The 'Order: New' window is opened, empty if you clicked [New] or containing a duplicate of the selected Order. In the case of the duplicate, the Order Date of the new Order will be the current date, not the date of the original Order.
Hansa provides several shortcuts to simplify your work with entering Orders. You may for example enter the current date into a date field with the 'Paste Special' function. This function can also be used to simplify the entering of Item Numbers, Customer Numbers, Payment Terms etc.
! | You are not bound by the values suggested as defaults by Hansa. For most fields you can change the pre-set values into something that suits you better. Changes made here are valid only for this particular Order. |
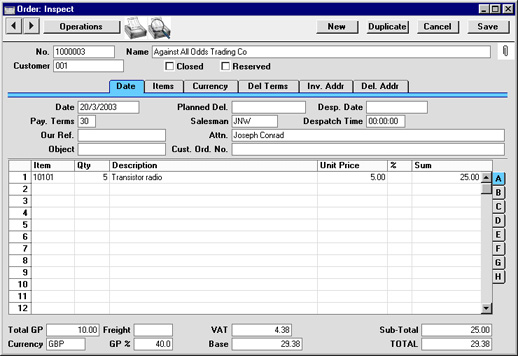
Since the amount of information stored about each Order will not fit on a single screen, the Order window has been divided into six cards. At the top of each is the header. This contains the Order Number, the Customer Number and Name. There are six named buttons ('tabs') in the header.

When the Order is complete, click the [Save] button to save it. The screen title changes from 'Order: New' to 'Order: Inspect'. Until the Order has been saved, Deliveries cannot be made.
Entering a Sales Order - Header

- No.
- Paste Special
Select from another Number Series
- When creating a new Order, Hansa will enter the next unused number from the number sequence allocated on the 'Ser Nos' card of the user's Person record or from the Number Series - Orders setting. You may change this number, but not to one that has already been used. If you are working in a multi-user environment, the Order Number is assigned when the Order is saved.
- Customer
- Paste Special
Customer register
- Enter the Customer Number or use the 'Paste Special' function. When you press Return, the Customer's name, address and other information will be entered into the appropriate fields.
- Name
- The Customer Name is entered after you have entered the Customer Number.
- Closed
- Check this box when the Order has been completed. Once this box has been checked and the Order saved, you will no longer be able to make changes to the Order. Should there be any remaining quantities that have not been delivered, these will be cancelled and will no longer appear in reports as being outstanding.
- If an Order is marked as Closed, you will not be able to create Deliveries from it. However, you will still be able to create Invoices for earlier Deliveries.
- A Closed Order can not be re-opened.
- If an Order is marked as Closed, you will not be able to create Deliveries from it. However, you will still be able to create Invoices for earlier Deliveries.
- Reserved
- Check this box if you want to reserve stock of the ordered Items for this Order. When delivering similar Items in fulfilment of other Orders, Hansa will maintain sufficient stock for this Order while it remains undelivered.
- Note that the Reserved check box operates by quantity in stock only. You should not allocate Serial Numbers to any of the Items on the Order until it is delivered, as Hansa will not prevent the delivery of those particular Serial Numbers to other Customers.
- The 'Create Deliveries from Orders' Maintenance function can be used to create Deliveries for all unfulfilled Orders which can be satisfied from stock. This function can give priority to Orders whose Reserved box is checked.
- Note that the Reserved check box operates by quantity in stock only. You should not allocate Serial Numbers to any of the Items on the Order until it is delivered, as Hansa will not prevent the delivery of those particular Serial Numbers to other Customers.
Entering a Sales Order - Date Card

- Date
- Paste Special
- Current Date
- The date the Order was placed: the current date according to the computer's clock is entered as a default.
- The date the Order was placed: the current date according to the computer's clock is entered as a default.
- Planned Del.
- Paste Special
Current Date
- The date on which the Order is scheduled to ship. The format of this field is determined by the Planned Delivery setting. Available options are free text, date, week number or year-week (4 characters).
- Using the options on the 'Delivery' card of each Customer record, you can choose to have the Delivery Date of the Deliveries created from this Order default to the current date or to this Planned Delivery Date. If you use the latter option, this field must use the Date format, set in the Planned Delivery setting.
- A separate Planned Delivery Date can also be specified for any of the Order rows (on flip E). However, these dates cannot be used to determine the Delivery Date of Deliveries created from the Order in the manner described in the previous paragraph.
- If you would like to prevent Deliveries from being created before the Planned Delivery Date (either here or on flip E), check the No Deliveries before Planned Date box in the Planned Delivery setting.
- Some businesses operate on the 'Just In Time' principle whereby Purchase Orders for Items on Sales Orders are raised as late as possible, so that the goods arrive just before they are scheduled for delivery to the Customer. The 'Create Planned Records' Maintenance function can be used to create Purchase Orders for Items on Sales Orders based on their Planned Delivery Dates and the lead times of the Items in question. In this case, if a Planned Delivery Date is specified for any of the Order rows, that will be used in place of the one specified here. Again, this field must use the Date format, set in the Planned Delivery setting, if you wish to use this feature.
- Using the options on the 'Delivery' card of each Customer record, you can choose to have the Delivery Date of the Deliveries created from this Order default to the current date or to this Planned Delivery Date. If you use the latter option, this field must use the Date format, set in the Planned Delivery setting.
- Desp. Date
- Record here the date the Order was delivered. This field is not updated automatically when a Delivery is issued from the Order. However, if the Copy Order Date to Despatch Date option in the Order Settings setting is on, the current date will appear here when the Order is first created, and this date will change whenever the Order Date is changed.
- Pay. Term
- Paste Special
Payment Terms setting, Sales/Purchase Ledger
- Default taken from Customer
- Payment Terms entered here will be transferred to any Invoices raised from the Order. In addition simply to ensuring that the correct Payment Terms appear on Invoices (in the Language of the Customer if necessary), entering basic Payment Terms records using the Sales Ledger setting can enable a system of early settlement discounts to be established.
- Payment Terms entered here will be transferred to any Invoices raised from the Order. In addition simply to ensuring that the correct Payment Terms appear on Invoices (in the Language of the Customer if necessary), entering basic Payment Terms records using the Sales Ledger setting can enable a system of early settlement discounts to be established.
- Salesman
- Paste Special
Person register, System module
- Default taken from Customer
- The Salesman responsible for the Order should be registered here: there are many reports in the Sales Orders and Sales Ledger modules which can be broken down by Salesman. It is also possible to assign commission on Items sold, using the Bonus setting in the Sales Ledger, the Bonus % field on the 'Pricing' card of the Item screen or the Bonus field on the 'Bonus' card of the Person screen.
- This field is also used by the Limited Access module: please refer to the description of the Sales Group field (on the 'Del Terms' card) for details.
- The Salesman responsible for the Order should be registered here: there are many reports in the Sales Orders and Sales Ledger modules which can be broken down by Salesman. It is also possible to assign commission on Items sold, using the Bonus setting in the Sales Ledger, the Bonus % field on the 'Pricing' card of the Item screen or the Bonus field on the 'Bonus' card of the Person screen.
- Despatch Time
- Paste Special
Current Time
- Record here the time the Order was delivered. This field is not updated automatically when a Delivery is issued from the Order.
- Our Ref.
- Use this field if you need to identify the Order by means other than the Order Number. A default will be taken from the Our Ref field on the 'Ser Nos' card of the Person record of the current user. References entered will appear on any Invoices created from the Order.
- Attn.
- Paste Special
Contact Person register, CRM module (if present)
- Default taken from Customer
- Record here the person for whose attention any Deliveries made from this Order are to be marked. If the CRM module is installed, 'Paste Special' will list the Contact Persons of the Customer.
- Record here the person for whose attention any Deliveries made from this Order are to be marked. If the CRM module is installed, 'Paste Special' will list the Contact Persons of the Customer.
- Object
- Paste Special
Object register, Nominal Ledger/System module
- Up to 20 Objects, separated by commas, can be assigned to this Order. You might define separate Objects to represent different departments, cost centres or product types. This provides a flexible method of analysis that can be used in Nominal Ledger reports.
- In any Nominal Ledger Transactions generated from Invoices raised from this Order, any Objects specified here will be assigned to the credit posting to the Sales Account(s), the debit posting to the Cost Account (if cost accounting is being used), and the debit posting to the Debtor Account (if the Objects on Debtor Account option in the Account Usage S/L setting is being used).
- The Objects specified here are also transferred to any Deliveries issued from this Order and will be assigned to the debit posting in any Nominal Ledger Transactions generated from those Deliveries.
- Any Objects specified for the Customer will be copied here as a default, as will any Objects specified in the Person record for the current user.
- In any Nominal Ledger Transactions generated from Invoices raised from this Order, any Objects specified here will be assigned to the credit posting to the Sales Account(s), the debit posting to the Cost Account (if cost accounting is being used), and the debit posting to the Debtor Account (if the Objects on Debtor Account option in the Account Usage S/L setting is being used).
- Cust Ord. No.
- Record the Customer's Purchase Order Number here. It will be printed on all documentation associated with the Order.
Entering a Sales Order - Items Card
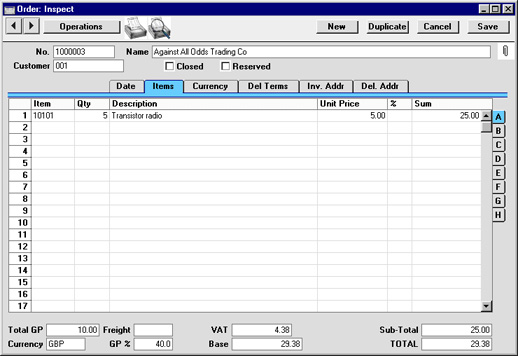
To add rows to an Order, click in any field in the first blank row and enter appropriate text. To remove a row, click on the row number on the left of the row and press the Backspace key. To insert a row, click on the row number where the insertion is to be made and press Return. Rows cannot be removed or inserted after Deliveries have been issued.
You can also bring Items into an Order by opening the 'Items: Browse' window, selecting a range of Items by clicking while holding down the Shift key, and then dragging them to the Item field in the first empty Order row.
Flip A
- Item
- Paste Special
Item register
- With the cursor in this field, enter the Item Number or Bar Code for each Item ordered. Pricing, descriptive and other information will be brought in from the Item record. If you leave this field blank, you can enter any text in the Description field, perhaps using the row for additional comments to be printed on Order documentation.
- If the Item is a Structured Item whose Show Components on Documents check box is on, its components will be listed on the following rows when you enter a Quantity. If you decide to change the Quantity, be sure to change the Quantities of the components as well.
- If the Item is a Structured Item whose Show Components on Documents check box is on, its components will be listed on the following rows when you enter a Quantity. If you decide to change the Quantity, be sure to change the Quantities of the components as well.
- Qty
- Enter the number of units ordered. Press Return to calculate the Sum, and the cursor will move to the Item field on the next row.
- Description
- Default taken from
Item
- This field shows the name of the Item, brought in from the Item register. If you want to add an extra description, you can do so: there is room for up to 100 characters of text.
- If you have specified various translations of the Description on the 'Texts' card of the Item screen, the correct translation will be brought in according to the Language of the Order (specified on the 'Del Terms' card). In addition, Hansa will take any rows of text that have been entered on the 'Texts' card of the Item record without a Language and move them into the Description field, as shown below.
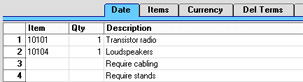
- If you have specified various translations of the Description on the 'Texts' card of the Item screen, the correct translation will be brought in according to the Language of the Order (specified on the 'Del Terms' card). In addition, Hansa will take any rows of text that have been entered on the 'Texts' card of the Item record without a Language and move them into the Description field, as shown below.
- Unit Price
- The Unit Price of the Item according to the valid Price List for this Customer is brought in. If the Customer has no Price List specified, or the Item is not on the Price List in question, the Base Price from the Item screen is brought in. If there is a Price List applying to this Order, it will be shown on the 'Del Terms' card. This figure will include VAT (and TAX) if the Price List specified is one that is Inclusive of VAT or if you have specified on card 1 of the Account Usage S/L setting in the Sales Ledger that Base Prices include VAT (or VAT and TAX).
- If a Currency and Exchange Rate have been specified, the figure shown will be in the Currency concerned (i.e. having undergone currency conversion).
- If a Currency and Exchange Rate have been specified, the figure shown will be in the Currency concerned (i.e. having undergone currency conversion).
- %
- Discount percentage. If a Discount Matrix that includes this Item has been allocated to the Customer, this figure will be determined by the Item Number and Quantity. It can be changed to an adhoc rate if necessary. If there is a Discount Matrix applying to this Order, it will be shown on the 'Del Terms' card.
- In the Round Off setting in the System module, you can determine whether the discount is to be applied to the Unit Price before it has been multiplied by the Quantity, or to the Sum. In certain circumstances (where there is a very small unit price and a large quantity) this choice can cause the calculated discount to vary, due to the rounding system used in Hansa. Please refer here for details and an example.
- The percentage entered here can act as a discount, margin factor or markup. This is controlled using the General Options setting in the System module.
- In the Round Off setting in the System module, you can determine whether the discount is to be applied to the Unit Price before it has been multiplied by the Quantity, or to the Sum. In certain circumstances (where there is a very small unit price and a large quantity) this choice can cause the calculated discount to vary, due to the rounding system used in Hansa. Please refer here for details and an example.
- Sum
- The total for the row: Quantity multiplied by Unit Price less Discount. Changing this figure will cause the Discount Percentage to be recalculated. This figure will include VAT (and TAX) if the Price List specified is one that is Inclusive of VAT or if you have specified on card 1 of the Account Usage S/L setting that Base Prices include VAT (or VAT and TAX).
- This figure will be rounded up or down according to rounding rules set for the Currency in the Currency Round Off setting in the System module.
- A/C
- Paste Special
Account register, Nominal Ledger/System module
- This code determines the Nominal Ledger Sales Account for this Item. Nominal Ledger Transactions generated by Invoices created from this Order will credit the Account specified here. A default is offered, taken from the record in the Price register for the Item/Price List combination. If there is no such record, or it has no Sales Account specified, the default will be taken from the Item record, the Item Group or from card 3 of the Account Usage S/L setting. This default can be changed for a particular Order row if necessary.
- Object
- Paste Special
Object register, Nominal Ledger/System module
- Default taken from Item
- Up to 20 Objects, separated by commas, can be assigned to this Item and all transactions generated from it. You might define separate Objects to represent different departments, cost centres or product types. This provides a flexible method of analysis that can be used in Nominal Ledger reports.
- In any Nominal Ledger Transactions generated from Invoices raised from this Order, any Objects specified here will be assigned to the credit posting to the Sales Account and, if cost accounting is being used, the debit posting to the Cost Account. This assignment will merge these Objects with those of the parent Order (shown on the 'Date' card).
- The Objects specified here are also transferred to the corresponding row of any Delivery issued from this Order row. They will be assigned to the debit posting in any Nominal Ledger Transactions generated from those Deliveries.
- Up to 20 Objects, separated by commas, can be assigned to this Item and all transactions generated from it. You might define separate Objects to represent different departments, cost centres or product types. This provides a flexible method of analysis that can be used in Nominal Ledger reports.
- V-Cd
- Paste Special
VAT Codes setting, Nominal Ledger
- When an Invoice is raised from this Order, the VAT Code entered here will determine the rate at which VAT will be charged on this Item and the VAT Account to be credited. A default is offered, taken from the Customer record. If none is specified, the default is taken from the Item, the Item Group or from card 3 of the Account Usage S/L setting. This default can be changed for a particular Order row if necessary.
- Cost
- Default taken from
Item (Cost Price + Extra Cost)
- The Cost Price is used in Gross Profit and Margin calculations. It can be altered if necessary.
- GP
- The Gross Profit for the Order row is calculated by subtracting the Cost Price (multiplied by the Quantity) from the Sum. The figure is therefore absolute, not a percentage.
- Del 1, Del 2
- The quantity delivered for each Order row is amended automatically when Deliveries are made using the 'Delivery' function on the Operations menu. The Del 1 quantity includes both approved and unapproved Deliveries, while the Del 2 field only shows approved Deliveries. Invoices cannot be raised for Deliveries that have not yet been approved.
- If the Automatic Delivery for Service and Plain Items option in the Stock Settings setting in the Stock module is being used, these fields will be changed to show the Order Quantity when the Order is saved if the Item is a Plain or Service Item. This means that such Items can be invoiced immediately without the need for a Delivery, and that they will not appear on any Deliveries. It also means that the Order Quantity for such Items cannot be reduced once the Order has been saved.
- If the Automatic Delivery for Service and Plain Items option in the Stock Settings setting in the Stock module is being used, these fields will be changed to show the Order Quantity when the Order is saved if the Item is a Plain or Service Item. This means that such Items can be invoiced immediately without the need for a Delivery, and that they will not appear on any Deliveries. It also means that the Order Quantity for such Items cannot be reduced once the Order has been saved.
- Invoiced
- The quantity invoiced for each Order row is amended automatically when Invoices are raised using the 'Invoice' function on the Operations menu. The quantity shown includes both approved and unapproved Invoices. Invoices cannot be raised until Deliveries have been made and approved. In the case of partial Deliveries, Invoices can only be raised for the quantity delivered.
- Recipe
- Paste Special
Recipes setting, Stock module
- Default taken from Item
- If the Item is a Structured Item, its Recipe is recorded here, brought in from the Item record. A Structured Item is essentially an Item which is assembled by your company from purchased components: its Recipe lists those components with quantities. Recipes are set up using a setting in the Stock module.
- Serial No
- Paste Special
Serial Numbers of Items in stock
- If Serial Numbers are required for the Item, they can be entered here or, preferably, on the Delivery screen (obtained using the 'Delivery' function on the Operations menu). If the Quantity is greater than one, the Delivery screen will have a number of rows each with a Quantity of one, allowing you to enter Serial Numbers individually. On returning to the Order, only the Serial Number of the last Item will be visible.
- When the time comes to raise an Invoice, where the Quantity is greater than one the Invoice can mirror the Order (i.e. with a single row for the Serial Numbered Item with the Quantity from the Order) or it can mirror the Delivery (i.e. with a number of rows each with a Quantity of one). The latter case will be useful if you need to have the Serial Numbers printed on Invoices as well as on Delivery Notes. Make this choice using the Invoice based on Delivery (Special Menu only) option in the Order Settings setting.
- If no Location is specified, the 'Paste Special' list will show the Serial Numbers of Items in all Locations, with an indication of the Location in which each Item is stored. However, if you have specified a Location on the 'Del Terms' card, only those Serial Numbers stored in that Location will be shown.
- If you would like Best Before dates to be shown in the 'Paste Special' list, switch on the Show Best Before Dates option in the Item Settings setting in the Sales Ledger. Best Before Dates are entered using the Batch Specifications setting in the Stock module.
- The 'Paste Special' list will not be shown if you are using the No Serial No. on Goods Receipts option in the Stock Settings setting. In this case, if you do enter a Serial Number here, no check will be carried out that the one you have used is valid (i.e. one that is currently in stock).
- Note that Serial Numbers must be allocated manually: there is no automatic FIFO allocation.
- When the time comes to raise an Invoice, where the Quantity is greater than one the Invoice can mirror the Order (i.e. with a single row for the Serial Numbered Item with the Quantity from the Order) or it can mirror the Delivery (i.e. with a number of rows each with a Quantity of one). The latter case will be useful if you need to have the Serial Numbers printed on Invoices as well as on Delivery Notes. Make this choice using the Invoice based on Delivery (Special Menu only) option in the Order Settings setting.
- Plan. Del.
- Paste Special
Current Date
- The date on which the Item is scheduled to ship, if this is different to the Planned Delivery Date on the 'Date' card. The format of this field is determined by the Planned Delivery setting. Available options are free text, date, week number or year-week (4 characters).
- If you are using the 'Create Planned Records' Maintenance function to create Purchase Orders for Items on Sales Orders based on the 'Just In Time' principle, this field must use the Date format, set in the Planned Delivery setting. For this purpose, it will take precedence over any such date entered on the 'Date' card.
- If you are using the 'Create Planned Records' Maintenance function to create Purchase Orders for Items on Sales Orders based on the 'Just In Time' principle, this field must use the Date format, set in the Planned Delivery setting. For this purpose, it will take precedence over any such date entered on the 'Date' card.
- Price Factor
- Default taken from
Item
- A Price Factor can be used to recalculate the Unit Price of an Item. For example, if the Item is normally purchased in boxes with 24 units, the Price Factor 24 can be entered in the Item record. The Unit Price for the Item will then refer to a box of 24 units. The Price Factor will be brought in to the Order from the Item and affect the Sum in an appropriate manner. It can be altered and Hansa will recalculate the Sum accordingly. The formula used is Sum = (Quantity/Price Factor) * Unit Price.
- Delivery Note
- This field can be used to record any documentation number connected with this Order row, for purposes of cross-reference. This field is not updated automatically.
- Location
- Paste Special
Locations setting, Stock module
- A separate stock Location can be entered for each row of the Order. This will be transferred to flip B of any Delivery row resulting from this Order row. Please refer to the section describing the Location field on the 'Del Terms' card for full details.
- If the 'Item Status' window is on screen, the quantities shown will refer to the Location specified on the 'Del Terms' card, not that entered here.
- If the 'Item Status' window is on screen, the quantities shown will refer to the Location specified on the 'Del Terms' card, not that entered here.
- Source
- Paste Special
Sources setting, Stock module
- Default taken from Item
- This field can be used to record the origin of the Item (e.g. the manufacturer). This will be copied to the Delivery.
These fields have been provided for use in the EDI (Electronic Data Interchange) module where it can be necessary to record the history of perishable goods such as fruit and vegetables. They will also be useful in other circumstances where the detailed recording of dated information of any kind is required. The Sourcing List report can be used to print out this information.
'Paste Special' can be used from each field to enter the current date or current time as appropriate.
Information must be entered to these fields before a Delivery is created from the Order row. Once a Delivery exists, the fields cannot be changed.
- Pick. Date, Time
- The date and time the goods were picked or harvested.
- Inl. Date, Time
- The inload date and time when the goods were received into your warehouse.
- Desp. Date, Time
- The despatch date and time for this Order row can be recorded here if they are different to those entered on the 'Date' card.
- Unit, Unit Qty, Unit Pr. of Unit
- These fields allow you to sell an Item using a different Unit to that specified on the 'Pricing' card of the Item record.
- When a Unit that has a Qty Factor is entered here, the Quantity and pricing for the Order row will change accordingly. For example, an Item is usually sold in single units. If you sell two dozen of them, you can enter the Unit representing one dozen (i.e. its Qty Factor is "12") in this Unit field and "2" in the Unit Qty field. The Quantity on flip A will change to "24" (i.e. 2 x 12) and the pricing will be adjusted accordingly. The Unit Price of Unit field will show the price for one dozen (i.e. the price of one of the new Unit).
- Use 'Paste Special' from the Unit field to choose from a list of Units.
- Use the 'Recalculate Weight and Volume' function on the Operations menu to update the Total Quantity, Weight and Volume on the 'Del Terms' card of the Order.
- When a Unit that has a Qty Factor is entered here, the Quantity and pricing for the Order row will change accordingly. For example, an Item is usually sold in single units. If you sell two dozen of them, you can enter the Unit representing one dozen (i.e. its Qty Factor is "12") in this Unit field and "2" in the Unit Qty field. The Quantity on flip A will change to "24" (i.e. 2 x 12) and the pricing will be adjusted accordingly. The Unit Price of Unit field will show the price for one dozen (i.e. the price of one of the new Unit).
- Width, Height, Depth
- Default taken from
Item
- These fields contain the dimensions of the Item. They can be used together with the Unit Qty field if the Item is sold by area or volume. Please refer to the description of the Units setting for details and an example.

- Total GP
- The total gross profit for the Order.
- Currency
- Paste Special
Currency register, System module
- Default taken from Customer or Default Base Currency
- The Currency of the Order: the exchange rate is shown on the 'Currency' card where it can be modified only for this particular Order if necessary. Ensure that the Currency is correct (i.e. it shows the Currency that is to be used on the Invoice) before any Items are added to the Order. This is to ensure that prices are converted correctly: if you forget, the 'Update Currency Price List Items' function is available on the Operations menu which retrospectively converts the prices of Items added to the Order before the Currency was specified (save the Order before using this function). Leave the field blank to use the home Currency (unless you have set a Default Base Currency, in which case this will be offered as a default and should be treated as your home Currency).
- If the Customer record has a Currency specified on the 'Pricing' card, only that Currency can be used. Otherwise, any Currency can be used.
- The Currency of the Order: the exchange rate is shown on the 'Currency' card where it can be modified only for this particular Order if necessary. Ensure that the Currency is correct (i.e. it shows the Currency that is to be used on the Invoice) before any Items are added to the Order. This is to ensure that prices are converted correctly: if you forget, the 'Update Currency Price List Items' function is available on the Operations menu which retrospectively converts the prices of Items added to the Order before the Currency was specified (save the Order before using this function). Leave the field blank to use the home Currency (unless you have set a Default Base Currency, in which case this will be offered as a default and should be treated as your home Currency).
- GP%
- The overall gross profit for the Order, shown as a percentage.
- VAT
- The VAT total for the Order.
- This figure is rounded up or down according to rounding rules set for the Currency (in the Currency Round Off setting in the System module). If no Currency has been specified, or the Currency in question has not been entered in the Currency Round Off setting, the rounding rules are taken from the Round Off setting (also in the System module).
- VAT is calculated after the Sum of each row has been rounded up or down according to rounding rules set in the Currency Round Off setting.
- This figure is rounded up or down according to rounding rules set for the Currency (in the Currency Round Off setting in the System module). If no Currency has been specified, or the Currency in question has not been entered in the Currency Round Off setting, the rounding rules are taken from the Round Off setting (also in the System module).
- Base
- This shows the Order total including VAT in the home Currency (or in Base Currency 1 as defined in the Base Currency setting in the System module). It is only used if the Currency of the Order is not blank and is not Base Currency 1.
- Sub-Total
- The total for the Order, excluding VAT.
- TOTAL
- The total for the Order, including VAT.
- This figure is rounded up or down according to rounding rules set for the Currency (in the Currency Round Off setting in the System module). If no Currency has been specified, or the Currency in question has not been entered in the Currency Round Off setting, the rounding rules are taken from the Round Off setting (also in the System module).
Entering a Sales Order - Items Card Part 2 (Flips C-H)
This page describes the fields on flips C-H of the 'Items' card of the Sales Order record. Please follow the links below for descriptions of the other cards:- Header
- 'Terms' card
- 'Items' card Part 1 (Flips A and B)
- 'Items' card Part 2 (Flips C-H)
- 'Items' card Part 3 (Footer)
- 'Currency' card
- 'Del. Terms' card
- 'Price List' card
- 'Inv. Address' card
- 'Del. Address' card
Flip C
- Order Type
- Paste Special
Choices of possible entries
- Default taken from Item (Default Order Type)
- Use the Order Type field to specify whether an Item will be "Drop Shipped" (ordered from a Supplier who will deliver the Item directly to your Customer so it doesn't pass through your warehouse).
- If you set this field to "Default", the Item will obey the Order Type specified on the 'Terms' card in the header. Please refer to the description of the Order Type field on the 'Terms' card here for more details.
- Use the Order Type field to specify whether an Item will be "Drop Shipped" (ordered from a Supplier who will deliver the Item directly to your Customer so it doesn't pass through your warehouse).
- Cost
- The unit Cost Price of the Item will be used in Gross Profit and Margin calculations.
- The default offered in each row will be chosen as follows:
- If an Item is Serial Numbered at the Batch or Unit level, you are using the Cost Price for Serial Number option for that Item and you are using the Use Actual Cost Price for GP Cost option in the Cost Accounting setting in the Stock module, the appropriate Cost Price for the Serial Number will be brought in to this field when you specify a Serial Number on flip E.
- If the Price List of the Order is one whose Type is "BuyBack", the Cost Price will be taken from the record in the Price register for the Item/Price List/Customer combination.
- The Cost Price from the Item record will be used.
If you need the figure that is brought in to be the Cost Price of the Item plus its Extra Cost, select the Include Item Extra Cost in Cost option in the Cost Accounting setting in the Stock module.
- If you duplicate an Order, the new Order will contain the latest Cost Price from the Item register, and the Gross Profit will be recalculated accordingly. The Cost Price in the original Order will not be transferred to the new Order.
- You can prevent certain users from changing Cost Prices in an Order using Access Groups, by denying them access to the 'Changeing Cost on Sales Order Rows' Action. You can also hide the Cost field altogether, by denying access to the 'View Item's Cost Price' Action. This will hide the Cost field, the GP field immediately below and the GP % and Total GP fields in the footer, and it will hide the same fields in Invoices and Quotations as well.
- The default offered in each row will be chosen as follows:
- GP
- The Gross Profit for the Order row is calculated by subtracting the Cost Price (multiplied by the Quantity) from the Sum. The figure is therefore absolute, not a percentage. You cannot change this figure yourself, but it will be recalculated if you change the Unit or Cost Price or the % discount.
Flip D
- Salesmen
- Paste Special
Person register, System module and Global User register, Technics module
- If necessary, you can specify a different Salesman or Salesmen (separated by commas) for each row of the Order.
- From any Invoices created from the Order, the Bonus, Salesman report will assign any commission for the corresponding row in the Invoice to the Salesman specified in the row only (i.e. not to the Salesman specified in the header).
- The 'Workflow Activity' function will not create Activities for the row Salesmen, and the Order will not be recognised as belonging to the row Salesmen by the Limited Access feature.
- From any Invoices created from the Order, the Bonus, Salesman report will assign any commission for the corresponding row in the Invoice to the Salesman specified in the row only (i.e. not to the Salesman specified in the header).
- Del., Del. OK
- These two fields display the quantity delivered from the Order row. They will be updated automatically when you create Deliveries from the Order (you will need to close the Order and re-open it to see the updated figures). The Del. figure will be calculated from all Deliveries, while the Del. OK figure will be calculated only from Deliveries that have been marked as OK. You cannot raise Invoices for Deliveries that have not yet been marked as OK.
- If the Item is a Plain or Service Item and if you are using the Automatic Delivery for Service and Plain Items option in the Stock Settings setting in the Stock module, the Order Quantity will be placed in these fields when you save the Order. This means that you can invoice such Items immediately without the need for a Delivery, and that they will not appear on any Deliveries.
- If the Item is a Plain or Service Item and if you are using the Automatic Delivery for Service and Plain Items option in the Stock Settings setting in the Stock module, the Order Quantity will be placed in these fields when you save the Order. This means that you can invoice such Items immediately without the need for a Delivery, and that they will not appear on any Deliveries.
- Invoiced
- This field displays the quantity invoiced from the Order row. It will be updated automatically when you raise Invoices from the Order (you will need to close the Order and re-open it to see the updated figure). The figure will be calculated from all Invoices, including those that have not yet been marked as OK.
- If you invalidate an Invoice related to the Order, the Invoiced Quantity in the relevant Order rows will be updated automatically.
- If you credit an Invoice related to the Order, the Invoiced Quantity will be updated automatically if you are using the Credit Notes Update Invoiced Quantity option in the Order Settings setting and providing you create the Credit Note using the following methods:
- You create the Credit Note by duplicating the original Invoice, and you enter the appropriate Payment Term and the number of the Invoice to be credited before you save the Credit Note for the first time.
- You create the Credit Note by selecting 'Credit Note' from the Create menu (Windows/Mac OS X) or from the + menu (iOS/Android) from the original Invoice or from the relevant Returned Goods record.
- If you create the Credit Note by entering a new record to the Invoice register, the Invoiced Quantity figure in the originating Order will not be updated, irrespective of whether you are using the Credit Notes Update Invoiced Quantity option, and it will not be updated by the 'Recalculate Orders' function. This is because the Credit Note will not be connected to the Order.
- If you credit or invalidate an Invoice that was created using the 'Group Invoicing' Maintenance function, the Invoiced Quantity in the relevant Orders will not be updated irrespective of whether you are using the Credit Notes Update Invoiced Quantity option.
- If you invalidate an Invoice related to the Order, the Invoiced Quantity in the relevant Order rows will be updated automatically.
- Recipe
- Default taken from
Item
- If the Item is a Structured Item whose Paste Components During Entry box (on the 'Recipe' card of the Item record) has not been ticked, its Recipe will be recorded here, brought in from the Item record. A Structured Item is essentially an Item that is assembled by your company on the point of delivery from components held in stock: its Recipe lists those components with quantities. You should not change this field. Please refer here for more details about Recipes.
Flip E
- Serial No.
- Paste Special
Serial Numbers of Items in stock
- If the Item uses Serial Numbers at the unit or batch level, you can enter them here. They will then be transferred to the Delivery when you create it from the Order. However, it will be more usual to leave this field empty and to specify Serial Numbers in the Delivery.
- If the Item uses Serial Numbers at the unit level and if the Quantity is greater than one, the Delivery will be given the appropriate number of rows each with a Quantity of one, allowing you to enter Serial Numbers individually.
- One reason to specify Serial Numbers in an Order before creating a Delivery is when you want to reserve particular Serial Numbers against an Order. In this case, specify the Serial Numbers, save the Order and then select 'Reservations' from the Operations menu (Windows/Mac OS X) or Tools menu (iOS/Android). If the Item is Serial Numbered at the unit level and you have sold more than one, enter separate rows in the Order each with a Quantity of 1. Please refer here for more details about the 'Reservations' function.
- If you enter a Serial Number in a new row, other details such as the Item Number and Name, pricing information, Location and, if appropriate, Position will be brought in automatically.
- When you create an Invoice from an Order for an Item that uses Serial Numbers at the unit level, the Invoice can mirror the Order (i.e. it can contain a single row for the Serial Numbered Item with the Quantity from the Order and with no Serial Numbers) or it can mirror the Delivery (i.e. it can contain a number of rows each with a Quantity of one, showing each Serial Number). The latter case will be useful if you need to have the Serial Numbers printed on Invoices as well as on Delivery Notes. If you need the Invoice to mirror the Delivery, select the Invoice based on Delivery option in the Order Settings setting or, if you don't want to use this option, create the Invoice from the Delivery.
- If you have not specified a Location in the Order, the 'Paste Special' list will show the Serial Numbers of Items in every Location, with an indication of the Location in which each Serial Number is stored. However, if you have specified a Location on the 'Del. Terms' card or on flip F of the row, the 'Paste Special' list will only show the Serial Numbers stored in that Location.
- If you would like the Best Before date and/or Batch Status of each Serial Number to be shown in the 'Paste Special' list, select the Show Best Before Dates and/or Show Batch Status options respectively in the Item Settings setting in the Sales Ledger. Please refer to the description of the Batch Specifications setting in the Stock module for details about Best Before Dates and here for details about Batch Statuses.
- The 'Paste Special' list will not be available if you are using the No Serial No. on Goods Receipts option in the Stock Settings setting. In this case, if you do enter a Serial Number here, no check will be carried out that the one you have used is valid (i.e. one that is currently in stock).
- No default Serial Numbers will be offered, so you will need to enter them yourself. There is no automatic FIFO allocation.
- If the Item uses Serial Numbers at the unit level and if the Quantity is greater than one, the Delivery will be given the appropriate number of rows each with a Quantity of one, allowing you to enter Serial Numbers individually.
- Plan. Del.
- Paste Special
Choose date
- The date on which the Item is scheduled to ship, if this is different to the Planned Delivery Date on the 'Terms' card. Enter this date using the format specified in the Planned Delivery setting. Available options are Free Text, Date, Week Number or Year and Week (4 characters).
- If you are using the Force Planned Delivery Date option in the Planned Delivery setting, you must enter a Planned Delivery Date either here or on the 'Terms' card before you can save the Order.
- If you are using the 'Create Planned Records' Maintenance function to create Purchase Orders for Items on Sales Orders based on the 'Just In Time' principle, this field must use the Date format, set in the Planned Delivery setting. For this purpose, it will take precedence over the Planned Delivery Date entered on the 'Terms' card.
- If you are using the Force Planned Delivery Date option in the Planned Delivery setting, you must enter a Planned Delivery Date either here or on the 'Terms' card before you can save the Order.
- Price Factor
- Default taken from
Item
- The Price Factor is the quantity of the Item that can be bought by the Unit Price. For example, if the Unit Price of an Item refers to a box of 24 units, its Price Factor will be 24. Specifying a Price Factor for such an Item is only necessary if it will be sold in individual units (e.g. if you will break into the box of 24 to sell a single unit). The Price Factor will be used to calculate the price of a single unit (in this example, the Price Factor will be 24).
- When you use an Item with a Price Factor in an Order row, the Quantity that you specify on flip A should be the quantity of individual units, not the quantity of boxes. When you enter a Quantity, the Sum will be calculated using the formula (Quantity/Price Factor) * Unit Price.
- The Unit Price field on flip A (and the Base Price field in the Item record) can only support three decimal places. Using a Price Factor can be useful if you need to use more. For example, if the price per unit is 0.0001, you can enter 0.01 as the Unit Price and 100 as the Price Factor. This will result in a Sum of 0.0001 when the quantity is one.
- When you use an Item with a Price Factor in an Order row, the Quantity that you specify on flip A should be the quantity of individual units, not the quantity of boxes. When you enter a Quantity, the Sum will be calculated using the formula (Quantity/Price Factor) * Unit Price.
Flip F
- Delivery Note
- You can use this field to record any documentation number connected with the Order row, for purposes of cross-reference. This field is not updated automatically.
- Location
- Paste Special
Locations setting, Stock module
- You can enter a separate stock Location for each row of the Order. This will be transferred to flip B of any Delivery row resulting from this Order row. Please refer to the section describing the Location field on the 'Del. Terms' card for full details.
- If you have specified a Location in this field, the figures in the 'Item Status' window will refer to this Location. If this field is empty, those figures will refer to the Location specified on the 'Del. Terms' card. If you have not specified a Location here or on the 'Del. Terms' card, the figures will refer to all Locations. This will be the case even if you have specified a Main Location in the Stock Settings setting.
- After issuing a Delivery from a row, you will not be able to change the Location in that row, even if you have not yet marked the Delivery as OK.
- If you have specified a Location in this field, the figures in the 'Item Status' window will refer to this Location. If this field is empty, those figures will refer to the Location specified on the 'Del. Terms' card. If you have not specified a Location here or on the 'Del. Terms' card, the figures will refer to all Locations. This will be the case even if you have specified a Main Location in the Stock Settings setting.
- Position
- Paste Special
Position register, Warehouse Management module
- You can only use this field if you are using the Warehouse Management module.
- If so and if the Demand Position option has not been ticked in the relevant Location, you can specify the Position in the Location from which the Item will be taken. This will be copied to the Delivery.
- If the Demand Position option has been ticked in the relevant Location, leave this field empty. In this case, you will create Deliveries using the 'Create Deliveries from Orders' Maintenance function which will specify Positions in each Delivery row automatically.
- If so and if the Demand Position option has not been ticked in the relevant Location, you can specify the Position in the Location from which the Item will be taken. This will be copied to the Delivery.
- Source
- Paste Special
Sources setting, Stock module
- Default taken from Item (Default Source)
- This field allows you to record the origin of the Item (e.g. the manufacturer or farm). This will be copied to the Delivery and will be printed in Order documentation if you have included the "Source" field in your Form Template designs.
- When producing a Sourcing List report, you can list Order rows with a particular Source.
- This field allows you to record the origin of the Item (e.g. the manufacturer or farm). This will be copied to the Delivery and will be printed in Order documentation if you have included the "Source" field in your Form Template designs.
Flip G
These fields have been provided for use in the EDI (Electronic Data Interchange) module where you may need to record the history of perishable goods such as fruit and vegetables. They will also be useful in other circumstances where the detailed recording of dated information of any kind is required. You can use the Sourcing List report to print out this information.Use 'Paste Special' from each field to choose a date or enter the current time as appropriate.
If you need to enter information to these fields, you must do so before you create a Delivery from the Order row. Once a Delivery exists, you cannot change the information in these fields.
- Pick. Date, Time
- The date and time the goods were picked or harvested.
- Inl. Date, Time
- The inload date and time when the goods were received into your warehouse.
- Desp. Date, Time
- Record here the despatch date and time for this Order row if they are different to those entered on the 'Date' card.
Flip H
- Unit, Unit Qty, Unit Pr. of Unit
- These fields allow you to sell an Item using a different Unit to the one specified on the 'Pricing' card of the Item record.
- If you enter a Unit that has a Qty Factor here, the Quantity and pricing for the Order row will change accordingly. For example, an Item is usually sold in single units. If you sell two dozen of them, you can enter the Unit representing one dozen (i.e. one whose Qty Factor is "12") in this Unit field and "2" in the Unit Qty field. The Quantity on flip A will change to "24" (i.e. 2 x 12) and the pricing will be adjusted accordingly. The Unit Price of Unit field will show the price for one dozen (i.e. the price of one of the new Unit).
- Use 'Paste Special' from the Unit field to choose from a list of Units.
- If you enter a Unit that has a Qty Factor here, the Quantity and pricing for the Order row will change accordingly. For example, an Item is usually sold in single units. If you sell two dozen of them, you can enter the Unit representing one dozen (i.e. one whose Qty Factor is "12") in this Unit field and "2" in the Unit Qty field. The Quantity on flip A will change to "24" (i.e. 2 x 12) and the pricing will be adjusted accordingly. The Unit Price of Unit field will show the price for one dozen (i.e. the price of one of the new Unit).
- Width, Height, Depth
- Default taken from
Item
- These fields contain the dimensions of the Item. You can use them together with the Unit Qty field if the Item is sold by area or volume. Please refer to the description of the Units setting for details and an example.
The Sales Order register in Standard ERP:
- Introduction
- Entering a Sales Order , including:
- Header
- 'Terms' card
- 'Items' card Part 1 (Flips A and B)
- 'Items' card Part 2 (Flips C-H)
- 'Items' card Part 3 (Footer)
- 'Currency' card
- 'Del. Terms' card
- 'Price List' card
- 'Inv. Address' card
- 'Del. Address' card
- Header
- Controlling Prices in Sales Orders
- Inspecting and Changing Sales Orders
- Printing Sales Orders
- Operations menu
- Create menu
- Row menu
- Home page for Sales Orders manual
- Home page for Standard ERP manual
- Pie de la Orden

- OK
- Puedes aprobar la Orden tildando esta casilla. Una vez hecho esto y después de haber guardado la Orden, ésta no será ya más modificable. Pero si necesitas cambiar una Orden aprobada, primero debes quitar el tilda de la casilla OK y luego guardar.
- No necesitas aprobar una Orden para entregar las mercaderías contenidas en ella; o para incluir Ítems en el total de la Orden mostrado mediante las función 'Estado de Ítem'. No obstante, en sistemas más extensos cuando se acaba de procesar una Orden de Ventas, se recomienda aprobarla por razones de seguridad.
- Puedes utilizar los Grupos de Acceso para controlar y decidir quién aprueba las Órdenes de Venta o quién las desaprueba, quién crea Entregas desde Órdenes de Venta sin aprobar y quién recibe Anticipos contra Órdenes de Venta sin aprobar. Para hacer esto, niega acceso a las acciones ‘Dar OK a Órdenes’, ‘Retirar OK a Órdenes’, ‘No Permitir Entrega desde Orden sin OK???, ‘No Permitir Anticipo para Orden sin OK’ respectivamente. La acción ‘Crear Entrega desde Orden’ te permite controlar la creación de Entregas desde Órdenes de Venta aprobadas y sin aprobar.
- Puedes prevenir la impresión de Órdenes de Venta que no han sido aprobadas. Aplicando esto a un conjunto de Órdenes, esta acción puede prevenir la creación e impresión fraudulenta de Órdenes de Venta. Por favor, revisa la página de 'Impresión de Órdenes de Venta' para más detalles.
- Las referencias hechas respecto a Órdenes de Venta aprobadas aluden a las Ordenes cuya casilla OK ha sido tildada.
- No necesitas aprobar una Orden para entregar las mercaderías contenidas en ella; o para incluir Ítems en el total de la Orden mostrado mediante las función 'Estado de Ítem'. No obstante, en sistemas más extensos cuando se acaba de procesar una Orden de Ventas, se recomienda aprobarla por razones de seguridad.
- Moneda
- Pegado Especial
registro Monedas, módulo Sistema
- Dato extraído desde Contactos (Moneda de Ventas) o Moneda Base por Defecto
- Será la Moneda de la Orden; el tipo de cambio aparece en la solapa 'Moneda' en donde puedes cambiarlo si quieres en función a una Orden particular en caso que sea necesario. Deja este campo en blanco para poder usar la Moneda local (a menos que hayas colocado una Moneda Base por Defecto, en cuyo caso éste dato ser ofrecerá automáticamente y deberá ser tratado como Moneda local).
- Si el archivo Contacto del Cliente posee una Moneda Ventas especificada en la solapa 'Precios', entonces sólo podrás utilizar esa Moneda. De lo contrario, puedes utilizar cualquier otra Moneda.
- Si cambias la Moneda después de agregar Ítems a la Orden, entonces los precios de esos Ítems serán convertidos automáticamente e inmediatamente. Para esto, se empleará el Tipo de Cambio en relación a la fecha de la Orden.
- Será la Moneda de la Orden; el tipo de cambio aparece en la solapa 'Moneda' en donde puedes cambiarlo si quieres en función a una Orden particular en caso que sea necesario. Deja este campo en blanco para poder usar la Moneda local (a menos que hayas colocado una Moneda Base por Defecto, en cuyo caso éste dato ser ofrecerá automáticamente y deberá ser tratado como Moneda local).
- Flete
- La opción Flete en el módulo Ventas, permite agregar automáticamente un monto fijo de Flete a cada Orden (o un monto calculado basado en el peso total de los Ítems). Si estás usando esta opción, entonces se colocará el monto apropiado en este campo cuando ingreses un Número de Cliente (o cuando cambies la Cantidad en una de las filas). Podrás cambiar la cifra si es necesario. El Código IVA y la Cuenta Ventas para el cobro de flete provendrán del Ítem ingresado en la opción Flete.
- Si no estás usando la opción Flete, entonces ingresa un monto de flete si es aplicable. En este caso, no se cobrará IVA y en la Factura resultante, el monto será colocado en la Cuenta Ventas apropiada según la Zona del Cliente (estipulado en la solapa 'Ventas' dentro de la opción ‘Manejo de Ctas. Ventas???)
- Si no estás usando la opción Flete, entonces ingresa un monto de flete si es aplicable. En este caso, no se cobrará IVA y en la Factura resultante, el monto será colocado en la Cuenta Ventas apropiada según la Zona del Cliente (estipulado en la solapa 'Ventas' dentro de la opción ‘Manejo de Ctas. Ventas???)
- P. IVA
- Cuando definas los archivos de Código IVA usando las opciones en el módulo Contabilidad, podrás a su vez especificar que se imponga un impuesto adicional como ser, impuesto ambiental. Si en una de las filas en la Orden, has definido un Código IVA con un impuesto adicional, entonces el monto de este impuesto aparecerá en este campo (en la Moneda de la Orden). Ese monto será recalculado cuando agregues Ítems a la Orden. Cuando crees una Factura desde la Orden y luego la apruebes para guardarla, entonces este Impuesto Extra será abonado a la Cuenta Impuesto especificada para el Código IVA apropiado. Si has especificado un Impuesto Mínimo (monto mínimo impositivo) para un Código IVA y además el Impuesto Extra de la Orden es menor a este monto mínimo, este campo quedará en blanco. Este campo también quedará vacío cuando el Cliente tenga su casilla ‘Sin Imp. Extra’ tildada en la solapa ('Términos').
- IVA
- Será el IVA total para la Orden
- Esta cifra será redondeada hacia arriba o abajo de acuerdo a las reglas de redondeo estipuladas para la Moneda (opción Redondeo de Moneda del módulo Sistema). Si la Orden no tiene una Moneda, o la Moneda en cuestión no ha sido cargada en la opción ‘Redondeo de Moneda’, entonces las reglas de redondeo serán tomadas de la opción Rendodeo (también en el módulo Sistema).
- El IVA se calcula después de haber redondeado la Suma de acuerdo a las reglas de redondeo estipuladas en la opción Redondeo de Moneda.
- Esta cifra será redondeada hacia arriba o abajo de acuerdo a las reglas de redondeo estipuladas para la Moneda (opción Redondeo de Moneda del módulo Sistema). Si la Orden no tiene una Moneda, o la Moneda en cuestión no ha sido cargada en la opción ‘Redondeo de Moneda’, entonces las reglas de redondeo serán tomadas de la opción Rendodeo (también en el módulo Sistema).
- P. IIBB
- Si la Orden presenta una Región en su solapa ‘Térm. Entr.’, y esta región efectúa el cobro de un Impuesto Regional para al menos, uno de los Ítems en la Orden, entonces el monto de ese impuesto aparecerá en este campo (en la Moneda de la Orden). Ese monto será recalculado cuando agregues Ítems a la Orden. Cuando crees una Factura desde la Orden y luego la apruebes para guardarla, entonces este Impuesto será abonado a la Cuenta especificada en el archivo de Impuesto Regional apropiado. Si has especificado uno Mínimo (monto mínimo de impuesto regional), y el P.IIBB en una Orden es menor a este monto mínimo, entonces este campo quedará en blanco. También este campo quedará vacío cuando el Cliente tenga su casilla ‘Sin Imp. Ambiental’ tildada en la solapa ('Términos').
- Base
- Este campo mostrará el total de la Orden incluyendo IVA y lo expresará en Moneda local (o en la Moneda Base 1 como se define en la opción Moneda Base del módulo Sistema). No se utilizará si la Moneda en la Orden está vacía.
- Subtotal
- Será el total de la Orden excluyendo IVA.
- TOTAL
- Será el total de la Orden incluyendo IVA
- Esta cifra se redondea hacia arriba o abajo de acuerdo las reglas de redondeo estipuladas para la Moneda (opción Redondeo de Moneda en el módulo Sistema. Si la Orden no tiene una Moneda, o la Moneda en cuestión no ha sido cargada en la opción ‘Redondeo de Moneda’, entonces las reglas de redondeo serán tomadas de las opción Redondeo (también en el módulo Sistema).
Entering a Sales Order - Currency Card

- Currency
- Paste Special
Currency register, System module
- Default taken from Customer or Default Base Currency
- The Currency of the Order (also shown in the footer of the 'Items' card) is shown together with the exchange rate which can be modified only for this particular Order if necessary. Ensure that the correct Currency is shown before any Items are added to the Order so that prices are converted correctly. If you forget, the 'Update Currency Price List Items' function is available on the Operations menu which retrospectively converts the prices of Items added to the Order before the Currency was specified (save the Order before using this function). Leave the field blank to use the home Currency (unless you have set a Default Base Currency, in which case this will be offered as a default and should be treated as your home Currency).
- The Currency of the Order (also shown in the footer of the 'Items' card) is shown together with the exchange rate which can be modified only for this particular Order if necessary. Ensure that the correct Currency is shown before any Items are added to the Order so that prices are converted correctly. If you forget, the 'Update Currency Price List Items' function is available on the Operations menu which retrospectively converts the prices of Items added to the Order before the Currency was specified (save the Order before using this function). Leave the field blank to use the home Currency (unless you have set a Default Base Currency, in which case this will be offered as a default and should be treated as your home Currency).
- Exchange Rates
- Default taken from
Base Currency Rates setting and/or Exchange Rate register, System module
- The current exchange rates for the specified Currency will be entered here by Hansa. Ensure that they are correct before adding Items to the Order to ensure the correct currency conversion takes place.
- One of two conversion methods will be used. The Dual-Base system will be useful for companies that have offices in two countries that need to report in both Currencies, for companies operating in countries where there is a second Currency (usually the US Dollar or Euro) in common use in addition to the national one, and for companies in the Euro zone who retain their old national Currency for comparison purposes. The second method is a simple conversion from the foreign Currency to the home Currency, applicable to the majority of worldwide Currency transactions. These are described below.
- Exchange Rates (Dual-Base System)
- In the example shown above, the Currency of the Order is the Euro. Base Currency 1 is the home Currency (GBP, Pounds Sterling) and Base Currency 2 is the Euro. The fields on the left show in the form of a ratio the exchange rate between the two base Currencies (taken from the latest record in the Base Currency Rates setting). In the illustration, GBP0.63 buys one Euro.
- Note that European Monetary Union (EMU) regulations specify that the ratios must always show how many units of the home or foreign Currency can be bought with one Euro.
- Note that European Monetary Union (EMU) regulations specify that the ratios must always show how many units of the home or foreign Currency can be bought with one Euro.
- Exchange Rates (Simple Currency Conversion System)
- In the case of a simple currency conversion system, the Rate and right-hand Base Currency 1 fields are used to show a simple exchange rate between the foreign and home Currencies. In the example shown below, the home Currency is US Dollars (USD) and the foreign Currency Japanese Yen (JPY). JPY122.15 buys USD1.00.
- One of two conversion methods will be used. The Dual-Base system will be useful for companies that have offices in two countries that need to report in both Currencies, for companies operating in countries where there is a second Currency (usually the US Dollar or Euro) in common use in addition to the national one, and for companies in the Euro zone who retain their old national Currency for comparison purposes. The second method is a simple conversion from the foreign Currency to the home Currency, applicable to the majority of worldwide Currency transactions. These are described below.

- Please click here for more examples.
Entering a Sales Order - Del Terms Card
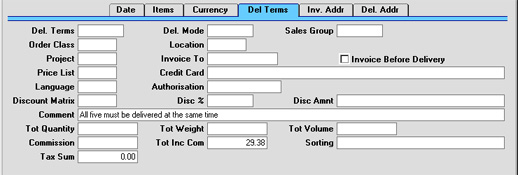
- Del. Terms
- Paste Special
Delivery Terms setting, Sales/Purchase Orders module
- Default taken from Customer
- Specify the Delivery Terms for this Order here. You will tend to use this field for international Customers: examples might be Cost, Insurance, Freight or Free On Board.
- For each Delivery Term record you can specify an appropriate description in different Languages: the Language for the Order (below) will therefore determine the translation to be printed on any Delivery Notes produced from the Order.
- Specify the Delivery Terms for this Order here. You will tend to use this field for international Customers: examples might be Cost, Insurance, Freight or Free On Board.
- Del. Mode
- Paste Special
Delivery Modes setting, Sales Orders module
- Default taken from Customer
- Enter the mode of shipping used for this Order. Examples might be Post or Courier, or might specify the name of the courier that you will use to supply the goods on the Order.
- For each Delivery Mode record you can specify an appropriate description in different Languages: the Language for the Order (below) will therefore determine the translation to be printed on any Delivery Notes produced from the Order.
- You can also set up different versions of the Invoice, Order and Delivery documents for each Delivery Mode, perhaps incorporating appropriate payment instructions. To do this, enter the Delivery Mode in the Language field when defining documents. Document definition is described here.
- Enter the mode of shipping used for this Order. Examples might be Post or Courier, or might specify the name of the courier that you will use to supply the goods on the Order.
- Sales Group
- Paste Special
Sales Groups setting, System module
- Default taken from Salesman
- The Sales Group is brought in from the Person record after you have entered a Salesman (on the 'Date' card). If the Limited Access module is present, this field can be used to prevent a user from seeing all Sales Orders in the 'Orders: Browse' window by restricting their view to their own Orders or to those of their Sales Group.
- Please click here for full details of the Limited Access module.
- The Sales Group is brought in from the Person record after you have entered a Salesman (on the 'Date' card). If the Limited Access module is present, this field can be used to prevent a user from seeing all Sales Orders in the 'Orders: Browse' window by restricting their view to their own Orders or to those of their Sales Group.
- Order Class
- Paste Special
Order Classes setting, Sales Orders module
- Enter the Order Class for the Order (if any). Order Classes permit the analysis of Orders for reporting or prioritising.
- In the case of Orders created from Quotations, the Quotation Class will be copied to this field if the Transfer Qtn Class to Order option in the Order Settings setting is being used.
- If you will be using the 'Create Purchase Orders' Maintenance function to create Purchase Orders in batches from Sales Orders, you can do so for Sales Orders of a particular Class.
- In the case of Orders created from Quotations, the Quotation Class will be copied to this field if the Transfer Qtn Class to Order option in the Order Settings setting is being used.
- Location
- Paste Special
Locations setting, Stock module
- Used as default in Deliveries
- If the stock which will be used to satisfy this Order is to be taken from a particular Location, specify that Location here. Otherwise, stock from all Locations will be available. A separate Location can be specified for any Order row (on flip F), overriding that entered here.
- If a Main Location has been specified in the Stock Settings setting, leaving the field blank means that stock from that Location will be used. Note, however, that the Require Location option in the same setting has no power over this field. If this option is in use, you will not have to enter a Location here, but you will have to specify one in any Deliveries resulting from this Order.
- A default Location can be brought in from the 'Bonus' card of the user's Person record.
- If the 'Item Status' window is on screen, the quantities shown will refer to the Location specified here. If this shows that there is insufficient stock in the Location to fulfil the Order, use the 'Stock Movement' function on the Operations menu to move any stock that might exist elsewhere into the Location.
- If the stock which will be used to satisfy this Order is to be taken from a particular Location, specify that Location here. Otherwise, stock from all Locations will be available. A separate Location can be specified for any Order row (on flip F), overriding that entered here.
- Project
- Paste Special
Project register, Job Costing module (if installed)
- This field is used to attach this Order to a Project. It is only used if the Job Costing module is installed.
- If the Order is assigned to a Project, Deliveries can be made from the Order screen, but all associated Invoices must be raised from the Job Costing module, using the 'Create Project Invoices' Maintenance function.
- You can attach an Order to an Active Project, but not to one whose Status is Finished or No More Transactions.
- If the Order is assigned to a Project, Deliveries can be made from the Order screen, but all associated Invoices must be raised from the Job Costing module, using the 'Create Project Invoices' Maintenance function.
- Invoice To
- Paste Special
Customer register
- Default taken from Customer
- If the invoice for this Order is to be sent to another company, such as a leasing company or a parent company, enter the Customer Number for that company here. That company must have their own record in the Customer register. The default is taken from the Factoring Company specified on the 'Terms' card of the Customer record.
- If the invoice for this Order is to be sent to another company, such as a leasing company or a parent company, enter the Customer Number for that company here. That company must have their own record in the Customer register. The default is taken from the Factoring Company specified on the 'Terms' card of the Customer record.
- Invoice before delivery
- When raising an Invoice from this Sales Order, usually only those Items on approved Deliveries will be included. This means that a Delivery must be issued from the Sales Order before an Invoice can be raised. If you would like to raise an Invoice from the Order (for the complete value of the Order) before issuing Deliveries, check this box. If you have determined that cost accounting transactions are to be created at the point of delivery, stock transactions in the Nominal Ledger will still be raised when the Delivery is approved (i.e. use of the Invoices before Delivery check box does not affect cost accounting in any way).
- This check box applies to this Order only. If you would always like to be able to create Invoices from Orders before issuing Deliveries, check the Invoices before Delivery box in the Stock Settings setting in the Stock module.
- This check box applies to this Order only. If you would always like to be able to create Invoices from Orders before issuing Deliveries, check the Invoices before Delivery box in the Stock Settings setting in the Stock module.
- Price List
- Paste Special
Price List register, Pricing module
- Default taken from Customer, Customer Category or Payment Term
- Specify here the Price List which will determine the prices used on this Order. Ensure you have chosen the correct Price List before adding rows to the Order: if you forget, the 'Update Currency Price List Items' function is available on the Operations menu which can be used to change the prices of Items added to the Order before the Price List was specified (save the Order before using this function).
- When a row is added to the Order and an Item specified, Hansa searches either in the Price register or in the Quantity Dependent Prices setting for the single record representing the Item/Price List combination and brings in the Unit Price from there. If no such record is found, the Base Price of the Item is used. If a Discount Price List is specified, the Price register will be used. Otherwise, the Quantity Dependent Prices setting will be used.
- If the Price List specified is one which is Inclusive of VAT, the Unit Prices and Sums of each Order row will include VAT.
- When creating a new Order, Hansa will first look to the Customer record for an appropriate Price List. If none is specified there, the Price List for the Customer Category to which the Customer belongs will be used. If this is blank, or the Customer does not belong to a Category, Hansa will look to the Payment Term record allocated to the Customer. If the Payment Term is subsequently changed for this Order only, the Price List will only be changed if it is blank.
- Specify here the Price List which will determine the prices used on this Order. Ensure you have chosen the correct Price List before adding rows to the Order: if you forget, the 'Update Currency Price List Items' function is available on the Operations menu which can be used to change the prices of Items added to the Order before the Price List was specified (save the Order before using this function).
- Credit Card
- Paste Special
Credit Card register, Cheques module (if installed)
- If the Order will be paid using a credit card, enter its number here. Known credit card numbers for each Customer can be stored in the Credit Card register in the Cheques module.
- Language
- Paste Special
Languages setting, System module
- Default taken from Customer
- The Language Code determines the text to be transferred from various registers and settings, for example the Item Name, text for Payment Terms and Payment Mode, and the selection of document forms etc. Leave the field blank to use the home Language.
- The Language Code determines the text to be transferred from various registers and settings, for example the Item Name, text for Payment Terms and Payment Mode, and the selection of document forms etc. Leave the field blank to use the home Language.
- Authorisation
- If the Order will be paid using a credit card, record the authorisation code here once it has been obtained.
- Discount Matrix
- Default taken from
Customer or Customer Category
- If there is a Discount Matrix applying to this Order, it will be shown here. The field cannot be changed. Discount Matrices are used to administer quantity discounts.
- Comment
- Default taken from
Customer
- Record here any comment about this Order: the comment will not be printed on Delivery Notes and will not be transferred to Invoices. The default is taken from the Order Comment field of the Customer record.
- Tot Quantity
- This shows the total number of Items on the Order. If this figure becomes inaccurate for any reason, use the 'Recalculate Weight and Volume' function on the Operations menu to update it.
- Tot Weight
- Default taken from
Items
- This field will contain a calculated value based on the Order Quantity and the Weight of the Items. If the Weight of one of the Items is changed or if this figure becomes inaccurate for any other reason, use the 'Recalculate Weight and Volume' function on the Operations menu to update this field.
- Tot Volume
- Default taken from
Items
- This field will contain a calculated value based on the Order Quantity and the Volume of the Items. If the Volume of one of the Items is changed or if this figure becomes inaccurate for any other reason, use the 'Recalculate Weight and Volume' function on the Operations menu to update this field.
- Commission, Tot Inc Com
- These fields are used in Russia. Please refer to your local Hansa representatives for details.
- Sorting
- Default Taken from
Customer (Sort Key)
- The Sort Key (post code or your own routing code) will be entered here automatically when you specify a Customer. It will be used by the Sorted Order List report, a list in Sort Key order of Orders with a particular Planned Delivery Date. This report can be used as an aid for delivery drivers.
- Tax Sum
- When defining VAT Code records using the setting in the Nominal Ledger, it is possible to specify that an additional tax, such as an environmental tax, be levied. If the VAT Code of any of the rows of the Order is one where such an additional tax has been defined, the amount of that tax will be shown in this field. That amount will be recalculated as Items are added to the Order. When an Invoice is created from the Order, this figure will be transferred to the Ext. Tax field in the footer area of the Invoice.
Entering a Sales Order - Price List Card
This page describes the fields on the 'Price List' card of the Sales Order record. Please follow the links below for descriptions of the other cards:- Header
- 'Terms' card
- 'Items' card Part 1 (Flips A and B)
- 'Items' card Part 2 (Flips C-H)
- 'Items' card Part 3 (Footer)
- 'Currency' card
- 'Del. Terms' card
- 'Price List' card
- 'Inv. Address' card
- 'Del. Address' card
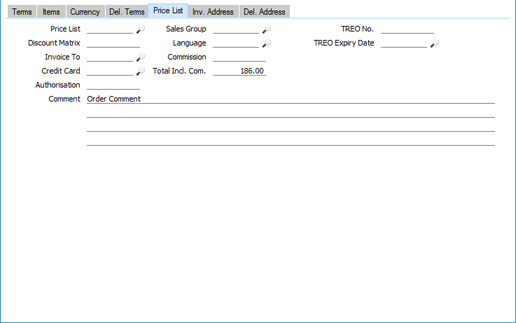
- Price List
- Paste Special
Price List register, Pricing module
- Specify here the Price List that will determine the prices used in the Order.
- If you change the Price List after adding Items to the Order, the prices of those Items will be updated automatically and immediately. At any time, you can also use the 'Update Currency Price List Items' function on the Operations menu (Windows/Mac OS X) or Tools menu (iOS/Android) to update all prices in the Order.
- When you create a new Order and specify a Customer, the Price List will be chosen as follows:
- It will be brought in from the 'Pricing' card of the Customer's Contact record.
- If the Customer doesn't have a Price List, the Price List for the Customer Category to which the Customer belongs will be used.
- If this is blank, or the Customer does not belong to a Category, the Price List will be taken from the Sales Pay. Term record allocated to the Customer. Note that if you change the Payment Term in an Order, the Price List in that Order will be changed if a Price List has been specified in the new Payment Term.
- If you are using dated Price Lists the choice of Price List in a particular Order can depend on its Order Date, its Planned Delivery Date or its Despatch Date. Use the Price Based On options on the 'Pricing' card of each Contact record to specify the date that will be used for each Customer.
- If you choose the Planned Delivery Date option, the standard Price List will be used if the Planned Delivery Date in the Sales Order is blank or in the wrong format. The Planned Delivery Date field must use the Date format, set in the Planned Delivery setting in the Sales Orders module. If you choose the Despatch Date option, the standard Price List will be used if the Despatch Date in the Sales Order is blank. The standard Price List is the one specified for the Customer on the 'Pricing' card, or the one in the Customer Category.
- Dated Price Lists are described here, with an example here.
- If the Price List specified is one that is Inclusive of VAT, the Unit Prices and Sums in each Order row will include VAT.
- When you add a row to the Order and specify an Item, the Unit Price will be chosen as follows, assuming the Type of the Price List is "Discount":
- The Unit Price will be taken from the Price record with the relevant Item/Price List/Customer combination.
- It will be taken from the Price record with the relevant Item/Price List combination where the Customer field is empty.
- The Base Price from the Item record will be used.
- The Unit Price will be taken from the Quantity Dependent Price record with the relevant Item/Price List combination.
- The Base Price from the Item record will be used.
- In multi-user systems, you can prevent certain users from changing the Price List in Quotations, Orders and Invoices using Access Groups, by denying them access to the 'Change Prices' Action.
- If you change the Price List after adding Items to the Order, the prices of those Items will be updated automatically and immediately. At any time, you can also use the 'Update Currency Price List Items' function on the Operations menu (Windows/Mac OS X) or Tools menu (iOS/Android) to update all prices in the Order.
- Discount Matrix
- Default taken from
Contact record for the Customer or Customer Category
- If there is a Discount Matrix applying to an Order, it will be shown here. You cannot change this field. You can use Discount Matrices to administer quantity discounts: please refer here for more details..
- If the Discount Matrix is one that calculates quantity discounts based on Item Group quantities rather than Item quantities, the calculated discount for an Item may become incorrect if you specify another Item belonging to the same Item Group in a later row in the Order. To cater for this, be sure to select 'Recalculate Discount' from the Operations menu (Windows/Mac OS X) or Tools menu (iOS/Android) when the Order is complete. This will recalculate the discount percentage for each Item in the Order.
- If the Discount Matrix is one that calculates quantity discounts based on Item Group quantities rather than Item quantities, the calculated discount for an Item may become incorrect if you specify another Item belonging to the same Item Group in a later row in the Order. To cater for this, be sure to select 'Recalculate Discount' from the Operations menu (Windows/Mac OS X) or Tools menu (iOS/Android) when the Order is complete. This will recalculate the discount percentage for each Item in the Order.
- Invoice To
- Paste Special
Customers in Contact register
- Default taken from Contact record for the Customer (Invoice To)
- If the invoice for an Order is to be sent to another company, such as a leasing company or a parent company, enter the Customer Number for that company here. That company must have their own Customer record in the Contact register. The default will be taken from the Invoice To field specified on the 'Terms' card of the Contact record for the Order Customer.
- When you create an Invoice from the Order, the Customer in that Invoice will be the leasing or parent company specified in this field. The Order Customer will be copied to the Original Customer field in the Invoice. Similarly if you receive a deposit against the Order and enter that deposit as a Prepayment, the leasing or parent company specified here will be brought in to the Customer field in the Receipt row when you specify the Order Number on flip D.
- If the invoice for an Order is to be sent to another company, such as a leasing company or a parent company, enter the Customer Number for that company here. That company must have their own Customer record in the Contact register. The default will be taken from the Invoice To field specified on the 'Terms' card of the Contact record for the Order Customer.
- Credit Card
- Paste Special
Credit Card register, Cheques module (if installed)
- If the Order will be paid using a credit card, enter its number here. You can store known credit card numbers for each Customer in the Credit Card register in the Cheques module.
- Authorisation
- If the Order will be paid using a credit card, record the authorisation code here once it has been obtained.
- Comment
- Default taken from
Contact record for the Customer (Order Comment)
- Record here any comment about this Order: it will be printed on the Invoice document if you have included the "Comment 2" field in your Form Template design.
- The first line of this Comment will be taken from the Order Comment field in the Contact record for the Customer ('Delivery' card). It will be copied to the Comment field in Deliveries and Invoices created from the Order.
- The first line of this Comment will be taken from the Order Comment field in the Contact record for the Customer ('Delivery' card). It will be copied to the Comment field in Deliveries and Invoices created from the Order.
- Sales Group
- Paste Special
Sales Groups setting, System module
- Default taken from Salesman
- The Sales Group is brought in from the Person record after you have entered a Salesman (on the 'Terms' card). If you are using the Limited Access feature, you can use this field to prevent a user from seeing every Sales Order in the 'Orders: Browse' window by restricting their view to their own Orders or to those of their Sales Group.
- Please click here for full details about the Limited Access module.
- The Sales Group is brought in from the Person record after you have entered a Salesman (on the 'Terms' card). If you are using the Limited Access feature, you can use this field to prevent a user from seeing every Sales Order in the 'Orders: Browse' window by restricting their view to their own Orders or to those of their Sales Group.
- Language
- Paste Special
Languages setting, System module
- Default taken from Contact record for the Customer
- The Language determines the Item Descriptions that will be shown on the 'Items' card, and the text for the Payment Term, Delivery Term and Delivery Mode that will be printed on forms. Leave the field blank to use your home Language.
- You can also use the Language to determine the Form Template that will be used when you print the Sales Order, and the printer that will be used to print it. This can include sending the form to a fax machine, if your hardware can support this feature. Do this in the 'Form Definition' window for the Order form, as described here. You can change the Language before printing the Sales Order even if it has been marked as OK, to ensure it is printed on the correct printer or fax machine.
- The Language determines the Item Descriptions that will be shown on the 'Items' card, and the text for the Payment Term, Delivery Term and Delivery Mode that will be printed on forms. Leave the field blank to use your home Language.
- Commission, Tot Incl. Com
- These fields are used in Russia. Please refer to your local HansaWorld representatives for details.
- TREO No., TREO Expiry Date
- TREO (Tax Remission Export Office) Orders are used in Kenya and other East African countries. If a manufacturing company receives a Sales Order from an export Customer, then any components purchased for manufacturing the Items on the Sales Order will be exempt from tax and customs duties. Such a Sales Order must be marked with a Control Code supplied by the tax authority and with the expiry date of that Control Code, which you should enter in these fields. This Control Code will be copied to all Deliveries and Invoices resulting from the Order.
- If an Order belongs to an Order Class in which you have ticked the TREO box, you will not be able to save it if the TREO No. field is empty.
The Sales Order register in Standard ERP:
- Introduction
- Entering a Sales Order, including:
- Header
- 'Terms' card
- 'Items' card Part 1 (Flips A and B)
- 'Items' card Part 2 (Flips C-H)
- 'Items' card Part 3 (Footer)
- 'Currency' card
- 'Del. Terms' card
- 'Price List' card
- 'Inv. Address' card
- 'Del. Address' card
- Header
- Controlling Prices in Sales Orders
- Inspecting and Changing Sales Orders
- Printing Sales Orders
- Operations menu
- Create menu
- Row menu
- Home page for Sales Orders manual
- Home page for Standard ERP manual
Entering a Sales Order - Inv Addr Card
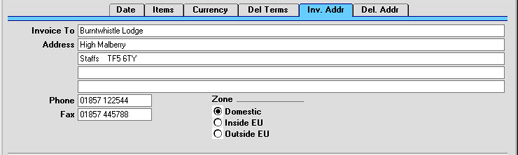
- Invoice to Address
- Default taken from
Customer
- Used as default in Invoices
- The Customer's address, as entered on the 'Contact' card of the Customer record. If you need to change something for this Order only, you can do so. Permanent changes should be made in the Customer register.
- The Customer's address, as entered on the 'Contact' card of the Customer record. If you need to change something for this Order only, you can do so. Permanent changes should be made in the Customer register.
- Phone, Fax
- Default taken from
Customer
- The Customer's telephone and fax numbers, as entered on the 'Contact' card of the Customer record.
- Zone
- Default taken from
Customer
- These radio buttons show the Zone for this Customer, brought in from the Customer record. The Account Usage S/L setting allows different defaults for the Sales Account and the VAT Account to be set up for each Zone. The setting can be changed for this Order: permanent changes should be made in the Customer register.
Entering a Sales Order - Del Addr Card
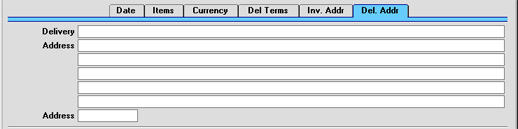
- Delivery Address
- Default taken from
Customer
- Used as default in Deliveries
- Enter the Delivery Address here, if different from the Invoice Address or the usual Delivery Address shown on the 'Delivery' card of the Customer record.
- Enter the Delivery Address here, if different from the Invoice Address or the usual Delivery Address shown on the 'Delivery' card of the Customer record.
- Address
- Paste Special
Delivery Addresses setting, Sales Orders module
- If the Customer is one with several Delivery Addresses (e.g. it has several branches), these can be recorded in the Delivery Addresses setting in the Sales Orders module. Select the correct one for this Order using the 'Paste Special' function. The full Delivery Address will be brought in to the fields above. Usually, only Delivery Addresses for this Customer and those with no Customer specified will be included in the 'Paste Special' list. If you would like the 'Paste Special' list to contain all Delivery Addresses, check the Paste All Delivery Addresses box in the Order Settings setting.
Controlling Prices in Orders
There are several methods that you can use to control prices in Orders:- To prevent all changes to the Unit Price, % and Sum fields in every Quotation, Order and Invoice row, assign users an Access Group in which you have denied access to the 'Change Unit Prices' Action (i.e. in which you have set the access level to "None").
- If you need to prevent users from changing the Price List in a Quotation, Order or Invoice, assign them an Access Group in which you have denied access to the 'Change Prices' Action.
- You can prevent users from entering a price (i.e. a unit price less discount) that is below a specified minimum in any Quotation, Order or Invoice. To do this, specify a Minimum Price List in each user's Person record. If it is necessary to sell an Item at a price that is below the minimum, a manager can confirm the price using the 'Manager's Discount Override' function on the Row menu (Tools menu if you are using iOS or Android).
- If you need to prevent users from changing the Cost Price in Order rows, you can do so using Access Groups, by denying access to the 'Changeing Cost on Sales Order Rows' Action.
- If you would like to hide the Cost Price, Cost B2, GP, FIFO and Row FIFO fields in each Quotation, Order and Invoice row and the GP % and Total GP fields in the footer of each record, use Access Groups to deny access to the 'View Item's Cost Price' Action.
- If you are using the Disallow Negative Row Sums on Sales option in the Account Usage S/L setting in the Sales Ledger, you will not be able to mark an Order or Invoice as OK and save it or save a Quotation if the Sum in any row is negative.
- Similarly, if you are using the Disallow Negative Totals on Sales option, also in the Account Usage S/L setting, you will not be able to mark an Order or Invoice as OK and save it or save a Quotation if the TOTAL is negative.
- You can have a responsible Person or Persons notified every time a sales person attempts to mark as OK and save a Sales Invoice or save a Quotation or Sales Order in which there is at least one Item with a gross profit that is lower than a specified percentage. The notification will be by Mail and Activity. Specify the percentage in the GP below minimum Alerts setting in the Business Alerts module, and specify the responsible Person or Persons in each Location record. To prevent the saving of any Invoice, Order or Quotation that would trigger such a notification, assign each sales person an Access Group in which you have granted Full access to the 'Disallow Selling Below Minimum GP' Action. Please refer to the description of the GP below minimum Alerts setting for more details.
The Sales Order register in Standard ERP:
- Introduction
- Entering a Sales Order
- Controlling Prices in Sales Orders
- Inspecting and Changing Sales Orders
- Printing Sales Orders
- Operations menu
- Create menu
- Row menu
- Home page for Sales Orders manual
- Home page for Standard ERP manual
Inspecting and Changing Sales Orders
You can change an Order at any time unless it has been closed. To do so, click the [Orders] button in the Master Control panel or select 'Sales Orders' from the Registers menu. The 'Orders: Browse' window is opened, listing all Orders. Double-click on the Order you want to inspect or change. The window 'Order: Inspect' will appear. This is identical to the 'Order: New' window described here.If Deliveries or Invoices have been created from the Order, some changes may not be permitted. For example, a Quantity cannot be changed to a number lower than has already been delivered. New rows can be added at any time, but no rows can be inserted or removed after Deliveries have begun, even if no Delivery has been made from the row in question.
Printing Sales Orders
It is often necessary to print Orders, perhaps for the purpose of confirmation or acknowledgement, or to gain an authorisation signature. There are three ways to print an Order.- While entering or inspecting an Order, click the Printer icon in the Button Bar or select 'Print' from the File menu. If you want to print to screen, click the Preview icon.
- Click the [Documents] button in the Master Control panel or select 'Documents' from the File menu. Double-click 'Sales Orders' in the 'Documents' list window, or click it once and press the Enter key. Indicate the Order Number (or range of Order Numbers) to be printed and press [Run].
- Orders can be printed automatically. This is controlled using the Auto Actions setting in the System module.
- Using the Form register in the System module, design the sales order and name it "ORDER". Use the 'Properties' function on the Operations menu to assign a Document Type of "Order". A sample "ORDER" is supplied with Hansa: this can be modified to suit your requirements.
- Select the Sales Orders module using the Modules menu.
- Click the [Documents] button in the Master Control panel or select 'Documents' from the File menu. The 'Documents' list window is opened: highlight 'Sales Orders'.
- Select 'Define Document' from the Operations menu.
- In the subsequent window, enter "ORDER" in the Form field of the first line (you can use 'Paste Special' to ensure the spelling is correct). If appropriate, you could use the first and second gridlines to ensure both an order acknowledgement and an order authorisation are printed at all times, using different Forms.
- Click [Save] to save the Order Form definition. From now on, the order form that you have designed will be used, from the 'Documents' function and from the Printer icon.
Operations Menu
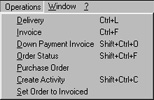
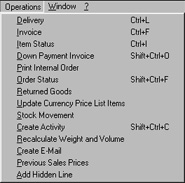
Operations Menu - Order Status
This produces a report for the Order currently open in a record window or for the first Order highlighted in the 'Orders: Browse' window. This report summarises all aspects of the Order, including Order details, each Delivery and each Invoice.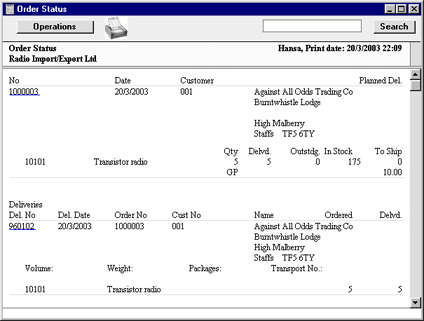
Operations Menu - Set Order to Invoiced
This function is only available on the Operations menu of the 'Orders: Browse' window. It can be used in cases where an approved Delivery has been created from an Order and for some reason an Invoice is not to be raised. Highlight the Order(s) in question and select this function from the Operations menu. The Invoiced Quantity on flip D of each Order row will be set to the Del 2 Quantity, thus preventing the raising of an Invoice.If you later decide to raise an Invoice, use the 'Recalculate Orders' Maintenance function to set the Invoiced Quantity on flip D of each Order row back to zero or to the quantity previously invoiced, whichever is correct.
Operations Menu - Sales Order - Recalculate Discount
This page describes the 'Recalculate Discount' function on the Operations menu in the Sales Order record window. If you are using iOS or Android, the 'Recalculate Discount' function is on the Tools menu (with 'wrench' icon).---
Discount Matrices allow you to offer quantity discounts based on the value, quantity, weight or volume of each Item sold. If the Customer in an Order is one to whom you have assigned a Discount Matrix, a discount percentage representing a quantity discount will be placed automatically in the % field in each Order row whenever you specify an Item and Quantity. If there is a Discount Matrix applying to an Order, it will be shown on the 'Price List' card.
The 'Recalculate Discount' function will be useful in cases where the Discount Matrix is one that calculates quantity discounts based on Item Group quantities rather than Item quantities and you have used more than one Item belonging to the same Item Group in an Order. When you add a second Item from an Item Group to the Order, the discount for the first Item may be rendered incorrect because its calculation did not take the quantity of the second Item into account. Therefore, when the Order is complete, you should recalculate the discount of every Item. To do this, select 'Recalculate Discount' from the Operations menu (Windows/Mac OS X) or Tools menu (iOS/Android). You can also use this function if you change the Discount Matrix record itself, to apply the changes you have made in the Discount Matrix to the Order.
---
The Sales Order register in Standard ERP:
- Introduction
- Entering a Sales Order
- Controlling Prices in Sales Orders
- Inspecting and Changing Sales Orders
- Printing Sales Orders
- Operations menu, including:
- Order Status
- Set Order to Invoiced
- Recalculate Discount
- Recalculate Weight and Volume
- Update Currency Price List Items
- Item Search
- Print Internal Order
- Reservations
- Order Status
- Create menu
- Row menu
- Home page for Sales Orders manual
- Home page for Standard ERP manual
Operations Menu - Recalculate Weight and Volume
As Items are added to an Order, the Total Quantity and their total Weight and Volume are shown on the 'Del Terms' card, calculated from the Order Quantity and from the Item records. If the Weight or Volume of an Item is changed or if these figures become inaccurate for any other reason, they can be recalculated using this function.Operations Menu - Update Currency Price List Items
Occasionally, a complex Order might be entered using the wrong Currency, exchange rate or Price List, or the exchange rate might change significantly between the entry of the Order and its final approval. In such a situation, it is not necessary to re-enter the Order. Amend the Currency, exchange rate or Price List as appropriate, save the Order and then select this function. All the prices will be converted correctly.Operations Menu - Sales Order - Item Search
This page describes the 'Item Search' function on the Operations menu in the Sales Order record window. If you are using iOS or Android, the 'Item Search' function is on the Tools menu (with 'wrench' icon).---
You can use the 'Item Search' function to search for Items that you can then add to the Order. This function is therefore an alternative to the 'Paste Special' feature. Place the insertion point in the Item field in any row and then select 'Search' from the Operations menu (Windows/Mac OS X) or Tools menu (iOS/Android). The following window opens:
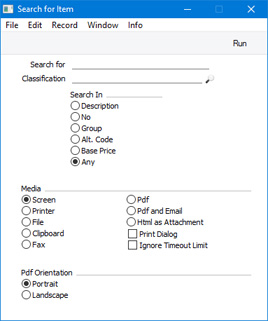
- Search for
- Enter here the string (e.g. part of an Item Number or Name) that you are looking for. You must make an entry in this field, otherwise no search will be carried out.
- Classification
- Paste Special
Item Classifications setting, Sales Ledger
- If you enter an Item Classification here, the search for the string that you specified in the field above will be restricted to Items belonging to that Classification.
- Search In
- Specify the field in which you want to search.
---
The Sales Order register in Standard ERP:
- Introduction
- Entering a Sales Order
- Controlling Prices in Sales Orders
- Inspecting and Changing Sales Orders
- Printing Sales Orders
- Operations menu, including:
- Order Status
- Set Order to Invoiced
- Recalculate Discount
- Recalculate Weight and Volume
- Update Currency Price List Items
- Item Search
- Print Internal Order
- Reservations
- Order Status
- Create menu
- Row menu
- Home page for Sales Orders manual
- Home page for Standard ERP manual
Operations Menu - Print Internal Order
A printed order is usually sent to the customer to confirm that the order has been entered. An internal order form is used within the company for administrative purposes and reference.There are three ways to print an internal Order.
- While entering or inspecting an order, select 'Print Internal Order' from the Operations menu.
- Click the [Documents] button in the Master Control panel or select 'Documents' from the File menu. Double-click 'Internal S/Orders' in the 'Documents' list window, or select it and press the Enter key. Indicate the Order Number (or range of Order Numbers) to be printed and press [Run].
- Internal Order forms can be printed automatically. This is controlled using the Auto Actions setting in the System module.
- Using the Form register in the System module, design the internal order and name it "INTERNAL_ORDER". Use the 'Properties' function on the Operations menu to assign a Document Type of "Internal S/Order". A sample "INTERNAL_ORDER" is supplied with Hansa: this can be modified to suit your requirements.
- Select the Sales Orders module using the Modules menu.
- Click the [Documents] button in the Master Control panel or select 'Documents' from the File menu. The 'Documents' list window is opened: highlight 'Internal S/Orders'.
- Select 'Define Document' from the Operations menu.
- In the subsequent window, enter "INTERNAL_ORDER" in the Form field of the first line (you can use 'Paste Special' to ensure the spelling is correct).
- Click [Save] to save the Internal Order Form definition. From now on, the internal order form that you have designed will be used, from the 'Documents' function and from the Operations menu function.
- Reservas
HansaWorld Enterprise contiene dos métodos diferentes para reservar stock a favor de Órdenes de Venta.- Puedes utilizar la casilla ‘Reservado’ en el encabezado de la Orden de Venta. Esto asegura que siempre se mantenga una cantidad suficiente en stock de los Ítems requeridos y así posibilitar la plena alimentación de la Orden de Venta. Puedes usar la función 'Estado de Ítem' para establecer la cantidad reservada para un Ítem particular.
- Podrás beneficiarte de las ventajas que existen al trabajar con reservas de stock. Es decir, cuando ingreses una Orden de Venta, podrás usar la función ‘Reservas’ desde el menú Operaciones a fin de reservar tanto Ítems existentes como no existentes (estos últimos son aquellos no ordenados de sus Proveedores). Para reservar stock existente, deberás trasladar estos insumos hacia una Ubicación “virtual”, es decir una Ubicación que no existe físicamente. Esto prevendrá que se utilice stock para otras Órdenes de Venta. Así, cuando crees Órdenes de Compra para los Ítems que no están en stock pero ya han arribado, una Mercadería Recibida desviará una cantidad suficiente hacia la Ubicación “virtual” para que así puedas suplir la Orden de Venta. Podrás utilizar los informes estándar del módulo Stock para ver los niveles de stock de la Ubicación “virtual??? y por tanto, para listar las Órdenes de Venta que pueden ser entregadas. También puedes usar el informe Análisis de Stock p/Antigüedad a fin de establecer lo que se requiere para entregar stock reservado.
- Ingresa ambas Ubicaciones (WHS y RES) en la opción Ubicaciones del módulo Stock
- Dentro de las Opciones de Stock, debes indicar que WHS es la Ubicación Principal. Esto asegurará que el stock sea recibido en WHS si el campo Ubicación estuviere vacío en la Mercadería Recibida.
- Dentro de los archivos Personas pertenecientes a los usuarios más probables a manejar Órdenes de Venta (o en la opción ‘Máquina Local’ sobre las distintas máquinas cliente que se usarán para ingresar Órdenes de Venta), debes especificar que RES “virtual”, es la Ubicación por defecto. Esta Ubicación se utilizará por defecto en todas las nuevas Órdenes de Venta. Estos usuarios y estas máquinas no deberán utilizarse para ingresar Mercaderías Recibidas. Si gustas, puedes tener Ubicaciones “virtuales” por separado para cada vendedor, esto para prevenir que un vendedor utilice stock reservado correspondiente a otro vendedor y para proporcionar mayor detalle en los informes.
- Completa el seteo de ‘Opciones Reservas de Stock’ (módulo Órdenes de Venta) conforme a los descrito en el paso 3ii más abajo.
- Ingresa una Orden de Venta del modo normal.
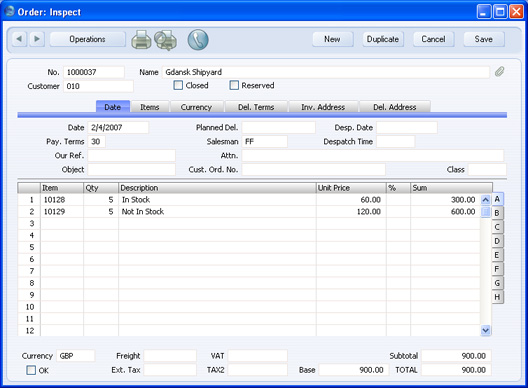
- La Ubicación RES será cargada por defecto en el campo Ubicación de la solapa 'Térm. Entr.'.
- Luego de guardar la Orden de Venta, selecciona ???Reservas’ desde el menú Operaciones. Así se producirá un informe de Reservas de Orden:
En este ejemplo, la Orden de Venta contiene un Ítem que está en stock y otro que no lo está. Por tanto, la trayectoria lógica de la acción será reservar stock del primer Ítem mientras se espera a que el segundo Ítem sea ordenado y recibido.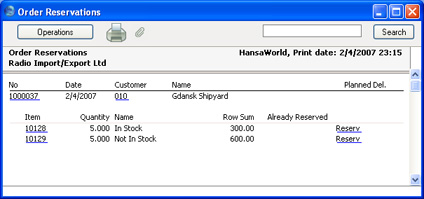
- Para reservar stock del primer Ítem, sigue estos pasos:
- Haz clic en ‘Reserv.’ (subrayado con azul al lado del primer Ítem en el informe). Así, se producirá un segundo informe de Reservas de Orden y mostrará los niveles de stock para este Ítem. En este ejemplo, hemos incluido el stock en una segunda Ubicación para fines ilustrativos:
Si algún stock ya está reservado para otra Orden de Venta, este detalle aparecerá en el informe.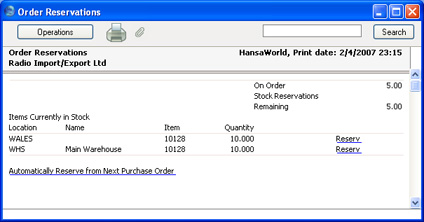
- Haz clic en ‘Reserv.’ (subrayado con azul al lado de la Ubicación que abastecerá con stock buscando satisfacer la Orden). Se creará un nuevo archivo en la opción ‘Reservas de Stock’ y se abrirá en una ventana llamada ‘Reserva de Stock: Crear’. Esto significa que este archivo no se ha guardado todavía:
Lo descrito en filas previas (ejemplo) trae como resultado la acción de reservar una cantidad de cinco Ítems (10149) ubicados actualmente en la Ubicación WHS. Es necesario que especifiques una ‘A Ubicación’ (en el ejemplo será Ubicación RES para stock reservado). Si has tildado la casilla ‘Requiere Ubicación Recepción’ dentro de las ‘Opciones Reservas de Stock’, debes especificar una ‘A Ubicación’ (destino) antes de guardar el archivo ‘Reserva de Stock’. Si activas el ratio botón ‘Desde Orden’ en ‘Definir Ubic. Recepción en’ conjuntamente con el modo automático, la Ubicación destino (‘A..’) se colocará por defecto en función a la Ubicación de la Orden.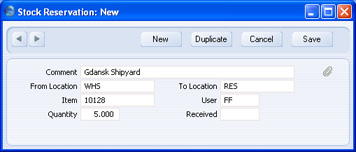
- Guarda el archivo de Reserva de Stock. Así se creará un nuevo Movimiento de Stock que trasladará el stock reservado desde la Ubicación WHS hacia la Ubicación RES. Este archivo se abre en una nueva ventana con el título ???Movimiento de Stock: Ver’; esto significará que el archivo ha sido guardado y está abierto para su verificación y aprobación:
- Haz clic en ‘Reserv.’ (subrayado con azul al lado del primer Ítem en el informe). Así, se producirá un segundo informe de Reservas de Orden y mostrará los niveles de stock para este Ítem. En este ejemplo, hemos incluido el stock en una segunda Ubicación para fines ilustrativos:
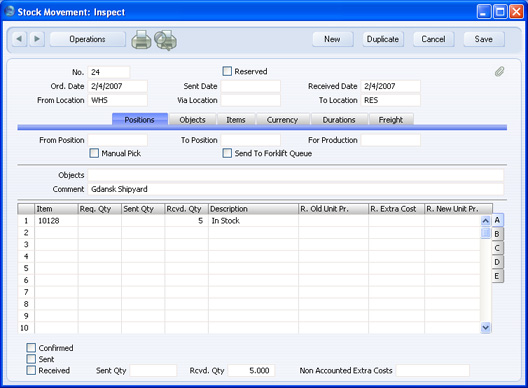
- Marca el Movimiento de Stock como ???Confirmado’ y ‘Recibido’, luego guárdalo. Los Movimientos de Stock se describen en detalle aquí.
- El segundo Ítem todavía no se encuentra en stock. Por tanto, deberás cargar algunos Ítems en la siguiente Orden de Compra a fin de abastecer esta Orden de Venta. Sigue estos pasos:
- Al volver al informe Reserva Orden el cual se describe en paso 2, haz clic en ‘Reserv.’ (subrayado con azul) junto al segundo Ítem. Así se producirá un segundo informe de Reservasde Stock:
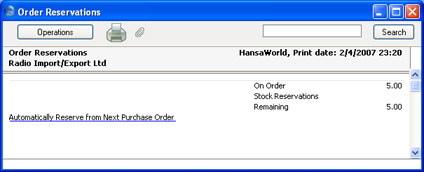
- Como no hay nada de stock, entonces el informe aparece vacío salvo un botón texto [Reservar desde Siguiente Orden de Compra Automáticamente]. Haz clic en este botón para abrir un segundo archivo nuevo de Reserva de Stock:
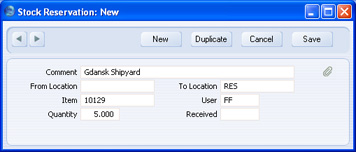
- Cuando guardes la Reserva de Stock, el sistema esperará a que crees una Orden de Compra conteniendo el Ítem. Cuando apruebes la Orden de Compra, ésta se conectará a la Reserva de Stock automáticamente (esto se describe más detalladamente en el paso 10). Si has tildado la casilla ‘Requiere Ubicación Recepción’ dentro de las ‘Opciones Reservas de Stock’, entonces debes especificar una Ubicación “A” (destino) antes de guardar el archivo Reserva de Stock.
En todo momento podrás verificar el Estado de la Reserva respecto a la Orden de Venta. Para esto, se deberá seleccionar ‘Reservas’ desde el menú Operaciones:
La columna ‘Ya Reservado??? nos muestra que los Ítems solicitados no están completamente reservados. Si pulsas ‘Reserv.’ (subrayado con azul) para cada uno de los Ítems, esto mostrará más detalles sobre cada Reserva: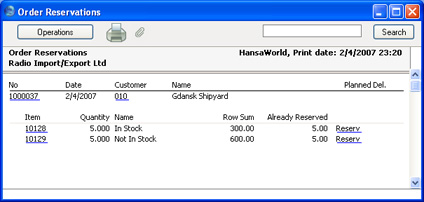
También podrás observar los archivos cargados en la opción ‘Reservas de Stock’: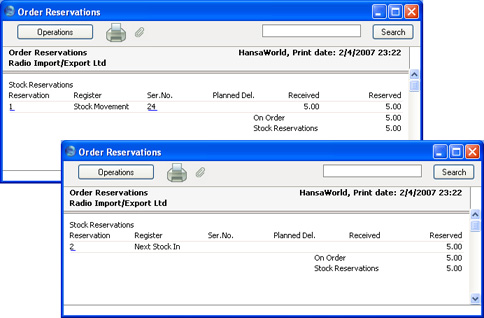
Notemos que el campo “A” dentro del archivo Reserva de Stock (del Ítem en stock), contiene “Movimiento de Stock” y dentro del archivo Reserva de Stock (para el Ítem que no está en stock) habrá “Siguiente Stock en”.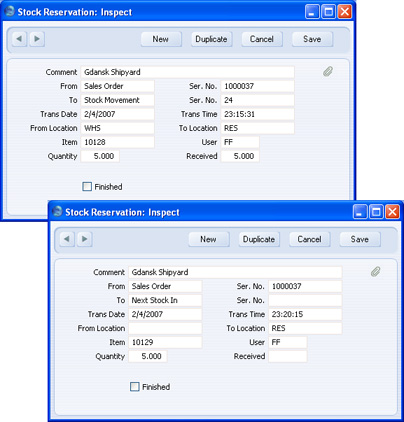
- Al volver al informe Reserva Orden el cual se describe en paso 2, haz clic en ‘Reserv.’ (subrayado con azul) junto al segundo Ítem. Así se producirá un segundo informe de Reservasde Stock:
- Si se incrementa la Cantidad de la Orden de Venta, entonces utiliza el procedimiento para reservas de manera adecuada para reservar cantidad extra.
- Si disminuye la Cantidad de la Orden de Venta, entonces utiliza el procedimiento para reservas de manera adecuada para reducir la cantidad reservada. Intercambia las Ubicaciones ‘De’ y ‘A’ e ingresa una Cantidad Recibida positiva antes de marcarla como Recibida (antes de guardar). Asegúrate de realizar estos cambios dentro del Movimiento de Stock y no en la Reserva de Stock.
- Si necesitas eliminar o cambiar un Ítem reservado dentro de la Orden de Venta, entonces deberás buscar primero y borrar el archivo de la Reserva de Stock. Para hacer esto, puedes usar la función ‘reservas’ desde el menú Operaciones según lo descrito en el paso 5. También puedes buscar el archivo pertinente dentro de la opción ‘Reservas de Stock’. Puede ser que necesites reservar también el Movimiento de Stock.
- Ingresa normalmente una Orden de Compra para aquel Ítem que no está en stock. Podrás ingresar esta orden directamente al registro Órdenes de Compra, o puedes usar la función 'Crear Orden de Compra' desde el (Menú Operaciones o el Mantenimiento respectivo. La Persona que ingrese esta Orden de Compra (o la máquina cliente empleada para esto), no deberá ser la misma que ingresó la Orden de Venta ya que la Ubicación por defecto deberá ser WHS y no RES.
- Cuando apruebes y guardes la Orden de Compra, el número de ésta será copiado a cualquier archivo de tipo Reservado en “Siguiente Stock en” vinculado al Ítem; por su parte, el campo ‘A’ en tales archivos cambiará de “Siguiente Stock en??? a “Orden de Compra”. De esta manera, se conectará las Reservas de Stock a la Orden de Compra:
Si la Cantidad de Orden de Compra es insuficiente para satisfacer todos los archivos de Reserva de Stock en “Siguiente Stock en???, entonces únicamente se conectará el primer archivo de Reserva de Stock a la Orden de Compra. Si es necesario, un archivo de Reserva de Stock será dividido en dos para que una cantidad parcial pueda conectarse a la Orden de Compra. Luego, se creará un segundo archivo Reserva de Stock el cual permitirá que la cantidad restante pueda preservarse en estado “Siguiente Stock en” y aguarde la siguiente Orden de Compra.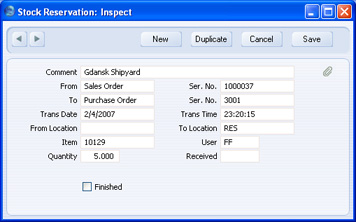
Si una Reserva de Stock no está conectada a una Orden de Compra (según lo descrito en el anterior párrafo), la razón probable será que la Orden de Compra posee la misma Ubicación que la Reserva de Stock (ej. tal vez la Orden de Compra está usando la Ubicación RES).
- El menú Operaciones de la Orden de Compra posee su propia función de ‘Reservas’. Una vez hayas aprobado la Orden de Compra, podrás utilizar esta función para ver si alguno de los Ítems de la Orden de Compra ha sido “pre-reservado” (es decir, reservado antes de llegar a stock):
Haz clic en el link de texto [Detalles] para ver las Órdenes de Venta que poseen Ítems reservados: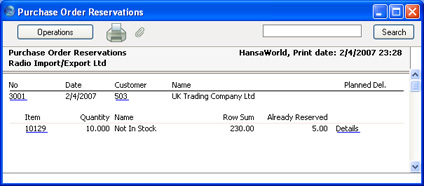
Puedes abrir una Orden de Venta o un archivo de Reserva de Stock desde este informe mediante drill-down.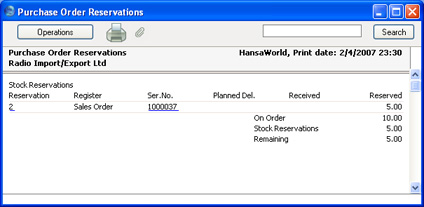
- Cuando las mercaderías lleguen a stock, puedes crear una Mercadería Recibida normalmente desde la Orden de Compra. La Mercadería Recibida contendrá dos filas, una que envía stock suficiente hacia la Ubicación RES abasteciendo la Orden de Venta; y otra que envía cualquier stock restante hacia la Ubicación en la Orden de Compra:
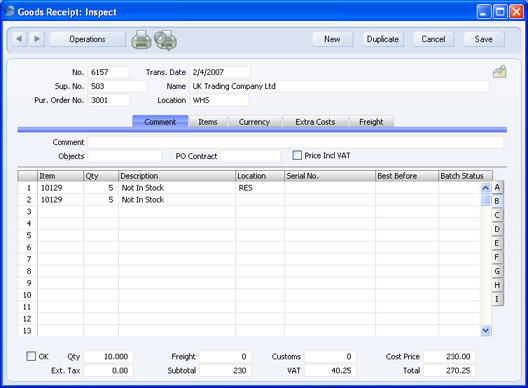
- Si el Ítem ha sido reservado para más de una Orden de Venta, entonces la Mercadería Recibida contendrá filas separadas para cada Orden de Venta; todas esta filas recibirán stock dentro de la Ubicación RES (o la ubicación apropiada si hubiese una distinta para cada vendedor).
Si la Mercadería Recibida no contiene al menos una fila separada que reciba el stock dentro de la Ubicación RES, entonces la razón probable será que no se aprobó la Orden de Compra antes de crear la Mercadería Recibida. Si estás usando la funcionalidad de Reservas de Stock, se recomienda que utilices Grupos de Acceso para asegurarte de que tú solamente estás habilitado para crear Mercaderías Recibidas desde Órdenes de Compra aprobadas. Si no apruebas la Orden de Compra, entonces no se conectará ningún archivo de Reserva de Stock a la Orden de Compra, de modo que no será posible destinar ningún Ítem a la Ubicación RES.
- Aprueba la Mercadería Recibida para poner los Ítems en stock. La cifra ‘Recibido’ dentro del archivo conectado de ‘Reserva de Stock’ será actualizada automáticamente para mostrar que los Ítems han sido recibidos en la Ubicación RES:
Si no recibiste la Cantidad completa de la Orden de Compra, entonces cambia la Cantidad dentro de alguna de las filas en la recepción antes de aprobar como es normal. Si cambias la Cantidad en una fila que recibe stock para la Ubicación RES y luego apruebas la Mercadería Recibida, el resultado será que la cifra ‘Recibida’ (dentro del archivo Reserva de Stock), será menor a la Cantidad. Por tanto, la Reserva de Stock permanecerá abierta esperando la siguiente Mercadería Recibida con la Cantidad restante de la Orden de Compra.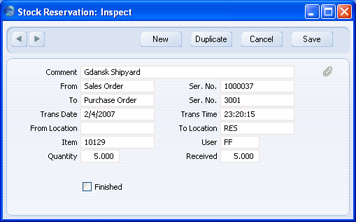
- Una vez que los Ítems estén en stock, deberás entregarlos usando la función de Mantenimiento 'Crear Entregas desde Órdenes' sin especificar un Número de Orden en la ventana de especificación. Cuando apruebes la Entrega, los archivos de Reserva de Stock serán marcados como Terminados:
Los archivos de Reserva de Stock no serán marcados como Terminados si la Entrega fuere parcial. Solo cuando hagas la Entrega final, entonces se marcarán como Terminados todos los archivos pertinentes de Reserva de Stock.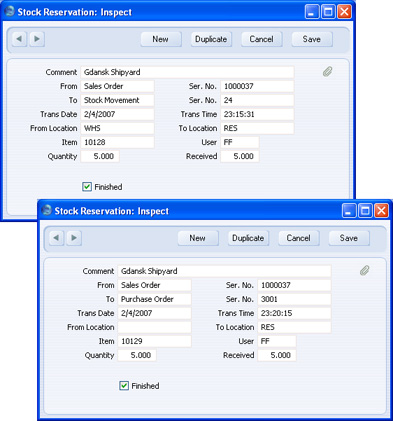
Mediante el uso de la función de Mantenimiento 'Crear Entregas desde Órdenes' sin especificar un Número de Orden, se garantizará que la Orden de Venta más vieja sea completada primero.
No deberás usar la función 'Crear Entrega' en el menú Operaciones (Orden de Venta) para crear la Entrega, puesto que esta acción corromperá el proceso de Reservas de Stock si tienes más de una Orden de Venta con la misma Ubicación RES en espera del mismo Ítem. En esta situación, cuando apruebes una Orden de Compra, su número será copiado primero al archivo más antiguo de Reserva de Stock (como se menciona en el paso 10) (ej. la Orden de Compra será asociada primero a las Órdenes de Venta más antiguas). Cuando el stock llegue, las cifras de ‘Recibido’ en esos archivos de Reserva de Stock serán actualizadas (ej. ese stock será asociado a la Orden de Venta más antigua). Si abres una Orden de Venta posterior usando la función 'Crear Entrega', esto equivaldrá a entregar Ítems apartados para una Orden precedente Venta. Si apruebas la Entrega, entonces el archivo de Reserva de Stock para la Orden de Venta entregada, será marcado como Terminado, a pesar de poseer el Estado ???Siguiente Stock en” e incluso teniendo una cantidad Recibida con valor cero. Cuando apruebes una próxima Factura de Compra, ésta no se conectará al archivo de Reserva de Stock en función a la Orden precedente de Venta puesto que la Factura ya tiene un Número de Orden de Compra y una cantidad Recibida en su totalidad. De modo que, cuando el stock legue, éste no será destinado a la Ubicación RES. La misma situación ocurrirá si utilizas la función 'Crear Entregas desde Órdenes' y especificas un Número de Orden de Venta. Si estás manejando Reservas de Stock, podrás desactivar la función 'Crear Entrega' (menú Operaciones) usando los Grupos de Acceso.
Create Menu - Sales Orders
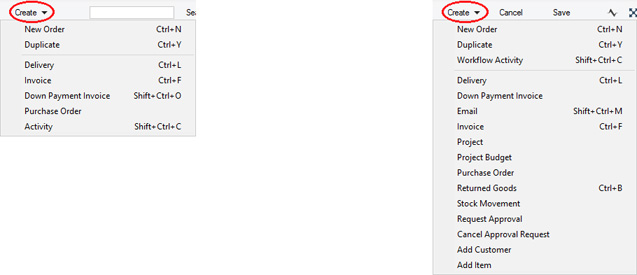
'New' and 'Duplicate' are standard functions that are provided on every Create and + menu. Use these functions to create new records, in this case in the Sales Order register. Please follow the links below for details about the other functions:
- Delivery
- Invoice
- Down Payment Invoice
- Purchase Order
- Workflow Activity
- Email
- Project
- Project Budget
- Returned Goods
- Stock Movement
- Request Approval
- Cancel Approval Request
- Add Customer
- Add Item
The Sales Order register in Standard ERP:
- Introduction
- Entering a Sales Order
- Controlling Prices in Sales Orders
- Inspecting and Changing Sales Orders
- Printing Sales Orders
- Operations menu
- Create menu
- Row menu
- Home page for Sales Orders manual
- Home page for Standard ERP manual
Operations Menu - Delivery
To issue a Delivery from a Sales Order, select 'Delivery' from the Operations menu. For the function to have any effect, all changes to the Sales Order must first have been saved (use the [Save] button).A new record is created in the Delivery register (in the Stock module). It is opened in a new window, entitled 'Delivery: Inspect'. This means that it has been created and saved and is being opened for amendment and approval.
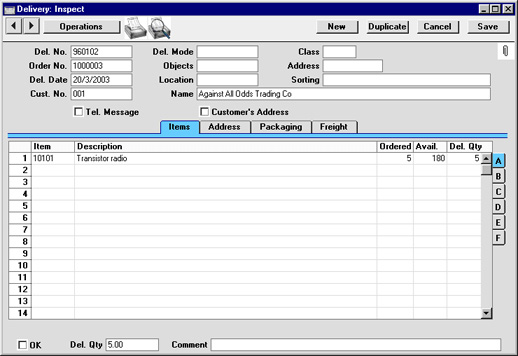
If an Item that requires Serial Numbers has been used on the Order with a Quantity greater than one, the Delivery will contain the appropriate number of rows each with a Quantity of one. This allows you to enter Serial Numbers on flip B: Serial Numbers must be entered before the Delivery can be approved.
If you need to make a part shipment, change the Quantity of one or more rows on the Delivery screen as appropriate. You can also remove entire rows, by clicking on the row number to the left and pressing the Backspace key. Hansa will prevent you delivering a greater Quantity than was ordered unless you have checked the Allow Del Qty greater than Ordered box in the Stock Settings setting. For Stocked Items, you can also prevent delivering more than you have in stock by checking the Do Not Allow Over Delivery option in the same setting.
If a part shipment has been made, when the time comes to ship the remainder of the Order, Hansa will again attempt to ship as many of the remaining Items on the Order as possible. The default quantity on the second Delivery will be the same, irrespective of whether the first Delivery has been approved.
The Date of the Delivery can default to the current date or to the Planned Delivery Date of the Order, depending on which Delivery Date Based On option has been selected on the 'Delivery' card of the Customer record. The default Delivery Date can be changed if necessary.
To print Freight Labels, use the function on the Operations menu. To print a Picking List, click the Printer icon. To print a Delivery Note, approve the Delivery (see next paragraph), click the [Save] button and then click the Printer icon. Alternatively, go into the Stock module and use the 'Documents' function on the File menu or the [Documents] button in the Master Control panel.
When the Delivery is complete, click the OK check box. This signifies that the Delivery has been approved. If you have determined that cost accounting transactions are to be created at the point of delivery, stock transactions in the Nominal Ledger will now be raised (they may otherwise be raised after invoicing). You will no longer be able to modify the Delivery. You will not be able to raise an Invoice for the Delivery until it has been approved.
Please click here for a full description of the Delivery screen, including detailed information about shipments, stock, approving Deliveries and Nominal Ledger Transactions.
To close the screen and return to the Order, click the close box. You will be asked if you want to save any changes. The Del 1 and Del 2 fields of the Order (visible on flip D) will be updated automatically. You will no longer be able to delete the Order.
If the 'Delivery' function is run from the Operations menu of the 'Orders: Browse' window, it will only create a Delivery for the first highlighted Order. If you need to create Deliveries in batches, use the 'Create Deliveries from Orders' Maintenance function. You can also create a Delivery by dragging an Order from the 'Orders: Browse' window to the 'Deliveries: Browse' window. In this case, the new Delivery will not be opened automatically for checking and approval.
If the function does not create a Delivery, the probable causes are:
- The Order has been marked as Closed.
- All Items on the Order have already been delivered.
- The Customer has exceeded their Credit Limit, and you have specified in the Credit Limit setting in the Sales Ledger that Deliveries should not be created for such Customers. In this case, a message will appear explaining the situation.
- The Customer is on hold (the 'On Hold' box on the 'Terms' card of their Customer record has been checked).
- There is no valid record in the Number Series - Deliveries setting (in the Stock module). This might be a fault in the setting itself, or it might be because the default Delivery Number on the 'Ser Nos' card of the current user's Person record or in the Number Series Defaults setting (in the System module) is not in a valid Number Series. This problem will usually occur at the beginning of a new year. If a change is made to the 'Ser Nos' card of the Person record, you will need to quit Hansa and restart for it to take effect.
Operations Menu - Invoice
To raise an Invoice from a Sales Order, select 'Invoice' from the Operations menu. For the function to have any effect, all changes to the Sales Order must first have been saved (use the [Save] button). Usually at least one approved Delivery must first have been created from the Order: the exceptions to this are described later on this page.A new record is created in the Invoice register (in the Sales Ledger). It is opened in a new window, entitled 'Invoice: Inspect'. This means that it has been created and saved and is being opened for amendment and approval.

If the Order contains an Item that requires Serial Numbers, it can be entered using a single Order row with the correct Quantity. When the Delivery is created, it will contain the appropriate number of rows each with a Quantity of one. The Invoice can mirror the Order (i.e. with a single row for the Serial Numbered Item with the Quantity from the Order) or it can mirror the Delivery (i.e. with a number of rows each with a Quantity of one). If you wish to use the latter option, check the Invoice Based on Delivery box in the Order Settings setting. This will be useful if you need to have the Serial Numbers printed on Invoices as well as on Delivery Notes.
Usually, at least one Delivery must be issued before an Invoice can be raised, so an Item cannot be invoiced until it has been delivered. There are two exceptions to this:
- if the Automatic delivery for Service and Plain Items box in the Stock Settings setting is checked. In this case, Deliveries are not created for Service and Plain Items so they can be invoiced immediately. If you are using this feature, take care not to create premature Invoices accidentally for services such as delivery and labour from Orders that also include Stocked Items. Stocked Items must still be delivered before they can be invoiced.
If this option is in use, when a Plain or Service Item is included in a Sales Order, the Del 1 and Del 2 Quantities will be changed to the Order Quantity when the Order is saved. Therefore Plain and Service Items will never be included on Deliveries created from the Order. This also means that the Order Quantity for such Items cannot be reduced once the Order has been saved.
- if the Invoice Before Delivery box on the 'Del Terms' card of the Order or the Invoices Before Delivery box in the Stock Settings setting is checked. In this case, an Invoice for the whole Order can be raised before a Delivery is created. If you have determined that cost accounting transactions are to be created at the point of delivery, stock transactions in the Nominal Ledger will still be raised when the Delivery is approved (i.e. use of the Invoices before Delivery check box does not affect cost accounting in any way).
Two check boxes in the Account Usage S/L setting, Update Base Cur. when Invoicing and Update Foreign Cur. when Invoicing, control the Base and Exchange Rates on the 'Currency' card of the Invoice. If these options are not used, the rates will be copied from the Order. If they are used, the latest Base and Exchange Rates will be used. In the latter case, the prices in Currency of the Items in the Invoice will not be changed. This means the Customer will still be charged the agreed price, but the value of the Invoice in the home Currency (and therefore in the Nominal Ledger) will be different to that of the Order. If you want to update the pricing in the Invoice to reflect new Base and Exchange Rates (i.e. to change the price charged to the Customer but to maintain the original value in the home Currency and in the Nominal Ledger), save the Invoice and then select 'Update Currency Price List Items' from the Operations menu.
If the Customer has been assigned a Default Item record ('Pricing' card of the Customer record), all Items in that record will be added to the Invoice automatically (they will not be shown in the Order or the Delivery). Note that these Items will not have a Quantity, so be sure to enter one before printing or approving the Invoice.
To print an Invoice, click the Printer icon. If the Invoice has not been approved, the printed Invoice will be marked as a test print, so that it cannot be confused with the final version of the Invoice.
When the Invoice is complete, click the OK check box. This signifies that the Invoice has been approved. Associated transactions in the Nominal Ledger (including cost accounting transactions if you are using this option) will now be raised and you will no longer be able to modify the Invoice. If you are raising part Invoices from an Order, you will be able to raise further Invoices even if the previous one has not been approved.
Please click here for a full description of the Invoice screen, including detailed information about approving and printing printing Invoices and Nominal Ledger Transactions.
To close the screen and return to the Order, click the close box. You will be asked if you want to save any changes. The Invoiced field of the Order (visible on flip D) will be updated automatically. However, if you reduced the quantity in an Invoice row, or removed an Invoice row altogether, this change will not be fed back to the Invoiced field on flip D of the Order. In this situation, run the 'Recalculate Orders' Maintenance function for the Order in question, and choose the Invoiced Qty option to reset the Invoiced figure.
If the 'Invoice' function is run from the Operations menu of the 'Orders: Browse' window, it will only create an Invoice for the first highlighted Order. If you need to create Invoices in batches, use the 'Group Invoicing' Maintenance function. You can also create an Invoice by dragging an Order from the 'Orders: Browse' window to the 'Invoices: Browse' window. In this case, the new Invoice will not be opened automatically for checking and approval.
If the function does not create an Invoice, the probable causes are:
- There are no Items on the Order awaiting invoicing.
- The Order has a Project Number quoted on the 'Del Terms' card. If this is the case, the Invoice must be raised from the Job Costing module, using the 'Create Project Invoices' Maintenance function.
- There is no valid record in the Number Series - Invoices setting (in the Sales Ledger). This might be a fault in the setting itself, or it might be because the default Invoice Number on the 'Ser Nos' card of the current user's Person record or in the Number Series Defaults setting (in the System module) is not in a valid Number Series. This problem will usually occur at the beginning of a new year. If a change is made to the 'Ser Nos' card of the Person record, you will need to quit Hansa and restart for it to take effect.
- Set the value of the Invoice to zero. Do this by removing every row from the Invoice or by changing all quantities to zero.
- Delete the Invoice using the 'Delete' command on the Record menu.
- Run the 'Recalculate Orders' Maintenance function for the Order in question, and choose the Invoiced Qty option to reset the Invoiced figure in the Order (flip D).
Operations Menu - Down Payment Invoice
A Down Payment Invoice should be raised if you have received a deposit against an Order or if you wish to ask for one. Hansa allows you to set up a standardised text for such Invoices, whose value can be calculated to be a certain proportion of the Order value. To take advantage of these features (defined using the Down Payments setting), a separate function is provided on the Operations menu of the Order screen by which Down Payment Invoices are created.On selecting the function, an Invoice is created containing a reference to the Order to which it belongs and the Down Payment amount. The Order must first be saved using the [Save] button before the function can be used.
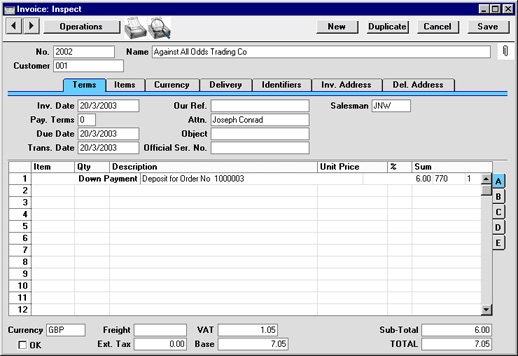
The Down Payment Invoice is treated just as any other Invoice:it has to be approved before it can be sent to the Customer and before any Nominal Ledger Transactions are created.
The final Invoice, when raised from the Order, will contain a reference to the Down Payment, which will be shown as a deduction from the total. The effect will be that the aggregate total of the Down Payment Invoice and the final Invoice will equal the Order total. If necessary you can delete the Down Payment row on the final Invoice and invoice the full amount. The final Invoice from the Order in the example is shown on the page describing the 'Invoice' Operations menu function.
When the Down Payment Invoice is approved, a Nominal Ledger Transaction is created (if so defined in the Sub Systems setting in the Nominal Ledger), crediting the Account shown in the first row of the Invoice. The default for this Account is the Sales Account of the Item (or of its Item Group) specified in the Down Payments setting. If this is blank, or if no Item has been specified, the appropriate Sales Account for the Zone of the Order is used, as specified on card 3 of the Account Usage S/L setting in the Sales Ledger. It might be that you need to change this to a Debt Account used to hold the value of Down Payments until the final Invoice is issued. This has been done in the illustration, using Account 770. When the final Invoice is issued, the resulting Nominal Ledger Transaction will debit the same Account with the Down Payment amount. The Item specified in the Down Payments setting also supplies the VAT Code and thus determines how VAT will be accounted for in Nominal Ledger Transactions created from Down Payment Invoices.
Only one Down Payment Invoice can be created from a particular Order. Subsequent Down Payment Invoices will be for a zero amount.
Operations Menu - Purchase Order
This function is used to create back-to-back Purchase Orders: Purchase Orders for Items on Orders that cannot be fulfilled from stock. The Purchase Orders will be saved in an unapproved state. You can then print them in a single batch, using the 'Documents' function on the File menu or the [Documents] button in the Master Control panel having first selected 'Purchase Orders' from the Modules menu. Please click here for more details about printing Purchase Orders.In contrast to the other functions on the Operations menu of the 'Orders: Browse' window, this can be applied to several Orders at once. To do this, highlight the Orders to which it is to be applied by clicking while holding down the Shift key. Then, select the function from the Operations menu.
In determining the Items for which Purchase Orders will be raised, the following conditions must be met:
- The Items to be purchased must be Stocked Items (recorded on the 'Pricing' card of the Item screen).
- The Items to be purchased must be registered as Purchase Items in the Purchase Orders module. For each Item there must be one Purchase Item with a Supplier specified and with the Default check box switched on (known as "Default Purchase Items"). Please refer here for details of Purchase Items.
- If an Item does not have a related Default Purchase Item, it will still be included in a Purchase Order if you have specified a Default Supplier in the Purchase Order Settings setting. If no Default Supplier has been specified, Purchase Orders will not be raised for Items that do not meet the criteria in the two points above.
Note that the purpose of this function is to create Purchase Orders for goods that are needed to fulfil outstanding Sales Orders ("back-to-back" Purchase Orders) in one single step. It is effectively the 'Create Purchase Orders' Maintenance function with no options. The Per Sales Order option of that function is used so, if there is more than one Order for the same Item, the function will not aggregate the quantities on a single Purchase Order. It will create the same number of separate Purchase Orders as there are Orders for that Item. The Cost Price will be taken from the Default Purchase Item. In the case of an Item that does not have a related Default Purchase Item and if you have specified a Default Supplier, the Cost Price will be taken from flip C of the relevant Sales Order row. If this does not suit your requirements, use the 'Create Purchase Orders' Maintenance function instead. If you need to create Purchase Orders for Items that have fallen below their minimum stock level, use the 'Create Purchase Orders' function on the Operations menu of the 'Purchase Orders: Browse' window.
Operations Menu - Create Activity
Use this function to create records in the Activity register in the System module. This can be useful if it is necessary, for example, to schedule a call with the Customer regarding the Order. The Activity Type given to Activities created by this function will be taken from the Activity Types, Subsystems setting in the CRM module. The Task Type of the new Activities will be To Do, the Symbol will be Other and the Start Date will be the Order Date.In contrast to the other functions on the Operations menu of the 'Orders: Browse' window, this can be applied to several Orders at once. To do this, highlight the Orders to which it is to be applied by clicking while holding down the Shift key. Then, select the function from the Operations menu. Separate Activities will be created in the Activity register for each Order highlighted. These are saved in the Activity register, but are not opened for checking or amendment.
When the function is used from the 'Sales Order: New' and 'Sales Order: Inspect' windows, the following screen appears, by which a new Activity record can be created:
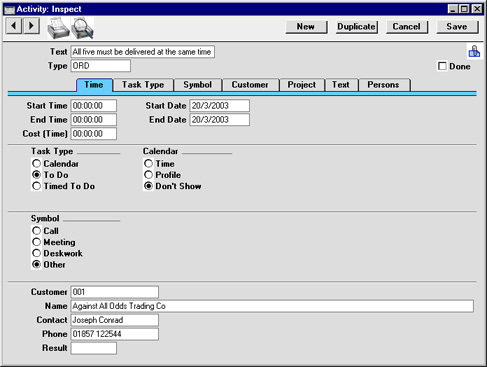
The Order and the Activity will remain connected to each other through the Attachments facility. This allows you to open the Order quickly and easily when reviewing the Activity, or to open the Activity from the Order. When viewing the Activity or Order, click the button with the paper clip image to open a list of attachments. Then double-click an item in this list to open it.
You can also have Activities created automatically from Orders when they are saved for the first time. Please refer to the description of the Order Classes setting for details.
The 'Activity: Inspect' window is fully described here.
Operations Menu - Create E-Mail
This function can be used to create a Mail containing details of the Order. This can be used to send the Order to the Customer by email.When the function is selected, the following screen appears, by which a new Mail can be created:
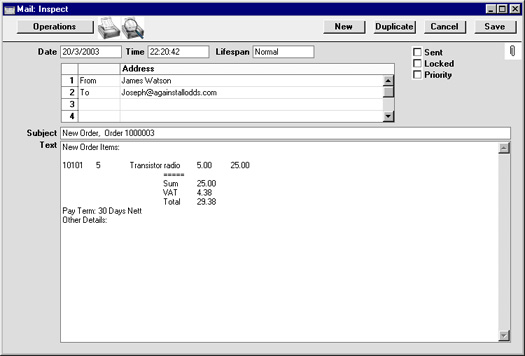
If the function does not create a Mail, the probable causes are:
- The current user does not have a Mailbox.
- The Contact Person and the Customer from the Order do not have email addresses.
- The Order has not been saved.
- Crear Proyecto
Utiliza esta función para crear un Proyecto desde la Orden de Venta. Esto será ventajoso para cuando un Cliente llame y coloque una Orden de servicios e inmediatamente haya la necesidad de crear un Proyecto. Asegúrate de haber guardado todos los cambios en la Orden y luego selecciona esta función. La ventana de la Orden se cerrará y se creará un nuevo Proyecto. Este Proyecto contendrá los detalles del Cliente desde la Orden de Venta. La Descripción del Proyecto será extraída desde al campo ‘Comentario’ en la solapa 'Térm. Entr.' de la Orden.El nuevo Proyecto se abrirá en una ventana titulada ‘Proyecto: Ver’. Esto significa que se habrá creado/guardado y está siendo abierto para su revisión. Después de hacer las enmiendas que fuesen necesarias, podrás guardar el archivo usando el botón [Guardar] y luego cerrar usando la casilla cerrar. Alternativamente, si es que ya no necesitas el Proyecto, entonces selecciona ‘Borrar’ desde el menú Registro.
El Número de Proyecto se copiará en el campo ‘Proyecto’ de la solapa 'Térm. Entr.' (Orden de Venta). Cuando se haya creado un Proyecto desde la Orden (ej. cuando el campo Proyecto no esté vacío), no podrás crear un segundo Proyecto. Tampoco podrás crear un Proyecto desde una Orden si ésta contiene Ítems prohibidos (usando la opción Manejo Ítem por Proyecto) en el módulo Proyectos:
- Únicamente se creará un Proyecto si la Orden contiene un Ítem de Stock y en tanto que hayas activado los radio botones ‘Órdenes de Venta’ y ‘Ambos, Cuidado!’ en ‘Sólo Ítems en Stock en’ dentro de la opción Manejo de Ítem por Proyecto.
- Únicamente se creará un Proyecto si la Orden contiene un Ítem Simple y en tanto hayas tildado la casilla ‘Órdenes de Venta’ en ‘Permitir Ítems Simples en’ dentro de la opción Manejo de Ítem por Proyecto.
No podrás crear un Proyecto desde una Orden cerrada.
- Crear Presupuesto de Proyecto
Utiliza esta función para crear un Presupuesto de Proyecto desde la Orden de Venta. Éste será una copia exacta de la Orden reduciendo el texto a cargar y disminuyendo el riesgo de error. Esto será particularmente ventajoso cuando hayas usado una Cotización para planificar con precisión aquellos Ítems (especialmente Ítems en Stock) que serán puestos a disposición para completar un Proyecto; y también en caso de haber acordado un precio especial para esos Ítems.El nuevo Presupuesto de Proyecto se abrirá en una ventana llamada ‘Presupuesto de Proyecto: Crear’. Esto significa que no ha sido guardado todavía. Cuando hayas verificado que el archivo está correcto o después de las enmiendas necesarias, guárdalo pulsando el botón [Guardar] y luego ciérralo usando la casilla cerrar. Alternativamente, si ya no requieres el Presupuesto de Proyecto, haz clic en [Cancelar]. En todo caso, aparecerá nuevamente la ventana de la Orden.
Si la función no crea un Presupuesto de Proyecto según lo esperado, entonces las causas probables son:
- Ya existe un archivo destinado a ser Presupuesto de Proyecto para el Proyecto en cuestión.
- La Orden ha sido marcada como Cerrada.
- El campo Proyecto está vacío en la solapa ''Térm. Entr' de la Orden.
- La Orden no ha sido guardada.
Operations Menu - Returned Goods
This function is used when goods that you have delivered to your Customer are returned to you. When this happens, open the Order and select 'Returned Goods' from the Operations menu. For the function to have any effect, all changes to the Sales Order must first have been saved (use the [Save] button), and at least one previous Delivery must be approved. An alternative method is to open the Delivery and select 'Return Goods' from the Operations menu.If you are using a FIFO stock system and/or cost accounting (maintaining stock values in the Nominal Ledger), the difficulty with the returning of goods to stock is that the system cannot know the actual cost (FIFO value) of the goods being returned. The purpose of the Returned Goods register is to allow the user to intervene in this process, so that the correct FIFO values can be recorded.
A new record is created in the Returned Goods register (in the Stock module). It is opened in a new window, entitled 'Returned Goods: Inspect'. This means that it has been created and saved and is being opened for amendment and approval.

Enter the returned Quantity for each Item and remove any Items not returned by clicking on the row number to the left and pressing the Backspace key. If necessary, change the Cost Price to the true value of the returned Item (which will be shown in the original Delivery record).
If an Item being returned is a Structured Item, you should list its components in the Return, not the Structured Item itself. Structured Items are built the moment the Delivery is made and are not kept in stock themselves. Therefore, they should not be included on a Return. Only the components should be listed on the Return: this will ensure they are correctly received back into stock.
If an Item being returned has a Serial Number, no Serial Number will be transferred from the Order to the Return. This is because the Serial Numbers of delivered Items are not all stored in Orders if the Order Quantity is greater than one. You must enter the correct Serial Number yourself on flip B.
If the goods were returned because they were faulty (i.e. the Customer requires a replacement), choose to reduce the shipped quantity using the options on the right-hand side of the screen. Then, once the Returned Goods record has been approved, when you return to the Order you can raise another Delivery for the appropriate quantity to fulfil the Order. In this instance you may choose not to update the stock levels and to write off the Items using the Stock Depreciation register. If you need to return the Items to your Supplier, it is recommended that you update stock levels and then enter a Stock Depreciation record.
Alternatively, the goods may have been returned without a replacement being required (perhaps the Order has been cancelled). In this case, choose to reduce the ordered quantity and to update stock levels. If the Order has been invoiced, you can credit the original Invoice using the 'Create Credit Note' Operations menu function on the Returned Goods screen. This will create a Credit Note with appropriate Payment Terms and a reference to the Invoice being credited.
When the Returned Goods record is complete, click the OK check box. This signifies that the Return has been approved. Once this has been done, you will no longer be able to modify the Returned Goods record. You will not be able to raise a credit Invoice for the goods that have been returned until the record has been approved. A stock transaction in the Nominal Ledger will be created if you have so determined using the Sub Systems setting in the Nominal Ledger.
A possible method of working might be to generate a Returned Goods record when the Customer contacts you to send back the delivered Items. The Number of the Returned Goods record can then be issued as a Returns Number. When the Items arrive, the record can be approved: this will alter the stock levels accordingly.
Please click here for a full description of the screen, including detailed information about any Nominal Ledger Transactions created when the Return is approved.
To close the screen and return to the Order, click the close box. You will be asked if you want to save any changes. The Del 1 and Del 2 fields of the Order (visible on flip D) will be updated automatically (as will the Order Quantity on flip A if you have so chosen).
Operations Menu - Stock Movement
If there is insufficient stock in the Location specified on the 'Del Terms' card to fulfil the Order (this can be ascertained using the 'Item Status' function), this function can be used to move any stock that might exist elsewhere into that Location. The Order must first have been saved before the function can be used, and there must be a Location specified on the 'Del Terms' card of the Order (unless a Main Location has been specified in the Stock Settings setting, in which case that Location will be used). The Order must not be closed, and it must have at least one row that has not been fully delivered.On selecting the function, a new record is created in the Stock Movement register (in the Stock module). It is opened in a new window, entitled 'Stock Movement: Inspect'. This means that it has been created and saved and is being opened for amendment and approval.
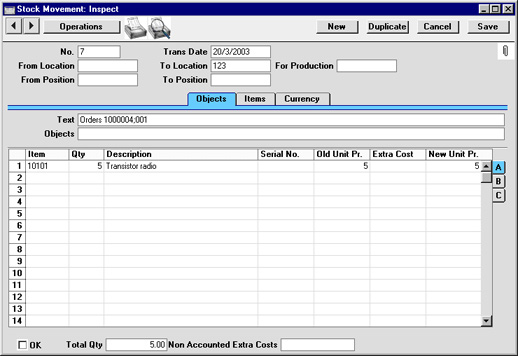
Enter a From Location (the Location from which the stock is to be moved), check the OK box and click the [Save] button to save.
The stock will be moved into the To Location. If the Do Not Allow Over Delivery option in the Stock Settings setting is being used, you will not be able to approve and save the Stock Movement if there is insufficient stock in the From Location for the transfer. This check will not be made for Plain or Service Items, whatever the setting of the Do Not Allow Over Delivery option. If you would like to ascertain yourself whether the From Location has sufficient stock for the transfer before approving and saving the Stock Movement, use the 'Item Status' function on the Operations menu or produce a Stock List report.
When the Stock Movement is approved and saved, the Old Unit Price will be changed to a FIFO or Weighted Average value. The Weighted Average cost of the Item (the average unit price of all previous purchases, visible on the 'Costs' card of the Item screen) is used if the Cost Model, Invoice in the Cost Model setting in the Sales Ledger has been set to Weighted Average. In all other cases, FIFO values are used. Also, if the FIFO per Location option in the Cost Accounting setting is on, any Extra Cost will be added to the FIFO value of the moved Item.
If you need to create Stock Movements in batches, use the 'Create Stock Movements' Maintenance function.
Please refer here for full details of the 'Stock Movement: Inspect' window, and here for detailed information about any Nominal Ledger Transactions created when the Stock Movement is approved.
Create Menu - Sales Order - Request Approval
This page describes the 'Request Approval' function on the Create menu in the Sales Order record window. If you are using iOS or Android, the 'Request Approval' function is on the + menu.---
If an Order has to pass through an approval process before you can create Deliveries from it (and before you can print it), ensure it is open in a record window and select 'Request Approval' from the Create menu (Windows/Mac OS X) or + menu (iOS/Android) to begin that approval process. Please refer to the description of the Approval Status field on the 'Inv. Address' card of the Order window for brief details about the approval process and here for full details.
---
The Sales Order register in Standard ERP:
- Introduction
- Entering a Sales Order
- Controlling Prices in Sales Orders
- Inspecting and Changing Sales Orders
- Printing Sales Orders
- Operations menu
- Create menu, including:
- Delivery
- Invoice
- Down Payment Invoice
- Purchase Order
- Workflow Activity
- Email
- Project
- Project Budget
- Returned Goods
- Stock Movement
- Request Approval
- Cancel Approval Request
- Add Customer
- Add Item
- Delivery
- Row menu
- Home page for Sales Orders manual
- Home page for Standard ERP manual
Create Menu - Sales Order - Cancel Approval Request
This page describes the 'Cancel Approval Request' function on the Create menu in the Sales Order record window. If you are using iOS or Android, the 'Cancel Approval Request' function is on the + menu (with 'wrench' icon).---
If an Order needs to go through an approval process before you can create Deliveries from it (and before you can print it) and you have started that approval process by selecting 'Request Approval' from the Create menu (Windows/Mac OS X) or + menu (iOS/Android), you will no longer be able to modify the Order. So, if you realise the Order contains an error, you must cancel the approval process before you can correct the error. To do this, open the Order and choose 'Cancel Approval Request' from the Create or + menu. You will now be able to amend the Order and then restart the approval process by once again choosing 'Request Approval'.
If you cannot cancel the approval process, the probable reasons are:
- The Approval Status of the Order (visible on the 'Inv. Address' card) is not Pending.
- You may have configured the approval process (using the Approval Rules register in the Business Alerts module) so that it does not allow cancellation.
- You cannot cancel the approval process if at least one Approval Person has approved the Order.
---
The Sales Order register in Standard ERP:
- Introduction
- Entering a Sales Order
- Controlling Prices in Sales Orders
- Inspecting and Changing Sales Orders
- Printing Sales Orders
- Operations menu
- Create menu, including:
- Delivery
- Invoice
- Down Payment Invoice
- Purchase Order
- Workflow Activity
- Email
- Project
- Project Budget
- Returned Goods
- Stock Movement
- Request Approval
- Cancel Approval Request
- Add Customer
- Add Item
- Delivery
- Row menu
- Home page for Sales Orders manual
- Home page for Standard ERP manual
Create Menu - Sales Order - Add Customer
This page describes the 'Add Customer' function on the Create menu in the Sales Order record window. If you are using iOS or Android, the 'Add Customer' function is on the + menu.---
The 'Add Customer' function provides an easy way of creating a new Customer record in the Contact register while looking at an Order. When you select the function from the Create menu (Windows/Mac OSX) or + menu (iOS/Android), the 'Contact: New' window will be opened immediately. The Customer check box will be ticked by default. If you entered a Customer Name, Invoice Address and/or Payment Terms in the Order, those details will be copied to the new Contact as well. Enter the new Customer's details and click [Save] (Windows/Mac OS X) or tap √ (iOS/Android). The new Customer will be saved, the window will be closed and the new Customer Number and other details will be entered in the Order. Please refer here for full details about the Contact register.
---
The Sales Order register in Standard ERP:
- Introduction
- Entering a Sales Order
- Controlling Prices in Sales Orders
- Inspecting and Changing Sales Orders
- Printing Sales Orders
- Operations menu
- Create menu, including:
- Delivery
- Invoice
- Down Payment Invoice
- Purchase Order
- Workflow Activity
- Email
- Project
- Project Budget
- Returned Goods
- Stock Movement
- Request Approval
- Cancel Approval Request
- Add Customer
- Add Item
- Delivery
- Row menu
- Home page for Sales Orders manual
- Home page for Standard ERP manual
Create Menu - Sales Order - Add Item
This page describes the 'Add Item' function on the Create menu in the Sales Order record window. If you are using iOS or Android, the 'Add Item' function is on the + menu.---
The 'Add Item' function provides an easy way of creating a new Item record while looking at an Order. When you select the function from the Create menu (Windows/Mac OSX) or + menu (iOS/Android), the 'Item: New' window will be opened immediately. If you entered an Item Number, Description, Unit Price, Sales Account, VAT Code/Tax Template Code and/or Cost Price in an Order row and left the insertion point in that row before selecting the function, those details will be copied to the new Item record. Enter the new Item's details and click [Save] (Windows/Mac OS X) or tap √ (iOS/Android). The new Item will be saved, the window will be closed and the new Item Number and other details will be entered in the first empty row in the Order. Please refer here for full details about the Item register.
---
The Sales Order register in Standard ERP:
- Introduction
- Entering a Sales Order
- Controlling Prices in Sales Orders
- Inspecting and Changing Sales Orders
- Printing Sales Orders
- Operations menu
- Create menu, including:
- Delivery
- Invoice
- Down Payment Invoice
- Purchase Order
- Workflow Activity
- Email
- Project
- Project Budget
- Returned Goods
- Stock Movement
- Request Approval
- Cancel Approval Request
- Add Customer
- Add Item
- Delivery
- Row menu
- Home page for Sales Orders manual
- Home page for Standard ERP manual
Row Menu - Sales Order
The matrix in the Sales Order window has its own menu, which contains functions that refer to or affect an individual row in the matrix. This is sometimes known as the "Row Menu".If you are using Windows or Mac OS X, you can open the Row menu by first clicking in any field in the row in question (i.e. the row to which the function is to be applied), and then right-clicking (Windows) or Ctrl-clicking (Mac OS X) the row number (on the left of the row). A menu will appear, where you can select the function that you need:

Please follow the links below for details about each function on the Row menu:
- Item Status
- Previous Sales Prices
- Add Header Line
- Add Hidden Line
- Add Subtotal
- Manager's Discount Override
The Sales Order register in Standard ERP:
- Introduction
- Entering a Sales Order
- Controlling Prices in Sales Orders
- Inspecting and Changing Sales Orders
- Printing Sales Orders
- Operations menu
- Create menu
- Row menu
- Home page for Sales Orders manual
- Home page for Standard ERP manual
Operations Menu - Item Status
This function provides instant feedback for the Item shown in the Order row containing the cursor or highlighted in the 'Paste Special' window listing Items, showing in a new window the quantity in stock, the quantity on order and the quantity shippable.Please click here for full details of this function.
Operations Menu - Previous Sales Prices
This function produces a report showing the prices previously charged to the Customer for one of the Items on the Order. Place the cursor in one of the rows of the Order and then select this function from the Operations menu. The report shows the most recent Order for each different price.- Agregar Línea de Encabezado
Utiliza función para insertar una línea encima de los Ítems en la Orden. Puedes utilizar este espacio para algún texto descriptivo en cualquier momento mientras ingresas la Orden. Se insertará un “Encabezado” especial dentro de la primera línea en la matriz. Puedes escribir el texto descriptivo dentro del campo a la derecha del texto “Encabezado”.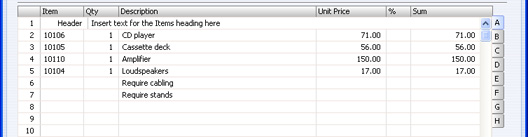
El “Encabezado” especial será transferido a todas las Facturas creadas desde la Orden, pero no a las Entregas.
Operations Menu - Add Hidden Line
This function can be used to ensure certain rows do not appear when the Order is printed.Enter the Order so that the rows to be printed are above those that are not to be printed. Then, place the cursor in the first row that is not to be printed. This cannot be the first row of the Order. Select this function and a new row is inserted. This new row and all those below it will not be printed.
- Agregar Subtotal
Utiliza esta función para incluir subtotales en las Órdenes. Coloca el cursor dentro de cualquier fila dentro de la matriz estando en la solapa 'Ítems' (o resalta toda la fila pulsando en su número). Luego selecciona la función desde el menú Operaciones. Así, se insertará una fila “Subtotal” especial dentro de la matriz y debajo de la fila que contiene al cursor. Un Subtotal se colocará en el campo ‘Suma’ (será la suma de las filas precedentes). En el campo situado a la izquierda de ‘Suma’, podrás escribir algún texto explicativo el cual aparecerá en la Orden cuando se imprima. Si ya existe una fila que muestre un subtotal, entonces solo los Ítems por debajo de esa fila serán incluidos en el nuevo subtotal.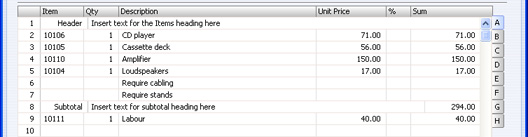
Row Menu - Sales Order - Manager's Discount Override
This page describes the 'Manager's Discount Override' function on the Row menu in the Sales Order record window. If you are using iOS or Android, the 'Manager's Discount Override' function is on the Tools menu (with 'wrench' icon).---
You can prevent users from saving an Order if they have entered a price (i.e. a unit price less discount) in any row that is below a specified minimum for the Item. To do this, follow these steps:
- Create a Price List (using the Price List register in the Pricing module).
- Create records in the Price register for each Item that is to have a minimum price, and specify the minimum price in the Price field in each one. Assign each Price record to the Price List from step 1.
- Open the Person records for each sales person and specify the Price List in the Minimum Price List field on the 'Sales' card.
In some circumstances, you may wish to allow the saving of an Order with at least one row in which the Unit Price less Discount is below the minimum. In order to allow the Order to be saved, a manager must approve the price. A manager in this context is a Person with a Discount Password, set using the 'Change Discount Password' function on the Operations menu of the 'Persons: Browse' window (on the Tools menu if you are using iOS or Android).
To approve the price, the manager should follow these steps:
- Click in any field in the row in which the Unit Price less Discount is less than the minimum.
- Open the Row menu by right-clicking (Windows) or ctrl-clicking (Mac OS X) the row number and select this 'Manager's Discount Override' function. If you are using iOS or Android, select 'Manager's Discount Override' from the Tools menu (with 'wrench' icon). The 'Manager's Override for Discount' window will open:
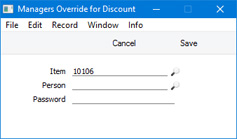
- Enter their Signature and Discount Password (not log-in password) and click (Windows/Mac OS X) or tap (iOS/Android) the [Save] button.
- Repeat the previous steps for each row in which the Unit Price less Discount is less than the minimum.
You can also specify a Minimum Price List in the manager's Person record. This will have two consequences:
- The manager will not be able to use the 'Manager's Discount Override' function to approve a price that is lower than the minimum specified in their Minimum Price List; and
- After the manager has approved a price in an Order row, the price specified in their Minimum Price List will become the new minimum for that row.
---
The Sales Order register in Standard ERP:
- Introduction
- Entering a Sales Order
- Controlling Prices in Sales Orders
- Inspecting and Changing Sales Orders
- Printing Sales Orders
- Operations menu
- Create menu
- Row menu, including:
- Item Status
- Previous Sales Prices
- Add Header Line
- Add Hidden Line
- Add Subtotal
- Manager's Discount Override
- Item Status
- Home page for Sales Orders manual
- Home page for Standard ERP manual