Introducción al Registro de Contacto
El resgistro de Contacto es donde guardarás información de cada empresa o persona con la que tienes contacto, pueden ser Clientes, Proveedores, empresas de envíos, fábricas, prospectos o individuos que trabajan para esas empresas. El registro de contacto, no necesariamente representa firmas que han comprado items o servicios a tu empresa, o vendido items o servicios a tu compañía, de hecho pueden representar cualquier empresa que sea un potencial cliente o proveedor. También deberías guardar información sobre personas en el registro de contacto: estas pueden ser personas individuales que trabajan para tus clientes o proveedores. La persona de contacto y el cliente o proveedor, quedará relacionada usando el registro Relaciones de Contacto (descripto aquí).El registro es accesible desde los módulos de Ventas, Compras, Ordenes de Venta, Ordenes de Compras, Contratos, Cotizaciones, CRM, y Ordenes de Servicio, si esta instalado. Para abrirlo primero usar el botón de [Seleccionar Módulo] en el Centro de Navegación para entrar alguno de estos módulos. Luego haz click (Windows/Mac OS X) o presiona (iOS/Android) el botón [Registros], también en el centro de Navegación y doble-click en ‘Contactos’ en la lista resultante.
La ventana Contactos: Hojear se abrirá, mostrando los contactos que haz ingresado.
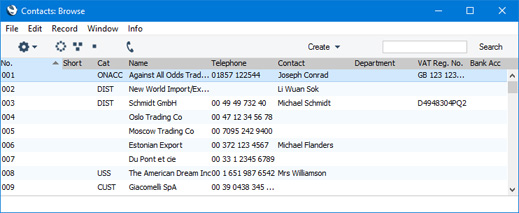
Si estas usando Windows o Mac OS X, puedes cambiar el orden haciendo click en el encabezado de la columna. La columna actual de orden es marcada en su encabezado pintada de azul. Si estas usando iOS o Android, presiona en cualquier columna y selecciona el orden que necesites.. Repetí el proceso para reversa el orden.
Para buscar un contacto en particular dependerá si estas usando la opción Filtro en el Ventana hojear , configurable en Opciones Funcionales en opciones del módulo Sistemas:
- Si no estas usando la opción Filtros de Ventana Hojear, primero orden por la columna que quieras hacer la búsqueda. Luego, entra el texto que necesites encontrar en el campo Buscar en la parte superior de la ventana y presiona enter (Mac OS X) o Buscar (iOS/Android). El primer registro que concuerde con tu búsqueda será marcado. Por ejemplo, para buscar por un nombre de contacto en particular, ordenar primero por nombre antes de ingresar el nombre del contacto (o sus primeras letras) en el campo Buscar.
- Si estas usando la opción Filtros de Ventana Hojear, todo lo que necesitas hacer es comenzar a tipper letras, palabras números, o fechas en el campo Buscar (no es necesario hacer click en el campo para tipear). Mientras tipeas todos los registros que no coincidan serán removidos de la lista. No es necesario ordenar la lista.

- Listas Contactos.

- Lista contactos donde el campo vendedor contiene la Firma de un usuario que pertenece al mismo grupo que el usuario actual.

- Lista contactos donde el campo vendedor contiene la Firma del usuario actual.
---
El registro de contacto en Standard ERP:
- Introducción
- Ingresando un Contacto
- Editando un Contacto
- Borrando un Contacto
- Relacionando Personas de contacto y Empresas
- Menú de Operaciones
- Menú Crear
- Pagina Principal del manual de Clientes, Proveedores y Personas de Contacto
- Pagina Principal para el manual de Standard ERP
Ingresando un Contacto
Para ingresar un nuevo Contacto, abri la ventana ‘Contactos: Hojear’ tal como se describe abajo y seleccioná ‘Nuevo’ desde el Menú Crear (Windows/Mac OS X) o desde el + menu (iOS/Android). También podes usar los atajos Ctrl-N (Windows) o ⌘-N (Mac OS X) . Alternativamente, puedes marcar un contacto similar al que necesitas crear y seleccioná ‘Duplicar’ desde el mismo menú. Si no quieres abrir la ventana de 'Contactos: Hojear’ antes de crear un nuevo registro, también puedes usar + menu en el Centro de Navegación en todas las plataformas.En la mayoría de los países, la ventana 'Contacto: Nuevo’ se abrirá vacia o contendrá los datos duplicados de otro . Completá los datos apropiados como se describe en las paginas mencionadas debajo, luego graba el registro haciendo click en el botón [Guardar] (Windows/Mac OS X) o presionando √ (iOS/Android) luego cierra la ventana.
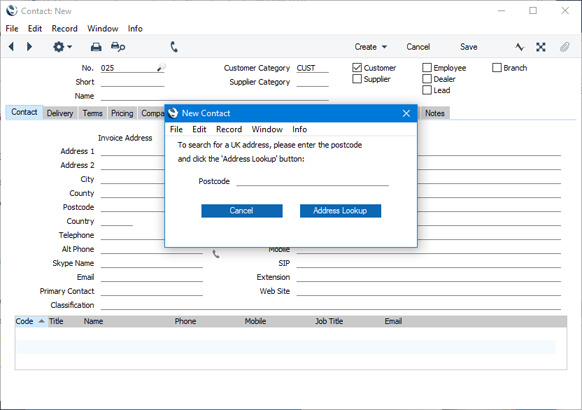
Si estas radicado en Estonia, Letonia, Lituania o Reino Unido y has seleccionado ‘Nuevo’, una ventana ‘Nuevo Contacto’ se abrirá:
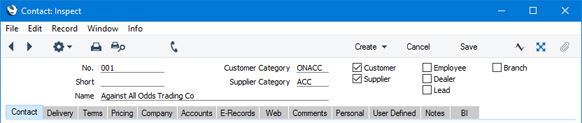
Como la información a guardar por cada cliente no cabe en una sola ventana, el registro Contacto fue dividido en 12 solapas (y si tienes acceso al módulo BI, serán 13)). Arriba de todo estará el encabezado. Este contiene el Número de contacto, código. breve, la categoría de Cliente y de proveedor, y los check box indicando que es. Hay 12 (o 13) solapas en el encabezado

Si estas usando iOS o Android, las solapas se vegan verticalmente.
Ingresar información en el registro de contacto, mayormente requiere que te refieras a opciones del modulo Ventas usando la función 'Pegado Especial’. Donde el uso de 'Pegado Especial’ es apropiado, será indicado en el texto junto con el módulo donde sera encontrado. Por favor has click en los links para mayor detalle.
---
El registro de contacto en Standard ERP:
- Introducción
- Entering a Contact, Incluyendo:
- Encabezado
- solapa ’Contacto’
- Solapa ’Entrega’
- Solapa 'Terminos’
- Solapa’Términos’ - Casillas
- Solapa’Precios’
- Solapa’Empresa’
- Solapa’Cuentas’
- Solapa’Reg. Elect.’
- Solapa'Web'
- Solapa'Comentarios'
- Solapa'Personal'
- Solaopa'Def.p/usuario’
- Solapa'Notas'
- Solapa'BI'
- Encabezado
- Editando un Contacto
- Borrando a Contacto
- Relacionando Personas de Contacto con Contacto
- Menú Operaciones
- Create menu
- Página Principal del manual de Clientes, Proveedores y Personas de Contacto
- Página Principal del manual de Standard ERP
Ingresando un contacto - Encabezado
Esta página describe los campos del encabezado del registro de contacto. Siga los enlaces a continuación para obtener descripciones de las otras pestañas:- Encabezado
- Pestaña 'Contacto'
- Pestaña 'Entrega'
- Pestaña ’Términos’: campos
- Pestaña ’Términos’ - Check boxes
- Pestaña 'Precios’
- Pestaña 'Empresa'
- Pestaña 'Cuentas'
- Pestaña 'E-Records'
- Pestaña 'Web'
- Pestaña 'Comentarios'
- Pestaña 'Personal'
- Pestaña 'Definido por el usuario'
- Pestaña 'Notas'
- Pestaña 'BI'
- No.
- Pegado especial
Seleccione desde otros Números de serie
- Ingrese el código único que está asignando al contacto: este es el medio por el cual este contacto se identificará en otra parte del Standard ERP.
- En la mayoría de los países, un número de contacto puede constar de hasta 20 caracteres alfanuméricos. Sin embargo, en Noruega (es decir, si la ley del IVA en la configuración información de la empresa es “Noruega") y si ha marcado la casilla Cliente que se describe a continuación, solo podrá utilizar números, no alfabéticos u otros caracteres no numéricos. En Finlandia, si ha marcado la casilla Cliente , solo podrá utilizar números y habrá un máximo de ocho dígitos.
- Se ofrecerá un valor predeterminado, basado en el número de contacto del registro anterior ingresado. Puede cambiar el valor predeterminado, pero no a un número que ya se haya utilizado. Si ha definido al menos una secuencia numérica en la configuración Números de serie - Contactos, el número al que cambie debe estar dentro de una secuencia numérica válida.
- Si está trabajando en un entorno multiusuario, el número de contacto se asignará cuando guarde el contacto por primera vez.
Después de haber guardado un contacto, no puede cambiar el número de contacto simplemente escribiendo en el campo. Si necesita cambiar un número de contacto, use la configuración Conversiones - Contactos en el módulo Sistema. Esta configuración cambiará el número de contacto tanto aquí como en todos los demás registros en los que se haya utilizado el contacto.
- En la mayoría de los países, un número de contacto puede constar de hasta 20 caracteres alfanuméricos. Sin embargo, en Noruega (es decir, si la ley del IVA en la configuración información de la empresa es “Noruega") y si ha marcado la casilla Cliente que se describe a continuación, solo podrá utilizar números, no alfabéticos u otros caracteres no numéricos. En Finlandia, si ha marcado la casilla Cliente , solo podrá utilizar números y habrá un máximo de ocho dígitos.
- Cod. Breve
- Use este campo si necesita un medio alternativo para identificar un contacto; la información que ingrese aquí aparecerá en la columna Breve en las ventanas de navegación de Contactos y 'Pegado especial'. Puede dar el mismo código corto a contactos de naturaleza similar para que se agrupen en las ventanas de exploración y 'Pegado especial' cuando los clasifique por la columna Breve. El campo contiene hasta diez letras y / o números.
- Categoría de cliente
- Pegado especial
Categorías de clientes, Ventas
- Valor predeterminado tomado de Configuración de contacto (Categoría de cliente predeterminada)
- Categoría de proveedor
- Pegado especial
Categorías de proveedores, Compras
- Si un contacto es un cliente, puede asignarlo a una categoría de cliente. Si es un Proveedor, puede asignarlo a una Categoría de Proveedor.
- La categoría de cliente es un medio para clasificar a los clientes. Los clientes que pertenecen a la misma categoría pueden utilizar la misma lista de precios predeterminada, matriz de descuento y cuenta deudor, lo que le ahorra el trabajo de tener que especificarlos para cada cliente individualmente. Si ingresó una Categoría de cliente predeterminada en la opción Configuración de contacto, se ingresará aquí automáticamente. Si un contacto es un cliente, debe ingresar una categoría de cliente si está utilizando la opción de categoría de cliente de demanda en la misma opción.
- De manera similar, las categorías de proveedores le permiten agrupar proveedores similares. Los proveedores que pertenecen a la misma categoría pueden utilizar las mismas cuentas predeterminadas de acreedor y a cuenta, lo que le ahorra el trabajo de tener que especificarlas para cada proveedor individualmente.
- La categoría de cliente es un medio para clasificar a los clientes. Los clientes que pertenecen a la misma categoría pueden utilizar la misma lista de precios predeterminada, matriz de descuento y cuenta deudor, lo que le ahorra el trabajo de tener que especificarlos para cada cliente individualmente. Si ingresó una Categoría de cliente predeterminada en la opción Configuración de contacto, se ingresará aquí automáticamente. Si un contacto es un cliente, debe ingresar una categoría de cliente si está utilizando la opción de categoría de cliente de demanda en la misma opción.
- Nombre
- Ingrese el nombre del contacto.
- Si desea que el nombre del contacto se imprima como parte de la dirección en todos los documentos, seleccione la opción Nombre de la empresa en la opción Opciones de formulario en el módulo sistema.
- Si desea que el nombre del contacto se imprima como parte de la dirección en todos los documentos, seleccione la opción Nombre de la empresa en la opción Opciones de formulario en el módulo sistema.
- Cliente, proveedor
- Marque una o ambas casillas si el contacto que ingresa es un cliente o proveedor potencial o real (o ambos). Si el contacto es una persona de contacto que trabaja para un cliente o una empresa proveedora, no marque ninguna de estas casillas a menos que la persona de contacto también sea un cliente o proveedor a título privado.
- Si originalmente abrió el registro de contactos en un módulo orientado a las ventas (por ejemplo, el módulo de Ventas u Ordenes de ventas), el nuevo registro se marcará como Cliente automáticamente. Si originalmente abrió el registro de contacto en un módulo orientado a la compra (por ejemplo, el módulo de Compras o de Órdenes de compra), el nuevo registro se marcará como Proveedor automáticamente. De manera similar, si creó el nuevo registro haciendo clic en el botón [Nuevo] en la ventana "Pegado especial" de los contactos, estas casillas de verificación se establecerán automáticamente según el contexto. Por ejemplo, si ingresó una orden de venta, activó 'Pegado especial' en el campo Cliente y hace clic en [Nuevo], el nuevo registro se marcará como Cliente.
- Si ha marcado un Contacto como Cliente únicamente, podrá utilizarlo en todos los registros de ventas (por ejemplo, Cotizaciones, Ordenes de Venta, Facturas de venta, Entregas), pero no en ningún registro de compras. Del mismo modo, si lo ha marcado solo como Proveedor, podrá utilizarlo en todos los registros de compras (p. Ej., Órdenes de compra, Facturas de Compra, Mercaderías Recibidas), pero no en ningún registro de ventas. Puede utilizar tanto a Clientes como a Proveedores en Actividades (es decir, en Calendario y Administrador de Tareas), Cartas a clientes y Correos.
- Una vez que haya marcado un contacto como cliente y haya emitido al menos una orden de venta o factura a ese contacto, no podrá quitar la marca de la casilla de cliente. Del mismo modo, si ha marcado un Contacto como Proveedor y ha recibido al menos una Orden de Compra o Factura de ese Contacto, no podrá quitar la marca de la casilla Proveedor.
- A lo largo de este documento, el término "Cliente" se ha utilizado para referirse a los Contactos marcados como Clientes, y el término "Proveedor" se refiere a los Contactos marcados como Proveedores.
- Puede usar Grupos de acceso para evitar que los usuarios creen y / o modifiquen Clientes y Proveedores. Asígnelos a Grupos de acceso en los que haya denegado el acceso a las acciones 'Crear clientes', 'Crear proveedores', 'Cambiar detalles del cliente' y / o 'Cambiar proveedores' según sea necesario.
- Si originalmente abrió el registro de contactos en un módulo orientado a las ventas (por ejemplo, el módulo de Ventas u Ordenes de ventas), el nuevo registro se marcará como Cliente automáticamente. Si originalmente abrió el registro de contacto en un módulo orientado a la compra (por ejemplo, el módulo de Compras o de Órdenes de compra), el nuevo registro se marcará como Proveedor automáticamente. De manera similar, si creó el nuevo registro haciendo clic en el botón [Nuevo] en la ventana "Pegado especial" de los contactos, estas casillas de verificación se establecerán automáticamente según el contexto. Por ejemplo, si ingresó una orden de venta, activó 'Pegado especial' en el campo Cliente y hace clic en [Nuevo], el nuevo registro se marcará como Cliente.
- Huésped
- Si está utilizando el módulo Hotel y un contacto es un huésped del hotel, marque esta casilla. Si originalmente abrió el registro de contacto desde el módulo de hotel, el nuevo registro se marcará tanto como cliente como invitado automáticamente.
- Empleado
- Si un contacto es un empleado, marque esta casilla.
- Debe marcar esta casilla en un registro de contacto que esté conectado al registro de persona de un usuario.
- El módulo de Gestión de Recursos Humanos contiene un registro Empleado, que es un subconjunto del registro de contactos. Cuando abra el registro de Empleados, la ventana de exploración solo contendrá aquellos Contactos que se hayan marcado como Empleados. Si agrega un nuevo registro al registro de Empleados (o al registro de Contactos después de abrirlo en el módulo de Gestión de Recursos Humanos), el nuevo registro se marcará como Empleado automáticamente. Debe marcar un contacto como empleado si necesita usar ese contacto en un contrato de trabajo.
- Debe marcar esta casilla en un registro de contacto que esté conectado al registro de persona de un usuario.
- Leads
- Si un contacto es un cliente potencial, marque esta casilla.
- El módulo CRM contiene una opción Leads, que es un subconjunto del registro de contactos. Cuando abre la opción de Leads, la ventana de exploración solo contendrá aquellos Contactos que se han marcado como Leads. Si agrega un nuevo registro a la opción de Leads, el nuevo registro se marcará como un Lead automáticamente. Debe marcar un contacto como Lead si necesita usar ese contacto en una Oportunidad.
El registro de contactos en Standard ERP:
- Introducción
- Ingresando un contacto, que incluye:
- Encabezado
- Pestaña 'Contacto'
- Pestaña 'Entrega'
- Pestaña ‘Términos’ Campos
- Pestaña ‘Términos’ - Check boxes
- Pestaña 'Precios’
- Pestaña 'Empresa'
- Pestaña 'Cuentas'
- Pestaña 'E-Records'
- Pestaña 'Web'
- Pestaña 'Comentarios'
- Pestaña 'Personal'
- Pestaña 'Definido por el usuario'
- Pestaña 'Notas'
- Pestaña 'BI'
- Encabezado
- Editando un contacto
- Borrar un contacto
- Vinculación de personas de contacto y empresas - Registro de relaciones de contacto
- Menú de operaciones
- Crear menú
- Página de inicio del manual Clientes, proveedores y personas de contacto
- Página de inicio del manual de Standard ERP
Ingresando un contacto - Pestaña Contacto
Esta página describe los campos de la Pestaña "Contacto" del registro de contacto. Siga los enlaces a continuación para obtener descripciones de las otras Pestañas:
- Encabezado
- Pestaña "Contacto"
- Pestaña 'Entrega'
- Pestaña ‘Términos’: campos
- Pestaña ‘Términos’ - Casillas
- Pestaña 'Precios’
- Pestaña 'Empresa'
- Pestaña 'Cuentas'
- Pestaña 'E-Records'
- Pestaña 'Web'
- Pestaña 'Comentarios'
- Pestaña 'Personal'
- Pestaña 'Definido por el usuario'
- Pestaña 'Notas'
- Pestaña 'BI'
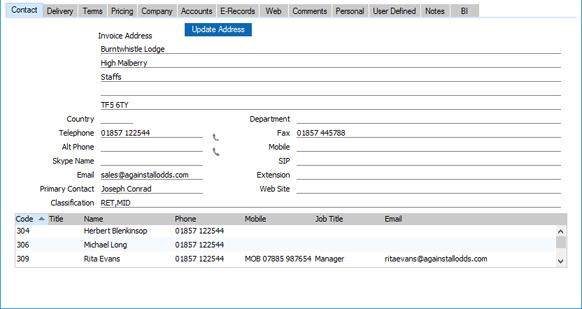
- Dirección Factura
- Usado por defecto en Ordenes de
Ventas y Compras, Facturas de Venta
- Introduzca aquí la dirección a la que se enviarán las facturas de venta, extractos, órdenes de compra y pagos.
- Si desea dar un nombre a cada una de las líneas de direcciones individuales, use la Pestaña 'Dirección' de la opción Campos definidos por el usuario - Contactos en el módulo CRM. Esto puede resultar útil si, por ejemplo, desea indicar que el pueblo o la ciudad siempre deben escribirse en la tercera línea de la dirección:
Los nombres de línea de dirección que especifique en la opción Campos definidos por el usuario - Contactos se utilizarán para esta Dirección de factura, para la Dirección de entrega en la Pestaña 'Entrega' y para las direcciones en otros registros (por ejemplo, en Cotizaciones, Pedidos y Facturas).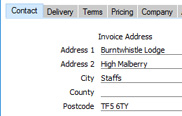
- En el Reino Unido, se recomienda que utilice la quinta línea de la dirección para el código postal. Esto le permitirá utilizar la función "Actualizar dirección" (descrita inmediatamente a continuación) y también el botón [Mapa] en la ventana 'Centro de comunicación'.
- Si va a utilizar Standard ERP para controlar el procesamiento de pagos con Tarjeta de crédito y débito y si su proveedor de Tarjeta de crédito verifica que las direcciones de los titulares de la tarjeta sean correctas, utilice la quinta línea de la dirección para los códigos postales (Reino Unido ) o la cuarta línea de la dirección del código de estado de dos caracteres (EE. UU.). Esto garantizará que los códigos postales / códigos de estado de los titulares de la tarjeta se envíen al proveedor correctamente. Consulte la página Procesando pagos con tarjeta de crédito y débito a través del Standard ERP para obtener más detalles sobre los pagos con tarjeta de crédito.
- Si desea dar un nombre a cada una de las líneas de direcciones individuales, use la Pestaña 'Dirección' de la opción Campos definidos por el usuario - Contactos en el módulo CRM. Esto puede resultar útil si, por ejemplo, desea indicar que el pueblo o la ciudad siempre deben escribirse en la tercera línea de la dirección:
- Actualizar dirección
- En el Reino Unido, puede utilizar este botón para obtener la dirección del contacto de una base de datos central de códigos postales. Ingrese el código postal del contacto (con o sin espacio) en la quinta línea de la dirección de la factura y luego presione este botón. El nombre de la calle se colocará en la primera línea de la dirección y se incluirán otros detalles de la dirección según corresponda. También se abrirá una lista de locales, donde puede seleccionar el número de edificio correcto, el nombre del edificio o el nombre de la empresa haciendo doble clic. El nombre de la empresa se copiará en el campo Nombre de arriba si está vacío, y el número o nombre del edificio (si lo hubiera) se incorporará en la primera línea de la dirección.
- Del mismo modo, en Estonia, Letonia, Lituania, Noruega y Suecia puede obtener la dirección de factura del contacto de una base de datos centralizada de números de registro de la empresa. Ingrese el número de registro de la compañía del contacto en la Pestaña ‘Empresa’ (en el campo Reg. No. 1 o Reg. No. 2, con prioridad para el registro No. 2) y luego presione este (se proporciona un botón duplicado en la Pestaña ‘Empresa' para que pueda presionar el botón inmediatamente después de ingresar el número de registro 1 o el número de registro 2). El nombre de la empresa, la dirección de la factura y otra información según el país se incluirán en los campos correspondientes. En Estonia, Letonia y Lituania, el número de registro de la empresa se colocará en el registro. Campo No. 1 si anteriormente estaba en Reg. No. 2.
- Búsqueda de direcciones es un servicio en la nube con cargo. Para usarlo, debe haber registrado su base de datos en Estonia, Letonia, Lituania, Noruega, Suecia o el Reino Unido utilizando el método Automatic Internet Enabler, como se describe en la página Enabler Key. Dependiendo de dónde esté registrada su base de datos, es posible que pueda comenzar a utilizar el servicio de búsqueda de direcciones de inmediato utilizando el esquema de precios predeterminado. Comuníquese con su representante local de HansaWorld para obtener más detalles.
- Si se encuentra en Canadá o EE. UU. y ha registrado una cuenta de Avalara en su base de datos de Standard ERP, puede usar el botón [Actualizar dirección] después de ingresar una dirección de factura para verificar que la dirección sea correcta. Si es correcto, los caracteres se convertirán a mayúsculas, pero si la dirección no es correcta o no es reconocida por Avalara, los caracteres se dejarán como están.
- Del mismo modo, en Estonia, Letonia, Lituania, Noruega y Suecia puede obtener la dirección de factura del contacto de una base de datos centralizada de números de registro de la empresa. Ingrese el número de registro de la compañía del contacto en la Pestaña ‘Empresa’ (en el campo Reg. No. 1 o Reg. No. 2, con prioridad para el registro No. 2) y luego presione este (se proporciona un botón duplicado en la Pestaña ‘Empresa' para que pueda presionar el botón inmediatamente después de ingresar el número de registro 1 o el número de registro 2). El nombre de la empresa, la dirección de la factura y otra información según el país se incluirán en los campos correspondientes. En Estonia, Letonia y Lituania, el número de registro de la empresa se colocará en el registro. Campo No. 1 si anteriormente estaba en Reg. No. 2.
- País
- Pegado especial
Pais, módulo Sistema
- Ingrese el país en el que se encuentra el contacto.
- Cuando especifica un país, la zona de IVA, el código de flete, la lista de precios, la matriz de descuento y las etiquetas / objetos de venta se obtendrán del registro correspondiente en la opción de países.
- Si ingresa un número de registro de IVA en la Pestaña ‘Empresa’, se realizará una verificación de validación automática de que está en el formato correcto para el país. Esta verificación de validación requiere que haya definido formatos de número de IVA para cada país en la opción Máscaras de número de registro de IVA en el módulo Sistema.
- Si se encuentra en el Reino Unido y utilizará el Standard ERP para controlar el procesamiento de los pagos con tarjeta de crédito y débito y si el proveedor de su tarjeta de crédito verificará que las direcciones de los titulares de la tarjeta sean correctas, debe ingresar "GB " en este campo. Los proveedores esperan "GB" y no reconocen "UK". Consulte la página Procesando pagos con tarjeta de crédito y débito a través del Standard ERP para obtener más detalles sobre los pagos con tarjeta de crédito.
- También en el Reino Unido, si necesita utilizar el ’Facturas Intrastat (UK)' y ’Facturas de Compra Intrastat (UK)' Exportar funciones en ventas y compras, debe especificar los países en los registros de contacto para cada cliente y proveedor. En el caso de Clientes y Proveedores nacionales (es decir, Clientes y Proveedores en el Reino Unido), ingrese "GB": no deje el campo vacío. Las funciones de Exportación de Intrastat usarán este País para determinar si se debe incluir una Factura en el archivo de exportación de Intrastat, y también lo incluirán en el archivo de exportación como el país al que se exportaron las mercancías en una Factura o desde donde se importaron. HM Revenue y Customs requiere que utilice códigos de país ISO de dos caracteres: puede encontrar una lista en su documento Notice 60, disponible en https://www.uktradeinfo.com/Intrastat/IntrastatServices/Pages/Notice60.aspx .
- Cuando especifica un país, la zona de IVA, el código de flete, la lista de precios, la matriz de descuento y las etiquetas / objetos de venta se obtendrán del registro correspondiente en la opción de países.
- Departamento
- Puede registrar el nombre de un Departamento aquí. Esto puede ser necesario si se trata de varios departamentos de la misma empresa.
- Alternativamente, si su empresa tiene varios departamentos, puede especificar aquí el responsable de las relaciones con esta empresa.
- Puede ordenar el informe Lista de clientes por departamento.
- Alternativamente, si su empresa tiene varios departamentos, puede especificar aquí el responsable de las relaciones con esta empresa.
- Teléfono, fax, teléfono alternativo, móvil, nombre de Skype, SIP, correo electrónico, extensión
- Ingrese el teléfono principal, los números de fax y móvil, las direcciones de correo electrónico y SIP y el nombre de Skype del contacto en estos campos. Utilice el campo Teléfono alternativo para registrar un número de contacto alternativo, como el teléfono particular o el número de fax personal.
- Si está utilizando servidor de fax Standard ERP, el número de fax se utilizará al enviar documentos por fax al contacto. El servidor de fax no enviará faxes a números que contengan espacios, guiones u otros caracteres no numéricos, por lo que no utilice estos caracteres. Puede usar la función de mantenimiento 'Actualizar números de fax' en el módulo Técnico para eliminar caracteres ilegales de los números de fax en los registros de contactos.
- La dirección de correo electrónico se utilizará cuando necesite enviar Correos a la empresa, y cuando necesite enviar Cartas por . Si no desea que las direcciones de correo electrónico se impriman en los informes Lista de cumpleaños, Lista de contactos, Lista de leads, Información de recursos y Reservaciones no confirmadas o exportadas por , Lista de contactos a Palm3 y las funciones de exportación de Lista de relaciones de contactos, seleccione la opción Excluir todos los correos electrónicos de contactos de los informes en la opción configuración de correo y conferencia en la Módulo de E-mail y conferencias. Si necesita que las direcciones de correo electrónico sean únicas (es decir, si desea que no se pueda utilizar la misma dirección de correo electrónico en más de un registro de contacto), seleccione la opción Correo electrónico en la Pestaña 'Registro' en Configuración de mi cuenta en el módulo Tienda web y CMS.
- Si necesita llamar al contacto, haga clic o toque el botón [Comunicar] en la barra de botones:
Se abre la ventana 'Centro de comunicación', que muestra los datos de contacto del contacto en el área de la derecha:
Sujeto a que su computadora o red tenga el software y hardware de conexión adecuados y que su base de datos esté configurada correctamente, haga clic en un método de contacto de la lista y luego haga clic en el botón correspondiente. Para obtener más detalles, consulte aquí. Si va a utilizar la ventana 'Centro de comunicación' para comunicarse con el contacto mediante métodos como SkypeOut y Asterisk, los números de teléfono y móvil del contacto solo pueden contener números, espacios, guiones y el signo +. No deben contener otros caracteres como puntos, paréntesis o caracteres alfabéticos. Puede utilizar el informe Listar números de teléfono no válidos en el módulo CRM para verificar si hay caracteres ilegales en los campos Teléfono, Teléfono alternativo, Fax y Móvil en cada contacto.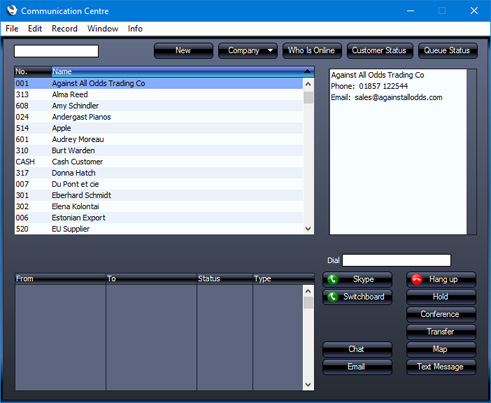
- También puede hacer clic o tocar los botones del teléfono en los campos individuales:
Si ha elegido un método de llamada preferido en la configuración de la máquina local en el módulo de configuración del usuario (Pestaña 'Integraciones'), se iniciará una llamada utilizando ese método de llamada al número en el campo cuyo botón de teléfono usaste. Si no ha elegido un Método de llamada preferido o su base de datos no se ha configurado correctamente para el Método de llamada preferido seleccionado, se abrirá la ventana 'Centro de comunicación'. La configuración de la máquina local es específica de la máquina que está utilizando, por lo que puede haber diferentes métodos de llamada preferidos en diferentes máquinas.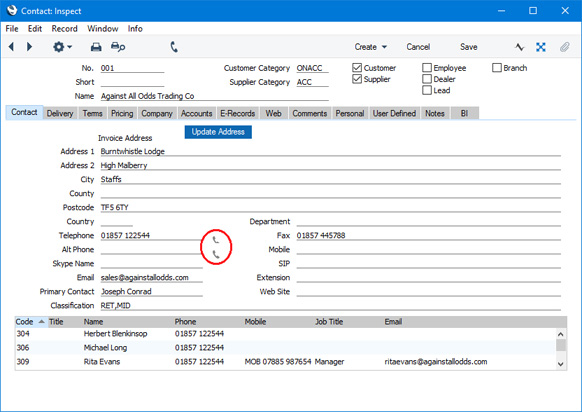
- Si está utilizando servidor de fax Standard ERP, el número de fax se utilizará al enviar documentos por fax al contacto. El servidor de fax no enviará faxes a números que contengan espacios, guiones u otros caracteres no numéricos, por lo que no utilice estos caracteres. Puede usar la función de mantenimiento 'Actualizar números de fax' en el módulo Técnico para eliminar caracteres ilegales de los números de fax en los registros de contactos.
- Contacto principal
- Pegado especial
Personas de contacto en el registro de contactos
- Si un contacto es una empresa u organización (es decir, no una persona individual), utilice este campo para registrar el nombre de su persona de contacto más importante en esa empresa u organización.
Si necesita conectar la empresa u organización con otras personas de contacto, utilice la función 'Persona de contacto vinculada' en el menú Crear (si una persona de contacto aún no tiene su propio registro en el registro de contactos) o la función 'Vincular contacto existente' función en el menú Operaciones (si una persona de contacto ya tiene su propio registro en el registro de contactos).
- Cuando utilice el registro de contacto de la empresa u organización en cualquier transacción, el contacto principal se copiará en esa transacción de forma predeterminada. Por ejemplo, si especifica la empresa u organización en una Factura de venta como Cliente, su Contacto principal se copiará en el campo Atención en esa Factura. Por supuesto, puede cambiar a otra persona de contacto en ese campo de atención. La lista 'Pegado especial' de ese campo solo contendrá Personas de contacto que trabajen para el Cliente.
- Si va a enviar documentos por correo electrónico a la empresa u organización y necesita especificar que determinados documentos se enviarán a determinadas Personas de Contacto (por ejemplo, que las Facturas deben enviarse a una Persona de Contacto y que los extractos deben enviado a otra persona de contacto), utilice la configuración destinatarios de correo electrónico adicionales en el módulo CRM para configurarlo.
- Consulte la página Vinculación de contactos y empresas para obtener más detalles sobre cómo conectar una empresa u organización a sus Personas de contacto.
- Cuando utilice el registro de contacto de la empresa u organización en cualquier transacción, el contacto principal se copiará en esa transacción de forma predeterminada. Por ejemplo, si especifica la empresa u organización en una Factura de venta como Cliente, su Contacto principal se copiará en el campo Atención en esa Factura. Por supuesto, puede cambiar a otra persona de contacto en ese campo de atención. La lista 'Pegado especial' de ese campo solo contendrá Personas de contacto que trabajen para el Cliente.
- Sitio web
- Si el contacto tiene un sitio web, ingrese su dirección (URL) aquí.
- Clasificación
- Pegado especial
Clasificación, módulo CRM
- Junto con las categorías de clientes y proveedores, puede utilizar las clasificaciones de contactos para agrupar los contactos de un tipo similar. Puede utilizar la Clasificación como criterio de envío de informes y correo en el módulo CRM y en el ventas. Puede asignar varias clasificaciones a cada registro de contacto, separadas por comas.
- Si ha asignado un contacto a una categoría de cliente en el que ha especificado algunos tipos de clasificación, debe ingresar clasificaciones que pertenecen a cada uno de esos tipos en este campo antes de poder guardar el contacto .
- Dos funciones de mantenimiento, 'Agregar clasificación a los contactos' en el módulo CRM y 'Actualizar clasificación de clientes' en ventas, le permiten asignar clasificaciones a los contactos en función de varios criterios, como los artículos que han comprado o no comprado.
- En Argentina, debe ingresar una Clasificación que represente el tipo de Cliente en cada registro de Contacto que represente a un Cliente. Cuando emite una factura a un cliente, la selección del número oficial en esa factura dependerá del tipo de cliente. Si un Cliente está registrado ante la autoridad fiscal como una empresa, sus Facturas deben recibir Números Oficiales de tipo "A". Las facturas emitidas a usuarios finales o particulares deben tener Números Oficiales de tipo "B", mientras que las Facturas emitidas a Clientes en el extranjero deben tener Números Oficiales de tipo "E". Cuando defina secuencias numéricas para números oficiales (utilizando la configuración números de registro legal en ventas), debe definir secuencias para los clientes "A", "B" y "E", separándolos especificando " Clasificaciones A "," B "y" E "en solapa B. Una vez asignada la Clasificación correspondiente a cada Cliente, esta conexión permitirá asignar a cada Factura un Número Oficial del tipo correcto, según el tipo de Cliente. Por lo general, también deberá especificar el tipo de Cliente en el campo Idioma (en la Pestaña ‘Empresa’), para asegurarse de que las Facturas para Clientes de un tipo particular se impriman utilizando la Plantilla de formulario correcta. En la parte inferior de la Pestaña 'Contacto', hay una cuadrícula. Si el contacto es un cliente o un proveedor, esta cuadrícula enumerará las personas de contacto que trabajan para ellos. Consulte la página Vinculación de personas de contacto y empresas - Registro de relaciones de contacto para obtener detalles completos.
---
El registro de contactos en Standard ERP:
- Introducción
- Ingresando un contacto, que incluye:
- Encabezado
- Pestaña "Contacto"
- Pestaña 'Entrega'
- Pestaña ‘Términos’: campos
- Pestaña ’Términos’ - Casillas
- Pestaña ‘Precios’
- Pestaña 'Empresa'
- Pestaña 'Cuentas'
- Pestaña 'E-Records'
- Pestaña 'Web'
- Pestaña 'Comentarios'
- Pestaña 'Personal'
- Pestaña 'Definido por el usuario'
- Pestaña 'Notas'
- Pestaña 'BI'
- Encabezado
- Editando un contacto
- Borrar un contacto
- Vinculación de personas de contacto y empresas - Registro de relaciones de contacto
- menú operaciones
- menú Crear
- Página de inicio del manual Clientes, proveedores y personas de contacto
- Página de inicio del manual de Standard ERP
Ingresando un contacto - Pestaña Entrega
Esta página describe los campos de la Pestaña "Entrega" del registro de contacto. Siga los enlaces a continuación para obtener descripciones de las otras Pestañas:
- Encabezado
- Pestaña 'Contacto'
- Pestaña de "entrega"
- Pestaña ’Términos’: campos
- Pestaña ‘Términos’ - Casillas
- Pestaña ‘Precios’
- Pestaña 'Empresa'
- Pestaña 'Cuentas'
- Pestaña 'E-Records'
- Pestaña 'Web'
- Pestaña 'Comentarios'
- Pestaña 'Personal'
- Pestaña 'Definido por el usuario'
- Pestaña 'Notas'
- Pestaña 'BI'
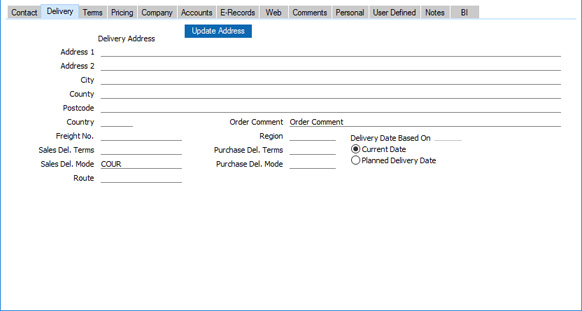
- Dir. de Entrega
- Usado como predeterminado en los registros
Entregas, Devolución de mercancías al proveedor
- Especifique aquí la dirección de entrega habitual del contacto.
- Si el contacto tiene varias direcciones de entrega, regístrelas en la opción Direcciones de entrega en el módulo Ordenes de venta. A continuación, podrá seleccionar el adecuado en los registros de Cotizaciones, Órdenes de venta, Facturas de venta, Entregas y Mercaderías devueltas al Proveedor según sea necesario.
- Si desea dar un nombre a cada una de las líneas de direcciones individuales, use la Pestaña 'Dirección' de la opción Campos definidos por el usuario - Contactos en el módulo CRM. Esto puede resultar útil si, por ejemplo, desea indicar que la ciudad siempre debe escribirse en la tercera línea de la dirección. Esto se ha hecho en la ilustración anterior.
- Si el contacto tiene varias direcciones de entrega, regístrelas en la opción Direcciones de entrega en el módulo Ordenes de venta. A continuación, podrá seleccionar el adecuado en los registros de Cotizaciones, Órdenes de venta, Facturas de venta, Entregas y Mercaderías devueltas al Proveedor según sea necesario.
- Opción País, Pegado especial Pais, módulo Sistema
- El país donde se encuentra la dirección de entrega.
- En el Reino Unido, si necesita utilizar la función de exportación de ’Facturas Intrastat (UK)' en ventas, debe especificar un país en cada dirección de entrega. En el caso de direcciones de entrega nacionales (es decir, direcciones de entrega en el Reino Unido), ingrese "GB": no deje el campo vacío. La función 'Facturas de Intrastat (Reino Unido)' utilizará este País para determinar si se debe incluir una Factura en el archivo de exportación de Intrastat y también lo incluirá en el archivo de exportación como el país al que se exportaron los productos de una Factura. HM Revenue and Customs requiere que utilice códigos de país ISO de dos caracteres: puede encontrar una lista en su documento Notice 60, disponible en https://www.uktradeinfo.com/Intrastat/IntrastatServices/Pages/Notice60.aspx .
- En el Reino Unido, si necesita utilizar la función de exportación de ’Facturas Intrastat (UK)' en ventas, debe especificar un país en cada dirección de entrega. En el caso de direcciones de entrega nacionales (es decir, direcciones de entrega en el Reino Unido), ingrese "GB": no deje el campo vacío. La función 'Facturas de Intrastat (Reino Unido)' utilizará este País para determinar si se debe incluir una Factura en el archivo de exportación de Intrastat y también lo incluirá en el archivo de exportación como el país al que se exportaron los productos de una Factura. HM Revenue and Customs requiere que utilice códigos de país ISO de dos caracteres: puede encontrar una lista en su documento Notice 60, disponible en https://www.uktradeinfo.com/Intrastat/IntrastatServices/Pages/Notice60.aspx .
- Actualizar dirección
- En el Reino Unido, puede utilizar este botón para obtener la dirección del contacto de una base de datos central de códigos postales. Ingrese el código postal del contacto (con o sin espacio) en la quinta línea de la dirección de entrega y luego presione este botón. El nombre de la calle se colocará en la primera línea de la dirección y se incluirán otros detalles de la dirección según corresponda. También se abrirá una lista de locales, donde puede seleccionar el número de edificio correcto, el nombre del edificio o el nombre de la empresa haciendo doble clic. El número o nombre del edificio (si lo hubiera) se incorporará en la primera línea de la dirección.
- Búsqueda de direcciones es un servicio en la nube con cargo. Para usarlo, debe haber registrado su base de datos en el Reino Unido utilizando el método Automatic Internet Enabler, como se describe en la página Enabler Key. Comuníquese con su representante local de HansaWorld para obtener más detalles sobre el servicio de búsqueda de direcciones.
- Si se encuentra en Canadá o EE. UU. y ha registrado una cuenta de Avalara en su base de datos de Standard ERP, puede usar el botón [Actualizar dirección] después de ingresar una Dirección de entrega para verificar que la dirección sea correcta. Si es correcto, los caracteres se convertirán a mayúsculas, pero si la dirección no es correcta o no es reconocida por Avalara, los caracteres se dejarán como están.
- Búsqueda de direcciones es un servicio en la nube con cargo. Para usarlo, debe haber registrado su base de datos en el Reino Unido utilizando el método Automatic Internet Enabler, como se describe en la página Enabler Key. Comuníquese con su representante local de HansaWorld para obtener más detalles sobre el servicio de búsqueda de direcciones.
- Comentario de pedido
- Si un contacto es un cliente, cualquier texto que ingrese aquí se copiará en los campos de comentario en sus cotizaciones (Pestaña ‘Lista de precios'), órdenes de venta (Pestaña ‘Lista de precios '), Contratos (Pestaña ' Term. Entrega '), Órdenes de servicio (Pestaña' Términos ') y Facturas de venta (Pestaña ' Lista de precios ').
- Número de carga
- Si un Contacto es un Cliente, en algunos países puede asignarle un Número de Carga específico, que se cotizará en cada Entrega. Si desea que los números de carga se impriman en los documentos de entrega, incluya el campo "Número de carga del cliente" en sus diseños de plantilla de formulario.
- Región
- Pegado especial
Regiones, Ventas
- Predeterminado tomado de Opciones de contacto (Región predeterminada)
- La Región (por ejemplo, el estado, provincia o condado) donde se encuentra el Contacto. Si un contacto es un cliente, esto se copiará en el campo Región en todas las cotizaciones, pedidos, facturas y entregas. Esto será útil si se encuentra en un país donde los impuestos sobre las ventas varían según la ubicación de los Clientes. Si un contacto es un proveedor, esta región se copiará en el campo Región en Facturas de compras. En Argentina, esto puede afectar el cálculo de Retención de impuestos.
- La Región (por ejemplo, el estado, provincia o condado) donde se encuentra el Contacto. Si un contacto es un cliente, esto se copiará en el campo Región en todas las cotizaciones, pedidos, facturas y entregas. Esto será útil si se encuentra en un país donde los impuestos sobre las ventas varían según la ubicación de los Clientes. Si un contacto es un proveedor, esta región se copiará en el campo Región en Facturas de compras. En Argentina, esto puede afectar el cálculo de Retención de impuestos.
- Término de entrega de ventas
- Pegado especial
Término de entrega, módulo Ordenes de venta
- Usado como predeterminado en Cotizaciones, Ordenes de venta, , Facturas de venta
- Términos de Entrega Compras
- Pegado especial
Términos de entrega, módulo Ordenes de venta
- Usado por defecto en Órdenes de compra
- Utilice estos dos campos para especificar los Términos de entrega que utilizará cuando envíe productos al Contacto y que ellos utilizarán cuando le envíen productos. Usará estos campos para empresas internacionales: algunos ejemplos pueden ser Costo, Seguro, Flete o Free On Board.
- Puede especificar traducciones en diferentes idiomas para cada nombre de plazo de entrega: el idioma en el registro de contacto (especificado en la Pestaña ‘Empresa’) determinará qué traducción se imprimirá en las notas de entrega , Órdenes de Compra y otros documentos.
- Utilice estos dos campos para especificar los Términos de entrega que utilizará cuando envíe productos al Contacto y que ellos utilizarán cuando le envíen productos. Usará estos campos para empresas internacionales: algunos ejemplos pueden ser Costo, Seguro, Flete o Free On Board.
- Forma de entrega de ventas
- Pegado especial
Forma de entrega, módulo Ordenes de venta
- Usado como predeterminado en Cotizaciones, Ordenes de venta, Facturas de venta
- Forma de entrega Compras
- Pegado especial
Formas de entrega, módulo Ordenes de venta
- Usado por defecto en Órdenes de compra
- Ingrese el modo de envío (es decir, la forma de envío) que tenderá a utilizar cuando envíe productos al Contacto y que ellos utilizarán cuando le envíen productos. Algunos ejemplos pueden ser Correo o Courier, o el nombre del servicio de mensajería que se utiliza con más frecuencia.
- Puede especificar traducciones en diferentes idiomas de cada nombre de forma de entrega: el idioma en el registro de contacto (especificado en la Pestaña ‘Empresa’) determinará qué traducción se imprimirá en las notas de entrega , Órdenes de Compra y otros documentos.
- Ingrese el modo de envío (es decir, la forma de envío) que tenderá a utilizar cuando envíe productos al Contacto y que ellos utilizarán cuando le envíen productos. Algunos ejemplos pueden ser Correo o Courier, o el nombre del servicio de mensajería que se utiliza con más frecuencia.
- Fecha de entrega basada en
- Si un Contacto es un Cliente, la Fecha de Entrega en cualquier Entrega que usted emita puede ser predeterminada en la fecha actual o en la Fecha de Entrega Planificada en la Orden desde el cual se emitió la Entrega. Especifique aquí qué opción se utilizará para un contacto en particular.
- Si elige la opción Fecha de entrega planificada , la fecha actual se utilizará como Fecha de entrega en una Entrega si la Fecha de entrega planificada en el Pedido de origen está en blanco. El campo Fecha de entrega planificada debe usar el formato de fecha, que debe especificar en la opción Entrega planificada en el módulo Ordenes de venta.
- La opción que elija aquí no se utilizará si crea entregas utilizando la función de mantenimiento 'Crear entregas a partir de órdenes’ en el módulo Ordenes de venta. Cuando ejecute la función, especificará una Fecha de entrega que se utilizará en cada Entrega que se cree. Si no especifica una fecha al ejecutar la función, se utilizará la Fecha de pedido de cada pedido.
- Si elige la opción Fecha de entrega planificada , la fecha actual se utilizará como Fecha de entrega en una Entrega si la Fecha de entrega planificada en el Pedido de origen está en blanco. El campo Fecha de entrega planificada debe usar el formato de fecha, que debe especificar en la opción Entrega planificada en el módulo Ordenes de venta.
- Ruta
- Pegado especial opción Rutas módulo Stock
- Puede utilizar este campo en los registros de contacto para clientes y proveedores para organizarlos en zonas (o "rutas") para proporcionar una guía para los conductores de entrega. Esto será más útil si tiene una flota de vehículos de reparto, cada uno de los cuales repite el mismo viaje o "Ruta" todos los días.
- Si un Contacto es un Cliente, la Ruta se copiará a Ordenes de venta, y desde allí a Entregas. La ruta es utilizada por el informe Lista de orden en el módulo de órdenes de venta (una lista en orden de ruta de órdenes de venta con una fecha de entrega planificada en particular) y el informe Hoja de ruta en el Módulo de Stock (lista de las entregas en una ruta particular que se pueden realizar en una fecha determinada o durante un período determinado).
- Si un Contacto es un Proveedor, la Ruta se copiará en los registros Devolución de mercaderías al proveedor. Estos registros también se mostrarán en el informe de la hoja de ruta.
- Puede utilizar este campo en los registros de contacto para clientes y proveedores para organizarlos en zonas (o "rutas") para proporcionar una guía para los conductores de entrega. Esto será más útil si tiene una flota de vehículos de reparto, cada uno de los cuales repite el mismo viaje o "Ruta" todos los días.
El registro de contactos en Standard ERP:
- Introducción
- Ingresando un contacto, que incluye:
- Encabezado
- Pestaña 'Contacto'
- Pestaña de "entrega"
- Pestaña 'Términos': campos
- Pestaña 'Términos' - Casillas
- Pestaña 'Precios’
- Pestaña 'Empresa'
- Pestaña 'Cuentas'
- Pestaña 'E-Records'
- Pestaña 'Web'
- Pestaña 'Comentarios'
- Pestaña 'Personal'
- Pestaña 'Definido por el usuario'
- Pestaña 'Notas'
- Pestaña 'BI'
- Encabezado
- Editando un contacto
- Borrando un contacto
- Vinculación de personas de contacto y empresas - Registro de relaciones de contacto
- Menú de operaciones
- Menú Crear
- Página de inicio del manual Clientes, proveedores y personas de contacto
- Página de inicio del manual de Standard ERP
Ingresando un contacto - Pestaña Términos - Campos
Esta página describe los campos de la Pestaña "Términos" del registro de contacto. Siga los enlaces a continuación para obtener descripciones de las otras Pestañas:
- Encabezado
- Pestaña 'Contacto'
- Pestaña 'Entrega'
- Pestaña de "Términos" : campos
- Pestaña 'Términos' - Casillas
- Pestaña 'Precios’
- Pestaña 'Empresa'
- Pestaña 'Cuentas'
- Pestaña 'E-Records'
- Pestaña 'Web'
- Pestaña 'Comentarios'
- Pestaña 'Personal'
- Pestaña 'Definido por el usuario'
- Pestaña 'Notas'
- Pestaña 'BI'
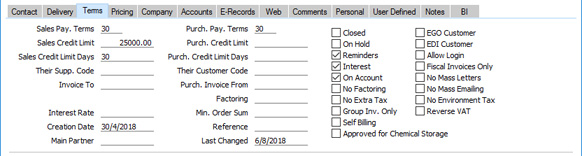
- Términos de pago Ventas
- Pegado especial
Términos de pago, ventas / compras
- Valor predeterminado tomado de Opciones de contacto (Término de pago predeterminado)
- Usado por defecto en Cotizaciones, Ordenes de venta, Facturas de venta
- Usado por defecto en Cotizaciones, Ordenes de venta, Facturas de venta
- Términos de pago compras
- Pegado especial
Términos de pago, ventas / compras
- Usado como predeterminado en Órdenes de compra, Facturas de compra
- Especifique aquí las Términos de pago que se utilizarán con el Contacto. Estos Términos se copiarán en las Facturas de Compra y Venta, donde garantizarán que las Fechas de Vencimiento se calculen correctamente. Los Términos de pago también le permiten configurar un sistema de descuentos por liquidación anticipada.
- La especificación de los términos de pago de ventas o compras en cada factura proporciona la base para los informes de gestión de crédito y seguimiento de deudas proporcionados en Standard ERP.
- En los Estados Bálticos, hay circunstancias en las que las Facturas de Compra en efectivo deben seguir la misma secuencia numérica que la utilizada por los registros de Pagos, Pagos al personal y Retiro de efectivo. Si necesita utilizar esta función, primero defina las secuencias numéricas utilizando los campos De y A de la derecha en la tapa C de la Opción Formas de pago (defina secuencias separadas para cada modo de pago que representa un pago en efectivo). Luego, seleccione la opción Serie de números comunes en la Opción Opción del libro de caja en el módulo Caja. Finalmente, ingrese Formas de pago en el Campo Término de pago Compras en los registros de contacto para proveedores de efectivo. Cuando ingresa dicho Proveedor en una Factura de Compra, el Número de Factura cambiará a uno en la secuencia correcta. Cuando marque la factura como OK y la guarde, se tratará como pagada y no se realizará ninguna contabilización en una cuenta de acreedor. En su lugar, se realizará una contabilización de crédito en la cuenta de Forma de pago (es decir, una cuenta bancaria o de efectivo).
- Si ingresó un Término de pago predeterminado en la Opción Opciones de contacto, se ingresará en el campo Término de pago ventas en cada nuevo contacto automáticamente.
- Si necesita cambiar las Términos de pago de ventas en un grupo de Clientes, una opción que está disponible es utilizar la función de mantenimiento 'Actualizar datos de contacto' en el módulo CRM.
- Especifique aquí las Términos de pago que se utilizarán con el Contacto. Estos Términos se copiarán en las Facturas de Compra y Venta, donde garantizarán que las Fechas de Vencimiento se calculen correctamente. Los Términos de pago también le permiten configurar un sistema de descuentos por liquidación anticipada.
- Límite de crédito de ventas
- Valor predeterminado tomado de Opciones de contacto (Límite de crédito predeterminado)
- Si un contacto es un cliente, especifique aquí el límite de crédito que le ha otorgado. Esta cifra debe estar en su moneda local.
- Si ingresó un registro para el Contacto en la Opción Límites de crédito de contacto ventas, el Límite de crédito de ventas se tomará de allí (es decir, el Límite de crédito en este campo no será utilizado).
- Después de establecer los límites de crédito para cada cliente, utilice la Opción Límite de crédito en ventas para controlar el comportamiento en las transacciones de ventas cuando los clientes han superado sus límites de crédito (por ejemplo, para advertir o prevenir ingreso de Órdenes y Facturas) y para especificar cómo se debe determinar que un Cliente ha excedido su Límite de Crédito.
- Si desea permitir que una empresa no otorgue ningún crédito, establezca su Límite de crédito de ventas en 0.01.
- Si necesita una lista de Clientes que compare el estado de su cuenta con sus Límites de crédito, genere un informe Estado de crédito del cliente (en ventas). Esta información también se mostrará para un cliente en particular en el informe producido por la función del menú de operaciones 'Estado del cliente', pero solo si hay un registro en la información en el informe de estado del cliente Opción en el módulo CRM para el usuario que produce el informe.
- Puede evitar que ciertos usuarios cambien el límite de crédito de ventas en cualquier contacto usando grupos de acceso (negándoles el acceso a la acción 'Cambiar límites de crédito').
- Si un contacto es un cliente, especifique aquí el límite de crédito que le ha otorgado. Esta cifra debe estar en su moneda local.
- Días límite de crédito de ventas
- Valor predeterminado tomado de Opciones de contacto (Días límite de crédito predeterminados)
- Si un contacto es un cliente, puede usar este campo para especificar el número máximo de días de crédito que le permitirá.
- Si ha especificado un Límite de días de crédito de ventas para un Cliente, se dirá inmediatamente que ese Cliente ha excedido sus términos de crédito tan pronto como una Factura de cualquier valor esté pendiente por más de ese número de días (medido desde su Fecha de Vencimiento). Consulte la descripción de la Opción Límite de crédito para obtener más detalles sobre cómo determinar cuándo un Cliente ha excedido sus términos de crédito.
- Si ha ingresado un registro para el Contacto en la Opción Límite de crédito Contacto en ventas, los Días de límite de crédito de ventas se tomarán de allí (es decir, los Días de límite de crédito en este no se utilizará el campo).
- Puede evitar que ciertos usuarios cambien el campo Días de límite de crédito de ventas en cualquier Contacto usando Grupos de acceso (negándoles el acceso a la acción 'Cambiar días de límite de crédito'). Los grupos de acceso se describen en el manual "Módulo sistema".
- Si un contacto es un cliente, puede usar este campo para especificar el número máximo de días de crédito que le permitirá.
- Límite de crédito Compras
- Si un contacto es un proveedor, especifique aquí el límite de crédito que le otorgaron a su empresa. Esto es solo para información: se mostrará para un proveedor en particular en el informe producido por la función del menú de operaciones 'Estado del proveedor'. Si ingresó un registro para el Contacto en la Opción Límites de crédito de contacto en ventas, el Límite de crédito de compra en el informe 'Estado del proveedor' se tomará de allí (es decir, el Límite de crédito en este campo no se utilizará).
- Días de límite de crédito compras
- Si un Contacto es un Proveedor, especifique aquí el número máximo de días de crédito que le otorgaron a su empresa. Esto es para información solamente.
- Su Código proveedor
- Si un contacto es un cliente, ingrese el número de proveedor que está usando para su empresa en su base de datos.
- Su código de cliente
- Si un contacto es un proveedor, ingrese el número de cliente que está usando para su empresa en su base de datos. Si desea que esto se imprima en la documentación de orden de compra, contrato de orden de compra, Cotización de orden de compra y Factura de compra , incluya el campo “Número de cliente propio” "en sus diseños de plantilla de formulario. Si desea que se imprima en Cheques y Formularios de pago, incluya el campo "Nuestro número de cliente" en sus diseños de plantilla de formulario.
- Facturar a
- Pegado especial
Clientes y proveedores en el registro de contactos
- Si un Contacto es un Cliente que no pagará sus Facturas por sí mismo pero que puede, por ejemplo, comprar a través de una empresa de leasing, ingrese aquí el Número de contacto de esa empresa (esa empresa también debe ser un Cliente o un Proveedor en el registro de contactos).
- Cuando aumente Facturas de venta para el cliente desde Ordenes de venta, se extenderán a nombre de la empresa especificada aquí.
- Cuando aumente Facturas de venta para el cliente desde Ordenes de venta, se extenderán a nombre de la empresa especificada aquí.
- Facturas de compra desde
- Pegado especial
Proveedores en el registro de contactos
- Utilice este campo si el Contacto es un Proveedor al que emitirá Órdenes de Compra para las cuales recibirá Facturas de Compra de un Proveedor diferente (la "Factura del Proveedor"). Introduzca aquí el número de contacto de la factura del proveedor (esa empresa también debe ser un proveedor en el registro de contacto).
- Por ejemplo, podría pertenecer a un club de compras. Como un club de compras tiene varios socios, compra a granel y, por tanto, obtiene mejores precios. Luego emitirá una orden de compra a un proveedor, pero recibirá la factura de compra del club de compras. En este ejemplo, el club de compras sería Factura del proveedor.
- Cuando utilice el Proveedor en una Orden de Compra, la Factura del Proveedor se copiará en el campo Factura de en la Pestaña 'Comentario' de la Orden de Compra. Cuando crea una Factura de compra de la Orden de compra, el Proveedor en esa Factura de compra será la Factura del Proveedor.
- Si especifica una Factura de proveedor, por lo tanto, espera que una Orden de compra y su Factura de compra relacionada tengan Proveedores diferentes. El pago irá a la Factura del Proveedor. Sin embargo, si una Orden de compra y su Factura de compra relacionada tendrán el mismo Proveedor, y solo el Pago irá a un Proveedor diferente, no utilice la Factura de compra desde el campo y, en su lugar, ingrese ese Proveedor en el campo Facturar a continuación.
- La factura de compra de la empresa también se utiliza en las siguientes circunstancias:
- Si pagará facturas de compra utilizando archivo de exportación de archivo bancario y el formato de archivo de pago que ha elegido en la Opción transferencia bancaria en compras es Lituania - LITAS-ESIS 1.1. Si un proveedor tiene una Factura de compra de la empresa, dirección y datos de la sucursal bancaria de la factura de compra de la empresa se incluirá en los archivos de exportación en lugar de los del proveedor. Sin embargo, el número de cuenta bancaria se tomará de cada fila de Pago, que lo habrá tomado de la Factura de Compra / Proveedor. Por lo tanto, asegúrese de especificar la cuenta bancaria correcta en el registro del proveedor.
- Si va a pagar facturas de compra mediante el servicio en la nube de pagos electrónicos, el formato de archivo de pago que ha elegido en el registro Banco correspondiente es Estonia - Swedbank Gateway o Letonia - Telehansa y el Proveedor recibe un pago mediante un Pago en el que se ha seleccionado la opción Pago en el extranjero. En este caso, la cuenta bancaria se tomará de la fila Pago o, si está en blanco, de la compra. Factura de la empresa (campo Cuenta bancaria).
- Por ejemplo, podría pertenecer a un club de compras. Como un club de compras tiene varios socios, compra a granel y, por tanto, obtiene mejores precios. Luego emitirá una orden de compra a un proveedor, pero recibirá la factura de compra del club de compras. En este ejemplo, el club de compras sería Factura del proveedor.
- Facturación
- Pegado especial
Proveedores en el registro de contactos
- Si un contacto es un proveedor que utiliza una empresa de facturación (a la que se enviarán los pagos), introduzca aquí el número de contacto de esa empresa (esa empresa también debe ser un proveedor en el registro de contactos).
- Si un proveedor tiene una empresa de facturación, se recomienda que deje en blanco el código IBAN, la cuenta bancaria y la cuenta bancaria 2 en el registro de contacto de ese proveedor. Esto asegurará que cuando cree una Factura de Compra a nombre del Proveedor, la Cuenta Bancaria en esa Factura de Compra se tomará de la empresa de Facturación. Cuando pague la factura de compra, esa cuenta bancaria se copiará en el campo Cuenta del banco en la fila Pago (flip H) y desde allí se incluirá en las exportaciones de archivos bancarios. El código bancario y el código de clasificación también se copiarán del proveedor de facturación a la factura de compra y de allí a la fila de pago.
- Si un proveedor tiene una empresa de facturación, se recomienda que deje en blanco el código IBAN, la cuenta bancaria y la cuenta bancaria 2 en el registro de contacto de ese proveedor. Esto asegurará que cuando cree una Factura de Compra a nombre del Proveedor, la Cuenta Bancaria en esa Factura de Compra se tomará de la empresa de Facturación. Cuando pague la factura de compra, esa cuenta bancaria se copiará en el campo Cuenta del banco en la fila Pago (flip H) y desde allí se incluirá en las exportaciones de archivos bancarios. El código bancario y el código de clasificación también se copiarán del proveedor de facturación a la factura de compra y de allí a la fila de pago.
- Tasa de interés
- Si un Contacto es un Cliente a quien puede estar emitiendo Facturas de Intereses, ingrese aquí la tasa de interés anual que se utilizará para calcular los cargos por intereses.
- Si deja este campo en blanco, el porcentaje se tomará de la Opción Interés en ventas. Donde quiera que se tome el porcentaje, la cuenta de ventas y el código de IVA para los intereses se tomarán de la Opción Interés: también puede usar esa Opción para especificar cualquier tarifa que se cobrará por el aumento de las facturas de intereses.
- Utilice la función de mantenimiento 'Crear facturas de intereses' en ventas para crear facturas de intereses, que solo se generarán para los clientes cuya casilla Interés haya sido marcada (descrito abajo).
- Si deja este campo en blanco, el porcentaje se tomará de la Opción Interés en ventas. Donde quiera que se tome el porcentaje, la cuenta de ventas y el código de IVA para los intereses se tomarán de la Opción Interés: también puede usar esa Opción para especificar cualquier tarifa que se cobrará por el aumento de las facturas de intereses.
- Suma del pedido mínima
- Si el contacto es un proveedor, registre aquí el valor mínimo de pedido que se aceptarán. Esto es solo para fines informativos, aunque se puede mostrar en el informe Órdenes de compra pendientes.
- Última modificación
- Este campo se actualizará automáticamente cada vez que guarde el registro de contacto en la pantalla.
El registro de contactos en Standard ERP:
- Introducción
- Ingresando un contacto, que incluye:
- Encabezado
- Pestaña 'Contacto'
- Pestaña 'Entrega'
- Pestaña de "Términos" : campos
- Pestaña 'Términos' - Casillas
- Pestaña 'Precios’
- Pestaña 'Empresa'
- Pestaña 'Cuentas'
- Pestaña 'E-Records'
- Pestaña 'Web'
- Pestaña 'Comentarios'
- Pestaña 'Personal'
- Pestaña 'Definido por el usuario'
- Pestaña 'Notas'
- Pestaña 'BI'
- Encabezado
- Editando un contacto
- Borrando un contacto
- Vinculación de personas de contacto y empresas - Registro de relaciones de contacto
- menú de operaciones
- Menú Crear
- Página de inicio del manual Clientes, proveedores y personas de contacto
- Página de inicio del manual de Standard ERP
Ingresando un contacto - Pestaña Términos - Casillas
Esta página describe las casillas en la Pestaña 'Términos' del registro de contacto. Siga los enlaces a continuación para obtener descripciones de las otras Pestañas:
- Encabezado
- Pestaña 'Contacto'
- Pestaña 'Entrega'
- Pestaña 'Términos': campos
- Pestaña de "Términos" : casillas
- Pestaña 'Precios'
- Pestaña 'Empresa'
- Pestaña 'Cuentas'
- Pestaña 'E-Records'
- Pestaña 'Web'
- Pestaña 'Comentarios'
- Pestaña 'Personal'
- Pestaña 'Definido por el usuario'
- Pestaña 'Notas'
- Pestaña 'BI'

- Cerrado
- Marque esta casilla si un contacto ya no se va a utilizar (si un contacto es un cliente o proveedor, no puede eliminarlo por completo si tiene al menos una orden de venta o una factura de venta o de compra). Los contactos cerrados aparecerán en la ventana 'Contactos: Examinar' pero no en la lista de contactos 'Pegado especial'. No podrá ingresar Órdenes de Venta o Ventas o Facturas de Compra para Clientes o Proveedores cerrados. Puede volver a abrir un contacto cerrado en cualquier momento.
- Si un contacto cerrado es una persona de contacto que trabaja para un cliente o una empresa proveedora, seguirá apareciendo en la lista de personas que trabajan para esa empresa en la parte inferior de la Pestaña 'Contacto' , pero se dibujará una línea roja a través de su nombre y detalles. No aparecerán en la lista 'Pegado especial' de Personas de contacto cuando la abra desde los campos Contacto principal y Atención en varios registros.
- Puede marcar varios clientes o proveedores como cerrados a la vez utilizando la función de mantenimiento 'Cerrar contactos' en el módulo CRM.
- Si un contacto cerrado es una persona de contacto que trabaja para un cliente o una empresa proveedora, seguirá apareciendo en la lista de personas que trabajan para esa empresa en la parte inferior de la Pestaña 'Contacto' , pero se dibujará una línea roja a través de su nombre y detalles. No aparecerán en la lista 'Pegado especial' de Personas de contacto cuando la abra desde los campos Contacto principal y Atención en varios registros.
- Cliente EGO
- Esta casilla de verificación está diseñada para su uso en Dinamarca, donde las Facturas emitidas a algunos Clientes no se imprimen sino que se envían electrónicamente a un tercero, como la Oficina de Correos, para su procesamiento. Marque esta casilla para todos esos Clientes. Consulte a su representante local de HansaWorld para obtener todos los detalles.
- En espera
- Si un contacto es un cliente que ha puesto en espera, marque esta casilla. Puede aumentar las facturas de venta para los clientes que están en espera, pero no podrá marcarlos como OK (consúltelos en ventas). Podrá ingresar pedidos para dichos clientes, pero no podrá crear entregas (enviarles ningún producto).
- Algunas funciones de mantenimiento (por ejemplo, 'Crear facturas de contrato' en el módulo Contratos y 'Crear entregas desde órdenes’) no crearán nuevos registros para los clientes que están en espera.
- Algunas funciones de mantenimiento (por ejemplo, 'Crear facturas de contrato' en el módulo Contratos y 'Crear entregas desde órdenes’) no crearán nuevos registros para los clientes que están en espera.
- Cliente EDI
- El módulo EDI (intercambio electrónico de datos) le permite recibir órdenes de venta y emitir facturas electrónicamente en formatos particulares. Si está utilizando este módulo y un contacto es un cliente que utiliza este sistema, marque esta casilla. Solo puede generar facturas EDI para los Clientes para los que se ha marcado esta casilla. Consulte a su representante local para obtener todos los detalles.
- Recordatorios
- Marque esta casilla si un contacto es un cliente a quien deberá enviar Recordatorios por pago atrasado cuando corresponda.
- Si ha marcado esta casilla en el registro de contacto de un cliente en particular, puede asegurarse de que no se enviarán recordatorios para facturas individuales marcando la casilla Sin recordatorio en la pestaña 'Entrega' de la Factura.
- Si no ha marcado esta casilla en el registro de contacto de un cliente, Recordatorio nunca se imprimirá para ese cliente. También puede especificar que estados de cuenta de cliente con factura abierta no se imprimirá para ese cliente, seleccionando las opciones Clientes solo con recordatorios o Omitir sin recordatorios . La opción Saltar sin recordatorios también excluirá las facturas en las que haya marcado la casilla Sin recordatorio de los extractos. Al enviar estados de cuenta de cliente de factura abierta por correo electrónico utilizando la función de mantenimiento 'Correo electrónico de estado de cuenta de cliente de factura abierta', los estados de cuenta nunca se enviarán al cliente.
- Si ha marcado esta casilla en el registro de contacto de un cliente en particular, puede asegurarse de que no se enviarán recordatorios para facturas individuales marcando la casilla Sin recordatorio en la pestaña 'Entrega' de la Factura.
- Permitir inicio de sesión
- Si está utilizando la instalación de la tienda web estándar de Standard ERP y desea permitir que el contacto realice pedidos a través de la web, marque esta casilla. Pueden usar su número de cliente o dirección de correo electrónico como ID de inicio de sesión, y puede asignarles una contraseña mediante la función 'Cambiar contraseña' en el menú Operaciones de la ventana 'Contactos: Examinar'.
- Si desea que esta casilla de verificación esté marcada de forma predeterminada en los registros de contactos nuevos, seleccione la opción Permitir inicio de sesión en la Opción Opciones de contacto.
- Si desea que esta casilla de verificación esté marcada de forma predeterminada en los registros de contactos nuevos, seleccione la opción Permitir inicio de sesión en la Opción Opciones de contacto.
- Interés
- Marque esta casilla si un contacto es un cliente al que se le enviarán facturas de interés por pagos atrasados. Consulte aquí para obtener detalles completos sobre esta función.
- Si ha marcado esta casilla en el registro de Contacto de un Cliente en particular, puede asegurarse de que no se cobrarán intereses por Facturas individuales marcando la casilla Sin interés en la pestaña 'Entrega' de la Factura.
- Si ha marcado esta casilla en el registro de Contacto de un Cliente en particular, puede asegurarse de que no se cobrarán intereses por Facturas individuales marcando la casilla Sin interés en la pestaña 'Entrega' de la Factura.
- Solo facturas fiscales
- Si un contacto es un cliente, marque esta casilla si sus facturas deben clasificarse como facturas fiscales. Las facturas fiscales deben imprimirse en impresoras fiscales en algunos países. Consulte a su representante local de HansaWorld para obtener más detalles.
- A cuenta
- Marque esta casilla si un Contacto es un Cliente de quien desea poder recibir Pagos anticipados y Recibos a cuenta (es decir, desea permitirles pagar antes de haberlos facturado) y / o el Contacto es un Proveedor a quien desea poder emitir prepagos y pagos a cuenta (es decir, poder pagarlos antes de recibir las facturas). Los detalles completos sobre el lado de las ventas se pueden encontrar aquí y sobre el lado de la compra aquí.
- En el lado de las ventas, antes de que pueda ingresar prepagos y recibos en la cuenta, debe especificar una cuenta en la Pestaña 'Deudores' de la Opción Manejo de Cuentas Ventas . Además, puede especificar dicha cuenta en el campo Deudores a cuenta en categoría de cliente. A esta Cuenta se le acreditará el valor de estos Recibos.
- En el lado de la compra, antes de que pueda ingresar Prepagos y Pagos a cuenta, debe especificar una cuenta en la Pestaña 'Acreedores' de la Opción Manejo de cuentas Compras . Además, puede especificar dicha Cuenta en la Pestaña Categoría de proveedor o en el registro de contacto individual (en la Pestaña 'Cuentas'). A esta Cuenta se le debitará el valor de estos Pagos.
- Si desea que esta casilla de verificación esté marcada de forma predeterminada en los registros de contactos nuevos, seleccione la opción En cuenta en la Opción Opciones de contacto.
- En el lado de las ventas, antes de que pueda ingresar prepagos y recibos en la cuenta, debe especificar una cuenta en la Pestaña 'Deudores' de la Opción Manejo de Cuentas Ventas . Además, puede especificar dicha cuenta en el campo Deudores a cuenta en categoría de cliente. A esta Cuenta se le acreditará el valor de estos Recibos.
- No se permiten cartas masivas
- Marque esta casilla si no desea que se envíe cartas impresas al Contacto desde el registro de Cartas a clientes.
- Tenga en cuenta que si ha incluido un contacto en una lista de correo que ha utilizado en una carta de cliente, las cartas impresas se enviarán al contacto de esa carta de cliente incluso si esta casilla es marcado.
- Puede activar o desactivar esta opción para varios contactos a la vez utilizando la función de mantenimiento ‘Correo masivo’ en el módulo CRM. Si desea que esta casilla de verificación esté marcada de forma predeterminada en los registros de contactos nuevos, seleccione la opción Sin cartas masivas en la Opción Opciones de contacto.
- Tenga en cuenta que si ha incluido un contacto en una lista de correo que ha utilizado en una carta de cliente, las cartas impresas se enviarán al contacto de esa carta de cliente incluso si esta casilla es marcado.
- Sin facturación
- Si utiliza una empresa de factoraje para pagar sus facturas de venta, utilizará regularmente la función de exportación 'Facturas para factoraje' en ventas para enviar sus facturas a la empresa de factoraje. Si desea recibir el pago de un Cliente en particular y no desea que las Facturas del Cliente se envíen a la empresa de facturación, marque esta casilla.
- La función de exportación 'Facturas por facturación’ es capaz de crear archivos en muchos formatos diferentes adecuados para enviar a muchos bancos diferentes. Debe especificar el formato que desea utilizar eligiendo un Banco de facturación en la Opción Exportación de facturación en ventas. La función 'Facturas por factoraje' no exportará Facturas emitidas a Clientes en los que se haya marcado la casilla No factoraje si está utilizando uno de los siguientes bancos de factoraje:
- Factoring Finans (NOR)
- Finvoice (FIN)
- Gjensidige Bank (NOR)
- Handelsbanken (FIN)
- Kredittstyring
- NORD finans
- NORD finans (DK)
- Nordea finans
- Nordea (FIN)
- Osuus Pankki (FIN)
- Sampo (FIN)
- SG Finans (NOR)
Si está utilizando un banco de facturación que no figura en la lista anterior, la casilla de verificación No factoraje se ignorará (es decir, las facturas de un cliente serán exportadas por las 'Facturas por factoraje’ Función de exportación incluso si ha marcado la casilla No factoraje para ese Cliente).
- Si está utilizando la función de exportación 'Finvoice' en ventas, puede volver a utilizar la casilla Sin facturación para evitar que esa función exporte las facturas emitidas a un Cliente en particular. La función de exportación 'Finvoice' solo está disponible en Finlandia (es decir, cuando la ley de IVA en la Opción información de la empresa es "finlandesa").
- La función de exportación 'Facturas por facturación’ es capaz de crear archivos en muchos formatos diferentes adecuados para enviar a muchos bancos diferentes. Debe especificar el formato que desea utilizar eligiendo un Banco de facturación en la Opción Exportación de facturación en ventas. La función 'Facturas por factoraje' no exportará Facturas emitidas a Clientes en los que se haya marcado la casilla No factoraje si está utilizando uno de los siguientes bancos de factoraje:
- No envío masivo de correos electrónicos
- Marque esta casilla si no desea que se envíe correos electrónicos al Contacto desde el registro de Cartas a clientes.
- Tenga en cuenta que si ha incluido un contacto en una lista de correo que ha utilizado en una carta de cliente, las cartas se enviarán por correo electrónico al contacto de esa carta de cliente incluso si esta casilla está marcada .
- Puede activar o desactivar esta opción para varios contactos a la vez utilizando la función de mantenimiento ‘Correo masivo’ en el módulo CRM. Si desea que esta casilla de verificación esté marcada de forma predeterminada en los registros de contactos nuevos, seleccione la opción No enviar correos electrónicos masivos en la Opción Opciones de contacto.
- Tenga en cuenta que si ha incluido un contacto en una lista de correo que ha utilizado en una carta de cliente, las cartas se enviarán por correo electrónico al contacto de esa carta de cliente incluso si esta casilla está marcada .
- Sin impuestos adicionales
- Si un contacto es un cliente, marque esta casilla si no desea que se carguen impuestos adicionales en sus facturas. Consulte la descripción de la tapa B de la Opción de Códigos de IVA aquí para obtener detalles completos sobre esta función. Si desea cobrar impuestos adicionales a un cliente, pero a una tasa de descuento, utilice la Opción descuentos de clientes de impuestos adicionales en ventas.
- Si un contacto es un proveedor, esta casilla de verificación no se aplicará. El impuesto adicional siempre se calculará en las facturas de compra a la tasa completa si el código de IVA tiene un porcentaje de impuesto.
- Si un contacto es un proveedor, esta casilla de verificación no se aplicará. El impuesto adicional siempre se calculará en las facturas de compra a la tasa completa si el código de IVA tiene un porcentaje de impuesto.
- Sin impuestos medioambientales
- Si el contacto es un cliente, marque esta casilla si no desea que se carguen impuestos ambientales en sus facturas. Consulte la descripción de la Opción de impuestos ambientales aquí para obtener detalles completos sobre esta función.
- Sin percepciones de región
- Esta opción solo se usa en Argentina y no será visible en muchos países.
- Si un contacto es un cliente, marque esta casilla si no desea que se cargue el impuesto regional sobre la percepción en sus facturas. Si desea cobrar el impuesto de percepción regional a un cliente, pero a una tasa de descuento, utilice la Opción Descuentos de cliente de percepción regional en ventas.
- Si un contacto es un cliente, marque esta casilla si no desea que se cargue el impuesto regional sobre la percepción en sus facturas. Si desea cobrar el impuesto de percepción regional a un cliente, pero a una tasa de descuento, utilice la Opción Descuentos de cliente de percepción regional en ventas.
- Facturación en grupo
- Marque esta casilla si un contacto es un cliente al que solo se pueden emitir facturas de órdenes de venta utilizando la función de mantenimiento 'facturación grupal' en el módulo Ordenes de venta. Seleccionar esta opción significará que no podrá crear facturas directamente desde Ordenes o entregas usando la función 'Factura' en el menú Crear, y la función 'Factura entregada’ no creará facturas para el cliente. Aún podrá ingresar facturas directamente en el registro de facturas.
- La función de mantenimiento 'Facturación grupal' incluye una opción Solo clientes de facturación grupal que puede usar si solo desea emitir facturas a clientes para los que la casilla Facturar en grupo se ha marcado .
- La función de mantenimiento 'Facturación grupal' incluye una opción Solo clientes de facturación grupal que puede usar si solo desea emitir facturas a clientes para los que la casilla Facturar en grupo se ha marcado .
- IVA inverso
- Marque esta casilla si un contacto es un cliente en la zona de IVA nacional al que venderá artículos de cualquier valor sobre la base del IVA de carga inversa. Si no marca esta casilla, aún podrá vender Artículos con cargo al IVA, pero solo si el valor de la venta se encuentra entre las cifras mínimas y máximas especificadas. Consulte la página 'IVA de cobro revertido en facturas de venta' para obtener más detalles sobre la venta de artículos con IVA de cobro revertido a un cliente en la zona de IVA nacional. Esta opción solo estará visible en Letonia, Lituania, Polonia y el Reino Unido (es decir, cuando la ley del IVA en la Opción información de la empresa sea "Letón", "Lituano", "Polaco" o "Predeterminado").
- Auto facturación
- Usado por defecto en Facturas y Facturas de compra
- Una factura de autofacturación es una factura que una empresa se emite a sí misma. Por ejemplo, una empresa puede haber recibido bienes de un Proveedor con el acuerdo de que la facturación se producirá a medida que los venda o los consuma. Esa empresa creará Facturas de Compra con autofacturación cuando sea necesario, notificando al Proveedor al hacerlo. Luego, ese proveedor debe crear las facturas de venta correspondientes. Si usted es el Proveedor en un acuerdo de autofacturación, puede marcar el registro de Contacto de su Cliente como autofacturación utilizando esta casilla de verificación. Del mismo modo, si usted es el Cliente en un acuerdo de autofacturación, puede marcar su Proveedor como autofacturación. Cuando crea facturas de compra o venta para el cliente o proveedor, respectivamente, se marcarán como autofacturación. Las facturas de autofacturación y las facturas de compra se marcan por separado cuando se incluyen en las exportaciones SAF-T en Portugal.
El registro de contactos en Standard ERP:
- Introducción
- Ingresando un contacto, que incluye:
- Encabezado
- Pestaña 'Contacto'
- Pestaña 'Entrega'
- Pestaña 'Términos': campos
- Pestaña de "Términos" : casillas
- Pestaña 'Precios’
- Pestaña 'Empresa'
- Pestaña 'Cuentas'
- Pestaña 'E-Records'
- Pestaña 'Web'
- Pestaña 'Comentarios'
- Pestaña 'Personal'
- Pestaña 'Definido por el usuario'
- Pestaña 'Notas'
- Pestaña 'BI'
- Encabezado
- Editando un contacto
- Borrar un contacto
- Vinculación de personas de contacto y empresas - Registro de relaciones de contacto
- Menú operaciones
- Menú Crear
- Página de inicio del manual Clientes, proveedores y personas de contacto
- Página de inicio del manual de Standard ERP
Entering a Contact - Pricing Card
This page describes the fields on the 'Pricing' card of the Contact record. Please follow the links below for descriptions of the other cards:
- Header
- 'Contact' card
- 'Delivery' card
- 'Terms' card - Fields
- 'Terms' card - Check Boxes
- 'Pricing' card
- 'Company' card
- 'Accounts' card
- 'E-Records' card
- 'Web' card
- 'Comments' card
- 'Personal' card
- 'User Defined' card
- 'Notes' card
- 'BI' card

- Sales Currency
- Paste Special
Currency register, System module
- Used as default in Quotations, Sales Orders, Sales Invoices
- Purch. Currency
- Paste Special
Currency register, System module
- Used as default in Purchase Orders, Purchase Invoices, Goods Receipts
- Use these two fields to specify the Currencies that are to be used when selling to and buying from a Contact.
- When you enter a sales transaction, the Customer's Sales Currency will be brought in to that transaction automatically. If the Customer's Sales Currency is not your home Currency, prices of Items will be converted to the Sales Currency automatically using the latest Exchange Rates as you add them to the transaction.
- When you enter a Purchase Order manually, the Supplier's Purch. Currency will be brought in automatically. If the Supplier's Purch. Currency is not your home Currency, prices of Items will be converted to the Purch. Currency automatically using the agreed Exchange Rate. When you create Purchase Orders using the automated 'Create Purchase Orders' function, the Purch. Currency specified here and the latest Exchange Rate will be used. The Supplier's Purch. Currency will also be brought in automatically to Purchase Invoices.
- If you specify a Sales Currency for a Contact, you will not be able to use any other Currency in sales transactions with that Contact. Similarly, if you specify a Purch. Currency, you will not be able to use any other Currency in purchase transactions. If you need to be able to use more than one Currency with a particular Contact, leave these fields blank. The Default Base Currency that you have specified in the Base Currency setting in the System module will then be used in their transactions, but you will be able to change to any other Currency if necessary.
- Once you have specified a Sales Currency and have used the Contact in a sales transaction of any kind, you should not change the Sales Currency. Similarly, you should not change the Purch. Currency once you have used the Contact in a purchasing transaction.
- Use these two fields to specify the Currencies that are to be used when selling to and buying from a Contact.
- Price List
- Paste Special
Price List register, Pricing module
- Default taken from Countries setting, System module
- Used as default in Quotations, Sales Orders, Sales Invoices
- If a Contact is a Customer and you wish to assign a particular Price List to them, you can do so here. This Price List will determine the default prices in all sales transactions made out to the Customer.
- You can also assign Price Lists to Customer Categories. This makes it easy to allocate or change the Price List of a group of Customers in a single step. Any Price List specified for a Customer will override the one in the Customer Category (if any) to which the Customer belongs.
- If you use Loyalty Cards, you can assign a Price List to each Loyalty Card Membership Level. This will allow you to charge different prices depending on the level of the Loyalty Card that a Customer holds.
- Please refer to the Price List page for full details about Price Lists. If you need to use dated Price Lists, please refer also to the section below describing the Price Based On options.
- Used as default in Quotations, Sales Orders, Sales Invoices
- Discount Matrix
- Paste Special
Discount Matrix register, Pricing module
- Default taken from Countries setting, System module
- Used as default in Quotations, Sales Orders, Sales Invoices
- If a Contact is a Customer and you wish to assign a particular Discount Matrix to them, you can do so here. Discount Matrices allow you to set up quantity discount structures (i.e. to offer discounts based on the quantity, weight, volume or value sold). When you enter a sales transaction made out to the Customer, the Discount Matrix entered here will determine the default percentage discount for each Item, depending on the quantity, weight, volume or value in the sales transaction.
- You can also assign Discount Matrices to Customer Categories. This makes it easy to allocate or change the Discount Matrix of a group of Customers in a single step. Any Discount Matrix specified for a Customer will override the one in the Customer Category (if any) to which the Customer belongs.
- If you use Loyalty Cards, you can assign a Discount Matrix to each Loyalty Card Membership Level. This will allow you to offer different discounts depending on the level of the Loyalty Card that a Customer holds.
- Please refer to the Quantity Discounts page for full details about Discount Matrices. If you need to use dated Discount Matrices, please refer also to the section below describing the Price Based On options.
- Used as default in Quotations, Sales Orders, Sales Invoices
- Supp. Disc. Matrix
- Paste Special
Discount Matrix register, Pricing module
- Used as default in Purchase Quotation Requests, Purchase Orders
- If a Contact is a Supplier and they have assigned a Discount Matrix to your company, you can specify that Discount Matrix here. Discount Matrices allow you to set up quantity discount structures (i.e. to take advantage of discounts based on the quantity, weight, volume or value purchased). When you enter a Purchase Quotation Request or a Purchase Order in the name of the Supplier, the Discount Matrix entered here will determine the default percentage discount for each Item, depending on the quantity, weight, volume or value in the transaction.
- If a Contact is a Supplier and they have assigned a Discount Matrix to your company, you can specify that Discount Matrix here. Discount Matrices allow you to set up quantity discount structures (i.e. to take advantage of discounts based on the quantity, weight, volume or value purchased). When you enter a Purchase Quotation Request or a Purchase Order in the name of the Supplier, the Discount Matrix entered here will determine the default percentage discount for each Item, depending on the quantity, weight, volume or value in the transaction.
- Salesman
- Paste Special
Person register, System module and Global User register, Technics module
- Used as default in Quotations, Sales Orders, Sales Invoices, Purchase Invoices
- Enter the Signature of the salesman responsible for the Contact's account. When you enter any transaction (e.g. a Sales or Purchase Order or a Sales or Purchase Invoice) in the name of the Contact, this Signature will be brought in to the Salesman field in that transaction as a default .
- This field is also used by the Limited Access module: please refer to the description of the Sales Group field (below) for details.
- If you would like the current user's Signature to be placed in this field in each new Contact record, select the Set Current User as Default Salesman option in the Contact Settings setting. If the current user belongs to a Sales Group, that Sales Group will be brought in to the field below as well.
- Enter the Signature of the salesman responsible for the Contact's account. When you enter any transaction (e.g. a Sales or Purchase Order or a Sales or Purchase Invoice) in the name of the Contact, this Signature will be brought in to the Salesman field in that transaction as a default .
- Sales Group
- Paste Special
Sales Groups setting, System module
- Default taken from Salesman
- When you specify a Salesman in the field above, the Sales Group will be brought in to this field from their Person record. If you have the Limited Access module, you can use this field to prevent a user from seeing all Contacts in the 'Contacts: Browse' and Contact 'Paste Special' windows by restricting their view to their own Contacts or to those of their Sales Group.
- Please refer to the page describing the Person register for full details about the Limited Access module.
- When you specify a Salesman in the field above, the Sales Group will be brought in to this field from their Person record. If you have the Limited Access module, you can use this field to prevent a user from seeing all Contacts in the 'Contacts: Browse' and Contact 'Paste Special' windows by restricting their view to their own Contacts or to those of their Sales Group.
- Default Items
- Paste Special
Default Items setting, Sales Ledger
- The Default Items setting allows you to define sets of Items that will always be added to Sales Invoices issued to certain Customers. If a Contact is a Customer, specify here if necessary the Default Item record that contains the set of Items that are always to be added to their Invoices. When you enter an Invoice, the default Items will be added when you enter the Customer Number. They will also be added to Sales Invoices created from Orders (although they will not appear in the Orders themselves or in Deliveries) and to those created in batches using the 'Group Invoicing' Maintenance function in the Sales Orders module. They will not appear in Interest Invoices.
- Price Based On
- If you are using dated Price Lists and/or Discount Matrices, the date that determines which Price List and Discount Matrix will be used in a Sales Order can be the Order Date, the Planned Delivery Date or the Despatch Date. Specify here which option is to be used for the Contact, if it is a Customer.
- If you choose the Planned Delivery Date option, the standard Price List and Discount Matrix will be used if the Planned Delivery Date in the Sales Order is blank or in the wrong format. The Planned Delivery Date field must use the Date format, which you should set using the Planned Delivery setting in the Sales Orders module.
- If you choose the Despatch Date option, the standard Price List and Discount Matrix will be used if the Despatch Date in the Sales Order is blank. The standard Price List and Discount Matrix are those specified for the Customer in the fields above, or those in the Customer Category.
- When you enter Invoices directly to the Invoice register, Price List and Discount Matrix selection will always depend on the Invoice Date. Similarly, when you enter Quotations, Price List and Discount Matrix selection will always depend on the Quotation Date, and in Purchase Orders, Discount Matrix selection will depend on the Order Date.
- Dated Price Lists are described here, with an example here. Dated Discount Matrices are described here, with an example here.
- If you choose the Planned Delivery Date option, the standard Price List and Discount Matrix will be used if the Planned Delivery Date in the Sales Order is blank or in the wrong format. The Planned Delivery Date field must use the Date format, which you should set using the Planned Delivery setting in the Sales Orders module.
The Contact register in Standard ERP:
- Introduction
- Entering a Contact, including:
- Header
- 'Contact' card
- 'Delivery' card
- 'Terms' card - Fields
- 'Terms' card - Check Boxes
- 'Pricing' card
- 'Company' card
- 'Accounts' card
- 'E-Records' card
- 'Web' card
- 'Comments' card
- 'Personal' card
- 'User Defined' card
- 'Notes' card
- 'BI' card
- Header
- Editing a Contact
- Deleting a Contact
- Linking Contact Persons and Companies - The Contact Relations Register
- Operations menu
- Create menu
- Home page for Customers, Suppliers and Contact Persons manual
- Home page for Standard ERP manual
Entering a Contact - Company Card
This page describes the fields on the 'Company' card of the Contact record. Please follow the links below for descriptions of the other cards:
- Header
- 'Contact' card
- 'Delivery' card
- 'Terms' card - Fields
- 'Terms' card - Check Boxes
- 'Pricing' card
- 'Company' card
- 'Accounts' card
- 'E-Records' card
- 'Web' card
- 'Comments' card
- 'Personal' card
- 'User Defined' card
- 'Notes' card
- 'BI' card
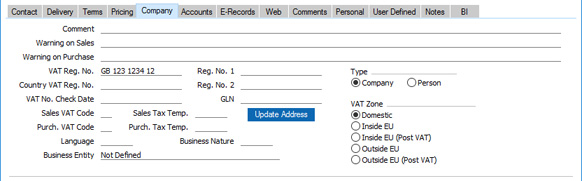
- Comment
- Any comment that you enter here will be printed in the Contact List, Customer Status and Supplier List reports. If a Contact is a Supplier, this comment will also be copied to the Comment field in all their Purchase Invoices ('Comment' card).
- Warning on Sales
- If a Contact is a Customer, text entered here will be shown as a warning message whenever you enter a sales transaction (e.g. a Quotation, Sales Order or Sales Invoice) in their name. It will also be included in the Contact List and Customer Status reports.
- Warning on Purchase
- If a Contact is a Supplier, text entered here will be shown as a warning message whenever you enter a purchase transaction (e.g. a Purchase Order or Purchase Invoice) in their name. It will also be included in the Supplier List report.
- VAT Reg No
- It is important that you record the Contact's VAT Number here if they are in the "Within EU" Zone as this information is required for EU VAT reporting purposes.
- If you enter a VAT Number that you have already used in another Contact record, a warning will appear when you save the record (the record will still be saved). The warning will contain the Contact Number of the other company. If you do not need this warning, select the No Warning For Duplicate VAT Reg. No. option on the 'VAT & Tax' card of the Account Usage S/L setting.
- If you need VAT Numbers to be validated when you save Contact records (i.e. to be checked that they are in the correct format for the Country specified on the 'Contact' card), define the correct formats in the VAT Number Masks setting in the System module. If the Country on the 'Contact' card is blank, the check will be made using the Country from the Company Info setting (i.e. your own country). If that is blank, no validation check will be made.
- If you need a VAT Number to be specified for every Contact that is a Customer or a Supplier, select the Require VAT Reg. No. option in the Contact Settings setting.
- If you enter a VAT Number that you have already used in another Contact record, a warning will appear when you save the record (the record will still be saved). The warning will contain the Contact Number of the other company. If you do not need this warning, select the No Warning For Duplicate VAT Reg. No. option on the 'VAT & Tax' card of the Account Usage S/L setting.
- Reg. No. 1
- If the Contact is a limited company, enter their Company Registration Number here.
- When you save the record, there will be a check that you have not already used the Company Registration Number in another Contact record. If you have, you will be warned, but you will still be able to save the record. The warning will contain the Contact Number of the other company. If you do not want this check to take place, select the No Warning For Duplicate VAT Reg. No. option on the 'VAT & Tax' card of the Account Usage S/L setting.
- The Customer Status report contains a [Credit History] text link that will open a separate report showing the Customer's credit history. This is a chargeable Cloud Service: to use it you must have entered a Reg No 1 in this field for the Customer whose credit history you are interested in, and you must have registered your database in Estonia using the Automatic Internet Enabler method, as described on the Enabler Key page.
- When you save the record, there will be a check that you have not already used the Company Registration Number in another Contact record. If you have, you will be warned, but you will still be able to save the record. The warning will contain the Contact Number of the other company. If you do not want this check to take place, select the No Warning For Duplicate VAT Reg. No. option on the 'VAT & Tax' card of the Account Usage S/L setting.
- Reg. No. 2
- Paste Special
Registration Defaults setting, Sales Ledger
- This field is used in Finland, where companies have two registration numbers.
- In Argentina, you should use this field for two purposes:
- You can use 'Paste Special' from this field to connect each Customer or Supplier to a row in the Registration Defaults setting. This connection will provide Official Tax Codes to the reports that will be sent to the tax authority. Please refer to the description of the Registration Defaults setting for more details.
- You should create records for each client machine in the Receipt Printer Texts per Machine in the Point of Sales module. In the matrix on the 'Defaults' card, enter a separate row for each row in the Registration Defaults setting, specifying the Customer VAT Responsibility for each one. When you enter an Order, Invoice or POS Invoice, the Reg. No. 2 in the Contact record for the Customer will be connected to the relevant row in the Receipt Printer Texts per Machine record for the till you are using. If the VAT Responsibility is Exempt, Not Responsible, End Consumer or Responsible Professional, then prices in the Order, Invoice or POS Invoice will include VAT. In addition, if you are using fiscal printers, the correct code representing the Customer VAT Responsibility can be printed on the Invoice by the fiscal printer. Please refer to step 10 here for more information.
- Elsewhere, you can use the 'Paste Special' link to the Registration Defaults setting to bring in default Sales and Purchase VAT Codes and Language.
- In Argentina, you should use this field for two purposes:
- VAT No. Check Date
- Paste Special Choose date
- If a Contact is a Customer of Supplier, use this field to record the date when you last checked the validity of their VAT registration number. This is for information only.
- If a Contact is a Customer of Supplier, use this field to record the date when you last checked the validity of their VAT registration number. This is for information only.
- GLN
- If a Contact is a Customer, enter the GLN (Global Location Number) of their Invoice address here. It will be copied to Sales Orders entered in the name of the Customer, and from there to Invoices.
- Sales VAT Code
- Paste Special
VAT Codes setting, Nominal Ledger
- Purch. VAT Code
- Paste Special
VAT Codes setting, Nominal Ledger
- If a Contact is a Customer, the Sales VAT Code will determine the rate at which VAT will be charged in sales to the Contact and the Output VAT Account to be credited.
- When you create sales transactions (e.g. Quotations, Sales Orders or Sales Invoices) for the Customer, this Sales VAT Code will take precedence over the VAT Codes specified in the Customer's Price List, in the Item and the Item Group and on the 'Sales' card of the Account Usage S/L setting in the Sales Ledger. Usually, you should only specify a Sales VAT Code here for an individual Customer if for some reason your usual VAT accounting method does not apply to them. Please refer here for more details about how a VAT Code will be chosen in sales transactions.
- If a Contact is a Supplier, the Purch. VAT Code will determine the rate at which VAT will be charged to you by the Contact and the Input VAT Account to be debited.
- When you enter Purchase Invoices for the Supplier directly to the Purchase Invoice register, this Purch. VAT Code will take precedence over the VAT Codes specified in the Account record and in the Account Usage P/L setting in the Purchase Ledger.
- Similarly, when you create Purchase Invoices for the Supplier from Goods Receipts, this Purch. VAT Code will take precedence over the VAT Codes specified in the Item and the Item Group and in the setting in the Purchase Ledger, but will be overridden by the VAT Code specified for the Item(s).
- When you create sales transactions (e.g. Quotations, Sales Orders or Sales Invoices) for the Customer, this Sales VAT Code will take precedence over the VAT Codes specified in the Customer's Price List, in the Item and the Item Group and on the 'Sales' card of the Account Usage S/L setting in the Sales Ledger. Usually, you should only specify a Sales VAT Code here for an individual Customer if for some reason your usual VAT accounting method does not apply to them. Please refer here for more details about how a VAT Code will be chosen in sales transactions.
- Sales Tax Temp.
- Paste Special
Tax Templates setting, Nominal Ledger
- Purch. Tax Temp.
- Paste Special
Tax Templates setting, Nominal Ledger
- In some countries, Tax Templates are used instead of VAT Codes. VAT Codes should be used where each sales and purchase transaction is taxed at a single rate, while Tax Templates should be used where different taxes and/or several tax rates are applied to one transaction.
- If you need to use Tax Templates, you should select the Use Tax Templates for Tax Calculation option in the Transaction Settings setting in the Nominal Ledger. Wherever a VAT Code field would appear, this option will cause a Tax Template field to appear instead. You should also enter your Tax Templates in the Tax Templates setting that is again in the Nominal Ledger. Please then refer here for details about how the Tax Template in each sales transaction row (e.g. in each Quotation, Order or Invoice row) will be chosen, and here for some examples.
- If you need to use Tax Templates, you should select the Use Tax Templates for Tax Calculation option in the Transaction Settings setting in the Nominal Ledger. Wherever a VAT Code field would appear, this option will cause a Tax Template field to appear instead. You should also enter your Tax Templates in the Tax Templates setting that is again in the Nominal Ledger. Please then refer here for details about how the Tax Template in each sales transaction row (e.g. in each Quotation, Order or Invoice row) will be chosen, and here for some examples.
- Update Address
- This is a duplicate of the [Update Address] button on the 'Contact' card: please refer to the description of that card here for details.
- Language
- Paste Special
Languages setting, System module
- Enter the Language spoken by the Contact here. Whenever you use the Contact in another record (e.g. in a Quotation, Sales or Purchase Order or Invoice), the Language will be copied to that record, with the following consequences:
- You can also use the Language to determine the Form Template that will be used when you print the record. In other words, you can design different versions of documents such as Invoices, Purchase Orders and Delivery Notes, to be printed in different Languages depending on the Language of the Contact. Please refer here for details about Form Templates, and here for details about using the Language to specify which Form Template will be used when printing a record.
- In some registers and settings (for example, the Item and Item Group registers, and the Delivery Modes, Delivery Terms, ,Payment Terms and Units settings, each record contains a matrix where you can enter translations of the name (e.g. of the Item Description or the Payment Term Text). When printing a record, the appropriate translation for the Language of the record will be printed. You can also enter separate records in the Values in Text setting for each Language. This will ensure that when you need amounts to be printed in words rather than figures (for example, when printing cheques), they will be printed in the correct Language.
- You can also use the Language to determine the Form Template that will be used when you print the record. In other words, you can design different versions of documents such as Invoices, Purchase Orders and Delivery Notes, to be printed in different Languages depending on the Language of the Contact. Please refer here for details about Form Templates, and here for details about using the Language to specify which Form Template will be used when printing a record.
- Business Nature
- Paste Special
Nature of Business setting, System module
- Use this field to note the nature of the Contact’s business. This is for information only.
- Type
- Use these options to specify whether the Contact is a company or an individual person. This information will be used in the official reports that will be sent to the tax authorities in various countries, and will also affect the check that the VAT Number is correct in Argentina and Paraguay.
- VAT Zone
- Default taken from
Countries setting, System module
- Used as default in Quotations, Sales and Purchase Orders, Sales and Purchase Invoices
- If a Contact is a Customer or Supplier, use these options to select a VAT Zone. The VAT Zone will be used in sales and purchase transactions to control VAT calculation and accounting. You can assign separate default sales VAT Codes and Sales Accounts to each Zone on the 'Sales' card of the Account Usage S/L setting in the Sales Ledger, and you can assign separate default purchase VAT Codes to each Zone on the 'VAT' card of the Account Usage P/L setting in the Purchase Ledger.
- On the sales side, it is important that you record the VAT Numbers (see above) of Customers in the "Within EU" Zone.
- When you raise Sales Invoices for Customers in the "Within EU" and "Outside EU" Zones, VAT will not be charged, irrespective of the VAT Code specified for those Zones in the Account Usage S/L setting. If you want VAT to be calculated and credited to the Output Account from the VAT Code in the normal way, place these Customers in the "Inside EU (Post VAT)" and "Outside EU (Post VAT)" Zones.
- Similarly, on the Purchase side, VAT will not be calculated on Purchase Invoices received from Suppliers in the "Outside EU" Zone. If the Supplier is in the "Inside EU" Zone, VAT from Purchase Invoices will be posted on a "reverse charge" bases and so will be debited to the Input Account from the VAT Code and credited to the Output Account from the VAT Code. For this reason, it is recommended that you use a dedicated VAT Code for VAT on EU Acquisitions, with Input and Output Accounts that are not used in any other VAT Code. The Invoice TOTAL will exclude VAT. If you want VAT to be calculated in the normal way, with no posting to the Output Account and with the TOTAL including VAT, place your Suppliers in the "Inside EU (Post VAT)" and "Outside EU (Post VAT)" Zones. Please refer here for more details about posting VAT from Purchase Invoices.
- You can change the names of two of these options if they are not suitable. Using the VAT Zone Label setting in the Sales Ledger, you can replace the string "EU" with your own string (for example "SACU" in South Africa).
- If a Contact is a Customer or Supplier, use these options to select a VAT Zone. The VAT Zone will be used in sales and purchase transactions to control VAT calculation and accounting. You can assign separate default sales VAT Codes and Sales Accounts to each Zone on the 'Sales' card of the Account Usage S/L setting in the Sales Ledger, and you can assign separate default purchase VAT Codes to each Zone on the 'VAT' card of the Account Usage P/L setting in the Purchase Ledger.
The Contact register in Standard ERP:
- Introduction
- Entering a Contact, including:
- Header
- 'Contact' card
- 'Delivery' card
- 'Terms' card - Fields
- 'Terms' card - Check Boxes
- 'Pricing' card
- 'Company' card
- 'Accounts' card
- 'E-Records' card
- 'Web' card
- 'Comments' card
- 'Personal' card
- 'User Defined' card
- 'Notes' card
- 'BI' card
- Header
- Editing a Contact
- Deleting a Contact
- Linking Contact Persons and Companies - The Contact Relations Register
- Operations menu
- Create menu
- Home page for Customers, Suppliers and Contact Persons manual
- Home page for Standard ERP manual
Entering a Contact - Accounts Card
This page describes the fields on the 'Accounts' card of the Contact record. Please follow the links below for descriptions of the other cards:
- Header
- 'Contact' card
- 'Delivery' card
- 'Terms' card - Fields
- 'Terms' card - Check Boxes
- 'Pricing' card
- 'Company' card
- 'Accounts' card
- 'E-Records' card
- 'Web' card
- 'Comments' card
- 'Personal' card
- 'User Defined' card
- 'Notes' card
- 'BI' card
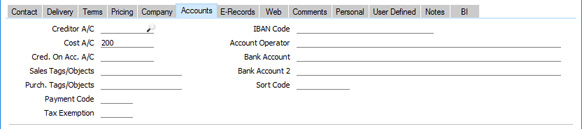
- Creditor A/C
- Paste Special
Account register, Nominal Ledger/System module
- If a Contact is a Supplier and you want their Purchase Invoices to be posted to a particular Creditor Account, specify that Account here.
- If you leave this field empty, the Creditor Account will be taken from the Supplier Category to which the Contact belongs, from the Customer Category if the Supplier Category field is empty or from the Creditor Account on the 'Creditors' card of the Account Usage P/L setting.
- If you leave this field empty, the Creditor Account will be taken from the Supplier Category to which the Contact belongs, from the Customer Category if the Supplier Category field is empty or from the Creditor Account on the 'Creditors' card of the Account Usage P/L setting.
- IBAN Code
- If a Contact has an IBAN (International Bank Account Number), enter it here (including two-character country prefix). When you save the Contact record, a validation check will be carried out to ensure the prefix is valid and the number of digits is correct for the prefix.
- IBAN is a standard account number format, permitting cross border payments in Europe. This information will be used when necessary by the electronic payment and payment export functions in Standard ERP.
- If the Contact is a Supplier, the IBAN Code will be transferred to any MAILLINK(HW0202PURCHINV_Entering_Identifiers_Card,Purchase Invoices) and Payments (flip H) entered in their name, being given priority over the Bank Account and Bank Account 2 below.
- In Finland, each Purchase Invoice carries a barcode, containing information such as the IBAN Code of the Supplier's bank account or the Supplier's bank account number, the total Invoice amount, a unique reference number and the Due Date. When entering a Purchase Invoice with a barcode to the Purchase Invoice register, you can enter or scan this barcode into the Barcode field on the 'Accounts' card. The Supplier (and all connected details such as Name, Address, Bank Account details and Payment Term), TOTAL, Reference and Due Date will be brought into the Purchase Invoice automatically. The Supplier will be found by searching the Contact register for the record with the IBAN Code or the bank account number contained in the barcode. If no Supplier with the relevant IBAN Code or bank account number is found, the other details (TOTAL, Reference and Due Date) will not be brought in from the barcode. So, if you will be using this feature, it is recommended that you keep the IBAN Codes and bank account numbers in the Contact records for your Suppliers up to date.
- It will usually be the case that the IBAN Code entered here and the SWIFT code in the Bank record quoted in the Account Operator field below should both refer to the same bank.
- IBAN is a standard account number format, permitting cross border payments in Europe. This information will be used when necessary by the electronic payment and payment export functions in Standard ERP.
- Cost A/C
- Paste Special
Account register, Nominal Ledger/System module
- If a Contact is a Supplier, you can determine that a particular Cost Account (i.e. Purchase Account) will be offered as a default in the first Purchase Invoice row when you enter a new Purchase Invoice. This can be particularly useful in the cases of specialist Suppliers and of Suppliers of services such as electricity or telephone services, whose Purchase Invoices are usually debited to the same Account. If you want to set a default Cost Account for a Supplier, specify that Account here.
- You must specify a Cost Account for a Supplier here if you intend to create Purchase Invoices in that Supplier's name from Purchase Orders and you are using the Consolidate Items to Supplier Cost Account or Consolidate by Items and Project options in the Purchase Invoice Settings setting. If you are using the Consolidate Items to Supplier Cost Account option, the cost of each Item on each Purchase Order will be debited to the Cost Account specified here.
- You must specify a Cost Account for a Supplier here if you intend to create Purchase Invoices in that Supplier's name from Purchase Orders and you are using the Consolidate Items to Supplier Cost Account or Consolidate by Items and Project options in the Purchase Invoice Settings setting. If you are using the Consolidate Items to Supplier Cost Account option, the cost of each Item on each Purchase Order will be debited to the Cost Account specified here.
- Account Operator
- Paste Special
Banks setting, Purchase Ledger
- Enter the name of each Contact's bank or building society here. If a Contact is a Supplier, their bank information will be transferred to any Purchase Invoices ('Accounts' card) and Payments (flip H) entered in their name, facilitating payment by the transfer of funds between banks. In particular, a Supplier's Account Operator will be copied to the Bank Code field in each Purchase Invoice.
- Cred. On Acc. A/C
- Paste Special
Account register, Nominal Ledger/System module
- If a Contact is a Supplier and you need to be able to issue Prepayments or On Account Payments to them without reference to a specific Invoice, you may want to use a special Account for such Payments. Specify that Account here, and tick the On Account check box on the 'Terms' card.
- When you issue a Prepayment or On Account Payment, it will be debited to this Account. Subsequently, when you receive the Invoice and connect it to that Payment, the same Account will be credited in place of the default Creditor Account. Please refer to the On Account Payments and Prepayments page for full details about this process.
- The Account that you specify here will override any such Accounts that you have specified for the Supplier Category to which the Supplier belongs or in the Account Usage P/L setting ( card).
- On the sales side, it is not possible to specify a Debtor On Account A/C at Customer level. The Debtor On Account A/C will always be taken from the Customer Category or from the Account Usage S/L setting.
- When you issue a Prepayment or On Account Payment, it will be debited to this Account. Subsequently, when you receive the Invoice and connect it to that Payment, the same Account will be credited in place of the default Creditor Account. Please refer to the On Account Payments and Prepayments page for full details about this process.
- Bank Account
- Enter each Contact's main bank account number here. If a Contact is a Supplier and providing they do not also have an IBAN Code (above), this bank account number will be transferred to any Purchase Invoices and Payments (flip H) entered in the Supplier's name, facilitating payment by the transfer of funds between banks.
- If the Payment File Format you have specified in the Bank Transfer setting in the Purchase Ledger is UK - BACS and the Contact is a Supplier, then their Bank Account must consist of eight digits. When the Payment File Format is UK - BACS, the 'Banking File' export function will take bank account and sort code information from the Contact records for each Supplier, not from Payment rows.
- In Finland, each Purchase Invoice carries a barcode, containing information such as the IBAN Code of the Supplier's bank account or the Supplier's bank account number, the total Invoice amount, a unique reference number and the Due Date. When entering a Purchase Invoice with a barcode to the Purchase Invoice register, you can enter or scan this barcode into the Barcode field on the 'Accounts' card. The Supplier (and all connected details such as Name, Address, Bank Account details and Payment Term), TOTAL, Reference and Due Date will be brought into the Purchase Invoice automatically. The Supplier will be found by searching the Contact register for the record with the IBAN Code or the bank account number contained in the barcode. If no Supplier with the relevant IBAN Code or bank account number is found, the other details (TOTAL, Reference and Due Date) will not be brought in from the barcode. So, if you will be using this feature, it is recommended that you keep the IBAN Codes and bank account numbers in the Contact records for your Suppliers up to date. You should also ensure bank account numbers use the correct format (six digits followed by a dash followed by eight digits).
- Leave this field empty and use the Bank Account 2 field below instead in the following circumstances:
- The Payment File Format you have specified in the Bank Transfer setting is Sweden - Handelsbanken, the Contact is a Supplier and they have a Handelsbanken account.
- The Payment File Format is Sweden - PlusGirot, the Contact is a Supplier and they have a PlusGiro account.
- The Payment File Format is Sweden - SE-Banken, the Contact is a Supplier and they have a Handelsbanken account.
- The Payment File Format is Sweden - Swedbank and the, the Contact is a Supplier and they have a Swedbank account.
- If the Payment File Format you have specified in the Bank Transfer setting in the Purchase Ledger is UK - BACS and the Contact is a Supplier, then their Bank Account must consist of eight digits. When the Payment File Format is UK - BACS, the 'Banking File' export function will take bank account and sort code information from the Contact records for each Supplier, not from Payment rows.
- Sales Tags/Objects
- Paste Special
Tag/Object register, Nominal Ledger/System module
- Default taken from Countries setting, System module
- Used as default in Quotations, Sales Orders, Sales Invoices
- Used as default in Quotations, Sales Orders, Sales Invoices
- Purch. Tags/Objects
- Paste Special
Tag/Object register, Nominal Ledger/System module
- You can assign up to 20 Tags/Objects in each of these fields, separated by commas. You might define separate Tags/Objects to represent different departments, cost centres or product types. This provides a flexible method of analysis that can be used in Nominal Ledger reports.
- If a Contact is a Customer, the Sales Tags/Objects will be used as defaults in their Sales Orders, Sales Invoices and other sales transactions. In the Nominal Ledger Transactions that are generated from Sales Invoices, these Tags/Objects will be will be assigned to the credit posting(s) to the Sales Account(s), to the Cost of Sales postings, to the debit posting to the Debtor Account (if you are using the
Tags/Objects on Debtors Account option in the Account Usage S/L setting) and to the credit posting(s) to the Output VAT Account(s) (if you are using the Tags/Objects on VAT Account option in the same setting ('VAT / Tax' card)).
- If a Contact is a Supplier, the Purch. Tags/Objects will be copied to the Tags/Objects field on the 'Terms' card of each Purchase Invoice, providing you are using the Tags/Objects on Creditor Account option in the Account Usage P/L setting. In the Nominal Ledger Transaction generated from a Purchase Invoice, these Tags/Objects will be assigned to the debit posting to the Purchase Account(s) and, if you are using the Tags/Objects on Creditor Account option, to the credit posting to the Creditor Account.
- When a Nominal Ledger Transaction is generated from a Goods Receipt, the Purch. Tags/Objects will be assigned to the credit posting to the Purchase Accruals Account. If you are using the Supplier Tag/Object on Stock A/C option on the 'Creditors' card of the Account Usage P/L setting, they will be assigned to the debit posting to the Stock Account as well.
- If you would like Sales and/or Purchase Tag/Objects to be created automatically from and assigned to Customers and Suppliers when you save them for the first time, select the Automatically Create Sales Tags/Objects on Contacts and/or Automatically Create Purchase Tags/Objects on Contacts options in the Contact Settings setting. You can also use the 'Tags/Objects' function on the Create menu in a Contact that you have already saved. If you need the new Tags/Objects to be assigned to Tag/Object Types, specify those Tag/Object Types in the Contact Settings setting. Tags/Objects will only be created from Customers and Suppliers, not from other types of Contact.
- If a Contact is a Customer, the Sales Tags/Objects will be used as defaults in their Sales Orders, Sales Invoices and other sales transactions. In the Nominal Ledger Transactions that are generated from Sales Invoices, these Tags/Objects will be will be assigned to the credit posting(s) to the Sales Account(s), to the Cost of Sales postings, to the debit posting to the Debtor Account (if you are using the
- Bank Account 2
- This field will usually only be used in Sweden for Contacts who are Suppliers. You should enter their main bank account number here and leave the Bank Account field above blank in the following circumstances:
- The Payment File Format you have specified in the Bank Transfer setting in the Purchase Ledger is Sweden - Handelsbanken and the Supplier has a Handelsbanken account.
- The Payment File Format is Sweden - PlusGirot and the Supplier has a PlusGiro account.
- The Payment File Format is Sweden - SE-Banken and the Supplier has an SE-Banken account.
- The Payment File Format is Sweden - Swedbank and the Supplier has a Swedbank account.
- If the Bank Account and IBAN Code above are empty, this bank account number will be transferred to any Purchase Invoices and Payments (flip H) entered in the Supplier's name, facilitating payment by the transfer of funds between banks.
- If the Payment File Format is Sweden - Handelsbanken, Sweden - PlusGirot, Sweden - SE-Banken or Sweden - Swedbank, the 'Banking File' export function will export information in different formats, depending on where the Supplier you are paying holds their bank account. For example, if the Payment File Format is Sweden - PlusGirot and a Supplier has a Bank Account 2, the export format will be correct for PlusGiro accounts, but if the Supplier has a Bank Account, the export format will be correct for accounts with other banks.
- This field is used by the 'Banking File' Export function. Please refer to your local HansaWorld representative for details.
- The Payment File Format you have specified in the Bank Transfer setting in the Purchase Ledger is Sweden - Handelsbanken and the Supplier has a Handelsbanken account.
- Sort Code
- Enter the Sort Code (branch number) of each Contact's bank here. If a Contact is a Supplier, their Sort Code will be transferred to any Purchase Invoices ('Accounts' card) and Payments (flip H) entered in the Supplier's name, facilitating payment by the transfer of funds between banks.
- If the Payment File Format you have specified in the Bank Transfer setting in the Purchase Ledger is UK - BACS and the Contact is a Supplier, then the Sort Code must be made up of six digits. When the Payment File Format is UK - BACS, the 'Banking File' export function will take bank account and sort code information from the Contact records for each Supplier, not from the Payment rows.
- If the Payment File Format you have specified in the Bank Transfer setting in the Purchase Ledger is UK - BACS and the Contact is a Supplier, then the Sort Code must be made up of six digits. When the Payment File Format is UK - BACS, the 'Banking File' export function will take bank account and sort code information from the Contact records for each Supplier, not from the Payment rows.
- Payment Code
- Paste Special
Payment Codes setting, Purchase Ledger
This field is used in Sweden, where every payment to a beneficiary domiciled outside Sweden (in a foreign currency or in Swedish kronor) that exceeds a counter value stipulated by the National Tax Board (Riksskatteverket) must be reported to the Tax Board by the intermediary bank. Included in the report should be a Payment Code, a three digit code representing a category (i.e. export/import, services etc.).
- Specify the Payment Code to be used with a particular Supplier here: this is only necessary if the company is a Supplier located outside Sweden and you will be sending banking files for cross-border payments. If the Contact is a Supplier, their Payment Code will be transferred to any Purchase Invoices ('Accounts' card) and Payments (flip H) entered in their name. From there, the Payment Code will be included in Banking File exports if you produce them using the Foreign Country Payment option and if the Payment File Format you have specified in the Bank Transfer setting in the Purchase Ledger is Sweden - Handelsbanken.
- Post Receipt VAT
- These options will only be visible if the VAT Law in the Company Info setting is "Croatian", "Hungarian", "Polish", "Serbian", "Slovakian" or "Slovenian".
- If a Contact is a Customer, use these options if the default Book Receipt VAT option set in the Account Usage S/L setting is not to be applied to the Customer's Invoices and Receipts.
- In general, you should use the Post Receipt VAT option when you need your output VAT liability to be calculated from your Receipts, not from your Invoices.
- If you are in Croatia, Hungary, Serbia, Slovakia or Slovenia and you are using the Post Receipt VAT option, the Outp A/C in each VAT Code will be treated as a preliminary Output VAT Account, to be credited whenever you mark an Invoice as OK. When the Invoice is paid, the Transaction from the Receipt will include an extra VAT element in which the VAT is moved from the Outp A/C to the VAT Code's O/P A/C. The O/P A/C will therefore become the final Output VAT Account.
- Moving away from the default Book Receipt VAT option requires some careful configuration. In this situation, the Outp A/C will contain two types of VAT:
- VAT resulting from sales to Book Receipt VAT Customers. This VAT is waiting for the Customers to pay, when it will be moved to the O/P A/C. You are not yet liable to pay this VAT to the tax authorities.
- VAT resultfng from sales to non-Book Receipt VAT Customers. This VAT will not be moved to the O/P A/C and so you are liable to pay this VAT to the tax authorities.
You therefore need to be able to separate the two types of VAT in the Outp A/C. You can do this as follows:
- Create a Tag/Object to be used with Customers who will not use the default Book Receipt VAT option, and assign this Tag/Object to those Customers (in the Sales Tag/Object field).
- Select the Tags/Objects on VAT Account option in the Account Usage S/L setting.
This will allow you to calculate your VAT liability from the O/P A/C and from the relevant portion of the Outp. A/C, and you will be able to adjust the definition of the VAT Report (or other report) accordingly.
- If you are in Poland and you are using the Post Receipt VAT option, you should specify an Outp A/C Corr. Account for each VAT Code (on flip C). The Outp A/C Corr. Account will be treated as a preliminary Output VAT Account, to be credited whenever you mark an Invoice as OK. When the Invoice is paid, the Transaction from the Receipt will include an extra VAT element in which the VAT is moved from the Outp A/C Corr. Account to the VAT Code's Outp A/C. The Outp A/C will therefore be used as the final Output VAT Account (as it is when the Post Receipt VAT option is not being used). VAT resulting from sales to non-Book Receipt VAT Customers will be posted directly to the Outp A/C. Therefore, in Poland there will be no need to separate different types of VAT using Objects.
- If a Contact is a Customer, use these options if the default Book Receipt VAT option set in the Account Usage S/L setting is not to be applied to the Customer's Invoices and Receipts.
- Post Payment VAT
- These options will only be visible if the VAT Law in the Company Info setting is "Croatian", "Hungarian", "Polish", "Serbian", "Slovakian" or "Slovenian".
- If a Contact is a Supplier, use these options if the default Book Payment VAT option set in the Account Usage P/L setting is not to be applied to the Supplier's Purchase Invoices and Payments.
- In general, you should use the Post Payment VAT option when you need the value of the input VAT that you can reclaim to be calculated from your Payments, not from your Purchase Invoices. In this case, the Inp A/C in each VAT Code will be treated as a preliminary Input VAT Account, to be debited whenever you mark a Purchase Invoice as OK. When you pay the Purchase Invoice, the Transaction from the Payment will include an extra VAT element in which the VAT is moved from the Inp A/C to the VAT Code's I/P A/C. The I/P A/C will therefore become the final Input VAT Account.
- Moving away from the default Book Payment VAT option requires some careful configuration. In this situation, the Inp A/C will contain two types of VAT:
- VAT resulting from purchases from Book Payment VAT Suppliers. This VAT is waiting for you to pay the Suppliers, when it will be moved to the I/P A/C. You are not yet able to reclaim this VAT from the tax authorities.
- VAT resulting from purchases from non-Book Payment VAT Suppliers. This VAT will not be moved to the I/P A/C and so you are able to reclaim this VAT from the tax authorities.
You therefore need to be able to separate the two types of VAT in the Inp A/C. You can do this as follows:
- Create a Tag/Object to be used with Suppliers who will not use the default Book Payment VAT option, and assign this Tag/Object to those Suppliers (in the Purch. Tag/Object field).
- Select the Tags/Objects on VAT Account option in the Account Usage P/L setting.
This will allow you to calculate how much VAT you can reclaim using the I/P A/C and from the relevant portion of the Inp. A/C, and you will be able to adjust the definition of the VAT Report (or other report) accordingly.
- If a Contact is a Supplier, use these options if the default Book Payment VAT option set in the Account Usage P/L setting is not to be applied to the Supplier's Purchase Invoices and Payments.
The Contact register in Standard ERP:
- Introduction
- Entering a Contact, including:
- Header
- 'Contact' card
- 'Delivery' card
- 'Terms' card - Fields
- 'Terms' card - Check Boxes
- 'Pricing' card
- 'Company' card
- 'Accounts' card
- 'E-Records' card
- 'Web' card
- 'Comments' card
- 'Personal' card
- 'User Defined' card
- 'Notes' card
- 'BI' card
- Header
- Editing a Contact
- Deleting a Contact
- Linking Contact Persons and Companies - The Contact Relations Register
- Operations menu
- Create menu
- Home page for Customers, Suppliers and Contact Persons manual
- Home page for Standard ERP manual
Entering a Contact - E-Records Card
This page describes the fields on the 'E-Records' card of the Contact record. Please follow the links below for descriptions of the other cards:
- Header
- 'Contact' card
- 'Delivery' card
- 'Terms' card - Fields
- 'Terms' card - Check Boxes
- 'Pricing' card
- 'Company' card
- 'Accounts' card
- 'E-Records' card
- 'Web' card
- 'Comments' card
- 'Personal' card
- 'User Defined' card
- 'Notes' card
- 'BI' card
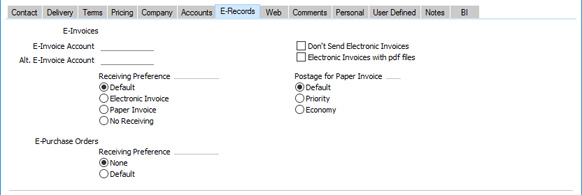
In some countries and depending on configuration, you can have Invoices sent electronically automatically when you mark them as OK and save. You can also receive Purchase Invoices that have been sent to you electronically.
Sending and receiving Invoices electronically are both chargeable Cloud Services: please refer to your local HansaWorld representative for details.
If you are sending Invoices electronically, use the 'E-Records' card to specify how Invoices should be sent to particular Customers. If you are receiving Invoices, use the 'E-Records' card to specify how Invoices from particular Suppliers will be sent to you.
The options that are available on the 'E-Records' card and the configuration that is required will depend on your country of operation. Again, please refer to your local HansaWorld representative for details.
---
The Contact register in Standard ERP:
- Introduction
- Entering a Contact, including:
- Header
- 'Contact' card
- 'Delivery' card
- 'Terms' card - Fields
- 'Terms' card - Check Boxes
- 'Pricing' card
- 'Company' card
- 'Accounts' card
- 'E-Records' card
- 'Web' card
- 'Comments' card
- 'Personal' card
- 'User Defined' card
- 'Notes' card
- 'BI' card
- Header
- Editing a Contact
- Deleting a Contact
- Linking Contact Persons and Companies - The Contact Relations Register
- Operations menu
- Create menu
- Home page for Customers, Suppliers and Contact Persons manual
- Home page for Standard ERP manual
Entering a Contact - Web Card
This page describes the fields on the 'Web' card of the Contact record. Please follow the links below for descriptions of the other cards:
- Header
- 'Contact' card
- 'Delivery' card
- 'Terms' card - Fields
- 'Terms' card - Check Boxes
- 'Pricing' card
- 'Company' card
- 'Accounts' card
- 'E-Records' card
- 'Web' card
- 'Comments' card
- 'Personal' card
- 'User Defined' card
- 'Notes' card
- 'BI' card

- Display on the Web
- Paste Special
Display on the Web setting, Web Shop and CMS module
- If you are using the Standard ERP Web Shop, you can use the Display on the Web setting to specify how much information about stock levels will be shown to visitors to the web shop, which payment methods will be shown, and whether Delivery Modes will be displayed.
- If a Contact is a Customer and you specify a Display on the Web record in this field, this will control the information that will be shown to the Customer after they have logged in. You can also specify Display on the Web records at the Customer Category level. If you do not specify a Display on the Web record at the Category level or at the Customer level, information will be displayed as follows:
- Stock information will be controlled by the Show Item Stock Levels options in the Webshop Settings setting.
- Payment methods will be controlled by the Webshop Company Settings setting.
- Delivery Modes will be controlled by the Show Delivery Modes option in the Webshop Company Settings setting.
- If a Contact is a Customer and you specify a Display on the Web record in this field, this will control the information that will be shown to the Customer after they have logged in. You can also specify Display on the Web records at the Customer Category level. If you do not specify a Display on the Web record at the Category level or at the Customer level, information will be displayed as follows:
- Freight Code
- Paste Special
Web Freight setting, Web Shop module
- Default taken from Countries setting, System module
- If you are using the Standard ERP Web Shop, you may wish to define various methods that are to be used to calculate freight charges for Orders placed over the web (e.g. for local, national and international delivery). Use the Web Freight setting in the Web Shop module to define these calculation methods, also known as "Freight Codes".
- When a Customer places an Order over the web, the Freight Code will be chosen as follows:
- If you have chosen in the Display on the Web record specified in the field above or in the Customer Category to which the Customer belongs or in the Webshop Company Settings setting that Delivery Modes will be displayed on the web, the Freight Code will be taken from the Delivery Mode chosen by the Customer.
- If no Delivery Modes are displayed on the web and if a Country has been specified on the 'Delivery' card of the Contact record for the Customer, the Freight Code will be taken from the record for that Country in the Countries setting in the System module.
- If no Country has been specified on the 'Delivery' card or the Country in question does not have a Freight Code, the Freight Code in this field will be used.
- The Freight Code will be taken from the Webshop Company Settings setting in the Web Shop and CMS module (Default Freight field).
- If you are using the Standard ERP Web Shop, you may wish to define various methods that are to be used to calculate freight charges for Orders placed over the web (e.g. for local, national and international delivery). Use the Web Freight setting in the Web Shop module to define these calculation methods, also known as "Freight Codes".
The Contact register in Standard ERP:
- Introduction
- Entering a Contact, including:
- Header
- 'Contact' card
- 'Delivery' card
- 'Terms' card - Fields
- 'Terms' card - Check Boxes
- 'Pricing' card
- 'Company' card
- 'Accounts' card
- 'E-Records' card
- 'Web' card
- 'Comments' card
- 'Personal' card
- 'User Defined' card
- 'Notes' card
- 'BI' card
- Header
- Editing a Contact
- Deleting a Contact
- Linking Contact Persons and Companies - The Contact Relations Register
- Operations menu
- Create menu
- Home page for Customers, Suppliers and Contact Persons manual
- Home page for Standard ERP manual
Entering a Contact - Comments Card
This page describes the fields on the 'Comments' card of the Contact record. Please follow the links below for descriptions of the other cards:
- Header
- 'Contact' card
- 'Delivery' card
- 'Terms' card - Fields
- 'Terms' card - Check Boxes
- 'Pricing' card
- 'Company' card
- 'Accounts' card
- 'E-Records' card
- 'Web' card
- 'Comments' card
- 'Personal' card
- 'User Defined' card
- 'Notes' card
- 'BI' card
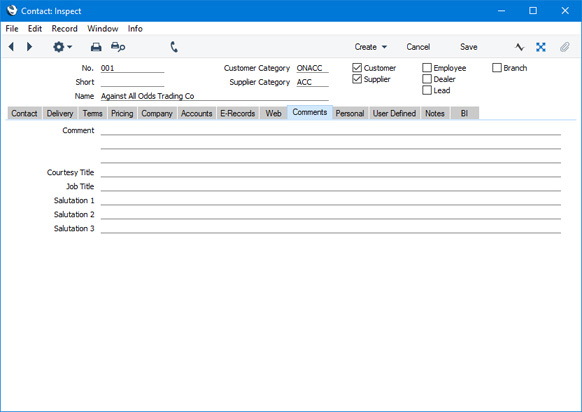
- Comment
- If a Contact is a Contact Person, any comment that you enter here will be printed in the Contact List report, if you print it using the Include All Contact Persons and Detailed options. For all Contacts, the first line of this Comment will be printed in the Telephone List report if you print it using the Overview with Work Details option.
- Courtesy Title
- Paste Special
Courtesy Titles setting, CRM/HRM module
- If a Contact is a Contact Person, enter their Title (e.g. Mr., Mrs., Miss, Ms., Dr., Prof., etc.). If you want this information to be printed on your Customer Letters, include the "Contact Person Title" field in your Form Template design. The Courtesy Title will also be shown in the 'Paste Special' list that you will use to specify a Contact Person in the Attention or Contact field in any transaction (e.g. Quotations, Orders or Invoices).
- Job Title
- Paste Special
Job Titles setting, CRM/HRM module
- If a Contact is a Contact Person, use this field to describe the role of the person within their company.
- Salutation 1, 2 and 3
- If a Contact is a Contact Person, use these fields to record greetings with various degrees of formality. It is recommended that you enter Salutations in all three fields, even if they are the same.
- When you design the Form Templates that will be used to print Customer Letters, you can include the "Salutation 1", "Salutation 2" or "Salutation 3" fields depending on the formality of the letter. You can also include these fields in the Form Templates that will be used to print Contact Labels and Invoices.
The Contact register in Standard ERP:
- Introduction
- Entering a Contact, including:
- Header
- 'Contact' card
- 'Delivery' card
- 'Terms' card - Fields
- 'Terms' card - Check Boxes
- 'Pricing' card
- 'Company' card
- 'Accounts' card
- 'E-Records' card
- 'Web' card
- 'Comments' card
- 'Personal' card
- 'User Defined' card
- 'Notes' card
- 'BI' card
- Header
- Editing a Contact
- Deleting a Contact
- Linking Contact Persons and Companies - The Contact Relations Register
- Operations menu
- Create menu
- Home page for Customers, Suppliers and Contact Persons manual
- Home page for Standard ERP manual
Entering a Contact - Personal Card
This page describes the fields on the 'Personal' card of the Contact record. Please follow the links below for descriptions of the other cards:
- Header
- 'Contact' card
- 'Delivery' card
- 'Terms' card - Fields
- 'Terms' card - Check Boxes
- 'Pricing' card
- 'Company' card
- 'Accounts' card
- 'E-Records' card
- 'Web' card
- 'Comments' card
- 'Personal' card
- 'User Defined' card
- 'Notes' card
- 'BI' card
The 'Personal' card allows you to record various pieces of personal information about a Contact that is a Guest that you have entered using the Hotel module.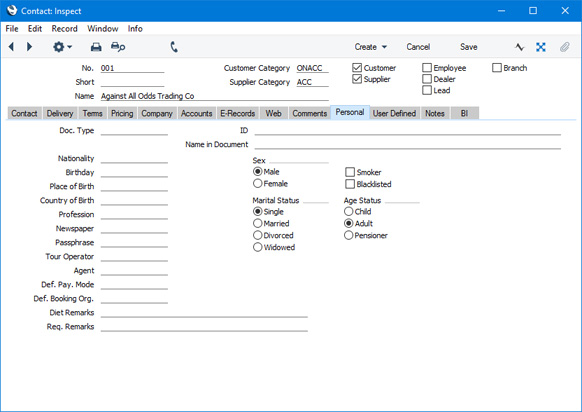
- Doc. Type
- Paste Special
Contact Document Types setting, Sales Ledger
- You can use the Doc. Type field for one of two purposes, as follows:
- If a Contact is a Hotel Guest, use the Doc. Type field to record the type of ID document that the Guest shows when they check in. Example values might be "passport" or "driving licence".
- In Argentina, if a Contact is a Customer or a Supplier, the Doc. Type field should contain a code representing the type of ID document that the Contact has. For example, if the Contact is registered with the tax authority as a company, the type of the ID document will usually be "80", but if the Contact is a private individual, it might be "86" or "96". This code will be used in e-invoicing and tax exports.
- If a Contact is a Hotel Guest, use the Doc. Type field to record the type of ID document that the Guest shows when they check in. Example values might be "passport" or "driving licence".
The Contact register in Standard ERP:
- Introduction
- Entering a Contact, including:
- Header
- 'Contact' card
- 'Delivery' card
- 'Terms' card - Fields
- 'Terms' card - Check Boxes
- 'Pricing' card
- 'Company' card
- 'Accounts' card
- 'E-Records' card
- 'Web' card
- 'Comments' card
- 'Personal' card
- 'User Defined' card
- 'Notes' card
- 'BI' card
- Header
- Editing a Contact
- Deleting a Contact
- Linking Contact Persons and Companies - The Contact Relations Register
- Operations menu
- Create menu
- Home page for Customers, Suppliers and Contact Persons manual
- Home page for Standard ERP manual
Entering a Contact - User Defined Card
The 'User Defined' card in the Contact record contains one permanent field (the Address Books field) and can contain up to eleven user-defined fields. Please refer to the description of the 'Values' card in the User Defined Fields - Contacts setting here for details about the user-defined fields on this card.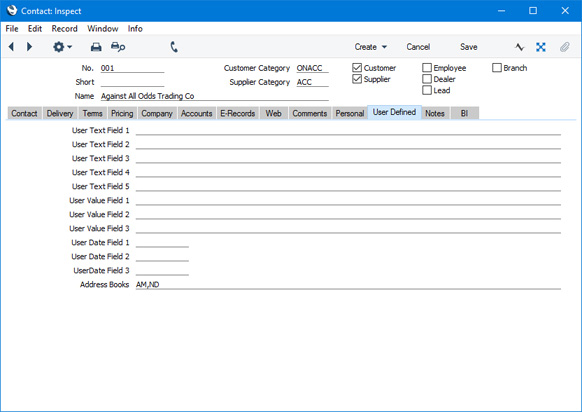
- Address Books
- The upper left area of the 'Communication Centre' window displays a list of the records in the Contact register in your current Company. By default, the list will show every record in the Contact register. You can restrict the list so that it only shows your Personal Contacts. To do this, click the button marked 'Company', hold down the mouse, and choose the 'Personal' option:
The button text will change to 'Personal'. Repeat the procedure to change the list back to showing every record. A Personal Contact is one where you are the Salesman, or one with your Signature in this Address Books field. The Address Books field can contain the Signatures of more than one Person separated by commas, so a Contact can be the Personal Contact of more than one Person.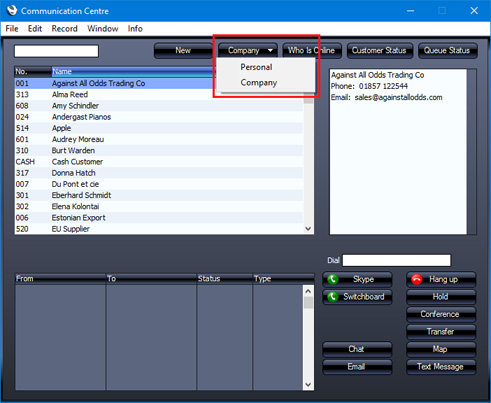
The Contact register in Standard ERP:
- Introduction
- Entering a Contact, including:
- Header
- 'Contact' card
- 'Delivery' card
- 'Terms' card - Fields
- 'Terms' card - Check Boxes
- 'Pricing' card
- 'Company' card
- 'Accounts' card
- 'E-Records' card
- 'Web' card
- 'Comments' card
- 'Personal' card
- 'User Defined' card
- 'Notes' card
- 'BI' card
- Header
- Editing a Contact
- Deleting a Contact
- Linking Contact Persons and Companies - The Contact Relations Register
- Operations menu
- Create menu
- Home page for Customers, Suppliers and Contact Persons manual
- Home page for Standard ERP manual
Entering a Contact - Notes Card
This page describes the fields on the 'Notes' card of the Contact record. Please follow the links below for descriptions of the other cards:
- Header
- 'Contact' card
- 'Delivery' card
- 'Terms' card - Fields
- 'Terms' card - Check Boxes
- 'Pricing' card
- 'Company' card
- 'Accounts' card
- 'E-Records' card
- 'Web' card
- 'Comments' card
- 'Personal' card
- 'User Defined' card
- 'Notes' card
- 'BI' card
---
The 'Notes' card contains a text field that you can use to record any comments about a Contact
The Contact register in Standard ERP:
- Introduction
- Entering a Contact, including:
- Header
- 'Contact' card
- 'Delivery' card
- 'Terms' card - Fields
- 'Terms' card - Check Boxes
- 'Pricing' card
- 'Company' card
- 'Accounts' card
- 'E-Records' card
- 'Web' card
- 'Comments' card
- 'Personal' card
- 'User Defined' card
- 'Notes' card
- 'BI' card
- Header
- Editing a Contact
- Deleting a Contact
- Linking Contact Persons and Companies - The Contact Relations Register
- Operations menu
- Create menu
- Home page for Customers, Suppliers and Contact Persons manual
- Home page for Standard ERP manual
Entering a Contact - BI Card
This page describes the fields on the 'BI' card of the Contact record. Please follow the links below for descriptions of the other cards:
- Header
- 'Contact' card
- 'Delivery' card
- 'Terms' card - Fields
- 'Terms' card - Check Boxes
- 'Pricing' card
- 'Company' card
- 'Accounts' card
- 'E-Records' card
- 'Web' card
- 'Comments' card
- 'Personal' card
- 'User Defined' card
- 'Notes' card
- 'BI' card
If you are using the BI module (i.e. if the BI option on the 'Technical' card in the Configuration setting in the System module is selected), a thirteenth card entitled 'BI' will be added to the Contact record. If a Contact is a Customer, this card will contain a graph displaying monthly sales over the past year. If you double-click on the graph, it will be opened in a new window where you can change the graph type and the parameters such as the period covered by the graph. You can use Access Groups to prevent certain users from double-clicking on the graph, by denying them access to the 'View BI' Action.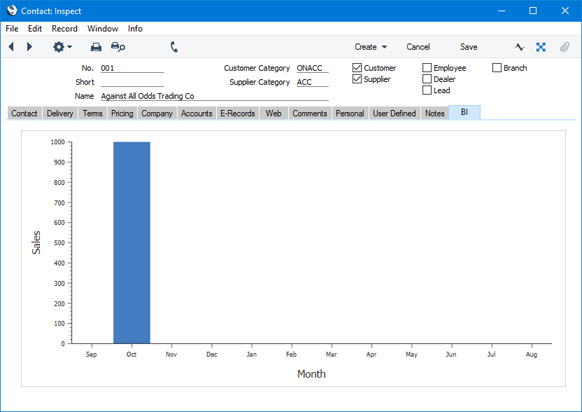
The Contact register in Standard ERP:
- Introduction
- Entering a Contact, including:
- Header
- 'Contact' card
- 'Delivery' card
- 'Terms' card - Fields
- 'Terms' card - Check Boxes
- 'Pricing' card
- 'Company' card
- 'Accounts' card
- 'E-Records' card
- 'Web' card
- 'Comments' card
- 'Personal' card
- 'User Defined' card
- 'Notes' card
- 'BI' card
- Header
- Editing a Contact
- Deleting a Contact
- Linking Contact Persons and Companies - The Contact Relations Register
- Operations menu
- Create menu
- Home page for Customers, Suppliers and Contact Persons manual
- Home page for Standard ERP manual
Editing a Contact
If you need to edit a Contact record and you are using Windows or Mac OS X, follow these steps :
- Check the Navigation Centre to make sure you are in a module that contains the Contact register (e.g. the Sales or Purchase Orders modules, the Sales or Purchase Ledgers, or the Contract, Quotations, CRM and Service Orders modules if installed). If you are in a different module, click the [Switch Module] button in the Navigation Centre or use the Ctrl-0 (zero) (Windows) or ⌘-0 (Mac OS X) keyboard shortcut. Double-click any of the modules mentioned above in the subsequent list.
- Open the Contact register by clicking the [Registers] button in the Navigation Centre and double-clicking 'Contacts' in the resulting list.
- The 'Contacts: Browse' window opens, listing the Contacts in Contact Number order. You can change the sort order by clicking on one of the column headings. The heading will be coloured blue to show the current sort order.
- Searching for a particular Contact depends on whether you are using the Browse Filtering option in the Optional Features setting in the System module, as follows:
- If you are not using the Browse Filtering option, first sort the list by the column that you want to use for the search. Then, enter the text that you want to find in the Search field in the top right-hand corner of the window. If you are using Windows, a match will be highlighted as you type each character. If you are using Mac OS X, press the Return key to search. For example, to search for a particular Contact Name, sort by Name before entering a Contact Name (or its first few characters) in the Search field.
- If you are using the Browse Filtering option, all you need to do is to start typing a letter, word, number, or date in the Search field (there is no need to click in the field before typing). As you type each character, non-matching records will be removed from the list. There is no need to sort the list first.
- If you are not using the Browse Filtering option, first sort the list by the column that you want to use for the search. Then, enter the text that you want to find in the Search field in the top right-hand corner of the window. If you are using Windows, a match will be highlighted as you type each character. If you are using Mac OS X, press the Return key to search. For example, to search for a particular Contact Name, sort by Name before entering a Contact Name (or its first few characters) in the Search field.
- To modify a Contact record, double-click it in the browse window or highlight it and press the Enter key. The record will be opened in a window entitled 'Contact: Inspect'. The fields in this window are the same as those in the 'Contact: New' window: please refer here for a detailed description of each field.
- Edit the fields as necessary. Use the Tab, Return or Enter keys to move from field to field. You will not be able to change the Contact Number.
- Click the [Save] button when you are ready to save changes or [Cancel] if you want to leave the record unchanged.
- You can also edit a Contact from another register. For example, when entering an Invoice, you might realise that your information about the Customer is out of date (they might have changed their address or telephone number, for example). Place the insertion point in the Customer field in the Invoice and press F2 (Windows) or ⌘-Shift-V (Mac OS X). The Contact record for the Customer opens, allowing you to make the necessary changes. You can also do this from the 'Paste Special' list, when you are choosing the Customer for the Invoice.
- Check the Navigation Centre to make sure you are in a module you are in a module that contains the Contact register (e.g. the Sales or Purchase Orders modules, the Sales or Purchase Ledgers, or the Contract, Quotations, CRM and Service Orders modules if installed). If you are in a different module, tap the [Switch Module] button in the Navigation Centre. Tap any of the modules mentioned above in the subsequent list.
- To open the Contact register, tap the [Registers] button in the Navigation Centre and then tap 'Contacts' in the resulting list.
- The 'Contacts: Browse' window opens, listing the Contacts in Contact Number order. Change the sort order by tapping on any of the column headings and then choosing an option in the resulting pop-up. The current sort column is marked by a dark grey heading.
- Searching for a particular Contact depends on whether you are using the Browse Filtering option in the Optional Features setting in the System module, as follows:
- If you are not using the Browse Filtering option, first sort the list by the column that you want to use for the search. Then, enter the text that you want to find in the Search field and press Search. For example, to search for a particular Contact Name, sort by Name before entering a Contact Name (or its first few characters) in the Search field.
- If you are using the Browse Filtering option, all you need to do is to start typing a letter, word, number, or date in the Search field. As you type each character, non-matching records will be removed from the list. There is no need to sort the list first.
- If you are not using the Browse Filtering option, first sort the list by the column that you want to use for the search. Then, enter the text that you want to find in the Search field and press Search. For example, to search for a particular Contact Name, sort by Name before entering a Contact Name (or its first few characters) in the Search field.
- To modify a Contact record, tap it in the browse window. The record will be opened in a window entitled 'Contact: Inspect'. The fields in this window are the same as those in the 'Contact: New' window: please refer please refer here for a detailed description of each field.
- Edit the fields as necessary. You will not be able to change the Contact Number.
- Tap √ in the Button Bar when you are ready to save changes. If you want to leave the record unchanged, select 'Cancel' from the Record menu (with 'cog' icon) or tap <. If you tap <, you will be asked to confirm the cancellation.
The Contact register in Standard ERP:
- Introduction
- Entering a Contact
- Editing a Contact
- Deleting a Contact
- Linking Contact Persons and Companies - The Contact Relations Register
- Operations menu
- Create menu
- Home page for Customers, Suppliers and Contact Persons manual
- Home page for Standard ERP manual
Borrando un Contacto
Solamente puedes borrar un contacto si aun no lo has usado en ninguna transacción (en alguna Orden de Compra, Orden de venta o Factura). Siguiendo estos pasos:
- Abir el registro de Contacto como se describe aquí.
- En la ventana 'Contactos: Hojear’, encontrar el contacto que deseas borrar y abrirlo con doble Click (Windows/Mac OS X) o presionando (iOS/Android).
- Seleccionar ‘Borrar’ desde el menú Registros.
El registro sera borrado, y la ventana mostrará al Contacto siguiente.
- Cierra la ventana.
!
No puedes deshacer el borrado de un item
Cuando usas el comando Borrar, mayormente no se te preguntara si estas seguro de borrar. Si así lo prefieres debes seleccionar , la opción Alerta al borrar en opciones de maquina local de Seteos de Usuario. En un sistema multiusuario, necesitaras tener configurada esta opción en cada máquina de usuario.
Puedes prevenir a ciertos usuarios del borrado de algunos registros Grupos de Acceso (Denegando acceso a que borren, con las acciones ‘Borrar registros’ y/o ‘Borrar ‘registros de registros Compratidos’).
No puedes borrar un contacto si este fue usado en alguna transacción. Si deseas que ese contacto no sea usado nunca mas, lo que puedes hacer es Cerrarlo, haciendo click en el box Cerrado.
---
El registro de Contacto Standard ERP:
- Introducción
- Ingresando un Contacto
- Editando un Contacto
- Borrando un Contacto
- Relacionando Personas de Contacto con Contactos
- Menú Operaciones
- Menú Crear
- Página principal del manual de Clientes, proveedores y Personas de Contacto
- Página principal del manual de Standard ERP
Linking Contact Persons and Companies - The Contact Relations Register
Customers, Suppliers and Contact Persons are all stored in the Contact register. On this page, we describe linking Contact Persons to the company they work for.
- The first step is to enter a Contact record representing the company. Mark the company as a Customer or Supplier or both, as appropriate. Remember that marking the company as a Customer or Supplier does not necessarily mean it has purchased goods or services from your business, or sold goods or services to you: the company can also be a potential customer or supplier to your business. Marking the company as a Customer or Supplier makes it available to the various sales or purchase registers respectively. Ensure you save this record before moving to step 2.

- The next step is to enter a Contact record representing a person working for the company (i.e. a Contact Person). Choose 'Linked Contact Person' from the Create menu (Windows/Mac OS X) or + menu (iOS/Android). A new record will be created in the Contact register and will be opened in a new window entitled 'Contact: Inspect'. This means the record has already been saved and is being opened to allow you to enter the Contact Person's name and contact details if these are different to those of the parent company:
The address details, telephone and fax will be copied from the parent company. Enter the Contact Person's name and appropriate contact information. As the Contact Person works for a company that has been marked as a Customer or a Supplier, you should not check these boxes in the Contact Person record (unless the Contact Person is also a Customer or Supplier in a private capacity).

- Save the Contact Person and close the record by clicking the close box (Windows/Mac OS X) or by tapping < (iOS/Android). The Contact Person will have been added to the list at the bottom of the 'Contact' card of the parent company's Contact record:
This list will contain all the Contact Persons working for the Customer or Supplier. As with all lists in Standard ERP, you can sort this one by clicking (Windows/Mac OS X) or tapping (iOS/Android) on a column heading. If you need to open the Contact record of a Contact Person, double-click or tap a line in this list.
- The 'Linked Contact Person' function just described will create a new record in the Contact register for a Contact Person, and will connect this new Contact Person to the Customer or Supplier. If, however, there already is a record for the Contact Person in the Contact register, you can use the 'Link Existing Contact' function instead. When you select this function from the Operations menu (Windows/Mac OS X) or Tools menu (iOS/Android) of the parent company's Contact record, the 'Add Contact' window will appear:
Enter the Contact Number of the Contact Person or choose it using 'Paste Special' and press [Save]. The Contact Person will be added to the list at the bottom of the 'Contact' card of the parent company's Contact record. If the Contact Person was already connected to another Customer or Supplier, that relationship will not be disturbed, so the Contact Person will now be connected to two parent companies.
- The 'Linked Contact Person' and 'Link Existing Contact' functions are the easiest ways to add a Contact Person to a Customer or Supplier, but you can also use a more manual method. First, enter a new record to the Contact register for the Contact Person. No address, telephone or mobile information will be offered, so you will need to enter this information yourself (unless you duplicate an existing Contact Person):
Now, you need to connect the Contact Person to the Customer or Supplier. The Contact Relations register in the CRM module provides this connection. The 'Linked Contact Person' and 'Link Existing Contact' functions described in the previous step will both create records in the Contact Relations register automatically, connecting a Contact Person to a Customer or Supplier. In this case, as you created the Contact Person manually, you also need to create the connecting Contact Relations record yourself. To do this, ensure you are in the CRM module, open the Contact Relations register and create a new record: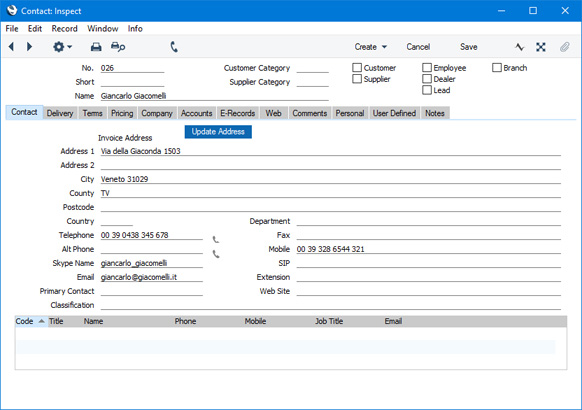

- Customer
- Paste Special
Customers, Suppliers and Contact Persons in Contact register
- Specify the Customer or Supplier for whom the Contact Person works.
- Contact
- Paste Special
Contact Persons in Contact register
- Specify the Contact Person.
- Start Date
- Paste Special
Choose date
- Enter the date when the Contact Person started working for the Customer or Supplier. This is for information only.
- End Date
- Paste Special
Choose date
- If appropriate, enter the date when the Contact Person stopped working for the Customer or Supplier. This is for information only.
- Invalid
- If the Contact Person stops working for the Customer or Supplier, you can mark the Contact Relations record as Invalid. This is described in step 9 below.
When you save the Contact Relations record, the Contact Person will be added to the list at the bottom of the 'Contact' card of the Customer or Supplier:
- Customer
- The Contact Relations register allows a Contact Person to work for more than one company. Simply enter as many records to the Contact Relations register as necessary, linking the Contact Person to the companies they work for:
The Contact Person is listed in the Contact records for both companies:

- The information shown in the list at the bottom of the 'Contact' card of the Customer or Supplier is stored in the Contact Relations register. If you edit a Contact Person, the connected Contact Relations record will be updated immediately, making the change visible in the list in the Customer or Supplier record. For example, if you change a Contact Person's Email Address, the Email Address in the relevant Contact Relations record will be updated and so the new Email Address will be visible in the list in the Customer or Supplier record immediately.
If a Contact Person works for more than one Customer or Supplier, that Contact Person will have more than one Contact Relations record. It is likely that such a Contact Person will have different contact details for each company.
When you connect a Contact Person to a second Customer or Supplier (as was done at the end of step 6), it is likely that their contact details for the second Customer or Supplier will not be correct and so you will need to change the contact details in the relevant Contact Relations record. To do this, open the Contact record for the second Customer or Supplier, highlight the Contact Person in the list at the bottom of the 'Contact' card and select 'Edit Linked Contact Data' from the Operations menu. The relevant Contact Relations record will open:
When you open the Contact Relations record in this way, the window will contain fields related to contact details that are not visible when opening the record in other ways (e.g. as shown in the illustrations in step 7. Update the record in the usual way. After doing so, the Contact Person will be listed in the Contact records for the Customers or Suppliers, with different contact details:
As mentioned at the beginning of this step, if you change the contact details in the Contact record for a Contact Person, those changes will be fed through to the related Contact Relations record automatically. However, if a Contact Person has more than one Contact Relations record, changes to their Email Address, Courtesy Title and/or Job Title will not be fed through to the Contact Relations records because these details are likely to be different in each one.
The 'Edit Linked Contact Data' function cannot be used on iOS or Android.
- If you change the Invoice Address in the Contact record for a Customer or Supplier and you need the change to be copied to the connected Contact Persons, save the changes to the Customer or Supplier and then select 'Update Contact Persons' from the Operations or Tools menu.
- If a Contact Person stops working for a Customer or Supplier, you can do one of the following:
- You can delete the relevant Contact Relations record. This will break the link between the Contact Person and the Customer or Supplier. Alternatively, if the Contact Person moves to another Customer or Supplier, you can enter the new Customer or Supplier in the Contact Relations record.
- You can mark the relevant Contact Relations record as Invalid. The link between the Contact Person and the Customer or Supplier will remain, but the Contact Person will no longer appear in 'Paste Special' lists or in the list in the Customer or Supplier record:
IMAGE(065.JPG) You can use this method if you want to remember that the Contact Person once worked for the Customer or Supplier, between the dates recorded in the Contact Relations record. If the Contact Person moves to another Customer or Supplier, you can create a new Contact Relations record.
- You can open the Customer or Supplier record, highlight the Contact Person in the list at the bottom of the window and select 'Remove Linked Contact' from the Operations menu. This function will mark the relevant Contact Relations record as Invalid and is therefore similar to option (ii) but means you do not need to find the Contact Relations record. This method cannot be used on iOS or Android.
- You can mark the Contact Person as Closed (on the 'Terms' card of their Contact record). All Contact Relations records for the Contact Person will be marked as Invalid automatically. The Contact Person will no longer appear in 'Paste Special' lists. This option will not be suitable if the Contact Person moves to another Customer or Supplier, or works for more than one at the same time. It closes the Contact Person as a whole, so they will not appear in 'Paste Special' lists of Contact Persons belonging to the new or second companies.
- You can delete the Contact Person record altogether. This option is not recommended if you want to keep your Contact History with the Contact Person. All Contact Relations records for the Contact Person will be deleted automatically.
- You can delete the relevant Contact Relations record. This will break the link between the Contact Person and the Customer or Supplier. Alternatively, if the Contact Person moves to another Customer or Supplier, you can enter the new Customer or Supplier in the Contact Relations record.
- Once you have entered a Customer or Supplier and all its Contact Persons, you can work with them quickly and easily. For example, when you enter a Sales Invoice, the 'Paste Special' list from the Customer field will only list Customers:
When you enter a Purchase Invoice, the 'Paste Special' list from the Supplier field will only list Suppliers:
In some cases (e.g. Activities, Customer Letters), you can specify Customers and Suppliers. When you open the 'Paste Special' list from the Customer field, it will list Customers, but there will be a [Suppliers] button at the top of the list, allowing you to choose a Supplier if necessary:
In many records, you can choose a Contact Person as well as a Customer or Supplier. The Primary Contact from the 'Contact' card of the Customer or Supplier will be brought in as a default. To choose a different Contact Person, activate 'Paste Special' from the Contact or Attention field (the name of this field varies depending on the register):
This list will only contain Contact Persons that work for the Customer or Supplier. Closed Contact Persons will not be included in the list. The Primary Contact from the 'Contact' card of the Customer or Supplier will be included in the list, but will not be listed twice if you have a separate Contact record for that Person. Note that the Title of each Contact Person is shown in the list, so you should record this information if you have it (on the 'Comments' card of the Contact record), to make selection of the correct Contact Person easier.
- If you will be sending documents by email to a Customer or Supplier and you need to specify that particular documents will be sent to particular Contact Persons (e.g. that Invoices should be sent to one Contact Person and that statements should be sent to another Contact Person), you can set this up using the Additional Email Recipients setting in the CRM module. Please refer to the description of that setting here for details.
The Contact register in Standard ERP:
- Introduction
- Entering a Contact
- Editing a Contact
- Deleting a Contact
- Linking Contact Persons and Companies - The Contact Relations Register
- Operations menu
- Create menu
- Home page for Customers, Suppliers and Contact Persons manual
- Home page for Standard ERP manual
Operations Menu - Contacts
The Operations menus for Contacts are shown above. On the left is the Operations menu for the 'Contacts: Browse' window, and on the right is the Operations menu for the 'Contact: New' and 'Contact: Inspect' windows.
If you are using Windows or Mac OS X, you can open the Operations menu by clicking the button with the 'cog' icon (shown highlighted in the illustration above). If you are using iOS or Android, you can access the Operations menu functions through the Tools menu (with 'wrench' icon).
Before using the functions on the Operations menu in the 'Contacts: Browse' window, you should highlight a record in the browse window. The function will then be applied to that record. If you are using iOS or Android, you can highlight a record in the browse window by searching for it.
Note that in Standard ERP version 8.0, some functions that were previously on the Operations menu were moved to the Create menu.
Please follow the links below for details about each function on the Operations menu:
- Customer Status
- Supplier Status
- Change Password
- Search
- Link Existing Contact
- Remove Linked Contact
- Edit Linked Contact Data
- Update Contact Persons
- Introduction
- Entering a Contact
- Editing a Contact
- Deleting a Contact
- Linking Contact Persons and Companies - The Contact Relations Register
- Operations menu
- Create menu
- Home page for Customers, Suppliers and Contact Persons manual
- Home page for Standard ERP manual
Operations Menu - Contacts - Customer Status
This page describes the 'Customer Status' function on the Operations menu in the Contact browse and record windows. If you are using iOS or Android, the 'Customer Status' function is on the Tools menu (with 'wrench' icon).
---
When you are reviewing the Contact record for a Customer, you can check their current account status using the 'Customer Status' function. When you select the function, a Customer Status report will be printed to screen.
If you are using Windows or Mac OS X, you can include several Customers in the report. Simply highlight a number of Contacts in the 'Contacts: Browse' window and select 'Customer Status' from the Operations menu. To highlight a range of Contacts, click the top one in the range and then hold down the Shift key and click the last one.
If you are using iOS or Android, you can only highlight a single Contact at a time, by searching for it, so you can only produce a Customer Status report for a single Customer.
On all platforms, you can also open the Contact record for a Customer in a record window and produce a Customer Status report by selecting 'Customer Status' from the Operations menu (Windows/Mac OS X) or Tools menu (iOS/Android).
In its basic form, this report will first show the Customer Number, Name and telephone number. This information will be followed by a list of the Customer's Contact Classifications. The five most recently paid Invoices will then be listed, as will all open (unpaid) Invoices.
You can have much more information shown in the report, such as lists of recent Activities, Contract Quotations, Contracts, Quotations and Orders, and monthly sales figures for the past year. To have this extra information shown in the report, create a record for yourself in the Info in Customer Status Report setting in the CRM module. As you can create separate records in this setting for each user, you can control how much of this additional information will be shown to different users. You can effectively give each user a different report definition.
Simply creating a record for yourself in the Info in Customer Status Report setting will add the Customer's address, Warning on Sales if there is one, Credit Limit and turnover for the first period in the Reporting Periods setting to the top of the report. The remainder of the report will then follow the specification in your Info in Customer Status Report record. If you are using the Open Invoices until Due Date only (Suspend on Overdue) option in the Credit Limit setting and a Customer has at least one overdue Invoice, their Credit Limit will be shown to be 0.00 in the report.
If the appearance of the Customer Status report is not as you expect (i.e. the Customer's address, Warning on Sales if there is one, Credit Limit and turnover are not shown, and the report only lists Invoices), the probable cause is you do not have a record in the Info in Customer Status Report setting.
The Customer Status report has the Standard ERP Drill-down feature. You can open many records such as Contact Persons, Activities, Quotations and Invoices from the report by clicking (Windows/Mac OS X) or tapping (iOS/Android) in the appropriate places (i.e. on Contact Person names, on Activity Dates and on Quotation and Invoice Numbers). You can also click or tap on a Person's Signature to open an Activities, Persons report for that Person. Text with the drill-down feature is shown underlined in the report. If you have a record in the Info in Customer Status Report setting, the report will also contain a [New Activity] text link that you can click or tap to create an empty new Activity and a [Credit History] text link that will open a separate report showing the Customer's credit history. This is a chargeable Cloud Service: to use it you must have registered your database in Estonia using the Automatic Internet Enabler method, as described on the 'Enabler Key' page. You must also have entered a Reg No 1 on the 'Company' card of the Contact record for the Customer whose credit history you are interested in.
As previously mentioned, this function will print to screen a Customer Status report for the Customer currently on screen or for those Customers highlighted in the browse window. If you run the function for a Contact Person, it will produce a Customer Status report for the Customer for whom the Contact Person works (i.e. the Customer that is linked to the Contact Person in the Contact Relations register). The function will have no effect if you try to use it with other Contacts (e.g. with Suppliers).
As well as using the 'Customer Status' function described here, you can also produce a Customer Status report using the following methods:
- Activate 'Paste Special' from the Customer Number field in a record such as an Order or Invoice, highlight a Customer in the list and choose 'Customer Status' from the Operations menu (Windows/Mac OS X only);
- Open an Activity where the Customer field contains a Customer (not a Supplier) and choose 'Customer Status' from the Operations or Tools menu;
- Open a Contract, Invoice, Quotation or Service Order in which a Customer has been specified and choose 'Customer Status' from the Operations or Tools menu (in the case of Contracts and Service Orders, you can also choose 'Customer Status' from the browse window);
- Open the 'Communication Centre' window, highlight one or more Customers in the Contact List and click the [Customer Status] button (Windows/Mac OS X only); and
- In the Sales Ledger, click (Windows/Mac OS X) or tap (iOS/Android) the [Reports] button in the Navigation Centre and choose to produce the Customer Status report.
---
The Contact register in Standard ERP:
- Introduction
- Entering a Contact
- Editing a Contact
- Deleting a Contact
- Linking Contact Persons and Companies - The Contact Relations Register
- Operations menu, including:
- Customer Status
- Supplier Status
- Change Password
- Search
- Link Existing Contact
- Remove Linked Contact
- Edit Linked Contact Data
- Update Contact Persons
- Customer Status
- Create menu
- Home page for Customers, Suppliers and Contact Persons manual
- Home page for Standard ERP manual
Operations Menu - Contacts - Supplier Status
This page describes the 'Supplier Status' function on the Operations menu in the Contact browse and record windows. If you are using iOS or Android, the 'Supplier Status' function is on the Tools menu (with 'wrench' icon).
---
When you are reviewing the Contact record for a Supplier, you can check their current account status using the 'Supplier Status' function. When you select the function, a Supplier Status report will be printed to screen.
If you are using Windows or Mac OS X, you can include several Suppliers in the report. Simply highlight a number of Contacts in the 'Contacts: Browse' window and select 'Supplier Status' from the Operations menu. To highlight a range of Contacts, click the top one in the range and then hold down the Shift key and click the last one.
If you are using iOS or Android, you can only highlight a single Contact at a time, by searching for it, so you can only produce a Supplier Status report for a single Supplier.
On all platforms, you can also open the Contact record for a Supplier in a record window and produce a Supplier Status report by selecting 'Supplier Status' from the Operations menu (Windows/Mac OS X) or Tools menu (iOS/Android).
The function will have no effect if you try to use it with a Contact that is not marked as a Supplier.
In its basic form, this report will first show the Supplier's Name and Address together with your Credit Limit and turnover for the first period in the Reporting Periods setting. This information will be followed by a list of the Supplier's Contact Classifications. The five most recently paid Invoices will then be listed, as will all open (unpaid) Invoices.
You can have additional information can also be shown in the report, such as lists of recent Activities, Goods Receipts and Purchase Orders and monthly purchasing figures for the past year. To have this extra information shown in the report, create a record for yourself in the Info in Supplier Status Report setting in the CRM module. As you can create separate records in this setting for each user, you can control how much of this additional information will be shown to different users. You can effectively give each user a different report definition.
The Supplier Status report has the Standard ERP Drill-down feature. You can open many records such as Activities, Goods Receipts, Purchase Orders and Purchase Invoices from the report by clicking (Windows/Mac OS X) or tapping (iOS/Android) in the appropriate places (i.e. on Activity Dates and on Goods Receipt, Purchase Order and Purchase Invoice Numbers). You can also click or tap on a Person's Signature to open an Activities, Persons report for that Person. Text with the drill-down feature is shown underlined in the report. At the top of the report, there will also be a [New Activity] text link that you can click or tap to create an empty new Activity.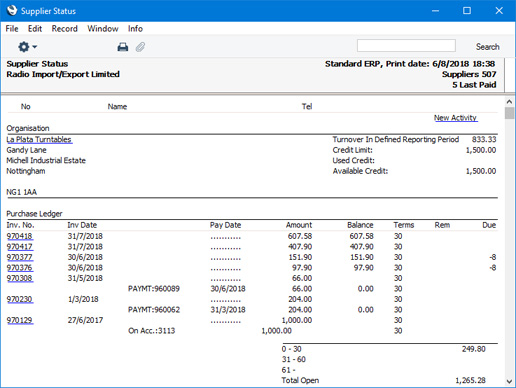
If you are using Windows or Mac OS X, an alternative method that you can use to produce a Supplier Status report is to activate 'Paste Special' from the Supplier Number field in a record such as a Purchase Order or Purchase Invoice, highlight a Supplier in the list and choose 'Supplier Status' from the Operations menu.
---
The Contact register in Standard ERP:
- Introduction
- Entering a Contact
- Editing a Contact
- Deleting a Contact
- Linking Contact Persons and Companies - The Contact Relations Register
- Operations menu, including:
- Customer Status
- Supplier Status
- Change Password
- Search
- Link Existing Contact
- Remove Linked Contact
- Edit Linked Contact Data
- Update Contact Persons
- Customer Status
- Create menu
- Home page for Customers, Suppliers and Contact Persons manual
- Home page for Standard ERP manual
Operations Menu - Contacts - Change Password
This page describes the 'Change Password' function on the Operations menu in the Contact browse window. If you are using iOS or Android, the 'Change Password' function is on the Tools menu (with 'wrench' icon).
---
If you are using the Standard ERP Web Shop facility and a Contact is a Customer who will be placing Orders over the web, you should use this function to give them a password. You should also tick the Allow Login box on the 'Terms' card of the Customer's Contact record. The Contact will be able to use their Contact Number or email address as Login IDs.
You will usually use this function with Customers whose records you have entered to the Contact register yourself, in order to allow those Customers access to your Web Shop. Customers will also be able to register themselves in the Web Shop, in which case they will be asked to choose their own password and the Allow Login box will be ticked automatically.
To set a password for a Customer, highlight their name in the 'Contacts: Browse' window and select 'Change Password' from the Operations menu (Windows/Mac OS X) or Tools menu (iOS/Android). The following window will be opened:
Enter the new password twice to ensure that it is correct. Press the [Save] button to close the window and save, or [Cancel] if you do not want to save changes. The password is case-sensitive.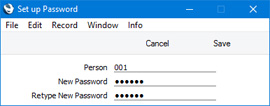
If you want create a random password and send it to the Customer in a Mail, open the Contact record and select 'Random Password Mail' from the Create menu (Windows/Mac OS X) or + menu (iOS/Android).
If you want to set rules for passwords (e.g. to impose a minimum number of characters, or to require at least one alpha or numeric character), use the Password Security setting in the System module.
You can use Access Groups to prevent certain users from using the 'Change Password' function, by denying them access to the 'Change Passwords' Action.
---
The Contact register in Standard ERP:
- Introduction
- Entering a Contact
- Editing a Contact
- Deleting a Contact
- Linking Contact Persons and Companies - The Contact Relations Register
- Operations menu, including:
- Customer Status
- Supplier Status
- Change Password
- Search
- Link Existing Contact
- Remove Linked Contact
- Edit Linked Contact Data
- Update Contact Persons
- Customer Status
- Create menu
- Home page for Customers, Suppliers and Contact Persons manual
- Home page for Standard ERP manual
Contactos - Menu operaciones - Buscar
Esta página describe la función ‘Buscar’ en el menú Operaciones del registro de Contacto. Si esas usando iOS o Android, la función ‘Buscar’ esta en el Menu Herramientas (con el ‘icono de ‘llave ‘inglesa’).
---
Puedes usar la función ‘Buscar’ para buscar por un Contacto que contenga cierta frase o palabra. Puedes abrir el registro de contacto desde el resultado de Buscar, esta función es una alternativa para buscar contactos en la ventana 'Contactos: Hojear’. Para usar la función Buscar, abrir la ventana 'Contactos: Hojear’ y selecciona ‘Buscar’ desde el menú de operaciones (Windows/Mac OS X) o el menu herramientas (iOS/Android).. La siguiente ventana se abrirá:
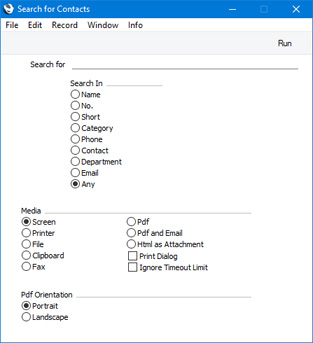
- Buscar
- Ingresa la palabra o frase que estas buscando.
- Buscar en
- Cambiar al campo donde donde necesitas buscar la palabra o frase.
---
El registro de Contacto en Standard ERP:
- Introducción
- Ingresar un Contacto
- Editando un Contacto
- Borrando un Contacto
- Relacionar Personas de Contacto a Contactos
- Menú de Operaciones, incluyendo:
- Estado de Cliente
- Estado de Proveedor
- Cambiar Contraseña
- Buscar
- Relacionar Contacto Existente
- Remover Contacto
- Modificar información de relación de Contacto
- Actualizar Dirección de Contacto
- Estado de Cliente
- Menú Crear
- Home page for Customers, Suppliers and Contact Persons manual
- Home page for Standard ERP manual
Operations Menu - Contact - Link Existing Contact
Please refer to the Linking Contact Persons and Companies - The Contact Relations Register page for details about the 'Link Existing Contact' function.
---
The Contact register in Standard ERP:
- Introduction
- Entering a Contact
- Editing a Contact
- Deleting a Contact
- Linking Contact Persons and Companies - The Contact Relations Register
- Operations menu, including:
- Customer Status
- Supplier Status
- Change Password
- Search
- Link Existing Contact
- Remove Linked Contact
- Edit Linked Contact Data
- Update Contact Persons
- Customer Status
- Create menu
- Home page for Customers, Suppliers and Contact Persons manual
- Home page for Standard ERP manual
Operations Menu - Contact - Remove Linked Contact
Please refer to the Linking Contact Persons and Companies - The Contact Relations Register page for details about the 'Remove Linked Contact' function.
---
The Contact register in Standard ERP:
- Introduction
- Entering a Contact
- Editing a Contact
- Deleting a Contact
- Linking Contact Persons and Companies - The Contact Relations Register
- Operations menu, including:
- Customer Status
- Supplier Status
- Change Password
- Search
- Link Existing Contact
- Remove Linked Contact
- Edit Linked Contact Data
- Update Contact Persons
- Customer Status
- Create menu
- Home page for Customers, Suppliers and Contact Persons manual
- Home page for Standard ERP manual
Operations Menu - Contact - Edit Linked Contact Data
Please refer to the Linking Contact Persons and Companies - The Contact Relations Register page for details about the 'Edit Linked Contact Data' function.
---
The Contact register in Standard ERP:
- Introduction
- Entering a Contact
- Editing a Contact
- Deleting a Contact
- Linking Contact Persons and Companies - The Contact Relations Register
- Operations menu, including:
- Customer Status
- Supplier Status
- Change Password
- Search
- Link Existing Contact
- Remove Linked Contact
- Edit Linked Contact Data
- Update Contact Persons
- Customer Status
- Create menu
- Home page for Customers, Suppliers and Contact Persons manual
- Home page for Standard ERP manual
Operations Menu - Contact - Update Contact Persons
This page describes the 'Update Contact Persons' function on the Operations menu in the Contact record window. If you are using iOS or Android, the 'Update Contact Persons' function is on the Tools menu (with 'wrench' icon).
---
If a Contact is a Customer or Supplier, you can use the 'Update Contact Persons' function when you need to update all its Contact Persons with the latest Invoice Address details. After changing the Invoice Address in the Contact record for a Customer or Supplier, save the record and then select this function from the Operations menu(Windows/Mac OS X) or Tools menu (iOS/Android). The new Invoice Address will be copied to all connected Contact Persons. Other contact details (e.g. telephone number, mobile, Delivery Address etc) will not be copied as Contact Person records are likely to contain personal numbers (e.g. extension numbers).
Please refer to the Linking Contact Persons and Companies - The Contact Relations Register page for more details about working with Customers and Suppliers and their connected Contact Persons.
---
The Contact register in Standard ERP:
- Introduction
- Entering a Contact
- Editing a Contact
- Deleting a Contact
- Linking Contact Persons and Companies - The Contact Relations Register
- Operations menu, including:
- Customer Status
- Supplier Status
- Change Password
- Search
- Link Existing Contact
- Remove Linked Contact
- Edit Linked Contact Data
- Update Contact Persons
- Customer Status
- Create menu
- Home page for Customers, Suppliers and Contact Persons manual
- Home page for Standard ERP manual
Create Menu - Contacts
The Create menus for Contacts are shown above. On the left is the Create menu for the 'Contacts: Browse' window. On the right is the Create menu for the 'Contact: New' and 'Contact: Inspect' windows. If you are using iOS or Android, you can access the Create menu functions through the + menu.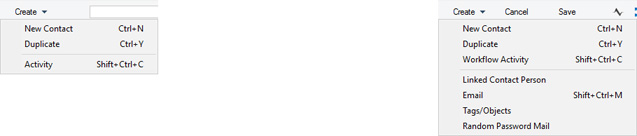
'New' and 'Duplicate' are standard functions that are provided on every Create and + menu. Use these functions to create new records, in this case in the Contact register. Please follow the links below for details about the other functions:
The Contact register in Standard ERP:
- Introduction
- Entering a Contact
- Editing a Contact
- Deleting a Contact
- Linking Contact Persons and Companies - The Contact Relations Register
- Operations menu
- Create menu
- Home page for Customers, Suppliers and Contact Persons manual
- Home page for Standard ERP manual
Create Menu - Contact - Workflow Activity
This page describes the 'Activity' function on the Create menus in the Contact browse window and the 'Workflow Activity' function on the Create menu in the Contact record window. If you are using iOS or Android, these functions are on the + menu.
---
Creating Activities from Contacts can be useful when you need to schedule a follow-up task related to a Contact, such as calling a new sales lead.
You can create an Activity from a Contact using the following methods:
- Highlight the Contact in the 'Contacts: Browse' window and select 'Activity' from the Create menu (Windows/Mac OS X) or + menu (iOS/Android). If you are using iOS or Android, you can highlight a Contact by searching for it.
- Open the Contact in a record window and select 'Workflow Activity' from the Create or + menu. Save any changes you have made to the Contact before selecting the function.
- Open the Contact in a record window and then open the 'Workflow Manager' window. Click or tap the [+] button in this window to create a new Activity.
The new record will be opened in a window entitled 'Activity: Inspect'. This means that it has already been saved and is being opened for checking.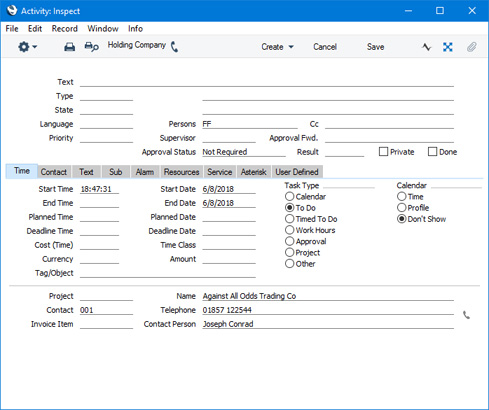
The new Activity will contain the following information:
- If you created the Activity from a Customer or Supplier, the Customer or Supplier Number and Name, Primary Contact and Phone Number will be brought in automatically to the fields on the 'Contact' card of the Activity. If you created the Activity from a Contact Person, their Name and Phone Number and the Number and Name of the Customer or Supplier they work for will be brought in to the 'Contact' card. If the Contact Person works for more than one Customer or Supplier, the one with the lowest Number will be used.
- No default Activity Type will be offered.
- The Task Type will be To Do.
- The Calendar Type will be Don't Show.
- The Symbol will be Other.
- The Start Date and Time of the Activity will be the current date and time.
- The Person will be the current user. As the Task Type will be To Do, the Activity will be placed in the current user's Task Manager.
The Contact and the Activity will be connected to each other through the Link Manager and Workflow Manager. When reviewing the Activity, you can return to the Contact quickly and easily using the Link Manager in the Activity, while you can open the Activity from the Contact using the Workflow Manager.
You must save a Contact record at least once before you can create an Activity from it. This is to ensure that the links mentioned in the previous paragraph can be established.
The 'Activity: Inspect' window is fully described here.
---
The Contact register in Standard ERP:
- Introduction
- Entering a Contact
- Editing a Contact
- Deleting a Contact
- Linking Contact Persons and Companies - The Contact Relations Register
- Operations menu
- Create menu, including:
- Workflow Activity
- Linked Contact Person
- Email
- Tags/Objects
- Random Password Mail
- Workflow Activity
- Home page for Customers, Suppliers and Contact Persons manual
- Home page for Standard ERP manual
Create Menu - Contact - Linked Contact Person
Please refer to the Linking Contact Persons and Companies - The Contact Relations Register page for details about the 'Linked Contact Person' function.
---
The Contact register in Standard ERP:
- Introduction
- Entering a Contact
- Editing a Contact
- Deleting a Contact
- Linking Contact Persons and Companies - The Contact Relations Register
- Operations menu
- Create menu, including:
- Workflow Activity
- Linked Contact Person
- Email
- Tags/Objects
- Random Password Mail
- Workflow Activity
- Home page for Customers, Suppliers and Contact Persons manual
- Home page for Standard ERP manual
Create Menu - Contact - Email
This page describes the 'Email' function on the Create menu in the Contact record window. If you are using iOS or Android, the 'Email' function is on the + menu.
---
The 'Email' function allows you to send an email to a Contact. To do so, first open the Contact in a record window and then select 'Email' from the Create menu(Windows/Mac OS X) or + menu (iOS/Android). The window shown below will appear, where you can create a new Mail.
The new record will be opened in a window entitled 'Mail: New'. This means that it has not yet been saved. The current user will be the sender of the Mail, and the To field will contain the email address of the Contact. After you have added a subject and written a message and when you are then ready to send the Mail, tick the Sent box. Finally, save the Mail by clicking the [Save] button (Windows/Mac OS X) or tapping ? (iOS/Android). If you are using the Lock and Send emails Automatically option in the Mail and Conference Settings setting in the Email and Conferences module and the Mail contains an external email address (i.e. one with the @ sign), it will now be sent automatically. If you are not using this option, select 'Send email' from the Mail's Operations or Tools menu after you have saved the Mail. Finally, close the Mail using the close box (Windows/Mac OS X) or by tapping < (iOS/Android). You will be returned to the Contact window.
If the function does not create a Mail, the probable causes are:
- The current user does not have a Mailbox.
- The Contact does not have an email address.
- The Contact has not been saved.
---
The Contact register in Standard ERP:
- Introduction
- Entering a Contact
- Editing a Contact
- Deleting a Contact
- Linking Contact Persons and Companies - The Contact Relations Register
- Operations menu
- Create menu, including:
- Home page for Customers, Suppliers and Contact Persons manual
- Home page for Standard ERP manual
Menú Crear -Objetos en Contactos
La página describe la función de 'Objetos' en el menú Crear in the de la ventana de Contacto. Si estas usando iOS o Android, la función 'Objetos' esta en + menu.
---
Si necesitas crear Objetos específicos por cada contacto, hay dos métodos que puedes usar:
- Puedes tener un Objeto creado automáticamente sin embargo tienes que guardar el Contacto primero. Para usar este método debes seleccionar las opciones Crear automáticamente objeto Ventas en Contactos y/o Crear automáticamente objeto Compras en Contactos en Opciones de Contacto.
- Luego de grabar un contacto, puedes crear un Objeto seleccionado la función Crear desde el menú (Windows/Mac OS X) o + menu (iOS/Android).
- Si el contacto es un cliente, el nuevo Objeto se colocara en el campo Objeto Ventas.
- Si el contacto es un proveedor, el nuevo Objeto se colocara en el campo Objeto Compras.
- Si el contacto es ambos, cliente y proveedor el nuevo objeto se completará en ambos lugares.
El número de Contacto será usado como código de Objeto. Por ejemplo, el Objeto 001 será creado desde el cliente 001.
Estos dos métodos sólo crearán Objetos desde Contactos que son Clientes y Proveedores, no desde otros contactos como Personas de Contactos. Así, si estas usando el método automático, estate seguro de marcar Cliente o proveedor antes de guardarlo la primera vez.
---
El registro de Contacto en Standard ERP:
- Introducción
- Ingresando un Contacto
- Editando un Contacto
- Borrando un Contacto
- Relacionado Personas de Contacto con Contactos
- Menú de Operaciones
- Menú Crear, incluyendo:
- Página Principal del manual de Clientes, Proveedores y Personas de Contacto
- Página principal del manual de Standard ERP
Menú Crear - Clave aleatoria de Mail
Esta página describe la función ‘Clave Aleatoria de Mail' en menu Crear en la ventana del registro de Contacto. Si estas usando iOS o Android, la función 'Clave Aleatoria de Maill' esta en + menu.
---
Si estas usando Standard ERP Web Shop y in Contacto es un cliente quien cargará órdenes en la Web, puedes usar la función de generar una clave para ellos. Deberías también tildar Permitir Logueo en la solapa ’Términos del registro de Contacto. El contacto puede usar su mail o su número de contacto como ID de Logueo.
Mayormente usarás esta función con registros de contacto que has ingresado tu mismo, en función de permitirle a tu cliente acceso a tu tienda en linea. Los Clientes podrán registrarse ellos mismos desde la tienda online, en ese caso ellos generarán su propia y el Check Permitir Loguin se tildará automáticamente.
Para configurar la clave en el contacto, abrir el contacto y seleccionar 'Clave Aleatoria de Mail' desde el menú crear (Windows/Mac OS X) o + menu (iOS/Android). La ventana a continuación donde te permitirá enviar un mail.
El registró se abrirá con una ventana titulada 'Mail: Ver’. Esto significa que ya fue grabada, y que es abierta para su control. El usuario actual será el que por defecto aparezca como remitente del Mail. El campo Para contendrá el mail del cliente. el título del mail contendrá la clave aleatoria. Luego tu puedes escribir un mensaje y cuando estes listos . Finalmente, guarda ell Mail haciendo Click en el botón [Guardar] (Windows/Mac OS X) or presionando √ (iOS/Android). Si estas usando la opción Bloquear y enviar mails automáticamente en Opciones de mail y Conferencias y el mail contendrá la dirección externa (i.e. one with the @ sign), será enviado automáticamente. Si no estas usando esta opción, selecciona ‘Enviar Mail’ desde el menu de Operaciones.Al cerrar el mail regresarás a la ventana de contacto.
Si la función no crea el mail, la causa del problema será:
- El usuario actual no tiene casilla.
- El contacto no tiene dirección de mail.
- El contacto no ha sido grabado.
---
El registro de Contacto en Standard ERP:
- Introducción
- Ingresando un Contacto
- Editando un Contacto
- Borrando un Contacto
- Relacionar Personas de Contacto
- Menú Operaciones
- Menú Crear, incluyendo:
- Flujo de Actividades
- Relacionar persona de contacto
- Email
- Objetos
- Clave aleatoria de Mail
- Flujo de Actividades
- Página principal del manual de Clientes, Proveedores y personas de Contacto
- Página principal del manual de Standard ERP
- Header
- Encabezado
- Encabezado
- Encabezado
- Si ha asignado un contacto a una categoría de cliente en el que ha especificado algunos tipos de clasificación, debe ingresar clasificaciones que pertenecen a cada uno de esos tipos en este campo antes de poder guardar el contacto .
- Encabezado