Introduction to Settings in the Production Module
The Production module contains the following settings: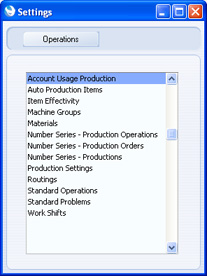
---
Please click the links below for details about each setting:
- Account Usage Production
- Auto Production Items
- Item Effectivity
- Machine Groups
- Materials
- Number Series - Production Operations
- Number Series - Production Orders
- Number Series - Productions
- Production Settings
- Routings
- Standard Operations
- Standard Problems
- Work Shifts
- Home page for Production manual
- Home page for HansaWorld Enterprise manual
Account Usage Production
This setting allows you to determine the Accounts that will be used as defaults in your Production transactions. Take care to ensure that the Accounts that you specify here exist in the Account register.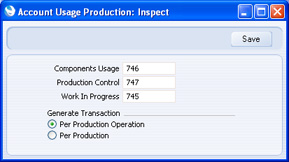
- Components Usage, Production Control
- Paste Special
Account register, Nominal Ledger/System module
- The standard Nominal Ledger Transaction from a Production or Production Operation will credit the value of the components to a Stock Account, credit the Work Cost to a Production W-cost Account, and debit the value of the final Item to a Stock Account.
- This Transaction therefore simply removes the value of the components from stock and adds the value of the final Item to stock. It will therefore not be possible to distinguish the value of Items removed from stock to be used in Productions from the value of the same Items removed from stock for other purposes (e.g. Delivery or Stock Depreciation). If you need to make such a distinction, you can do so using Components Usage and Production Control Accounts. If you specify both a Components Usage Account and a Production Control Account, the Transaction will contain additional postings, debiting the value of the components to the Components Usage Account and crediting that value to the Production Control Account.
- The Components Usage and Production Control Accounts will be taken from the Item Group to which the component Item belongs (if you are using the Use Item Groups for Cost Accounts option in the Cost Accounting setting in the Stock module). If these Accounts are empty or you are not using the Use Item Groups for Cost Accounts option, they will be taken from the component Item (in the case of the Components Usage Account only) or from this setting.
- This Transaction therefore simply removes the value of the components from stock and adds the value of the final Item to stock. It will therefore not be possible to distinguish the value of Items removed from stock to be used in Productions from the value of the same Items removed from stock for other purposes (e.g. Delivery or Stock Depreciation). If you need to make such a distinction, you can do so using Components Usage and Production Control Accounts. If you specify both a Components Usage Account and a Production Control Account, the Transaction will contain additional postings, debiting the value of the components to the Components Usage Account and crediting that value to the Production Control Account.
- Work In Progress
- Paste Special
Account register, Nominal Ledger/System module
- Production Operations allow you to carry out Productions in stages. You will be able to remove components from stock at any stage, and add the final Item to stock when the final stage is completed. Apart from the final stage, you will not be adding to stock, but you will need to account for the work carried out so far. The Work in Progress Account is used for this purpose. This Account will be debited with the value of each intermediate Production Operation, and credited with the value of the final Production Operation. This Account will only be used if you are using the Per Production Operation option below.
- In Transactions created from intermediate Production Operations, the Work In Progress Account will be taken from the Item Groups to which the component Items belong (if you are using the Use Item Groups for Cost Accounts option in the Cost Accounting setting in the Stock module) or from this setting. In the Transaction created from the final Production Operation, the Work In Progress Account will be taken from the Item Group to which the Output Item belongs (if you are using the Use Item Groups for Cost Accounts option) or from this setting.
- In Transactions created from intermediate Production Operations, the Work In Progress Account will be taken from the Item Groups to which the component Items belong (if you are using the Use Item Groups for Cost Accounts option in the Cost Accounting setting in the Stock module) or from this setting. In the Transaction created from the final Production Operation, the Work In Progress Account will be taken from the Item Group to which the Output Item belongs (if you are using the Use Item Groups for Cost Accounts option) or from this setting.
- Generate Transaction
- If you are using Production Operations to build Productions in stages, use these options to specify whether you want separate Nominal Ledger Transactions to be created from each Production Operation, or a single final Transaction to be created from the Production. The first option allows you to record the value of each Production Operation in the Nominal Ledger in the Work In Progress Account (specified above).
- If you choose the Production Operation option, the sequence in which you Finish each Production Operation becomes significant. In particular, the Transaction from the final Production Operation, which debits the value of the final Item to the Stock Account and credits this value to the Work In Progress Account, may not be correct if there are earlier Operations in the sequence that you have not yet Finished. Therefore, if you choose this option, it is recommended that you also use the Complete Sequence Before Next One option in the Production Settings setting. This will ensure that you mark the Operations as Finished in the correct order.
- Note that stock levels of components will always be reduced and those of final Items will always be increased from Production Operations. If you choose the Production option, therefore, there may be a difference between the stock valuation in the Stock List report and in the Nominal Ledger.
- If you choose the Production option, you should also allow Transactions to be created from Productions in the Sub Systems setting in the Nominal Ledger and in the Number Series - Productions setting. If you choose the Production Operation option, you should again allow Transactions to be created from Productions in the Sub Systems setting (the Productions option in this setting applies to both Productions and Production Operations) and in the Number Series - Production Operations setting.
- This option only applies to Productions that will be built in stages (Productions with Routings). Productions without Routings will always generate Nominal Ledger Transactions (subject to the Sub Systems and the Number Series - Productions settings).
- If you choose the Production Operation option, the sequence in which you Finish each Production Operation becomes significant. In particular, the Transaction from the final Production Operation, which debits the value of the final Item to the Stock Account and credits this value to the Work In Progress Account, may not be correct if there are earlier Operations in the sequence that you have not yet Finished. Therefore, if you choose this option, it is recommended that you also use the Complete Sequence Before Next One option in the Production Settings setting. This will ensure that you mark the Operations as Finished in the correct order.
Settings in the Production module:
- Introduction
- Account Usage Production
- Auto Production Items
- Item Effectivity
- Machine Groups
- Materials
- Number Series - Production Operations
- Number Series - Production Orders
- Number Series - Productions
- Production Settings
- Routings
- Standard Operations
- Standard Problems
- Work Shifts
- Home page for Production manual
- Home page for HansaWorld Enterprise manual
Auto Production Items
This setting will be useful if you have Recipes in which you can substitute various different component Items to produce the same final Item. For example, you may have a Recipe to produce chocolate milk, which requires milk powder as a component or ingredient. Milk powder is a generic component: when the Recipe simply calls for milk powder, you can in fact use Brand A Milk Powder or Brand B Milk Powder, supplied in 5 kg or 10 kg sacks, and the resulting chocolate milk will be the same.Using a generic Item (also known as a "Produced Item") as a component in the Recipe in this way means you will only need one Recipe for chocolate milk, instead of many Recipes with each of the milk powder variations. This will minimise the number of Recipes you need to set up and maintain, and also make the choice of the correct Recipe in Production records simple and easy.
To work with Auto Production Items, follow these steps:
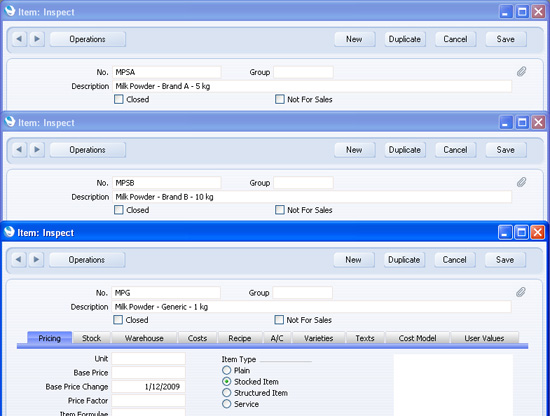
- In the Item register, enter records for the specific Items, such as "Brand A Milk Powder, 5 kg", "Brand B Milk Powder, 10 kg" and so on, and for the generic Item:
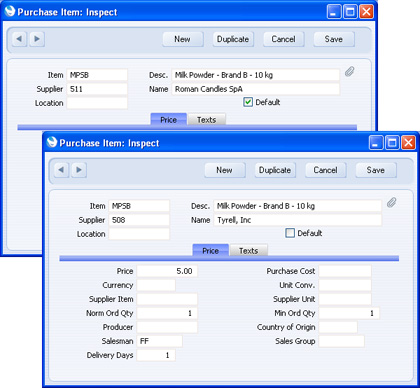
- Create Purchase Items for the specific Items in the usual way:
- Enter the Recipe. This is an example Recipe for chocolate milk:
Two components in this Recipe (the milk powder and the chocolate flavouring) are generic. Where a generic component is called for, you can in fact use any one of a number of specific Items. For example, you can use Brand A Milk Powder or Brand B Milk Powder as the generic milk powder. The end result, the chocolate milk powder, will be the same, irrespective of which specific Items you use as components.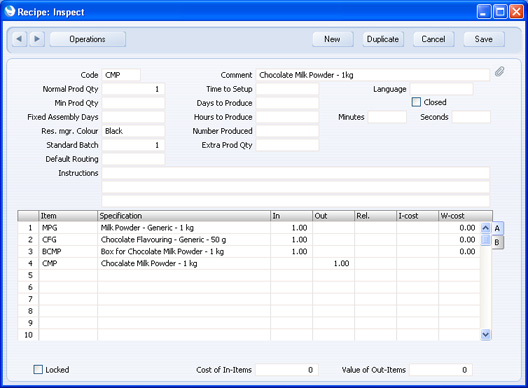
- Having entered the generic Item and the specific Items in the Item register, you then need to connect them together. This connection will state that a particular specific Item can be used when a Recipe calls for a particular generic Item. For example, such connections will mean that when the Recipe calls for "milk powder", you can send either Brand A Milk Powder or Brand B Milk Powder to the production area, depending on what you have in stock at the time. You can make these connections using the Auto Production Items setting, available in the MRP and Production modules.
Double-clicking 'Auto Production Items' in the 'Settings' list in the MRP or Production modules opens the 'Auto Production Items: Inspect' window listing the Auto Production Items that have already been entered. Double-click a record in the list to edit it, or add a new record by clicking the [New] button in the Button Bar. When the record is complete, save it by clicking the [Save] button in the Button Bar or by clicking the close box and choosing to save changes. To close it without saving changes, click the close box.
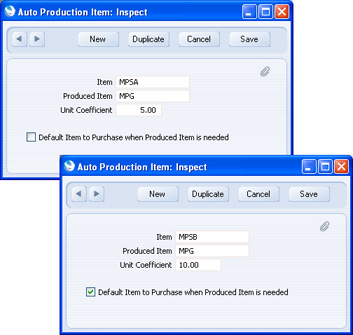
- Item
- Paste Special
Item register
- Enter here a specific Item that you can use when a Recipe calls for a generic Item. Following the example used in this description, you should enter the Item representing Brand A Milk Powder or Brand B Milk Powder here.
- Produced Item
- Paste Special
Item register
- Specify the generic Item here (in the example, the Item for "milk powder"). As shown in the illustration, it is likely you will need to enter several Auto Production Item records for the same Produced Item, with different Items specified in the field above.
- Unit Coefficient
- If the two Items are supplied and used in different Units, enter the ratio between them here. The ratio should represent how many Produced Items can be made from one Item. For example, if you measure the Produced Item in multiples of 1 kg, and the Item is supplied in 10 kg sacks, enter "10" here.
- Default Item to Purchase when Produced Item is needed
- If you have several Auto Production Item records for the same Produced Item, use this check box to choose which one is to be treated as the Default Auto Production Item. This is the Item that you prefer to purchase when the Recipe calls for the generic Item. For example, you can use this check box to signify your preference to purchase Brand B Milk Powder over Brand A Milk Powder. This is described in step 5 below.
- You can only have one Default Auto Production Item for a particular Produced Item (generic Item).
- Item
- The MRP module allows you to plan future Productions, including the purchasing of the necessary quantity of components. In brief, the process will be as follows:
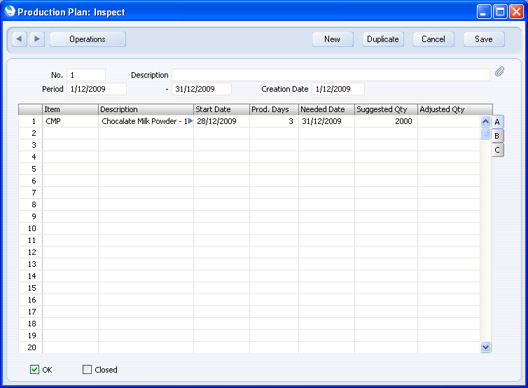
- A Production Plan is a list of assembled Items, showing how many of each you need to build during a particular period (e.g. a month). You can enter a Production Plan yourself, or you can create one based on estimated sales requirements that you have recorded in the Sales Forecast register.
In this example Production Plan, we have specified that we need to produce 2000 x 1 kg chocolate milk powder:
- After approving a Production Plan, you should then use the 'Create Purchase Order Plan' Maintenance function to create a Purchase Order Plan. This will list the quantities of each component that you need to purchase in order to produce the assembled Items in the Production Plan.
Illustrated below is the Purchase Order Plan containing the components that we need to purchase in order to produce 2000 x 1 kg chocolate milk powder:
In this example, the chocolate flavouring and the milk powder are both generic components. As they are generic, we cannot issue Purchase Orders for them. Instead, we need to issue a Purchase Order for a specific Item such as Brand A Milk Powder or Brand B Milk Powder. The Item to Order field on flip C of the Purchase Order Plan will suggest the specific Items that we should order: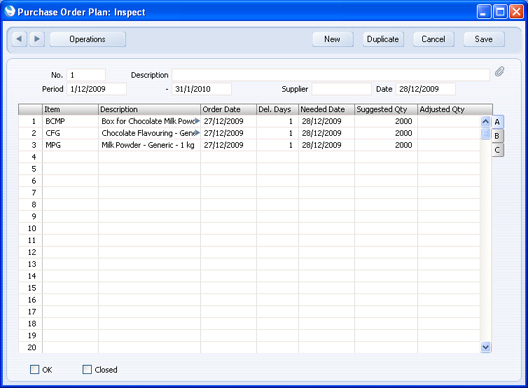
The suggested Item is taken from the Auto Production Item record that is marked as the Default Auto Production Item (step 4 above). Before we approve the Purchase Order Plan, we could change the Item to Order, but only to another Item that has been connected to the generic component in an Auto Production Record. For example, as illustrated in step 4 above, the generic Item for milk powder MPG has two connected specific Items, MPSA and MPSB, with MPSB being the default. We could therefore change the Item to Order to MPSA but not to any other Item.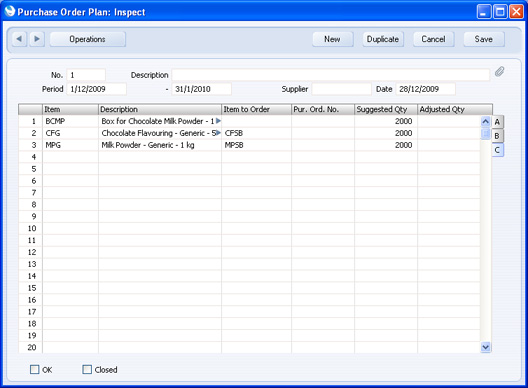
- After approving the Purchase Order Plan, you can then use the 'Create Purchase Orders' Maintenance function to create the relevant Purchase Orders.
This is one of the Purchase Orders created to satisfy the Purchase Order Plan illustrated above:
If flip C of a Purchase Order Plan contains an Item to Order, this Item is the one that will be included in the Purchase Order. The Supplier and pricing information is taken from the Default Purchase Item illustrated in step 2.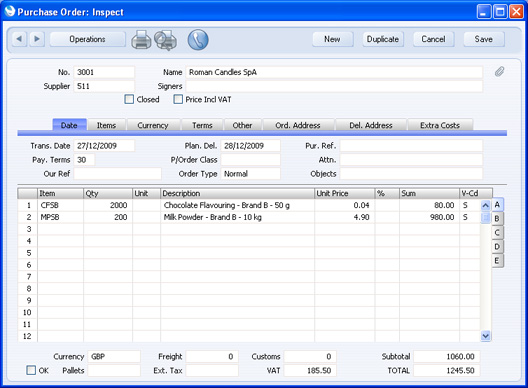
In this example, the generic component requirement is 2000 (i.e. 2000 x milk powder 1 kg). However, the specific Item is supplied in 10 kg bags. We therefore entered a Coefficient of 10 in the relevant Auto Production Item record, as illustrated in step 4, and this Coefficient has determined the Qty of 200 in the Purchase Order.
The Location in the Purchase Order (i.e. the Location to which the Items will be delivered) should be a warehouse and not the Production area or workshop. The default Location will be taken from the Person record belonging to the user who created the Purchase Order by running the 'Create Purchase Orders' Maintenance function. If no Location has been specified in the relevant Person record, the Location in the Purchase Order will be empty.
You can of course issue ad hoc Purchase Orders for specific Items yourself. They do not necessarily have to result from the Production planning process or from the MRP module as described here.
- A Production Plan is a list of assembled Items, showing how many of each you need to build during a particular period (e.g. a month). You can enter a Production Plan yourself, or you can create one based on estimated sales requirements that you have recorded in the Sales Forecast register.
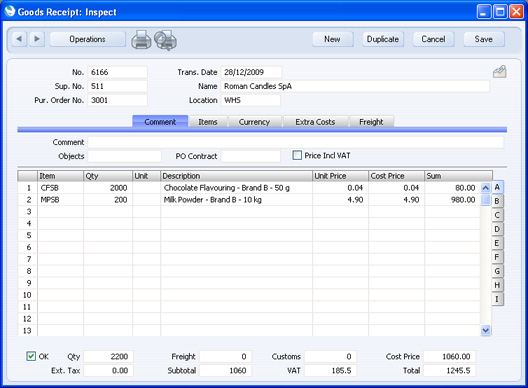
- When the specific Item arrives, you will receive it into stock in your warehouse (i.e. in the Location specified in the Purchase Order) using a Goods Receipt as normal:
- Now you can use a Stock Movement to move the Items from the warehouse to the Production area or workshop:
When you mark the Stock Movement as Received and save it, the Items will be moved to the Production area as usual. Stock levels will be adjusted, as will the stock valuation in the Nominal Ledger. In addition, one Production for each row in the Stock Movement will be created automatically and immediately marked as Finished. In effect, these Productions will convert the specific Items into generic Items. This is the Production that converts the Brand B Milk Powder to generic milk powder: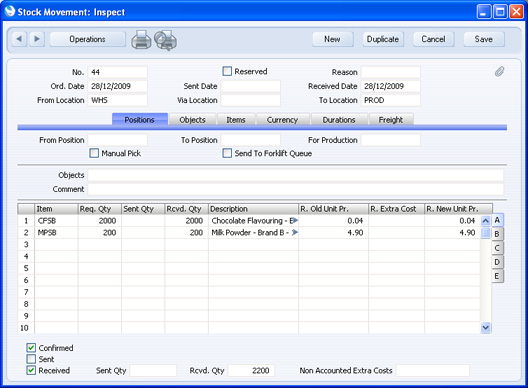
As a result, the Production area now contains 2000 kg of generic milk powder, which you can now use to produce chocolate milk powder.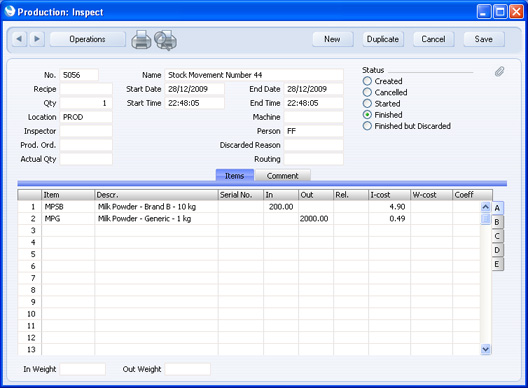
For such a Production to be created automatically from a Stock Movement, two conditions must be met:
- There must be a record in the Auto Production Items setting with the specific Item (i.e. the Item in the Stock Movement) in the Item field and the generic Item in the Produced field. The conversion from the Received Quantity in the Stock Movement (also the In Qty in the Production) to the Out Qty in the Production will be governed by the Coefficient in the Auto Production Item record.
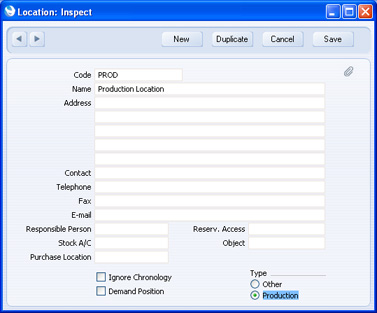
- The Type of the To Location in the Stock Movement (i.e. the Production area or workshop) must be "Production":
- There must be a record in the Auto Production Items setting with the specific Item (i.e. the Item in the Stock Movement) in the Item field and the generic Item in the Produced field. The conversion from the Received Quantity in the Stock Movement (also the In Qty in the Production) to the Out Qty in the Production will be governed by the Coefficient in the Auto Production Item record.
Settings in the Production module:
- Introduction
- Account Usage Production
- Auto Production Items
- Item Effectivity
- Machine Groups
- Materials
- Number Series - Production Operations
- Number Series - Production Orders
- Number Series - Productions
- Production Settings
- Routings
- Standard Operations
- Standard Problems
- Work Shifts
- Home page for Production manual
- Home page for HansaWorld Enterprise manual
Item Effectivity
You can use this setting together with the Item Effectivity report to monitor the use and performance of consumable Items in the production process.You can enter separate records in this setting for each individual consumable Item to record how many Output Items it was used to produce. For example, each time you change a cutting disc in a Machine, you can enter the number of Output Items produced by the previous one in the existing Item Effectivity record, approve it, and then create a new Item Effectivity record for the new cutting disc. Alternatively, you can maintain a single record for the cutting disc as a general Item, updating the same Item Effectivity record each time you fit a new cutting disc to the Machine. This second method may help you compare cutting discs with different specifications, purchased from different Suppliers.
If you are using the first method, you can produce the Item Effectivity report using the Overview option to display the information in those records as if you were using the second method. This option adds the figures in all records with the same Item/Supplier/Machine combination to provide totals.
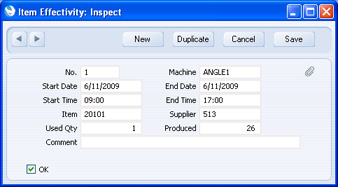
To work with this setting, first ensure you are in the Production module, and then click the [Settings] button in the Master Control panel or use the Ctrl-S/⌘-S keyboard shortcut to open the 'Settings' list. Double-click 'Item Effectivity' in the list. The 'Item Effectivity: Browse' window lists the Item Effectivity records that have already been entered: double-click one to modify it or click [New] to create a new record. When the record is complete, click the [Save] button in the Button Bar to save changes and close it using the close box, or click the close box if you don't want to save changes.
- No.
- This field contains the unique identifying number of each Item Effectivity record. This number is generated automatically.
- Machine
- Paste Special
Asset register, Assets module
- Enter the Machine to which the consumable Item has been fitted.
- Start Date, End Date
- Paste Special
Choose date
- Enter the dates when you started using the consumable Item and when you stopped using it. The End Date cannot be earlier than the Start Date.
- Start Time, End Time
- Paste Special
Current Time
- Enter the times when you started using the consumable Item and when you stopped using it.
- Item
- Paste Special
Item register
- Specify the consumable Item here. This must be an Item in the Item register.
- Supplier
- Paste Special
Suppliers in Contact register
- Specify the Supplier from whom you purchased the consumable Item.
- If you are maintaining a single Item Effectivity record for each general consumable Item, updating it each time you fit a new one, you can use this field to compare the performance of similar Items from different Suppliers.
- If you are maintaining a single Item Effectivity record for each general consumable Item, updating it each time you fit a new one, you can use this field to compare the performance of similar Items from different Suppliers.
- Used Qty
- Enter the quantity of the consumable Item that you have used. If you are maintaining a single Item Effectivity record for each general consumable Item, you should update this field each time you fit a new one to the Machine. If you are entering separate records in this setting for each individual consumable Item, you will always enter "1" here.
- You do not have to enter a Used Qty before saving an Item Effectivity record, but you must do so before marking it as OK.
- You do not have to enter a Used Qty before saving an Item Effectivity record, but you must do so before marking it as OK.
- Produced
- Use this field to record the number of Output Items produced by the consumable Item. If you are maintaining a single Item Effectivity record for each general consumable Item, you should update this field each time you fit a new one to the Machine. If you are entering separate records in this setting for each individual consumable Item, enter the quantity produced when using an individual Item.
- You do not have to enter a figure here before saving an Item Effectivity record, but you must do so before marking it as OK.
- You do not have to enter a figure here before saving an Item Effectivity record, but you must do so before marking it as OK.
- Comment
- Use this field to record any general comments about the Item Effectivity record.
- OK
- When the Item Effectivity record is complete, mark it as OK and save it. You will no longer be able to make any changes. You cannot reverse this action. If you are maintaining a single Item Effectivity record for each general consumable Item, you will need to update the record each time you fit a new one to the Machine and therefore you should never mark it as OK. An Item Effectivity record does not have to be marked as OK for it to appear in the Item Effectivity report.
See also:
- Introduction
- Account Usage Production
- Auto Production Items
- Item Effectivity
- Machine Groups
- Materials
- Number Series - Production Operations
- Number Series - Production Orders
- Number Series - Productions
- Production Settings
- Routings
- Standard Operations
- Standard Problems
- Work Shifts
Go back to:
- Home page for Production manual
- Home page for HansaWorld Enterprise manual
Machine Groups
This setting allows you to divide your company's Machines into groups. These groups might represent the different Recipes that the machines can produce. Dividing Machines into Machine Groups will help with resource planning: please refer to the Scheduling Productions page for an illustrated example.Each Machine should have its own record in the Asset register in the Assets module. This register will allow you to account for each Machine's depreciation. You should record each Machine in the Asset register before entering Machine Groups.
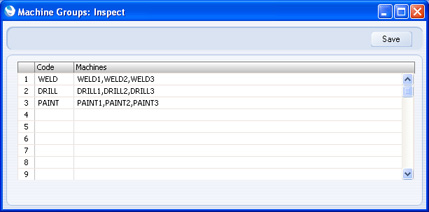
Double-clicking 'Machine Groups' in the 'Settings' list in the Production module opens the 'Machine Groups: Inspect' window listing the Machine Groups that have already been entered. To add a new record, simply enter its details on the first blank line and click [Save] to save and close. Click the close box to close without saving changes.
- Code
- Specify a unique identification Code for each Machine Group. You can use up to five alphanumeric characters. Use a Code that makes it easy to distinguish Machine Groups from other records in the Resource Planner, but do not use a Code that is the same as a Machine Code (Asset's Inventory Number).
- Machines
- Paste Special
Asset register, Asset module
- Enter the Asset (Inventory) Number of each Machine (Asset) that belongs to the Machine Group, separated by commas.
- If you need to use 'Paste Special" to enter several Machines, type the comma before opening the 'Paste Special' list. This will cause the next Machine to be added to those already entered. Otherwise, the previous Machine will be overwritten.
- A particular Machine can belong to more than one Machine Group.
- If you need to use 'Paste Special" to enter several Machines, type the comma before opening the 'Paste Special' list. This will cause the next Machine to be added to those already entered. Otherwise, the previous Machine will be overwritten.
Settings in the Production module:
- Introduction
- Account Usage Production
- Auto Production Items
- Item Effectivity
- Machine Groups
- Materials
- Number Series - Production Operations
- Number Series - Production Orders
- Number Series - Productions
- Production Settings
- Routings
- Standard Operations
- Standard Problems
- Work Shifts
- Home page for Production manual
- Home page for HansaWorld Enterprise manual
Materials, Standard Operations, Routings
The Production Operation feature in HansaWorld Enterprise allows you to configure and implement a complex Production process with several assembly stages. This feature offers the following benefits:- You can record each stage of the Production process separately, so you will always know exactly how each Production is progressing;
- Components will be removed from stock as you use them, not at the end of the entire Production process; and
- You can record Work in Progress in the Nominal Ledger.
- What the stages are;
- Which components will be used in each stage (and which assembled Items if any will result from each stage); and
- The sequence in which the stages should be carried out.
- When you divide a Production process into stages, you will first create template or model Operations. These are known as "Standard Operations". A Standard Operation record should contain the normal specifications for a stage in the process.
- When you implement a Production process, you will create a Production record in the normal way and choose the Recipe. You will then create Operations specific to that Production, using the relevant Standard Operations as templates. The Operations that are specific to a particular Production are known as "Production Operations".
- Define the various stages by entering separate records for each stage in the Standard Operations setting.
The example process will require three Standard Operations: "WELDING", "PAINTING" and "SHELF_ASSEMBLY".
Depending on the circumstances, you may find that you can define a single generic Standard Operation such as "PAINTING" that can be used in many Recipes. In other cases (for example single- and multi-colour painting), you may need to define several more precise Standard Operations, so that you can choose the most appropriate one for each Recipe.
- Now you should allocate the Input and Output Items in the Recipe to the relevant Operation. To do this, you need to classify those Items according to their type or task. This classification is given the name "Material". A Material is simply a name for the basic type of Item or task, but it is also the mechanism that connects the Items with the Operations.
In the example Recipe, the Input Items for metal box section will be used during the first Operation, paint will be used during the second Operation, and the nuts and bolts will not be required until the final Operation. To use the nuts and bolts as an example, proceed as follows:
- Define the Material(s) that you need in the Materials setting. In this example, create a Material "NUTS_AND_BOLTS".
- You will have listed the nuts and bolts of various sizes as separate Input Items in the Recipe, so that you can control stock of each size. As you will use the nuts and bolts at the same time, and they are all the same type of Item, you can assign the "NUTS_AND_BOLTS" Material to each of these Items on flip B of the Recipe.
- You will use the nuts and bolts as part of the assembly stage of the Production process. Open the "SHELF_ASSEMBLY" Standard Operation that represents this stage of the process and include "NUTS_AND_BOLTS" in the list of Materials.
Steps ii and iii connect specific Input Items (the nuts and bolts) with a particular stage in the Production process (in this case, the last stage). The nuts and bolts will be removed from stock when this stage is completed.
As "SHELF_ASSEMBLY" is the final Standard Operation, it should also include a Material such as "FINAL_ITEM". The Material of the Output Item in the Recipe should also be "FINAL_ITEM". This connects the Output Item with the final "SHELF_ASSEMBLY" Operation: when this Operation is completed, the Output Item will be added to stock.
- Define the Material(s) that you need in the Materials setting. In this example, create a Material "NUTS_AND_BOLTS".
- Use the Routings setting to define the order in which the Operations should be carried out.
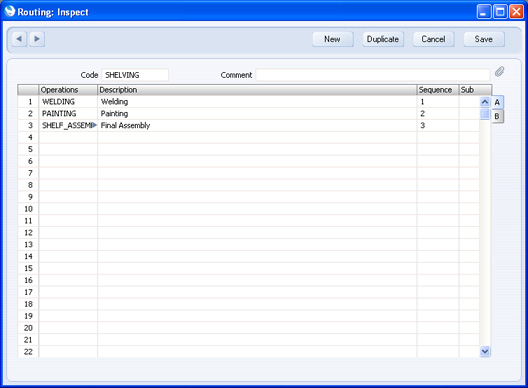
In the example Production process, the Routing will specify that the "WELDING" Operation will be first, followed by "PAINTING" and finally by "SHELF_ASSEMBLY".
- Having configured the Routing, return to the Recipe and enter the Routing in the Default Routing field.
To implement a multi-stage Production process, create a Production record in the normal way and choose the Recipe. As the Production represents a multi-stage process, you cannot simply mark the Production as Finished in order to remove the components from stock and add the assembled Item to stock. Instead, you need to create the Production Operations that represent each stage in the process, and mark each Operation as Finished in turn.
Choose 'Create Production Operations' from the Operations menu of the Production. This function uses the Standard Operations as templates to create Production Operations specific to the Production, as follows:
- The function will refer to the Routing specified in the Production to obtain the sequence of Standard Operations.
- The function will then refer to the first Standard Operation in the sequence to obtain a list of Materials.
- The function will then look in the Production to find the Input and Output Items that share the first Material in the list in step 2.
If an Input Item in the Production has a Recipe (i.e. the Input Item is a sub-assembly), the function will also look in the sub-assembly Recipe for Input and Output Items with the Material in question.
- A Production Operation will be created, containing the Input and Output Items found in step 3.
- Step 3 is repeated for each Material in the Standard Operation, and the Input and Output Items that share those Materials will be added to the Production Operation created in step 4.
- Steps 2-5 are repeated for each Standard Operation in the Routing.
You can now work through the Production Operations in turn. In effect, each Production Operation is a Production in miniature. As you Finish each one, the relevant Input Items will be removed from stock and the relevant Output Items if any and if they are Stocked Items will be added to stock. If you have specified in the Account Usage Production setting that Nominal Ledger Transactions are to be created after each Production Operation, the value of the Production Operation will be posted to the Work In Progress Account (again, specified in the Account Usage Production setting). Work In Progress will be cleared when you Finish the last Production Operation in the sequence.
---
Settings in the Production module:
- Introduction
- Account Usage Production
- Auto Production Items
- Item Effectivity
- Machine Groups
- Materials, Standard Operations and Routings, including:
- Number Series - Production Operations
- Number Series - Production Orders
- Number Series - Productions
- Production Settings
- Routings
- Standard Operations
- Standard Problems
- Work Shifts
- Production Operation register
- Home page for Production manual
- Home page for HansaWorld Enterprise manual
Materials, Standard Operations, Routings - The Standard Operations setting
The first step when dividing a Production process into stages is to determine what the stages are. You should enter each stage as a separate record in the Standard Operations setting.Standard Operations are essentially templates. They should contain the usual specifications for each stage in the process. When you create Production Operations from a Production, they will be created using the relevant Standard Operations as templates. Production Operations represent the same stages in the process as the Standard Operations, but are specific to the individual Production. If there is something unusual about a Production Operation (e.g. it takes longer than expected to complete), you can register this in the Production Operation without disturbing the template Standard Operation.
To work with the Standard Operations setting, first ensure you are in the Production module, and then click the [Settings] button in the Master Control panel or use the Ctrl-S/⌘-S keyboard shortcut to open the 'Settings' list. Double-click 'Standard Operations' in the list. The 'Standard Operations: Browse' window lists the Item Effectivity records that have already been entered: double-click one to modify it or click [New] to create a new record. When the record is complete, click the [Save] button in the Button Bar to save changes and close it using the close box, or click the close box if you don't want to save changes.
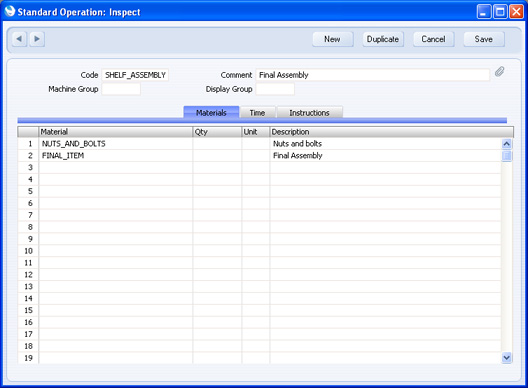
- Code
- Specify a unique identification Code for the Standard Operation.
- Comment
- Enter a name for the Standard Operation.
- Machine Group
- Paste Special
Machine Groups setting, Production module
- Used as default in Production Operations
- Specify here the Machine Group that contains the Machines that you can use to carry out the work represented by the Standard Operation.
- The Machine Group will be copied to each Production Operation that you create from this template.
- Specify here the Machine Group that contains the Machines that you can use to carry out the work represented by the Standard Operation.
- Display Group
- Paste Special
Display Groups setting, System module
- Used as default in Production Operations
- Specify here the Display Group that contains the Persons that can carry out the work represented by the Standard Operation.
- The Display Group will be copied to each Production Operation that you create from this template.
- Specify here the Display Group that contains the Persons that can carry out the work represented by the Standard Operation.
Materials Card
Use the 'Materials' card to list the Materials that will be used as part of the Standard Operation. When you create a Production Operation from a Production using the Standard Operation as a template, every Input and Output Item in the Production that has been assigned one of these Materials will be copied to the Production Operation. Please refer to the description of the Materials setting here for an example.
- Material
- Paste Special
Materials setting, Production module
- Choose a Material from the Materials setting. You can also enter an ad hoc Material if necessary.
- Qty
- When you create a Production Operation from a Production using the Standard Operation as a template, every Input and Output Item in the Production with the Material specified above will be copied to the Production Operation. Usually, the In Qty or Out Qty as appropriate will be copied from the Production row to the corresponding Production Operation row. However, if you enter a Quantity here, it will be copied to the relevant Production Operation row instead. If the Production row has an In Qty, this Quantity will be copied to the In Qty field in the Production Operation row. Otherwise, it will be copied to the Out Qty field. This figure will therefore take priority over the In and Out Quantities in the Production (which themselves will have been taken from the Recipe). As this figure applies to a Material not an Item, it will be used as the In or Out Quantity for every Item in the Production with that Material.
- Unit
- Paste Special Units setting, Sales Ledger
- Enter the Unit that the Quantity above refers to. This is for information only.
- Enter the Unit that the Quantity above refers to. This is for information only.
- Description
- The Description is copied from the Materials setting.
Time Card

- Setup Time, Queue Time, Move Time, Run Time
- Used as default in
Routings
- Use these four fields to stipulate the time required for the Standard Operation, as follows:
- Setup
- the time required to set up the Machine or otherwise prepare for the Standard Operation e.g. calibration or replenishing fluids or consumables.
- Queue
- the time required to wait for parts to be ready from the previous Standard Operation e.g. waiting for paint to dry or heated parts to cool. Queue time is also known as "non-instant availability".
- Move
- the time required to move parts from stock or from the previous Standard Operation.
- Run Time
- the time required for the Standard Operation itself.
If you are using the Fixed Time option in the Production Settings setting, the 'Items' card of each Production Operation will contain extra rows for each type of Time. The Item Numbers in these rows will be the Setup, Queue, Move and Labour Cost Items specified in the Production Settings setting, and the Unit Cost in each case will be the Work Cost per Hour in the same setting. The In Qty in each of these rows (number of hours) will be the times from the relevant Routing row which, by default, will be the times specified here. These extra rows allow you to account for the running costs of the Operation.
If you are using the Actual Time option in the Production Settings setting, you can still specify times here. In this case, these times will not be used to account for the running costs of the Operation, but you can use them as guides, to give an idea of how much time is required for the Operation (they will be copied to the 'Time' card of each Production Operation).
- Setup
Use the 'Instructions' card to record details about how to carry out the Standard Operation. These Instructions will be copied to the 'Instructions' card of each Production Operation.
---
Settings in the Production module:
- Introduction
- Account Usage Production
- Auto Production Items
- Item Effectivity
- Machine Groups
- Materials, Standard Operations and Routings, including:
- Number Series - Production Operations
- Number Series - Production Orders
- Number Series - Productions
- Production Settings
- Routings
- Standard Operations
- Standard Problems
- Work Shifts
- Home page for Production manual
- Home page for HansaWorld Enterprise manual
Materials, Standard Operations, Routings - The Materials setting
Materials allow you to determine the components that will be used in each stage in the Production process (and the assembled Items if any that will result from each stage). A "Material" is simply a name for the basic type of Input or Output Item or task, but it is also the mechanism that connects the Items with the Standard Operations (i.e. with the stages in the Production process).To work with the Materials setting, first ensure you are in the Production module, and then click the [Settings] button in the Master Control panel or use the Ctrl-S/⌘-S keyboard shortcut to open the 'Settings' list. Double-click 'Materials' in the list. The 'Materials: Browse' window lists the Materials that have already been entered: double-click one to modify it or click [New] to create a new record. Enter a Code and a Name and, when the record is complete, click the [Save] button in the Button Bar to save changes and close it using the close box, or click the close box if you don't want to save changes.
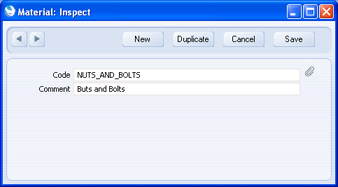
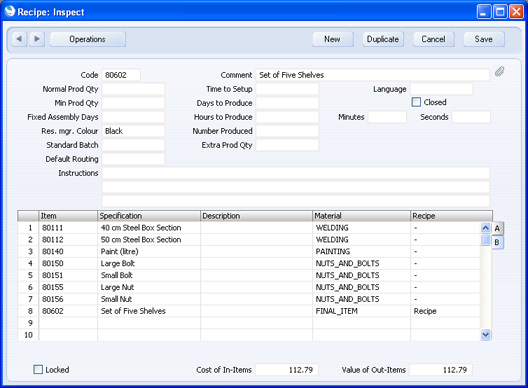
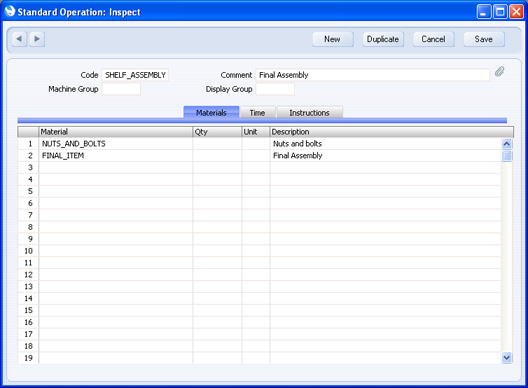
When you enter the Recipe in a Production and create Production Operations from that Production, this is the equivalent Production Operation:
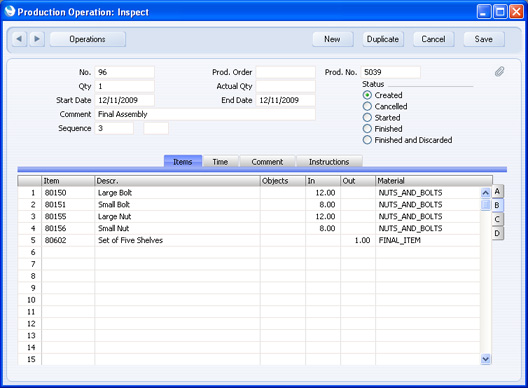
If you need to use any of the nuts and bolts at another time, e.g. during the welding stage, you will need to separate them in the Recipe (and therefore in the Production) by entering the "welding nuts and bolts" and the "assembly nuts and bolts" on separate rows even if they have the same Item Number, and you will need to mark them using a different Material. For example, you might need "NUTS_AND_BOLTS_A" and "NUTS_AND_BOLTS_B" as Materials, or, to be clearer, "NUTS_AND_BOLTS_WELD" and "NUTS_AND_BOLTS_ASSEM". This will ensure the correct nuts and bolts in the correct quantities will be used and removed from stock at the appropriate stage in the process.
---
Settings in the Production module:
- Introduction
- Account Usage Production
- Auto Production Items
- Item Effectivity
- Machine Groups
- Materials, Standard Operations and Routings, including:
- Standard Operations
- Materials
- Routings
- Standard Operations
- Number Series - Production Operations
- Number Series - Production Orders
- Number Series - Productions
- Production Settings
- Routings
- Standard Operations
- Standard Problems
- Work Shifts
- Home page for Production manual
- Home page for HansaWorld Enterprise manual
Materials, Standard Operations, Routings - The Routings setting
Having used Standard Operations to divide a Production process into stages, and Materials to assign the Input and Output Items to those stages, you can now use Routings to determine the order in which the Operations are to be carried out.To work with the Routings setting, first ensure you are in the Production module, and then click the [Settings] button in the Master Control panel or use the Ctrl-S/⌘-S keyboard shortcut to open the 'Settings' list. Double-click 'Routings' in the list. The 'Routings: Browse' window lists the Routing records that have already been entered: double-click one to modify it or click [New] to create a new record. When the record is complete, click the [Save] button in the Button Bar to save changes and close it using the close box, or click the close box if you don't want to save changes.
- Code
- Specify a unique identification Code for the Routing record.
- Comment
- Enter a name for the Routing record.
Flip A
- Operations
- Paste Special
Standard Operations setting, Production module
- When you enter a Standard Operation here, its Comment and the various times will be brought in to the appropriate fields.
- Description
- When you choose a Standard Operation in the field above, its Comment will be placed here.
- Sequence, Sub
- Use the Sequence field to specify the order in which the Standard Operations are to be carried out.
- If more than one Operation can be carried out at the same time, give them the same Sequence numbers, and different Sub Sequence numbers. For example, it might be possible to build two sub-assemblies simultaneously, because the building of one does not depend on the other one already existing. But both sub-assemblies must be complete before they can be brought together to make a whole, so the assembly stage should have a later Sequence number.
- Setup Time, Queue Time, Move Time, Run Time
- Default taken from
Standard Operation
- Used as default in Production Operations
- Use these four fields to stipulate the time required for the Operation, as follows:
- Setup
- the time required to set up the Machine or otherwise prepare for the Operation e.g. calibration or replenishing fluids or consumables.
- Queue
- the time required to wait for parts to be ready from the previous Operation e.g. waiting for paint to dry or heated parts to cool. Queue time is also known as "non-instant availability".
- Move
- the time required to move parts from stock or from the previous Operation.
- Run Time
- the time required for the Operation itself.
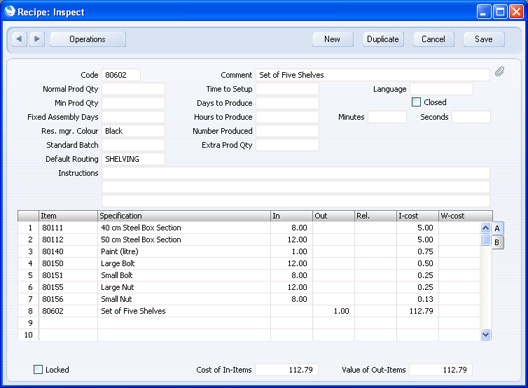
If you are using the Fixed Time option in the Production Settings setting, the 'Items' card of each Production Operation will contain extra rows for each type of Time. The Item Numbers in these rows will be the Setup, Queue, Move and Labour Cost Items specified in the Production Settings setting, and the Unit Cost in each case will be the Work Cost per Hour in the same setting. The In Qty in each of these rows (number of hours) will be the times from the relevant Routing row which, by default, will be the times specified here. These extra rows allow you to account for the running costs of the Operation.
If you are using the Actual Time option in the Production Settings setting, you can still specify times here. In this case, these times will not be used to account for the running costs of the Operation, but you can use them as guides, to give an idea of how much time is required for the Operation (they will be copied to the 'Time' card of each Production Operation).
- Use these four fields to stipulate the time required for the Operation, as follows:
---
Settings in the Production module:
- Introduction
- Account Usage Production
- Auto Production Items
- Item Effectivity
- Machine Groups
- Materials, Standard Operations and Routings, including:
- Standard Operations
- Materials
- Routings
- Standard Operations
- Number Series - Production Operations
- Number Series - Production Orders
- Number Series - Productions
- Production Settings
- Routings
- Standard Operations
- Standard Problems
- Work Shifts
- Home page for Production manual
- Home page for HansaWorld Enterprise manual
Number Series - Production Operations
Use this setting to define the number sequences for Production Operations in a similar manner to that described for Productions.---
Settings in the Production module:
- Introduction
- Account Usage Production
- Auto Production Items
- Item Effectivity
- Machine Groups
- Materials
- Number Series - Production Operations
- Number Series - Production Orders
- Number Series - Productions
- Production Settings
- Routings
- Standard Operations
- Standard Problems
- Work Shifts
- Home page for Production manual
- Home page for HansaWorld Enterprise manual
Number Series - Production Orders
Use this setting to define the number sequences for Production Orders in a similar manner to that described for Productions.---
Settings in the Production module:
- Introduction
- Account Usage Production
- Auto Production Items
- Item Effectivity
- Machine Groups
- Materials
- Number Series - Production Operations
- Number Series - Production Orders
- Number Series - Productions
- Production Settings
- Routings
- Standard Operations
- Standard Problems
- Work Shifts
- Home page for Production manual
- Home page for HansaWorld Enterprise manual
Number Series - Productions
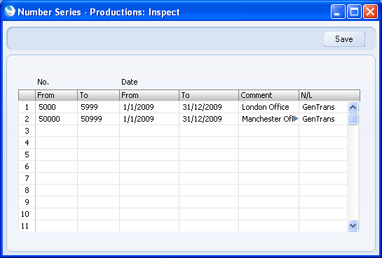
Each record in the Production register has its own unique identifying number, based on a sequential series. When you enter a new record, the next number in the sequence will be used. If required, you can have a number of such sequences running concurrently, perhaps representing different years or different departments.Use this setting to define these sequences, or Number Series. The different series should not overlap. If you leave the setting empty, Production Numbers will start at 1 and continue consecutively.
When you enter a Production, the next number in the first valid Number Series entered to this setting will be used as a default; change to the first unused number in any other Number Series using 'Paste Special'.
For each number sequence, you have a measure of control over whether Nominal Ledger Transactions will be generated automatically when you approve Production records in that sequence. Using 'Paste Special' from the N/L field brings up a selection list containing two options: "GenTrans" and "Do Not GenTrans". Select the first option if Nominal Ledger Transactions are to be generated and the second if they are not. In effect, this feature is an exclusionary one in that you can only choose to not have Nominal Ledger Transactions created for a particular number sequence. If the overall preference (set in the Sub Systems setting in the Nominal Ledger) is to not have such transactions created, you cannot decide to have them created for a single sequence.
When you double-click 'Number Series - Productions' in the Settings list, the following window appears:
---
Settings in the Production module:
- Introduction
- Account Usage Production
- Auto Production Items
- Item Effectivity
- Machine Groups
- Materials
- Number Series - Production Operations
- Number Series - Production Orders
- Number Series - Productions
- Production Settings
- Routings
- Standard Operations
- Standard Problems
- Work Shifts
- Home page for Production manual
- Home page for HansaWorld Enterprise manual
Production Classes
This page describes the Production Classes setting in the Production module.---
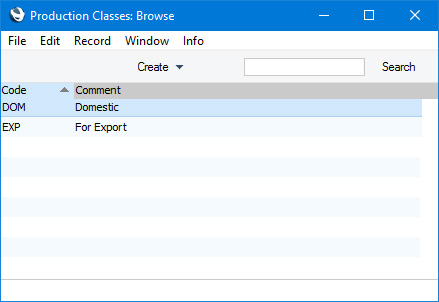
The Production Class is a means of classifying Production Orders and Productions. When you enter a Production Order or Production, you can assign it to a Production Class. This Class will be visible in the 'Production Orders: Browse' and 'Productions: Browse' windows.
If you are using the Transfer Order Class to Production Class option in the Production Settings setting, you should ensure your Order Classes also exist as Production Classes. Otherwise you will not be able to save any changes that you make to Production Orders and Productions that you created from Sales Orders.
To open the Production Classes setting, first ensure you are in the Production module. Then, if you are using Windows or macOS, click the [Settings] button in the Navigation Centre or use the Ctrl-S/⌘-S keyboard shortcuts and then double-click 'Production Classes' in the 'Settings' list. If you are using iOS or Android, select 'Settings' from the Tools menu (with 'wrench' icon) and tap 'Production Classes' in the 'Settings' list. The 'Production Classes: Browse' window will open, listing the Production Classes that you have previously entered.
---
Go back to:
- Home page for Settings in the Production module
- Home page for Production manual
- Home page for Standard ERP manual
Production Settings
This setting contains some miscellaneous options controlling the behaviour of various aspects of the Production module. It is divided into two cards: please click for details about:- the 'Options' card
- the 'Cost Items' card
Settings in the Production module:
- Introduction
- Account Usage Production
- Auto Production Items
- Item Effectivity
- Machine Groups
- Materials
- Number Series - Production Operations
- Number Series - Production Orders
- Number Series - Productions
- Production Settings, including:
- 'Options' card
- 'Cost Items' card
- 'Options' card
- Routings
- Standard Operations
- Standard Problems
- Work Shifts
- Home page for Production manual
- Home page for HansaWorld Enterprise manual
Production Settings - Options Card
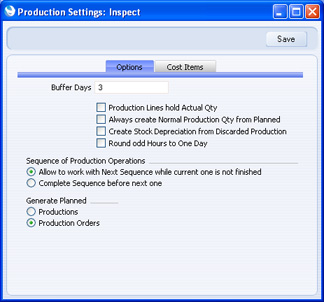
- Buffer Days
- If the Machines that you use in the production process require some down time between jobs, perhaps for cleaning or calibration, specify the duration of that down time here, in days. This down time will apply to every Machine.
- This information will be used by the 'Create Planned Records' Maintenance function in the Sales Orders and Production modules, and by the 'Create Planned Records from Orders' function, also in the Sales Orders module. These functions create Production Orders or Productions for Stocked Items with Recipes that have been included in Sales Orders with future Planned Delivery Dates (i.e. for Items that you have sold and that you need to build or assemble). The dates of these Production Orders or Productions will be calculated using the Planned Delivery Dates of the Sales Orders, the various lead times in the appropriate Recipes (i.e. Days, Hours, Minutes and Seconds to Produce, Time to Setup and Fixed Assembly Days), the number of Buffer Days specified here, and the working hours of the Machine recorded in the Machine Hours register. This ensures you will build or assemble the goods just before they are scheduled for delivery to the Customer.
- The number of Buffer Days will also be used when calculating Start Dates in Production Plans in the MRP module.
- This information will be used by the 'Create Planned Records' Maintenance function in the Sales Orders and Production modules, and by the 'Create Planned Records from Orders' function, also in the Sales Orders module. These functions create Production Orders or Productions for Stocked Items with Recipes that have been included in Sales Orders with future Planned Delivery Dates (i.e. for Items that you have sold and that you need to build or assemble). The dates of these Production Orders or Productions will be calculated using the Planned Delivery Dates of the Sales Orders, the various lead times in the appropriate Recipes (i.e. Days, Hours, Minutes and Seconds to Produce, Time to Setup and Fixed Assembly Days), the number of Buffer Days specified here, and the working hours of the Machine recorded in the Machine Hours register. This ensures you will build or assemble the goods just before they are scheduled for delivery to the Customer.
- Production Lines hold Actual Qty
- Use this option to specify whether the quantities shown in Production and Production Operation rows represent a single application of the Recipe or the total quantities required.
- For example, a Recipe states that two components are required to produce one final Item. When you use this Recipe in a Production with the requirement to produce two final Items, you will enter "2" in the Qty field in the header of the Production record. If you are using this option, the In Qty of the component will change from "2" to "4", and the Out Qty of the final Item will change from "1" to "2". If you are not using this option, the In Qty of the component will stay at "2", and the Out Qty of the final Item will stay at "1".
This option does not apply to Production Orders. The quantities shown in Production Order rows will always represent a single application of the Recipe. When you create a Production from a Production Order using the 'Finish Batch' Operations menu function or the Production Time Entry interface, the calculation of the quantities in the new Production rows will depend on this option.
- For example, a Recipe states that two components are required to produce one final Item. When you use this Recipe in a Production with the requirement to produce two final Items, you will enter "2" in the Qty field in the header of the Production record. If you are using this option, the In Qty of the component will change from "2" to "4", and the Out Qty of the final Item will change from "1" to "2". If you are not using this option, the In Qty of the component will stay at "2", and the Out Qty of the final Item will stay at "1".
- Always create Normal Production Qty from Planned
- This option affects the calculation of quantities in Production Orders and Productions created by the 'Create Planned Records' Maintenance function in the Sales Orders and Production modules, and by the 'Create Planned Records from Orders' function, also in the Sales Orders module. These functions create Production Orders or Productions for Stocked Items with Recipes that have been included in Sales Orders with future Planned Delivery Dates (i.e. for Items that you have sold and that you need to build or assemble).
- If you do not use this option, these functions will create Production Orders or Productions for the exact quantity that you have sold. If you use this option, they will create Production Orders or Productions for the exact quantity or the Normal Prod Qty in the relevant Recipes, whichever is the larger. For example, if you have sold 10 of an Item but the Normal Prod Qty in its Recipe is 20, these functions will create a Production for Qty 10 if you are not using this option and Qty 20 if you are. If you have sold 21, then this option will have no effect and a Production for Qty 21 will be created in both situations.
- If you do not use this option, these functions will create Production Orders or Productions for the exact quantity that you have sold. If you use this option, they will create Production Orders or Productions for the exact quantity or the Normal Prod Qty in the relevant Recipes, whichever is the larger. For example, if you have sold 10 of an Item but the Normal Prod Qty in its Recipe is 20, these functions will create a Production for Qty 10 if you are not using this option and Qty 20 if you are. If you have sold 21, then this option will have no effect and a Production for Qty 21 will be created in both situations.
- Create Stock Depreciation from Discarded Production
- This option is used in two situations.
- The first situation occurs when you mark a Production as Finished but Discarded. If you are not using this option, the components will be removed from stock but the Discarded final Item(s) will not be added to stock. In the Nominal Ledger, the value of the components and the Work Cost will be credited to the relevant Stock and W-cost Accounts as normal. These postings will be balanced by a debit posting to the Discarded Production Cost Account specified in the Account Usage Stock setting. If you are using this option, the Discarded final Item(s) will be added to stock and an automatic approved Stock Depreciation will then remove them, again debiting the Discarded Production Cost Account.
- The second situation occurs when an operative uses the Production Time Entry interface to record that some of what has been produced has been discarded. In this situation, a second Production will be created for the discarded quantity. This second Production will be marked as Finished but Discarded, thus removing the components from stock and updating the stock valuation in the Nominal Ledger. The two Productions will be connected to each other through the Attachments facility. If you are not using this option, the second Production will not add any final Items to stock. If you are using this option, the Discarded final Items will be added to stock, and an automatic approved Stock Depreciation will then remove them.
- If you are using this option, note that in both situations the Stock Depreciation will remove the Discarded final Item(s) from stock with a cost that will be calculated using the Cost Model specified in the relevant Item or Item Group record. If that Cost Model is Default, the Primary Cost Model specified in the Cost Accounting setting will be used. This Stock Depreciation will therefore be treated as a normal removal from stock, and the value of that removal may not be the same as the value of the Discarded Production.
- The first situation occurs when you mark a Production as Finished but Discarded. If you are not using this option, the components will be removed from stock but the Discarded final Item(s) will not be added to stock. In the Nominal Ledger, the value of the components and the Work Cost will be credited to the relevant Stock and W-cost Accounts as normal. These postings will be balanced by a debit posting to the Discarded Production Cost Account specified in the Account Usage Stock setting. If you are using this option, the Discarded final Item(s) will be added to stock and an automatic approved Stock Depreciation will then remove them, again debiting the Discarded Production Cost Account.
- Round odd Hours to One Day
- You can use the 'Create Planned Records' Maintenance function in the Sales Orders and Production modules, and the 'Create Planned Records from Orders' function, also in the Sales Orders module to create Production Orders or Productions for Stocked Items with Recipes that have been included in Sales Orders with future Planned Delivery Dates (i.e. for Items that you have sold and that you need to build or assemble). The dates of these Production Orders or Productions will be calculated using the Planned Delivery Dates of the Sales Orders, the various lead times in the appropriate Recipes (i.e. Days, Hours, Minutes and Seconds to Produce, Time to Setup and Fixed Assembly Days) and the number of Buffer Days specified above. This ensures you will build or assemble the goods just before they are scheduled for delivery to the Customer.
- If the result of this calculation is not be a whole number of days, it will usually be rounded down, unless you are using this option.
- For example, if the lead time is 4 days 23 hours and you are not using this option, then the date of the Production or Production Order will be four days before it is needed. If you are using this option, the date will be five days before it is needed.
- This option is also used as described above in the MRP module to calculate the dates in Production Plans and, from there, in Productions or Production Orders.
- If the result of this calculation is not be a whole number of days, it will usually be rounded down, unless you are using this option.
- Sequence of Production Operations
- When you create a sequence of Production Operations from a Production, these options will control how strictly that sequence must be followed.
- If you choose the first option, you will be able to mark the Production Operations as Started and Finished in any order.
- If you choose the second option, you will be able to mark the Production Operations as Started in any order, but you will have to mark them as Finished in sequence order.
- In both cases, you will be able to have more than one Production Operation marked as Started at any one time.
- It is recommended that you choose the second option if you have chosen in the Account Usage Production setting to have Nominal Ledger Transactions from Production Operations. In this case, the sequence in which you Finish each Production Operation becomes significant. In particular, the Transaction from the final Production Operation, which debits the value of the final Item to the Stock Account and credits this value to the Work In Progress Account, may not be correct if there are earlier Operations in the sequence that you have not yet Finished. This option will ensure that you mark the Operations as Finished in the correct order.
- If you choose the first option, you will be able to mark the Production Operations as Started and Finished in any order.
- Generate Planned
- There are various Maintenance functions that you can use to create Production Orders or Productions remotely.
- For example, you can use the 'Create Planned Records' Maintenance function in the Sales Orders and Production modules, and the 'Create Planned Records from Orders' function, also in the Sales Orders module to create Production Orders or Productions for Stocked Items with Recipes that have been included in Sales Orders with future Planned Delivery Dates (i.e. for Items that you have sold and that you need to build or assemble).
- You can use the Sales Forecast register in the MRP module to predict the future monthly sales of Output Items. From a Sales Forecast record, you can create a Production Plan for each month, and from there you can use the 'Create Productions' Maintenance function to schedule the assembly of the Items that you expect to sell.
- Use these options to specify whether these functions will create Productions or Production Orders for these Items.
- For example, you can use the 'Create Planned Records' Maintenance function in the Sales Orders and Production modules, and the 'Create Planned Records from Orders' function, also in the Sales Orders module to create Production Orders or Productions for Stocked Items with Recipes that have been included in Sales Orders with future Planned Delivery Dates (i.e. for Items that you have sold and that you need to build or assemble).
Settings in the Production module:
- Introduction
- Account Usage Production
- Auto Production Items
- Item Effectivity
- Machine Groups
- Materials
- Number Series - Production Operations
- Number Series - Production Orders
- Number Series - Productions
- Production Settings, including:
- 'Options' card
- 'Cost Items' card
- 'Options' card
- Routings
- Standard Operations
- Standard Problems
- Work Shifts
- Home page for Production manual
- Home page for HansaWorld Enterprise manual
Production Settings - Cost Items Card
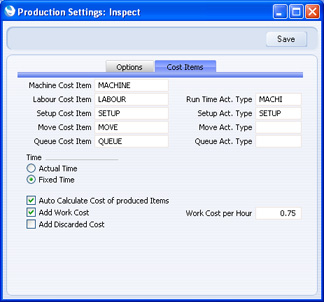
- Machine Cost Item
- Paste Special
Item register
- The Auto Calculate Cost of Produced Items option (below) allows you to record the running costs of the Machines used in Productions. If you are using this option, you must also specify a Machine Cost Item here, you should specify Running Costs/hr in the Asset records for your Machines ('Costs' card) and you should specify such an Asset in the Machine field in each Production.
- If you are using this feature, an extra row containing this Item will be added to each Production when you first save it. This row will record the running cost of the Machine used during the Production process. The running cost will be taken from the Running Costs/hr field in the relevant Asset record, and from the Start and End Time of the Production. When you mark the Production as Finished and save it, the running cost will be added to the value of the assembled Item (i.e. it will be debited to the Stock Account), and it will be credited to the Production W-cost Account.
- The choice of the Production W-cost Account will depend on whether you are using the Use Item Groups for Cost Accounts option in the Cost Accounting setting in the Stock module. If you are, and you specify a Machine Cost Item here that belongs to an Item Group in which you have specified a Production W-cost Account, that Account will be used. If you are not using this option or the Item Group does not have a Production W-cost Account, the W-cost Account will be taken from the Account Usage Stock setting.
- If a Production has a Routing, the extra row for the running cost will not be added to the Production, but instead will be added to each Production Operation. You will need to remember to specify a Machine in each Production Operation yourself before the extra row can be added, as the Machine will not be copied from the Production.
- This Item must be a Service Item.
- If you are using this feature, an extra row containing this Item will be added to each Production when you first save it. This row will record the running cost of the Machine used during the Production process. The running cost will be taken from the Running Costs/hr field in the relevant Asset record, and from the Start and End Time of the Production. When you mark the Production as Finished and save it, the running cost will be added to the value of the assembled Item (i.e. it will be debited to the Stock Account), and it will be credited to the Production W-cost Account.
- Labour Cost Item, Setup Cost Item, Move Cost Item, Queue Cost Item
- Paste Special
Item register
- If a Production has a Routing, running costs will be calculated at Production Operation level. You can record four separate types of running costs, as follows:
- Labour
- The cost of labour.
- Setup
- The cost of setting up the Machine e.g. calibration or replenishing fluids or consumables.
- Move
- The cost of moving parts either from stock to the first Production Operation or from one Production Operation to the next.
- Queue
- The cost incurred in waiting for parts to be ready e.g. waiting for paint to dry or heated parts to cool. Queue time is also known as non-instant availability.
- If you are using the Actual Time option (below), you only need specify a Labour Cost Item. Again, this should be a Service Item. You will record the labour time required for the Production Operation first by creating Activities using the 'Create Activity' function on the Operations menu of the Production Operation. This Item will appear in the Item field of all Activities created in this way. You will then bring these Activities into the Production Operation using the 'Add Labour' function on the same menu. The 'Add Labour' function will add an extra row containing the Labour Cost Item to the Production Operation. The In Qty of this row (number of hours) will be the total Cost (Time) of these Activities (providing they have been marked as Done), and the Unit Cost will be the Work Cost per Hour (below).
- In both cases (Fixed Time and Actual Time), when you mark a Production Operation as Finished, the choice of the Account(s) that will be credited with these running costs will depend on whether you are using the Use Item Groups for Cost Accounts option in the Cost Accounting setting in the Stock module. If you are, and you specify Items in these four fields that belong to Item Groups in which you have specified Production W-cost Accounts, those Accounts will be used. If you are not using this option or the Item Groups do not have Production W-cost Accounts, the W-cost Account will be taken from the Account Usage Stock setting.
- These Items must all be Service Items.
- Labour
- Run Time Act. Type
- Paste Special
Activity Types setting, CRM module
- The Production Time Entry interface is a simple interface that allows you to work on a Production while automatically recording Labour and Setup Time. If you are using this interface, when you start work on a Production, an Activity will be created automatically, with the time you started work as the Start Time. This Activity is known as a "Run Time" Activity. When you finish working on the Production, the Run Time Activity will be updated automatically with the time when work stopped, and the Activity will be marked as Done.
- Specify here the Activity Type that you want to be used in each Run Time Activity.
- Specify here the Activity Type that you want to be used in each Run Time Activity.
- Setup Act. Type
- Paste Special
Activity Types setting, CRM module
- The Production Time Entry interface is a simple interface that allows you to work on a Production while automatically recording Labour and Setup Time. When you finish working on a Production, you will have the opportunity to enter a Setup Time (e.g. time spent calibrating the Machine or replenishing fluids before starting work on the Production). If you enter a Setup Time and if you are using the Add Work Cost option (below), an Activity will be created automatically to record this time. This Activity is known as a "Setup Activity", and will be marked as Done.
- Specify here the Activity Type that you want to be used in each Setup Activity.
- Specify here the Activity Type that you want to be used in each Setup Activity.
- Time
- Use these options to specify whether you will record actual or fixed time against Production Operations.
- Actual
- Recording actual time against a Production Operation is a two-stage process. You should first create Activities using the 'Create Activity' function on the Operations menu of the Production Operation, and then bringing these Activities into the Production Operation using the 'Add Labour' function on the same menu. This function will add an extra row containing the Labour Cost Item specified above to the Production Operation. The In Qty of this row (number of hours) will be the total Cost (Time) of these Activities (providing they have been marked as Done), and the Unit Cost will be the Work Cost per Hour (below).
- Fixed
- If you are using this option, when you create a Production Operation record from a Production, it will contain extra rows for each of the cost types, using the Labour Cost Item, Setup Cost Item, Move Cost Item and Queue Cost Item specified above. The In Quantities of these rows (number of hours) will be taken from the Routing specified in the Production or from the Standard Operation record specified in the Routing. The Unit Cost in each case will be the Work Cost per Hour (below).
- Actual
- Auto Calculate Cost of produced Items
- Please refer to the description of the Machine Cost Item at the beginning of this page for details of this option.
- Add Work Cost
- This option is used for three purposes.
- First, if you are using the Production Time Entry interface and you want an Activity to be created for Setup Time using the Setup Activity Type specified above, check this box. Run Time Activities will always be created.
- Second, if you are using the Production Time Entry interface together with this option, a Work Cost will be added to each Production automatically. This will be calculated using the total Cost (Time) of the Setup and Run Time Activities and the Work Cost per Hour specified below. Since each Production will be marked as Finished automatically, you will not be able to change this Work Cost. If you have specified a Number Produced in the Recipe, the Cost (Time) of the Setup Activity will be divided by this figure before being added into the calculation.
- Finally, use this option if you would like a Work Cost to be added to each new Recipe automatically. This Work Cost will be calculated using the Work Cost per Hour specified below and the time required for the Recipe (the total of the Time to Setup and the Days, Hours, Minutes and Seconds to Produce). The Work Cost will be placed in the W-cost field in the last Input row in the Recipe. If the Recipe has a Number Produced, this will be used to calculate a Work Cost per unit. You cannot change this calculated Work Cost figure, but you can in effect adjust it by specifying another Work Cost (which can be negative if necessary) in one of the other Input rows. This feature does not apply to Recipes with Routings.
- First, if you are using the Production Time Entry interface and you want an Activity to be created for Setup Time using the Setup Activity Type specified above, check this box. Run Time Activities will always be created.
- Work Cost per Hour
- The Work Cost per Hour is used for four purposes.
- First, if you are using the Fixed Time option above, this will be the hourly rate for Labour, Setup Time, Move Time and Queue Time that will be added automatically to Production Operations when you create them from Productions.
- Second, if you are using the Actual Time option above and you use the 'Add Labour' Operations menu function to add time to Production Operations from Activities, this will be the hourly rate.
- Third, if you record time against a Production using the Production Time Entry interface and you are using the Add Work Cost option above, then this time will be added automatically to the Production as a Work Cost using the hourly rate specified here.
- Finally, if you are using the Add Work Cost option above, a Work Cost will be added to each new Recipe automatically. This Work Cost will be calculated using the Work Cost per Hour specified here and the time required for the Recipe (the total of the Time to Setup and the Days, Hours, Minutes and Seconds to Produce). The Work Cost will be placed in the W-cost field in the last Input row in the Recipe. If the Recipe has a Number Produced, this will be used to calculate a Work Cost per unit. This feature does not apply to Recipes with Routings.
- First, if you are using the Fixed Time option above, this will be the hourly rate for Labour, Setup Time, Move Time and Queue Time that will be added automatically to Production Operations when you create them from Productions.
- Add Discarded Cost
- If an operative uses the Production Time Entry interface to record that some of what has been produced has been discarded, a second Production will be created for the discarded quantity. This second Production will be marked as Finished but Discarded, thus removing the components from stock and updating the stock valuation in the Nominal Ledger. The two Productions will be connected to each other through the Attachments facility. If you are using this option, the value of the second (Discarded) Production will be added to the first (Finished) Production as a Work Cost, and therefore this value will be included in the stock value of the "good" Items.
Settings in the Production module:
- Introduction
- Account Usage Production
- Auto Production Items
- Item Effectivity
- Machine Groups
- Materials
- Number Series - Production Operations
- Number Series - Production Orders
- Number Series - Productions
- Production Settings, including:
- 'Options' card
- 'Cost Items' card
- 'Options' card
- Routings
- Standard Operations
- Standard Problems
- Work Shifts
- Home page for Production manual
- Home page for HansaWorld Enterprise manual
Routings
Please click here for details of this setting.---
Settings in the Production module:
- Introduction
- Account Usage Production
- Auto Production Items
- Item Effectivity
- Machine Groups
- Materials
- Number Series - Production Operations
- Number Series - Production Orders
- Number Series - Productions
- Production Settings
- Routings
- Standard Operations
- Standard Problems
- Work Shifts
- Home page for Production manual
- Home page for HansaWorld Enterprise manual
Standard Operations
Please click here for details of this setting.---
Settings in the Production module:
- Introduction
- Account Usage Production
- Auto Production Items
- Item Effectivity
- Machine Groups
- Materials
- Number Series - Production Operations
- Number Series - Production Orders
- Number Series - Productions
- Production Settings
- Routings
- Standard Operations
- Standard Problems
- Work Shifts
- Home page for Production manual
- Home page for HansaWorld Enterprise manual
Standard Problems
Use this setting to record reasons for discarding finished Productions. Please click here for full details.---
Settings in the Production module:
- Introduction
- Account Usage Production
- Auto Production Items
- Item Effectivity
- Machine Groups
- Materials
- Number Series - Production Operations
- Number Series - Production Orders
- Number Series - Productions
- Production Settings
- Routings
- Standard Operations
- Standard Problems
- Work Shifts
- Home page for Production manual
- Home page for HansaWorld Enterprise manual
Work Shifts
If you define your Work Shifts in this setting, you can then use the Production Journal report to list the Productions worked on during a particular Work Shift. A Production will satisfy this requirement if its Start Time and End Date comply with the specified Work Shift record. If a Production has an End Date that complies with the Work Shift record but its Start Time is blank, it will not be included in the report.To work with this setting, first ensure you are in the Production module, and then click the [Settings] button in the Master Control panel or use the Ctrl-S/⌘-S keyboard shortcut to open the 'Settings' list. Double-click 'Work Shifts' in the list. The 'Work Shifts: Browse' window lists the Work Shift records that have already been entered: double-click one to modify it or click [New] to create a new record. When the record is complete, click the [Save] button in the Button Bar to save changes and close it using the close box, or click the close box if you don't want to save changes.
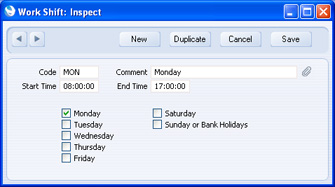
A Work Shift marked as Sunday will include work on bank holidays. For example this would include work on Christmas Day, even if Christmas Day is not a Sunday. If Christmas Day is a Monday, work on Christmas Day will not be included in a Work Shift marked as Monday.
To use the bank holiday feature, you must list the holidays in your country in the Bank Holidays setting in the System module.
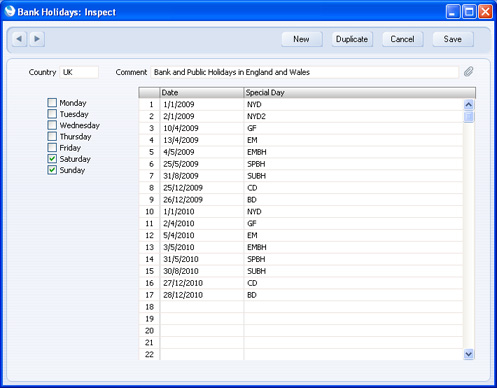
---
Settings in the Production module:
- Introduction
- Account Usage Production
- Auto Production Items
- Item Effectivity
- Machine Groups
- Materials
- Number Series - Production Operations
- Number Series - Production Orders
- Number Series - Productions
- Production Settings
- Routings
- Standard Operations
- Standard Problems
- Work Shifts
- Home page for Production manual
- Home page for HansaWorld Enterprise manual