The Master Control Panel
The HansaWorld Enterprise work area contains a single movable, tool palette: the Master Control panel, located by default in the centre of the screen.You can open the Master Control panel or bring it to the front at any time using the 'Master Control' item on the File menu. Windows and Linux users can use the keyboard shortcut Ctrl-M, while Mac OS X users can use ⌘-M. To close the Master Control panel, click the close box or use the keyboard shortcuts Ctrl-F4/⌘-W.
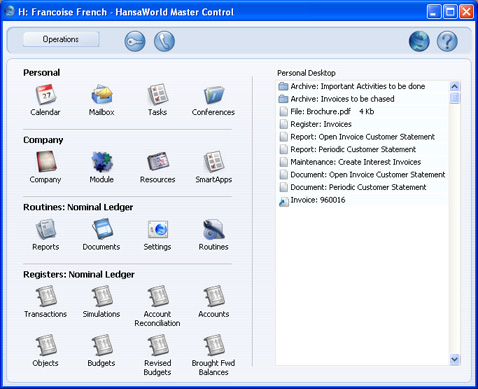
- The area on the right of the Master Control panel is known as the "Personal Desktop". If you have certain records, registers, reports or Maintenance functions that you use all the time, you can move them to your Personal Desktop for easy access. You can open a record or register or run a report or Maintenance function from your Master Control panel at any time, without first having to change modules, find records in browse windows or find reports, documents or Maintenance functions in list windows. The Personal Desktop therefore gives you access to the most important parts of HansaWorld Enterprise in a similar manner to a list of Bookmarks in a browser. Please refer to the description of the Personal Desktop here for full details.
- The strip along the top of the Master Control panel contains the following tools:
- Operations
- This drop-down menu contains a number of functions connected to the Personal Desktop. It also contains a function that you can use to change your password.

- Click this button if you want to log in as a different user.

- This button opens the Business Communicator window. This allows you to communicate with any Contact (both external and internal) using any method (e.g. telephone, mobile, Skype, SIP, email, text SMS and the chat feature built in to HansaWorld Enterprise).

- Click this button to connect to the web and go to the HansaWorld website (www.hansaworld.com). To find and download the latest version of HansaWorld Enterprise, click this button and then, in your browser, click the "Products" link and then "Downloads" to go to the 'Downloads' page.

- Click this button to connect to the web and go to the HansaWorld website where you can find the HansaWorld Enterprise manuals in a web format (www.hansamanuals.com).
- Operations
- The left-hand part of the Master Control panel contains a number of buttons, divided into four sections, as follows:
- Personal
- These buttons allow you to communicate with other users of your HansaWorld Enterprise system and to organise your diary. This provides a means of recording appointments and other tasks. Some of these buttons have a keyboard shortcut, as shown below, which you can use when the Master Control panel is the active (front) window.
- [Calendar]
- Windows/Linux keyboard shortcut: Ctrl-Shift-C
- Mac OS X keyboard shortcut: ⌘-Shift-C
- Opens your Calendar. You can use this tool to schedule your time and that of other users.
- Requirement: access to the Calendar module.
- Full details: Calendar page.
- Mac OS X keyboard shortcut: ⌘-Shift-C
- [Mailbox]
- Windows/Linux keyboard shortcut: Ctrl-Shift-M
- Mac OS X keyboard shortcut: ⌘-Shift-M
- Opens your Mailbox. This allows you to send and receive mail from other users in your HansaWorld Enterprise system, and to send and receive external mail (i.e. to communicate with people outside your HansaWorld Enterprise system who use standard email programs).
- Requirement: you must have a Mailbox.
- Full details: Sending and Receiving Mail page.
- Mac OS X keyboard shortcut: ⌘-Shift-M
- [Tasks]
- Windows/Linux keyboard shortcut: Ctrl-T
- Mac OS X keyboard shortcut: ⌘-T
- Opens your Task Manager. This is your 'To Do' list.
- Requirement: access to the Task Manager module.
- Full details: Task Manager page.
- Mac OS X keyboard shortcut: ⌘-T
- [Conferences]
- Windows/Linux keyboard shortcut: Ctrl-Shift-O
- Mac OS X keyboard shortcut: ⌘-Shift-O
- Opens a list of Conferences. These are addresses to which you can send public mail (mail all users can read, subject to access restrictions).
- Requirement: you must have a Mailbox.
- Full details: Mails and Conferences page.
- Mac OS X keyboard shortcut: ⌘-Shift-O
- [Calendar]
- Company
- These buttons allow you to work in different parts of your HansaWorld Enterprise system. Some of these buttons have a keyboard shortcut, as shown below, which you can use when the Master Control panel is the active (front) window.
- [Company]
- Windows/Linux keyboard shortcut: Ctrl-O
- Mac OS X keyboard shortcut: ⌘-O
- Allows you to change the Company you are working in. You can change Company using the keyboard shortcut at any time (even if the Master Control panel is hidden or closed).
- More details: Working with Companies page.
- Mac OS X keyboard shortcut: ⌘-O
- [Module]
- Windows/Linux keyboard shortcut: Ctrl-0 (zero)
- Mac OS X keyboard shortcut: ⌘-0 (zero)
- Allows you to work in a different module (e.g. to change from the Nominal Ledger to the Sales Ledger). The Register buttons in the lower part of the Master Control panel will be changed to show the Registers in the new module. You can change modules using the keyboard shortcut at any time (even if the Master Control panel is hidden or closed).
- Mac OS X keyboard shortcut: ⌘-0 (zero)
- [Resources]
- Opens the Resource Planner window.
- Requirement: access to the Resource Planning module.
- Requirement: access to the Resource Planning module.
- [SmartApps]
- SmartApps are small applications that you can purchase or create yourself. You can share and synchronise information between a SmartApp in your HansaWorld Enterprise system and one on a hand-held device such as a Nokia E90. Example applications might include workforce automation, data collection and on-line reporting. This button opens a list of the SmartApps in your system.
- More details: HansaWorld SmartApps page.
- [Company]
- Routines
- Routines are tasks that you will need to carry out as part of your daily work. Clicking one of these buttons will open a list of options in which you can choose the one you need by double-clicking. The options in the list will vary depending on the current module. Each of these buttons has a keyboard shortcut, as shown below, which you can use at any time (even if the Master Control panel is hidden or closed).
- [Reports]
- Windows/Linux keyboard shortcut: Ctrl-R
- Mac OS X keyboard shortcut: ⌘-R
- Produces reports to screen, printer, file or other print destination.
- More details: Reports and the Report Window pages. The reports themselves are described in detail in the appropriate sections of these web pages.
- Mac OS X keyboard shortcut: ⌘-R
- [Documents]
- Windows/Linux keyboard shortcut: Ctrl-D
- Mac OS X keyboard shortcut: ⌘-D
- Prints documents intended for external use (e.g. Invoices or Purchase Orders).
- More details: Documents page. The documents themselves are described individually in the appropriate sections of these web pages.
- Mac OS X keyboard shortcut: ⌘-D
- [Settings]
- Windows/Linux keyboard shortcut: Ctrl-S
- Mac OS X keyboard shortcut: ⌘-S
- Allows you to tailor the operations of each module to your requirements.
- More details: Settings page. The settings themselves are described individually in the appropriate sections of these web pages.
- Mac OS X keyboard shortcut: ⌘-S
- [Routines]
- Allows you to import and export information, run Maintenance functions (batch processing routines), and register your copy of HansaWorld Enterprise.
- More details: Routines page.
- [Reports]
- Registers
- Windows/Linux keyboard shortcuts: Ctrl-1-8
- Mac OS X keyboard shortcuts: ⌘-1-8
- These buttons vary according to the current module: one is provided for each register in that module. Separate registers are used for the different types of information stored in and used by the module. Click on a register button to open the browse window listing all the records contained in the register.
More details: Registers page. Each register is explained in separate sections throughout these web pages. - Mac OS X keyboard shortcuts: ⌘-1-8
- Personal
- Routines, including
- HansaWorld.com button
- Personal Desktop
- Passwords
Routines
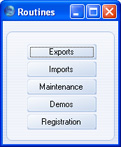
The 'Routines' section of the Master Control panel contains tools that you can use to produce reports, print documents, set preferences, import and export information, run Maintenance functions (batch processing routines), and register your copy of HansaWorld Enterprise.You can use three of these tools by clicking the [Reports], [Documents] and [Settings] buttons in the Master Control panel. To use the remaining tools, click the [Routines] button. This will open the 'Routines' window, in which you can click the button that you need:
Routines - Reports
Reporting in HansaWorld Enterprise is non-destructive, i.e. you can make and print a report as many times as you wish. Some accounting programs are designed in such a way as to allow journal printing only directly in connection with the data entry. HansaWorld Enterprise does not have this limitation.When you click the [Reports] button in the Master Control panel or use the Ctrl-R (Windows and Linux) or ⌘-R (Mac OS X) keyboard shortcut, a window is opened, containing a list of the available reports. The contents of this window will vary with the selected module: the illustration below shows the reports in the Nominal Ledger module:
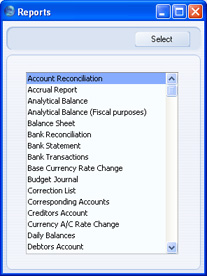
Once you have done this, double-click the report name in the list. A specification window will open, where you can choose the information that you want to be shown in the report. For example, when producing a Balance Sheet, you can use its specification window (illustrated below) to choose the period that is to be covered by the report.
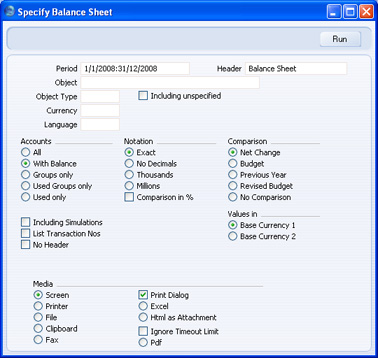
- Screen
- If you print to screen (the default setting), the report will be shown in a new window (described here). You can subsequently send the report to a printer by clicking the Printer icon in the Button Bar of this window or by selecting 'Print' from the File menu.
- Printer
- Use this option to send the report directly to a printer.
- File
- Choose this option to export the contents of any report to a tab-delimited text file on your hard disk. You can then open this file in Excel, for further calculations etc or in Word or a page make-up program, for incorporation in publicity material or published reports.
- Clipboard
- This option will place the contents of a report in your computer's clipboard, from where you can paste it into another application.
- Fax
- You cannot use this option with reports.
- Excel
- This option opens the Excel application and creates a new workbook containing the report.
- The following example shows a Customer Statistics report opened in Excel, after which a chart has been added:
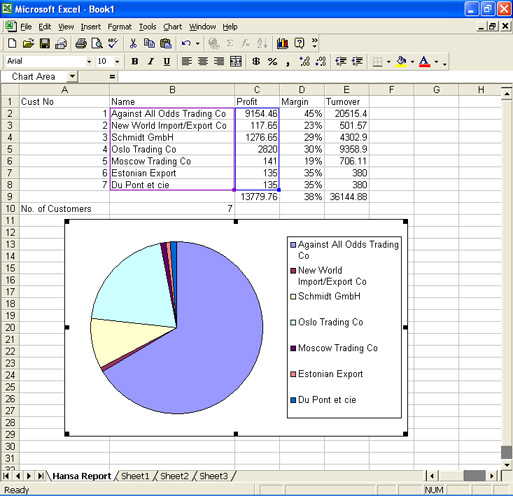
- The following example shows a Customer Statistics report opened in Excel, after which a chart has been added:
- Html as attachment
- This option will place a file containing report in your Personal Desktop. You may need to close and re-open the Master Control panel to see the report there.
- You can only use this option in a multi-user system, where it can be useful when you need to produce a long report. You can print a report using this option, log off and leave the server to produce the report overnight, and the report will be waiting for you in your Personal Desktop the next day.
- To open the report, highlight it in your Personal Desktop and choose 'Open Record' from the Master Control panel's Operations menu. The report will be shown in a new window in your browser.
- You can only use this option in a multi-user system, where it can be useful when you need to produce a long report. You can print a report using this option, log off and leave the server to produce the report overnight, and the report will be waiting for you in your Personal Desktop the next day.
- Pdf
- Choose this option to print a report as a PDF file on your hard disk.
There are also two check boxes at the bottom of each report specification window:
- Print Dialog
- If you want a print dialogue to appear when you send the report to a printer, check this box. You might do this if you want to print several copies of a report.
- Ignore Timeout Limit
- Please refer to the 'Parallel Reporting' section at the bottom of this page for details of this option.
Defining Reports
For some reports in the Nominal Ledger module, you can redefine the contents and layout of the report. To do this, use the Report Settings setting in the Nominal Ledger.
Parallel Reporting
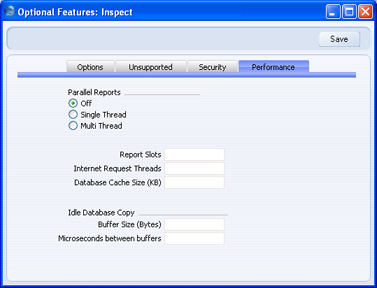
In multi-user systems, the server will give a higher priority to working with records (searching, opening, saving), and a lower priority to reporting. Despite this prioritisation, if some users in your system will frequently produce reports, the other users may find that performance suffers. You can use the Parallel Reporting options to attempt to optimise the performance for all users. The Single Thread option can be used with any server, while the Multi Thread option will allow you to take advantage of multiple cores and processors. These options can be found on the 'Performance' card of the Optional Features setting in the System module.
- Off
- The server will calculate a single report at a time, so reports will be produced in the order in which they were requested. Reflecting the higher priority given to working with records, the calculation of each report will be paused periodically to allow records to be read and saved.
- Single Thread
- The server can calculate a number of reports simultaneously. It does this by working on a particular report for a few moments, then working on a second report for a few moments, then on a third, before returning to the first. This will give a benefit when there is a long report queue that includes both short and heavy reports, as the short reports will be produced more quickly. The server will be able to start working on them more quickly, without always needing to wait until the earlier reports in the queue have been produced. This benefit by its very nature will be much reduced when there is a short report queue or no queue at all.
- By default, the server can work on up to five reports at once, but you can change this using the Report Slots field underneath the Parallel Reports options. The number of Report Slots can be between one and 80.
- If the users in your system will frequently produce many reports, you may find it beneficial to increase the number of Report Slots. If reports will be produced infrequently, you might consider reducing the number. Depending on the complexity of the reports in the queue, increasing the number may mean each individual report will be produced more slowly, so you may need to experiment to find the optimum setting for the typical report queue in your system.
- By default, the server can work on up to five reports at once, but you can change this using the Report Slots field underneath the Parallel Reports options. The number of Report Slots can be between one and 80.
- Multi Thread
- The server will dedicate separate threads to reports. Each thread will be able to produce a separate report, allowing several reports to be produced simultaneously. When a report is requested, it will be placed in an overall report queue, to be assigned to the first thread that becomes available.
By default, there can be up to five separate report threads. Again, you can change this using the Report Slots field. A good guideline is to set the number of Report Slots to twice the number of processor cores in the server.
Usually, you should only consider using this option if you have a multiple-core or multiple-processor server.
By default, the server will spend up to 300 seconds calculating each report. You can change this report time-out limit by entering a number of seconds in the Seconds a Report is allowed to Run before Timing out field in the Timed Operations setting in the Technics module. If a report takes longer than the report time-out limit, the following will happen, depending on the Parallel Reporting option:
- Off
- There is no report time-out limit if Parallel Reporting is Off, so every report will always be produced in its entirety.
- Single Thread
- The report calculation will be halted, and the incomplete report will be printed.
- Multi Thread
- The report calculation will be halted, and the incomplete report will not be printed.
If you are using the single- or multi-thread options, you can monitor the reports that the server is working on. To do this, produce a Report Status report from the User Settings module. As well as showing you the calculation times for each report being produced, this report also gives you the chance to cancel a particular report. To do this, click the [Cancel] text button next to the report name. If you are using the single-thread option, the incomplete report will be printed. You cannot use the Report Status report if Parallel Reporting is off. In this case, the Report Status will be placed in the report queue behind the other reports, which will be completed before calculation of the Report Status report begins. When it is produced, it will therefore be empty.
Massive Cache
Another way to improve reporting speed is to increase the size of the cache used by the HansaWorld Enterprise application. By default, this is 3.2 Mb. By increasing the size of this cache, you will improve the speed of operation because data that is in the cache can be accessed much more quickly than data on disk. Data in the cache is data that has already been used during the work session. In particular, the speed of importing will improve if you increase the cache size and, in many installations, the speed of reporting and processing records will improve as well.
The optimum size of the cache will vary, depending on the server type, RAM size and operating system, and can only be established through experimentation. A good guideline, especially for Windows servers and for servers with smaller RAM sizes, is never to assign more than 40% of the machine's RAM size to the cache. If the cache is too large, the memory available for other tasks may not be enough. If the machine then runs out of memory, it will start using its hard disk as extra memory. This will cause it to slow down significantly and may also increase instability. If the server is a 32-bit machine, the maximum cache size is between 1 and 3.5 Gb, depending on machine and operating system. If the server is a 64-bit machine with a 64-bit capable operating system (Mac OS X or Linux) and a large amount of RAM and if you are using the 64-bit version of HansaWorld Enterprise, then the 40% guideline becomes less important. For example, if the server has 12 Gb RAM, you could assign up to 10 Gb to the cache.
You can increase the cache size using one of two methods:
- You can start the application on the server using the --db-cache parameter. For example:
- ./HansaWorld --db-cache=1G
The --db-cache parameter sets the cache size for the particular work session only. After quitting and restarting the server, the cache size will revert to the default.
- To set the cache size permanently, follow these steps:
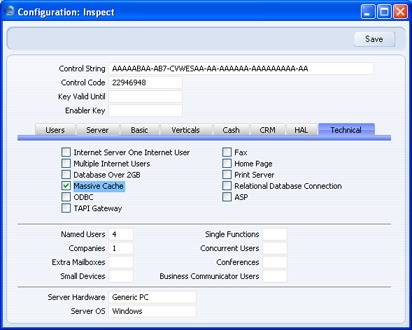
- In the Configuration setting in the System module, choose to use the Massive Cache feature using the option on the 'Technical' card:
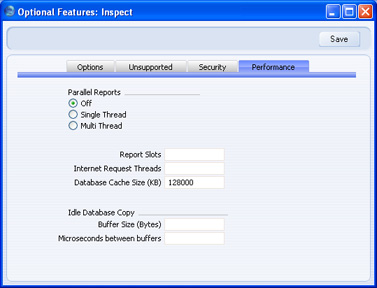
- Enter the cache size in the Database Cache Size field on the 'Performance' card of the Optional Features setting. The cache size should be a number of kilobytes.
- Restart the server.
- In the Configuration setting in the System module, choose to use the Massive Cache feature using the option on the 'Technical' card:
Please click the links for details about the individual reports in the following modules:
- Assets
- Cash Book
- Consolidation
- Contracts
- CRM
- Expenses
- Job Costing
- Nominal Ledger
- Production
- Purchase Ledger
- Purchase Order Processing
- Quotations
- Sales Ledger
- Sales Order Processing
- Service Orders
- Stock
- System
Routines - Documents
Documents are more formal printouts, usually printed using forms, such as invoices or delivery notes, for sending to third parties (e.g. Customers or Suppliers). HansaWorld Enterprise offers several documents in each module.When you click the [Documents] button in the Master Control panel or use the Ctrl-D (Windows and Linux) or ⌘-D (Mac OS X) keyboard shortcut, a window is opened, containing a list of the available documents. The documents available vary with the selected module: the illustration below shows those in the Sales Ledger module:
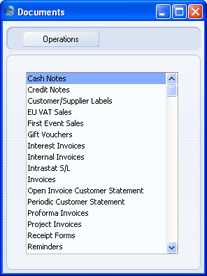
Once you have done this, double-click the document name in the list. A specification window will open, where you can choose the information that you want to be shown in the report. For example, when printing Invoices, you can use the specification window (illustrated below) to choose the Invoices that you want to print.
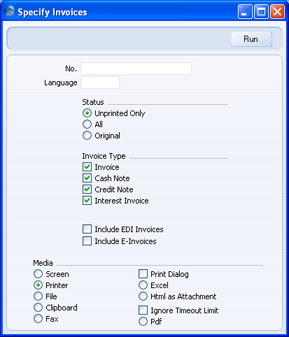
Once you have specified the documents that you want to be printed and have chosen a print destination, click [Run] to print the documents.
Defining Documents
You must assign a Form to each document before you print it for the first time. The Form is the design or layout of the document. You can have a single Form for each document, or you may have several versions of a particular type of document, to be used on different occasions. To assign a Form or Forms to a document, open the 'Documents' list as described above, highlight the document in the list, and select 'Define Document' from the Operations menu.
The example described below imagines you to have two different invoice layouts, one for French language customers, and one for all other customers. In this case, you will need two Forms named, for example, "INV" and "INVFRE". Design these Forms using the Form register in the System module. Full details of this design process can be found here.
Having designed the two Forms, use the 'Define Document' function to specify when each one will be used, as follows:
- Use the [Module] button in the Master Control panel or the Ctrl-0/⌘-0 keyboard shortcut to choose the module in which the document is to be found. In the case of the Invoice document, this is the Sales Ledger.
- Click the [Documents] button in the Master Control panel or use the Ctrl-D/⌘-D keyboard shortcut. The 'Documents' list window is opened showing a list of available documents. Highlight the document that you need to define ('Invoices' in the example).
- Select 'Define Document' from the Operations menu. Specify "INV" as the Form on the first row and "INVFRE" as the Form on the second row:
The "FRA" Language has been specified in the second row, meaning that the "INVFRE" Form will be used when you print Invoices with this Language. No Language has been specified in the first row, so the "INV" Form will be used when you print Invoices with all other Languages. The Status in both cases is "OKed". This means the Invoices must be approved (marked as OK and saved, so that they are posted to the Sales and Nominal Ledgers) to use these Forms when you print them. As there is no row with the "Not OKed" Status, it will not be possible to print unapproved Invoices.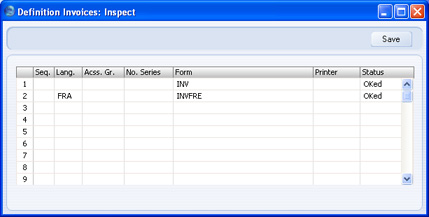
In more detail, the fields in the 'Define Document' window are as follows:
- Seq.
- Use this column if you want to print two (or more) different documents from a single command. For example, you might want to print a Delivery Note and an Invoice together. In this case, you would enter the Delivery Note with Seq. no. 1 on the first row of the grid, and the Invoice with Seq. no 2 on the second row.
- Lang.
- If necessary, enter a Language code in some or all rows. You can use 'Paste Special' (Ctrl-Enter or ⌘-Enter) to select from a list of Languages as set up in the System module. The 'Paste Special' feature is described here. You can also assign a Language to each Customer and/or Invoice. When you print an Invoice with a particular Language, the row with the same Language will determine the Form that will be used. If there is no document with the relevant Language, the first one with no Language will be used. This allows you to ensure that, for example, an English Invoice will be printed for all Customers except those who have been assigned the Language code for French, for whom a French Invoice will be printed.
- In some cases, you can also enter a Delivery Mode here, permitting different layouts to be used depending on the Delivery Mode. You can only use this feature when the record to be printed contains a Delivery Mode field (e.g. you can use it with Invoices but not with Activities or Mails).
- In some cases, you can also enter a Delivery Mode here, permitting different layouts to be used depending on the Delivery Mode. You can only use this feature when the record to be printed contains a Delivery Mode field (e.g. you can use it with Invoices but not with Activities or Mails).
- Acss. Gr.
- You can assign a particular Form to an Access Group. If you log in as a member of this Access Group, when you print the document, the system will automatically select the Form assigned to your Access Group. Use 'Paste Special' to select from a list of Access Groups as set up in the System module.
- Ser No
- You can assign a particular Form to a Number Series, so that records with numbers from that series will be printed using the assigned Form. For example, if you use different number sequences for Invoices and Credit Notes, you can use this feature to print Invoices and Credit Notes using different Forms.
- Form
- Enter the Form Code of the relevant Form in this field. This field is case sensitive: you should only use upper case characters. Use 'Paste Special' to select from a list of Forms as set up in the System module. Please refer to the description of the Form register for details about designing Forms.
- Printer
- Enter a printer code to send the printout to extra printers defined in the System module (use 'Paste Special' to obtain a selection list). Leave this field blank to use the default printer as selected in the Windows Control Panel or the Mac OS X Print & Fax System Preference.
- Status
- You can use this field to use different Forms when printing approved and unapproved records e.g. you might want to use a Form entitled "Proforma Invoice" when printing an unapproved Invoice, and a different Form entitled "Invoice" when printing an approved Invoice. In this case, enter two rows in the 'Define Document' window, one for the Proforma and one for the standard Invoice, with appropriate Status in each case. An approved Invoice is one that you have marked as OK and saved i.e. one that has been committed to the Sales and Nominal Ledgers.
- Enter one of the following values in this field, using 'Paste Special' to check the spelling is correct:
- OKed
- The specified Form will only be used when you are printing an approved record.
- Not OKed
- The specified Form will only be used when you are printing an unapproved record.
- All
- The specified Form will be used when you are printing both approved and unapproved records.
- In the 'Define Document' window for Purchase Orders, set the Status to "OKed" in every row. This will mean that Purchase Orders can only be printed if they have been approved.
- Use Access Groups to restrict access to the 'OKing Purchase Orders' Action. This will control who can approve Purchase Orders.
- Use Access Groups to give no access to the Purchase Order document to most users (i.e. set the Level to "None" for this document). These users will be able to open a Purchase Order and print it, but they will not be able to open the 'Define Document' window for Purchase Orders to change the Status to "Not OKed" or "All".
- Enter one of the following values in this field, using 'Paste Special' to check the spelling is correct:
- Seq.
- Click [Save] to save the document definition. In this example, when you print Invoices from now on, the correct Form will be selected automatically according to the Language of the Customer, without further user intervention.
You can repeat this process for almost every document as required.
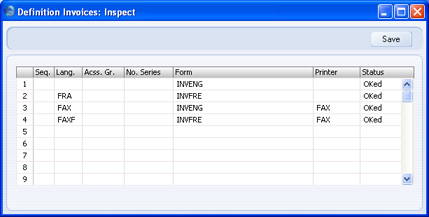
- the first row determines that Invoices with no Language will be printed using the "INVENG" Form on the default printer.
- the second row determines that Invoices with the "FRA" Language (French) will be printed using the "INVFRE" Form on the default printer.
- the third row determines that Invoices with the "FAX" Language will be printed using the "INVENG" Form on the "FAX" printer (fax machine).
- the last row determines that Invoices with the "FAXF" Language (i.e. Invoices in French that are to be faxed) will be printed using the "INVFRE" Form on the "FAX" printer (fax machine).
Individual Documents
Please click the links for details about the individual documents in the following modules:
- Assets
- Cash Book
- Contracts
- CRM
- Expenses
- Job Costing
- Nominal Ledger
- Production
- Purchase Ledger
- Purchase Order Processing
- Quotations
- Sales Ledger
- Sales Order Processing
- Service Orders
- Stock
Routines - Settings
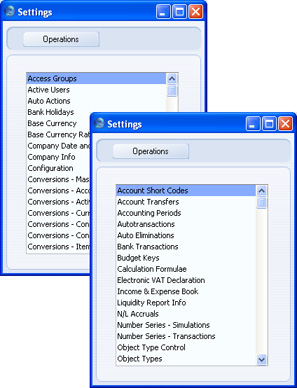
This command opens the 'Settings' list window where you will find an alphabetical list of the settings that are available. Settings allow you to tailor certain aspects of the program's operation to your requirements, and to supply information to be used throughout the program.The contents of the 'Settings' list window vary according to the module selected. The illustration below shows the different settings in the System (on the left) and Nominal Ledger modules.
Types of Setting
The settings in HansaWorld Enterprise can be divided into three groups:
- Settings of this type take the form of a single screen where you can set preferences to determine exactly how HansaWorld Enterprise is to operate in a certain situation. Examples of such settings include Account Usage S/L and P/L, Company Info and Locking.
When you open one of these settings from the 'Settings' list, you can change any of the fields as required. To save changes and close the window, click the [Save] button. To close the window without saving changes, click the close box.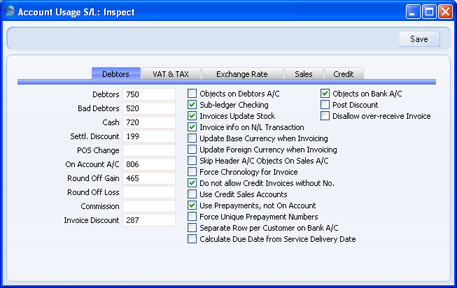
- Settings of the second type contain a number of records that are displayed in a grid. When working in one of the main registers, you may have to refer to a particular record in a setting of this type: the 'Paste Special' look-up function is provided to make this task as easy as possible. Examples of such settings include Payment Modes and VAT Codes.
When you open one of these settings from the 'Settings' list, you can change any of the fields in the existing records as required. To add new records to the list, click in any field in the first blank row and enter appropriate text. To remove a record, click on the row number on the left of the row containing the record and press the Backspace key. To insert a row, click on the row number where the insertion is to be made and press Return. To save changes to all records in the grid and close the window, click the [Save] button. To close the window without saving changes, click the close box.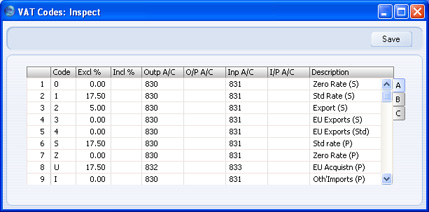
- Settings of the final type also contain a number of records, but behave in a similar manner to the main registers in that their contents are displayed in a browse window and have to be opened in a record window for editing. Again, when working in one of the main registers, you may have to refer to a particular record in a setting of this type using the 'Paste Special' look-up function. Examples of such settings include Autotransactions and Payment Terms.
When you open one of these settings from the 'Settings' list, the browse window is displayed, listing the records already entered.
Double-click an item in the list to edit it, or add a new record by clicking the [New] button in the Button Bar. Alternatively, highlight a record similar to the one you want to enter and click [Duplicate] on the Button Bar. A record window is then opened, allowing you to change the existing record or enter the new one.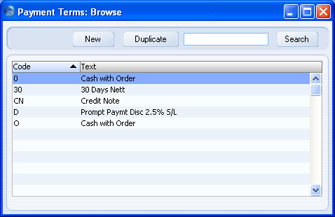
To save changes, click the [Save] button. To close the window without saving changes, click the close box. You can also close the browse window using the close box.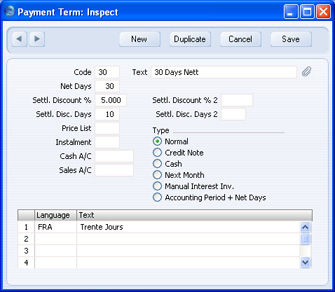
Please click the links for details about the individual settings in the following modules:
- Assets
- Cash Book
- Consolidation
- Contracts
- CRM
- Expenses
- Job Costing
- Nominal Ledger
- Production
- Purchase Ledger
- Purchase Order Processing
- Quotations
- Sales Ledger
- Sales Order Processing
- Service Orders
- Stock
- System
Routines - Exports
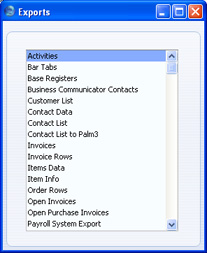
The Exports routine allows you to export information from your HansaWorld Enterprise to tab-delimited text files on your hard disk. This information is then available for use in other programs, such as word processors, spreadsheets, database programs etc. You can also import the information into other HansaWorld Enterprise databases or Companies using the 'Automatic' and 'Automatic manual file search' Import routines in the System module.To begin exporting, click the [Routines] button in the Master Control panel and then the [Exports] button in the 'Routines' window. Alternatively you can use the Ctrl-E (Windows and Linux) or ⌘-E (Mac OS X) keyboard shortcut at any time (even if the Master Control panel is hidden or closed). The 'Exports' list window is then opened, listing the Exports that you can produce from the active module. The options in this list window vary according to the active module: the majority of Exports are in the Integration module, as shown in the illustration below:
By default, text files exported from a HansaWorld Enterprise database will contain Unicode characters. You can change this by specifying a Default Export Codepage in the Local Machine setting in the User Settings module.
As well as exporting information to text files, you can also use the Exports routine to back up your HansaWorld Enterprise database. For full details of how to do this, please refer to the Backing Up page. For security reasons, the 'Company Text Backup' and 'Database Text Backup' exports do not produce text files as mentioned above but encrypted files that can only be read by another copy of HansaWorld Enterprise.
Note that you can also print all HansaWorld Enterprise reports to disk as text files. This, in combination with the Exports routine, makes it very easy to retrieve information from HansaWorld Enterprise for use with other applications.
Individual Export Functions
Please click the links for details about the individual export functions in the following modules:
- Assets
- Consolidation
- Contracts
- CRM
- Expenses
- Job Costing
- Nominal Ledger
- Purchase Ledger
- Purchase Order Processing
- Sales Ledger
- Stock
- System
Routines - Imports
The Imports routine allows you to import the contents of text files, previously saved in the proper format, into the Company you are working with. Usually, only new records will be added during the import process, and there is no danger that you will get duplicate data of any kind into your database. However, if you import a setting that is a set of fields and check boxes (e.g. the Account Usage S/L and Account Usage P/L settings), the imported setting will overwrite the existing setting.To begin importing, click the [Routines] button in the Master Control panel and then the [Imports] button in the 'Routines' window. Alternatively you can use the Ctrl-Shift-I (Windows and Linux) or ⌘-Shift-I (Mac OS X) keyboard shortcut at any time (even if the Master Control panel is hidden or closed). The 'Imports' list window is opened, where you can specify what is to be imported. The options available in the 'Imports' list window will vary, depending on the active module. Double-click the option that you need and then, when the 'Open File' dialogue box opens, locate and open the import file in the normal way.
You must save or cancel all changes before trying to import information. If you are modifying a record or setting (i.e. at least one window is open with the title 'Update'), you will be told 'Some records/blocks are locked' when you attempt to use the Imports routine.
You should use the 'Imports' function to restore your HansaWorld Enterprise database from a back-up and when updating to a new version of the program. For full details of how to do this, please refer to the Restoring from a Back-up page.
In multi-user systems, you can only use the Imports routine when you are the only user logged in.
You should also use the Imports routine to import information previously exported from another HansaWorld Enterprise database or from a text file created by another computer program. In the latter instance, you should ensure the text file is correctly formatted (contains the information in the correct order) before importing. This format information is available from your local HansaWorld representative, and can also be found in the Export/Import Format report in the Technics module.
Usually, you will use the 'Automatic' or 'Automatic manual file search' import functions in the System module to import information in this way. These functions require the following lines to appear at the beginning of the import file:
- format
- 1 46 1 0 1 44
- codepage UTF-8
- 1 46 1 0 1 44
The numbers in the second line are parameters that inform the import procedure about the contents of the import file, as follows:
- Date Order
- The first parameter tells the import procedure what date format you have used in the text file. You can use the following values:
- 0
- Month/Day/Year
- 1
- Day/Month/Year
- 2
- Year/Month/Day
- 3
- Month/Year/Day
- 4
- Day/Year/Month
- 5
- Year/Day/Month
- 6
- Hijri (Arabic)
- 7
- Persian
- Decimal Separator
- The second parameter uses ASCII codes to tell the import procedure what decimal separator you have used in the text file. Typical values are:
- 44
- comma
- 46
- full stop
- Import Mode
- Use the third parameter to specify the platform on which you created the text file, as follows:
- 0
- Mac OS X, AIX, iSeries
- 1
- Windows, Linux
- The import procedure will use the default codepage for the platform specified here for string conversion, if the fifth parameter (String Type) is 0 and if there is no "codepage" line at the beginning of the file.
- Replace Mode
- This parameter tells the import procedure what to do if information in the text file duplicates what is already in the database.
- 0
- Any duplicate information in the text file will not be imported. Records in the database will not be replaced.
- 1
- Duplicate information in the text file will be imported, overwriting existing records in the database. This applies to entire records. For example, there is an existing Customer 001 in the database with the name Customer A and Payment Terms 30 days, and in the import file Customer 001 has the name Customer AA and no Payment Terms. The import procedure will overwrite the entire record for Customer 001, so the result will be that it has the name Customer AA and no Payment Terms. Records in the database with no duplicate in the text file will not be touched.
- Note that blocks will always be overwritten with duplicate information from a text file, irrespective of whether this parameter is 0 or 1. There are two types of block: the setting that is a set of fields and check boxes (e.g. Account Usage S/L, Account Usage P/L, Locking); and the setting that is a series of rows (e.g. Payment Modes, VAT Codes).
- String Type
- Use the fifth parameter to specify the character set used in the text file:
- 0
- The text file contains characters belonging to a single character set (e.g. ASCII, KOI-8R [Russian Cyrillic], ISO-8859-1 [Western European]).
- 1
- The text file contains Unicode characters.
- If this parameter is 0 and if there is no "codepage" line at the beginning of the file, the third parameter will determine the codepage/character set.
- By default, text files exported from a HansaWorld Enterprise database will contain Unicode characters. You can change this by specifying a Default Export Codepage in the Local Machine setting in the User Settings module.
- Thousands Separator
- The sixth parameter uses ASCII codes to tell the import procedure what thousands separator you have used in the text file. Typical values are:
- 0
- no thousand separator
- 32
- space
- 44
- comma
- 45
- hyphen
- 46
- full stop
| UTF-8 | UTF-8 (Unicode) |
| ISO-8859-1 | ISO 8859-1 (Western Europe) |
| ISO-8859-4 | ISO 8859-4 (Baltic) |
| ISO-8859-5 | ISO 8859-5 (Cyrillic) |
| ISO-8859-15 | ISO 8859-15 (Western European with Euro sign) |
| US-ASCII | US ASCII |
| CP437 | DOS CP 437 (US) |
| CP850 | DOS CP 850 (Western Europe) |
| CP1250 | Windows codepage 1250 (Central Europe) |
| CP1251 | Windows codepage 1251 (Cyrillic) |
| CP1252 | Windows codepage 1252 (Western Europe) |
| CP1257 | Windows codepage 1257 (Baltic) |
| KOI8-R | KOI8-R (Cyrillic) |
| MACINTOSH | Apple Western Europe |
| ACE | Apple Central Europe |
| ACYR | Apple Cyrillic |
If you are importing Quotations, Orders, Invoices or Purchase Invoices, the import file may already contain Quotation, Order or Invoice Numbers. However, you may want new numbers to be assigned to each record as part of the import process. If so, enter "-99" in the import file in the space where each Quotation, Order or Invoice Number would otherwise appear. When each record is imported, it will be given the next number in the relevant Number Series, as if you had entered it yourself.
If you use this feature, take great care over the following two points:
- In the case of Invoices and Purchase Invoices, the Invoice Number is determined by the Transaction Date, not the Invoice Date. The Invoice Number will be the first unused number in the Number Series for the year or other period in which the Transaction Date of the Invoice falls. Quotation Numbers are determined by the Quotation Date, and Order Numbers by the Order Date. Make sure you include these dates for each record in your import file, otherwise the imported records could be placed in the wrong number sequence.
- Make sure there are sufficient unused numbers in the relevant Number Series for the number of records that will be imported. If there are not enough unused numbers in the relevant Number Series, some records will not be given numbers at all.
It is possible to have information imported to your HansaWorld Enterprise database automatically. To use this feature, follow these steps:
- Make sure there is a folder or directory named 'Import' in the folder containing the HansaWorld Enterprise application. In multi-user systems, this folder should be on the server.
- Open the Optional Features setting in the System module and choose the Autoscan Import folder option.
- Restart your HansaWorld Enterprise application. In multi-user systems, you will need to restart the server application.
If you have more than one Company, you can specify in the import file the Company into which it is to be imported. To do this, the first lines in the text file should be:
- compnr x
- format
- 1 46 1 0 1 44
- codepage UTF-8
Massive Cache
If you will be importing information regularly to your HansaWorld Enterprise database, you may find it advantageous to increase the cache size. Please refer to the 'Massive Cache' section on the Reports page for details.
Individual Import Functions
Please click the links for details about the individual import functions in the following modules:
Routines - Maintenance
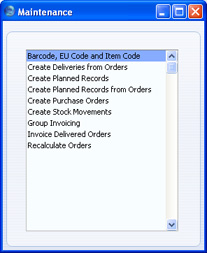
Maintenance functions allow you to carry out certain updating tasks, usually involving batch processing. Examples include creating Purchase Orders from Sales Orders, creating Invoices in batches or recalculating Price Lists.To run a Maintenance function, click the [Routines] button in the Master Control panel and then the [Maintenance] button in the 'Routines' window. A list window will appear, in which you can choose the function you need by double-clicking. The options in the list will vary, depending on the active module. Illustrated below are the Maintenance functions in the Sales Orders module:
Maintenance functions are described individually in the appropriate sections of these web pages.
Individual Maintenance Functions
Please click the links for details about the individual Maintenance functions in the following modules:
- Assets
- Cash Book
- Consolidation
- Contracts
- CRM
- E-mail and Conferences
- Job Costing
- Nominal Ledger
- Production
- Purchase Ledger
- Purchase Order Processing
- Quotations
- Sales Ledger
- Sales Order Processing
- Service Orders
- Stock
- System
Routines - Registration
Use this routine to register your copy of HansaWorld Enterprise. When you click the [Registration] button in the 'Routines' window, the 'Choose Your Country: Inspect' window described in step 2c in the 'Automatic Internet Enablers' section on the Enabler Key page opens. Please refer to that section for full details.Please click the links for more details about each routine:
HansaWorld.com
In the top right-hand corner of the Master Control panel there is a [HansaWorld.com] button:
---
In this chapter:
- Master Control panel
- Routines
- HansaWorld.com button
- Personal Desktop
- Passwords
Personal Desktop
Please click here for full details of the Personal Desktop.---
In this chapter:
- Master Control panel
- Routines
- HansaWorld.com button
- Personal Desktop
- Passwords
Passwords
You can set or change your password from the Master Control panel. Bring the Master Control panel to the front using the Ctrl-M (Windows and Linux) or ⌘-M (Mac OS X) keyboard shortcut, and then select 'Change Password' from the Operations menu. Enter the old password if there is one and then type in the new one twice to ensure that it is correct. Click [Save] to close the window and save, or [Cancel] if you do not want to save changes. The password is case-sensitive.When you first used the old password, you may have specified that you wanted HansaWorld Enterprise to remember it so that you did not have to enter it yourself each time you log in (as described in step 8 on this page). If so, the first time you use the new password, you will be asked once again if you want it to be remembered. Please refer to the description of the 'Stop Auto Login' function for more details.
In a single-user system, you can only set or change your password if a record for you already exists in the Person register (i.e. you had to log in to HansaWorld Enterprise). If this is not the case, you must create such a record first: please refer here for details.
---
In this chapter: