Introduction to Forms in the Stock Module
The 'Forms' function allows you to print particular records or documents in batches.Each separate document that you can print contains two elements, the "Form" and the "Form Template". The Form element extracts the relevant information from the database and places it in printable fields, while the Form Template is the graphic layout design of the printed output i.e. it determines where on the page the printable fields will be placed.
To begin printing, first ensure you are in the Stock module. Then, if you are using Windows or Mac OS X click the [Forms] button in the Navigation Centre or use the Ctrl-D (Windows)/⌘-D (Mac OS X) key combination. If you are using iOS or Android, tap the [Routines] button in the Navigation Centre and then tap [Forms]. A window similar to the one illustrated below appears, listing the forms that you can print from the Stock module.
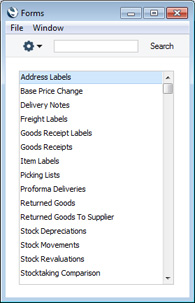
- If you are using Windows or Mac OS X, double-click the form name or highlight it and press the Enter key. If you are using iOS or Android, tap the form name. In both cases, a specification window will then appear, where you can determine the records that you want to be printed (e.g. which Delivery Notes are to be printed). The specification windows for each form are described in detail on the pages describing each form.
- Click or tap [Run] to print the forms.
- Close the 'Forms' window using the close box (Windows/Mac OS X) or by tapping < (iOS/Android).
Before you can print a form, you must connect it to a Form Template. The Form Template contains the layout of the printed output. If necessary you can connect a form to more than one Form Template: for example, you might need a particular form to be able to produce printed output in different Languages determined by the Language of the Customer.
To connect a form to a Form Template, follow this procedure, which you must carry out using Windows or Mac OS X:
- For each option, design a Form Template using the Form Template register in the System module. A file containing samples of each Form is supplied with Standard ERP: if you want to use these samples as templates for your own designs, import the "UKForms.txt" file as described on the Importing Set-up Data page.
- Change to the Stock module and open the 'Forms' list window by clicking the [Forms] button in the Navigation Centre or using the Ctrl-D/⌘-D key combination.
- Highlight each item in the list in turn and for each one select 'Define Form' from the Operations menu. In the subsequent window, assign a Form Template (or more than one Form Template) to each form. The 'Form Definition' window is fully described here.
- You only need use the 'Define Form' function once. Afterwards, Form Template selection will be automatic.
You can often print forms from a range of records, such as a range of Deliveries. To do this, enter the lowest and highest values of the range, separated by a colon. For example, to print Deliveries 001 to 010, enter "001:010" in the Delivery Number field. Depending on the field, the sort used might be alpha or numeric. In the case of an alpha sort, a range of 1:2 would also include 100, 10109, etc.
---
Please follow the links below for details about each form:
- Introduction
- Address Labels
- Base Price Change
- Delivery Notes
- Freight Labels
- Goods Receipt Labels
- Goods Receipts
- Item Labels
- Picking Lists
- Proforma Deliveries
- Returned Goods
- Returned Goods to Supplier
- Stock Depreciations
- Stock Movements
- Stock Revaluations
- Stocktaking
- and please refer here for a list of standard fields that you can include in almost every Form Template
- Home page for Stock module manual
- Home page for Standard ERP manual
Address Labels
You can print address labels per Customer or for all Customers.Double-click 'Address Labels' in the 'Documents' list and the 'Specify Address Labels' window appears:

For hints on label design, including the printing of static text (i.e. text that identifies the information on the labels, such as "Customer Name"), please follow the instructions on the page describing the Item Label document. The Form to be amended has the Code "ADDRESS_LABEL".
Base Price Change
This document provides a hard copy of any records entered to the Base Price Changes setting. You can print it for a range of records using the 'Documents' function, or for a single record by clicking the Printer icon in the 'Base Price Change: Inspect' window.When using the 'Documents' function, double-click 'Base Price Change' in the 'Documents' list and, when the 'Specify Base Price Change' window appears, enter the Number of a Base Price Change record or a range of numbers separated by a colon. Click [Run] to start printing.
Delivery Notes
There are several ways to print Delivery Notes:- While the Delivery is shown in an inspect window, click the Printer icon in the Button Bar. If you want to print to screen, click the Preview icon.
- The Delivery Note can be printed automatically when the Delivery is approved. This is controlled by the Auto Actions setting in the System module.
- With a list of Deliveries shown in the 'Deliveries: Browse' window, you can select one or more rows, and choose 'Print' from the File menu. Delivery Notes for the selected records will then be printed.
Select several rows by shift-clicking the first to the last record. This will select all records in the interval.
- In the Stock module, click [Documents] in the Master Control panel, or select 'Documents' from the File menu. Double-click 'Delivery Notes' in the 'Documents' list.
The 'Specify Delivery Notes' window is opened.
Enter a single Delivery number, or a range separated by a colon. If there are any unapproved Deliveries in the range, they will be printed using the Picking List Form instead of the Delivery Note Form. You must enter a Delivery number or a range of numbers: if you leave this field empty, no Delivery Notes will be printed.
Use the Sort Key options to choose the order in which the Delivery Notes are to be printed.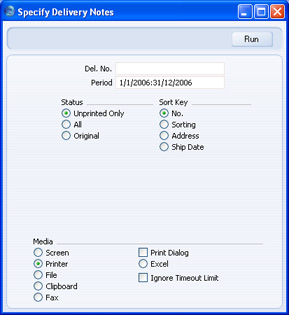
Click [Run] to start the printout.
Freight Labels
These are special freight labels that you can attach to parcels to identify a particular Delivery.Double-click 'Freight Labels' in the 'Documents' list and, when the 'Specify Freight Labels' window appears, enter a Delivery Number or a range of numbers separated by a colon. Unusually, you must specify a Delivery: you cannot leave this field blank. Click [Run] to start printing.
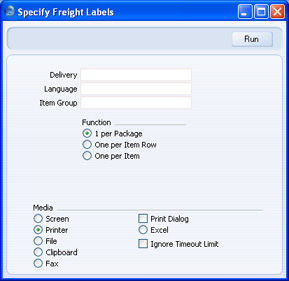
When using the One per Item Row or One per Item options, you can prevent the printing of labels for certain Items. To do so, place these Items in an Item Group whose Do Not Print Freight Labels for this Group is switched on. This is useful for Service Items such as labour.
You can also prevent Freight Labels being printed for Deliveries with particular Delivery Modes. To do this, check the Do Not Print Freight Labels option in the Delivery Mode record, using the setting in the Sales Orders module.
For hints on label design, including the printing of static text on your labels (i.e. text that identifies the information on the labels, such as "Item Name"), please follow the instructions on the page describing the Item Label document. The Form to be amended has the Code "FREIGHT_LABEL".
Goods Receipt Labels
These are labels that you can attach to parcels received, in order to identify particular shipments into stock. You can print a Goods Receipt Label for a range of Goods Receipts using the 'Documents' function, or for a single Goods Receipt using the 'Print Labels' item on the Operations menu of the 'Goods Receipt: Inspect' window.When using the 'Documents' function, double-click 'Goods Receipt Labels' in the 'Documents' list and, when the 'Specify Goods Receipt Labels' window appears, enter a Goods Receipt Number or a range of numbers separated by a colon. Unusually, you must specify a Goods Receipt Number: you cannot leave this field blank. Click [Run] to start printing.
For hints on label design, including the printing of static text on your labels (i.e. text that identifies the information on the labels, such as "Item Name"), please follow the instructions on the page describing the Item Label. The Form to be amended has the Code "PUR_LABEL".
Goods Receipts
This document provides a hard copy of any records entered to the Goods Receipt register. You can print a range of Goods Receipts using the 'Documents' function, or a single Goods Receipt by clicking the Printer icon in the 'Goods Receipt: Inspect' window.When using the 'Documents' function, double-click 'Goods Receipts' in the 'Documents' list and, when the 'Specify Goods Receipts' window appears, enter a Goods Receipt Number or a range of numbers separated by a colon. Click [Run] to start printing.
Item Labels
This document allows you to print Item Labels can be printed for affixing to item packages. Information in the label is taken from the Item register.Double-click 'Item Labels' in the 'Documents' list and the 'Specify Item Labels' window appears:

- Item
- Paste Special
Item register
- Range Reporting Alpha
- Use this field if you need to print labels for specific Items.
- Use this field if you need to print labels for specific Items.
- Item Group
- Paste Special
Item Group register, Sales Ledger
- Use this field if you need to print labels for all Items belonging to a particular Item Group.
- Labels/Item
- Specify here the number of labels that you want printed for each Item. One label per Item will be printed if this field is blank.
- Sorting
- The Labels can be sorted by Item Number or Name.
- Function
- Select the appropriate option for the label configuration being used.


If you want static text to be printed on your labels (i.e. text that identifies the information on the labels, such as "Item Name"), follow these steps:
- Click the [Field] button and draw a rectangle where you want the static text to appear. The Field dialogue box opens.
- Leave the Fieldname blank and enter the static text in the Field Argument field.

- Click [OK] to save.
- Do not use the [Text] button for this purpose: any text entered this way will be printed for the first label only.
Picking Lists
The Picking List can be used by the stock staff to prepare an Order for delivery.Double-click 'Picking Lists' in the 'Documents' list and, when the 'Specify Picking Lists' window appears, enter a Delivery Number or a range of numbers separated by a colon. Please refer to the description of the Delivery Note document for details of the other options. Click [Run] to start printing.
If you have included fields to print your telephone and/or fax number on Picking Lists, this information will be taken from the Location record. If the relevant fields in the Location are blank or the Delivery does not have a Location, it will be taken from the Company Info setting in the System module.
Proforma Deliveries
This option behaves in the same manner as 'Picking Lists', but uses its own dedicated form.Returned Goods
This document provides a hard copy of any records entered to the Returned Goods register. You can print it for a range of Returned Goods records using the 'Documents' function, or for a single Returned Goods record by clicking the Printer icon in the 'Returned Goods: Inspect' window.When using the 'Documents' function, double-click 'Returned Goods' in the 'Documents' list and, when the 'Specify Returned Goods' window appears, enter a Returned Goods Number or a range of numbers separated by a colon. Click [Run] to start printing.
Returned Goods to Supplier
This document provides a hard copy of any records entered to the Returned Goods to Supplier register. You can print it for a range of Returned Goods to Supplier records using the 'Documents' function, or for a single Returned Goods to Supplier record by clicking the Printer icon in the 'Returned Goods to Supplier: Inspect' window.When using the 'Documents' function, double-click 'Returned Goods to Supplier' in the 'Documents' list and, when the 'Specify Returned Goods to Supplier' window appears, enter a Returned Goods to Supplier Number or a range of numbers separated by a colon. Click [Run] to start printing.
Stock Depreciations
This document provides a hard copy of any records entered to the Stock Depreciation register. You can print it for a range of Stock Depreciation records using the 'Documents' function, or for a single Stock Depreciation record by clicking the Printer icon in the 'Stock Depreciation: Inspect' window.When using the 'Documents' function, double-click 'Stock Depreciations' in the 'Documents' list and, when the 'Specify Stock Depreciations' window appears, enter a Stock Depreciation Number or a range of numbers separated by a colon. Click [Run] to start printing.
Stock Movements
This document provides a hard copy of any records entered to the Stock Movement register. You can print a range of Stock Movements using the 'Documents' function, or a single Stock Movement by clicking the Printer icon in the 'Stock Movement: Inspect' window.When using the 'Documents' function, double-click 'Stock Movements' in the 'Documents' list and, when the 'Specify Stock Movements' window appears, enter a Stock Movement Number or a range of numbers separated by a colon. Click [Run] to start printing.
Stock Revaluations
This form allows you to print a hard copy of any record entered in the Stock Revaluation register.You can also print an individual Stock Revaluation by opening the record and clicking the Printer icon (Windows/Mac OS X) or selecting 'Print' from the File menu (all platforms). To print a Stock Revaluation to screen, click the Preview icon (Windows/Mac OS X only).

- No.
- Enter the Stock Revaluation Number if you wish to print a single Stock Revaluation, or a range of numbers separated by a colon (:) if you wish to print several. You must enter a Stock Revaluation number or a range of numbers: if you leave this field empty, no Stock Revaluations will be printed.
| Header Fields (these print once per Stock Revaluation) | |
| Field in Form Template | Prints (from Stock Revaluation) |
| Comment | Comment |
| Cost Account | Var. A/C |
| Delivery Date | Trans. Date |
| Location | Location |
| Object | Objects |
| Payment Number for Russia | Prints the No. of the Stock Revaluation with the first three characters removed |
| Reason | Reason |
| Reason Text | Description from the record in the Standard Problems setting for the Reason. This information will be printed on separate lines, so you should specify a Line Height for this field |
| Stock Serial Number | No. |
| Total Price (totpris) | Sum of the values in the "Sum, FIFO" row field |
| Total Quantity (totqty) | Tot. Qty |
| The following fields print information from the record in the Locations setting for the Location specified in the header of the Stock Revaluation record | |
| Field in Form Template | Prints (from Location) |
| Location Address | Address. This information will be printed on separate lines, so you should specify a Line Height for this field |
| Location Contact | Contact |
| Location Fax | Fax |
| Location Name | Name |
| Location Phone | Telephone |
| Note: use the "Location" field to print the Location itself, taken from the Location field in the Stock Revaluation. | |
| Row Fields (these print once per row, so remember to specify a Line Height and to set the Format to "Matrix") | |
| Field in Form Template | Prints (from Stock Revaluation row) |
| Cost Account, Row | Var. A/C |
| Depth per unit | Depth |
| Description 1 | Description |
| Difference | Diff. (from flip A i.e. Diff. per unit) |
| Difference Total | Diff. (from flip B i.e. total Diff. for the row) |
| FIFO | Old Cost |
| Height per unit | Height |
| Item Code | Item |
| Item Code 2 | Item |
| Location, row | Location |
| Object, row | Objects |
| Price | New Cost |
| Quantity | Qty |
| Quantity 2 | Qty * Unit Coefficient from the Item record, or Qty / Unit Coefficient from the Item record (depends on the Unit 2 Conversion Calculation options in the Stock Settings setting) |
| Row Number | Row number (only printed if a row has an Item) |
| Serial Number (serienr) | Serial No. |
| Sum, FIFO | Tot. Cost |
| Sum, Price | New Tot. Cost |
| Width per unit | Width |
| The following fields print information from the records in the Item register for the Items specified in each Invoice row. In these fields, you should specify a Line Height and set the Format to "Matrix" | |
| Field in Form Template | Prints (from Item) |
| Alternative Code | Alternative Code |
| Commodity Code | Commodity Code |
| Cost Price | Last Pur. Cost (incl. extras) |
| Item Price | Base Price |
| Price, row | Last Pur. Cost (excl. extras) |
| Purchase Value | Last Pur. Cost (excl. extras) multiplied by the Qty in the Stock Revaluation row |
| Row Sum | Last Pur. Cost (incl. extras) multiplied by the Qty in the Stock Revaluation row |
| Shelf Code (lagerplats) | Shelf Code |
| Sum, base price | Base Price multiplied by the Qty in the Stock Revaluation row |
| Unit | The Comment from the Unit assigned to the Item, or the Unit Code |
| Weighted Average | Weighted Average |
| Weighted Average Total | Weighted Average multiplied by the Qty in the Stock Revaluation row |
Please refer here for details of the standard fields that you can also include in the Form Template.
---
Forms in the Stock module:
- Introduction
- Address Labels
- Base Price Change
- Delivery Notes
- Freight Labels
- Goods Receipt Labels
- Goods Receipts
- Item Labels
- Picking Lists
- Proforma Deliveries
- Returned Goods
- Returned Goods to Supplier
- Stock Depreciations
- Stock Movements
- Stock Revaluations
- Stocktaking
- Home page for Stock module manual
- Home page for Standard ERP manual
Stocktaking
The Stocktaking document is similar to the Stocktaking Comparison report, but as it is a document you can design the printed output to meet your requirements using the Form register in the System module. Please refer to the description of the Stocktaking Comparison report for full details.