Введение
Когда ежедневная работа с HansaWorld завершена, мы советуем вам создать резервные копии. Наилучший вариант - сохранять копии файлов и хранить их в надежном месте. Может показаться, что нет необходимости в том, чтобы производить сохранение резервных копий каждый день, однако, это не занимает много времени, и послужит отличным вложением в будущее – на случай, если что-то произойдет с жестким диском.Данные резервных копий особенно важны для базы данных HansaWorld, содержащей вашу финансовую информацию. Если вы потеряете все свои данные, то можете оказаться в весьма неловкой ситуации в отсутствие всех счетов-фактуры, квитанций, отчетов и т.д. Не забывайте, каждый раз при окончании работы с вашими счетами сохранять резервные копии. Систематизируйте названия копий, указав в них дату, так чтобы можно было легко восстановить базу данных в случае необходимости.
Если на вашем компьютере появился вирус, в первую очередь вы должны попытаться определить дату заражения компьютера. В таком случае, вы должны восстанавливать данные из резервных копий, созданных до даты заражения. Иначе вы подвергнете компьютер риску повторного заражения.
Метод использования резервных копий HansaWorld является быстрым и экономичным. Данные сохраняются как резервные копии, занимающие минимальное количества места, и файлы резервных копий не зависят от версии программы. Конечно, также возможно скопировать файл базы данных, чтобы он находился на жестком диске, но это не так экономично в отношении места, занимаемого на диске, и последующее восстановление может быть неудачным, если версия приложения HansaWorld с момента создания резервных копий менялась.
! | Встроенная функция HansaWorld гарантирует успешное восстановление информации. |
Чтобы создать резервную копию, следуйте данным этапам:
- Выберите из меню модуль «Система».
- C Выберите «Экспорт» из меню файлов, или щелкнув на кнопку [Экспорт] на панели управления. Появится окно экспорта:
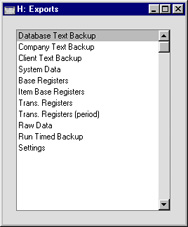
- Выберите из окна «Экспорт» функцию «Текстовая копия компании» (если вы желаете создать резервную копию в базе данных в отношении одной компании, выбранной на данной момент) или «Текстовая копия базы данных» (если вы желаете сохранить всю базу данных), и нажмите [Запуск]..
Обычно используется опция «Текстовая копия базы данных», как единственный способ выбрать сохранение резервных копий всей базы данных. Для спокойствия и надежности вы регулярно должны использовать эту опцию. Некоторые регистры и настройки (например, настройки «Конфигураций», «Почта» и «Конференции») сохраняются на уровне базы данных, а не на уровне «Компании». Такие данные не будут экспортированы при помощи опции «Текстовая копия компании», даже если ваша база данных содержит только одну компанию. Опция «Текстовая копия компании» рассчитана на использование в ситуации, когда вам необходимо переместить всю информацию по определенной компании из одной базы данных в другую.
В многопользовательской системе, «Текстовая копия базы данных» не может быть использована на оборудовании с прикладной программой. Ее можно использовать только на серверном оборудовании, когда больше никто из пользователей не подключен к системе. Вначале выберите «Выход, удалив режим автоматической загрузки сервера» из меню «Файл» и перезагрузите HansaWorld. Затем выберите модуль «Система» из меню «Модули». Если работать с сервера неудобно, используйте функцию автоматического регулярного создания резервных копий.
Если сервер не имеет графического интерфейса, вы можете использовать автоматическую функцию регулярного создания резервных копий, или создавать файлы резервных копий путем ввода в «Terminal»:
- ./hansa --backup
- Появиться окно «Определите текстовою копию». В вашем распоряжении 40 знаков для описания файла резервной копии, который вы собираетесь создать. Когда возникнет необходимость в восстановлении информации из резервной копии, это описание будет отображено в списке импортируемых файлов, чтобы помочь вам выбрать необходимый.
Введите соответствующее описание и щелкните на [Запуск].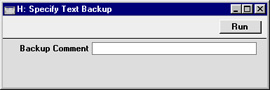
- Если вы выбрали функцию создания резервной копии всей базы данных, и у вас имеется более одной компании, вас попросят подключиться к любой, которую вы еще не использовали в данной рабочей сессии. В целях безопасности; если вы не можете подключиться ко всем компаниям, процедура создания резервных копий будет прервана.
- HansaWorld откроет окно диалога, где вы сможете назвать и определить местонахождение экспортируемого файла. Введите наименование файла в поле имени файла и определите его местонахождение в соответствующей директории обычным способом. Имя файла резервной копии должно содержать дату создания копии, однако, примите во внимание, что вы можете использовать максимум 8 знаков, если вы работаете с версией Windows NT 3. Затем щелкните на [Записать].
Рекомендуется хранить файлы резервных копий в папке или директории под названием "Backup", которая должна находится в той же самой папке или директории, что и приложение HansaWorld. Все файлы резервных копий в данной папке будут отображены в списке импортируемых файлов, если будет необходимо восстановить информацию из резервных копий.
Окно сообщения проинформирует вас о состоянии процесса экспорта.
! | Ни при каких обстоятельствах не редактируйте и не меняйте файл резервной копии при помощи другой программы. |
Text Back-ups
The "text back-up" method of backing up will copy the data in your database to a separate back-up file. You will always be able to recreate your database from such a back-up file, even if you have updated the version of your HansaWorld Enterprise application since making the back-up.To create a text back-up file, follow these steps:
- Use the [Module] button in the Master Control panel or the Ctrl-0 (zero) (Windows and Linux) or ⌘-0 (Mac OS X) keyboard shortcut to go into the System module.
- Click the [Routines] button in the Master Control panel and then [Exports]. Alternatively, use the Ctrl-E (Windows and Linux) or ⌘-E (Mac OS X) keyboard shortcut. The Exports window is shown:
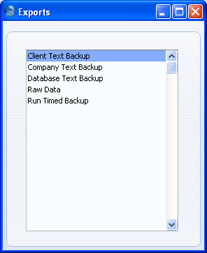
- Double-click 'Company Text Backup' (if you wish to back up the data in the database relating to the single Company currently selected) or 'Database Text Backup' (if you wish to back up the whole database) from the 'Exports' window.
Usually, you should use the 'Database Text Backup' option, as this is the only choice that backs up the entire database. You must use it regularly for your safety and peace of mind. Some registers and settings (e.g. the Configuration setting, Mailboxes and Conferences) are stored at database level, not Company level. These will not be exported by the 'Company Text Backup' option, even if your database only contains a single Company. Attachments also will not be exported by the 'Company Text Backup' option. This option is intended for use in the situation where you need to move all the information relating to a specific Company from one database to another.
In a multi-user system, you cannot use the 'Database Text Backup' option on a client machine (it will not be included in the 'Exports' list illustrated in step 2). You can only use it on the server machine, when no other user is logged in and when you access the server database using the GUI application. If it is not convenient to work from the server, use the automatic timed back-up feature from a client.
If you are using the command line server application (Mac OS X or Linux), you can use the automatic timed back-up feature from a client, or you can create a back-up file on the server by typing into the Terminal:
- ./HansaWorld --backup
If you are using the service application (Windows), you will need to place the --backup parameter in a "parameters.txt" file before launching the application, as described in the 'Launching the Server with Parameters ' section on the Loading an Existing Database and Company page. When the back-up file is complete, the application will quit (you may need to monitor the log file (named "hansa.log") to see when the application quits). Remove the --backup parameter from the "parameters.txt" file before restarting the application.
- The 'Specify Text Backup' window appears. This offers you 40 characters with which to describe the back-up file that you are about to create. If it becomes necessary to restore from a back-up, this description will be shown in the list of importable files to help you select the correct one.
Enter an appropriate description and click [Run].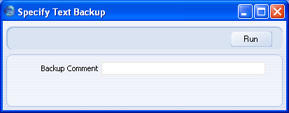
- If you have chosen to back up the whole database and you have more than one Company, you will now be asked to log in to any that you have not yet used in this work session. For reasons of security, if you are not able to log in to every Company, the back-up procedure will be halted. After logging in to every Company, return to the 'Specify Text Backup' window illustrated in step 4 to continue the backing-up procedure (the 'Specify Text Backup' window will be hidden behind the Master Control panel).
- A dialogue box will open, allowing you to name and place the export file. Enter the name of the file in the filename area and locate it in the appropriate directory in the usual way. The name of the back-up should include the date the back-up was made. For ease of importing later, it is recommended that you do not include spaces or other non-alphabetic characters in the name of your back-up file, and that you give it a .txt extension. More details are on this page. Then, click [Save].
It is recommended that you save the back-up file in a folder or directory named "Backup" which should be in the folder or directory containing the HansaWorld Enterprise application. All back-up files in this folder will be shown in a list of importable files if it becomes necessary to restore from a back-up.
A message window informs you about the progress of the export.
! | Under no circumstances should you edit or change a back-up file with another program. |
---
In this chapter:
- Introduction
- Text Back-ups
- Automatic Timed Back-ups
- Backing Up Using Specialist Back-up Software
- Database Duplication
- Journaling
- Restoring from a Back-up
- The Raw Data Export
- Updating to New Versions of HansaWorld Enterprise
Автоматическое регулярное создание резервных копий
Степень важность автоматической функции создания резервных копий не может быть преувеличена, потому что HansaWorld – как и все финансовые системы – работает с единой базой данных, в которой хранятся все ваши данные о клиентах, счетах-фактуры, финансовом регистре и т.д. Если вы теряете этот файл, пропадает не просто один документ, а вся ваша информация по счетам и клиентам.Чтобы упростить процесс сохранения резервных копий, HansaWorld предлагает функцию регулярной копии, таким образом, файл резервной копии базы данных может создаваться автоматически каждый день. Для того чтобы определить, когда должны создаваться файлы резервных копий, и где они должны храниться, следуйте описанным ниже пунктам. В многопользовательской системе, данные действия должны производиться только на серверном оборудовании.
- Выберите из меню «Модули» «Технические параметры». В многопользовательской системе, это может быть произведено только на серверном оборудовании, когда больше не подключен ни один пользователь. Для получения доступа к меню «Модули» выберите «Выход, удаляя режим автоматической загрузки сервера» из меню «Файл» и перезагрузите HansaWorld.
Если работать на сервере не удобно (например, если он не имеет графического интерфейса или находится в другом здании), вы можете работать с прикладной программы. Войдите в систему как сотрудник, имеющий доступ к модулю «Технические параметры» (контролируемый «Группами доступа»).
Если в однопользовательской системе в меню модулей отсутствуют «Технические параметры», это может быть вызвано тем, что вы не предоставили себе доступ к модулю «Сервер» в настройках «Конфигураций».
- Выберите «Настройки» из меню файлов. Двойным щелчком откройте «Регулярные операции». Появится следующее окно:
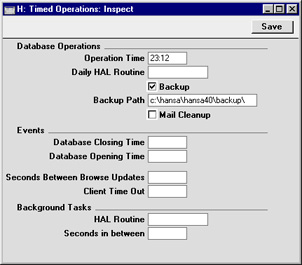
- Установите время операции (время, когда должна создаваться резервная копия) на определенное время, когда наиболее вероятно, что никто не будет использовать HansaWorld. Следует использовать 24-часовой режим времени и двоеточие ( : ), разделяющее часы и минуты. Файл резервной копии будет создаваться в определенное время, даже если в системе еще остались пользователи. Однако, эти пользователи почувствуют заметное снижение скорости операций, в то время как происходит процесс создания резервных копий. Поэтому настоятельно рекомендуется определить время вне рабочих часов, чтобы свести риск возникновения такого неудобства к минимуму.
- Установите путь для копии, определяющий, где на диске должны храниться файлы резервных копий. Если это поле пустует, файлы резервных копий будут сохраняться в папке, содержащей приложение HansaWorld.
Следующие примеры иллюстрируют правильную структуру пути для копии. Вы можете использовать либо символ «\», либо «/» в качестве знака разделения между наименованиями папок в Windows, Linux и Mac OS X, в то время как на Mac OS 9 используется символ «:». Обратите внимание, что знак разделения появляется как последний знак в указании пути.
Рекомендуется хранить файлы резервных копий в папке или директории под названием "Backup", которая должна находится в той же самой папке или директории, что и приложение HansaWorld. Все файлы резервных копий в данной папке будут отображены в списке импортируемых файлов, если будет необходимо восстановить информацию из резервных копий. В системах Windows XP, Linux и Mac OS X вы можете осуществить это, используя соответствующий путь:
- backup/
- hard disk:hansa:backup:
- Windows
- c:/samplefolder1/samplefolder2/backup/
- Mac OS 9
- hard disk:samplefolder1:samplefolder2:backup:
- Mac OS X
- /samplefolder1/samplefolder2/backup/
- Когда вы заполните функцию регулярных операций, вышеуказанным способом, файл резервной копии будет создаваться автоматически каждый день в одно и то же время. Ему будет присвоено имя «TBYYMMDD.TXT», где «YYMMDD» – это текущая дата. Файл будет содержать комментарий по резервной копии, указывающий, что она была создана функцией регулярного создания резервных копий, а также дату и время, когда это произошло.
Remote Back-ups
The timed back-up feature in Enterprise by HansaWorld means that a database text back-up file will be created automatically every day. The remote back-up feature provides additional security by ensuring an extra copy of each daily back-up file will be stored off-site on a remote server. It is always recommended that you store back-up files on more than one hard disk and in more than one location. While you can use the remote back-ups feature as a tool to help with this, you should of course keep your own copies of your back-up files and not rely solely on the remote server.
The remote back-ups feature is a chargeable cloud service provided by HansaWorld. Please refer to your local HansaWorld representative for information about pricing and for details about registering for the service.
To start using remote back-ups, follow these steps:
- Follow the instructions on the Automatic Timed Back-ups page to set up the timed back-up feature. This is necessary because whenever a back-up file is created using the timed back-up feature, it will be copied automatically to the remote server. Back-up files created using the 'Database Text Backup' option will not be copied to the remote server. In any case, the 'Database Text Backup' option cannot be used from a client machine in a multi-user system.
- Select 'System' using the [Module] button in the Master Control panel or the Ctrl-0 (zero) (Windows and Linux) or ⌘-0 (Mac OS X) keyboard shortcut.
- Click the [Settings] button in the Master Control panel or use the Ctrl-S or ⌘-S keyboard shortcut. Double-click 'Backup Settings'. The following window appears:
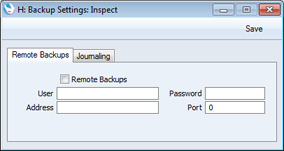
- When you register for the remote back-ups service, you will be provided with User, Password, Address and Port information. Enter that information here and check the Remote Backups box.
- Click the [Save] button in the Button Bar to save the back-up specifications.
- In a single-user system, close your Enterprise by HansaWorld database and restart. If you are working on a client in a multi-user system, ignore this step.
- After you have followed the steps above, each time a timed back-up file is created, it will first be saved on your hard disk and then uploaded to the remote server. The Job Status setting in the System module will show you the progress of the upload.
- If you need to retrieve a back-up file from the remote server, you must use a single-user database. You cannot do so from a client in a multi-user system. It is assumed that you need to retrieve the back-up file because your main system has become damaged or lost.
To create a new single-user database, place your Enterprise by HansaWorld application and "hob" folder in a new folder together with the "dbdef.txt" and "default.txt" files and launch the application. When the 'Welcome to HansaWorld' window appears, click the [Single User Database] button and follow the instructions on the Creating a New Database - Single-user page.
- Enter your details in the Backup Settings setting as described in steps 4-6 above.
- Open the Remote Backups setting in the System module. The 'Remote Backups' window will open, listing the back-up files that are on the remote server:
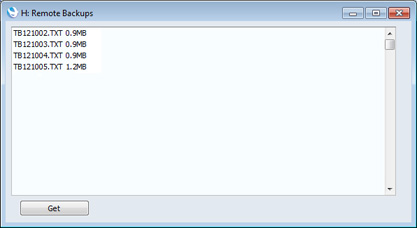
- Click on the most recent back-up file (or the most recent back-up file that you know is undamaged) and click the [Get] button. The back-up file will be downloaded to your computer, to a folder named "Downloads" that will be inside the folder or directory containing your Enterprise by HansaWorld application. You can monitor the progress of the download using the Job Status setting, as mentioned in step 7.
- Please refer to the Restoring from a Back-up page for details about recreating your database from the back-up file.
In this chapter:
- Introduction
- Text Back-ups
- Automatic Timed Back-ups
- Remote Back-ups
- Backing Up Using Specialist Back-up Software
- Database Duplication
- Journaling
- Restoring from a Back-up
- The Raw Data Export
- Updating to New Versions of Enterprise by HansaWorld
- Home page for Introduction and Installation manual
- Home page for Enterprise by HansaWorld manual
Создание рез.копии, используя спец. программное обеспечение
Как описано здесь, мы настоятельно рекомендуем использовать в качестве основной части создания резервных копий встроенные функции резервных копий HansaWorld. Они более экономичны в отношении места на диске и более надежны в плане успешного восстановления, гарантируемого даже если изменена версия HansaWorld.
Тем не менее, возможно, некоторые пользователи предпочтут специализированное программное обеспечение для создания резервных копий, такое как Retrospect. При использовании такого программного обеспечения иногда возникают проблемы в создании файлов резервных копий, если файлы находятся в использовании. Например, если пользователь ушел домой, забыв выйти из системы (или оставив оборудование в процессе создания отчета), создание резервной копии, может произойти неудачно.
Для таких ситуаций в HansaWorld должна находится инструкция по изменению состояния базы данных на не находящееся в использовании, при создании резервных копий. Чтобы осуществить это, произведите следующие действия:
- Выберите «Технические параметры» из меню модулей, а затем выберите «Настройки» из меню файлов.
- Двойным щелчком откройте «Регулярные операции». Появится следующее окно:
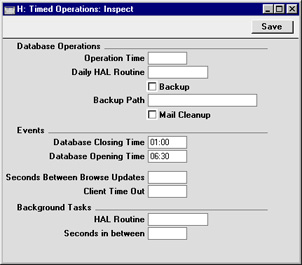
- Установите «Время закрытия БД» (базы данных) за несколько минут до момента установленного начала запуска программного обеспечения по созданию резервных копий. Следует использовать 24-часовой режим времени и двоеточие ( : ), разделяющее часы и минуты.
- Установите «Время открытия БД» на несколько минут позже момента установленного завершения работы программного обеспечения резервных копий.
- Если вы также определили «время операции», оно не должно находится между временем открытия и закрытия базы данных. База данных не используется в течение этого периода, поэтому «время операции» никак не подействует.
- Щелкните на кнопку [Записать], чтобы сохранить изменения.
Database Duplication
In some circumstances, it may not be practical to create text back-up files every day using either the back-up facilities built in HansaWorld Enterprise or specialist back-up software. If the database is very large and/or 24-hour access is required, it may not be convenient to slow the speed of operation or to prevent users logging in altogether while back-up files are created. In this situation you can use the database duplication feature to create copies of the database file (the "HANSA.HDB" file) automatically.
Remember that you will no longer be able to use an old "HANSA.HDB" file if you have updated the version of your HansaWorld Enterprise application. Therefore, while database duplication can play an important role in your back-up routine, you must still create a text back-up when you are about to update to a new version, and if you want to create an archive copy of your database that you want to be able to read in the future. Updating is described here. You can of course use a script to move the duplicate database to another machine, rename it "HANSA.HDB", start the command line server application and create a text back-up. To create a true back-up, the script should also move the other contents of the folder containing your HansaWorld Enterprise application, especially the "Attach" folder.
If you are using journaling, you must do so in combination with the database duplication feature.
The database duplication feature will create a copy of your database and store it in the folder containing your HansaWorld Enterprise application. This process will result in the following files being created:
- While the first copy is being created, the file will be named "HANSA.HDB.TEMP".
- When the copy is complete, the file will be renamed "HANSA.HDB.COPY".
- When the second copy begins, a second file named "HANSA.HDB.TEMP" will be created.
- When the second copy is complete, the file will be renamed "HANSA.HDB.COPY". The previous "HANSA.HDB.COPY" will be renamed "HANSA.HDB.OLD". If there already is a "HANSA.HDB.OLD", it will be deleted.
Follow these steps to configure the database duplication feature:
- Select 'Technics' using the [Module] button in the Master Control panel or the Ctrl-0 (zero) (Windows and Linux) or ⌘-0 (Mac OS X) keyboard shortcut. Then, click the [Settings] button in the Master Control panel or use the Ctrl-S or ⌘-S keyboard shortcut.
- Double-click 'Timed Operations'. The following window appears:
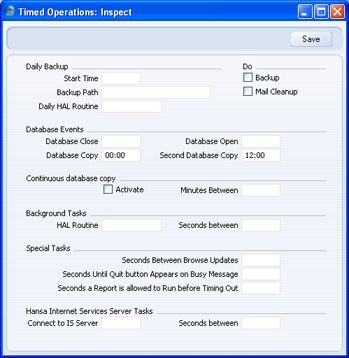
- Enter in the Database Copy field the time when you want the database to be copied. Use the 24-hour clock, and place a colon (:) between the hour and the minute. If you would like the database to be copied twice a day, enter the second time in the Second Database Copy field (this must be later than the first copy time).
If you are also using the Backup option to create a daily text back-up, make sure the text back-up is created at a different time to the copy. They should not be created at the same time.
- If two copies a day are not enough, use the Continuous Database Copy feature. Check the Activate box and enter the number of minutes between copies. This is the number of minutes between the moment the last copy finished and the beginning of the next copy.

- Click the [Save] button in the Button Bar to save the changes. If you activated the Continuous Database Copy feature, the first copy will begin immediately.
To change the database copy speed, open the Optional Features setting in the System module and go to the 'Performance' card:
The database duplication feature creates a duplicate database by copying one section of the database at a time. Each section is known as a "buffer". In this example, we have specified a buffer size (size of each copied section) of 262144 bytes (256k) and a delay of 15000 microseconds between the end of one buffer and the beginning of the next. This will give a copy speed of about 16.7 Mb per second (58.6 Gb per hour). To calculate the copy speed, divide the buffer size in Mb (0.25 in this example) by the delay in seconds (0.015). The result (in this case, 16.7 MB per second) will be a theoretical maximum, which you should then reduce to allow for the time to copy the buffer (this time will be hardware dependent).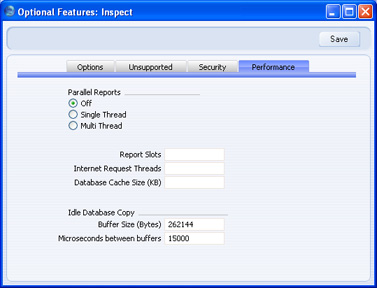
---
In this chapter:
- Introduction
- Text Back-ups
- Automatic Timed Back-ups
- Backing Up Using Specialist Back-up Software
- Database Duplication
- Journaling
- Restoring from a Back-up
- The Raw Data Export
- Updating to New Versions of HansaWorld Enterprise
Journaling
A busy system where many users are constantly saving large numbers of records can cause problems for a back-up strategy that relies on a text back-up file being created once a day and/or on copying the database twice a day. The volume of new records means that the text back-up file or database copy quickly becomes out-of-date. If you need to revert to a back-up, it will be difficult and time-consuming if not impossible to recreate the records entered since the text back-up or database copy was made. The journaling feature is designed to address this problem. If you are using this feature, every new record and every modification will be saved in the database and in a separate journal file. If you need to revert to an older copy of the database, you will be able to "apply" the journal. "Applying" the journal means importing the recent new records and modifications to the older copy of the database from the journal file. This will be much faster and more complete than recreating the recent records manually, or extracting them from the damaged database.You must use the journal feature together with the database duplication feature. If your database becomes damaged, you should revert to the most recent (undamaged) duplicate and apply the journal. It is not possible to revert to a text back-up and apply the journal. Therefore, if you are using journaling, you must make sure you are duplicating the database regularly. The text back-up will play a much less important role in your back-up strategy.
The journal file will grow in size very quickly, especially if you import large amounts of data while journaling is running. Therefore, you must take special care to monitor the level of free hard disk on the server if you are using this feature.
---
In this section:
- Introduction to Journaling
- Starting Journaling
- Applying the Journal
- Managing Journal Files
- Introduction to Backing Up
- Text Back-ups
- Automatic Timed Back-ups
- Backing Up Using Specialist Back-up Software
- Database Duplication
- Restoring from a Back-up
- The Raw Data Export
- Updating to New Versions of HansaWorld Enterprise
Journaling - Starting Journaling
- You can start the journal feature using one of two methods:
- Launch the command line application on the server by typing:
- ./HansaWorld --start-journaling &
- Starts the HansaWorld Enterprise server application and marks the database as journaled. A new folder named "journal" will be created in the folder containing the HansaWorld Enterprise server application, and in that folder a journal file named "J0000001.HJN" will be created.
- If the server is already running and you don't want to restart it, log in from a client, change to the System module and open the Journaling setting:
Click the [Start Journaling] button. A new folder named "journal" will be created in the folder containing the HansaWorld Enterprise server application, and a journal file named "J0000001.HJN" will be created in that folder.
You can also use the Journaling setting to start journaling in a single-user system.
- Launch the command line application on the server by typing:
- Referring to the Database Duplication page, establish a regular database duplication routine. If you need to revert to an old database, you must do so to one that was created after you started journaling. You cannot revert to a text back-up.
- Log on from clients in the usual way and begin work. Every change will be saved in the database and in the "J0000001.HJN" file.
- The next time you launch the command line or service application on the server, do so in the usual way (i.e. there is no need to use the --start-journaling parameter again). A message will be shown in the Terminal (Mac OS X and Linux) and in the log file as a reminder that journaling is in operation. You can also monitor this from a client by referring to the Journaling setting in the System module.
!
Never move, edit or rename the journal file or the "journal" folder. Make a copy of the journal file if you want to back it up.
- If you need to update to a new version of HansaWorld Enterprise, you must do so by creating a text back-up from the old version, creating a new database using the new version and importing the text back-up. Full details are on the Updating to New Versions of HansaWorld Enterprise page. A side effect of importing a text back-up will be that journaling will be switched off. Therefore, after updating you must restart journaling as described above in steps 1-3 above. Before doing so, make sure that the "journal" folder in the folder containing the HansaWorld Enterprise server application is empty or removed altogether.
In this section:
- Introduction to Journaling
- Starting Journaling
- Applying the Journal
- Managing Journal Files
- Introduction to Backing Up
- Text Back-ups
- Automatic Timed Back-ups
- Backing Up Using Specialist Back-up Software
- Database Duplication
- Restoring from a Back-up
- The Raw Data Export
- Updating to New Versions of HansaWorld Enterprise
Journaling - Applying the Journal
If you need to revert to an old database, follow these steps:- The old database must be one that was created after you started journaling. If you are using the database duplication feature, the most recent database copy will be named "HANSA.HDB.COPY".
Before reverting to this old database, you may wish to check that it does not contain the damage that caused you to revert to it. You must carry out this check using a copy of the "HANSA.HDB.COPY" file and a copy of the "J0000001.HJN" journal file. If you use the "HANSA.HDB.COPY" file itself for this check, you will no longer be able to apply the journal successfully because you will break the synchronicity between the database and the journal. You must not even open the "HANSA.HDB.COPY" file or log in to it, let alone save any records before applying the journal.
To carry out this check, place a copy of the "HANSA.HDB.COPY" database in the folder containing the HansaWorld Enterprise server application and ensure it is named "HANSA.HDB". As this database was created after you started journaling, a "J0000001.HJN" journal file must be present in the "journal" folder when testing. This must be a copy of the journal file, because anything that you save when testing will be added to this file.
!
Make sure you have an untouched "HANSA.HDB" file and journal file at all times.
- When you are sure that the "HANSA.HDB.COPY" file does not contain any damage, place it in the folder containing the HansaWorld Enterprise server application and ensure it is named "HANSA.HDB". Remember that this must be a database that is untouched by any testing. Similarly, the "J0000001.HJN" journal file in the "journal" folder must also be one untouched by any testing. It is recommended that you keep copies of both files, at least until you are sure the journal has been applied successfully, in case of a power failure or hardware problem occurring while the journal is being applied. Then, launch the command line application on the server by typing:
- ./HansaWorld --apply-journal &
- Starts the HansaWorld Enterprise server application and imports everything in the journal file that is not already in the database. The application will then quit.
!
You must apply the journal immediately after reverting to the copy. If you open the copy and allow users to log in before applying the journal, the data in both the database and the journal file will be corrupted.
- Restart the command line or service application in the usual way. After logging on from clients, every change will, as before, be saved in the database and in the “J0000001.HJN” file.
In this section:
- Introduction to Journaling
- Starting Journaling
- Applying the Journal
- Managing Journal Files
- Introduction to Backing Up
- Text Back-ups
- Automatic Timed Back-ups
- Backing Up Using Specialist Back-up Software
- Database Duplication
- Restoring from a Back-up
- The Raw Data Export
- Updating to New Versions of HansaWorld Enterprise
Journaling - Managing Journal Files
In a busy system with many users, it is likely that the journal file will grow in size very quickly. To prevent journal files becoming too large, you can use the Journaling setting in the System module to create new journal files periodically. Large journal files, as well as being cumbersome, will increase the time required to apply the journal.To create a new journal file, first open the Journaling setting. The journal file(s) that are currently in the "journal" folder will be listed on the right. In this example, we are still using the first journal file "J0000001.HJN":
Then, click the [New Journal File] button. This will create a new journal file (in this example, named "J0000002.HJN") and save it in the "journal" folder. It will also be listed in the 'Journaling' window: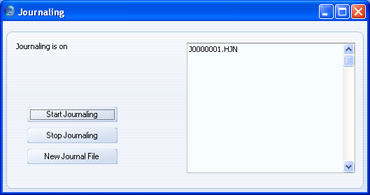
All changes made in the database will now be saved in the new journal file. If you need to revert to an old database, everything in both journal files that is not already in the database will be imported when you apply the journal.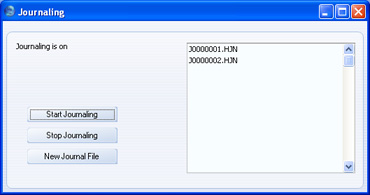
It may be that you establish a routine for creating new journal files, for example creating a new one once a week. As you will also be duplicating your database regularly, such a routine will allow you to discard the older journal files, thus ensuring that they do not take up too much hard disk space. The older journal files will become redundant because the work they contain will also be stored in the more recent duplicate databases. But careful management is required, to ensure that you can combine each duplicate database with the required journal files. For example, let us assume you have the following journal files:
If you need to revert to an old database, it must be one created after your oldest journal file. For example, to revert to the database created on July 10, you only need ensure that "J0000006.HJN" and "J0000007.HJN" are present in the "journal" folder when you apply the journal. Only these two journal files will contain work that is not in the database copy, so only these two files are needed to bring that copy up-to-date. The older journal files will do no harm if they are also present, but they are not necessary.Journal File Date Created J0000001.HJN June 1 J0000002.HJN June 8 J0000003.HJN June 15 J0000004.HJN June 22 J0000005.HJN June 29 J0000006.HJN July 5 J0000007.HJN July 12 If the most recent database copy is from July 5, a date on which a new journal file was created, you should assume that "J0000005.HJN" will also be required when you apply the journal, because this may be the "current" journal file for that database. The "current" journal file is the one in which the last record was stored. When you create "J0000006.HJN", "J0000005.HJN" will remain the "current" journal file for the brief period until the next record is saved. This will be saved in "J0000006.HJN", which will then become the "current" journal file. If the database copy was made in the brief period before that record was saved, then "J0000005.HJN" will still be the "current" journal file in that database and so must be present in the "journal" folder when you apply the journal.
When you apply the journal, a message stating that "Current journal file not last file in journal folder J0000XXX.HJN" will be shown in the Terminal (Mac OS X and Linux) and in the log. In this message, "J0000XXX.HJN" is the "current" journal file for the database copy i.e. the earliest journal file that must be present in the "journal" folder. In the example, if you are reverting to a database copy created on July 10, this will be "J0000006.HJN". If "J0000006.HJN" is present in the "journal" folder, the journal will be applied. If it is not present, the journal will not be applied, and the Terminal and log will contain further messages, including "hole detected in journal". You should place "J0000006.HJN" in the "journal" folder and re-apply the journal.
The latest possible version of each journal file must be present in the "journal" folder when you apply the journal. As already mentioned, in the example, if you are reverting to a database copy created on July 10, you will need "J0000006.HJN" and "J0000007.HJN". This means the final version of "J0000006.HJN" as it was on July 12 at the moment that you created "J0000007.HJN", not any copy that you may have created on July 10 at the time of copying the database. A July 10 copy of "J0000006.HJN" will not be complete.
---
In this section:
- Introduction to Journaling
- Starting Journaling
- Applying the Journal
- Managing Journal Files
- Introduction to Backing Up
- Text Back-ups
- Automatic Timed Back-ups
- Backing Up Using Specialist Back-up Software
- Database Duplication
- Restoring from a Back-up
- The Raw Data Export
- Updating to New Versions of HansaWorld Enterprise
Восстановление по резервным копиям
Чтобы восстановить информацию по резервным копиям, в первую очередь необходимо создать новую базу данных. Затем импортировать файл резервной копии, используя функцию «Импорт» из меню «Файл» в модуле «Система».
Перемещение резервного файла является безопасным процессом, т.е. файл резервной копии не повреждается от процесса чтения. Это означает, что вы можете использовать один и тот же файл резервной копии более одного раза.
FВ целях сохранения скорости процесса, в многопользовательских установках рекомендуется производить восстановление по резервным копиям на серверном оборудовании. Если это невозможно, должна использоваться одна прикладная программа. Если у вас имеются отдельные файлы резервных копий для разных компаний, они должны быть импортированы индивидуально. Если вы будете пытаться импортировать их одновременно, используя другую прикладную программу, данные могут быть утеряны.
- Переместите старую базу данных («Hansa.HDB») в другую папку/директорию, чтобы избежать путаницы. Измените ее имя так, чтобы вы знали, что в ней находится.
- Удалите файл базы данных «Hansa.HDB» из папки или директории с приложением HansaWorld. Два раза щелкните на приложение HansaWorld, чтобы создалась новая база данных, как описано здесь.
!
Очень важно произвести восстановление в новую, пустую базу данных, чтобы избежать путаницы между восстановленными данными и старой поврежденной базой данных.
Файлы «DBDef.txt» и «Default.txt» всегда должны находится в той же директории/папке, что и приложение HansaWorld. Они содержат важную информацию, используемую при установке новой базы данных и создании новых компаний. Если данный файл отсутствует, возможно, приложение HansaWorld не будет работать должным образом!
- Как часть процесса создания новой базы данных, представлен список файлов резервных копий. Для того, чтобы быть представленными в данном списке, файлы резервных копий должны храниться в папке или директории «Backup» или «Setup», которые должны находится в той же самой папке или директории, что и приложение HansaWorld.
В данном списке, имя каждого файла резервной копии отображается вместе с датой создания и любым описание, добавленным при создании (см. этап 4 на данной странице).

- Выделите файл, который вы хотите импортировать (резервная копия, которую вы хотите использовать) и нажмите кнопку [Enter] ([Ввод]) (или же щелкните два раза на имя файла). Данные резервных копий будут импортированы. Окно сообщения проинформирует вас о состоянии процесса импорта. В целях безопасности, по завершению импорта, если файл резервной копии содержит хотя бы одну запись в регистре «Сотрудники», программа закроется. Перезагрузите программу и введите ключ базы данных в настройки доступа: затем вы сможете продолжить работу.
- Закройте список файлов, доступных для импорта, если он все еще открыт.
- В модуле «Система», выберите «Импорт» из меню файлов. Окно «Импорт» показано ниже:
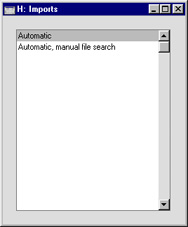
- Выберите «Ручной поиск файлов» и нажмите кнопку [Enter] (или два раза щелкните на «Ручной поиск файлов»).
В большинстве операционных систем HansaWorld откроет стандартное окно диалога, в котором будет находится список файлов в текущей папке текущего тома. Чтобы найти файл резервной копии, просмотрите список или выберите другую папку или том обычным способом.
В некоторых операционных системах (например Macintosh OS X) HansaWorld использует свое собственное окно диалога: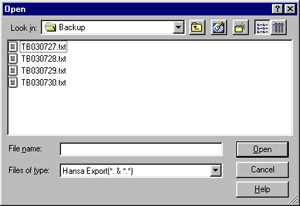
Когда впервые открывается окно диалога, главная часть окна отображает содержание папки, в которой находится приложение HansaWorld. Имя папки отображено в угловых скобках <>. При двойном щелчке на имя папки, появится ее содержимое. При двойном щелчке на первую единицу в списке - (..) – вы переместитесь на один уровень выше. Нажмите кнопку [Desktop] для перемещения на рабочий стол, и кнопку [Backup], чтобы войти в папку резервных копий, находящихся внутри папки, содержащей приложение HansaWorld. Данные действия проиллюстрированы выше.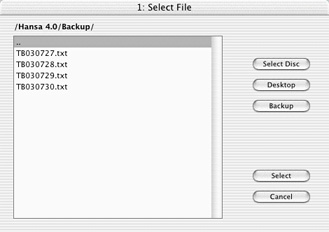
- Как только вы нашли файл, который желаете импортировать (резервную копию, которую вы хотите использовать), выделите его и щелкните на [Open] или [Select] (в зависимости от операционной системы), или два раза щелкните на имя файла.
Окно сообщения проинформирует вас о состоянии процесса импорта.
The Raw Data Export
If your database somehow becomes damaged while you are using it, you will be prompted to create a Raw Data export. You should do so, using the Raw Data Export function in the System module or, if you are working on the server, by launching the server application with the --rawdata parameter. The Raw Data option exports data in byte order, while the Database Text Backup option exports data in record order, on a register-by-register basis. When a database is damaged, the Raw Data option may create an export file where the Database Text Backup option fails.If you need to revert to a back-up, you should do so in this order of priority:
- If you are using journaling, you should revert to the most recent undamaged copy of the database and apply the journal.
- If you are not using journaling, but you are regularly duplicating your database, you should revert to the most recent undamaged copy of the database and recreate the data entered since the duplicate was made.
- If you are not using journaling or database duplication, you should revert to the most recent text back-up of the database that does not contain any damage and recreate the data entered since the duplicate was made.
Do not under any circumstances regard the file created by the Raw Data export as a means of successfully rebuilding your database. Restoration from a Raw Data file is extremely unlikely to produce a useable database. At the very best, use a Raw Data file as a reference to help recreate the data entered since the last successful back-up, as mentioned in points ii and iii above. Due to the method used to create the Raw Data file, and due to the fact that a Raw Data file will be created from a damaged database, it will not contain any user passwords, it is likely that many settings will be missing, it probably will not contain any user accounts, and many records may be missing or incomplete. For example, many records may be missing from the Contact or Transaction registers, and data may be missing from hidden fields in stock transactions, making it impossible to rebuild stock or obtain an accurate stock valuation.
If you need to create a test database from a Raw Data file for use as a reference, use the GUI application to follow these steps:
- Make sure the folder or directory containing your HansaWorld Enterprise application does not contain a "HANSA.HDB" file and launch the application.
- When the 'Welcome to HansaWorld' window appears, click the [Master Database] or [Single User Database] button as appropriate. Follow the instructions on the Creating a New Database - Server or the Creating a New Database - Single-user pages respectively.
- Referring to the 'Single-user' section on the Changing and Adding Companies page, create all the Companies as they were in the damaged database (in particular, the Codes must be the same as they were in the damaged database).
- Create all Fiscal Years exactly as they were in the damaged database (in every Company).
- In every Company, configure the Company Date and Numeric Format setting in the System module as follows:
- Date Order
- Month, Day, Year
- All three check boxes
- ticked
- Date separator
- / or -
- Decimal separator
- . (a single full stop, not a comma)
- Thousand separator
- space (one single space)
- Ensure you are in the System module and use the Ctrl-Shift-I/⌘-Shift-I keyboard shortcut to open the 'Imports' window. Choose one of the options depending on where the Raw Data file is located and import it.
If the Raw Data file is large, you may prefer to use the command line (Linux or Mac OS X) or service (Windows) application for this step, as the speed benefit will be significant.
- Even if the Raw Data file is imported successfully, the database will not be useable because no indexes will be created. Therefore, you must immediately create a Database Text Backup and import that file to a new database. This will ensure the data is properly indexed. Again, you may prefer to use the command line (Linux or Mac OS X) or service (Windows) application to import the file.
- As mentioned in the introduction to this section, restoration from a Raw Data file will usually result in an incomplete database. You should only regard it as a test database that will help you with the process of re-entering information to the new "live" database. You may be able to do this by exporting from the test database using the relevant Export routine in the Integration module. The Transaction Registers Export will be particularly useful, as it allows you to export a specified range of records from every Sub System. If there is no suitable Export routine for the information that is missing from the new "live" database, use the test system as a guide enter the data manually to the new "live" database.
---!
Never build a "live" database from a Raw Data file!
In this chapter:
- Introduction
- Text Back-ups
- Automatic Timed Back-ups
- Backing Up Using Specialist Back-up Software
- Database Duplication
- Journaling
- Restoring from a Back-up
- The Raw Data Export
- Updating to New Versions of HansaWorld Enterprise
Обновление предыдущих версий HansaWorld
Последняя версия HansaWorld всегда доступна на сайте www.hansaworld.com, откуда должны производиться все обновления. Если вы подключены к сети, щелкнув на кнопку [HansaWorld.com] на панели управления, вы окажетесь на данном сайте.
Новые версии неизменно подвергаются значительным структурным изменениям. Поэтому, существует возможность того, что новая версия не сможет открыть базу данных, созданную предыдущими версиями, если не используется функция экспорта и импорта.
Для того, чтобы произвести обновление, осуществите следующие этапы:
- Перед установкой новой базы данных создайте резервную копию базы данных, как вы делаете обычно, используя старую версию приложения.
- Загрузите новую версию HansaWorld и установите ее в новой папке или директории.
- Убедитесь, что в новой папке или директории присутствуют файлы «DBDef.txt» и «Default.txt», но нет файла «Hansa.HDB». Также убедитесь, что она содержит папку или директорию с именем «Backup», которая, в свою очередь, содержит файл резервной копии, созданный в 1-ом этапе, и что имя этого файла соответствует DOS соглашению по присвоению имен.
- Скопируйте следующие папки и их содержимое из старой папки HansaWorld в новую: «Attach», «Halcust», «Shared», «Tmp», «Web» и «Webcust». Возможно, всех указанных папок не будет в вашей установке. Если это так, скопируйте те, которые у вас есть, и не беспокойтесь о тех, которые отсутствуют. НЕ копируйте папку «Hob».
- Запустите новое приложение HansaWorld. Создана новая база данных.
- Импортируйте резервную копию, созданную предыдущей версией HansaWorld, используя процедуру, описанную на странице «Восстановление по резервным копиям».
В целях сохранения скорости процесса, в многопользовательских установках рекомендуется производить создание резервных копий, восстановление и обновление на серверном оборудовании. Если это невозможно, должна использоваться одна прикладная программа. Если у вас имеются отдельные файлы резервных копий для разных компаний, они должны быть импортированы индивидуально. Если вы будете пытаться импортировать их одновременно, используя другую прикладную программу, данные могут быть утеряны.
- Теперь, в многопользовательских установках, новое приложение HansaWorld должно быть установлено на всем оборудовании с прикладной программой. Повторите этапы 2, 3, 4 и 5 для каждой прикладной программы. Если у вас имеются какие-либо текстовые файлы копий прикладных программ, они должны быть импортированы в новую базу данных на соответствующем оборудовании, как при вышеуказанном этапе 6.
Updating to New Versions of Enterprise by HansaWorld - Updating Clients Automatically
When you update to a new version of Enterprise by HansaWorld, you should ensure that you are update to the same new version on the server and on all client machines. If you have many client machines in your network, updating them manually can be a laborious job. To make this task easier, you can use the auto update feature that will cause the version on the client machines to be updated automatically the next time they connect to the server.
To configure the auto update feature, follow these steps:
- By default, the auto update feature will transfer the new client applications through port 80 on the server. Opening this port might be undesirable and also requires superuser privilege in many systems. If you want to use a different port, create a text file named "serverip.dat" that contains the server's IP address and Web Port in the following format, on a single line:
- IP address:port
You can find the server's Web Port by opening the Program Mode register in the Technics module and going to the 'Web' card. If you need to specify a Web Port on the server or change the one that is there, you will need to restart the server for the change to take effect.
- Place the "serverip.dat" file in the "Hob" folders on every client.
- Set up a new Enterprise by HansaWorld installation on a client machine, with no database (no .hdb file). Create a folder or directory named "clientmp" and place it in the folder containing the Enterprise by HansaWorld application.
- Inside "clientmp", create one sub-folder or sub-directory for each client platform that you need, as follows:
This feature is not supported on Windows 7 clients.Folder For Client Application Name books Books Mac Books.app hansaraamaosx HansaRaama Mac (only used in Estonia) HansaRaama.app hansaraamawin HansaRaama Windows (only used in Estonia) HansaRaama.EXE hansaraamawindowsnet HansaRaama Windows .Net (only used in Estonia) HansaRaama.EXE linuxxt Linux XT HansaWorld linuxwine Linux Wine HansaWorld.EXE macosx Mac OS X Cocoa HansaWorld.app win98 Windows 98/NT HansaWorld.EXE wince Windows CE HansaWorld.EXE windows Windows 2000/XP HansaWorld.EXE windowsnet Windows .Net HansaWorld.EXE
- Copy the following files into the sub-folders or sub-directories from step 4:
- The "DBDEF.TXT" and "DEFAULT.TXT" files;
- The new version of the relevant Enterprise by HansaWorld application for the operating system. This must be named as shown in the list in step 4 (the names are case-sensitive). Depending on how you have configured your operating system, the file extensions may not be visible.
- The new "Hob" folder (which should contain the "serverip.dat" file from step 1, as this will ensure you don't need to repeat step 1 each time you update); and
- (optionally) a file named "AUTOUPDATEIMPORT.TXT", which can contain information that will be imported to each client database.
- The "windowsnet" folder should also contain the following files: "Boo.HtmlEditor.Shared.dll", "ColorPicker.dll" and "HtmlAgilityPack.dll".
- The "DBDEF.TXT" and "DEFAULT.TXT" files;
- Create a folder or directory named "clients" in the folder containing the Enterprise by HansaWorld application that you are using.
- Start the Enterprise by HansaWorld application, change to the Database Maintenance module. To gain access to the Database Maintenance module, grant yourself full access to it in your Access Group and log in again.
Run the 'Create Autoupdate Clients' Maintenance function:
Tick the Client options that you need (each option should have its own folder as listed in step 4), specify the Folder (if different to step 6) and click the [Run] button.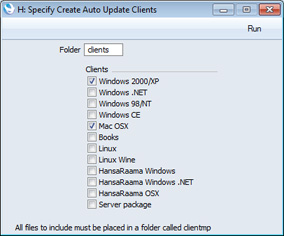
The Maintenance function will create separate .ha files for each Client options, saving them in the "clients" folder (for example, "windows.ha", "windowsnet.ha" and "macosx.ha").
- On the server machine, create a folder or directory named "web" in the folder containing the Enterprise by HansaWorld server application.
- Copy the entire "clients" folder (containing the .ha files) into the "web" folder created in the previous step.
- Update your Enterprise by HansaWorld server application to the new version as described here, and then launch this application as normal.
- Log in from a client using the new version and change to the Technics module. To do this, you should be working on a client and you should have logged in as a system administrator (i.e. as a Person that has access to the Technics module) as described here.
Open the Available Client Version setting in the Technics module:
Enter the version number of the server application in one or both of the fields. When a client logs in using a version that is earlier than the one specified in these fields, the client will be asked to update. If the client version is earlier than the Minimum Client Version, the update will be mandatory. If the client version is earlier than the Available Client Version, the update will not be mandatory.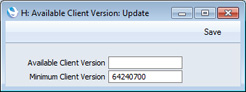
In most cases, it is recommended that you make updates mandatory, as shown in the illustration. This will ensure that all client machines are using the same version.
If the new version contains structural changes compared to the old, the update will be set as mandatory automatically, irrespective of the field that you use in this setting.
The version number of the server will be shown in the Terminal window when you launch the server and will be written to the log file at the same time.
- On a client machine, launch the old Enterprise by HansaWorld client application.
- After choosing the company, you will be told that a newer client is available, and whether the update is mandatory:
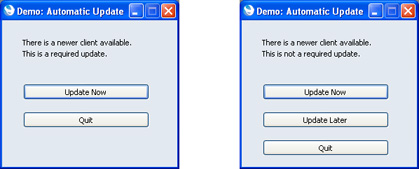
- Click the [Update Now] button. Your client application will be updated, as follows:
- Your client database will be backed up;
- The new client application, "Hob" folder and any other files will be downloaded to your client folder;
- The old client application, "Hob" folder, database and other files will be moved to a folder named "oldver"; and
- The new client application will be launched and the client text back-up imported.
- Your client database will be backed up;
- Log in as normal.
In this chapter:
- Introduction
- Text Back-ups
- Automatic Timed Back-ups
- Remote Back-ups
- Backing Up Using Specialist Back-up Software
- Database Duplication
- Journaling
- Restoring from a Back-up
- The Raw Data Export
- Updating to New Versions of Enterprise by HansaWorld, including:
- Updating Clients Automatically
- Major Updates
- Updating Clients Automatically
- Home page for Introduction and Installation manual
- Home page for Enterprise by HansaWorld manual
Updating to New Versions of Enterprise by HansaWorld - Major Updates
Listed below are some major revisions that have been made to Enterprise by HansaWorld. When you update for the first time to a version that contains one of these revisions, you will need to update your data, usually by running a Maintenance function.Version Revision More Information 3.8 Assets module: Fixed Asset register replaced by Asset register Description of Export to new Fixed Assets Module function 4.1 Customers and Suppliers combined into a single register Combining Customers and Suppliers page 4.1 Definition of Key Financial Ratio and VAT Reports: change in syntax used in formulae Defining Key Financial Ratios page 5.0 Customers/Suppliers and Contact Persons combined into a single register Combining Customers and Contact Persons page 5.1 Stock module rewritten Description of Rebuild Stock function 5.3 070723 Change in naming convention for attached files Point 2iii above (update is automatic, requiring no user intervention) 6.1 090510 Currency added to Job Costing module Use the 'Change Project Currency' Maintenance function in the Job Costing module to add Currencies to existing Projects
---
In this chapter:
- Introduction
- Text Back-ups
- Automatic Timed Back-ups
- Remote Back-ups
- Backing Up Using Specialist Back-up Software
- Database Duplication
- Journaling
- Restoring from a Back-up
- The Raw Data Export
- Updating to New Versions of Enterprise by HansaWorld, including:
- Updating Clients Automatically
- Major Updates
- Updating Clients Automatically
- Home page for Introduction and Installation manual
- Home page for Enterprise by HansaWorld manual
- Follow the instructions on the Automatic Timed Back-ups page to set up the timed back-up feature. This is necessary because whenever a back-up file is created using the timed back-up feature, it will be copied automatically to the remote server. Back-up files created using the 'Database Text Backup' option will not be copied to the remote server. In any case, the 'Database Text Backup' option cannot be used from a client machine in a multi-user system.