Introduction to the Purchase Order Register
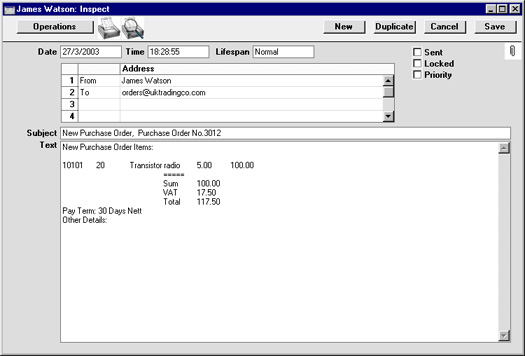
The Purchase Order register contains records for each Purchase Order issued.Before you start entering Purchase Orders, make sure you have defined your sequence of Purchase Order Numbers using the Number Series - Purchase Orders setting.
Entering a Purchase Order
In the Purchase Orders module, select 'Purchase Orders' from the Registers menu, or click the [Pur Orders] button in the Master Control panel.The 'Purchase Orders: Browse' window is opened, showing Purchase Orders already entered.
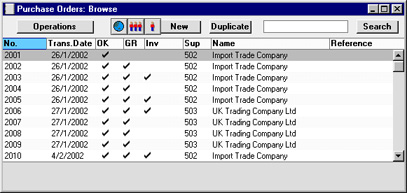
Also shown are indications that the Purchase Order has been approved, that the ordered goods have been received and approved in their entirety (in the 'GR' or 'Goods Received' column) and that a Purchase Invoice has been received and approved (in the 'Inv' column), and the Supplier number and name.
The functions on the Operations menu are described here.
Hansa provides several shortcuts to simplify your work with entering Purchase Orders. You may for example enter the current date into a date field with the 'Paste Special' function. This can also be used to simplify the entering of Item Numbers, Customer Numbers, Payment Codes etc.
To enter a new Purchase Order, click [New] in the Button Bar or use the Ctrl-N (Windows and Linux) or ⌘-N (Macintosh) keyboard shortcut. Alternatively, highlight a Purchase Order similar to the one you want to enter and click [Duplicate] on the Button Bar.
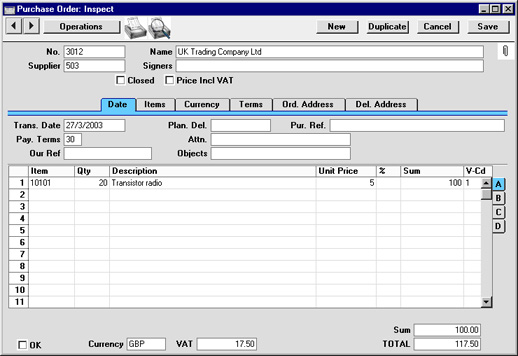
The 'Purchase Order: New' window is opened, empty if you clicked [New] or containing a duplicate of the highlighted Purchase Order.
! | You are not bound by the values suggested by Hansa as defaults. For most fields you can change the pre-set values into something that suits you better. Changes made here are valid only for this particular Purchase Order. |
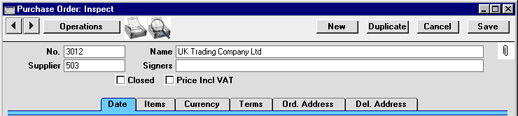
Since the amount of information stored about each Purchase Order will not fit on a single screen, the Purchase Order window has been divided into six cards. At the top of each is the header. This contains the Purchase Order Number, the Supplier Number and Name. There are six named buttons ('tabs') in the header.

Entering a Purchase Order - Header
- No.
- Paste Special
Select from another Number Series
- When creating a new Purchase Order, Hansa will enter the next unused number from the first number sequence entered in the Number Series - Purchase Orders setting. You may change this number, but not to one that has already been used.
- Supplier
- Paste Special
Supplier register
- Enter the Supplier Number or use the 'Paste Special' function. When you press Return, the Supplier's name, address and other information will be entered into the appropriate fields.
- Name
- The Supplier Name is entered after you have entered the Supplier Number.
- Signers
- Paste Special
Person register, System module
- Enter the initials of the person who approved the Purchase Order. Initials of more than one Person can be entered, separated by commas.
!
Note that an approved Purchase Order cannot be altered.
- Closed
- Check this box when all deliveries and Purchase Invoices for this Purchase Order have been received. Any remaining quantities that have not been received will be cancelled and will no longer appear in reports as being outstanding.
- If a Purchase Order is marked as Closed, you will not be able to create Goods Receipts from it. However, you will still be able to create Purchase Invoices for earlier Goods Receipts.
- If a Purchase Order is marked as Closed, you will not be able to create Goods Receipts from it. However, you will still be able to create Purchase Invoices for earlier Goods Receipts.
- Price Incl. VAT
- Check this box if the prices entered for the goods ordered include VAT.
Entering a Purchase Order - Date Card

- Trans. Date
- Paste Special
Current Date
- The date the Purchase Order is to be issued. Hansa enters the current date as a default.
- Plan. Del.
- Paste Special
Current Date
- Specify here the date on which you need to receive the goods into stock. The format of this field is determined by the Planned Delivery setting. Available options are free text, date, week number or year-week (4 characters).
- A separate Planned Delivery Date can also be specified for any of the Order rows (on flip D).
- A separate Planned Delivery Date can also be specified for any of the Order rows (on flip D).
- Pur. Ref.
- This field can be used if you need to identify the Purchase Order by any means other than the Purchase Order Number. The Reference is shown in the 'Purchase Orders: Browse' window, allowing you to search for a Purchase Order with a particular Reference.
- Payment Terms
- Paste Special
Payment Terms setting, Sales/Purchase Ledger
- Default taken from Supplier
- Payment Terms entered here will be transferred to any Purchase Invoices raised from the Order. In addition to simply ensuring the correct Payment Terms appear on Purchase Orders (in the Language of the Supplier if necessary), using the correct Payment Terms will result in Hansa looking after the implications of an early settlement discount, if appropriate.
- Payment Terms entered here will be transferred to any Purchase Invoices raised from the Order. In addition to simply ensuring the correct Payment Terms appear on Purchase Orders (in the Language of the Supplier if necessary), using the correct Payment Terms will result in Hansa looking after the implications of an early settlement discount, if appropriate.
- Attn.
- Default taken from
Supplier
- Record here your contact at the Supplier company.
- Our Ref
- Use this field if you need to identify the Purchase Order by means other than the Purchase Order Number. A default will be taken from the Our Ref field on the 'Ser Nos' card of the Person record of the current user. References entered will appear on any printed Purchase Orders.
- Objects
- Paste Special
Object register, System module
- Default taken from Supplier
- Up to 20 Objects, separated by commas, can be assigned to this Order and all transactions generated from it. You might define separate Objects to represent different departments, cost centres or product types. This provides a flexible method of analysis that can be used in Nominal Ledger reports.
- In any Nominal Ledger Transactions generated from Purchase Invoices raised from this Order, any Objects specified here will be assigned to the debit posting to the Purchase Account(s) and, if the Objects on Creditor Account option in the Account Usage P/L setting is being used, to the credit posting to the Creditor Account.
- Similarly, in any Nominal Ledger Transactions generated from Goods Receipts raised from this Order, any Objects specified here will be assigned to the debit posting.
- Up to 20 Objects, separated by commas, can be assigned to this Order and all transactions generated from it. You might define separate Objects to represent different departments, cost centres or product types. This provides a flexible method of analysis that can be used in Nominal Ledger reports.
Entering a Purchase Order - Items Card
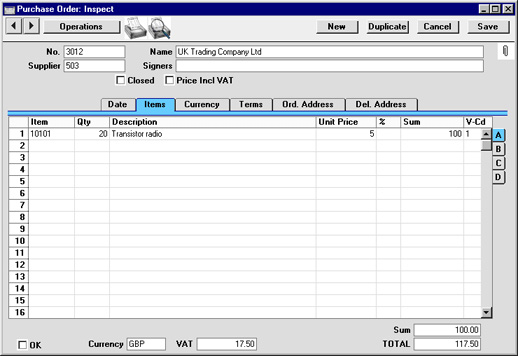

To add rows to a Purchase Order, click in any field in the first blank row and enter appropriate text. To remove a row, click on the row number on the left of the row and press the Backspace key. To insert a row, click on the row number where the insertion is to be made and press Return. Rows cannot be removed or inserted after Goods Receipts have been created from the Purchase Order.
Flip A
- Item
- Paste Special
Item register
- With the cursor in this field, enter the Item Number or Bar Code for each Item ordered. Pricing, descriptive and other information will be brought in from the Item record. If you leave this field blank, you can enter any text in the Description field, perhaps using the row for additional comments to be printed on Purchase Order documentation.
- If you want Hansa to check if the Item is in fact sold by the Supplier, switch on the Warning If Not Default Supplier option in the Purchase Order Settings setting. If this option is on, Hansa will issue a warning if the Item does not have a related Purchase Item in the name of the Supplier of the Purchase Order. If this option is off, it will be the user's responsibility to ensure that the correct Supplier/Item combination is chosen.
- If you want Hansa to check if the Item is in fact sold by the Supplier, switch on the Warning If Not Default Supplier option in the Purchase Order Settings setting. If this option is on, Hansa will issue a warning if the Item does not have a related Purchase Item in the name of the Supplier of the Purchase Order. If this option is off, it will be the user's responsibility to ensure that the correct Supplier/Item combination is chosen.
- Qty
- Enter the number of units ordered. Press Return to calculate the Sum, and the cursor will move to the Item field on the next row.
- This figure refers to the main Unit of the Item (the Unit you use to sell the Item, shown on the 'Pricing' card of the Item record). This may not be the Unit used by the Supplier. For example, your firm might sell an Item in single units, but the Supplier might sell in boxes of 12. If so, "12" should be entered to the Unit Conversion field of the Purchase Item. Then, if you need to order 240 of the Item, enter "240"here as the Quantity. The Sup. Qty field on flip B will be calculated to show "20", i.e. the order quantity from the Supplier's point of view (Quantity divided by Unit Conversion).
- This figure refers to the main Unit of the Item (the Unit you use to sell the Item, shown on the 'Pricing' card of the Item record). This may not be the Unit used by the Supplier. For example, your firm might sell an Item in single units, but the Supplier might sell in boxes of 12. If so, "12" should be entered to the Unit Conversion field of the Purchase Item. Then, if you need to order 240 of the Item, enter "240"here as the Quantity. The Sup. Qty field on flip B will be calculated to show "20", i.e. the order quantity from the Supplier's point of view (Quantity divided by Unit Conversion).
- Description
- If the Item has a related Purchase Item in the name of the Supplier of the Purchase Order, the Description will be taken from that Purchase Item record. Any text entered on card 2 of the Purchase Item will also be brought in, taking up as many Purchase Order rows as necessary.
- In other circumstances, the Description will be taken from the Item record.
- In other circumstances, the Description will be taken from the Item record.
- Unit Price
- If the Item has a related Purchase Item in the name of the Supplier of the Purchase Order, the Unit Price will be taken from that Purchase Item record.
- If the Purchase Item has a Unit Conversion and a Supplier Unit, then this figure will be the Unit Price per Supplier Unit. For example, your firm might sell an Item in single units, but the Supplier might sell in boxes of 12. If so, "12" should be entered to the Unit Conversion field of the Purchase Item and "Dozen" to the Supplier Unit field. The figure here will be the price per dozen.
- If there is no suitable Purchase Item, the Unit Price will be taken from the 'Costs' card of the Item record.
- The Unit Price includes VAT if the Price Incl. VAT box in the header is checked. In this case, the Price in the Purchase Item or the Unit Price in the Item record (as appropriate) will be treated as including VAT.
- If a Currency and Exchange Rate have been specified in the Purchase Order, the figure shown will be in the Currency concerned (i.e. having undergone currency conversion).
- If the Purchase Item has a Unit Conversion and a Supplier Unit, then this figure will be the Unit Price per Supplier Unit. For example, your firm might sell an Item in single units, but the Supplier might sell in boxes of 12. If so, "12" should be entered to the Unit Conversion field of the Purchase Item and "Dozen" to the Supplier Unit field. The figure here will be the price per dozen.
- %
- A discount percentage.
- Sum
- The total for the row: Supplier Quantity (from flip B) multiplied by Unit Price less Discount. Changing this figure will cause the Discount Percentage to be recalculated.
- Note that even if the Unit Price has been taken from the Purchase Item record, any Price Factor entered for the Item will be taken into account.
- This figure will be rounded up or down according to rounding rules set for the Currency in the Currency Round Off setting in the System module.
- Note that even if the Unit Price has been taken from the Purchase Item record, any Price Factor entered for the Item will be taken into account.
- V-Cd
- Paste Special
VAT Codes setting, Nominal Ledger
- When a Purchase Invoice is raised from this Order, the VAT Code entered here will determine the rate at which VAT will be charged on this Item and the VAT Account to be debited. A default is offered, taken from the Supplier record. If none is specified, the default is taken from the Item, the Item Group or from card 3 of the Account Usage P/L setting. In the last three cases, the appropriate VAT Code for the Zone of the Supplier will be used. This default can be changed for a particular Order row if necessary.
- Purch Acc
- Paste Special
Account register, Nominal Ledger/System module
- Default taken from Purchase Control Account of Item Group or from Account Usage S/L
- If the Transfer Each Row Separately option in the Purchase Invoice Settings setting is in use, this Account will be debited in the Nominal Ledger Transaction generated from the Purchase Invoice resulting from this Purchase Order row.
- If the Transfer Account and Object to Goods Receipt option in the Purchase Order Settings setting is in use, this Account will be copied to the Stock Account field in the appropriate row of any Goods Receipt created from this Purchase Order. It will then be debited in the Nominal Ledger Transaction resulting from that Goods Receipt.
- If the Transfer Each Row Separately option in the Purchase Invoice Settings setting is in use, this Account will be debited in the Nominal Ledger Transaction generated from the Purchase Invoice resulting from this Purchase Order row.
- Objects
- Paste Special
Object register, Nominal Ledger/System module
- Default taken from Item
- Up to 20 Objects, separated by commas, can be assigned to this row and all transactions generated from it. You might define separate Objects to represent different departments, cost centres or product types. This provides a flexible method of profit centre analysis that can be used in Nominal Ledger reports.
- In the Nominal Ledger Transaction generated from Purchase Invoices resulting from this Purchase Order, any Objects specified here will be assigned to the debit posting to the Purchase Account. This assignment will merge these Objects with those of the parent Order (shown on the 'Date' card).
- If the Transfer Account and Object to Goods Receipt option in the Purchase Order Settings setting is in use, this Object will be copied to the Objects field in the appropriate row of any Goods Receipt created from this Purchase Order. It will then be assigned to the debit posting in the Nominal Ledger Transaction resulting from that Goods Receipt.
- Up to 20 Objects, separated by commas, can be assigned to this row and all transactions generated from it. You might define separate Objects to represent different departments, cost centres or product types. This provides a flexible method of profit centre analysis that can be used in Nominal Ledger reports.
- Sup. Item
- The code allocated to the Item by this Supplier. This is shown as the main Item Code on the Purchase Order document. If the Item has been registered as a Purchase Item and if the Supplier of the Purchase Order is the same as the Supplier entered for the Purchase Item, then Hansa will get the Supplier's code from the Purchase Item record.
- Sup. Qty
- This shows the number of Items the Supplier needs to despatch to fulfil your Purchase Order and is dependent on the Unit Conversion field in the Purchase Item record. For example, your firm might sell an Item in single units, but the Supplier might sell in boxes of 12. If so, "12" should be entered to the Unit Conversion field of the Purchase Item. Then, if you need to order 240 of the Item, enter "240" as the Quantity on flip A. The Sup. Qty field will be calculated to show "20", i.e. the order quantity from the Supplier's point of view (Quantity divided by Unit Conversion). This figure is shown as the Quantity on the Purchase Order document.
- Altering this figure will cause the Quantity field to be amended appropriately (i.e. Sup. Qty multiplied by Unit Conversion).
- If the Purchase Item does not have a Unit Conversion, or there is no Purchase Item, then this figure will be the same as the Quantity on flip A.
- Altering this figure will cause the Quantity field to be amended appropriately (i.e. Sup. Qty multiplied by Unit Conversion).
- Received
- In this field, Hansa will enter the number of units received against this Purchase Order. The field will be updated automatically by the 'Goods Receipt' function on the Operations menu. Only quantities on approved Goods Receipts are included in the figure. This feature makes it easy to follow up on part shipments.
- If the Automatic receiving of Service and Plain Items option in the Stock Settings setting in the Stock module is being used, these fields will be changed to show the Order Quantity when the Purchase Order is saved if the Item is a Plain or Service Item. This means that Purchase Invoices for such Items can be created immediately without the need for a Goods Receipt, and that these Items will not appear on any Goods Receipts. It also means that the Order Quantity for such Items cannot be reduced once the Purchase Order has been saved.
- If the Automatic receiving of Service and Plain Items option in the Stock Settings setting in the Stock module is being used, these fields will be changed to show the Order Quantity when the Purchase Order is saved if the Item is a Plain or Service Item. This means that Purchase Invoices for such Items can be created immediately without the need for a Goods Receipt, and that these Items will not appear on any Goods Receipts. It also means that the Order Quantity for such Items cannot be reduced once the Purchase Order has been saved.
- Invoiced
- The quantity invoiced for each Order row is amended automatically when Invoices are raised using the 'Invoice' function on the Operations menu. The quantity shown is taken from approved Invoices only. Invoices cannot be raised until Goods Receipts have been made and approved. In the case of partial Goods Receipts, Invoices can only be raised for the quantity delivered.
- Project
- If the Job Costing module is being used and a single Purchase Order row is related to a Project, enter its Project Number here. If the whole Purchase Order is related to a Project, use the Project field on the 'Terms' card.
- WS
- Purchase Orders can be generated for spare parts from the Service Orders module using the 'Make Purchase Order' function on the Operations menu of the Work Order screen. Such Purchase Orders could feature several Items when there is more than one Work Sheet related to the Work Order from which they were generated. This field will carry a record of the Work Sheet to which each row is related. Please refer here for full details of this feature.
- Plan. Del.
- Paste Special
Current Date
- Specify here the date on which you need to receive this Item into stock, if this is different to the Planned Delivery Date on the 'Terms' card. The format of this field is determined by the Planned Delivery setting. Available options are free text, date, week number or year-week (4 characters).
- Comment
- Any further details about the Item can be recorded here.

- OK
- The Purchase Order can be approved by clicking this check box. Once this has been done, the Purchase Order will no longer be modifiable.
- A Purchase Order does not have to be approved for goods to be received against it or for its Items to be included in the Purchase Order total displayed by the 'Item Status' function. Nevertheless, once a Purchase Order has been finalised and printed, it should be approved because the functions that create Purchase Orders automatically will sometimes add Items to existing unapproved Purchase Orders instead of creating new ones.
- References in these web pages to approved Purchase Orders are to those whose OK check box has been switched on.
- A Purchase Order does not have to be approved for goods to be received against it or for its Items to be included in the Purchase Order total displayed by the 'Item Status' function. Nevertheless, once a Purchase Order has been finalised and printed, it should be approved because the functions that create Purchase Orders automatically will sometimes add Items to existing unapproved Purchase Orders instead of creating new ones.
- Currency
- Paste Special
Currency register, System module
- Default taken from Supplier or Default Base Currency
- The Currency of the Purchase Order: the exchange rate is shown on the 'Currency' card where it can be modified only for this particular Purchase Order if necessary. Ensure that the correct Currency is shown (that in which you are to be invoiced) before any Items are added to the Purchase Order. This is to ensure that prices are converted correctly: prices of Items added to the Purchase Order before the Currency was specified cannot be converted retrospectively. Leave the field blank to use the home Currency (unless you have set a Default Base Currency, in which case this will be offered as a default and should be treated as your home Currency).
- If the Supplier record has a Currency specified on the 'Company' card, only that Currency can be used. Otherwise, any Currency can be used.
- The Currency of the Purchase Order: the exchange rate is shown on the 'Currency' card where it can be modified only for this particular Purchase Order if necessary. Ensure that the correct Currency is shown (that in which you are to be invoiced) before any Items are added to the Purchase Order. This is to ensure that prices are converted correctly: prices of Items added to the Purchase Order before the Currency was specified cannot be converted retrospectively. Leave the field blank to use the home Currency (unless you have set a Default Base Currency, in which case this will be offered as a default and should be treated as your home Currency).
- VAT
- The VAT total for the Purchase Order.
- This figure is rounded up or down according to rounding rules set for the Currency (in the Currency Round Off setting in the System module). If no Currency has been specified, or the Currency in question has not been entered in the Currency Round Off setting, the rounding rules are taken from the Round Off setting (also in the System module).
- VAT is calculated after the Sum of each row has been rounded up or down according to rounding rules set in the Currency Round Off setting.
- This figure is rounded up or down according to rounding rules set for the Currency (in the Currency Round Off setting in the System module). If no Currency has been specified, or the Currency in question has not been entered in the Currency Round Off setting, the rounding rules are taken from the Round Off setting (also in the System module).
- Sum
- The total for the Purchase Order, excluding VAT.
- TOTAL
- The total for the Purchase Order, including VAT.
- This figure is rounded up or down according to rounding rules set for the Currency (in the Currency Round Off setting in the System module). If no Currency has been specified, or the Currency in question has not been entered in the Currency Round Off setting, the rounding rules are taken from the Round Off setting (also in the System module).
Artiklite kaart, jalus

- Kinnita
- Märgi see valik Ostutellimuse kinnitamiseks. Kinnitatud Ostutellimust ei saa enam muuta. Kinnitatud Ostutellimuse muutmiseks võta see valik maha ja salvesta Tellimus.
- Laosissetuleku koostamiseks ei pea Ostutellimus olema kinnitatud. Samuti arvestatakse kinnitamata Ostutellimusi 'Artikli hetkeseisu' aknas. Kui aga töö Ostutellimusega on lõpetatud, peab tellimus olema kinnitatud järgmistel põhjustel:
- Ostutellimuste automaatsel koostamisel ei koostata alati uut Tellimust, vaid lisatakse Artikleid juba olemasolevatele kinnitamata Ostutellimusele.
- Kui soovid samale Laosissetulekule kaasata mitu Ostutellimust (kasutades välju Laosissetuleku I osal), peavad vastavad Ostutellimused olema eelnevalt kinnitatud.
- Kasutajagruppidega saad määrata, kellel on õigus Ostutellimusi kinnitada, kinnitust maha võtta, koostada koostada Laosissetulekuid kinnitamata Ostutellimustest ja tasuda Ettemakse kinnitamata Ostutellimuste eest. Selleks anna vastavale Kasutajagrupile õigused teostada järgmisi toiminguid: Ostutellimuse kinnitamine, Ostutellimuse kinnituste mahavõtmine, Laosissetuleku koostamine kinnitamata ostutellimusest keelatud ja Ära luba ettemaksu kinnitamata ostutellimusele. Ostutellimustest laosissetulekute koostamise toiminguga saad kontrollida Laosissetulekute koostamist nii kinnitatud kui kinnitamata Ostutellimustest. Samuti võid keelata kõigil kasutajatel koostada Laosissetulekuid kinnitamata Ostutellimustest ja võtta maha Ostutellimuste kinnitusi, märkides Ostutellimuste seadistustes valiku Ostutell. kinnituse mahavõtmine keelatud ja laosisset. koostamiseks vajalik ostutell. kinnitamine.
- Võid keelata kinnitamata Ostutellimuste välja trükkimise. Koos piirangute seadmisega Kasutajagruppidele saad nii takistada kinnitamata Ostutellimuste koostamist ja välja trükkimist. Täpsemalt loe palun osast 'Ostutellimuste välja trükkimine'.
- Laosissetuleku koostamiseks ei pea Ostutellimus olema kinnitatud. Samuti arvestatakse kinnitamata Ostutellimusi 'Artikli hetkeseisu' aknas. Kui aga töö Ostutellimusega on lõpetatud, peab tellimus olema kinnitatud järgmistel põhjustel:
- Valuuta
- Ctrl-Enter
Valuutade register, Üldine moodul
- Sisestub vaikimisi Kontaktikaardilt (Ostuvaluuta) või Vaikimisi baasvaluuta
- Ostutellimuse Valuuta: valuutakurssi näed Ostutellimuse 'Valuuta' kaardil, kus saad seda vajadusel antud Tellimuse jaoks muuta. Kui soovid koostada Ostutellimuse kohalikus Valuutas, jäta antud väli tühjaks (kui oled määranud vaikimisi kasutatava baasvaluuta, sisestub see automaatselt ning seda käsitletakse kohaliku Valuutana).
- Kui Tellimusele määratud Hankija Kontaktikaardi 'Hindade' kaardil on määratud Ostuvaluuta, saad kasutada ainult seda. Muul juhul võid kasutada ükskõik millist Valuutat.
- Kui muudad Valuutat peale Ostutellimusele Artiklite lisamist, arvutatakse nende Artiklite hinnad ümber automaatselt vastavalt Tellimuse päeval kehtivale kursile.
- Ostutellimuse Valuuta: valuutakurssi näed Ostutellimuse 'Valuuta' kaardil, kus saad seda vajadusel antud Tellimuse jaoks muuta. Kui soovid koostada Ostutellimuse kohalikus Valuutas, jäta antud väli tühjaks (kui oled määranud vaikimisi kasutatava baasvaluuta, sisestub see automaatselt ning seda käsitletakse kohaliku Valuutana).
- Aluste arv
- Siin näita antud Tellimuse täitmiseks saabuma pidavate aluste hulk, kui Tellimus sisaldab Artikleid, mida tarnitakse alustel ja mille Artiklikaardi 'Laohalduse' kaardil on näidatud kauba kogus ühel alusel. Aluste arvu muudetakse automaatselt Koguse või Hankija koguse muutmisel Ostutellimuse B osal. Ridade alusel saadakse Aluste koguarv Ostutellimuse jaluses. Seda välja kasutatakse koos Laohalduse mooduliga: lähemalt küsi palun oma HansaWorldi esindajalt.
- Transport
- Selle välja kohta loe palun E osa Transpordikulu välja kirjeldavast osast eespool. Transpordikulu on kohalikus Valuutas (või Üldise mooduli Baasvaluutade seadistuses määratud Baasvaluutas 1).
- Transpordikulu ei lisata Ostutellimuse kogusummale, kuna sageli tuleb see tasuda Tellimuse hankijast erinevale ettevõttele. Seetõttu ei trükita transpordikulu ka Ostutellimusele. Samuti on tõenäoline, et Ostutellimust koostades saad Sa sisestada vaid hinnangulise transpordikulu. Ostutellimusest Laosissetuleku koostamisel sisestub see summa Laosissetuleku jalusesse Transpordi väljale. Kui siin pole transpordikulu määratud, sisestub Laosissetulekule transpordikulu 'Muu' kaardilt (osalise Laosissetuleku korral vähendatakse seda proportsionaalselt). Transpordikulu lisatakse Laosissetuleku kogusummale. Laosissetulekul saad seda summat muuta. Kui transpordikulu Laosissetulekul ja Ostuarvel erineb, kantakse erinevus Hinnaerinevuse kontole. Lähemalt loe palun Laomooduli juhendi peatükist Hinnaerinevused.
- Transpordikulu ei lisata Ostutellimuse kogusummale, kuna sageli tuleb see tasuda Tellimuse hankijast erinevale ettevõttele. Seetõttu ei trükita transpordikulu ka Ostutellimusele. Samuti on tõenäoline, et Ostutellimust koostades saad Sa sisestada vaid hinnangulise transpordikulu. Ostutellimusest Laosissetuleku koostamisel sisestub see summa Laosissetuleku jalusesse Transpordi väljale. Kui siin pole transpordikulu määratud, sisestub Laosissetulekule transpordikulu 'Muu' kaardilt (osalise Laosissetuleku korral vähendatakse seda proportsionaalselt). Transpordikulu lisatakse Laosissetuleku kogusummale. Laosissetulekul saad seda summat muuta. Kui transpordikulu Laosissetulekul ja Ostuarvel erineb, kantakse erinevus Hinnaerinevuse kontole. Lähemalt loe palun Laomooduli juhendi peatükist Hinnaerinevused.
- Lisamaks
- Käibemaksukoodide seadistuses Finantsis on võimalik määrata lisamakse, nagu näiteks keskkonnamaks. Kui Ostutellimuse real on kasutatud sellist lisamaksuga KM-koodi, näed siin selle maksu summat Ostutellimuse Valuutas. Ostutellimusele Artiklite lisamisel arvutatakse lisamaks ümber. Ostutellimusest koostatud Ostuarve kinnitamisel debiteeritakse lisamaksu summas vastavale KM-koodile määratud Maksukontot. Kui KM-koodile on määratud lisamaksu miinimumsumma ning Ostutellimuse Lisamaks jääb alla selle, on see väli tühi.
- Toll
- Selle välja kohta loe palun E osa Tolli välja kirjeldavast osast eespool. Tollikulu on kohalikus Valuutas (või Baasvaluutade seadistuses määratud Baasvaluutas 1). Vaikimisi sisestub siia Ostuartiklite Ostukulude summa (korrutatud kogustega).
- Tollikulu ei lisata Ostutellimuse kogusummale, kuna sageli tuleb see tasuda mitte Tellimuse hankijale, vaid riigile. Seetõttu ei trükita tollikulu ka Ostutellimusele. Samuti on tõenäoline, et Ostutellimust koostades saad Sa sisestada vaid hinnangulise tollikulu. Ostutellimusest Laosissetuleku koostamisel sisestub see summa Laosissetuleku jalusesse Tolli väljale (osalise Laosissetuleku korral vähendatakse seda proportsionaalselt). Tollikulu lisatakse Laosissetuleku kogusummale. Laosissetulekul saad seda summat muuta. Kui tollikulu Laosissetulekul ja Ostuarvel erineb, kantakse erinevus Hinnaerinevuse kontole. Lähemalt loe palun Laomooduli juhendi peatükist Hinnaerinevused.
- Tollikulu ei lisata Ostutellimuse kogusummale, kuna sageli tuleb see tasuda mitte Tellimuse hankijale, vaid riigile. Seetõttu ei trükita tollikulu ka Ostutellimusele. Samuti on tõenäoline, et Ostutellimust koostades saad Sa sisestada vaid hinnangulise tollikulu. Ostutellimusest Laosissetuleku koostamisel sisestub see summa Laosissetuleku jalusesse Tolli väljale (osalise Laosissetuleku korral vähendatakse seda proportsionaalselt). Tollikulu lisatakse Laosissetuleku kogusummale. Laosissetulekul saad seda summat muuta. Kui tollikulu Laosissetulekul ja Ostuarvel erineb, kantakse erinevus Hinnaerinevuse kontole. Lähemalt loe palun Laomooduli juhendi peatükist Hinnaerinevused.
- KM
- Ostutellimuse käibemaks kokku.
- Käibemaksusumma ümardatakse üles- või allapoole vastavalt antud valuutale määratud ümardamise reeglitele (Üldise mooduli Valuuta ümardamise seadistuses). Kui Ostutellimusel ei ole valuutat märgitud või ei ole valitud valuutat sisestatud Valuuta ümardamise seadistusse, ümardatakse käibemaksusumma vastavalt Üldise mooduli Ümardamise seadistusele.
- Käibemaks arvutatakse pärast iga rea summa ümardamist vastavalt antud Valuutale Valuuta ümardamise seadistuses määratud ümardamise reeglitele.
- Käibemaksusumma ümardatakse üles- või allapoole vastavalt antud valuutale määratud ümardamise reeglitele (Üldise mooduli Valuuta ümardamise seadistuses). Kui Ostutellimusel ei ole valuutat märgitud või ei ole valitud valuutat sisestatud Valuuta ümardamise seadistusse, ümardatakse käibemaksusumma vastavalt Üldise mooduli Ümardamise seadistusele.
- Summa
- Ostutellimuse summa ilma käibemaksuta.
- TASUDA
- Ostutellimuse summa koos käibemaksuga.
- Kogusumma ümardatakse üles- või allapoole vastavalt valitud valuutale määratud ümardamise reeglitele (Üldise mooduli Valuuta ümardamise seadistuses). Kui Ostutellimusel ei ole valuutat märgitud või ei ole valitud valuutat sisestatud Valuuta ümardamise seadistusse, ümardatakse summa vastavalt Üldise mooduli Ümardamise seadistusele.
Entering a Purchase Order - Currency Card

- Currency
- Paste Special
Currency register, System module
- Default taken from Supplier or Default Base Currency
- The Currency of the Purchase Order (also shown in the footer of the 'Items' card) is shown together with the exchange rate which can be modified only for this particular Purchase Order if necessary. Ensure that the Currency is correct (i.e. shows the Currency in which you are to be invoiced) before any Items are added to the Purchase Order. This is to ensure that prices are converted correctly: prices of Items added to the Purchase Order before the Currency was specified cannot be converted retrospectively. Leave the field blank to use the home Currency (unless you have set a Default Base Currency, in which case this will be offered as a default and should be treated as your home Currency).
- The Currency of the Purchase Order (also shown in the footer of the 'Items' card) is shown together with the exchange rate which can be modified only for this particular Purchase Order if necessary. Ensure that the Currency is correct (i.e. shows the Currency in which you are to be invoiced) before any Items are added to the Purchase Order. This is to ensure that prices are converted correctly: prices of Items added to the Purchase Order before the Currency was specified cannot be converted retrospectively. Leave the field blank to use the home Currency (unless you have set a Default Base Currency, in which case this will be offered as a default and should be treated as your home Currency).
- Exchange Rates
- Default taken from
Base Currency Rates setting and/or Exchange Rate register, System module
- The current exchange rates for the specified Currency will be entered to this card by Hansa. If appropriate, change the exchange rate to that agreed with the Supplier for this Purchase Order. Ensure that it is correct and not blank before adding Items to the Purchase Order to ensure the correct currency conversion takes place.
- One of two conversion methods will be used. The Dual-Base system will be useful for companies that have offices in two countries that need to report in both Currencies, for companies operating in countries where there is a second Currency (usually the US Dollar or Euro) in common use in addition to the national one, and for companies in the Euro zone who retain their old national Currency for comparison purposes The second method is a simple conversion from the foreign Currency to the home Currency, applicable to the majority of worldwide Currency transactions, for users outside and not trading with the EU. These are described below.
- Exchange Rates (Dual-Base System)
- In the example shown above, the Currency of the Purchase Order is the Euro. Base Currency 1 is the home Currency (GBP, Pounds Sterling) and Base Currency 2 is the Euro. The fields on the left show in the form of a ratio the exchange rate between the two base Currencies (taken from the latest record in the Base Currency Rates setting). The illustration shows that GBP0.63 buys one Euro.
- Note that European Monetary Union (EMU) regulations specify that the ratios must always show how many units of the home or foreign Currency can be bought with one Euro.
- Note that European Monetary Union (EMU) regulations specify that the ratios must always show how many units of the home or foreign Currency can be bought with one Euro.
- Exchange Rates (Simple Currency Conversion System)
- In the case of a simple currency conversion system, the Rate and right-hand Base Currency 1 fields are used to show a simple exchange rate between the foreign and home Currencies. In the example shown below, the home Currency is US Dollars (USD) and the foreign Currency Japanese Yen (JPY). JPY122.15 buys USD1.00.
- One of two conversion methods will be used. The Dual-Base system will be useful for companies that have offices in two countries that need to report in both Currencies, for companies operating in countries where there is a second Currency (usually the US Dollar or Euro) in common use in addition to the national one, and for companies in the Euro zone who retain their old national Currency for comparison purposes The second method is a simple conversion from the foreign Currency to the home Currency, applicable to the majority of worldwide Currency transactions, for users outside and not trading with the EU. These are described below.

Entering a Purchase Order - Terms Card
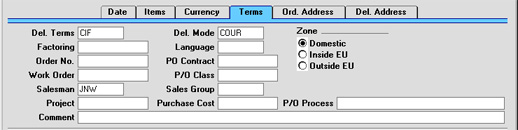
- Del. Terms
- Paste Special
Delivery Terms setting, Sales/Purchase Orders module
- Default taken from Supplier
- Specify the Delivery Terms that you wish to be used for this Order here. You will tend to use this field for international Suppliers: examples might be Cost, Insurance, Freight or Free On Board.
- For each Delivery Term record you can specify an appropriate description in different Languages: the Language of the Purchase Order will therefore determine the translation to be printed on the Purchase Order.
- Specify the Delivery Terms that you wish to be used for this Order here. You will tend to use this field for international Suppliers: examples might be Cost, Insurance, Freight or Free On Board.
- Del. Mode
- Paste Special
Delivery Modes setting, Sales Orders module
- Default taken from Supplier
- Enter the mode of shipping for this order. For each Delivery Mode record you can specify an appropriate description in different Languages: the Language of the Purchase Order will therefore determine the translation to be printed on any documentation produced from the Order.
- You can also set up different versions of the Purchase Order document for each Delivery Mode, perhaps incorporating appropriate payment instructions. To do this, enter the Delivery Mode in the Language field when defining documents. Document definition is described here.
- Enter the mode of shipping for this order. For each Delivery Mode record you can specify an appropriate description in different Languages: the Language of the Purchase Order will therefore determine the translation to be printed on any documentation produced from the Order.
- Factoring
- Paste Special
Supplier register
- Default taken from Supplier
- If the payment for the Purchase Invoice resulting from this Purchase Order is to be sent to another company, such as a factoring company, enter the Supplier Number here. The company must be registered as a Supplier in your system.
- If the payment for the Purchase Invoice resulting from this Purchase Order is to be sent to another company, such as a factoring company, enter the Supplier Number here. The company must be registered as a Supplier in your system.
- Language
- Paste Special
Languages setting, System module
- Default taken from Supplier
- The Language Code determines the text to be transferred from various registers and settings, for example the text for Payment Terms, Delivery Terms and Delivery Mode, the selection of document forms etc. Leave the field blank to use the home Language.
- The Language Code determines the text to be transferred from various registers and settings, for example the text for Payment Terms, Delivery Terms and Delivery Mode, the selection of document forms etc. Leave the field blank to use the home Language.
- Order No.
- If this Purchase Order is raised to satisfy one of your own Sales Orders, enter the Sales Order Number here. Where a Purchase Order has been created remotely from the Sales Orders module using the 'Create Purchase Orders' Maintenance or Operations menu functions, the Sales Order Number will be brought in automatically.
- PO Contract
- If the Purchase Order was created from a Purchase Order Contract, the Contract Number will appear here. This field cannot be changed.
- Work Order
- Purchase Orders can be generated for spare parts from the Service Orders module using the 'Make Purchase Order' function on the Operations menu of the Work Order screen. Such Purchase Orders will carry a record of the Work Order from which they were generated in this field. Please refer here for full details of this feature.
- P/O Class
- Paste Special
Purchase Order Classes setting, Purchase Orders module
- Enter the Purchase Order Class for the Order (if any). Purchase Order Classes permit the analysis of Orders for reporting or prioritising.
- Salesman
- Paste Special
Person register, System module
- Default taken from Supplier
- Enter the initials of the Person responsible for this Purchase Order.
- This field is also used by the Limited Access module: please refer to the description of the Sales Group field (below) for details.
- Enter the initials of the Person responsible for this Purchase Order.
- Sales Group
- Paste Special
Sales Groups setting, System module
- Default taken from Salesman
- The Sales Group is brought in from the Person record after you have entered a Salesman. If the Limited Access module is present, this field can be used to prevent a user from seeing all Purchase Orders in the 'Purchase Orders: Browse' window by restricting their view to their own Purchase Orders or to those of their Sales Group.
- Please click here for full details of the Limited Access module.
- The Sales Group is brought in from the Person record after you have entered a Salesman. If the Limited Access module is present, this field can be used to prevent a user from seeing all Purchase Orders in the 'Purchase Orders: Browse' window by restricting their view to their own Purchase Orders or to those of their Sales Group.
- Project
- Paste Special
Project register, Job Costing module (if installed)
- This field is used to attach this Purchase Order to a Project. It is only used if the Job Costing module is installed. The Project Number can be shown on the Purchase Order document.
- Purchase Cost
- Any value entered here will be transferred to Goods Receipts as a Freight charge. In the case of partial Goods Receipts, the figure will be distributed proportionally.
- When a Nominal Ledger Transaction is generated from the Goods Receipt, this Purchase Cost is credited to the Purchase Freight Cost Account specified on card 5 of the Account Usage S/L setting. It will also be included in any Purchase Invoice created using the 'Invoice' Operations menu function.
- When a Nominal Ledger Transaction is generated from the Goods Receipt, this Purchase Cost is credited to the Purchase Freight Cost Account specified on card 5 of the Account Usage S/L setting. It will also be included in any Purchase Invoice created using the 'Invoice' Operations menu function.
- P/O Process
- Paste Special
Purchase Order Process register, Purchase Orders module
- In the case of Purchase Order that has an associated Purchase Order Process, enter the Process Number here.
- Comment
- Record here any comment about the Purchase Order.
- Zone
- Default taken from
Supplier
- This information is fetched from the Supplier record, and indicates the origin of the Supplier. The selection of a VAT Code for each row depends on the Zone of the Supplier. The Zone should not be changed for an individual Purchase Order.
Muu kaart

- Keel
- Ctrl-Enter
Keelte seadistus, Üldine moodul
- Sisestub vaikimisi Kontaktikaardilt
- Vastavalt valitud Keelele trükitakse Ostutellimusele tekstid erinevatest registritest ja seadistustest nagu Tasumistingimus, Lähetustingimus ja Lähetusviis. Keelekoodiga võid siduda ka erinevaid dokumendimalle. Kui soovid kasutada kohalikku keelt, jäta see väli tühjaks.
- Keelekoodidega saad valida ka Ostutellimuste printimisel kasutatava dokumendimalli ning printeri. Võid ka Ostutellimuse faksida. Tee vastavad seadistused Ostutellimuse dokumendi määramisaknas, nagu kirjeldatud siin. Keelt saad muuta ka kinnitatud Ostutellimusel.
- Vastavalt valitud Keelele trükitakse Ostutellimusele tekstid erinevatest registritest ja seadistustest nagu Tasumistingimus, Lähetustingimus ja Lähetusviis. Keelekoodiga võid siduda ka erinevaid dokumendimalle. Kui soovid kasutada kohalikku keelt, jäta see väli tühjaks.
- Ostuprotsess
- Ctrl-Enter
Ostuprotsesside register, Ostutellimuste moodul
- Kui Ostutellimus on seotud Ostuprotsessiga, näita siin selle number. Ostuprotsesse kirjeldatakse edaspidi.
- Ostuleping
- Kui Ostutellimus koostati Ostulepingust, näed siin selle numbrit. Seda välja muuta ei saa.
- Töökäsk
- Hooldusteeninduse moodulist saad vajalike varuosade kohta koostada Ostutellimused, kasutades Töökäsu Operatsioonide menüü käsklust Koosta ostutellimus. Hooldusteeninduse moodulist koostatud Ostutellimusel näed ka vastava Töökäsu numbrit, millest see koostati. Lähemalt loe palun siit.
- Transpordikulu
- Siia sisestatud summa kantakse Ostutellimusest koostatud Laosissetuleku Transpordikulu väljale, kui Ostutellimuse jaluses pole transpordikulu määratud. Osaliste Laosissetulekute puhul jaotatakse transpordikulu summa proportsionaalselt.
- Kui Laosissetulekust koostatakse Kanne Finantsi, krediteeritakse Transpordikulu summas Laosissetuleku transpordikulu kontot seadistuse Lausendamine, Ladu 'Laosissetuleku kulu' kaardilt. Samuti lisatakse transpordikulu Operatsioonide menüü funktsiooniga 'Koosta ostuarve' koostatud Ostuarvetele.
- Kui Laosissetulekust koostatakse Kanne Finantsi, krediteeritakse Transpordikulu summas Laosissetuleku transpordikulu kontot seadistuse Lausendamine, Ladu 'Laosissetuleku kulu' kaardilt. Samuti lisatakse transpordikulu Operatsioonide menüü funktsiooniga 'Koosta ostuarve' koostatud Ostuarvetele.
- Ostujuht
- Ctrl-Enter
Isikute register, Üldine moodul
- Sisestub vaikimisi Hetkekasutaja
- Sisesta antud Ostutellimuse eest vastutava töötaja initsiaalid.
- Seda välja kasutab ka Piiratud kasutuse moodul: lähemalt loe palun Ostugrupi välja lõigust edaspidi.
- Sisesta antud Ostutellimuse eest vastutava töötaja initsiaalid.
- Ostugrupp
- Ctrl-Enter
Müügigruppide seadistus, Üldine moodul
- Sisestub vaikimisi Ostujuhilt
- Ostugrupp sisestub valitud Ostujuhi Isikukaardilt. Kui kasutad Piiratud kasutuse moodulit, saad selle välja abil piirata Ostujuhi nähtavaid Ostutellimusi aknas Ostutellimused: Sirvi ainult tema enda või tema Ostugrupi Ostutellimustega.
- Piiratud kasutuse mooduli kohta loe palun siit.
- Ostugrupp sisestub valitud Ostujuhi Isikukaardilt. Kui kasutad Piiratud kasutuse moodulit, saad selle välja abil piirata Ostujuhi nähtavaid Ostutellimusi aknas Ostutellimused: Sirvi ainult tema enda või tema Ostugrupi Ostutellimustega.
- Kommentaar
- Vabalt sisestatav kommentaar Ostutellimuse kohta.
Entering a Purchase Order - Ord. Address Card

- Ordering Address
- Default taken from
Supplier
- The Supplier's address to which the Purchase Order is to be sent.
Entering a Purchase Order - Del Address Card
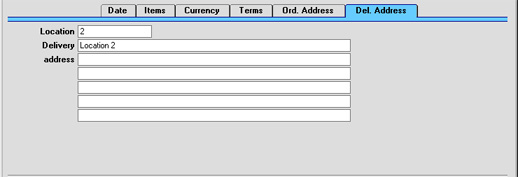
- Location
- Paste Special
Locations setting, Stock module
- The stock Location to which you want the delivery to be made. This will be used as a default in any Goods Receipts raised from this Purchase Order.
- A default Location and associated address can be brought in from the 'Bonus' card of the user's Person record.
- A default Location and associated address can be brought in from the 'Bonus' card of the user's Person record.
- Delivery Address
- Default taken from
Location
- The address to which delivery is to be made, where this differs from your main address.
Lisakulude kaart

- Lisakulu 1-5
- Igasugune Ostutellimuse lisakulu. Sisesta siia lisakulu kogusummad, mis jagatakse 'Artiklite' kaardi E osa Kulu 1-5 väljade vahel vastavalt ridade Ostuhindadele.
- Lisakulusid ei lisata Ostutellimuse kogusummale, kuna sageli tuleb need tasuda Tellimuse hankijast erinevale ettevõttele. Seetõttu ei trükita lisakulusid ka Ostutellimusele. Samuti on tõenäoline, et Ostutellimust koostades saad Sa sisestada vaid hinnangulised lisakulud. Ostutellimusest Laosissetuleku koostamisel sisestuvad need summad Laosissetuleku 'Lisakulude' kaardile. Lisakulud lisatakse ka Laosissetuleku kogusummale. Laosissetulekul saad neid summasid muuta. Kui lisakulu Laosissetulekul ja Ostuarvel erineb, kantakse erinevus Hinnaerinevuse kontole. Lähemalt loe palun Laomooduli juhendi peatükist Hinnaerinevused.
- Lisakulu väljadele saad anda nimed Laomooduli seadistuses Omakirjeldatud väljad – Lisakulu.
- Lisakulusid ei lisata Ostutellimuse kogusummale, kuna sageli tuleb need tasuda Tellimuse hankijast erinevale ettevõttele. Seetõttu ei trükita lisakulusid ka Ostutellimusele. Samuti on tõenäoline, et Ostutellimust koostades saad Sa sisestada vaid hinnangulised lisakulud. Ostutellimusest Laosissetuleku koostamisel sisestuvad need summad Laosissetuleku 'Lisakulude' kaardile. Lisakulud lisatakse ka Laosissetuleku kogusummale. Laosissetulekul saad neid summasid muuta. Kui lisakulu Laosissetulekul ja Ostuarvel erineb, kantakse erinevus Hinnaerinevuse kontole. Lähemalt loe palun Laomooduli juhendi peatükist Hinnaerinevused.
Inspecting and Changing Purchase Orders
You can change a Purchase Order at any time, as long as it has not been approved (i.e. as long as the OK check box has not been switched on). To do so, click the [Pur Orders] button in the Master Control panel or select 'Purchase Orders' from the Registers menu. The 'Purchase Orders: Browse' window is opened, listing all Purchase Orders. Double-click on the Purchase Order you want to inspect or change. The window 'Purchase Order: Inspect' will appear. This is identical to the 'Purchase Order: New' window described here.If Goods Receipts or Purchase Invoices have been created from the Purchase Order, some changes may not be permitted. For example, a Quantity cannot be changed to a number lower than has already been received into stock. New rows can be added at any time, but no rows can be inserted or removed after Goods Receipts have begun, even if no Goods Receipt has been made from the row in question.
Printing Purchase Orders
There are two ways to print a Purchase Order.- While entering or inspecting a Purchase Order, click the Printer icon in the Button Bar or select 'Print' from the File menu. If you want to print to screen, click the Preview icon.
- Click the [Documents] button in the Master Control panel or select 'Documents' from the File menu. Double-click 'Purchase Orders' in the 'Documents' list window or highlight it and press the Enter key. Indicate the Purchase Order Number (or range of Purchase Order Numbers) to be printed and press [Run].
- Using the Form register in the System module, design the purchase order and name it "PURCHASE_ORDER". Use the 'Properties' function on the Operations menu to assign a Document Type of "Purchase Order". A sample Purchase Order Form is supplied with Hansa: this can be modified to suit your requirements. You might want to design different Forms for use with different Languages or Delivery Modes.
- Select the Purchase Orders module using the Modules menu.
- Click [Documents] in the Master Control panel or select 'Documents' from the File menu. The 'Documents' list window is opened: highlight 'Purchase Orders'.
- Select 'Define Document' from the Operations menu.
- In the subsequent window, enter "PURCHASE_ORDER" in the Form field of the first line (you can use 'Paste Special' to ensure the spelling is correct).
- If you have designed different Forms for use with different Languages or Delivery Modes in step 1 above, enter the Form Code of each one on separate rows in the grid. In the Lang. field of each row, enter the appropriate Language or Delivery Mode. 'Paste Special' can be used to open a list of Languages from which the correct one can be chosen.
- Click [Save] to save the Purchase Order Form definition. From now on, the purchase order form that you have designed will be used, from the 'Documents' function and from the Printer icon. If you have designed more than one Form, the correct one will be used depending on the Language or Delivery Mode of the Purchase Order.
Generating Purchase Orders for Stock
The 'Create Purchase Orders' function on the Operations menu of the 'Purchase Orders: Browse' window creates Purchase Orders by comparing stock levels with minimum stock quantities for each Item, taking quantities on unfulfilled Sales Orders into account ("Stocking" Purchase Orders). The Purchase Orders will be saved in an unapproved state. You can print the Purchase Orders in a single batch, using the 'Documents' function on the File menu or the [Documents] button in the Master Control panel. Printing is covered in more detail here.In determining the Items for which Purchase Orders will be raised, certain conditions must be met.
In the Purchase Item register the following information must be present:
- The Items to be purchased must be registered as Purchase Items. For each Item there must be one Purchase Item with a Supplier specified and with the Default check box switched on.
- Each Purchase Item should have a Normal or Minimum Order Quantity specified.
- Each Purchase Item should have a Price (i.e. a normal purchase price) specified.
- If an Item does not have a corresponding Default Purchase Item, it will still be included on a Purchase Order if you have specified a Default Supplier in the Purchase Order Settings setting. In this case, the purchase price of the Item will be the Cost Price from the 'Costs' card of the Item record.
In the Item register the following information must be present:
- The Items to be purchased must be Stocked Items (recorded on the 'Pricing' card of the Item screen).
- A minimum stock level must be specified on the 'Stock' card of the Item screen. Alternatively, if you want to specify separate minimum stock levels for each Location, use the Minimum Stock Levels setting in the Stock module.
- The Items to be purchased must not be Closed.
Before using this function, it is recommended that you produce a Deficiency List or Purchasing Suggestion report, so that you become aware of the Items for which Purchase Orders are likely to be created.
Selecting the 'Create Purchase Orders' function brings up the following dialogue box:
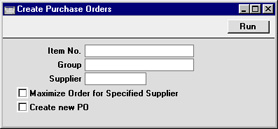
- Item No.
- Paste Special
Item register
- Range Reporting Alpha
- Use this field to ensure the function considers the stock/re-ordering position of a particular Item or range of Items.
- Use this field to ensure the function considers the stock/re-ordering position of a particular Item or range of Items.
- Group
- Paste Special
Item Group register, Sales Ledger
- Use this field to ensure the function considers the stock/re-ordering position of the Items of a particular Item Group.
- Supplier
- Paste Special
Supplier register
- Use this field to ensure the function considers the stock/re-ordering position of Items with a particular Supplier specified in their Default Purchase Item.
- Items without a Default Purchase Item (i.e. those using the Default Supplier specified in the Purchase Order Settings setting) will not be considered if that Supplier is entered here. Such Items can only be ordered using the Item Number or Group fields above.
- Items without a Default Purchase Item (i.e. those using the Default Supplier specified in the Purchase Order Settings setting) will not be considered if that Supplier is entered here. Such Items can only be ordered using the Item Number or Group fields above.
- Maximise Order for Specified Supplier
- If you have specified a Supplier, check this box if you would like to include on the Purchase Order Purchase Items which they supply but for which they are not the default Supplier.
- If you check this box and do not specify a Supplier, no Purchase Orders will be created unless a Default Supplier has been specified in the Purchase Order Settings setting. In this case all Items will be ordered from that Supplier (even those that have a Default Purchase Item).
- If you check this box and do not specify a Supplier, no Purchase Orders will be created unless a Default Supplier has been specified in the Purchase Order Settings setting. In this case all Items will be ordered from that Supplier (even those that have a Default Purchase Item).
- Create new PO
- Check this box if you want new Purchase Orders always to be created. Otherwise, if there are any unapproved or open Purchase Orders in the name of any of the Suppliers used by this function, any Items to be purchased from those Suppliers will be added to the earliest of those Purchase Orders.
- If this option is used, separate Purchase Orders will be created for each Item, even if they come from a single Supplier.
Note that the purpose of this function is to create Purchase Orders for Items that have fallen below their minimum stock level ("stocking" Orders). If you need to create Purchase Orders for goods that are needed to fulfil outstanding Sales Orders ("back-to-back" Purchase Orders), use the 'Create Purchase Orders' Maintenance function in the Sales Orders module.
Generating Purchase Orders for Stock - Creating Purchase Orders from Deficiency Stock
When you need to create Purchase Orders for stock (i.e. to bring stock levels of Items up to their minimum levels), one way of doing so is to use the 'Create Purchase Orders' function. This function will generate Purchase Orders for every Item where the stock balance is lower than the Minimum Stock Level, taking outstanding Sales, Purchase and Production Orders into account. You can of course edit the resulting Purchase Orders (e.g. removing Items that you don't need to order) before sending them to your Suppliers.An alternative is to create a shopping list of Items to be ordered, and then to create Purchase Orders for those Items. The shopping list is given the term "Deficiency Stock" in Standard ERP. After constructing the Deficiency Stock list, you can then use the 'Create Purchase Orders from Deficiency Stock' Maintenance function to create Purchase Orders for the Items in that list.
To prepare to use the Deficiency Stock feature, follow these steps:
- If you are not using Locations, ensure each Item has a related Default Purchase Item.
Specify a Minimum Stock Level for each Item using the Minimum Level field in the Item record.
- If you have a single Location (i.e. you have a single record in the Locations setting and you have specified a Main Location in the Stock Settings setting), ensure each Item has a related Default Purchase Item.
Specify a Minimum Stock Level for each Item by creating separate records in the Minimum Stock Levels setting in the Stock module for each Item. Specify the Location in these records.
- If you have more than one Location, ensure each Item has a related Default Purchase Item. If necessary, you can enter separate Default Purchase Items for each Location. If so, enter a Default Purchase Item with a blank Location as well, to be used if there is no Default Purchase Item for a particular Location.
Specify a Minimum Stock Level for each Item by creating separate records in the Minimum Stock Levels setting in the Stock module. You should enter separate Minimum Stock Levels record for each Item for each Location.
To use the Deficiency Stock feature, follow these steps:
- The first step is to run the Deficiency List per Location report from the Stock module. When you run the report using the default options, it will list the Stocked Items that you have in stock but where the stock level is too low. There is an option to include Items that are not in stock as well. Each Item/Location combination for which there is a deficiency will be shown on a separate row in the report:
The last column (headed "Defncy") displays the current stock deficiency of the Item in each Location. If the stock level after all Sales, Purchase and Production Orders have been fulfilled is less than the Minimum Stock Level, then there is a deficiency. That deficiency is the quantity required to bring the stock level up to the Minimum Stock Level.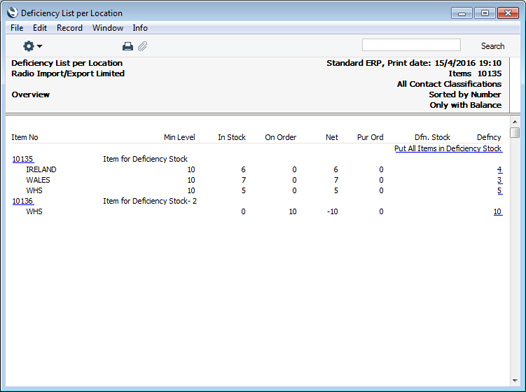
In this example, Item 10135 has a deficiency in three Locations because the stock level in each of those Locations is below the Minimum Stock Level. Item 10136 doesn't have a Minimum Stock Level, but it has a deficiency because there is an outstanding Sales Order.
- To add an Item to the Deficiency Stock list, click (Windows/Mac OS X) or tap (iOS/Android) the relevant figure in the Defncy column. A Deficiency Stock record will be created and opened, in this example for Item 10135 in Location WHS:
The quantity that is required will be copied to the Quant field. The Supplier and Supp. Item will be copied from the Default Purchase Item for the Item/Location combination or, if there is no such Purchase Item, from the Default Purchase Item for the Item in which the Location is blank. If there is no suitable Default Purchase Item, the Supp. Item and Supplier will be blank.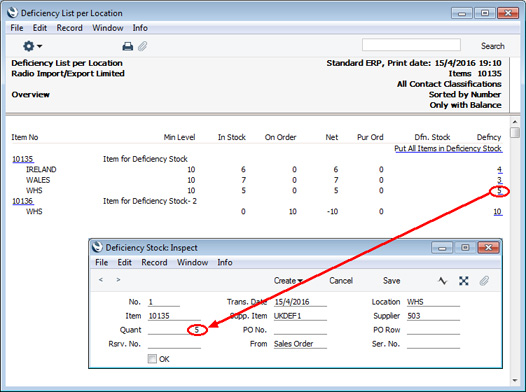
Note that the window title is 'Deficiency Stock: Inspect'. This means that the record has already been saved i.e. that the Item has already been added to the Deficiency Stock list for the relevant Location. If you don't need the Item to be included in the Deficiency Stock list, delete the record by selecting 'Delete' from the Record menu (which has a 'cog' icon if you are using iOS or Android). Otherwise, simply close the record.
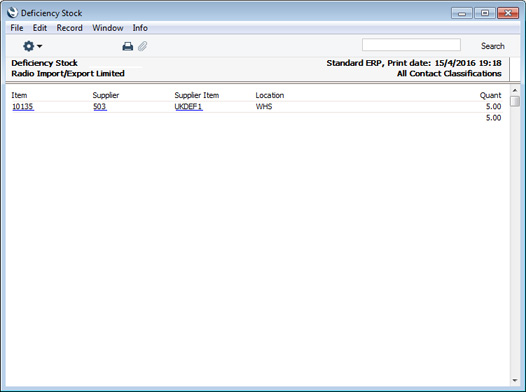
- To check what is in the Deficiency Stock list, run the Deficiency Stock report in the Purchase Orders module:
- If you need to inspect the Deficiency Stock records, you will find them in the Deficiency Stock setting in the Database Maintenance module.
- To create Purchase Orders for the Items in the Deficiency Stock list, run the 'Create Purchase Orders from Deficiency Stock' Maintenance function in the Purchase Orders module:
Specify a single Item, Location or Supplier as appropriate, or leave all the fields blank to create Purchase Orders from the entire Deficiency Stock list. Then, press the [Run] button to start the generation of Purchase Orders. When the process finishes, the new Purchase Orders will be available in the Purchase Order register for viewing, modifying and printing. The function will always create new Purchase Orders: it won't emulate the 'Create Purchase Orders' function and attempt to add to existing Purchase Orders.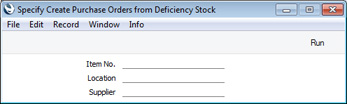
The Purchase Order register in Standard ERP:
- Introduction
- Entering a Purchase Order
- Inspecting and Changing Purchase Orders
- Printing Purchase Orders
- Generating Purchase Orders for Stock, including:
- Creating Purchase Orders from Deficiency Stock
- Operations menu
Go back to:
- Home page for Purchase Orders manual
- Home page for Standard ERP manual
Operations Menu
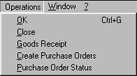
Operations Menu - OK
This command is available on the Operations menu only from the 'Purchase Orders: Browse' window. It permits the approving of a Purchase Order and is therefore the equivalent of checking the OK box in a Purchase Order record. You can also select several invoices in the 'Purchase Orders: Browse' window (hold down the Shift key to select a range of Purchase Orders in the list) and approve them all at once. Remember that once this action has been carried out you will no longer be able to modify those Purchase Orders.Operations Menu - Close
This command is available on the Operations menu only from the 'Purchase Orders: Browse' window. It is the equivalent of checking both the Close and the OK boxes in a Purchase Order record. You can also select several invoices in the 'Purchase Orders: Browse' window (hold down the Shift key to select a range of Purchase Orders in the list) and close them all at once. Remember that once this action has been carried out you will no longer be able to modify those Purchase Orders.A Purchase Order is closed when all deliveries have been received, and the Purchase Invoice has been processed. Any remaining quantities that have not been received will be cancelled.
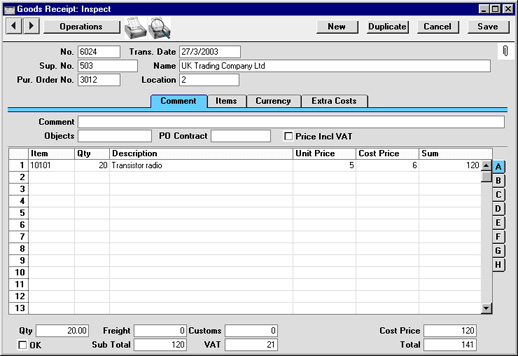
Operations Menu - Goods Receipt
This command is used to receive goods into stock against a Purchase Order. It is available on the Operations menu both in the browse window and in the record window for an individual Purchase Order. When used from the browse window, highlight a single Purchase Order before selecting the function. When used from the record window, all changes to the Purchase Order must first have been saved (use the [Save] button).On selecting the function, a new record is created in the Goods Receipt register (in the Stock module). It is opened in a new window, entitled 'Goods Receipt: Inspect'. This means that it has been created and saved and is being opened for amendment and approval.
Plain Items on the Purchase Order will not appear on the Goods Receipt if the Automatic receiving of Service and Plain Items option in the Stock Settings setting is being used.
If an Item that requires Serial Numbers (set on the 'Stock' card of the Item screen) has been used on the Order with a Quantity greater than one, the Goods Receipt will contain the appropriate number of rows each with a Quantity of one. This allows you to enter Serial Numbers on flip B: Serial Numbers must be entered before the Goods Receipt can be approved.
The Quantity of one or more rows on the Goods Receipt screen can be amended as appropriate. You can also remove entire rows, by clicking on the row number to the left and pressing the Backspace key. You can receive into stock a greater Quantity than was ordered.
To print Stock Labels, use the function on the Operations menu. To print a Goods Receipt Note, click the Printer icon.
When the Goods Receipt has been checked, click the OK check box. This signifies that the Goods Receipt has been approved. If you have determined that Nominal Ledger Transactions are to be created at the point of delivery (using the Sub Systems setting in the Nominal Ledger), these Transactions will now be created. You will no longer be able to modify the Goods Receipt. You will not be able to create a Purchase Invoice for the Items on the Goods Receipt until it has been approved.
Please click here for a full description of the screen, including detailed information about shipments, stock and Nominal Ledger Transactions.
To close the screen and return to the Purchase Order, click the close box. You will be asked if you want to save any changes. The Received field of the Purchase Order (visible on flip C) will be updated automatically if the Goods Receipt was approved. For any Items on the Goods Receipt that are Stocked Items, the stock balance for the stock Location specified for the Goods Receipt will be updated.
If you are making use of the cost accounting facility in Hansa, you will want such transactions to be created on the receipt of goods as well as on their delivery. To ensure that this occurs, switch on the Goods In check box in the Sub Systems setting in the Nominal Ledger. You will also need to specify Accounts for each of the fields on card 5 of the Account Usage S/L setting in the Sales Ledger. Please refer to the Cost Accounting page for full details.
If the function does not create a Goods Receipt, the probable causes are:
- The Purchase Order has been marked as Closed.
- All Items on the Purchase Order have already been received.
- There is no valid record in the Number Series - Goods Receipts setting (in the Stock module). This might be a fault in the setting itself, or it might be because the default Goods Rec Number on the 'Ser Nos' card of the current user's Person record or in the Number Series Defaults setting (in the System module) is not in a valid Number Series. This problem will usually occur at the beginning of a new year. If a change is made to the 'Ser Nos' card of the Person record, you will need to quit Hansa and restart for it to take effect.
Operations Menu - Create Purchase Orders
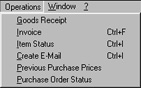
This function is one of several methods by which Purchase Orders can be created automatically. Please refer to the Generating Purchase Orders for Stock page for a full description of how to use this function.Operations Menu - Purchase Order Status
This produces a report for the Purchase Order currently open in a record window or for the first Order highlighted in the 'Purchase Orders: Browse' window. This report summarises all aspects of the Order, including Order details, each Goods Receipt and each Purchase Invoice.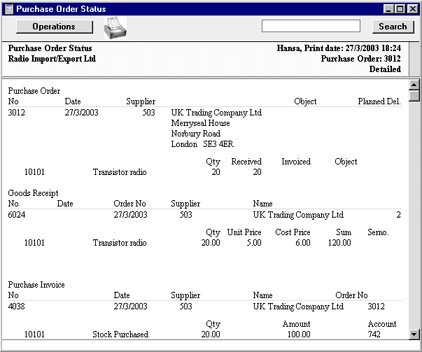
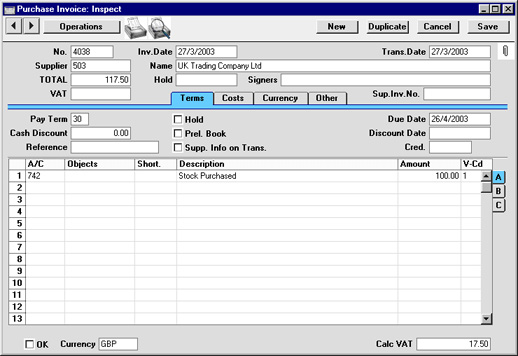
Operations Menu - Invoice
To raise a Purchase Invoice from a Purchase Order, select 'Invoice' from the Operations menu. For the function to have any effect, all changes to the Purchase Order must first have been saved (use the [Save] button), and the Supplier record must have a Cost Account specified on its 'Accounts' card. Usually, an approved Goods Receipt must first have been created from the Purchase Order: exceptions to this are described later on this page.On selecting the function, a new record is created in the Purchase Invoice register (in the Purchase Ledger). It is opened in a new window, entitled 'Purchase Invoice: Inspect'. This means that it has been created and saved and is being opened for amendment and approval.
- Consolidate Items to Supplier Cost Account
- The ordered Items are grouped together on a single row on the Invoice indicating that they are to be posted to the same Cost Account (taken from the Cost Account on the 'Accounts' card of the Supplier record). If the Items on the Purchase Order have different VAT Codes, there will be a separate row on the Invoice for each VAT Code.
- Consolidate by Items and Project
- The Purchase Invoice will feature a separate row for each received Item/Project combination on the Purchase Order. The Cost Accounts will be the Purchase Control Account for the Item Groups to which the Items belong (if the Use Item Groups for Cost Accounts option in the Cost Accounting setting in the Stock module is in use) or that on card 5 of the Account Usage S/L setting.
- Transfer Each Row Separately
- Each ordered Item will have its own row on the Invoice. The Cost Accounts will be the Purchase Control Account on flip B of the Purchase Order, the Purchase Control Account for the Item Groups to which the Items belong (if the Use Item Groups for Cost Accounts option in the Cost Accounting setting in the Stock module is in use) or that on card 5 of the Account Usage S/L setting.
- If the Always use Full Qty from Purch. Ord. box in the Purchase Invoice Settings setting is checked. In this case all Items (Stocked, Plain and Service) from the Purchase Order will be included on the Purchase Invoice even if they have not been received: no Goods Receipt need exist.
- If the Automatic receiving of Service and Plain Items box in the Stock Settings setting is checked, Goods Receipts are not created for Service and Plain Items. Therefore, they can be included on Purchase Invoices immediately: no Goods Receipt need exist. Stocked Items must still be received unless point 1 also applies.
If this box is checked, when a Plain or Service Item is included in a Purchase Order, the Received Quantity will be changed to the Order Quantity when the Purchase Order is saved. Therefore Plain and Service Items will never be included on Goods Receipts created from the Purchase Order. This also means that the Order Quantity for such Items cannot be reduced once the Purchase Order has been saved. This option is intended for use where Purchase Orders for Items such as labour or training are issued frequently and Goods Receipts are not required.
Two check boxes in the Account Usage P/L setting, Update Base Cur. when Invoicing and Update Foreign Cur. when Invoicing, control the Base and Exchange Rates on the 'Currency' card of the Invoice. If these options are not used, the rates will be copied from the Order. If they are used, the latest Base and Exchange Rates will be used. In the latter case, the prices in Currency in the Invoice will not be changed. This means you will still be charged the agreed price, but the value of the Invoice in the home Currency (and therefore in the Nominal Ledger) will be different to that of the Order.
When the Purchase Invoice has been checked, click the OK check box. This signifies that the Purchase Invoice has been approved. Associated Transactions in the Nominal Ledger will now be raised (if so defined in the Sub Systems setting in the Nominal Ledger) and you will no longer be able to modify the Invoice.
Please click here for a full description of the screen, including detailed information about approving the Invoice and Nominal Ledger Transactions.
To close the screen and return to the Purchase Order, click the close box. You will be asked if you want to save any changes. The Invoiced field of the Order (visible on flip C) will be updated automatically if the Purchase Invoice was approved.
If the function does not create a Purchase Invoice, the probable causes are:
- The Supplier has been marked as Closed or does not have a Cost Account specified.
- There are no Items on the Purchase Order awaiting invoicing.
- There is no valid record in the Number Series - Purchase Invoices setting (in the Purchase Ledger). This might be a fault in the setting itself, or it might be because the default Purch Inv Number on the 'Ser Nos' card of the current user's Person record or in the Number Series Defaults setting (in the System module) is not in a valid Number Series. This problem will usually occur at the beginning of a new year. If a change is made to the 'Ser Nos' card of the Person record, you will need to quit Hansa and restart for it to take effect.
Operations Menu - Item Status
This function provides instant feedback for the Item shown in the Order row containing the cursor or highlighted in the 'Paste Special' window listing Items, showing in a new window the quantity in stock, the quantity on order and the quantity shippable.Please click here for full details of this function.
Operations Menu - Create E-Mail
This function can be used to create a Mail containing details of the Purchase Order. This can be used to send the Purchase Order to the Supplier by email.When the function is selected, the following screen appears, by which a new Mail can be created:
If the function does not create a Mail, the probable causes are:
- The current user does not have a Mailbox.
- The Supplier from the Purchase Order does not have email addresses.
- The Purchase Order has not been saved.
Operations Menu - Previous Purchase Prices
This function produces a report showing the prices previously charged by the Supplier for one of the Items on the Order. Place the cursor in one of the rows of the Order and then select this function from the Operations menu. The report shows the most recent Order for each different price.Koosta tagastatud kaubad
Kasuta antud funktsiooni, kui on vaja kaup Hankijale tagastada. Selleks ava Ostutellimus ja vali Operatsioonide menüüst Koosta tagastatud kaubad. Enne funktsiooni kasutamist pead olema Ostutellimuse salvestanud ning kinnitanud sellest vähemalt ühe Laosissetuleku. Teine võimalus on avada Laosissetulek ja valida Operatsioonide menüüst käsklus 'Koosta tagastatud kaubad' (Laosissetuleku saad avada ka Ostutellimuselt Kirjaklambri alt). Koosta Tagastatud kauba kaardid Laosissetulekutest, kui Laomooduli Kuluarvestuse seadistuses on märgitud valik Algne laosisset. ostuhind hankijatele tagast. kaupadel ja/või Ostutellimuste seadistustes on märgitud valik Ära luba tellimusest koostada tagastatud kaupu.Kauba tagastamisel lattu on keeruline leida tagastatud kauba tegelikku väärtust (FIFO, LIFO või Kaalutud keskmine). Selleks, et kauba väärtused püsiksid võimalikult täpsed, kasutatakse registrit Tagastatud kaubad hankijale. Näiteks Kulujärjekorra kulumudeli (FIFO või LIFO) puhul tuleb kaup võtta tagasi lattu väärtusega, mis oli selle lattu võtmise hetkel. Kaalutud keskmise või Ostuhinna kulumudeli korral võivad lattu võtmise ja tagastuse vahepeal Kaalutud keskmine või Ostuhind muutuda.
Funktsiooni käivitamisel koostatakse uus kaart registrisse Tagastatud kaubad hankijale (Laomoodulis). Kaart avatakse eraldi aknas, mis tähendab, et kaart on salvestatud ning avatud muutmiseks ning kinnitamiseks.
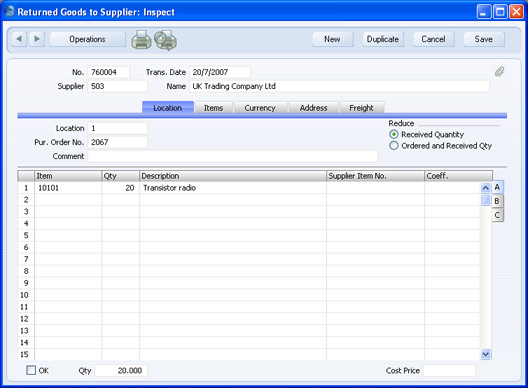
Sisesta Artiklite tagastatud kogused ja eemalda Artiklid, mida ei tagastatud, klikkides rea numbril ning vajutades klaviatuuril Backspace klahvi. Algselt saadud kogusest suuremat kogust tagastada ei saa. Samuti ei saa tagastada rohkem kui kaupa laos on, juhul kui osa saadud kaubast on väljastatud klientidele või muidu laost eemaldatud.
Kui tagastatud Artikkel kannab Seerianumbrit, ei näe seda Tagastamisel. Selle põhjuseks on, et Ostutellimusel ei näidata Seerianumbreid. Sisesta ise õige Seerianumber C osale.
Kui tagastati rikkega kaup (st vaja on asenduskaupa), märgi Hankijale tagastatud kauba kaardi paremas servas valik Vähenda saadud kogust. Kui oled Tagastamise kinnitanud, võid kauba saabumisel avada Ostutellimuse ning koostada sellest uue Laosissetuleku vastava koguse kohta.
Kui asenduskaupa ei soovita, (nt tagastas klient kauba ja tühistas tellimuse), märgi Tagastamisel valikud Vähenda tellitud ja saadud kogust. Kui Ostutellimusest on väljastatud Ostuarve, saad koostada kreeditarve Ostutellimuse kaardi Operatsioonide menüü käsklusega 'Koosta ostuarve'. Võid ka avada algse Ostuarve ja valida selle Operatsioonide menüüst käskluse 'Koosta kreeditarve' (Arve leiad Tellimuse Kirjaklambri alt). Koostatakse sobiva Tasumistingimusega Kreeditarve viitega krediteeritavale Ostuarvele. Kreeditarve saab koostada ka kaardi Tagastatud kaubad hankijale Operatsioonide menüü käsklusega 'Koosta kreeditarve'. Igal juhul muudab Kreeditarve Arvega kogust Tellimuse C osal, kui Ostutellimuste seadistustes on märgitud valik Kreeditarved uuendavad arvega kogust ja kui Ostuarve seadistuses ei ole märgitud valik Ühe summeeritud reana hankija kulukontoga.
Kui Tagastatud kaup hankijale kaart on valmis, kinnita see. Kinnitatud kaarti ei saa enam muuta. Tagastatud kaupade kohta ei saa Kreeditarvet koostada enne, kui Tagastamine on kinnitatud. Kui oled vastavalt seadistanud Allsüsteemide seadistuses Finantsis ja seadistuses Numbriseeriad – Tagastatud kaubad hankijatele Laomoodulis, koostatakse Tagastamise kinnitamisel sellest Kanne Finantsi.
Tagastatud kaubad hankijale kaardi ning kaardi kinnitamisel koostatavate finantskannete kohta loe palun lähemalt siit.
Sulge aken sulgemisruudust. Salvesta muudatused. Lähetatud kogused Ostutellimuse C osal muudetakse automaatselt (nagu ka kogus Ostutellimuse A osal, kui oled märkinud vastava valiku). Muudatuste nägemiseks võib olla vajalik Ostutellimus korraks sulgeda.
Kui funktsiooniga kaarti Tagastatud kaubad hankijale registrisse ei koostatud ja viga pole numbriseeriates, on tõenäoliselt põhjuseks, et Ostutellimus ei sisalda Laoartikleid. Sellisel juhul koostatakse Tagastamine vaid tingimusel, et Kuluarvestuse seadistuses on märgitud valik Konteeri tavaliste ja teenusartiklite kulu. Kui seda valikut ei kasutata ja Ostutellimusel on nii Lao-, Tavalisi kui Teenusartikleid, võetakse Tagastamisele vaid Laoartiklid.
Reserveeringud
Selle funktsiooni kohta loe palun lähemalt siit.