Configuring the POS Invoice Window
The POS Invoice interface is designed to allow the quick and easy registration of sales in high volumes, by touch if you will be using cash machines and tills with touch screens. In such a high-pressure environment, each company will have their own requirements for the tools and functions that their cashiers should use. To allow for this, the placing of tools and functions in the POS Invoice window is fully user-definable. For details, please refer to the following pages:- Placing Buttons, Tools and Functions in the POS Invoice Window
- Adjusting Elements in the POS Invoice Window
- Descriptions of Individual Button Types
- POS Commands
- Descriptions of Individual POS Commands
- Connecting Printers
- Credit and Debit Card Payments
- Home page for Point of Sales manual
- Home page for Standard ERP manual
Placing Buttons, Tools and Functions in the POS Invoice Window
This page describes in outline the placing of buttons, tools and functions in the POS Invoice window. For detailed descriptions about each function, please refer here. If you will need cashiers to be able to activate some tasks and functions using keyboard commands, please refer here for details about configuring these commands.---
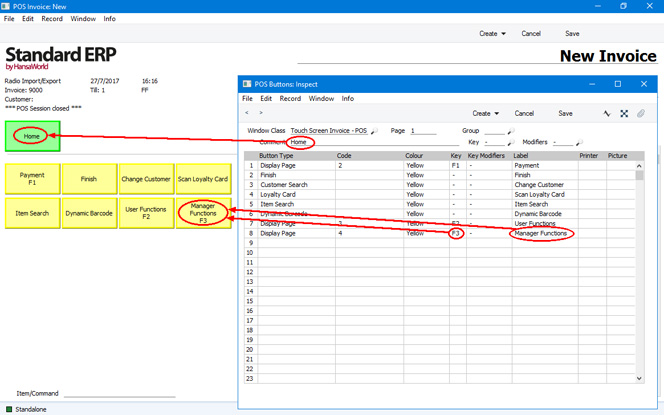
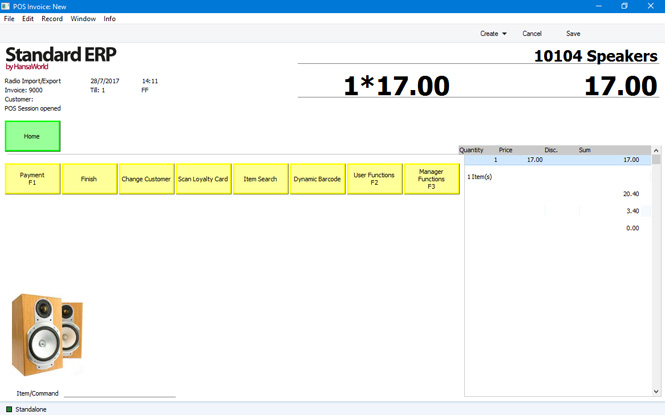
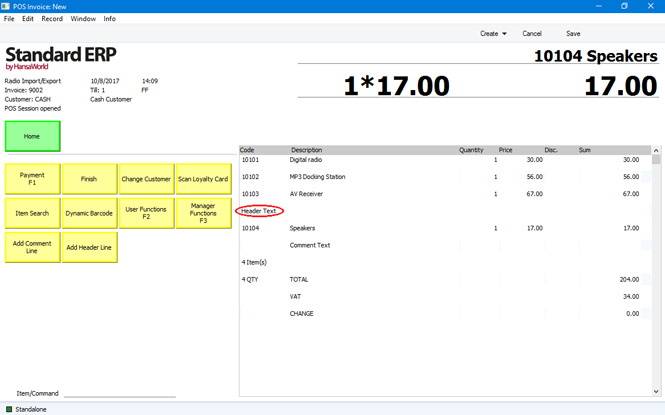
Illustrated below is the POS Invoice window as it will appear in a new installation of Standard ERP:
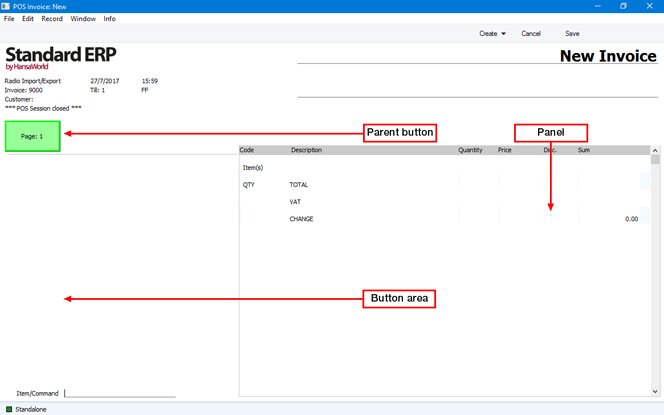
- It can activate a particular function; or
- It can replace the set of buttons that is currently visible with a different set.
An example button structure is illustrated below:
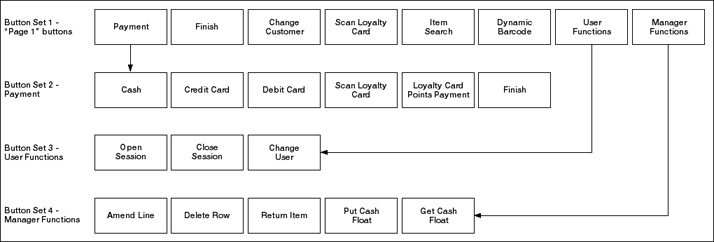
You can include a button more than once in the structure (in the example, this has been done with the "Finish" and "Scan Loyalty Card" buttons).
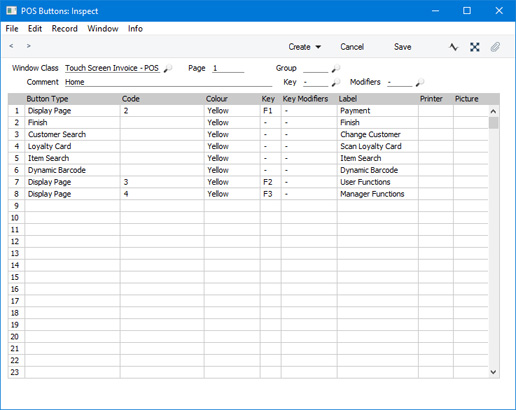
Use the POS Buttons setting to design your sets of buttons. This setting is available in the Point of Sales and Restaurant modules. You should enter a separate record in this setting for each set of buttons that you need.
- Window Class
- Paste Special
Choice of possible entries
- Using 'Paste Special', specify the window in which the set of buttons will be used. The following options are available:
- Touch Screen Invoice - POS
- The set of buttons will be used in POS Invoices.
- Bar Tab
- The set of buttons will be used in Bar Tabs in the Restaurant module.
- Touch Screen Invoice - SL
- Not used.
The remainder of this page will assume you have chosen "Touch Screen Invoice - POS" as the Window Class.
- Touch Screen Invoice - POS
- Page
- Use this field to assign a unique identifying code to the POS Button record.
- In most cases, you can use an arbitrary code. However, you must have one POS Button record in which the Page is "1" as shown in the illustration (described as a "Page 1" record in this documentation). This record will contain the buttons that will be displayed in new POS Invoices.
- In most cases, you can use an arbitrary code. However, you must have one POS Button record in which the Page is "1" as shown in the illustration (described as a "Page 1" record in this documentation). This record will contain the buttons that will be displayed in new POS Invoices.
- Group
- Paste Special
POS Button Groups setting, Point of Sales/Restaurant module
- Use this field to assign a POS Button record to a Button Group.
- Button Groups allow you to use different sets of Buttons in different circumstances. For example in a restaurant you might need different sets of buttons to appear on the tills in the food area compared to the tills in the bar. In this case, you would create one POS Button Group for the food area and one for the bar. Then, create the POS Button records that you need, assigning them each to the relevant Button Group (i.e. use this field to assign each POS Button record to the food area or to the bar). Then, assign each till to a Button Group using the POS Button Group field in the Local Machine setting in the User Settings module (or, if a till has a live-sync connection to the server, in the record for the till in the Local Settings setting in the Technics module). Buttons designed for the food area will not be used on tills in the bar and vice versa.
- If you are using Button Groups, you must have a "Page 1" record for each Button Group. Continuing the example, the "Page 1" record for the food area will contain the buttons that will be displayed in new POS Invoices created on tills in the food area, while the "Page 1" record for the bar will contain the buttons that will be displayed in new POS Invoices created in the bar.
- Button Groups allow you to use different sets of Buttons in different circumstances. For example in a restaurant you might need different sets of buttons to appear on the tills in the food area compared to the tills in the bar. In this case, you would create one POS Button Group for the food area and one for the bar. Then, create the POS Button records that you need, assigning them each to the relevant Button Group (i.e. use this field to assign each POS Button record to the food area or to the bar). Then, assign each till to a Button Group using the POS Button Group field in the Local Machine setting in the User Settings module (or, if a till has a live-sync connection to the server, in the record for the till in the Local Settings setting in the Technics module). Buttons designed for the food area will not be used on tills in the bar and vice versa.
- Comment
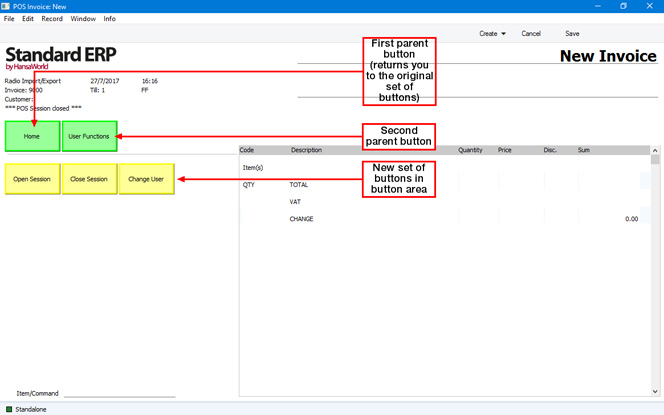
- This Comment will be used as the button label for the button above the button area (i.e. as the button label for the parent button). In the example illustrated above, "Main" will replace the default label, "Page 1".
- Key, Modifiers
- Paste Special
Choice of possible entries
- As an option, use the Key field to specify a Function Key that a cashier can use to activate the set of buttons. In practice, it is only useful to do this for the set of buttons attached to the parent ("Page 1") button, because this button is always visible above the button area and therefore the Function Key will always be active.
Be sure to choose a Function Key that isn't already used by the operating system. If necessary, add a Modifier to the Function Key (e.g. Ctrl or Shift).
The buttons will be shown in the POS Invoice in the order in which you list them in the POS Button record. The first four buttons in the list in the POS Button record will appear in the first row of buttons in the POS Invoice, and so on.
Each row in the matrix represents a single button, with the following attributes:
- Button Type
- Paste Special
Choice of possible entries
- Use 'Paste Special' to specify the task or function that should be carried out when the cashier touches or presses the button. Please refer to the 'POS Button Types’ page for descriptions of each option.
- Code
- Paste Special
Depends on Button Type
- Depending on the Button Type you have chosen in the field to the left, you may need to make an entry in this field. For example, if the Button Type is "Display Page", use this field to specify the Page that is to be displayed when the cashier touches or presses the button. If the Button Type is "Cash", "Credit Card" or "Loyalty Points Payment", use 'Paste Special' to choose a Payment Mode for the payment. Please refer to the descriptions of the individual Button Types (index here) for more details about using this field with specific Button Types.
- Colour
- Paste Special
Choice of possible entries
- Choose a colour for the button, to be used in the POS Invoice window.
- Key, Key Modifiers
- Paste Special
Choice of possible entries
- As an option, use the Key field to specify a Function Key that a cashier can use instead of pressing the button.
- Be sure to choose a Function Key that isn't already used by the operating system. If necessary, add a Modifier to the Function Key (e.g. Ctrl or Shift).
- Be sure to choose a Function Key that isn't already used by the operating system. If necessary, add a Modifier to the Function Key (e.g. Ctrl or Shift).
- Label
- Enter the name of the button, as it will appear in the POS Invoice window.
- Printer
- Paste Special
Printers setting, System module
- This field will only be used if the Window Class in the header is "Bar Tab" and if the Button Type is "Display Page" or "Item". When a waiter prints a Bar Tab, you can use this field to specify that specific Items on the Bar Tab will be printed on particular printers in the kitchen. You can do this for an individual Item (by specifying a Printer in a row in which the Button Type is "Item"), or you can do this for a selection of Items (by specifying a Printer in a row in which the Button Type is "Display Page").
- Picture
- Paste Special
POS Button Pictures setting, Point of Sales module
- If you need a picture or image to appear in a button instead of a Label, choose a record in the POS Button Pictures setting here. You should have attached the picture or image to that POS Button Picture record, as described here. The image can be a JPG or PNG file (BMP is also supported on Windows clients only, but using BMP files is not recommended because their size can have a detrimental effect on the speed with which the button will be drawn). If you need to use POS Button Pictures, you should also select the Item Pictures on Buttons option on the 'POS’ card in the Local Machine setting in the User Settings module. You may also want to change the default button size, which you can do using the Button Width and Button Length fields in the same setting. As the Local Machine setting is stored separately in each client database, you will need to make these changes on each till or cash machine.
Configuring the POS Invoice WIndow:
- Introduction
- Placing Buttons, Tools and Functions in the POS Invoice Window
- Adjusting Elements in the POS Invoice Window
- Descriptions of Individual Button Types
- POS Commands
- Descriptions of Individual POS Commands
- Connecting Printers
- Credit and Debit Card Payments
- Home page for Point of Sales manual
- Home page for Standard ERP manual
Adjusting Elements in the POS Invoice Window
This page describes the adjustments you can make to the appearance of the POS Invoice window so that it best suits your requirements.---
The 'POS' card in the Local Machine setting in the User Settings module contains various options that you can use to change and move the elements in the POS Invoice and Bar Tab windows. As the Local Machine setting is stored separately in each client database, you will need to make these changes on each till or cash machine (or you can have different settings on each till). If a till will have a live-sync connection with the server, you can make these changes in the Local Settings setting in the Technics module before connecting the till to the server. The changes will then be sent to the till as part of the synchronisation process.

- Item Picture in POS Invoice (iOS)
- Select this option if you would like Item pictures to be shown in the POS Invoice window. You should also set the Item Pictures on Cashier Screen option in the POS Settings setting to "Default" or "On”.
- The pictures will be brought in from the Item register as the cashier scans the Items to add them to a POS Invoice. Please refer here for details about adding pictures to Item records.
- If you select this option, Item pictures will be shown in the button area above the Item/Command field, so they will reduce the area that is available for buttons:
You should only select this option on tills and cash machines that have a live connection to the server. If a till or cash machine has a live-sync connection to the server, the Item picture files will not be sent to the till by the synchronisation process so selecting this option will have no effect.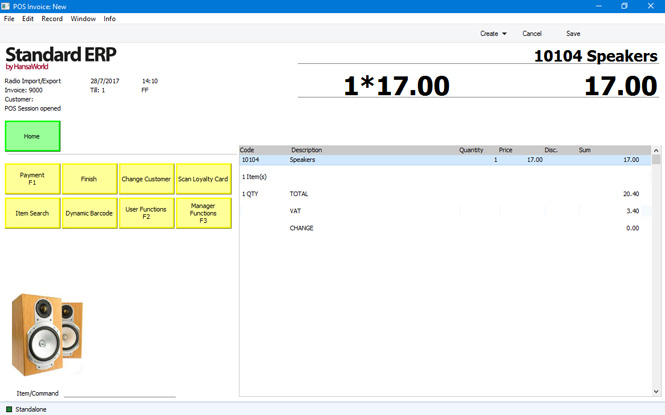
- The pictures will be brought in from the Item register as the cashier scans the Items to add them to a POS Invoice. Please refer here for details about adding pictures to Item records.
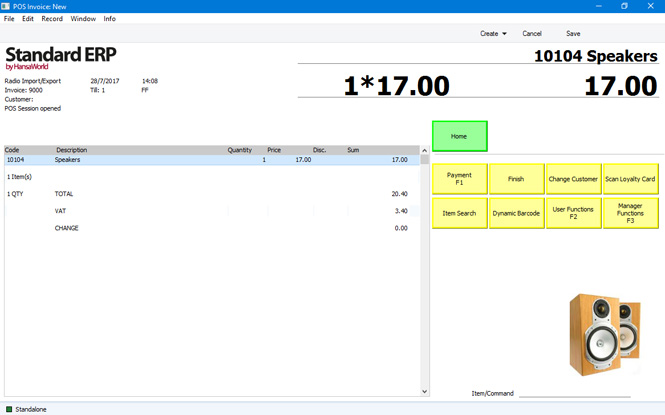
- Buttons Position
- Use these options to specify whether the button area should be placed on the left side of the POS Invoice or on the right. If you choose the Right option, the POS Invoice will appear as follows:
- Panel Size
- The panel is the area in the POS Invoice that lists the Items that have been scanned by the cashier. You can choose to reduce the size of the panel if you need a larger button area. If you select this option, you may need to reduce the Panel Font Size using the options below as well.
- Panel Font Size
- Use these options to set the font size of the text in the panel. These options will have no effect on Windows tills.
- Button Width, Button Length
- By default, the buttons in the POS Invoice window will be 93 x 50 pixels in size, excluding the border (98 x 55 pixels including the border). If you need the buttons on a particular till or cash machine to be a different size, enter that size in pixels in these fields.
- Item Pictures on Buttons
- Select this option if you would like the buttons in the POS Invoice window to contain images or pictures, instead of text labels. Please refer to the description of the POS Button Pictures setting here for more details.
Configuring the POS Invoice Window:
- Introduction
- Placing Buttons, Tools and Functions in the POS Invoice Window
- Adjusting Elements in the POS Invoice Window
- Descriptions of Individual Button Types
- POS Commands
- Descriptions of Individual POS Commands
- Connecting Printers
- Credit and Debit Card Payments
- Home page for Point of Sales manual
- Home page for Standard ERP manual
POS Button Types in POS Invoices
When you add a POS Button to the POS Invoice window, you should specify a Button Type. This will determine the task or function that will be carried out when cashiers press or touch the button. For detailed descriptions of each Button Type, please refer to the following pages:- Customer Functions
Includes the following Button Types:
- Change Address
- Customer Search
- Open Customer Record
- Change Address
- Gift Vouchers
Includes the following Button Types:
- Create Gift Voucher
- (Gift Voucher)
- Sell Gift Voucher
- Create Gift Voucher
- Invoice Functions
Includes the following Button Types:
- Change Terms
- Enter Reference Number
- Open Tax Matrix
- Change Terms
- Invoice Row Functions
Includes the following Button Types:
- Add Comment Line
- Add Header Line
- Amend Line
- Delete Row
- Void Item
- Add Comment Line
- Item and Pricing Functions
Includes the following Button Types:
- Dynamic Barcode
- Item
- Item Search
- Item Status
- Modifier
- Open Item Record
- Previous Sales Prices
- Price Lookup
- Serial No. Lookup
- Split Item
- Dynamic Barcode
- Loyalty Cards
Includes the following Button Types:
- Loyalty Card
- (Loyalty Points Payment)
- Loyalty Card
- Miscellaneous Functions
Includes the following Button Types:
- Connect to CC Terminal
- Send Email
- Senior Citizen Discount
- Connect to CC Terminal
- Navigation and Appearance
Includes the following Button Types:
- All Invoices
- Blank
- Display Page
- Open Unfinished Invoices
- POS Command
- Top Level
- All Invoices
- Payment Methods
Includes the following Button Types:
- Cash
- Cheque
- Credit Card
- Credit Card Payment Reversal
- Debit Card
- Full Payment
- Gift Voucher
- Loyalty Points Payment
- Pay
- Pay (one Mode)
- Cash
- Personnel Functions
Includes the following Button Types:
- Bagger Search
- Change User
- Sales Assistant
- Select Salesman
- Supervisor Search
- Bagger Search
- Processing Invoices
Includes the following Button Types:
- Finish
- Invalidate Invoice
- Open Cash Drawer
- Paste Quotation
- Paste Sales Order
- Print Invoice
- Reprint Last CC Slip
- Reprint Receipt/ul>
- Returns
Includes the following Button Types:
- Return
- Return Invoice No.
- Return Reason
- Return
- Transfer to Other Registers
Includes the following Button Types:
- Transfer to Invoice
- Transfer to Quotation
- Transfer to Sales Order
- Transfer to Invoice
- Workflow
Includes the following Button Types:
- Cash Up Report
- Close Session
- Daily Report
- Daily Z Report
- Get Cash Float
- Open Session
- Operations Menu Function
- Pause Sales
- Put Cash Float
- Resume Sales
- Cash Up Report
---
Configuring the POS Invoice Window:
- Introduction
- Placing Buttons, Tools and Functions in the POS Invoice Window
- Adjusting Elements in the POS Invoice Window
- Descriptions of Individual Button Types
- POS Commands
- Descriptions of Individual POS Commands
- Connecting Printers
- Credit and Debit Card Payments
- Home page for Point of Sales manual
- Home page for Standard ERP manual
POS Button Types in POS Invoices - Customer Functions
This page describes the following POS Button Types in POS Invoices:
- Change Address
- Customer Search
- Open Customer Record
---
Change Address
- Function
- Allows a cashier to change the Invoice Address in a POS Invoice.
- Requirements
- Can only be used on tills and cash machines that have keyboards.
- Workflow
- Click or touch the "Change Address“ button.
- The 'Change Address' window appears:
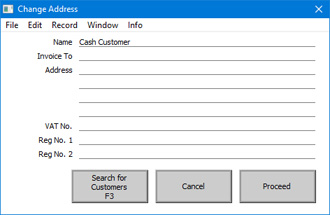
- Enter the new address details.
- Click or touch the [Proceed] button to add the new address to the POS Invoice, or the [Cancel] button to return to the POS Invoice without changing the address.
If you need to change the address to one that is already in the Contact register, click or touch the [Search for Customers] button. Then proceed as described immediately below for the "Customer Search" button. Note that the [Search for Customers] button will only copy an address to a POS Invoice, it won't change the Customer in the POS Invoice. If you need to do this, use the "Customer Search" button.
- Notes
- Click or touch the "Change Address“ button.
- You cannot change the address in a POS Invoice after clicking or touching the "Finish” button.
- The address will not be visible on screen, but it will be printed on the receipt if you have included the relevant fields (for example, "Address") in your Form Template design.
Customer Search
- Function
- Allows the cashier to change the Customer in a POS Invoice.
- Requirements
- Can only be used on tills and cash machines that have keyboards.
- Workflow
- Click or touch the "Customer Search" button.
- The 'Search for Customers' window appears:
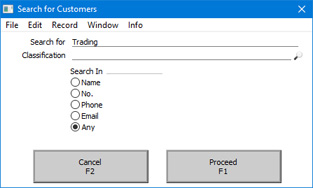
- Enter part of the Customer's name or other piece of information (information that fits one of the radio button options e.g. telephone number or email address) in the Search for field.
Entering more than one word as the search string will be treated as a "Find All Words" search, not "Find Exact Phrase".
- Press the Enter key twice, or click or touch the [Proceed] button.
- The 'Paste Customer' window will appear, listing the results of the search:
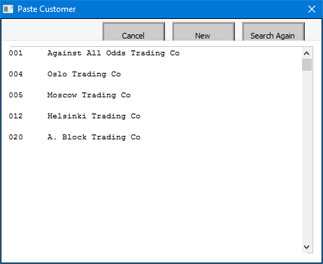
- Click or touch the Customer that you need. The Customer will be added to the POS Invoice, together with their Loyalty Card if they have one. If the Customer that you need isn't listed, click or touch the [Search Again] button or close the window using the [Cancel] button, the close box or the Esc key.
If the Customer that you need isn't in the database, you can use the [New] button to create a new record, providing your till has a live connection to the server. Please refer to the description of the Fields for Creating New Customer setting for more details.
- Notes
- Click or touch the "Customer Search" button.
- In a new POS Invoice, the Customer will be the Default Customer specified in the Local Machine setting or, if that field is empty, in the POS Settings setting.
- An allternative method that will also change the Customer in a POS Invoice is to add a Loyalty Card to the Invoice using the ”Loyalty Card” button.
- If you need cashiers to be able to use the "Customer Search" button but you do not want them to be able to create new Customers, assign them to an Access Group in which you have denied access to the 'Creating New Customer from Touch Screen POS Invoice' Action.
- An allternative method that will also change the Customer in a POS Invoice is to add a Loyalty Card to the Invoice using the ”Loyalty Card” button.
Open Customer Record
- Function
- Opens the Contact record for the Customer in a POS Invoice
- Workflow
- Click or touch the "Open Customer Record" button.
- The Contact record for the Customer in the POS Invoice opens.
- If your till has a keyboard, you will be able to make changes to the record.
- Close the Contact record using the close box.
- Note
- Click or touch the "Open Customer Record" button.
- If a till has a live-sync connection to the server, any changes that a cashier makes to a Customer record on that till will not be sent to the server. If another user with a live connection to the server changes the same record, these changes will be sent to the live-sync till and the changes made on that till will be lost. For this reason, it is recommended that you use Access Groups to give live-sync users Read access to the Contact register so that they cannot change Contact records. You may not want cashiers to be able to change Contact records in any case.
Configuring the POS Invoice Window:
- Introduction
- Placing Buttons, Tools and Functions in the POS Invoice Window
- Adjusting Elements in the POS Invoice Window
- Descriptions of Individual Button Types
- POS Commands
- Descriptions of Individual POS Commands
- Connecting Printers
- Credit and Debit Card Payments
- Home page for Point of Sales manual
- Home page for Standard ERP manual
POS Button Types in POS Invoices - Gift Vouchers
This page describes the following POS Button Types in POS Invoices:
- Create Gift Voucher
- Sell Gift Voucher
- Full Details about Gift Vouchers
- POS Button Types connected with Payment - includes a description of the "Gift Voucher" button
- Index of POS Button Types
Create Gift Voucher
- Function
- Registers Gift Vouchers in the system and sells them to Customers.
- Requirements
- In the row in the POS Button record that adds the "Create Gift Voucher" button to the POS Invoice window, you can optionally specify a Payment Mode in the Code field, using 'Paste Special' if necessary. The Account in the specified Payment Mode will be credited with the value of the Gift Voucher when it is sold. If you do not specify a Payment Mode here, the Payment Mode will be taken from the Gift Voucher Type of the new Gift Voucher. If the new Gift Voucher does not have a Gift Voucher Type, the Gift Vouch. Sold Payment Mode in the Default Payment Modes setting will be used.
- You must register a Gift Voucher in the system before you can sell it. The "Create Gift Voucher" button will register and sell a Gift Voucher in one step, while the "Sell Gift Voucher" button described below will sell a Gift Voucher that has already been registered. Gift Vouchers can be registered using three methods:
- Using a "Create Gift Voucher" button.
- When a cashier sells a Gift Voucher using the "Sell Gift Voucher" button, they can open 'Paste Special' from Gift Voucher No. field in the 'Sell Gift Voucher' window and create a new Gift Voucher from there.
- Back office staff can register Gift Vouchers by entering them directly to the Gift Vouchers Issued setting in the Sales Ledger or in the Point of Sales module
If you want cashiers to sell Gift Vouchers but not register them, assign them to an Access Group in which you have granted Read or Browse access to the Gift Vouchers Issued setting. This will mean cashiers will be able to choose a Gift Voucher using 'Paste Special' but not create a new one.
- If cashiers will register Gift Vouchers on tills or cash machines that have live-sync connections to the server, you must use the Synchronised Number Series setting in the Technics module to ensure that those tills will use separate number series for Gift Vouchers. You must also define separate Number Series for the live tills in the Number Series - Gift Vouchers setting.
- You must register a Gift Voucher in the system before you can sell it. The "Create Gift Voucher" button will register and sell a Gift Voucher in one step, while the "Sell Gift Voucher" button described below will sell a Gift Voucher that has already been registered. Gift Vouchers can be registered using three methods:
- Workflow
- To create a Gift Voucher, click or touch the "Create Gift Voucher" button.
- The 'Issued Gift Voucher: New' window opens:
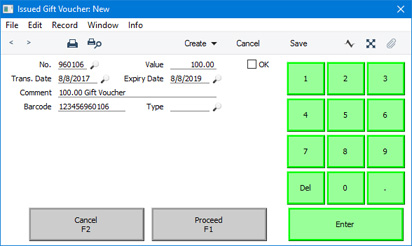
- Fill in the details. If you do not do it yourself, the OK box will ticked automatically when you click or touch [Proceed]. Please refer here for full details about each field.
- Click or touch [Proceed] to save the Gift Voucher, or [Cancel] to abandon it.
- The Gift Voucher will be saved in the Gift Vouchers Issued setting and a line will be added to the POS Invoice, showing the immediate sale of the Gift Voucher to the Customer.
- Add a payment for the Gift Voucher (e.g. cash or credit card) as normal.
- To create a Gift Voucher, click or touch the "Create Gift Voucher" button.
Gift Voucher
Use the "Gift Voucher" button when you need to receive Gift Vouchers in payment for a POS Invoice. Please refer to the page describing POS Button Types connected with payment for full details.
Sell Gift Voucher
- Function
- Sells Gift Vouchers to Customers.
- Requirements
- In the row in the POS Button record that adds the "Sell Gift Voucher" button to the POS Invoice window, you must specify a Payment Mode in the Code field, using 'Paste Special' if necessary. This Payment Mode will determine the Nominal Ledger Account that will be credited with the value of the sale. 'Paste Special' will list the Payment Modes that have been made listed in the Local Machine Payment Modes setting in the Point of Sales module. If necessary, you can override this Payment Mode in an individual Gift Voucher by assigning it to a Gift Voucher Type when you register it in the system.
- Gift Vouchers that you sell must first be registered in the Gift Vouchers Issued setting (in the Point of Sales module and the Sales Ledger), as detailed in the description of the "Create Gift Voucher" button above.
- Gift Vouchers that you sell must first be registered in the Gift Vouchers Issued setting (in the Point of Sales module and the Sales Ledger), as detailed in the description of the "Create Gift Voucher" button above.
- Workflow
- To sell a Gift Voucher, click or touch the "Sell Gift Voucher" button.
- The 'Sell Gift Voucher' window appears:
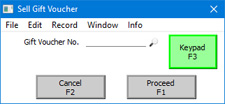
- Enter or scan the Gift Voucher Number or Barcode in the Gift Voucher No. field.
- If you need to enter the Gift Voucher Number and the till has a touch screen but no keyboard, touch the Gift Voucher No. field and then touch the [Keypad] button to open a keypad. Enter the Gift Voucher Number and touch the [Enter] key.
- Click or touch [Proceed] to add the Gift Voucher to the POS Invoice, or [Cancel] to abandon it.
- A line will be added to the POS Invoice, showing the sale of the Gift Voucher.
- Add a payment for the Gift Voucher (e.g. cash or credit card) as normal.
- Note
- To sell a Gift Voucher, click or touch the "Sell Gift Voucher" button.
- Please refer here for more details about selling Gift Vouchers.
Configuring the POS Invoice Window:
- Introduction
- Placing Buttons, Tools and Functions in the POS Invoice Window
- Adjusting Elements in the POS Invoice Window
- Descriptions of Individual Button Types
- POS Commands
- Descriptions of Individual POS Commands
- Connecting Printers
- Credit and Debit Card Payments
- Home page for Point of Sales manual
- Home page for Standard ERP manual
POS Button Types in POS Invoices - Invoice Functions
This page describes the following POS Button Types in POS Invoices:
- Change Terms
- Enter Reference Number
- Open Tax Matrix
---
Change Terms
- Function
- Allows various details in a POS Invoice to be changed.
- Requirements
- Can only be used on tills and cash machines that have keyboards.
- Workflow
- Click or touch the "Change Terms" button.
- The 'Change Terms' window appears:
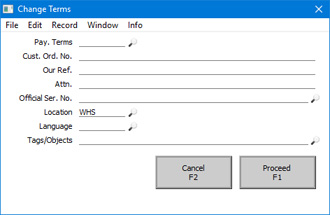
- Enter new details as required.
- Click or touch [Proceed] to commit the changes to the POS Invoice, or [Cancel] to abandon them. Note: any changes to the Payment Term will not be transferred to the POS Invoice.
- Note
- Click or touch the "Change Terms" button.
- You cannot change details in a POS Invoice after clicking or touching the "Finish” button.
Enter Reference Number
- Function
- Allows a Reference to be added to a POS Invoice.
- Requirements
- Can only be used on tills and cash machines that have keyboards.
- Workflow
- Click or touch the "Enter Reference Number" button.
- The 'Enter Reference Number' window appears:
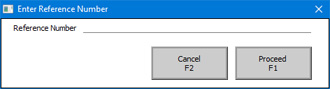
- Enter the Reference as required.
- Click or touch [Proceed] to update the POS Invoice, or [Cancel] to abandon the change.
- Notes
- Click or touch the "Enter Reference Number" button.
- You cannot add a Reference to a POS Invoice after clicking or touching the "Finish” button.
- Adding a Reference to a POS Invoice is necessary in Croatia and Slovenia when using a till or cash machine that is not connected to the server or to the internet (i.e. when entering a POS Invoice that cannot immediately be submitted to the fiscal authorities). In this situation, a cashier should add a Reference that they should take from a pre-prepared invoice book to a POS Invoice. In Slovenia, the Reference should consist of three parts: the invoice number, the set number and the serial number. When entering these parts as a Reference, separate them using a space or a stroke. For example, if the invoice number is 612, the set is 03 and the serial number is 5001-0001018, enter 612 03 5001-0001018 or 612/03/5001-0001018 as the Reference.
- If you need to print the Reference on receipts, add the "Reference (Invoice)" field to your Form Template designs.
- Adding a Reference to a POS Invoice is necessary in Croatia and Slovenia when using a till or cash machine that is not connected to the server or to the internet (i.e. when entering a POS Invoice that cannot immediately be submitted to the fiscal authorities). In this situation, a cashier should add a Reference that they should take from a pre-prepared invoice book to a POS Invoice. In Slovenia, the Reference should consist of three parts: the invoice number, the set number and the serial number. When entering these parts as a Reference, separate them using a space or a stroke. For example, if the invoice number is 612, the set is 03 and the serial number is 5001-0001018, enter 612 03 5001-0001018 or 612/03/5001-0001018 as the Reference.
Open Tax Matrix
- Function
- Opens a window displaying how tax in a POS Invoice or in a POS Invoice line is calculated.
- Requirements
- Can only be used if you are using Tax Templates (instead of VAT Codes) to calculate tax (i.e. if you are using the Use Tax Templates for Tax Calculation option in the Transaction Settings setting in the Nominal Ledger).
- Workflow
- If you want to display the tax calculation for a particular line in a POS Invoice, highlight that line. The last line added to the Invoice will be highlighted by default. If you want to display the tax calculation for the entire POS Invoice, ensure that no lines are highlighted.
- Click or touch the "Open Tax Matrix" button.
- The 'Tax Matrix' window will open:

- Close the 'Tax Matrix' window using the close box.
- Note
- If you want to display the tax calculation for a particular line in a POS Invoice, highlight that line. The last line added to the Invoice will be highlighted by default. If you want to display the tax calculation for the entire POS Invoice, ensure that no lines are highlighted.
- Please refer here for details about using Tax Templates to calculate tax in sales transactions.
Configuring the POS Invoice Window:
- Introduction
- Placing Buttons, Tools and Functions in the POS Invoice Window
- Adjusting Elements in the POS Invoice Window
- Descriptions of Individual Button Types
- POS Commands
- Descriptions of Individual POS Commands
- Connecting Printers
- Credit and Debit Card Payments
- Home page for Point of Sales manual
- Home page for Standard ERP manual
POS Button Types in POS Invoices - Invoice Row Functions
This page describes the following POS Button Types in POS Invoices:
- Add Comment Line
- Add Header Line
- Amend Line
- Delete Row
- Void Item
---
Add Comment Line
- Function
- Allows the addition of a line containing free text to a POS Invoice.
- Requirements
- Can only be used on tills and cash machines that have keyboards.
- Workflow
- Highlight the line in the POS Invoice below which the comment is to appear. The last line added to the Invoice will be highlighted by default. If no line in the POS Invoice is highlighted, the comment will be inserted at the top of the Invoice.
- Click or touch the "Add Comment Line" button.
- The 'Add Comment Line' window will open:
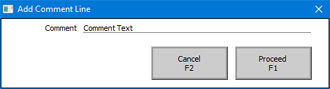
- Type in the comment.
- Click or touch the [Proceed] button to add the comment to the POS Invoice or [Cancel] to return to the POS Invoice without adding the comment.

- Note
- You cannot add a comment line to a POS Invoice after clicking or touching the "Finish” button.
- Note
- Highlight the line in the POS Invoice below which the comment is to appear. The last line added to the Invoice will be highlighted by default. If no line in the POS Invoice is highlighted, the comment will be inserted at the top of the Invoice.
Add Header Line
- Function
- Allows the addition of a line containing free text to a POS Invoice.
- Requirements
- Can only be used on tills and cash machines that have keyboards.
- Workflow
- Highlight the line in the POS Invoice above which the comment is to appear. The last line added to the Invoice will be highlighted by default. If no line in the POS Invoice is highlighted, the comment will be inserted at the end of the Invoice after the last Item.
- Click or touch the "Add Header Line" button.
- The 'Add Header Line' window will open:
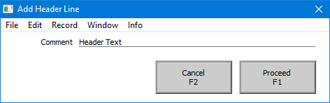
- Type in the comment.
- Click or touch the [Proceed] button to add the comment to the POS Invoice or [Cancel] to return to the POS Invoice without adding the comment.
- Notes
- Highlight the line in the POS Invoice above which the comment is to appear. The last line added to the Invoice will be highlighted by default. If no line in the POS Invoice is highlighted, the comment will be inserted at the end of the Invoice after the last Item.
- You cannot add a comment line to a POS Invoice after clicking or touching the "Finish” button.
- "Add Header Line" differs from "Add Comment Line" described above in the following respects:
- They insert the comment line in a different position relative to the highlighted line.
- A comment inserted by the "Add Comment Line" button can be removed by the "Delete Row" and "Void Item" buttons described below, but a comment inserted by the "Add Header Line" button can only be removed by the "Delete Row" button.
- "Add Comment Line" is the equivalent of entering a comment in the Description field in a row in a Sales Ledger Invoice, while "Add Header Line" is the equivalent of using the 'Add Header Line' Row menu function. So, when you design the Form Template to be used when printing POS Invoices, you can specify that the header" line will be printed in a different Style to the lines containing the Items (e.g. font, font size, etc). To do this, use the 'Row Styles' function on the Operations menu of the Form Template window.
- "Add Header Line" differs from "Add Comment Line" described above in the following respects:
Amend Line
- Function
- Allows the modification of an existing line in a POS Invoice.
- Requirements
- Requires a supervisor to log in: can only be used by a cashier or supervisor whose Access Group gives access to the 'Amend Lines on Touch Screen Invoice/Bar Tab' Action.
- Workflow
- Highlight the line in the POS Invoice that is to be changed. The last line added to the Invoice will be highlighted by default.
- Click or touch the "Amend Line" button.
- If the cashier does not have the necessary access right, the 'Login' window will appear, allowing a supervisor to log in.
- The supervisor should enter the new quantity, price or discount in the 'Amend Line' window:
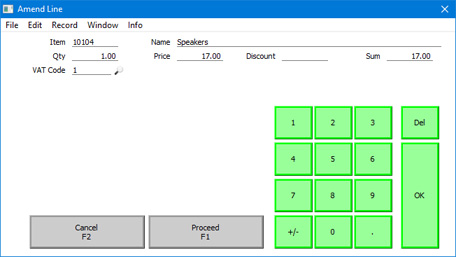
- If the till has a touch screen but no keyboard, touch the field to be amended and then touch the [Keypad] button to open a keypad. Enter the new figure and touch the [Enter] key.
- Click or touch the [Proceed] button in the 'Amend Line' window to commit the amendment to the POS Invoice or [Cancel] to return to the POS Invoice without amending it.
- Control of the till will be passed back to the cashier.
- Note
- Highlight the line in the POS Invoice that is to be changed. The last line added to the Invoice will be highlighted by default.
- You should not use the "Amend Line" button if you are using the Register Cash Sales in Fiscal Control Unit option in the POS Settings setting. If you are using this option, it should not be possible to change Item Descriptions and Unit Prices in POS Invoices.
Delete Row
- Function
- Removes a line from a POS Invoice.
- Requirements
- Requires a supervisor to log in: can only be used by a cashier or supervisor whose Access Group gives access to the 'Delete Items on Touch Screen Invoice' Action.
- Workflow
- Highlight the line in the POS Invoice that is to be removed. The last line added to the Invoice will be highlighted by default.
- Click or touch the "Delete Row" button.
- If the cashier does not have the necessary access right, the 'Login' window will appear, allowing a supervisor to log in.
- The line will be removed.
- Control of the till will be passed back to the cashier.
- Notes
- Highlight the line in the POS Invoice that is to be removed. The last line added to the Invoice will be highlighted by default.
- The "Delete Row" button will delete lines of all kinds from POS Invoices. It will completely delete them with no audit trail (i.e. there will be no record that an Item was added to a POS Invoice and then removed).
- If you are using the Incremental Receipt Printing option on a particular till, you should use the "Void Item" button, not the "Delete Row" button. If you are using the Incremental Receipt Printing option, the deleted line will already have been printed on the receipt. "Delete Row" will not print a cancelling line, but "Void Item" will.
- If you are using the Incremental Receipt Printing option on a particular till, you should use the "Void Item" button, not the "Delete Row" button. If you are using the Incremental Receipt Printing option, the deleted line will already have been printed on the receipt. "Delete Row" will not print a cancelling line, but "Void Item" will.
- Equivalent POS Command
- Delete Row (can only be used by a cashier who has access to the 'Delete Items on Touch Screen Invoice' Action because it does not support the supervisor log-in feature)
Void Item
- Function
- Removes a line from a POS Invoice.
- Requirements
- Requires a supervisor to log in: can only be used by a cashier or supervisor whose Access Group gives access to the 'Void Touch Screen Invoice rows' Action.
- Workflow
- Highlight the line in the POS Invoice that is to be removed. The last line added to the Invoice will be highlighted by default.
- Click or touch the "Void Item" button.
- If the cashier does not have the necessary access right, the 'Login' window will appear, allowing a supervisor to log in.
- The line will be removed.
- Control of the till will be passed back to the cashier.
- Notes
- Highlight the line in the POS Invoice that is to be removed. The last line added to the Invoice will be highlighted by default.
- The "Void Item" button will only delete lines containing Items from POS Invoices. Unlike the "Delete Row" button it will not delete other lines (e.g. lines containing payments). Also unlike "Delete Row", "Void Item" does leave an audit trail (i.e. it will be seen that an Item was added to a POS Invoice and then removed), including the reason for voiding if you specified one as described under 'Requirements' above. If you need to see a list of the voided lines in POS Invoices, use the Void Report in the Sales Ledger.
- If you are using the Incremental Receipt Printing option on the 'POS' card of the Local Machine setting on a particular till, the "Void Item" button will cause a line with a negative quantity to be printed on the till receipt to mark the removal of the Item from the POS Invoice.
- If you are using the Incremental Receipt Printing option on the 'POS' card of the Local Machine setting on a particular till, the "Void Item" button will cause a line with a negative quantity to be printed on the till receipt to mark the removal of the Item from the POS Invoice.
- Equivalent POS Command
- Void Item (can only be used by a cashier who has access to the 'Void Touch Screen Invoice rows' Action because it does not support the supervisor log-in feature).
Configuring the POS Invoice Window:
- Introduction
- Placing Buttons, Tools and Functions in the POS Invoice Window
- Adjusting Elements in the POS Invoice Window
- Descriptions of Individual Button Types
- POS Commands
- Descriptions of Individual POS Commands
- Connecting Printers
- Credit and Debit Card Payments
- Home page for Point of Sales manual
- Home page for Standard ERP manual
POS Button Types in POS Invoices - Item and Pricing Functions
This page describes the following POS Button Types in POS Invoices:
- Dynamic Barcode
- Item
- Item Search
- Item Status
- Modifier
- Open Item Record
- Previous Sales Prices
- Price Lookup
- Serial No. Lookup
- Split Item
---
Dynamic Barcode
- Function
- Adds an Item that is priced by size or weight to a POS Invoice.
- Requirements
- You must have specified a barcode structure for Items priced by size or weight in the Dynamic Barcode setting.
- Workflow
- Click or touch the "Dynamic Barcode" button.
- The 'Dynamic Barcode Scan' window appears.
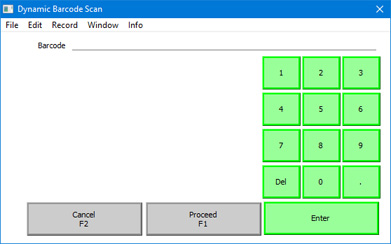
- Scan the barcode on the Item or enter it using the keypad.
- Click or touch the [Proceed] button.
- The Item will be added to the POS Invoice.
- Equivalent POS Command
- Click or touch the "Dynamic Barcode" button.
- Scan Dynamic Barcode
Item
- Function
- Adds a specific Item to a POS Invoice.
- Requirements
- In the row in the POS Button record that adds the "Item" button to the POS Invoice window, you must enter an Item Number in the Code field, using 'Paste Special' if necessary. This is the Item that will be added to the POS Invoice when the cashier clicks or touches the button.
- Workflow
- Click or touch the "Item" button.
- The relevant Item will be added to the POS Invoice.
- Note
- Click or touch the "Item" button.
- The "Item" button can be useful for commonly used Items, especially those without barcodes (for example, fruit and vegetables).
Item Search
- Function
- Allows a cashier to add an Item to a POS Invoice by searching for it by name.
- Requirements
- Can only be used on tills and cash machines that have keyboards.
- Workflow
- Click or touch the "Item Search" button.
- The 'Search for Item' window appears:
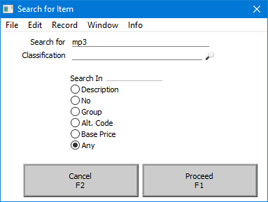
- Enter part of the Item's name or other piece of information (information that fits one of the radio button options e.g. Item Group or Base Price) in the Search for field.
Entering more than one word as the search string will be treated as a "Find All Words" search, not "Find Exact Phrase".
- Press the Enter key twice or click or touch the [Proceed] button.
- The 'Paste Item' window will appear, listing the results of the search:
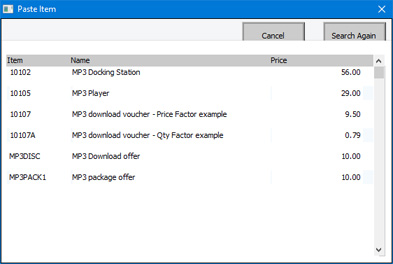
- Click or touch the Item that you need, or highlight it and press the Enter key. The Item will be added to the POS Invoice. If the Item that you need isn't listed, click or touch the [Search Again] button or close the window using the [Cancel] button, the close box or the Esc key.
- Click or touch the "Item Search" button.
Item Status
- Function
- Produces an Item Status report for a particular Item.
- Workflow
- Highlight the Item in the POS Invoice you are interested in. The last Item added to the Invoice will be highlighted by default.
- Click or touch the "Item Status" button.
- An Item Status report for the Item will be printed to screen.
- Notes
- Highlight the Item in the POS Invoice you are interested in. The last Item added to the Invoice will be highlighted by default.
- The Item Status report shows the stock levels of the Item in every Location, the sales price of the Item in every Price List, and various other details. A fuller description can be found here.
- If you use the "Item Status" button on a till with a live-sync connection to the server, the stock levels and outstanding order quantities shown in the report will not be correct. These figures are not stored in the local databases on live-sync tills.
Modifier
- Function
- Adds a specific Item together with selected accessories or options to a POS Invoice.
- Requirements
- The relationship between an Item and its accessories or options must be established in the Modifiers setting.
- In the row in the POS Button record that adds the "Modifier" button to the POS Invoice window, you must specify a Modifier record in the Code field, using 'Paste Special' if necessary. This means you should add a separate POS Button for each Item that is sold together with accessories or options.
- In the row in the POS Button record that adds the "Modifier" button to the POS Invoice window, you must specify a Modifier record in the Code field, using 'Paste Special' if necessary. This means you should add a separate POS Button for each Item that is sold together with accessories or options.
- Workflow
- Click or touch the "Modifiers" button.
- A 'Modifiers' window will appear, containing one button for each option or accessory:
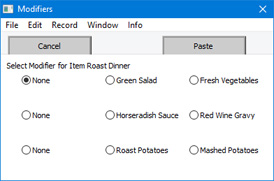
- Click or touch the button representing the option or accessory that the Customer requires. If the window contains more than one row of buttons, click or touch one option in each row.
- Click or touch the [Paste] button to add the Item together with the selected options to the POS Invoice, or click or touch [Cancel] to return to the POS Invoice without adding any Items.
- Note
- Click or touch the "Modifiers" button.
- Please refer here for details about Modifiers.
Open Item Record
- Function
- Opens the Item record for any Item in a POS Invoice
- Workflow
- Highlight the line in the POS Invoice containing the Item in which you are interested. The last Item added to the Invoice will be highlighted by default.
- Click or touch the "Open Item Record" button.
- The relevant Item record opens.
- If your till has a keyboard, you will be able to make changes to the record.
- Close the Item record using the close box.
- Note
- Highlight the line in the POS Invoice containing the Item in which you are interested. The last Item added to the Invoice will be highlighted by default.
- If a till has a live-sync connection to the server, any changes that a cashier makes to a Item record on that till will not be sent to the server. If another user with a live connection to the server changes the same record, these changes will be sent to the live-sync till and the changes made on that till will be lost. For this reason, it is recommended that you use Access Groups to give live-sync users Read access to the Item register so that they cannot change Item records. You may not want cashiers to be able to change Item records in any case.
Previous Sales Prices
- Function
- Produces a report listing the prices previously paid by the Customer for a particular Item.
- Workflow
- Highlight the Item in the POS Invoice you are interested in. The last Item added to the Invoice will be highlighted by default.
- Click or touch the "Previous Sales Prices" button.
- A Previous Sales Prices report for the Item will be printed to screen. The report will list each price paid by the Customer for the Item, together with the Invoice or POS Invoice Number of the most recent Invoice or POS Invoice in which they were charged each different price.
- Highlight the Item in the POS Invoice you are interested in. The last Item added to the Invoice will be highlighted by default.
Price Lookup
- Function
- Displays the price of an Item without adding it to a POS Invoice.
- Workflow
- Click or touch the "Price Lookup" button.
- The 'Price Lookup' window appears:
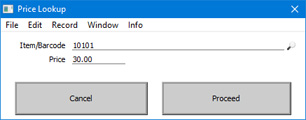
- Scan the Item's barcode, or enter its Item Number or Barcode and click or touch the [Proceed] button.
- The Item's price will be displayed in the Price field.
- Click or touch the [Cancel] button to return to the POS Invoice.
- Click or touch the "Price Lookup" button.
Serial No. Lookup
- Function
- Allows the cashier to specify the Serial Number of an Item.
- Requirements
- The Item must be one that requires Serial Numbers at Unit or Batch level.
- Workflow
- Highlight a Serial Numbered Item in the POS Invoice. The last line added to the Invoice will be highlighted by default.
- Click or touch the "Serial No. Lookup" button.
- If the highlighted Item is Serial Numbered, the 'Scan Serial No.' window will appear:
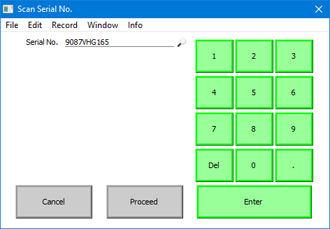
- Enter or scan the Serial Number.
- Click or touch [Proceed] to add the Serial Number to the POS Invoice or [Cancel] to retain the previous one.
- Notes
- Highlight a Serial Numbered Item in the POS Invoice. The last line added to the Invoice will be highlighted by default.
- When a cashier adds a Serial Numbered Item to a POS Invoice, the 'Scan Serial No.' window will usually be opened automatically. It will not be opened if the Item is Serial Numbered at the Batch level and the Do not Require Batch No. on POS Invoice option in the Item record ('Stock' card) is selected. The "Serial No. Lookup" button will therefore be useful when a cashier needs to change the Serial Number of an Item and when the cashier did not specify a Serial Number when originally prompted (i.e. if they cancelled the 'Scan Serial No.' window without specifying a Serial Number).
- As you can use this button to change the Serial Number in any row in the POS Invoice, it is not recommended that you use it if you are also using the Incremental Receipt Printing option on a particular till. If so, the original Serial Number will already have been printed so the new Serial Number will not be printed. If you are using incremental printing, use the ”Serial No.” POS Command, which only allows you to change the Serial Number of the last Item (i.e. before it is printed).
- If an Item is Serial Numbered at the Batch level and the Do not Require Batch No. on POS Invoice option in the Item record is selected, it will not be necessary for cashiers to specify Serial Numbers for that Item. If a cashier does not specify a Serial Number for an Item, a Serial Number will be selected automatically when you run the 'Update Stock' Maintenance function to remove the Items sold on POS Invoices from stock.
- As you can use this button to change the Serial Number in any row in the POS Invoice, it is not recommended that you use it if you are also using the Incremental Receipt Printing option on a particular till. If so, the original Serial Number will already have been printed so the new Serial Number will not be printed. If you are using incremental printing, use the ”Serial No.” POS Command, which only allows you to change the Serial Number of the last Item (i.e. before it is printed).
- Equivalent POS Command
- Serial No. (will only change the Serial Number of the last Item in a POS Invoice).
Split Item
- Function
- Allows the cashier to break a box or package into its constituent units (e.g. into individual units: for simplicity, this description uses the phrase "constituent unit" to mean "individual or other constituent unit").
- Requirements
- Requires a supervisor to log in: can only be used by a cashier or supervisor whose Access Group gives access to the 'Split Item on Touch Screen Invoice' Action.
- The relationship between the box or package and its constituent unit must be established in the Split Items setting. A box or package cannot be split if there is no record in this setting specifying how it should be split.
- The relationship between the box or package and its constituent unit must be established in the Split Items setting. A box or package cannot be split if there is no record in this setting specifying how it should be split.
- Workflow
- Enter the Item Number or scan the barcode of the box or package.
- Ensure the box or package is highlighted in the POS Invoice (it will be highlighted if it is the last line to be added to the POS Invoice) and click or touch the "Split Item" button.
- If the cashier does not have the necessary access right, the 'Login' window will appear, allowing a supervisor to log in.
- The price in the row in the POS Invoice showing the box or package will be removed, and the quantity of constituent units will be placed in the Sum column. This converts the row into a signifier that the box or package has been split into its constituent units.
- Control of the till will be passed back to the cashier.
- Enter the Item Number or scan the barcode of the individual unit.
- Notes
- Enter the Item Number or scan the barcode of the box or package.
- When you use the 'Update Stock' Maintenance function to update stock levels from the POS Invoice, the row that signifies that the box or package has been split will cause the box or package to be removed from stock and the constituent units to be added to stock. The second row where the cashier scanned the barcode of the individual unit will cause that Item to be removed from stock.
- You can use this button if you want to record in a POS Invoice that it caused a box or package to be split. However, if a cashier does not use this button and simply scans the constituent unit as if it were a normal Item, stock levels will still be updated correctly by the 'Update Stock' Maintenance function (i.e. if there are no constituent units in stock, the stock updating process will split a box or package automatically using the information in the Split Items setting). Because of this, you will usually not need to offer a "Split Item" button to your cashiers, and it is not recommended that you do. If you do not offer a "Split Item" button, cashiers will only need to scan the constituent unit (they should be aware that they should not also scan the box or package).
Configuring the POS Invoice Window:
- Introduction
- Placing Buttons, Tools and Functions in the POS Invoice Window
- Adjusting Elements in the POS Invoice Window
- Descriptions of Individual Button Types
- POS Commands
- Descriptions of Individual POS Commands
- Connecting Printers
- Credit and Debit Card Payments
- Home page for Point of Sales manual
- Home page for Standard ERP manual
POS Button Types in POS Invoices - Loyalty Cards
This page describes the following POS Button Types in POS Invoices:
- Loyalty Card
- Full Details about Loyalty Cards
- POS Button Types connected with Payment - includes a description of the "Loyalty Points Payment" button
- Index of POS Button Types
Note that if a till or cash machine has a live-sync connection to the server, you cannot use Loyalty Cards on that till when it is not connected to the server
Loyalty Card
- Function
- Adds the Customer's Loyalty Card to the POS Invoice, so that points can be added to the Card account.
- Workflow
- Click or touch the "Loyalty Card" button.
- The 'Loyalty Card' window appears:

- Scan the Loyalty Card or enter its number using the keypad.
- Click or touch [Proceed] to add the Loyalty Card to the Invoice or [Cancel] to return to the POS Invoice without adding it.
- The Customer in the POS Invoice will change to the cardholder of the Loyalty Card.
- Notes
- Click or touch the "Loyalty Card" button.
- If you use the "Customer Search" button to change the Customer in a POS Invoice and the new Customer has a Loyalty Card, that Loyalty Card will be added to the POS Invoice automatically.
- Please refer here for more details about Loyalty Cards.
- Please refer here for more details about Loyalty Cards.
- Equivalent POS Command
- Loyalty Card No.
Loyalty Points Payment
Use the "Loyalty Points Payment" button when you need to receive Loyalty Card points in payment for a POS Invoice. Please refer to the page describing POS Button Types connected with payment for full details.
---
Configuring the POS Invoice Window:
- Introduction
- Placing Buttons, Tools and Functions in the POS Invoice Window
- Adjusting Elements in the POS Invoice Window
- Descriptions of Individual Button Types
- POS Commands
- Descriptions of Individual POS Commands
- Connecting Printers
- Credit and Debit Card Payments
- Home page for Point of Sales manual
- Home page for Standard ERP manual
POS Button Types in POS Invoices - Miscellaneous Functions
This page describes the following POS Button Types in POS Invoices:
- Connect to CC Terminal
- Send Email
- Senior Citizen Discount
---
Connect to CC Terminal
- Function
- In Sweden, if you are processing credit card payments through Bambora, allows a cashier to attempt to reconnect a till to its credit card terminal if connection is lost.
- Requirements
- In the Local Credit Card Terminal setting on the till, you must have specified that the Terminal Type is "Bambora".
- Workflow
- If you know that the connection between the till and the credit card terminal has been broken, click or touch the "Connect to CC Terminal" button to attempt to re-establish the connection.
Send Email
- Function
- Allows a cashier to send an email to a Customer.
- Configuration
- The Mail must have a sending address. This will be chosen as follows:
- If the cashier has a Mailbox, the cashier will be the sender of the Mail and the sending address will be taken from the cashier's Global User or Person record.
- If the cashier does not have a Mailbox, the From System Mailbox specified in the Mail and Conference Settings setting in the Email and Conferences module will be the sender of the Mail. The sending address will be taken from the Global User or Person record belonging to the owner of the From System Mailbox.
The Mail will be sent to an address belonging to the Customer. This will be chosen as follows:
- If the Customer has a record in the Additional Email Recipients setting in the CRM module, the Mail will be sent to the Contact Persons listed with the Form Type "POS Invoice" in that record.
- If the Customer does not have a record in the Additional Email Recipients setting or its record in that setting has no Contact Persons with the Form Type "POS Invoice", the Mail will be sent to the Email Address of the Contact Person quoted in the Primary Contact field in the Contact record for the Customer.
- If the Primary Contact does not have an Email Address or there is no Primary Contact, the Mail will be sent to the Email Address specified in the Contact record for the Customer.
The Subject and Text of the Mail will be taken from the record in the Mail Texts setting in the Email and Conferences module in which the Form is "POS Invoices". If the POS Invoice has a Language and the Mail Text record contains a row for that Language, the Subject and Text will be determined by the fields in that row. Otherwise, they will be determined by the fields in the Mail Text header, as follows:
- The Subject in the mail will be composed from the Subject in the Mail Text record (which should have a trailing space) and the POS Invoice Number. For example, if the Subject in the Mail Text record is "Please find attached Invoice " (with trailing space), the Subject of the Mail will be "Please find attached Invoice XXXX" (where XXXX is the POS Invoice Number).
- The Text of the Mail will be built up as follows:
- The initial text will be taken from the Standard Text record quoted in the First Text field in the Mail Text record.
- Depending on the Do not put Record Details in Mail Body option in the Mail Text record, the Items in the Invoice will then be listed, followed by the Invoice totals and the Payment Term.
- The final text will be taken from the Standard Text record quoted in the Last Text field in the Mail Text record. It is recommended that the first line in this Standard Text record should be a carriage return, to ensure that the text in the mail is neatly spaced.
If either Standard Text record is in HTML format, the Mail will be in HTML format as well.
- The initial text will be taken from the Standard Text record quoted in the First Text field in the Mail Text record.
- If the cashier has a Mailbox, the cashier will be the sender of the Mail and the sending address will be taken from the cashier's Global User or Person record.
- Workflow
- Ensure the POS Invoice has been saved. If you have received payment, the POS Invoice will have been saved automatically. Otherwise, save it using the [Save] button (Windows/Mac OS X) or the √ button (iOS/Android).
- Click or touch the "Send Email" button.
- A Mail will be opened in a new window entitled 'Mail: Inspect'. This means that it has already been saved and is being opened for checking.
- Edit the Mail if necessary.
- When you are ready to send the Mail, tick the Sent box and save the Mail by clicking or touching the [Save] button (Windows/Mac OS X) or tapping √ (iOS/Android) in the Button Bar. If you are using the Lock and Send emails Automatically option in the Mail and Conference Settings setting in the Email and Conferences module and the Mail contains an external email address (i.e. one with the @ sign), it will now be sent automatically. If you are not using this option, select 'Send email' from the Mail's Operations menu after you have saved the Mail.
- Close the Mail using the close box (Windows/Mac OS X) or by tapping < (iOS/Android). You will be returned to the POS Invoice window.
If you are using the Use External Mail Software option in the Mail and Conference Settings setting, the Mail will not be created inside Standard ERP as described above. Instead, it will be created in your default mail application (e.g. Eudora, Outlook, etc).
- Note
- Ensure the POS Invoice has been saved. If you have received payment, the POS Invoice will have been saved automatically. Otherwise, save it using the [Save] button (Windows/Mac OS X) or the √ button (iOS/Android).
- You can only send Mails to Customers from a till or cash machine that has a live connection to the server. You cannot use the "Send Email" button from a till or cash machine that has a live-sync connection to the server because the required settings are not sent to the client by the synchronisation process.
Senior Citizen Discount
- Function
- Adds a Senior Citizen Discount to a POS Invoice.
- Requirements
- You must have specified a Senior Citizen Discount Item in the POS Settings setting. This Item must contain an Item Formula that will be used to calculate the Senior Citizen Discount.
- Workflow
- When every Item has been added to a POS Invoice, click or touch the "Senior Citizen Discount" button.
- The 'Senior Citizen Discount' window appears:
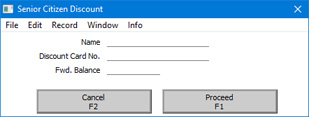
- From the discount entitlement card offered by the senior citizen, enter their name, card number and forward balance. You must enter all three pieces of information. Please refer to the note below for details about the forward balance.
- Click or touch [Proceed] to add the discount to the POS Invoice, or [Cancel] to return to the POS Invoice without adding the discount.
- The discount will be added to the end of the POS Invoice, calculated using the Item Formula specified in the Senior Citizen Discount Item.
- Notes
- When every Item has been added to a POS Invoice, click or touch the "Senior Citizen Discount" button.
- If you need to include additional Items in a POS Invoice after having added a Senior Citizen Discount, you can simply repeat the process described above. The previous discount will be removed from the POS Invoice and the new one added to the end.
- The Senior Citizen Discount feature is designed to satisfy a requirement in the Philippines, where each senior citizen is given a weekly discount allowance. Enter the unused portion of this allowance in the Fwd. Balance field in the 'Senior Citizen Discount' window, taken from the discount entitlement card. The discount given in the POS Invoice will be calculated using the Item Formula from the value of the POS Invoice (including VAT) or from the Fwd. Balance, whichever is the lower.
Configuring the POS Invoice Window:
- Introduction
- Placing Buttons, Tools and Functions in the POS Invoice Window
- Adjusting Elements in the POS Invoice Window
- Descriptions of Individual Button Types
- POS Commands
- Descriptions of Individual POS Commands
- Connecting Printers
- Credit and Debit Card Payments
- Home page for Point of Sales manual
- Home page for Standard ERP manual
POS Button Types in POS Invoices - Navigation and Appearance
This page describes the following POS Button Types in POS Invoices:
- All Invoices
- Blank
- Display Page
- Open Unfinished Invoices
- POS Command
- Top Level
---
All Invoices
- Function
- Allows the inspection and modification of a previous POS Invoice.
- Workflow
- Click or touch the "All Invoices" button.
- The 'POS Invoices: Browse' window opens:
This is a list of all POS Invoices that have been entered (including both finished and unfinished POS Invoices). If the till has a live-sync connection to the server, the list will only show the POS Invoices that have been entered on that till. If the till has a live connection to the server, the list will show all POS Invoices.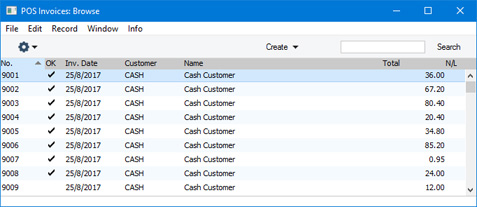
- Double-click the POS Invoice that you need to inspect or alter.
- The POS Invoice is opened, replacing the one that was previously on screen.
- Note
- Click or touch the "All Invoices" button.
- This button opens a list of all POS Invoices (including finished and unfinished POS Invoices), from where you can open an Invoice for inspection or modification. If you want to open a list that only shows unfinished POS Invoices, use the "Open Unfinished Invoices" button described below.
- If you are using a Windows till or cash machine, you may want to select the Wide Scroll Bars option in the Local Machine setting (or, if a till has a live-sync connection to the server, in the record for the till in the Local Settings setting in the Technics module). This may make scrolling easier on a touch-screen.
Blank
- Function
- Adds a dummy button to the Button Page.
- Notes
- A dummy button can help with arranging the buttons in the POS Invoice window.
- The buttons in a Button Page will be shown in the POS Invoice window in the order in which you list them in the POS Button record. The first four buttons in the list in a POS Button record will appear in the first row of buttons in a POS Invoice, and so on. If you need the first row of buttons to contain three buttons, you can insert a "Blank" fourth button to ensure that the next button will be the first one on the second row. (The number of buttons in a row in a POS Invoice will depend on the Panel Size option and the Button Width in the Local Machine setting that you are using.)
- "Blank" buttons will be displayed as white space in the POS Invoice window. The Colour and Label that you specify when you define a "Blank" button in a POS Button record will not be used. However, you must choose a Colour or a Label, because you won’t be able to save the POS Button record if the Colour field in a row is "Black" and if the Label field in the same row is empty.
- The buttons in a Button Page will be shown in the POS Invoice window in the order in which you list them in the POS Button record. The first four buttons in the list in a POS Button record will appear in the first row of buttons in a POS Invoice, and so on. If you need the first row of buttons to contain three buttons, you can insert a "Blank" fourth button to ensure that the next button will be the first one on the second row. (The number of buttons in a row in a POS Invoice will depend on the Panel Size option and the Button Width in the Local Machine setting that you are using.)
Display Page
- Function
- Changes the buttons shown in the button area in a POS Invoice.
- Requirements
- In the row in the POS Button record that adds the "Display Page" button to the POS Invoice window, you must enter the Page of the new POS Button record in the Code field.
- Both POS Button records (the one representing the set of buttons you are leaving, and the one representing the set of buttons you are going to) must have the same Window Class and Group.
- Both POS Button records (the one representing the set of buttons you are leaving, and the one representing the set of buttons you are going to) must have the same Window Class and Group.
- Workflow
- Click or touch the "Display Page" button.
- The existing set of buttons will be replaced with a new set.
- Notes
- Click or touch the "Display Page" button.
- A button representing the new set of buttons will appear above the button area, next to the [Page 1] button. The Comment in the POS Button record representing the set of buttons you are going to will be used as the label in this button.
- The [Page 1] button will remain visible above the button area. Cashiers can click or touch this button to go back to the set of buttons that was originally visible. If you want cashiers to be able to go to any other set of buttons, include "Display Page" buttons in each POS Button record.
Open Unfinished Invoices
- Function
- Allows a cashier to go back to a previous unfinished POS Invoice.
- Workflow
- Click or touch the "Open Unfinished Invoices" button.
- The 'Open POS Invoices: Browse' window opens:
This is a list of unfinished POS Invoices. If the till uses a live-sync connection to the server, the list will only show the POS Invoices that have been entered on that till. If the till has a live connection to the server, the list will show all unfinished POS Invoices.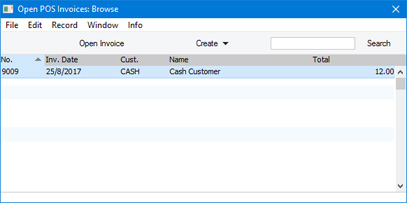
- Highlight the POS Invoice that you need to alter and click or touch the [Open Invoice] button at the top of the window.
- The POS Invoice is opened, replacing the one that was previously on screen.
- Notes
- Click or touch the "Open Unfinished Invoices" button.
- This button opens a list of unfinished POS Invoices,allowing you to open and continue processing an Invoice that had previously been parked. It is similar to the "Resume Sales" button: the main difference is that the "Resume Sales" button allows you to choose a POS Invoice using a simple selection window, while this button uses a more detailed browse window.
- If you want to open a list of all POS Invoices (i.e. including finished Invoices), use the "All Invoices" button described above.
- If you are using a Windows till or cash machine, you may want to select the Wide Scroll Bars option in the Local Machine setting (or, if a till has a live-sync connection to the server, in the record for the till in the Local Settings setting in the Technics module). This may make scrolling easier on a touch-screen.
- If you want to open a list of all POS Invoices (i.e. including finished Invoices), use the "All Invoices" button described above.
POS Command
- Function
- Allows cashiers to activate some POS Commands using buttons.
- Requirements
- In the row in the POS Button record that adds the "POS Command" button to the POS Invoice window, you must enter the POS Command Action in the Code field (use 'Paste Special' to choose the Action). Each "POS Command" button can therefore represent a single POS Command.
- Workflow
- Click or touch a "POS Command" button to activate the relevant POS Command.
- Notes
- POS Commands are commands that cashiers can activate using key commands. Attaching a POS Command to a "POS Command" button will allow cashiers to use POS Commands if their till or cash machine doesn't have a keyboard, or if they will not remember the key commands.
- It is not possible to activate every POS Command by button, because some POS Commands require further keyboard input. The POS Commands that can be activated by button with no additional configuration are "Add 1", "Delete Row", "Subtract 1", and "Void Item". "Discount" and "Quantity" can also be activated by button with the following configuration:
- Enter keyboard commands for the "Discount" and "Quantity" POS Commands in the POS Commands setting. When the cashier activates the Discount" or Quantity" command by pressing the button, the keyboard command will be placed in the Item/Command field in the POS Invoice. The cashier can then enter the discount or quantity.
- Alternatively, select the Open NumPad option on the ‘POS’ card in the Local Machine setting in the User Settings module on each till and cash machine. If a till has a live-sync connection to the server, select this option in the record for the till in the Local Settings setting in the Technics module. When the cashier activates the "Discount" or "Quantity" command by pressing the button, a numeric keypad will open which the cashier can use to enter the discount or quantity.
Most of the other POS Commands have equivalent Button Types that you can use instead.
- Please refer here for full details about POS Commands.
- It is not possible to activate every POS Command by button, because some POS Commands require further keyboard input. The POS Commands that can be activated by button with no additional configuration are "Add 1", "Delete Row", "Subtract 1", and "Void Item". "Discount" and "Quantity" can also be activated by button with the following configuration:
Top Level
- Function
- If you have used a "Display Page" button to change the buttons that are visible in a POS Invoice, the "Top Level" button will take you back to the original set of buttons (i.e. the set of buttons that were shown when the POS Invoice is created).
- Workflow
- Click or touch the "Top Level" button.
- The existing set of buttons will be replaced with the "Page 1" set of buttons.
- Note
- Click or touch the "Top Level" button.
- The "Top Level" button has the same function as the [Page 1] button that is always visible above the button area.
Configuring the POS Invoice Window:
- Introduction
- Placing Buttons, Tools and Functions in the POS Invoice Window
- Adjusting Elements in the POS Invoice Window
- Descriptions of Individual Button Types
- POS Commands
- Descriptions of Individual POS Commands
- Connecting Printers
- Credit and Debit Card Payments
- Home page for Point of Sales manual
- Home page for Standard ERP manual
POS Button Types in POS Invoices - Payment Methods
This page describes the following POS Button Types in POS Invoices:
- Cash
- Cheque
- Credit Card
- Credit Card Payment Reversal
- Debit Card
- Full Payment
- Gift Voucher
- Loyalty Points Payment
- On Hotel Guest Account
- Pay
- Pay (one Mode)
---
Cash
- Function
- Allows cashiers to receive and manage cash payments for POS Invoices.
- Requirements
- In the row in the POS Button record that adds the "Cash" button to the POS Invoice window, you must specify a Payment Mode in the Code field, using 'Paste Special' if necessary. This Payment Mode will determine the Nominal Ledger Account that will be debited with the value of the cash payment. 'Paste Special' will list the Payment Modes that you have included in the Local Machine Payment Modes setting.
- You must specify that your home Currency is Base Currency 1 in the Base Currency setting in the System module. If you accept cash payments in different Currencies, list the Currencies that you accept in the Payment Currencies setting.
- You must specify that your home Currency is Base Currency 1 in the Base Currency setting in the System module. If you accept cash payments in different Currencies, list the Currencies that you accept in the Payment Currencies setting.
- Workflow
- When every Item has been added to a POS Invoice, click or touch the "Cash" button.
- The 'Cash Payment' window appears:
If the Total Due and Amount Due fields do not contain any figures, the probable reason is that you have not specified that your home Currency is Base Currency 1 in the Base Currency setting.
If you accept payment in different Currencies, the 'Cash Payment' window will contain fields for each Currency:
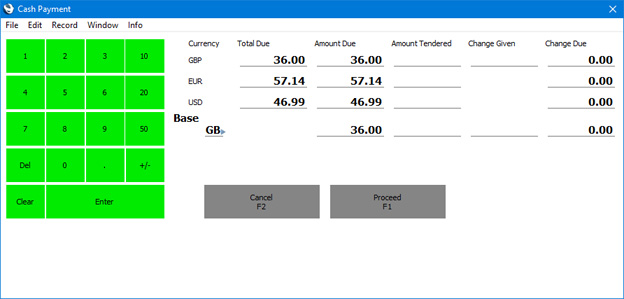
- Enter the value of the cash payment provided by the Customer in the Amount Tendered field (in the field for the relevant Currency if you accept more than one). The Change Due field will show you how much change is needed.
- If you are only using one Currency, you do not need to enter the value of the change that you give to the Customer in the Change Given field. All that is necessary is to click or touch [Proceed] as it will be assumed that you will give the full change value to the Customer.
If you are using more than one Currency, again you do not need enter the value of the change if you give the full value of the change in your home Currency. But if you give change in a different Currency, enter the value of the change in the relevant Change Given field for the relevant Currency.
- If you are using a touch screen, use the numeric keypad to enter amounts, and touch the [Enter] button to move from field to field.
- Click or touch [Proceed] to commit the payment, or [Cancel] to abandon it.
- A line will be added to the bottom of the POS Invoice, showing the value of the cash payment. If you needed to give change, a second added line will show the value of the change (in your home Currency).
- If the value of the cash payment is not correct (e.g. because of operator error or because the Customer presents another Item to be scanned), simply repeat the process. Clicking or touching the "Cash" button for a second time will immediately remove the line that shows the value of the payment from the Invoice. Repeat the process to add the correct payment.
- Notes
- When every Item has been added to a POS Invoice, click or touch the "Cash" button.
- As mentioned under the 'Requirements' heading above, you will need to specify a Payment Mode in the row in the POS Button record that adds the "Cash" button to the POS Invoice window. This Payment Mode will determine the Nominal Ledger Account that will be debited with the value of the cash payment. If you need different Accounts to be debited, perhaps from different tills, or from tills in different departments or branches, use the Local Machine Payment Modes setting to assign different cash Payment Modes (i.e. Payment Modes with different Cash Accounts) to each till. Please refer here for more details. You can also use the Local Machine Payment Modes setting if you need different Accounts to be debited depending on the Currency of the payment: please refer here for details.
- If a till has a cash drawer, the drawer can be opened automatically so that the cashier can receive the cash payment. Please refer here for details.
- If a till has a cash drawer, the drawer can be opened automatically so that the cashier can receive the cash payment. Please refer here for details.
- Equivalent POS Command
- Cash (note that the button will open the cash drawer but the command will not).
Cheque
- Function
- Allows cashiers to receive cheque payments for POS Invoices.
- Requirements
- In the row in the POS Button record that adds the "Cheque" button to the POS Invoice window, you must specify a Payment Mode in the Code field, using 'Paste Special' if necessary. This Payment Mode will determine the Nominal Ledger Account that will be debited with the value of the cheque payment. 'Paste Special' will list the Payment Modes that you have included in the Local Machine Payment Modes.
- Workflow
- When every Item has been added to a POS Invoice, click or touch the "Cheque" button.
- The 'Cheque Payment' window appears:
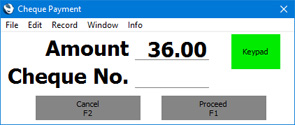
- Enter the value of the cheque payment in the Amount field (this will default to the total of the POS Invoice) and the cheque number in the Cheque No. field.
- If you are using a touch screen, use the [Keypad] button to open a numeric keypad to enter the Amount or Cheque No.
- Click or touch [Proceed] to commit the payment, or [Cancel] to abandon it.
- A line will be added to the bottom of the POS Invoice, showing the value of the cheque payment.
- If the value of the payment is not correct, remove the line showing the value of the cheque payment using the "Delete Row" button.
- When every Item has been added to a POS Invoice, click or touch the "Cheque" button.
Credit Card
Please refer here for details about receiving credit card payments for POS Invoices.
You should add a "Credit Card" button to the POS Invoice window in the following circumstances:
- You will use a separate system to process credit card payments for POS Invoices. Cashiers will use the "Credit Card" button only to record the fact that a POS Invoice has been paid. Cashiers can also use the "Pay" button for this purpose, especially when a Customer pays using more than one payment method (e.g. cash and credit card).
- You will use Standard ERP to control the processing of credit and debit card payments for POS Invoices through Authorize.net or Stripe.
- You will use Standard ERP to control the processing of credit and debit card payments for POS Invoices through Bambora, PC-EFTPOS or Point via Banksys Yomani.
Credit Card Payment Reversal
If you are processing credit card payments through Point via Banksys Yomani, you can use the "Credit Card Payment Reversal" button to reverse credit card payments in some circumstances.
After a credit card transaction has been processed through Point via Banksys Yomani, it will be cleared through the Point system. The clearing process normally occurs nightly. If a transaction hasn't been cleared, you can reverse it using the "Credit Card Payment Reversal" button. If it has been cleared, use the "Credit Card" button instead of the "Credit Card Payment Reversal" button to create a new transaction.
Please refer to the Connecting Standard ERP to a credit and debit card processing system page for details.
Debit Card
Please refer here for details about receiving debit card payments for POS Invoices.
You should add a "Debit Card" button to the POS Invoice window in the following circumstances:
- You will use a separate system to process credit card payments for POS Invoices. Cashiers will use the "Debit Card" button only to record the fact that a POS Invoice has been paid. Cashiers can also use the "Pay" button for this purpose, especially when a Customer pays using more than one payment method (e.g. cash and debit card).
- You will use Standard ERP to control the processing of credit and debit card payments for POS Invoices through Authorize.net or Stripe.
In Latvia, if you will process credit card payments through Verifone, do not add a "Debit Card" button to the POS Invoice window. Use the "Full Payment" or the "Pay (one Mode)" buttons instead.
Full Payment
- Function
- Adds full payment to a POS Invoice
- Requirements
- In the row in the POS Button record that adds the "Full Payment" button to the POS Invoice window, you must specify a Payment Mode in the Code field, using 'Paste Special' if necessary. This Payment Mode will determine the Nominal Ledger Account that will be debited with the value of the payment. 'Paste Special' will list the Payment Modes that you have included in the Local Machine Payment Modes setting. You can add several "Full Payment" buttons with different Payment Modes (i.e. representing different payment methods).
- Workflow
- When every Item has been added to a POS Invoice, click or touch the "Full Payment" button.
- A line will be added to the bottom of the POS Invoice, showing the value of the payment. The text in this line will be the same as the label of the "Full Payment" button.
- If the value of the payment is not correct or you pressed a button that represents the wrong payment method, remove the line showing the value of the cheque payment using the "Delete Row" button.
- Note
- When every Item has been added to a POS Invoice, click or touch the "Full Payment" button.
- In Latvia, if you will process credit card payments through Verifone, you can do so using the "Full Payment" button. Please refer here for details.
Gift Voucher
- Function
- Allows cashiers to receive Gift Vouchers in payment for POS Invoices.
- Requirements
- In the row in the POS Button record that adds the "Gift Voucher" button to the POS Invoice window, you must specify a Payment Mode in the Code field, using 'Paste Special' if necessary. This Payment Mode will determine the Nominal Ledger Account that will be debited with the value of the payment. 'Paste Special' will list the Payment Modes that you have included in the Local Machine Payment Modes setting in the Point of Sales module.
- Gift Vouchers that you take in payment must be registered in the Gift Vouchers Sold setting (in the Point of Sales module and the Sales Ledger). Registration in this setting will occur automatically when you sell Gift Vouchers (using the "Sell Gift Vouchers" button).
- Gift Vouchers that you take in payment must be registered in the Gift Vouchers Sold setting (in the Point of Sales module and the Sales Ledger). Registration in this setting will occur automatically when you sell Gift Vouchers (using the "Sell Gift Vouchers" button).
- Workflow
- When every Item has been added to a POS Invoice, click or touch the "Gift Voucher" button.
- The 'Gift Voucher Payment' window appears:
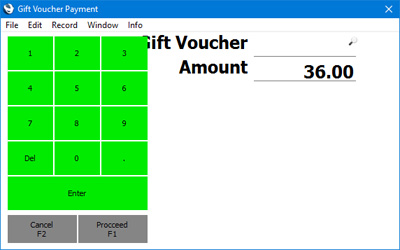
- Enter or scan the Gift Voucher Number or Barcode in the Gift Voucher No. field.
- If the till has a touch screen but no keyboard, touch the Gift Voucher No. field and then use the keypad to enter the Gift Voucher Number.
- Click or touch [Proceed] to commit the voucher payment, or [Cancel] to abandon it.
- A line will be added to the bottom of the POS Invoice, showing the value of the voucher payment.
- Note
- When every Item has been added to a POS Invoice, click or touch the "Gift Voucher" button.
- Gift Vouchers are described in more detail here.
Loyalty Points Payment
- Function
- Allows cashiers to receive Loyalty Card points in payment for POS Invoices.
- Requirements
- Requires a supervisor to log in: can only be used by a cashier or supervisor whose Access Group gives access to the 'Loyalty Payment on Touch Screen Invoice' Action.
- You must add a Loyalty Card to a POS Invoice using the "Loyalty Card" or "Customer Search" buttons before you can use the "Loyalty Points Payment" button.
- In the row in the POS Button record that adds the "Loyalty Points Payment" button to the POS Invoice window, you must specify a Payment Mode in the Code field, using 'Paste Special' if necessary. This Payment Mode will determine the Nominal Ledger Account that will be debited with the value of the payment. 'Paste Special' will list the Payment Modes that you have included in the Local Machine Payment Modes setting in the Point of Sales module.
- You must add a Loyalty Card to a POS Invoice using the "Loyalty Card" or "Customer Search" buttons before you can use the "Loyalty Points Payment" button.
- Workflow
- When every Item has been added to a POS Invoice, and a Loyalty Card has been specified, click or touch the "Loyalty Points Payment" button.
- If the cashier does not have the necessary access right, the 'Login' window will appear, allowing a supervisor to log in.
- The 'Loyalty Points Payment' window appears:
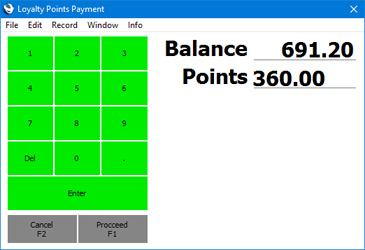
- The Balance field shows the Loyalty Card's total points balance, while the Points field shows the number of points required to pay the POS Invoice (or the card's points balance if this is insufficient to pay the Invoice). The supervisor can change the Points field if necessary.
- If you are using a touch screen, use the numeric keypad to enter amounts, and touch the [Enter] button to move from field to field.
- Click or touch [Proceed] to commit the payment, or [Cancel] to abandon it.
- A line will be added to the bottom of the POS Invoice, showing the value of the points payment.
- Control of the till will be passed back to the cashier.
- Notes
- When every Item has been added to a POS Invoice, and a Loyalty Card has been specified, click or touch the "Loyalty Points Payment" button.
- Note that if a till or cash machine has a live-sync connection to the server, you cannot use Loyalty Cards on that till when it is not connected to the server.
- Loyalty Cards are described in more detail here.
On Hotel Guest Account
- Function
- Allows cashiers to charge POS Invoices to Hotel Reservations (i.e. to hotel room accounts).
- Workflow
- Click or touch the "On Hotel Guest Account" button.
- The 'Assign to Guest' window appears:
The Amount field shows the value of the POS Invoice.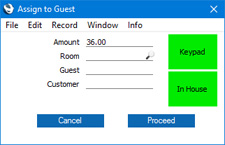
- One option is to enter the Room Number and Guest and Customer Numbers, using 'Paste Special' if necessary. After entering the Room Number, the 'Paste Special' list from the Guest and Customer fields will only include Guests and Customers that are booked into the room.
If you are using a touch screen, use the [Keypad] button to open a numeric keypad to enter the Room Number and Guest and Customer Numbers.
- A second option is to press the [In House] button. This will print a report to screen that lists the rooms that are occupied, together with Guest Names. If you click or touch a Guest Name, the report window will be closed and you will be returned to the 'Assign to Guest' window with the Room, Guest and Customer fields filled in.
- Click or touch [Proceed] to assign the POS Invoice to the Room/Guest, or [Cancel] to return to the POS Invoice without any assignment.
- You will be returned to the POS Invoice.
- Add any further Items to the POS Invoice as needed.
- Click or touch the "Finish" button. The POS Invoice will be saved and closed, and a new one opened. The Items on the POS Invoice will be added to the hotel room account.
- Notes
- Click or touch the "On Hotel Guest Account" button.
- By default, the Items on the POS Invoice will be listed individually on the hotel room account. However, if you specify a Tab Item Code in the Tab Item Group register on a particular till or cash machine, a single line with the Tab Item Code and Item Name and the total value of the POS Invoice will be added to the hotel room account.
- Hotel Reservations are not synchronised. Therefore you can only use this button on a till that has a live connection with the server. You cannot use it on a till that has a live-sync connection with the server.
Pay
- Function
- Allows cashiers to receive and manage payments for POS Invoices when a Customer uses more than one payment method (e.g. cash and credit card).
- Requirements
- You must list the Payment Modes that can be used on the till in the Local Machine Payment Modes setting.
- If you will receive cash payments in different Currencies, you must create a separate Payment Mode for each Currency. In each Payment Mode, specify an Account in which you have specified the appropriate Currency. Make these Payment Modes available to each till by listing them separately in the Local Machine Payment Modes setting.
- If you need the cashier to record credit card authorisation codes, select the Require Authorization Code for Credit Card Payments option in the Local Machine setting in the User Settings module (or, if a till has a live-sync connection to the server, in the record for the till in the Local Settings setting in the Technics module).
- If you will receive cash payments in different Currencies, you must create a separate Payment Mode for each Currency. In each Payment Mode, specify an Account in which you have specified the appropriate Currency. Make these Payment Modes available to each till by listing them separately in the Local Machine Payment Modes setting.
- Workflow
- When every Item has been added to a POS Invoice, click or touch the "Pay" button.
- The 'Payment' window appears:
There will be one Amount field for each Payment Mode (payment method) assigned to the till in the Local Machine Payment Modes setting. If appropriate, there will be a field for Authorisation Code as well (e.g. for credit cards).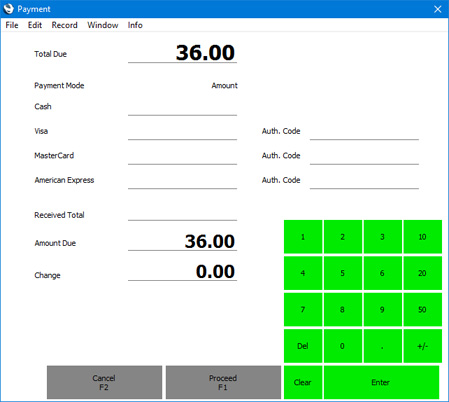
- Enter the value of the payment in the Amount field(s) for the relevant payment method(s).
- If you are using the Require Authorization Code for Credit Card Payments option on the till, you must enter an Authorisation Code for the relevant Payment Mode before you can proceed. Copy this from the credit card terminal.
- If you are using a touch screen, use the [Keypad] button to open a numeric keypad to enter the Amount.
- If a Customer pays cash in different Currencies, enter the amounts in those Currencies as presented by the Customer.
- Click or touch [Proceed] to commit the payment, or [Cancel] to abandon it.
- Lines will be added to the bottom of the POS Invoice (one line for each payment method), showing the value of each payment.
- If the total value of the payment is not the same as the value of the POS Invoice, the remaining amount that is due or the change that should be given will be shown at the top of the Invoice, expressed in your home Currency.
- Notes
- When every Item has been added to a POS Invoice, click or touch the "Pay" button.
- It is not practical to use the "Pay" button if there are many Payment Modes listed for the till in the Local Machine Payment Modes setting. If so, the Received Total and Change fields and some Amount fields will not be visible. In this situation it is recommended that you use individual Button Types instead (e.g. "Cash" and "Credit Card").
- If a Customer pays by credit or debit card, you can only use the "Pay" button to record the fact of the payment. If you will process credit and debit card payments using Standard ERP, use the "Credit Card", "Debit Card", "Full Payment" and/or "Pay (one Mode)" buttons to process the payments, depending on the credit card processing method you are using. It is recommended that you do not use the "Pay" button at all if you will process credit and debit card payments using Standard ERP, because the 'Payment' window won't open if the Terminal Type field in the Local Credit Card Terminal setting on the till is not blank.
- The "Pay" button is similar to the "Pay (one Mode)" button described below. The "Pay" button requires cashiers to enter the payments in separate fields in the 'Payment' window depending on the payment method, while the "Pay (one Mode)" button requires cashiers to push buttons that represent each payment method. The "Pay" button does not support the processing of credit card payments, while the "Pay (one Mode)" button does support the processing of credit card payments through Verifone.
- If a till has a cash drawer, the drawer can be opened automatically so that the cashier can receive the payments. Please refer here for details.
- Payments registered using the "Pay" button are described in more detail here.
- If a Customer pays by credit or debit card, you can only use the "Pay" button to record the fact of the payment. If you will process credit and debit card payments using Standard ERP, use the "Credit Card", "Debit Card", "Full Payment" and/or "Pay (one Mode)" buttons to process the payments, depending on the credit card processing method you are using. It is recommended that you do not use the "Pay" button at all if you will process credit and debit card payments using Standard ERP, because the 'Payment' window won't open if the Terminal Type field in the Local Credit Card Terminal setting on the till is not blank.
Pay (one Mode)
- Function
- Allows cashiers to receive and manage payments for POS Invoices when a Customer uses more than one payment method (e.g. cash and credit card).
- Requirements
- You must list the Payment Modes that can be used on the till in the Local Machine Payment Modes setting.
- If you will receive cash payments in different Currencies, you must create a separate Payment Mode for each Currency. In each Payment Mode, specify an Account in which you have specified the appropriate Currency. Make these Payment Modes available to each till by listing them separately in the Local Machine Payment Modes setting.
- If you will receive cash payments in different Currencies, you must create a separate Payment Mode for each Currency. In each Payment Mode, specify an Account in which you have specified the appropriate Currency. Make these Payment Modes available to each till by listing them separately in the Local Machine Payment Modes setting.
- Workflow
- When every Item has been added to a POS Invoice, click or touch the "Pay (one Mode)" button.
- The 'Payment' window appears:
There will be one button for each Payment Mode (payment method) assigned to the till in the Local Machine Payment Modes setting.
- Enter the value of the payment in the Amount Tendered field and click or touch the button that represents the relevant payment method.
- A line will be added to the bottom of the POS Invoice, showing the value of the payment. The remaining outstanding amount (or the change that is due) will be shown at the top of the Invoice and at the top of the 'Payment' window.
- Repeat step 3 for each payment method used by the Customer.
- If you are using a touch screen, use the [Keypad] button to open a numeric keypad to enter the Amount Tendered.
- If a Customer pays cash in different Currencies, enter each amount in those Currencies as presented by the Customer and press the relevant payment method button.
- If the Customer pays the full amount using a single payment method, there is no need to enter a figure in the Amount Tendered field. Simply click or touch the button that represents the relevant payment method.
- When you have registered every payment made by the Customer, click or touch the [Close] button to close the 'Payment' window and to return to the POS Invoice. If you don't need to return to the POS Invoice, click or touch the [Proceed] button. If the Invoice is fully paid, this will print the Invoice, mark it as OK and close it, and open a new POS Invoice. If the Invoice is not fully paid, you will be told "Full Payment Required" and you will be returned to the POS Invoice.
- Notes
- When every Item has been added to a POS Invoice, click or touch the "Pay (one Mode)" button.
- It is not practical to use the "Pay (one Mode)" button if there are many Payment Modes listed for the till in the Local Machine Payment Modes setting. If so, some of the buttons will not be visible. In this situation it is recommended that you use individual Button Types instead (e.g. "Cash" and "Credit Card").
- The "Pay (one Mode)" button is similar to the "Pay" button described above. The "Pay" button requires cashiers to enter the payments in separate fields in the 'Payment' window depending on the payment method, while the "Pay (one Mode)" button requires cashiers to push buttons that represent each payment method. The "Pay" button does not support the processing of credit card payments, while the "Pay (one Mode)" button does support the processing of credit card payments through Verifone. If you will process credit and debit card payments using Standard ERP using another method (i.e. not using Verifone), use the "Credit Card" and/or "Debit Card" buttons, not the "Pay (one Mode)" button.
- If a till has a cash drawer, the drawer can be opened automatically so that the cashier can receive the payments. Please refer here for details.
- Payments registered using the "Pay (one Mode)" button are described in more detail here.
- The "Pay (one Mode)" button is similar to the "Pay" button described above. The "Pay" button requires cashiers to enter the payments in separate fields in the 'Payment' window depending on the payment method, while the "Pay (one Mode)" button requires cashiers to push buttons that represent each payment method. The "Pay" button does not support the processing of credit card payments, while the "Pay (one Mode)" button does support the processing of credit card payments through Verifone. If you will process credit and debit card payments using Standard ERP using another method (i.e. not using Verifone), use the "Credit Card" and/or "Debit Card" buttons, not the "Pay (one Mode)" button.
Configuring the POS Invoice Window:
- Introduction
- Placing Buttons, Tools and Functions in the POS Invoice Window
- Adjusting Elements in the POS Invoice Window
- Descriptions of Individual Button Types
- POS Commands
- Descriptions of Individual POS Commands
- Connecting Printers
- Credit and Debit Card Payments
- Home page for Point of Sales manual
- Home page for Standard ERP manual
POS Button Types in POS Invoices - Personnel Functions
This page describes the following POS Button Types in POS Invoices:
- Bagger Search
- Change User
- Sales Assistant
- Select Salesman
- Supervisor Search
---
Bagger Search
- Function
- Changes the Bagger in a POS Invoice.
- Requirements
- You can optionally list Baggers in the Baggers setting, although the cashier can choose a Bagger not listed in that setting.
- Workflow
- Click or touch the "Bagger Search" button.
- The 'Enter Bagger' window appears:
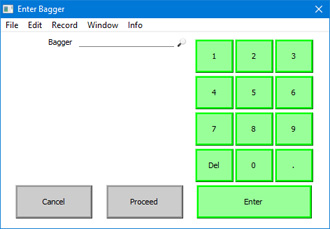
- Choose a Bagger using 'Paste Special, enter their Signature using the keypad or scan their ID card.
'Paste Special' will list the Persons and Global Users listed in the Baggers setting.
You can choose a Bagger that is not listed in the Baggers setting or even one that does not have a record in the Person or Global User registers.
- Click or touch [Proceed] to choose the new Bagger or [Cancel] to retain the previous one.
- Notes
- Click or touch the "Bagger Search" button.
- The Bagger is the person who packs a Customer's Items into bags or boxes after they have been scanned by the cashier. If you need the Bagger to be shown in the POS Invoice window, select the Show Bagger on POS Invoice option in the Local Machine setting on each till and cash machine. If a till has a live-sync connection to the server, select this option in the record for the till in the Local Settings setting in the Technics module.
When you use the "Bagger Search" button to change the Bagger, the new Bagger will be saved in the Local Machine setting (Bagger field). If you need this Bagger to be used in each new POS Invoice until you change to a different Bagger, select the Default Bagger and Supervisor on POS Invoice option, also in the Local Machine and Local Settings settings. If you do not select this option, no Bagger will be assigned to a new POS Invoice until the cashier selects one.
If you need to calculate bonuses for Baggers, use the POS Bonus report. To be included in the POS Bonus report, a Bagger must have a record in the Person register and the cashier must have identified them by Signature.
Change User
- Function
- Allows a new cashier to log in.
- Workflow
- Click or touch the "Change User" button.
- The POS Invoice that is currently on screen will be saved and closed, you will be logged out and the 'Login' window will be opened, ready for the next cashier.
- After the next cashier has logged in, the saved POS Invoice will be re-opened, ready for the next cashier to continue working. The Salesman in the POS Invoice will be changed to the new cashier.
- Note
- Click or touch the "Change User" button.
- By default, every cashier will be able to use the "Change User" button to log out and to leave the 'Login' window on screen waiting for the next cashier. If you want to prevent particular cashiers from using the "Change User" button, assign them to an Access Group in which you have denied access to the 'Logout on Touch Screen Invoice' Action.
Sales Assistant
- Function
- Adds a line to a POS Invoice acknowledging the help of a Sales Assistant. Used when a Sales Assistant helps a Customer to choose an Item.
- Workflow
- Before adding or scanning the Item for which the Sales Assistant is to be credited, click or touch the "Sales Assistant" button.
- The 'Sales Assistant' window will appear:
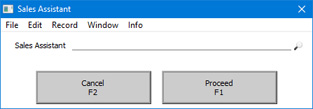
- Choose a Sales Assistant using 'Paste Special, enter their Signature using the keypad or scan their ID card.
'Paste Special' will list Persons and Global Users.
You can choose a Sales Assistant that does not have a record in the Person or Global User registers.
- Click or touch [Proceed] to add the Sales Assistant's name to the POS Invoice, or click [Cancel] to leave the POS Invoice unchanged.
- Add or scan the Item for which the Sales Assistant is to be credited.
- Notes
- Before adding or scanning the Item for which the Sales Assistant is to be credited, click or touch the "Sales Assistant" button.
- A line will be added to the POS Invoice below the last Item, containing the text "Assisted by: " and the Signature or name of the Sales Assistant (as chosen by the cashier).
- If you need to calculate bonuses for Sales Assistants, use the POS Bonus report. To be included in the POS Bonus report, a Sales Assistant must have a record in the Person register and the cashier must have identified them by Signature. A Sales Assistant will be given a bonus for every Item under the row containing their Signature in a POS Invoice, but not for Items above that row. Only one Sales Assistant can receive a bonus from a particular POS Invoice.
- If you need to calculate bonuses for Sales Assistants, use the POS Bonus report. To be included in the POS Bonus report, a Sales Assistant must have a record in the Person register and the cashier must have identified them by Signature. A Sales Assistant will be given a bonus for every Item under the row containing their Signature in a POS Invoice, but not for Items above that row. Only one Sales Assistant can receive a bonus from a particular POS Invoice.
- Equivalent POS Command
- Sales Assistant
Select Salesman
- Function
- Adds a Salesman to a POS Invoice.
- Workflow
- Click or touch the "Select Salesman" button.
- The 'Enter Salesman' window will appear:
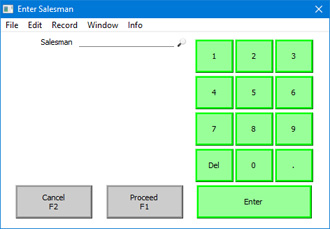
- Enter the Signature of the Salesman, using 'Paste Special' if necessary, or scan their ID card. The Salesman must have their own record in the Person register.
- Click or touch [Proceed] to add the Salesman to the POS Invoice, or click [Cancel] to leave the POS Invoice unchanged.
- Notes
- Click or touch the "Select Salesman" button.
- The default Salesman in a POS Invoice will be the current user (i.e. the cashier). If a cashier used the "Change User" button to log out, the POS Invoice that was on screen will be saved (even if, as is likely, it is an empty Invoice). When the next cashier logs in, the same POS Invoice will be opened, with the new cashier as Salesman.
- The "Salesman" button changes the Salesman field in a POS Invoice, while the "Sales Assistant" button adds a row to a Invoice that credits the Sales Assistant.
- If you need to calculate bonuses for Salesmen (i.e. cashiers), use the POS Bonus report.
- The "Salesman" button changes the Salesman field in a POS Invoice, while the "Sales Assistant" button adds a row to a Invoice that credits the Sales Assistant.
Supervisor Search
- Function
- Changes the Supervisor in a POS Invoice.
- Requirements
- Supervisors must be listed in the Supervisors setting in the Point of Sales module.
- Workflow
- Click or touch the "Supervisor Search" button.
- A list of Supervisors will appear: click or touch the one that you need.
- Note
- Click or touch the "Supervisor Search" button.
- You can specify a default Supervisor for each till and cash machine in the Local Machine setting (Supervisor field). If a till has a live-sync connection to the server, specify the Default Supervisor in the record for the till in the Local Settings setting in the Technics module. If you need this Supervisor to be assigned to each new POS Invoice, select the Default Bagger and Supervisor on POS Invoice option, also in the Local Machine and Local Settings settings. If you do not select this option, no Supervisor will be assigned to new POS Invoices. When you use the "Supervisor Search" button to change the Supervisor, the new Supervisor will not be copied back to the Local Machine setting (i.e. the change will be for the individual POS Invoice only).
Configuring the POS Invoice Window:
- Introduction
- Placing Buttons, Tools and Functions in the POS Invoice Window
- Adjusting Elements in the POS Invoice Window
- Descriptions of Individual Button Types
- POS Commands
- Descriptions of Individual POS Commands
- Connecting Printers
- Credit and Debit Card Payments
- Home page for Point of Sales manual
- Home page for Standard ERP manual
POS Button Types in POS Invoices - Processing POS Invoices
This page describes the following POS Button Types in POS Invoices:
- Finish
- Invalidate Invoice
- Open Cash Drawer
- Paste Quotation
- Paste Sales Order
- Print Invoice
- Reprint Last CC Slip
- Reprint Receipt
---
Finish
- Function
- Prints, marks as OK and closes the POS Invoice, and opens a new POS Invoice.
- Requirements
- The POS Invoice must be fully paid.
- If you need POS Invoices to be printed on a conventional printer (i.e. not a receipt printer or a fiscal printer) when you click or touch the "Finish" button, specify in the Auto Actions setting in the System module that POS Invoices are to be printed At OK. A printer must be connected to the till, and you must have assigned a Form Template to the POS Invoice form.
- If a fiscal printer or fiscal control unit is attached to a till, touching or clicking the "Finish" button will cause the POS Invoice to be printed on that printer and can also open the printer's cash drawer.
- If you need POS Invoices to be printed on a conventional printer (i.e. not a receipt printer or a fiscal printer) when you click or touch the "Finish" button, specify in the Auto Actions setting in the System module that POS Invoices are to be printed At OK. A printer must be connected to the till, and you must have assigned a Form Template to the POS Invoice form.
- Workflow
- When a POS Invoice is complete (including payment), click or touch the "Finish" button.
- The POS Invoice will be printed, saved and closed, and a new one opened, ready for the next Customer.
- If you needed to give change to the previous Customer, the amount will be shown in the new POS Invoice as a reminder until you start adding Items.
- When a POS Invoice is complete (including payment), click or touch the "Finish" button.
Invalidate Invoice
- Function
- Invalidates or voids a POS Invoice.
- Requirements
- Requires a supervisor to log in: can only be used by a cashier or supervisor whose Access Group gives access to the 'Invalidate Touch Screen Invoice' Action.
- Workflow
- Click or touch the "Invalidate" button.
- If the cashier does not have the necessary access right, the 'Login' window will appear, allowing a supervisor to log in.
- The POS Invoice will be saved in an invalidated state and closed, and a new empty POS Invoice opened, allowing the cashier to enter the next Invoice.
- Control of the till will be passed back to the cashier.
- Notes
- Click or touch the "Invalidate" button.
- A cashier can use the "Invalidate Invoice" button when they have scanned a Customer's Items and the Customer then realises they cannot pay. If you are using the Incremental Receipt Printing option on the till, a receipt will already have been printed for the Items, and the "Invalidate Invoice" button will print a line on the receipt showing that the transaction has been invalidated. If you are not using the Incremental Receipt Printing option, you may not need to invalidate the POS Invoice as you can simply cancel the Invoice.
- You can use the "All Invoices" button to open a previous POS Invoice that has already been finished and then invalidate that Invoice. If the till is not connected to a receipt printer or a fiscal printer, a copy of the Invoice will be printed automatically as part of the process, with an "Invalidated" watermark. However you cannot invalidate a previous finished POS Invoice if it has been included in a POS Balance record (i.e. if it has been posted to the Nominal Ledger) or if it has updated stock (i.e. if you have run the 'Update Stock' Maintenance function after the Invoice was created).
- An invalidated Invoice is easily distinguished because all fields have red lines drawn through them. These red lines are also shown in the 'POS Invoices: Browse' window.
- You can use the "All Invoices" button to open a previous POS Invoice that has already been finished and then invalidate that Invoice. If the till is not connected to a receipt printer or a fiscal printer, a copy of the Invoice will be printed automatically as part of the process, with an "Invalidated" watermark. However you cannot invalidate a previous finished POS Invoice if it has been included in a POS Balance record (i.e. if it has been posted to the Nominal Ledger) or if it has updated stock (i.e. if you have run the 'Update Stock' Maintenance function after the Invoice was created).
Open Cash Drawer
- Function
- Opens the till's cash drawer.
- Requirements
- Can only be used by a cashier or supervisor whose Access Group includes a row explicitly giving full access to the 'Open Cash Drawer' Action.
- The POS Invoice must contain at least one payment. The Payment Mode of this payment must have been registered together with the Local Machine Code of the till in a row in the Local Machine Payment Modes setting. In this row, the Drawer field should not be empty.
- You must have specified in the Local Machine Serial Port Devices setting in the Technics module that the till or cash machine has a cash drawer.
- The POS Invoice must contain at least one payment. The Payment Mode of this payment must have been registered together with the Local Machine Code of the till in a row in the Local Machine Payment Modes setting. In this row, the Drawer field should not be empty.
- Workflow
- Click or touch the "Open Cash Drawer" button.
- The till's cash drawer will open.
- Notes
- Click or touch the "Open Cash Drawer" button.
- If a receipt printer (Epson TM-U210 or TM-T88II) with cash drawer is attached to a till, touching or clicking the "Finish" button will also open the cash drawer.
- The "Open Cash Drawer" button does not have the supervisor log-in feature. So, if a cashier who does not have access to the 'Open Cash Drawer' Action clicks or touches the button, a message will appear to this effect. The 'Login' window will not appear, so there will be no opportunity for a supervisor to log in.
Paste Quotation
- Function
- Copies the details from a Quotation into a POS Invoice.
- Workflow
- Click or touch the "Paste Quotation" button.
- A 'Paste Quotation' window and a numeric keypad open:

- Enter a Quotation Number in the 'Paste Quotation' window.
- If you are using a touch screen, use the numeric keypad to enter the Quotation Number, and touch the [Enter] button to add it to the 'Paste Quotation' window.
- Click or touch [Proceed] to copy the details of the Quotation into the POS Invoice, or [Cancel] if you do not want to proceed.
- The Customer in the POS Invoice will be changed to the one in the Quotation, and the Items in the Quotation will be added to the POS Invoice, after any Items that were already there. The first line in the Comment on the 'Price List' card of the Quotation will be copied to a separate line in the POS Invoice.
The Quotation will not be updated (e.g. it will not be marked as Accepted), and it will not be connected to the POS Invoice.
- Note
- Click or touch the "Paste Quotation" button.
- The Quotation register is not synchronised. Therefore you can only use this button on a till that has a live connection with the server. You cannot use it on a till that has a live-sync connection with the server.
Paste Sales Order
- Function
- Copies the details from a Sales Order into a POS Invoice.
- Workflow
- Click or touch the "Paste Sales Order" button.
- A 'Paste Sales Order' window and a numeric keypad open:
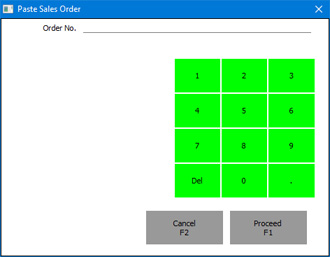
- Enter an Order Number in the 'Paste Sales Order' window.
- If you are using a touch screen, use the numeric keypad to enter the Order Number, and touch the [Enter] button to add it to the 'Paste Sales Order' window.
- Click or touch [Proceed] to copy the details of the Sales Order into the POS Invoice, or [Cancel] if you do not want to proceed.
- The Customer in the POS Invoice will be changed to the one in the Sales Order, and the Items in the Sales Order will be added to the POS Invoice, after any Items that were already there. Items in the Order that are fully delivered (i.e. Items where the Order Quantity and the Del. OK quantity are the same) will not be copied. Items that are partially delivered will be copied with their undelivered quantities. The first line of the Comment on the 'Price List' card of the Sales Order will be copied to a separate line in the POS Invoice.
The Sales Order will not be updated, and it will not be connected to the POS Invoice.
- Note
- Click or touch the "Paste Sales Order" button.
- The Sales Order register is not synchronised. Therefore you can only use this button on a till that has a live connection with the server. You cannot use it on a till that has a live-sync connection with the server.
Print Invoice
- Function
- Reprints a POS Invoice
- Requirements
- Can only be used to print a finished Invoice. Therefore, if you add a "Print Invoice" button to the POS Invoice window, you must also add an "All Invoices" button to allow a cashier to find the finished Invoice that is to be printed.
- Workflow
- Click or touch the "All Invoices" button and then locate and open the POS Invoice that is to be printed.
- Click or touch the "Print Invoice" button. The POS Invoice will be printed.
- Note
- Click or touch the "All Invoices" button and then locate and open the POS Invoice that is to be printed.
- The "Print Invoice" button will print POS Invoices on a conventional printer (i.e. not a receipt printer or a fiscal printer) using the Form Template that you have assigned to the POS Invoice form (in other words, it is similar to using the Printer icon in a Sales Ledger Invoice or other printable record). If you need to be able to reprint POS Invoices on a receipt printer or on the TSL FP05 (Kenya) or FPrint 02K fiscal printers, use the "Reprint Receipt" button described below.
Reprint Last CC Slip
- Function
- In Sweden, if you are processing credit card payments through Bambora, will reprint the last credit card slip (with a "Copy" watermark).
- Requirements
- In the Local Credit Card Terminal setting on the till, you must have specified that the Terminal Type is "Bambora".
- Workflow
- Click or touch the "Reprint Last CC Slip" button to reprint the last credit card slip.
Reprint Receipt
- Function
- Reprints a POS Invoice.
- Requirements
- Requires a supervisor to log in: can only be used by a cashier or supervisor whose Access Group gives access to the 'Reprint Touch Screen Invoice' Action.
- Can only be used to print a finished Invoice. Therefore, if you add a "Reprint Receipt" button to the POS Invoice window, you must also add an "All Invoices" button to allow a cashier to find the finished Invoice that is to be printed.
- Can only be used to print a finished Invoice. Therefore, if you add a "Reprint Receipt" button to the POS Invoice window, you must also add an "All Invoices" button to allow a cashier to find the finished Invoice that is to be printed.
- Workflow
- Click or touch the "All Invoices" button and then locate and open the POS Invoice that is to be printed.
- Click or touch the "Reprint Receipt" button.
- If the cashier does not have the necessary access right, the 'Login' window will appear, allowing a supervisor to log in.
- The POS Invoice will be printed.
- Control of the till will be passed back to the cashier.
- Note
- Click or touch the "All Invoices" button and then locate and open the POS Invoice that is to be printed.
- The "Reprint Receipt" button will reprint POS Invoices on a receipt printer or on the TSL FP05 (Kenya) or FPrint 02K fiscal printers. If you do not have such a printer attached to a till (i.e. you have not entered a record in the Local Machine Serial Port Devices setting in the Technics module that connects such a printer to the till), the button will print POS Invoices on a conventional printer using the Form Template that you have assigned to the POS Invoice form (i.e. it will behave in the same way as the "Print Invoice" button described above).
- Equivalent POS Command
- Reprint Receipt
Configuring the POS Invoice Window:
- Introduction
- Placing Buttons, Tools and Functions in the POS Invoice Window
- Adjusting Elements in the POS Invoice Window
- Descriptions of Individual Button Types
- POS Commands
- Descriptions of Individual POS Commands
- Connecting Printers
- Credit and Debit Card Payments
- Home page for Point of Sales manual
- Home page for Standard ERP manual
POS Button Types in POS Invoices - Returns
This page describes the following POS Button Types in POS Invoices:
- Return
- Return Invoice No.
- Return Reason
---
Return
- Function
- Allows Customers to return Items.
- Requirements
- Can only be used by a cashier or supervisor whose Access Group gives access to the 'Negative Quantity on POS Invoices' Action.
- Workflow A
- Add the Item(s) being returned to a POS Invoice.
- Click or touch the "Return" button. All quantities will be changed from positive to negative.
- Click or touch a payment button (e.g. "Cash" or "Credit Card") to process the refund.
- Click or touch the "Finish" button as normal to close the POS Invoice and open a new one.
- Workflow B
- Click or touch the "All Invoices" button and then locate and open the POS Invoice containing the Items that are being returned.
- Click or touch the "Return" button.
- The POS Invoice will be duplicated, and the duplicate will be opened. All quantities will be negative.
- Click or touch a payment button (e.g. "Cash" or "Credit Card") to process the refund.
- Click or touch the "Finish" button as normal to close the POS Invoice and open a new one.
- Notes
- Add the Item(s) being returned to a POS Invoice.
- Workflow A allows you to process a return without having access to the original Invoice. Workflow B allows you to process a return by locating the original Invoice and duplicating it.
- It is unlikely that an Invoice and its refund will be processed on the same till or cash machine. In a live-sync environment, a cashier will only have access to the POS Invoices that are stored on the till they are using i.e. to the Invoices that were created on that till. Therefore it won't be possible to follow Workflow B. For this reason, you may need to arrange for returns to be processed on a till that has a live connection to the server and that therefore has access to every POS Invoice in the main server database. Entering reasons for returns (using the "Return Reason" button described below) will also be easier on a till with a live connection.
- If the Customer possesses the original receipt as proof of purchase, use the "Return Invoice No." button to record the Invoice Number of this receipt in the refund Invoice. If you used Workflow B, this will be done automatically.
- The "Return" button converts an entire Invoice into a Return. Every quantity will be changed from positive to negative, even for Items added to the Invoice after you press the button. If some quantities should be positive (e.g. the Customer wants to exchange one Item for another), do not use the "Return" button and instead use a "Subtract 1” POS Command to reduce the quantities of the returned Items.
- If you are using the Incremental Receipt Printing option on a till, use Workflow A and press the "Return" button before adding any Items to the Invoice. This will ensure the Items are printed on the receipt with negative quantities.
- The "Return" button does not have the supervisor log-in feature. So, if a cashier who does not have access to the 'Negative Quantity on POS Invoices' Action clicks or touches the button, a message will appear to this effect. The 'Login' window will not appear, so there will be no opportunity for a supervisor to log in.
- If you need it to be mandatory for cashiers to specify a Customer in returns (i.e. if the Customer in a return cannot be the Default Customer), select the Require Return Customer option in the POS Settings setting.
- It is unlikely that an Invoice and its refund will be processed on the same till or cash machine. In a live-sync environment, a cashier will only have access to the POS Invoices that are stored on the till they are using i.e. to the Invoices that were created on that till. Therefore it won't be possible to follow Workflow B. For this reason, you may need to arrange for returns to be processed on a till that has a live connection to the server and that therefore has access to every POS Invoice in the main server database. Entering reasons for returns (using the "Return Reason" button described below) will also be easier on a till with a live connection.
Return Invoice No.
- Function
- Allows a cashier to record the original Invoice Number when a Customer returns an Item.
- Requirements
- In the row in the POS Button record that adds the "Return Invoice No." button to the POS Invoice window, you can optionally enter a Standard Problem in the Code field, using 'Paste Special' if necessary. This will be saved in the row recording the original Invoice Number as the reason for the return. You can therefore add several "Return Invoice No." buttons, each configured so that different reasons for returns will be recorded.
- Workflow
- Click or touch the "Return Invoice No." button.
- The 'Return Invoice No.' window opens:
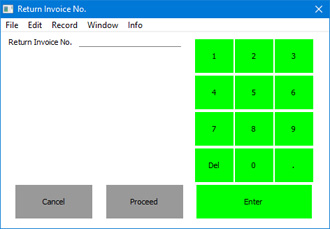
- Enter the original Invoice Number from the receipt presented by the Customer using the keypad.
- Click or touch [Proceed] to add the original Invoice Number to the current POS Invoice or [Cancel] to leave the current POS Invoice unchanged. A new line will be added to the POS Invoice (after the Items) showing the original Invoice Number.
- Click or touch the "Return Invoice No." button.
Return Reason
- Function
- When a Customer returns an Item, allows a cashier to record the reason for the return.
- Requirements
- In the row in the POS Button record that adds the "Return Reason" button to the POS Invoice window, you can optionally enter a Standard Problem in the Code field, using 'Paste Special' if necessary. This will be used as the default in the window that opens when the cashier clicks or touches the "Return Reason" button.
- If cashiers will enter their own return reasons, they will need to use tills and cash machines that have keyboards.
- If cashiers will enter their own return reasons, they will need to use tills and cash machines that have keyboards.
- Workflow
- Click or touch the "Return Reason" button.
- The 'Return Invoice No.' window opens:
If you specified a Standard Problem in the row in the POS Button record that adds the "Return Reason" button to the POS Invoice window, that Standard Problem together with the first line of its Description will be shown in the window by default.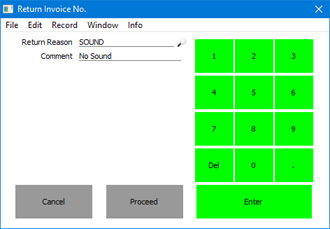
- In the Return Reason field, use 'Paste Special' to choose the Standard Problem that represents the reason for the return.
- Enter a description of the reason in the Comment field.
- Click or touch [Proceed] to add the return reason to the POS Invoice or [Cancel] to leave the current POS Invoice unchanged. A new line will be added to the POS Invoice (after the Items) showing the return reason.
- Notes
- Click or touch the "Return Reason" button.
- If you need it to be mandatory for cashiers to use the "Return Reason" button to enter a reason for every return, select the Require Return Reason option in the POS Settings setting. Cashiers will need to enter a Comment in the 'Return Invoice No.' window to satisfy this requirement (i.e. entering a Return Reason will not be enough).
- The Standard Problems setting is not synchronised, so cashiers using tills and cash machines with live-sync connections to the server will not be able to choose Standard Problems using 'Paste Special'. If you are using the Require Return Reason option, cashiers will need to enter return reasons as free text using keyboards.
Configuring the POS Invoice Window:
- Introduction
- Placing Buttons, Tools and Functions in the POS Invoice Window
- Adjusting Elements in the POS Invoice Window
- Descriptions of Individual Button Types
- POS Commands
- Descriptions of Individual POS Commands
- Connecting Printers
- Credit and Debit Card Payments
- Home page for Point of Sales manual
- Home page for Standard ERP manual
POS Button Types in POS Invoices - Transfer to Other Registers
This page describes the following POS Button Types in POS Invoices:
- Transfer to Invoice
- Transfer to Quotation
- Transfer to Sales Ledger
- Transfer to Sales Order
---
Transfer to Invoice
- Function
- Creates a Sales Ledger Invoice from a POS Invoice.
- Requirements
- Requires a supervisor to log in: can only be used by a cashier or supervisor whose Access Group gives access to the 'Transfer POS Invoice to Sales Ledger Invoice' Action.
- Can only be used on a till with a live connection to the server, not on one with a live-sync connection. Use the "Transfer to Sales Ledger" button (described below) on live-sync tills.
- If you add a "Transfer to Invoice" button to the POS Invoice window, you should also add a "Customer Search" button. This will allow a cashier to change the Customer away from the Default Customer before using the "Transfer to Invoice" button.
- Can only be used on a till with a live connection to the server, not on one with a live-sync connection. Use the "Transfer to Sales Ledger" button (described below) on live-sync tills.
- Workflow
- Use the "Customer Search" button to change the Customer in the POS Invoice.
- When every Item has been added to a POS Invoice, click or touch the "Transfer to Invoice" button.
- If the cashier does not have the necessary access right, the 'Login' window will appear, allowing a supervisor to log in.
- The POS Invoice will be closed without being saved, and a Sales Ledger Invoice created. The Payment Terms in the Invoice will be taken from the Contact record for the Customer (Sales Pay. Terms). Providing the cashier has access to the Invoice register, the Sales Ledger Invoice will then be opened for editing, checking and printing.
- You can use the "Transfer to Invoice" button from a POS Invoice that has already been saved, providing it has not been finished. For example, you can use it in a POS Invoice that you opened using the "All Invoices”, "Open Unfinished Invoices” or ”Resume Sales” buttons. The POS Invoice will be deleted when the Sales Ledger Invoice is created.
- Notes
- Use the "Customer Search" button to change the Customer in the POS Invoice.
- If the cashier does not have access to the Sales Ledger Invoice register, the Invoice will be created but will not be opened as described in step 4 of the Workflow.
- Any payment that may have been entered in the POS Invoice will be transferred to the Sales Ledger Invoice.
Transfer to Quotation
- Function
- Creates a Quotation from a POS Invoice.
- Requirements
- Requires a supervisor to log in: can only be used by a cashier or supervisor whose Access Group gives access to the 'Transfer POS Invoice to Quotation' Action.
- Can only be used on a till with a live connection to the server, not on one with a live-sync connection.
- If you add a "Transfer to Quotation" button to the POS Invoice window, you should also add a "Customer Search" button. This will allow a cashier to change the Customer away from the Default Customer before using the "Transfer to Quotation" button.
- Can only be used on a till with a live connection to the server, not on one with a live-sync connection.
- Workflow
- Use the "Customer Search" button to change the Customer in the POS Invoice.
- When every Item has been added to a POS Invoice, click or touch the "Transfer to Quotation" button.
- If the cashier does not have the necessary access right, the 'Login' window will appear, allowing a supervisor to log in.
- The POS Invoice will be closed without being saved, and a Quotation created. The Payment Terms in the Quotation will be taken from the Contact record for the Customer (Sales Pay. Terms). Providing the cashier has access to the Quotation register, the Quotation will then be opened for editing, checking and printing.
- You can use the "Transfer to Quotation" button from a POS Invoice that has already been saved, providing it has not been finished. For example, you can use it in a POS Invoice that you opened using the "All Invoices”, "Open Unfinished Invoices” or ”Resume Sales” buttons. The POS Invoice will be deleted when the Quotation is created.
- Notes
- Use the "Customer Search" button to change the Customer in the POS Invoice.
- If the cashier does not have access to the Quotation register, the Quotation will be created but will not be opened as described in step 4 of the Workflow.
- Do not enter any payment in a POS Invoice that will be converted into a Quotation because the payment will not be transferred to the Quotation.
Transfer to Sales Ledger
- Function
- Instructs the 'Cash Up' Maintenance function to create a Sales Ledger Invoice from a POS Invoice.
- Requirements
- Requires a supervisor to log in: can only be used by a cashier or supervisor whose Access Group gives access to the 'Transfer POS Invoice to Sales Ledger' Action.
- If you add a "Transfer to Sales Ledger" button to the POS Invoice window, you should also add a "Customer Search" button because the cashier must change the Customer away from the Default Customer before using the "Transfer to Sales Ledger" button.
- If you add a "Transfer to Sales Ledger" button to the POS Invoice window, you should also add a "Customer Search" button because the cashier must change the Customer away from the Default Customer before using the "Transfer to Sales Ledger" button.
- Workflow
- Use the "Customer Search" button to change the Customer in the POS Invoice.
- When every Item has been added to a POS Invoice, click or touch the "Transfer to Sales Ledger" button.
- If the cashier does not have the necessary access right, the 'Login' window will appear, allowing a supervisor to log in.
- The POS Invoice will be saved and closed, and a new one opened, ready for the next Customer.
- Control of the till will be passed back to the cashier.
- Notes
- Use the "Customer Search" button to change the Customer in the POS Invoice.
- Cashiers can use this button in place of the "Finish" button when the Customer does not pay immediately. Unlike "Finish", this button does not require the POS Invoice to be fully paid.
When the cashier presses the "Transfer to Sales Ledger" button, the POS Invoice will be saved and closed. It will also be marked as to be transferred to the Sales Ledger. When you next run the 'Cash Up' Maintenance function, it will create a Sales Ledger Invoice from the POS Invoice. The Sales Ledger Invoice will be marked as OK immediately, and therefore will be posted to the Nominal Ledger. The POS Invoice will not otherwise be included in the cashing up calculations and so will not be posted to the Nominal Ledger. The POS Invoice will also be ignored by the 'Update Stock' function as any cost of sales postings and updating of stock will be triggered by the Sales Ledger Invoice.
- Unlike the "Transfer to Invoice" button, the "Transfer to Sales Ledger" button can be used on a till with a live-sync connection to the server. This is because the consequent Sales Ledger Invoice will not be created immediately but instead will be created by the 'Cash Up' function. However, if you are not using the 'Cash Up' function, you should not use this button because the Sales Ledger Invoice will never be created.
- Any payment that may have been entered in the POS Invoice will be transferred to the Sales Ledger Invoice.
- Unlike the "Transfer to Invoice" button, the "Transfer to Sales Ledger" button can be used on a till with a live-sync connection to the server. This is because the consequent Sales Ledger Invoice will not be created immediately but instead will be created by the 'Cash Up' function. However, if you are not using the 'Cash Up' function, you should not use this button because the Sales Ledger Invoice will never be created.
Transfer to Sales Order
- Function
- Creates a Quotation from a POS Invoice.
- Requirements
- Requires a supervisor to log in: can only be used by a cashier or supervisor whose Access Group gives access to the 'Transfer POS Invoice to Sales Order' Action.
- Can only be used on a till with a live connection to the server, not on one with a live-sync connection.
- If you add a "Transfer to Sales Order" button to the POS Invoice window, you should also add a "Customer Search" button. This will allow a cashier to change the Customer away from the Default Customer before using the "Transfer to Sales Order" button.
- Can only be used on a till with a live connection to the server, not on one with a live-sync connection.
- Workflow
- Use the "Customer Search" button to change the Customer in the POS Invoice.
- When every Item has been added to a POS Invoice, click or touch the "Transfer to Sales Order" button.
- If the cashier does not have the necessary access right, the 'Login' window will appear, allowing a supervisor to log in.
- The POS Invoice will be closed without being saved, and a Sales Order created. The Payment Terms in the Order will be taken from the Contact record for the Customer (Sales Pay. Terms). Providing the cashier has access to the Order register, the Order will then be opened for editing, checking and printing.
- You can use the "Transfer to Sales Order" button from a POS Invoice that has already been saved, providing it has not been finished. For example, you can use it in a POS Invoice that you opened using the "All Invoices”, "Open Unfinished Invoices” or ”Resume Sales” buttons. The POS Invoice will be deleted when the Order is created.
- Notes
- Use the "Customer Search" button to change the Customer in the POS Invoice.
- If the cashier does not have access to the Order register, the Order will be created but will not be opened as described in step 4 of the Workflow.
- Do not enter any payment in a POS Invoice that will be converted into a Sales Order because the payment will not be transferred to the Order.
Configuring the POS Invoice Window:
- Introduction
- Placing Buttons, Tools and Functions in the POS Invoice Window
- Adjusting Elements in the POS Invoice Window
- Descriptions of Individual Button Types
- POS Commands
- Descriptions of Individual POS Commands
- Connecting Printers
- Credit and Debit Card Payments
- Home page for Point of Sales manual
- Home page for Standard ERP manual
POS Button Types in POS Invoices - Workflow
This page describes the following POS Button Types in POS Invoices:
- Cash Up Report
- Close Session
- Daily Report
- Daily Z Report
- Get Cash Float
- Open Session
- Operations Menu Function
- Pause Sales
- Put Cash Float
- Resume Sales
- Suspend Invoice
- Finish
---
Cash Up Report
- Function
- Prints to screen a Cash Up report for the current Till Drawer.
- Workflow
- Click or touch the "Cash Up Report" button. A Cash Up report will immediately be printed to screen in a new window.
- Notes
- The report period will depend on the Start from Previous POS Balance option in the POS Settings setting. If you are using this option, the report period will begin on the date of the most recent POS Balance record for the current Till Drawer. If you are not using this option, the period will begin one day before the current day. In both cases, the period will end on the current day.
- Please refer here for full details about the Cash Up report.
Change User
The "Change User" button allows a new cashier to sign in and use a till or cash machine. Please refer to the section describing POS Button Types connected with personnel functions here for full details.Close Session
- Function
- Closes the work session for the current Till Drawer.
- Requirements
- If you have tills with live-sync connections to the server, you must have defined Number Series for POS Sessions for each live-sync till in the Synchronised Number Series setting, and separate Number Series for the live tills in the Number Series - POS Sessions setting.
- Workflow
- Click or touch the "Close Session" button. The session will be closed immediately.
- Notes
- If you are using a till or cash machine with a live-sync connection to the server, you must open and close work sessions from the till itself (you can't do this remotely from a desktop client). The easiest way to do this is to use the "Open Session" and "Close Session" buttons, so be sure to add these buttons to the POS Invoice window if you have these tills in your network. An alternative method is to open and close work sessions from the HW0706REPORTS_Cash_Up,Cash Up) report, which requires you to add a "Cash Up Report" button to the POS Invoice window.
- Please refer here for more details about work sessions.
Daily Report
- Function
- Instructs a fiscal printer to print a report.
- Requirements
- You must have specified in the Local Machine Serial Port Devices setting in the Technics module that the till or cash machine is connected to one of the fiscal printers listed in the 'Notes' section below.
- Workflow
- Click or touch the "Daily Report" button. The report will be printed by the fiscal printer.
- Notes
- You can also use the Fiscal Printer Reports setting in the User Settings module to instruct fiscal printers to print reports. The table below lists the fiscal printers that will print reports in response to the "Daily Report" button, the reports that will be printed and the buttons in the Fiscal Printer Reports setting that will print the same reports:
Fiscal Printer Report Equivalent button in the Fiscal Printer Reports setting Bematech MP-2100 TH FI X report (Leitura X) None Brio FisUSBM with Middle Ware (Latvia) Daily report (X report) None Brio FM32 with Middle Ware (Latvia) Daily report (X report) None CHD Virtual Fiscal Printer (Latvia) Monthly report (X report) Monthly Balance Empirija FB15 (Lithuania) Periodic report for the current date Periodic Report Empirija FB15 with Middle Ware (Lithuania) Periodic report for the current date Periodic Report POSNET (Poland, POSNET Protocol) Daily report for the current date Daily Balance (can enter a Date for reports for other dates) POSNET (Poland, POSNET Protocol w VAT, from 01/10/2013) Daily report for the current date Daily Balance (can enter a Date for reports for other dates) POSNET HD FV EJ (Poland, POSNET Protocol over TCPIP) Daily report for the current date Daily Balance (can enter a Date for reports for other dates)
Daily Z Report
- Function
- The "Daily Z Report" button is similar to the "Daily Report" button described above, but it instructs the fiscal printer to print the daily ("Z") report, as follows:
Fiscal Printer Report Equivalent button in the Fiscal Printer Reports setting Bematech MP-2100 TH FI Z report (Redução Z) None Brio FisUSBM with Middle Ware (Latvia) Daily report (Z report) Daily Balance Brio FM32 with Middle Ware (Latvia) Daily report (Z report) Daily Balance CHD Virtual Fiscal Printer (Latvia) Daily report (Z report) Daily Balance Empirija FB15 (Lithuania) Daily report (Z report) Daily Balance Empirija FB15 with Middle Ware (Lithuania) Daily report (Z report) Daily Balance
- If you are using the Empirija FB15, specify in the Local Machine or Local Settings settings where the electronic journal files should be stored. Please refer to the description of the Fiscal Printer Reports setting here for more details
Get Cash Float
- Function
- Allows cashiers to move cash and other takings from the Till Drawer to the back office.
- Requirements
- If you have tills with live-sync connections to the server, you must have defined Number Series for Cash Events for each live-sync till in the Synchronised Number Series setting, and separate Number Series for the live tills in the Number Series - Cash Events setting.
- Workflow
- Click or touch the "Get Cash Float" button.
- The 'Cash Out: New' window will open:
If you have specified a Cash Pay. Mode in the Default Payment Modes setting, this Payment Mode will be shown in the first line of the matrix as a default.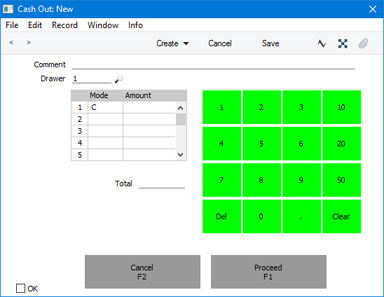
- In each row, choose a Payment Mode (e.g. cash, cheque, credit card etc) (if the till has a keyboard, you can use 'Paste Special') and enter an Amount for each one. The Amount should be the value of cash, cheques, credit card payments, etc that is being moved out of the till.
- Click or touch the [Proceed] button to save and commit the Cash Out, or the [Cancel] button to return to the POS Invoice without saving. Although the 'Cash Out: New' window contains an OK check box, you do not need to tick it before pressing [Proceed] because this will be done automatically.
- Notes
- Click or touch the "Get Cash Float" button.
- If you are using work sessions, ensure the Till Drawer is in open session before using the "Get Cash Float" button.
- Behind the scenes, the Cash Out will be saved in the Cash Events setting. Please refer here for more details about Cash Events.
Open Session
- Function
- Opens a new work session for the current Till Drawer.
- Requirements
- If you have tills with live-sync connections to the server, you must have defined Number Series for POS Sessions for each live-sync till in the Synchronised Number Series setting, and separate Number Series for the live tills in the Number Series - POS Sessions setting.
- Workflow A
- Click or touch the "Open Session" button.
- The 'POS Session: New' window will open:
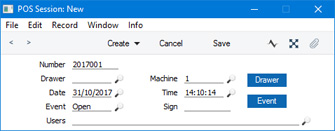
- The Machine field will contain the Local Machine Code of the till you are working on, and the Event will be set to "Open". So, all you need to do is choose a Drawer using 'Paste Special' or by clicking or touching the [Drawer] button on the right.
- Save the POS Session record. The 'POS Session: New' window will close. The work session is now open.
- Workflow B
- Click or touch the "Open Session" button.
- Click or touch the "Open Session" button. The session will be opened immediately.
- Notes
- Workflow A will be used the first time you try to open a work session on a new till or cash machine. The 'POS Session: New' window will open to allow you to specify a Drawer. This will connect the Drawer to the till. The next time you open a work session, Workflow B will be used. The same Drawer will be used, so there will be no need for the 'POS Session: New' window to open.
- If you are using a till or cash machine with a live-sync connection to the server, you must open and close work sessions from the till itself (you can't do this remotely from a desktop client). The easiest way to do this is to use the "Open Session" and "Close Session" buttons, so be sure to add these buttons to the POS Invoice window if you have these tills in your network. An alternative method is to open and close work sessions from the Cash Up report, which requires you to add a "Cash Up Report" button to the POS Invoice window.
- Please refer here for more details about work sessions.
- If you are using a till or cash machine with a live-sync connection to the server, you must open and close work sessions from the till itself (you can't do this remotely from a desktop client). The easiest way to do this is to use the "Open Session" and "Close Session" buttons, so be sure to add these buttons to the POS Invoice window if you have these tills in your network. An alternative method is to open and close work sessions from the Cash Up report, which requires you to add a "Cash Up Report" button to the POS Invoice window.
Operations Menu Function
- Function
- Activates a specified Operations menu function.
- Requirements
- In the row in the POS Button record that adds the "Operations Menu Function" button to the POS Invoice window, you must use the Code field to specify the function that will be run when the button is clicked or touched. Use 'Paste Special' to see a list of available functions ('Cash In', 'Cash Out', 'Cash Up Report', 'Open Session' and 'Close Session').
- Workflow
- Click or touch the "Operations Menu Function" button.
- The relevant Operations menu function will be activated.
- Note
- Click or touch the "Operations Menu Function" button.
- The "Operations Menu" button is one way of adding the 'Cash In', 'Cash Out', 'Cash Up Report', 'Open Session' and 'Close Session' functions to the POS Invoice window. Another way is to use the dedicated Button Types "Put Cash Float", "Get Cash Float", "Cash Up Report", "Open Session" and "Close Session" respectively. Please refer to the descriptions of these Button Types elsewhere on this page for full details.
Pause Sales
- Function
- Saves the current POS Invoice, closes it and opens an empty new one (i.e. it "parks" the current POS Invoice).
- Requirements
- If you add a "Pause Sales" button to the POS Invoice window, you should also add an "All Invoices", "Open Unfinished Invoices" or "Resume Sales" button to allow a cashier to return to the saved Invoice at a later time.
- Workflow
- Click or touch the "Pause Sales" button.
- The POS Invoice currently on screen will be saved and closed and an empty new Invoice will be opened in its place.
- Notes
- Click or touch the "Pause Sales" button.
- A cashier can use the "Pause Sales" button when they have scanned a Customer's Items and the Customer then realises that they have forgotten something. The cashier can "park" the POS Invoice and serve the next Customer while the first one is away.
- To go back to the parked Invoice, click or touch the "All Invoices", "Open Unfinished Invoices" or "Resume Sales" button.
- If you are using the Incremental Receipt Printing option on the till, use the "Suspend Invoice" button instead of the "Pause Sales" button. If you are using this option, a receipt will already have been printed for the Items. The "Suspend Invoice" button will print a line on the receipt for the last Item added to the Invoice, but the "Pause Sales" button will not.
- To go back to the parked Invoice, click or touch the "All Invoices", "Open Unfinished Invoices" or "Resume Sales" button.
Put Cash Float
- Function
- Allows cashiers to move cash into the Till Drawer from the back office.
- Requirements
- If you have tills with live-sync connections to the server, you must have defined Number Series for Cash Events for each live-sync till in the Synchronised Number Series setting, and separate Number Series for the live tills in the Number Series - Cash Events setting.
- Workflow
- Click or touch the "Put Cash Float" button.
- The 'Cash In: New' window will open:
If you have specified a Cash Pay. Mode in the Default Payment Modes setting, this Payment Mode will be shown in the first line of the matrix as a default.
- In each row, choose a Payment Mode (e.g. cash, cheque, credit card etc) (if the till has a keyboard, you can use 'Paste Special') and enter an Amount for each one. The Amount should be the value of cash or other payments that is being moved in to the till.
- Click or touch the [Proceed] button to save and commit the Cash In, or the [Cancel] button to return to the POS Invoice without saving. Although the 'Cash In: New' window contains an OK check box, you do not need to tick it before pressing [Proceed] because this will be done automatically.
- Notes
- Click or touch the "Put Cash Float" button.
- If you are using work sessions, ensure the Till Drawer is in open session before using the "Put Cash Float" button.
- Behind the scenes, the Cash In will be saved in the Cash Events setting. Please refer here for more details about Cash Events.
Resume Sales
- Function
- Allows a cashier to go back to a previous unfinished POS Invoice.
- Workflow
- Click or touch the "Resume Sales" button.
- The POS Invoice that is currently on screen will be closed, and the 'Paused Sales' window will open:
This is a list of unfinished POS Invoices. If the till uses a live-sync connection to the server, the list will only show the POS Invoices that have been entered on that till. If the till has a live connection to the server, the list will show all unfinished POS Invoices.
- Double-click or touch the POS Invoice that you need to open.
- The POS Invoice will be opened.
- Notes
- Click or touch the "Resume Sales" button.
- This button opens a list of unfinished POS Invoices, allowing you to open and continue processing an Invoice that had previously been parked. It is similar to the "Open unfinished Invoices" button: the main difference is that the "Open unfinished Invoices" button allows you to choose a POS Invoice using a detailed browse window, while this button uses a simpler selection window.
- If you are using a Windows till or cash machine, you may want to select the Wide Scroll Bars option in the Local Machine setting (or, if a till has a live-sync connection to the server, in the record for the till in the Local Settings setting in the Technics module). This may make scrolling easier on a touch-screen.
Suspend Invoice
- Function
- Saves the current POS Invoice, closes it and opens an empty new one (i.e. it "parks" the current POS Invoice).
- Requirements
- If you add a "Suspend Invoice" button to the POS Invoice window, you should also add an "All Invoices", an "Open Unfinished Invoices" or a "Resume Sales" button to allow a cashier to return to the saved Invoice at a later time.
- Workflow
- Click or touch the "Suspend Invoice" button.
- The POS Invoice currently on screen will be saved and closed and an empty new Invoice will be opened in its place.
- Notes
- Click or touch the "Suspend Invoice" button.
- A cashier can use the "Suspend Invoice" button when they have scanned a Customer's Items and the Customer then realises that they have forgotten something. The cashier can "park" the POS Invoice and serve the next Customer while the first one is away.
- To go back to the parked Invoice, click or touch the "All Invoices", "Open Unfinished Invoices" or "Resume Sales" button.
- If you are using the Incremental Receipt Printing option on the till, use the "Suspend Invoice" button instead of the "Pause Sales" button. If you are using this option, a receipt will already have been printed for the Items. The "Suspend Invoice" button will print a line on the receipt for the last Item added to the Invoice, but the "Pause Sales" button will not.
- To go back to the parked Invoice, click or touch the "All Invoices", "Open Unfinished Invoices" or "Resume Sales" button.
Configuring the POS Invoice Window:
- Introduction
- Placing Buttons, Tools and Functions in the POS Invoice Window
- Adjusting Elements in the POS Invoice Window
- Descriptions of Individual Button Types
- POS Commands
- Descriptions of Individual POS Commands
- Connecting Printers
- Credit and Debit Card Payments
- Home page for Point of Sales manual
- Home page for Standard ERP manual
POS Commands
This page describes in outline the configuring of POS Commands (keyboard commands) that cashiers will be able to use when entering POS Invoices. For detailed descriptions about each command, please refer here.---
As described here, you can place buttons in the POS Invoice window that cashiers will use to activate various tasks and functions. If your tills and cash machines have keyboards, you can also configure various keyboard commands that cashiers will be able to use from the POS Invoice window. You can decide which tasks and functions will be available to your cashiers, and what keyboard commands they will use to activate them. Use the POS Commands setting in the Point of Sales module to configure these commands.
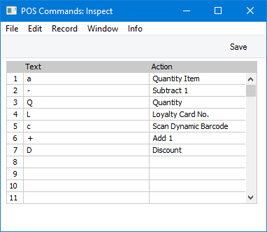
- Text
- The text is the keyboard command that the cashiers should use when they need to activate the task or function specified in the field to the right. This can be a single character as shown in the illustration or a number of characters.
- For example and referring to the illustration above, a cashier could type "a" or "A" to activate the "Quantity Item" Action (the text is not case-sensitive).
- You should not use text that could also be an Item Number, Bar Code or Alternative Code. For example, the POS Commands in the illustration above assume there are no Item Numbers, Bar Codes or Alternative Codes beginning with the characters A, C, D, L, Q, + and -. Cashiers will type or scan Item Numbers and type POS Commands into the same field in a POS Invoice, so there should be no conflicts.
- You should also take care not to enter conflicting POS Commands. For example, in the illustration above, we have assigned the text L to the "Loyalty Card No." Action. This allows a cashier to type "L4" for example to add Loyalty Card 4 to a POS Invoice. We should not then assign text such as LCP to another action, because this text would cause the Loyalty Card CP to be added to the Invoice instead of invoking the other action.
- For example and referring to the illustration above, a cashier could type "a" or "A" to activate the "Quantity Item" Action (the text is not case-sensitive).
- Action
- Paste Special
Choices of possible entries
- Use 'Paste Special' to specify the task or function that should be carried out when the cashier types the text (i.e. uses the keyboard command). Please refer to the 'POS Command Actions' page for descriptions of each option.
---
Configuring the POS Invoice Window:
- Introduction
- Placing Buttons, Tools and Functions in the POS Invoice Window
- Adjusting Elements in the POS Invoice Window
- Descriptions of Individual Button Types
- POS Commands
- Descriptions of Individual POS Commands
- Connecting Printers
- Credit and Debit Card Payments
- Home page for Point of Sales manual
- Home page for Standard ERP manual
POS Command Actions
When you use the POS Commands setting to create a set of keyboard commands for the POS Invoice window, you should use the Action field in the matrix to specify the tasks or functions that you want to be carried out when cashiers enter the keyboard commands. This page describes the available tasks and functions (i.e. the various Actions) in detail.As noted in the descriptions of each Action, cashiers can also activate some of these tasks and functions by clicking or touching buttons. Use the POS Buttons setting to configure these buttons. This setting is described here.
If you are using the Incremental Receipt Printing option on a particular till, till receipts will be printed as cashiers add Items to POS Invoices. Printing will be one row behind the cashier. For example, when the cashier adds the second Item to a POS Invoice, the first Item will be printed. This means cashiers will be able to use POS Commands such as "Add 1", "Discount", "Quantity", "Serial No." and "Subtract 1" because these commands only affect the last Item on the Invoice i.e. the one that has yet to be printed. However, as noted in the descriptions below, some commands cannot be used together with Incremental Receipt Printing.Add 1
- Function
- Increases by one the quantity of the last Item added to a POS Invoice.
- Example Workflow
- If the Text for this command is "+", type "+" followed by Enter or Return to increase by one the quantity of the last Item added to a POS Invoice.
- Equivalent POS Button Type
- POS Command (specify "Add 1" as the Code in the row in the POS Button record that adds the "POS Command" button to the POS Invoice window).
- The command will only increase the quantity of the last Item added to a POS Invoice. The button can increase the quantity of any Item in the Invoice: highlight an Item in the Invoice before pressing the button. For this reason, be careful using the button if you are using the Incremental Receipt Printing on a particular till as the button can be used to increase the quantity of an Item that has already been printed on the receipt.
Cash
- Function
- Receives and manages cash payments for POS Invoices.
- Requirements
- You must have specified a Cash Payment Mode in the Default Payment Modes setting. This Payment Mode will determine the Nominal Ledger Account that will be debited with the value of the cash payments.
- Example Workflow
- If the Text for this command is "C", type "C" followed by Enter or Return to add a full cash payment to a POS Invoice. Type "C25" followed by Enter or Return to add a cash payment of 25.00 to the POS Invoice.
- A line will be added to the end of the POS Invoice, showing the value of the cash payment. If the cash payment is greater than the amount due, the change will be calculated and displayed as well.
- A line will be added to the end of the POS Invoice, showing the value of the cash payment. If the cash payment is greater than the amount due, the change will be calculated and displayed as well.
- Equivalent POS Button Type
- Cash.
- The button will open the cash drawer but the command will not.
Delete Row
- Function
- Removes a line from a POS Invoice.
- Requirements
- Can only be used by a cashier whose Access Group gives access to the 'Delete Items on Touch Screen Invoice' Action.
- Example Workflow
- If the Text for this command is "D", type "D2" followed by Enter or Return to remove the second line from a POS Invoice.
- Notes
- The "Delete Row" command will delete lines of all kinds from POS Invoices. It will completely delete them with no audit trail (i.e. there will be no record that an Item was added to a POS Invoice and then removed).
- A line containing a payment will be shown below the total lines in a POS Invoice. If you need to remove a line containing a payment, do not count the total lines when calculating the line number. For example, if a POS Invoice contains two Items, the Items will be listed, then the totals, then the payment. The payment line will be line 3 in this example, so type "D3" to remove the payment (assuming "D" is the Text for this command).
- If you are using the Incremental Receipt Printing option on a particular till, you should not use the "Delete Row" or "Void Item" commands. Instead, use the "Void Item" button. The Incremental Receipt Printing option will mean that the deleted line will already have been printed on the receipt. The "Delete Row" and "Void Item" commands will not print a cancelling line, but the "Void Item" button will.
- A line containing a payment will be shown below the total lines in a POS Invoice. If you need to remove a line containing a payment, do not count the total lines when calculating the line number. For example, if a POS Invoice contains two Items, the Items will be listed, then the totals, then the payment. The payment line will be line 3 in this example, so type "D3" to remove the payment (assuming "D" is the Text for this command).
- Equivalent POS Button Types
- Delete Row and POS Command (specify "Delete Row" as the Code in the row in the POS Button record that adds the "POS Command" button to the POS Invoice window).
- The command can only be used by a cashier who has access to the 'Delete Items on Touch Screen Invoice' Action because it does not support the supervisor log-in feature. The buttons do support the supervisor log-in feature.
Discount
- Function
- Allows you to change the discount of the last Item to be added to a POS Invoice.
- Example Workflow
- If the Text for this command is "D", type "D5" followed by Enter or Return to add a 5% discount to the last Item to be added to a POS Invoice.
- Equivalent POS Button Type
- POS Command (specify "Discount" as the Code in the row in the POS Button record that adds the "POS Command" button to the POS Invoice window).
- If you add a "POS Command" button to the POS Invoice window, you should also do one of the following:
- Enter a row in the POS Commands setting in which the Action is "Discount" and with a Text (keyboard command). When the cashier presses the button, the keyboard command will be placed in the Item/Command field in the POS Invoice. The cashier can then enter the discount.
- An alternative is to use the Open NumPad option on each till and cash machine. When the cashier presses the button, this option will cause a numeric keypad to open which the cashier can use to enter the discount.
The command will only add a discount to the last Item added to a POS Invoice. The button can add a discount to any Item in the Invoice: highlight an Item in the Invoice before pressing the button. For this reason, be careful using the button if you are using the Incremental Receipt Printing option on a particular till as the button can be used to add a discount to an Item that has already been printed on the receipt.
- If you add a "POS Command" button to the POS Invoice window, you should also do one of the following:
Loyalty Card No.
- Function
- Adds a Customer's Loyalty Card to the POS Invoice, so that points can be added to the Card account.
- Example Workflow
- If the Text for this command is "L", type "L5" followed by Enter or Return to add Loyalty Card 5 to a POS Invoice (or type "L" and then scan the Loyalty Card).
- Equivalent POS Button Type
- Loyalty Card
Quantity
- Function
- Allows you to change the quantity of the last Item to be added to a POS Invoice (i.e. after scanning the Item).
- Example Workflow
- If the Text for this command is "Q", type "Q5" followed by Enter or Return to change the quantity of the last Item added to a POS Invoice to five.
- Equivalent POS Button Type
- POS Command (specify "Quantity" as the Code in the row in the POS Button record that adds the "POS Command" button to the POS Invoice window).
- If you add a "POS Command" button to the POS Invoice window, you should also do one of the following:
- Enter a row in the POS Commands setting in which the Action is "Quantity" and with a Text (keyboard command). When the cashier presses the button, the keyboard command will be placed in the Item/Command field in the POS Invoice. The cashier can then enter the quantity.
- An alternative is to use the Open NumPad option on each till and cash machine. When the cashier presses the button, this option will cause a numeric keypad to open which the cashier can use to enter the quantity.
The command will only change the quantity of the last Item added to a POS Invoice. The button can change the quantity of any Item in the Invoice: highlight an Item in the Invoice before pressing the button. For this reason, be careful using the button if you are using the Incremental Receipt Printing option on a particular till as the button can be used to change the quantity of an Item that has already been printed on the receipt.
- If you add a "POS Command" button to the POS Invoice window, you should also do one of the following:
Quantity Item
- Function
- Allows you to specify the quantity of an Item to be added to a POS Invoice (i.e. before scanning the Item).
- Example Workflow
- If the Text for this command is "A", type "A5 10101" followed by Enter or Return to add 5 x Item 10101 to a POS Invoice (or type "A5 " (including trailing space) and then scan the Item's barcode).
- Note
- If you are using the Incremental Receipt Printing option on a particular till, you should not use this command. Items added to a POS Invoice using this command will not be printed in an incremental receipt.
Reprint Receipt
- Function
- Reprints a POS Invoice.
- Requirements
- Can only be used by a cashier or supervisor whose Access Group gives access to the 'Reprint Touch Screen Invoice' Action.
- Can only be used to print a finished Invoice. Therefore, if you will use the "Reprint Receipt" command, you must also add an "All Invoices" button to allow a cashier to find the finished Invoice that is to be printed.
- Can only be used to print a finished Invoice. Therefore, if you will use the "Reprint Receipt" command, you must also add an "All Invoices" button to allow a cashier to find the finished Invoice that is to be printed.
- Example Workflow
- Click or touch the "All Invoices" button and then locate and open the POS Invoice that is to be printed.
- If the Text for this command is "RR", type "RR" followed by Enter or Return.
- If the cashier does not have the necessary access right, the 'Login' window will appear, allowing a supervisor to log in.
- The POS Invoice will be printed.
- Control of the till will be passed back to the cashier.
- Note
- Click or touch the "All Invoices" button and then locate and open the POS Invoice that is to be printed.
- The "Reprint Receipt" command will reprint POS Invoices on a receipt printer or on the TSL FP05 (Kenya) or FPrint 02K fiscal printers. If you do not have such a printer attached to a till (i.e. you have not entered a record in the Local Machine Serial Port Devices setting in the Technics module that connects such a printer to the till), the command will print POS Invoices on a conventional printer using the Form Template that you have assigned to the POS Invoice form (i.e. it will behave in the same way as the "Print Invoice" button).
- Equivalent POS Button Type
- Reprint Receipt
Sales Assistant
- Function
- Adds a line to a POS Invoice acknowledging the help of a Sales Assistant. Used when a Sales Assistant helps a Customer to choose an Item.
- Example Workflow
- If the Text for this command is "S", type "SSJ" followed by Enter or Return to add sales assistant SJ to a POS Invoice. Add the Sales Assistant to the Invoice before adding or scanning the Item for which the Sales Assistant is to be credited.
- Equivalent POS Button Type
- Sales Assistant
Scan Dynamic Barcode
- Function
- Adds an Item that is priced by size or weight to a POS Invoice.
- Requirements
- You must have specified a barcode structure for Items priced by size or weight in the Dynamic Barcode setting.
- Example Workflow
- If the Text for this command is "B", type "B0010101123454" followed by Enter or Return to add an Item to a POS Invoice based on the Dynamic Barcode setting (in this example: Item 10101; Qty 123.45) (or type "B" and then scan the Item's barcode).
- Note
- If you are using the Incremental Receipt Printing option on a particular till, you should not use this command. Items added to a POS Invoice using this command will not be printed in an incremental receipt.
- Equivalent POS Button Type
- Dynamic Barcode (can be used together with the Incremental Receipt Printing option).
Serial No.
- Function
- Allows you to change the Serial Number of the last Item added to a POS Invoice.
- Example Workflow
- If the Text for this command is "S", type "S123" followed by Enter or Return to change the Serial Number of the last Item added to a POS Invoice to 123 (or type "S" and then scan the Item's Serial Number).
- Note
- When a cashier adds a Serial Numbered Item to a POS Invoice, the 'Scan Serial No.' window will usually be opened automatically. It will not be opened if the Item is Serial Numbered at the Batch level and the Do not Require Batch No. on POS Invoice option in the Item record ('Stock' card) is selected. This command will therefore be useful when a cashier needs to change the Serial Number of an Item and when the cashier did not specify a Serial Number when originally prompted (i.e. if they cancelled the 'Scan Serial No.' window without specifying a Serial Number).
- Equivalent POS Button Type
- Serial No. Lookup.
- The command will only change the Serial Number of the last Item added to a POS Invoice. The button can change the Serial Number of any Item in the Invoice: highlight an Item in the Invoice before pressing the button. For this reason, be careful using the button if you are using the Incremental Receipt Printing on a particular till as the button can be used to change the Serial Number of an Item that has already been printed on the receipt.
Subtract 1
- Function
- Reduces by one the quantity of the last Item added to a POS Invoice by one.
- Example Workflow
- If the Text for this command is "-", type "-" followed by Enter or Return to reduce by one the quantity of the last Item added to a POS Invoice.
- Equivalent POS Button Type
- POS Command (specify "Subtract 1" as the Code in the row in the POS Button record that adds the "POS Command" button to the POS Invoice window).
- The command will only reduce the quantity of the last Item added to a POS Invoice. The button can reduce the quantity of any Item in the Invoice: highlight an Item in the Invoice before pressing the button. For this reason, be careful using the button if you are using the Incremental Receipt Printing option on a particular till as the button can be used to reduce the quantity of an Item that has already been printed on the receipt.
Void Item
- Function
- Removes a line from a POS Invoice.
- Requirements
- Can only be used by a cashier or supervisor whose Access Group gives access to the 'Void Touch Screen Invoice rows' Action.
- Example Workflow
- If the Text for this command is "V", type "V2" followed by Enter or Return to remove the second line from a POS Invoice.
- Notes
- The "Void Item" command will only delete lines containing Items from POS Invoices. Unlike the "Delete Row" command it will not delete other lines (e.g. lines containing payments). Also unlike "Delete Row", "Void Item" does leave an audit trail (i.e. it can be seen that an Item was added to a POS Invoice and then removed).
- If you are using the Incremental Receipt Printing option on a particular till, you should not use the "Delete Row" or "Void Item" commands. Instead, you should use the "Void Item" button. The Incremental Receipt Printing option will mean that the deleted line will already have been printed on the receipt. The "Delete Row" and "Void Item" commands will not print a cancelling line, but the "Void Item" button will.
- If you are using the Incremental Receipt Printing option on a particular till, you should not use the "Delete Row" or "Void Item" commands. Instead, you should use the "Void Item" button. The Incremental Receipt Printing option will mean that the deleted line will already have been printed on the receipt. The "Delete Row" and "Void Item" commands will not print a cancelling line, but the "Void Item" button will.
- Equivalent POS Button Types
- Void Item and POS Command (specify "Void Item" as the Code in the row in the POS Button record that adds the "POS Command" button to the POS Invoice window).
- The command can only be used by a cashier who has access to the 'Void Touch Screen Invoice rows' Action because it does not support the supervisor log-in feature. The buttons do support the supervisor log-in feature.
Configuring the POS Invoice Window:
- Introduction
- Placing Buttons, Tools and Functions in the POS Invoice Window
- Adjusting Elements in the POS Invoice Window
- Descriptions of Individual Button Types
- POS Commands
- Descriptions of Individual POS Commands
- Connecting Printers
- Credit and Debit Card Payments
- Home page for Point of Sales manual
- Home page for Standard ERP manual
Connecting Printers
When a cashier touches or clicks the "Finish" button in a POS Invoice, a till receipt will be printed from the POS Invoice, the POS Invoice will be marked as finished and closed, and a new POS Invoice opened on screen. For till receipts to be printed from POS Invoices, printers must be connected to the cash machines and tills. The following printer types are supported: please follow the links in the list for more details:- USB/Wifi Receipt Printers with user-definable print-outs
- Serial Receipt Printers with pre-defined print-outs
- Fiscal Printers
Configuring the POS Invoice Window:
- Introduction
- Placing Buttons, Tools and Functions in the POS Invoice Window
- Adjusting Elements in the POS Invoice Window
- Descriptions of Individual Button Types
- POS Commands
- Descriptions of Individual POS Commands
- Connecting Printers
- Credit and Debit Card Payments
- Home page for Point of Sales manual
- Home page for Standard ERP manual
Connecting Printers - USB/Wifi Receipt Printers with user-definable print-outs
This page describes connecting USB and Wifi printers to tills and cash machines: for details about serial printers, please refer to the Serial Receipt printer or the Fiscal Printer pages. Among the USB and Wifi printers that can be used are the Epson TM-T88V and Star TSP 113, both of which are supplied with drivers for many operating systems.To work with USB and Wifi printers, follow these steps:
- Connect USB and Wifi printers to each till and install any necessary drivers.
- Using the tools provided by each till's operating system, specify that the USB or Wifi printer is the default printer.
- Working on a desktop client, change to the System module and use the Form Template register to design the POS Invoice Form. Use the 'Properties' function on the Operations menu to name the Form Template (in this description, we have used the name "POS_INVOICE") and to turn off the Printer Dialog option. Full instructions for using the Form Template register can be found here, while specific instructions for designing till receipts can be found at the end of this page. A full list of the fields you can include in the Template design can be found here.
- Remaining in the System module, open the Auto Actions setting and choose to have POS Invoices printed automatically At OK.
This will ensure that till receipts will be printed automatically from POS Invoices whenever a cashier touches or clicks the "Finish" button.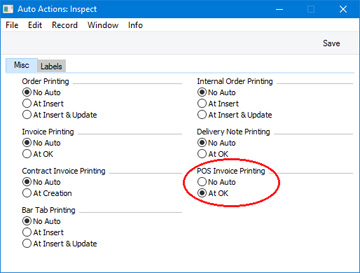
Note: if you are in Sweden and you are using CleanCash devices, do not carry out this step. Receipts will always be printed automatically as part of the process of sending Invoices to the CleanCash devices.
Click the [Save] button (Windows/Mac OS X) or tap √ (iOS/Android) to save and close the setting.
- Change to the Point of Sales module and click or tap the [Forms] button in the Navigation Centre. The 'Forms' list window is opened: highlight 'POS Invoices'.
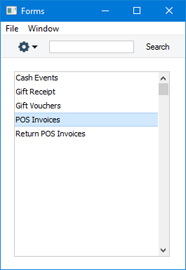
- Select 'Define Form' from the Operations menu (with 'cog' icon):
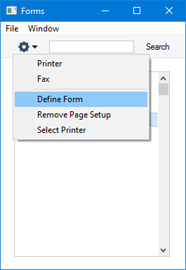
- In the subsequent 'Form Definition' window, enter "POS_INVOICE" in the Form Template field of the first row (you can use 'Paste Special' to ensure the spelling is correct):
Click [Save] to save the POS Invoice Form definition.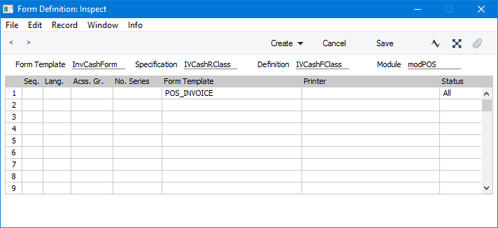
- In a mixed network with tills that use different operating systems, you may need a separate Form Template for each operating system. If so, you can ensure the appropriate Form Template will be printed from each till using Languages. Assign a Language (for example, Mac or Windows) to each cashier (in their Person records) and then enter a row for each Language/operating system in the 'Form Definition' window:
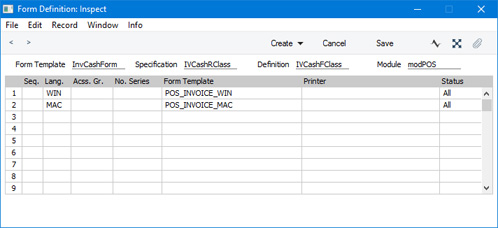
- If you will need cashiers to be able to re-print POS Invoices, add "All Invoices" and "Print Invoice" buttons to the POS Invoice window.
Designing the POS Invoice Form Template
To design the POS Invoice Form Template, follow the steps listed below. You can only follow this process using Windows or Mac OS X, not iOS or Android:- Switch to the System module, click the [Registers] button in the Navigation Centre and double-click 'Form Templates' in the resulting list.
- The 'Form Templates: Browse' window will be opened, listing the Form Templates that you have already entered. To enter a new POS Invoice Form Template, select 'New' from the Create menu; to modify an existing template, double-click it in the list.
- In the case of a new Form Template, select 'Properties' from the Operations menu.
Enter an appropriate Code and, using 'Paste Special' from the Form Type field, classify the Form Template as a Cash Invoice(POS). This will ensure that you will only be able to include fields appropriate to POS Invoices in the Form Template.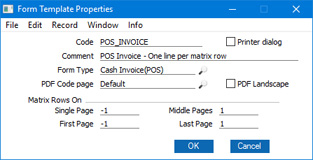
As till receipts will be printed from POS Invoices automatically when cashiers click or touch or click the "Finish" button, it will probably not be necessary or desirable for the cashiers to process a printer dialogue every time. So, do not tick the Printer dialog option.
You should now specify how many items will be printed on each page of each till receipt. As a till receipt is usually a long strip of paper that does not have pages in the usual sense, one recommendation (which will depend on the printers you are using) is that you configure the Form Template as shown in the illustration above. In this illustration, we have specified that no Items will be printed on the first page ("-1" has been entered in the Single and First Page fields; do not enter "0"), one Item will be printed on each middle page, and one Item will be printed on the last page. This will mean that every till receipt will be printed using the first page, an appropriate number of middle pages, and the last page. To use this model, you must specify that an Item will be printed on the last page.
- In this step, you will design the First page. Add fields and text elements as described below the illustration, to produce a design similar to the one in the illustration. The First page should contain the fields that you need to be printed at the top of each till receipt.
To add a field to the design, click the [Field] button at the top of the window and then draw a box on the Form Template where the field is to appear. You can move or resize it later if necessary. The 'Field' window opens: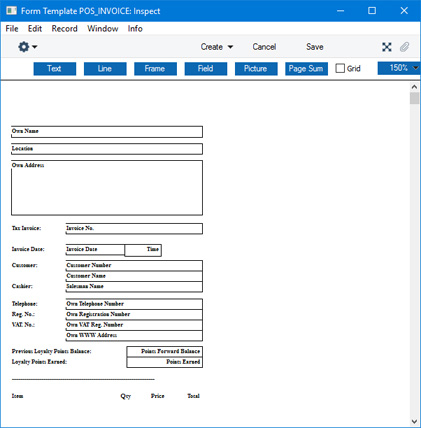
Enter the Field Name (use 'Paste Special' to see all available Field Names for the "Cash Invoice(POS)" Field Type), and paste a type style in the Style field.
Use the Exclude From Page options to specify the pages on which each field will be printed. Tick Middle, Last and Single, to signify that each field will be printed on the First page (i.e. they will be excluded from the Middle, Last and Single pages).
In the case of fields that will be printed over more than one line (e.g. the field that will print your company address), specify the Field Name, and complete the other details as follows:
- Line Height
- Use the Line Height field to specify the vertical spacing between the lines (in pixels) If you leave it at 0 (the default), all the lines of text will be superimposed on each another. In the case of 10 point Times, a Line Height of at least 10 points is recommended.
- Top, Bottom
- Don't forget to enter top and bottom pixel measurements to ensure that the Text field is deep enough to accommodate the required number of lines of text in the specified font.
Click the [OK] button in the dialogue box to save the field specifications, and repeat as necessary until you have added every field to the First page.
You can add text elements to the design in a similar manner, by clicking the [Text] button at the top of the window and then drawing a box on the Form Template where the element is to appear. When the 'Text' window opens, type the text that is to be printed on the Form Template in the Text field. This can be up to 80 characters long, but it is limited to one line. To create a text area with more than one line, use the appropriate number of separate one-line text elements.
As with fields, give all the text elements that are to appear on the First page the same page specification using the Exclude From Page options, as shown:
Click the [OK] button in the dialogue box to save the text element specifications, and repeat as necessary until you have added every text element to the First page. As shown in the example design illustrated above, the text elements at the bottom of the First page should be the column headings for the Item listing.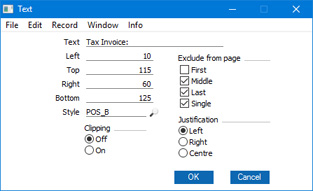
- Line Height
- Now design the Middle page. This should contain the fields that will list the Items on till receipts. To help with the design process, you can hide the elements that you added in step (iv). To do this, select 'Middle Only' from the Operations menu. This displays only those elements that are to be printed on the Middle page. At this stage, there are no such elements, so the window goes blank. Add fields and text elements to the top of the design area, so that the design looks something like this:
This time, use the Exclude From Page options to specify that each element will only be printed on the Middle pages (i.e. they will be excluded from the First, Single and Last pages). You should also set the Format to 1 in each field, to ensure the Items will be listed correctly and neatly: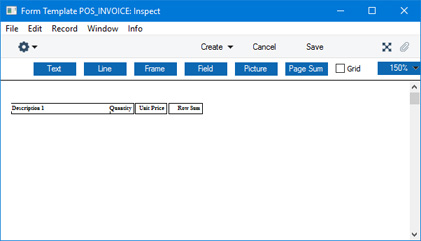
Note that Clipping has been activated for the "Description 1" field in the illustration. This will mean that long Item Names will be truncated, so that they do not extend over the Quantity, Unit Price and Row Sum.
If you need more space for long Item Names, you can place the "Description 1" field above or below the fields that will print the Item Number, quantity and price information.
If you do this and you specified that more than one matrix row will be printed on each middle page, you will need to double the Line Height in each field.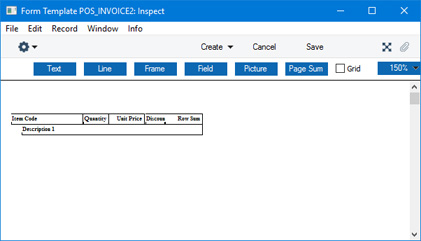
- Finally, design the Last page. This should contain the fields that you need to be printed at the end of each till receipt (e.g. totals). To help with the design process, hide the elements that you added in the previous steps by selecting 'Last Only' from the Operations menu. Again place the fields and text elements at the top of the design area. As you must print at least one Item on the Last page, add the fields that will list the Items once again, to match the arrangement that you used for the Middle page (i.e. placing the "Description 1" field under the other fields if necessary):
Use the Exclude From Page options to specify that each element will only be printed on the Last page (i.e. they will be excluded from the First, Middle and Single pages):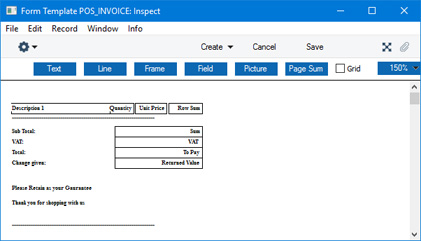
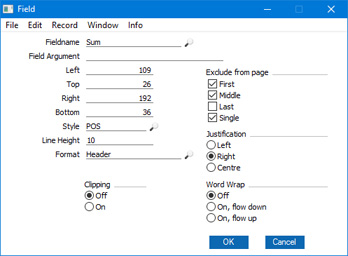
- Now, choose 'View All' from the Operations menu. Every elements from every page will be displayed. This allows you to confirm that the elements on all pages are correctly aligned with each other:
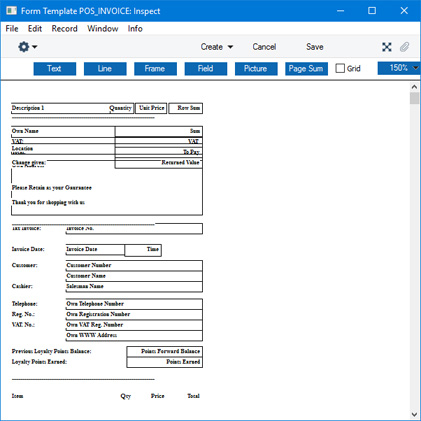
- If any element is not aligned correctly, drag it into position using the mouse, or double-click it to open its specification window and type in the correct co-ordinates.
- Depending on the printer you are using, you may need to select 'PC Printer' from the Operations menu, enter "1" in the Rows Per Page field and tick the End Page with Form Feed (FF) option, as well as specifying a Codepage.
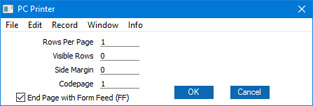
- As mentioned in step (iii), the Form Template described above will cause every till receipt to be printed using the first page, an appropriate number of middle pages, and the last page. Possible alternatives that may be more suitable depending on the printer you are using are:
- An essentially similar design, but with more than one Item being printed on each Middle page. Simply change the Middle Page figure in step (iii). Depending on the printer, you may also need to change the Rows per Page specification in the ‘PC Printer’ window (step ix).
- A more complicated design that incorporates a Single page that will be printed if an Invoice only contains a single Item. This design requires the following amendments:
- Change the Single Page and First Page figures in step (iii) from -1 to 1.
- For each element in step (iv), tick the Middle and Last options, so that the elements will be printed on the Single and First pages.
- To the end of the First page design in step (iv), add the fields and text elements that will print the Item and footer information. In these additional elements, tick the First, Middle and Last options so that they will only be printed on the Single page.
- Change the Single Page and First Page figures in step (iii) from -1 to 1.
- An essentially similar design, but with more than one Item being printed on each Middle page. Simply change the Middle Page figure in step (iii). Depending on the printer, you may also need to change the Rows per Page specification in the ‘PC Printer’ window (step ix).
- When the design is complete, click the [Save] button in the Button Bar to save the Form Template.
- Now you should specify that the Form Template you have just designed is to be used when printing till receipts. For details, please refer to steps 5-7 at the beginning of this section.
Configuring the POS Invoice Window:
- Introduction
- Placing Buttons, Tools and Functions in the POS Invoice Window
- Adjusting Elements in the POS Invoice Window
- Descriptions of Individual Button Types
- POS Commands
- Descriptions of Individual POS Commands
- Connecting Printers, including:
- USB/Wifi Receipt Printers with user-definable print-outs
- Serial Receipt Printers with pre-defined print-outs
- Fiscal Printers
- USB/Wifi Receipt Printers with user-definable print-outs
- Credit and Debit Card Payments
- Home page for Point of Sales manual
- Home page for Standard ERP manual
Connecting Printers - Serial Receipt Printers with pre-defined print-outs
This page describes connecting serial receipt printers to tills and cash machines: for details about USB/Wifi receipt printers, please refer here, and for details about fiscal printers, here.The following serial receipt printers are supported:
- Axiohm A777
- CHD 6800
- EpsonTM-T88II
- Epson TM-U210
- If you have not already assigned Local Machine Codes to your tills and cash machines, you should do so as the first step.
In the case of tills and cash machines with live connections to the server, open the Local Machine setting in the User Settings module and ensure the Code field in the header contains the correct Local Machine Code. You should do this separately on each till. If the Local Machine Code field was previously empty, you should quit Standard ERP on the till and restart.
In the case of a till with a live-sync connection to the server, you will have assigned a Local Machine Code when you connected the till to the server for the first time.
- Connect receipt printers to each till and cash machine using RS232 serial cables. If a till is a Mac OS X or Linux machine that does not have a serial port, you will need an RS232-to-USB adapter and driver.
- Working on a desktop client, change to the Technics module and open the Local Machine Serial Port Devices setting. This setting should contain separate records for each individual serial port device (i.e. separate records for each individual receipt printer). By specifying a Local Machine Code in each record, you will in effect use the setting to specify which tills and cash machines are connected to receipt printers. Enter a separate record for each individual receipt printer as follows:
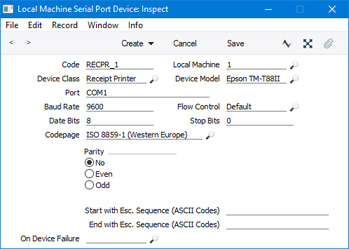
- Code
- Enter a unique Code for the receipt printer. The Code can consist of up to ten characters, and you can use both numbers and letters.
- Local Machine
- Paste Special
Local Machines setting, Point of Sales/Restaurant/Technics module
- Device Class
- Paste Special
Choices of possible entries
- Use 'Paste Special' to set the Device Class to "Receipt Printer".
- Device Model
- Paste Special
Choices of possible entries
- Use 'Paste Special' to specify the model of receipt printer that you are using.
- Port
- Specify the till's serial port to which the receipt printer is connected (e.g. "COM1" if the till is a Windows machine).
- If a till is a Mac OS X or Linux machine and you have connected the printer using an RS232-to-USB adapter, you can discover the port number of the new port using the Network section of System Preferences or by typing ls /dev/tty.* in a new Terminal window. Then enter the port number in this field (for example, /dev/tty.usbserial or /dev/tty.KeySerial1).
- Baud Rate, Flow Control, Data Bits, Stop Bits, Parity
- Refer to the manual for the receipt printer to specify the appropriate communications settings. In the case of the Flow Control field, you can choose the relevant value using 'Paste Special'.
- Codepage
- Paste Special
Choices of possible entries
- Specify the code page (character encoding system) that is to be used when communicating with the receipt printer. This information can again often be found in the manual for the receipt printer.
- Start with Esc. Sequence (ASCII Codes), End with Esc. Sequence (ASCII Codes)
- If required by the receipt printer, specify the escape sequences that should mark the start and end points of each communication with the printer. Again, please refer to the manual for the printer for this information.
- On Device Failure
- Paste Special
Local Machine Serial Port Devices setting, Technics module
- You can specify here a secondary printer that is to be used if the receipt printer fails. The secondary printer should have its own record in the Local Machine Serial Port Devices setting, and should also be attached to the till or cash machine.
Please refer here for more details about the Local Machine Serial Port Devices setting, including details about how information in this setting is sent to the Local Serial Port Devices Cache setting in the User Settings module on each till and cash machine.
- Code
- If your receipt printers have their own cash drawers, remain in the Local Machine Serial Port Devices setting and enter separate records for each cash drawer. These records should be as described above (i.e. with the same Device Model), but the Device Class field should contain "Drawer". You may also need to specify a Start Escape Sequence: refer to the printer's manual for this information. Please refer to step 8 for more information about cash drawers.
- If you need to use incremental printing, open the Local Machine setting on each till and tick the Incremental Receipt Printing box on the 'POS’ card. This will mean each POS Invoice will be printed as the cashier scans the Items, rather than being printed in its entirety when the cashier touches or clicks the "Finish" button. You can only use the Incremental Receipt Printing option with the Axiohm A777 and Epson TM-T88II receipt printers.
If a till has a live-sync connection to the server, you should select the Incremental Receipt Printing option in the record for the till in the Local Settings setting in the Technics module.
- Use the Receipt Printer Texts and/or Receipt Printer Texts per Machine settings to enter the text that is to be printed at the top and bottom of each receipt.
- Having followed the steps above, each time a cashier finishes a POS Invoice (by clicking or touching the "Finish" button), it will be printed on the receipt printer.
- If your receipt printers have their own cash drawers and you have created separate records in the Local Machine Serial Port Devices setting for each till for those drawers as described in step 3, the cash drawer will be opened after a POS Invoice has been printed, providing the following conditions are met:
- The cashier belongs to an Access Group that includes a row explicitly giving full access to the 'Open Cash Drawer' Action; and
- The POS Invoice contains at least one payment. The Payment Mode of this payment must have been registered together with the Local Machine Code of the till in a row in the Local Machine Payment Modes setting in the Point of Sales module. In this row, the Drawer field should not be empty.
Please refer here for more details about opening cash drawers.
- The cashier belongs to an Access Group that includes a row explicitly giving full access to the 'Open Cash Drawer' Action; and
- If you will need cashiers to be able to re-print POS Invoices on receipt printers, add "All Invoices" and "Reprint Receipt" buttons to the POS Invoice window.
Configuring the POS Invoice Window:
- Introduction
- Placing Buttons, Tools and Functions in the POS Invoice Window
- Adjusting Elements in the POS Invoice Window
- Descriptions of Individual Button Types
- POS Commands
- Descriptions of Individual POS Commands
- Connecting Printers, including:
- USB/Wifi Receipt Printers with user-definable print-outs
- Serial Receipt Printers with pre-defined print-outs
- Fiscal Printers
- USB/Wifi Receipt Printers with user-definable print-outs
- Credit and Debit Card Payments
- Home page for Point of Sales manual
- Home page for Standard ERP manual
Connecting Printers - Fiscal Printers
A fiscal printer is a device that prints receipts as well as recording them in an internal memory. This information can later be read by tax authorities to ensure that a shop's sales have been registered and reported correctly.This section describes connecting fiscal printers to tills and cash machines. Precise configuration, connection and operation details will vary depending on the model of fiscal printer that you are using. What follows is a general guide: for more detailed information, please refer to your local HansaWorld representative.
To use a fiscal printer, follow these steps:
- If you have not already assigned Local Machine Codes to your tills and cash machines, you should do so as the first step.
In the case of tills and cash machines with live connections to the server, open the Local Machine setting in the User Settings module and ensure the Code field in the header contains the correct Local Machine Code. You should do this separately on each till. If the Local Machine Code field was previously empty, you should quit Standard ERP on the till and restart.
In the case of a till with a live-sync connection to the server, you will have assigned a Local Machine Code when you connected the till to the server for the first time.
- Connect fiscal printers to each till or cash machine likely to receive cash or credit card payments. Usually the connection will be via USB or RS232 serial cables, but some printers can connect using Bluetooth or, in the case of shared printers, ethernet. Please refer to the sections towards the end of this page for details about connecting these printers.
- If you are using a fiscal printer with middleware, install the middleware on each till and cash machine. In the case of the Empirija FB15, only the .dll file from the Empirija middleware installer is required.
- Using the software supplied with the fiscal printers, make sure that:
- The printers have been configured with the correct VAT Codes (i.e. the VAT percentages in the printer should match the percentages in the Excl % field in the VAT Codes setting)
- The till and printer dates match.
- If the fiscal printers have been used before, make sure as well that the last daily report has been printed from each one.
- If your fiscal printer is the Epson TM-T81F, set payment type 1 in the printer to "Cash", payment type 2 to "Cheques" and payment type 3 to "Credit Card".
- The printers have been configured with the correct VAT Codes (i.e. the VAT percentages in the printer should match the percentages in the Excl % field in the VAT Codes setting)
- Working on a desktop client, change to the Technics module and open the Local Machine Serial Port Devices setting. This setting should contain separate records for each individual serial port device (i.e. separate records for each individual fiscal printer). By specifying a Local Machine Code in each record, you will in effect use the setting to specify which tills and cash machines are connected to fiscal printers. Enter a separate record for each individual fiscal printer as follows:
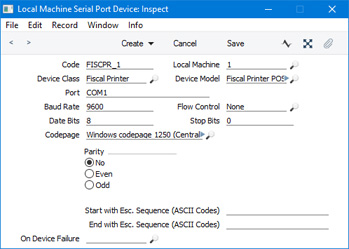
- Code
- Enter a unique Code for the fiscal printer. The Code can consist of up to ten characters, and you can use both numbers and letters.
- Local Machine
- Paste Special
Local Machines setting, Point of Sales/Restaurant/Technics module
- Enter the Local Machine Code of the till or cash machine to which the fiscal printer is or will be attached.
- Device Class
- Paste Special
Choices of possible entries
- Use 'Paste Special' to set the Device Class to "Fiscal Printer".
- Device Model
- Paste Special
Choices of possible entries
- Use 'Paste Special' to specify the model of fiscal printer that you are using.
- For the Epson LX-300, choose "Fiscal Printer Epson (Argentina)" from the 'Paste Special' list.
- For the Epson LX-300, choose "Fiscal Printer Epson (Argentina)" from the 'Paste Special' list.
- Port
- Specify the till's serial port to which the fiscal printer is connected.
- If the till is a Windows machine, the manual for the fiscal printer may recommend a particular port that you should use.
- If a till is a Mac OS X or Linux machine and you have connected the printer using an RS232-to-USB adapter, you can discover the port number of the new port using the Network section of System Preferences or by typing ls /dev/tty.* in a new Terminal window. Then enter the port number in this field (for example, /dev/tty.usbserial or /dev/tty.KeySerial1).
- Leave the Port field empty if the fiscal printer uses a Bluetooth connection.
- If you are using a shared fiscal printer, enter the IP address of the printer and the port, separated by a colon (e.g. 192.10.1.18:1350).
- If the till is a Windows machine, the manual for the fiscal printer may recommend a particular port that you should use.
- Baud Rate, Flow Control, Data Bits, Stop Bits, Parity
- Refer to the manual for the receipt printer to specify the appropriate communications settings. In the case of the Flow Control field, you can choose the relevant value using 'Paste Special'.
- Codepage
- Paste Special
Choices of possible entries
- Specify the code page (character encoding system) that is to be used when communicating with the fiscal printer. This information can again often be found in the manual for the fiscal printer. Examples are:
- Bematech MP-2100 TH FI
- US ASCII.
- Citizen ST-05
- Windows codepage 1257 (Baltic).
- Empirija FB05
- Windows codepage 1257 (Baltic).
- Empirija FB15
- Windows codepage 1257 (Baltic).
- Epson LX-300
- DOS CP 437 (US).
- Epson TM-T81F
- US ASCII.
- Epson TM-U220
- DOS CP 437 (US).
- POSNET
- Windows codepage 1250 (Central Europe)
- Tremol TSL FP05
- UTF-8 (Unicode).
- Bematech MP-2100 TH FI
- End with Esc. Sequence (ASCII Codes)
- Enter the following values, depending on the model of fiscal printer you are using:
- Citizen ST-05, Empirija FB05, FB15
- 114 (if a cash drawer is connected directly to the printer and you need the drawer to be opened after printing a receipt) or blank (otherwise).
- Citizen ST-05, Empirija FB05, FB15
- On Device Failure
- This field is not used with fiscal printers.
Please refer here for more details about the Local Machine Serial Port Devices setting, including details about how information in this setting is sent to the Local Serial Port Devices Cache setting in the User Settings module on each till and cash machine.
- Code
- If your fiscal printers have built-in pole displays, remain in the Local Machine Serial Port Devices setting and create separate records for each pole display. These records should be as described above (i.e. with the same Device Model), but the Device Class field should contain "Pole Display". Remember also to choose the Use Cash Display option in the Local Machine setting on each till (or, if a till has a live-sync connection to the server, in the record for the till in the Local Settings setting in the Technics module). The following printer pole displays are supported: Citizen ST-05, Empirija FB05, Empirija FB15, POSNET (POSNET Protocol) and POSNET (POSNET Protocol with VAT, from 01/10/2013).
- Open the Contact records for each Customer to whom you will issue Fiscal Invoices and tick the Fiscal Invoices Only check box on the 'Terms' card. This will ensure Sales Ledger and POS Invoices and Bar Tabs will be marked as Fiscal Invoices, which in turn will ensure they are printed on fiscal printers. Usually you will at least need to do this for the Customer that you have named as the Default Customer (in the POS Settings or Local Machine settings).
- If your fiscal printer is an FP3000, an OPTIMUS or a POSNET, bear in mind that Item Numbers will be truncated if they contain more than 12 characters. You can avoid this problem by specifying a shorter Alternative Code in each Item record. When Items are printed on Fiscal Invoices, they will be identified by Alternative Code. Only if the Alternative Code is blank will the Item Number be printed.
If your fiscal printer is an Epson TM-T81F, Item Numbers must fall in the range 0-99999 and can only contain numeric characters. If an Item Number is greater than 99999 or contains non-numeric characters, the Item will not be printed by the printer.
- Prices in Sales Ledger and POS Invoices printed by most fiscal printers should include VAT. You should therefore either specify in the Account Usage S/L setting that Base Prices include VAT, or create a Price List that includes VAT and assign this Price List to all Customers whose Sales Ledger and POS Invoices are likely to be printed by fiscal printers. An exception to this rule is the Epson TM-T81F, which requires that prices exclude VAT.
- In the Round Off setting in the System module, most fiscal printers require that you choose "Row Sum" as the Discount Calculation and "Per VAT Code" as the VAT Calculation.
- In Argentina (i.e. if your fiscal printer is an Epson LX-300 or TM-U220 or a Hasar 330F), follow these steps to satisfy official reporting requirements:
- Use the Registration Defaults setting in the Sales Ledger to create a list of Official Tax Codes, with a description of each Official Tax Code in the Registration No. column.
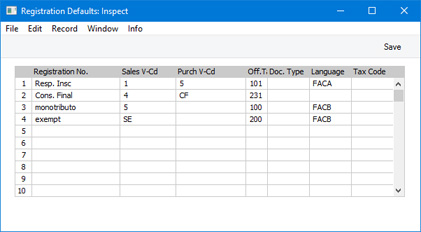
- Open the Contact record for each Customer and, on the 'Company' card, use 'Paste Special' to specify a Reg. No. 2. This will connect each Customer to the relevant row in the Registration Defaults setting, and will ensure that the Official Tax Code for each Invoice will be included in reports submitted to the tax authorities.
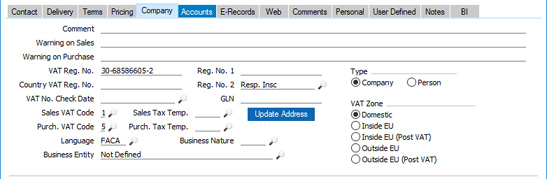
- Create records for each till in the Receipt Printer Texts per Machine in the Point of Sales module. In the matrix on the 'Defaults' card, enter a separate row for each row in the Registration Defaults setting, specifying the Customer VAT Responsibility for each Official Tax Code. Use 'Paste Special' from the Reg No. Defaults column to choose a row in the Registration Defaults setting, and again from the Cust. VAT Resp. column to choose from a list of options. A code representing the Customer VAT Responsibility will be printed on every Invoice by the fiscal printer. Depending on this code, the VAT Perception (shown in the Ext. Tax field in each Invoice) and Gross Income Perception (shown in the TAX2 field in each Invoice) may be printed as well. If a Customer whose VAT Responsibility is Exempt, Not Responsible, End Consumer or Responsible Professional is used in an Order or Invoice, then prices in that Order or Invoice will include VAT.
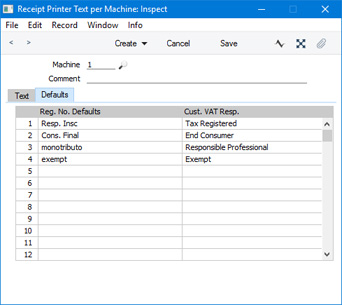
- Specify a valid Commercial Reg. No in the Company Info setting in the System module. 'Paste Special' from this field again connects to the Registration Defaults setting, thus assigning an Official Tax Code and Customer VAT Responsibility to your own company. If your fiscal printer is an Epson LX-300 or TM-U220, this will ensure that a code representing your Customer VAT Responsibility will be printed on every Invoice by the fiscal printer. If your fiscal printer is a Hasar 330F, you will need to register the relevant code in the printer's memory using its own software.
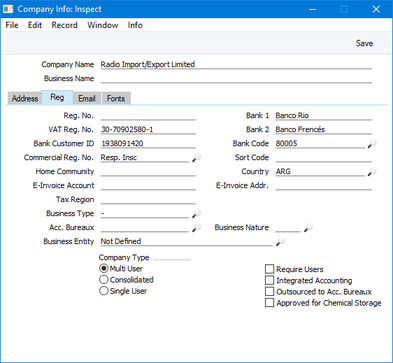
- Use the Registration Defaults setting in the Sales Ledger to create a list of Official Tax Codes, with a description of each Official Tax Code in the Registration No. column.
- In Zimbabwe, if you are using the RCH Flea fiscal printer, use the Fiscal Printer VAT Codes (Zimbabwe) setting to map the VAT Codes in Standard ERP to those in the printer. Enter the printer's codes in the Department field: each of these codes should be an integer between 1 and 5. The Fiscal Printer VAT Codes (Zimbabwe) setting is located in the Point of Sales module and will only be available if the VAT Law in the Company Info setting is "Zimbabwean".
- In Brazil, if you are using the Bematech MP-2100 TH FI fiscal printer, follow these steps to configure your VAT Codes:
- On flip B of the VAT Codes setting, assign each VAT Code to a Tax Rule in which the Tax Type is "ISSQN" or "ICMS". Specify an Excl % in each VAT Code.
- Use the Fiscal Printer VAT Codes (Brazil) setting to map the VAT Codes in Standard ERP to those in the printer. You can do this yourself, or you can select 'Sync with Fiscal Printer' from the Operations menu (with "cog" icon). This setting is located in the Point of Sales module and will only be available if the VAT Law in the Company Info setting is "Brazilian".
The 'Sync with Fiscal Printer' function will extract the VAT percentages from the fiscal printer and list them in the Fiscal Printer VAT Codes (Brazil) setting. For each percentage, it will look in the VAT Codes setting for an "ISSQN" or "ICMS" VAT Code with a matching percentage rate (in the Excl. % field). If a match is found, the function will add a row to the Fiscal Printer VAT Codes (Brazil) setting containing the VAT Code and the printer's code in the Department field. If no matching VAT Code is found, the function will add a row to the setting in which the VAT Code field contains the percentage from the printer followed by the % character. The % character is added to signify that you should add a corresponding VAT Code in the VAT Codes setting. If you have already added some VAT Codes to the Fiscal Printer VAT Codes (Brazil) setting that are not in the printer's memory, the function will send them to the printer. Finally, any non "ISSQN" or "ICMS" VAT Codes will be removed from the Fiscal Printer VAT Codes (Brazil) setting.
- On flip B of the VAT Codes setting, assign each VAT Code to a Tax Rule in which the Tax Type is "ISSQN" or "ICMS". Specify an Excl % in each VAT Code.
- Having completed the steps above, each Sales Ledger and POS Invoice and Bar Tab will be marked as a Fiscal Invoice automatically if you used a Customer in which you have ticked the Fiscal Invoices Only box, as described in step 6.
In the case of a Sales Ledger Invoice, you can override the default fiscal status using the Fiscal Invoice check box on the 'Identifiers' card (i.e. you can use the Fiscal Invoice check box to create and print a Fiscal Invoice for a Customer that does not usually receive them, and vice versa).
In the case of POS Invoices and Bar Tabs, you cannot override the Fiscal Invoice default. So, be sure to tick the Fiscal Invoices Only check box in every Customer that you will use in these transactions.
Each time you finish a POS Invoice or Bar Tab that has been marked as a Fiscal Invoice (by clicking or touching the "Finish" button), it will be sent to, printed by and recorded in the fiscal printer automatically.
If your fiscal printer is an FPrint 02K, the printer will send back a control code that will be stored in the Official No. field in the Invoice.
- If for some reason you were able to mark a Sales Ledger Invoice as OK and save it but it was not printed by the fiscal printer, follow these steps:
- If your fiscal printer is an Epson LX-300 or Hasar 330F, go to the User Settings module and open the Local Serial Port Devices setting. Open the record for the fiscal printer and choose 'Reset' from the Operations menu (with "cog" icon).
- In all cases, go back to the Invoice and choose 'Send to Fiscal Device' from the Operations menu. The Invoice will be printed as if it were a new Invoice, with a new fiscal number.
You can use Access Groups to control who can use the 'Send to Fiscal Printer' function. To do this, deny access to the 'Print To Fiscal Printer' Action.
- If your fiscal printer is an Epson LX-300 or Hasar 330F, go to the User Settings module and open the Local Serial Port Devices setting. Open the record for the fiscal printer and choose 'Reset' from the Operations menu (with "cog" icon).
- Depending on the fiscal printer, each time you mark a Cash In or Cash Out Cash Event as OK and save, it will be sent to, printed by and recorded in the fiscal printer. However, Cash Out Cash Events created by the 'Cash Up' Maintenance function will not be sent to the fiscal printer.
If you need to reprint a Cash Event, open it and choose 'Send to Fiscal Device' from the Operations menu. Again, you can control access to this function using the 'Print To Fiscal Printer' Action as mentioned in the previous step.
- If your fiscal printer is the FPrint 02K, a message will be sent automatically to the printer each time you open or close a work session. Some reports cannot be printed by the printer if a work session is open, so you may need to select the Require Open Session option in the POS Settings setting if you are using the FPrint 02K.
- Each transaction printed by a fiscal printer is also stored in its memory. At the end of each day you will need print a report listing the day's transactions. This report is known as a "Z report" in some countries. Use the Fiscal Printer Reports setting in the User Settings module to instruct fiscal printers to print the Z report and other reports. An exception is the Bematech MP-2100 TH FI: in this case you must use "Daily Z Report" and "Daily Report" buttons from the POS Invoice window to print the Z and other reports.
- If your fiscal printer is the FPrint 02K, you can at any time produce a Printer Status report, showing information such as the printer serial number and next receipt and document numbers. To do this, go to the User Settings module and open the Local Serial Port Devices setting. Open the record for the fiscal printer and choose 'Device status' from the Operations menu with "cog" icon).
Fiscal Printers - Bluetooth Connection
Some fiscal printers can be connected to iOS and Android devices using Bluetooth. This description uses the POSNET Temo and Trio as examples: some details may vary, depending on the printer you are using. Please refer to your local HansaWorld representative for details about specific printers.The POSNET Temo and Trio require Bluetooth 4.0 low energy on iOS and Classic Bluetooth on Android. To connect a POSNET printer to an iOS device using Bluetooth, follow these steps:
- In Standard ERP on the iOS device, ensure you have assigned a Local Machine Code to the device, as described in step 1 above.
- Create a record for the printer/till combination in the Local Machine Serial Port Devices setting in the Technics module, as described in step 5 above. Leave the Port field empty. For POSNET printers, the other settings should be: Baud Rate - 115200; Flow Control - None; Data Bits - 8; Stop Bits - 0; Codepage - Windows codepage 1250 (Central Europe); and Parity - None.
- Enable Bluetooth on the iOS device.
- On a POSNET Temo, make sure Bluetooth is set to NG (New Generation). Set the connection type to Bluetooth and enable pairing.
- On a POSNET Trio, connect the optional Bluetooth module to the printer and make sure Bluetooth is set to Low Energy (by default it will be set to Classic). This can be done by POSNET, or you can use the POSNET app, which is a Windows app.
Using the printer's menu, set the code page to Windows 1250 (Configuration> general parameters> communication functions> PC interface> COM interface> Posnet protocol> Code page Windows 1250). Then set the communication parameters (Configuration> hardware configuration> Communication ports> select COM> select Baud rate 115200, Stop bits 1, Parity None, Flow control None). These settings govern the communication between the printer and the Bluetooth module, which connects to the printer's serial port.
- In Standard ERP, open the Bluetooth Devices setting in the User Settings module.
If you did not enable Bluetooth on the device in step (iii), it will be enabled automatically when you open the Bluetooth Devices setting. In this case you will need to close and re-open the setting before the printer will appear in the list.
- On a POSNET Trio, enable pairing on the Bluetooth module.
- In Standard ERP, wait for the printer to appear in the list. When it does, select it. You will be asked if you want to pair the devices. After pairing, the address of the POSNET device will be placed in the Bluetooth Mac Addr field in the Local Machine setting.
- In Standard ERP on the Android device, ensure you have assigned a Local Machine Code to the device, as described in step 1 above.
- Create a record for the printer/till combination in the Local Machine Serial Port Devices setting in the Technics module, as described in step 5 above. Leave the Port field empty. For POSNET printers, the other settings should be: Baud Rate - 115200; Flow Control - None; Data Bits - 8; Stop Bits - 0; Codepage - Windows codepage 1250 (Central Europe); and Parity - None.
- On a POSNET Temo, make sure Bluetooth is set to Classic.
- On a POSNET Trio, connect the optional Bluetooth module and make sure Bluetooth is set to Classic (the default). This can be done by POSNET, or you can use the POSNET app, which is a Windows app.
- Enable Bluetooth on the Android device.
- On the printer, set the connection type to Bluetooth and enable pairing.
- In Standard ERP, open the Bluetooth Devices setting in the User Settings module and wait for the printer to appear in the list. When it does, select it.
If you did not enable Bluetooth on the device in step (e), it will be enabled automatically when you open the Bluetooth Devices setting. In this case you will need to close and re-open the setting before the printer will appear in the list.
- Restart Standard ERP on the Android device.
Fiscal Printers - Shared Printer with Ethernet Connection to the Server
Some fiscal printers can be shared, so that only one printer is needed and the tills and cash machines can all print to the same printer. The printer should be connected to any client in the network using Ethernet. This description uses the POSNET Thermal HD printer as an example: some details may vary, depending on the printer you are using. Please refer to your local HansaWorld representative for details about specific printers.To connect a shared printer to the network, follow these steps:
- In Standard ERP on the till or cash machine to which the printer will be connected, ensure you have assigned a Local Machine Code to the till, as described in step 1 above.
- On the printer, set the connection type to ethernet and the default interface to TCP/IP (Configuration> general parameters> communication functions> PC interface). Choose a port, set the communication protocol to POSNET and set the code page to Windows 1250.
- Set the IP address of the printer (Configuration> hardware configuration> TCP/IP). Enter a permanent IP address for the printer or specify that the IP address should be assigned by DHCP.
- Connect the fiscal printer to the till by ethernet.
- Check on the printer (Configuration> hardware configuration> TCP/IP) that it has been given an IP address.
- In Standard ERP, create a record for the printer/till combination in the Local Machine Serial Port Devices setting in the Technics module, as described in step 4 above. Enter the printer's IP address and port from steps (V) and (II) above separated by a colon in the Port field (e.g. 192.10.1.18:1350). For POSNET printers, the other settings should be: Device Model - Fiscal Printer POSNET HD FV EJ (Poland, POSNET Protocol over TCPIP); Baud Rate - 9600; Flow Control - None; Data Bits - 8; Stop Bits - 0; Codepage - Windows codepage 1250 (Central Europe); and Parity - None.
Configuring the POS Invoice Window:
- Introduction
- Placing Buttons, Tools and Functions in the POS Invoice Window
- Adjusting Elements in the POS Invoice Window
- Descriptions of Individual Button Types
- POS Commands
- Descriptions of Individual POS Commands
- Connecting Printers, including:
- USB/Wifi Receipt Printers with user-definable print-outs
- Serial Receipt Printers with pre-defined print-outs
- Fiscal Printers
- USB/Wifi Receipt Printers with user-definable print-outs
- Credit and Debit Card Payments
- Home page for Point of Sales manual
- Home page for Standard ERP manual
Credit and Debit Card Payments
When you receive a credit or debit card payment for a POS Invoice, you can process that payment in one of three ways, listed below. Please follow the links in the list for more details:- Using a separate credit and debit card processing system
- Processing credit and debit card payments through Standard ERP
- Connecting Standard ERP to a credit and debit card processing system
- Connecting Standard ERP to a credit and debit card processing system - Workflow
Configuring the POS Invoice Window:
- Introduction
- Placing Buttons, Tools and Functions in the POS Invoice Window
- Adjusting Elements in the POS Invoice Window
- Descriptions of Individual Button Types
- POS Commands
- Descriptions of Individual POS Commands
- Connecting Printers
- Credit and Debit Card Payments
- Home page for Point of Sales manual
- Home page for Standard ERP manual
Credit and Debit Card Payments - Using a separate credit and debit card processing system
This page describes using a separate system to process credit and debit card payments for POS Invoices, a system that is not connected to Standard ERP. Using a separate card processing system will mean that in Standard ERP cashiers will only need to record the fact that a POS Invoice has been paid. The following configuration steps are required:- Add "Credit Card" and "Debit Card" buttons to the POS Invoice window. In the rows in the POS Button record that add these buttons, you must specify a Payment Mode in the Code field, using 'Paste Special' if necessary. These Payment Modes will determine the Nominal Ledger Accounts that will be debited with the value of the credit and debit card payments:
An option that is available is to use separate "Credit Card" buttons for each credit card type (e.g. American Express, Visa, MasterCard, Discover etc). For each button, specify a different Payment Mode as the Code, with each Payment Mode posting to a different Account. This will allow you to reconcile credit card statements more easily.
- If you need cashiers to record the credit card authorisation code of each payment, select the Require Authorisation Code for Credit Card Payments option in the Local Machine setting in the User Settings module. This option will cause an Authorisation field to be placed in the 'Credit Card Payment' and 'Debit Card Payment' windows, as shown in the illustration below. As this option is in the Local Machine setting, you will need to select it on each till or cash machine as necessary. If a till has a live-sync connection to the server, select this option in the record for the till in the Local Settings setting in the Technics module.
- If the tills have cash drawers, the drawers can be opened automatically so that the cashiers can receive the credit or debit card payments (e.g. the credit or debit card slips). List the Payment Modes that you used in step 1 together with the Local Machine Codes of each till in separate rows in the Local Machine Payment Modes setting. In these rows, the Drawer field should not be empty. Please refer here for more details.
- After adding every Item to a POS Invoice, the cashier should click or touch the appropriate "Credit Card" or "Debit Card" button for the type of the credit or debit card.
- The 'Credit Card Payment' window (or identical 'Debit Card Payment' window) will appear:
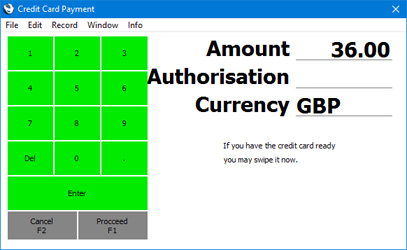
- Enter the value of the credit card payment in the Amount field (this will default to the total of the POS Invoice).
- The Customer should swipe their credit or debit card, and the cashier should process the payment through the card terminal.
- If you are using the Require Authorisation Code for Credit Card Payments option, an Authorisation field will be visible in the 'Credit Card Payment' or 'Debit Card Payment' window (as shown in the illustration). Enter the Authorisation Code from the card terminal. If this field is visible, you must enter an Authorisation Code before you can proceed.
- Click or touch [Proceed] to commit the payment, or [Cancel] to abandon it.
- A line will be added to the bottom of the POS Invoice, showing the value of the credit card payment.
Configuring the POS Invoice Window:
- Introduction
- Placing Buttons, Tools and Functions in the POS Invoice Window
- Adjusting Elements in the POS Invoice Window
- Descriptions of Individual Button Types
- POS Commands
- Descriptions of Individual POS Commands
- Connecting Printers
- Credit and Debit Card Payments, including:
- Using a separate credit and debit card processing system
- Processing credit and debit card payments through Standard ERP
- Connecting Standard ERP to a credit and debit card processing system
- Connecting Standard ERP to a credit and debit card processing system - Workflow
- Using a separate credit and debit card processing system
- Home page for Point of Sales manual
- Home page for Standard ERP manual
Credit and Debit Card Payments - Processing credit and debit card payments through Standard ERP
This page describes using Standard ERP to control the processing of credit and debit card payments for POS Invoices. When a cashier receives a credit or debit card payment for a POS Invoice, they will enter the credit card number into Standard ERP, and Standard ERP will then contact your payment gateway or payment service provider to process the payment. The payment gateway or payment service provider is also termed "Partner" in this documentation. At the time of writing, partners supported by Standard ERP for use with POS Invoices are Authorize.net and Stripe.The processing of credit card payments through a payment gateway or payment service provider is a chargeable Cloud Service. Please refer to your local HansaWorld representative for more details about subscribing to this service.
Precise configuration details will vary depending on your Partner. What follows is a general guide: for more detailed information, please refer to your local HansaWorld representative.
The following configuration steps are required:
- Provide the details of your merchant account to your local HansaWorld representative. These details will be sent to the appropriate electronic credit card processor ("Partner") (i.e. Authorize.net or Stripe).
- The partner will verify and connect with your merchant account.
- The service will be activated.
- Register your partner in the Merchant ID setting in the Point of Sales module. Please refer here for details.
- Register the credit card types supported by your partner in the Credit Card Types setting, also in the Point of Sales module. Please refer here for details.
,li>Create merchant accounts in the Payment Gateways setting. Please refer here for details.
- Add "Credit Card" and "Debit Card" buttons to the POS Invoice window. In the rows in the POS Button record that add these buttons, you must specify a Payment Mode in the Code field, using 'Paste Special' if necessary. These Payment Modes will determine the Nominal Ledger Accounts that will be debited with the value of the credit and debit card payments:
An option that is available is to use separate "Credit Card" buttons for each credit card type (e.g. American Express, Visa, MasterCard, Discover etc). For each button, specify a different Payment Mode as the Code, with each Payment Mode posting to a different Account. This will allow you to reconcile credit card statements more easily.
- After adding every Item to a POS Invoice, the cashier should click or touch the appropriate "Credit Card" or "Debit Card" button for the type of the credit or debit card.
- The 'Credit Card Payment' window (or identical 'Debit Card Payment' window) will appear:
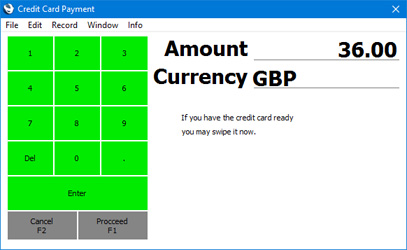
- Enter the value of the credit card payment in the Amount field (this will default to the total of the POS Invoice) and click or touch [Proceed].
- A second 'Credit Card Payment' window will open, where you can enter the credit card details (use 'Paste Special' to choose the Credit Card Type):
The basic version of the 'Credit Card Payment' window is illustrated. If you have selected the Send Invoice Address and/or Send Delivery Address options in the relevant Payment Gateway record, extra fields will be added to the 'Credit Card Payment' window where you can provide this information.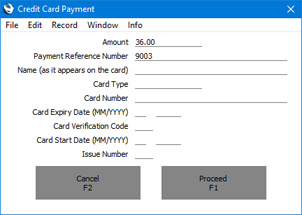
- Click or touch [Proceed] to commit the payment, or [Cancel] to abandon it.
- After the payment has been processed, a line will be added to the bottom of the POS Invoice, showing the value of the credit card payment.
Configuring the POS Invoice Window:
- Introduction
- Placing Buttons, Tools and Functions in the POS Invoice Window
- Adjusting Elements in the POS Invoice Window
- Descriptions of Individual Button Types
- POS Commands
- Descriptions of Individual POS Commands
- Connecting Printers
- Credit and Debit Card Payments including:
- Using a separate credit and debit card processing system
- Processing credit and debit card payments through Standard ERP
- Connecting Standard ERP to a credit and debit card processing system
- Connecting Standard ERP to a credit and debit card processing system - Workflow
- Using a separate credit and debit card processing system
- Home page for Point of Sales manual
- Home page for Standard ERP manual
Credit and Debit Card Payments - Connecting Standard ERP to a credit and debit card processing system
This page describes connecting Standard ERP to a separate system that will control the processing of credit and debit card payments for POS Invoices. When a cashier receives a credit or debit card payment for a POS Invoice, they will seamlessly connect Standard ERP to the processing system. It will instruct the cashier to swipe the credit or debit card using a connected card reader, process the payment and finally update Standard ERP with the result of the process. At the time of writing, card processing applications supported by Standard ERP for use with POS Invoices are Bambora (Sweden), PC-EFTPOS (Australia and New Zealand), Point via Banksys Yomani and VeriFone Vx810 (Finland) and Verifone (Latvia).Precise configuration details will vary depending on the card processing applications you are using. What follows is a general guide: for more detailed information, please refer to your local HansaWorld representative.
General Configuration
Before proceeding to the instructions for each processing system, ensure you have assigned Local Machine Codes to your tills and cash machines.
In the case of tills and cash machines with live connections to the server, open the Local Machine setting in the User Settings module and ensure the Code field in the header contains the correct Local Machine Code. You should do this separately on each till. If the Local Machine Code field was previously empty, you should quit Standard ERP on the till and restart.
In the case of a till with a live-sync connection to the server, you will have assigned a Local Machine Code when you connected the till to the server for the first time.
If you have tills with live-sync connections to the server, ensure you have define separate Number Series for Credit Card Slips for each live-sync till in the Synchronised Number Series setting, and that you have also defined a different Number Series for live tills in the Number Series - Coupons setting.
Bambora via iSMP Companion and Ingenico iPP 350
In Sweden, Standard ERP can process credit and debit card payments for POS Invoices through Bambora. The connection to Bambora will be made through credit card terminals that you should connect to each till and cash machine: supported terminals are the iSMP Companion (connects to iOS only, using Bluetooth) and the Ingenico iPP 350.
To configure Standard ERP to process credit card payments through Bambora, follow these steps:
- Connect iSMP Companion or the Ingenico iPP 350 credit card terminals to each till or cash machine likely to process credit card payments. In the case of the iSMP Companion, pair it to the iOS device that will run Standard ERP.
- Working separately on each till connected to an iPP 350, open the Local Credit Card Terminal setting in the Point of Sales module and set the Terminal Type to "Bambora". Enter the IP address of the device, and specify 1337 as the Port.
On each iOS device connected to an iSMP, open the Local Credit Card Terminal setting. Set the Terminal Type to "Bambora" but leave the other fields empty.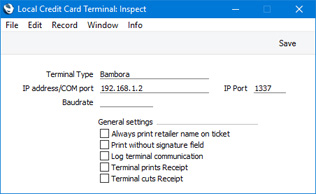
- Add a "Credit Card" button to the POS Invoice window. In the row in the POS Button record that adds this button, you must specify a Payment Mode in the Code field, using 'Paste Special' if necessary. This Payment Mode will determine the Nominal Ledger Accounts that will be debited with the value of the credit and debit card payments. You should also add "Connect to CC Terminal" and "Reprint Last CC Slip" buttons:
An option that is available is to use separate "Credit Card" buttons for each credit card type (e.g. American Express, Visa, MasterCard, Discover etc). For each button, specify a different Payment Mode as the Code, with each Payment Mode posting to a different Account. This will allow you to reconcile credit card statements more easily.
- Create a record in the Merchant ID setting in the Point of Sales module in which the Partner is "Bambora":
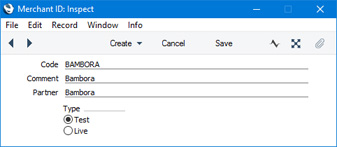
- Create a record in the Payment Gateways setting in the Point of Sales module that refers to the Merchant ID record from the previous step, and in which you have set the Type to "POS":

PC-EFTPOS
PC-EFTPOS is an application available in Australia and New Zealand that allows point of sales applications including Standard ERP to communicate with EFTPOS card devices. PC-EFTPOS can only be used on Windows tills and cash machines.To configure Standard ERP to communicate with PC-EFTPOS, follow these steps:
- Connect EFTPOS credit card terminals to each till or cash machine likely to process credit card payments. EFTPOS credit card terminals are available with USB or DB9 serial port connections: if your terminals have DB9 connections, you will need to use USB-to-DB9 adapters.
- Install the PC-EFTPOS software on each till. Detailed instructions are available from your local HansaWorld representative.
- Again working separately on each till, open the Local Credit Card Terminal setting in the Point of Sales module and set the Terminal Type to "PC-EFTPOS (IP)". Enter "localhost" as the IP address. In the IP Port field, enter the port that you specified (when installing the PC-EFTPOS software) to be used by the EFTPOS card terminal to communicate with the till:
Tick the Terminal prints Receipt and Terminal cuts Receipt options if you would like the card terminal to print receipts. Otherwise, they will be printed by Standard ERP.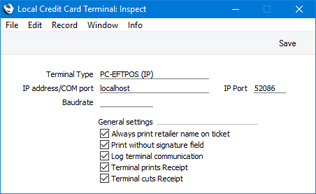
Although this setting is in the Point of Sales module, it is stored in the databases on the client machines. Therefore, you need to configure it separately on each client.
- Add a "Credit Card" button to the POS Invoice window. In the row in the POS Button record that adds this button, you must specify a Payment Mode in the Code field, using 'Paste Special' if necessary. This Payment Mode will determine the Nominal Ledger Accounts that will be debited with the value of the credit and debit card payments:
An option that is available is to use separate "Credit Card" buttons for each credit card type (e.g. American Express, Visa, MasterCard, Discover etc). For each button, specify a different Payment Mode as the Code, with each Payment Mode posting to a different Account. This will allow you to reconcile credit card statements more easily.
- Create a record in the Merchant ID setting in the Point of Sales module in which the Partner is "PC-EFTPOS":
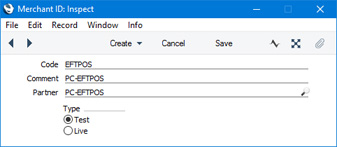
- Create a record in the Payment Gateways setting in the Point of Sales module that refers to the Merchant ID record from the previous step, and in which you have set the Type to "POS":
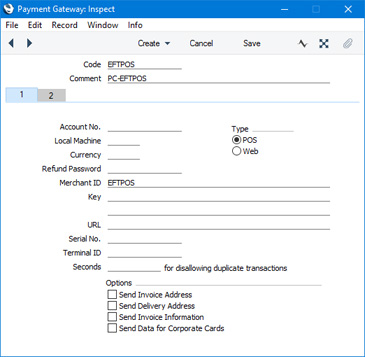
Point via Banksys Yomani or VeriFone Vx810
In Finland, Standard ERP can process credit and debit card payments for POS Invoices through the Point Transaction Collecting System. The connection to Point will be made through credit card terminals that you should connect to each till and cash machine: supported terminals are the Banksys Yomani and the VeriFone Vx810.To configure Standard ERP to process credit card payments through the Point Transaction Collecting System, follow these steps:
- Connect Banksys Yomani or VeriFone Vx810 credit card terminals to each till or cash machine likely to process credit card payments.
- Working on a desktop client, change to the Technics module and open the Local Machine Serial Port Devices setting. This setting should contain separate records for each individual serial port device (i.e. separate records for each individual card terminal). By specifying a Local Machine Code in each record, you will in effect use the setting to specify which tills and cash machines are connected to card terminals. Enter a separate record for each individual card terminal as follows:
- Code
- Enter a unique Code for the card terminal. The Code can consist of up to ten characters, and you can use both numbers and letters.
- Local Machine
- Paste Special
Local Machines setting, Point of Sales/Restaurant/Technics module
- Enter the Local Machine Code of the till or cash machine to which the card terminal is or will be attached.
- Device Class
- Paste Special
Choices of possible entries
- Use 'Paste Special' to set the Device Class to "Credit Card Terminal".
- Device Model
- Paste Special
Choices of possible entries
- Use 'Paste Special' to set the Device Model to "Credit Card Terminal Yomani Banksys" or "Credit Card Terminal Verifone" (depending on the model of card terminal you are using).
- Port
- Specify the till's serial port to which the card terminal is connected.
- If the till is a Windows machine, you may need to obtain a USB virtual comport driver.
- If the Till is a Mac OS X or Linux machine and does not have a serial port, you will need an RS232-to-USB adapter. Install the driver supplied with the adapter. To discover the port number of the new port, you can use the Network section of System Preferences or type ls /dev/tty.* in a new Terminal window. Then enter the port number in this field (for example, /dev/tty.usbserial or /dev/tty.KeySerial1).
- If the till is a Windows machine, you may need to obtain a USB virtual comport driver.
- Baud Rate, Flow Control, Data Bits, Stop Bits, Parity
- Refer to the manual for the card terminal to specify the appropriate communications settings. In the case of the Flow Control field, you can choose the relevant value using 'Paste Special'.
- Codepage
- Paste Special
Choices of possible entries
- Specify the code page (character encoding system) that is to be used when communicating with the card terminal. This information can again often be found in its manual.
All other fields should be empty.

- Code
- Again working separately on each client or Till, open the Local Credit Card Terminal setting in the Point of Sales module and set the Terminal Type to "Yomani banksys (Serial/COM)":
Leave the other fields empty. The purpose of this record is simply to signify that credit card payments are to be sent to Point via a credit card terminal.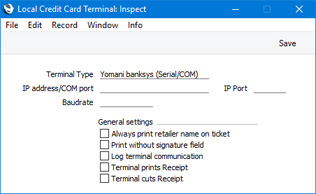
Although this setting is in the Point of Sales module, it is stored in the databases on the client machines. Therefore, you need to configure it separately on each client.
- Add "Credit Card" and "Credit Card Payment Reversal" buttons to the POS Invoice window. In the rows in the POS Button record that add these buttons, you must specify a Payment Mode in the Code field, using 'Paste Special' if necessary. These Payment Modes will determine the Nominal Ledger Accounts that will be debited with the value of the credit and debit card payments (credited in the case of the "Credit Card Payment Reversal" button):
An option that is available is to use separate "Credit Card" buttons for each credit card type (e.g. American Express, Visa, MasterCard, Discover etc). For each button, specify a different Payment Mode as the Code, with each Payment Mode posting to a different Account. This will allow you to reconcile credit card statements more easily.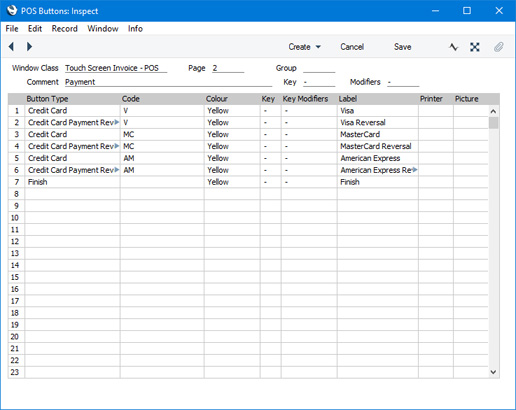
- Refer to the USB/Wifi receipt printers with user-definable print-outs page for details about connecting printers and designing the Form Template that will be used to print receipts.
To print credit card slip information on receipts, include the following fields in your Form Template:
- Credit Card Slip Note
- Enter CUSTOMER as the Field Argument in this field.
- Credit Card Slip Note 2
- Enter MERCHANT as the Field Argument in this field.
Specify a Line Height in both fields.
Depending on the printer you are using, you may need to set the Form Template to print two copies, using the 'Copies' function on the Operations menu).
- Credit Card Slip Note
Verifone
In Latvia, Standard ERP can process credit and debit card payments for POS Invoices through Verifone. The connection will be made through credit card terminals that you should connect to each till and cash machine.To configure Standard ERP to process credit card payments through Verifone, follow these steps:
- Connect credit card terminals to each till or cash machine likely to process credit card payments.
- Working on a desktop client, change to the Technics module and open the Local Machine Serial Port Devices setting. This setting should contain separate records for each individual serial port device (i.e. separate records for each individual card terminal). By specifying a Local Machine Code in each record, you will in effect use the setting to specify which tills and cash machines are connected to card terminals. Enter a separate record for each individual card terminal as follows:
- Code
- Enter a unique Code for the card terminal. The Code can consist of up to ten characters, and you can use both numbers and letters.
- Local Machine
- Paste Special
Local Machines setting, Point of Sales/Restaurant/Technics module
- Enter the Local Machine Code of the till or cash machine to which the card terminal is or will be attached.
- Device Class
- Paste Special
Choices of possible entries
- Use 'Paste Special' to set the Device Class to "Credit Card Terminal".
- Device Model
- Paste Special
Choices of possible entries
- Use 'Paste Special' to set the Device Model to "Credit Card Terminal Verifone".
- Port
- Specify the till's serial port to which the card terminal is connected.
- If the Till is a Mac OS X or Linux machine and does not have a serial port, you will need an RS232-to-USB adapter. Install the driver supplied with the adapter. To discover the port number of the new port, you can use the Network section of System Preferences or type ls /dev/tty.* in a new Terminal window. Then enter the port number in this field (for example, /dev/tty.usbserial or /dev/tty.KeySerial1).
- If the Till is a Mac OS X or Linux machine and does not have a serial port, you will need an RS232-to-USB adapter. Install the driver supplied with the adapter. To discover the port number of the new port, you can use the Network section of System Preferences or type ls /dev/tty.* in a new Terminal window. Then enter the port number in this field (for example, /dev/tty.usbserial or /dev/tty.KeySerial1).
- Baud Rate, Flow Control, Data Bits, Stop Bits, Parity
- Refer to the manual for the card terminal to specify the appropriate communications settings. In the case of the Flow Control field, you can choose the relevant value using 'Paste Special'.
- Codepage
- Paste Special
Choices of possible entries
- Specify the code page (character encoding system) that is to be used when communicating with the card terminal. This information can again often be found in its manual.
All other fields should be empty.
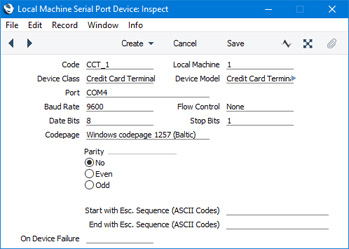
- Code
- Remain in the Local Machine Serial Port Devices setting and enter separate records for the fiscal printers that will be attached to each till and cash machine. Please refer here for more information about fiscal printers.
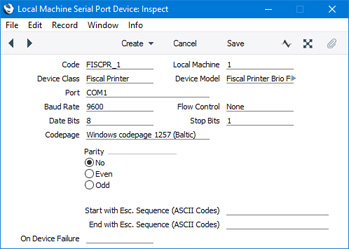
- Again working separately on each client or Till, open the Local Credit Card Terminal setting in the Point of Sales module and set the Terminal Type to "Verifone (Serial/COM)":
Leave the other fields empty. The purpose of this record is simply to signify that credit card payments are to be sent to Verifone via a credit card terminal.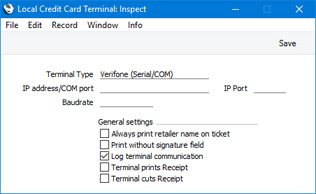
Although this setting is in the Point of Sales module, it is stored in the databases on the client machines. Therefore, you need to configure it separately on each client.
- Add "Full Payment" and/or "Pay (one Mode)" buttons to the POS Invoice window.
In the case of "Full Payment" buttons, you can add more than one button, representing different payment methods. For example, you might add one "Full Payment" button to be used for cash payments and one for credit card payments. In the rows in the POS Button record that add these buttons, you must specify a Payment Mode in the Code field, using 'Paste Special' if necessary. These Payment Modes represent the payment method (e.g. cash or credit card) and will determine the Nominal Ledger Accounts that will be debited with the value of the payments. You can use separate "Full Payment" buttons for each credit card type (e.g. American Express, Visa, MasterCard, Discover etc). For each button, specify a different Payment Mode as the Code, with each Payment Mode posting to a different Account. This will allow you to reconcile credit card statements more easily:
In the case of the "Pay (one Mode)" button, list the Payment Modes (i.e. the payment methods) that can be used on each till in the Local Machine Payment Modes setting. Again, you can use separate Payment Modes for different credit card types. The Local Machine Payment Modes setting is described here.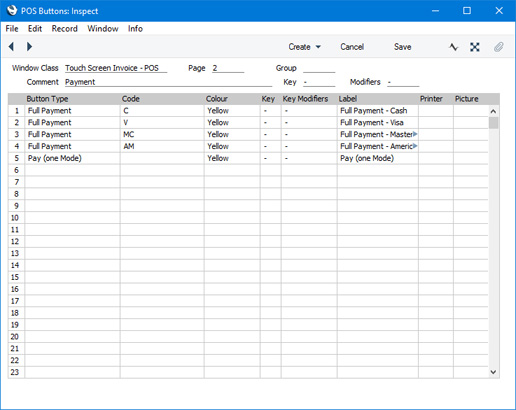
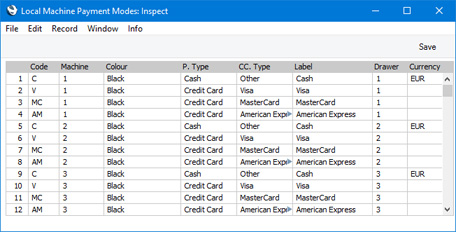
—
Configuring the POS Invoice Window:
- Introduction
- Placing Buttons, Tools and Functions in the POS Invoice Window
- Adjusting Elements in the POS Invoice Window
- Descriptions of Individual Button Types
- POS Commands
- Descriptions of Individual POS Commands
- Connecting Printers
- Credit and Debit Card Payments, including:
- Using a separate credit and debit card processing system
- Processing credit and debit card payments through Standard ERP
- Connecting Standard ERP to a credit and debit card processing system
- Connecting Standard ERP to a credit and debit card processing system - Workflow
- Using a separate credit and debit card processing system
- Home page for Point of Sales manual
- Home page for Standard ERP manual
Credit and Debit Card Payments - Connecting Standard ERP to a credit and debit card processing system - Workflow
This page describes the processing of credit and debit card payments for POS Invoices through a credit and debit card processing system. When a cashier receives a credit or debit card payment for a POS Invoice, they will seamlessly connect Standard ERP to the processing system. It will instruct the cashier to swipe the credit or debit card using a connected card reader, process the payment and finally update Standard ERP with the result of the process. At the time of writing, card processing applications supported by Standard ERP for use with POS Invoices are Bambora (Sweden), PC-EFTPOS and Smartpay (Australia and New Zealand), Point via Banksys Yomani and VeriFone Vx810 (Finland), Verifone (Latvia) and Worldpay.General configuration details can be found here: precise configuration details will vary depending on the card processing applications you are using. For more detailed information, please refer to your local HansaWorld representative.
Workflow (except Verifone)
After completing the configuration steps described above, cashiers will be able to receive credit and debit card payments, as follows:
- After adding every Item to a POS Invoice, the cashier should click or touch the appropriate "Credit Card" or "Debit Card" button for the type of the credit or debit card.
- If you are using Bambora or PC-EFTPOS, the 'Credit Card Payment' window will appear:
If you are using Point via Banksys Yomani, a simpler window will appear:
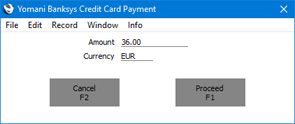
- Enter the value of the credit card payment in the Amount field (this will default to the total of the POS Invoice) and click or touch [Proceed].
- In all cases, control will be passed to the credit card terminal. The customer should swipe their card, and the payment will be processed. The terminal will send information to the till or cash machine so the cashier can monitor progress.
- After the payment has been processed, a line will be added to the bottom of the POS Invoice, showing the value of the credit card payment. A record will also be created in the Credit Card Slips setting in the Point of Sales module.
- If the payment was successful and was sufficient to pay the POS Invoice in full and depending on which credit card processing system you are using,, the Invoice will be Finished automatically, and a new POS Invoice opened. Otherwise, register additional payments as appropriate and then use the "Finish" button.
Workflow (Verifone)
After completing the configuration steps described above, cashiers will be able to receive credit and debit card payments, as follows:- After adding every Item to a POS Invoice, the cashier can click or touch the appropriate "Full Payment" button for the type of the credit or debit card, or they can click or touch the "Pay (one Mode)" button.
- If the cashier uses the "Pay (one Mode)" button, the 'Payment' window will appear:
This window will contain one button for each Payment Mode (payment method) assigned to the till in the Local Machine Payment Modes setting.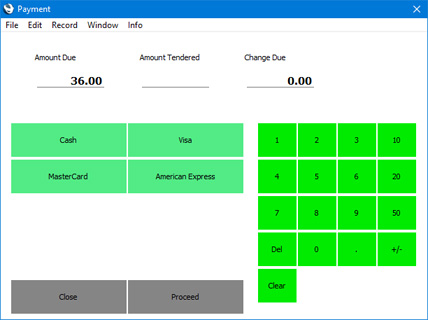
If the Customer pays the full amount using a single credit card, there is no need to enter a figure in the Amount Tendered field. Simply click or touch the button that represents the relevant credit card.
If the Customer pays using more than one credit card, enter the value of the first payment in the Amount Tendered field and click or touch the button that represents the relevant credit card. The payment will be processed as described in steps iii-iv. The, enter the next payment value in the Amount Tendered field and click or touch the button that represents the next credit card.
- In both cases ("Full Payment" and "Pay (one Mode)", control will be passed to the credit card terminal. The customer should swipe their card, and the payment will be processed. The terminal will send information to the till or cash machine so the cashier can monitor progress.
- After the payment has been processed, a line will be added to the bottom of the POS Invoice, showing the value of the credit card payment. Records will also be created in the Credit Card Slips and Credit Card Terminal Slips settings in the Point of Sales module.
- If you used the "Pay (one Mode") button and the payment was sufficient to pay the POS Invoice in full, click or touch [Proceed] to close the 'Payment' window. The Invoice will be Finished automatically, and a new POS Invoice opened.
If the payment was not sufficient to pay the POS Invoice in full, click or touch the [Close] button to return to the POS Invoice to process additional payments as appropriate.
If you used the "Full Payment" button, use the "Finish" button to close the Invoice and open a new one.
Returns
If you need to refund a credit card transaction, you will usually need to open the POS Invoice that is to be refunded, use the "Return" button and then the "Credit Card" button (or "Full Payment" or "Pay (one Mode)" buttons if you are using Verifone). Please refer here for details about the "Return" button.However, if you are using Point via Banksys Yomani, you may be able to use the "Return" button and then the "Credit Card Payment Reversal" button. After a credit card transaction has been processed through Point via Banksys Yomani, it will be cleared through the Point system. The clearing process normally occurs nightly. If a transaction hasn't been cleared, you can reverse it using the "Credit Card Payment Reversal" button. If it has been cleared, use the "Credit Card" button instead of the "Credit Card Payment Reversal" button to create a new transaction.
Follow these steps:
- Open the POS Invoice whose credit card payment is to be refunded.
- Click or touch the "Return" button. A new POS Invoice will be opened, a duplicate of the original in which the amounts are negative.
- if you are using Point via Banksys Yomani and you can reverse the transaction, click or touch the "Credit Card Payment Reversal" button. The 'Yomani Banksys Credit Card Payment Reversal' window will open, showing the Transaction ID of the transaction that is to be reversed.
If you cannot reverse the transaction or you are not using Point via Banksys Yomani, click or touch the "Credit Card" button (or "Full Payment" or "Pay (one Mode)" buttons if you are using Verifone).
- Enter the value of the reversed or refunded payment in the Amount field (this will default to the total of the POS Invoice) and click or touch the [Proceed] button.
- Process the payment reversal or refund following the instructions on screen.
- A line will be added to the bottom of the POS Invoice, showing the value of the credit card payment reversal or refund. A record will also be created in the Credit Card Slips setting in the Point of Sales module.
- If the POS Invoice was paid in full by the credit card payment reversal or refund, it will be Finished automatically, and a new POS Invoice opened. Otherwise, register additional payments as appropriate and then use the "Finish" button.
Configuring the POS Invoice Window:
- Introduction
- Placing Buttons, Tools and Functions in the POS Invoice Window
- Adjusting Elements in the POS Invoice Window
- Descriptions of Individual Button Types
- POS Commands
- Descriptions of Individual POS Commands
- Connecting Printers
- Credit and Debit Card Payments, including:
- Using a separate credit and debit card processing system
- Processing credit and debit card payments through Standard ERP
- Connecting Standard ERP to a credit and debit card processing system
- Using a separate credit and debit card processing system
- Home page for Point of Sales manual
- Home page for Standard ERP manual