Introduction to Documents in Standard products
When you need to print an individual record, you will do so by printing a document. Documents are formal printouts such as invoices, often printed for sending to third parties (e.g. Customers or Suppliers). You can use up to three methods to print documents. These are:- Open the record that you want to print and click the Printer icon:
If you want to print to screen, click the Preview icon:

- Open the register containing the record that you want to print, highlight it in the list and select 'Print' from the File menu. You can select a number of records by shift-clicking to print them all.
- Use the [Documents] button in the Master Control panel or the ⌘-D keyboard shortcut to open the list of documents. In Standard Accounts, the documents in the list will vary with the selected module. In the other Standard products, every document in the program will be listed.
- If you need to set the page size, number of copies and other printer options for a document, click on it in the list once and choose 'Page Setup' from the File menu. You can also use this function to choose the printer on which the document is to be printed. These settings will be used whenever you print the particular document until you choose 'Page Setup' once again, or until you choose 'Remove Page Setup' from the Operations menu of the 'Documents' list.
- Double-click the document that you want to print. A dialogue box (also known as a "specification window") will open, where you should specify the records that you want to print. Illustrated below is the specification window for Invoices:
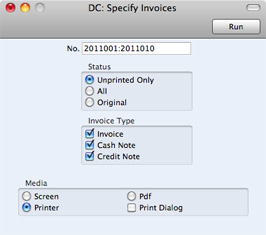
- Specify the record or records that you want to be printed. If you want to print a range, separate the first and last records in the range using a colon as shown in the illustration where, to print Invoices 2011001 to 2011010, "2011001:2011010" has been entered in the No. field. Depending on the field, the sort used might be alpha or numeric. In the case of an alpha sort, a range of 1:2 would also include 100, 10109, etc.
- Use the Media options to choose the destination of the printout. If you need to use the Pdf option, you may need to use Styles that will embed fonts in the resulting pdf files. You may also need to choose a code page and page setup, which you can do in the Form Properties (the 'Page Setup' function mentioned earlier in this section does not apply when you choose the Pdf Media option). Please refer here for details about Styles and here for details about Form Properties.
- Once you have specified the documents that you want to be printed and have chosen a print destination, click [Run] to print the documents.
---
In this chapter:
- Standard Accounts manual
- Standard Contracts manual
- Standard Invoicing manual
- Standard POS manual
Designing Forms
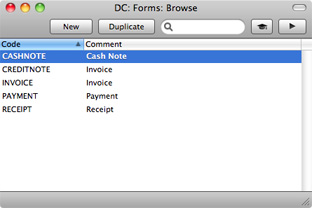
You can print various documents from all Standard products except Standard Nominal Ledger. For example, the Standard products that contain an Invoice register all allow you to print Invoices, Credit Notes and Cash Notes. The Form register is a forms editor built in to each Standard product that you can use to design your own formats (i.e. your own stationery) to be used when printing these documents. In this register, you can design separate Forms for each document used in the program.If you are using Standard Accounts, open the forms editor by first ensuring you are in the System module and then clicking the [Forms] button in the Master Control panel. In all other products, simply click the [Forms] button in the Master Control panel. In all cases, the 'Forms: Browse' window will open, listing the Forms that are already in the system:
---
In this chapter:
- Introduction
- Designing Forms, including:
- Styles
- Document Definition
- List of Individual Documents
- Standard Accounts manual
- Standard Contracts manual
- Standard Invoicing manual
- Standard POS manual
Designing Forms - Adding and Editing Objects
To add an object to the Form, click the appropriate button at the top of the window and then draw a box with the mouse in the Form where you want the object to appear. When you release the mouse button, a dialogue box will be opened, where you can place the object more precisely using coordinates, specify a font style and so on. To edit an object, double-click on it with the mouse. The same dialogue box will open, where you can edit the specifications of the object. Each object type has its own dialogue box, described below.Text Objects
To add a new text object to the Form, click the [Text] button and then draw the object where you want the text to appear.
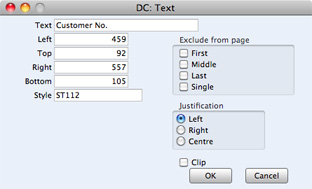
When you release the mouse button, the following dialogue box will appear:
- Text
- The text that is to be printed on the Form. This can be up to 80 characters long, but it is limited to one line. To create a text area with more than one line, use the appropriate number of separate one-line text objects.
- Left, Top, Right, Bottom
- Use these fields to specify the size and position of the text box that is to contain the text. When you create a new text box, the measurements of the box that you have just drawn will appear here.
- Style
- Paste Special
Style register or setting
Use this field to assign a font and font style to the text. You should define your Styles using a separate register or setting (depending on the Standard product you are using) that is fully described here. If you do not enter a Style here, the first record in the Style register or setting will be used.
- Exclude from page
- Please refer to the Single- and Multi-Page Forms page for details about these options.
- Justification
- Use these options to specify where the text will appear inside the text box.
To edit a text object once it has been created, double-click it to open the 'Text' dialogue box.
Lines and Frames
Use these tool buttons to draw lines and frames on the Form. Click either button and then draw the object. When you release the mouse button, a dialogue box will appear where you can indicate the width in pixels of the line or frame, and the pages on which it is to be printed.
Fields
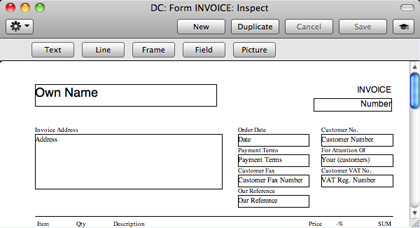
A field is an area on the Form where a piece of information from your Standard database is to be printed. The following example from an Invoice Form explains how:

To add a field, click the [Field] button, and mark the position of the field. A dialogue box opens:
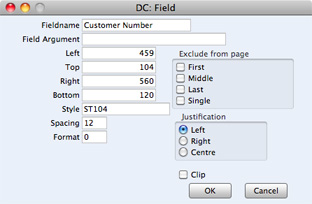
- Fieldname
- Paste Special
Fields for the Document Type
- Enter the Field Name using 'Paste Special'. If you have assigned a Document Type to the Form as described here, 'Paste Special' will only list the fields for that Document Type. Otherwise it will list all fields. Fields belonging to other Document Types will not be printed.
- Field Argument
- You can use the Field Argument with certain fields to control how they will be printed. For example, in some fields you can use the Field Argument to specify the number of decimal places that will be printed. The Field Argument can only be used with a few fields: please refer to the descriptions of the individual documents for details.
- Left, Top, Right, Bottom
- Use these fields to specify the size and position of the text box that is to contain the text. When you create a new text box, the measurements of the box that you have just drawn will appear here.
- Style
- Paste Special
Style register or setting
Use this field to assign a font and font style to the text. You should define your Styles using a separate register or setting (depending on the Standard product you are using) that is fully described here. If you do not enter a Style here, the first record in the Style register or setting will be used.
- Spacing
- Some fields will cause more than one line of text to be printed (e.g. the fields listing the Items in Invoices). In these fields, you should use the Spacing field to specify the spacing between lines (in pixels). Usually the number of pixels that you specify here should be the same as the font size. If you leave this field empty, the lines of text will be printed on top of each other.
- Format
- In the case of matrix fields (for example, those printing the Items in Invoices), you should enter "1" as the Format (as well as specifying a Spacing). If the Format is 0, the printed matrix columns may not be aligned correctly if the first row only contains text.
- Exclude from page
- Please refer to the Single- and Multi-Page Forms page for details about these options.
- Justification
- Use these options to specify where the text will appear inside the text box.
Usually each field that you place in a Form corresponds to a field in the original record. For example, the Customer Number field in the illustration above will print the contents of the Customer Number field in each Invoice. An exception is the "Note" field. If you include the "Note" field in your Form design, this will print the first note or comment that you attach to the original record using the Attachments feature.
Pictures
Use the [Picture] button to include a picture in your design. As with other tools, click the button and draw a frame for the picture on the Form. A dialogue box then appears.
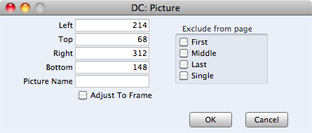
The picture must be a PDF or PICT file. If you will use the Form to create pdf files, the only picture format that is supported is 24-bit BMP. This applies when the pdf file will be generated by the Standard application (i.e. not by your computer's operating system). Please refer here for details about pdf generation. If you will use the Form to create pdf files and will also print it on a printer, you should have versions of each picture on your computer in each format, and you should use the [Picture] button to include all versions in your Form design (i.e. you should have BMP and PDF/PICT picture objects in the same position in each Form). This will ensure the picture will always be printed correctly.
All picture file names should have the correct extensions.
When you design a Form, PDF and PICT pictures will be visible immediately in the Form editor. 24-bit BMP images will not be visible and instead will be marked by rectangular placeholders of the appropriate size.
---
In this chapter:
- Introduction
- Designing Forms, including:
- Adding and Editing Objects
- Operations menu
- Single- and Multi-Page Forms
- Adding and Editing Objects
- Styles
- Document Definition
- List of Individual Documents
- Standard Accounts manual
- Standard Contracts manual
- Standard Invoicing manual
- Standard POS manual
Designing Forms - Operations Menu
The Operations menu for Forms is shown below. It is available from the 'Form: New' and 'Form: Inspect' windows. There is no Operations menu for the 'Forms: Browse' window.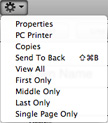
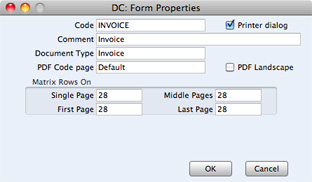
This menu command opens the 'Form Properties' dialogue box. Here you can record the basic specification of the Form you are creating or editing.
- Code
- Enter the unique code of the Form: this is the means by which the Form will be identified elsewhere in the Standard application. If you create a new Form by duplicating an existing one, you must enter a new Code here before you can save it.
- Printer dialog
- Check this box to force a printer dialogue box to be shown each time the Form is printed. This dialogue box will allow you choose how many copies are to be printed, and also to choose the printer.
- If you are using Standard POS and are designing the Form to be used when printing POS Invoices, you will probably not want to use this option. Each time you (or a cashier) clicks or touches the "Finish" button in a POS Invoice, the Invoice will be printed automatically. It will probably be unnecessary for this automatic process to be interrupted by a printer dialogue box that requires your input every time.
- If you are using Standard POS and are designing the Form to be used when printing POS Invoices, you will probably not want to use this option. Each time you (or a cashier) clicks or touches the "Finish" button in a POS Invoice, the Invoice will be printed automatically. It will probably be unnecessary for this automatic process to be interrupted by a printer dialogue box that requires your input every time.
- Comment
- Enter text describing the Form here.
- The Comment will be shown in the 'Paste Special' list that you will use when assigning Forms to documents, so it should be descriptive enough to make the selection of the correct Form easy for all users.
- The Comment will be shown in the 'Paste Special' list that you will use when assigning Forms to documents, so it should be descriptive enough to make the selection of the correct Form easy for all users.
- Document Type
- Paste Special
Choices of possible entries
- Using 'Paste Special', enter one of the available Document Types into this field. When the time comes to add fields to the Form, only the fields available for that Document Type will be available in the 'Paste Special' list in the 'Field' dialogue box.
- PDF Code page
- Paste Special
Choices of possible entries
- If you will use the Form to create pdf files, specify here the code page that is to be used, if different to the default. For example, you may usually use the CP1252 code page, but you may need to use KOI8-R Cyrillic in a particular Form.
- This applies when the pdf file will be generated by the Standard application (i.e. not by the computer's operating system). Please refer here for details about pdf generation.
- The default code page will depend on the language of the Standard application you are using, as follows:
Language Default Code Page Estonian, Latvian, Lithuanian CP1257 Polish, Hungarian, Slovak, Slovenian, Serbian CP1250 Russian, Ukrainian, Byelorussian KOI8-R Others CP1252 - This applies when the pdf file will be generated by the Standard application (i.e. not by the computer's operating system). Please refer here for details about pdf generation.
- PDF Landscape
- If you will use the Form to create pdf files, use this option if you would like those pdf files to be created in landscape format.
- This applies when the pdf file will be generated by d by the Standard application (i.e. not by the computer's operating system), in which case a landscape format specified using the 'Page Setup' function on the File menu would not be applied. Please refer here for details about pdf generation.
- This applies when the pdf file will be generated by d by the Standard application (i.e. not by the computer's operating system), in which case a landscape format specified using the 'Page Setup' function on the File menu would not be applied. Please refer here for details about pdf generation.
- Matrix Rows On
- Please refer to the Single- and Multi-Page Forms page for details about these options.
If you are using a dot matrix printer, use this dialogue box to define the page size.
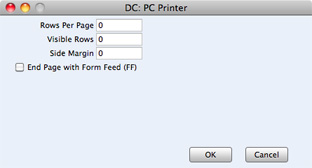
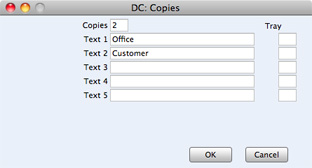
Copies
Send to Back
If you want certain objects on the Form to appear behind other objects, click on them and select this function.
View All, First Only, Middle Only, Last Only, Single Page Only
These functions are described on the Single- and Multi-Page Forms page.
---
In this chapter:
- Introduction
- Designing Forms, including:
- Adding and Editing Objects
- Operations menu
- Single- and Multi-Page Forms
- Adding and Editing Objects
- Styles
- Document Definition
- List of Individual Documents
- Standard Accounts manual
- Standard Contracts manual
- Standard Invoicing manual
- Standard POS manual
Designing Forms - Single- and Multi-Page Forms
When you design a Form, you should consider what is to happen when the printing of a document requires more than one page. Two options are available:- The "simple" option, where the same page design is used for each page.
- The "multi-page" option allows the use of up to four page designs, as follows:
- First
- The first page of a multi-page document.
- Middle
- In a multi-page document, the pages between the first and last pages.
- Last
- The last page of a multi-page document.
- Single
- The sole page of a single-page document.
- First
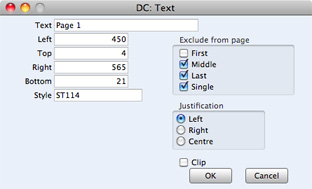
When you add an object of any kind (i.e. text, line, frame or field) to a Form design, you can use the Exclude From Page check boxes to specify the pages on which the object is to be printed. If you do not check any of these boxes, the object will be printed on every page. This will be the case when using the "simple" option. If you want the object to be printed on certain pages only, check one or more of the boxes. For example, if the object is to be printed on all pages except the first, check the First box. If it is only to be printed on the first page, check all boxes except the First box (i.e. it will be excluded from all pages except the first). The text object in the illustration below will be printed on the first page only:
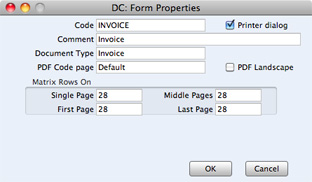
The number of pages printed will vary from record to record, depending on the number of rows that the record has. An Invoice with one Item will be printed on a single page (i.e. using those objects whose Single box is not checked). An Invoice with 100 Items (i.e. 100 rows) will be printed over several pages. You should specify the maximum number of rows that can be printed on each page by selecting 'Properties' from the Operations menu. This opens the 'Form Properties' window, which has four fields under the overall heading of Matrix Rows On:
| Invoice rows | Pages | Type of Page |
| Up to 5 | 1 | Single |
| 5-12 | 2 | First and Last |
| 13-19 | 3 | First, Middle and Last |
| 19-25 | 4 | First, 2 x Middle, Last |
If you are using Standard POS, note that this application is supplied with four sample Forms that use the multi-page feature to ensure that POS Invoices can be printed on continuous stationery on a USB receipt printer. If you need to design your own POS Invoice Form, it is strongly recommended that you use one of the supplied designs as a template.
---
In this chapter:
- Introduction
- Designing Forms, including:
- Adding and Editing Objects
- Operations menu
- Single- and Multi-Page Forms
- Adding and Editing Objects
- Styles
- Document Definition
- List of Individual Documents
- Standard Accounts manual
- Standard Contracts manual
- Standard Invoicing manual
- Standard POS manual
Styles
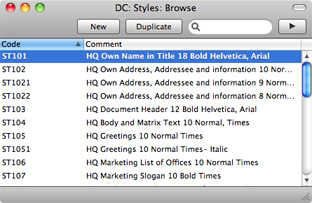
Use Styles to define the various fonts and font styles that you will use in the Fields and Text objects in your Forms, ensuring a consistency of appearance. Styles is a register in Standard Accounts, and a setting in the other Standard products.If you are using Standard Accounts, open the Style register by first ensuring you are in the System module and then clicking the [Styles] button in the Master Control panel. If you are using one of the other Standard products, first open the 'Settings' list by clicking the [Settings] button in the Master Control panel or using the ⌘-S keyboard shortcut. Then, double-click 'Styles' in the list. In both cases, the 'Styles: Browse' window will open, listing the Styles you have previously entered.
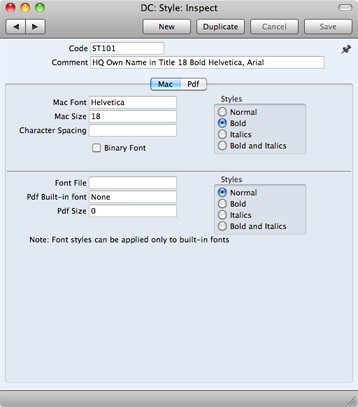
- Code
- The code for the Style.
- Comment
- Any description.
- The Comment will be shown in the 'Paste Special' list that you will use when assigning Styles to Fields and Text objects in Forms, so it should be descriptive enough to make the selection of the correct Style easy for all users.
- The Comment will be shown in the 'Paste Special' list that you will use when assigning Styles to Fields and Text objects in Forms, so it should be descriptive enough to make the selection of the correct Style easy for all users.
- Mac Font
- Paste Special Fonts available on your computer
- Specify the name of the font.
- Specify the name of the font.
- Mac Size
- Specify the font size in points.
- Styles
- Select one of the available style types.
- Character Spacing
- You should use this field in Styles that will be used when printing bank giro forms, where a fixed character spacing is required. Specify here the spacing in pixels from the start of one character to the start of the next. Usually this will be six pixels or less.
- You can only use Styles with a Character Spacing in Fields and Text objects with a left or right justification. The Character Spacing will have no effect in Fields and Text objects with a centre justification.
In this chapter:
- Introduction
- Designing Forms
- Styles, including:
- 'Pdf' card
- Document Definition
- List of Individual Documents
- Standard Accounts manual
- Standard Contracts manual
- Standard Invoicing manual
- Standard POS manual
Styles - Pdf Card
If you will use a Style in a Form that you will print to pdf files, you should also fill in the fields on the 'Pdf' card, especially if the Style uses a non-standard font. The standard fonts are Times, Helvetica, Courier, Symbol and Zapf Dingbats. Most pdf readers are able to read and print these fonts. If the Style uses a non-standard font, you should use the 'Pdf' card to ensure that the font will be embedded in pdf files, so that those files have the correct appearance when opened and printed by pdf readers. This is particularly important for barcode fonts.You can create pdf files from a Standard application using two methods:
- Open a record, click the Printer icon and, when the printer dialogue box appears, choose to print to pdf. In this case, the pdf will be generated by the operating system, which embeds fonts as necessary.
- Click the [Documents] button in the Master Control panel, double-click a document in the list and choose 'Pdf' as the Media option in the specification window.
In this case, the pdf will be generated by the Standard application, which will embed fonts following the instructions on the 'Pdf' cards of the relevant Style records.
If a Pdf file is generated by your Standard application and you find that the Times font has been used where you are expecting a different font, then it is likely that you need to use the 'Pdf' card in the relevant Style record to embed the intended font in the Pdf file.
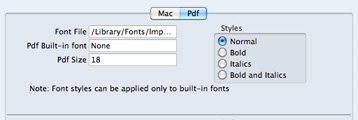
- Font File
- Paste Special
Opens the standard 'Open File' dialogue that you can use to locate the font file
- Use 'Paste Special' to specify the path to the font file.
- The font file must be an OpenType font with the .ttf extension or a Type 1 Post Script font with the .afm or .pfa extensions. Other font formats are not supported.
- The font file must be an OpenType font with the .ttf extension or a Type 1 Post Script font with the .afm or .pfa extensions. Other font formats are not supported.
- Pdf Built-in font
- Paste Special
Choices of possible entries
- If you want to embed one of the standard fonts in pdf files, specify that font here. This will usually be because the Style uses one of the standard fonts and you want to embed that font in pdf files. This will help ensure the Style prints as you expect, but will also slightly increase the size of the pdf file.
- If you specify both a Pdf Built-in font and a Font File in the field above, the Pdf Built-in font will be used.
- If you specify both a Pdf Built-in font and a Font File in the field above, the Pdf Built-in font will be used.
- Pdf Size
- The font size in points.
- Styles
- Select one of the available style types.
Note that the .ttf extension does not guarantee that the font is an OpenType font, as this extension is also used with TrueType fonts. You can confirm the font format, using the Font Book application. If there is still a problem, the Pdf font will not be visible in a pdf file and will be replaced by Times), check the hansa.log file for error messages.
If you will use a Form to create pdf files, as well as specifying the fonts that will be embedded as described here, you should also specify a PDF Code page for that Form and, if appropriate, specify that pdf files will be created in landscape format. Please refer here for details.
---
In this chapter:
- Introduction
- Designing Forms
- Styles, including:
- 'Pdf' card
- Document Definition
- List of Individual Documents
- Standard Accounts manual
- Standard Contracts manual
- Standard Invoicing manual
- Standard POS manual
Document Definition
You must assign a Form to each document before you print it for the first time. The Form is the design or layout of the document. For example, if you have designed a Form with the Form Code of "INVOICE", you need to connect it to the Invoice document so that the Form will be used when you print the document. You can have a single Form for each document, or you may have several versions of a particular type of document, to be used on different occasions.To assign a Form or Forms to a document, follow these steps:
- If you are using Standard Accounts, ensure you are in the correct module for the document. For example, to assign the "INVOICE" Form to the Invoices document, ensure you are in the Sales Ledger.
- In all Standard products, click the [Documents] button in the Master Control panel or use the ⌘-D keyboard shortcut. The 'Documents' list window is opened showing a list of available documents. Highlight the document that you need to define ('Invoices' in the example).
- Select 'Define Document' from the Operations menu.
- Enter the Form Code (e.g. "INVOICE") in the Form field. Use the 'Paste Special' feature to see the available forms in your Form register and to ensure the spelling is correct.
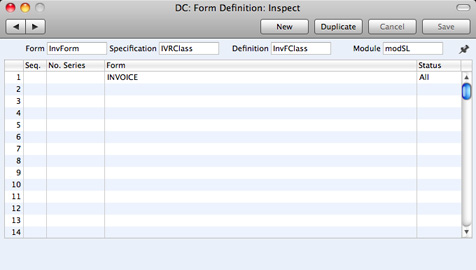
- Click [Save] to save the Invoice definition. From now on, whenever Invoices are printed, the "INVOICE" Form will be used.
The 'Define Document' function is available for every document, allowing a high level of flexibility in the production of printed output from each Standard product.
---
In this chapter:
- Introduction
- Designing Forms
- Styles
- Document Definition
- List of Individual Documents
- Standard Accounts manual
- Standard Contracts manual
- Standard Invoicing manual
- Standard POS manual
Individual Documents
The following documents are available in the various Standard products:| Document | Available in |
| Cash Notes and Credit Notes | Standard Accounts (Sales Ledger module) |
| Standard Invoicing | |
| Contracts | Standard Contracts |
| Customer Labels | Standard Accounts (Sales Ledger module) |
| Standard Invoicing | |
| Invoices | Standard Accounts (Sales Ledger module) |
| Standard Invoicing | |
| Open Invoice Customer Statement | Standard Accounts (Sales Ledger module) |
| Standard Invoicing | |
| Payment Forms | Standard Accounts (Purchase Ledger module) |
| Payment Lists | Standard Accounts (Purchase Ledger module) |
| Periodic Customer Statement | Standard Accounts (Sales Ledger module) |
| POS Invoices | Standard POS |
| Standard Invoicing (as 'Receipts') | |
| Purchase Invoices | Standard Accounts (Purchase Ledger module) |
| Receipt Forms | Standard Accounts (Sales Ledger module) |
| Standard Invoicing (as 'Receipts') |
---
In this chapter:
- Introduction
- Designing Forms
- Styles
- Document Definition
- List of Individual Documents
- Standard Accounts manual
- Standard Contracts manual
- Standard Invoicing manual
- Standard POS manual
Individual Documents - POS Invoices
The POS Invoice document is included in the following Standard products:- Standard POS
Use this document to print a POS Invoice or a range of POS Invoices. This document will also be printed automatically each time you click or touch the "Finish" button to close a POS Invoice.
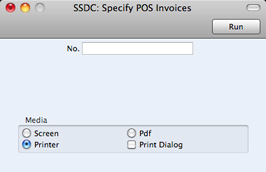
- No.
- Range Reporting
Numeric
- Enter a POS Invoice Number (or range of POS Invoice Numbers) for which documents are to be printed. Documents will only be printed for Invoices in the range that have not previously been printed.
In this chapter:
- Standard POS manual