Introduction to Settings in Standard products
Settings allow you to tailor the operation of your Standard application to your requirements, and to supply information to be used throughout the program. Many settings take the form of preferences: examples include Account Usage S/L and Account Usage P/L, which you can use to specify which Account is to be used in a particular situation (e.g. which Accounts are to be used as your Debtor and Creditor Accounts), and Invoice Settings, where you can specify an overall default sales VAT Code and choose whether your prices include VAT. Other settings require a number of records to be entered: this information tends to be used in 'look-up' tables (i.e. 'Paste Special' windows) from the main registers.To edit or add to a setting, click the [Settings] button in the Master Control panel. You can also use the ⌘-S keyboard shortcut. The 'Settings' list window will open. In Standard Accounts, its contents will vary according to the module selected. In the other Standard products, every setting in the program will be listed.
Choose an entry in the list by double-clicking it, or by selecting it and pressing the Enter key. Each setting is described in detail below.
---
In this chapter:
- Introduction
- Types of Setting
- List of Individual Settings
- Standard Accounts manual
- Standard Contracts manual
- Standard Invoicing manual
- Standard Nominal Ledger manual
- Standard POS manual
Types of Setting
The settings in Standard products can be divided into three groups:- Settings of the first type take the form of a single screen where you can set preferences to determine exactly how your Standard application is to operate in a certain situation. Examples of such settings include Account Usage S/L and P/L, Company Info and Locking.
When you open one of these settings from the 'Settings' list, you can change any of the fields as required. To save changes and close the window, click the [Save] button. To close the window without saving changes, click the close box.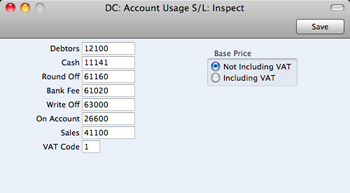
- Settings of the second type contain a number of records that are displayed in a grid. Each row in the grid represents a separate record. Examples of this type of setting include Payment Modes, Reporting Periods and VAT Codes.
When you open one of these settings from the 'Settings' list, you can change any of the fields in the existing records as required. To add new records to the list, click in any field in the first blank row and enter appropriate text. To remove a record, click on the row number on the left of the row containing the record and press the Backspace key. To insert a row, click on the row number where the insertion is to be made and press Return. To save changes to all records in the grid and close the window, click the [Save] button. To close the window without saving changes, click the close box.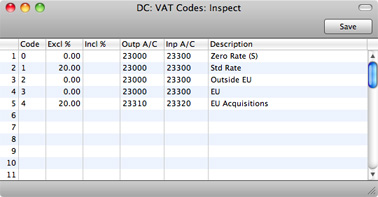
When working in one of the main registers, you may need to refer to a particular record in a setting of this type: the 'Paste Special' look-up function is provided to make this task as easy as possible. For example, when entering a Payment or Receipt, you can use 'Paste Special' to choose the relevant Payment Mode. To help you choose the correct record using 'Paste Special', it is recommended that you keep the rows in the alphabetical order of the Codes. An exception is the Fiscal Years setting which should never be re-arranged (rows should not be inserted or removed, you can only add new ones).
- Settings of the final type also contain a number of records, but behave in a similar manner to the main registers. Therefore, their contents are displayed in browse windows, from where you can double-click records for editing. Use the [New] or [Duplicate] buttons to create new records. Again, when working in one of the main registers, you may need to refer to a particular record in a setting of this type using the 'Paste Special' look-up function. Examples of this type of setting are Customer Categories and Payment Terms.
When you open one of these settings from the 'Settings' list, the browse window is displayed, listing the records already entered.
You can sort and search in these browse windows in the normal way. Double-click an item in the list to edit it, or add a new record by clicking the [New] button in the Button Bar. Alternatively, highlight a record similar to the one you want to enter and click [Duplicate] on the Button Bar. A record window is then opened, allowing you to change the existing record or enter the new one.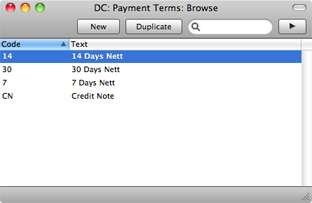
To save changes, click the [Save] button. To close the window without saving changes, click the close box. You can also close the browse window using the close box.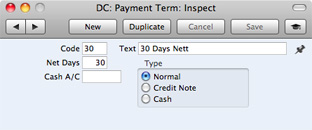
In this chapter:
- Introduction
- Types of Setting
- List of Individual Settings
- Standard Accounts manual
- Standard Contracts manual
- Standard Invoicing manual
- Standard Nominal Ledger manual
- Standard POS manual
Individual Settings
The following settings are available in the various Standard products:| Setting | Available in |
| Account Usage PL | Standard Accounts (Purchase Ledger module) |
| Account Usage SL | Standard Accounts (Sales Ledger module) |
| Age Limits | Standard Contracts |
| Company Date and Numeric Format | Standard Nominal Ledger |
| Company Info | Standard Accounts (System module) |
| Standard Contracts | |
| Standard Invoicing | |
| Standard Nominal Ledger | |
| Standard POS | |
| Contract Classes | Standard Contracts |
| Contract Defaults | Standard Contracts |
| Customer Categories | Standard Accounts (Sales Ledger module) |
| Standard Contracts | |
| Standard Invoicing | |
| Fiscal Years | Standard Accounts (System module) |
| Standard Nominal Ledger | |
| Invoice Settings | Standard Contracts |
| Standard Invoicing | |
| Standard POS | |
| Item Classifications | Standard POS |
| Item Groups | Standard Accounts (Sales Ledger module) |
| Standard Invoicing | |
| Standard POS | |
| Locking | Standard Accounts (System module) |
| Standard Nominal Ledger | |
| Number Series - Invoices | Standard Accounts (Sales Ledger module) |
| Number Series - Payments | Standard Accounts (Purchase Ledger module) |
| Number Series - Purchase Invoices | Standard Accounts (Purchase Ledger module) |
| Number Series - Receipts | Standard Accounts (Sales Ledger module) |
| Number Series - Transactions | Standard Accounts (Nominal Ledger module) |
| Payment Modes | Standard Accounts (Sales and Purchase Ledger modules) |
| Standard Contracts | |
| Standard Invoicing | |
| Standard POS | |
| Payment Terms | Standard Accounts (Sales and Purchase Ledger modules) |
| Standard Contracts | |
| Standard Invoicing | |
| Persons | Standard Accounts (System module) (as a register) |
| Standard Contracts (as a register) | |
| Standard Invoicing | |
| Standard POS | |
| POS Buttons | Standard POS |
| Price Lists | Standard Accounts (Sales Ledger module) |
| Standard Invoicing | |
| Prices | Standard Accounts (Sales Ledger module) (as a register) |
| Standard Invoicing | |
| Report Settings | Standard Accounts (Nominal Ledger module) |
| Standard Nominal Ledger | |
| Reporting Periods | Standard Accounts (System module) |
| Standard Contracts | |
| Standard Invoicing | |
| Standard Nominal Ledger | |
| Standard POS | |
| Styles | Standard Accounts (System module) (as a register) |
| Standard Contracts | |
| Standard Invoicing | |
| Standard POS | |
| Sub Systems | Standard Accounts (Nominal Ledger module) |
| Supplier Categories | Standard Accounts (Purchase Ledger module) |
| Units | Standard Accounts (Sales Ledger module) |
| Standard Contracts | |
| Standard Invoicing | |
| Standard POS | |
| VAT Codes | Standard Accounts (Nominal Ledger module) |
| Standard Contracts | |
| Standard Invoicing | |
| Standard Nominal Ledger | |
| Standard POS |
---
In this chapter:
- Introduction
- Types of Setting
- List of Individual Settings
- Standard Accounts
- Standard Contracts manual
- Standard Invoicing manual
- Standard Nominal Ledger manual
- Standard POS manual
Individual Settings - Company Info
The Company Info setting is included in the following Standard products:- Standard Accounts (System module)
- Standard Contracts
- Standard Invoicing
- Standard Nominal Ledger
- Standard POS
Use this setting to record your company's name and address, and other particulars such as phone and fax numbers, and the bank and bank account number. This information will be printed as appropriate on all documents.
If you are using Standard Accounts, you will find the Company Info setting in the System module. Use the [Module] button in the Master Control panel to enter the System module before working with this setting. Then, as in every Standard product, open the setting by first clicking the [Settings] button in the Master Control panel and then double-clicking 'Company Info' in the 'Settings' list. The 'Company Info: Inspect' window will be opened.
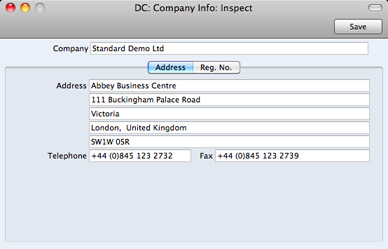
Apart from the Company Name, Address etc, you should enter the following information in this setting, on the 'Reg. No.' card:
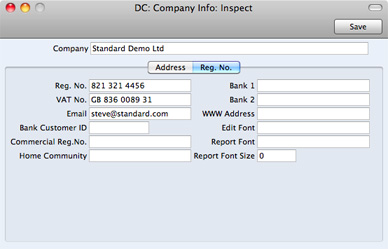
- Reg. No.
- Enter your company registration number here. This information can then be printed on any appropriate documentation.
- VAT No.
- Enter your VAT Registration Number here. This information can then be printed on any appropriate documentation.
- Bank 1, Bank 2
- You should enter your company's main bank account number(s) here. This information can then be printed on any appropriate documentation.
- Bank Customer ID
- This is an ID number used for electronic communication with certain banks and other credit institutions in some countries. Please contact your local Standard product representative for details.
- Edit Font, Report Font, Report Font Size
- Paste Special
Fonts in your system
- These fields allow you to select different fonts for use on screen and in reports respectively. If you leave these fields empty, default fonts selected for maximum readability will be used. You should only change them if you have good reasons to do so. In non-English versions of the Standard products, use these fields to select fonts with special character sets.
- Commercial Reg. No.
- This field is used in Portugal. Enter the commercial registration number of your company. This information is required for SAF-T reporting.
- Home Community
- This field is used in Portugal. Enter the region or district in which your company is located. This information is required for SAF-T reporting.
- VAT Law
- Paste Special
Choices of possible entries
- Use this field to ensure the behaviour of your Standard application conforms to the local accounting conventions in your country. If your country is not listed in the 'Paste Special' list, choose the "Default" option.
- Character Set
- Paste Special
Choices of possible entries
- This field is used to control sorting in your Standard application. In countries where the alphabet differs to that of the UK/US, sorting by ASCII codes produces a list that is not in the correct alphabetical order: use this field to overcome this problem.
---
In this chapter:
- Standard Accounts manual
- Standard Contracts manual
- Standard Invoicing manual
- Standard Nominal Ledger manual
- Standard POS manual
Individual Settings - Invoice Settings
The Invoice Settings setting is included in the following Standard products:- Standard Contracts
- Standard Invoicing
- Standard POS
To open this setting, first click the [Settings] button in the Master Control panel. Then double-click 'Invoice Settings' in the 'Settings' list. Fill in the fields as described below. Then, to save changes and close the window, click the [Save] button. To close the window without saving changes, click the close box.
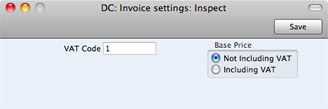
- VAT Code
- Paste Special
VAT Codes setting
- The VAT Code will determine the rate at which VAT will be charged whenever you sell an Item. For each Item that you sell, the default VAT Code will be chosen in this order:
- It will be taken from the Item record itself.
- It will be taken from the Item Group to which the Item belongs (not Standard Invoicing).
- This VAT Code in the Invoice Settings setting will be used.
- It will be taken from the Item record itself.
- Base Price
- Use these options to specify whether the sales Prices in the Item records are to include VAT. VAT rates are defined in the VAT Codes setting.
In this chapter:
- Standard Contracts manual
- Standard Invoicing manual
- Standard POS manual
Individual Settings - Item Classifications
The Item Classifications setting is included in the following Standard products:- Standard POS
The Item Classification provides an alternative means of classifying Items to the Item Group. You will usually use Item Groups to group Items together for accounting purposes (e.g. Items with the same VAT Code can belong to the same Item Group). On the other hand, you can use Classifications to group Items together for sales purposes. Each Item can belong to several Item Classifications, but can only belong to a single Item Group.
To work with Item Classifications, first click the [Settings] button in the Master Control panel to open the 'Settings' list. Double-click 'Item Classifications' in the 'Settings' list. To create a new record, click the [New] button in the Button Bar, or highlight a record in the list that is similar to the one that you are about to create and click [Duplicate]. When the record is complete, click the [Save] button in the Button Bar to save changes and close it using the close box, or click the close box if you don't want to save changes.
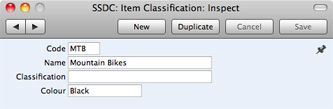
- Code
- Enter a unique code to identify the Item Classification. You can use any combination of letters and numbers. There is a maximum of five characters.
- Name
- Assign a descriptive name to the Item Classification. This is shown in the 'Item Classifications: Browse' window and the 'Paste Special' list: it should therefore be descriptive enough to make the selection of the correct Item Classification easy for all users.
In this chapter:
- Standard POS manual
Individual Settings - Item Groups
The Item Groups setting is included in the following Standard products:- Standard Accounts (System module)
- Standard Invoicing
- Standard POS
It can be practical to organise Items of similar kinds into Item Groups. This option gives you more flexibility in reporting.
If you are using Standard Accounts, you will find the Item Groups setting in the Sales Ledger module. Use the [Module] button in the Master Control panel to enter the Sales Ledger before working with this setting. Then, as in every Standard product, open the setting by first clicking the [Settings] button in the Master Control panel and then double-clicking 'Item Groups' in the 'Settings' list. To create a new record, click the [New] button in the Button Bar, or highlight a record in the list that is similar to the one that you are about to create and click [Duplicate]. When the record is complete, click the [Save] button in the Button Bar to save changes and close it using the close box, or click the close box if you don't want to save changes.
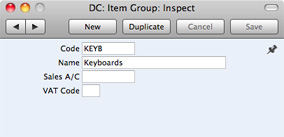
- No.
- Enter the code or number identifying this Item Group. You can use any combination of letters and numbers. There is a maximum of five characters.
- Name
- Enter the name or description of the Item Group.
- The Name will be shown in the 'Paste Special' list that you will use when assigning Item Groups to Items and elsewhere, so it should be descriptive enough to make the selection of the correct Item Group easy for all users.
- Sales A/C
- Paste Special
Account register, Nominal Ledger
- A Sales Account will be credited whenever you sell an Item, allowing you to record the levels of sales of different types of Items in the Nominal Ledger. For each Item that you sell, the default Sales Account will be chosen in this order:
- The Sales Account will be taken from the Item record.
- It will be taken from this field in the Item Group.
- The Sales Account in the Account Usage S/L setting will be used.
- The Sales Account will be taken from the Item record.
- VAT Code
- Paste Special
VAT Codes setting, Nominal Ledger
- The VAT Code will determine the Output VAT Account to be credited whenever you sell an Item and the rate at which VAT will be charged. For each Item that you sell, the default VAT Code will be chosen in this order:
- The Sales VAT Code for the Customer will be used (Standard Accounts only).
- It will be taken from the Item record itself.
- It will be taken from this field in the Item Group to which the Item belongs.
- The VAT Code in the Account Usage S/L setting will be used.
- The Sales VAT Code for the Customer will be used (Standard Accounts only).
In this chapter:
- Standard Accounts manual
- Standard Invoicing manual
- Standard POS manual
Individual Settings - Payment Modes
The Payment Modes setting is included in the following Standard products:- Standard Accounts (Sales and Purchase Ledger modules)
- Standard Contracts
- Standard Invoicing
- Standard POS
Payment Modes represent the different methods by which your Invoices will be paid by your Customers (and by which you will pay your Suppliers). Typical examples are cash, cheque, direct debit and credit card. For many businesses, the difference between such payment methods in terms of the way they are accounted for is minimal, but if necessary and if you are using Standard Accounts, you can configure each Payment Mode to post to a different Account (i.e. to ensure payments are paid into or issued from a different bank account or petty cash account).
If you are using Standard Accounts, you will find the Payment Modes setting in both the Purchase and Sales Ledger modules. Use the [Module] button in the Master Control panel to enter either of these modules to work with this setting. Then, as in every Standard product, open the setting by first clicking the [Settings] button in the Master Control panel and then double-clicking 'Payment Modes' in the 'Settings' list. Fill in the fields as described below. Then, to save changes and close the window, click the [Save] button. To close the window without saving changes, click the close box.
You can enter as many Payment Modes as you need, using the grid on the 'Payment Modes' screen. To add a Payment Mode, click in the Code field of the first blank row and enter appropriate text. To remove a Payment Mode, click on the row number on the left of the row and press the Backspace key.
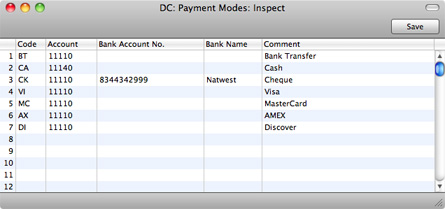
- Code
- Enter a unique code by which the Payment Mode is to be identified from elsewhere in your Standard application.
- Bank Account No.
- Specify here the bank account number used for this Payment Mode. On the purchase side, this will be copied to the Own Bank Account field in Payments.
- Bank Name
- Record the name of the bank where the account is held here.
- Comment
- The name of the Payment Mode. This will be shown in the 'Paste Special' list, so it should be descriptive enough to make the selection of the correct Payment Mode easy for all users.
- Account
- Paste Special
Account register, Nominal Ledger
- Specify here the cash, bank or other Account to be debited by any Receipt and credited by any Payment using the Payment Mode.
In this chapter:
- Standard Accounts manual
- Standard Contracts manual
- Standard Invoicing manual
- Standard POS manual
Individual Settings - Persons
The Persons setting is included in the following Standard products:- Standard Invoicing
- Standard POS
- Accounts (System module)
- Standard Contracts
- Standard Nominal Ledger
Please refer to the Persons page for details about this setting.
---
In this chapter:
- Standard Accounts manual
- Standard Invoicing manual
- Standard POS manual
Individual Settings - POS Buttons
The POS Buttons setting is included in the following Standard products:- Standard POS
---
In this chapter:
- Standard POS manual
Individual Settings - Reporting Periods
The Reporting Periods setting is included in the following Standard products:- Standard Accounts (System module)
- Standard Contracts
- Standard Invoicing
- Standard Nominal Ledger
- Standard POS
This setting allows you to name and define certain time periods. These should be the periods that you will commonly use when you produce reports. If you open the 'Paste Special' list from the Period field of a report specification window, that list will consist of the Reporting Periods entered in this setting. For example, if you often produce monthly reports you should define each month as a separate period in this setting.
If you are using Standard Accounts, you will find the Reporting Periods setting in the System module. Use the [Module] button in the Master Control panel to enter the System module to work with this setting. Then, as in every Standard product, open the setting by first clicking the [Settings] button in the Master Control panel and then double-clicking 'Reporting Periods' in the 'Settings' list. When the 'Reporting Periods: Inspect' window opens, you can enter a new Reporting Period simply by clicking in the first blank line and entering details as appropriate. Click [Save] to save and close, or the close box to close without saving changes.
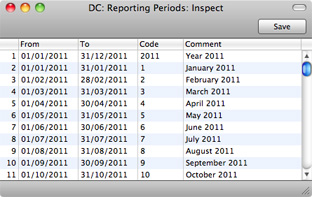
The Reporting Period in the first row of this setting will be offered as a default wherever a Reporting Period is required. You might therefore like to change the first row from time to time so that a useful Period is always offered as a default. You can simply change the dates and, if necessary, the Code in the first row, but if you want to delete the old first row once it is no longer useful, click on the row number and press the Backspace key. To insert a new record on the first row, click on the row number and press the Return key.
---
In this chapter:
- Standard Accounts manual
- Standard Contracts manual
- Standard Invoicing manual
- Standard Nominal Ledger manual
- Standard POS manual
Individual Settings - Styles
The Persons setting is included in the following Standard products:- Standard Accounts (System module) (as a register)
- Standard Contracts
- Standard Invoicing
- Standard POS
Please refer to the Styles page for details about this setting.
---
In this chapter:
- Standard Accounts manual
- Standard Contracts manual
- Standard Invoicing manual
- Standard POS manual
Individual Settings - Units
The Units setting is included in the following Standard products:- Standard Accounts (Sales Ledger module)
- Standard Contracts
- Standard Invoicing
- Standard POS
The "Unit" of an Item is the quantity to which its price refers. You might, for example, sell some Items singly, some in pairs and others in dozens. The single Item, the pair and the dozen are all separate Units. You can list the Units that are used in your business in the Units setting, thus making them available in a 'Paste Special' list. Having done so, you can assign Units to your Items using the Unit field in each Item record. For example, if an Item is sold in boxes of twelve, its Unit should be "Dozen". When the Item is included in an Invoice, the Quantity will refer to this Unit. If the Quantity in an Invoice is 2, this means "two boxes of twelve". The Price of the Item will also refer to this Unit. If the Price is 85.00, this means "85.00 for a box of twelve".
If you are using Standard Accounts, you will find the Units setting in the Sales Ledger module. Use the [Module] button in the Master Control panel to enter the Sales Ledger module to work with this setting. Then, as in every Standard product, open the setting by first clicking the [Settings] button in the Master Control panel and then double-clicking 'Units' in the 'Settings' list.The 'Units: Browse' window will be displayed, showing all Unit records previously entered. Double-click an item in the list to edit, or add a new record by clicking the [New] button in the Button Bar. When the record is complete, click the [Save] button in the Button Bar to save it.
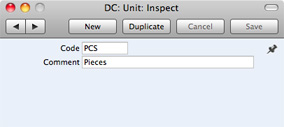
- Code
- Enter the unique Code by which the Unit record is to be identified from elsewhere in your Standard application. You can enter up to five characters, and you can use both numbers and letters.
- Comment
- Here you enter the name for the Unit record as it will be shown in the 'Units: Browse' window and the 'Paste Special' list.
In this chapter:
- Standard Accounts manual
- Standard Contracts manual
- Standard Invoicing manual
- Standard POS manual
Individual Settings - VAT Codes
The VAT Codes setting is included in the following Standard products:- Standard Accounts (Nominal Ledger module)
- Standard Contracts
- Standard Invoicing
- Standard Nominal Ledger
- Standard POS
In order to comply with VAT regulations in various countries, you may need to charge or pay VAT at different rates, depending on the Item in question. To address these issues, you should use the VAT Codes setting to define as many VAT Codes as you need, with different accounting specifications.
After defining your VAT Codes, you can then assign them to Customers, Suppliers, Items and also to individual Sales and Purchase Accounts (depending on the Standard product you are using). VAT Codes allow you to ensure the correct VAT percentages are used, VAT is posted to the correct Nominal Ledger Accounts and accurate VAT statistics are provided.
If you are using Standard Accounts, you will find the VAT Codes setting in the Nominal Ledger module. Use the [Module] button in the Master Control panel to enter the Nominal Ledger module to work with this setting. Then, as in every Standard product, open the setting by first clicking the [Settings] button in the Master Control panel and then double-clicking 'VAT Codes' in the 'Settings' list to open the following window:
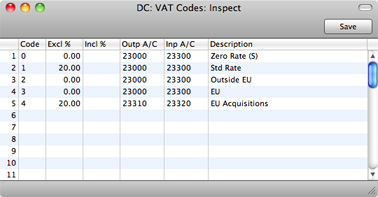
- Code
- You should assign a unique Code to each VAT Code record, with a maximum of two characters.
- Excl %
- Specify the percentage to be applied to a figure that excludes VAT in order to calculate the VAT amount.
- Incl %
- Specify the percentage to be applied to a figure that includes VAT in order to calculate the VAT amount.
- Description
- The description entered here will appear in the 'Paste Special' list, so should be detailed enough to ensure the correct VAT Code is always chosen.
- Outp A/C
- Paste Special
Account register, Nominal Ledger
- Specify here the VAT Outputs Account to be credited whenever you use the VAT Code in a sales transaction.
- Inp A/C
- Paste Special
Account register, Nominal Ledger
- Specify here the VAT Inputs Account to be debited whenever you use the VAT Code in a purchase transaction.
---
In this chapter:
- Standard Accounts manual
- Standard Contracts manual
- Standard Invoicing manual
- Standard Nominal Ledger manual
- Standard POS manual