Introduktion
When the day's work with FirstOffice is done, we advise you to make a back-up. It is a good idea to save a copy of the file on a diskette and store it in a safe place. It might seem unnecessary to make a back-up every day, but the short time this takes is a good investment for the day something goes wrong with the hard disk.To back up your data is particularly important when, as in the case of a FirstOffice database, the financial information of your company is involved. If you should lose all your data, you will find yourself in a very awkward situation, missing all invoices, receipts, reports etc. Make sure you make a back-up each time you have been working with your accounts. Name your copies systematically with dates so that you can easily restore the database, should an accident occur.
If you get a virus on your computer, you must first try to establish the date when your computer was infected. In this case you must restore your data from a back-up created before the infection date. Otherwise you run the obvious risk of re-infecting the computer again.
FirstOffice's method of back-up is fast and economical. The data is saved as a back-up file that takes up a minimal amount of space, and the back-up files are independent of the program versions. Of course, it is also possible to copy the database file as it appears on your hard disk, but this is not so economical in terms of disk space, and a subsequent restoration may not be successful if the version of your FirstOffice application has changed since the back-up was made.
! | Use FirstOffice's built-in back-up feature to guarantee a successful restoration. |
To create a back-up, follow these steps:
- Click the [Backup] button in the Master Control panel.
The resulting back-up file will contain the data from the whole database. Alternatively, if you want to back up a section of the database, follow step 2 below.
- Choose 'Exports' from the File menu or click the [Exports] button in the Master Control panel. The available Exports are listed:
Double-click 'Company Text Backup' (if you wish to back up the data in the database relating to the single Company currently selected) or 'Database Text Backup' (if you wish to back up the whole database). The second choice creates the same back-up file as clicking the [Backup] button in step 1.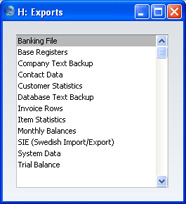
Usually you should use the 'Database Text Back-up' option, as this is the only choice that backs up the entire database. You must use it regularly for your safety and peace of mind. Some registers and settings (e.g. the Configuration setting) are stored at database level, not Company level. These will not be exported by the 'Company Text Back-up' option, even if your database only contains a single Company. The 'Company Text Back-up' option is intended for use in the situation where you need to move all the information relating to a specific Company from one database to another.
- If you followed step 1 above, the 'Specify Text Backup' window appears. This offers you 40 characters with which to describe the back-up file that you are about to create. If it becomes necessary to restore from a back-up, this description will be shown in the list of importable files to help you select the correct one.
Enter an appropriate description and click [Run].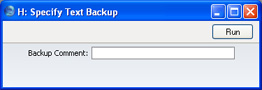
- If you have chosen to back up the whole database and you have more than one Company, you will now be asked to log in to any that you have not yet used in this work session. For reasons of security, if you are not able to log in to all Companies, the back-up procedure will be halted.
- FirstOffice opens a dialogue where you can name and place the export file. Enter the name of the file in the filename area and locate it in the appropriate directory in the usual way. The name of the back-up should include the date the back-up was made. For ease of importing later, it is recommended that you do not include spaces or other non-alphabetic characters in the name of your back-up file, and that you give it a .txt extension. Then, click [Save].
It is recommended that you save the back-up file in a folder or directory named "Backup" which should be in the same folder or directory as the FirstOffice application. All back-up files in this folder will be shown in a list of importable files if it becomes necessary to restore from a back-up.
A message window informs you about the progress of the export.
! | Under no circumstances should you edit or change a back-up file with another program. |
Automatiska tidsbackuper
The importance of establishing a regular routine for backing up cannot be emphasised enough. Because FirstOffice works - like all financial systems - with a single file database in which all your data about customers, invoices, nominal ledger etc. is stored, if you lose that file, you have lost not just a single document, but all your accounting and customer information.To make this task easier, FirstOffice contains a timed back-up feature whereby a database back-up file can be created automatically every day. To specify when the back-up files are to be created, and where they are to be stored, follow the steps outlined below.
- Choose 'Settings' from the File menu. Double-click 'Timed Operations'. The following window appears:
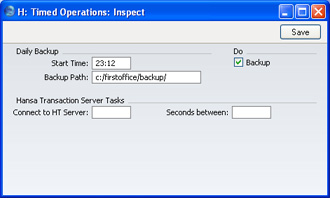
- Set the Operation Time (the time when the backup is to take place) to the appropriate time, when it is likely that you will not be using FirstOffice. Use the 24-hour clock, and place a colon (:) between the hour and the minute. The back-up file will be created at the specified time, even if you are still logged in to FirstOffice. However, you will find the speed of operation to be much reduced while the back-up is being carried out. It is therefore highly recommended that you specify a time that is outside working hours, to minimise such inconvenience.
- Specify the Database Backup Path, which determines where on your hard disk the back-up files are to be saved. If you leave this field blank, the back-up files will be saved in the folder containing the FirstOffice application.
The following examples show the correct syntax for the Database Backup Path. You can use either \ or / as a separator between folder names under Windows, Linux and Mac OS X while you should use : on Mac OS 9. Note that the separator appears as the final character in the path.
It is recommended that you save the back-up file in a folder or directory named "Backup" which should be in the same folder or directory as the FirstOffice application. All back-up files in this folder will be shown in a list of importable files if it becomes necessary to restore from a back-up. Under Windows XP, Linux and Mac OS X, you can do this using a relative path:
backup/
Under Mac OS 9, you can only use an absolute path:
hard disk:firstoffice:backup:
- If you want to store the back-up file somewhere else, use absolute paths with the following syntax:
Windows c:/samplefolder1/samplefolder2/backup/
Mac OS 9 hard disk:samplefolder1:samplefolder2:backup:
Mac OS X /samplefolder1/samplefolder2/backup/
Note that if you make a mistake (for example, you make a syntax error or specify a non-existent folder) there is a risk that the back-up file will not be created.
- Click the [Save] button in the Button Bar to save the back-up specifications.
Återställa efter en backup
To restore from a back-up, you must first create a new database. Then import the back-up file using the 'Imports' function on the File menu.The replacement of a safety back-up is a non-destructive process, i.e. the back-up file is not affected by the reading process. This means that you can use the same back-up file more than once.
Restoring from a back-up is done in the following way:
- Move the old database (named "1Office.HDB") to another folder/directory or to a diskette, to avoid mixing things up. Rename it so that you know what it contains.
- Delete the database file "1Office.HDB" from the folder or directory with your FirstOffice application. Double-clicking the FirstOffice application now will force it to create a new database.
!
It is important to restore to a new, empty database, to avoid mixing the restored data with the old, damaged database.
The "DBDef.txt" and "Default.txt" files should always be present in the same directory/folder as the FirstOffice application. They contain some important data used when setting up the new database and creating new Companies. If this file is missing, your FirstOffice application may not work the way you expect it to do!
- As part of the process of creating a new database, a list of back-up files is shown. To be included in this list, a back-up file must be stored in the "Backup" or "Setup" folder or directory, which should be in the same folder or directory as the FirstOffice application.
In the list, the filename of each back-up file is shown together with the date it was saved and any comment added when it was created (this last is only applicable to back-up files created by clicking the [Backup] button in the Master Control panel, step 1 in the previous section).
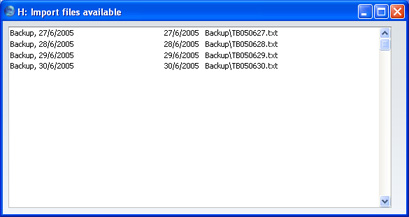
- Highlight the file you want to import (the back-up to which you wish to revert) and click [OK] (or double-click on the name of the file). The back-up data will be imported. A message window informs you about the progress of the import. For reasons of security, FirstOffice will then close if the back-up file contains at least one record in the Persons setting. Restart the program: you are now ready to continue working.
- If it is still open, close the list of available import files using the close box.
- Choose 'Imports' from the File menu. The 'Imports' window is shown:
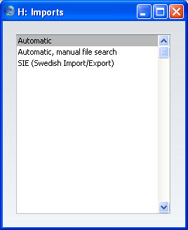
- Select 'Automatic, manual file search' and press the Enter key (or double-click on 'Automatic, manual file search').
FirstOffice opens a dialogue box with a list of the files in the current folder of the current volume. To find the back-up file, scroll through the list or select another folder or volume in the normal way.
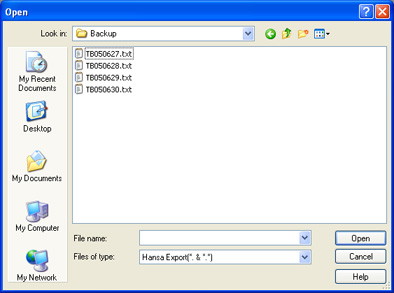
- Once you have found the file you want to import (the back-up to which you wish to revert), highlight it and click [Open] or [Select] (depending on the operating system), or double-click on the name of the file.
A message window informs you about the progress of the import.
Uppdatera från tidare version av FirstOffice
The latest version of FirstOffice is always available at www.hansaworld.com, from where updates should be obtained. If you are online, clicking the [HansaWorld.com] button in the Master Control panel will take you to this site.Inevitably, new versions of FirstOffice will incorporate significant structural changes. Because of this, it cannot be guaranteed that they will be able to open databases created by previous versions unless you use the built-in export and import functions.
To update, follow these steps:
- Before installing the new version, create a database back-up as usual using the old application.
- Install the new version of FirstOffice in a new folder or directory.
- Ensure that the new folder or directory contains the "DBDef.txt" and "Default.txt" files, but not a "1Office.HDB" file. Ensure it also contains a folder or directory named "Backup" which in turn contains the back-up file created in step 1, and that the name of this file has a .txt extension and does not contain any spaces or other non-alphabetic characters.
- Copy the "Attach" folder and its contents from the old FirstOffice folder to the new one. Do NOT copy the "Hob" folder.
- Launch the new FirstOffice application. A new database is created.
- Import the back-up created by the previous version of FirstOffice using the procedure described on the Restoring from a Back-up page.