Introduction to Customer Settings
There are three settings concerned with Customers and Suppliers:Customer Categories
Customer Categories are defined using the setting in the Sales Ledger. Use the Modules menu to enter the Sales Ledger and then select 'Settings' from the File menu or click [Settings] in the Master Control panel. Double-click 'Customer Categories' in the resulting list. Then click [New] to open a new record, or double-click an existing record to modify it.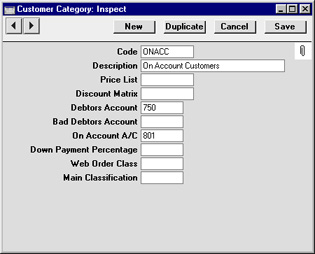
- Code
- Specify a unique code, by which the Customer Category may be identified from the Customer screen and elsewhere in Hansa.
- Description
- Enter text describing the Customer Category here.
- Price List
- Paste Special
Price List register, Pricing module
- Used as default in Customers, Quotations, Orders, Invoices
- The Price List entered here determines the prices used in Orders and Invoices for all Customers belonging to this Category. Price Lists are described here.
- The Price List entered here determines the prices used in Orders and Invoices for all Customers belonging to this Category. Price Lists are described here.
- Discount Matrix
- Paste Special
Discount Matrix register, Pricing module
- Used as default in Customers, Quotations, Orders, Invoices
- A Discount Matrix code entered here determines the discount structure for all Customers in this Category. Discount Matrices are described here.
- A Discount Matrix code entered here determines the discount structure for all Customers in this Category. Discount Matrices are described here.
- Debtors Account
- Paste Special
Account register, Nominal Ledger/System module
- Specify here the Debtor Account that you wish to be debited by the Nominal Ledger Transactions created when Invoices are raised for Customers of this Category.
- Note that a Debtor Account can only be specified at the Customer Category level, not at the individual Customer level. If no Debtor Account is specified for a Category, the Debtor Account specified in the Account Usage S/L setting in the Sales Ledger will be used.
- If you have Sub-ledger Checking switched on, any Account entered here must first be defined as a Debtor Control Account. Sub-ledger Checking is switched on using the check box on card 1 of the Account Usage S/L setting, and Control Accounts are defined using the Sub-ledger Control Accounts setting in the System module.
- Note that a Debtor Account can only be specified at the Customer Category level, not at the individual Customer level. If no Debtor Account is specified for a Category, the Debtor Account specified in the Account Usage S/L setting in the Sales Ledger will be used.
- Bad Debtors Account
- Paste Special
Account register, Nominal Ledger/System module
- You can use the 'Transfer to Bad Debtors' Maintenance function to transfer the outstanding balances of overdue Invoices from the Debtor Account specified above to a Bad Debtor Account. Specify here the Account that you wish to be used as the Bad Debtor Account for Invoices made out to Customers belonging to this Category.
- As with the Debtor Account above, a Bad Debtor Account can only be specified at the Customer Category level, not at the individual Customer level. If no Bad Debtor Account is specified for a Category, the Bad Debtor Account specified in the Account Usage S/L setting in the Sales Ledger will be used.
- As with the Debtor Account above, a Bad Debtor Account can only be specified at the Customer Category level, not at the individual Customer level. If no Bad Debtor Account is specified for a Category, the Bad Debtor Account specified in the Account Usage S/L setting in the Sales Ledger will be used.
- On Account A/C
- Paste Special
Account register, Nominal Ledger/System module
- This Account is used when you allow Customers to buy on account (i.e. to allow them to pay before you have invoiced them). To allow this, you must check the On Account check box for each individual Customer affected (on the 'Terms' card of the Customer screen). When a Prepayment or On Account Receipt is received from a Customer belonging to this Category, it will be credited to this Account. Subsequently, when the Invoice is issued and allocated to that Receipt, the same Account is debited in place of the default Debtor Account. Please refer to the On Account Receipts and Prepayments page for full details of this process.
- An On Account A/C can only be specified at the Customer Category level, not at the individual Customer level. If no On Account A/C is specified for a Category, the On Account A/C specified on card 2 of the Account Usage S/L setting in the Sales Ledger will be used.
- An On Account A/C can only be specified at the Customer Category level, not at the individual Customer level. If no On Account A/C is specified for a Category, the On Account A/C specified on card 2 of the Account Usage S/L setting in the Sales Ledger will be used.
- Down Payment Percentage
- When creating Down Payment Invoices from Sales Orders for Customers belonging to this Category, enter here the percentage of the Order total that is to be the value of the Down Payment Invoice. This value will be rounded up or down to the nearest whole number.
- If this field is blank or the Customer does not belong to a Category, the percentage will be taken from the Down Payments setting in the Sales Orders module.
- Wherever the percentage is taken from, it can be applied to the Order total including or excluding VAT. This is set in the Down Payments setting.
- If this field is blank or the Customer does not belong to a Category, the percentage will be taken from the Down Payments setting in the Sales Orders module.
- Web Order Class
- Paste Special
Order Classes setting, Sales Orders module
- Specify here the Order Class that you wish to be used in all Orders placed over the web (i.e. using Hansa's Web Shop) by Customers of this Category. All such Orders will be given this Class automatically.
- A Web Order Class can only be specified at the Customer Category level, not at an individual Customer level. It is therefore recommended that all Web Shop Customers be placed in a Customer Category if you want to distinguish and analyse their Orders using the Order Class field.
- Conventional Orders (i.e. those entered directly to the Order register and those created from Quotations) will not use this Order Class.
- A Web Order Class can only be specified at the Customer Category level, not at an individual Customer level. It is therefore recommended that all Web Shop Customers be placed in a Customer Category if you want to distinguish and analyse their Orders using the Order Class field.
- Main Classification
- Paste Special
Item Classifications setting, Stock module
- If you are using Hansa's Web Shop, you may wish to offer different Items to different Customers. This is done by dividing the Items into sets known as "Classifications" and then specifying a Classification for each Customer or Customer Category. Customers will see only those Items in the relevant Classification when they log on to your Web Shop site.
- If a Classification has been specified at the individual Customer level, this will override one that has been specified at the Category level.
- If no Classification has been specified for a Customer or Customer Category, the Classification with the Code "MAIN" will be used. If there is no "MAIN" Display Group, or if a non-existent Classification has been specified for the Customer or Category, no Items will listed when the Customer logs on.
- If a Classification has been specified at the individual Customer level, this will override one that has been specified at the Category level.
Customer Categories - Header
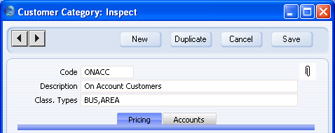
- Code
- Specify a unique code, by which the Customer Category can be identified from the Contact screen and elsewhere in HansaWorld Enterprise.
- Description
- Enter text describing the Customer Category here.
- Class. Types
- Paste Special
Classification Types setting, CRM module
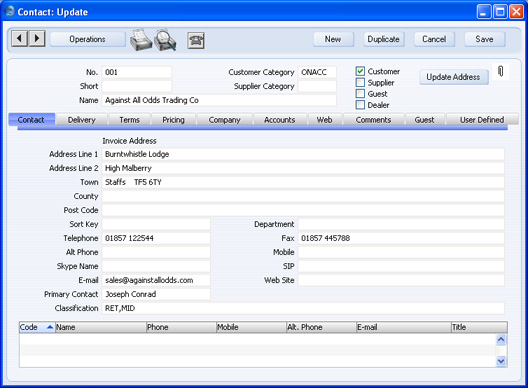
- If you enter a Classification Type (or several Classification Types separated by commas) here and then assign a Contact record to this Category, you will then have to specify a Classification belonging to that Type or Types in that Contact record before you can save it.
If you forget to enter a Classification belonging to a required Classification Type, the following alert will be shown when you try to save the Contact record:
If you have already assigned a Contact record to the Category before you enter a Classification Type in this field, you will be asked to enter an appropriate Classification the next time you open the Contact record.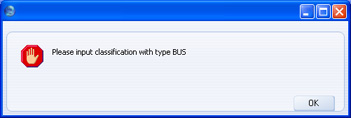
Classifications are described here.
This field also controls the Assisted Classification Entry feature, described here.
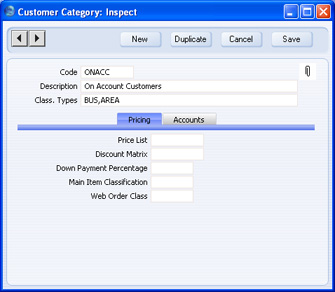
Customer Categories - Pricing Card
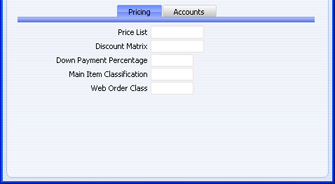
- Price List
- Paste Special
Price List register, Pricing module
- Used as default in Customers, Quotations, Orders, Invoices
- The Price List entered here determines the prices used in Orders and Invoices for all Customers belonging to this Category. Price Lists are described here.
- The Price List entered here determines the prices used in Orders and Invoices for all Customers belonging to this Category. Price Lists are described here.
- Discount Matrix
- Paste Special
Discount Matrix register, Pricing module
- Used as default in Customers, Quotations, Orders, Invoices
- A Discount Matrix code entered here determines the discount structure for all Customers in this Category. Discount Matrices are described here.
- A Discount Matrix code entered here determines the discount structure for all Customers in this Category. Discount Matrices are described here.
- Down Payment Percentage
- When creating Down Payment Invoices from Sales Orders for Customers belonging to this Category, enter here the percentage of the Order total that is to be the value of the Down Payment Invoice. This value will be rounded up or down to the nearest whole number.
- If this field is blank or the Customer does not belong to a Category, the percentage will be taken from the Down Payments setting in the Sales Orders module.
- Wherever the percentage is taken from, it can be applied to the Order total including or excluding VAT. This is set in the Down Payments setting.
- If this field is blank or the Customer does not belong to a Category, the percentage will be taken from the Down Payments setting in the Sales Orders module.
- Main Item Classification
- Paste Special
Item Classifications setting, Stock module
- If you are using the HansaWorld Enterprise Web Shop, you may wish to offer different Items to different Customers. You can do this by dividing the Items into sets known as "Classifications" and then specifying a Classification for each Customer or Customer Category. Customers will see only those Items in the relevant Classification when they log on to your Web Shop site.
- If you have specified a Classification at the individual Customer level, this will override one that has been specified at the Category level.
- If you have not specified a Classification has been specified for a Customer or Customer Category, the Classification with the Code "MAIN" will be used. If there is no "MAIN" Display Group, or if you specified a non-existent Classification for the Customer or Category, no Items will be listed when the Customer logs on.
- If you have specified a Classification at the individual Customer level, this will override one that has been specified at the Category level.
- Web Order Class
- Paste Special
Order Classes setting, Sales Orders module
- Specify here the Order Class that you wish to be used in all Orders placed over the web (i.e. using the HansaWorld Enterprise Web Shop) by Customers of this Category. All such Orders will be given this Class automatically.
- You can only specify a Web Order Class at the Customer Category level, not at an individual Customer level. It is therefore recommended that you place all Web Shop Customers in a Customer Category if you want to distinguish and analyse their Orders using the Order Class field.
- Conventional Orders (i.e. those entered directly to the Sales Order register and those created from Quotations) will not use this Order Class.
- You can only specify a Web Order Class at the Customer Category level, not at an individual Customer level. It is therefore recommended that you place all Web Shop Customers in a Customer Category if you want to distinguish and analyse their Orders using the Order Class field.
Customer Categories - Accounts Card
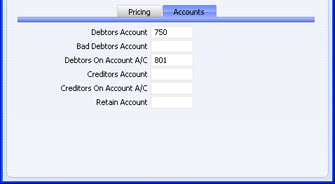
- Debtors Account
- Paste Special
Account register, Nominal Ledger/System module
- Specify here the Debtor Account that you wish to be debited by the Nominal Ledger Transactions created when Invoices are raised for Customers that belong to this Category.
- You can only specify a Debtor Account at the Customer Category level, not at the individual Customer level. If you do not specify a Debtor Account in a Category, the Debtor Account specified in the Account Usage S/L setting in the Sales Ledger will be used.
- If you cannot save the Customer Category, it may be because you are using Sub-ledger Checking in the Sales Ledger and you have not defined the Account entered here as a Debtor Control Account. You can switch on Sub-ledger Checking using the check box on the 'Debtors' card of the Account Usage S/L setting, and you can define Control Accounts using the Sub-ledger Control Accounts setting in the System module.
- You can only specify a Debtor Account at the Customer Category level, not at the individual Customer level. If you do not specify a Debtor Account in a Category, the Debtor Account specified in the Account Usage S/L setting in the Sales Ledger will be used.
- Bad Debtors Account
- Paste Special
Account register, Nominal Ledger/System module
- You can use the 'Transfer to Bad Debtors' Maintenance function to transfer the outstanding balances of overdue Invoices from the Debtor Account specified above to a Bad Debtor Account. Specify here the Account that you wish to be used as the Bad Debtor Account for Invoices made out to Customers belonging to this Category.
- As with the Debtor Account above, you can only specify a Bad Debtor Account at the Customer Category level, not at the individual Customer level. If you do not specify a Bad Debtor Account in a Category, the Bad Debtor Account specified in the Account Usage S/L setting in the Sales Ledger will be used.
- As with the Debtor Account above, you can only specify a Bad Debtor Account at the Customer Category level, not at the individual Customer level. If you do not specify a Bad Debtor Account in a Category, the Bad Debtor Account specified in the Account Usage S/L setting in the Sales Ledger will be used.
- Debtors On Account A/C
- Paste Special
Account register, Nominal Ledger/System module
- This Account is used when you allow Customers to buy from you on account (i.e. you allow them to pay before you have invoiced them). To allow this, you must check the On Account check box for each individual Customer affected (on the 'Terms' card of the Contact screen). When you receive a Prepayment or On Account Receipt is received from a Customer belonging to this Category, it will be credited to this Account. Subsequently, when you issue an Invoice and allocate it to that Receipt, the same Account will be debited in place of the default Debtor Account. Please refer to the On Account Receipts and Prepayments page for full details of this process.
- You can only specify an On Account A/C at the Customer Category level, not at the individual Customer level. If you do not specify an On Account A/C in a Category, the On Account A/C specified on the 'Debtors' card of the Account Usage S/L setting in the Sales Ledger will be used.
- You can only specify an On Account A/C at the Customer Category level, not at the individual Customer level. If you do not specify an On Account A/C in a Category, the On Account A/C specified on the 'Debtors' card of the Account Usage S/L setting in the Sales Ledger will be used.
- Creditors Account
- Paste Special
Account register, Nominal Ledger/System module
- Specify here the Creditor Account that you wish to be credited by the Nominal Ledger Transactions created when you receive Purchase Invoices from Suppliers that belong to this Category.
- This Account will only be used if you assign this Customer Category to a Supplier and do not also assign a Supplier Category to that Supplier. If you specify a Creditor Account both in a Customer Category and in a Supplier that belongs to that Category, the Account entered for the Supplier will take precedence. If you do not specify a Creditor Account in a Category or a Supplier, the Creditor, On Account or Cash Accounts specified in the Account Usage P/L setting will be used.
- If you cannot save the Customer Category, it may be because you are using Sub-ledger Checking in the Purchase Ledger and you have not defined the Account entered here as a Creditor Control Account. You can switch on Sub-ledger Checking using the check box on the 'Creditors' card of the Account Usage P/L setting, and you can define Control Accounts using the Sub-ledger Control Accounts setting in the System module.
- This Account will only be used if you assign this Customer Category to a Supplier and do not also assign a Supplier Category to that Supplier. If you specify a Creditor Account both in a Customer Category and in a Supplier that belongs to that Category, the Account entered for the Supplier will take precedence. If you do not specify a Creditor Account in a Category or a Supplier, the Creditor, On Account or Cash Accounts specified in the Account Usage P/L setting will be used.
- Creditors On Account A/C
- Paste Special
Account register, Nominal Ledger/System module
- This Account is used when you can buy on account from a Supplier (i.e. when they allow you to pay before they have issued you with a Purchase Invoice). To allow this, you must check the On Account check box in the Contact record for each individual Supplier affected (on the 'Terms' card). When you issue a Prepayment or On Account Payment to a Supplier belonging to this Category, it will be debited to this Account. Subsequently, when you receive the Purchase Invoice and allocate it to that Payment, the same Account will be credited in place of the default Creditor Account. Please refer to the On Account Payments and Prepayments page for full details of this process.
- This Account will only be used if you assign this Customer Category to a Supplier and do not also assign a Supplier Category to that Supplier. If you specify a Creditor On Account A/C for an individual Supplier, it will be used in place of the one entered here. If you do not specify an On Account A/C for a Supplier or for the Category to which it belongs, the On Account A/C specified in the Account Usage P/L setting ('Creditors' card) will be used.
Customer Categories - Web Card
This page describes the fields on the 'Web' card of the Customer Category record. Please follow the links below for descriptions of the other cards:- Introduction
- Header
- 'Pricing' card
- 'Accounts' card
- 'Web' card
- 'BI' card
- Assisted Classification Entry
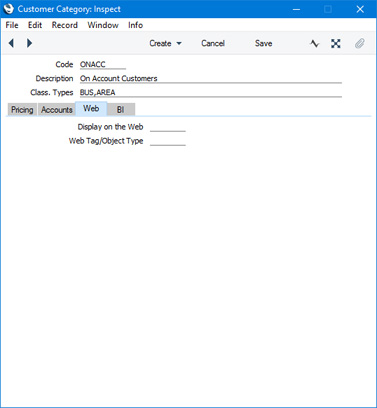
- Display on the Web
- Paste Special
Display on the Web setting, Web Shop and CMS module
- If you are using the Standard ERP Web Shop, you can use the Display on the Web setting to specify how much information about stock levels will be shown to visitors to the web shop, which payment methods will be shown, and whether Delivery Modes will be displayed.
- If you specify a Display on the Web record in this field, this will control the information that will be shown to Customers that belong to the Category after they have logged in. You can also specify Display on the Web records at the Customer level. If you do not specify a Display on the Web record at the Category level or at the Customer level, information will be displayed as follows:
- Stock information will be controlled by the Show Item Stock Levels options in the Webshop Settings setting.
- Payment methods will be controlled by the Webshop Company Settings setting.
- Delivery Modes will be controlled by the Show Delivery Modes option in the Webshop Company Settings setting.
- If you specify a Display on the Web record in this field, this will control the information that will be shown to Customers that belong to the Category after they have logged in. You can also specify Display on the Web records at the Customer level. If you do not specify a Display on the Web record at the Category level or at the Customer level, information will be displayed as follows:
Settings related to Contacts:
- Customer Categories, including:
- Header
- 'Pricing' card
- 'Accounts' card
- 'Web' card
- 'BI' card
- Assisted Classification Entry
- Home page for Customers, Suppliers and Contact Persons manual
- Home page for Standard ERP manual
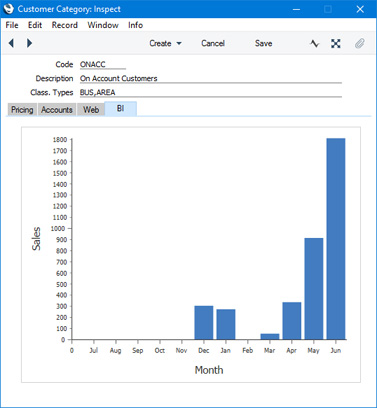
Customer Categories - BI Card
This page describes the 'BI' card of the Customer Category record. Please follow the links below for descriptions of the other cards:- Introduction
- Header
- 'Pricing' card
- 'Accounts' card
- 'Web' card
- 'BI' card
- Assisted Classification Entry
---
Settings related to Contacts:
- Customer Categories, including:
- Header
- 'Pricing' card
- 'Accounts' card
- 'Web' card
- 'BI' card
- Assisted Classification Entry
- Home page for Customers, Suppliers and Contact Persons manual
- Home page for Standard ERP manual
Customer Categories - Assisted Classification Entry
HansaWorld Enterprise contains two methods of organising records in the Contact register: Customer Categories and Contact Classifications. Each Contact can only belong to a single Category, but can be given more than one Classification. Classifications are therefore more versatile, allowing you to categorise your Contacts in several different ways. For example, you can use Classifications to record that a particular Contact is both a lead and has a credit rating of 3.If you are using both Categories and Classifications, the Assisted Classification Entry feature will help you choose the correct Classifications when entering Contact records, as follows:
- The header of the Customer Category record has a Class. Types field. If you enter a Classification Type (or several Classification Types separated by commas) in that field and then assign a Contact record to the Category, you will then have to specify a Classification belonging to that Type or Types in that Contact record before you can save it. For example, all Contacts belonging to the Category illustrated below must have Classifications belonging to the BUS and AREA Classification Types:
- When you enter a Contact record belonging to this Category, activate the 'Paste Special' feature using Ctrl-Enter or ⌘-Enter from the Classification field as usual. Because you have used a Category containing some compulsory Classification Types, the 'Assisted Classification Entry' window opens instead of the usual 'Paste Special' list:
The illustration of the Customer Category earlier on this page shows that it requires Classifications belonging to two different Classification Types. As a result, the 'Assisted Classification Entry' window has two fields, one for each required Classification Type. (The maximum number of Classification Types that can be required by a particular Category is seven.)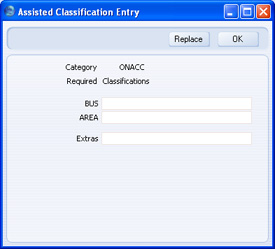
- Using 'Paste Special' in the usual way, enter a Classification belonging to each Type in the appropriate field. 'Paste Special' here will only list the Classifications belonging to the Type in question. Use the Extras field if you want to add another Classification belonging to a third Type.
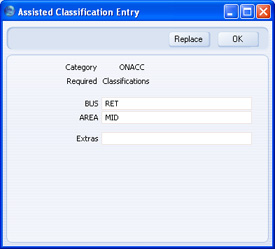
- If you close the 'Assisted Classification Entry' window by clicking the [OK] button, the Classifications will be added to anything previously in the Classification field in the Contact record. If you click the [Replace] button, the Classifications will replace anything that was previously in the Classification field.
Classification Types
Classification Types are used to divide the Contact Classifications into groups.You can define Classification Types using a setting in the CRM module. Use the [Select Module] button in the Master Control panel to enter the CRM module and then select 'Settings' from the File menu or click the [Settings] button, also in the Master Control panel. Double-click 'Classification Types' in the resulting list.
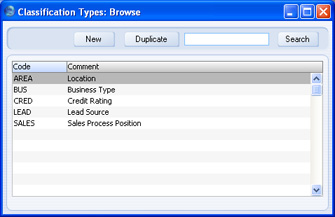
You can make sure that all Contacts are given a Classification belonging to a particular Classification Type. For details, please refer to the description of the header of the Customer Categories setting.
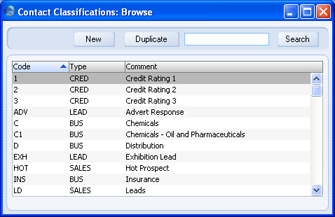
Contact Classifications
This setting in the CRM module allows you to define any number of Classifications, which you can then use to categorise your Contacts, perhaps recording their relationship to you (e.g. lead, service customer or retail customer). You can do this using the Classification field on the 'Contact' card of the Contact record. This field can contain one or more Classification Codes, separated by commas. So, for example, a particular Contact can be both a lead and have a credit rating of 3.The Contact Classification provides a different means of classifying Contacts compared with the Customer Categories setting in the Sales Ledger. You will usually use the Category to record the types of business in which your Contacts are engaged. You can allocate more than one Contact Classification to each Customer, but only one Category.
You can use the Contact Classification as a search criterion in many reports in the CRM module (and the EU VAT Sales report in the Sales Ledger) , and you can also use it as a means of targeting mailshots using the Customer Letter register in the CRM module.
You can divide Contact Classifications into Classification Types, allowing great flexibility.
Once you have saved a new record for the first time, you cannot change its Code simply by typing into the field. If you need to change a Code, use the Conversions - Master and Conversions - Contact Classifications settings in the System module. These settings will change the Code both here and in all other registers where the Classification has been used.
Contact Settings
This setting, available in the Sales Ledger, allows you to set various defaults to be used when you create new records in the Contact register.Use the [Select Module] button in the Master Control panel to ensure you are in the Sales Ledger and then select 'Settings' from the File menu or click the [Settings] button, also in the Master Control panel. Double-click 'Customer Settings' in the resulting list. The 'Customer Settings: Inspect' window opens:
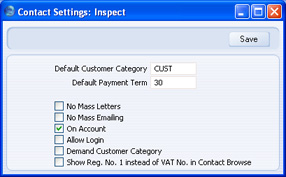
- Default Customer Category
- Paste Special
Customer Categories setting, Sales Ledger
- If you enter a Customer Category here, it will be brought in as a default to new Contacts created by entering them directly to the Contact register. It will not be used when you create new Contacts using the 'Create Contact' Operations menu function (i.e. when you add Contact Persons to a Customer or Supplier).
- Default Payment Term
- Paste Special
Payment Terms setting, Sales Ledger
- If you enter a Payment Term here, it will be brought in as a default Sales Pay. Term when you create new Contacts.
- No Mass Letters, No Mass Emailing, On Account, Allow Login
- The options you choose here will be selected by default when you create new Contacts.
- Demand Customer Category
- Use this option if you want every Contact that is a Customer to be assigned to a Customer Category.
- Show Reg. No. 1 instead of VAT No. in Contact Browse
- Use this option if you would like the Reg No.1 to be shown in the 'Contacts: Browse', 'Paste Customers' and 'Paste Suppliers' windows instead of the VAT Registration Number. You will need to quit HansaWorld Enterprise and restart for this change to take effect.
Klienta statusa atskaite
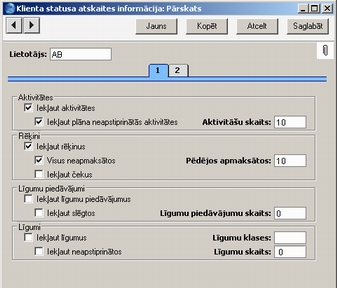
Šajā sagatavošanā tiek uzstādīta Klienta statusa atskaitē iekļaujamā informācija, palaižot to no logiem ‘Klienti: Pārskats’, ‘Klients: Pārskats’, 'Kontaktpersonas: Pārskats' un 'Kontaktpersona: Pārskats' izvēlnes Speciāli. Šī sagatavošana nav saitīta ar Realizācijas moduļa atskaiti Klienta statuss.Katrai personai šajā sagatavošanā var saglabāt atsevišķu ierakstu, tādējādi katrs lietotājs var izveidot savām vajadzībām atbilstošu atskaites konfigurāciju. Divreiz noklikšķinot uz CRM moduļa sagatavošanas ‘Klienta statusa atskaite’, tiks parādīts ierakstu saraksts. Lai izveidotu jaunu, pogu joslā noklikšķiniet uz [Jauns] vai sarakstā iezīmējiet līdzīgu ierakstu tam, kādu vēlaties izveidot, un noklikšķināt uz [Kopēt].
Tiks atvērts attēlotais logs. Lai saglabātu lietotāja definētos Klientu statusa atskaites uzstdījumus, saglabājiet izmaiņas un aizveriet logu.
- Lietotājs
- Ievietot Speciāli
Sistēmas moduļa reģistrs Personas
- Norādiet personas iniciāļus, ja nepieciešams, izmantojot funkciju ‘Ievietot Speciāli’. HansaWorld Enerprise neļaus veidot vairākus vienai personai paredzētus ierakstus.
Info on Customer Status Report - Header
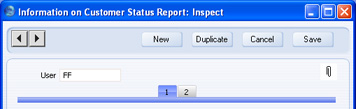
- User
- Paste Special
Person register, System module
- Enter the user's initials in the User field, using 'Paste Special' if necessary. You will only be able to enter one record for a particular Person.
- 1. sadaļa
- Iekļaut aktivitātes
- Atzīmējiet izvēles rūtiņu, ja ierakstā norādītā lietotāja izveidotajā atskaitē jāiekļauj pabeigtās aktivitātes. Ja no tās jāizslēdz aktivitātes ar noteiktu tipu, norādiet tos 2. sadaļas laukā ‘Neiekļaut aktivitāšu tipus’.
- Iekļaut plāna neapstiprinātās aktivitātes
- Atzīmējiet izvēles rūtiņu, ja atskaitē jāiekļauj arī nepabeigtās aktivitātes. Tas nozīmē, ka tiks uzskaitītas dažādas aktivitātes. Šai izvēles rūtiņai nav nozīmes, ja nav atzīmēta arī rūtiņa ‘Iekļaut aktivitātes’. 2. sadaļas lauks ‘Neiekļaut aktivitāšu tipus’ attiecas arī uz nepabeigtām aktivitātēm.
- Aktivitāšu skaits
- Norādiet maksimālo pabeigto aktivitāšu skaitu, ko rādīt konkrētās personas izveidotajā atskaitē. Tiks rādītas jaunākās pabeigtās aktivitātes. Ja atzīmēta izvēles rūtiņa ‘Iekļaut plāna neapstiprinātās aktivitātes’, tiks rādītas visas aktivitātes, kas ievadītas vēlāk par vecāko pabeigto aktivitāti. Lai uzskaitītu visas aktivitātes, lauku neaizpildiet.
- Iekļaut rēķinus
- Atzīmējiet izvēles rūtiņu, lai konkrētās personas izveidotajā Klienta statusa atskaitē tiktu uzskaitīti rēķini. Definējiet arī, kādus rēķinus iekļaut – atzīmējiet ‘Visus neapmaksātos’ un/vai laukā 'Pēdējos apmaksātos’ norādiet rēķinu skaitu.
- Visus neapmaksātos
- Atzīmējiet rūtiņu, lai rādītu neapmaksātos rēķinus.
- Pēdējos apmaksātos
- Ja atskaitē vēlaties rādīt apmaksātos rēķinus, norādiet to skaitu.
- Iekļaut čekus
- Atzīmējiet izvēles rūtiņu, lai atskaitē rādītu visus no katra klienta saņemtos čekus. Lai funkcija darbotos, jāatzīmē arī izvēles rūtiņas ‘Iekļaut rēķinus’ un ???Visus neapmaksātos’, kā arī jābūt iegādātam Čeku modulim.
- Iekļaut līgumu piedāvājumus
- Atzīmējiet izvēles rūtiņu, lai konkrētā lietotāja izveidotajā Klienta statusa atskaitē tiktu rādīti arī līgumu piedāvājumi.
- Iekļaut slēgtos
- Atzīmējiet izvēles rūtiņu, lai atskaitē iekļautu arī vairs spēkā neesošus līgumu piedāvājumus.
- Līgumu piedāvājumu skaits
- Norādiet maksimālo atskaitē iekļaujamo līgumu piedāvājumu skaitu.
- Iekļaut līgumus
- Atzīmējiet izvēles rūtiņu, lai konkrētā lietotāja izveidotajā Klienta statusa atskaitē tiktu iekļauti līgumi.
- Līgumu klases
- Ievietot Speciāli
Norēķinu pēc līgumiem moduļa sagatavošana Līgumu klases
- Norādiet līgumu klasi, lai sarakstā iekļautu tikai noteiktas klases līgumus.
- Iekļaut neapstiprinātos
- Atzīmējiet izvēles rūtiņu, lai atskaitē rādītu arī neapstiprinātos līgumus.
- Līgumu skaits
- Norādiet maksimālo atskaitē iekļaujamo līgumu skaitu.
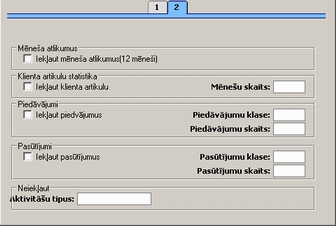
- 2. sadaļa
- Iekļaut mēneša atlikumus (12 mēneši)
- Atzīmējiet, lai atskaitē rādītu pagājušā gada pārdošanas kopsummas pa mēnešiem. Šī informācija tiek apkopota no apstiprinātajiem rēķiniem.
- Iekļaut klienta artikulu, Mēnešu skaits
- Ja vēlaties uzskaitīt katra klienta iegādātos artikulus noteiktā periodā, atzīmējiet izvēles rūtiņu ‘Iekļaut klienta artikulu' un laukā ‘Mēnešu skaits’ norādiet periodu. Atzīmētai izvēles rūtiņai nebūs nozīmes, ja šis lauks būs tukšs. Informācija tiks apkopota no apstiprinātajiem rēķiniem.
- Iekļaut piedāvājumus
- Atzīmējiet izvēles rūtiņu, lai konkrētā lietotāja veidotajā Klienta statusa atskaitē iekļautu piedāvājumus. Atzīmētai izvēles rūtiņai nebūs nozīmes, ja lauks ‘Pasūtījumu skaits’ būs tukšs.
- Piedāvājumu klase
- Ievietot Speciāli
Piedāvājumu moduļa sagatavošana Piedāvājumu klases
- Norādiet klasi, lai atskaitē iekļautu tikai noteiktas klases piedāvājumus.
- Piedāvājumu skaits
- Norādiet maksimālo atskaitē iekļaujamo piedāvājumu skaitu, sākot no jaunākā. Ja neko nenorādīsiet, netiks iekļauts neviens piedāvājums.
- Iekļaut pasūtījumus
- Atzīmējiet, lai konkrētā lietotāja izveidotajā Klienta statusa atskaitē iekļautu klientu pasūtījumus. Atzīmētai izvēles rūtiņai nebūs nozīmes, ja lauks ‘Pasūtījumu skaits’ būs tukšs.
- Pasutījumu klase
- Ievietot Speciāli
Klientu pasūtījumu moduļa sagatavošana Klientu pasūtījumu veidi
- Norādiet, lai atskaitē iekļautu tikai konkrētas klases klientu pasūtījumus.
- Pasūtījumu skaits
- Norādiet maksimālo atskaitē iekļaujamo pasūtījumu skaitu, sākot no jaunākā. Ja lauks būs tukšs, netiks rādīts neviens klientu pasūtījums.
- Neiekļaut aktivitāšu tipus
- Ievietot Speciāli
CRM moduļa sagatavošana Aktivitāšu tipi
- Ja 1. sadaļāatzīmējāt izvēles rūtiņas ‘Iekļaut aktivitātes’ un ‘Iekļaut plānā neapstiprinātās aktivitātes’, varat atzīmēt to aktivitāšu tipu, kuru ierakstus nevēlaties rādīt atskaitē. Šajā laukā norādiet nevajadzīgos aktivitāšu tipus, atdalītus ar komatu.
Info in Customer Status Report - Card 3
This page describes the fields on card 3 of each record in the Info in Customer Status report setting. Please click the following links for descriptions of the other cards:- Introduction
- Header
- Card 1
- Card 2
- Card 3
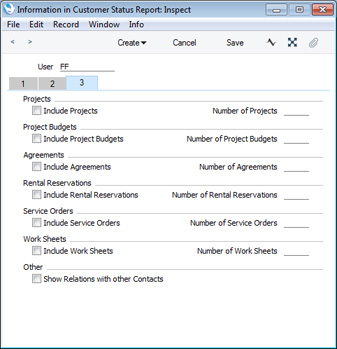
In each case, activate an option by ticking a check box on the left. Then specify the maximum number of records that are to be listed in the report using the field on the right. No records will be listed if you select an option but do not specify a maximum number.
- Show Relations with other Contacts
- This option will list all a Customer's Contact Persons in the Customer Status report. If you print the report to screen, you will be able to open individual Contact Person records using the Drill-down feature.
Settings related to Contacts:
- Introduction
- Customer Categories
- Classification Types
- Contact Classifications
- Contact Settings
- Info in Customer Status Report, including:
- Info in Supplier Status Report
- Job Titles
- Number Series - Contacts
- Supplier Categories
- User Defined Fields - Contacts.
- Home page for Customers, Suppliers and Contact Persons manual
- Home page for Standard ERP manual
Piegādātāju statusa atskaite
Šajā sagatavošanā tiek definēts, kāda informācija būs pieejama, veidojot Piegādātāja statusa atskaiti no izvēlnes Speciāli logos ‘Klienti: Pārskats’, ‘Klients: Pārskats’, 'Kontaktpersonas: Pārskats' un 'Kontaktpersona: Pārskats'.Katrai personai šajā sagatavošanā var saglabāt atsevišķu ierakstu, tādējādi katrs lietotājs var izveidot savām vajadzībām atbilstošu atskaites konfigurāciju. Divreiz noklikšķinot uz CRM moduļa sagatavošanas Piegādātāja statusa atskaite, tiek parādīts ierakstu saraksts. Lai izveidotu jaunu, pogu joslā noklikšķiniet uz [Jauns] vai iezīmējiet sarakstā līdzīgu ierakstu tam, kādu vēlaties izveidot, un noklikšķināt uz [Kopēt].
Lai saglabātu lietotāja sagatavošanas Piegādātāja statusa atskaite uzstādījumus, aizveriet logu un izvēlieties saglabāt izmaiņas.
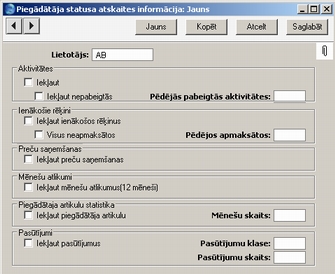
- Lietotājs
- Ievietot Speciāli
Sistēmas moduļa reģistrs Personas
- Norādiet lietotāja iniciāļus, ja nepieciešams, izmantojot funkciju ‘Ievietot Speciāli’. HansaWorld Enterprise neļaus izveidot vairākus vienai personai paredzētus ierakstus.
- Aktivitātes iekļaut
- Atzīmējiet, lai konkrētā lietotāja izveidotajā Piegādātāju statusa atskaitē tiktu iekļautas pabeigtās aktivitātes.
- Iekļaut nepabeigtās
- Atzīmējiet, ja atskaitē jāiekļauj arī nepabeigtās aktivitātes. Tas nozīmē, ka tiks uzskaitītas dažādas aktivitātes. Šai izvēles rūtiņai nav nozīmes, ja nav atzīmēta arī rūtiņa ‘Iekļaut aktivitātes’.
- Pēdējās pabeigtās aktivitātes
- Norādiet maksimālo pabeigto aktivitāšu skaitu, ko rādīt konkrētās personas izveidotajā atskaitē. Tiks rādītas jaunākās pabeigtās aktivitātes. Ja atzīmēta izvēles rūtiņa ‘Iekļaut nepabeigtās’, tiks rādītas visas aktivitātes, kas ievadītas vēlāk par vecāko pabeigto aktivitāti. Lai uzskaitītu visas aktivitātes, lauku neaizpildiet.
- Iekļaut ienākošos rēķinus
- Atzīmējiet izvēles rūtiņu, lai konkrētās personas izveidotajā Piegādātāja statusa atskaitē tiktu uzskaitīti ienākošie rēķini. Norādiet arī, kādus rēķinus iekļaut, atzīmējot ‘Visus neapmaksātos’ un/vai norādot rēķinu skaitu laukā ‘Pēdējos apmaksātos’.
- Visus neapmaksātos
- Atzīmējiet rūtiņu, lai rādītu neapmaksātos rēķinus.
- Pēdējos apmaksātos
- Ja atskaitē vēlaties rādīt apmaksātos rēķinus, norādiet to skaitu.
- Iekļaut preču saņemšanas
- Atzīmējiet, lai konkrētā lietotāja izveidotajā Piegādātāja statusa atskaitē tiktu rādītas saņemtās preces.
- Iekļaut mēnešu atlikumus (12 mēneši)
- Atzīmējiet, lai atskaitē rādītu pagājušā gada iegādes summas pa mēnešiem. Šī informācija tiek apkopota no apstiprinātajām preču saņemšanām.
- Iekļaut piegādātāja artikulu, Mēnešu skaits
- Ja vēlaties uzskaitīt no katra piegādātāja iegādāto artikulu daudzumu un summu noteiktā periodā, atzīmējiet izvēles rūtiņu ‘Iekļaut piegādātāja artikulu’ un laukā ‘Mēnešu skaits’ norādiet periodu. Atzīmētai izvēles rūtiņai nebūs nozīmes, ja šis lauks būs tukšs. Informācija tiks apkopota no apstiprinātajām preču saņemšanām.
- Iekļaut pasūtījumus
- Atzīmējiet izvēles rūtiņu, lai konkrētā lietotāja izveidotajā Piegādātāja statusa atskaitē iekļautu pasūtījumus. Atzīmētai izvēles rūtiņai nebūs nozīmes, ja lauks ‘Pasūtījumu skaits’ būs tukšs.
- Pasūtījumu klase
- Ievietot Speciāli
Pasūtījumu moduļa sagatavošana Pasūtījumu veidi
- Norādiet klasi, lai atskaitē iekļautu tikai konkrētas klases piedāvājumus.
- Pasūtījumu skaits
- Norādiet maksimālo atskaitē iekļaujamo pasūtījumu skaitu, sākot no jaunākā. Ja lauks būs tukšs, netiks rādīts neviens klientu pasūtījums.
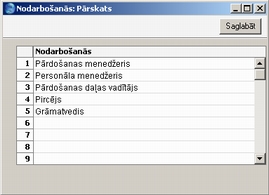
Nodarbošanās
Šī sagatavošana ir kā pārskata tabula, kuru izmanto reģistros Kontaktpersonas un Klientu vēstules.Ir iespējams veidot atskaites un sūtīt e-pastu kontaktpersonām atkarībā no to ieņemamajiem amatiem. Tādēļ šajā sagatavošanā ieteicams ievadīt vispārēju nodarbošanās, nevis faktisko amatu nosaukumus (kuri katrā uzņēmumā var atšķirties). Tādējādi varēsit izveidot atskaites vai nosūtīt e-pastu kontaktpersonām ar vienādu nodarbošanos, bet atšķirīgu amata nosaukumu.
Sagatavošanu sarakstā divreiz noklikšķinot uz ‘Nodarbošanās’, tiks atvērts šāds logs:
Number Series - Contacts
Each Contact has its own unique identifying number, based on a sequential series. When you enter a new Contact, the next number in the sequence will be used. If required, you can have a number of such sequences running concurrently, perhaps representing different types of Contact (e.g. Customer, Supplier or Contact Person) or different departments.Use this setting to define these sequences, or Number Series. The different series should not overlap. If you leave the setting empty, Contact Numbers will start at 1 and continue consecutively. If you want to start from another number, simply specify it in a new Contact record before saving.
Once you have defined number sequences for Contacts, you can optionally use the Number Series Defaults setting in the System module to specify the number sequence that is to be used by default. The first new Contact that you enter will take its Number from the number sequence specified in the Number Series Defaults setting or otherwise from the first valid Number Series in this setting. For a particular Contact, any user can change to the first unused number in any other valid Number Series using 'Paste Special'.
When you save each Contact for the first time, its Contact Number will also be saved in the Number Series Defaults setting. So, if you used 'Paste Special' to change to another Number Series, that Number Series will provide the default Number for the next new Contact.
You should define Number Series - Contacts using the setting in the Sales Ledger. Use the [Module] button in the Master Control panel to enter the Sales Ledger and then click the [Settings] button, also in the Master Control panel. Double-click 'Number Series - Contacts' in the resulting list. The following window appears:
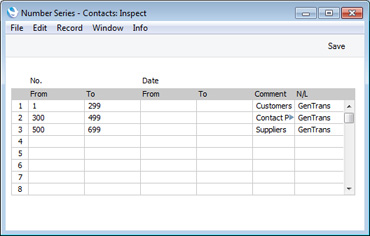
Note that you can only enter numeric characters in the Number Series - Contacts setting, but Contact Numbers can also contain alpha characters. So, you can only set numeric number sequences, but when entering Contacts you can use alpha characters providing you remain within the sequence. For example, if you have a sequence of 1-100, you will be able to use Contact Numbers 1, 1A, 1B, 2 and so on, but not A1 or B1. You will also be able to use Contact Numbers with leading zeros (001, 002 and so on), but you will need to set this format in the first Contact you enter or in the Number Series Defaults setting, not in the Number Series setting. The format will be remembered for subsequent Contacts.
---
Settings related to Contacts:
- Introduction
- Customer Categories
- Classification Types
- Contact Classifications
- Contact Settings
- Info in Customer Status Report
- Info in Supplier Status Report
- Job Titles
- Number Series - Contacts
- Supplier Categories
- User Defined Fields - Contacts.
- Home page for Customers, Suppliers and Contact Persons manual
- Home page for Standard ERP manual
Supplier Categories
Suppliers of a similar type can be grouped together using Supplier Categories. All Suppliers of the same Category can be given the same default Creditor Account, saving you the work of having to specify this for all Suppliers individually.Use the Modules menu to enter the Purchase Ledger and then select 'Settings' from the File menu or click [Settings] in the Master Control panel. Double-click 'Supplier Categories' in the resulting list. The 'Supplier Categories: Browse' window is displayed, showing all Categories previously entered. Click [New] to enter a new record, and [Save] to save it.
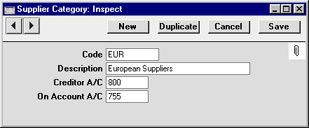
- Code
- Specify a unique code, by which the Supplier Category may be identified from the Supplier screen and elsewhere in Hansa.
- Description
- Enter text describing the Supplier Category here.
- Creditor Account
- Paste Special
Account register, Nominal Ledger/System module
- Specify here the Creditor Account that you wish to be credited by the Nominal Ledger Transactions created when Purchase Invoices are raised for Suppliers of this Category.
- If a Creditor Account is specified both for a Supplier Category and for a Supplier that belongs to that Category, that entered for the Supplier will take precedence. If no Creditor Account is specified for a Category or a Supplier, it will be taken from the Creditor, On Account or Cash Accounts specified in the Account Usage P/L setting.
- If you have Sub-ledger Checking switched on, any Account entered here must first be defined as a Creditor Control Account. Sub-ledger Checking is switched on using the check box on card 1 of the Account Usage P/L setting, and Control Accounts are defined using the Sub-ledger Control Accounts setting in the System module.
- If a Creditor Account is specified both for a Supplier Category and for a Supplier that belongs to that Category, that entered for the Supplier will take precedence. If no Creditor Account is specified for a Category or a Supplier, it will be taken from the Creditor, On Account or Cash Accounts specified in the Account Usage P/L setting.
- On Account A/C
- Paste Special
Account register, Nominal Ledger/System module
- This account is used when you can buy on account from a Supplier ((i.e. when you can pay before you have received the Invoice). To allow this, you must check the On Account check box for each individual Supplier affected (on the 'Terms' card of the Supplier screen). When a purchase is made from account Suppliers in this Category, this Account will be used in place of the default Creditor Account. When a Prepayment or On Account Payment is issued to a Supplier belonging to this Category, it will be debited to this Account. Subsequently, when the Invoice is received and allocated to that Payment, the same Account is credited in place of the default Creditor Account. Please refer to the On Account Payments and Prepayments page for full details of this process.
- If an On Account A/C is specified for an individual Supplier, it will be used in place of the one entered here. If no On Account A/C is specified for a Supplier or for the Category to which it belongs, it will be taken from the On Account A/C specified in the Account Usage P/L setting (card 2).
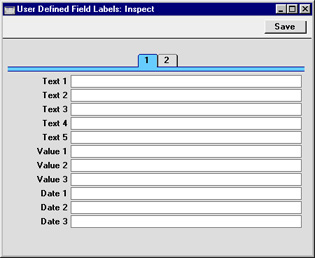
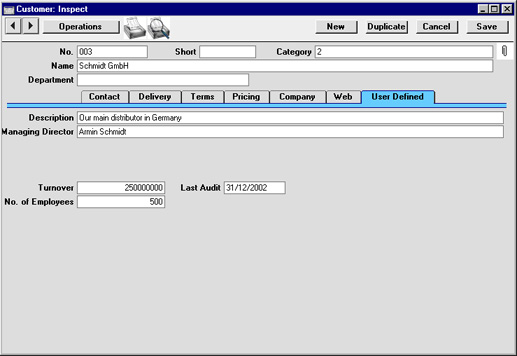
User Defined Fields
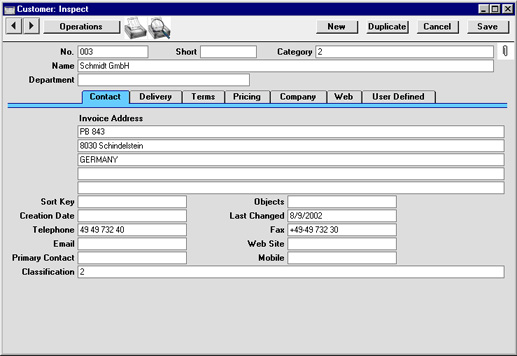
The Customer record is capable of storing a sufficient quantity of information to cater for most requirements. However, in some circumstances, it might be necessary to store additional information for which no fields have been provided. The User Defined Fields setting in the CRM module allows you to add your own fields to each Customer record for this purpose. The new fields will be visible on the 'User Defined' card of each Customer record.Use the Modules menu to enter the CRM module and then select 'Settings' from the File menu or click [Settings] in the Master Control panel. Double-click 'User Defined Fields' in the resulting list. The 'User Defined Field Labels: Inspect' window opens. Make changes as required and then click the [Save] button in the Button Bar to save changes and close the window. Click the close box if you do not want to save changes.
User Defined Fields - Card 1
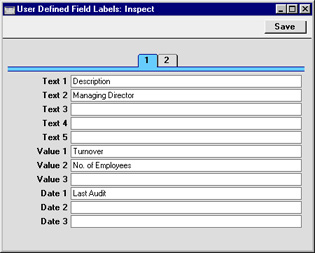
User Defined Fields - Card 2
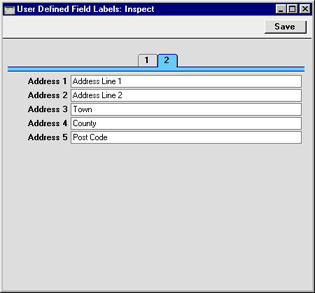
Use card 2 of the 'User Defined Field Labels: Inspect' to name the address fields in each Customer record. When card 2 of the 'User Defined Field Labels: Inspect' window is empty, the address fields on the 'Contact' and 'Delivery' cards of each Customer record are unnamed: