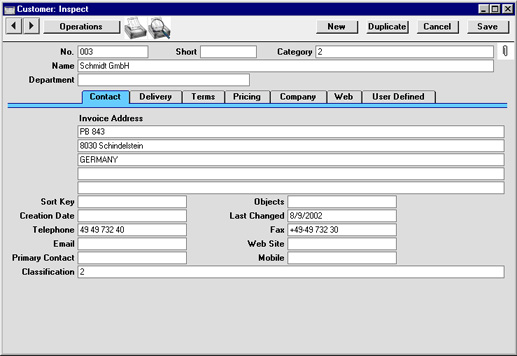
Introduction to Customer Settings
There are three settings concerned with Customers and Suppliers:Customer Categories
Customer Categories are defined using the setting in the Sales Ledger. Use the Modules menu to enter the Sales Ledger and then select 'Settings' from the File menu or click [Settings] in the Master Control panel. Double-click 'Customer Categories' in the resulting list. Then click [New] to open a new record, or double-click an existing record to modify it.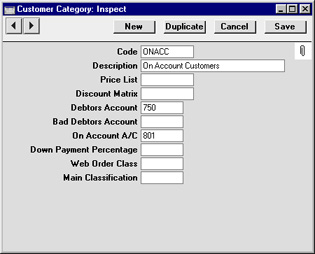
- Code
- Specify a unique code, by which the Customer Category may be identified from the Customer screen and elsewhere in Hansa.
- Description
- Enter text describing the Customer Category here.
- Price List
- Paste Special
Price List register, Pricing module
- Used as default in Customers, Quotations, Orders, Invoices
- The Price List entered here determines the prices used in Orders and Invoices for all Customers belonging to this Category. Price Lists are described here.
- The Price List entered here determines the prices used in Orders and Invoices for all Customers belonging to this Category. Price Lists are described here.
- Discount Matrix
- Paste Special
Discount Matrix register, Pricing module
- Used as default in Customers, Quotations, Orders, Invoices
- A Discount Matrix code entered here determines the discount structure for all Customers in this Category. Discount Matrices are described here.
- A Discount Matrix code entered here determines the discount structure for all Customers in this Category. Discount Matrices are described here.
- Debtors Account
- Paste Special
Account register, Nominal Ledger/System module
- Specify here the Debtor Account that you wish to be debited by the Nominal Ledger Transactions created when Invoices are raised for Customers of this Category.
- Note that a Debtor Account can only be specified at the Customer Category level, not at the individual Customer level. If no Debtor Account is specified for a Category, the Debtor Account specified in the Account Usage S/L setting in the Sales Ledger will be used.
- If you have Sub-ledger Checking switched on, any Account entered here must first be defined as a Debtor Control Account. Sub-ledger Checking is switched on using the check box on card 1 of the Account Usage S/L setting, and Control Accounts are defined using the Sub-ledger Control Accounts setting in the System module.
- Note that a Debtor Account can only be specified at the Customer Category level, not at the individual Customer level. If no Debtor Account is specified for a Category, the Debtor Account specified in the Account Usage S/L setting in the Sales Ledger will be used.
- Bad Debtors Account
- Paste Special
Account register, Nominal Ledger/System module
- You can use the 'Transfer to Bad Debtors' Maintenance function to transfer the outstanding balances of overdue Invoices from the Debtor Account specified above to a Bad Debtor Account. Specify here the Account that you wish to be used as the Bad Debtor Account for Invoices made out to Customers belonging to this Category.
- As with the Debtor Account above, a Bad Debtor Account can only be specified at the Customer Category level, not at the individual Customer level. If no Bad Debtor Account is specified for a Category, the Bad Debtor Account specified in the Account Usage S/L setting in the Sales Ledger will be used.
- As with the Debtor Account above, a Bad Debtor Account can only be specified at the Customer Category level, not at the individual Customer level. If no Bad Debtor Account is specified for a Category, the Bad Debtor Account specified in the Account Usage S/L setting in the Sales Ledger will be used.
- On Account A/C
- Paste Special
Account register, Nominal Ledger/System module
- This Account is used when you allow Customers to buy on account (i.e. to allow them to pay before you have invoiced them). To allow this, you must check the On Account check box for each individual Customer affected (on the 'Terms' card of the Customer screen). When a Prepayment or On Account Receipt is received from a Customer belonging to this Category, it will be credited to this Account. Subsequently, when the Invoice is issued and allocated to that Receipt, the same Account is debited in place of the default Debtor Account. Please refer to the On Account Receipts and Prepayments page for full details of this process.
- An On Account A/C can only be specified at the Customer Category level, not at the individual Customer level. If no On Account A/C is specified for a Category, the On Account A/C specified on card 2 of the Account Usage S/L setting in the Sales Ledger will be used.
- An On Account A/C can only be specified at the Customer Category level, not at the individual Customer level. If no On Account A/C is specified for a Category, the On Account A/C specified on card 2 of the Account Usage S/L setting in the Sales Ledger will be used.
- Down Payment Percentage
- When creating Down Payment Invoices from Sales Orders for Customers belonging to this Category, enter here the percentage of the Order total that is to be the value of the Down Payment Invoice. This value will be rounded up or down to the nearest whole number.
- If this field is blank or the Customer does not belong to a Category, the percentage will be taken from the Down Payments setting in the Sales Orders module.
- Wherever the percentage is taken from, it can be applied to the Order total including or excluding VAT. This is set in the Down Payments setting.
- If this field is blank or the Customer does not belong to a Category, the percentage will be taken from the Down Payments setting in the Sales Orders module.
- Web Order Class
- Paste Special
Order Classes setting, Sales Orders module
- Specify here the Order Class that you wish to be used in all Orders placed over the web (i.e. using Hansa's Web Shop) by Customers of this Category. All such Orders will be given this Class automatically.
- A Web Order Class can only be specified at the Customer Category level, not at an individual Customer level. It is therefore recommended that all Web Shop Customers be placed in a Customer Category if you want to distinguish and analyse their Orders using the Order Class field.
- Conventional Orders (i.e. those entered directly to the Order register and those created from Quotations) will not use this Order Class.
- A Web Order Class can only be specified at the Customer Category level, not at an individual Customer level. It is therefore recommended that all Web Shop Customers be placed in a Customer Category if you want to distinguish and analyse their Orders using the Order Class field.
- Main Classification
- Paste Special
Item Classifications setting, Stock module
- If you are using Hansa's Web Shop, you may wish to offer different Items to different Customers. This is done by dividing the Items into sets known as "Classifications" and then specifying a Classification for each Customer or Customer Category. Customers will see only those Items in the relevant Classification when they log on to your Web Shop site.
- If a Classification has been specified at the individual Customer level, this will override one that has been specified at the Category level.
- If no Classification has been specified for a Customer or Customer Category, the Classification with the Code "MAIN" will be used. If there is no "MAIN" Display Group, or if a non-existent Classification has been specified for the Customer or Category, no Items will listed when the Customer logs on.
- If a Classification has been specified at the individual Customer level, this will override one that has been specified at the Category level.
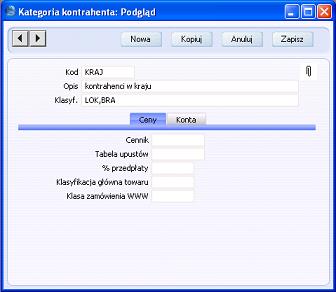
Nagłówek
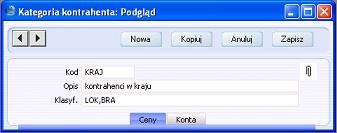
- Kod
- Wprowadź unikalny kod identyfikujący kategorię kontrahenta w kartotece Kontrahentów oraz w innych miejscach w systemie.
- Opis
- Wprowadź opis dla kategorii.
- Klasyf.
- polecenie Wstaw
ustawienie Klasyfikacje kontrahentów - typy, moduł CRM
- Jeśli w polu Klasyf. zdefiniowano dowolny typ klasyfikacji (lub kilka typów klasyfikacji oddzielonych przecinkiem), a następnie kategoria została przypisana do karty Kontrahenta, to przed zapisaniem karty należy podać właściwą klasyfikację.
Jeśli użytkownik nie poda klasyfikacji należącej do odpowiedniego typu klasyfikacji to przy próbie zapisania karty pojawi się następujący komunikat z ostrzeżeniem:
Jeśli kategoria została przypisana do karty Kontrahenta wcześniej niż typ klasyfikacji na karcie kategorii, to po otwarciu karty Kontrahenta w dowolnym momencie, system będzie wymagał przypisania właściwej klasyfikacji.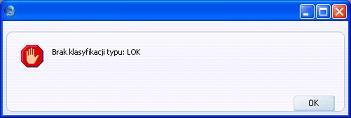
Klasyfikacje zostały opisane w dalszej części podręcznika.
Pole kontroluje funkcjonalność Wstaw klasyfikację opisaną w dalszej części podręcznika.
Zakładka Ceny
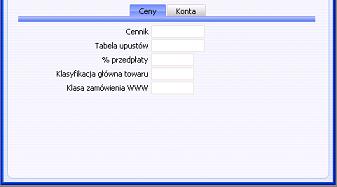
- Cennik
- polecenie Wstaw
kartoteka Cenniki, moduł Zarządzanie cenami
- Domyślnie używany w kartotece: Kontrahenci, Oferty, Zamówienia, Faktury
- Cennik zdefiniowany w tym polu określa ceny, jakie zostaną użyte w zamówieniach oraz na fakturach dla wszystkich Odbiorców należących do danej kategorii. Szczegółowe informacje na temat definiowania cenników znajdziesz w dalszej części podręcznika.
- Cennik zdefiniowany w tym polu określa ceny, jakie zostaną użyte w zamówieniach oraz na fakturach dla wszystkich Odbiorców należących do danej kategorii. Szczegółowe informacje na temat definiowania cenników znajdziesz w dalszej części podręcznika.
- Tabela upustów
- polecenie Wstaw
kartoteka Tabele upustów, moduł Zarządzanie cenami
- Domyślnie używana w kartotece: Kontrahenci, Oferty, Zamówienia, Faktury
- Tabela upustów zdefiniowana w tym polu określa strukturę upustów dla wszystkich Odbiorców należących do danej kategorii. Szczegółowe informacje na temat definiowania tabel znajdziesz w dalszej części podręcznika.
- Tabela upustów zdefiniowana w tym polu określa strukturę upustów dla wszystkich Odbiorców należących do danej kategorii. Szczegółowe informacje na temat definiowania tabel znajdziesz w dalszej części podręcznika.
- % przedpłaty
- Procent przedpłaty zdefiniowany w tym polu zostanie wykorzystany przy tworzeniu 'Faktury na przedpłatę' z karty zamówienia dla wszystkich Odbiorców należących do danej kategorii. Procent przedpłaty jest kalkulowany od całkowitej wartości zamówienia.
- Jeśli pole jest puste lub Odbiorca nie należy do danej kategorii, system wykorzysta procent przedpłaty zdefiniowany w ustawieniu Przedpłaty w module Zamówienia Sprzedaży.
- Procent przedpłaty,niezależnie od tego, gdzie został zdefiniowany w systemie, może być liczony od wartości netto lub brutto zamówienia. Można to zdefiniować w ustawieniu Przedpłaty.
- Jeśli pole jest puste lub Odbiorca nie należy do danej kategorii, system wykorzysta procent przedpłaty zdefiniowany w ustawieniu Przedpłaty w module Zamówienia Sprzedaży.
- Klasyfikacja główna towaru
- polecenie Wstaw
ustawienie Klasyfikacje towarów, moduł Magazyn
- Jeśli użytkownik wykorzystuje sklep internetowy może oferować różne towary, różnym grupom Odbiorców. Towary można sklasyfikować, a następnie przypisać właściwą klasyfikację do karty Odbiorcy lub całej kategorii. Odbiorca po zalogowaniu do sklepu internetowego będzie przeglądał towary należące do odpowiedniej klasyfikacji.
- Klasyfikacja określona bezpośrednio na karcie Kontrahenta jest nadrzędna w stosunku do klasyfikacji określonej w kategorii.
- Jeśli klasyfikacja nie zostanie określona na karcie Kontrahenta lub w kategorii to system wykorzysta główną klasyfikację. Jeśli główna klasyfikacja nie została zdefiniowana lub jeśli na karcie Kontrahenta lub kategorii zdefiniowano błędną klasyfikację towaru, to system nie wyświetli żadnego towaru po zalogowaniu do sklepu internetowego.
- Klasyfikacja określona bezpośrednio na karcie Kontrahenta jest nadrzędna w stosunku do klasyfikacji określonej w kategorii.
- Klasa zamówienia WWW
- polecenie Wstaw
ustawienie Klasy zamówień, moduł Zamówienia Sprzedaży
- Wstaw klasę zamówienia, która będzie używana we wszystkich zamówieniach złożonych na stronie www (sklep internetowy) przez Odbiorców należących do danej kategorii. Klasa zamówienia zostanie przypisana automatycznie.
- Klasę zamówienia WWW można przypisać tylko na poziomie kategorii, klasy zamówienia nie można określić na poziomie Kontrahenta. Zaleca się grupowanie Kontrahentów w kategorie, aby umożliwić analizowanie skladanych zamówień pod kątem klasy zamówienia.
- Klasa zamówienia WWW nie jest używana w standardowych zamówieniach tj. zamówieniach utworzonych bezpośrednio w kartotece Zamówienia Sprzedaży lub tworzonych z Ofert.
- Klasę zamówienia WWW można przypisać tylko na poziomie kategorii, klasy zamówienia nie można określić na poziomie Kontrahenta. Zaleca się grupowanie Kontrahentów w kategorie, aby umożliwić analizowanie skladanych zamówień pod kątem klasy zamówienia.
Zakładka Konta
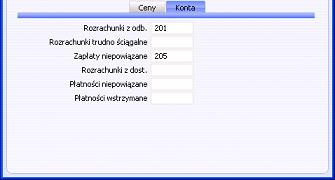
- Rozrachunki z odb.
- polecenie Wstaw
kartoteka Plan kont, moduł Księga Główna/System
- Wstaw odpowienie konto Rozrachunków z odbiorcami. Zatwierdzenie faktury dla Odbiorcy należącego do danej kategorii spowoduje obciążenie tego konta (odpowiedni zapis po stronie Wn na tym koncie rozrachunków).
- Konto Rozrachunków z odb. można określić na poziomie kategorii; konta nie można określić bezpośrednio na karcie Odbiorcy. Jeśli konto Rozrachunków z odb. nie zostanie zdefiniowane w kategorii, system wykorzysta konto zdefiniowane w ustawieniu Rozksięgowanie-Sprzedaż na zakładce 'Rozrachunki' w module Księga Sprzedaży.
- Jeśli w systemie wykorzystywana jest funkcja 'Kontrola zapisu na kontach' to w przypadku problemów z zapisaniem kategorii należy sprawdzić czy podane konto Rozrachunków z odb. zostało zabezpieczone kontrolą zapisu na kontach. Aby korzystać z funkcji należy zaznaczyć check box 'Kontrola zapisu na kontach' na zakładce 'Rozrachunki' w ustawieniu Rozksięgowanie-Sprzedaż, a następnie zdefiniować właściwe konta w ustawieniu Kontrola zapisów na kontach z modułów w module System.
- Konto Rozrachunków z odb. można określić na poziomie kategorii; konta nie można określić bezpośrednio na karcie Odbiorcy. Jeśli konto Rozrachunków z odb. nie zostanie zdefiniowane w kategorii, system wykorzysta konto zdefiniowane w ustawieniu Rozksięgowanie-Sprzedaż na zakładce 'Rozrachunki' w module Księga Sprzedaży.
- Rozrachunki trudno ściągalne
- polecenie Wstaw
kartoteka Plan kont, moduł Księga Główna/System
- Polecenie Obsługi 'Przenieś na rozrachunki sporne' można wykorzystać do przeniesienia sald przeterminowanych faktur z konta Rozrachunków z odb. na konto Rozrachunków trudno ściągalnych. Podaj właściwe konto w tym polu, na które zostaną przeniesione salda przeterminowanych faktur dla Kontrahenta należącego do danej kategorii.
- Konto Rozrachunki trudno ściągalne (podobnie jak konto Rozrachunki z odb.) można określić na poziomie kategorii; konta nie można określić bezpośrednio na karcie Odbiorcy. Jeśli konto nie zostanie zdefiniowane w kategorii, system wykorzysta konto zdefiniowane w w ustawieniu Rozksięgowanie-Sprzedaż na zakładce 'Rozrachunki' w module Księga Sprzedaży.
- Konto Rozrachunki trudno ściągalne (podobnie jak konto Rozrachunki z odb.) można określić na poziomie kategorii; konta nie można określić bezpośrednio na karcie Odbiorcy. Jeśli konto nie zostanie zdefiniowane w kategorii, system wykorzysta konto zdefiniowane w w ustawieniu Rozksięgowanie-Sprzedaż na zakładce 'Rozrachunki' w module Księga Sprzedaży.
- Zapłaty niepowiązane
- polecenie Wstaw
kartoteka Plan kont, Księga Główna/System
- Konto jest wykorzystywane do księgowania operacji niepowiązanych po stronie Odbiorcy (tj. Odbiorca wpłaca pieniądze przed wystawieniem dokumentu faktury). Aby umożliwić rejestrowanie zapłat niepowiązanych należy zaznaczyć check box Zapłaty niepow. na karcie Odbiorcy na zakładce 'Warunki'. Przedpłaty oraz zapłaty niepowiązane otrzymane od Odbiorcy należącego do danej kategorii są księgowane po stronie Ma na tym koncie. Po wystawieniu faktury oraz powiązaniu tej faktury z zapłatą niepowiązaną obciążone zostanie to samo konto Zapłaty niepow. zamiast konta Rozrachunków z odbiorcami. Więcej informacji na temat zapłat niepowiązanych oraz przedpłaty znajdziesz w dalszej części rozdziału.
- Konto Zapłat niepow. można określić na poziomie kategorii; konta nie można określić bezpośrednio na karcie Odbiorcy. Jeśli konto Zapłat niepow. nie zostanie zdefiniowane w kategorii, system wykorzysta konto zdefiniowane w ustawieniu Rozksięgowanie-Sprzedaż na zakładce 'Rozrachunki' w module Księga Sprzedaży.
- Konto Zapłat niepow. można określić na poziomie kategorii; konta nie można określić bezpośrednio na karcie Odbiorcy. Jeśli konto Zapłat niepow. nie zostanie zdefiniowane w kategorii, system wykorzysta konto zdefiniowane w ustawieniu Rozksięgowanie-Sprzedaż na zakładce 'Rozrachunki' w module Księga Sprzedaży.
- Rozrachunki z dostawcami
- polecenie Wstaw
kartoteka Plan kont, moduł Księga Główna/System
- Wstaw odpowienie konto Rozrachunków z dostawcami. Zatwierdzenie faktury zakupu dla Dostawcy należącego do danej kategorii spowoduje uznanie tego konta (odpowiedni zapis po stronie Ma na tym koncie rozrachunków).
- Konto Rozrachunków z dostawcami zostanie wykorzystane, jeśli do karty Dostawcy zostanie przypisana kategoria odbiorcy, ale nie zostanie przypisana kategoria dostawcy. Jeśli konto Rozrachunków z dostawcami zostanie zdefiniowane zarówno do kategorii odbiorcy jak i kategorii dostawcy, do której należy dany Dostawca, to nadrzędne jest konto wprowadzone w kategorii dostawcy. Jeśli konto Rozrachunków z dostawcami nie zostanie zdefiniowane w kategorii lub na karcie Dostawcy, system wykorzysta konto Rozrachunków z dostawcami, konto Płatności niepowiązanych oraz konto got. zdefiniowane w ustawieniu Rozksięgowanie - Zakupy.
- Jeśli w systemie wykorzystywana jest funkcja 'Kontrola zapisu na kontach' to w przypadku problemów z zapisaniem kategorii należy sprawdzić czy podane konto Rozrachunków z dostawcami nie zostało zabezpieczone kontrolą zapisu na kontach. Aby korzystać z funkcji należy zaznaczyć check box 'Kontrola zapisu na kontach' na zakładce 'Rozrachunki' w ustawieniu Rozksięgowanie-Zakupy, a następnie zdefiniować właściwe konta w ustawieniu Kontrola zapisów na kontach z modułów w module System.
- Konto Rozrachunków z dostawcami zostanie wykorzystane, jeśli do karty Dostawcy zostanie przypisana kategoria odbiorcy, ale nie zostanie przypisana kategoria dostawcy. Jeśli konto Rozrachunków z dostawcami zostanie zdefiniowane zarówno do kategorii odbiorcy jak i kategorii dostawcy, do której należy dany Dostawca, to nadrzędne jest konto wprowadzone w kategorii dostawcy. Jeśli konto Rozrachunków z dostawcami nie zostanie zdefiniowane w kategorii lub na karcie Dostawcy, system wykorzysta konto Rozrachunków z dostawcami, konto Płatności niepowiązanych oraz konto got. zdefiniowane w ustawieniu Rozksięgowanie - Zakupy.
- Płatności niepowiązane
- polecenie Wstaw
kartoteka Plan kont, moduł Księga Główna/System
- Konto jest wykorzystywane do księgowania operacji niepowiązanych na rzecz Dostawcy (tj. wpłacamy pieniądze Dostawcy przed wystawieniem dokumentu faktury zakupu). Aby umożliwić rejestrowanie płatności niepowiązanych należy zaznaczyć check box Zapłaty niepow. na karcie Dostawcy na zakładce 'Warunki'. Przedpłaty oraz płatności niepowiązane wysłane Dostawcy należącemu do danej kategorii są księgowane po stronie Wn na tym koncie. Po wystawieniu faktury zakupu oraz powiązaniu tej faktury z płatnością niepowiązaną powstanie zapis po kredycie na kontcie Płatności niepow. zamiast na koncie Rozrachunków z dost.. Więcej informacji na temat płatności niepowiązanych oraz przedpłat znajdziesz w dalszej części rozdziału.
- Konto Płatności niepowiązanych zostanie wykorzystane, jeśli do karty Dostawcy zostanie przypisana kategoria odbiorcy, ale nie zostanie przypisana kategoria dostawcy. Konto Płatności niepowiązanych zdefiniowane bezpośrednio na karcie Dostawcy jest nadrzędne w stosunku do konta wprowadzonego w tym polu. Jeśli konto Płatności niepowiązanych nie zostanie zdefiniowane na karcie Dostawcy lub kategorii do której należy dany Dostawca to system użyje konto Płatności niepowiązanych zdefiniowane w ustawieniu Rozksięgowanie - Zakupy na zakładce 'Rozrachunki'.
Customer Categories - Web Card
This page describes the fields on the 'Web' card of the Customer Category record. Please follow the links below for descriptions of the other cards:- Introduction
- Header
- 'Pricing' card
- 'Accounts' card
- 'Web' card
- 'BI' card
- Assisted Classification Entry
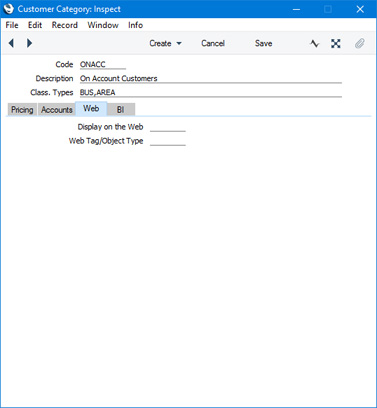
- Display on the Web
- Paste Special
Display on the Web setting, Web Shop and CMS module
- If you are using the Standard ERP Web Shop, you can use the Display on the Web setting to specify how much information about stock levels will be shown to visitors to the web shop, which payment methods will be shown, and whether Delivery Modes will be displayed.
- If you specify a Display on the Web record in this field, this will control the information that will be shown to Customers that belong to the Category after they have logged in. You can also specify Display on the Web records at the Customer level. If you do not specify a Display on the Web record at the Category level or at the Customer level, information will be displayed as follows:
- Stock information will be controlled by the Show Item Stock Levels options in the Webshop Settings setting.
- Payment methods will be controlled by the Webshop Company Settings setting.
- Delivery Modes will be controlled by the Show Delivery Modes option in the Webshop Company Settings setting.
- If you specify a Display on the Web record in this field, this will control the information that will be shown to Customers that belong to the Category after they have logged in. You can also specify Display on the Web records at the Customer level. If you do not specify a Display on the Web record at the Category level or at the Customer level, information will be displayed as follows:
Settings related to Contacts:
- Customer Categories, including:
- Header
- 'Pricing' card
- 'Accounts' card
- 'Web' card
- 'BI' card
- Assisted Classification Entry
- Home page for Customers, Suppliers and Contact Persons manual
- Home page for Standard ERP manual
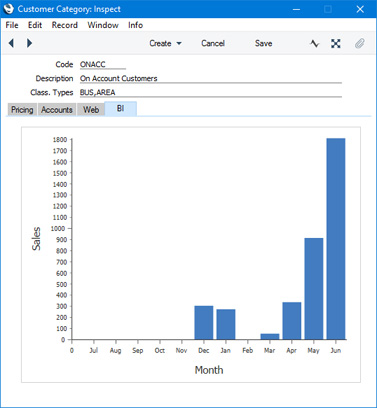
Customer Categories - BI Card
This page describes the 'BI' card of the Customer Category record. Please follow the links below for descriptions of the other cards:- Introduction
- Header
- 'Pricing' card
- 'Accounts' card
- 'Web' card
- 'BI' card
- Assisted Classification Entry
---
Settings related to Contacts:
- Customer Categories, including:
- Header
- 'Pricing' card
- 'Accounts' card
- 'Web' card
- 'BI' card
- Assisted Classification Entry
- Home page for Customers, Suppliers and Contact Persons manual
- Home page for Standard ERP manual
Wprowadzanie klasyfikacji
HansaWorld Enterprise umożliwa organizację rekordów w kartotece Kontrahentów za pomocą ustawień: Kategorie kontahentów oraz Klasyfikacje kontrahentów. Chociaż każdy Kontrahent może należeć tylko do jednej kategorii, to można mu przypisać więcej niż jedną klasyfikację. Klasyfikacje są bardzo uniwersalne. Umożliwiają analizę Kontrahentów na wiele różnych sposobów. Można, na przykład klasyfikować Kontrahentów w podziale na branże oraz lokalizacje.Jeśli w systemie wykorzystywane są oba ustawienia to funkcja Wstaw klasyfikację wspomaga klasyfikowanie Kontrahentów w następujący sposób:
- W nagłówku na karcie kategorii Odbiorcy znajduje się pole Klasyf.. Jeśli podasz typ klasyfikacji (lub kilka typów po przecinku), a następnie przypiszesz kategorię do karty Kontrahenta to system kontroluje, aby przed zapisaniem karty zostały podane właściwe klasyfikacje. Na przykładowo, wszystkim Kontrahentom należącym do poniższej kategorii należy przypisać klasyfikację należącą do typu LOK oraz BRA.
- Wprowadzając kartę Kontrahenta należącego do tej kategorii można wykorzystać polecenie 'Wstaw' (skrót klawiaturowy Ctrl-Enter lub ⌘-Enter) w polu Klasyfikacja. Jednak zamiast standardowej listy podpowiedzi pojawi się okno 'Wstaw klasyfikację':
W oknie 'Wstaw klasyfikację' należy wybrać klasyfikacje należące do dwóch różnych typów. Okno posiada dwa pola, po jednym dla każdej wymaganej klasyfikacji (maksymalna liczba klasyfikacji wymagana przez kategorię to 7).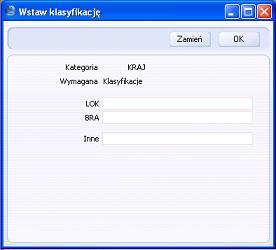
- Wykorzystując polecenie 'Wstaw' w poszczególnych polach okna można wybrać z listy podpowiedzi właściwe klasyfikacje. Można wykorzystać pole Inne, aby wprowadzić dodatkową klasyfikację należącą do innego typu.
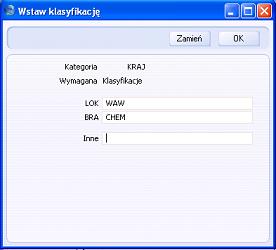
- Klasyfikacja zostanie dopisana do już zdefiniowanych w polu Klasyfikacja, jeśli klikniesz przycisk [OK] w oknie 'Wstaw klasyfikację'. Jeśli klikniesz przycisk [Zamień] wszystkie klasyfikacje zdefiniowane w polu Klasyfikacja zostaną zamienione na nowe.
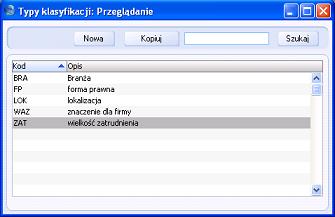
Typy klasyfikacji
Typy klasyfikacji umożliwiają podział klasyfikacji kontrahentów na grupy.Typy klasyfikacji są definiowane w ustawieniach modułu CRM. Kliknij przycisk [Wybierz moduł] w Oknie Głównym i przejdź do modułu CRM. Następnie wybierz 'Ustawienia' z menu Plik lub kliknij przycisk [Ustawienia] w Oknie Głównym. Dwukrotnie kliknij 'Klasyfikacje kontrahentów - typy' na liście dostępnych ustawień.
System wspomaga klasyfikowanie Kontrahentów według różnych typów. Więcej informacji na ten ten temat zobacz: nagłówek ustawienia Kategorie kontrahentów.
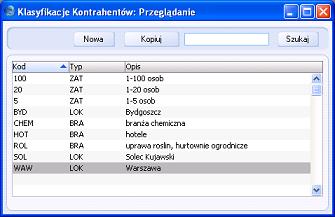
Klasyfikacje kontrahentów
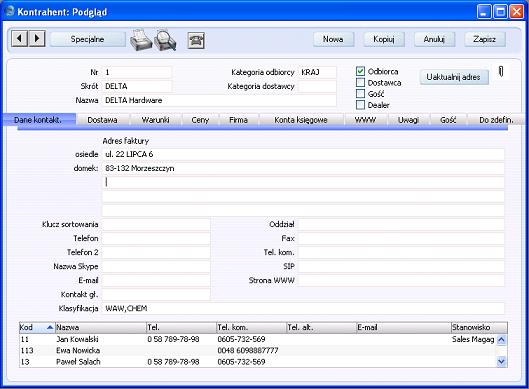
Ustawienie Klasyfikacje kontrahentów w module CRM pozwala zdefiniować dowolną liczbę klasyfikacji, które można wykorzystać przy grupowaniu i klasyfikowaniu Kontrahentów według dowolnie zdefiniowanych kryteriów (region, branża, wielkość zatrudnienia itd.). Klasyfikacje definiuje się na zakładce 'Dane kontakt.' na karcie Kontrahenta. W polu Klasyfikacja można podać po przecinku kilka klasyfikacji. Można, na przykład klasyfikować Kontrahentów w podziale na branże oraz lokalizacje.Ustawienie Klasyfikacje kontrahentów daje inne możliwości klasyfikowania Kontrahentów niż ustawienie Kategorie kontrahentów w Księdze Sprzedaży. Najczęściej wykorzystuje się kategorię do grupowania Kontrahentów ze względu na rodzaj działalności. Do karty Kontrahenta można przypisać tylko jedną kategorię, ale kilka klasyfikacji.
Klasyfikacje kontrahentów są dostępne jako kryterium wyboru w parametrach wielu raportów w module CRM oraz w Księdze Sprzedaży (np. Rejestr sprzedaży VAT- UE). Klasyfikacje wspomagają prowadzenie akcji mailingowych poprzez możliwość wysyłania faksów i listów do wybanej grupy Kontrahentów za pomocą kartoteki Listów kontrahentów w module CRM.
Klasyfikacje można grupować w typy, co ułatwia prowadzenie analiz.
Po zapisaniu karty klasyfikacji nie można zmienić pola Kod. Aby zmodyfikować kod należy wykorzystać ustawienia
Konwersja - Podstawowe oraz Konwersja -Klasyfikacje kontrahentów w module System. Za pomocą ustawień można zmienić kod klasyfikacji w ustawieniu oraz na wszystkich kartach, we wszystkich kartotekach systemu.
Ustawienia kontrahenta
Ustawienie dostępne jest w module Księga Sprzedaży i pozwala zdefiniować domyślne ustawienia, które będą wykorzystywane na kartach w kartotece Kontrahentów.Kliknij przycisk [Wybierz moduł] w Oknie Głównym, a następnie wybierz moduł Księga Sprzedaży. Wybierz 'Ustawienia' z menu Plik lub kliknij przycisk [Ustawienia] w Oknie Głównym. Dwukrotnie kliknij 'Ustawienia kontrahenta' na liście dostępnych ustawień. Pojawi się okno 'Ustawienia kontrahenta:Podgląd':
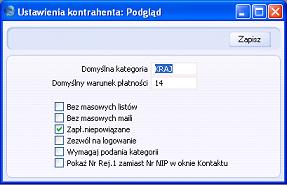
- Domyślna kategoria
- polecenie Wstaw
ustawienie Kategorie kontrahentów, Księga Sprzedaży
- Kategoria wprowadzona w tym polu zostanie domyślnie przypisana do nowej karty Kontrahenta. Kategoria nie zostanie przypisana, jeśli karta zostanie utworzona za pomocą polecenia 'Utwórz osobę kontaktową' z menu Specjalne.
- Domyślny warunek platności
- polecenie Wstaw
ustawienie Warunki płatności, Księga Sprzedaży
- Warunek płatności wprowadzony w tym polu zostanie domyślnie przypisany do nowej karty Kontrahenta w polu War. płatności.
- Bez masowych listów, Bez masowych maili, Zapł.niepowiązane, Zezwól na logowanie
- Wybrane opcje zostaną domyślnie zaznaczone na nowej karcie Kontrahenta.
- Wymagaj podania kategorii
- Zaznacz opcję, jeśli chcesz, aby dla każdego Odbiorcy system wymagał podania kategorii odbiorcy.
- Pokaż Regon zamiast nr NIP w oknie przeglądu
- Zaznacz opcję, jeśli chcesz, aby w oknie 'Kontrahenci:Przeglądanie', 'Wstaw Odbiorcę', 'Wstaw dostawcę' pojawiła się kolumna Regon zamiast kolumny NIP. Aby uruchomić opcję należy zrestartować system.
Customer Status Report
You can use this setting to specify what will be shown in the Customer Status Report when it is produced by different users using the Operations menu function of the 'Customers: Browse', 'Customer: Inspect', 'Contact Persons: Browse' and 'Contact Person: Inspect' windows. The setting has no effect on Customer Status reports produced using the 'Reports' function in the Sales Ledger.You can save a separate record in this setting for each Person, so each user can customise the report to their particular requirements. These records are listed when you double-click 'Customer Status Report' in the 'Settings' list in the CRM module. To create a new record, click the [New] button in the Button Bar, or highlight a record in the list that is similar to the one that you are about to create and click [Duplicate].
The window shown below opens. To save a user's Customer Status Report setting, click the close box and elect to save changes.

- User
- Paste Special
Person register, System module
- Enter the user's initials in the User field, using 'Paste Special' if necessary. Hansa will prevent you from entering more than one record for a particular Person.
Nagłówek
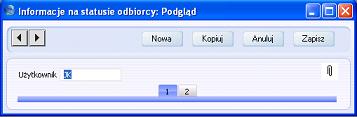
- Użytkownik
- polecenie Wstaw
kartoteka Osoby, moduł System
- Wstaw podpis użytkownika w polu Użytkownik. Aby otworzyć okno podpowiedzi z listą wszystkich osób zdefiniowanych w systemie, wykorzystaj polecenie Wstaw. Dla każdego użytkownika można zdefiniować tylko jedną kartę w ustawieniu.
Customer Status Report - Card 1
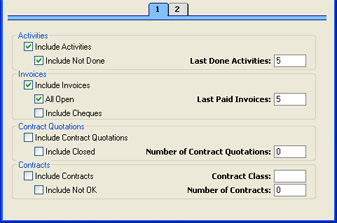
- Include Activities
- Check this box if Done Activities are to be included whenever the user entered to the field in the header produces a Customer Status report. If you want to exclude Activities with particular Activity Types from the report, use the Exclude Activity Types field on card 2.
- Include Not Done
- If Activities that are not Done are to be included as well, check this box. This means Activities of all kinds will be listed. This box has no effect if the Include Activities box is not checked. The Exclude Activity Types field on card 2 also applies to Activities that are not Done.
- Last Done Activities
- Specify here the maximum number of Done Activities that will be shown in the report when produced by the Person in question. The most recent Done Activities will be shown. If the Include Not Done box is checked, all such Activities that are later than the earliest Done Activity will also be shown. Leave the field blank to list all Activities.
- Include Invoices
- Check this box if Invoices are to be listed in Customer Status Reports produced by the Person entered in the User field in the header. You should also specify which Invoices are to be included by checking the All Open box and/or entering a number in the Last Paid Invoices field.
- All Open
- Check this box if open (unpaid) Invoices are to be listed.
- Last Paid Invoices
- If you want paid Invoices to be shown in the report, specify here how many are to be included.
- Include Cheques
- Check this box if you would like cheques received from each Customer to be shown in the report. The Include Invoices and All Open boxes must also be checked, and the Cheques module should be present.
- Include Contract Quotations
- Check this box if Contract Quotations are to be included whenever the user entered to the field in the header produces a Customer Status report.
- Include Closed
- Check this box if you want expired Contract Quotations to be included in the listing.
- Number of Contract Quotations
- Specify here the maximum number of Contract Quotations that will be shown in the report.
- Include Contracts
- Check this box if Contracts are to be included whenever the user entered to the field in the header produces a Customer Status report.
- Contract Class
- Paste Special
Contract Classes setting, Contracts module
- Enter a Contract Class here to restrict the listing to Contracts belonging to that Class.
- Include Not OK
- Check this box if you want Contracts that have not been approved to be included in the listing.
- Number of Contracts
- Specify here the maximum number of Contracts that will be shown in the report.
Customer Status Report - Card 2
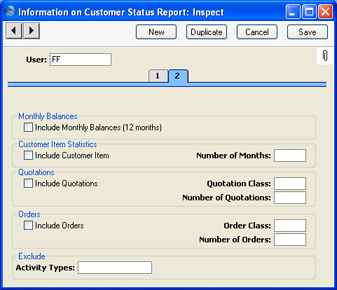
- Include Monthly Balances (12 months)
- Check this box if you want monthly sales totals for the past year to be shown in the report. This information is taken from approved Invoices.
- Include Customer Item, No. of months
- If you want to list the Items purchased by each Customer over a particular period, check the Include Customer Item box and enter the period in the No. of Months field. The check box will have no effect if the No. of Months field is blank. This information is taken from approved Invoices.
- Include Quotations
- Check this box if Quotations are to be included whenever the user entered to the field in the header produces a Customer Status Report. The check box will have no effect if the Number of Quotations field is blank.
- Quotation Class
- Paste Special
Quotation Classes setting, Quotations module
- Enter a Quotation Class here to restrict the listing to Quotations belonging to that Class.
- Number of Quotations
- Specify here the maximum number of Quotations that will be shown in the report, starting with the most recent. No Quotations will be shown if you do not enter a number.
- Include Orders
- Check this box if Orders are to be included whenever the user entered to the field in the header produces a Customer Status Report. The check box will have no effect if the Number of Orders field is blank.
- Order Class
- Paste Special
Order Classes setting, Sales Orders module
- Enter an Order Class here to restrict the listing to Orders belonging to that Class.
- Number of Orders
- Specify here the maximum number of Orders that will be shown in the report, starting with the most recent. No Orders will be shown if you do not enter a number.
- Exclude Activity Types
- Paste Special
Activity Types setting, CRM module
- If you are using the Include Activities and Include Not Done options on card 1, you can choose to remove Activities with particular Activity Types from the report. Enter the Activity Types that you want excluded here, separated by commas.
Info in Customer Status Report - Card 3
This page describes the fields on card 3 of each record in the Info in Customer Status report setting. Please click the following links for descriptions of the other cards:- Introduction
- Header
- Card 1
- Card 2
- Card 3
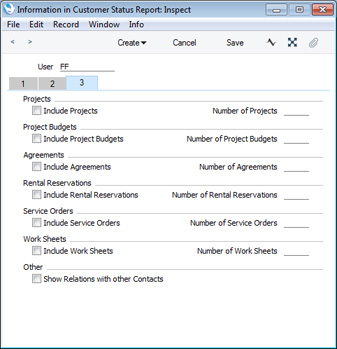
In each case, activate an option by ticking a check box on the left. Then specify the maximum number of records that are to be listed in the report using the field on the right. No records will be listed if you select an option but do not specify a maximum number.
- Show Relations with other Contacts
- This option will list all a Customer's Contact Persons in the Customer Status report. If you print the report to screen, you will be able to open individual Contact Person records using the Drill-down feature.
Settings related to Contacts:
- Introduction
- Customer Categories
- Classification Types
- Contact Classifications
- Contact Settings
- Info in Customer Status Report, including:
- Info in Supplier Status Report
- Job Titles
- Number Series - Contacts
- Supplier Categories
- User Defined Fields - Contacts.
- Home page for Customers, Suppliers and Contact Persons manual
- Home page for Standard ERP manual
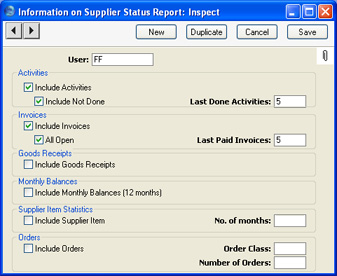
Supplier Status Report
This setting is used to control the appearance of the Supplier Status Report when produced using the Operations menu function of the 'Customers: Browse', 'Customer: Inspect', 'Contact Persons: Browse' and 'Contact Person: Inspect' windows.A separate record can be saved in this setting for each Person, so each user can customise the report to their particular requirements. These records are listed when first double-clicking 'Supplier Status Report' in the 'Settings' list in the CRM module. To create a new record, click the [New] button in the Button Bar, or highlight a record in the list that is similar to the one that you are about to create and click [Duplicate].
The window shown below opens. To save a user's Supplier Status Report setting, click the close box and elect to save changes.
- User
- Paste Special
Person register, System module
- Enter the user's initials in the User field, using 'Paste Special' if necessary. Hansa will prevent you from entering more than one record for a particular Person.
- Include Activities
- Check this box if Done Activities are to be included whenever the user entered to the field in the header produces a Supplier Status report.
- Include Not Done
- If Activities that are not Done are to be included as well, check this box. This means Activities of all kinds will be listed. This box has no effect if the Include Activities box is not checked.
- Last Done Activities
- Specify here the maximum number of Done Activities that will be shown in the report when produced by the Person in question. The most recent Done Activities will be shown. If the Include Not Done box is checked, all such Activities that are later than the earliest Done Activity will also be shown. Leave the field blank to list all Activities.
- Include Invoices
- Check this box if Purchase Invoices are to be listed in Supplier Status Reports produced by the Person entered in the User field in the header. You should also specify which Invoices are to be included by checking the All Open box and/or entering a number in the Last Paid Invoices field.
- All Open
- Check this box if open (unpaid) Invoices are to be listed.
- Last Paid Invoices
- If you want paid Invoices to be shown in the report, specify here how many are to be included.
- Include Goods Receipts
- Check this box if Goods Receipts are to be included whenever the user entered to the field in the header produces a Supplier Status Report.
- Include Monthly Balances (12 months)
- Check this box if you want monthly purchase totals for the past year to be shown in the report. This information is taken from approved Purchase Invoices.
- Include Supplier Item, No. of Months
- If you want to list the Items purchased from each Supplier over a particular period, together with quantities and totals, check the Include Supplier Item box and enter the period in the No. of Months field. The check box will have no effect if the No. of Months field is blank. This information is taken from approved Goods Receipts.
- Include Orders
- Check this box if Purchase Orders are to be included whenever the user entered to the field in the header produces a Supplier Status Report. The check box will have no effect if the Number of Orders field is blank.
- Order Class
- Paste Special
Purchase Order Classes setting, Purchase Orders module
- Enter a Purchase Order Class here to restrict the listing to Purchase Orders belonging to that Class.
- Number of Orders
- Specify here the maximum number of Orders that will be shown in the report, starting with the most recent. No Orders will be shown if you do not enter a number.
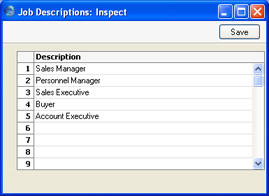
Job Descriptions
This setting is a look-up table used by the Contact Person and Customer Letter registers.You can report on and mail Contacts based on their Job Description. It is therefore recommended that this setting be used not to record actual job titles (which vary from company to company) but generic job descriptions. This would enable you to report on or mail Contacts with similar roles but varying job titles.
On double-clicking 'Job Descriptions' in the 'Settings' list, the following window appears:
Number Series - Contacts
Each Contact has its own unique identifying number, based on a sequential series. When you enter a new Contact, the next number in the sequence will be used. If required, you can have a number of such sequences running concurrently, perhaps representing different types of Contact (e.g. Customer, Supplier or Contact Person) or different departments.Use this setting to define these sequences, or Number Series. The different series should not overlap. If you leave the setting empty, Contact Numbers will start at 1 and continue consecutively. If you want to start from another number, simply specify it in a new Contact record before saving.
Once you have defined number sequences for Contacts, you can optionally use the Number Series Defaults setting in the System module to specify the number sequence that is to be used by default. The first new Contact that you enter will take its Number from the number sequence specified in the Number Series Defaults setting or otherwise from the first valid Number Series in this setting. For a particular Contact, any user can change to the first unused number in any other valid Number Series using 'Paste Special'.
When you save each Contact for the first time, its Contact Number will also be saved in the Number Series Defaults setting. So, if you used 'Paste Special' to change to another Number Series, that Number Series will provide the default Number for the next new Contact.
You should define Number Series - Contacts using the setting in the Sales Ledger. Use the [Module] button in the Master Control panel to enter the Sales Ledger and then click the [Settings] button, also in the Master Control panel. Double-click 'Number Series - Contacts' in the resulting list. The following window appears:
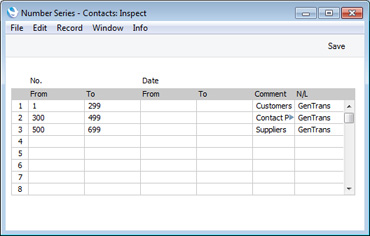
Note that you can only enter numeric characters in the Number Series - Contacts setting, but Contact Numbers can also contain alpha characters. So, you can only set numeric number sequences, but when entering Contacts you can use alpha characters providing you remain within the sequence. For example, if you have a sequence of 1-100, you will be able to use Contact Numbers 1, 1A, 1B, 2 and so on, but not A1 or B1. You will also be able to use Contact Numbers with leading zeros (001, 002 and so on), but you will need to set this format in the first Contact you enter or in the Number Series Defaults setting, not in the Number Series setting. The format will be remembered for subsequent Contacts.
---
Settings related to Contacts:
- Introduction
- Customer Categories
- Classification Types
- Contact Classifications
- Contact Settings
- Info in Customer Status Report
- Info in Supplier Status Report
- Job Titles
- Number Series - Contacts
- Supplier Categories
- User Defined Fields - Contacts.
- Home page for Customers, Suppliers and Contact Persons manual
- Home page for Standard ERP manual
Supplier Categories
Suppliers of a similar type can be grouped together using Supplier Categories. All Suppliers of the same Category can be given the same default Creditor Account, saving you the work of having to specify this for all Suppliers individually.Use the Modules menu to enter the Purchase Ledger and then select 'Settings' from the File menu or click [Settings] in the Master Control panel. Double-click 'Supplier Categories' in the resulting list. The 'Supplier Categories: Browse' window is displayed, showing all Categories previously entered. Click [New] to enter a new record, and [Save] to save it.
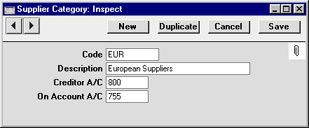
- Code
- Specify a unique code, by which the Supplier Category may be identified from the Supplier screen and elsewhere in Hansa.
- Description
- Enter text describing the Supplier Category here.
- Creditor Account
- Paste Special
Account register, Nominal Ledger/System module
- Specify here the Creditor Account that you wish to be credited by the Nominal Ledger Transactions created when Purchase Invoices are raised for Suppliers of this Category.
- If a Creditor Account is specified both for a Supplier Category and for a Supplier that belongs to that Category, that entered for the Supplier will take precedence. If no Creditor Account is specified for a Category or a Supplier, it will be taken from the Creditor, On Account or Cash Accounts specified in the Account Usage P/L setting.
- If you have Sub-ledger Checking switched on, any Account entered here must first be defined as a Creditor Control Account. Sub-ledger Checking is switched on using the check box on card 1 of the Account Usage P/L setting, and Control Accounts are defined using the Sub-ledger Control Accounts setting in the System module.
- If a Creditor Account is specified both for a Supplier Category and for a Supplier that belongs to that Category, that entered for the Supplier will take precedence. If no Creditor Account is specified for a Category or a Supplier, it will be taken from the Creditor, On Account or Cash Accounts specified in the Account Usage P/L setting.
- On Account A/C
- Paste Special
Account register, Nominal Ledger/System module
- This account is used when you can buy on account from a Supplier ((i.e. when you can pay before you have received the Invoice). To allow this, you must check the On Account check box for each individual Supplier affected (on the 'Terms' card of the Supplier screen). When a purchase is made from account Suppliers in this Category, this Account will be used in place of the default Creditor Account. When a Prepayment or On Account Payment is issued to a Supplier belonging to this Category, it will be debited to this Account. Subsequently, when the Invoice is received and allocated to that Payment, the same Account is credited in place of the default Creditor Account. Please refer to the On Account Payments and Prepayments page for full details of this process.
- If an On Account A/C is specified for an individual Supplier, it will be used in place of the one entered here. If no On Account A/C is specified for a Supplier or for the Category to which it belongs, it will be taken from the On Account A/C specified in the Account Usage P/L setting (card 2).
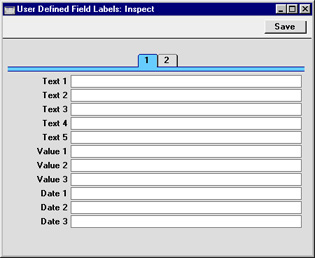
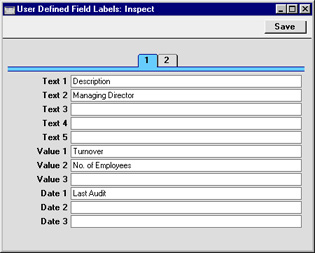
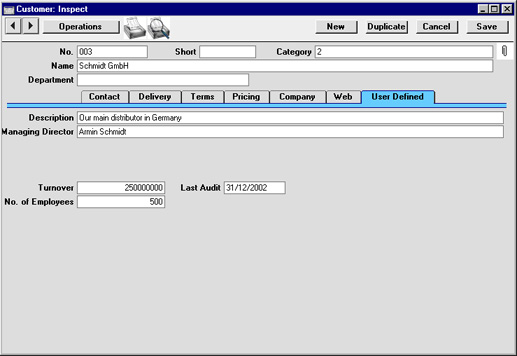
User Defined Fields
The Customer record is capable of storing a sufficient quantity of information to cater for most requirements. However, in some circumstances, it might be necessary to store additional information for which no fields have been provided. The User Defined Fields setting in the CRM module allows you to add your own fields to each Customer record for this purpose. The new fields will be visible on the 'User Defined' card of each Customer record.Use the Modules menu to enter the CRM module and then select 'Settings' from the File menu or click [Settings] in the Master Control panel. Double-click 'User Defined Fields' in the resulting list. The 'User Defined Field Labels: Inspect' window opens. Make changes as required and then click the [Save] button in the Button Bar to save changes and close the window. Click the close box if you do not want to save changes.
User Defined Fields - Card 1
User Defined Fields - Card 2
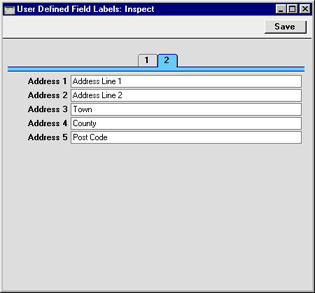
Use card 2 of the 'User Defined Field Labels: Inspect' to name the address fields in each Customer record. When card 2 of the 'User Defined Field Labels: Inspect' window is empty, the address fields on the 'Contact' and 'Delivery' cards of each Customer record are unnamed: