Introduction to Receipts in Standard Accounts
This section describes the Receipt register in Standard Accounts and Standard Stock. If you are using any other Standard product, please click here.---
As important as the invoicing itself is the filing of incoming payments in the Receipts register. It is by keeping the Invoice and Receipt registers up to date that you can operate an efficient debt-chasing system.
Before working with Receipts, you should also look at the following settings and registers:
In this chapter:
- Introduction
- Entering a Receipt
- Checking and Approving Receipts
- Nominal Ledger Transactions from Receipts
- Operations menu
- On Account Receipts
- Correcting Mistakes in Receipts
- Home page for Standard Accounts manual
Entering a Receipt
Open the Receipt register by ensuring you are in the Sales Ledger and clicking the [Receipts] button in the Master Control panel. The 'Receipts: Browse' window is opened, showing Receipts already entered.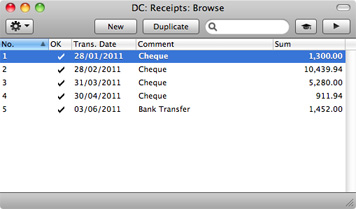
To enter a new Receipt, click [New] in the Button Bar or use the ⌘-N keyboard shortcut. Alternatively, select a Receipt similar to the one you want to enter and click [Duplicate] on the Button Bar.
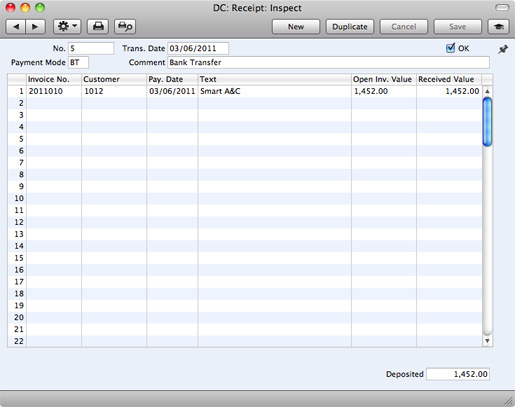
The 'Receipt: New' window is opened, empty if you clicked [New] or containing a duplicate of the highlighted Receipt. In the case of the duplicate, the Transaction Date of the new Receipt will be the current date, not the date of the duplicated Receipt. Complete the Receipt record as described below, then save it using the [Save] button and close the window by clicking the close box. Then, close the browse window using the close box again.
- No.
- Paste Special
Select from another Number Series
- The Receipt Number of a new Receipt is provided automatically by Standard Accounts. The default is the first unused number in the first valid number sequence in the Number Series - Receipts setting. You may change this number, but not to one that has already been used.
- If you have not defined any number sequences in the Number Series - Receipts setting, the Receipt Number sequence will start at 1 and continue consecutively. If you want the sequence to start from another number, change the Receipt Number of a Receipt before saving it: Standard Accounts will then continue the sequence from there.
- If you have not defined any number sequences in the Number Series - Receipts setting, the Receipt Number sequence will start at 1 and continue consecutively. If you want the sequence to start from another number, change the Receipt Number of a Receipt before saving it: Standard Accounts will then continue the sequence from there.
- Trans. Date
- Paste Special
Choose date
- This date will be used as the Transaction Date in the Nominal Ledger Transaction that will result from the Receipt.
- OK
- You can approve a Receipt by checking this box. When you click [Save] to save the Receipt, the Bank or Cash Account specified for the Payment Mode will be debited and the Debtor Control Account of the Invoice(s) being paid will be credited. No further modifications to the Receipt will be possible.
- References in these web pages to approved Receipts are to Receipts whose OK box has been checked (i.e. an approved Receipt is one that is no longer a Draft).
- References in these web pages to approved Receipts are to Receipts whose OK box has been checked (i.e. an approved Receipt is one that is no longer a Draft).
- Payment Mode
- Paste Special
Payment Modes setting, Sales Ledger/Purchase Ledger
- The Payment Mode is the method of payment (e.g. cheque, credit card or cash). It determines the Nominal Ledger Account that will be debited by the Receipt.
You can enter payments from different Customers against different Invoices in a single Receipt. However, you cannot enter payments with different Payment Modes.
The first record listed in the Payment Modes setting will be offered as a default.
- Comment
- Default taken from
Payment Mode
- This text is taken from the Payment Modes setting and will be copied to the Text field in the header of the Nominal Ledger Transaction that will result from the Receipt. You can change it if necessary.
Each record in the Receipt register results in one Nominal Ledger Transaction, with bank or other institution as debit Account (taken from the Payment Mode).
To add a row to a Receipt, click in any field in the first blank row and enter appropriate text. To remove a row, click on the row number on the left of the row and press the Backspace key. To insert a row, click on the row number where the insertion is to be made and press Return.
You can bring several Invoices into a Receipt at once by opening the 'Invoices: Browse' or 'Paste Special' windows, selecting a range of Invoices by clicking while holding down the Shift key, and then dragging them to the Inv. No. field in the first empty Receipt row. You can also copy a list of Invoice Numbers in a spreadsheet or word processor and paste them in the Inv. No. field in the first empty row.
- Inv. No.
- Paste Special
Open, approved Invoices, Invoice register
- The number of the Invoice being paid. When you enter an Invoice Number, the Open Invoice Value (the amount outstanding) will be shown in the Open Inv. Val field, and this figure will also be brought in to the Received Value field as a default.
- Note that when you use 'Paste Special', only unpaid Invoices will appear in the selection list. However, if you have saved a Receipt without approving it (i.e. the Receipt is a Draft), the Invoice(s) in that Receipt will be treated as unpaid and thus will continue to be included in the 'Paste Special' list. It is therefore recommended that you do not leave Receipts as unapproved for too long, to minimise the risk of quoting Invoices in Receipts more than once.
- A Receipt that is a payment made without reference to a specific Invoice (e.g. a deposit paid by the Customer before you have issued them with an Invoice) is known as an "On Account Receipt". Leave this field blank when entering an On Account Receipt, and specify the Customer as usual in the field to the right. The Customer must be one where you are using the On Account option on the 'Terms' card of their Contact record. Please refer to the On Account Receipts page for details.
- Note that when you use 'Paste Special', only unpaid Invoices will appear in the selection list. However, if you have saved a Receipt without approving it (i.e. the Receipt is a Draft), the Invoice(s) in that Receipt will be treated as unpaid and thus will continue to be included in the 'Paste Special' list. It is therefore recommended that you do not leave Receipts as unapproved for too long, to minimise the risk of quoting Invoices in Receipts more than once.
- Customer
- Paste Special
Customers in Contact register
- Default taken from Invoice
- The Customer Number will be placed here automatically when you enter an Invoice Number.
- In the case of an On Account Receipt, choose a Customer using 'Paste Special'.
- The Customer Number will be placed here automatically when you enter an Invoice Number.
- Pay. Date
- The date when the payment was made. This date must be the same as the Transaction Date (in the header) and cannot be changed independently.
- Text
- The Customer's Name will appear here when you enter the Invoice or Customer Number. You can change this text if necessary.
- Open Inv. Val.
- The outstanding amount of the Invoice being paid. This value cannot be changed.
- Received Val
- Default taken from
Open Invoice Value
- The amount paid. You can change the default figure in the event of partial payments or overpayments.
- Deposited
- The sum of the Received Values: the total for this Receipt.
In this chapter:
- Introduction
- Entering a Receipt
- Checking and Approving Receipts
- Nominal Ledger Transactions from Receipts
- Operations menu
- On Account Receipts
- Correcting Mistakes in Receipts
- Home page for Standard Accounts manual
Checking and Approving Receipts
Before approving a Receipt, first check to ensure it contains no mistakes. When you are sure it is correct, you can approve it in one of two ways:- Click the OK check box with the Receipt on screen and then save it by clicking [Save].
- Select a Receipt by clicking on it in the 'Receipts: Browse' window, and select 'OK' from the Operations menu. By holding down the Shift key you can highlight a batch of Receipts to approve at a single stroke using this method.
! | After approving a Receipt, you cannot change it. |
---
In this chapter:
- Introduction
- Entering a Receipt
- Checking and Approving Receipts
- Nominal Ledger Transactions from Receipts
- Operations menu
- On Account Receipts
- Correcting Mistakes in Receipts
- Home page for Standard Accounts manual
Nominal Ledger Transactions from Receipts
When you approve and save a Receipt, a Nominal Ledger Transaction will be generated automatically if you have so determined in the Sub Systems setting in the Nominal Ledger. An example is illustrated below: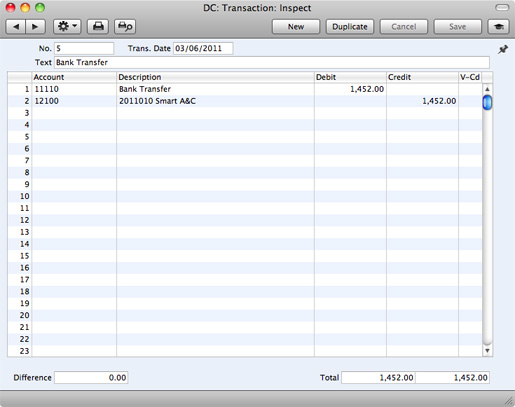
If the Receipt is an On Account Receipt, the On Account A/C specified in the Account Usage S/L setting will be credited instead of the Debtor Account.
The Bank or Cash Account posting will be determined by the Payment Mode that you specify in the Receipt. This will refer to a record in the Payment Modes setting, available in the Sales and Purchase Ledgers. You should list in this setting the various payment methods that you and your Customers use, such as cheque, cash, credit card. You can attach a different Account to each payment method, allowing you to receive payments into different bank and cash accounts.
Once the Transaction has been generated, you can look at it straight away using the 'Open NL Transaction' function on the Operations drop-down menu.
---
In this chapter:
- Introduction
- Entering a Receipt
- Checking and Approving Receipts
- Nominal Ledger Transactions from Receipts
- Operations menu
- On Account Receipts
- Correcting Mistakes in Receipts
- Home page for Standard Accounts manual
Operations Menu

---
In this chapter:
- Introduction
- Entering a Receipt
- Checking and Approving Receipts
- Nominal Ledger Transactions from Receipts
- Operations menu, including:
- On Account Receipts
- Correcting Mistakes in Receipts
- Home page for Standard Accounts manual
Operations Menu - OK
This command is only available on the Operations menu for the 'Receipts: Browse' window. It allows you to approve a Receipt and is therefore the equivalent of checking the OK box in a Receipt record and saving it. You can also select several Receipts (hold down the Shift key to select a range of Receipts in the list) and approve them all at once. Remember that, if so defined in the Sub Systems setting in the Nominal Ledger, this action will cause a separate Nominal Ledger Transaction to be created for each Receipt in the selection and therefore once it has been carried out you will no longer be able to modify those Receipts.---
In this chapter:
- Introduction
- Entering a Receipt
- Checking and Approving Receipts
- Nominal Ledger Transactions from Receipts
- Operations menu, including:
- On Account Receipts
- Correcting Mistakes in Receipts
- Home page for Standard Accounts manual
Operations Menu - Add Write-off
You can use this function to write off an Invoice. First, specify the Invoice to be written off in a new Receipt row and change the Received Value to zero. If you need to record a partial payment and wish to write off the remainder, change the Received Value to the value of the partial payment. Move the insertion point out of the Received Value field, but make sure it remains in the same row, then select this function. A new row will be created, containing the phrase "Writeoff". The Received Value field in this new row will be set to the remaining outstanding amount (i.e. the amount that is to be written off). You can change this figure if you do not want to write off the entire outstanding amount. Approve and save the Receipt in the usual way. When the Nominal Ledger Transaction is created, the Write Off Account specified in the Account Usage S/L setting will be debited.---
In this chapter:
- Introduction
- Entering a Receipt
- Checking and Approving Receipts
- Nominal Ledger Transactions from Receipts
- Operations menu, including:
- OK
- Add Write-off
- Open NL Transaction
- OK
- On Account Receipts
- Correcting Mistakes in Receipts
- Home page for Standard Accounts manual
Operations Menu - Open NL Transaction
When you approve and save a Receipt, a Nominal Ledger Transaction will be created if so defined in the Sub Systems setting in the Nominal Ledger. This function allows you to view that Transaction.When you select the function, the Transaction will be opened in a new window.
---
In this chapter:
- Introduction
- Entering a Receipt
- Checking and Approving Receipts
- Nominal Ledger Transactions from Receipts
- Operations menu, including:
- OK
- Add Write-off
- Open NL Transaction
- OK
- On Account Receipts
- Correcting Mistakes in Receipts
- Home page for Standard Accounts manual
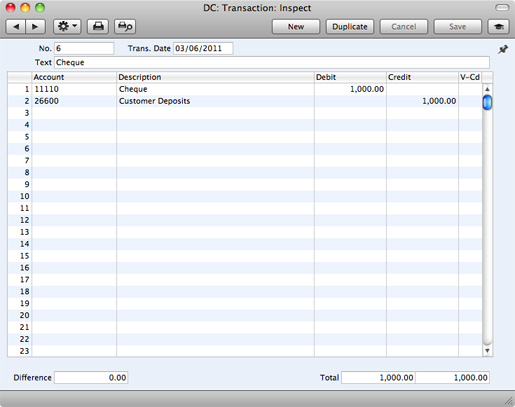
On Account Receipts
You can use On Account Receipts when you receive payments from Customers without reference to specific Invoices (usually before you have raised the Invoices). You can enter these payments to the Receipt register in the normal way but without specifying an Invoice Number:


In this chapter:
- Introduction
- Entering a Receipt
- Checking and Approving Receipts
- Nominal Ledger Transactions from Receipts
- Operations menu
- On Account Receipts
- Correcting Mistakes in Receipts
- Home page for Standard Accounts manual
Correcting Mistakes in Receipts
Even with the tightest quality control, it is probable that you will make an occasional mistake when entering Receipts. Once you have approved a Receipt, you cannot change it, but you can correct mistakes easily using the following procedure. It is important that you follow this procedure, to ensure the Customer's payment history remains correct.- In the 'Receipts: Browse' window, highlight the Receipt containing the error.
- Click [Duplicate]. A new Receipt record is created, an exact copy of the Receipt with the error.
- Insert a minus sign in front of the Received Value, ensuring the Received Value figure itself remains unchanged.
- Click the OK check box and save the Receipt.
- Enter a new, correct, Receipt.
In this chapter:
- Introduction
- Entering a Receipt
- Checking and Approving Receipts
- Nominal Ledger Transactions from Receipts
- Operations menu
- On Account Receipts
- Correcting Mistakes in Receipts
- Home page for Standard Accounts manual