Introduction to Customers, Vendors and Contact Persons in Books by HansaWorld
Information about your Customers, Vendors, Contact Persons and all other companies and individuals with whom you have some contact is stored in the Contact register. You only need maintain a single record for a company who is both a Customer and a Vendor.Throughout this manual, the terms "Customer" and "Vendor" are used to refer to records in the Contact register. Those records do not necessarily represent firms that have purchased goods or services from your business, or sold goods or services to you, and in fact can represent any company that is a potential customer or vendor. As soon as contact is established between your business and a potential client or vendor, you should record their details in the Contact register. Mark the record as a Customer or a Vendor or both using the check boxes in the header, depending on their potential or actual relationship to your company. These check boxes will allow you to use the record in sales or purchase transactions as appropriate.
The term "Customer" is usually used when describing the use of a record in the Contact register in a sales context, while "Vendor" is used in a purchase context. "Vendor" implies that the Vendor box in the header of the Contact record has been checked.
The term "Contact Person" is used in this manual when referring to an individual person: this may be a private individual or someone who works for a Customer or Vendor. In the latter case, you will have separate records in the Contact register for the Customer or Vendor and for the individual Contact Person.
The term "Contact" is used in this manual when referring to any record in the Contact register. A Contact can therefore be a Customer, a Vendor or a Contact Person.
On the sales side, you can group Customers of a similar type together using Customer Categories. You will often be able to report on the Customers belonging to a particular Category. Before entering Customers, therefore, it is recommended that you enter some Customer Categories. Customer Categories are described here.
Similarly, on the purchase side you can group Vendors of a similar type together using Vendor Categories. Every Vendor belonging to the same Category will be given the same default Creditor Account, saving you the work of having to specify this for each one individually. A company that is both a Customer and Vendor can belong both to a Customer Category and to a Vendor Category. Before entering Vendors, therefore, it is recommended that you enter some Vendor Categories. Vendor Categories are described here.
Before working with Contacts, you should also look at the following settings and registers:
In this chapter:
- Introduction
- Entering a Contact
- Editing a Contact
- Deleting a Contact
- Contact Persons
- Operations menu
- The 'Business Communicator' Window - Making Contact
- Home page for Books by HansaWorld manual
Entering a Contact
The Contact register is available in the Receivables and Payables modules. To work with Contacts, use the [Module] button in the Master Control panel to enter either of these modules, and then open the Contact register by clicking the [Contacts] button, also in the Master Control panel. The 'Contacts: Browse' window is opened, showing a list of Contacts already entered. To create a new Contact, click the [New] button above the list or use the ⌘-N or Ctrl-N keyboard shortcut. Alternatively, highlight a Contact similar to the one you want to enter and click [Duplicate] (or use ⌘-Y/Ctrl-K).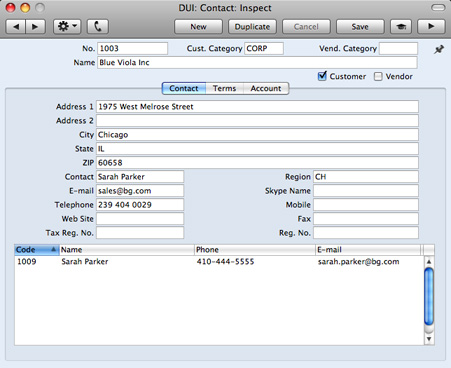
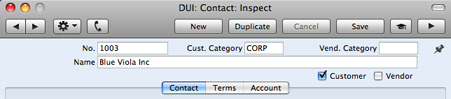
Since the amount of information stored about each company will not fit in a single window, the 'Contact: New' window is divided into three cards. At the top of each is the header. This contains the Contact Number and Name, the Customer and Vendor Categories, and the Customer and Vendor check boxes. There are three named buttons ('tabs') in the header.

---
In this chapter:
- Introduction
- Entering a Contact, including:
- Editing a Contact
- Deleting a Contact
- Contact Persons
- Operations menu
- The 'Business Communicator' Window - Making Contact
- Home page for Books by HansaWorld manual
Entering a Contact - Header
- No.
- Enter the unique code you are assigning to the Contact: this is the means by which this Contact will be identified elsewhere in Books by HansaWorld. The field holds up to 20 letters and/or numbers. A default will be offered, based on the Contact Number of the previous record entered.
- Once you have saved the record, you cannot change the Contact Number simply by typing into the field. If you need to change a Contact Number, use the Conversions - Master and Conversions - Contacts settings in the System module. These settings will change the Contact Number both here and in all other registers where the Contact has been used.
- Once you have saved the record, you cannot change the Contact Number simply by typing into the field. If you need to change a Contact Number, use the Conversions - Master and Conversions - Contacts settings in the System module. These settings will change the Contact Number both here and in all other registers where the Contact has been used.
- Cust. Category
- Paste Special
Customer Categories setting, Receivables module
- Vendor Category
- Paste Special
Vendor Categories setting, Payables module
- If the company is a Customer, you can assign it to a Customer Category. If it is a Vendor, you can assign it to a Vendor Category.
- Customer Categories enable you to classify similar Customers together. Several reports allow you to list Customers belonging to a particular Category.
- Vendor Categories enable you to classify similar Vendors together. All Vendors belonging to the same Category can use the same default Creditor Account, saving you the work of having to specify this for each Vendor individually.
- Customer Categories enable you to classify similar Customers together. Several reports allow you to list Customers belonging to a particular Category.
- Name
- Enter the Name of the Contact.
- If you want the Customer Name to be printed as part of the address in all documents, use the Organization Name option in the Form Settings setting in the System module.
- If you want the Customer Name to be printed as part of the address in all documents, use the Organization Name option in the Form Settings setting in the System module.
- Customer, Vendor
- Mark the Contact as a Customer or Vendor or both as appropriate, using the check boxes at the top of the window. If the Contact is a Contact Person who works for a Customer or Vendor company, do not check either of these boxes unless the Contact Person is also a Customer or Vendor in a private capacity.
- Marking the Contact as a Customer or Vendor does not necessarily mean it has purchased goods or services from your business, or sold goods or services to you: the company can also be a potential customer or vendor to your business.
- If you have marked a Contact as a Customer only, you will be able to use it in Sales Invoices and Receipts, but not in any purchase registers. Similarly, if you have marked it as a Vendor only, you will be able to use it in Purchase Invoices and Payments, but not in any sales registers.
- If you originally opened the Contact register in the Receivables module, the new record will be marked as a Customer automatically. If you originally opened the Contact register in the Payables module, the new record will be marked as a Vendor automatically. Similarly, if you created the new record by clicking the [New] button in the 'Paste Special' window listing Contacts, these check boxes will be set automatically depending on the context. For example, if you enter a Sales Invoice, activate 'Paste Special' from the Customer field and click [New], the new record will be marked as a Customer.
- Once you have marked a company as a Customer and you have issued at least one Sales Invoice to that company, you will not be able to remove the check from the Customer box. Similarly, if you have marked a company as a Vendor and you have received at least one Purchase Invoice from that company, you will not be able to remove the check from the Vendor box.
- Throughout this manual (including in the index), the term "Customer" has been used when referring to Contacts marked as Customers, and the term "Vendor" refers to Contacts marked as Vendors.
- Marking the Contact as a Customer or Vendor does not necessarily mean it has purchased goods or services from your business, or sold goods or services to you: the company can also be a potential customer or vendor to your business.
In this chapter:
- Introduction
- Entering a Contact, including:
- Editing a Contact
- Deleting a Contact
- Contact Persons
- Operations menu
- The 'Business Communicator' Window - Making Contact
- Home page for Books by HansaWorld manual
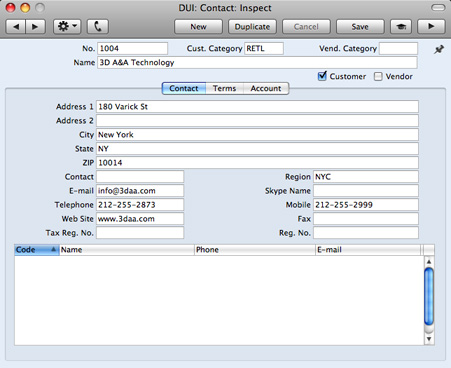
Entering a Contact - Contact Card
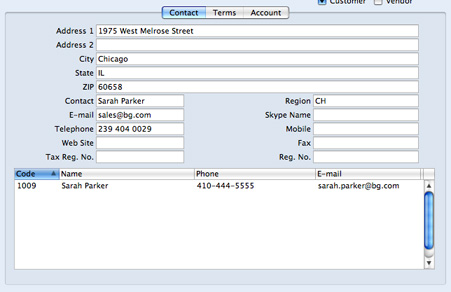
- Address
- Enter here the address to which Invoices, statements and Payments are to be sent.
- Contact
- Paste Special
Contact Persons in Contact register
- Used as default in Sales Invoices
- If the Contact is a company or organization (i.e. not an individual person), enter here the name of your most important Contact Person working there. This person is your "Primary Contact". If you need to add the names of more Contact Persons who work for the company, use the 'Create Contact' function on the Operations menu.
- When you use the Contact in any transaction, the Primary Contact will be copied to that transaction as a default. For example, if you specify the Contact in a Sales Invoice as the Customer, its Primary Contact will be copied to the Attn. field in that Invoice. You can of course change to another Contact Person in that Attn. field. The 'Paste Special' list from that field will only contain Contact Persons that work for the Customer.
- Please refer to the Contact Persons page for more details.
- If the Contact is a company or organization (i.e. not an individual person), enter here the name of your most important Contact Person working there. This person is your "Primary Contact". If you need to add the names of more Contact Persons who work for the company, use the 'Create Contact' function on the Operations menu.
- Region
- Paste Special
Regions setting, Receivables module
- The Region (e.g. the state, province or county) where the Contact is located. If the Contact is a Customer, this will be copied to the Region field in all Invoices. This will be useful if you are situated in a country where sales taxes vary depending on where Customers are located.
- Telephone, Mobile, Fax, E-mail, Skype Name
- Enter the Contact's main telephone, cell phone and fax numbers, email address and Skype name here.
- If you need to call the Contact, click the [Communicate] button in the Button Bar:
The 'Business Communicator' window opens, showing the Contact's contact details in the area on the right:
Subject to your computer or network having the suitable connection software and hardware, click on a contact method in the area on the right, and then click the appropriate button. For more details, please click here.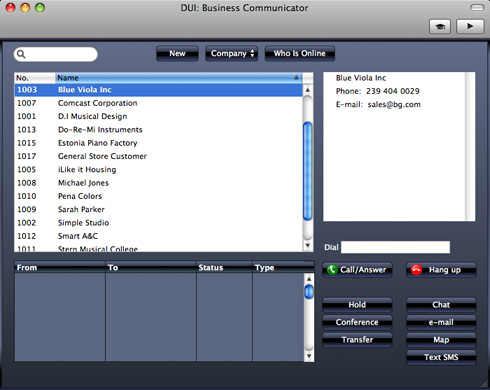
- If you will use the 'Business Communicator' window to communicate with the Contact using SkypeOut, the Contact's telephone and mobile numbers can only contain numbers, spaces, dashes and the + sign. They must not contain other characters such as periods, brackets or any alpha characters.
- If you need to call the Contact, click the [Communicate] button in the Button Bar:
- Web Site
- If the Contact has a website, enter its address (URL) here.
- Tax Reg No.
- Record the Contact's Tax Registration Number here.
- When you save the record, there will be a check that you have not already used the Tax Registration Number in another Contact record. If you have, you will be warned, but you will still be able to save the record. The warning will contain the Contact Number of the other company.
- When you save the record, there will be a check that you have not already used the Tax Registration Number in another Contact record. If you have, you will be warned, but you will still be able to save the record. The warning will contain the Contact Number of the other company.
- Reg No
- If the Contact is a company with a Company Registration Number, enter that Number here.
- When you save the record, there will be a check that you have not already used the Company Registration Number in another Contact record. If you have, you will be warned, but you will still be able to save the record. The warning will contain the Contact Number of the other company.
---
In this chapter:
- Introduction
- Entering a Contact, including:
- Editing a Contact
- Deleting a Contact
- Contact Persons
- Operations menu
- The 'Business Communicator' Window - Making Contact
- Home page for Books by HansaWorld manual
Entering a Contact - Terms Card

- Sales Credit Limit
- If the Contact is a Customer, specify here the Credit Limit that you have granted to them. You can use the Credit Limit setting in the Receivables module to warn against or prevent the entering of Invoices for Customers who have exceeded their Credit Limit.
- If you want to allow a company no credit at all, set their Sales Credit Limit to 0.01.
- If you want to allow a company no credit at all, set their Sales Credit Limit to 0.01.
- Purch. Credit Limit
- If the Contact is a Vendor, specify the Credit Limit extended to your company by them here. This is for information only.
- Sales Pay. Terms
- Paste Special
Payment Terms setting, Receivables/Payables modules
- Used as default in Sales Invoices
- Purch. Pay. Terms
- Paste Special
Payment Terms setting, Receivables/Payables modules
- Used as default in Purchase Invoices
- If the Contact is a Customer, use the Sales Pay. Terms field to specify the Payment Terms that your company offers them. If the Contact is a Vendor, use the Purch. Pay. Terms field to specify the Payment Terms that they offer your company. These Terms will be copied to Sales and Purchase Invoices, where they will ensure that the Due Dates are calculated correctly.
- If the Contact is a Customer, use the Sales Pay. Terms field to specify the Payment Terms that your company offers them. If the Contact is a Vendor, use the Purch. Pay. Terms field to specify the Payment Terms that they offer your company. These Terms will be copied to Sales and Purchase Invoices, where they will ensure that the Due Dates are calculated correctly.
- Sales Tax Code
- Paste Special
Tax Codes setting, General Ledger
- Purch. Tax Code
- Paste Special
Tax Codes setting, General Ledger
- If the Contact is a Customer, the Sales Tax Code will determine the rate at which Tax will be charged in sales to the Contact and the Output Tax Account to be credited.
- When you create Sales Invoices for the Customer, this Sales Tax Code will take precedence over the Tax Codes specified in the Item and in the Account Usage A/R setting in the Receivables module.
- If the Contact is a Vendor, the Purch. Tax Code will determine the rate at which Tax will be charged to you by the Contact and the Input Tax Account to be debited.
- When you enter Purchase Invoices for the Vendor directly to the Purchase Invoice register, this Purch. Tax Code will take precedence over the Tax Codes specified in the Account record and in the Account Usage A/P setting in the Payables module.
- When you create Sales Invoices for the Customer, this Sales Tax Code will take precedence over the Tax Codes specified in the Item and in the Account Usage A/R setting in the Receivables module.
- Price List
- Paste Special
Price Lists setting, Receivables module
- Used as default in Invoices
- If the Contact is a Customer and you wish to assign a particular Price List to them, you can do so here. This Price List will determine the default prices in Sales Invoices made out to the Customer.
- Please refer to the Price Lists and Prices page for full details about how to use this feature.
- If the Contact is a Customer and you wish to assign a particular Price List to them, you can do so here. This Price List will determine the default prices in Sales Invoices made out to the Customer.
- On Account
- Check this box if the Contact is a Customer from whom you want to be able to receive On Account Receipts (i.e. you want to allow them to pay before you have invoiced them) and/or the Contact is a Vendor to whom you want to be able to issue On Account Payments (i.e. to be able to pay them before you receive Invoices). On Account Receipts are described here and On Account Payments here.
- Before you can enter On Account Receipts, you must specify an On Account A/C in the Account Usage A/R setting in the Receivables module. This Account will be credited with the value of these Receipts.
- On the purchase side, before you can enter On Account Payments, you must specify an On Account A/C in the Account Usage A/P setting in the Payables module. This Account will be debited with the value of these Payments.
- Before you can enter On Account Receipts, you must specify an On Account A/C in the Account Usage A/R setting in the Receivables module. This Account will be credited with the value of these Receipts.
- Closed
- Check this box if the Contact is no longer to be used (if the Contact is a Customer or Vendor, you cannot delete it altogether if Sales or Purchase Invoices have been raised in their name). Closed Contacts will appear in the 'Contacts: Browse' window but not in the Contacts 'Paste Special' list. You will not be able to enter Sales or Purchase Invoices for closed Customers or Vendors. You can re-open a closed Contact at any time.
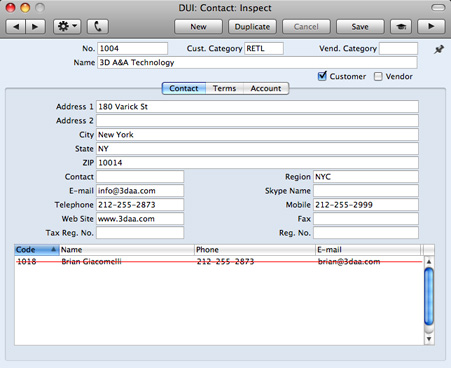
- If the Closed Contact is a Contact Person working for a Customer or Vendor company, they will still appear in the list of people working for that company at the bottom of the 'Contact' card, but a red line will be drawn through their name and details. They will not appear in the 'Paste Special' list of Contact Persons obtained from the Primary Contact and Attn. fields in various registers.
- If the Closed Contact is a Contact Person working for a Customer or Vendor company, they will still appear in the list of people working for that company at the bottom of the 'Contact' card, but a red line will be drawn through their name and details. They will not appear in the 'Paste Special' list of Contact Persons obtained from the Primary Contact and Attn. fields in various registers.
- Type
- Use these options to specify whether the Contact is a company or a private individual.
In this chapter:
- Introduction
- Entering a Contact, including:
- Editing a Contact
- Deleting a Contact
- Contact Persons
- Operations menu
- The 'Business Communicator' Window - Making Contact
- Home page for Books by HansaWorld manual
Entering a Contact - Account Card
- Comment
- Record here any additional information about the Contact.
- Bank
- This field is used by the 'Banking File' Export function. Please refer to your local Books by HansaWorld representative for details.
- Bank Account
- Enter the Contact's main bank account number here. If the Contact is a Vendor, this bank account number will be transferred to any Purchase Invoices and Payments entered in their name.
- Creditor A/C
- Paste Special
Account register, General Ledger/System module
- If the Contact is a Vendor and you want to use a particular Creditor Account, enter its Account number here.
- If you leave this field empty the Creditor Account will be taken from the Vendor Category or from the Account Usage A/P setting.
- If you leave this field empty the Creditor Account will be taken from the Vendor Category or from the Account Usage A/P setting.
- Cost A/C
- Paste Special
Account register, General Ledger/System module
- If the company is a Vendor, you can determine that a particular Cost Account (i.e. Purchase Account) will be offered as a default in the first Purchase Invoice row whenever you enter a new Purchase Invoice. This can be useful in the cases of specialist Vendors and of Vendors of services such as electricity or telephone services, whose Purchase Invoices are usually debited to the same Account.
- If you want to set a default Cost Account for this Vendor, enter its Account Number here.
- If you want to set a default Cost Account for this Vendor, enter its Account Number here.
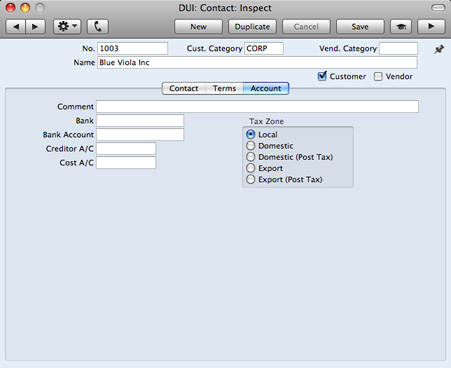
- Tax Zone
- Used as default in
Sales and Purchase Invoices
- Select a Zone for the Contact, as follows:
- Local
- The Contact is located in the your state.
- Domestic
- The Contact is located in the United States, but not in your state.
- Export
- The Contact is located abroad.
- The Zone will be used in all sales and purchase transactions to control Tax calculation and accounting.
- On the sales side, you can assign separate default sales Tax Codes and Sales Accounts to each Zone in the Account Usage A/R setting in the Receivables module.
- When you raise Sales Invoices for Customers in the "Domestic" and "Export" Zones, Tax will not be charged, irrespective of the Tax Code specified for those Zones in the Account Usage A/R setting. If you want Tax to be calculated and credited to the Output Account from the Tax Code in the normal way, place these Customers in the Domestic (Post Tax)" and "Export (Post Tax)" Zones.
- On the Purchase side, you can assign separate default purchase Tax Codes to each Zone in the Account Usage A/P setting in the Payables module.
- Tax will not be calculated on Purchase Invoices received from Vendors in the "Export" Zone. If the Vendor is in the "Domestic" Zone, Tax from Purchase Invoices will be debited to the Input Account from the Tax Code and credited to the Output Account from the Tax Code. For this reason, it is recommended that you use a dedicated Tax Code for Tax on domestic purchases, with Input and Output Accounts that are not used in any other Tax Code. The full Invoice amount will be debited to the Cost Account. If you want Tax to be calculated in the normal way, with no posting to the Output Account and with the total excluding Tax being debited to the Cost Account, place your Vendors in the Domestic (Post Tax)" and "Export (Post Tax)" Zones.
- The Zone will be used in all sales and purchase transactions to control Tax calculation and accounting.
- Local
In this chapter:
- Introduction
- Entering a Contact, including:
- Editing a Contact
- Deleting a Contact
- Contact Persons
- Operations menu
- The 'Business Communicator' Window - Making Contact
- Home page for Books by HansaWorld manual
Editing a Contact
To edit a Contact, first ensure you are in the Receivables or Payables modules and then open the Contact register by clicking the [Contacts] button in the Master Control panel.The 'Contacts: Browse' window opens, listing the Contacts in Contact Number order. Change the sort order by clicking on one of the column headings: the blue heading shows the current sort order.
To search for a specific Contact, first sort the list by the column that you want to use for the search. Then, enter the text that you want to find in the Search field in the top right-hand corner of the window and press Return. For example, to search for a particular Contact Name, sort by Name before entering a Contact Name (or its first few characters) in the Search field.
To modify a Contact record, double-click on the line in the browse window. The Contact record will be opened in a window entitled 'Contact: Inspect'. The fields in this window are the same as those in the 'Contact: New' window: please refer here for a detailed description of each field.
Edit the fields as necessary. Move from field to field using the Tab, Enter or Return keys, using the arrow keys, or using the mouse. Click the [Save] button when you have finished, to save changes.
You can also edit a Contact from another register. For example, when entering an Invoice, you might realize that your information about the Customer is out of date (they might have changed their address or telephone number, for example). Place the insertion point in the Customer field in the Invoice and press ⌘-Shift-V. The Contact record for the Customer opens, allowing you to make the necessary changes. You can also do this from the 'Paste Special' list, when you are choosing the Customer for the Invoice.
---
In this chapter:
- Introduction
- Entering a Contact
- Editing a Contact
- Deleting a Contact
- Contact Persons
- Operations menu
- The 'Business Communicator' Window - Making Contact
- Home page for Books by HansaWorld manual
Deleting a Contact
- Find the Contact you want to delete in the 'Contacts: Browse' window, using the Search feature described here.
- Double-click the Contact record to open it.
- Select 'Delete' from the Record menu. The Contact will be deleted.
You cannot delete a Contact if you have used it in an Invoice or Purchase Invoice.
! | You cannot undo the deletion of a Contact record. |
---
In this chapter:
- Introduction
- Entering a Contact
- Editing a Contact
- Deleting a Contact
- Contact Persons
- Operations menu
- The 'Business Communicator' Window - Making Contact
- Home page for Books by HansaWorld manual
Contact Persons
Customers, Vendors and Contact Persons are all stored in the Contact register. On this page, we describe linking Contact Persons to the company they work for.- The first step is to enter a Contact record representing the company. Mark the company as a Customer or Vendor or both, as appropriate. Ensure you save this record before moving to step 2.
- The next step is to enter a Contact record representing a person working for the company (i.e. a Contact Person). Choose 'Create Contact' from the Operations menu. A new record will be created in the Contact register and will be opened in a new window entitled 'Contact: Inspect'. This means the record has already been saved and is being opened to allow you to enter the Contact Person's name and contact details if these are different to those of the parent company:
The address details, telephone and fax will be copied from the parent company. Enter the Contact Person's name and appropriate contact information. As the Contact Person works for a company that has been marked as a Customer or a Vendor, you should not check these boxes in the Contact Person record.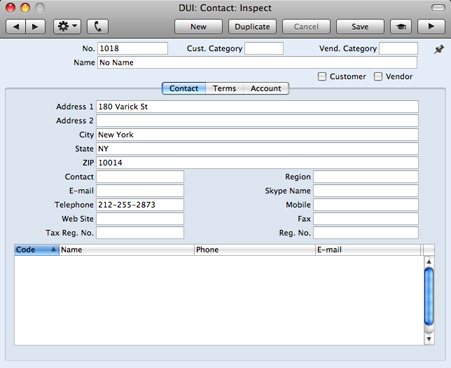
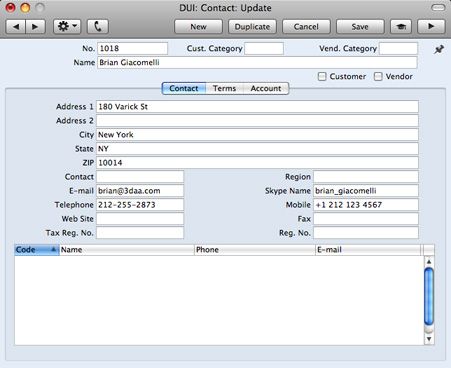
- Save the Contact Person and close the record by clicking the close box. The Contact Person is now included in the list at the bottom of the 'Contact' card of the parent company's Contact record:
This list will contain all the Contact Persons working for the Customer or Vendor. As with all lists in Books by HansaWorld, you can sort this one by clicking on a column heading. If you need to open the Contact record of a Contact Person, double-click a line in this list.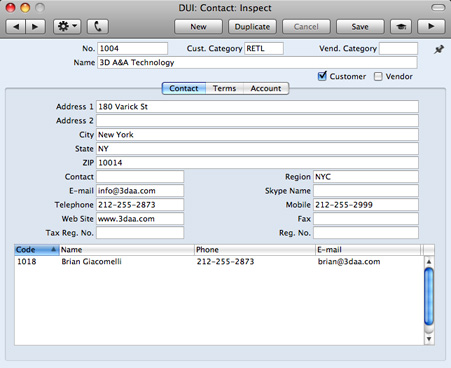
- If a Contact Person stops working for a Customer or Vendor, you can delete the Contact record for the Contact Person. Alternatively, you can mark the Contact Person as Closed. The link between the Contact Person and the Customer or Vendor will remain, but the Contact Person will be marked with a red line, as illustrated below. The Contact Person will no longer appear in 'Paste Special' lists. This method will not be suitable if the Contact Person moves to another Customer or Vendor, or works for more than one at the same time. It closes the Contact Person as a whole, so they will not appear in 'Paste Special' lists for the new or second companies.
- Once you have entered a Customer or Vendor and all its Contact Persons, you can work with them quickly and easily. For example, when you enter a Sales Invoice, only Customers will be shown in the 'Paste Special' list from the Customer field:
When you enter a Purchase Invoice, only Vendors will be shown in the 'Paste Special' list from the Vendor field: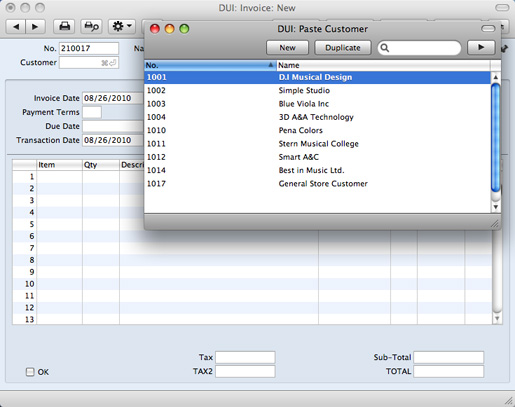
In most records, you can choose a Contact Person as well as a Customer or Vendor. The Primary Contact from the 'Contact' card of the Customer or Vendor will be brought in as a default. To choose a different Contact Person, activate 'Paste Special' from the Contact or Attn. field (the name of this field varies depending on the register):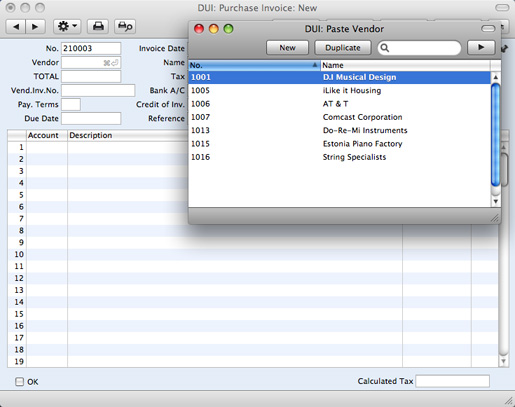
This list will only contain Contact Persons that work for the Customer or Vendor. Closed Contact Persons will not be included in the list. The Primary Contact from the 'Contact' card of the Customer or Vendor will be included in the list, but will not be listed twice if you have a separate Contact record for that Person.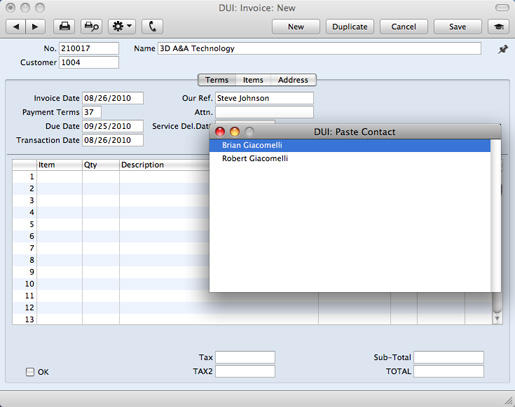
In this chapter:
- Introduction
- Entering a Contact
- Editing a Contact
- Deleting a Contact
- Contact Persons
- Operations menu
- The 'Business Communicator' Window - Making Contact
- Home page for Books by HansaWorld manual
Operations Menu

---
In this chapter:
- Introduction
- Entering a Contact
- Editing a Contact
- Deleting a Contact
- Contact Persons
- Operations menu, including:
- The 'Business Communicator' Window - Making Contact
- Home page for Books by HansaWorld manual
Customer Status
You can use the 'Customer Status' function with Contacts that are Customers. It prints to screen a Customer Status report, which shows the current account status of the Customer currently on screen or of those Customers highlighted in the browse window.In its basic form, this report will first show the Customer Number, Name and telephone number. The five most recently paid Invoices will then be listed, as will all open (unpaid) Invoices.
You can have more information shown in the report. To have this extra information shown in the report, create a record for yourself in the Info on Customer Status Report setting in the Receivables module. As you can create separate records in this setting for each user, you can control how much of this additional information will be shown to different users. You can effectively give each user a different report definition.
Simply creating a record for yourself in the Info on Customer Status Report setting will add the Customer's address, Credit Limit and turnover for the first period in the Reporting Periods setting to the top of the report. The remainder of the report will then follow the specification in your Info on Customer Status Report record.
If the appearance of the Customer Status report is not as you expect (i.e. the Customer's address, Credit Limit and turnover are not shown, and the report only lists Invoices), the probable cause is that you do not have a record in the Info on Customer Status Report setting.
The Customer Status report has the Books by HansaWorld Drill-down feature. You can open Contacts and Invoices from the report by clicking on the Contact Numbers and Names and on Invoice Numbers. Text with the drill-down feature is shown underlined in the report.
The function will have no effect if you try to use it with a Contact that is not marked as a Customer.
---
In this chapter:
- Introduction
- Entering a Contact
- Editing a Contact
- Deleting a Contact
- Contact Persons
- Operations menu, including:
- Customer Status
- Vendor Status
- Create Contact
- Customer Status
- The 'Business Communicator' Window - Making Contact
- Home page for Books by HansaWorld manual
Vendor Status
You can use the 'Vendor Status' function with Contacts that are Vendors. It prints to screen a Vendor Status report, which shows your current account status with the Vendor currently on screen or with those highlighted in the browse window. It also shows total turnover and amount due figures. The function will have no effect if you try to use it with a company that is not marked as a Vendor.---
In this chapter:
- Introduction
- Entering a Contact
- Editing a Contact
- Deleting a Contact
- Contact Persons
- Operations menu, including:
- Customer Status
- Vendor Status
- Create Contact
- Customer Status
- The 'Business Communicator' Window - Making Contact
- Home page for Books by HansaWorld manual
Create Contact
Please refer to the Contact Persons page for details about this function.---
In this chapter:
- Introduction
- Entering a Contact
- Editing a Contact
- Deleting a Contact
- Contact Persons
- Operations menu, including:
- Customer Status
- Vendor Status
- Create Contact
- Customer Status
- The 'Business Communicator' Window - Making Contact
- Home page for Books by HansaWorld manual
The 'Business Communicator' Window - Making Contact
The 'Business Communicator' window allows you to communicate with any Contact (both external and internal) using Skype, email and text SMS messages.To open the 'Business Communicator' window, click the [Communicate] button in the Master Control panel:


- The Contact List
- This is a list of the records in the Contact register.
- As with all lists of records in Books by HansaWorld, you can scroll through the list using the scroll bar on the right, you can sort the list by clicking a column heading, and you can use the Search field and button to find a particular Contact in the list.
- To create a new Contact, click the [New] button above the list. The 'Contact: New' window will open, allowing you to enter the details of the new Contact. By default, the new Contact will be marked as a Customer. To edit an existing Contact, double-click their name in the list. The Contact record window is described in full here.
- To communicate with a Contact, click their name once in the list. The available communication methods (telephone and cell phone numbers, Skype names, etc.) will be shown in the Contact Method list on the right, described below.
- As with all lists of records in Books by HansaWorld, you can scroll through the list using the scroll bar on the right, you can sort the list by clicking a column heading, and you can use the Search field and button to find a particular Contact in the list.
- The Contact Method List
- To communicate with a Contact, click their name once in the Contact list. The available communication methods (telephone and cell phone numbers, Skype names, etc.) will be shown in the Contact Method list. Choose a communication method by clicking, and then click the appropriate button below. For example, to open a Skype call, click the Contact's Skype name in the Contact Method list and then click the [Call/Answer] button below. To open a Skype-Out call, click the Contact's telephone or cell phone number in the Contact Method list and then click the [Call/Answer] button. As soon as you click the appropriate button, the call will be added to the Call list in the lower left-hand corner of the window.
- The Call List
- The Call list in the lower left-hand corner of the 'Business Communicator' window shows the open calls you are making, including any that are on hold.
In this chapter:
- Introduction
- Entering a Contact
- Editing a Contact
- Deleting a Contact
- Contact Persons
- Operations menu
- The 'Business Communicator' Window - Making Contact, including:
- Home page for Books by HansaWorld manual
The 'Business Communicator' Window - Making and Answering Skype Calls and Chats
To call a Contact using Skype from the 'Business Communicator' window, first open the 'Business Communicator' window:
- To make a Skype-to-Skype call, click on their Skype Name in the Contact Method list and then click the [Call/Answer] button.
- To make a SkypeOut call, click on their telephone or cell phone number in the Contact Method list (or enter a number in the Dial field) and then click the [Call/Answer] button.
- To open the Skype Chat window, click on their Skype Name in the Contact Method list and then click the [Chat] button.
You can use the [Call/Answer] button to answer an incoming Skype-to-Skype call, as well as doing so in Skype itself. If you already have an open call, it will be put on hold when you click the [Call/Answer] button to answer the new call.
Communication using Skype requires the following:
- The Skype application must be running.
- You must have allowed Books by HansaWorld to use Skype. Please refer to the 'Establishing Communication between Books by HansaWorld and Skype' section below on this page.
- To make a SkypeOut call, you must have Skype credits.
- When you make a SkypeOut call, the format of the number you are calling must be as described on the Contact Numbers page.
The 'Business Communicator' window offers you various tools that you can use to manage your calls:
- To put a call on hold, highlight it in the Call list and click the [Hold] button. To continue with the call, highlight it again and click the [Hold] button again. If another call is in progress, it will be put on hold automatically.
- To open a conference call (a call with more than two participants), follow these steps:
- Make or receive a call.
- Put the call on hold.
- Make or receive a second call.
- Click the [Conference] button.
If all calls are on hold, the conference will not start: you must have one call in progress to open the conference.
- Make or receive a call.
- To transfer a call, first highlight it in the Call list and click the [Hold] button. Then find and highlight the person to whom you want to transfer the call in the Contact list and then click the appropriate number or address in the Contact Method list (for example, if you are transferring a Skype call, click the person's Skype name in the Contact Method list). Finally, click the [Transfer] button. Note that you cannot transfer Skype calls that you initiated. You can only transfer Skype calls that you received.
Remember that the Contact list is a list of records in the Contact register. Therefore, to transfer a call to another member of staff, that member of staff must have their own record in the Contact register, and this record must be connected to their Person record using the Contact Code field. If you have more than one Company in your database, the Contact list will list the records in the Contact register in the Company you are currently working in.
Communication using Skype requires Skype to be running and communicating with Books by HansaWorld. To establish communication, follow these steps:
- Click the [Module] button in the Master Control panel or use the ⌘-0 (zero) (Mac OS X) or Ctrl-0 (Windows) keyboard shortcut to open the list of modules. Find 'User Settings' in the list and double-click.
- Click the [Settings] button in the Master Control panel or use the ⌘-S/Ctrl-S keyboard shortcut. Find 'Local Machine' in the list and double-click.
- A window entitled 'Local Machine: Inspect' will open:
The window contains a set of options marked 'Connect to Skype'. Choose the 'Yes' option, and then click the [Save] button in the top right-hand corner of the window.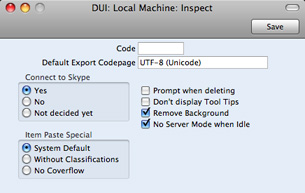
- Close Books by HansaWorld and restart. If Skype is already running, Skype will ask you if you will allow Books by HansaWorld to use Skype. If Skype is not running, you will be asked this question when you start it:
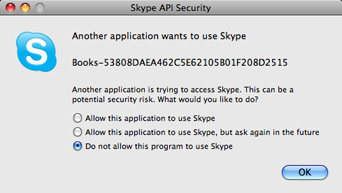
- Allow this application to use Skype
- Choosing this option means you will allow Books by HansaWorld to use Skype, and you will not be asked again (unless you install a new version of Books by HansaWorld). This means that you will be able to initiate Skype calls and chats from the 'Business Communicator' window.
- Allow this application to use Skype, but ask again in the future
- If you choose this option, you will be asked to allow Books by HansaWorld to use Skype each time you start one of the applications when the other is already running. Note that this option is not present in every version of Skype.
- Do not allow this program to use Skype
- Choose this option if you want to prevent Books by HansaWorld from using Skype, and you will therefore not be able to make or receive Skype calls or chats from Books by HansaWorld.
Remove all Books by HansaWorld entries from the list, and then restart Books by HansaWorld.
Note: in a new database, the 'Yes' option will be chosen by default. Therefore, if Skype is running when you start Books by HansaWorld for the first time, the window illustrated in step 4 asking if you want to allow Books by HansaWorld to use Skype will appear when you log in.
- Allow this application to use Skype
In this chapter:
- Introduction
- Entering a Contact
- Editing a Contact
- Deleting a Contact
- Contact Persons
- Operations menu
- The 'Business Communicator' Window - Making Contact, including:
- Making and Answering Skype Calls and Chats
- Text (SMS) Messages
- Email
- Contact Numbers
- Making and Answering Skype Calls and Chats
- Home page for Books by HansaWorld manual
The 'Business Communicator' Window - Text (SMS) Messages
To send a Text (SMS) message, first open the 'Business Communicator' window:
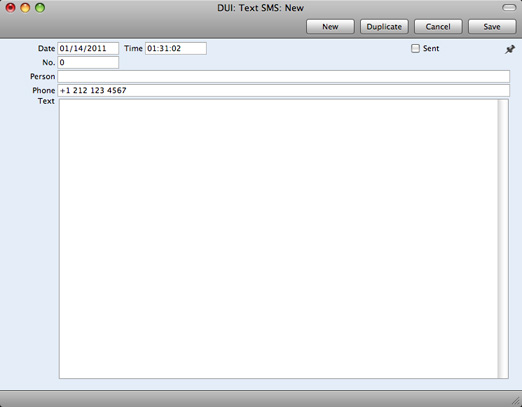
Enter the message in the Text field and click the [Save] button. Your Signature will appear in the Person field and the Sent box will be marked automatically, signifying that the message has been sent.
The Person field in the Text SMS record will take your Signature from your Person record. The Text SMS message will take your mobile number as its originating number, and this will be chosen as follows:
- It will be taken from your record in the Contact register. Your record in the Contact record is the one quoted in the Contact Code field in your Person record;
- If you do not have a record in the Contact register, or this record does not have a mobile phone number, it will be taken from the Phone field in your Person record.
Sending a Text (SMS) message also requires the following:
- The format of the mobile number to which you are sending the Text (SMS) message must be as described on the Contact Numbers page.
- Sending Text (SMS) messages is a chargeable Cloud Service. To use it, you must have registered your database as described here. Please contact your local HansaWorld representative to sign up for the service and for pricing details.
In this chapter:
- Introduction
- Entering a Contact
- Editing a Contact
- Deleting a Contact
- Contact Persons
- Operations menu
- The 'Business Communicator' Window - Making Contact, including:
- Making and Answering Skype Calls and Chats
- Text (SMS) Messages
- Email
- Contact Numbers
- Making and Answering Skype Calls and Chats
- Home page for Books by HansaWorld manual
The 'Business Communicator' Window - Email
To send an e-mail, first open the 'Business Communicator' window: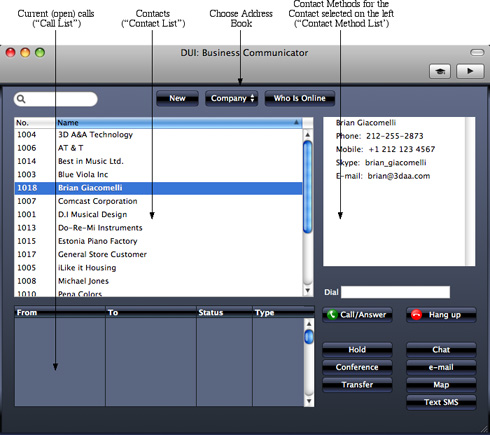
Sending an email requires the following:
- The Contact must have an email address.
- You must have a mail application fully installed and declared to be your default mail application.
In this chapter:
- Introduction
- Entering a Contact
- Editing a Contact
- Deleting a Contact
- Contact Persons
- Operations menu
- The 'Business Communicator' Window - Making Contact, including:
- Home page for Books by HansaWorld manual
The 'Business Communicator' Window - Contact Numbers
To call a Contact from the ''Business Communicator' window, you should have entered their telephone or mobile number as follows:- the only legal characters are numbers, spaces, dashes and the + sign. Do not use periods or brackets, and do not use alpha characters (e.g. do not place text such as "home" or "work" after telephone numbers.
- enter all numbers as international numbers. You can place + or 00 at the beginning of a number, but + is to be preferred as it is the standard method of signifying international numbers and will not change.
---
In this chapter:
- Introduction
- Entering a Contact
- Editing a Contact
- Deleting a Contact
- Contact Persons
- Operations menu
- The 'Business Communicator' Window - Making Contact, including:
- Making and Answering Skype Calls and Chats
- Text (SMS) Messages
- Email
- Contact Numbers
- Making and Answering Skype Calls and Chats
- Home page for Books by HansaWorld manual