Introduction to Item Exports
The 'Exports' function allows you to export certain information from your Standard CRM database to tab-delimited text files from where you can incorporate it in word processing programs for mailmerge, in spreadsheets for further statistical analysis or in page make-up programs for incorporation in publicity material or published reports. In many cases, you can also import the information into other Standard CRM databases or Companies using the 'Automatic' and 'Automatic, manual file search' import functions in the System module. Remember that you can also print reports to disk, so most of the information that is stored in Standard CRM is available to other applications via the medium of the text file.To export information from Standard CRM, you must log in as a Person whose Access Group explicitly grants full access to the Integration module. Change to the Integration module, then click the [Routines] button in the Master Control panel. In the subsequent window, click the [Exports] button. After changing to the Integration module, you can also use the Ctrl-E (Windows) or ⌘-E (Mac OS X) keyboard shortcut.
The window illustrated below appears. This is a list of all the Export functions in the Integration module, of which two are relevant to Items. Double-click the item in the list: a specification window will then appear, where you can decide the contents of the exported text file. Click [Run] and a 'Save File' dialogue box will appear, where you can name the file and determine where it is to be saved.
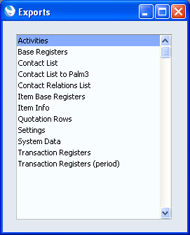
Please click the links below for details about each export function:
- Introduction
- Item Base Registers
- Item Info
Go back to:
- Home page for Items and Pricing manual
- Home page for Standard CRM manual
Item Base Registers
You can use this function in the Integration module to export Item information from your database. This is a practical tool when you want to create a new Company or database that will need this information.This function creates a file with the correct format to be imported into another Standard CRM Company or database.
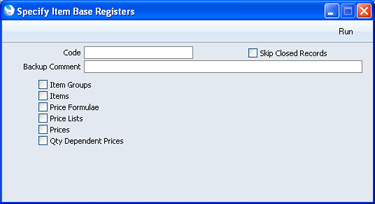
- Code
- Range Reporting
Alpha
- Use this field if you need to export a specific record or records from the registers selected below. For example, to export an Item record, enter the Item Number here. To export Prices, enter a Price List: all Prices with the same Price List will be exported.
- Skip Closed Records
- Check this box if you would like to exclude from the export file records that have been marked as Closed.
- Backup Comment
- Enter a short comment describing the contents of the export file (up to 40 characters are permitted). If you try to import the resulting file to another Company or database using the 'Automatic' import function in the System module, this description will be shown in the list of importable files.
- Check boxes
- Check one or more boxes to specify the registers from where records are to be exported.
Enter a name for the file, and click [Save] or press the Enter key.
A message window informs you about the progress of the export process. You can interrupt the process at any time by pressing Esc (Windows) or ⌘-Full Stop (Mac OS X).
---
In this chapter:
- Introduction
- Item Base Registers
- Item Info
- Home page for Items and Pricing manual
- Home page for Standard CRM manual
Item Info
This function in the Integration module exports information from the Item register. Items will be listed in Item Number order in the export file.This function creates a file with the correct format to be imported into another Standard CRM Company or database.
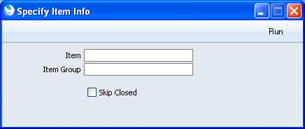
- Item No.
- Paste Special
Item register
- Range Reporting Alpha
- Use this field to export specific Items from the Item register.
- Use this field to export specific Items from the Item register.
- Item Group
- Paste Special
Item Groups setting, Contact module
- Range Reporting Alpha
- To export Items belonging to a single Item Group, enter an Item Group Code here.
- If you specify both a range of Items and a range of Item Groups, only those Items in the range that are members of the specified Item Groups will be included in the export file.
- To export Items belonging to a single Item Group, enter an Item Group Code here.
- Skip Closed
- Check this box if you would like to exclude from the report Items that have been marked as Closed.
Enter a name for the file, and click [Save] or press the Enter key.
A message window informs you about the progress of the export process. You can interrupt the process at any time by pressing Esc (Windows) or ⌘-Full Stop (Mac OS X).
---
In this chapter:
- Introduction
- Item Base Registers
- Item Info
- Home page for Items and Pricing manual
- Home page for Standard CRM manual