Menus

Please click the links below for details about each menu:
- Home page for Working Environment manual
- Home page for Standard CRM manual
File Menu

---
In this chapter:
- File menu, including:
- Edit menu
- Record menu
- Window menu
- About Standard CRM
- Home page for Working Environment manual
- Home page for Standard CRM manual
File Menu - Master Control
This function brings the Master Control panel to the front. This will be necessary if you wish to use the Standard CRM Mail functions or run a Maintenance function as the Master Control panel provides the only means of accessing these.---
In this chapter:
- File menu, including:
- Master Control
- Page Setup
- Print
- Stop Auto Login
- Quit
- Master Control
- Edit menu
- Record menu
- Window menu
- About Standard CRM
- Home page for Working Environment manual
- Home page for Standard CRM manual
File Menu - Page Setup
This function is available when the active (top) window on the screen contains a list of reports or documents.When you print a report or document, one copy is usually produced, using a standard page size. If you need to print more than one copy, or to use a non-standard page size or magnification, highlight the desired report or document in the list and then select 'Page Setup' from the File menu to make these changes. Once you have done this, double-click the item in the list to carry on with the printing process.
You can set the number of copies, page size and/or magnification in this way for each document or report. These settings will remain in place for a particular document or report until you choose 'Page Setup' for that document or report once again.
You can also use this function to choose the printer on which the report or document is to be printed.
---
In this chapter:
- File menu, including:
- Master Control
- Page Setup
- Print
- Stop Auto Login
- Quit
- Master Control
- Edit menu
- Record menu
- Window menu
- About Standard CRM
- Home page for Working Environment manual
- Home page for Standard CRM manual
File Menu - Print
This function is available when the active (top) window on the screen contains something that can be printed (a screen report or a record that has a connected document).When you select 'Print', the record or the report is printed directly to the selected printer.
This menu item duplicates the functions of the Printer icon in the Button Bar of the active window.
---
In this chapter:
- File menu, including:
- Edit menu
- Record menu
- Window menu
- About Standard CRM
- Home page for Working Environment manual
- Home page for Standard CRM manual
File Menu - Stop Auto Login
When you create the first user in a new database and log in as that user, you will be asked if you want Standard CRM to remember your password, so that you do not have to enter it yourself each time you log in.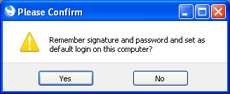
If you choose to have your password remembered, you will be logged in automatically each time you start Standard CRM on the same client machine, although you will still need to choose a Company if you have more than one. Each time you change your password, the first time you log in using a new one you will be asked if you want it to be remembered. If you decide you no longer want your password to be remembered, choose 'Stop Auto Login' from the File menu. The next time you log in, you will be asked once again if you want your password to be remembered.
---
In this chapter:
- File menu, including:
- Master Control
- Page Setup
- Print
- Stop Auto Login
- Quit
- Master Control
- Edit menu
- Record menu
- Window menu
- About Standard CRM
- Home page for Working Environment manual
- Home page for Standard CRM manual
File Menu - Quit
Quits Standard CRM. Remember to take a safety back-up of your work before you quit!Mac OS X users can find the 'Quit' command on the CRM menu.
---
In this chapter:
- File menu, including:
- Edit menu
- Record menu
- Window menu
- About Standard CRM
- Home page for Working Environment manual
- Home page for Standard CRM manual
Edit Menu
---
In this chapter:
- File menu
- Edit menu, including:
- Record menu
- Window menu
- About Standard CRM
- Home page for Working Environment manual
- Home page for Standard CRM manual
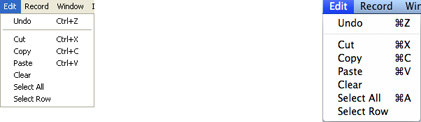
Edit Menu - Undo
Select 'Undo' to undo your last action.There are a few actions in Standard CRM that cannot be undone, e.g. deleting a record using the 'Delete' command on the Record menu or removing an Attachment using the 'Clear' command on the Edit menu.
---
In this chapter:
- File menu
- Edit menu, including:
- Undo
- Cut
- Copy
- Paste
- Clear
- Select All
- Select Row
- Undo
- Record menu
- Window menu
- About Standard CRM
- Home page for Working Environment manual
- Home page for Standard CRM manual
Edit Menu - Cut
'Cut' removes the data you have selected (highlighted) and puts a copy in the Clipboard. The Clipboard is a special part of the computer's memory that temporarily stores a single piece of data. You can then insert ('Paste') this data somewhere else, as many times as necessary, until you 'Cut' or 'Copy' something else. That will replace the old contents in the Clipboard.In certain fields, e.g. the Item Number of an Item that has already been saved, you may not remove the data, and thus cannot use 'Cut'. If you want to copy the contents of such a field, use the 'Copy' command instead.
---
In this chapter:
- File menu
- Edit menu, including:
- Record menu
- Window menu
- About Standard CRM
- Home page for Working Environment manual
- Home page for Standard CRM manual
Edit Menu - Copy
Use 'Copy' to copy text or numbers from one field to another without removing the data from the original field. The copy is put in the Clipboard. Then you can 'Paste' the copy in as many other locations as required. The copy remains in the Clipboard until you 'Cut' or 'Copy' something else.Note that you can only use 'Copy' (and 'Cut') to copy text from a single field at a time. If you want to copy a whole record in a file, use the 'Duplicate' command on the Record menu (or the [Duplicate] button in the Button Bar).
---
In this chapter:
- File menu
- Edit menu, including:
- Undo
- Cut
- Copy
- Paste
- Clear
- Select All
- Select Row
- Undo
- Record menu
- Window menu
- About Standard CRM
- Home page for Working Environment manual
- Home page for Standard CRM manual
Edit Menu - Paste
This command allows you to insert into a field text or a value that you have previously 'Cut' or 'Copied' to the Clipboard. If you highlight several characters in the destination field before 'Pasting', the selected text will be replaced by the contents of the Clipboard.---
In this chapter:
- File menu
- Edit menu, including:
- Undo
- Cut
- Copy
- Paste
- Clear
- Select All
- Select Row
- Undo
- Record menu
- Window menu
- About Standard CRM
- Home page for Working Environment manual
- Home page for Standard CRM manual
Edit Menu - Clear
'Clear' removes the characters you have selected (highlighted) without copying them to the Clipboard.The 'Clear' command removes text or values within a single field. If you wish to remove an entire record, use the 'Delete' command on the Record menu.
---
In this chapter:
- File menu
- Edit menu, including:
- Undo
- Cut
- Copy
- Paste
- Clear
- Select All
- Select Row
- Undo
- Record menu
- Window menu
- About Standard CRM
- Home page for Working Environment manual
- Home page for Standard CRM manual
Edit Menu - Select All
Use this command to select the entire contents of a field. You can use it when you are editing a field and want to replace the whole contents with new data.---
In this chapter:
- File menu
- Edit menu, including:
- Record menu
- Window menu
- About Standard CRM
- Home page for Working Environment manual
- Home page for Standard CRM manual
Edit Menu - Select Row
You can use this command in record windows that contain rows of information, divided into separate columns, for example the Quotation window. It allows you to select a whole row. When you choose 'Select Row', the row in which the cursor is placed is selected. Clicking the row number (on the left) has the same effect.---
In this chapter:
- File menu
- Edit menu, including:
- Record menu
- Window menu
- About Standard CRM
- Home page for Working Environment manual
- Home page for Standard CRM manual
Record Menu
Almost all these commands can also be executed using the buttons in the Button Bar. In addition, there are keyboard shortcuts available for most of them.
! | You cannot use 'Undo' to reverse Record menu commands. |
---
In this chapter:
- File menu
- Edit menu
- Record menu, including:
- Window menu
- About Standard CRM
- Home page for Working Environment manual
- Home page for Standard CRM manual
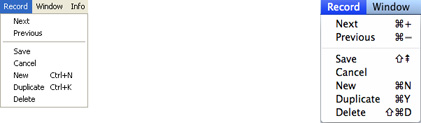
Record Menu - Next
- When you work in a record window, showing an individual record in a register, 'Next' will take you forward to the next record in that register.
It will also save all changes you have made in the record you have just left.
In this situation, the 'Next' command has the same effect as clicking the [Next Record] button in the Button Bar.
- When you work in a browse window, 'Next' will scroll the list down one page.
- When you work with a Report, 'Next' will scroll to the next page of the report.
In this chapter:
- File menu
- Edit menu
- Record menu, including:
- Window menu
- About Standard CRM
- Home page for Working Environment manual
- Home page for Standard CRM manual
Record Menu - Previous
The command works in the same way as 'Next', but moves backwards instead of forwards. As with 'Next', when working in a record window, 'Previous' saves all changes you have made in the record you are leaving.In record windows, the 'Previous' command has the same effect as clicking the [Previous Record] button in the Button Bar.
---
In this chapter:
- File menu
- Edit menu
- Record menu, including:
- Window menu
- About Standard CRM
- Home page for Working Environment manual
- Home page for Standard CRM manual
Record Menu - Save
This command is equivalent to pressing the [Save] and [Run] buttons in the Button Bar (depending on context). When you use this command in a record window, it saves all changes to the record you are creating or editing. When you use it in a browse window, it opens the selected (highlighted) record for editing. In a specification window, it prints the report or document or activates the Maintenance function.---
In this chapter:
- File menu
- Edit menu
- Record menu, including:
- Window menu
- About Standard CRM
- Home page for Working Environment manual
- Home page for Standard CRM manual
Record Menu - Cancel
Closes the record on screen without saving any changes. It is equivalent to the [Cancel] button in the Button Bar.You can also close windows of all types using the close box or Ctrl-F4 (Windows) or ⌘-W (Mac OS X). When using these methods, you will be asked if you wish to save changes.
---
In this chapter:
- File menu
- Edit menu
- Record menu, including:
- Window menu
- About Standard CRM
- Home page for Working Environment manual
- Home page for Standard CRM manual
Record Menu - New
Use this command when you need to create a new record. You can only use it after you have opened a register using one of the buttons in the bottom row of the Master Control panel or the equivalent keyboard shortcut.This function opens a blank window into which you can enter the new record. If you click [Save], the record will be saved into the register concerned. If you click [New] again, the record will be saved and a new blank window opened, enabling you to enter another new record in the same register. If you click [Cancel], the record will be closed but not saved.
---
In this chapter:
- File menu
- Edit menu
- Record menu, including:
- Window menu
- About Standard CRM
- Home page for Working Environment manual
- Home page for Standard CRM manual
Record Menu - Duplicate
This function creates a new record by duplicating an existing one. The duplicate will be opened in a window marked 'New'. In many cases, dates in the new record will be changed to show the current date.You can duplicate a record either from a record window, showing the record to be duplicated, or from the browse window, in which you have highlighted the record to be duplicated by clicking with the mouse.
---
In this chapter:
- File menu
- Edit menu
- Record menu, including:
- Window menu
- About Standard CRM
- Home page for Working Environment manual
- Home page for Standard CRM manual
Record Menu - Delete
Use this command to delete, i.e. remove, an existing record. You must open a record in the record window to be able to delete it. The only exception to this rule is that you must delete Mails from the browse window.When you delete a record, the next record in the register is displayed.
! | Remember that you cannot undo the deletion of a record. |
When you use the 'Delete' command, you are usually not asked if you are sure you want to go ahead with the deletion. If you would like such a warning to appear, switch on the Prompt When Deleting option in the Local Machine setting in the User Settings module. In a multi-user system, this option is specific to each client machine.
---
In this chapter:
- File menu
- Edit menu
- Record menu, including:
- Window menu
- About Standard CRM
- Home page for Working Environment manual
- Home page for Standard CRM manual
Window Menu
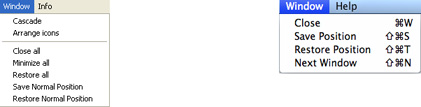
Although the 'Close All' function is not available to Mac OS X users, clicking the close box of a window while holding down the Alt key will have the same effect.
In multi-user systems, each user can use the 'Save Normal Position'/'Save Position' functions to save their own window positions, sizes and sort orders. This information is stored on the client machine, so it will not be included in the normal daily back-up file made from the server. To back up this information, use the 'Client Text Backup' option.
---
In this chapter:
- File menu
- Edit menu
- Record menu
- Window menu
- About Standard CRM
- Home page for Working Environment manual
- Home page for Standard CRM manual
About Standard CRM
This command on the Info menu (Windows) and the CRM menu (Mac OS X) shows the copyright information for Standard CRM. The version of the program and information about the owner of the program license are also shown here. You return to the program by clicking [OK].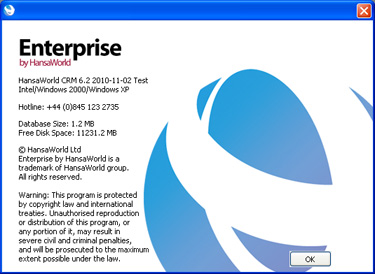
This window also shows the size of your Standard CRM database and the amount of disk space available on the hard disk on which it is stored. In multi-user systems, these figures refer to the server.
---
In this chapter:
- Home page for Working Environment manual
- Home page for Standard CRM manual