The Master Control Panel
The Standard CRM work area contains a single movable tool palette, the Master Control panel, located by default in the centre of the screen.You can open the Master Control panel or bring it to the front at any time by choosing 'Master Control' from the File menu. Windows users can use the keyboard shortcut Ctrl-M, while Mac OS X users can use ⌘-M. To close the Master Control panel, click the close box or use the keyboard shortcuts Ctrl-F4/⌘-W.
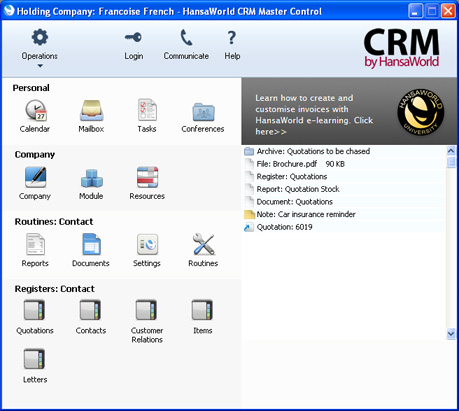
- The area on the right of the Master Control panel is known as the "Personal Desktop". If you have certain records, registers, reports or Maintenance functions that you use all the time, you can move them to your Personal Desktop for easy access. You can open a record or register or run a report or Maintenance function from your Master Control panel at any time, without first having to change modules, find records in browse windows or find reports, documents or Maintenance functions in list windows. The Personal Desktop therefore gives you access to the most important parts of Standard CRM in a similar manner to a list of Bookmarks in a browser. Please refer to the description of the Personal Desktop here for full details.
- The strip along the top of the Master Control panel contains the following tools (illustrated on the left, the Windows versions; on the right, the Mac OSX versions):

- Click this button to open the Operations drop-down menu. This contains a number of functions connected to the Personal Desktop. It also contains a function that you can use to change your password.

- Click this button if you want to log in as a different user.

- This button opens the Business Communicator window. This allows you to communicate with any Contact (both external and internal) using any method (e.g. Skype, email, text SMS and the chat feature built in to Standard CRM).

- Click this button to connect to the web to read this manual online at www.hansamanuals.com. Mac OS X users should go to the Help menu and choose 'Online Manual'.

- Click the logo to connect to the web and go to the HansaWorld website (www.hansaworld.com).
- The left-hand part of the Master Control panel contains a number of buttons, divided into four sections, as follows:
- Personal
- These buttons allow you to communicate with other users of your Standard CRM system and to organise your diary. This provides a means of recording appointments and other tasks. Some of these buttons have a keyboard shortcut, as noted below, which you can use when the Master Control panel is the active (front) window.
- [Calendar]
- Windows keyboard shortcut: Ctrl-Shift-C
- Mac OS X keyboard shortcut: ⌘-Shift-C
- Opens your Calendar. You can use this tool to schedule your time and that of other users.
- Full details: Calendar page.
- Mac OS X keyboard shortcut: ⌘-Shift-C
- [Mailbox]
- Windows keyboard shortcut: Ctrl-Shift-M
- Mac OS X keyboard shortcut: ⌘-Shift-M
- Opens your Mailbox. This allows you to send and receive mail from other users in your Standard CRM system and to send and receive external mail (i.e. to communicate with people outside your Standard CRM system who use standard email programs).
- Requirement: you must have a Mailbox.
- Full details: Sending and Receiving Mail page.
- Mac OS X keyboard shortcut: ⌘-Shift-M
- [Tasks]
- Windows keyboard shortcut: Ctrl-T
- Mac OS X keyboard shortcut: ⌘-T
- Opens your Task Manager. This is your 'To Do' list.
- Full details: Task Manager page.
- Mac OS X keyboard shortcut: ⌘-T
- [Conferences]
- Windows keyboard shortcut: Ctrl-Shift-O
- Mac OS X keyboard shortcut: ⌘-Shift-O
- Opens a list of Conferences. These are addresses to which you can send public mail (mail that all users can read, subject to access restrictions).
- Requirement: you must have a Mailbox.
- More details: Mails and Conferences page.
- Mac OS X keyboard shortcut: ⌘-Shift-O
- [Calendar]
- Company
- These buttons provide more tools to help you communicate with other users of your Standard CRM system. Some of these buttons have a keyboard shortcut, as noted below, which you can use when the Master Control panel is the active (front) window.
- [Company]
- Windows keyboard shortcut: Ctrl-O
- Mac OS X keyboard shortcut: ⌘-O
- Allows you to change the Company you are working in. You can change Company using the keyboard shortcut at any time (even if the Master Control panel is hidden or closed).
- More details: Working with Companies page.
- Mac OS X keyboard shortcut: ⌘-O
- [Module]
- Windows keyboard shortcut: Ctrl-0 (zero)
- Mac OS X keyboard shortcut: ⌘-0 (zero)
- Allows you to work in a different module (e.g. to change from the Contact module to the System module). The Register buttons in the lower part of the Master Control panel will be changed to show the Registers in the new module. You can change modules using the keyboard shortcut at any time (even if the Master Control panel is hidden or closed).
- Mac OS X keyboard shortcut: ⌘-0 (zero)
- [Company]
- Routines
- Routines are tasks that you will need to carry out as part of your daily work. Clicking one of these buttons will open a list of options in which you can choose the one you need by double-clicking. The options in the list will vary depending on the current module. Each of these buttons has a keyboard shortcut, as noted below, which you can use at any time (even if the Master Control panel is hidden).
- [Reports]
- Windows keyboard shortcut: Ctrl-R
- Mac OS X keyboard shortcut: ⌘-R
- Prints reports to screen, printer, file or other print destination.
- More details: Reports and Report Window pages. The reports themselves are described in detail in the appropriate sections of these web pages.
- Mac OS X keyboard shortcut: ⌘-R
- [Documents]
- Windows keyboard shortcut: Ctrl-D
- Mac OS X keyboard shortcut: ⌘-D
- Prints documents intended for external use (e.g. Quotations).
- More details: Documents page. The documents themselves are described individually in the appropriate sections of these web pages.
- Mac OS X keyboard shortcut: ⌘-D
- [Settings]
- Windows keyboard shortcut: Ctrl-S
- Mac OS X keyboard shortcut: ⌘-S
- Allows you to tailor the operations of each module to your requirements.
- More details: Settings page. The settings themselves are described individually in the appropriate sections of these web pages.
- Mac OS X keyboard shortcut: ⌘-S
- [Routines]
- Allows you to import and export information, run Maintenance functions (batch processing routines), and register your copy of Standard CRM.
- More details: Routines page.
- [Reports]
- Registers
- Windows keyboard shortcuts: Ctrl-1-7
- Mac OS X keyboard shortcuts: ⌘-1-7
- These buttons vary according to the current module: one is provided for each register in that module. Separate registers are used for the different types of information stored in and used by the module. Click on a register button to open the browse window for the register.
- More details: Registers page. Each register is explained in separate sections throughout these web pages.
- Mac OS X keyboard shortcuts: ⌘-1-7
- Personal
- Routines, including
- Passwords
- Personal Desktop
- Home page for Working Environment manual
- Home page for Standard CRM manual
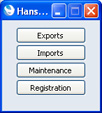
Routines
The 'Routines' section of the Master Control panel contains tools that you can use to produce reports, print documents, set preferences, import and export information, run Maintenance functions (batch processing routines), and register your copy of Standard CRM.You can use three of these tools by clicking the [Reports], [Documents] and [Settings] buttons in the Master Control panel. To use the remaining tools, click the [Routines] button. This will open the 'Routines' window, in which you can click the button that you need:
Go back to:
- Home page for Working Environment manual
- Home page for Standard CRM manual
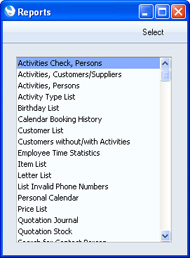
Routines - Reports
Reporting in Standard CRM is non-destructive, i.e. you can make and print a report as many times as you wish. Some programs are designed in such a way as to allow journal printing only directly in connection with the data entry. Standard CRM does not have this limitation.When you click the [Reports] button in the Master Control panel or use the Ctrl-R (Windows) or ⌘-R (Mac OS X) keyboard shortcut, a window will be opened, containing a list of all available reports. The contents of this window will vary with the selected module: the illustration below shows the reports in the Contact module (if you have any Value Packs or Extra Features, you may see more reports than are shown in the illustration):
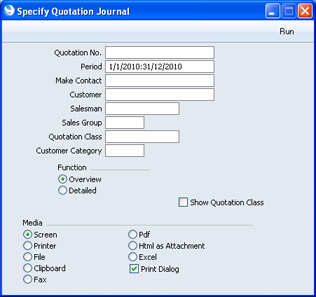
Once you have done this, double-click the report name in the list. A specification window will open, where you can choose the information that you want to be shown in the report. For example, when producing a Quotation Journal, you can use its specification window (illustrated below) to choose the period that is to be covered by the report.
- Screen
- If you print to screen (the default setting), the report will be shown in a new window (described here). You can subsequently send the report to a printer by clicking the Printer icon in the Button Bar of this window or by selecting 'Print' from the File menu.
- Printer
- Use this option to send the report directly to a printer.
- File
- Choose this option to export the contents of a report to a tab-delimited text file on your hard disk. You can then open this file in Excel, for further calculations etc, or in Word or a page make-up program, for incorporation in publicity material or published reports.
- Clipboard
- This option will place the contents of a report in your computer's clipboard, from where you can paste it into another application.
- Fax
- You cannot use this option with reports.
- Pdf
- Choose this option to print a report as a PDF file on your hard disk.
- Excel
- This option opens the Excel application and creates a new workbook containing the report.
- Html as Attachment
- This option will place an html version of a report in your Personal Desktop. You may need to close and re-open the Master Control panel to see the report there.
- You can only use this option in a multi-user system, where it can be useful when you need to produce a long report. You can print a report using this option, log off and leave the server to produce the report overnight, and the report will be waiting for you in your Personal Desktop the next day.
- To open the report, highlight it in your Personal Desktop and choose 'Open Record' from the Master Control panel's Operations menu. The report will be shown in a new window in your browser.
- You can only use this option in a multi-user system, where it can be useful when you need to produce a long report. You can print a report using this option, log off and leave the server to produce the report overnight, and the report will be waiting for you in your Personal Desktop the next day.
If you want a print dialogue to appear when you send the report to a printer, check the Print Dialog box (last of the Media options). You might do this if you want to print several copies of a report.
Once you have entered the reporting criteria and have chosen a print destination, click [Run] to produce the report.
Individual Reports
Please click the links for details about the individual reports, descriptions of which have been divided into the following categories:
- Activities, Calendar and Task Manager
- Customers, Suppliers and Contact Persons
- E-mail and Conferences
- Items and Pricing
- Letters
- Quotations
- System
Go back to:
- Home page for Working Environment manual
- Home page for Standard CRM manual
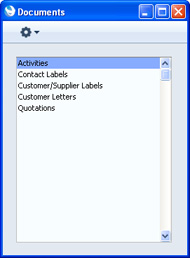
Routines - Documents
Documents are more formal printouts, usually printed using forms, such as Quotations. They are often directed to third parties (e.g. Customers or Suppliers). Standard CRM offers several documents in each module.When you click the [Documents] button in the Master Control panel or use the Ctrl-D (Windows) or ⌘-D (Mac OS X) keyboard shortcut, a window will be opened, containing a list of the available documents. The documents available vary with the selected module: the illustration below shows those in the Contact module (if you have any Value Packs or Extra Features, you may see more documents than are shown in the illustration):
Once you have done this, double-click the document name in the list. A specification window will open, where you can choose the information that you want to be shown in the report. For example, when printing Quotations, you can use the specification window (illustrated below) to choose the Quotations that you want to print.
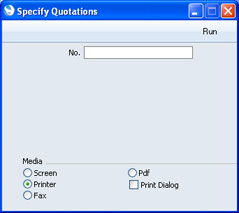
Once you have specified the documents that you want to be printed and have chosen a print destination, click [Run] to print the documents.
Defining Documents
You must assign a Form to each document before you print it for the first time. The Form is the design or layout of the document. You can have a single Form for each document, or you may have several versions of a particular type of document, to be used on different occasions. To assign a Form or Forms to a document, open the 'Documents' list as described above, highlight the document in the list, and select 'Define Document' function from the Operations menu. Click the button in the top left-hand corner of the 'Documents' list window and illustrated below to access the Operations menu:

Having designed your Forms, use the 'Define Document' function to specify when each one will be used, as described below. In this example, we will imagine that we have designed a Form named "QUOTATION", and we want this Form to be used whenever we print an Quotation:
- Use the [Module] button in the Master Control panel or the Ctrl-0/⌘-0 keyboard shortcut to choose the module in which the document is to be found. In the case of the Quotation document, this is the Contact module.
- Click the [Documents] button in the Master Control panel or use the Ctrl-D/⌘-D keyboard shortcut. The 'Documents' list window will be opened showing a list of available documents. Highlight the document that you need to define ('Quotations' in the example).
- Select 'Define Document' from the Operations menu. Specify "QUOTATION" as the Form on the first row, and enter the following:
- Seq
- Use this column if you want to print two (or more) different documents from a single command. For example, you might want to print Quotations on two printers: one containing plain paper and one containing headed paper. If you want a Quotation to be printed on plain paper first, allocate Seq. no. 1, to this row and Seq. no 2 to the row with the Printer with headed paper.
- Form
- Enter the Form Code of the relevant Form in this field. This field is case sensitive: you should only use upper case characters. Use 'Paste Special' to select from a list of Forms as set up in the System module. Please refer to the description of the Form register for details about designing Forms, and here for details about the 'Paste Special' feature.
- Seq
- Click [Save] to save the document definition. In this example, when you print Quotations from now on, they will always be printed using the "QUOTATION" Form, without further user intervention.
You can repeat this process for almost all documents as required.
Please click the links for details about the individual documents, descriptions of which have been divided into the following categories:
- Activities, Calendar and Task Manager
- Customers, Suppliers and Contact Persons
- Letters
- Quotations
- System
- Introduction
- Reports
- Documents
- Settings
- Exports
- Imports
- Maintenance
- Registration
- Home page for Working Environment manual
- Home page for Standard CRM manual
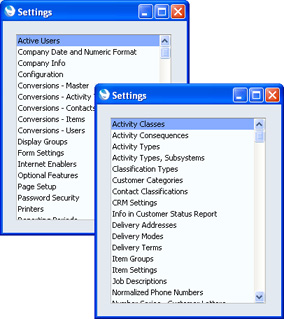
Routines - Settings
This command opens the 'Settings' list window where you will find an alphabetical list of the settings that are available in the current module. Settings allow you to tailor certain aspects of the program's operation to your requirements, and to supply information to be used throughout the program.The contents of the 'Settings' list window vary according to the module selected. The illustration below shows the different settings in the System (on the left) and Contact modules (if you have any Value Packs or Extra Features, you may see more settings than are shown in the illustration).
Types of Setting
The settings in Standard CRM can be divided into three groups:
- Settings of the first type take the form of a single screen where you can set preferences to determine exactly how Standard CRM is to operate in a certain situation. Examples of such settings include Configuration, Company Date and Numeric Format, and Company Info.
When you open one of these settings from the 'Settings' list, you can change any of the fields as required. To save changes and close the window, click the [Save] button. To close the window without saving changes, click the close box.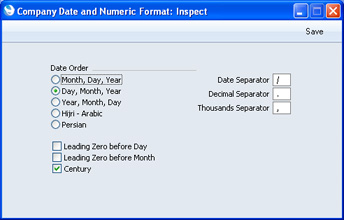
- Settings of the second type contain a number of records that are displayed in a grid. Each row in the grid represents a separate record. Examples of such settings include Quotation Classes and VAT Codes.
When you open one of these settings from the 'Settings' list, you can change any of the fields in the existing records as required. To add new records to the list, click in any field in the first blank row and enter appropriate text. To remove a record, click on the row number on the left of the row containing the record and press the Backspace key. To insert a row, click on the row number where the insertion is to be made and press Return. To save changes to all records in the grid and close the window, click the [Save] button. To close the window without saving changes, click the close box.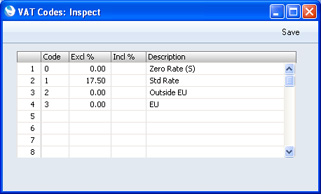
When working in one of the main registers, you may need to refer to a particular record in a setting of this type: the 'Paste Special' look-up function is provided to make this task as easy as possible. For example, when entering a Quotation, you can use 'Paste Special' to choose the relevant Quotation Class. To help you choose the correct record using 'Paste Special', it is recommended that you keep the rows in the alphabetical order of the Codes.
- Settings of the final type also contain a number of records, but behave in a similar manner to the main registers in that their contents are displayed in a browse window and have to be opened in a record window for editing. Again, when working in one of the main registers, you may have to refer to a particular record in a setting of this type using the 'Paste Special' look-up function. Examples of such settings include Price Lists and Payment Terms.
When you open one of these settings from the 'Settings' list, the browse window is displayed, listing the records already entered.
Double-click an item in the list to edit it, or add a new record by clicking the [New] button in the Button Bar. Alternatively, highlight a record similar to the one you want to enter and click [Duplicate] on the Button Bar. A record window is then opened, allowing you to change the existing record or enter the new one.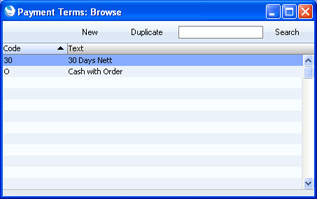
To save changes, click the [Save] button. To close the window without saving changes, click the close box. You can also close the browse window using the close box.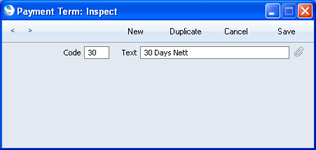
Please click the links for details about the individual settings, descriptions of which have been divided into the following categories:
- Activities, Calendar and Task Manager
- Customers, Suppliers and Contact Persons
- Items and Pricing
- Letters
- Quotations
- System
Go back to:
- Home page for Working Environment manual
- Home page for Standard CRM manual
Routines - Exports
The Exports routine allows you to export information from your Standard CRM database to tab-delimited text files on your hard disk. This information is then available for use in other programs, such as word processors, spreadsheets, database programs etc. You can also import the information into other Standard CRM databases or Companies using the 'Automatic' and 'Automatic manual file search' Import routines in the System module.To begin exporting, click the [Routines] button in the Master Control panel and then the [Exports] button in the 'Routines' window. Alternatively you can use the Ctrl-E (Windows) or ⌘-E (Mac OS X) keyboard shortcut at any time (even if the Master Control panel is hidden). The 'Exports' list window is then opened, listing the Exports that you can produce from the active module. The options available in the 'Exports' list vary according to the active module: the majority of Exports are in the Integration module, as shown in the illustration below:
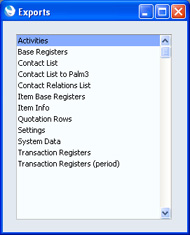
To gain access to the Integration module, you must log in as a Person whose Access Group explicitly grants full access to that module.
By default, text files exported from a Standard CRM database will contain Unicode characters. You can change this by specifying a Default Export Codepage in the Local Machine setting in the User Settings module.
As well as exporting information to text files, you can also use the Exports routine to back up your Standard CRM database. For full details of how to do this, please refer to the Backing Up page. For security reasons, the 'Company Text Backup' and 'Database Text Backup' exports do not produce text files as mentioned above but encrypted files that can only be read by another copy of Standard CRM.
Note that you can also print all Standard CRM reports to disk as text files. This, in combination with the Exports routine, makes it very easy to retrieve information from Standard CRM for use with other applications.
Individual Export Functions
Please click the links for details about the individual export functions, descriptions of which have been divided into the following categories:
- Activities, Calendar and Task Manager
- Customers, Suppliers and Contact Persons
- Items and Pricing
- Quotations
- System
Go back to:
- Home page for Working Environment manual
- Home page for Standard CRM manual
Routines - Imports
The Imports routine allows you to import the contents of text files, previously saved in the proper format, into the Company you are working with. Usually, only new records will be added during the import process, and there is no danger that you will get duplicate data of any kind in your database. However, if you import a setting that is a set of fields and check boxes (e.g. the Company Date and Numeric Format and Activity Types, Subsystems settings), the imported setting will overwrite the existing setting.To begin importing, click the [Routines] button in the Master Control panel and then the [Imports] button in the 'Routines' window. Alternatively you can use the Ctrl-Shift-I (Windows) or ⌘-Shift-I (Mac OS X) keyboard shortcut at any time (even if the Master Control panel is hidden). The 'Imports' list window will be opened, where you can specify what is to be imported. The options available in the 'Imports' list window will vary, depending on the active module. Double-click the option that you need and then, when the 'Open File' dialogue box opens, locate and open the import file in the normal way.
You must save or cancel all changes before trying to import information. If you are modifying a record or setting (i.e. at least one window is open with the title 'Update'), you will be told 'Some records/blocks are locked' when you attempt to use the Imports routine.
In multi-user systems, you can only use the Imports routine when you are the only user logged in.
You should use the Imports routine to restore your Standard CRM database from a back-up and when updating to a new version of the program. For full details of how to do this, please refer to the Restoring from a Back-up page.
You should also use the Imports routine to import information previously exported from another Standard CRM database or from a text file created by another program. In the latter instance, you should ensure the text file is correctly formatted (contains the information in the correct order) before importing. This format information is available from your local Standard CRM representative and can also be found in the Export Format report in the Technics module.
Usually, you will use the 'Automatic' or 'Automatic manual file search' import functions in the System module to import information in this way. These functions require the following lines to appear at the beginning of the import file:
- format
- 1 46 1 0 1 44 0 /
- codepage UTF-8
- 1 46 1 0 1 44 0 /
The numbers in the second line are parameters that inform the import procedure about the contents of the import file, as follows:
- Date Order
- The first parameter tells the import procedure what date format you have used in the text file. You can use the following values:
- 0
- Month/Day/Year
- 1
- Day/Month/Year
- 2
- Year/Month/Date
- 3
- Month/Year/Day
- 4
- Day/Year/Month
- 5
- Year/Day/Month
- 6
- Hijri (Arabic)
- 7
- Persian
- 0
- Decimal Character
- The second parameter uses ASCII codes to tell the import procedure what decimal character you have used in the text file. Typical values are:
- 44
- comma
- 46
- full stop
- 44
- Import Mode
- Use the third parameter to specify the platform on which you created the text file, as follows:
- 0
- Mac OS X, AIX, iSeries
- 1
- Windows, Linux
- The import procedure will use the default codepage for the platform specified here for string conversion if the fifth parameter (String Type) is 0 and if there is no "codepage" line at the beginning of the file.
- 0
- Replace Mode
- This parameter tells the import procedure what to do if information in the text file duplicates what is already in the database.
- 0
- Any duplicate information in the text file will not be imported. Records in the database will not be replaced.
- 1
- Duplicate information in the text file will be imported, overwriting existing records in the database. This applies to entire records. For example, there is an existing Customer 001 in the database with the name Customer A and Payment Terms 30 days, and in the import file Customer 001 has the name Customer AA and no Payment Terms. The import procedure will overwrite the entire record for Customer 001, so the result will be that it has the name Customer AA and no Payment Terms. Records in the database with no duplicate in the text file will not be touched.
- Note that blocks will always be overwritten with duplicate information from a text file, irrespective of whether this parameter is 0 or 1. There are two types of block: the setting that is a set of fields and check boxes (e.g. Company Date and Numeric Format, Activity Types, Subsystems); and the setting that is a series of rows (e.g. Quotation Classes, VAT Codes).
- 0
- String Type
- Use the fifth parameter to specify the character set used in the text file:
- 0
- The text file contains characters belonging to a single character set (e.g. ASCII, KOI-8R [Russian Cyrillic], ISO-8859-1 [Western European]).
- 1
- The text file contains Unicode characters.
- If this parameter is 0 and if there is no "codepage" line at the beginning of the file, the third parameter will determine the codepage/character set.
- By default, text files exported from a Standard CRM database will contain Unicode characters. You can change this by specifying a Default Export Codepage in the Local Machine setting in the User Settings module.
- 0
- Thousands Separator
- The sixth parameter uses ASCII codes to tell the import procedure what thousands separator you have used in the text file. Typical values are:
- 0
- No thousands separator
- 32
- space
- 44
- comma
- 45
- hyphen
- 46
- full stop
- 0
- Escape Character
- The seventh parameter is not currently (version 6.2) used by the import procedure. You should place a 0 (zero) in this position as shown in the example at the beginning of this section.
- Date Separator
- The eighth parameter will tell the import procedure what date separator you have used in the text file. This parameter should be the actual character, not the ASCII code. Typical values are:
- (blank)
- System default (set in the Company Date and Numeric Format setting in the System module)
- /
- /
- .
- .
- -
- -
- (blank)
| UTF-8 | UTF-8 (Unicode) |
| ISO-8859-1 | ISO 8859-1 (Western Europe) |
| ISO-8859-4 | ISO 8859-4 (Baltic) |
| ISO-8859-5 | ISO 8859-5 (Cyrillic) |
| ISO-8859-15 | ISO 8859-15 (Western European with Euro sign) |
| US-ASCII | US ASCII |
| CP437 | DOS CP 437 (US) |
| CP850 | DOS CP 850 (Western Europe) |
| CP1250 | Windows codepage 1250 (Central Europe) |
| CP1251 | Windows codepage 1251 (Cyrillic) |
| CP1252 | Windows codepage 1252 (Western Europe) |
| CP1257 | Windows codepage 1257 (Baltic) |
| KOI8-R | KOI8-R (Cyrillic) |
| MACINTOSH | Apple Western Europe |
| ACE | Apple Central Europe |
| ACYR | Apple Cyrillic |
If you are importing Quotations, the import file may already contain Quotation Numbers. However, you may want new numbers to be assigned to each record as part of the import process. If so, enter "-99" in the import file in the space where each Quotation Number would otherwise appear. When each record is imported, it will be given the next number in the relevant Number Series, as if you had entered it yourself.
If you use this feature, take great care over the following two points:
- The Quotation Number is determined by the Quotation Date. The Quotation Number will be the first unused number in the Number Series for the year or other period in which the Quotation Date of the Quotation falls. Make sure you include a Quotation Date for each record in your import file, otherwise the imported records could be placed in the wrong number sequence.
- Make sure there are sufficient unused numbers in the relevant Number Series for the number of records that will be imported. If there are not enough unused numbers in the relevant Number Series, some records will not be given numbers at all.
Please click the links for details about the individual import functions, descriptions of which have been divided into the following categories:
In this chapter:
Go back to:
- Home page for Working Environment manual
- Home page for Standard CRM manual
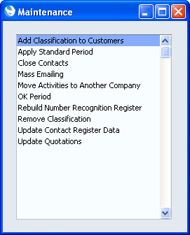
Routines - Maintenance
Maintenance functions allow you to carry out certain updating tasks, usually involving batch processing: examples include adding Contact Classifications to or removing them from Customers and updating Quotations with the latest Item, Price and Customer information.To run a Maintenance function, click the [Routines] button in the Master Control panel and then the [Maintenance] button in the 'Routines' window. A list window will appear, from where you can choose the required option by double-clicking. The options in the list will vary, depending on the active module. Illustrated below are the Maintenance functions in the Contact module:
Individual Maintenance Functions
Please click the links for details about the individual Maintenance functions, descriptions of which have been divided into the following categories:
- Activities, Calendar and Task Manager
- Customers, Suppliers and Contact Persons
- E-mail and Conferences
- Quotations
- System
- Introduction
- Reports
- Documents
- Settings
- Exports
- Imports
- Maintenance
- Registration
- Home page for Working Environment manual
- Home page for Standard CRM manual
Routines - Registration
Use this routine to register your copy of Standard CRM. Please refer to the Enabler Key page for full details.---
In this chapter:
- Introduction
- Reports
- Documents
- Settings
- Exports
- Imports
- Maintenance
- Registration
- Home page for Working Environment manual
- Home page for Standard CRM manual
Passwords
You can set or change your password from the Master Control panel. Bring the Master Control panel to the front using the Ctrl-M (Windows) or ⌘-M (Mac OS X) keyboard shortcut, and then select 'Change Password' from the Operations menu. Enter the old password if there is one and then type in the new one twice to ensure that it is correct. Click [ve] to close the window and save, or [Cancel] if you do not want to save changes. The password is case-sensitive.When you first used the old password, you may have specified that you wanted Standard CRM to remember it so that you did not have to enter it yourself each time you log in (as described in step 7 on this page). If so, the first time you use the new password, you will be asked once again if you want it to be remembered. Please refer to the description of the 'Stop Auto Login' function for more details.
In a single-user system, you can only set or change your password if a record for you already exists in the Person register (i.e. you had to log in to Standard CRM). If this is not the case, you must create such a record first: please refer here for details.
---
In this chapter:
- Master Control panel
- Personal Desktop
- Passwords
- Home page for Working Environment manual
- Home page for Standard CRM manual