Entering the first Items
The Item register contains information about the products and services that you sell. This register is available in the Sales Orders, Purchase Orders and Sales Ledger modules, and in the Contracts, Production, Quotations, Service Orders and Job Costing modules if installed.You can group Items of a similar type together using Item Groups. You can give every Item belonging to the same Group the same default Sales and Cost Accounts, Credit Account and VAT Codes, saving you the work of having to specify these for each Item individually. Defining and assigning Item Groups also makes modification easier: if you need to change the Cost Account, for example, you only need make one change (to the Item Group), rather than many (to each of the Items). Before entering Items, therefore, it is recommended that you enter some Item Groups, using the register in the Sales Ledger.
To enter your first Item, first select one of the modules mentioned in the first paragraph using the [Switch Module] button in the Navigation Centre or the Ctrl-0 (zero) (Windows and Linux) or ⌘-0 (Mac OS X) keyboard shortcut. Then, click the [Registers] button in the Navigation Centre and double-click 'Items' in the resulting list. The 'Items: Browse' window is opened, showing a list of Items already entered. To create a new Item, select 'New' from the Create menu above the list or use the Ctrl-N/⌘-N keyboard shortcut. Alternatively, highlight an Item similar to the one you want to enter and select 'Duplicate' from the same menu (or use Ctrl-K/⌘-Y).
If you don't need to open the 'Items: Browse' window, a shortcut is to open the + drop-down menu from the Navigation Centre (in the top right-hand corner if you are using Windows or Linux, towards the top left if you are using Mac OS X) and select 'Items'.
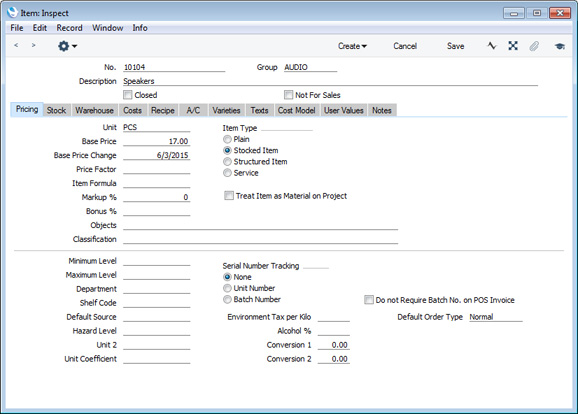
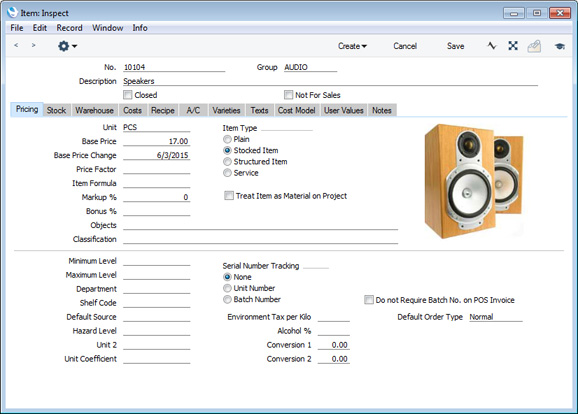
Use the 'Item: New' window shown below to enter information about an Item. Notes about the more important fields can be found beneath the illustration: for full details about every field, please refer to the Items page.
When an Item record is complete, click the [Save] button in the top right-hand corner of the window. The Item will be saved in the Item register. The window title will change to 'Item: Inspect', giving you a chance to check you have not made any mistakes in entering the record.
Close the record by clicking the close box or using the Ctrl-F4 (Windows and Linux) or ⌘-W (Mac OS X) keyboard shortcut. If you have a number of Items to enter, select 'New' from the Create menu (or use the Ctrl-N/⌘-N keyboard shortcut) instead of clicking the [Save] button as described above. The Item will be saved and closed, and a blank window will be opened, allowing you to enter another Item straight away.
If you wish to import Items from your old accounts system, please follow the import instructions on the Importing Set-up Data page to import a text file created by that system. For details of the composition of this text file, please refer to your HansaWorld representative.

- Base Price
- The Base Price is the standard retail price of the Item. Please click here for more details about Pricing.
- Unit
- The Unit is the quantity to which the Base Price refers. For example, the Unit could be a single entity, a pair or a dozen. Please click the links for more information about Units, including selling Items using different Units, selling Items by area or volume and producing stock reports in different Units.
- Item Type
- Choose an Item Type, as follows:
- Plain
- Use this Type for non-physical Items that you will not keep in stock e.g. delivery charges.
- Stocked
- Use this Type for physical Items that you will keep in stock. Stock levels and values will always be maintained for Stocked Items. You can obtain a stock list and valuation at any time using the Stock List report in the Stock module.
- You should choose a stock valuation method (or "Cost Model") for your Stocked Items. This will be used by the Stock List report to value your stock and will also determine the cost of sales value of each Item when you sell one. You can set an overall valuation method in the Cost Accounting setting in the Stock module. If you want to use a different valuation method for a particular Stocked Item, choose it on the 'Cost Model' card of the Item record or in the Item Group if the Item belongs to one.
- You should also choose a Cost of Sales Account for a Stocked Item. Again, you can do this in the Item record ('A/C' card) or in the Item Group if the Item belongs to one. You should also set a default Cost of Sales Account in the Account Usage Stock setting in the Stock module.
- You should choose a stock valuation method (or "Cost Model") for your Stocked Items. This will be used by the Stock List report to value your stock and will also determine the cost of sales value of each Item when you sell one. You can set an overall valuation method in the Cost Accounting setting in the Stock module. If you want to use a different valuation method for a particular Stocked Item, choose it on the 'Cost Model' card of the Item record or in the Item Group if the Item belongs to one.
- Structured
- Use this Type for Items that you will build from components at the moment of delivery. You will never keep a Structured Item in stock, only its components.
- You should specify a Recipe for each Structured Item, on the 'Recipe' card. The Recipe is a list of the components that you will use to build the Item: define each Recipe in the Recipes setting in the Stock module.
- When you sell a Structured Item, it will of course be shown on all paperwork (e.g. the Invoice). If you would like the components to be listed as well, tick the Paste Components during Entry box on the 'Recipe' card.
- You should specify a Recipe for each Structured Item, on the 'Recipe' card. The Recipe is a list of the components that you will use to build the Item: define each Recipe in the Recipes setting in the Stock module.
- Service
- Use this Type for chargeable time, e.g. consultancy, labour, training. If you do not have the Job Costing module, these Items can also be Plain Items. Outside that module Plain and Service Items are handled in a similar manner. If you have the Job Costing module, these Items should be Service Items to take full advantage of the time recording features in that module.
- Plain
- Picture
- You can attach a picture of the Item. This is described here.
- Cost Price
- The Cost Price on the 'Costs' card is the standard purchase price of the Item. If necessary, you can have this updated automatically each time you receive the Item into stock. Use the Upd. Cost Price at Goods Receipt options on the same card to control this feature.
In this chapter:
- Entering the first Items
- Pictures and Item records
Go back to:
- Home page for Starting Work manual
- Home page for Standard ERP manual
Pictures
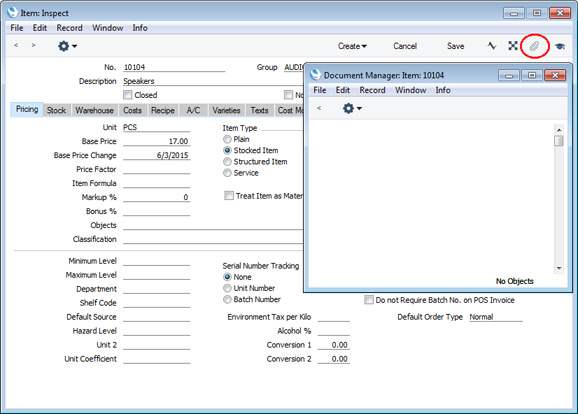
You can attach pictures to records in the Person and Item registers. Follow these steps:- Open the record in question. The record must already have been saved at least once (i.e. the window title must be 'Inspect' or 'Update').
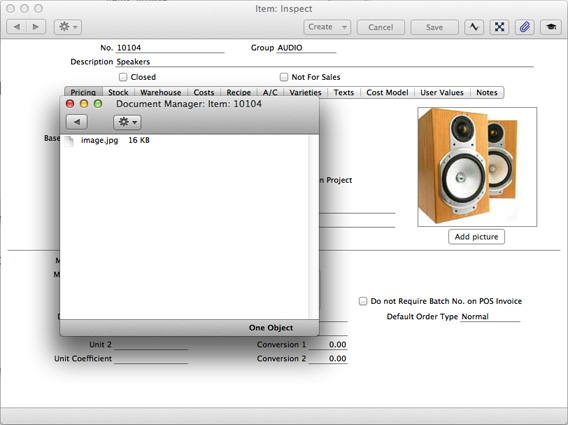
- Click the [Document Manager] button (in the top right-hand corner with the paper clip icon) or select 'Attachments' from the Record menu. A list of objects currently attached to the record is opened.
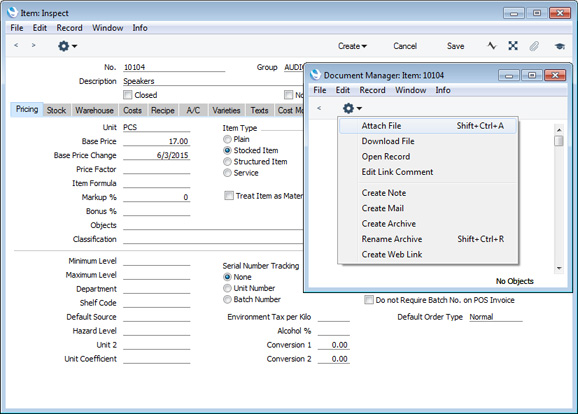
- Choose 'Attach File' from the Operations menu of this list.
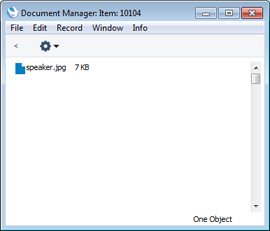
- Locate the picture file on your hard disk and click [Open]. The picture will be attached to the record. It must be a .jpg file (or a .png file if you are using Mac OS X). The maximum picture size is 280 x 280 pixels: larger pictures will be cropped.
- After the picture file has uploaded, you may need to close and reopen the record to see the picture:
In the Mac OS X version of Standard ERP, you can attach pictures to Person and Item records as described above, but you can also use the [Add picture] button underneath the picture field:
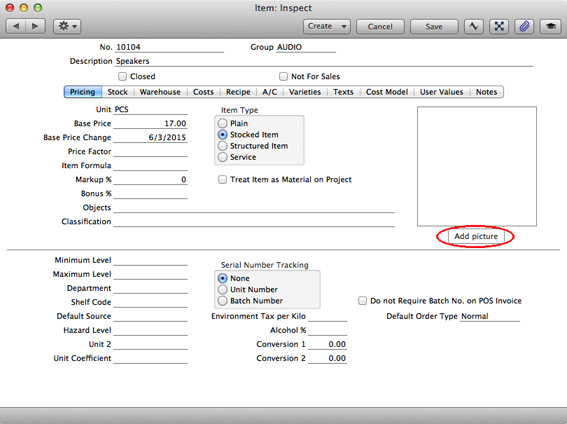
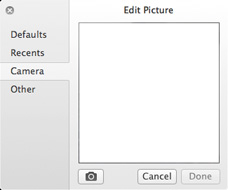
In both cases you can then scale the picture using the slider and, if the picture is too big, move the picture by dragging so that the part you need is in the centre of the frame (the part outside the frame will be cropped).
Finally, click the [Done] button to add the picture to the Item. After uploading, the picture will appear in the list of attachments, with the name "image.jpg" or "image.png":
---
In this chapter:
- Entering the first Items
- Pictures
Go back to:
- Home page for Starting Work manual
- Home page for Standard ERP manual