Ievads
Apkalpošanas funkcijas tiek izmantotas atjaunināšanas uzdevumu veikšanai, parasti iekļaujot ierakstu sērijas un aptverot vienu vai vairākus noteikta reģistra ierakstus. CRM modulī ir pieejamas septiņas šādas funkcijas. Lai tās izmantotu, no izvēlnes Fails izvēlieties funkciju ‘Apkalpošana’. Tiks atvērts šāds logs: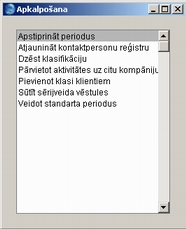
Pievienot klasi klientiem
Šo funkciju izmanto, lai klientiem pievienotu konkrētu klasifikāciju, piemēram, tiem, kuri ir vai nav iegādājušies konkrētu artikulu, vai tiem, kuru līgumā ietilpst vai neietilpst konkrēts artikuls.Tas var noderēt, ja vēlaties šādiem klientiem nosūtīt vēstules. Lai to izdarītu, palaidiet šo funkciju un pēc tam izveidojiet vēstuli, tās sadaļā 'Kat./Klases izv.' norādiet nepieciešamo klasifikāciju. Šādu klasifikāciju varat izmantot arī atskaitēs, lai redzētu konkrēto klientu sarakstu. Kad klasifikācija vairs nav vajadzīga, to iespējams dzēst no klientu kartiņām, izmantojot Apkalpošanas funkciju 'Dzēst klasifikāciju'.
Lai redzētu to klientu sarakstu, kuru kartiņās tiks mainīta informācija, pirms funkcijas palaišanas varat izveidot atskaiti Kas ir/nav nopirkuši.
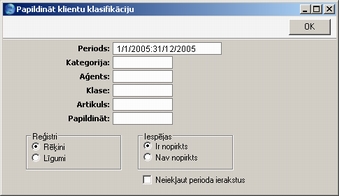
- Periods
- Ievietot Speciāli
Sistēmas moduļa sagatavošana Atskaišu periodi
- Funkcija meklēs klientus, kuri ir vai nav nopirkuši konkrētos artikulus norādītajā periodā, un šiem klientiem pievienos jaunu klasifikāciju. Ja funkcijai periods nav jāņem vērā, loga apakšējā daļā atzīmējiet izvēles rūtiņu ‘Neiekļaut perioda ierakstus’. Ja funkcija attiecas uz līgumiem, periods nekad netiks ņemts vērā.
- Kategorija
- Ievietot Speciāli
Realizācijas moduļa sagatavošana Klientu kategorijas
- Ja norādāt klientu kategoriju, funkcija meklēs tās kategorijas klientus, kuri ir vai nav iegādājušies konkrēto artikulu. Pēc tam atrastajiem klientiem tiks pievienota jauna klasifikācija.
- Aģents
- Ievietot Speciāli
Sistēmas moduļa reģistrs Personas
- Ievadiet tās personas (aģenta) iniciāļus, kura apkalpotajiem klientiem (kuri ir vai nav iegādājušies konkrētu artikulu) jāpievieno jauna klasifikācija.
- Klase
- Ievietot Speciāli
CRM moduļa sagatavošana Klientu klasifikācijas
- Ja laukā ir norādīta klientu klasifikācija, funkcija meklēs klientus, kuru klasifikācija norāda, vai tie ir, vai nav iegādājušies konkrēto artikulu. Pēc tam šiem klientiem tiks pievienota jauna klasifikācija.
- Ja norādāt vairākas klasifikācijas, atdalītas ar komatu, funkcija meklēs klientus, kuru kartiņā ievadītas visas šīs klasifikācijas. Ja ievadāt vairākas klasifikācijas, atdalītas ar plus zīmi (+), jauna klasifikācija tiks pievienota visiem tiem klientiem, kuru kartiņā būs norādīta vismaz viena no šīm klasifikācijām. Ja pirms klasifikācijas koda ievadāt izsaukuma zīmi (!), jauna klasifikācija tiks pievienota visiem tiem klientiem, kuru kartiņā nebūs norādītās klasifikācijas.
- Piemēram:
- 1,2
- Jauna klasifikācija tiek pievienota klientiem, kuru kartiņā ievadītas klasifikācijas 1 un 2 (kā arī klientiem ar klasifikāciju 1, 2 un 3).
- 1+2
- Jauna klasifikācija tiek pievienota klientiem, kuru kartiņā ievadīta klasifkācija 1 vai 2.
- !2
- Jauna klasifikācija tiek pievienota visiem klientiem, kuru kartiņā nav ievadīta klasifikācija 2.
- 1,!2
- Jauna klasifikācija tiek pievienota klientiem ar klasifikāciju 1, bet netiek pievienota tiem, kuriem ievadīta klasifikācija 2 (t.i., klientiem, kuru kartiņā ievadītas klasifikācijas 1 un 2, nekas netiks pievienots). Ievērojiet, ka šajā piemērā pirms izsaukuma zīmes ielikts komats.
- !1,!2
- Jauna klasifikācija tiks pievienota visiem klientiem, kuru kartiņās nebūs ievadīta klasifikācija 1 vai 2, vai abas minētās. Ievērojiet, ka klasifikācijas atdalītas arī ar komatu.
- Ja norādāt vairākas klasifikācijas, atdalītas ar komatu, funkcija meklēs klientus, kuru kartiņā ievadītas visas šīs klasifikācijas. Ja ievadāt vairākas klasifikācijas, atdalītas ar plus zīmi (+), jauna klasifikācija tiks pievienota visiem tiem klientiem, kuru kartiņā būs norādīta vismaz viena no šīm klasifikācijām. Ja pirms klasifikācijas koda ievadāt izsaukuma zīmi (!), jauna klasifikācija tiks pievienota visiem tiem klientiem, kuru kartiņā nebūs norādītās klasifikācijas.
- Artikuls
- Ievietot Speciāli
reģistrs Artikuls
- Norādiet artikulu, kurš funkcijai jāiekļauj meklēšanā: jauna klasifikācija tiks pievienota tiem klientiem, kuri ir vai nav iegādājušies šo artikulu. Ja artikulu nenorādāt, funkcija nedarbosies.
- Papildināt
- Ievietot Speciāli
CRM moduļa sagatavošana Klientu klasifikācijas
- Norādiet klasifikāciju, kura jāpievieno katram klientam, kurš ir vai nav iegādājies konkrēto artikulu. Ja kādam klientam jau būs ievadīta šāda klasifikācija, tā netiks pievienota atkārtoti.
- Reģistri
- Izvēlieties funkcijas darbības reģistru.
- Rēķini
- Funkcija pārbaudīs apstiprinātus rēķinus, lai atrastu klientus, kuri ir vai nav iegādājušies konkrēto artikulu.
- Līgumi
- Funkcija pārbaudīs reģistru Līgumi, lai atrastu klientus, kuru līgumos ir vai nav iekļauts konkrēts artikuls. Augšējā laukā norādītais periods netiks ņemts vērā.
- Ja atzīmējāt opciju ‘Nav nopirkts’ (blakus), funkcija ignorēs klientus bez līguma.
- Rēķini
- Iespējas
- Izvēlieties, vai jaunā klasifikācija jāpievieno klientiem kuri ir, vai nav iegādājušies konkrēto artikulu.
- Neiekļaut perioda ierakstus
- Atzīmējiet rūtiņu, ja vēlaties, lai funkcija ignorē augšējā laukā ievadīto periodu (t.i., jaunu klasifikāciju vēlaties pievienot visiem klientiem, kuri ir vai nav iegādājušies konkrēto artikulu jebkurā laika periodā).
Add Classification to Items
This page describes the 'Add Classification to Items" Maintenance function in the CRM module.---
The 'Add Classification to Items' function allows you to add a particular Item Classification to a set of Items.
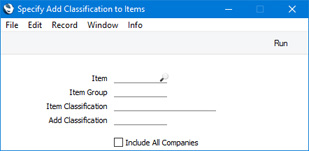
- Item
- Paste Special
Item register
- Range Reporting Alpha
- Specify here the Item or range of Items that is to be the subject of the function: the new Item Classification will be added to every Item in the range.
- Specify here the Item or range of Items that is to be the subject of the function: the new Item Classification will be added to every Item in the range.
- Item Group
- Paste Special
Item Group register, Sales Ledger
- If you specify an Item Group here, the new Item Classification will be added to every Item belonging to that Item Group.
- Item Classification
- Paste Special
Item Classifications setting, Sales Ledger
- Use this field if you need the new Item Classification to be added to every Item that has a particular Item Classification. If you enter a number of Item Classifications separated by commas, the new Classification will only be added to the Items that feature all the Item Classifications listed.
- Add Classification
- Paste Special
Item Classifications setting, Sales Ledger
- Specify here the Item Classification that is to be added to the selected Items. If a particular Item already has this Classification, it will not be added again.
- Include All Companies
- If you have more than one Company in your database and you would like the new Item Classification to be added to Items in every Company, select this option.
---
Maintenance functions in the CRM module:
- Introduction
- Add Classification to Contacts
- Add Classification to Items
- Apply Standard Period
- Close Contacts
- Create Mails from Activities
- Mass Emailing
- Move Activities to Another Company
- OK Period
- Rebuild Number Recognition Register
- Remove Classification from Contacts
- Update Activities
- Update Contact Data
- Home page for CRM module manual
- Home page for Standard ERP manual
Veidot standarta periodus
Sīkāku informāciju par šo funkciju skatiet registra Standarta periodi aprakstā.Close Contacts
This page describes the 'Close Contacts" Maintenance function in the CRM module.---
The 'Close Contacts' function allows you to mark Customers or Suppliers as Closed in batches.
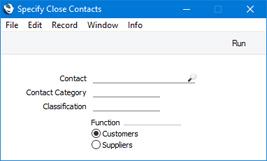
- Contact
- Paste Special
Customers and Suppliers in Contact register
- Range Reporting Alpha
- Specify here the Contacts that you want to mark as Closed. Use the Function options below to choose whether Customers or Suppliers in the range are to be closed. The 'Paste Special' list will contain Customers or Suppliers, depending on which Function option you have chosen.
- Specify here the Contacts that you want to mark as Closed. Use the Function options below to choose whether Customers or Suppliers in the range are to be closed. The 'Paste Special' list will contain Customers or Suppliers, depending on which Function option you have chosen.
- Contact Category
- Paste Special
Customer Categories setting, Sales Ledger or Supplier Categories setting, Purchase Ledger
- If you have chosen to close Customers, you can specify a Customer Category here to close every Customer belonging to that Customer Category. The 'Paste Special' list will contain Customer Categories.
- If you have chosen to close Suppliers, you can specify a Supplier Category here to close every Supplier belonging to that Supplier Category. The 'Paste Special' list will contain Supplier Categories.
- If you have chosen to close Suppliers, you can specify a Supplier Category here to close every Supplier belonging to that Supplier Category. The 'Paste Special' list will contain Supplier Categories.
- Classification
- Paste Special
Contact Classifications setting, CRM module
- Enter a Contact Classification in this field if you want to close Customers or Suppliers with a certain Classification. If you enter a number of Classifications separated by commas, only those Customers or Suppliers featuring all the Classifications listed will be closed.
- Function
- Use these options to choose whether to close Customers or Suppliers in the range. The option that you choose here will also determine what will be shown in the 'Paste Special' list from the Contact and Contact Category fields.
---
Maintenance functions in the CRM module:
- Introduction
- Add Classification to Contacts
- Add Classification to Items
- Apply Standard Period
- Close Contacts
- Create Mails from Activities
- Mass Emailing
- Move Activities to Another Company
- OK Period
- Rebuild Number Recognition Register
- Remove Classification from Contacts
- Update Activities
- Update Contact Data
- Home page for CRM module manual
- Home page for Standard ERP manual
Create Mails from Activities
This page describes the 'Create Mails from Activities" Maintenance function in the CRM module.---
The 'Create Mails from Activities' function will create Mails from selected Activities. Depending on the option you choose, the function will create a separate Mail for each Activity (with a PDF version of the Activity attached), a separate Mail for each Customer (with more than one PDF Activity attached) or a separate Mail for each Project. In all cases, Mails will be created as follows:
- The sender of each Mail will be the current user or, if the current user has no Mailbox, the From System Mailbox specified in the Mail and Conference Settings setting in the Email and Conferences module.
- The recipient of each Mail will be chosen as follows:
- If the Contact in an Activity has a record in the Additional Email Recipients setting in the CRM module, the Mail will be sent to the Contact Persons listed with the Form Type "Activity" in that record.
- If the Contact does not have a record in the Additional Email Recipients setting or its record in that setting has no Contact Persons with the Form Type "Activity" and if an Activity has been connected to a Project, the Mail will be sent to the Contact Person specified in the Project.
- If the Contact Person specified in the Project does not have an email address, the Project does not have a Contact Person or the Activity has not been connected to a Project, the email will be sent to the Contact in the Activity.
- If the above points are not satisfied, no Mail will be created for the Contact/Activity.
- If the Contact in an Activity has a record in the Additional Email Recipients setting in the CRM module, the Mail will be sent to the Contact Persons listed with the Form Type "Activity" in that record.
- The Subject and Text of the Mail will be taken from the record in the Mail Texts setting in the Email and Conferences module in which the Form is "Activity". If the Activity has been connected to a Project in which a Language has been specified and the Mail Text record contains a row for that Language, the Subject and Text will be determined by the fields in that row. Otherwise, they will be determined by the fields in the Mail Text header, as follows:
- The Subject in the Mail Text record will be used as the Subject in the Mail.
- The Text of the Mail will be built up as follows:
- The initial text will be taken from the Standard Text record quoted in the First Text field in the Mail Text record.
- Depending on the Do not put Record Details in Mail Body option in the Mail Text record, the rows from the 'Text' card in the Activity will then be listed.
- The final text will be taken from the Standard Text record quoted in the Last Text field in the Mail Text record.
- The initial text will be taken from the Standard Text record quoted in the First Text field in the Mail Text record.
If either Standard Text record is in HTML format, the Mail will be in HTML format as well.
- The Subject in the Mail Text record will be used as the Subject in the Mail.
- A PDF version of the Activity will be attached to the Mail, accessible through the Document Manager. This requires you to have designed a Form Template to be used by the Activity Form, and to have assigned that Form Template to the Form using the 'Define Form' function When you design the Form Template, you may need to use Styles that will embed fonts in PDF files (this will depend on the fonts you use). You may also need to choose a code page and page setup, which you can do in the Form Template Properties. Please refer here for details about designing Form Templates and here for a list of the fields you can include in the Form Template used by the Activity form.
- The Activity itself will also be connected to the Mail through its Workflow Manager, and the Mail will be connected to the Activity through its Link Manager. This allows you to open the Mail quickly and easily when reviewing the Activity, or to open the Activity from the Mail.
To send Mails to Contacts using this function, you must be using the External Gateway module, and you must have configured the Email SMTP Server setting. Please refer here for full details about the mailing features in Standard ERP.
Selecting the function brings up the following dialogue box:
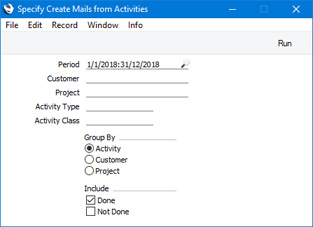
- Period
- Paste Special
Reporting Periods setting, System module
- Mails will be created from Activities whose Start Dates fall in the period specified here.
- Mails will not be created from Activities in which the Contact field is empty.
- Mails will not be created from Activities in which the Contact field is empty.
- Customer
- Paste Special
Customers in Contact register
- If you need to create Mails from Activities that are connected to a particular Customer, enter their Customer Number here. These are Activities with the Customer Number in the Contact field.
- Project
- Paste Special
Project register, Job Costing module
- If you need to create Mails from Activities that are connected to a particular Project, enter the Project Number here.
- Activity Type
- Paste Special
Activity Types setting, CRM module
- To create Mails from Activities with a particular Activity Type, enter that Activity Type here.
- Activity Class
- Paste Special
Activity Classes setting, CRM module
- To create Mails from Activities with Activity Types belonging to a particular Activity Class, enter that Activity Class here.
- Group By
- Use these options to specify how many Mails will be created, as follows:
- Activity
- Separate Mails will be created for each Activity in the selection. PDF versions of the Activities will be attached to the corresponding Mails.
- Customer
- A single Mail will be created for each Customer. If a Customer has been connected to more than one Activity in the selection, PDF versions of each of those Activities will be attached to the corresponding Mail.
- Project
- A single Mail will be created for each Project. If a Project has been connected to more than one Activity in the selection, PDF versions of each of those Activities will be attached to the corresponding Mail. Mails will not be created from Activities that are not connected to Projects.
- Activity
- Include
- Use these options to specify whether Mails should be created from Activities that have been marked as Done, from Activities that have not been marked as Done or both.
You can also create a Mail from an individual Activity. Simply open the Activity in a record window and choose 'Email' from the Create menu. Note that the recipient(s) in a Mail created from an individual Activity will be chosen using a different method than that described earlier in this section.
---
Maintenance functions in the CRM module:
- Introduction
- Add Classification to Contacts
- Add Classification to Items
- Apply Standard Period
- Close Contacts
- Create Mails from Activities
- Mass Emailing
- Move Activities to Another Company
- OK Period
- Rebuild Number Recognition Register
- Remove Classification from Contacts
- Update Activities
- Update Contact Data
- Home page for CRM module manual
- Home page for Standard ERP manual
Exclude customer category from mass mailing
This page describes the 'Exclude customer category from mass mailing' Maintenance function in the CRM module.---
The 'Exclude customer category from mass mailing' function allows you to tick the No Mass Letters and No Mass Emailing options in all Contacts belonging to a specified Customer Category.
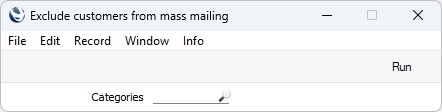
- Categories
- Paste Special
Customer Categories setting, Sales Ledger
- Specify a Customer Category here. When you run the function, the No Mass Letters and No Mass Emailing options will be ticked in every Contact that belongs to the Category. You must specify a Category here, otherwise running the function will have no effect.
Go back to:
- Home page for Maintenance functions in the CRM module
- Home page for CRM module manual
- Home page for Standard ERP manual
Sūtīt sērijveida vēstules
Šo funkciju var izmantot, lai klientu un kontaktpersonu kartiņās atjauninātu izvēles rūtiņas ‘Neiekļaut vēstuļu kopsar.’, ‘Neiekļaut e-pasta kopsar.’ un ‘Nesūtīt vēstules’.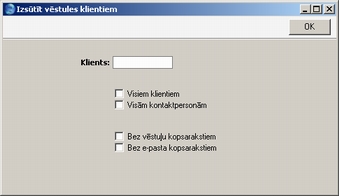
- Klients
- Ievietot Speciāli
reģistra Klienti piegādātāji un klienti
- Norādiet klientu, uz kuru attieksies funkcijas darbība. Pēc tam jāatzīmē kāda no opcijām, lai norādītu, vai izvēles rūtiņas jāatjaunina klientiem un/vai kontaktpersonām. Ja nav izvēlēta vismaz viena izvēles rūtiņa, funkcija nedarbosies.
- Visiem klientiem
- Atzīmējiet, lai laukā norādīto klientu kartiņās atjauninātu izvēles rūtiņas ‘Neiekļaut vēstuļu kopsar.’ un ‘Neiekļaut e-pasta kopsar.’.
- Visām kontaktpersonām
- Atzīmējiet, lai laukā norādīto klientu kontaktpersonu kartiņās atjauninātu izvēles rūtiņas ‘Nesūtīt vēstules.’ un ‘Neiekļaut vēstuļu kopsar.’.
- Bez vēstuļu kopsarakstiem
- Atzīmējot izvēles rūtiņu, funkcija klientu un/vai kontaktpersonu kartiņās atzīmēs izvēles rūtiņu ‘Neiekļaut vēstuļu kopsar.’ vai ‘Nesūtīt vēstules’. Ja šo rūtiņu neatzīmēsiet, klientu un/vai kontaktpersonu kartiņās no izvēles rūtiņas ‘Neiekļaut vēstuļu kopsar.’ vai ‘Nesūtīt vēstules’ tiks izņemts ķeksītis.
- Bez e-pasta kopsarakstiem
- Atzīmējot izvēles rūtiņu, funkcija klientu un/vai kontaktpersonu kartiņās atzīmēs izvēles rūtiņu ‘Neiekļaut e-pasta kopsar.' vai 'Neiekļaut vēstuļu kopsarakstos’. Ja šo rūtiņu neatzīmēsiet, klientu un/vai kontaktpersonu kartiņās no izvēles rūtiņas ‘Neiekļaut e-pasta kopsar.’ vai ‘ Neiekļaut vēstuļu kopsarakstos’ tiks izņemts ķeksītis.
Move Activities to Another Company
This page describes the 'Move Activities to Another Company" Maintenance function in the CRM module.---
If your Standard ERP database contains more than one Company, an Activity will usually be saved as follows:
- If the user creating the Activity is a Global User, the Activity will be saved in the Global User's Main CRM Company.
- If the user creating the Activity is not a Global User, the Activity will be saved in the Company in which the user is working at the time.
You can use the 'Move Activities to Another Company' function if you need to move Activities from one Company to another. This can be useful if, for example, you need a Person's Activities to be visible in more than one Company, if a Person created an Activity in the wrong Company, or if you simply need all Activities to be stored in the same Company.
To use this function, you should be working in the Company where the Activities are currently stored.
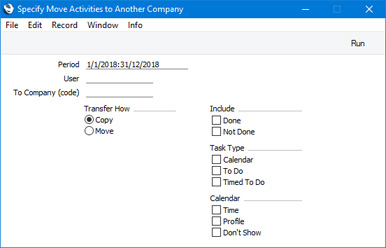
- Period
- Paste Special
Reporting Periods setting, System module
- Activities whose Start Dates fall in the period specified here will be moved to the destination Company.
- User
- Paste Special
Person register, System module and Global User register, Technics module
- Enter the Signature of the Person whose Activities are to be moved. Every Activity in which this Signature is included in the Persons or Cc fields will be moved.
- If the Persons or Cc field of an Activity contains several Persons including the one specified here, that Activity will be moved to the destination Company. However, in the destination Company, all other Persons will be removed from the Persons and Cc fields, leaving the Person specified here as the only entry in the Persons field.
- You must specify a Person, otherwise the function will have no effect.
- If the Persons or Cc field of an Activity contains several Persons including the one specified here, that Activity will be moved to the destination Company. However, in the destination Company, all other Persons will be removed from the Persons and Cc fields, leaving the Person specified here as the only entry in the Persons field.
- To Company (code)
- Specify the Code of the Company to which the Activities are to be moved (the destination Company).
- You must specify a destination Company, otherwise the function will have no effect.
- You must specify a destination Company, otherwise the function will have no effect.
- Transfer How
- Choose the Copy option if you want the Activity being moved to be left in the original Company. Choose the Move option if you want the delete the Activity from the original Company. An Activity whose Persons or Cc fields contain several Persons will not be deleted from the original Company.
- Include
- Use these options to choose whether Activities marked as Done, Activities not marked as Done or both are to be moved to the destination Company.
- Task Type
- Use these options to choose whether Calendar, To Do or Timed To Do Activities or any combination are to be moved to the destination Company.
- Calendar
- Use these options to choose whether Time, Profile or Don' Show Activities or any combination are to be moved to the destination Company.
---
Maintenance functions in the CRM module:
- Introduction
- Add Classification to Contacts
- Add Classification to Items
- Apply Standard Period
- Close Contacts
- Create Mails from Activities
- Mass Emailing
- Move Activities to Another Company
- OK Period
- Rebuild Number Recognition Register
- Remove Classification from Contacts
- Update Activities
- Update Contact Data
- Home page for CRM module manual
- Home page for Standard ERP manual
Apstiprināt periodus
Funkcija atzīmē visas konkrētā perioda kalendāra aktivitātes kā pabeigtas.
- Persona
- Ievietot Speciāli
Sistēmas moduļa reģistrs Personas
- Norādiet personu, kuras kalendāra aktivitātēs jāatzīmē izvēles rūtiņa ‘OK’. Šis lauks obligāti jāaizpilda, pretējā gadījumā funkcija nedarbosies.
- Sākuma datums, Beigu datums
- Ievietot Speciāli
Pašreizējais datums
- Šajos laukos norādiet periodu, kurā izveidotajās kalendāra aktivitātēs jāatzīmē izvēles rūtiņa ‘OK’.
Rebuild Number Recognition Register
Please refer to the Asterisk page for details about the 'Rebuild Number Recognition Register' Maintenance function.---
Maintenance functions in the CRM module:
- Introduction
- Add Classification to Contacts
- Add Classification to Items
- Apply Standard Period
- Close Contacts
- Create Mails from Activities
- Mass Emailing
- Move Activities to Another Company
- OK Period
- Rebuild Number Recognition Register
- Remove Classification from Contacts
- Update Activities
- Update Contact Data
- Home page for CRM module manual
- Home page for Standard ERP manual
Dzēst klasifikāciju
Funkciju var izmantot, lai no visām klientu kartiņām izdzēstu klasifikāciju.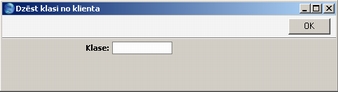
- Klase
- Ievietot Speciāli
CRM moduļa sagatavošana Klientu klasifikācijas
- Norādiet vienu klasifikāciju, kura jāizdzēš no visu klientu kartiņām. Ja vēlaties izdzēst vairākas klasifikācijas, izmantojiet funkciju tik reizes, cik nepieciešams.
Lai no klientu kartiņām izdzēstu klasifikāciju, var izmantot arī Realizācijas moduļa Apkalpošanas funkciju ‘Papildināt klientu klasifikāciju’.
Update Activities
This page describes the 'Update Activities" Maintenance function in the CRM module.---
The 'Update Activities' function will first search for Activities with a particular Activity State. In each of those Activities, it will then change that State to a different one. The Activity State will not be changed in Activities that have been marked as Done or that have been invalidated.
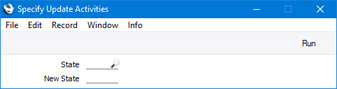
- State
- Paste Special
Activity States setting, Productivity module
- Use this field to specify the Activity State that is to be changed. The function will search for Activities with this State and then update those Activities with the New State specified below.
- New State
- Paste Special
Activity States setting, Productivity module
- Specify here the new Activity State that is to be copied to every Activity that currently has the State specified in the field above.
- You must specify both a State and a New State, otherwise the function will have no effect.
---
Maintenance functions in the CRM module:
- Introduction
- Add Classification to Contacts
- Add Classification to Items
- Apply Standard Period
- Close Contacts
- Create Mails from Activities
- Mass Emailing
- Move Activities to Another Company
- OK Period
- Rebuild Number Recognition Register
- Remove Classification from Contacts
- Update Activities
- Update Contact Data
- Home page for CRM module manual
- Home page for Standard ERP manual
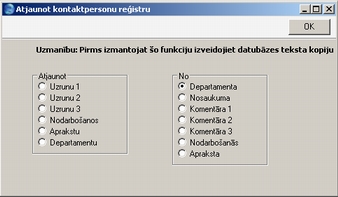
Atjaunināt kontaktpersonu reģistru
Šī funkcija katrā reģistra Kontaktpersonas kartiņā kopē datus no viena lauka uz citu.Izvēloties funkciju, tiks atvērts šāds dialoga logs: