Introduction to Settings in the CRM Module
Settings concerned with the contact and time management tools in Standard ERP are located in the CRM module. To edit a setting when you are using Windows or Mac OS X, use the [Switch Module] button in the Navigation Centre to enter the CRM module and then click the [Settings] button, also in the Navigation Centre. To edit a setting when you are using iOS or Android, ensure you are in the CRM module using the [Switch Module] button in the Navigation Centre. Select ‘Settings’ from the Tools menu (with ‘wrench’ icon). In both cases, the 'Settings' list will open, listing the settings to be found in the CRM module: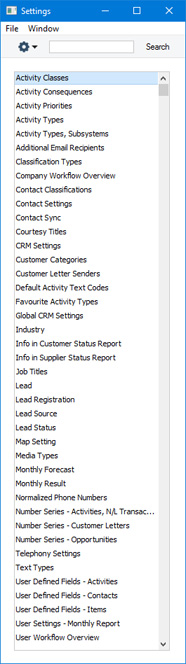
---
Please follow the links below for details about each setting:
- Introduction
- Activity Classes
- Activity Consequences
- Activity Priorities
- Activity Types
- Activity Types, Subsystems
- Additional Email Recipients
- Classification Types
- Company Workflow Overview
- Contact Classifications
- Contact Settings
- Courtesy Titles
- CRM Settings
- Customer Categories
- Default Activity Text Codes
- Favourite Activity Types
- Global CRM Settings
- Industries
- Info in Customer Status Report
- Info in Supplier Status Report
- Job Titles
- Leads
- Lead Sources
- Lead Status
- Map Setting
- Normalized Phone Numbers
- Number Series - Activities, N/L Transactions
- Number Series - Customer Letters
- Number Series - Opportunites
- Opportunity Classes
- Telephony Settings
- Text Types
- User Defined Fields - Activities
- User Defined Fields - Contacts
- User Defined Fields - Items
- User Workflow Overview
- Home page for CRM module manual
- Home page for Standard ERP manual
Tegevuste tüüpide klassid
Tegevuste tüüpide klassidega saad grupeerida sarnaseid Tegevusi. Igale Tegevusele tuleb anda Tüüp, mis tähistab teatud tööd või ülesannet (nt müügikõne, müügikohtumine või koosolek). Sarnased Tegevuste Tüübid (nt kõik müüki puudutavad Tüübid) saad grupeerida eraldi Tegevuste Klassidesse.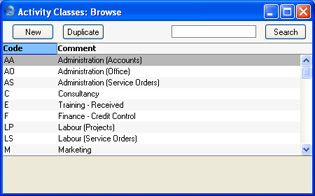
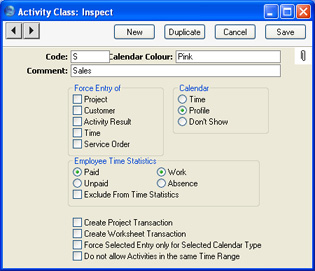
- Kood
- Anna Klassile kuni viiest tähemärgist koosnev ainulaadne kood.
- Värv kalendris
- Ctrl-Enter
Võimalikud valikud
- Kõik Tegevused, mille Tüübid kuuluvad samasse Klassi, esitatakse Kalendris sama värviga. Määra see värv siin.
- Kommentaar
- Sisesta Klassi kirjeldav nimetus. Seda näed aknas Tegevuste tüüpide klassid: Sirvi ja Ctrl-Enter valikuaknas.
- Nõua sisestust
- Märgi üks või mitu valikut, kui soovid, et Projekt, Klient, Tegevuse tulemus, Aeg ja/või Teenindustellimus kindlasti antud Klassi kuuluvat Tüüpi kandvatele Tegevustele sisestataks.
- Kalendritüüp
- Nende valikutega määra, kuidas antud Klassi kuuluvat Tüüpi kandvad Tegevused Kalendris esitatakse. Lähemalt loe palun Tegevuse kaardi 'Tüübi' kaarti käsitlevast lõigust edaspidi.
- Töötaja ajastatistika
- Nende valikutega määra, kuidas antud Klassi kuuluvat Tüüpi kandvad Tegevused esitatakse aruandes Töötaja aja statistika.
- Palgaline, Palgata, Töö, Puudumine
- Märgi valikud Palgaline ja Töö, kui soovid antud Klassi kuuluvat Tüüpi kandvaid Tegevusi näha Töötaja aja statistika aruande põhiosas ning iga töötaja kogusummades.
- Ülejäänud kombinatsioonide puhul (st Palgaline/Puudumine, Palgata/Puudumine, Palgata/Töö) esitatakse Tegevused samuti aruande põhiosas, kuid igaühe kohta on välja toodud eraldi kogusummad iga töötaja kohta.
- Antud valikud ei kehti Töötaja aja statistika aruande kokkuvõtliku versiooni puhul, milles näidatakse vaid kõikide Tegevuste kogusumma.
- Ülejäänud kombinatsioonide puhul (st Palgaline/Puudumine, Palgata/Puudumine, Palgata/Töö) esitatakse Tegevused samuti aruande põhiosas, kuid igaühe kohta on välja toodud eraldi kogusummad iga töötaja kohta.
- Jäta ajastatistika aruandest välja
- Märgi antud valik, kui soovid antud Klassi kuuluvat Tüüpi kandvad Tegevused Töötaja aja statistika aruandest välja jätta.
- Palgaline, Palgata, Töö, Puudumine
- Koosta projektikanne
- Märgi see valik, kui soovid, et antud Klassi kuuluvat Tüüpi kandvate Tegevuste Tehtuks märkimisel ja salvestamisel koostataks Projektikanne.
- See on vajalik, kui kasutad Ajatabelite alternatiivina aja registreerimiseks Tegevusi (Projektide raames tehtud töö registreerimiseks). Vastavalt Projektikannetele koostatakse projektide eest Arved.
- Kui Tegevuse tüübi klassil on see valik märgitud, on soovitav märkida ka Projekti ja Aja sisestamise nõudmise valikud ning Kalendritüübiks määrata Aeg. Projektikandeid ei koostata Planeeritud Tegevustest ega Tegevustest, millel on märgitud valik Ära näita, küll aga saab Projektikandeid koostada igat Tüüpi Tegevustest.
- See on vajalik, kui kasutad Ajatabelite alternatiivina aja registreerimiseks Tegevusi (Projektide raames tehtud töö registreerimiseks). Vastavalt Projektikannetele koostatakse projektide eest Arved.
- Koosta töölehekanne
- Märgi see valik, kui soovid, et antud Klassi kuuluvat Tüüpi kandvate Tegevuste Tehtuks märkimisel ja salvestamisel koostataks Töölehekanne.
- See on vajalik, kui kasutad Töölehtede alternatiivina aja registreerimiseks Tegevusi (Teenindustellimuse või Töökäsu alusel tehtud töö registreerimiseks). Vastavalt Töölehekannetele koostatakse Kliendile Arved.
- Kui Tegevuse tüübi klassil on see valik märgitud, on soovitav märkida ka Aja ja Teenindustellimuse sisestamise nõudmise valikud ning Kalendritüübiks määrata Aeg. Töölehekandeid ei koostata Planeeritud Tegevustest ega Tegevustest, millel on märgitud valik Ära näita, küll aga saab Töölehekandeid koostada igat Tüüpi Tegevustest.
- See on vajalik, kui kasutad Töölehtede alternatiivina aja registreerimiseks Tegevusi (Teenindustellimuse või Töökäsu alusel tehtud töö registreerimiseks). Vastavalt Töölehekannetele koostatakse Kliendile Arved.
- Nõua valitud sisestust ainult valitud kalendritüübile
- Antud valik toimib koos Nõua sisestust ja Kalendritüübi valikutega ülalpool. Kui Tegevusel muuta Kalendritüüpi, tühistab see märgitud Nõua sisestust valikud.
- Näiteks on Tegevuse tüübi klassil märgitud Projekti sisestamise nõudmise valik ning Kalendritüübiks määratud Aeg. Kui Tegevusel kasutatakse antud Klassi kuuluvat Tüüpi, saab selle Tegevuse Kalendritüübiks Aeg. Tegevust ei saa enne sellel Projekti määramist salvestada. Tegevuse Kalendritüüpi saad muuta: valida kas Aeg või Ära näita, kuid tavaliselt pead ka sellisel juhul määrama Projekti. Kui kasutad seda valikut, ei pea Kalendritüübi muutmisel Projekti määrama. See on vajalik, kui tead ette, et hakkad tegema tööd mingi Projekti raames, kuid ei tea veel, millise. Aja planeerimiseks võid sisestada Planeeritud Tegevuse ilma Projekti määramata. Kui töö on tehtud, saad sisestada Aja Tegevuse, millele määrad ka Projekti.
- Näiteks on Tegevuse tüübi klassil märgitud Projekti sisestamise nõudmise valik ning Kalendritüübiks määratud Aeg. Kui Tegevusel kasutatakse antud Klassi kuuluvat Tüüpi, saab selle Tegevuse Kalendritüübiks Aeg. Tegevust ei saa enne sellel Projekti määramist salvestada. Tegevuse Kalendritüüpi saad muuta: valida kas Aeg või Ära näita, kuid tavaliselt pead ka sellisel juhul määrama Projekti. Kui kasutad seda valikut, ei pea Kalendritüübi muutmisel Projekti määrama. See on vajalik, kui tead ette, et hakkad tegema tööd mingi Projekti raames, kuid ei tea veel, millise. Aja planeerimiseks võid sisestada Planeeritud Tegevuse ilma Projekti määramata. Kui töö on tehtud, saad sisestada Aja Tegevuse, millele määrad ka Projekti.
- Ära luba kattuvaid tegevusi samas ajavahemikus
- Märgi antud valik hoidmaks ära Kalendrisse samale ajale mitme tegevuse planeerimise. Märkima pead ka aja sisestamise nõudmise valiku ülalpool.
- Antud Klassi kuuluvat Tüüpi kandva Aja Tegevuse sisestamisel kontrollitakse, et samale ajale ei oleks juba tegevusi planeeritud. Tegevust ei saa salvestada, kui ükskõik millist Tegevuse tüüpi kandev Aja Tegevus (st Tegevus ei pea kuuluma samasse Klassi) on samale Isikule samale ajale planeeritud.
- Näiteks oled kella 9:00-12:00 sisestanud Aja Tegevuse. Uut Tegevust, mille Algus- ja/või Lõppaeg jääb antud perioodi, salvestada ei saa. Varasema Tegevuse Lõppaeg ning uue Tegevuse Algusaeg võivad olla samad, nii et antud näite puhul võib teine Tegevus alata 12:00 (kuid mitte 11:59:59).
- Antud Klassi kuuluvat Tüüpi kandva Aja Tegevuse sisestamisel kontrollitakse, et samale ajale ei oleks juba tegevusi planeeritud. Tegevust ei saa salvestada, kui ükskõik millist Tegevuse tüüpi kandev Aja Tegevus (st Tegevus ei pea kuuluma samasse Klassi) on samale Isikule samale ajale planeeritud.
Järgnevad tegevused
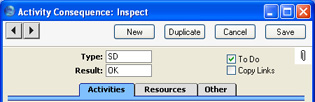
Selles seadistuses pannakse paika uute Tegevuste automaatne koostamine teatud Tüübi/Tulemuse kombinatsiooni kandvatest Tegevustest.See on vajalik, kui näiteks helistad Kliendile, kuid inimene, kellega soovisid rääkida, ei ole hetkel kohal. Sellisel juhul saad lasta automaatselt koostada uue Tegevuse, mis meenutab Sulle, et pead paari päeva pärast uuesti helistama. Seda funktsiooni saavad kasutada ka kliendivõlgnevuste jälgimisega tegelevad töötajad, kellel Tegevuste register aitab süstematiseerida tehtud telefonikõnesid.
Samuti saab siin määrata, et teatud Tegevustest koostataks automaatselt Teenindustellimus.
Mine Kliendihalduse moodulisse ja vali seadistus Järgnevad tegevused. Avaneb aken Järgnevad tegevused: Sirvi, milles näed eelnevalt sisestatud kaarte. Uue kaardi sisestamiseks klõpsa Uus. Avaneb aken Järgnev tegevus: Uus. Täida kaart ja salvesta see, klõpsates Salvesta.
Päis
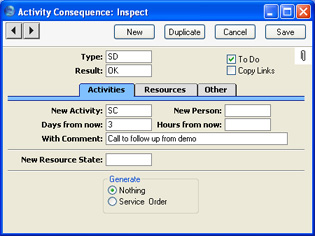
- Tüüp, Tulemus
- Ctrl-Enter
Tegevuse tüüpide seadistus, Kliendihalduse moodul
- Kui teatud Tüübi/Tulemuse kombinatsiooni kandev Tegevus märgitakse Tehtuks ja salvestatakse, koostatakse automaatselt uus Tegevus. Määra neil väljadel see kombinatsioon. Iga Tüübi/Tulemuse kombinatsiooni kohta saad registreerida ühe Järgneva tegevuse kaardi.
- Tööülesanne
- Märgi see valik, kui tahad, et uue Tegevuse Tüübiks oleks Tööülesanne. Vastasel juhul on järgneva ja algse Tegevuse Tüüp sama.
- Kopeeri lingid
- Märgi see valik, kui tahad, et uuele Tegevusele lisataks vana Tegevuse Kirjaklambriga seotud objektid.
Tegevuste kaart
- Uus tegevus
- Ctrl-Enter
Tegevuste tüüpide seadistus, Kliendihalduse moodul
- Määra siin uuel Tegevusel kasutatav Tüüp.
- Iga Tegevuse Tüüp võib omakorda kuuluda Klassi, mis määrab ära uuel Tegevusel vaikimisi kasutatava Kalendritüübi.
- Iga Tegevuse Tüüp võib omakorda kuuluda Klassi, mis määrab ära uuel Tegevusel vaikimisi kasutatava Kalendritüübi.
- Uus isik
- Ctrl-Enter
Isikute register, Üldine moodul
- Kui soovid, et uus Tegevus adresseeritaks mõnele teisele töötajale, sisesta siia selle töötaja initsiaalid. See võib olla vajalik, kui näiteks võla sissenõudmisega peab hakkama tegelema keegi kõrgemalt poolt. Jäta see väli tühjaks, kui uus Tegevus läheb samale töötajale.
- Pane tähele, et uue Tegevuse koostamisel arvestatakse töötajat algselt Tegevuselt peale viimast salvestamist. Kui algsel kaardil töötajat muudetakse, tuleb see kaart enne Tulemuse sisestamist salvestada. Vastasel juhul võidakse uus Tegevus adresseerida valele töötajale.
- Pane tähele, et uue Tegevuse koostamisel arvestatakse töötajat algselt Tegevuselt peale viimast salvestamist. Kui algsel kaardil töötajat muudetakse, tuleb see kaart enne Tulemuse sisestamist salvestada. Vastasel juhul võidakse uus Tegevus adresseerida valele töötajale.
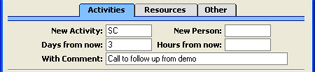
- Päevi tänasest
- Sisesta siia number, millega määratakse uue Tegevuse Alguskuupäev. Selleks kuupäevaks saab siin määratud arv päevi algse Tegevuse Alguskuupäevast edasi.
- Tunde tänasest
- Sarnaselt Alguskuupäevale saad määrata ka uue koostatava Tegevuse Alguskellaaja määratud arv tunde algse Tegevuse Alguskellaajast hilisemaks.
- Kommentaariga
- Siin salvestatud kommentaar sisestub uue Tegevuse Kommentaari väljale.
Ressursside kaart

- Uus ressursistaatus
- Ctrl-Enter
Ressursistaatuste seadistus, Ressursiplaneerimise moodul
- Kui algsel Tegevusel on 'Projekti' kaardil määratud Ressursid ning Tegevus muudab selle staatust, sisesta see uus Ressursistaatus siia. Tegevusele sisestub uus Ressursistaatus automaatselt. Näiteks, kui Tegevusel on registreeritud ruumide koristamine, võib ruumi kui ressursi staatus Tegevuse Tehtuks märkimisel ja salvestamisel muutuda – koristamata asemel koristatuks.
Activity Consequences - Alarm Card
This page describes the fields on the 'Alarm' card of the Activity Consequence record. Please follow the links below for descriptions of the other cards:- Introduction
- Header
- 'Activities' card
- 'Resources' card
- 'Alarm' card
- 'Other' card
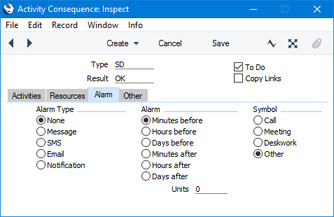
- Alarm Type, Alarm
- Use these sets of options to specify Alarm instructions that will be copied to the 'Alarm' card of the follow-up Activities.
- The options on the 'Alarm' card of an Activity allow reminders about the Activity to be sent to every Person in the Persons field in the Activity. Please refer to the description of the 'Alarm' card here for full details.
- The options on the 'Alarm' card of an Activity allow reminders about the Activity to be sent to every Person in the Persons field in the Activity. Please refer to the description of the 'Alarm' card here for full details.
- Symbol
- Specify the Symbol that is to be used in each follow-up Activity. The Symbol is an image that will be shown next to the Activity in the Task Manager.
Settings in the CRM module:
- Introduction
- Activity Classes
- Activity Consequences, including:
- Header
- 'Activities' card
- 'Resources' card
- 'Alarm' card
- 'Other' card
- Header
- Activity Priorities
- Activity Types
- Activity Types, Subsystems
- Additional Email Recipients
- Classification Types
- Company Workflow Overview
- Contact Classifications
- Contact Settings
- Courtesy Titles
- CRM Settings
- Customer Categories
- Default Activity Text Codes
- Favourite Activity Types
- Global CRM Settings
- Industries
- Info in Customer Status Report
- Info in Supplier Status Report
- Job Titles
- Leads
- Lead Sources
- Lead Status
- Map Setting
- Normalized Phone Numbers
- Number Series - Activities, N/L Transactions
- Number Series - Customer Letters
- Number Series - Opportunites
- Opportunity Classes
- Telephony Settings
- Text Types
- User Defined Fields - Activities
- User Defined Fields - Contacts
- User Defined Fields - Items
- User Workflow Overview
- Home page for CRM module manual
- Home page for Standard ERP manual
Muud kaart
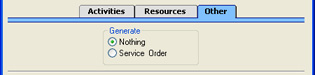
- Koosta teenindustellimus
- Märgi antud valik, kui soovid koostada Teenindustellimused teatud Tüübi ja Tegevuse kombinatsiooniga Tegevustest, mille 'Teeninduse' kaardil on määratud Seerianumbrid ja Artiklid.
- Kliendiandmed võetakse uuele Teenindustellimusele Tegevuselt. Artikliandmed Tegevuse 'Teeninduse' kaardilt sisestuvad Teenindustellimuse esimesele reale. Kommentaar Tegevuse päises, nagu ka kolm esimest rida 'Teksti' kaardilt sisestuvad Teenindustellimuse Kommentaari kaardile.
Activity Priorities
This page describes the Activity Priorities setting in the CRM module.---
The Activity Priorities setting allows you to construct a list of Priorities that you can use when entering Activities. This list will become a look-up table that you can access from the Priority field when entering Activities and when working in the Workflow Overview window.
To open the Activity Priorities setting, first ensure you are in the CRM module. Then, if you are using Windows or Mac OS X, click the [Settings] button in the Navigation Centre or use the Ctrl-S/⌘-S keyboard shortcuts and then double-click 'Activity Priorities' in the 'Settings' list. If you are using iOS or Android, select 'Settings' from the Tools menu (with 'wrench' icon) and tap 'Activity Priorities' in the 'Settings' list. The window illustrated below will open.
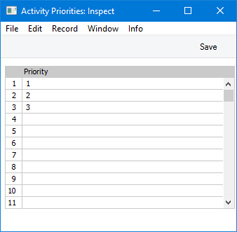
It is recommended that you enter Activity Priorities in numerical or alphabetical order, as shown in the illustration. You can insert a new Activity Priority in the correct place in the list by clicking on a row number and pressing the Return key (Windows/Mac OS X) or long tapping on a row number and selecting 'Insert Row' (iOS/Android). When you enter a new Activity and use 'Paste Special' to choose a Priority, the Activity Priorities will be listed in the same order as they are listed in this setting. If they are in numerical or alphabetical order, you will be able to find the correct one quickly and easily.
---
Settings in the CRM module:
- Introduction
- Activity Classes
- Activity Consequences
- Activity Priorities
- Activity Types
- Activity Types, Subsystems
- Additional Email Recipients
- Classification Types
- Company Workflow Overview
- Contact Classifications
- Contact Settings
- Courtesy Titles
- CRM Settings
- Customer Categories
- Default Activity Text Codes
- Favourite Activity Types
- Global CRM Settings
- Industries
- Info in Customer Status Report
- Info in Supplier Status Report
- Job Titles
- Leads
- Lead Sources
- Lead Status
- Map Setting
- Normalized Phone Numbers
- Number Series - Customer Letters
- Number Series - Opportunites
- Opportunity Classes
- Telephony Settings
- Text Types
- User Defined Fields - Activities
- User Defined Fields - Contacts
- User Defined Fields - Items
- User Workflow Overview
- Home page for CRM module manual
- Home page for Standard ERP manual
Tegevuste tüübid
Tegevuste Tüüpe kasutatakse Tegevuste klassifitseerimiseks. Tüübid tähistavad teatud tööd või ülesannet (nt müügikõne, müügikohtumine või koosolek). Sarnastele Tegevustele antakse sama Tüüp. Paljusid Kliendihalduse mooduli aruandeid saad tellida Tegevuse Tüübi järgi.Tegevuste Tüüpe kirjeldades pead kirjeldama ka mõned, mida saad kasutada Tegevuse Tulemusena. See on eriti oluline, kui kasutad Järgnevaid Tegevusi.
Tegevuste Tüüpe ei tohiks luua väga palju ning hoolikalt tuleb jälgida, et need oleksid üksteist välistavad. Sarnased Tegevuste Tüübid (nt kõik müüki puudutavad Tüübid) saad grupeerida eraldi Klassidesse.
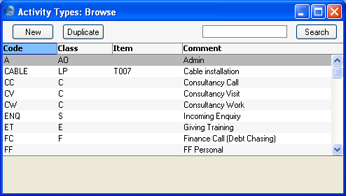
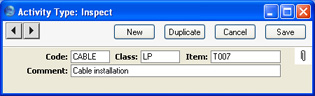
- Kood
- Anna Tegevuse Tüübile kuni viiest tähemärgist koosnev ainulaadne kood.
- Samasse Klassi kuuluvate Tüüpide koodide puhul on soovitav kasutada sama algussümbolit, et need oleksid Ctrl-Enter valikuaknas järjest.
- Salvestatud kaardil ei saa Koodi välja käsitsi muuta. Tegevuse Tüübi koodi muutmiseks kasuta Üldise mooduli seadistusi Konverteerimine – Master ja Konverteerimine – Tegevuste tüübid. Nende seadistustega muudetakse Tegevuse Tüübi kood nii siin kui kõikides teistes registrites, kus Tegevuse Tüüpi on kasutatud.
- Samasse Klassi kuuluvate Tüüpide koodide puhul on soovitav kasutada sama algussümbolit, et need oleksid Ctrl-Enter valikuaknas järjest.
- Klass
- Ctrl-Enter
Tegevuste tüüpide klasside seadistus, Kliendihalduse moodul
- Sarnased Tegevuste Tüübid (nt kõik müüki puudutavad Tüübid) saad grupeerida eraldi Klassidesse.
- Samasse Klassi kuuluvat Tüüpi kandvad Tegevused esitatakse Kalendris sama värviga. Võid kõigil sama Klassi kuuluvatel Tegevustel nõuda ka Projekti, Kliendi, Tulemuse ja/või Aja sisestamist.
- Samasse Klassi kuuluvat Tüüpi kandvad Tegevused esitatakse Kalendris sama värviga. Võid kõigil sama Klassi kuuluvatel Tegevustel nõuda ka Projekti, Kliendi, Tulemuse ja/või Aja sisestamist.
- Artikkel
- Ctrl-Enter
Artiklite register
- Kui siin on määratud Artikkel, sisestub see automaatselt kõigile antud Tüüpi kandvatele Tegevustele. See on vajalik, kui Tegevusest koostatakse Projektikanne.
- Kui Tegevuse Tüüp tähistab näiteks mingit tüüpi tööd, mis tehti Projekti või Teenindustellimuse raames, võid siia sisestada seda tööd tähistava Artikli ning see kantakse automaatselt kõigile seda Tüüpi kandvatele Tegevustele.
- Siia saad sisestada ainult Teenus-tüüpi või tavalisi Artikleid.
- Kui Tegevuse Tüüp tähistab näiteks mingit tüüpi tööd, mis tehti Projekti või Teenindustellimuse raames, võid siia sisestada seda tööd tähistava Artikli ning see kantakse automaatselt kõigile seda Tüüpi kandvatele Tegevustele.
- Nimetus
- Tegevuse Tüübi kirjeldus, mida näed aknas Tegevuste tüübid: Sirvi ning Ctrl-Enter valikuaknas.
Tegevuste tüübid, allsüsteemid
Tegevusi on võimalik lasta koostada automaatselt mõnest teisest registrist. Selleks kasutatakse antud seadistust.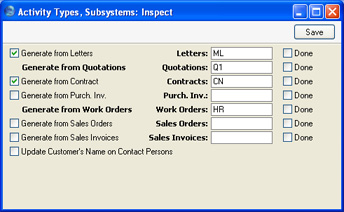
Lepingutest, Kliendikirjadest, Arvetest ja Ostuarvetest on võimalik lasta Tegevusi koostada ka kaardi kinnitamisel ja salvestamisel. Seda saad määrata vasakul olevate valikutega: siin tehtud valikud ei mõjuta Operatsioonide menüü funktsiooni Koosta tegevus kasutamist. Tegevustele antakse Tüüp vastavalt antud seadistuses tehtud määratlustele.
Müügitellimustest saab koostada Tegevusi ka kaartide esmakordsel salvestamisel. Selleks märgi valik Koosta müügitellimustest. Tegevustele antakse parempoolsel väljal määratud Tegevuse Tüüp, jällegi tingimusel, et Müügitellimus ei kuulu Tellimuse Klassi, millel on Tegevuse Tüüp määratud.
Märgi valik Tehtud, kui soovid, et vastavast registrist koostatud uued Tegevused oleksid märgitud Tehtuks.
Märgi valik Uuenda kliendi nime kontaktisiku kaardil, kui soovid, et Klientide registris tehtud Kliendinime muudatused kajastuksid selle Kliendi Kontaktisikutel.
Additional Email Recipients
This page describes the Additional Email Recipients setting in the CRM module.---
The Additional Email Recipients setting allows you to specify the Contact Persons in Customer or Supplier companies who should receive forms of various kinds when they are sent by email. For example, you can specify that every Invoice you send to a particular Customer by email will be sent to a particular person or persons.
You can use the following methods to create Mails to send specific documents or forms to Customers and Suppliers:
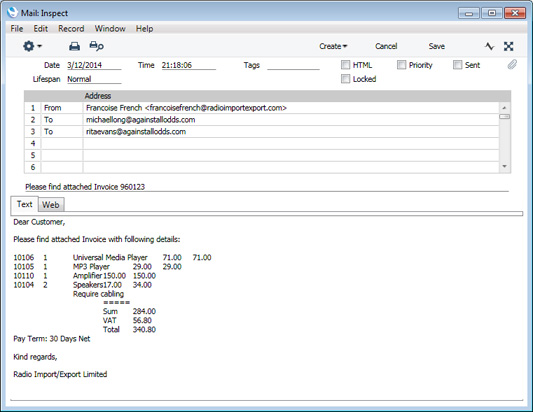
- You can create individual Mails from many records, such as Quotations, Sales Orders, Purchase Orders and Invoices. To create Mails from such records, simply open them and select 'E-Mail' from the Create menu (in versions prior to 8.0, use 'Create E-Mail' from the Operations menu). A pdf version of the record (e.g. the Quotation, Sales Order, Purchase Order or Invoice) will be attached to the Mail.
- You can create Mails in batches using various Maintenance functions. For example, the Sales Ledger contains Maintenance functions that you can use to send Invoices, Open Invoice Customer Statements and Periodic Customer Statements by email, while the Purchase Ledger contains a function that allows you to mail Periodic Supplier Statements to Suppliers. Again, pdf versions of the relevant form will be attached to each Mail.
- Use the Mail Texts setting in the Email and Conferences module to determine how the Subject and Text will be chosen. Please refer to the ‘Mail’ manual for details.
- Use the Additional Email Recipients setting in the CRM module to determine how the recipients will be chosen, as described below.
- If the Customer or Supplier has a record in this Additional Email Recipients setting, the Mail will be sent to the Contact Persons listed with the relevant Form Type in that record. For example, when you create a Mail from an Invoice, it will be sent to the Contact Persons with the "Invoice" Form Type in the Additional Email Recipients record.
- If the Customer or Supplier does not have a record in the Additional Email Recipients setting or its record in that setting has no Contact Persons with the relevant Form Type, the Mail will be sent to the Email Address of the Contact Person quoted in the Attention field in the record being mailed.
- If the Contact Person quoted in the Attention field in the record does not have an Email Address or there is no Contact Person in the Attention field, the Mail will be sent to the Email Address specified in the Contact record for the Customer or Supplier.
- If the above points are not satisfied, no Mail will be created.
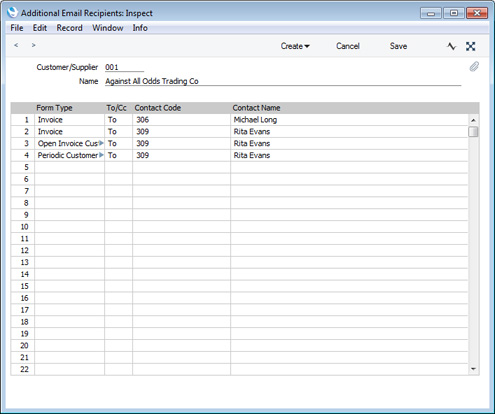
- Customer/Supplier
- Paste Special
Customers, Suppliers and Contact Persons in Contact register
- Specify the Customer or Supplier for whom you are entering email recipients.
- Name
- The Customer or Supplier Name will appear here when you specify a Contact Number in the field above.
- Form Type
- Paste Special
Choices of possible entries
- Using 'Paste Special', choose the form for which you will specify a recipient in the field to the right.
- To/Cc
- Paste Special
Choices of possible entries
- Specify the address format that is to be used when sending emails to the recipient. Possible entries are "To:", "Cc:" and "Bcc:"
- Contact Code
- Paste Special
Contact Persons in Contact register
- Specify the Contact Person to whom all forms specified in the field to the left are to be emailed. The record for the Contact Person in the Contact register must contain an Email Address in order for them to be sent Mails.
- The 'Paste Special' list will only contain Contact Persons connected to the Customer or Supplier specified in the header.
- The 'Paste Special' list will only contain Contact Persons connected to the Customer or Supplier specified in the header.
- Contact Name
- The Contact Person Name will appear here when you specify a Contact Number in the field on the left.
Settings in the CRM module:
- Introduction
- Activity Classes
- Activity Consequences
- Activity Types
- Activity Types, Subsystems
- Additional Email Recipients
- Classification Types
- Company Workflow Overview
- Contact Classifications
- Contact Settings
- Courtesy Titles
- CRM Settings
- Customer Categories
- Global CRM Settings
- Industries
- Info in Customer Status Report
- Info in Supplier Status Report
- Job Titles
- Leads
- Lead Sources
- Lead Status
- Map Setting
- Normalized Phone Numbers
- Number Series - Customer Letters
- Number Series - Opportunites
- Opportunity Classes
- Telephony Settings
- Text Types
- User Defined Fields - Activities
- User Defined Fields - Contacts
- User Defined Fields - Items
- User Workflow Overview
- Home page for CRM module manual
- Home page for Standard ERP manual
Klassifikaatorite tüübid
Klassifikaatorite tüüpidega saad grupeerida Klientide klassifikaatoreid.
On võimalik määrata, et kõikidele Klientidele antaks teatud Tüüpi kandev Klassifikaator. Lähemalt loe palun juhendi „Kliendid ja hankijad“ Kliendiklasside seadistust käsitlevast peatükist.
Company Workflow Overview
Please click here for details about the Company Workflow Overview setting in the CRM module.---
Settings in the CRM module:
- Introduction
- Activity Classes
- Activity Consequences
- Activity Types
- Activity Types, Subsystems
- Additional Email Recipients
- Classification Types
- Company Workflow Overview
- Contact Classifications
- Contact Settings
- Courtesy Titles
- CRM Settings
- Customer Categories
- Global CRM Settings
- Industries
- Info in Customer Status Report
- Info in Supplier Status Report
- Job Titles
- Leads
- Lead Sources
- Lead Status
- Map Setting
- Normalized Phone Numbers
- Number Series - Customer Letters
- Number Series - Opportunites
- Opportunity Classes
- Telephony Settings
- Text Types
- User Defined Fields - Activities
- User Defined Fields - Contacts
- User Defined Fields - Items
- User Workflow Overview
- Home page for CRM module manual
- Home page for Standard ERP manual
Kontakti klassifikaatorid
Antud seadistuses saad kirjeldada Klassifikaatorid, mis võimaldavad Kliente klassifitseerida (nt potentsiaalsed kliendid, jaekliendid, teenindatavad kliendid jne). Klassifikaator sisestatakse Kliendikaardi 'Kontakti' kaardile ja Kontaktisiku kaardi 'Kommentaari' kaardile. Kliendile võid määrata ka mitu Klassifikaatorit, eraldades need komadega. Näiteks saad määrata Kliendile nii tema potentsiaalse kliendi staatust kui tegevusvaldkonda tähistavad Klassifikaatorid.Klassifikaatorid on alternatiivne võimalus Klientide klassifitseerimiseks Müügireskontro Kliendiklasside kõrval. Klient saab kuuluda vaid ühte Kliendiklassi, kuid võib kanda erinevaid Klassifikaatoreid.
Paljusid Kliendihalduse mooduli aruandeid (ning EL Käibemaksuaruannet Müügireskontros) saad tellida Klassifikaatori järgi.
Klassifikaatoritele saad omakorda anda Klassifikaatorite tüübid, mis lisab veelgi paindlikkust. Klassifikaatorite tüüpide seadistus asub samuti Kliendihalduse moodulis.

Salvestatud kaardil ei saa Koodi välja käsitsi muuta. Koodi muutmiseks kasuta Üldise mooduli seadistusi Konverteerimine – Master ja Konverteerimine – Kontakti klassifikaatorid. Nende seadistustega muudetakse kood nii siin kui kõikides teistes registrites, kus Klassifikaatorit on kasutatud.
Contact Settings
Please refer here for details about the Contact Settings setting.---
Settings in the CRM module:
- Introduction
- Activity Classes
- Activity Consequences
- Activity Priorities
- Activity Types
- Activity Types, Subsystems
- Additional Email Recipients
- Contact Classifications
- Contact Settings
- Courtesy Titles
- CRM Settings
- Customer Categories
- Default Activity Text Codes
- Favourite Activity Types
- Global CRM Settings
- Industries
- Info in Customer Status Report
- Info in Supplier Status Report
- Job Titles
- Leads
- Lead Sources
- Lead Status
- Map Setting
- Normalized Phone Numbers
- Number Series - Activities, N/L Transactions
- Number Series - Customer Letters
- Number Series - Opportunites
- Opportunity Classes
- Telephony Settings
- Text Types
- User Defined Fields - Activities
- User Defined Fields - Contacts
- User Defined Fields - Items
- User Workflow Overview
- Home page for CRM module manual
- Home page for Standard ERP manual
Courtesy Titles
The Courtesy Titles setting can also be found in the Human Resources Management. module. Please refer here for details.---
Settings in the CRM module:
- Introduction
- Activity Classes
- Activity Consequences
- Activity Priorities
- Activity Types
- Activity Types, Subsystems
- Additional Email Recipients
- Contact Classifications
- Contact Settings
- Courtesy Titles
- CRM Settings
- Customer Categories
- Default Activity Text Codes
- Favourite Activity Types
- Global CRM Settings
- Industries
- Info in Customer Status Report
- Info in Supplier Status Report
- Job Titles
- Leads
- Lead Sources
- Lead Status
- Map Setting
- Normalized Phone Numbers
- Number Series - Activities, N/L Transactions
- Number Series - Customer Letters
- Number Series - Opportunites
- Opportunity Classes
- Telephony Settings
- Text Types
- User Defined Fields - Activities
- User Defined Fields - Contacts
- User Defined Fields - Items
- User Workflow Overview
- Home page for CRM module manual
- Home page for Standard ERP manual
CRM Settings
This page describes the CRM Settings setting in the CRM module.---
The CRM Settings setting contains some miscellaneous options controlling the behaviour of Activities.
Use the [Module] button in the Master Control panel to ensure you are in the CRM module and then click the [Settings] button, also in the Master Control panel. Double-click 'CRM Settings' in the resulting list. The 'CRM Settings: Inspect' window opens:
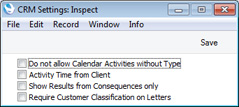
- Do not allow Calendar Activities without Type
- Use this option if you want every Activity to be given an Activity Type. This only applies to Time Activities (Activities where the Task Type is Calendar and the Calendar Type is Time).
- Activity Time from Client
- You can use this option in a multi-user system where the server is in a different time zone to the client machines.
- If you are using this option, the date and time in a new Activity will be taken from the clock on the client machine on which it was created. If you are not using this option, the date and time will be taken from the clock on the server.
- This option applies when the date and time in a new Activity is the current date and time. It does not apply in other situations (e.g. if you create an Activity from a Quotation, the date in the Activity will be the Make Contact Date or the Quotation Date from the Quotation).
- If you are using this option, the date and time in a new Activity will be taken from the clock on the client machine on which it was created. If you are not using this option, the date and time will be taken from the clock on the server.
- Show Results from Consequences only
- When you specify a Result in an Activity, mark the Activity as Done and save it, a new follow-up Activity will be created automatically if there is a record in the Activity Consequences setting for the Activity Type/Result combination.
- This option makes it easy to find the Results that will cause follow-up Activities to be created i.e the Results that have been connected to the specified Activity Type in the Activity Consequences setting.
- By default, when you use 'Paste Special' to choose a Result in an Activity, every possible Result will be listed. However, if you are using this option, only Results that will cause follow-up Activities to be created will be listed.
- For example, if the Activity Type in an Activity is "A" and there are records in the Activity Consequences setting with "A" as the Activity Type and with Results "X", "Y" and "Z", using this option will mean that only "X", "Y" and "Z" will be shown in the 'Paste Special' list when opened from the Result field. If the Activity Type is "B" and there are no records in the Activity Consequences setting with this Activity Type, the 'Paste Special' list will be empty.
- This option makes it easy to find the Results that will cause follow-up Activities to be created i.e the Results that have been connected to the specified Activity Type in the Activity Consequences setting.
- Require Customer Classification on Letters
- Select this option if you would like it to be mandatory to specify a Cust. Class in a Customer Letter in which you have entered * in the Customer field.
- Entering * in the Customer field in a Customer Letter means that all Contacts will be mailed, subject to their satisfying any requirements entered in the other fields in the Customer Letter. Making it mandatory to specify a Cust. Class when the Customer is * reduces the risk of printing letters to too many Contacts by mistake.
---
Settings in the CRM module:
- Introduction
- Activity Classes
- Activity Consequences
- Activity Types
- Activity Types, Subsystems
- Additional Email Recipients
- Classification Types
- Company Workflow Overview
- Contact Classifications
- Contact Settings
- Courtesy Titles
- CRM Settings
- Customer Categories
- Global CRM Settings
- Industries
- Info in Customer Status Report
- Info in Supplier Status Report
- Job Titles
- Leads
- Lead Sources
- Lead Status
- Map Setting
- Normalized Phone Numbers
- Number Series - Customer Letters
- Number Series - Opportunites
- Opportunity Classes
- Telephony Settings
- Text Types
- User Defined Fields - Activities
- User Defined Fields - Contacts
- User Defined Fields - Items
- User Workflow Overview
- Home page for CRM module manual
- Home page for Standard ERP manual
Customer Categories
The Customer Categories setting can also be found in the Sales Ledger: please refer here for details.---
Settings in the CRM module:
- Introduction
- Activity Classes
- Activity Consequences
- Activity Priorities
- Activity Types
- Activity Types, Subsystems
- Additional Email Recipients
- Classification Types
- Company Workflow Overview
- Contact Classifications
- Contact Settings
- Courtesy Titles
- CRM Settings
- Customer Categories
- Default Activity Text Codes
- Favourite Activity Types
- Global CRM Settings
- Industries
- Info in Customer Status Report
- Info in Supplier Status Report
- Job Titles
- Leads
- Lead Sources
- Lead Status
- Map Setting
- Normalized Phone Numbers
- Number Series - Activities, N/L Transactions
- Number Series - Customer Letters
- Number Series - Opportunites
- Opportunity Classes
- Telephony Settings
- Text Types
- User Defined Fields - Activities
- User Defined Fields - Contacts
- User Defined Fields - Items
- User Workflow Overview
- Home page for CRM module manual
- Home page for Standard ERP manual
Default Activity Text Codes
This page describes the Default Activity Text Codes setting in the CRM module.---
The Default Activity Text Codes setting in the CRM module allows you to define sets of Text Types which will then be added automatically to new Activities when you specify the Activity Code. You can allocate one set of Default Activity Text Codes to each Activity Code (using the Def. Text Codes field).
To open the setting, first change to the CRM module using the [Switch Module] button in the Navigation Centre. Then, if you are using Windows or Mac OS X, click the [Settings] button, also in the Navigation Centre or use the Ctrl-S/⌘-S keyboard shortcuts and then double-click 'Default Activity Text Codes' in the 'Settings' list. If you are using iOS or Android, select 'Settings' from the Tools menu (with 'wrench' icon) and tap 'Default Activity Text Codes' in the 'Settings' list. The 'Default Activity Text Codes: Browse' window is displayed, showing all Default Activity Text Code records previously entered.
To enter a new record, select 'New' from the Create menu (Windows/Mac OS X) or + menu (iOS/Android). The 'Default Activity Text Code: New' window appears: enter the details as appropriate and click the [Save] button (Windows/Mac OS X) or tap √ (iOS/Android) to save the new record.
After saving a Default Activity Text Code record, assign it to an Activity Type or Activity Types as necessary:
Settings in the CRM module:
- Introduction
- Activity Classes
- Activity Consequences
- Activity Priorities
- Activity Types
- Activity Types, Subsystems
- Additional Email Recipients
- Classification Types
- Company Workflow Overview
- Contact Classifications
- Contact Settings
- Courtesy Titles
- CRM Settings
- Customer Categories
- Default Activity Text Codes
- Favourite Activity Types
- Global CRM Settings
- Industries
- Info in Customer Status Report
- Info in Supplier Status Report
- Job Titles
- Leads
- Lead Sources
- Lead Status
- Map Setting
- Normalized Phone Numbers
- Number Series - Activities, N/L Transactions
- Number Series - Customer Letters
- Number Series - Opportunites
- Opportunity Classes
- Telephony Settings
- Text Types
- User Defined Fields - Activities
- User Defined Fields - Contacts
- User Defined Fields - Items
- User Workflow Overview
- Home page for CRM module manual
- Home page for Standard ERP manual
Favourite Activity Types
This page describes the Favourite Activity Types setting in the CRM module.---
Whenever you need to choose an Activity Type using 'Paste Special' (e.g. when entering Activities and when producing reports), you can reduce the 'Paste Special' list so that it only shows your favourite Activity Types. To do this, open the 'Paste Special' window and press the [Favourites] button at the top of the list (this button will not be visible if you are using iOS or Android).
If you want to specify that the 'Paste Special' list only shows your favourite Activity Types when it opens, open the Local Machine setting in the User Settings module and select "Favourite Activity Types" as the Activity Type Paste Special option. In this case, the 'Paste Special' list will contain an [All] button that you can use if you want to see every Activity Type (again, the [All] button will not be visible if you are using iOS or Android)
To mark an Activity Type as a favourite, highlight it in the 'Paste Special' window when that window is showing every Activity Type and select 'Add to Favourites' from the Create menu. Behind the scenes, the 'Add to Favourites' function will create a record in the Favourite Activity Types setting in the CRM module.
To remove an Activity Type from your favourites, highlight it in the 'Paste Special' window when that window is showing your favourite Activity Types and select 'Remove from Favourites' from the Operations menu. Behind the scenes, the 'Remove from Favourites' function will delete the relevant record from the Favourite Activity Types setting.
As well as using the 'Add to Favourites' and 'Remove from Favourites' functions to manage your favourite Activity Types, you can work directly in the Favourite Activity Types setting, adding and deleting records as necessary.
- Person
- Paste Special
Person register, System module and Global User register, Technics module
- Enter the Signature of a user to assign a Favourite Activity Type to that user. If an Activity Type is a favourite of more than one user, you will need to enter separate records in this setting for each user.
- Activity Type
- Paste Special
Activity Types setting, CRM module
- Enter the Activity Type that is a favourite of the user specified above.
- Comment
- The Comment of the Activity Type will appear here when you enter the Activity Type in the field above.
- Activity Class
- The Class to which the Activity Type belongs will appear here when you enter the Activity Type in the field above.
Settings in the CRM module:
- Introduction
- Activity Classes
- Activity Consequences
- Activity Priorities
- Activity Types
- Activity Types, Subsystems
- Additional Email Recipients
- Classification Types
- Company Workflow Overview
- Contact Classifications
- Contact Settings
- Courtesy Titles
- CRM Settings
- Customer Categories
- Default Activity Text Codes
- Favourite Activity Types
- Global CRM Settings
- Industries
- Info in Customer Status Report
- Info in Supplier Status Report
- Job Titles
- Leads
- Lead Sources
- Lead Status
- Map Setting
- Normalized Phone Numbers
- Number Series - Activities, N/L Transactions
- Number Series - Customer Letters
- Number Series - Opportunites
- Opportunity Classes
- Telephony Settings
- Text Types
- User Defined Fields - Activities
- User Defined Fields - Contacts
- User Defined Fields - Items
- User Workflow Overview
- Home page for CRM module manual
- Home page for Standard ERP manual
Global CRM Settings
The Global CRM Settings setting contains three options that will help you manage the creation of Activities and the viewing of the Calendar and Task Manager in a database that contains more than one Company. These options will be useful if you are using Global Users. The setting also contains a fourth option that will enable HTML formatting in Customer Letters.The Global CRM Settings setting is stored in Company 0, a partition of the database that stores information at database level (i.e. information that is available to every Company). This means that you can be working in any Company when you edit the setting, and the changes that you make will apply to every Company.
To open the Global CRM Settings setting, first ensure you are in the CRM or Technics modules. Then, if you are using Windows or Mac OS X, click the [Settings] button in the Navigation Centre or use the Ctrl-S/⌘-S keyboard shortcuts and then double-click 'Global CRM Settings' in the 'Settings' list. If you are using iOS or Android, select 'Settings' from the Tools menu (with 'wrench' icon) and tap 'Global CRM Settings' in the 'Settings' list. The 'Global CRM Settings: Inspect' window will open:
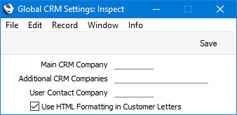
The following three fields will only be useful if you have more than one Company in your database and you are controlling access to those Companies using Global Users:
- Main CRM Company
- If you are using Global Users, you should specify a Main CRM Company in each Global User record. Specifying a Main CRM Company for a Global User has two main purposes:
- By default, each Activity saved by the Global User will be stored in their Main CRM Company, irrespective of the Company the Global User is working in at the time.
- When the Global User or anyone else opens the Global User's Calendar or Task Manager, they will be shown a list of the Global User's Activities stored in the Global User's Main CRM Company (again irrespective of the Company being worked in at the time).
- The purpose of this field is only to set a default to be used in new Global User records. It will not be used as a fallback Main CRM Company if the Main CRM Company field in a particular Global User record is blank.
- Activities created from Asterisk calls may be saved in the Company specified here if the calls came through Menus or Queues in which the Company field is empty..
- By default, each Activity saved by the Global User will be stored in their Main CRM Company, irrespective of the Company the Global User is working in at the time.
- Additional CRM Companies
- If a Global User will save Activities in several Companies, you can specify a Main CRM Company for that Global User and several Additional CRM Companies, separated by commas.
- As with the Main CRM Company field above, you can use this field to specify the Additional CRM Companies that will be copied to each new Global User record as defaults. However, unlike the Main CRM Company field, the Additional CRM Companies will be used as fallbacks if the Additional CRM Companies field in a particular Global User record is empty. Therefore, you should only use this field for Additional CRM Companies to which every user has access.
- As with the Main CRM Company field above, you can use this field to specify the Additional CRM Companies that will be copied to each new Global User record as defaults. However, unlike the Main CRM Company field, the Additional CRM Companies will be used as fallbacks if the Additional CRM Companies field in a particular Global User record is empty. Therefore, you should only use this field for Additional CRM Companies to which every user has access.
- User Contact Company
- The User Contact Company is the Company in which you will enter the Contact records that will be connected to the Global User records. If you leave this field blank, you should enter such a Contact record in a Global User's Main CRM Company.
The following option will be useful in any database:
- Use HTML Formatting in Customer Letters
- Check this box if you want to use HTML formatting in Customer Letters. Please refer here for more details.
Settings in the CRM module:
- Introduction
- Activity Classes
- Activity Consequences
- Activity Priorities
- Activity Types
- Activity Types, Subsystems
- Additional Email Recipients
- Classification Types
- Company Workflow Overview
- Contact Classifications
- Contact Settings
- Courtesy Titles
- CRM Settings
- Customer Categories
- Default Activity Text Codes
- Favourite Activity Types
- Global CRM Settings
- Industries
- Info in Customer Status Report
- Info in Supplier Status Report
- Job Titles
- Leads
- Lead Sources
- Lead Status
- Map Setting
- Normalized Phone Numbers
- Number Series - Activities, N/L Transactions
- Number Series - Customer Letters
- Number Series - Opportunities
- Opportunity Classes
- Telephony Settings
- Text Types
- User Defined Fields - Activities
- User Defined Fields - Contacts
- User Defined Fields - Items
- User Workflow Overview
- Home page for CRM module manual
- Home page for Standard ERP manual
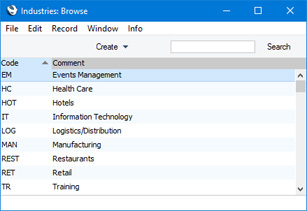
Industries
This page describes the Industries setting in the CRM module.---
The Industries setting allows you to construct a list of industries or economic sectors that you can use when entering Leads. This list will become a look-up table that you can access from the Industry field on the 'Status' card of the Lead window.
To open the Industries setting, first ensure you are in the CRM module. Then, if you are using Windows or Mac OS X, click the [Settings] button in the Navigation Centre or use the Ctrl-S/⌘-S keyboard shortcuts and then double-click 'Industry' in the 'Settings' list. If you are using iOS or Android, select 'Settings' from the Tools menu (with 'wrench' icon) and tap 'Industry' in the 'Settings' list. The 'Industries: Browse' window will open, listing the Industries that you have previously entered.
---
Settings in the CRM module:
- Introduction
- Activity Classes
- Activity Consequences
- Activity Priorities
- Activity Types
- Activity Types, Subsystems
- Additional Email Recipients
- Classification Types
- Company Workflow Overview
- Contact Classifications
- Contact Settings
- Courtesy Titles
- CRM Settings
- Customer Categories
- Default Activity Text Codes
- Favourite Activity Types
- Global CRM Settings
- Industries
- Info in Customer Status Report
- Info in Supplier Status Report
- Job Titles
- Leads
- Lead Sources
- Lead Status
- Map Setting
- Normalized Phone Numbers
- Number Series - Activities, N/L Transactions
- Number Series - Customer Letters
- Number Series - Opportunities
- Opportunity Classes
- Telephony Settings
- Text Types
- User Defined Fields - Activities
- User Defined Fields - Contacts
- User Defined Fields - Items
- User Workflow Overview
- Home page for CRM module manual
- Home page for Standard ERP manual
Customer Status Report
Please refer here for details about this setting.Supplier Status Report
Please refer here for details about this setting.Job Descriptions
Please refer here for details about this setting.Leads
This page describes the Leads setting in the CRM module.---
The Leads setting is a means of storing and viewing sales leads. This setting is a subset of the Contact register, so Leads are stored together with Customers, Suppliers and Contact Persons in the same register. A Lead record is a record in the Contact register in which you have ticked the Lead check box (visible in the header of the Contact window, but not shown in the Lead window).
When you open the Contact register in a module such as the Sales or Purchase Ledger, the browse window will contain every Contact record including Leads (subject to the Limited Access feature). When you open the Leads setting in the CRM module, the browse window will only contain those Contacts that have been marked as Leads.
As the Leads setting is a subset of the Contact register, you can open a Lead record or create a new one from both the 'Contacts: Browse' and 'Leads: Browse' windows. However, the Lead record window only contains fields that are relevant to Leads, including several that are not shown in the Contact record window.
If you create a new Lead record using the Leads setting in the CRM module, the new record will be marked as a Lead automatically. If you can create a Lead record using the Contact register in any other module, you will need to tick the Lead check box in the header of the Contact window yourself.
You can use both Leads and Customers in Opportunities. However, you can only use Customers in Quotations, Orders and Invoices. So, if you create an Opportunity in the name of a Lead and you then create a Quotation, Order or Invoice from that Opportunity, you will need to "upgrade" the Lead to Customer status (i.e. tick the Customer check box in the header of the relevant Contact record) before proceeding further.
The Leads setting is described below. The Contact register is described here.
To open the Leads setting, first change to the CRM module using the [Switch Module] button in the Navigation Centre. Then, if you are using Windows or Mac OS X, click the [Settings] button, also in the Navigation Centre or use the Ctrl-S/⌘-S keyboard shortcuts and then double-click 'Lead' in the 'Settings' list. If you are using iOS or Android, select 'Settings' from the Tools menu (with 'wrench' icon) and tap 'Leads: Browse' window is displayed, the Lead records that you have previously entered.
To enter a new record, select 'New' from the Create menu (Windows/Mac OS X) or + menu (iOS/Android). The 'Lead: New' window appears: enter the details as appropriate and click the [Save] button (Windows/Mac OS X) or tap √ (iOS/Android) to save the new record.
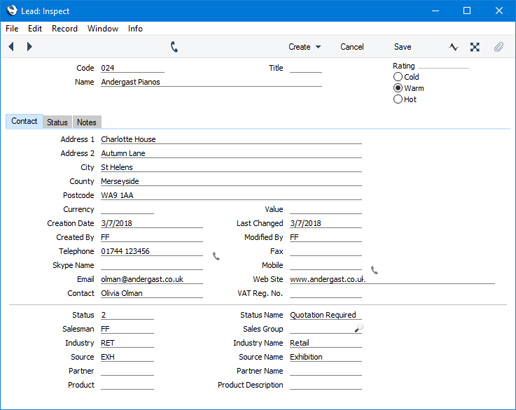
- Header
- Enter the unique Code for each Lead, and the Name, Rating and Title. The Title field is the equivalent of the Courtesy Title field on the 'Comments' card in the Contact window, so you can use 'Paste Special' to choose from the Courtesy Titles setting.
- Contact Card
- Here you can enter address and other contact details for the Lead. The Currency field is the equivalent of the Sales Currency field on the 'Pricing' card in the Contact window.
- Status Card
- On the 'Status' card you can enter information about the Lead, such as the Industry they are in and the source of the Lead.
- Notes Card
- The 'Notes' card contains a text field that you can use to record comments about the Lead.
Settings in the CRM module:
- Introduction
- Activity Classes
- Activity Consequences
- Activity Priorities
- Activity Types
- Activity Types, Subsystems
- Additional Email Recipients
- Classification Types
- Company Workflow Overview
- Contact Classifications
- Contact Settings
- Courtesy Titles
- CRM Settings
- Customer Categories
- Default Activity Text Codes
- Favourite Activity Types
- Global CRM Settings
- Industries
- Info in Customer Status Report
- Info in Supplier Status Report
- Job Titles
- Leads
- Lead Sources
- Lead Status
- Map Setting
- Normalized Phone Numbers
- Number Series - Activities, N/L Transactions
- Number Series - Customer Letters
- Number Series - Opportunities
- Opportunity Classes
- Telephony Settings
- Text Types
- User Defined Fields - Activities
- User Defined Fields - Contacts
- User Defined Fields - Items
- User Workflow Overview
- Home page for CRM module manual
- Home page for Standard ERP manual
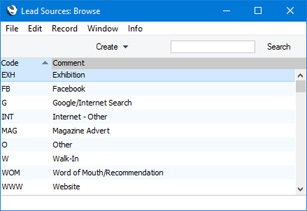
Lead Sources
This page describes the Lead Sources setting in the CRM module.---
The Lead Sources setting allows you to construct a list of sources that you can use when entering Leads. This list will become a look-up table that you can access from the Source field on the 'Status' card of the Lead window.
To open the Lead Sources setting, first ensure you are in the CRM module. Then, if you are using Windows or Mac OS X, click the [Settings] button in the Navigation Centre or use the Ctrl-S/⌘-S keyboard shortcuts and then double-click 'Lead Source' in the 'Settings' list. If you are using iOS or Android, select 'Settings' from the Tools menu (with 'wrench' icon) and tap 'Lead Source' in the 'Settings' list. The 'Lead Sources: Browse' window will open, listing the Lead Sources that you have previously entered.
---
Settings in the CRM module:
- Introduction
- Activity Classes
- Activity Consequences
- Activity Priorities
- Activity Types
- Activity Types, Subsystems
- Additional Email Recipients
- Classification Types
- Company Workflow Overview
- Contact Classifications
- Contact Settings
- Courtesy Titles
- CRM Settings
- Customer Categories
- Default Activity Text Codes
- Favourite Activity Types
- Global CRM Settings
- Industries
- Info in Customer Status Report
- Info in Supplier Status Report
- Job Titles
- Leads
- Lead Sources
- Lead Status
- Map Setting
- Normalized Phone Numbers
- Number Series - Activities, N/L Transactions
- Number Series - Customer Letters
- Number Series - Opportunities
- Opportunity Classes
- Telephony Settings
- Text Types
- User Defined Fields - Activities
- User Defined Fields - Contacts
- User Defined Fields - Items
- User Workflow Overview
- Home page for CRM module manual
- Home page for Standard ERP manual
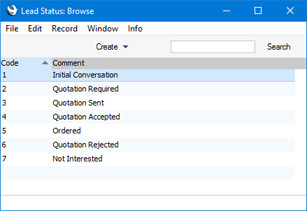
Lead Status
This page describes the Lead Status setting in the CRM module.---
The Lead Status setting allows you to construct a list of Lead Status records that you can use when entering Leads. This list will become a look-up table that you can access from the Status field on the 'Status' card of the Lead window.
To open the Lead Status setting, first ensure you are in the CRM module. Then, if you are using Windows or Mac OS X, click the [Settings] button in the Navigation Centre or use the Ctrl-S/⌘-S keyboard shortcuts and then double-click 'Lead Status' in the 'Settings' list. If you are using iOS or Android, select 'Settings' from the Tools menu (with 'wrench' icon) and tap 'Lead Status' in the 'Settings' list. The 'Lead Status: Browse' window will open, listing the Lead Status records that you have previously entered.
---
Settings in the CRM module:
- Introduction
- Activity Classes
- Activity Consequences
- Activity Priorities
- Activity Types
- Activity Types, Subsystems
- Additional Email Recipients
- Classification Types
- Company Workflow Overview
- Contact Classifications
- Contact Settings
- Courtesy Titles
- CRM Settings
- Customer Categories
- Default Activity Text Codes
- Favourite Activity Types
- Global CRM Settings
- Industries
- Info in Customer Status Report
- Info in Supplier Status Report
- Job Titles
- Leads
- Lead Sources
- Lead Status
- Map Setting
- Normalized Phone Numbers
- Number Series - Activities, N/L Transactions
- Number Series - Customer Letters
- Number Series - Opportunities
- Opportunity Classes
- Telephony Settings
- Text Types
- User Defined Fields - Activities
- User Defined Fields - Contacts
- User Defined Fields - Items
- User Workflow Overview
- Home page for CRM module manual
- Home page for Standard ERP manual
Map Setting
If you need to see a map showing a Contact’s location, open the 'Communication Centre' window from the Contact record and then press the [Map] button. A new browser window will open in your default browser. By default, the Contact’s location will be shown using maps.google.com, but you can use this setting to specify that bing.com/maps will be used instead. You can also specify that Google will be used for addresses in some countries and Bing in others. Please refer here for more details.---
Settings in the CRM module:
- Introduction
- Activity Classes
- Activity Consequences
- Activity Priorities
- Activity Types
- Activity Types, Subsystems
- Additional Email Recipients
- Classification Types
- Company Workflow Overview
- Contact Classifications
- Contact Settings
- Courtesy Titles
- CRM Settings
- Customer Categories
- Default Activity Text Codes
- Favourite Activity Types
- Global CRM Settings
- Industries
- Info in Customer Status Report
- Info in Supplier Status Report
- Job Titles
- Leads
- Lead Sources
- Lead Status
- Map Setting
- Normalized Phone Numbers
- Number Series - Activities, N/L Transactions
- Number Series - Customer Letters
- Number Series - Opportunites
- Opportunity Classes
- Telephony Settings
- Text Types
- User Defined Fields - Activities
- User Defined Fields - Contacts
- User Defined Fields - Items
- User Workflow Overview
- Home page for CRM module manual
- Home page for Standard ERP manual
Normalized Phone Numbers
Please refer to the Asterisk page for details about the Normalized Phone Numbers setting.---
Settings in the CRM module:
- Introduction
- Activity Classes
- Activity Consequences
- Activity Priorities
- Activity Types
- Activity Types, Subsystems
- Additional Email Recipients
- Classification Types
- Company Workflow Overview
- Contact Classifications
- Contact Settings
- Courtesy Titles
- CRM Settings
- Customer Categories
- Favourite Activity Types
- Global CRM Settings
- Industries
- Info in Customer Status Report
- Info in Supplier Status Report
- Job Titles
- Leads
- Lead Sources
- Lead Status
- Map Setting
- Normalized Phone Numbers
- Number Series - Activities, N/L Transactions
- Number Series - Customer Letters
- Number Series - Opportunites
- Opportunity Classes
- Telephony Settings
- Text Types
- User Defined Fields - Activities
- User Defined Fields - Contacts
- User Defined Fields - Items
- User Workflow Overview
- Home page for CRM module manual
- Home page for Standard ERP manual
Number Series - Activities, N/L Transactions
This page describes the Number Series - Activities, N/L Transactions setting in the CRM module.---
If you use Activities to post time to Projects, you can have that time posted to Work in Progress Accounts in the Nominal Ledger. In order for an Activity to post time to Work in Progress Accounts, that Activity must cause the creation of a Nominal Ledger Transaction. This will occur if the following conditions are met:
- You post time to a Project in which the Use WIP option has been selected; and
- You have specified in the Sub Systems setting in the Nominal Ledger that Transactions can be created from Activities.
To solve this issue, Activities have two unique identifying numbers: the Activity Number and the Activity Transaction Number. Every Activity has an Activity Number, but an Activity will only be given an Activity Transaction Number if it is one that has caused a Nominal Ledger Transaction to be created. This allows Transactions created from Activities to follow a sequential number series. The Activity Number and the Activity Transaction Number are not visible in the interface.
By default, the Activity Transaction Number sequence will begin at 1. If you would like it to begin elsewhere, use the Number Series - Activities, N/L Transactions setting to define the sequence that is to be used. Usually, you will only need to define a single number sequence for each year. This is because you won't be able to change the Activity Transaction Number in an individual Activity to one from another Number Series since the Activity Transaction Number is not visible.
To open the Number Series - Activities, N/L Transactions setting, ensure you are in the CRM module and double-click (Windows/Mac OS X) or tap (iOS/Android) 'Number Series - Activities, N/L Transactions' in the 'Settings' list. The following window will appear:
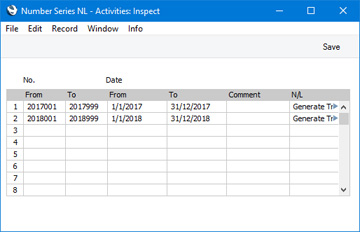
When the setting is complete, click the [Save] button (Windows/Mac OS X) or tap √ (iOS/Android) in the Button Bar to save the changes. To close the window without saving changes, click the close box (Windows/Mac OS X) or tap < (iOS/Android).
Please refer to the description of the Project and Invoice Item fields on the 'Contact' card of an Activity here for more details about using Activities to post time to Projects.
---
Settings in the CRM module:
- Introduction
- Activity Classes
- Activity Consequences
- Activity Priorities
- Activity Types
- Activity Types, Subsystems
- Additional Email Recipients
- Classification Types
- Company Workflow Overview
- Contact Classifications
- Contact Settings
- Courtesy Titles
- CRM Settings
- Customer Categories
- Favourite Activity Types
- Global CRM Settings
- Industries
- Info in Customer Status Report
- Info in Supplier Status Report
- Job Titles
- Leads
- Lead Sources
- Lead Status
- Map Setting
- Normalized Phone Numbers
- Number Series - Activities, N/L Transactions
- Number Series - Customer Letters
- Number Series - Opportunites
- Opportunity Classes
- Telephony Settings
- Text Types
- User Defined Fields - Activities
- User Defined Fields - Contacts
- User Defined Fields - Items
- User Workflow Overview
- Home page for CRM module manual
- Home page for Standard ERP manual
Numbriseeriad - Kliendikirjad
Igal Kliendikirjal on oma kordumatu number numbriseeriast. Uue Kliendikirja koostamisel antakse sellele järgmine vaba number seeriast. Soovi korral saad Kliendikirjadele kirjeldada ka mitu erinevart numbriseeriat, näiteks erinevateks aastateks või erinevatele osakondadele.Need numbriseeriad kirjelda siin. Erinevad numbriseeriad ei tohi omavahel kattuda. Kui Kliendikirjadele ei ole numbriseeriaid kirjeldatud, alustatake nummerdamist ühest ülespoole.
Vaikimisi antakse uuele Kliendikirjale esimene vaba number esimesest numbriseeriast. Alati saad valida numbri mõnest teisest seeriast, kasutades Ctrl-Enter klahvikombinatsiooni.
Topeltklõps seadistuste nimekirjas real Numbriseeriad - Kliendikirjad avab järgmise akna:
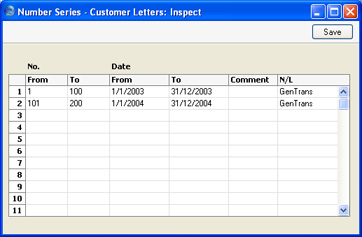
Antud juhul ei kasutata kõikidele Numbriseeriate seadistustele omast Kande välja.
Number Series - Opportunities
This page describes the Number Series - Opportunities setting in the CRM module.---
Whenever you enter a new Opportunity, it will be given its own unique identifying number, based on a sequential number series.
You can have more than one sequential number series running at the same time, or at different times. For example, you may want to use different sequences to represent different departments, or you may want to use different sequences to represent different fiscal or calendar years.
The Number Series - Opportunities setting allows you to take advantage of this feature. Here you can define the number sequences that you would like to use with Opportunities.
To open the Number Series - Opportunities setting, ensure you are in the CRM module and double-click (Windows/Mac OS X) or tap (iOS/Android) 'Number Series - Opportunities' in the 'Settings' list. The following window will appear:
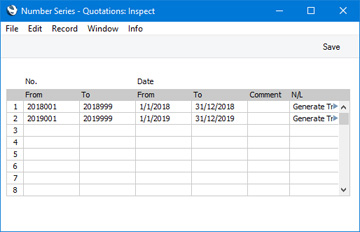
The N/L field common to all Number Series settings is not used in this instance.
When the setting is complete, click the [Save] button (Windows/Mac OS X) or tap √ (iOS/Android) to save the changes. To close the window without saving changes, click the close box or tap <.
Once you have defined number sequences for Opportunities, you can set a universal default sequence in the Number Series Defaults setting, in the System module. When you enter a new Opportunity, its Quotation Number will be the first unused number in that specific sequence. If you do not set a universal default, Opportunity Numbers will be taken from the first valid Number Series in this setting. You will be able to change to the first unused number in any other valid Number Series using 'Paste Special'.
If you leave the Number Series - Opportunities setting empty, Opportunity Numbers will all be taken from the same sequence, starting at 1 and continuing consecutively. If you want to start from another number, simply specify it in a new Opportunity before saving.
---
Settings in the CRM module:
- Introduction
- Activity Classes
- Activity Consequences
- Activity Priorities
- Activity Types
- Activity Types, Subsystems
- Additional Email Recipients
- Classification Types
- Company Workflow Overview
- Contact Classifications
- Contact Settings
- Courtesy Titles
- CRM Settings
- Customer Categories
- Default Activity Text Codes
- Favourite Activity Types
- Global CRM Settings
- Industries
- Info in Customer Status Report
- Info in Supplier Status Report
- Job Titles
- Leads
- Lead Sources
- Lead Status
- Map Setting
- Normalized Phone Numbers
- Number Series - Activities, N/L Transactions
- Number Series - Customer Letters
- Number Series - Opportunities
- Opportunity Classes
- Telephony Settings
- Text Types
- User Defined Fields - Activities
- User Defined Fields - Contacts
- User Defined Fields - Items
- User Workflow Overview
- Home page for CRM module manual
- Home page for Standard ERP manual
Opportunity Classes
This page describes the Opportunity Classes setting in the CRM module.---
The Opportunity Class is a means of analysing Opportunities for prioritising. When entering an Opportunity, you can assign it to an Opportunity Class. This will be visible in the 'Opportunities: Browse' window.
If you are using the Workflow Overview to monitor the progress of Opportunities, you will be able to display the Open Opportunities belonging to each Class in separate columns.
If you want to ensure every Opportunity is assigned to an Opportunity Class, select the Require Quotation Class option in the Quotation Settings setting.
To open the Opportunity Classes setting, first ensure you are in the CRM module. Then, if you are using Windows or Mac OS X, click the [Settings] button in the Navigation Centre or use the Ctrl-S/⌘-S keyboard shortcuts and then double-click 'Opportunity Classes' in the 'Settings' list. If you are using iOS or Android, select 'Settings' from the Tools menu (with 'wrench' icon) and tap 'Opportunity Classes' in the 'Settings' list. The 'Opportunity Classes: Browse' window will open, listing the Opportunity Classes that you have previously entered.
To add a new Opportunity Class, click in the first blank row. To remove an Opportunity Class, click on the row number on the left of the row containing the record and press the Backspace key. To insert a row, click on the row number where the insertion is to be made and press Return. If you are using iOS or Android, you can add rows by tapping the + button below the matrix. To remove a row, long tap on the row number on the left of the row and select 'Delete Row' from the resulting menu. To insert a row, long tap on the row number where the insertion is to be made and select 'Insert Row' from the resulting menu.
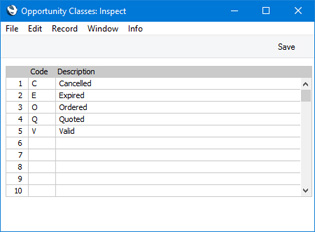
- Code
- Enter the Code for the Opportunity Class in this field. The code can contain up to five characters, and you may freely mix letters and numbers.
- Description
- To make it easier to remember what the different codes stand for, you can enter a short descriptive text here.
Click the [Save] button (Windows/Mac OS X) or tap √ (iOS/Android) to save the changes. To close the window without saving changes, click the close box or tap <.
---
Settings in the CRM module:
- Introduction
- Activity Classes
- Activity Consequences
- Activity Priorities
- Activity Types
- Activity Types, Subsystems
- Additional Email Recipients
- Classification Types
- Company Workflow Overview
- Contact Classifications
- Contact Settings
- Courtesy Titles
- CRM Settings
- Customer Categories
- Default Activity Text Codes
- Favourite Activity Types
- Global CRM Settings
- Industries
- Info in Customer Status Report
- Info in Supplier Status Report
- Job Titles
- Leads
- Lead Sources
- Lead Status
- Map Setting
- Normalized Phone Numbers
- Number Series - Activities, N/L Transactions
- Number Series - Customer Letters
- Number Series - Opportunities
- Opportunity Classes
- Telephony Settings
- Text Types
- User Defined Fields - Activities
- User Defined Fields - Contacts
- User Defined Fields - Items
- User Workflow Overview
- Home page for CRM module manual
- Home page for Standard ERP manual
Telephony Settings
Please refer to the Asterisk page for details about the Telephony Settings setting.---
Settings in the CRM module:
- Introduction
- Activity Classes
- Activity Consequences
- Activity Priorities
- Activity Types
- Activity Types, Subsystems
- Additional Email Recipients
- Classification Types
- Company Workflow Overview
- Contact Classifications
- Contact Settings
- Courtesy Titles
- CRM Settings
- Customer Categories
- Favourite Activity Types
- Global CRM Settings
- Industries
- Info in Customer Status Report
- Info in Supplier Status Report
- Job Titles
- Leads
- Lead Sources
- Lead Status
- Map Setting
- Normalized Phone Numbers
- Number Series - Activities, N/L Transactions
- Number Series - Customer Letters
- Number Series - Opportunites
- Opportunity Classes
- Telephony Settings
- Text Types
- User Defined Fields - Activities
- User Defined Fields - Contacts
- User Defined Fields - Items
- User Workflow Overview
- Home page for CRM module manual
- Home page for Standard ERP manual
Tegevuste tekstitüübid
Tegevuste koostamisel saad 'Teksti' kaardile kommentaaride sisestamise lihtsustamiseks kasutada standardtekste. Sisesta need tekstid siia.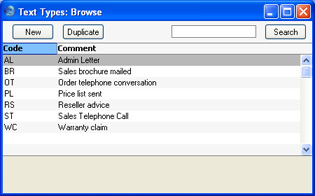
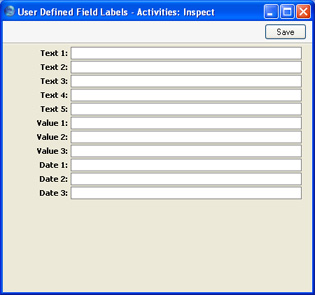
Omakirjeldatud väljad - tegevused
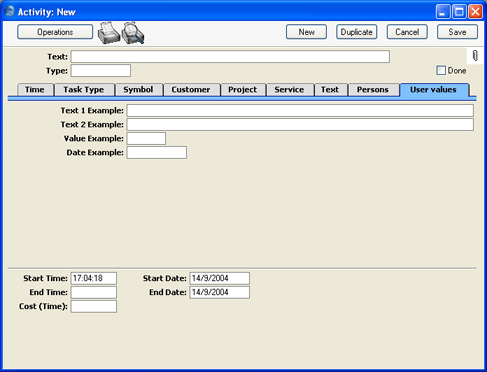
Tavaliselt on Tegevuse kaardil võimalik salvestada kogu vajaminev informatsioon. Kuid võib juhtuda, et on vaja täiendavaid välju lisainfo registreerimiseks. Sellisel juhul on antud seadistuse abil võimalik lisada Tegevustele oma välju, mida näed Tegevuse kaardi 'Omakirjeldatud' kaardil.Mine Kliendihalduse moodulisse ja vali seadistus Omakirjeldatud väljad - tegevused. Avaneb aken Omakirjeldatud väljad - tegevused: Vaata. Tee soovitud muudatused ja salvesta ning sulge seadistus. Sulge aken sulgemisruudust, kui ei soovi muudatusi salvestada.

Omakirjeldatud väljad - kliendid
Antud seadistus on sarnane eespool kirjeldatud seadistusele Omakirjeldatud väljad – tegevused. Siin saad lisada oma välju Kliendikaartidele. Palun loe täpsemalt juhendist „Kliendid ja hankijad“.User Defined Fields - Items
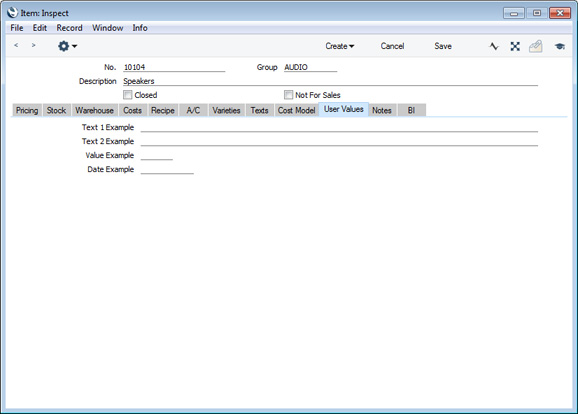
This page describes the User Defined Fields - Items setting in the CRM module.---
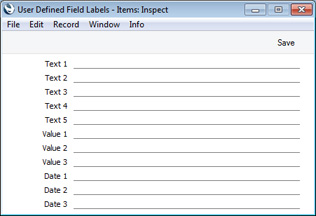
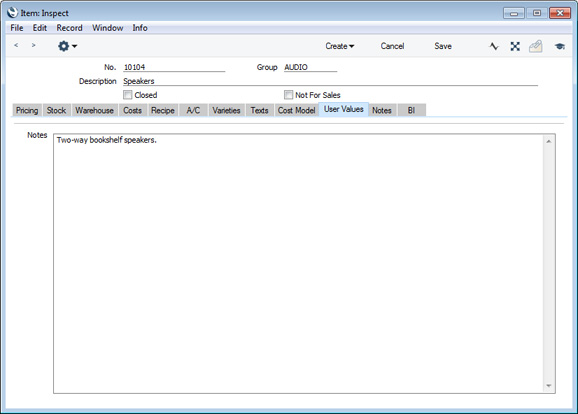
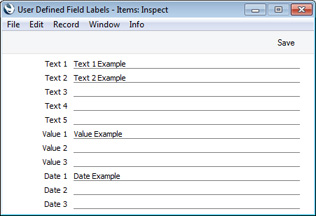
The Item record is capable of storing a sufficient quantity of information to cater for most requirements. However, in some circumstances, it might be necessary to store additional information for which no fields have been provided. The User Defined Fields - Items setting allows you to add your own fields to each Item record for this purpose. The new fields will be visible on the 'User Values' card of each Item record.
To open the User Defined Fields - Items setting, first use the [Switch Module] button in the Navigation Centre to enter the CRM module. Then, if you are using Windows or Mac OS X, click the [Settings] button, also in the Navigation Centre or use the Ctrl-S/⌘-S keyboard shortcuts and then double-click 'User Defined Fields - Items' in the resulting list. If you are using iOS or Android, select 'Settings' from the Tools menu (with 'wrench' icon) and tap 'User Defined Fields - Items' in the 'Settings' list. The 'User Defined Field Labels - Items: Inspect' window will open. Make changes as required and then click the [Save] button (Windows/Mac OS X) or tap √ (iOS/Android) to save the change and close the window. To close the window without saving changes, click the close box (Windows/Mac OS X) or tap < (iOS/Android).
Settings in the CRM module:
- Introduction
- Activity Classes
- Activity Consequences
- Activity Types
- Activity Types, Subsystems
- Additional Email Recipients
- Classification Types
- Company Workflow Overview
- Contact Classifications
- Contact Settings
- Courtesy Titles
- CRM Settings
- Customer Categories
- Global CRM Settings
- Industries
- Info in Customer Status Report
- Info in Supplier Status Report
- Job Titles
- Leads
- Lead Sources
- Lead Status
- Map Setting
- Normalized Phone Numbers
- Number Series - Customer Letters
- Number Series - Opportunites
- Opportunity Classes
- Telephony Settings
- Text Types
- User Defined Fields - Activities
- User Defined Fields - Contacts
- User Defined Fields - Items
- User Workflow Overview
- Home page for CRM module manual
- Home page for Standard ERP manual
User Workflow Overview
Please click here for details about the User Workflow Overview setting in the CRM module.---
Settings in the CRM module:
- Introduction
- Activity Classes
- Activity Consequences
- Activity Types
- Activity Types, Subsystems
- Additional Email Recipients
- Classification Types
- Company Workflow Overview
- Contact Classifications
- Contact Settings
- Courtesy Titles
- CRM Settings
- Customer Categories
- Global CRM Settings
- Industries
- Info in Customer Status Report
- Info in Supplier Status Report
- Job Titles
- Leads
- Lead Sources
- Lead Status
- Map Setting
- Normalized Phone Numbers
- Number Series - Customer Letters
- Number Series - Opportunites
- Opportunity Classes
- Telephony Settings
- Text Types
- User Defined Fields - Activities
- User Defined Fields - Contacts
- User Defined Fields - Items
- User Workflow Overview
- Home page for CRM module manual
- Home page for Standard ERP manual