Introduction to the Customer Letter Register
This register allows you to send letters to Customers: it provides a mechanism whereby you can match standard or ad hoc letter texts with one or more addresses. You can thus send letters to individual Customers or produce mailshots for a range of Customers.Entering a Customer Letter
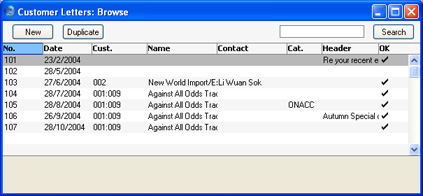
In the CRM module, select 'Customers Letters' from the Registers menu, or click the [Customer Letters] button in the Master Control panel.The 'Customer Letters: Browse' window is opened, showing records already entered.
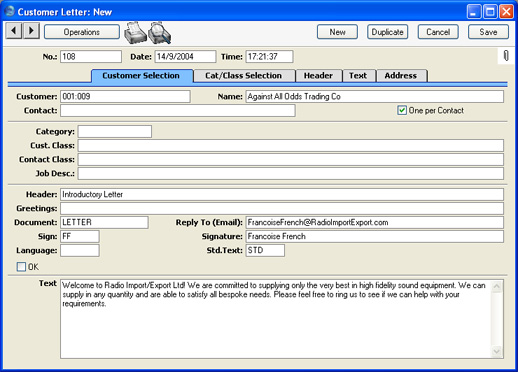
The 'Customer Letter: New' window is opened, empty if you clicked [New] or containing a duplicate of the highlighted Letter. In the case of the duplicate, the Date and Time of the new record will show the current date and time, not those of the original Customer Letter.

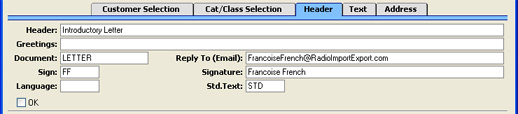
Entering a Customer Letter - Header

- No.
- Paste Special
Select from another Number Series
- This Number is the unique identifier for this Customer Letter record. When you create a new record, Hansa will enter the next unused number from the first record in the Number Series - Customer Letters setting. You may change this number, but not to one that has already been used. If you are working in a multi-user environment, the Customer Letter Number will be assigned when you save the record for the first time.
- Date
- Paste Special
Choose date
- The date as it is to appear on the letter.
- Time
- This field records the time the record was originally created. It can be changed and can be made to appear on the printed letter if necessary.
Entering a Customer Letter - Customer Selection Card

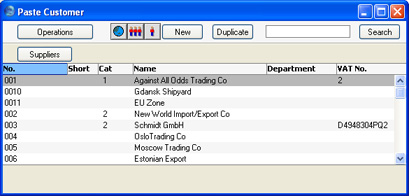
- Customer
- Paste Special
Customers and Suppliers in Customer register
- Enter the Customer Number of the Customer to whom the letter is to be addressed. If you leave the field blank, all Customers (except those marked as No Letters or No Mass Mailing on the 'Terms' card of their Customer records) will be mailed, subject to their satisfying any requirements entered to other fields.
- You can mail a range of Customers. To do this, enter the lowest and highest Customer Numbers of the range, separated by a colon. For example, to report on Customers 001 to 010, enter "001:010". Note that an alpha sort is used, not a numeric one. Thus a range of 1:2 would also include 100, 10109, etc.
- By default, the 'Paste Special' list shows Customers. Click the [Suppliers] button if you need to see Suppliers.
- You can mail a range of Customers. To do this, enter the lowest and highest Customer Numbers of the range, separated by a colon. For example, to report on Customers 001 to 010, enter "001:010". Note that an alpha sort is used, not a numeric one. Thus a range of 1:2 would also include 100, 10109, etc.
- Customer Name
- If you entered a single Customer Number in the field above, the appropriate Customer Name is shown here.
- If you entered a range of Customer Numbers in the field above, the name of the first Customer in the range is shown.
- If you entered a range of Customer Numbers in the field above, the name of the first Customer in the range is shown.
- Contact
- Paste Special
Contact Person register, CRM module
- If you specified a single Customer Number, you can mail a particular Contact at that firm by entering their name here. The 'Paste Special' function only lists Contact Persons for the Customer in question.
- If you do not specify a Contact here and do not check the One per Contact check box below, a single letter will be produced for each selected Customer, addressed to the main Contact entered on the 'Contact' card of each Customer record.
- If you do not specify a Contact here and do not check the One per Contact check box below, a single letter will be produced for each selected Customer, addressed to the main Contact entered on the 'Contact' card of each Customer record.
- One per Contact
- Check this box if you would like to print a separate letter for each Contact for each selected Customer (i.e. those in the Contact Person register and those entered on the 'Contact' card of each Customer record). Letters will not be printed for Contact Persons whose No Letters or Closed boxes have been checked.
- If you do not check this box and do not specify a Contact in the field above, a single letter will be produced for each selected Customer, addressed to the main Contact entered on the 'Contact' card of each Customer record.
- If the check box is on, it will override any entries that have been made to the Contact Classification and Job Description fields on the 'Cat/Class Selection' card.
- If you do not check this box and do not specify a Contact in the field above, a single letter will be produced for each selected Customer, addressed to the main Contact entered on the 'Contact' card of each Customer record.
Entering a Customer Letter - Cat/Class Selection Card

Entering a Customer Letter - Header Card
- Design a standard letter using the Form register in the System module. The general principles of Form design are described here, with details specific to letter design and an example here. Use the 'Properties' function on the Operations menu of the Form editor to assign the letter a suitable Form Code such as "LETTER". The Document Type should be "Customer Letters".
- Change to the CRM module and open the 'Documents' list window using the 'Documents' item on the File menu or by clicking the [Documents] button in the Master Control panel.
- Highlight 'Customer Letter' in the list and select 'Define Document' from the Operations menu. In the subsequent window, enter the Form Code ("LETTER", in our example) in the Form field on the first row. As is usual, you can use the 'Define Document' window to determine that a different Form is to be used according to the Language or Number Series of the Customer Letter or the Access Group of the user.
- Once you have done this, the "LETTER" Form (or other Form from the 'Define Document' window chosen on the basis of Language, Number Series or Access Group) will be used if the Document field on the 'Header' card of the Customer Letter record is blank. If you wish to use a different Form for a particular Customer Letter, specify that using the Document field.
The Form specified in this field will be used instead of that specified in the 'Define Document' window.
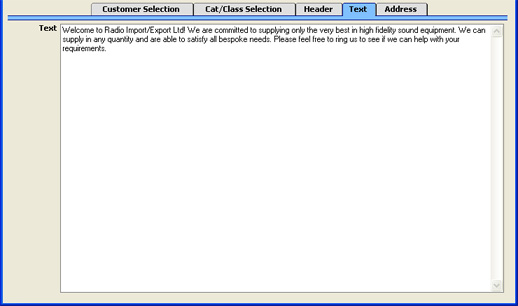
Entering a Customer Letter - Text Card
Entering a Customer Letter - Address Card
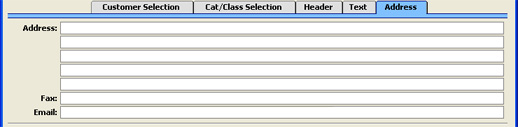
These fields are only used if you specified a single Customer and did not check the One per Contact box. In this case, the address entered here will be printed on the letter. If the letter is to be sent by fax or email, the fax number or email address entered here will be used. If you need to change the address for a particular letter, you can do so here: such a change will not be fed back to the Customer or Contact Person.
When designing the Form to be used when printing the letter, several fields are available to print the address. The Address 1, Address 2, etc. fields contain each line of the address entered here. The Address field contains the whole of this address. The Contact Address field contains the address from the Contact Person record or, if that is empty, from the Customer record.
If you specified more than one Customer in the Customer Letter, the address, fax number or email address will be taken from each Customer record in turn. If you checked the One per Contact box, they will be taken from each Contact Person record or, if blank, from the related Customer.
HTML Formatting
This page describes HTML formatting in Customer Letters in Standard ERP.---
The standard Customer Letter window does not allow for any formatting (e.g. bold text, changing font size, coloured text, etc) or for in-line graphics.
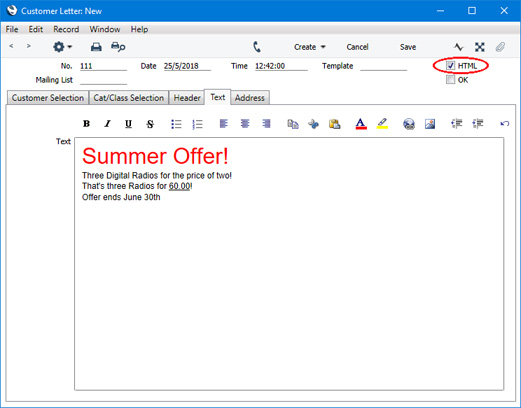
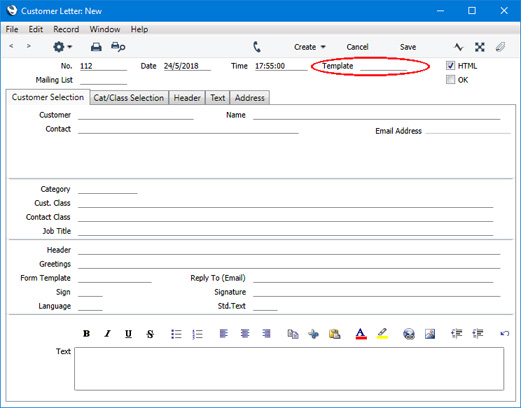
However, an alternative Customer Letter window is available that does allow you to use full HTML formatting in Customer Letters. If you want to be able to use the HTML Customer Letter window, select the Use HTML Formatting in Customer Letters option in the Global CRM Settings setting in the CRM and Technics modules.
If you have selected the Use HTML Formatting in Customer Letters option, the HTML box towards the top of the Customer Letter window will be ticked automatically in new Customer Letters. HTML tools will appear above the text area:

- Bold text

- Italic text

- Underlined text

- Text with strike through

- Unordered list (list with bullet points)

- Ordered list (list with numbered points)

- Left-justified text

- Centred text

- Right-justified text

- Copy selected text (Ctrl-C/⌘-C)

- Cut selected text (Ctrl-X/⌘-X)

- Paste text (Ctrl-V/⌘-V)

- Change text attributes (font, size, style, colour)

- Text background colour (Windows only, on Mac OS X use the previous tool)

- Outdented text

- Indented text

- Undo (Ctrl-X/⌘-X)

- Redo
If you are using HTML formatting, you can also use HTML Templates, to ensure that all your Customer Letters have a similar appearance that conforms to your corporate identity. Please refer here for details.
Note that the text areas in non-HTML and HTML Letters are different fields. You can begin writing a Customer Letter with the HTML box ticked, and then decide to untick the box. Your text will be copied to the non-HTML text area. Any text that you add from this point will not be copied back to the HTML text area, so you can end up with two different versions of the text. The HTML check box is effectively a switch: tick it to see the HTML text area and tools; remove the tick to see the non-HTML text area.
If you print letters from a Customer Letter record when the HTML box is ticked, the HTML text will be printed. If the HTML box is not ticked, the non-HTML text will be printed.
---
The Customer Letter register in Standard ERP:
- Introduction
- Entering a Customer Letter
- HTML Formatting, including:
- Inspecting Customer Letters and Marking them as OK
- Printing Customer Letters
- Operations menu
- Create menu
- Home page for CRM module manual
- Home page for Standard ERP manual
HTML Formatting - HTML Templates
This page describes using HTML Templates in Customer Letters in Standard ERP. Please refer here for more details about HTML formatting.---
If you are using HTML formatting in Customer Letters, you can use HTML Templates to help ensure each Customer Letter is formatted correctly so that it conforms to corporate identity.
To create a new HTML Template, simply open the HTML Template register in the Email and Conferences module and create a new record:
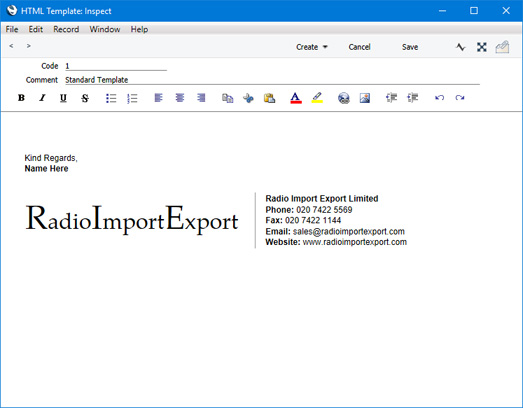
When you tick the HTML box in a Customer Letter, a Template field will be added to the Customer Letter window:
---
The Customer Letter register in Standard ERP:
- Introduction
- Entering a Customer Letter
- HTML Formatting, including:
- HTML Templates
- Inspecting Customer Letters and Marking them as OK
- Printing Customer Letters
- Operations menu
- Create menu
- Home page for CRM module manual
- Home page for Standard ERP manual
Inspecting and Approving Customer Letters
Before printing the letters as determined by a Customer Letter record, it is worth checking that the letter text contains no errors and that everyone that should receive a letter will do so, especially if the Customer Letter record represents a large mailshot. To do this, use the 'Letter List' function on the Operations menu. This produces a report showing the full letter text and a list of recipients.When everything is satisfactory, approve the Customer Letter record by checking the OK box and saving. Once this has been done, you will no longer be able to change any details in the record. If it subsequently becomes necessary to make a change, remove the check from the OK box and save by clicking the [Save] button in the Button Bar.
Printing Customer Letters
You can print the letters determined by a Customer Letter record using one of two methods. In both cases, if the Customer Letter record has not been approved, all printed letters will be marked "Test Printout" (providing you are not using the No Test Printout option in the Optional Features setting in the System module). The two methods are:- With a Customer Letter record on screen, click the Printer icon.
- Use the 'Documents' function (accessible using the function on the File menu or the button in the Master Control panel). Double-click 'Customer Letters' in the resulting list. This method allows you to print letters from a range of Customer Letter records.
The design should take into account what is to happen when the printing of a letter requires more than one page. Usually, in such cases the address, date and greeting will be printed on the first page only. This means the letter text might start higher up on the second and subsequent pages compared to the first page.
To design the letter template follow these steps:
- Switch to the System module and select 'Forms' from the Registers menu or click the [Forms] button in the Master Control panel.
- The 'Forms: Browse' window is opened, listing Forms already entered. To enter a new standard letter template, click the [New] button in the Button Bar; to modify an existing template, double-click it in the list.
- In the case of a new Form, select 'Properties' from the Operations menu.
Enter an appropriate Code and, using 'Paste Special' from the Document Type field, classify the Form as a Customer Letter. This will ensure that you will only be able to include in the template those fields appropriate to letters.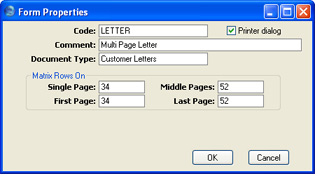
You should now calculate how many lines of letter text can be printed on each page of a multi-page letter. In the example we will use throughout this description, the first page has room for 34 lines of text, while the second and subsequent pages have room for 52. Type these figures in to the four fields under the heading of Matrix Rows On, as shown in the illustration.
These four fields are used as follows:
- First
- The first page of a multi-page document
- Middle
- In a multi-page document, the pages between the first and last pages.
- Last
- The last page of a multi-page document.
- Single
- The sole page of a single-page document.
So, in this example, letters will be printed as follows, depending on the length of the letter text (i.e. on the number of lines):
When all fields are complete, click the [OK] button in the dialogue box to close it.Lines of Text Pages Type of Page Up to 34 1 Single 35-87 2 First and Last 88-139 3 First, Middle and Last 140-191 4 First, 2 x Middle, Last
- First
- Usually, the First and Single page designs will be the same (a single page letter will have the same appearance as the first page of a multi-page letter). In this step, you will design these pages (the First and Single pages). Add fields and text objects as described below, so that the design ends up looking something like this:
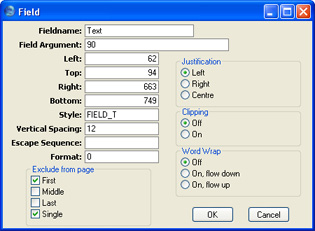
To add a field to the design, click the [Field] button at the top of the window and then draw a box on the Form where the field is to appear. You can move or resize it later if necessary. The 'Field' window opens: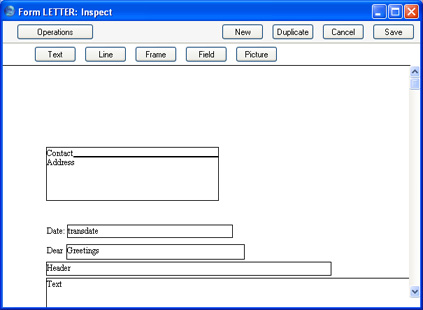
Enter the Field Name (use 'Paste Special' to see all available Field Names for the "Customer Letter" Document Type), and paste a type style in the Style field.
Use the Exclude From Page options to set the page specification for each field. Check the Middle and Last of these options, to signify that each field will be printed on the First and Single pages (i.e. they will be excluded from the Middle and Last pages).
In the case of the field representing the letter text itself, enter "Text" as the Field Name, and complete the other details as follows:
- Spacing
- Since the letter text is likely to extend over more than one line, you should make an entry to the Spacing field. If you leave it at 0 (the default), all the lines of the letter will be superimposed on one another. In the case of 10 point Times, a Spacing of at least 10 points is recommended.
- Top, Bottom
- Don't forget to ensure that the Text field is deep enough to accommodate the required number of lines of text in the specified font (34 lines in the example).
- Field Argument
- Enter here the maximum number of characters that can be printed in one line. In the example illustration, it has been specified that up to 90 characters can be printed per line (fewer if the 90th character occurs in the middle of a word).
You can add text objects to the design in a similar manner, by clicking the [Text] button at the top of the window and then drawing a box on the Form where the object is to appear. When the 'Text' window opens, type the text that is to be printed on the Form in the Text field. This can be up to 80 characters long, but it is limited to one line. To create a text area with more than one line, use the appropriate number of separate one-line text objects.
As with fields, give all the text objects that are to appear on the First and Single pages the same page specification using the Exclude From Page options, as shown:
Click the [OK] button in the dialogue box to save the text object specifications, and repeat as necessary until all text objects for the First and Single pages have been added.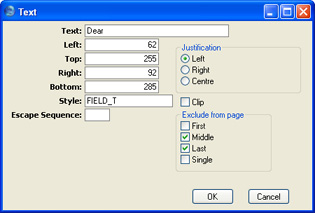
- Spacing
- Now design the Middle and Last pages. In our example, they will be the same. To help with this, you can hide the objects added in step 4 above. To do this, select 'Middle Only' from the Operations menu. This displays only those objects that are to be printed on the Middle page. At this stage, there are no such objects, so the window goes blank. Add fields and text objects, so that the design looks something like this:
This time, use the Exclude From Page options to specify that each object will be printed on the Middle and Last pages (i.e. they will be excluded from the First and Single pages). In the case of the Text field, don't forget to ensure that it is deep enough to accommodate the required number of lines of text in the specified font (52 lines in the example):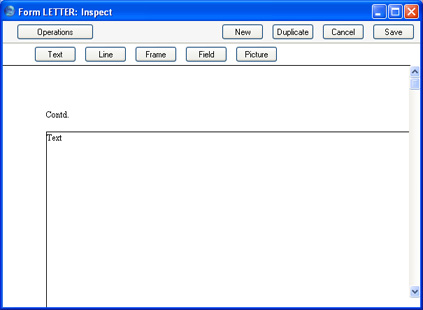
- Now, choose 'View All' from the Operations menu. All objects from all pages are displayed. This confirms that the left-hand margins of all objects are correctly aligned:
Note how the Text field from the Middle and Last pages starts higher up the page than the Text field from the First and Single pages.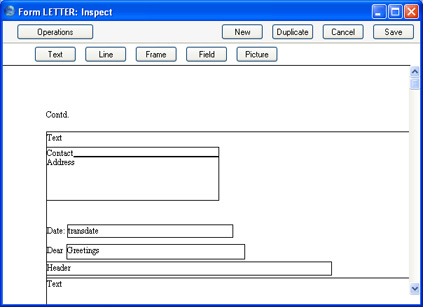
- If any object is not aligned correctly, drag it into position using the mouse, or double-click it to open its specification window and type in the correct co-ordinates.
- When the design is complete, click the [Save] button in the Button Bar to save the Form.
- Now you should inform Hansa that the template you have just designed is to be used when printing letters. For details about how to do this, please refer to the description of the 'Header' card of the Customer Letter record.
Printing Customer Letters - Faxing
If you want to fax a letter instead of printing it and are using a Macintosh with a fax modem, follow these steps:- Having entered the Customer Letter as usual, select 'Documents' from the File menu.
- Highlight 'Customer Letters' in the list.
- Select 'Fax' from the Operations menu.
- Double-click 'Customer Letters' in the list and proceed in the usual way.
- Following the instructions on the Setting up a Fax Server page, enter a row representing your fax server in the Printers setting in the System module.
- In the CRM module, select 'Documents' from the File menu. Highlight 'Customer Letters' in the list and select 'Define Document' from the Operations menu. Enter a row with the appropriate Form and quoting your fax server in the Printer field. This row should have a dedicated Language (e.g. "FAX") in the Lang field or a dedicated Number Series in the Ser. No. field.
- When you enter a Customer Letter that is to be faxed, ensure it has the correct Language on the 'Header' card or that you assign it a Number that is in the correct Number Series. A form must be specified in the Document field, also on the 'Header' card.
- If you have a standard letter that is sometimes printed and sometimes faxed, enter separate rows in the 'Define Document' window for printing and faxing, as described in step ii above. When you create the Customer Letter, enter the appropriate Language on the 'Header' card to use the default printer (usually the Language can be left blank in both the Customer Letter and the 'Define Document' window). When you need to fax the letter, open the 'Specify Customer Letter' window from the 'Documents' list in the normal way, and enter the Language for the fax server. This will override the Language in the Customer Letter record.
The fax number will be chosen in the same way as the address for printed letters: please refer to the description of the 'Address' card of the Customer Letter record for details.
Printing Customer Letters - Emailing
You can send letters from a Customer Letter record by email. To do this, open the Customer Letter record and select 'Send email' from the Operations menu. Please refer to the description of this function here for details.---
The Customer Letter register in Standard ERP:
- Introduction
- Entering a Customer Letter
- Inspecting Customer Letters and Marking them as OK
- HTML Formatting
- Printing Customer Letters, including:
- Faxing
- Emailing
- Faxing
- Operations menu
- Create menu
- Home page for CRM module manual
- Home page for Standard ERP manual
Operations Menu
When a Customer Letter is open in a record window, the Operations menu is available.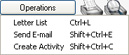
Operations Menu - Customer Letters - Search
This page describes the 'Search' function on the Operations menu in the 'Customer Letters: Browse' window. If you are using iOS or Android, the 'Search' function is on the Tools menu (with 'wrench' icon).---
You can use the 'Search' function to search for Customer Letters containing a certain word or phrase. You can open Customer Letter records from the search results, so this function supplements the ability to search for Customer Letters in the 'Customer Letters: Browse' window. To use the 'Search' function, open the 'Customer Letters: Browse' window and select 'Search' from the Operations menu (Windows/Mac OS X) or Tools menu (iOS/Android). The following window opens:
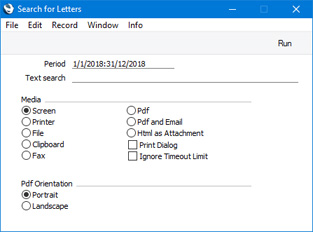
- Period
- Paste Special
Reporting Periods setting, System module
- The search will be carried out in Customer Letters whose Dates fall in the period that you specify here.
- Text search
- Enter here the text string that you are looking for. You must make an entry in this field, otherwise no search will be carried out. The search will only be carried out in the non-HTML text field in Customer Letters.
---
The Customer Letter register in Standard ERP:
- Introduction
- Entering a Customer Letter
- HTML Formatting
- Inspecting Customer Letters and Marking them as OK
- Printing Customer Letters
- Operations menu, including:
- Search
- Letter List
- Send email
- Search
- Create menu
- Home page for CRM module manual
- Home page for Standard ERP manual
Operations Menu - Letter List
Select this command to produce an instant report showing the letter text and a list of recipients. Ensure you save the Customer Letter record by clicking the [Save] button in the Button Bar before using this function.Operations Menu - Send Email
This function will send the letter text to all recipients by email. The email addresses will be taken from the Contact Person or Customer registers as necessary. Each email address will be checked to see if it is valid (i.e. contains the @ character) before an email is sent to it. The return address (sender's address) will be taken from the Reply To (Email) field on the 'Header' card of the Customer Letter record, from the sender's Person record or from the E-Mail SMTP Server setting.To use this function, you must have approved and saved the Customer Letter, and you must have configured the Gateway and the E-Mail SMTP Server setting. Please refer here for full details of Hansa's mailing facilities.
Create Menu - Customer Letters
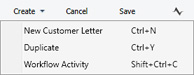
'New' and 'Duplicate' are standard functions that are provided on every Create and + menu. Use these functions to create new records, in this case in the Customer Letter register. Please follow the links below for details about the other functions:
The Customer Letter register in Standard ERP:
- Introduction
- Entering a Customer Letter
- HTML Formatting
- Inspecting Customer Letters and Marking them as OK
- Printing Customer Letters
- Operations menu
- Create menu
- Home page for CRM module manual
- Home page for Standard ERP manual
Operations Menu - Create Activity
You can use this function to create Activities from Customer Letters. This can be useful if you need, for example, to schedule a print run. The Activity Type given to Activities created by this function will be taken from the Activity Types, Subsystems setting. The Task Type of the new Activities will be To Do, the Symbol will be Other and the Start Date will be the current date.When you select the function, the following screen appears, which you can use to create a new Activity record:
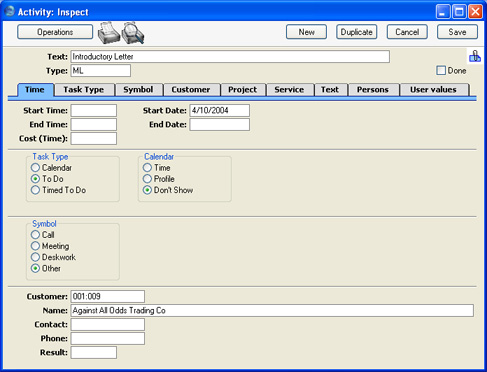
The Customer Letter and the Activity will remain connected to each other through the Attachments facility. This allows you to open the Customer Letter quickly and easily when reviewing the Activity, or to open the Activity from the Customer Letter. When viewing the Activity or Customer Letter, click the button with the paper clip image to open a list of attachments. Then double-click an item in this list to open it.
The Customer Letter does not have to be saved before creating an Activity.
You can choose to have an Activity created automatically when each Customer Letter is approved. Again, this is controlled using the Activity Types, Subsystems setting. An Activity will not be created using this method if you have entered a range of Customers in the Customer field in the Customer Letter record.
The 'Activity: Inspect' window is fully described here.