Introduction to the Calendar
The Calendar is useful for booking employees' time and for analysing employee time statistics. Every member of the company can see a particular individual's Calendar, so its graphical format makes it easy to check employees' availability and to schedule major tasks. Numerous reports (e.g. the Personal Calendar report, the Employee Time Statistics report and the Activities Period report) are compiled using Calendar Activities and these again are useful scheduling and time analysis tools.To open the Calendar, click the [Calendar] button in the Master Control panel:

- The six-monthly view (known as the "Overview")
- The monthly view
- The weekly view
- The daily view (known as the "Day Planner")
Opening the Calendar - Overview
In the Overview, the current date (August 16th in the illustration) is marked with a square and weekends are red.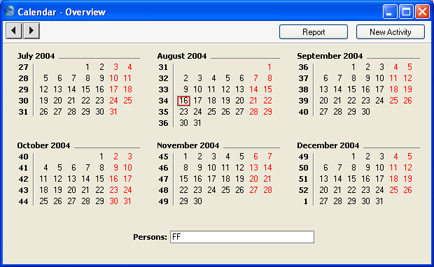
- To open the Overview, click the [Calendar] button in the Master Control panel.
- To change the months shown, use the 'Next' and 'Previous' functions on the Record menu or the equivalent buttons on the left of the Button Bar.
- To open a monthly view, double-click on the name of any month. To open a weekly view for the current month, select 'Month' from the Operations menu or use the Ctrl-Shift-M (Windows and Linux) or ⌘-Shift-M (Macintosh) keyboard shortcuts.
- To open a weekly view, double-click on the number of any week. To open a weekly view for the current week, select 'Week' from the Operations menu or use the Ctrl-Shift-W (Windows and Linux) or ⌘-Shift-W (Macintosh) keyboard shortcuts.
- To open the Day Planner, double-click on any date. To open the Day Planner for the current day, select 'Day' from the Operations menu or use the Ctrl-Shift-D (Windows and Linux) or ⌘-Shift-D (Macintosh) keyboard shortcuts.
- To close the Overview, use the close box.
Opening the Calendar - Monthly View
In the monthly view, the current date (August 16th in the illustration) is marked with a thick border. Weekends are shaded, with dates in red.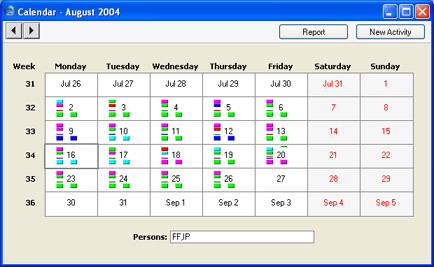
- To open the monthly view, double-click any month name in the Overview.
- To change the month shown, use the 'Next' and 'Previous' functions on the Record menu or the equivalent buttons on the left of the Button Bar.
- To open a weekly view, double-click on the number of any week.
- To open the Day Planner, double-click on any date.
- The Activities for each day are represented by coloured bars. These are solid for Time Activities and hollow for Profile Activities. Double-click any coloured bar to open the Activity. The colours are determined by the Activity Class of each Activity. Only Calendar Activities are shown.
- The monthly view can show more than one Person's Activities at once. Enter each Person's initials (use 'Paste Special' if necessary) separated by commas in the Persons field and press the Return key. A separate column of coloured bars is shown for each Person. The left-hand column belongs to the first Person named in the Persons field and the right-hand column to the last Person. Your Private Activities are shown, but those of other Persons are not.
- To close the monthly view, use the close box.
Opening the Calendar - Weekly View
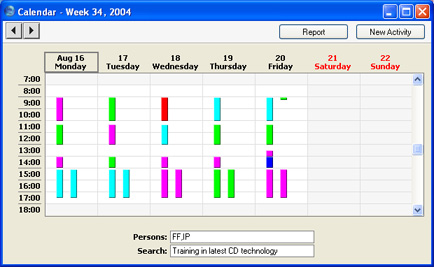
- To open the weekly view, double-click any week number in the Overview or monthly view.
- To change the week shown, use the 'Next' and 'Previous' functions on the Record menu or the equivalent buttons on the left of the Button Bar.
- To move to an earlier or later part of the day, use the scroll bar on the right-hand side of the window. Activities beginning at a time too early to be shown have an arrow at the top of their coloured bar, while those ending too late to be shown have an arrow at the bottom of their bar.
- To open the Day Planner, double-click on any date.
- The Activities for each day are represented by coloured bars. These are solid for Time Activities and hollow for Profile Activities. Double-click any coloured bar to open the Activity, or click once for its Text to appear in the Search field. The colours are determined by the Activity Class of each Activity. Only Calendar Activities are shown.
- The weekly view can show more than one Person's Activities at once. Enter each Person's initials (use 'Paste Special' if necessary) separated by commas in the Persons field and press the Return key. A separate column of coloured bars is shown for each Person. The left-hand column belongs to the first Person named in the Persons field and the right-hand column to the last Person. Your Private Activities are shown, but those of other Persons are not.
- You can move an Activity to another time and/or date by dragging and dropping, providing the Activity has not been marked as Done.
- To close the weekly view, use the close box.
Opening the Calendar - Day Planner
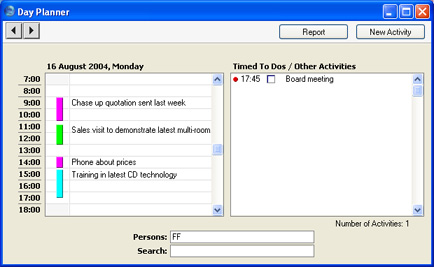
- To open the Day Planner, double-click any date in the Overview or in the monthly or weekly views, or click the [Day Planner] button in the Task Manager.
- To change the day shown, use the 'Next' and 'Previous' functions on the Record menu or the equivalent buttons on the left of the Button Bar.
- The Day Planner is divided into two sections. The panel on the left contains the day's Calendar Activities, represented by coloured bars. These are the same Activities that were visible in the monthly and weekly views. The coloured bars are solid for Time Activities (the first Activity in the illustration above) and hollow and to the left for Profile Activities (the second, third and fourth in the illustration). Double-click any coloured bar to open the Activity, or click once for its Text to appear in the Search field. The colours are determined by the Activity Class of each Activity. Only Calendar Activities are shown.
- To move to an earlier or later part of the day, use the scroll bar on the right-hand side of the left-hand panel. Activities beginning at a time too early to be shown have an arrow at the top of their coloured bar, while those ending too late to be shown have an arrow at the bottom of their bar.
- The left-hand panel can show more than one Person's Activities at once. Enter each Person's initials (use 'Paste Special' if necessary) separated by commas in the Persons field and press the Return key. A separate column of coloured bars is shown for each Person. The left-hand column belongs to the first Person named in the Persons field and the right-hand column to the last Person. Your Private Activities are shown, but those of other Persons are not.
- The panel on the right lists Timed To Do Activities. This list only contains Activities for the Person whose initials appear first in the Persons field. As usual, your Private Activities are shown, but those of other Persons are not.
- In the right-hand panel, double-click the Activity Text to open an Activity.
- You can use the check boxes in the Done column in the right-hand panel to mark each Activity as Done once you have completed it. This will not be fed through to the corresponding Activity immediately: you must save the Day Planner (by pressing the Shift-Enter key combination or by selecting 'OK' from the Record menu) in order to mark Activity as Done. You can mark several rows as Done before saving.
!
If you have marked any Activities as Done, remember to save the Day Planner before closing it or changing to a different day.
- To close the Day Planner, use the close box.
Features in the Calendar