Ievads
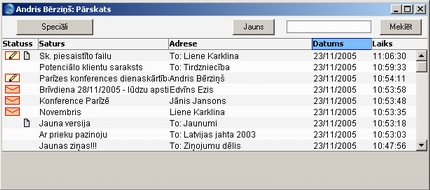
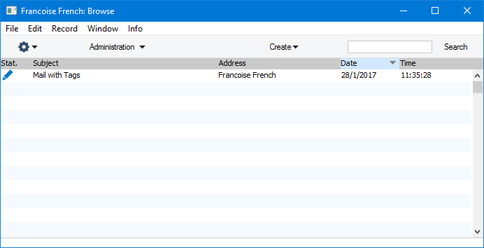
Lai atvērtu savu pastkastīti, Bāzes logā noklikšķiniet uz pogas [Pasts]. Ja Bāzes logs ir aktīvais logs, varat nospiest taustiņus Ctrl-Shift-M (Windows un Linux) vai ⌘-Shift-M (Macintosh). Tiks atvērts logs ar nosūtīto un saņemto vēstuļu sarakstu: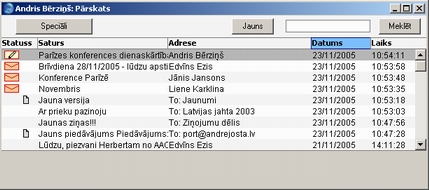
Kolonnā ‘Statuss’ var būt šādi simboli:
- Šāds simbols apzīmē vēstuli, kura vēl nav izlasīta vai arī tikusi atjaunināta pēc tam, kad bijāt to izslasījis:

- Šāds simbols ir uzrakstītai, bet nenosūtītai vēstulei:

- Vēstule ir nosūtīta vai izlasīta:
- (nekāds)
- Datums
- Datums, kad vēstule pēdējo reizi atjaunināta. Tas tiek ievietots automātiski un nav maināms. Datums tiek ievietots no servera.
- Laiks
- Laiks, kad vēstule pēdējo reizi atjaunināta. Tas tiek ievietots automātiski un nav maināms. Laiks tiek ievietots no servera.
- Svars (Uzglabāšanas ilgums)
- Ievietot Speciāli
izvēlieties no piedāvātajām opcijām
- Šis lauks tiek izmantots, lai norādītu, cik ilgi vēstule jāuzglabā sistēmā. Sistēmas administrators var regulāri izmantot E-pasta un konferenču moduļa Apkalpošanas fuunkciju 'Iztīrīt vēstuļu reģistrus', lai izdzēstu vecās vēstules. Iespējamas šādas opcijas:
- Parasts
- Šo vēstuli funkcija 'Iztīrīt vēstuļu reģistrus' izdzēsīs līdzko būs pagājis tās uzglabāšanas laiks. Šis laiks tiek aprēķināts no pēdējā atjaunināšanas datuma un to var norādīt katrai pastkastei vai visai sistēmai sagatavošanā Pasta un konferenču parametri.
- Neizņemt
- Funkcija 'Iztīrīt vēstuļu reģistrus' vēstuli izdzēst nevarēs.
- Ja pastkastei norādīts maksimālais vēstuļu daudzums vai sagatavošanā Pasta un konferenču parametri un ja opcija ‘Neizņemt’ norādīta lielākam vēstuļu skaitam, nekā atļauts, funkcija 'Iztīrīt vēstuļu reģistrus' katru reizi izdzēsīs pārsniegto vēstuļu skaitu (t.i., tās, kurām atzīmēts ‘Parasts’ vai ‘Dzēst nākamajā dienā’).
- Ja pastkastei norādīts maksimālais vēstuļu daudzums vai sagatavošanā Pasta un konferenču parametri un ja opcija ‘Neizņemt’ norādīta lielākam vēstuļu skaitam, nekā atļauts, funkcija 'Iztīrīt vēstuļu reģistrus' katru reizi izdzēsīs pārsniegto vēstuļu skaitu (t.i., tās, kurām atzīmēts ‘Parasts’ vai ‘Dzēst nākamajā dienā’).
- Dzēst nākamajā dienā
- Vēstule tiks izdzēsta nākamajā reizē, kad tiks izmantota funkcija 'Iztīrīt vēstuļu reģistrus'.
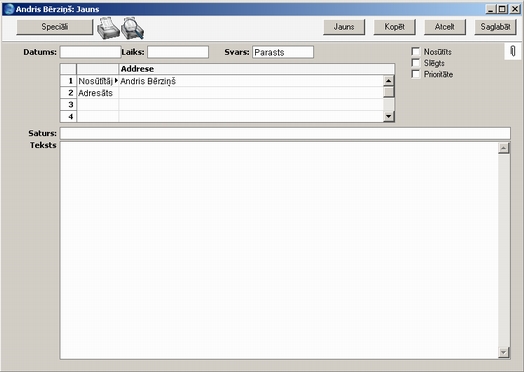
- Parasts
- Nosūtīts
- Atzīmējiet, lai nosūtītu vēstuli. Nākamreiz saglabājot vēstuli, tā uzreiz parādīsies ar aploksnes ikonu to darbinieku pastkastītēs, kuri norādīti kā adresāti, un tas norādīs uz to, ka saņēmējs to vēl nav lasījis.
- Ja nosūtītu vēstuli izdzēsīsiet no savas pastkastes, tā saglabāsies saņēmēju pastkastītēs, pat ja viņi nebūs to izlasījuši.
- Ja būs norādīta vismaz viena e-pasta adrese (t.i., adrese ar @ simbolu), (un ja sagatavošanā Pasta un konferenču parametri atzīmēta izvēles rūtiņa ‘Slēgt un nosūtīt e-pastu automātiski’, atzīmējot vēstules izvēles rūtiņu ‘Nosūtīt’ un saglabājot ierakstu, vēstule tiks automātiski nosūtīta un slēgta. Tas nozīmē, ka tad, ja vēlaties vispirms nosūtīt vēstuli pārbaudei sistēmas ietvaros, adresātu sarakstā e-pasta adrese nav jānorāda. Ja sagatavošanā izvēles rūtiņa ‘Slēgt un nosūtīt e-pastu automātiski’ nav atzīmēta, vēstule ārpus sistēmas tiks nosūtīta tad, ja pēc izvēles rūtiņas ‘Nosūtīt’ atzīmēšanas un ieraksta saglabāšanas no izvēlnes Speciāli izvēlēsities funkciju ‘Sūtīt e-pastu’.
- Ja nosūtītu vēstuli izdzēsīsiet no savas pastkastes, tā saglabāsies saņēmēju pastkastītēs, pat ja viņi nebūs to izlasījuši.
- Slēgts
- Kad vēstule ir atzīmēta kā slēgta un ir saglabāta, tajā vairs neviens nevar veikt izmaiņas, pat tās autors. Tomēr to joprojām var izdzēst gan autors, gan saņēmējs, bet, kad tās uzglabāšanas laiks beidzas, to izdzēsīs funkcija 'Iztīrīt vēstuļu reģistrus'.
- Prioritāte
- Atzīmējiet, ja vēlaties saņēmējam norādīt, ka vēstule jāuzskata par augstas prioritātes paziņojumu..
- Adrese
- Ievietot Speciāli
pastkastītes un konferences, kontaktpersonas un klienti
- Pastkastītes vai konferences nosaukums, uz kuru tiek sūtīta vēstule. Vēstuli var nosūtīt līdz 99 pastkastītēm, konferencēm un e-pasta adresēm. Tikīdz vēstule izlasīta, tās nosūtītājs vai saņēmējs vēstuli var pārsūtīt (forward) uz citu adresi, adresātu saraksta beigās vienkārši pievienojot jaunu adresi.
Ja ir zināms saņēmēja pastkastes nosaukums, ievadiet dažas pirmās rakstzīmes un nospiediet taustiņu Enter. Tiks ievietots pilns pastkastes nosaukums.
Ja nosūtāt ārējo vēstuli, šajā sarakstā ievadiet pilnu saņēmēja(-u) e-pasta adresi(-es). Varat arī izmantot funkciju ‘Ievietot Speciāli’ kā parasti, nospiežot taustiņus Ctrl-Enter vai ⌘-Enter. Tiks atvērts ‘Ievietot Speciāli’ saraksts ar iekšējo pastkastīšu un konferenču nosaukumiem:
Noklikšķiniet uz pogas [Kont.personas] vai [Klienti]: saraksts nomainīsies un tiks rādītas vai nu kontaktpersonas vai klienti. Divreiz noklikšķiniet uz tā kontaktpersonas vai klienta ieraksta, kura adrese jāievieto adresātu sarakstā.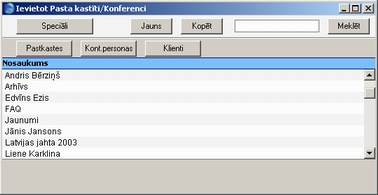
- Ja sagatavošanā Pasta un konferenču parametri ir atzīmēta izvēles rūtiņa ‘Slēgt un nosūtīt e-pastu automātiski’, e-pasta adrese jāievada tikai tad, ja esat pilnīgi pārliecināti par vēstules pareizību. (Šī opcija nozīmē to, ka vēstule ar e-pasta adresi (t.i., adrese ar @ simbolu) tiks nosūtīta un slēgta automātiski pēc izvēles rūtiņas ‘Nosūtīts’ atzīmēšanas un saglabāšanas. Ja vēstuli vispirms vēlaties nosūtīt pārbaudei sistēmas ietvaros, e-pasta adrese saņēmēju sarakstā nav jānorāda.
- Jūsu pasta kastītes nosaukums tiek ievietots saraksta pirmajā rindā automātiski, un tiek rādīts kā nosūtītājs.
- Kolonnā, kas atrodas pa kreisi no adreses, iespējams norādīt nepieciešamo opciju “Adresāts:”, “Nosūtītājs:”, “Zināšanai:??? vai “Bcc:” pēc nepieciešamības. Šo opciju izvēlei var izmantot funkciju ‘Ievietot Speciāli’. “Bcc” (blind carbon copy) izmantojama tikai ārējā pasta nosūtīšanai: katrs iekšējā pasta saņēmējs var redzēts pilnu adresātu sarakstu.
- Saturs
- Vēstules nosaukums vai tās satura īss apraksts, kas tiks rādīts vēstuļu pārskata logā.
- Teksts
- Vēstules saturs. Iespējams ievadīt līdz 32 000 rakstzīmju. Kad vēstule ir izlasīta, tās tekstu var mainīt gan nosūtītājs, gan saņēmēji.
- Ja vēstule saņemta no ārējām sistēmām un satur vairāk kā 7 500 rakstzīmes, vēstules teksts tiks pievienots vēstulei kā pielikums.
Vēstules sūtīšana
Kad rakstāt vēstuli, it īpaši, ja tā ir gara, iespējams, ik pa laikam vēlēsities to saglabāt drošības apsvērumu dēļ tā, lai tās saņēmēji pirms laika to nevarētu izlasīt. Lai to izdarītu, rakstiet vēstuli un ievadiet saņēmēju sarakstu, bet neatzīmējiet izvēles rūtiņu 'Nosūtīts’. Varat vēstules ierakstu aizvērt un turpināt rakstīt, kā arī izdrukāt un pārbaudīt to nākamajā dienā. Jūsu pastkastītē tam tiks rādīta ‘zīmuļa’ ikona norādot, ka tā vēl nav aizsūtīta.
Kad vēstule ir pabeigta, atzīmējiet izvēles rūtiņu ‘Nosūtīts’ un saglabājiet ierakstu. Tas nekavējoties tiks parādīts saņēmēju pastkastītēs. Jūsu pastkastītē tam vairs netiks rādīta ‘zīmuļa’ ikona, bet visu saņēmēju pastkastītēs tam klāt būs ‘aploksnes’ ikona, kas norādīs, ka tā vēl nav lasīta.

- Ārējās vēstules
Ja saņēmēju sarakstā ievadīta vismaz viena e-pasta adrese, tās īpašnieks var saņemt vēstuli divējādi:
- Vēstule tiks nosūtīta automātiski, tiklīdz būs atzīmēta izvēles rūtiņa ‘Nosūtīts’ un ieraksts saglabāts. Tas notiks tādā gadījumā, ja sagatavošanā Pasta un konferenču parametri ir atzīmēta izvēles rūtiņa 'Slēgt un nosūtīt e-pastu automātiski’. Vēstule reizē tiks arī slēgta.
- Ja izvēles rūtiņa ‘Slēgt un nosūtīt e-pastu automātiski’ nav atzīmēta, pēc vēstules saglabāšanas no izvēlnes Speciāli izvēlieties funkciju ???Sūtīt e-pastu’. Ja pirms šīs funkcijas izvēles vēstuli nesaglabājāt, pēdējās vēstulē veiktās izmaiņas netiks nosūtītas. Vēstule tiks nosūtīta pat tad, ja nebūs atzīmēta izvēles rūtiņa ‘Nosūtīts’, taču ieteicams to atzīmēt, lai pastkastē pie tās netiktu rādīta ‘zīmuļa’ ikona. Vēstule netiks slēgta.
Kad vēstule nosūtīta uz e-pasta adresi, tā tiks ievietota e-pasta rindā. Tā tiks apstrādāta šādi:
- Vairāki lietotāji
- Kad ārējā vārteja ir aktivizēta, kā aprakstīts šeit, tā periodiski pārbaudīs e-pastu rindu. Visas rindā esošās vēstules tiks nosūtītas automātiski.
- Viens lietotājs
- Vienlietotāja sistēmā e-pasta vēstules jānosūta manuāli. Lai to izdarītu, aktivizējiet Bāzes logu un no izvēlnes Speciāli izvēlieties funkciju ‘Saņemt un nosūtīt e-pastu’. Atkarībā no jūsu datora konfigurācijas, iespējams, vispirms vajadzēs pieslēgties internetam. Pēc tam tiks nosūtītas visas rindā esošās vēstules, kā arī no POP3 konta tiks lejupielādētas saņemtās vēstules.
Paraksta pievienošana ārējām vēstulēm
Ikvienai ārējā e-pasta vēstulei varat pievienot parakstu. Tas ir īss teksts, kas tiks rādīts vēstules beigās.Lai izveidotu parakstu, aktivizējiet Bāzes logu un no izvēlnes Speciāli izvēlieties funkciju ???Atvērt parakstu’. Tiks atvērts šāds logs:
Ievadiet parakstu un noklikšķiniet uz pogas [Saglabāt], lai saglabātu ierakstu, un aizveriet logu. Paraksta logu izmaiņu veikšanai varat atvērt jebkurā laikā, izmantojot šo pašu funkciju.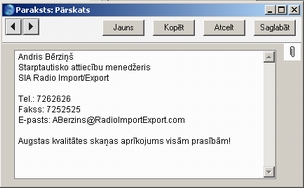
Katrai pastkastītei var izveidot savu parakstu. Administrators var pārbaudīt un labot visus sistēmā ievadītos parakstus, izmantojot E-pasta un konferenču moduļa sagatavošanu Paraksti.
Automātiskā atbilde uz ārējām vēstulēm
Iespējams uzstādīt, lai saņemtajām ārējā e-pasta vēstulēm tiktu automātiski nosūtīta atbilde Tas visbiežāk noderēs gadījumos, kad neesat birojā un vēlaties savas korespondences adresātiem paziņot savu atgriešanās laiku.
Lai izveidotu automātisko atbildi, aktivizējiet Bāzes logu un no izvēlnes Speciāli izvēlieties funkciju ‘Atvērt automātisko atbildi’. Tiks atvērts šāds logs:
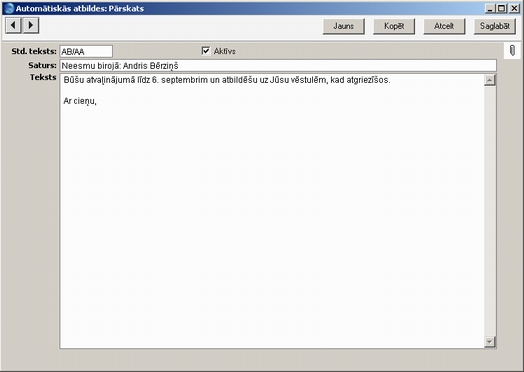
- Std. teksts
- Ievietot Speciāli
CRM moduļa reģistrs Standarta teksti
- Norādiet atbilstošo CRM moduļa reģistra Standarta teksti ieraksta kodu. Šajā ierakstā ietilps teksts, kas tiks nokopēts apakšējā laukā ‘Teksts’.
- Aktīvs
- Atzīmējiet, ja vēlaties saņemtajām ārējām vēstulēm automātiski nosūtīt atbildi. Piemēram, atstājot biroju uz ilgāku laiku, atzīmējiet šo izvēles rūtiņu, bet atgriežoties – izņemiet ķeksīti. Ja šī rūtiņa nebūs atzīmēta, automātiskā atbilde netiks nosūtīta.
- Saturs
- Ievadiet īsu tekstu, kas jārāda kā automātiskās atbildes vēstules virsraksts.
- Teksts
- Ievadiet automātiskās atbildes vēstules tekstu. Ja ievadāt iepriekš sagatavotu standarta tekstu, noklusējuma tekstu varat mainīt pēc vajadzības (piem., lai ievadītu datumus, kuros nebūsit pieejams).
Kad izveidots automātiskās atbildes ieraksts, visām saņemtajām ārējā e-pasta vēstulēm tiks nosūtīta automātiskā atbilde (maksimāli trīs automātiskās atbildes vienai e-pasta adresei). Savā pastkastītē šīs atbildes redzēt nevarēsit, taču visas oriģinālās saņemtās vēstules tajā būs kā parasti. Automātiskās atbildes netiks nosūtītas uz adresēm, kas atzīmētas kā ‘Zināšanai’, kā arī uz iekšējām vēstulēm.
Katrai pastkastītei var izveidot savu automātiskās atbildes ierakstu. Administrators var pārbaudīt un labot jebkuru sistēmā ievadīto automātisko atbildi, izmantojot E-pasta un konferenču moduļa sagatavošanu Automātiskās atbildes.
Pasts un konferences
Vēstules konferencēs var lasīt tāpat kā savā pasta kastītē, kā aprakstīts šeit. Lai nokļūtu savās konferencēs, Bāzes logā noklikšķiniet uz pogas [Konferences]. Tiks atvērts logs ‘Konferences’ ar alfabēta kārtībā sakārtotām konferencēm un mapēm.
Lai atvērtu konferenci vai mapi, divreiz noklikšķiniet uz nepieciešamās ikonas.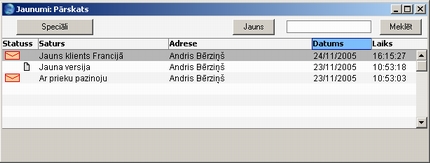
Atverot mapi, tiek parādīts tās saturs. Piemērā parādīta mape “Tehniskais”, kurā atrodas divas konferences:
Lai nokļūtu iepriekšējā līmenī, kreisajā augšējā stūrī divreiz noklikšķiniet uz bultas pogas.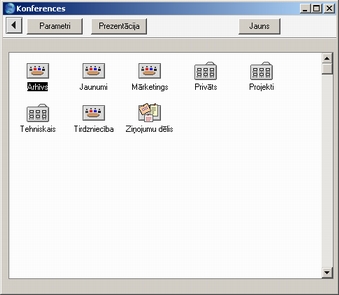
Noklikšķinot uz konferences, tiek atvērts pārskata logs, grupējot vēstules pēc sērijas numura. Pārskata loga nosaukuma joslā tiek rādīts konferences nosaukums.
Ja jums nav pieejas tiesību konferencēm, divreiz noklikšķinot uz ikonas, konference netiks atvērta.
Vēl neizlasītām vēstulēm tiks rādīta ‘aploksnes’ ikona. Lai izlasītu vēstuli, sarakstā divreiz uz tās noklikšķiniet. Pēc izlasīšanas varat pievienot savus komentārus, kā tas aprakstīts nodaļā Atbildēt uz vēstuli un labot to.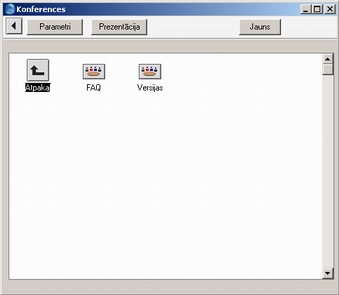
Konferences pārskata logā varat izveidot jaunu vēstuli. Pogu joslā noklikšķiniet uz [Jauns]: tiks atvērts jaunas vēstules logs:
Ievērojiet, ka nosūtītāja laukā tiks rādīts jūsu pastkastes nosaukums, bet kā pirmais saņēmējs būs norādīts attiecīgās konferences nosaukums. Izveidojiet vēstuli, kā aprakstīts iepriekš, ja nepieciešams, pievienojot papildu adreses, atzīmējiet izvēles rūtiņu ‘Nosūtīts’, un saglabājiet. Vēstule uzreiz tiks parādīta konferences pārskata logā bez ‘aploksnes’ ikonas jūsu pārskata logā (jo jūs esat tās autors), taču pārējo lietotāju pārskata logos tā būs.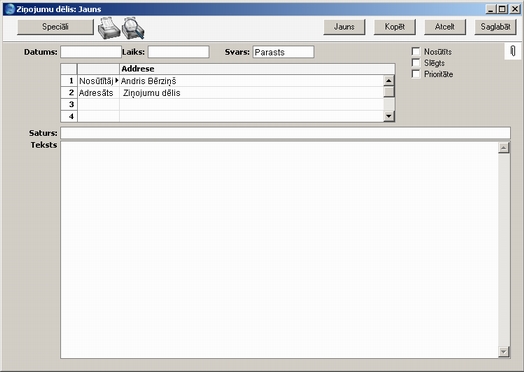
Mails and Conferences - Feed Reader
If you need to follow several Conferences closely, you can use the Feed Reader. The Feed Reader displays the Mails from several Conferences in a single browse window. If you have the Feed Reader window open, you will be able to see immediately that a new Mail has been sent to any of the Conferences you have added to your Feed Reader or that an existing Mail has been updated. The Feed Reader is only available on Mac OS X clients.
To add a Conference to your Feed Reader, open the Conference and tick the Follow box at the top of the Conference browse window:
To open your Feed Reader, simply click (Windows/Mac OS X) or tap (iOS/Android) the [Feed Reader] button in the Navigation Centre. A window similar to the Conference browse window opens, listing all the Mails in the Conferences that you are following: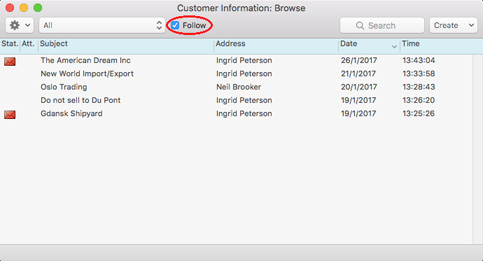
The Address column will display the sender of each Mail or, if you are the sender, the first recipient. The Source column will display the recipient Conference of each Mail (i.e. this will be one of the Conferences you are following). If a Mail has been sent to more than one Conference that you are following, it will appear more than once in your Feed Reader.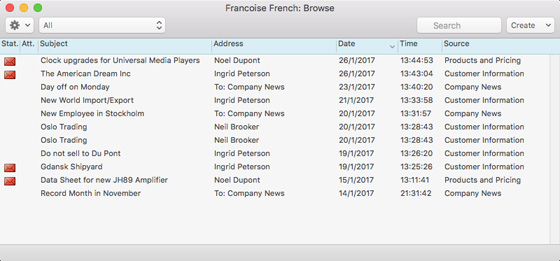
Each time someone adds a new Mail to any of the Conferences you are following, or updates an existing Mail, it will be sent to the top of your Feed Reader (assuming you have retained the default sort order by date), so it will immediately be visible to you.
---
Sending and Receiving Mail in Standard ERP:
- Introduction and Creating Mail
- Sending Mail
- Mails and Conferences, including:
- Feed Reader
- Replying to and Amending Mail
- Marking Mail as Not Read
- Attachments
- HTML Formatting in Mails
- Mail Tags
- Requiring Acceptance or Rejection of Mails
- Printing Mail
- Saving a Mail as a Text File
- Creating Mail from Other Records and Forms - The Mail Texts Setting
- Searching for Mail
- Removing and Deleting Mail
- Home page for Mail manual
- Home page for Standard ERP manual
Atbildēt uz vēstuli un labot to
Lai atbildētu uz vēstuli, atveriet to un no izvēlnes Speciāli izvēlieties ‘Atbildēt’, ‘Atbildēt citējot’ vai ‘Atbildēt ’. Tiks izveidota jauna vēstule, kurā adreses laukos ‘Nosūtītājs’ un ‘Adresāts’ būs apmainītas vietām. Ja izvēlēsities funkciju ‘Atbildēt', lauka ‘Saturs’ tekstam priekšā tiks pievienots “Re ”:
Funkcija ???Atbildēt citējot’ nokopēs iepriekšējās vēstules saturu un rādīs to ar īpašiem simboliem: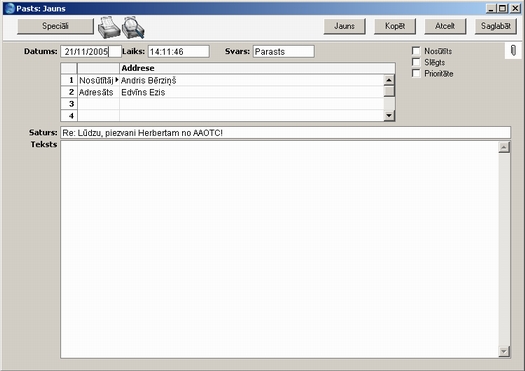
Funkciju ‘Atbildēt sūtītājam' var izmantot, atbildot uz vēstuli, kurai bija norādīti vairāki saņēmēji un uz kuru atbildi vēlaties nosūtīt tikai sūtītājam. Atbildes vēstulē sūtītājs tiks rādīts kā vienīgais adresāts, bet pārējie adresāti no saraksta tiks dzēsti.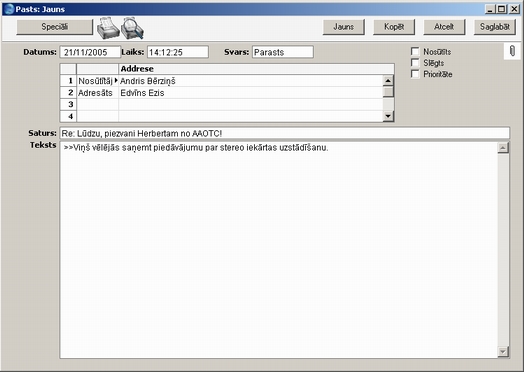
Visos trijos gadījumos atbildes vēstule tiks atvērta logā ‘Jauns’, kas nozīmē, ka tā vēl nav saglabāta. Pabeidziet to un nosūtiet vēstuli, kā aprakstīts iepriekš, vai, ja tā vairs nav vajadzīga, noklikšķiniet uz [Atcelt].
Funkcijas ‘Atbildēt’ visdrīzāk tiks izmantotas tikai atbildēšanai uz ārējām vēstulēm, jo, lai atbildētu iekšējām vēstulēm, jauna nav jāveido. Turklāt vēstuli var labot jebkurš saņēmējs, tāpēc nav nepieciešams lasīt vairākas vēstules, lai sekotu līdzi diskusijai. Tas attiecas uz visām vēstulēm, bet jo īpaši noderīgi tas ir konferencēs, kur to var izlasīt un komentēt daudzi cilvēki.
Kad vēstule tiek papildināta un saglabāta, visu pārējo saņēmēju pasta kastītēs tā tiks rādīta kā neizlasīta (ar ‘aploksnes’ ikonu). Ja vēstule atrodas konferencē, tā tiks rādīta kā neizlasīta visiem pārējiem lietotājiem, lai tie redzētu, ka kopš tās izlasīšanas ir notikušas izmaiņas. Ja sarakstā ir vismaz viena e-pasta adrese, pēc vēstules saglabāšanas no izvēlnes Speciāli jāizvēlas funkcija ‘Sūtīt e-pastu’, lai šis adresāts redzētu vēstules izmaiņas. Ja sagatavošanā Pasta un konferenču parametri ir atzīmēta izvēls rūtiņa ‘Slēgt un nosūtīt e-pastu automātiski’, tajās vēstulēs, kurās vismaz vienam adresātam ir ārējā e-pasta adrese, izmaiņas veikt nevarēs.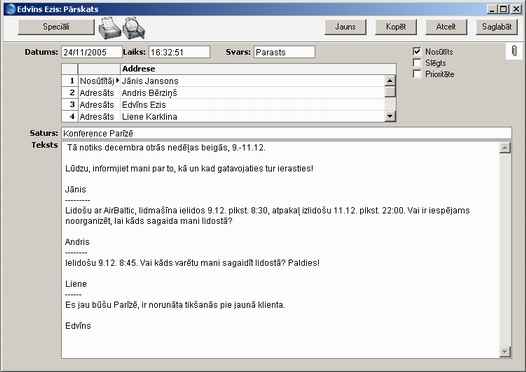
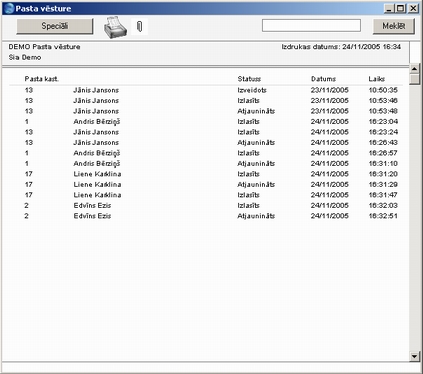
Mainot vēstules atbilstoši iepriekš aprakstītajai metodei, ieteicams visām izmaiņām pievienot datumu un darbinieka iniciāļus, pretējā gadījumā var pazaudēt vēstules jēgu un izmaiņu secību. Ja tā gadījumā notiek, var palīdzēt vēstules vēsture. Iezīmējiet nepieciešamo vēstuli pārskata logā vai atveriet to, un no izvēlnes Speciāli izvēlieties ‘Vēsture’. Šajā atskaitē tiks rādīts, kurš un kad lasījis vēstuli vai veicis tajā labojumus.
Atzīmēt vēstuli kā neizlasītu
Jebkuru vēstuli savā pastkastītē vai konferencē varat atzīmēt kā neizlasītu. Tas var noderēt, lai pie vēstules tiktu rādīta ‘aploksnes' ikona, kas atgādinātu to izlasīt vēlreiz vai atbildēt uz to vēlāk. Lai to izdarītu, savā pasta kastītē vai arī konferencē iezīmējiet vēstuli un no izvēlnes Speciāli izvēlieties funkciju ‘Neizlasīts’. Varat šo funkciju izvēlēties arī tad, ja vēstule ir atvērta.Piesaistnes
Vēstulēm var piesaistīt failus, piezīmes, kā arī citus HansaWorld Enterprise ierakstus (tai skaitā citas vēstules), izmantojot pogu [Piesaistnes] ar papīra saspraudes ikonu. Tā var izskatīties divējādi:

Šādi piesaistītie objekti tiek saukti par “piesaistnēm” un šī funkcionalitāte darbojas visā programmā. Sīkāku informāciju skatiet sadaļā Piesaistnes. Lai varētu izmantot piesaistnes, neaizmirstiet, ka programmas servera mapē jābūt “Attach??? mapei vai direktorijai, bet, lai saņemtu vai nosūtītu ārējās vēstules ar piesaistnēm, vārtejas datorā jābūt “Tmp” mapei. Lai varētu pievienot piesaistni, vēstule vismaz reizi jāsaglabā.
Vēstulēm, kurām pievienota piesaistne, pastkastīšu un konferenču pārskata logos ir papildu ikona:
HTML Formatting
This page describes HTML formatting in Mails in Standard ERP.
---
The standard Mail window does not allow for any formatting (e.g. bold text, changing font size, coloured text, etc) or for in-line graphics. An external mail with HTML formatting will be received as plain text, with the HTML version attached in the Document Manager as an HTML file. To see the HTML formatting, open the Document Manager, highlight the HTML file (named "body.html") and choose 'Open Record' from the Operations menu (with 'cog' icon, Windows/Mac OS X) or Tools menu (with 'wrench' icon, iOS/Android). The HTML file will be opened as a new page in your default browser.
However, an alternative Mail window is available that does allow you to use full HTML formatting in the Mails that you write, and for such formatting to be fully visible in the Mails that you receive. If you want to be able to use the HTML Mail window, select the Use HTML Formatting in Mail option in the Mail and Conference Settings setting in the Email and Conferences module.
Additional options are available in the Mailbox properties window for each Mailbox. Use the Default Mail Format options on the 'Formatting' card to specify whether new Mails should be in plain text or HTML, and the Force Mail Format option to allow or prevent changing between the plain text and HTML formats.
If you want to use HTML formatting in a Mail, simply tick the HTML box towards the top of the Mail window. HTML tools will appear above the text area:
The following tools are provided: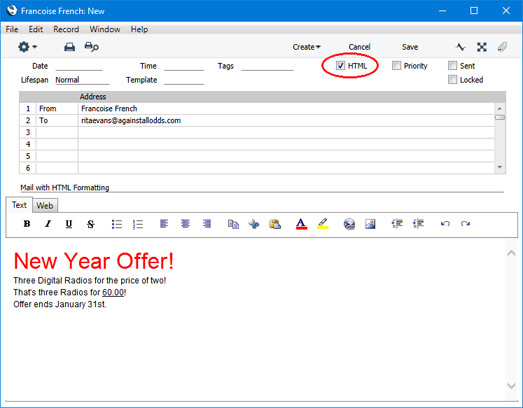

- Bold text

- Italic text

- Underlined text

- Text with strike through

- Unordered list (list with bullet points)

- Ordered list (list with numbered points)

- Left-justified text

- Centred text

- Right-justified text

- Copy selected text (Ctrl-C/⌘-C)

- Cut selected text (Ctrl-X/⌘-X)

- Paste text (Ctrl-V/⌘-V)

- Change text attributes (font, size, style, colour)

- Text background colour (Windows only, on Mac OS X use the previous tool)

- Outdented text

- Indented text

- Undo (Ctrl-X/⌘-X)

- Redo
If you cannot tick the HTML box in a Mail, this will be because you are not using the Use HTML Formatting in Mail option in the Mail and Conference Settings setting, or because you have prevented the selection of the HTML box using the Force Mail Format option in the Mailbox properties.
If you are using HTML formatting, you can also use HTML Templates, to ensure that all your Mails have a similar appearance that conforms to your corporate identity. Please refer here for details.
Note that the text areas in non-HTML and HTML Mails are different fields. You can begin writing a Mail without the HTML box ticked, and then decide to tick the box. Your text will be copied to the HTML text area, where you can apply HTML formatting to it. Any text that you add from this point will not be copied back to the non-HTML text area. The HTML check box is effectively a switch: tick it to see the HTML text area and tools; remove the tick to see the non-HTML text area.
---
Sending and Receiving Mail in Standard ERP:
- Introduction and Creating Mail
- Sending Mail
- Mails and Conferences
- Replying to and Amending Mail
- Marking Mail as Not Read
- Attachments
- HTML Formatting in Mails, including:
- Mail Tags
- Requiring Acceptance or Rejection of Mails
- Printing Mail
- Saving a Mail as a Text File
- Creating Mail from Other Records and Forms - The Mail Texts Setting
- Searching for Mail
- Removing and Deleting Mail
- Home page for Mail manual
- Home page for Standard ERP manual
HTML Formatting - HTML Templates
This page describes using HTML Templates in Mails in Standard ERP. Please refer here for more details about HTML formatting.
---
If you are using HTML formatting in Mails, you can use HTML Templates to help ensure each Mail is formatted correctly so that it conforms to corporate identity.
To create a new HTML Template, simply open the HTML Template register in the Email and Conferences module and create a new record:
Enter a Code and a Comment, and use the area that occupies the majority of the screen to design the HTML Template. The HTML tools are same as those in the Mail window, as described here.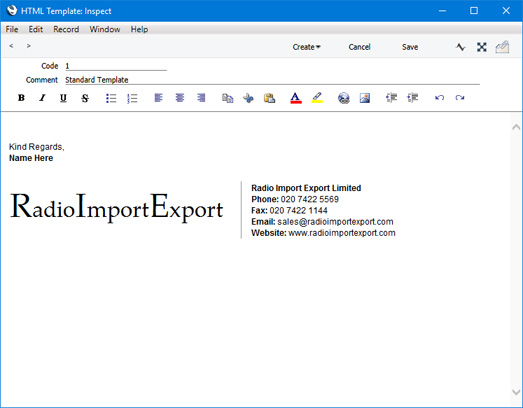
When you tick the HTML box in a Mail, a Template field will be added to the Mail:
Use 'Paste Special' to choose the HTML Template than you need. The Template will be brought in to the Mail body: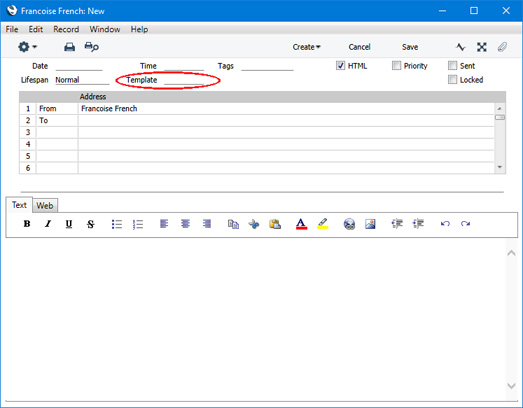
Choose the HTML Template before adding any text to the Mail, because the HTML Template will overwrite any text that you have already entered.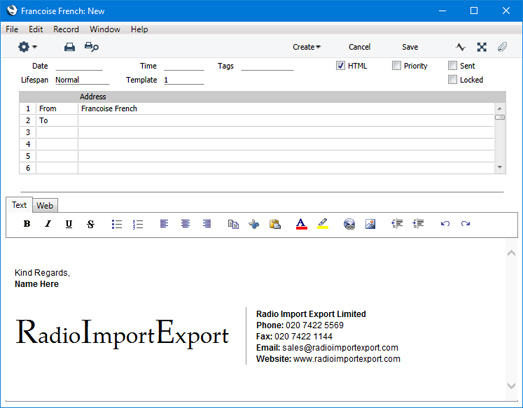
If you want to specify that a particular HTML Template will be used in all Mails added to a particular Mailbox, specify that Template in the Default template field in the Mailbox properties window, and select the Force Default Template option. This option will mean that you cannot change the HTML Template in Mails. It is not recommended that you use this option if you are using more than one Default HTML Template in your Mailboxes and Conferences, because they will clash. If you do not want to force the use of a particular Template, but you do want a Template to be specified in every Mail, tick the Force Template Selection when Creating Formatted Mails option.
The Conference properties window has the same HTML Template options, which will be used when you add Mails to the Conference from the Conference browse window (i.e. when you open the Conference and create a new Mail). They will not be applied when a user sends a Mail to a Conference from their own Mailbox (the formatting options set in their Mailbox properties will be applied in this case).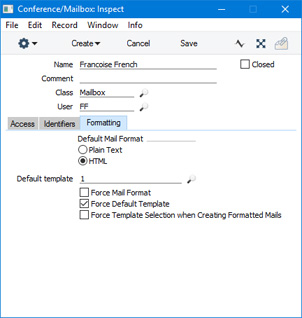
---
Sending and Receiving Mail in Standard ERP:
- Introduction and Creating Mail
- Sending Mail
- Mails and Conferences
- Replying to and Amending Mail
- Marking Mail as Not Read
- Attachments
- HTML Formatting in Mails, including:
- HTML Templates
- Mail Tags
- Requiring Acceptance or Rejection of Mails
- Printing Mail
- Saving a Mail as a Text File
- Creating Mail from Other Records and Forms - The Mail Texts Setting
- Searching for Mail
- Removing and Deleting Mail
- Home page for Mail manual
- Home page for Standard ERP manual
Mail Tags
This page describes using Mail Tags to classify the Mails in your Mailbox and in Conferences in Standard ERP.
---
Mail Tags allow you to classify the Mails in your Mailbox. You can attach a Tag (or more than one Tag) to each Mail, and you can then specify that you only want to see Mails with a particular Tag in your Mailbox or in a Conference.
Follow these steps:
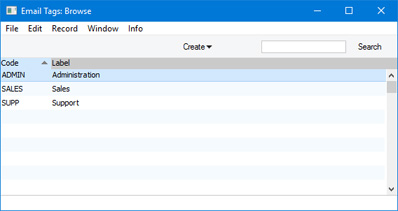
- The first step is to define the Mail Tags that you want to use. To do this, use the Mail Tags setting in the Email and Conferences module. Simply enter a Code and a Label for each Tag: the Label is the text you will see when you assign Tags to Mails.
- After creating or changing Mail Tags, you will need to quit Standard ERP and restart in order for the changes to take effect. There is no need to restart the server, but any other users currently logged in will also need to quit and restart in order to use the new Mail Tags.
- When creating or reading Mails, you can assign Tags to it. If you are using Windows, use 'Paste Special' from the Tags field to choose the Tags, separating them by commas:
If you are using Mac OS X, the Tags field is a drop-down menu. Open the drop-down menu and tick the Tags as appropriate: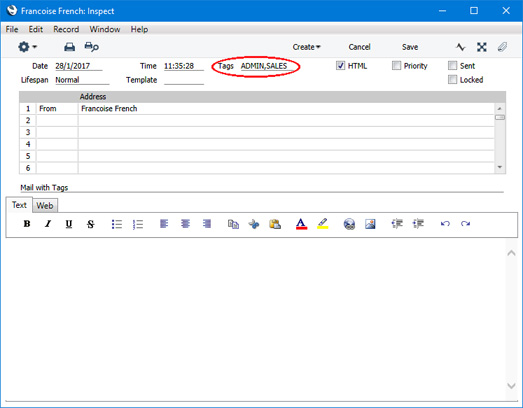
If you duplicate a Mail, any Tags in the Mail will be copied to the new one.]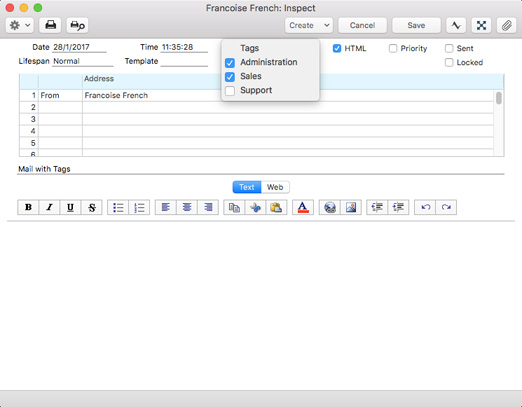
- If you only want to see Mails with a particular Tag in your Mailbox or in a Conference browse window, open the drop-down menu marked "All":
Choose a Tag from the list. The Mailbox or Conference browse window will only list the Mails with that Tag:
---
Sending and Receiving Mail in Standard ERP:
- Introduction and Creating Mail
- Sending Mail
- Mails and Conferences
- Replying to and Amending Mail
- Marking Mail as Not Read
- Attachments
- HTML Formatting in Mails
- Mail Tags
- Requiring Acceptance or Rejection of Mails
- Printing Mail
- Saving a Mail as a Text File
- Creating Mail from Other Records and Forms - The Mail Texts Setting
- Searching for Mail
- Removing and Deleting Mail
- Home page for Mail manual
- Home page for Standard ERP manual
Requiring Acceptance or Rejection of Mails
There can be occasions when you need every reader of a Mail that you have sent internally to accept or reject it. An example might be a Mail that contains a new or changed company policy.
If you need a Mail to be accepted or rejected by every reader, follow these steps:
- Write the Mail, add the recipients and mark it as Sent in the usual way.
- Choose 'Require Acceptance' from the Operations menu (with 'cog' icon, Windows/Mac OS X) or Tools menu (with 'wrench' icon, iOS/Android):
Three new buttons will be added to the Mail.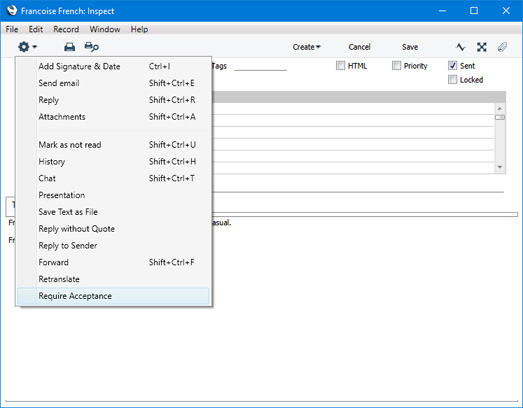
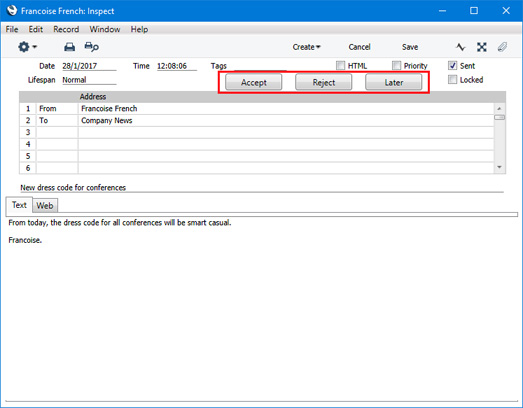
- If you now close the Mail window, you will be told "Acceptance required". In other words, to be able to close the Mail window, you need to press one of the three new buttons, as follows:
- Accept
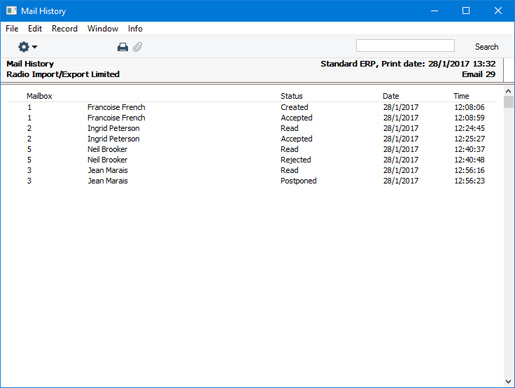
- Press [Accept] to accept the Mail. Your acceptance will be shown in the Mail History, and the three buttons will be removed from the Mail window.
- Reject
- Press [Reject] to accept the Mail. Your rejection will be shown in the Mail History, and the three buttons will be removed from the Mail window.
- Later
- Press [Later] if you are not ready to make a decision. Your postponement will be shown in the Mail History, and the Mail window will be closed.
- Accept
- When each of the recipients reads the Mail, they will also need to accept or reject the Mail or postpone the decision. If you have sent the Mail to a Conference, everybody who reads the Mail will need to accept or reject it.
- If somebody changes the Mail, everybody will need to accept or reject it again, even if they have already done so.
Sending and Receiving Mail in Standard ERP:
- Introduction and Creating Mail
- Sending Mail
- Mails and Conferences
- Replying to and Amending Mail
- Marking Mail as Not Read
- Attachments
- HTML Formatting in Mails
- Mail Tags
- Requiring Acceptance or Rejection of Mails
- Printing Mail
- Saving a Mail as a Text File
- Creating Mail from Other Records and Forms - The Mail Texts Setting
- Searching for Mail
- Removing and Deleting Mail
- Home page for Mail manual
- Home page for Standard ERP manual
Vēstules drukāšana
Lai izdrukātu vēstuli, atveriet to un noklikšķiniet uz printera ikonas, vai no izvēlnes Fails izvēlieties funkciju ‘Drukāt’.
Izmantojamā forma tiek definēta šādi:
- Sistēmas moduļa reģistrā Dok. formas izveidojiet vēstules veidni un nosauciet to “VESTULE”. No izvēlnes Speciāli izvēlieties 'Raksturojums', lai vēstules formai piesaistītu tipu “Vēstule”.
Lai pievienotu jaunus laukus, noklikšķiniet uz pogas [Lauki] un uzvelciet rāmīti tajā vietā, kur formā jābūt laukam. Ja nepieciešams, vēlāk to var pārvietot vai mainīt lielumu. Tiks atvērts logs ‘Lauks’. Ja lauks attēlo pašu vēstules tekstu vai adresi, tā kā tas parasti neietilpst vienā rindā, nepieciešams norādīt rindas augstumu. Ja atstāsit ievadītu “0" (pēc noklusējuma), visas teksta līnijas pārklāsies. Ja stils ir 10. fonta izmēra Times, rindas augstumam jābūt vismaz 10 pikseļiem.
Laukā ‘Arguments’ jānorāda maksimālais rakstzīmju skaits, ko var izdrukāt vienā rindā. Piemērā norādīts, ka vienā rindā varēs izdrukāt līdz 40 rakstzīmēm (mazāk, ja 40. rakstzīme atrodas vārda vidū).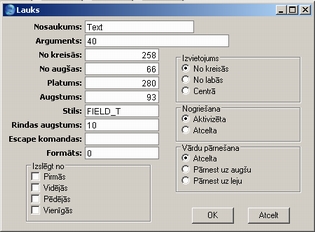
Sīkāku informāciju par reģistra Dok. formas izmantošanu skatiet rokasgrāmatā “Sistēmas modulis”.
- Sistēmas modulī no izvēlnes Fails izvēlieties ???Dokumenti’. Tiks atvērts dokumentu saraksta logs ‘Dokumenti’: iezīmējiet ‘Pasts’.
- No izvēlnes Speciāli izvēlieties ‘Definēt dokumentu’.
- Tiks atvērts logs, kura kolonnas ‘Forma’ pirmajā rindā ievadiet ???PASTS” (varat izmantot funkciju ‘Ievietot Speciāli’, lai būtu droši par pareizrakstību).
- Noklikšķiniet uz [Saglabāt], lai saglabātu formas definīciju. Turpmāk vēstules izdrukāšanai tiks izmantota jaunizveidotā forma.
Vēstules saglabāšana teksta failā
Vēstules tekstu iespējams saglabāt kā teksta failu. Lai to paveiktu, atveriet vēstuli un no izvēlnes Speciāli izvēlieties ‘Saglabāt failā'. Tiks atvērts dialoga logs ‘Save as’, ļaujot piešķirt failam nosaukumu un saglabāt uz cietā diska. Pēc noklusējuma vēstules virsraksts tiks izmantots kā faila nosaukums (lai gan rakstzīmes, kas dažās operētājsistēmās nav atļautas, tiks izdzēstas). Ja virsraksts ir pārāk garš, tas tiks saīsināts, HansaWorld Enterprise signālizēs. Vēstules virsraksts tiks rādīts arī izveidotajā teksta faila kā pirmā rinda.
Vēstules saglabāšana failā var noderēt šādos gadījumos:
- Vēlaties saglabāt vēstules ierakstu, pirms to izdzēsusi Apkalpošanas funkcija 'Iztīrīt vēstuļu reģistrus'.
- Vēlaties izlasīt un atjaunināt vēstuli nesaistes (off-line) režīmā. Šādā gadījumā atveriet teksta failu teksta apstrādes programmā un veiciet nepieciešamos labojumus. Pēc tam nokopējiet tekstu (izņemot pirmo rindu, kas ir vēstules virsraksts) un ievietojiet to atpakaļ programmā HansaWorld Enterprise. Ievietojiet kursoru teksta laukā un no izvēlnes Redaktors izvēlieties funkciju ‘Iezīmēt visu’ (Ctrl-A vai ⌘-A) un ievietojiet nokopēto tekstu.
Creating Mails from Other Records and Forms - The Mail Texts Setting
As well as creating Mails from scratch as described here, you can create Mails to send specific documents or forms to Customers and Suppliers. The following methods are available:
- You can create individual Mails from many other records, such as Quotations, Sales Orders, Purchase Orders and Invoices. To create Mails from such records, simply open them and select 'E-Mail' from the Create menu (in versions prior to 8.0, use 'Create E-Mail' from the Operations menu). A pdf version of the record (e.g. the Quotation, Sales Order, Purchase Order or Invoice) will be attached to the Mail.
- You can create Mails in batches using various Maintenance functions. For example, the Sales Ledger contains Maintenance functions that you can use to send Invoices, Open Invoice Customer Statements and Periodic Customer Statements by email, while the Purchase Ledger contains a function that allows you to mail Periodic Supplier Statements to Suppliers. Again, pdf versions of the relevant form will be attached to each Mail.
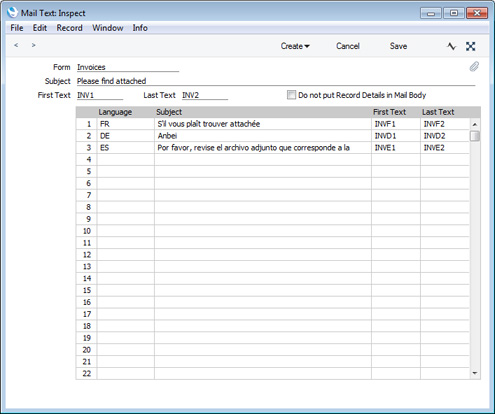
- They will be taken from the record in the Mail Texts setting in the E-mail and Conferences module that you have created for the relevant Form. For example, when you create a Mail from an Invoice, the Subject and Text will be taken from the record in the Mail Texts setting in which the Form is "Invoices". If the record from which you are creating the Mail has a Language and the Mail Text record contains a row for that Language, the Subject and Text will be determined by the fields in that row. Otherwise, they will be determined by the fields in the header of the Mail Text record.
- When you create a Mail from an individual record, there will often be a dedicated setting in the relevant module that will be used if there is no suitable record in the Mail Texts setting. For example, when you create a Mail from an Invoice and if there is no record in the Mail Texts setting in which the Form is "Invoices", the Subject and Text will be taken from Invoice Mail Settings setting in the Sales Ledger.
- Form
- Paste Special
Choices of possible entries
- Using 'Paste Special', choose the Form to which the Mail Text record is to apply.
- The Subject and Text in the Mail Text record will be copied to every Mail that you create to send the specified Form to a Customer or Supplier.
- You can create one Mail Text record for each Form (for example, one Mail Text record each for Invoices, Open Invoice Customer Statements, Periodic Customer Statements, Periodic Supplier Statements and so on).
- The Subject and Text in the Mail Text record will be copied to every Mail that you create to send the specified Form to a Customer or Supplier.
- Subject
- Enter the short piece of text that is to be copied to the Subject line of each Mail.
- Depending on the Form, extra information may be added to the text that you specify here. For example, if the Form is "Invoices", the word "Invoice" (or, if appropriate, "Credit Note") and the Invoice Number will be added to this text automatically. Please refer to the individual descriptions of the functions that create Mails for details about any text that will be added to the Subject.
- Depending on the Form, extra information may be added to the text that you specify here. For example, if the Form is "Invoices", the word "Invoice" (or, if appropriate, "Credit Note") and the Invoice Number will be added to this text automatically. Please refer to the individual descriptions of the functions that create Mails for details about any text that will be added to the Subject.
- First Text
- Paste Special
Standard Text register, CRM module
- Specify here the Code of a record in the Standard Text register in the CRM module. This record will contain the text that will be copied to the beginning of the main body of the Mail. Depending on the Form and on whether you are using the Do not put Record Details in Mail Body option below, the text will appear before the Items are listed. It is not necessary to add a carriage return to the end of the text in this Standard Text record.
- Last Text
- Paste Special
Standard Text register, CRM module
- Again, specify the Code of a record in the Standard Text register. The text in this record will be copied to the end of the main body of the Mail. Depending on the Form and on whether you are using the Do not put Record Details in Mail Body option below, the text will appear after the Items are listed and after any other text taken from the record, such as the Payment Terms. It is recommended that the first line in this Standard Text record should be a carriage return, to ensure that the text in the Mail is neatly spaced.
- If at least one of the First and Last Standard Text records uses HTML formatting (i.e. if you have ticked the HTML box in either Standard Text record), the HTML box will be ticked in the Mail record as well.
- If at least one of the First and Last Standard Text records uses HTML formatting (i.e. if you have ticked the HTML box in either Standard Text record), the HTML box will be ticked in the Mail record as well.
- Do not put Record Details in Mail Body
- When you send an individual record by email (e.g. a Quotation, Sales Order, Purchase Order or Invoice), the details of the record will by default be included in the main body of the Mail, and a pdf version of the record will be attached to the Mail as well. Select this option if you do not want the details of each record to be included in the main body of the Mail.
The translation that will be used in a particular Mail will depend on the Language of the record being mailed (e.g. of the Quotation, Order, Purchase Order or Invoice) or, in the case of form such as a statement, the Language of the Customer or Supplier. If a record does not have a Language or has a Language with no translation listed in this table, the Subject and First and Last Texts specified in the fields above the table will be used.
Shown below are the two Standard Text records quoted in the example Mail Text record illustrated above:
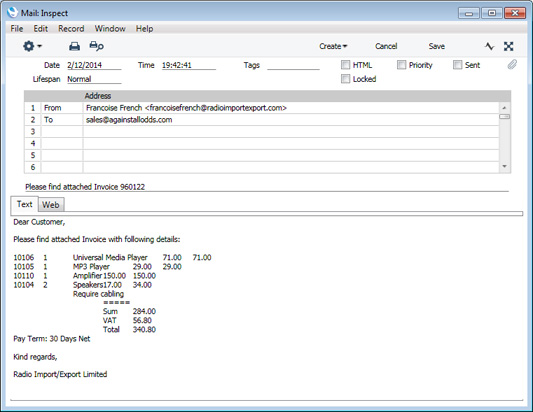
This is an example Mail created from an Invoice using the settings illustrated above. As the Do not put Record Details in Mail Body option was not selected, details of the Invoice have been included in the mail text: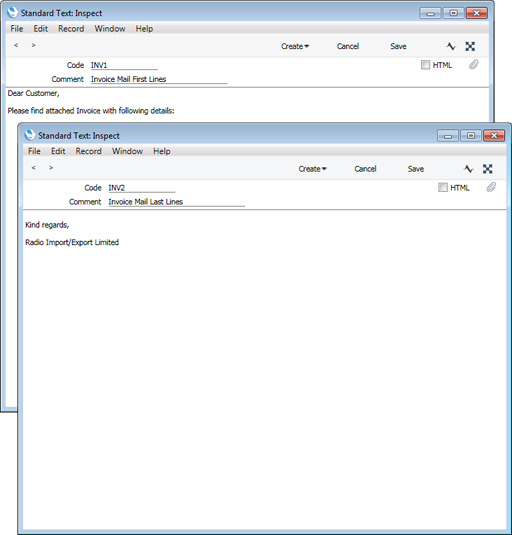
---
In this chapter:
- Sending and Receiving Mail
- Sending Mail
- Mails and Conferences
- Replying to and Amending Mail
- Marking Mail as Not Read
- Attachments
- Printing Mail
- Creating Mail from Other Records and Forms (The Mail Texts Setting)
- Saving a Mail as a Text File
- Searching for Mail
- Deleting
- Home page for Mail manual
- Home page for Standard ERP by HansaWorld manual
Vēstules meklēšana
Iespējams sameklēt vēstuli, kurā ir kāds konkrēts vārds vai frāze. Lai to izdarītu, atveriet savu pastkastīti vai konferenci un no izvēlnes Speciāli izvēlieties funkciju ‘Meklēt’. Tiks atvērts šāds logs:
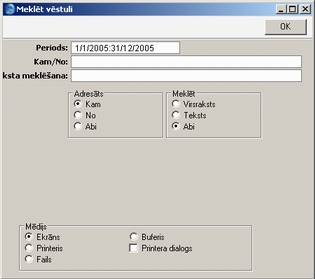
- Periods
- Ievietot Speciāli
Sistēmas moduļa sagatavošana Atskaišu periodi
- Funkcija meklēs konkrētu vārdu vai frāzi vēstulēs, kurās pēdējās izmaiņas veiktas norādītajā periodā.
- Kam/No
- Ievietot Speciāli
pastkastes vai konferences
- Norādiet pastkastītes vai konferences nosaukumu, ja vēlaties sameklēt vēstules no konkrēta nosūtītāja vai konkrētam adresātam nosūtītās (zemāk no opcijām ‘Adresāts’ izvēlieties nepieciešamo).
- Teksta meklēšana
- Ievadiet meklējamo vārdu vai frāzi.
- Adresāts
- Izvēlieties, vai pastkastītēs un/vai konferencēs vēstules jāmeklē pēc norādes laukā ‘Kam/No’ kā saņēmējs, adresāts vai abi.
- Meklēt
- Izvēlieties, vārds vai frāze jāmeklē vēstules virsrakstā, saturā vai abos.
Funkcija meklēs vēstules tikai tajā pastkastītē vai konferencē, kurā tā izvēlēta.
Vēstules dzēšana
Lai izdzēstu vēstuli, iezīmējiet to savas pastkastītes pārskata logā un no izvēlnes Kartiņa izvēlieties funkciju ‘Dzēst’. Varat arī izvēlēties vairākas vēstules (turot nospiestu taustiņu Shift, sarakstā izvēlieties vēstuļu intervālu) un izdzēsiet visas uzreiz. Šādā veidā vēstules no konferences izdzēst nevar.
Ja izdzēsīsit nosūtītu vēstuli, tā pazudīs tikai no jūsu pastkastītes. Saņēmēju pasta kastītēs un konferencēs tā paliks, pat ja vēl nebūs izlasīta. Ja vēlaties izdzēst vēstuli no visām pastkastītēm un konferencēm, pirms dzēšanas izņemiet ķeksīti no izvēles rūtiņas ???Nosūtīts’.
!
Vēstules dzēšanu nevar atcelt.
- Introduction and Creating Mail
- Ja vēstule saņemta no ārējām sistēmām un satur vairāk kā 7 500 rakstzīmes, vēstules teksts tiks pievienots vēstulei kā pielikums.