Introduction to Settings in the System Module
The following settings are available in the System module:
Access Groups
Access Groups allow you to control the access that different users have to your Standard ERP system. For example, you may want to grant a particular user access to the Sales and Purchase Ledgers while preventing them from entering the Nominal Ledger. After configuring your Access Groups, whenever you enter a record to the Person register for a new user, you should assign that Person to the relevant Access Group.You can use Access Groups to control access to your Standard ERP database in one of two ways:
- You can exclude a Person from everywhere in your Standard ERP database except those areas that you list in that Person's Access Groupi.e. you specify what the Person can do. This is known as "Starting from No Access".
- You can allow a Person to go everywhere in your Standard ERP database except to those areas that you list in that Person's Access Group i.e. you specify what the Person cannot do. This is known as "Starting from Full Access".
Note that you can only control a Person's access by assigning them to an Access Group. Persons that do not belong to an Access Group will have full access to your Standard ERP database.
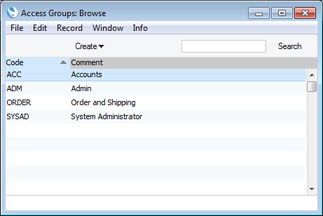
To work with Access Groups, first use the [Switch Module] button in the Master Control panel to enter the System module and then click the [Settings] button, also in the Master Control panel. Double-click 'Access Groups' in the resulting list to open the 'Access Groups: Browse' window. This window will display a list of the Access Groups that are already in the system:
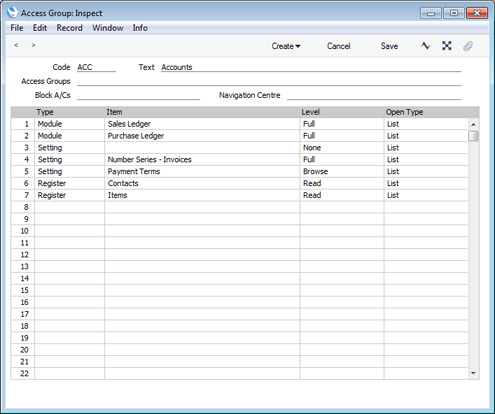
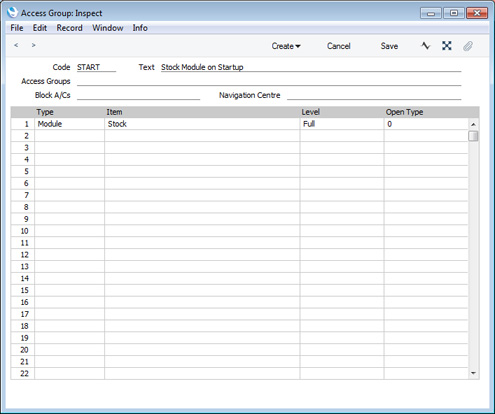
Members of this Access Group will only have access to two modules - the Sales Ledger and the Purchase Ledger. The first row of the grid gives access to the Sales Ledger, so this will be the active module when members log in to your Standard ERP database.
If the Access Group only contained the first two rows, its members would be allowed access to every area of those modules (i.e. every register, setting, report, form, Maintenance function, etc). However in this case, the third row with its blank Item denies access to all settings in both modules. The fourth row gives access back to one particular setting, the Number Series - Invoices setting, while row 5 gives Browse access to a second setting, Payment Terms. This allows members of the Access Group to open the 'Payment Terms: Browse' window but not to open individual records or to create new ones. You need to give some level of access to Payment Terms if you want members of the Access Group to be able to choose a Payment Term using 'Paste Special' when entering Invoices.
Rows 6 and 7 give Read access to the Contact and Item registers. This allows members of the Access Group to be able to open individual Contact and Item records, but not to be able to create new ones. Again, some level of access is needed to allow members to be able to choose Customers and Items using 'Paste Special' when entering Invoices.
The Access Group record contains the following fields:
- Code
- Use this field to assign a unique identifier to each Access Group. You can use up to five alpha-numeric characters.
- Text
- Enter a description of the Access Group, to be shown in the 'Access Groups: Browse' and 'Paste Special' windows.
- Access Groups
- Paste Special
Access Groups setting, System module
- You can use this field if you are creating an Access Group that will include access rights that you have already defined in another Access Group. Specify that Access Group here. You can enter several Access Groups, separated by commas.
- For example, you might already have one Access Group giving access to the Sales Ledger and one giving access to the Purchase Ledger. If you now need to create a third Access Group giving access to both Ledgers, you can enter the two previous Access Groups here, saving you the need of listing the registers, settings and so on in the matrix once again. It also reduces the maintenance burden: if you make a change in the Access Group giving access to the Sales Ledger, you won't need to make the same change in the Access Group giving access to both Ledgers.
- The access rights in the Access Group that you specify in this field will have priority over those that you specify in the matrix below. For example, if you deny access to the Number Series - Invoices setting in the grid below, and you enter an Access Group in this field in which you have given full access to the same setting, then users will have full access to the setting. If you list several Access Groups in this field with varying levels of access to that setting, then access will be given as specified in the last-named Access Group. For example, if you enter Access Groups A, B and C, then C will have priority over A and B and over the matrix below.
- For example, you might already have one Access Group giving access to the Sales Ledger and one giving access to the Purchase Ledger. If you now need to create a third Access Group giving access to both Ledgers, you can enter the two previous Access Groups here, saving you the need of listing the registers, settings and so on in the matrix once again. It also reduces the maintenance burden: if you make a change in the Access Group giving access to the Sales Ledger, you won't need to make the same change in the Access Group giving access to both Ledgers.
- Block A/Cs
- Please refer to the Block Accounts page for details about this field.
The access right that you specify in the row with the highest number will be given priority. For example, if you deny access to all settings on row 1 and then give access to the Payment Terms setting on row 2, then members of the Access Group will have access to Payment Terms. However, if you give access to the Payment Terms setting on row 1 and deny access to all settings on row 2, then members of the Access Group will not have access to Payment Terms. You can use this order of priority to set a general rule (e.g. a rule for settings as a whole) and then to make exceptions (e.g. for Payment Terms).
- Type
- Paste Special
Choices of possible entries
- The first step is use the Type field to specify the area of your database to which you are controlling access (for example, module, register, setting, report, document, etc.). Use 'Paste Special' to open a list of the Types available:
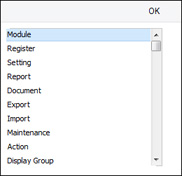
- Item
- Paste Special
Choices of possible entries
- Having specified the Type, use the Item field to name the specific component whose access you are controlling. Again, use 'Paste Special' to open a list of the components available. The 'Paste Special' list will vary, depending on the Type.
- For example, if you entered "Module" in the Type field, the 'Paste Special' list from the Item field will contain a list of modules:
The list will show every module in Standard ERP, including those that you may not have installed. Make sure you only select modules that are included in your particular installation of Standard ERP.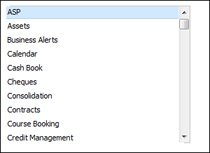
- If you enter "Action" in the Type field, the 'Paste Special' list from the Item field will contain a list of functions to which you can restrict access if necessary. These include the checking of the OK box in transactions of all kinds, the Operations menu functions and some miscellaneous features such as deleting records.
Note that, as indicated by their names, some of these Actions will Allow access, while others will Disallow access. Make sure you make an appropriate entry in the Level field to the right.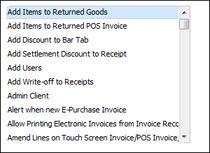
- If you enter "Reports" in the Type field, 'Paste Special' from the Item field will list all reports, and so on.
- You can leave the Item field empty if you want to apply the Level to all sub-components of the specified Type. For example, if the Type is "Reports", the Item is empty and the Level is "None", members of the Access Group will have no access to any report. You can then list individual reports on subsequent rows with a Level of "Full" to give access only to those reports listed.
- For example, if you entered "Module" in the Type field, the 'Paste Special' list from the Item field will contain a list of modules:
- Level
- Paste Special
Choices of possible entries
- Use the Level field to specify the level of access that you are allowing to the Item. A further 'Paste Special' list displays the available options:
You can use the following two options with any Type:
- Full
- Allows full access to the Item.
- None
- Denies all access to the Item.
- If the Type is "Document", this Level will allow users to print forms from browse and record windows, but not from elsewhere. For example, a user with no access to the Invoice document will be able to print an Invoice record by opening it and clicking the Printer icon, and by highlighting it in the 'Invoices: Browse' window and selecting 'Print' from the File menu. They will not be able to choose the 'Invoices' option in the 'Forms' list , so they won't be able to print a range of Invoices, and they won't have access to the 'Form Definition' window (i.e. they will not be able to change the Form Template used when Invoices are printed).
- Browse
- Allows users to open the register or setting and to see the records it contains in a list. Users will be able to search the list. Users will not be able to open, modify or create individual records.
- Browse/New
- Allows users to open the register or setting and to see the records it contains in a list. Users will be able to search the list. Users will not be able to open or modify individual records, but they will be able to create new ones (although not by duplicating existing ones).
- Read
- Allows users to open the register or setting and to see the records it contains in a list. Users will be able to search the list. Users will be able to open individual records but not to modify them or to create new ones.
You can also use this Level when the Type is "Report", in which case users will be able to print the report to screen but not to a printer or to a text file (i.e. users will not be able to print the report using any of the Media options in the report specification window except Screen).
- Read/New
- Allows users to open the register or setting and to see the records it contains in a list. Users will be able to search the list. Users will be able to open individual records but not to modify them. They will be able to create new records (including by duplicating existing ones).
Be careful when granting access to Items and Locations. Items is a setting in the Stock module but a register in many other modules. You may need separate rows for Items as a setting and for Items as a register. Similarly, Locations is a setting in the Stock module but a register in the Warehouse Management module. If you need to grant Browse or Read access to Locations so that they can be chosen using 'Paste Special', you should do so as a register.
- Full
- Open Type
- Paste Special
Choices of possible entries
- You can only use the Open Type if the Type is "Register". This field controls what will happen when a member of the Access Group opens a register, as follows:
- List
- The register's browse window will open, listing the records in the register.
- New Record
- An empty record window will open, allowing the user to create a new record in the register immediately. To open the register's browse window from this record window, the user should use the F3 (Windows and Linux) or ⌘-Shift-G (Mac OS X) key combination.
- List
Settings in the System module:
- Access Groups
- Active Users
- Auto Actions
- Bank Holidays
- Base Currency
- Base Currency Rates
- Company Date and Numeric Format
- Company Info
- Configuration
- Conversions - Master, Conversions - Accounts and VAT Code
- Conversions - Master, Conversions - Activity Types
- Conversions - Master, Conversions - Contact Classifications
- Conversions - Master, Conversions - Contacts
- Conversions - Master, Conversions - Currency Codes
- Conversions - Master, Conversions - Items
- Conversions - Master, Conversions - Locations
- Conversions - Master
- Conversions - Master, Conversions - Suppliers
- Conversions - Master, Conversions - Objects
- Conversions - Master, Conversions - Users
- Countries
- Countries Regions
- Currency Round Off
- Days and Months
- Departments
- Discount Options
- Display Groups
- Exchange Rates Settings
- Form Settings
- Global Warnings on UnOKed Records
- Internet Enablers
- Journaling
- KPIs
- Languages
- Locking
- Locking Exceptions
- Number Series Defaults
- Opened Windows History
- Optional Features
- Password Security
- Printers
- Reporting Periods
- Round Off
- Sales Groups
- Single Functions
- Special Days
- Styles
- Sub-Ledger Control Accounts
- Task Manager Access
- User Warnings on UnOKed Records
- Values in Text
- VAT Number Masks
- Weeks
- Home page for System Module manual
- Home page for Standard ERP manual
Access Groups - Active Module on Log-in
This page describes using Access Groups to determine the module that users will see when they log in to your Standard ERP system. Please click the following links for more details about other aspects of Access Groups:- The Access Groups Setting
- Active Module on Log-in
- System Administrator
- Block Accounts
By default, the Nominal Ledger will be the first module that you will see when you log in to Standard ERP. If you want another module to be active on log-in, you can change this default using Access Groups. Simply specify that module in the first row of the matrix.
If the only purpose of the Access Group is to specify the active module on log-in (i.e. you do not want to restrict access in any way), there’s no need to enter anything else in the matrix, as shown in the illustration below.
If the Access Group will be more complex, you should still use the first row to determine the active module on log-in.
---
Settings in the System module:
- Access Groups, including:
- Active Module on Log-in
- System Administrator
- Block Accounts
- Active Module on Log-in
- Active Users
- Auto Actions
- Bank Holidays
- Base Currency
- Base Currency Rates
- Company Date and Numeric Format
- Company Info
- Configuration
- Conversions - Master, Conversions - Accounts and VAT Code
- Conversions - Master, Conversions - Activity Types
- Conversions - Master, Conversions - Contact Classifications
- Conversions - Master, Conversions - Contacts
- Conversions - Master, Conversions - Currency Codes
- Conversions - Master, Conversions - Items
- Conversions - Master, Conversions - Locations
- Conversions - Master
- Conversions - Master, Conversions - Suppliers
- Conversions - Master, Conversions - Objects
- Conversions - Master, Conversions - Users
- Countries
- Countries Regions
- Currency Round Off
- Days and Months
- Departments
- Discount Options
- Display Groups
- Exchange Rates Settings
- Form Settings
- Global Warnings on UnOKed Records
- Internet Enablers
- Journaling
- KPIs
- Languages
- Locking
- Locking Exceptions
- Number Series Defaults
- Opened Windows History
- Optional Features
- Password Security
- Printers
- Reporting Periods
- Round Off
- Sales Groups
- Single Functions
- Special Days
- Styles
- Sub-Ledger Control Accounts
- Task Manager Access
- User Warnings on UnOKed Records
- Values in Text
- VAT Number Masks
- Weeks
- Home page for System Module manual
- Home page for Standard ERP manual
Access Groups - System Administrator
This page provides some suggestions regarding the configuration of the Access Group for the System Administrator. Please click the following links for more details about other aspects of Access Groups:- The Access Groups Setting
- Active Module on Log-in
- System Administrator
- Block Accounts
In multi-user systems, it is recommended that at least one member of staff acts as a system administrator, able to use the Technics module on a client machine when other users are logged in. To implement this, the Person record for that administrator should belong to an Access Group that explicitly grants full access to the Technics module:
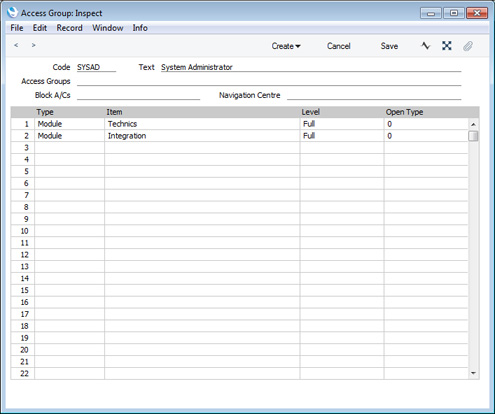
The Technics module is unusual in that you must explicitly include it in an Access Group to gain access to it. If you have not listed the Technics module in an Access Group, access will not be given, even for a Person that Starts from Full Access.
Other modules that you must include in an Access Group to gain access are Integration, which contains various functions that you can use to export information from your Standard ERP database, Data Integrity and Database Maintenance.
---
Settings in the System module:
- Access Groups, including:
- Active Module on Log-in
- System Administrator
- Block Accounts
- Active Module on Log-in
- Active Users
- Auto Actions
- Bank Holidays
- Base Currency
- Base Currency Rates
- Company Date and Numeric Format
- Company Info
- Configuration
- Conversions - Master, Conversions - Accounts and VAT Code
- Conversions - Master, Conversions - Activity Types
- Conversions - Master, Conversions - Contact Classifications
- Conversions - Master, Conversions - Contacts
- Conversions - Master, Conversions - Currency Codes
- Conversions - Master, Conversions - Items
- Conversions - Master, Conversions - Locations
- Conversions - Master
- Conversions - Master, Conversions - Suppliers
- Conversions - Master, Conversions - Objects
- Conversions - Master, Conversions - Users
- Countries
- Countries Regions
- Currency Round Off
- Days and Months
- Departments
- Discount Options
- Display Groups
- Exchange Rates Settings
- Form Settings
- Global Warnings on UnOKed Records
- Internet Enablers
- Journaling
- KPIs
- Languages
- Locking
- Locking Exceptions
- Number Series Defaults
- Opened Windows History
- Optional Features
- Password Security
- Printers
- Reporting Periods
- Round Off
- Sales Groups
- Single Functions
- Special Days
- Styles
- Sub-Ledger Control Accounts
- Task Manager Access
- User Warnings on UnOKed Records
- Values in Text
- VAT Number Masks
- Weeks
- Home page for System Module manual
- Home page for Standard ERP manual
Access Groups - Block Accounts
This page describes the Block Accounts field in the Access Group record. Please click the following links for more details about other aspects of Access Groups:- The Access Groups Setting
- Active Module on Log-in
- System Administrator
- Block Accounts
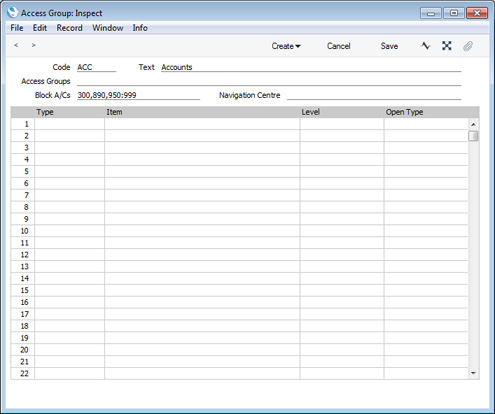
You can use the Block A/Cs field in an Access Group to prevent details of particular Accounts being shown in the Account Reconciliation and Nominal Ledger reports when they are produced by members of the Access Group. It will also prevent details of those Accounts being shown in the Account Reconciliation window. For example, you can use this field to prevent members of the Access Group seeing the details of salary payments when carrying out bank reconciliation.
You can enter a range of Accounts, a number of individual Accounts separated by commas, or a number of ranges of Accounts, again separated by commas. If you need to use 'Paste Special" to enter several Accounts, type the comma or colon before opening the 'Paste Special' list. This will cause Standard ERP to add the next Account to those already entered. Otherwise, the previous Account will be overwritten.
---
Settings in the System module:
- Access Groups, including:
- Active Module on Log-in
- System Administrator
- Block Accounts
- Active Module on Log-in
- Active Users
- Auto Actions
- Bank Holidays
- Base Currency
- Base Currency Rates
- Company Date and Numeric Format
- Company Info
- Configuration
- Conversions - Master, Conversions - Accounts and VAT Code
- Conversions - Master, Conversions - Activity Types
- Conversions - Master, Conversions - Contact Classifications
- Conversions - Master, Conversions - Contacts
- Conversions - Master, Conversions - Currency Codes
- Conversions - Master, Conversions - Items
- Conversions - Master, Conversions - Locations
- Conversions - Master
- Conversions - Master, Conversions - Suppliers
- Conversions - Master, Conversions - Objects
- Conversions - Master, Conversions - Users
- Countries
- Countries Regions
- Currency Round Off
- Days and Months
- Departments
- Discount Options
- Display Groups
- Exchange Rates Settings
- Form Settings
- Global Warnings on UnOKed Records
- Internet Enablers
- Journaling
- KPIs
- Languages
- Locking
- Locking Exceptions
- Number Series Defaults
- Opened Windows History
- Optional Features
- Password Security
- Printers
- Reporting Periods
- Round Off
- Sales Groups
- Single Functions
- Special Days
- Styles
- Sub-Ledger Control Accounts
- Task Manager Access
- User Warnings on UnOKed Records
- Values in Text
- VAT Number Masks
- Weeks
- Home page for System Module manual
- Home page for Standard ERP manual
Access Groups - Sorting Rows in an Access Group
This page describes sorting rows in an Access Group record. Please refer to the following pages for more details about other aspects of Access Groups:- The Access Groups Setting
- Active Module on Log-in
- System Administrator
- Block Accounts
- Sorting Rows in an Access Group
When working with Access Groups, bear in mind that the access right that you specify in the row with the highest number will be given priority. For example, if you deny access to all settings on row 1 and then give access to the Payment Terms setting on row 2, then members of the Access Group will have access to Payment Terms. However, if you give access to the Payment Terms setting on row 1 and deny access to all settings on row 2, then members of the Access Group will not have access to Payment Terms. You can use this order of priority to set a general rule (e.g. a rule for settings as a whole) and then to make exceptions (e.g. for Payment Terms). To help organise an Access Group record in this way you can sort the rows by selecting 'Sort' from the Operations menu (Windows/macOS) or Tools menu (iOS/Android). You do not need to save an Access Group before sorting the rows.
The function will sort the rows in an Access Group using the following principles:
- If the Type in the first row is "Module", that row will remain as the first row. This will preserve the specified module as being the one that is shown to members of the Access Group when they log in.
- Other rows will be sorted by Type (in the order Module, Register, Setting, Report, Form, Export, Import, Maintenance, Action, Display Group) then alphabetically.
- Rows granting access will be placed above those that deny access. If there are contradicting rows (e.g. rows that grant and deny access to the same setting), the lower rows will be given priority as mentioned in the introductory paragraph, so the sort will deny access.
- If there are duplicate rows that may or may not be contradicting, there will be a beep and the insertion point will then be placed in the first duplicate row. You can therefore use the 'Sort' function to find duplicate rows. After correcting the duplicate, select 'Sort' again to be shown the next duplicate.
- The Access Groups Setting
- Active Module on Log-in
- System Administrator
- Block Accounts
- Sorting Rows in an Access Group
Go back to:
- Home page for Settings in the System module
- Home page for System Module manual
- Home page for Standard ERP manual
Active Users
This setting lists the current users in a network (multi-user) installation of Hansa.Auto Actions
This setting determines the rules for automatic document printing.The documents involved are the Order Confirmation/Acknowledgement, the Internal Order, the Delivery Note, the Freight Label and the Invoice. The default setting is that no documents are printed automatically.
You can choose to have Order Confirmations and Internal Orders printed every time a new Order is saved for the first time, or after every alteration of an Order. For Invoices, Freight Labels and Delivery Notes, the document can be printed each time an Invoice or Delivery Note is approved and saved. In the case of Freight Labels, if you choose the One per Item Row or One per Item option, you can prevent their being printed for certain Items. To do this, place these Items in an Item Group whose Do Not Print Freight Labels for this Group option is switched on. Invoices can also be printed automatically when they are created using the 'Invoice' function on the Operations menu of the Contract screen. At the time that these are printed, the Invoices are unapproved, so they are marked with the text "Test Printout". Finally, Cash Invoices can also be printed automatically from the Point of Sales module when they are approved and saved.
Backup Settings
Please refer to the Remote Back-ups and Journaling pages for full details about this setting.---
Go back to:
- Home page for Settings in the System module
- Home page for System Module manual
- Home page for Standard ERP manual
Bank Holidays
Use the Bank Holidays setting to specify which days of the week are working days and to list the public holidays during the year. This information will be used by the various scheduling functions in Standard ERP.Usually you will only need a single record in this setting. The Country in this record should be the same as the Country in the Company Info setting.
To work with this setting, first ensure you are in the System module. Then, if you are using Windows or Mac OS X, click the [Settings] button in the Navigation Centre and then double-click 'Bank Holidays' in the 'Settings' list. If you are using iOS or Android, select 'Settings' from the Tools menu (with 'wrench' icon) and tap 'Bank Holidays' in the 'Settings' list. The 'Bank Holidays: Browse' window will open. This contains a list of the records already entered to this setting.
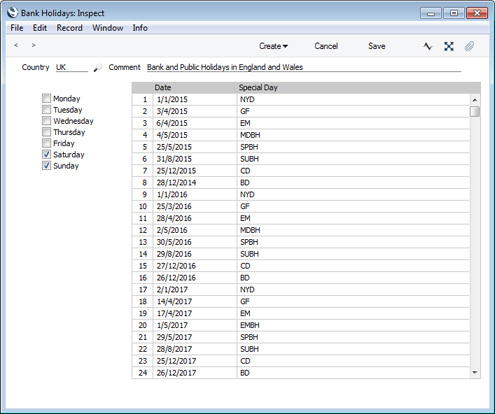
- Country
- Paste Special
Countries setting, System module
- Comment
- Enter any comment about the record, to be shown in the browse window.
- Days of the Week
- Tick the boxes of non-working days. For example, if you normally work Monday - Friday and not Saturday or Sunday, tick the boxes for Saturday and Sunday.
- Date
- Paste Special
Choose date
- Enter the date of each public holiday.
- Special Day
- Paste Special
Special Days setting, System module
- Enter the name of each public holiday.
Settings in the System module:
- Access Groups
- Active Users
- Auto Actions
- Bank Holidays
- Base Currency
- Base Currency Rates
- Company Date and Numeric Format
- Company Info
- Configuration
- Conversions - Master, Conversions - Accounts and VAT Code
- Conversions - Master, Conversions - Activity Types
- Conversions - Master, Conversions - Contact Classifications
- Conversions - Master, Conversions - Contacts
- Conversions - Master, Conversions - Currency Codes
- Conversions - Master, Conversions - Items
- Conversions - Master, Conversions - Locations
- Conversions - Master
- Conversions - Master, Conversions - Suppliers
- Conversions - Master, Conversions - Objects
- Conversions - Master, Conversions - Users
- Countries
- Countries Regions
- Currency Round Off
- Days and Months
- Departments
- Discount Options
- Display Groups
- Exchange Rates Settings
- Form Settings
- Global Warnings on UnOKed Records
- Internet Enablers
- Journaling
- KPIs
- Languages
- Locking
- Locking Exceptions
- Number Series Defaults
- Opened Windows History
- Optional Features
- Password Security
- Printers
- Reporting Periods
- Round Off
- Sales Groups
- Single Functions
- Special Days
- Styles
- Sub-Ledger Control Accounts
- Task Manager Access
- User Warnings on UnOKed Records
- Values in Text
- VAT Number Masks
- Weeks
- Home page for System Module manual
- Home page for Standard ERP manual
Base Currency
Please click here for full details of this setting.Base Currency Rates
Please click here for full details of this setting.Cloud Security
This page describes the Cloud Security setting in the System module.---
The Cloud Security setting in the System module contains a single option that you can use to prevent any users from downloading any files relating to your server from their MyStandard pages.
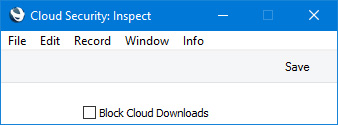
- List of Backups
- It will not be possible to use 'List of Backups' to list the back-up files stored in the "Backup" folder on the server. The list that appears when you select 'List of Backups' will be empty.
- File Manager
- It will not be possible to use 'File Manager' to list the files and folders stored in the folder containing the server application. The list that appears when you select 'File Manager' will be empty.
- View Log
- It will not be possible to use 'View Log' to view any of the server log files. If you select any of the 'View Log' options, the message "There was no log file found" will appear.
Settings in the System module:
- Access Groups
- Active Users
- Auto Actions
- Bank Holidays
- Base Currency
- Base Currency Rates
- Cloud Security
- Company Date and Numeric Format
- Company Info
- Configuration
- Conversions - Master, Conversions - Accounts and VAT Code
- Conversions - Master, Conversions - Activity Types
- Conversions - Master, Conversions - Contact Classifications
- Conversions - Master, Conversions - Contacts
- Conversions - Master, Conversions - Currency Codes
- Conversions - Master, Conversions - Items
- Conversions - Master, Conversions - Locations
- Conversions - Master
- Conversions - Master, Conversions - Suppliers
- Conversions - Master, Conversions - Tags/Objects
- Conversions - Master, Conversions - Users
- Countries
- Countries Regions
- Currency Round Off
- Days and Months
- Departments
- Discount Options
- Display Groups
- Exchange Rates Settings
- Form Settings
- Global Warnings on UnOKed Records
- Internet Enablers
- Journaling
- KPIs
- Languages
- Locking
- Locking Exceptions
- Nature of Business
- Number Series Defaults
- Opened Windows History
- Optional Features
- Password Security
- Printers
- Reporting Periods
- Round Off
- Sales Groups
- Single Functions
- Special Days
- Styles
- Sub-Ledger Control Accounts
- Task Manager Access
- User Warnings on UnOKed Records
- Values in Text
- VAT Reg. Number Masks
- Weeks
- Home page for System Module manual
- Home page for Standard ERP manual
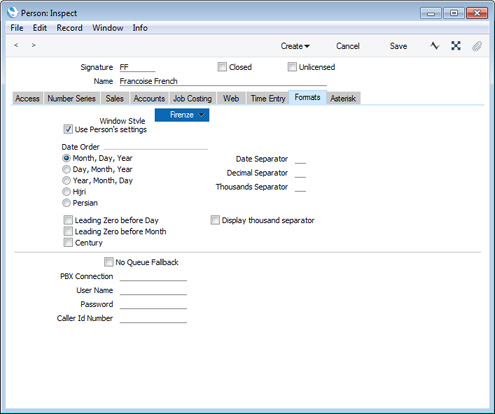
Company Date and Numeric Format
The Company Date and Numeric Format setting is where you can ensure your Standard ERP installation displays, prints and exports dates and numbers using your preferred formats.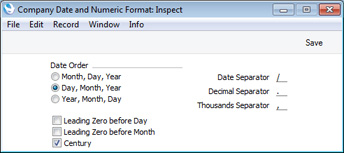
If you need the Thousands Separator to be displayed on screen, select the Display Thousand Separator option in the Optional Features setting in the System module. The Thousands Separator will always be displayed in reports and in forms.
In a single-user system, whenever you make a change in this setting, its effect will be immediate and universal.
In a multi-user system, you can change the Company Date and Numeric Format setting from a client machine, but the changes will not take effect until you restart the client. You can also have different date and numeric formats on a particular client machine, and a particular user can have their own formats as well. To choose date and numeric formats for a client machine, use the Client Date and Numeric Format setting in the User Settings module, working on that machine. These formats will be used on that machine irrespective of the Person logging in (unless the Person has their own formats). Be sure to tick the Use Client Settings box before saving, to activate the setting.
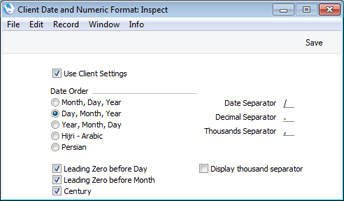
To choose date and numeric formats for a particular user, use the 'Formats' card of their Person record. The user will see dates and numbers displayed in these formats irrespective of the client machine they are using, even if the machine has its own Client Date and Numeric Format. Be sure to tick the Use Person's Settings box before saving, to activate the setting, and to quit Standard ERP and restart for the change to take effect.
Dates and Export Files
Be careful when opening a Standard ERP Export file in Microsoft Excel with the intention of editing it before importing it to a new database. Under certain circumstances, Excel will, when opening a text file, convert some variables that it interprets as dates into its own internal date format. Where you are expecting a date to appear in the spreadsheet you may see a number such as "35475". When you save the spreadsheet again as a text file these variables will not be converted back to date format. So, if you import this text file into your Standard ERP database, the dates will be wrong. To avoid this problem, make sure you use the third step of Excel's Import Wizard to set all imported columns to 'text' format (highlight all the columns in the Data Preview area using the Shift key and select 'Text' as the Column Data Format).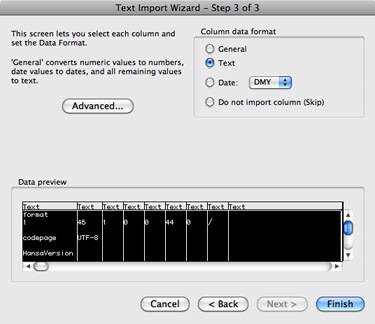
---
Settings in the System module:
- Access Groups
- Active Users
- Auto Actions
- Bank Holidays
- Base Currency
- Base Currency Rates
- Company Date and Numeric Format
- Company Info
- Configuration
- Conversions - Master, Conversions - Accounts and VAT Code
- Conversions - Master, Conversions - Activity Types
- Conversions - Master, Conversions - Contact Classifications
- Conversions - Master, Conversions - Contacts
- Conversions - Master, Conversions - Currency Codes
- Conversions - Master, Conversions - Items
- Conversions - Master, Conversions - Locations
- Conversions - Master
- Conversions - Master, Conversions - Suppliers
- Conversions - Master, Conversions - Objects
- Conversions - Master, Conversions - Users
- Countries
- Countries Regions
- Currency Round Off
- Days and Months
- Departments
- Discount Options
- Display Groups
- Exchange Rates Settings
- Form Settings
- Global Warnings on UnOKed Records
- Internet Enablers
- Journaling
- KPIs
- Languages
- Locking
- Locking Exceptions
- Number Series Defaults
- Opened Windows History
- Optional Features
- Password Security
- Printers
- Reporting Periods
- Round Off
- Sales Groups
- Single Functions
- Special Days
- Styles
- Sub-Ledger Control Accounts
- Task Manager Access
- User Warnings on UnOKed Records
- Values in Text
- VAT Number Masks
- Weeks
- Home page for System Module manual
- Home page for Standard ERP manual
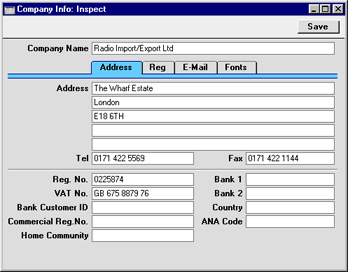
Company Info
This setting is used to enter your company's name and address, and other particulars such as phone and fax numbers, and the bank and bank account number. This will be printed as appropriate on all documents.To open the Company Info setting, double-click on 'Company Info' in the 'Settings' list. The 'Company Info: Inspect' window is opened. When the window is complete, confirm the entry by clicking [Save], or cancel it by closing the window using the close box.
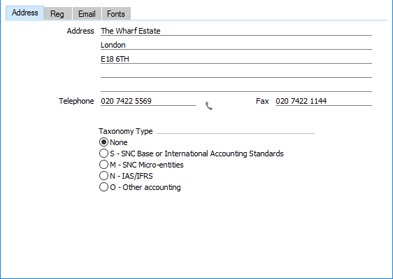
Company Info - Address Card
This page describes the fields on the 'Address' card of the Company Info setting. Please follow the links below for descriptions of the other cards:- Introduction
- 'Address' card
- 'Reg' card
- 'Email' card
- 'Fonts' card
- Address
- Fields for Form Templates
Own Address, Own Address 2
- Enter your company's address in these fields.
- If you want to give a name to each of the individual address lines, use the 'Address' card of the User Defined Fields - Contacts setting in the CRM module.
- In Finland, enter your company's address in the first two Address fields (street in the first field, post code and town in the second field) and the Country field (on the 'Reg' card). The Country must use the two-character ISO 3166 format (i.e. "FI").
- Similarly, in Germany, Latvia and Spain, enter your company's address in the first two Address fields, and the Country using the two-character ISO 3166 format. In Poland, use the first three Address fields.
- To ensure the Address will be printed on documentation, add the "Own Address" or "Own Address 2" fields to your Form Template designs. The "Own Address" field will include the Company Name (from the header in this setting) in the address, while the "Own Address 2" field will not. So, if you need the Business Name to be printed instead of the Company Name, use the "Own Address 2" field. In both fields, the address will be printed on separate lines, so in both cases you should specify a Line Height. Use the Form Settings setting in the System module to specify whether blank lines will be printed, whether parts of the address will be printed on the same line, etc.
- Please refer here for more details about adding fields to Form Templates, including specifying Line Heights.
- If you want to give a name to each of the individual address lines, use the 'Address' card of the User Defined Fields - Contacts setting in the CRM module.
- Telephone
- Field for Form Templates
Own Telephone Number
- Enter your company's telephone number here.
- When adding the "Own Telephone Number" field to your Form Template designs, enter "N" as the Field Argument if you need the telephone number to be printed without spaces or other non-numeric characters.
- You can enter your company's email and web addresses on the 'Email' card of this setting.
- When adding the "Own Telephone Number" field to your Form Template designs, enter "N" as the Field Argument if you need the telephone number to be printed without spaces or other non-numeric characters.
- Fax
- Field for Form Templates
Own Fax Number
- Enter your company's fax number here.
- Taxonomy Type
- This set of options is used in Portugal. Choose the account classification reference (TaxonomyReference) used by your company. This information will be included in 'SAFT' export files, and will determine the account classification codes (TaxonomyCodes) that will also be included in 'SAFT' files.
Settings in the System module:
- Access Groups
- Active Users
- Auto Actions
- Bank Holidays
- Base Currency
- Base Currency Rates
- Cloud Security
- Company Date and Numeric Format
- Company Info, including:
- Configuration
- Conversions - Master, Conversions - Accounts and VAT Code
- Conversions - Master, Conversions - Activity Types
- Conversions - Master, Conversions - Contact Classifications
- Conversions - Master, Conversions - Contacts
- Conversions - Master, Conversions - Currency Codes
- Conversions - Master, Conversions - Items
- Conversions - Master, Conversions - Locations
- Conversions - Master
- Conversions - Master, Conversions - Suppliers
- Conversions - Master, Conversions - Tags/Objects
- Conversions - Master, Conversions - Users
- Countries
- Countries Regions
- Currency Round Off
- Days and Months
- Departments
- Discount Options
- Display Groups
- Exchange Rates Settings
- Form Settings
- Global Warnings on UnOKed Records
- Internet Enablers
- Journaling
- KPIs
- Languages
- Locking
- Locking Exceptions
- Nature of Business
- Number Series Defaults
- Opened Windows History
- Optional Features
- Password Security
- Printers
- Reporting Periods
- Round Off
- Sales Groups
- Single Functions
- Special Days
- Styles
- Sub-Ledger Control Accounts
- Task Manager Access
- User Warnings on UnOKed Records
- Values in Text
- VAT Number Masks
- Weeks
- Home page for System Module manual
- Home page for Standard ERP manual
Company Info - Reg Card
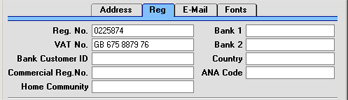
- Bank 1, Bank 2
- Your company's main bank account number(s) should be entered here. This information can then be printed on any appropriate documentation.
- Bank Customer ID
- This is an ID number used for automatic (modem) communication with certain credit institutions in some countries. Please contact your local Hansa representative for details.
- Country
- Paste Special
Countries setting, System module
- Hansa contains a feature whereby any VAT Numbers entered for Customers and Suppliers are checked to make sure they comply with the official format for their Countries. For Customers and Suppliers whose Country is unspecified, this validation check will use the Country entered here. Please refer to the description of the VAT Number Masks setting for full details of this feature.
- Commercial Reg. No.
- The Intrastat system is used to collect statistics on the physical trade in goods (i.e. the actual movement of goods) between the various member countries of the European Union (EU). If your business is situated in an EU country and its trade with companies in other EU countries is greater than the threshold value, it will be necessary to send an Intrastat report periodically to the relevant authorities. You can do this by printing a document or exporting a text file. In both cases, the report should include your company name and address (from the 'Address' card), your VAT Number (above) and a company or branch identifier (entered in this field). You should have a separate identifier for each branch if you will be submitting Intrastat returns from different branches using the same VAT Number.
- ANA Code
- Record the unique number assigned by the Article Numbering Association to your company here. This is required if you will be using the EDI (Electronic Data Interchange) module. Please refer to your local representative for details.
Company Info - Email Card
This page describes the fields on the 'Email' card of the Company Info setting. Please follow the links below for descriptions of the other cards:- Introduction
- 'Address' card
- 'Reg' card
- 'Email' card
- 'Fonts' card

- Email
- Field for Form Templates
Own Email
- Enter your company's email address here, to be printed on documentation and included in official reports.
- WWW Address
- Field for Form Templates
Own WWW Address
- Enter your company's web address here, to be printed on documentation and included in official reports.
- CEO Name
- Enter the name of your company's CEO here.
- In Italy, the contents of this field will be included in files created by the 'Periodic VAT Declaration' Export function in the Nominal Ledger.
- In Italy, the contents of this field will be included in files created by the 'Periodic VAT Declaration' Export function in the Nominal Ledger.
- CEO
- Paste Special
Customers in Contact register
- Field for Form Templates Manager / CEO
- In Lithuania and Norway, enter a record in the Contact register representing the CEO of your company. Then, enter the Contact Number of that Contact record in this field. The Contact Name in this record will be included in 'SAFT' export files.
- In Argentina, use this field if you will be sending hotel and restaurant Invoices as e-invoices. These e-invoices should include information about the CEO of the company, in the <Opcionalales> tag. Enter a record in the Contact register representing the CEO and enter at least the VAT Reg. No., Doc. Type and Profession. Then, enter the Contact Number of that Contact record in this field.
- In Lithuania and Norway, enter a record in the Contact register representing the CEO of your company. Then, enter the Contact Number of that Contact record in this field. The Contact Name in this record will be included in 'SAFT' export files.
- Chief Accountant
- Field for Form Templates
Chief Accountant
- In Bolivia, the Chief Accountant will be included in VAT Report Purchases and VAT Report Sales reports.
- In Italy, the Chief Accountant will be exported in the <CodiceFiscale> tag inside <Dichiarante> in files created by the 'Periodic VAT Declaration' Export function in the Nominal Ledger if you have ticked the Outsourced to Acc. Bureaux box on the 'Reg' card.
- In Latvia, the Chief Accountant will be included in files created by the 'VAT Annual' Export function in the Nominal Ledger.
- In Lithuania, Norway and Portugal, the Chief Accountant will be included in 'SAFT' export files.
- In Italy, the Chief Accountant will be exported in the <CodiceFiscale> tag inside <Dichiarante> in files created by the 'Periodic VAT Declaration' Export function in the Nominal Ledger if you have ticked the Outsourced to Acc. Bureaux box on the 'Reg' card.
- Line of Business
- Field for Form Templates
Own Line of Business
- In Brazil, the Line of Business will be exported as the Código do Serviço Federal (positions 672-675 in lines in which the Tipo do registro is 20) in files created by the 'Fiscal Note for Services' Export function in the Sales Ledger. The Line of Business will also be included in the <CNAE> tag in e-invoices.
- In Portugal, the Line of Business will be included in Fiscal Year Depreciation and Fiscal Year Write-Offs reports produced from the Assets module.
- In Portugal, the Line of Business will be included in Fiscal Year Depreciation and Fiscal Year Write-Offs reports produced from the Assets module.
- Share Capital
- Field for Form Templates
Own Share Capital
- In Portugal, it is mandatory that the value of a company's share capital is printed on all documentation.
Settings in the System module:
- Access Groups
- Active Users
- Auto Actions
- Bank Holidays
- Base Currency
- Base Currency Rates
- Cloud Security
- Company Date and Numeric Format
- Company Info, including:
- Configuration
- Conversions - Master, Conversions - Accounts and VAT Code
- Conversions - Master, Conversions - Activity Types
- Conversions - Master, Conversions - Contact Classifications
- Conversions - Master, Conversions - Contacts
- Conversions - Master, Conversions - Currency Codes
- Conversions - Master, Conversions - Items
- Conversions - Master, Conversions - Locations
- Conversions - Master
- Conversions - Master, Conversions - Suppliers
- Conversions - Master, Conversions - Tags/Objects
- Conversions - Master, Conversions - Users
- Countries
- Countries Regions
- Currency Round Off
- Days and Months
- Departments
- Discount Options
- Display Groups
- Exchange Rates Settings
- Form Settings
- Global Warnings on UnOKed Records
- Internet Enablers
- Journaling
- KPIs
- Languages
- Locking
- Locking Exceptions
- Nature of Business
- Number Series Defaults
- Opened Windows History
- Optional Features
- Password Security
- Printers
- Reporting Periods
- Round Off
- Sales Groups
- Single Functions
- Special Days
- Styles
- Sub-Ledger Control Accounts
- Task Manager Access
- User Warnings on UnOKed Records
- Values in Text
- VAT Number Masks
- Weeks
- Home page for System Module manual
- Home page for Standard ERP manual
Company Info - Fonts Card
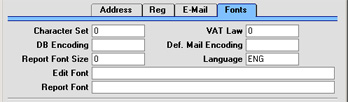
- Character Set
- This field is used to control sorting in Hansa. In the UK, it should be set to zero. In countries where the alphabet differs to that of the UK/US, sorting by ASCII codes produces a list that is not in the correct alphabetical order: this field is used to overcome this problem.
- VAT Law
- This field is used to ensure the behaviour of Hansa conforms to certain local conventions of the country in which it is being used. The following values can be used:
Byelorussia 46 Denmark 7 Estonia 27 Finland 13 France 1 Germany 2 Hungary 26 Iceland 15 Ireland (Republic of) 35 Italy 3 Latvia 28 Lithuania 24 Netherlands 4 Norway 9 Poland 25 Portugal 8 Russia 32 Spain 6 Sweden 5 Ukraine 45 United Kingdom 0 (zero) - DB Encoding
- If you are using Hansa to send and receive email, this field should be set to "mac" (all lower case) if the server uses a PowerPC processor (e.g. AS/400, AIX, Macintosh, Z-series). If the server is Intel-based, the field should be left blank. In Russia, enter "acyr" for PowerPC servers and "cp1251" for Intel servers.
- Def. Mail Encoding
- All emails are encoded to protect special characters in the text. This allows the recipient to read these characters as they were written. If you are using Hansa to send and receive email, the ISO-8859-1 (Western European) encoding standard will be used if you leave this field empty. If you need to use a different encoding standard, specify that here. For example, users in Russia should enter "koi8-r" to this field. Please refer to your local Hansa representative for further information.
- Edit Font, Report Font, Report Font Size
- These allow you to select different fonts for use on screen and in reports respectively. If nothing is entered in these fields, Hansa's default fonts will be used. These fonts are selected for maximum readability, and should only be changed if you have good reasons to do so. In non-English versions of Hansa, these fields are used to select fonts with special character sets.
- Language
- Paste Special
Languages setting, System module
- When printing amounts in words (rather than figures) in documents, these can be printed in different Languages using rules defined in the Values in Text setting. In most cases, the Language used will be determined by the Language of the Customer or Supplier in question. For Customers and Suppliers whose Language is unspecified, the Language entered here will be used. Please refer to the description of the Values in Text setting for full details of this feature.
Company Info - Mail Address Card
This page describes the fields on the 'Mail Address' card of the Company Info setting. Please follow the links below for descriptions of the other cards:- Introduction
- 'Address' card
- 'Reg' card
- 'Email' card
- 'Fonts' card
- 'Mail Address' card
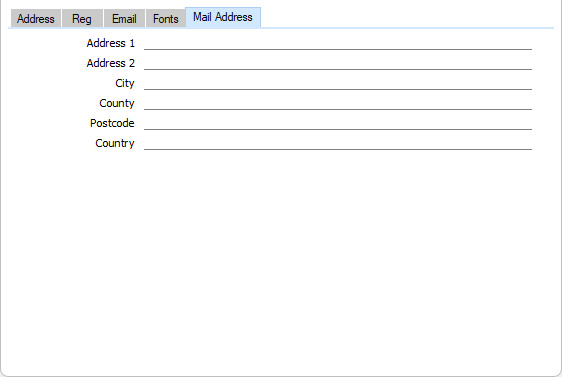
- Address
- Field for Form Templates
Own Mail Address
- If your company has different registration and correspondence addresses, enter the correspondence address in these fields.
- If you want to give a name to each of the individual address lines (as has been done in the illustration above), use the 'Address' card of the User Defined Fields - Contacts setting in the CRM module.
- To ensure the Address will be printed on documentation, add the "Own Mail Address" field to your Form Template designs. This field will not include the Company Name (from the header in this setting) in the address. If you need the Company or Business Name to be printed, add the "Own Name" or "Own Business Name" fields respectively as well. The address will be printed on separate lines so you should specify a Line Height. Use the Form Settings setting in the System module to specify whether blank lines will be printed, whether parts of the address will be printed on the same line, etc.
- Please refer here for more details about adding fields to Form Templates, including specifying Line Heights.
- If you want to give a name to each of the individual address lines (as has been done in the illustration above), use the 'Address' card of the User Defined Fields - Contacts setting in the CRM module.
- Country
- Paste Special
Countries setting, System module
- Field for Form Templates Own Mail Address Country Code
- Enter the Country in which the correspondence address is located.
- Introduction
- 'Address' card
- 'Reg' card
- 'Email' card
- 'Fonts' card
- 'Mail Address' card
Go back to:
- Home page for Settings in the System module
- Home page for System Module manual
- Home page for Standard ERP manual
System Usage
This setting is used to register which modules have been purchased, how many Companies there are in your Hansa database and how many users will have access to the system. Once this has been done, Hansa will generate a Control Code, which should be quoted when it is necessary to obtain an Enabler Key. The setting is fully described on the Modules, Users and Companies and Enabler Key pages.Conversions - Master, Conversions - Accounts
These settings allow you to move all postings to one or more Accounts to another Account. Assume that you have been using Account 100 for sales of a particular product, and that for some reason you want to use Account 102 instead. These settings allow you to change Account 100 wherever it appears in the Transaction register to Account 102 and to recalculate all previous entries to the old Account, so that they will appear under the new Account in all reports. To do this recoding you must follow the steps below:- Make a back-up of your entire database and quit Hansa.
- Remove the Hansa database file (named "Hansa.HDB") from the folder or directory containing your Hansa application. Ensure, however, that the "DBDef.txt" and "Default.txt" files are present.
- Launch Hansa again. Because there is now no "Hansa.HDB" file, a new database is created. Enter new Company information to the dialogue (a Code and Name is sufficient): click [Save] and double-click the new Company in the subsequent list.
- When the 'Import files available' window appears, close it by clicking the close box. Do not import anything yet.
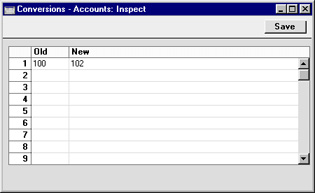
- Select 'System Module' from the Modules menu, and 'Settings' from the File menu. Double-click 'Conversions - Accounts'. Enter the old and new Account numbers one by one in the window as shown in the illustration. Finish by saving the setting by clicking [Save].
- From the 'Settings' list, select 'Conversions - Master' and enter a check mark in the Convert Accounts check box. Save the setting by clicking [Save].

- Select 'Imports' from the File menu and import the back-up using the 'Automatic' or 'Automatic manual file search' import routines. Quit Hansa and restart if so prompted.
- The routine will renumber the Account records in the Account register as required. In the example, Account 100 will be given the new number of 102. If Account 102 already existed, the old Account (100) would be deleted. Check the Account register to make sure that this has happened.
- Produce a Nominal Ledger report for one of the new Accounts and check that all the Transactions have been converted as you expected.
- You must now inspect and change all report definitions in the Nominal Ledger where the old Account number has been used.
- Return to the Conversions - Master setting in the System module and turn off the option to Convert Accounts.
- Return to the Conversions - Accounts setting and delete everything line by line.
Note that if you have more than one Company in your database, the conversion will apply to all Companies in that database. If you want the conversion to take place in one Company only, follow the procedure described above with the following differences:
- Before step 1, and working in the Company where the conversion is to take place, enter the old and new Account numbers one by one in the Conversions - Accounts setting. Check that the setting is empty in all other Companies, or, if you want a different conversion to take place in another Company, enter old and new Account numbers in that Company as necessary.
- Omit step 5.
The other options in the Conversions - Master setting are described on the following pages:
- Convert Activity Types;
- Convert Currency Codes;
- Convert Customers;
- Convert Customer Classifications;
- Convert Items;
- Convert all Registers to Dual-Base Currency; and
- Switch Base Currency 1 to Base Currency 2.
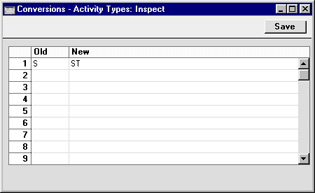
Conversions - Master, Conversions - Activity Types
These settings allow you to change the Activity Type in all Activities. For example, assume that you have been using Activity Type "S", and that for some reason you want to use Activity Type "ST" instead. These settings allow you to change Activity Type "S" in every past Activity in which it has been used to Activity Type "ST". The Activities will appear under the new Activity Type in all reports. To do this recoding you must follow the steps below:- Make a back-up of your entire database and quit Hansa.
- Remove the Hansa database file (named "Hansa.HDB") from the folder or directory containing your Hansa application. Ensure, however, that the "DBDef.txt" and "Default.txt" files are present.
- Launch Hansa again. Because there is now no "Hansa.HDB" file, a new database is created. Enter new Company information to the dialogue (a Code and Name is sufficient): click [Save] and double-click the new Company in the subsequent list.
- When the 'Import files available' window appears, close it by clicking the close box. Do not import anything yet.
- Select 'System Module' from the Modules menu, and 'Settings' from the File menu. Double-click 'Conversions - Activity Types'. Enter the old and new Activity Types numbers one by one in the window as shown in the illustration. Finish by saving the setting by clicking [Save].
- From the 'Settings' list, select 'Conversions - Master' and enter a check mark in the Convert Activity Types check box. Save the setting by clicking [Save].
- Select 'Imports' from the File menu and import the back-up using the 'Automatic' or 'Automatic manual file search' import routines. Quit Hansa and restart if so prompted.
- The routine will apply the new Activity Type to all Activities with the old Type. In the example, Activities which were of Type "S" will be given the new Type of "ST". Any use of the old Activity Type elsewhere (e.g. in the Target Time register) will also be changed.
If the Activity Type "ST" existed as a record in the Activity Types setting in the old database, the old Activity Type ("S") will be deleted. If the Activity Type "ST" did not exist in the old database, the old Activity Type will have its Code changed from "S" to "ST".
- Return to the Conversions - Master setting in the System module and turn off the option to Convert Accounts.
- Return to the Conversions - Activity Types setting and delete everything line by line.
- Before step 1, and working in the Company where the conversion is to take place, enter the old and new Activity Types one by one in the Conversions - Activity Types setting. Check that the setting is empty in all other Companies, or, if you want a different conversion to take place in another Company, enter old and new Activity Types in that Company as necessary.
- Omit step 5.
Conversions - Master, Conversions - Customer Classifications
The Conversions - Master and Conversions - Customer Classifications settings can be used to change the Customer Classification in Customers, Contact Persons and Customer Letters. The Customer Classifications setting will be updated as well.To do this, follow the numbered steps described on the Conversions - Master, Conversions - Activity Types page, using the Conversions - Customer Classifications setting in place of the Conversions - Activity Types setting, and checking the Convert Customer Classifications box in step 6.
Conversions - Master, Conversions - Customers
The Conversions - Master and Conversions - Customers settings can be used in much the same manner as described on the Conversions - Master, Conversions - Activity Types page to change the Customer Number of a Customer record. For example, Customer Number "001" can be changed to "002", and all transactions such as Quotations, Orders, Invoices and Activities will be changed as well.To do this, follow the numbered steps described on the Conversions - Master, Conversions - Activity Types page, using the Conversions - Customers setting in place of the Conversions - Activity Types setting and with the following differences:
- In step 5, the Conversions - Customers setting can be used to carry out a simple change of Customer Number as already described. It can also be used to add a prefix or suffix to existing Customer Numbers, as follows:
Old New Result + A "A" will be placed in front of all Customer Numbers - A "A" will be placed at the end of all Customer Numbers The prefix or suffix will be added to all Customer Numbers in the database.
- In step 6, check the Convert Customers box instead of the Convert Activities box.
- The routine will convert all occurrences of the old Customer Number to the new one (in the Customer register and in the transaction registers).
If the new Customer Number (002 in the example) existed as a record in the Customer register in the old database, the record with the old Customer Number (001) will be deleted. In this circumstance, the Customer Number in transaction registers such as Orders and Invoices will be changed from 001 to 002, but the Customer Name in those records will not be changed to that of the new Customer. If the new Customer did not exist in the old database, the old Customer will have its Number changed from the old one (001) to the new one (002).
Conversions - Master, Conversions - Currency Codes
The Conversions - Master and Conversions - Currency Codes settings can be used to change the Currency Code of a Currency record. All transactions such as Quotations, Orders, Invoices and Transactions will be changed as well.To do this, follow the numbered steps described on the Conversions - Master, Conversions - Activity Types page, using the Conversions - Currency Codes setting in place of the Conversions - Activity Types setting, and checking the Convert Currency Codes box in step 6.
Conversions - Master, Conversions - Items
The Conversions - Master and Conversions - Items settings can be used to change the Item Number of a Item record. For example, Item Number "10101" can be changed to "10102", and all transactions such as Quotations, Orders, Invoices, Deliveries and Goods Receipts will be changed as well.To do this, follow the numbered steps described on the Conversions - Master, Conversions - Activity Types page, using the Conversions - Items setting in place of the Conversions - Activity Types setting, and checking the Convert Items box in step 6.
Conversions - Master, Conversions - Locations
This page describes the Conversions - Master and Conversions - Locations settings in the System module.---
The Conversions - Master and Conversions - Locations settings together allow you to change the Location Code in a Location record. For example, you can change Location Code "WHS" to "WHS_1", and the Location Code in all transactions such as Quotations, Orders, Invoices, Deliveries and Goods Receipts will be changed as well. Follow these steps:
- Change to the System module and open the Conversions - Locations setting. Enter each pair of old and new Location Codes as shown in the illustration below. In the example illustrated, we will change "WHS" (the old Location Code) to "WHS_1" (the new Location Code):
The new Location Code does not have to exist in the Locations setting. In this example, if "WHS_1" is not an existing Location, Location "WHS" will be changed to "WHS_1" by the conversion process and so "WHS" will no longer exist. If "WHS_1" is an existing Location, Location "WHS" will be deleted. In effect, this will mean that you are merging "WHS" with "WHS_1".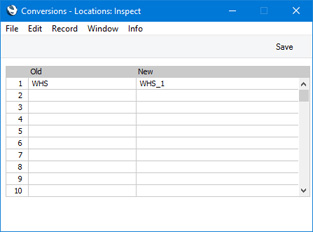
Although it is possible to merge Locations as just described, it is not recommended that you do so. The FIFO/LIFO queues for the Items in the merged Location will not be correct, and the Weighted Average setting will be corrupted. This will mean that the valuation in the Stock List will not be correct.
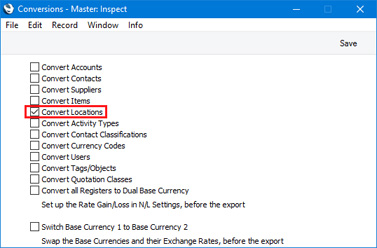
- Remaining in the System module, open the Conversions - Master setting and select the Convert Locations option:
- Make a text or timed back-up of your database and quit Standard ERP.
- Remove the Standard ERP database file (named "Hansa.HDB") from the folder or directory containing your Standard ERP application.
- Launch Standard ERP again. Because there is now no "Hansa.HDB" file, the 'Welcome to Standard ERP' window will appear. Select the [Restore from Backup] option.
- When the 'Import files available' window appears, choose to import the back-up file that you created in step 3.
- During the import process, Location records will be updated as required. In the example, the Code of Location WHS will be changed to WHS_1. References to Location WHS will be replaced with WHS_1 in all records (including Sales and Purchase Ledger transactions and Stock records).
The Location and Service Location fields in Person records, the Purchase and Via Location fields in Location records and the Main and Service Location fields in the Stock Settings setting will not be updated.
The Default Location and Default Return Location fields in the Local Machine setting in the User Settings module will not be updated. This is because the Local Machine setting is stored locally in the databases on each client machine, and the conversion routine is not able to access these local databases.
- Return to the Conversions - Master setting in the System module and turn off the option to Convert Locations.
- Return to the Conversions - Locations setting and delete everything line by line.
If the Locations setting is shared, you should repeat steps 1 and 2 above in every Company that shares it. For example, if you have three Companies and Companies 2 and 3 are sharing the Locations setting, follow steps 1 and 2 in Companies 2 and 3.
If the Locations setting is shared and is stored in Company 0 (i.e. in the Shared Registers setting in the Technics module, the In Company field is empty), you should again repeat steps 1 and 2 above in every Company that shares the register. Then, follow the procedure described above, but replace steps 5 and 6 with the following:
- Launch Standard ERP again. Because there is now no "Hansa.HDB" file, the 'Welcome to Standard ERP' window will appear. Then:
- Close the 'Welcome to Standard ERP window using the close box .
- You will be prompted to enter a new Company: a Code and Name will be sufficient. Press [Save].
- You will be presented with a blank screen: quit Standard ERP and restart.
- Repeat steps 1 and 2.
- Close the 'Welcome to Standard ERP window using the close box .
- Ensure you are in the System module and use the 'Automatic' or 'Manual file search' import functions to import the back-up file that you created in step 3.
---
Settings in the System module:
- Introduction
- Access Groups
- Active Users
- Auto Actions
- Bank Holidays
- Base Currency
- Base Currency Rates
- Cloud Security
- Company Date and Numeric Format
- Company Info
- Configuration
- Conversions - Master, Conversions - Accounts and VAT Code
- Conversions - Master, Conversions - Activity Types
- Conversions - Master, Conversions - Contact Classifications
- Conversions - Master, Conversions - Contacts
- Conversions - Master, Conversions - Currency Codes
- Conversions - Master, Conversions - Items
- Conversions - Master, Conversions - Locations
- Conversions - Master
- Conversions - Master, Conversions - Suppliers
- Conversions - Master, Conversions - Tags/Objects
- Conversions - Master, Conversions - Users
- Countries
- Countries Regions
- Currency Round Off
- Days and Months
- Departments
- Discount Options
- Display Groups
- Exchange Rates Settings
- Form Settings
- Global Warnings on UnOKed Records
- Internet Enablers
- Journaling
- KPIs
- Languages
- Locking
- Locking Exceptions
- Number Series Defaults
- Opened Windows History
- Optional Features
- Password Security
- Printers
- Reporting Periods
- Round Off
- Sales Groups
- Single Functions
- Special Days
- Styles
- Sub-Ledger Control Accounts
- Task Manager Access
- User Warnings on UnOKed Records
- Values in Text
- VAT Number Masks
- Weeks
- Home page for System Module manual
- Home page for Standard ERP manual
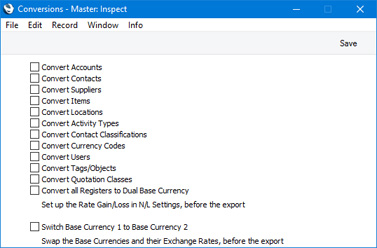
Conversions - Master
This page describes the Conversions - Master setting in the System module.---
The Conversions - Master setting in the System module allows you to change a particular piece of information in all records in the database. Usually you will use it together with a second setting where you will specify the information that will be changed. For example, if you need to change the Contact Number of a Contact, you will specify the old and new Contact Numbers in the Conversions - Contacts setting and tick the Convert Contacts option in the Conversions - Master setting. Then, create a text or timed back-up and import that back-up in to a new database. In the new database, the old Contact Number will have been replaced by the new one in the relevant Contact record and in all records related to the Contact (e.g. Sales and Purchase Invoices, Sales and Purchase Orders, Activities, stock transactions, etc).
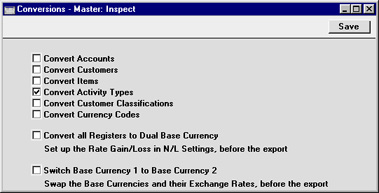
The Conversions - Master setting contains the following options:
- Convert Accounts
- Convert Contacts
- Convert Suppliers
- Convert Items
- Convert Locations
- Convert Activity Types
- Convert Contact Classifications
- Convert Currency Codes
- Convert Users
- Convert Tags/Objects
- Convert all Registers to Dual Base Currency
- Switch Base Currency 1 to Base Currency 2
Settings in the System module:
- Introduction
- Access Groups
- Active Users
- Auto Actions
- Bank Holidays
- Base Currency
- Base Currency Rates
- Cloud Security
- Company Date and Numeric Format
- Company Info
- Configuration
- Conversions - Master, Conversions - Accounts and VAT Code
- Conversions - Master, Conversions - Activity Types
- Conversions - Master, Conversions - Contact Classifications
- Conversions - Master, Conversions - Contacts
- Conversions - Master, Conversions - Currency Codes
- Conversions - Master, Conversions - Items
- Conversions - Master, Conversions - Locations
- Conversions - Master
- Conversions - Master, Conversions - Suppliers
- Conversions - Master, Conversions - Tags/Objects
- Conversions - Master, Conversions - Users
- Countries
- Countries Regions
- Currency Round Off
- Days and Months
- Departments
- Discount Options
- Display Groups
- Exchange Rates Settings
- Form Settings
- Global Warnings on UnOKed Records
- Internet Enablers
- Journaling
- KPIs
- Languages
- Locking
- Locking Exceptions
- Number Series Defaults
- Opened Windows History
- Optional Features
- Password Security
- Printers
- Reporting Periods
- Round Off
- Sales Groups
- Single Functions
- Special Days
- Styles
- Sub-Ledger Control Accounts
- Task Manager Access
- User Warnings on UnOKed Records
- Values in Text
- VAT Number Masks
- Weeks
- Home page for System Module manual
- Home page for Standard ERP manual
Conversions - Master, Conversions - Suppliers
The Conversions - Suppliers setting is described on the Combining Customers and Suppliers page.---
Settings in the System module:
- Introduction
- Access Groups
- Active Users
- Auto Actions
- Bank Holidays
- Base Currency
- Base Currency Rates
- Cloud Security
- Company Date and Numeric Format
- Company Info
- Configuration
- Conversions - Master, Conversions - Accounts and VAT Code
- Conversions - Master, Conversions - Activity Types
- Conversions - Master, Conversions - Contact Classifications
- Conversions - Master, Conversions - Contacts
- Conversions - Master, Conversions - Currency Codes
- Conversions - Master, Conversions - Items
- Conversions - Master, Conversions - Locations
- Conversions - Master
- Conversions - Master, Conversions - Suppliers
- Conversions - Master, Conversions - Tags/Objects
- Conversions - Master, Conversions - Users
- Countries
- Countries Regions
- Currency Round Off
- Days and Months
- Departments
- Discount Options
- Display Groups
- Exchange Rates Settings
- Form Settings
- Global Warnings on UnOKed Records
- Internet Enablers
- Journaling
- KPIs
- Languages
- Locking
- Locking Exceptions
- Number Series Defaults
- Opened Windows History
- Optional Features
- Password Security
- Printers
- Reporting Periods
- Round Off
- Sales Groups
- Single Functions
- Special Days
- Styles
- Sub-Ledger Control Accounts
- Task Manager Access
- User Warnings on UnOKed Records
- Values in Text
- VAT Number Masks
- Weeks
- Home page for System Module manual
- Home page for Standard ERP manual
Conversions - Master, Conversions - Tags/Objects
This page describes the Conversions - Master and Conversions - Tags/Objects settings in the System module. For clarity, the term "Object" has been used in this description.---
The Conversions - Master and Conversions - Tags/Objects settings together allow you to change the Code in an Object record. The Object in all transactions such as Quotations, Orders, Invoices, Deliveries and Nominal Ledger Transactions will be changed as well. For example, using these settings, you can change Object "A" in every record in which it has been used to Object "AA". Follow these steps:
- Change to the System module and open the Conversions - Tags/Objects setting. Enter each pair of old and new Object Codes as shown in the illustration below. In the example illustrated, we will change "A" (the old Object Code) to "AA" (the new Object Code):
The new Object Code does not have to exist in the Object register. In this example, if "AA" is not an existing Object Code, Object Code "A" will be changed to "AA" by the conversion process and so "A" will no longer exist. If "AA" is an existing Object Code, Object "A" will be deleted. In effect, this will mean that you are merging "A" with "AA".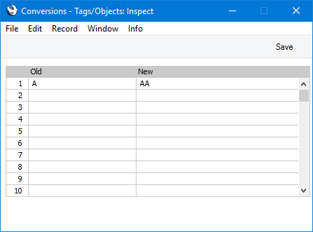
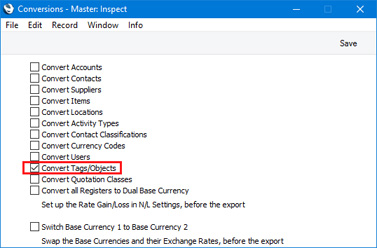
- Remaining in the System module, open the Conversions - Master setting and select the Convert Tags/Objects option:
- Make a text or timed back-up of your database and quit Standard ERP.
- Remove the Standard ERP database file (named "Hansa.HDB") from the folder or directory containing your Standard ERP application.
- Launch Standard ERP again. Because there is now no "Hansa.HDB" file, the 'Welcome to Standard ERP' window will appear. Select the [Restore from Backup] option.
- When the 'Import files available' window appears, choose to import the back-up file that you created in step 3.
- During the import process, Object records will be updated as required. References to the old Currency will be replaced with the new Currency in all records (including Sales, Purchase and Nominal Ledger transactions and Sales Order records).
Note that use of the old Object Code in some settings (settings of types 1 and 2 as described here) will not be updated. Examples include Transaction Settings and Payment Modes. You will need to update these settings yourself to ensure that they contain valid Object Codes.
- Return to the Conversions - Master setting in the System module and turn off the option to Convert Tags/Objects.
- Return to the Conversions - Tags/Objects setting and delete everything line by line.
If the Tag/Object register is shared, you should repeat steps 1 and 2 above in every Company that shares it. For example, if you have three Companies and Companies 2 and 3 are sharing the Tag/Object register, follow steps 1 and 2 in Companies 2 and 3.
If the Tag/Object register is shared and is stored in Company 0 (i.e. in the Shared Registers setting in the Technics module, the In Company field is empty), you should again repeat steps 1 and 2 above in every Company that shares the register. Then, follow the procedure described above, but replace steps 5 and 6 with the following:
- Launch Standard ERP again. Because there is now no "Hansa.HDB" file, the 'Welcome to Standard ERP' window will appear. Then:
- Close the 'Welcome to Standard ERP window using the close box .
- You will be prompted to enter a new Company: a Code and Name will be sufficient. Press [Save].
- You will be presented with a blank screen: quit Standard ERP and restart.
- Repeat steps 1 and 2.
- Close the 'Welcome to Standard ERP window using the close box .
- Ensure you are in the System module and use the 'Automatic' or 'Manual file search' import functions to import the back-up file that you created in step 3.
---
Settings in the System module:
- Introduction
- Access Groups
- Active Users
- Auto Actions
- Bank Holidays
- Base Currency
- Base Currency Rates
- Cloud Security
- Company Date and Numeric Format
- Company Info
- Configuration
- Conversions - Master, Conversions - Accounts and VAT Code
- Conversions - Master, Conversions - Activity Types
- MAILLINK(HW0107SETTINGS_Conversions_Customer_Classifications,Conversions - Master, Conversions - Contact Classifications)
- Conversions - Master, Conversions - Contacts
- Conversions - Master, Conversions - Currency Codes
- Conversions - Master, Conversions - Items
- Conversions - Master, Conversions - Locations
- Conversions - Master
- Conversions - Master, Conversions - Suppliers
- Conversions - Master, Conversions - Tags/Objects
- Conversions - Master, Conversions - Users
- Countries
- Countries Regions
- Currency Round Off
- Days and Months
- Departments
- Discount Options
- Display Groups
- Exchange Rates Settings
- Form Settings
- Global Warnings on UnOKed Records
- Internet Enablers
- Journaling
- KPIs
- Languages
- Locking
- Locking Exceptions
- Number Series Defaults
- Opened Windows History
- Optional Features
- Password Security
- Printers
- Reporting Periods
- Round Off
- Sales Groups
- Single Functions
- Special Days
- Styles
- Sub-Ledger Control Accounts
- Task Manager Access
- User Warnings on UnOKed Records
- Values in Text
- VAT Number Masks
- Weeks
- Home page for System Module manual
- Home page for Standard ERP manual
Conversions - Master, Conversions - Users
This page describes the Conversions - Master and Conversions - Users settings in the System module.---
You can use the Conversions - Master and Conversions - Users settings to change the Signature (initials) in a Person record. For example, you can change Person "FF" to "FS" (perhaps because the Person married), and the Signature in all records such as Quotations, Orders, Invoices, Deliveries and Goods Receipts will be changed as well. Follow these steps:
- Change to the System module and open the Conversions - Users setting. Enter each pair of old and new Signatures as shown in the illustration below. In the example illustrated, we will change "FF" (the old Signature) to "FS" (the new Signature):
The new Signature does not have to exist in the Person register. In this example, if "FS" is not an existing Signature, Signature "FF" will be changed to "FS" by the conversion process and so "FF" will no longer exist. If "AA" is an existing Signature, Person "FF" will be deleted. In effect, this will mean that you are merging "FF" with "FS".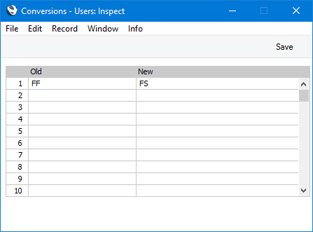
- Remaining in the System module, open the Conversions - Master setting and select the Convert Users option:
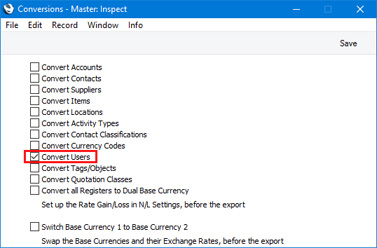
- Make a text or timed back-up of your database and quit Standard ERP.
- Remove the Standard ERP database file (named "Hansa.HDB") from the folder or directory containing your Standard ERP application.
- Launch Standard ERP again. Because there is now no "Hansa.HDB" file, the 'Welcome to Standard ERP' window will appear. Select the [Restore from Backup] option.
- When the 'Import files available' window appears, choose to import the back-up file that you created in step 3.
- During the import process, Person records will be updated as required. References to the old Signature will be replaced with the new Signature in all records (including Sales, Purchase and Nominal Ledger transactions and Sales Order records).
Note that Mailboxes will not be updated. You will need to update Mailboxes yourself to ensure that they contain valid Signatures.
- Return to the Conversions - Master setting in the System module and turn off the option to Convert Users.
- Return to the Conversions - Users setting and delete everything line by line.
If the Person register is shared, you should repeat steps 1 and 2 above in every Company that shares it. For example, if you have three Companies and Companies 2 and 3 are sharing the Person register, follow steps 1 and 2 in Companies 2 and 3.
If the Person register is shared and is stored in Company 0 (i.e. in the Shared Registers setting in the Technics module, the In Company field is empty), you should again repeat steps 1 and 2 above in every Company that shares the register. Then, follow the procedure described above, but replace steps 5 and 6 with the steps listed below.
If you are using Global Users, you should also replace steps 5 and 6 with the steps listed below because Global Users are stored in Company 0:
- Launch Standard ERP again. Because there is now no "Hansa.HDB" file, the 'Welcome to Standard ERP' window will appear. Then:
- Close the 'Welcome to Standard ERP window using the close box .
- You will be prompted to enter a new Company: a Code and Name will be sufficient. Press [Save].
- You will be presented with a blank screen: quit Standard ERP and restart.
- Repeat steps 1 and 2.
- Close the 'Welcome to Standard ERP window using the close box .
- Ensure you are in the System module and use the 'Automatic' or 'Manual file search' import functions to import the back-up file that you created in step 3.
---
Settings in the System module:
- Introduction
- Access Groups
- Active Users
- Auto Actions
- Bank Holidays
- Base Currency
- Base Currency Rates
- Cloud Security
- Company Date and Numeric Format
- Company Info
- Configuration
- Conversions - Master, Conversions - Accounts and VAT Code
- Conversions - Master, Conversions - Activity Types
- MAILLINK(HW0107SETTINGS_Conversions_Customer_Classifications,Conversions - Master, Conversions - Contact Classifications)
- Conversions - Master, Conversions - Contacts
- Conversions - Master, Conversions - Currency Codes
- Conversions - Master, Conversions - Items
- Conversions - Master, Conversions - Locations
- Conversions - Master
- Conversions - Master, Conversions - Suppliers
- Conversions - Master, Conversions - Tags/Objects
- Conversions - Master, Conversions - Users
- Countries
- Countries Regions
- Currency Round Off
- Days and Months
- Departments
- Discount Options
- Display Groups
- Exchange Rates Settings
- Form Settings
- Global Warnings on UnOKed Records
- Internet Enablers
- Journaling
- KPIs
- Languages
- Locking
- Locking Exceptions
- Number Series Defaults
- Opened Windows History
- Optional Features
- Password Security
- Printers
- Reporting Periods
- Round Off
- Sales Groups
- Single Functions
- Special Days
- Styles
- Sub-Ledger Control Accounts
- Task Manager Access
- User Warnings on UnOKed Records
- Values in Text
- VAT Number Masks
- Weeks
- Home page for System Module manual
- Home page for Standard ERP manual
Countries
This setting is used to define the correct spelling of the name of each country, in different Languages. This country name can be used to produce correct business documents in several different Languages.Double-click on 'Countries' in the 'Settings' list to view a list of Countries already entered. Then double-click on one of the rows, e.g. FIN to bring up the record for Finland.
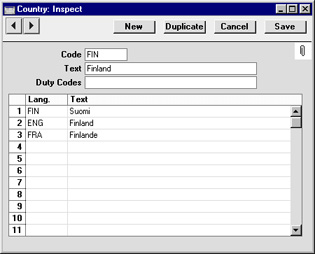
The Duty Code is used by the Customs module: please refer to your local Hansa representative for details.
Countries Regions
This page describes the Countries Regions setting in the System module.---
The Countries Regions setting will be useful if you are using the Hotel module. It allows you to construct a look-up table for the Region field in the header of the Country record. This look-up table could be a list of continents or of other regional descriptions as necessary.
When adding records to the Countries setting, the Region field will allow you to assign each Country to a Region (e.g. a continent or other regional description). This information will be used by the Nationality Statistics report in the Hotel module, which can list the number of Guests from each Country, the number of Guests from each Region or both.
To open the Countries Regions setting, first ensure you are in the System module. Then, if you are using Windows or macOSX, click the [Settings] button in the Navigation Centre or use the Ctrl-S/⌘-S keyboard shortcuts and then double-click 'Countries Regions' in the 'Settings' list. If you are using iOS or Android, select 'Settings' from the Tools menu (with 'wrench' icon) and tap 'Countries Regions' in the 'Settings' list. The 'Countries Regions: Browse' window will open, listing the Country Regions records that you have previously entered.
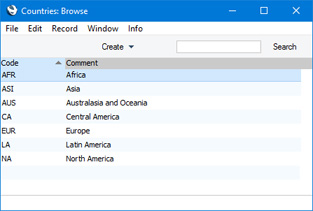
---
Settings in the System module:
- Introduction
- Access Groups
- Active Users
- Auto Actions
- Bank Holidays
- Base Currency
- Base Currency Rates
- Cloud Security
- Company Date and Numeric Format
- Company Info
- Configuration
- Conversions - Master, Conversions - Accounts and VAT Code
- Conversions - Master, Conversions - Activity Types
- Conversions -
Master, Conversions - Contact Classifications
- Conversions - Master, Conversions - Contacts
- Conversions - Master, Conversions - Currency Codes
- Conversions - Master, Conversions - Items
- Conversions - Master, Conversions - Locations
- Conversions - Master
- Conversions - Master, Conversions - Suppliers
- Conversions - Master, Conversions - Tags/Objects
- Conversions - Master, Conversions - Users
- Countries
- Countries Regions
- Currency Round Off
- Days and Months
- Departments
- Discount Options
- Display Groups
- Exchange Rates Settings
- Form Settings
- Global Warnings on UnOKed Records
- Internet Enablers
- Journaling
- KPIs
- Languages
- Locking
- Locking Exceptions
- Nature of Business
- Number Series Defaults
- Opened Windows History
- Optional Features
- Password Security
- Printers
- Reporting Periods
- Round Off
- Sales Groups
- Single Functions
- Special Days
- Styles
- Sub-Ledger Control Accounts
- Task Manager Access
- User Warnings on UnOKed Records
- Values in Text
- VAT Reg. Number Masks
- Weeks
- Home page for System Module manual
- Home page for Standard ERP manual
Currency Round Off
Please click here for full details of this setting.Days and Months
This page describes the Days and Months setting in the System module.---
The Days and Months setting allows you to record the names of the days and months in various Languages. This will be useful if you have added the "Month in words" field to your Form Templates. You can use the "Month in words" field in many Form Templates when you need the name of a month to be printed in a form in the relevant Language (e.g. in the Language of a Customer or Supplier).
To work with this setting, first ensure you are in the System module. Then, if you are using Windows or macOS, click the [Settings] button in the Navigation Centre and then double-click 'Days and Months' in the 'Settings' list. If you are using iOS or Android, select 'Settings' from the Tools menu (with 'wrench' icon) and tap 'Days and Months' in the 'Settings' list. The 'Days and Months: Browse' window will open. This contains a list of the records already entered to this setting.
Double-click (Windows/macOS) or tap (iOS/Android) on a line to open the edit window, or add a new record by selecting 'New' from the Create menu (Windows/macOS) or the + menu (iOS/Android). When the record is complete, click the [Save] button (Windows/macOS) or tap √ (iOS/Android) to save it, or use the close box (Windows/macOS) or < (iOS/Android) to close it without saving changes.
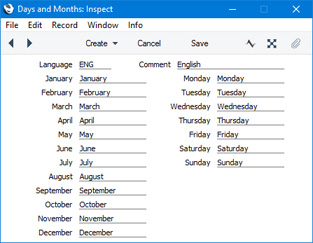
---
Settings in the System module:
- Introduction
- Access Groups
- Active Users
- Auto Actions
- Bank Holidays
- Base Currency
- Base Currency Rates
- Cloud Security
- Company Date and Numeric Format
- Company Info
- Configuration
- Conversions - Master, Conversions - Accounts and VAT Code
- Conversions - Master, Conversions - Activity Types
- Conversions -
Master, Conversions - Contact Classifications
- Conversions - Master, Conversions - Contacts
- Conversions - Master, Conversions - Currency Codes
- Conversions - Master, Conversions - Items
- Conversions - Master, Conversions - Locations
- Conversions - Master
- Conversions - Master, Conversions - Suppliers
- Conversions - Master, Conversions - Tags/Objects
- Conversions - Master, Conversions - Users
- Countries
- Countries Regions
- Currency Round Off
- Days and Months
- Departments
- Discount Options
- Display Groups
- Exchange Rates Settings
- Form Settings
- Global Warnings on UnOKed Records
- Internet Enablers
- Journaling
- KPIs
- Languages
- Locking
- Locking Exceptions
- Nature of Business
- Number Series Defaults
- Opened Windows History
- Optional Features
- Password Security
- Printers
- Reporting Periods
- Round Off
- Sales Groups
- Single Functions
- Special Days
- Styles
- Sub-Ledger Control Accounts
- Task Manager Access
- User Warnings on UnOKed Records
- Values in Text
- VAT Reg. Number Masks
- Weeks
- Home page for System Module manual
- Home page for Standard ERP manual
Departments
Please refer here for details about this setting.---
Settings in the System module:
- Introduction
- Access Groups
- Active Users
- Auto Actions
- Bank Holidays
- Base Currency
- Base Currency Rates
- Cloud Security
- Company Date and Numeric Format
- Company Info
- Configuration
- Conversions - Master, Conversions - Accounts and VAT Code
- Conversions - Master, Conversions - Activity Types
- Conversions -
Master, Conversions - Contact Classifications
- Conversions - Master, Conversions - Contacts
- Conversions - Master, Conversions - Currency Codes
- Conversions - Master, Conversions - Items
- Conversions - Master, Conversions - Locations
- Conversions - Master
- Conversions - Master, Conversions - Suppliers
- Conversions - Master, Conversions - Tags/Objects
- Conversions - Master, Conversions - Users
- Countries
- Countries Regions
- Currency Round Off
- Days and Months
- Departments
- Discount Options
- Display Groups
- Exchange Rates Settings
- Form Settings
- Global Warnings on UnOKed Records
- Internet Enablers
- Journaling
- KPIs
- Languages
- Locking
- Locking Exceptions
- Nature of Business
- Number Series Defaults
- Opened Windows History
- Optional Features
- Password Security
- Printers
- Reporting Periods
- Round Off
- Sales Groups
- Single Functions
- Special Days
- Styles
- Sub-Ledger Control Accounts
- Task Manager Access
- User Warnings on UnOKed Records
- Values in Text
- VAT Reg. Number Masks
- Weeks
- Home page for System Module manual
- Home page for Standard ERP manual
Discount Options
Use this setting to specify how discounts are to be calculated in Hansa (in Contracts, Invoices, Quotations, Sales Orders, Work Sheets and Project Budgets).To open the Discount Options setting, ensure you are in the System module and then click the [Settings] button in the Navigation Centre. Double-click 'Discount Options' in the 'Settings' list. The 'Discount Options: Inspect' window will open:
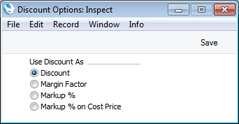
- Discount
- 200 - (200 x 10%) = 180
- Margin Factor
- 200 x 10% = 20
- Markup %
- 200 + (200 x 10%) = 220
- Markup % on Cost Price
- 150 + (150 x 10%) = 165
Note that this setting does not affect Purchase Orders, Purchase Quotations or Purchase Order Contracts, which always use the 'Discount' method.
---
Settings in the System module:
- Access Groups
- Active Users
- Auto Actions
- Bank Holidays
- Base Currency
- Base Currency Rates
- Company Date and Numeric Format
- Company Info
- Configuration
- Conversions - Master, Conversions - Accounts and VAT Code
- Conversions - Master, Conversions - Activity Types
- Conversions - Master, Conversions - Contact Classifications
- Conversions - Master, Conversions - Contacts
- Conversions - Master, Conversions - Currency Codes
- Conversions - Master, Conversions - Items
- Conversions - Master, Conversions - Locations
- Conversions - Master
- Conversions - Master, Conversions - Suppliers
- Conversions - Master, Conversions - Objects
- Conversions - Master, Conversions - Users
- Countries
- Countries Regions
- Currency Round Off
- Days and Months
- Departments
- Discount Options
- Display Groups
- Exchange Rates Settings
- Form Settings
- Global Warnings on UnOKed Records
- Internet Enablers
- Journaling
- KPIs
- Languages
- Locking
- Locking Exceptions
- Number Series Defaults
- Opened Windows History
- Optional Features
- Password Security
- Printers
- Reporting Periods
- Round Off
- Sales Groups
- Single Functions
- Special Days
- Styles
- Sub-Ledger Control Accounts
- Task Manager Access
- User Warnings on UnOKed Records
- Values in Text
- VAT Number Masks
- Weeks
- Home page for System Module manual
- Home page for Standard ERP manual
Display Groups
This setting allows you to divide the employees of your company into groups. These groups might represent different types of work or the various departments in your company. Dividing employees into Display Groups will help with resource planning and with classifying Activities in the CRM module. Many reports in the CRM module can list the Activities recorded, scheduled or carried out by the Persons belonging to a particular Display Group. The Employee Time Statistics report can compare the work carried out by the various Display Groups.Double-clicking 'Display Groups' in the 'Settings' list in the System module opens the 'Display Groups: Inspect' window listing the Display Groups that have already been entered. To add a new record, simply enter its details on the first blank line and click [Save] to save and close. Click the close box to close without saving changes.
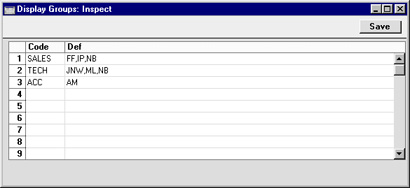
- Code
- Specify a unique identification Code for each Display Group. You can use up to five alphanumeric characters.
- Def
- Paste Special
Person register, System module
- Enter the initials of each Person that belongs to the Display Group, separated by commas.
- If you need to use 'Paste Special" to enter several sets of initials, type the comma before opening the 'Paste Special' list. This will cause Hansa to add the next set of initials to those already entered. Otherwise, the previous initials will be overwritten.
- A particular Person can belong to more than one Display Group, as shown in the illustration.
- If you need to use 'Paste Special" to enter several sets of initials, type the comma before opening the 'Paste Special' list. This will cause Hansa to add the next set of initials to those already entered. Otherwise, the previous initials will be overwritten.
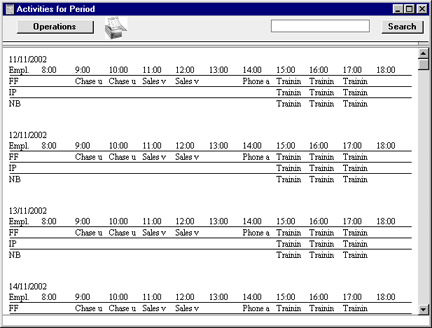
Exchange Rates Settings
Please refer here for full details about this setting.---
Settings in the System module:
- Access Groups
- Active Users
- Auto Actions
- Bank Holidays
- Base Currency
- Base Currency Rates
- Cloud Security
- Company Date and Numeric Format
- Company Info
- Configuration
- Conversions - Master, Conversions - Accounts and VAT Code
- Conversions - Master, Conversions - Activity Types
- Conversions - Master, Conversions - Contact Classifications
- Conversions - Master, Conversions - Contacts
- Conversions - Master, Conversions - Currency Codes
- Conversions - Master, Conversions - Items
- Conversions - Master, Conversions - Locations
- Conversions - Master
- Conversions - Master, Conversions - Suppliers
- Conversions - Master, Conversions - Tags/Objects
- Conversions - Master, Conversions - Users
- Countries
- Countries Regions
- Currency Round Off
- Days and Months
- Departments
- Discount Options
- Display Groups
- Exchange Rates Settings
- Form Settings
- Global Warnings on UnOKed Records
- Internet Enablers
- Journaling
- KPIs
- Languages
- Locking
- Locking Exceptions
- Nature of Business
- Number Series Defaults
- Opened Windows History
- Optional Features
- Password Security
- Printers
- Reporting Periods
- Round Off
- Sales Groups
- Single Functions
- Special Days
- Styles
- Sub-Ledger Control Accounts
- Task Manager Access
- User Warnings on UnOKed Records
- Values in Text
- VAT Reg. Number Masks
- Weeks
- Home page for System Module manual
- Home page for Standard ERP manual
Form Settings
This page describes the Form Settings setting in the System module.---
The Form Settings setting allows you to control how addresses will be printed in forms. The setting affects the following form fields in most (but not all) forms: "Address"; "Address with Attention" (only when printed from Reservations); "Delivery Address"; "Delivery Address 2" (only when printed from Orders); "From Address"; "Invoice Address"; "Invoice To Address"; "Invoice To, jewellery"; "Location Address"; "Order Address"; "Order Delivery Address"; "Ordering Customer Name and Address"; "Own Address"; "Own Address 2"; "Premise Address"; "Shipment Address"; "Shipment Address 2"; "To Address" and "Via Location Address".
To open the Forms Setting setting, first ensure you are in the System module. Then, if you are using Windows or Mac OS X, click the [Settings] button in the Navigation Centre and double-click 'Form Settings' in the 'Settings' list. If you are using iOS or Android, select 'Settings' from the Tools menu (with 'wrench' icon) and tap 'Form Settings' in the 'Settings' list. Select options as described below. Then, to save changes and close the window, click the [Save] button (Windows/Mac OS X) or tap √ (iOS/Android). To close the window without saving changes, click the close box (Windows/Mac OS X) or tap < (iOS/Android).
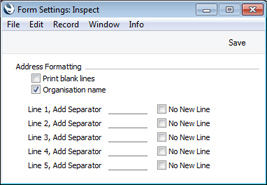
- Print Blank Lines
- By default, blank lines in addresses will not be printed in address fields. Use this option if you want the blank lines to be printed.
- In the illustration below, the "Address" field in the Invoice on the right was printed using this option:
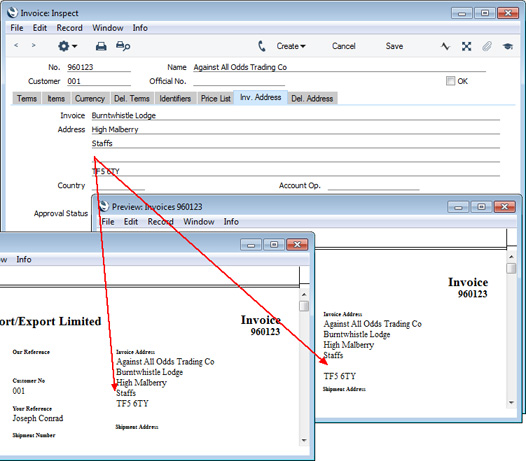
- In the illustration below, the "Address" field in the Invoice on the right was printed using this option:
- Organisation Name
- Use this option if you want the Customer Name to be printed as the first line of the address.
- In the illustration below, the "Address" field in the Invoice on the right was printed using this option:
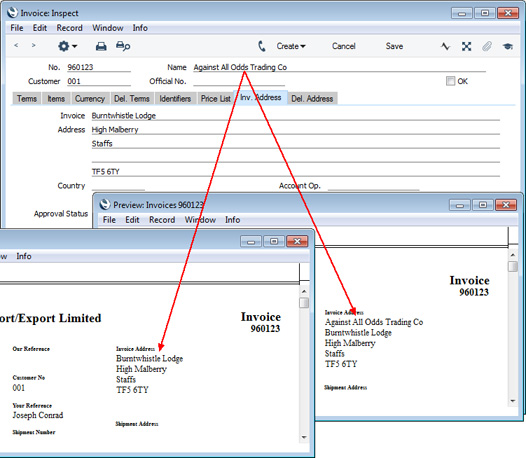
- In the illustration below, the "Address" field in the Invoice on the right was printed using this option:
- Line, Add Separator, No New Line
- By default, each line of an address will be printed on a separate line in address fields. In some countries, it will be normal practice to print some address lines together on the same line. For example, in the US, the town, state and ZIP code should all be printed on the same line.
- If you need address lines to be printed on the same line, tick the No New Line option for the second and subsequent lines, and specify the separator, which might be a space or a comma followed by a space. You must enter a space as the separator if you need one.
- In the example illustrated below (a US address), the third, fourth and fifth lines of the address should all be printed on the same line. So, tick the No New Line option for lines four and five. In other words, no new line will be printed before the fourth line of the address, and no new line will be printed before the fifth line of the address. In this case, the separator between the third and fourth lines will be a comma and space, and the separator between the fourth and fifth lines will be a space. In the illustration below, the "Address" field in the Invoice on the right was printed using these options, while the Invoice on the left was printed without using these options:
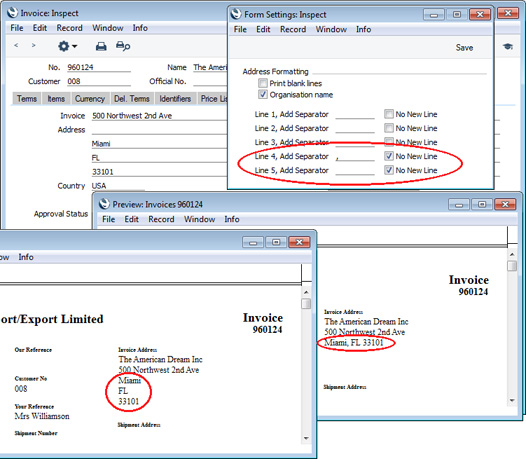
- If you need address lines to be printed on the same line, tick the No New Line option for the second and subsequent lines, and specify the separator, which might be a space or a comma followed by a space. You must enter a space as the separator if you need one.
Settings in the System module:
- Access Groups
- Active Users
- Auto Actions
- Bank Holidays
- Base Currency
- Base Currency Rates
- Company Date and Numeric Format
- Company Info
- Configuration
- Conversions - Master, Conversions - Accounts and VAT Code
- Conversions - Master, Conversions - Activity Types
- Conversions - Master, Conversions - Contact Classifications
- Conversions - Master, Conversions - Contacts
- Conversions - Master, Conversions - Currency Codes
- Conversions - Master, Conversions - Items
- Conversions - Master, Conversions - Locations
- Conversions - Master
- Conversions - Master, Conversions - Suppliers
- Conversions - Master, Conversions - Objects
- Conversions - Master, Conversions - Users
- Countries
- Countries Regions
- Currency Round Off
- Days and Months
- Departments
- Discount Options
- Display Groups
- Exchange Rates Settings
- Form Settings
- Global Warnings on UnOKed Records
- Internet Enablers
- Journaling
- KPIs
- Languages
- Locking
- Locking Exceptions
- Number Series Defaults
- Opened Windows History
- Optional Features
- Password Security
- Printers
- Reporting Periods
- Round Off
- Sales Groups
- Single Functions
- Special Days
- Styles
- Sub-Ledger Control Accounts
- Task Manager Access
- User Warnings on UnOKed Records
- Values in Text
- VAT Number Masks
- Weeks
- Home page for System Module manual
- Home page for Standard ERP manual
Global Locking
Please refer to the description of the Locking setting for details about this setting.---
Go back to:
- Home page for Settings in the System module
- Home page for System Module manual
- Home page for Standard ERP manual
Global Warnings on UnOKed Records
The integration between the different modules in Enterprise by HansaWorld means that Nominal Ledger Transactions can be generated automatically when you mark as OK and save records in other ledgers and registers. These other ledgers and registers have been given the term "Sub Systems" in the program and these manuals. For example, when you approve an Invoice in the Sales Ledger, this can cause a Nominal Ledger Transaction to be generated automatically, debiting a Debtor Account and crediting a Sales Account and, if appropriate, a VAT Account.When you enter a Sub System record such as an Invoice, you can save it as many times as necessary before marking it as OK. This can be useful if, for example, you want to check that the record is correct before committing it to the Nominal Ledger.
On the other hand, there may be situations where you need Sub System records to be marked as OK immediately. This may be the case if you are printing Invoices on stationery with pre-printed Official Serial Numbers, in which case you need to be sure that the Official Serial Numbers on the stationery and in the Invoice records correspond. This can also be the case in stock registers, especially if you are using a Queued Cost Model. In this situation, you must make certain that you enter all stock transactions in strict chronological order. Failure to do this may cause your FIFO/LIFO queue to become incorrect. You should not, for example, enter a Delivery with yesterday's date if you have already entered an outgoing stock transaction of any kind (e.g. Delivery, Stock Depreciation) with today's.
You can use the Global Warnings on UnOKed Records setting to help ensure Sub System records are always marked as OK immediately. In a multi-user system, the options that you choose in this setting will apply to every user, but you can set different options for a particular user. To choose options for a particular user, use the User Warnings on UnOKed Records setting in the System module and enter separate records for each user. The user will be given warnings irrespective of the client machine they are using.
To open the Global Warnings on UnOKed Records setting, ensure you are in the System module and click the [Settings] button in the Master Control panel. Then, double-click 'Global Warnings on UnOKed Records' in the 'Settings' list. The following window opens:
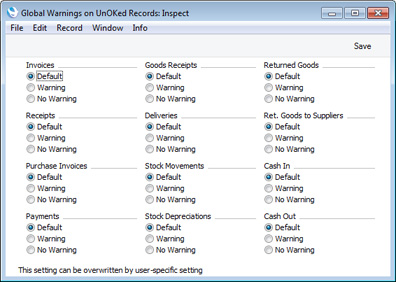
To set warning options for a particular user, ensure you are in the System module and click the [Settings] button in the Master Control panel. Then, double-click 'User Warnings on UnOKed Records' in the 'Settings' list. To create a new record, click the [New] button in the Button Bar, or highlight a record in the list that is similar to the one that you are about to create and click [Duplicate].
The following window opens:
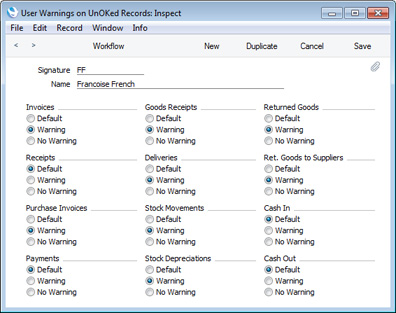
- Signature
- Paste Special
Person register, System module
- Specify the user, using 'Paste Special' if necessary. You will only be able to enter one record for a particular Person.
- Name
- The Person's Name will be brought in when you enter their Signature in the field above.
- Default
- When the user saves a record that had not been marked as OK, a warning will be or will not be given, depending on how you have configured the Global Warnings on UnOKed Records setting.
- Warning
- When the user saves a record that had not been marked as OK, a warning will be given.
- No Warning
- When the user saves a record that had not been marked as OK, a warning will not be given.
If a particular user does not have access to the System module, they can create or change their own record in the User Warnings on UnOKed Records setting by changing to the User Settings module and opening the Warnings on UnOKed Records setting. The user will be shown their own record from the User Warnings setting. Any changes that the user makes will update this record. If the user does not have a record in the User Warnings setting, one will be created when they close the window and choose to save changes. The user will not be able to change any other user's records from the User Settings module.
If you specify that a warning will be issued whenever you try to save a record that you have not marked as OK, the record will be saved, and then the following warning will appear:
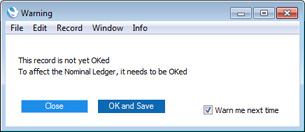
- Close
- The warning will be closed, and the record will be left as it is.
- OK and Save
- The warning will be closed, the record will be marked as OK and saved again, and the appropriate Nominal Ledger Transaction will be created.
- Warn me next time
- Uncheck this option if you want to prevent the warning appearing in the future when you save records in the same register that you have not marked as OK. This will update your record in the User Warnings on UnOKed Records setting i.e. it will not affect any other users.
Settings in the System module:
- Access Groups
- Active Users
- Auto Actions
- Bank Holidays
- Base Currency
- Base Currency Rates
- Company Date and Numeric Format
- Company Info
- Configuration
- Conversions - Master, Conversions - Accounts and VAT Code
- Conversions - Master, Conversions - Activity Types
- Conversions - Master, Conversions - Contact Classifications
- Conversions - Master, Conversions - Contacts
- Conversions - Master, Conversions - Currency Codes
- Conversions - Master, Conversions - Items
- Conversions - Master, Conversions - Locations
- Conversions - Master
- Conversions - Master, Conversions - Suppliers
- Conversions - Master, Conversions - Objects
- Conversions - Master, Conversions - Users
- Countries
- Countries Regions
- Currency Round Off
- Days and Months
- Departments
- Discount Options
- Display Groups
- Exchange Rates Settings
- Form Settings
- Global Warnings on UnOKed Records
- Internet Enablers
- Journaling
- KPIs
- Languages
- Locking
- Locking Exceptions
- Number Series Defaults
- Opened Windows History
- Optional Features
- Password Security
- Printers
- Reporting Periods
- Round Off
- Sales Groups
- Special Days
- Styles
- Sub-Ledger Control Accounts
- Task Manager Access
- User Warnings on UnOKed Records
- Values in Text
- VAT Number Masks
- Weeks
- Home page for System Module manual
- Home page for Enterprise by HansaWorld manual
Enabler
Please click here for full details of this setting.Journaling
Please refer to the Journaling page for full details about this setting.---
Settings in the System module:
- Access Groups
- Active Users
- Auto Actions
- Bank Holidays
- Base Currency
- Base Currency Rates
- Cloud Security
- Company Date and Numeric Format
- Company Info
- Configuration
- Conversions - Master, Conversions - Accounts and VAT Code
- Conversions - Master, Conversions - Activity Types
- Conversions - Master, Conversions - Contact Classifications
- Conversions - Master, Conversions - Contacts
- Conversions - Master, Conversions - Currency Codes
- Conversions - Master, Conversions - Items
- Conversions - Master, Conversions - Locations
- Conversions - Master
- Conversions - Master, Conversions - Suppliers
- Conversions - Master, Conversions - Tags/Objects
- Conversions - Master, Conversions - Users
- Countries
- Countries Regions
- Currency Round Off
- Days and Months
- Departments
- Discount Options
- Display Groups
- Exchange Rates Settings
- Form Settings
- Global Warnings on UnOKed Records
- Internet Enablers
- Journaling
- KPIs
- Languages
- Locking
- Locking Exceptions
- Nature of Business
- Number Series Defaults
- Opened Windows History
- Optional Features
- Password Security
- Printers
- Reporting Periods
- Round Off
- Sales Groups
- Single Functions
- Special Days
- Styles
- Sub-Ledger Control Accounts
- Task Manager Access
- User Warnings on UnOKed Records
- Values in Text
- VAT Reg. Number Masks
- Weeks
- Home page for System Module manual
- Home page for Standard ERP manual
KPIs
KPIs are Key Performance Indicators, visible in the bottom right-hand corner of the Master Control panel. KPIs summarise the activity of the company in specified areas during the current week, month or year, and compare that activity with the previous period. By default, KPI figures will be updated automatically every hour, to keep you up-to date.Depending on how an individual KPI has been configured, you may be able to click on it in your Master Control panel and be taken to a web page. A useful web page might be your HansaWorld SmartView page where you can analyse the statistics in more detail. Please refer to your local HansaWorld representative for more information about HansaWorld SmartView. If no web page has been assigned to a KPI, clicking on it will open a report showing how the KPI figure has been calculated. For example, clicking on a "Sales Excluding VAT" or "Sales Including VAT" KPI will cause an Invoice Journal report covering the relevant period to be opened.
You can configure your company's KPIs so that different ones will be seen by different users. So, if someone else logs in to Enterprise by HansaWorld on your machine using the [Login] button in the Master Control panel, your KPIs will disappear, to be replaced with theirs.
Use the KPIs setting to configure the Key Performance Indicators that will be shown in each user's Master Control panel. To work with this setting, follow these steps:
- The KPI feature is an extra-cost addition to the standard Enterprise by HansaWorld system. The first step is therefore to specify the number of KPIs you have purchased in the field on the 'Basic' card of the Configuration setting in the System module:
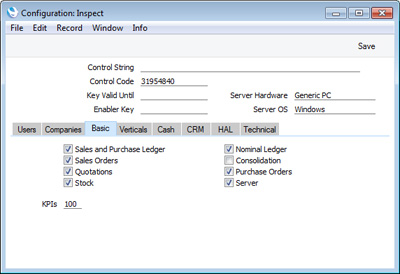
- The second step is to configure your KPIs. Remaining in the System module, open the KPIs setting and create a new record:
Complete the record as follows: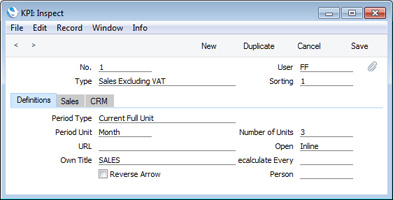
Header
- No.
- The unique identifier for the KPI record, generated automatically.
- User
- Paste Special
Person register, System module
- Specify here the Person in whose Personal Desktop the KPI is to appear. You can enter more than one Person, separated by commas.
- If you need to use 'Paste Special' to enter several Persons, type the comma or colon before opening the 'Paste Special' list. This will cause the next Person to be added to those already entered. Otherwise, the previous Person will be overwritten.
- If you enter more than one Person, this will cause the KPI record to take up more than one of your KPI "slots". For example, if you have purchased 100 KPIs and you enter a KPI record containing three Persons in its User field, this KPI record will occupy three of those 100 KPIs.
- If you need to use 'Paste Special' to enter several Persons, type the comma or colon before opening the 'Paste Special' list. This will cause the next Person to be added to those already entered. Otherwise, the previous Person will be overwritten.
- Type
- Paste Special
Choices of possible entries
- Use this field to specify the figure that will be monitored by the KPI. The following options are available:
- Activities Cost Time
- The total Cost (Time) from Time Activities with Start Dates falling within the period. A Time Activity is one where the Task Type is Calendar and the Calendar Type is Time. If an Activity has more than Person, it will be included in the KPI figure once for each Person. Clicking the KPI in the Master Control panel will open the Activities, Persons report.
- Cost of Sales
- The total cost of sales from approved Invoices dated during the period. Clicking the KPI will not open a report.
- GP%
- The gross margin of approved Invoices dated during the period. Clicking the KPI will open the GP, Invoices report.
- No. of Activities
- The number of Time Activities with Start Dates falling within the period. If an Activity has more than Person, it will be included in the KPI figure once for each Person. Clicking the KPI will open the Activities, Persons report.
- No. of Orders
- The number of Sales Orders dated during the period. Closed Orders are not included. Clicking the KPI will open the Order Journal report.
- No. of Quotations
- The number of Quotations dated during the period. Closed and Rejected Quotations are not included. Clicking the KPI will open the Quotation Journal report.
- Outstanding Orders
- The value excluding VAT of Sales Orders dated during the period. Invoiced and Closed Orders are not included. Clicking the KPI will open the Outstanding Orders report (this report doesn't have a period selection so the figures it shows will not match the KPI figures).
- Outstanding Quotations
- The value excluding VAT of Quotations dated during the period. Closed and Rejected Quotations are not included. Clicking the KPI will open the Pipeline report (this report doesn't have a period selection so the figures it shows will not match the KPI figures).
- P/L Due
- The outstanding total from unpaid Purchase Invoices that have exceeded their Payment Terms (i.e. whose Due Date has passed). This figure can also be seen at the bottom of the Purchase Ledger report. Clicking the KPI will open the Purchase Ledger report.
- P/L On Acc.
- The On Account balance in the Purchase Ledger, including open On Account Payments and open Prepayments for all Suppliers. This figure can also be seen at the bottom of the Purchase Ledger report. Clicking the KPI will open the Purchase Ledger report using the Only On Account option.
- Receipts
- The value of Receipts taken during the period. Clicking the KPI will not open a report.
- Sales Excluding VAT
- The value excluding VAT of approved Invoices dated during the period. Clicking the KPI will open the Invoice Journal report.
- Sales Including VAT
- The value including VAT of approved Invoices dated during the period. Clicking the KPI will open the Invoice Journal report.
- S/L Due excluding Disputed Invoices
- The outstanding total from unpaid Invoices that have exceeded their Payment Terms (i.e. whose Due Date has passed) and that have not been marked as Disputed. Clicking the KPI will open the Sales Ledger report using the Exclude Disputed option.
- S/L Due
- The outstanding total from unpaid Invoices that have exceeded their Payment Terms (i.e. whose Due Date has passed). This figure can also be seen at the bottom of the Sales Ledger report. Clicking the KPI will open the Sales Ledger report.
- S/L On Acc.
- The On Account balance in the Sales Ledger, including open On Account Receipts and open Prepayments for all Customers. This figure can also be seen at the bottom of the Sales Ledger report. Clicking the KPI will open the Sales Ledger report using the Only On Account option.
- Activities Cost Time
- Sorting
- Use this field to control the order in which the KPIs will be listed in the User's Personal Desktop. For example, a KPI with "1" in its Sorting field will be listed above a KPI whose Sorting is "2". You should only enter whole numbers in this field.
- Period Type
- Paste Special
Choices of possible entries
- The KPI display in the User's Personal Desktop includes figures for a Previous period (in the column headed "Prev.") and for the Current period (in the column headed "Current").
- This field controls how the Prev. and Current periods relate to each other. For example, if the current date is 10 June, the Period Length (below) is "Month" and the Number of Units is 1, the Prev. and Current figures will be calculated as follows, depending on the option in this field:
- -
- Current: 10 June - 10 June
- Previous: 10 June - 10 June
- Previous: 10 June - 10 June
- Until Current Date
- Current: 11 May - 10 June
- Previous: 11 April - 10 May
- Previous: 11 April - 10 May
- Current Full Unit
- Current: 1 June - 30 June
- Previous: 1 May - 31 May
- Previous: 1 May - 31 May
- Current Unit, Until Current Date
- Current: 1 June - 10 June
- Previous: 1 May - 10 May
- This field controls how the Prev. and Current periods relate to each other. For example, if the current date is 10 June, the Period Length (below) is "Month" and the Number of Units is 1, the Prev. and Current figures will be calculated as follows, depending on the option in this field:
- Period Unit
- Paste Special
Choices of possible entries
- Use this field to specify whether the KPI will display weekly, monthly or yearly figures.
- URL
- If you want the User to be taken to a web page when they click the KPI in their Personal Desktop, specify the URL of that web page here. A useful URL might be your HansaWorld SmartView page where you can analyse the statistics in more detail. Please refer to your local HansaWorld representative for more information about HansaWorld SmartView.
- You must include the http:// or https:// in the URL that you enter in this field.
- If you leave this field empty, clicking the KPI will open a report showing how the KPI figure has been calculated. The reports that will be opened from each KPI Type are included in the descriptions of the Type options above.
- You must include the http:// or https:// in the URL that you enter in this field.
- Own Title
- Specify the name of the KPI, to be shown in the KPI Display in the Personal Desktop.
- Reverse Arrow
- This check box controls the arrow that is shown in the Trend column in the Personal Desktop. By default, if the Current figure is larger than the Prev. figure, the Trend column will contain an upward-pointing arrow. This will be appropriate if the KPI is one where a larger Current figure is a positive trend (e.g. "No. of Quotations" or "Sales Including VAT"). In some cases, however, a larger Current figure is a negative trend (e.g. "S/L Due") and therefore a downward-pointing arrow is more appropriate. Use the Reverse Arrow option in these cases.
- Number of Units
- This field is related to the Period Unit field above: use it to specify how many Period Units are to be included in the Current and Prev. in the KPI Display.
- For example, if the Period Type is "Month" and you enter "3" in this field, the Current period will cover the current quarter and the Prev. period will cover the previous quarter.
- For example, if the Period Type is "Month" and you enter "3" in this field, the Current period will cover the current quarter and the Prev. period will cover the previous quarter.
- Open
- Paste Special
Choices of possible entries
- If you have specified a URL in the field on the left and the User clicks the KPI in their Personal Desktop, they will be taken to the relevant web page. If you enter "Inline" here, the web page will be opened in a new window inside Enterprise by HansaWorld. If you enter "External" here, the web page will be opened in the User's default browser.
- Recalculate Every
- By default, the KPI figures in the User's Personal Desktop will be updated once an hour. If you would like them to be updated more (or less) often, specify here the time between updates that you need. Use the format hh:mm:ss.
- If you need an immediate update of the KPIs in your Personal Desktop, click the following button at the top of the list (Mac OS X only):

- If you need an immediate update of the KPIs in your Personal Desktop, click the following button at the top of the list (Mac OS X only):
- Person
- Paste Special
Person register, System module
- Use this field if you need KPI figures to be calculated for a particular Person or Persons.
- For example, if the Type is "No. of Orders", leaving this field empty will mean the KPI will display the total number of Orders created during the period and the previous period. If you enter a Person's Signature, the KPI will display the number of Orders created by that Person.
- Unless the Type is "Activities Cost Time" or "No. of Activities", you can enter more than one Person, separated by commas. If you need to use 'Paste Special' to enter several Persons, type the comma or colon before opening the 'Paste Special' list. This will cause the next Person to be added to those already entered. Otherwise, the previous Person will be overwritten.
- For the following Types, the KPI figure will be calculated from Sales Invoices where the specified Person (or one of the specified Persons) is the Salesman:
- Cost of Sales
- Sales Excluding VAT
- Sales Including VAT
- S/L Due
- S/L Due excluding Disputed Invoices
- GP%
For the following Types, the KPI figure will be calculated from Purchase Invoices where the specified Person (or one of the specified Persons) is the Salesman:
- P/L Due
For the following Types, the KPI figure will be calculated from Quotations where the specified Person (or one of the specified Persons) is the Salesman:
- No. of Quotations
- Outstanding Quotations
For the following Types, the KPI figure will be calculated from Sales Orders where the specified Person (or one of the specified Persons) is the Salesman:
- No. of Orders
- Outstanding Orders
For the following Types, the KPI figure will be calculated for Customers and Suppliers in whose Contact records the specified Person (or one of the specified Persons) is the Salesman:
- P/L on Acc.
- S/L on Acc.
For the following Types, the KPI figure will be calculated from Time Activities where the specified Person is included in the Persons field. You should not specify more than one Person in the KPI: if you do, the KPI figure will be zero:
- Activities Cost Time
- No. of Activities
- For example, if the Type is "No. of Orders", leaving this field empty will mean the KPI will display the total number of Orders created during the period and the previous period. If you enter a Person's Signature, the KPI will display the number of Orders created by that Person.

- Item
- Paste Special
Item register
- Use this field if you need KPI figures to be calculated for a particular Item.
- For example, if the Type is "No. of Orders", leaving this field empty will mean the KPI will display the total number of Orders created during the period and the previous period. If you enter an Item Number, the KPI will display the number of Orders containing that Item.
- You can use this field with the following KPI Types:
- Cost of Sales
- GP %
- No. of Orders
- No. of Quotations
- Outstanding Orders
- Outstanding Quotations
- Sales Excluding VAT
- Sales Including VAT
- For example, if the Type is "No. of Orders", leaving this field empty will mean the KPI will display the total number of Orders created during the period and the previous period. If you enter an Item Number, the KPI will display the number of Orders containing that Item.
- Classification
- Paste Special
Item Classifications setting, Sales Ledger
- Use this field if you need KPI figures to be calculated for Items belonging to a particular Classification. It operates in the same manner as the Item field described immediately above, and can be used with the same KPI Types.
- If you enter a number of Classifications separated by commas, KPI figures will be calculated for the Items belonging to all the Classifications listed.
- If you enter a number of Classifications separated by commas, KPI figures will be calculated for the Items belonging to all the Classifications listed.
- Group
- Paste Special
Item Group register, Sales Ledger
- Use this field if you need KPI figures to be calculated for Items belonging to a particular Item Group. It operates in the same manner as the Item field described immediately above, and can be used with the same KPI Types.
- Act. Type
- Paste Special
Activity Types setting, CRM module
- Use this field if you need KPI figures to be calculated for a particular Activity Type.
- For example, if the Type is "No. of Activities", leaving this field empty will mean the KPI will display the total number of Activities created during the period and the previous period. If you enter an Activity Type, the KPI will display the number of Activities with that Activity Type.
- You can use this field with the following KPI Types:
- Activities Cost Time
- No. of Activities
- For example, if the Type is "No. of Activities", leaving this field empty will mean the KPI will display the total number of Activities created during the period and the previous period. If you enter an Activity Type, the KPI will display the number of Activities with that Activity Type.
- Act. Type Class.
- Paste Special
Activity Classes setting, CRM module
- Use this field if you need KPI figures to be calculated for Activities with Activity Types belonging to a particular Activity Class. It operates in the same manner as the Act. Type field described immediately above, and can be used with the same KPI Types.
- No.
- Save the KPI record. As soon as you do so the KPI will be added to the User's Personal Desktop:
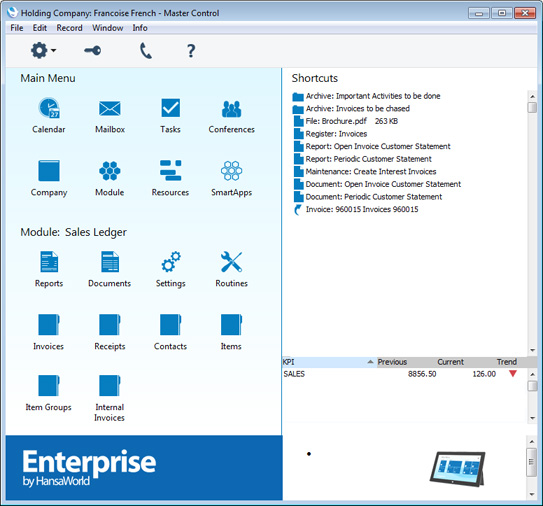
Settings in the System module:
- Access Groups
- Active Users
- Auto Actions
- Bank Holidays
- Base Currency
- Base Currency Rates
- Company Date and Numeric Format
- Company Info
- Configuration
- Conversions - Master, Conversions - Accounts and VAT Code
- Conversions - Master, Conversions - Activity Types
- Conversions - Master, Conversions - Contact Classifications
- Conversions - Master, Conversions - Contacts
- Conversions - Master, Conversions - Currency Codes
- Conversions - Master, Conversions - Items
- Conversions - Master, Conversions - Locations
- Conversions - Master
- Conversions - Master, Conversions - Suppliers
- Conversions - Master, Conversions - Objects
- Conversions - Master, Conversions - Users
- Countries
- Countries Regions
- Currency Round Off
- Days and Months
- Departments
- Discount Options
- Display Groups
- Exchange Rates Settings
- Form Settings
- Global Warnings on UnOKed Records
- Internet Enablers
- Journaling
- KPIs
- Languages
- Locking
- Locking Exceptions
- Number Series Defaults
- Opened Windows History
- Optional Features
- Password Security
- Printers
- Reporting Periods
- Round Off
- Sales Groups
- Special Days
- Styles
- Sub-Ledger Control Accounts
- Task Manager Access
- User Warnings on UnOKed Records
- Values in Text
- VAT Number Masks
- Weeks
Go back to:
- Home page for System Module manual
- Home page for Enterprise by HansaWorld manual
Languages
This setting allows you to define foreign Languages: Language Codes can then be assigned to Customers or Suppliers. These can be used to ensure the correct Forms are used: e.g. French invoice forms to French customers, Finnish documents for Finnish customers etc. In addition, Language Codes can be used to show the correct translations of Item Names, Payment Terms, Delivery Terms, etc. on printed documentation.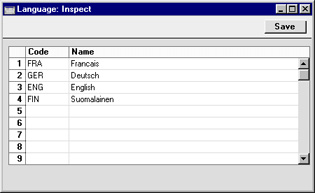
Locking
This setting allows you to close an accounting period to prevent the further entry of new or corrected transactions. This is done by specifying a cut-off date. Once this has been done, no transactions whose Transaction Date is on or before the cut-off date will be permitted. Because Locking is carried out by specifying a single date, months or periods must be locked chronologically.Hansa does not force you to close months or periods, but this setting allows the use of such a feature if necessary.
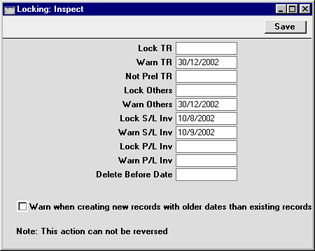
- Lock TR
- If a date has been entered in this field, the entry of Transactions whose Transaction Date is on or before this date will not be permitted. This applies only to Transactions entered directly to the Transaction register in the Nominal Ledger.
- If it is discovered that a Transaction which falls within a closed month contains an error, it can only be corrected using the 'Correction Mark' function. Please refer to the Correcting Transactions page for full details.
- If an attempt is made to enter a Transaction whose Transaction Date is on or before the Lock TR date, the following warning is shown:

- If it is discovered that a Transaction which falls within a closed month contains an error, it can only be corrected using the 'Correction Mark' function. Please refer to the Correcting Transactions page for full details.
- Warn TR
- If a date has been entered in this field, a warning will be displayed on the entry of Transactions whose Transaction Date is on or before this date. This applies only to Transactions entered directly to the Transaction register in the Nominal Ledger.
- If an attempt is made to enter a Transaction whose Transaction Date is on or before the Warn TR date, the following warning is shown:
- If an attempt is made to enter a Transaction whose Transaction Date is on or before the Warn TR date, the following warning is shown:
- Not Prel TR
- If Preliminary Transactions are allowed (this is controlled in the Transaction Settings setting in the Nominal Ledger) and a date has been entered to this field, only those Transactions whose Transaction Date is after this date will be treated as Preliminary (i.e. modifiable). All Transactions whose Transaction Date is on or before this date will not be modifiable.
- If the Not Prel TR date is later than the Lock TR date, it will be possible to enter Transactions with a Transaction Date that falls between them. Such Transactions will be treated as actual Transactions as soon as they have been saved (i.e. they will never be modifiable).
- If the Not Prel TR date is later than the Lock TR date, it will be possible to enter Transactions with a Transaction Date that falls between them. Such Transactions will be treated as actual Transactions as soon as they have been saved (i.e. they will never be modifiable).
- Lock Others
- If a date has been entered in this field, the creation of records in any of Hansa's transaction registers whose Transaction Date is on or before this date will not be permitted. This covers all transaction registers except Invoices or Purchase Invoices, which have separate controls (below).
- Warn Others
- If a date has been entered in this field, a warning will be displayed on the creation of records in any of Hansa's transaction registers whose Transaction Date is on or before this date. Again, all transaction registers except Invoices and Purchase Invoices are affected.
- Lock S/L Inv
- If a date has been entered in this field, the creation of Invoices whose Transaction Date is on or before this date will not be permitted.
- Warn S/L Inv
- If a date has been entered in this field, a warning will be displayed on the creation of Invoices whose Transaction Date is on or before this date.
- Lock P/L Inv
- If a date has been entered in this field, the creation of Purchase Invoices whose Transaction Date is on or before this date will not be permitted.
- Warn P/L Inv
- If a date has been entered in this field, a warning will be displayed on the creation of Purchase Invoices whose Transaction Date is on or before this date.
!
After locking the accounts at a certain date, you may not enter Transactions with earlier dates, and you may not alter earlier Transactions.
- Delete Before Date
- Under normal circumstances, it is not possible to delete Nominal Ledger Transactions or approved records in the transaction registers. However, it can be necessary to delete such records in certain situations, perhaps because disk space is at a premium and the previous year's accounts have been committed to an archive file.
- To allow the deletion of such transactions, a Delete Before Date must be entered in this field. It will only be possible to delete Nominal Ledger Transactions and records in Hansa's transaction registers whose Transaction Date is on or before this Delete Before Date.
- Deletions can be carried out for individual records using the 'Delete' function on the record menu and for groups of records using 'Delete Old Transactions' Maintenance function in the System module. This latter function will only delete records whose Transaction Date is on or before the Delete Before Date specified here.
!
Use great care when attempting to delete records, and make sure you have a backup before you remove any data.
- To allow the deletion of such transactions, a Delete Before Date must be entered in this field. It will only be possible to delete Nominal Ledger Transactions and records in Hansa's transaction registers whose Transaction Date is on or before this Delete Before Date.
- Warn when creating new records with older dates than existing records
- Use this option if you would like to be warned when entering a date to an accounting transaction if a record with a later date already exists in the same register. The existing record can be approved or unapproved. The warning appears as follows:
- As it is a warning, you will still be able to save and approve the new record.
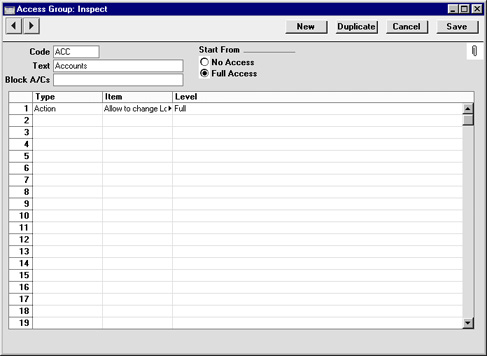
Locking Exceptions
This page describes the Locking Exceptions setting in the System module.---
After closing a period by setting a lock date in the Locking setting, you usually cannot re-open that period. You can only advance the lock dates, you cannot change them so that they are earlier. After you have printed and filed the management reports (e.g. Balance Sheet, Profit & Loss report, etc) for a period and locked it, it will usually not be appropriate to re-open the period to post new transactions. However, there can be some exceptional circumstances when you need to post a transaction to a closed period. For example, your lock date might be October 31 and you might need to post a transaction to September. Two options are available:
- Log in as a Global User or Person belonging to an Access Group in which Full access has been granted to the 'Change System Locking' Action. You will now be able to change any of the lock dates in the Locking setting to earlier dates.
In the example, you will need to set the lock date back to September 30 (or to a date in September prior to the date that you need). This will re-open October as well as September, and it will re-open those months for all users.
- Use Locking Exceptions.
In the example, you will be able to re-open the precise date or dates in September that you need, without re-opening October as well. The date or dates will only be re-opened for particular users.
- Open the Locking Exceptions setting in the System module and add a row for the period that you need to re-open:

- Start Date, End Date
- Paste Special
Choose date
- Use these fields to specify the period that is to be re-opened.
- Action
- Paste Special
Choices of possible options
Choose whether you want to remove a lock or a warning. Usually you will need to remove a lock.
- Register
- Paste Special
Choices of possible options
Specify which register is to be unlocked. The following options are available:
- All
- Removes all lock or warn dates for the specified period.
- Transactions
- Removes the Lock or Warn Transactions date for the specified period.
- Purchase Invoices
- Removes the Lock or Warn Purchase Invoices date for the specified period.
- Sales Invoices
- Removes the Lock or Warn Sales Invoices date for the specified period.
- Activities
- Removes the Lock or Warn Activities date for the specified period.
- Other
- Removes the Lock or Warn Others date for the specified period.
- Start Date, End Date
- Log in as a Global User or Person belonging to an Access Group in which Full access has been granted to the relevant 'Lock Exceptions' Action. For example, if you set the Register to "Transactions" in step 1, you will need Full access to the 'Lock Exceptions for Transactions' Action. Each Register option except "All" has a corresponding Access Group Action as shown in the illustration below. If you chose "All" as the Register option in step 1, you will need Full access to all five 'Lock Exceptions' Actions:
The period that you specified in step 1 will only be re-opened to users with Full access to these Access Group Actions. The period will remain closed to other users.
- Enter the transactions that you need to the re-opened period. If you entered a row in the Locking Exceptions setting that removed a lock date but you did not enter a second row removing a warn date, you may be given "Month Checked" messages when entering the transactions, but you will be able to save them.
- Return to the Locking Exceptions setting and remove the row(s) that re-opened the period. This will close the period once again.
Settings in the System module:
- Access Groups
- Active Users
- Auto Actions
- Bank Holidays
- Base Currency
- Base Currency Rates
- Cloud Security
- Company Date and Numeric Format
- Company Info
- Configuration
- Conversions - Master, Conversions - Accounts and VAT Code
- Conversions - Master, Conversions - Activity Types
- Conversions - Master, Conversions - Contact Classifications
- Conversions - Master, Conversions - Contacts
- Conversions - Master, Conversions - Currency Codes
- Conversions - Master, Conversions - Items
- Conversions - Master, Conversions - Locations
- Conversions - Master
- Conversions - Master, Conversions - Suppliers
- Conversions - Master, Conversions - Tags/Objects
- Conversions - Master, Conversions - Users
- Countries
- Countries Regions
- Currency Round Off
- Days and Months
- Departments
- Discount Options
- Display Groups
- Exchange Rates Settings
- Form Settings
- Global Warnings on UnOKed Records
- Internet Enablers
- Journaling
- KPIs
- Languages
- Locking
- Locking Exceptions
- Locking Exceptions
- Nature of Business
- Number Series Defaults
- Opened Windows History
- Optional Features
- Password Security
- Printers
- Reporting Periods
- Round Off
- Sales Groups
- Single Functions
- Special Days
- Styles
- Sub-Ledger Control Accounts
- Task Manager Access
- User Warnings on UnOKed Records
- Values in Text
- VAT Reg. Number Masks
- Weeks
- Home page for System Module manual
- Home page for Standard ERP manual
Nature of Business
This page describes the Nature of Business setting in the System module.---
The Nature of Business setting allows you to construct a look-up table for the Business Nature field on the 'Company' card of the Contact record and on the 'Reg.' card in the Company Info setting.
To open the Nature of Business setting, first ensure you are in the System module. Then, if you are using Windows or macOS, click the [Settings] button in the Navigation Centre or use the Ctrl-S/⌘-S keyboard shortcuts and then double-click 'Nature of Business' in the 'Settings' list. If you are using iOS or Android, select 'Settings' from the Tools menu (with 'wrench' icon) and tap 'Nature of Business' in the 'Settings' list. The 'Nature of Business: Browse' window will open, listing the Nature of Business records that you have previously entered.
---
Settings in the System module:
- Access Groups
- Active Users
- Auto Actions
- Bank Holidays
- Base Currency
- Base Currency Rates
- Cloud Security
- Company Date and Numeric Format
- Company Info
- Configuration
- Conversions - Master, Conversions - Accounts and VAT Code
- Conversions - Master, Conversions - Activity Types
- Conversions - Master, Conversions - Contact Classifications
- Conversions - Master, Conversions - Contacts
- Conversions - Master, Conversions - Currency Codes
- Conversions - Master, Conversions - Items
- Conversions - Master, Conversions - Locations
- Conversions - Master
- Conversions - Master, Conversions - Suppliers
- Conversions - Master, Conversions - Tags/Objects
- Conversions - Master, Conversions - Users
- Countries
- Countries Regions
- Currency Round Off
- Days and Months
- Departments
- Discount Options
- Display Groups
- Exchange Rates Settings
- Form Settings
- Global Warnings on UnOKed Records
- Internet Enablers
- Journaling
- KPIs
- Languages
- Locking
- Locking Exceptions
- Nature of Business
- Number Series Defaults
- Opened Windows History
- Optional Features
- Password Security
- Printers
- Reporting Periods
- Round Off
- Sales Groups
- Single Functions
- Special Days
- Styles
- Sub-Ledger Control Accounts
- Task Manager Access
- User Warnings on UnOKed Records
- Values in Text
- VAT Number Masks
- Weeks
- Home page for System Module manual
- Home page for Standard ERP manual
Number Series Defaults
This page describes the Number Series Defaults setting in the System module.—
You can define the number sequences (known as "Number Series") that you want be used when generating Order Numbers, Invoice Numbers, Transaction Numbers and so on. If you have not defined a Number Series for a particular register, the sequence will begin at 1 and continue consecutively. For example, if you have not defined a Number Series for Invoices, the first Invoice that you enter will carry the Invoice Number 1, the second one will be Number 2, and so on. If you change the sequence at any time, the sequence will continue from that point. For example, if you change the Number of the first Invoice from 1 to 1000 before you save it for the first time, the next Invoice will be given the Number 1001.
For many registers, you can define a Number Series, or several Number Series that are to run concurrently. For example, the Number Series - Invoices setting allows you to define Number Series for Invoices. Defining a Number Series involves specifying the first and last Numbers and the period during which the Number Series can be used. The period can be open-ended.
Having defined Number Series for a particular register, each new record in that register will by default take its Number from the first current Number Series in the setting. When entering a record, you will be able to change to the first unused number in any other current Number Series using 'Paste Special'.
Depending on the register, if you have defined several number sequences in the relevant Number Series setting, you can specify here in the Number Series Defaults setting which sequence is to be used as the default when you create new records. A different sequence will be used if the current user has a Number Series specified on the 'Number Series' card of their record in the Person register.
To open the Number Series Defaults setting, ensure you are in the System module using the [Switch Module] button in the Navigation Centre and click the [Settings] button, also in the Navigation Centre. The 'Settings' list opens: double-click 'Number Series Defaults'. Click [Save] to save any changes and close, or the close box to close without saving changes.
In a single-user system, you will need to quit and restart (or log in again using the button in the Navigation Centre) for the changes you make in this setting to take effect. In a multi-user system, you will only be able to make a change in this setting if you are the only user logged in. You will then need to quit and restart (or log in again) for the change to take effect, but there will be no need to restart the server.
The illustration below shows a Number Series - Invoices setting in which we have defined three number sequences for Invoices for the year 2015:
If we want to use a different Number Series as the overall default, we can choose one in the Number Series Defaults setting. In the illustration below, we have specified that the second sequence (9700000 - 9700999) is be used as the overall default in standard Invoices. Enter the first number in the sequence (9700000 in this example) in the Invoices field. We have also specified that we want to use the third sequence for Interest Invoices:
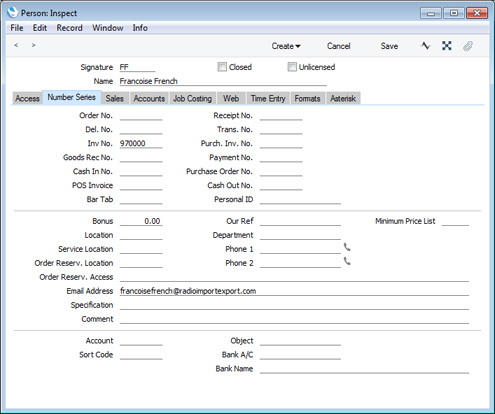
---
Settings in the System module:
- Access Groups
- Active Users
- Auto Actions
- Bank Holidays
- Base Currency
- Base Currency Rates
- Company Date and Numeric Format
- Company Info
- Configuration
- Conversions - Master, Conversions - Accounts and VAT Code
- Conversions - Master, Conversions - Activity Types
- Conversions - Master, Conversions - Contact Classifications
- Conversions - Master, Conversions - Contacts
- Conversions - Master, Conversions - Currency Codes
- Conversions - Master, Conversions - Items
- Conversions - Master, Conversions - Locations
- Conversions - Master
- Conversions - Master, Conversions - Suppliers
- Conversions - Master, Conversions - Objects
- Conversions - Master, Conversions - Users
- Countries
- Countries Regions
- Currency Round Off
- Days and Months
- Departments
- Discount Options
- Display Groups
- Exchange Rates Settings
- Form Settings
- Global Warnings on UnOKed Records
- Internet Enablers
- Journaling
- KPIs
- Languages
- Locking
- Locking Exceptions
- Number Series Defaults
- Opened Windows History
- Optional Features
- Password Security
- Printers
- Reporting Periods
- Round Off
- Sales Groups
- Single Functions
- Special Days
- Styles
- Sub-Ledger Control Accounts
- Task Manager Access
- User Warnings on UnOKed Records
- Values in Text
- VAT Number Masks
- Weeks
- Home page for System Module manual
- Home page for Standard ERP manual
Opened Windows History
This page describes the Opened Windows History setting in the System module.---
The Opened Windows History setting is a list of the windows that you have previously opened. In a multi-user system, it only lists the windows that have been opened in the client database that you are using, not the windows that have been opened on other client machines.
To open the Opened Windows History setting, first ensure you are in the System module. Then, if you are using Windows or macOS, click the [Settings] button in the Navigation Centre and then double-click 'Opened Windows History' in the 'Settings' list. If you are using iOS or Android, select 'Settings' from the Tools menu (with 'wrench' icon) and tap 'Opened Windows History' in the 'Settings' list. The 'Opened Windows History' window will open:
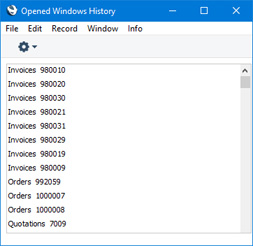
If you need to return to a window, double-click or tap it in the list. If you would like to add a window to your Personal Desktop, highlight it in the list and select 'Send to Desktop' from the Operations menu (Windows/macOS) or Tools menu (iOS/Android).
---
Settings in the System module:
- Access Groups
- Active Users
- Auto Actions
- Bank Holidays
- Base Currency
- Base Currency Rates
- Cloud Security
- Company Date and Numeric Format
- Company Info
- Configuration
- Conversions - Master, Conversions - Accounts and VAT Code
- Conversions - Master, Conversions - Activity Types
- Conversions - Master, Conversions - Contact Classifications
- Conversions - Master, Conversions - Contacts
- Conversions - Master, Conversions - Currency Codes
- Conversions - Master, Conversions - Items
- Conversions - Master, Conversions - Locations
- Conversions - Master
- Conversions - Master, Conversions - Suppliers
- Conversions - Master, Conversions - Tags/Objects
- Conversions - Master, Conversions - Users
- Countries
- Countries Regions
- Currency Round Off
- Days and Months
- Departments
- Discount Options
- Display Groups
- Exchange Rates Settings
- Form Settings
- Global Warnings on UnOKed Records
- Internet Enablers
- Journaling
- KPIs
- Languages
- Locking
- Locking Exceptions
- Nature of Business
- Number Series Defaults
- Opened Windows History
- Optional Features
- Password Security
- Printers
- Reporting Periods
- Round Off
- Sales Groups
- Single Functions
- Special Days
- Styles
- Sub-Ledger Control Accounts
- Task Manager Access
- User Warnings on UnOKed Records
- Values in Text
- VAT Reg. Number Masks
- Weeks
- Home page for System Module manual
- Home page for Standard ERP manual
Optional Features
The Optional Features setting contains some miscellaneous options controlling the behaviour of various aspects of your Standard ERP database.The Optional Features setting is unusual in that it affects the entire database. So, if you have more than one Company, choosing an option in this setting in one Company will affect every other Company as well.
To open the Optional Features setting, first ensure you are in the System module. Then, if you are using Windows or macOS, click the [Settings] button in the Navigation Centre and then double-click 'Optional Features' in the 'Settings' list. If you are using iOS or Android, select 'Settings' from the Tools menu (with 'wrench' icon) and tap 'Optional Features' in the 'Settings' list. The 'Optional Features: Inspect' window will open.
When the setting is complete, click the [Save] button (Windows/macOS) or tap √ (iOS/Android) to save, or use the close box (Windows/macOS) or < (iOS/Android) to close the window without saving changes.
The Optional Features setting is spread over four cards. To view specific cards, click or tap one of the four named tabs:

- 'Options' card
- 'Unsupported' card
- 'Security' card
- 'Performance' card
Settings in the System module:
- Access Groups
- Active Users
- Auto Actions
- Bank Holidays
- Base Currency
- Base Currency Rates
- Cloud Security
- Company Date and Numeric Format
- Company Info
- Configuration
- Conversions - Master, Conversions - Accounts and VAT Code
- Conversions - Master, Conversions - Activity Types
- Conversions - Master, Conversions - Contact Classifications
- Conversions - Master, Conversions - Contacts
- Conversions - Master, Conversions - Currency Codes
- Conversions - Master, Conversions - Items
- Conversions - Master, Conversions - Locations
- Conversions - Master
- Conversions - Master, Conversions - Suppliers
- Conversions - Master, Conversions - Tags/Objects
- Conversions - Master, Conversions - Users
- Countries
- Countries Regions
- Currency Round Off
- Days and Months
- Departments
- Discount Options
- Display Groups
- Exchange Rates Settings
- Form Settings
- Global Warnings on UnOKed Records
- Internet Enablers
- Journaling
- KPIs
- Languages
- Locking
- Locking Exceptions
- Nature of Business
- Number Series Defaults
- Opened Windows History
- Optional Features
- Password Security
- Printers
- Reporting Periods
- Round Off
- Sales Groups
- Single Functions
- Special Days
- Styles
- Sub-Ledger Control Accounts
- Task Manager Access
- User Warnings on UnOKed Records
- Values in Text
- VAT Reg. Number Masks
- Weeks
- Home page for System Module manual
- Home page for Standard ERP manual
Optional Features - Options Card
This page describes the fields on the 'Options' card in the Optional Features setting. Please follow the links below for descriptions of the other cards:- Introduction
- 'Options' card
- 'Unsupported' card
- 'Security' card
- 'Performance' card
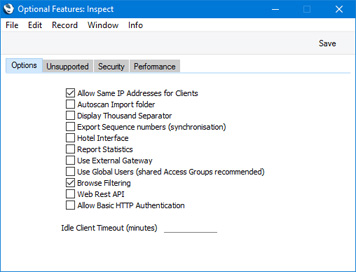
- Allow Same IP Addresses for Clients
- Use this option if you want to log on to your Standard ERP server more than once from the same IP address (i.e. from more than one Standard ERP client on a single machine). This can sometimes be useful for testing. If you change this option, it will not take effect until you restart the server.
- Autoscan Import Folder
- Select this option if you would like information to be imported to your Standard ERP database automatically. If you are using this option, the contents of any files that you place in the 'Import' folder in the folder containing your Standard ERP server application will be imported automatically. Please refer to the 'Importing Information Automatically' section on the Imports page for details.
- If you change this option, it will not take effect until you restart the server.
- If you change this option, it will not take effect until you restart the server.
- Display Thousand Separator
- Select this option if you would like the thousand separator to be displayed on screen. The thousand separator will always be displayed in reports and in forms.
- You can set this option differently on a particular client machine, and a particular user can set this option individually as well.
- To set this option for a particular client machine, use the Client Date and Numeric Format setting in the User Settings module, working on the machine in question. Be sure to tick the Use Client Settings box before saving, to activate the setting.
- To set this option for a particular user, use the 'Formats' card of their Person record. The user will see dates and numbers displayed in these formats irrespective of the client machine they are using, even if the machine has its own Client Date and Numeric Format. Be sure to tick the Use Person's Settings box before saving, to activate the setting,
- To specify the character that is to be used as the thousand separator, use the Company Date and Numeric Format setting in the System module. This thousand separator will always be used in forms (to ensure consistency in printed documentation), but you can choose a different thousand separator to be used on screen and in reports on a particular client machine, and a particular user can choose their own thousand separator as well. Again, use the Client Date and Numeric Format setting or the 'Formats' card of the relevant Person record respectively, as mentioned above.
- If you change this option, you will need to restart your Standard ERP client or single-user system for it to take effect. In a multi-user system, there is no need to restart the server.
- You can set this option differently on a particular client machine, and a particular user can set this option individually as well.
- Export Sequence numbers (synchronisation)
- This option ensures that sequence numbers are included in database text backup files. You must use this option if any Standard ERP clients will use "live-sync" connections with the server. A "live synchronised" connection can be appropriate for sales terminals in a point of sales system. The sales terminals will connect to the server when the server is available and otherwise act as stand-alone systems. Information is saved in the server database immediately when the connection exists, and at other times in the databases on the sales terminals. After a period of working offline, synchronisation of information between the server and the sales terminals will occur automatically when the connection is re-established, at times when the server's workload is low. Please refer here for more details about this option.
- Hotel Interface
- There are two versions of the Resource Planner and Reservation windows. One is suitable for use when administering in-house resources (e.g. booking conference rooms and company resources) and the other is suitable for use at the front desk in a hotel. Select this option if you need to use the hotel versions of these two windows. Please refer here for more details about the Hotel module.
- If you change this option, you will need to restart your Standard ERP client or single-user system for it to take effect. In a multi-user system, there is no need to restart the server.
- If you change this option, you will need to restart your Standard ERP client or single-user system for it to take effect. In a multi-user system, there is no need to restart the server.
- Report Statistics
- Select this option if you need statistics to be printed at the end of each report. These statistics will include the time taken to produce the report. This option can be useful if you are using single-thread parallel reporting. Please refer to the 'Parallel Reporting' section on the Reports page for details.
- There is no need for a restart after changing this option.
- There is no need for a restart after changing this option.
- Use External Gateway
- If you will be using a Gateway to fetch incoming mail from your POP3 account(s), select this option. Please refer to the External Mail page for details.
- Use Global Users (shared Access Groups recommended)
- If you have more than one Company in your database and you want a user to have access to some or all of those Companies, you can create a Global User record for that user. This will make it easier to manage that user's access rights, passwords, Calendar and Task Manager.
- By default, a user will log in to your Standard ERP as a Person. This means they will only be able to log in to the Company containing their Person record, and they will use the password that is connected to that Person record. If that user needs to be able to log in to more than Company, they will need Person records in each of those Companies. These Person records can have the same Signature and StandardID, but the user will need to set separate passwords for each one.
- An option is to create a Global User record for that user. If you create any Global User records, you should also select this option. This will mean that when the user logs in, it will be as a Global User and not as a Person. The user will be able to log in to any Company listed in their Global User record, and they will use the password that is connected to that Global User record (i.e. they will only need to set their password once, and they will use it for every Company). Users who do not have Global User records will still log in as Persons.
- Please refer to the User Accounts when you have more than one Company page for details.
- By default, a user will log in to your Standard ERP as a Person. This means they will only be able to log in to the Company containing their Person record, and they will use the password that is connected to that Person record. If that user needs to be able to log in to more than Company, they will need Person records in each of those Companies. These Person records can have the same Signature and StandardID, but the user will need to set separate passwords for each one.
- Browse Filtering
- When searching for particular records in browse and 'Paste Special' windows, you can use one of two methods:
- You can search for the first instance of a text string in the current sort column.
- You can enter the search string and as you do so, non-matching records will be removed from the list. This is known as "Browse Filtering".
- Select this option if you would like to use Browse Filtering in all browse and 'Paste Special' windows.
- You can use Browse Filtering in some registers and standard searching in others. Use the Register Search Mode setting in the Technics module to specify a search method for each register.
- Please refer to the 'Searching in Browse Windows' section on the Browse Window page for more details about both search methods, including illustrated examples.
- There is no need for a restart after changing this option.
- You can search for the first instance of a text string in the current sort column.
- Web Rest API
- Select this option if you need third-party applications to be able to communicate with your database using the Standard ERP REST API. Please refer here for details about the Standard ERP REST API.
- Allow Basic HTTP Authentication
- This option allows third-party applications to be able to connect to your database through the Standard ERP REST API using basic HTTP authentication.
- This option is provided to allow you to become familiar with the Standard ERP REST API and for testing. It allows you to make API requests to your database from a browser or terminal window/command prompt. You should not use this option in your live system as the communications are not well encrypted and you will need to include your Signature and password in plain test in the requests.
- This option is provided to allow you to become familiar with the Standard ERP REST API and for testing. It allows you to make API requests to your database from a browser or terminal window/command prompt. You should not use this option in your live system as the communications are not well encrypted and you will need to include your Signature and password in plain test in the requests.
- Idle Client Timeout (minutes)
- If you would like Standard ERP clients to be logged out automatically from the server if they have been idle or inactive for some time, specify the period of inactivity here (in minutes). A Standard ERP client application will be closed after it has been idle for the specified time. If you leave this field empty, idle clients will not be logged out automatically, providing the connection is alive. If a connection is dead, the client will be logged out from the server after ten minutes.
- Changes to this field will not take effect until you restart the server.
Settings in the System module:
- Access Groups
- Active Users
- Auto Actions
- Bank Holidays
- Base Currency
- Base Currency Rates
- Cloud Security
- Company Date and Numeric Format
- Company Info
- Configuration
- Conversions - Master, Conversions - Accounts and VAT Code
- Conversions - Master, Conversions - Activity Types
- Conversions - Master, Conversions - Contact Classifications
- Conversions - Master, Conversions - Contacts
- Conversions - Master, Conversions - Currency Codes
- Conversions - Master, Conversions - Items
- Conversions - Master, Conversions - Locations
- Conversions - Master
- Conversions - Master, Conversions - Suppliers
- Conversions - Master, Conversions - Tags/Objects
- Conversions - Master, Conversions - Users
- Countries
- Countries Regions
- Currency Round Off
- Days and Months
- Departments
- Discount Options
- Display Groups
- Exchange Rates Settings
- Form Settings
- Global Warnings on UnOKed Records
- Internet Enablers
- Journaling
- KPIs
- Languages
- Locking
- Locking Exceptions
- Nature of Business
- Number Series Defaults
- Opened Windows History
- Optional Features, including:
- 'Options' card
- 'Unsupported' card
- 'Security' card
- 'Performance' card
- 'Options' card
- Password Security
- Printers
- Reporting Periods
- Round Off
- Sales Groups
- Single Functions
- Special Days
- Styles
- Sub-Ledger Control Accounts
- Task Manager Access
- User Warnings on UnOKed Records
- Values in Text
- VAT Reg. Number Masks
- Weeks
- Home page for System Module manual
- Home page for Standard ERP manual
Optional Features - Unsupported Card
This page describes the fields on the 'Unsupported' card in the Optional Features setting. Please follow the links below for descriptions of the other cards:- Introduction
- 'Options' card
- 'Unsupported' card
- 'Security' card
- 'Performance' card

- Allow Import with Multiple Users
- By default, you will only be able to use the 'Automatic' and 'Manual file search' Import functions in the System module when you are the only user that is logged in to your database. Select this option if you would like to be able use these functions when more than one user is logged in. It will still not be possible to import information if any user is modifying a record or setting (i.e. if any user has a window open with the title 'Update'). Users will not be able to work while an import is taking place. You can use the Active Users setting in the System module to check how many users are logged in and to see if any are modifying records.
- Another way to import information is to select the Autoscan Import folder option on the 'Options' card of this setting. If you are using this option, the contents of any files that you place in the 'Import' folder in the folder containing your Standard ERP server application will be imported automatically. The automatic import will always take place, even if more than one user is logged in at the time (i.e. irrespective of whether the Allow Import with Multiple Users option is ticked).
- Please refer to the Imports page for more details about importing information into your Standard ERP database.
- If you change this option, it will not take effect until you restart the server.
- Another way to import information is to select the Autoscan Import folder option on the 'Options' card of this setting. If you are using this option, the contents of any files that you place in the 'Import' folder in the folder containing your Standard ERP server application will be imported automatically. The automatic import will always take place, even if more than one user is logged in at the time (i.e. irrespective of whether the Allow Import with Multiple Users option is ticked).
- Client Driven Forms, Client Driven Reports
- In a multi-user system, forms and reports will by default be processed on the server and then sent to the client for display or printing. Other work will be queued while the server is processing a form or report. If you select this option, forms and reports will be processed on the client machines. A client will need to send many requests to the server, but in between those requests the server will be able to process other work. These options can therefore be useful if large form or report processing tasks will frequently delay the completion of other tasks. These options have now largely been superseded by the Forms on Threads and Parellel Reports options on the 'Performance' card.
- If you change these options, they will not take effect until you restart the server.
- If you change these options, they will not take effect until you restart the server.
- Credit Invoices Update Stock
- If you have ticked the Update Stock box on the 'Delivery' card of an Invoice, stock levels and the Nominal Ledger stock valuation will be updated from that Invoice when you mark it as OK and save. By default, the Update Stock box will be ticked if you are using the Invoices Update Stock option in the Account Usage S/L setting. However, even if you are using the Invoices Update Stock option, the Update Stock box will not be ticked if the Invoice is a Credit Note. If you would like the Update Stock box to be ticked by default in Credit Notes, select this option. Please refer here for more details.
- There is no need for a restart after changing this option.
- There is no need for a restart after changing this option.
- Goods Receipt from Credit Invoices
- Select this option if you would like a Goods Receipt to be created automatically whenever you mark a Credit Note as OK and save. Selecting this option will mean that Goods Receipts will be created automatically from every Credit Note except those connected to Invoices that were created from Sales Orders. The new Goods Receipts will be marked as OK automatically, so there will be no opportunity to check or change the stock value. Please refer here for more details.
- There is no need for a restart after changing this option.
- There is no need for a restart after changing this option.
- No Test printout
- Some forms will be printed with watermarks in the following circumstances:
- When you print a record that has not been marked as OK, the text "Test Printout" will be printed on the page as a watermark. This is to avoid this print-out being confused with the final version, which you will print after marking the record as OK and saving.
- When you print a record that you have already printed, the text "Copy" will be printed on the page as a watermark.
- When you print a record that you have invalidated, the text "Invalidated" will be printed on the page as a watermark.
Use this option if you want to turn off the watermark feature (but note that you cannot turn off the "Invalidated" watermark).
- The following forms have the watermark feature:
- Bar Tab
- "Test Printout", "Copy" and "Invalidated"
- Cash Note
- "Test Printout", "Copy" and "Invalidated"
- Credit Note
- "Test Printout", "Copy" and "Invalidated"
- Customer Letter
- "Test Printout"
- Delivery Note
- "Copy"
- Interest Invoice
- "Test Printout", "Copy" and "Invalidated"
- Invoice
- "Test Printout", "Copy" and "Invalidated"
- Payment Forms
- "Test Printout"
- POS Invoice
- "Test Printout", "Copy" and "Invalidated"
- Production Order
- "Test Printout"
- Proforma Invoice
- "Test Printout" (this watermark cannot be switched off)
- Project Invoice
- "Test Printout", "Copy" and "Invalidated"
- Receipt Forms
- "Test Printout" and "Copy"
- Stock Movement
- "Copy"
- VAT Correction S/L
- "Test Printout" and "Copy"
- There is no need for a restart after changing this option.
- When you print a record that has not been marked as OK, the text "Test Printout" will be printed on the page as a watermark. This is to avoid this print-out being confused with the final version, which you will print after marking the record as OK and saving.
- Allow Negative Quantities on Invoices
- When entering Invoices, it will usually not be possible to use negative quantities in any row. Select this option if you would like negative quantities to be allowed. This can be useful to facilitate returns in a retail environment.
- Be careful using this option in Invoices that Update Stock. If the Quantity in an Invoice row is negative, the Item in that row will be received into stock, at a cost determined by its Cost Model. If the Cost Model is Queued the cost will always be zero, and if the Cost Model is Weighted Average the cost will be zero if you currently have no units in stock. Please refer here for more details about Cost Models. The Allow Negative Quantities on Invoices option does not allow negative quantities to be used with Serial Numbered Items.
- There is no need for a restart after changing this option.
- Be careful using this option in Invoices that Update Stock. If the Quantity in an Invoice row is negative, the Item in that row will be received into stock, at a cost determined by its Cost Model. If the Cost Model is Queued the cost will always be zero, and if the Cost Model is Weighted Average the cost will be zero if you currently have no units in stock. Please refer here for more details about Cost Models. The Allow Negative Quantities on Invoices option does not allow negative quantities to be used with Serial Numbered Items.
Settings in the System module:
- Access Groups
- Active Users
- Auto Actions
- Bank Holidays
- Base Currency
- Base Currency Rates
- Cloud Security
- Company Date and Numeric Format
- Company Info
- Configuration
- Conversions - Master, Conversions - Accounts and VAT Code
- Conversions - Master, Conversions - Activity Types
- Conversions - Master, Conversions - Contact Classifications
- Conversions - Master, Conversions - Contacts
- Conversions - Master, Conversions - Currency Codes
- Conversions - Master, Conversions - Items
- Conversions - Master, Conversions - Locations
- Conversions - Master
- Conversions - Master, Conversions - Suppliers
- Conversions - Master, Conversions - Tags/Objects
- Conversions - Master, Conversions - Users
- Countries
- Countries Regions
- Currency Round Off
- Days and Months
- Departments
- Discount Options
- Display Groups
- Exchange Rates Settings
- Form Settings
- Global Warnings on UnOKed Records
- Internet Enablers
- Journaling
- KPIs
- Languages
- Locking
- Locking Exceptions
- Nature of Business
- Number Series Defaults
- Opened Windows History
- Optional Features, including:
- 'Options' card
- 'Unsupported' card
- 'Security' card
- 'Performance' card
- 'Options' card
- Password Security
- Printers
- Reporting Periods
- Round Off
- Sales Groups
- Single Functions
- Special Days
- Styles
- Sub-Ledger Control Accounts
- Task Manager Access
- User Warnings on UnOKed Records
- Values in Text
- VAT Reg. Number Masks
- Weeks
- Home page for System Module manual
- Home page for Standard ERP manual
Optional Features - Security Card
This page describes the fields on the 'Security' card in the Optional Features setting. Please follow the links below for descriptions of the other cards:- Introduction
- 'Options' card
- 'Unsupported' card
- 'Security' card
- 'Performance' card
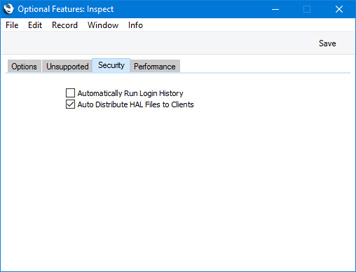
- Auto Distribute HAL Files to Clients
- If you are using HAL to add bespoke features or windows to your Standard ERP system, you will need the HAL files to reside both on the server and on all client machines. An easy way to manage the distribution of these files to the client machines is to use the HAL Rules setting in the Technics module. When a user logs in from a client machine, the server will check that the correct HAL files are present on the client machine and that those files are the latest versions. If there is any discrepancy, the latest HAL files will be copied to the client machine as part of the log-in process. If you would like to use this feature, you should configure the HAL Rules setting, and you should select this option.
- If you change this option, it will not take effect until you restart the server.
Settings in the System module:
- Access Groups
- Active Users
- Auto Actions
- Bank Holidays
- Base Currency
- Base Currency Rates
- Cloud Security
- Company Date and Numeric Format
- Company Info
- Configuration
- Conversions - Master, Conversions - Accounts and VAT Code
- Conversions - Master, Conversions - Activity Types
- Conversions - Master, Conversions - Contact Classifications
- Conversions - Master, Conversions - Contacts
- Conversions - Master, Conversions - Currency Codes
- Conversions - Master, Conversions - Items
- Conversions - Master, Conversions - Locations
- Conversions - Master
- Conversions - Master, Conversions - Suppliers
- Conversions - Master, Conversions - Tags/Objects
- Conversions - Master, Conversions - Users
- Countries
- Countries Regions
- Currency Round Off
- Days and Months
- Departments
- Discount Options
- Display Groups
- Exchange Rates Settings
- Form Settings
- Global Warnings on UnOKed Records
- Internet Enablers
- Journaling
- KPIs
- Languages
- Locking
- Locking Exceptions
- Nature of Business
- Number Series Defaults
- Opened Windows History
- Optional Features, including:
- 'Options' card
- 'Unsupported' card
- 'Security' card
- 'Performance' card
- 'Options' card
- Password Security
- Printers
- Reporting Periods
- Round Off
- Sales Groups
- Single Functions
- Special Days
- Styles
- Sub-Ledger Control Accounts
- Task Manager Access
- User Warnings on UnOKed Records
- Values in Text
- VAT Reg. Number Masks
- Weeks
- Home page for System Module manual
- Home page for Standard ERP manual
Optional Features - Performance Card
This page describes the fields on the 'Performance' card in the Optional Features setting. Please follow the links below for descriptions of the other cards:- Introduction
- 'Options' card
- 'Unsupported' card
- 'Security' card
- 'Performance' card
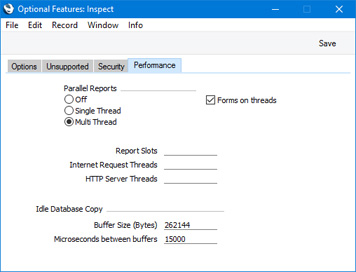
- Parallel Reports, Report Slots
- The Parallel Reports options and the Report Slots field allow you to move the production of reports away from the main processing thread in the server to their own dedicated threads. Please refer to the Reports page for details.
- If you change this option, it will not take effect until you restart the server.
- If you change this option, it will not take effect until you restart the server.
- Forms on threads
- In multi-user systems, a user printing many forms may cause performance to suffer for the other users. In this situation, you can use the Forms on Threads option to move the printing of forms away from the main processing thread in the server to their own dedicated threads. This will help optimise performance for all users. Please refer to the Forms page for details.
- If you change this option, it will not take effect until you restart the server.
- If you change this option, it will not take effect until you restart the server.
- Internet Request Threads
- This field governs the number of parallel Cloud Service requests that can be made. By default (i.e. if this field is empty), up to three parallel Cloud Service requests can be made. Usually there will be no need to change this value, but you can do so this by entering a number between one and 100 here.
- If you change this value, it will not take effect until you restart the server.
- If you change this value, it will not take effect until you restart the server.
- HTTP Server Threads
- If you are using the Standard ERP Web Shop, use this field to specify how many parallel web shop requests can be made to the server (i.e. how many dedicated threads will be used to handle these requests). It is usually recommended that you set this to a number between three and ten. The default is zero, so web shop requests will be handled by the main thread in the server.
- Idle Database Copy
- If you are using the Continuous Database Copy feature, you can use these fields to control the database copy speed. Please refer to the Database Duplication page for details.
Settings in the System module:
- Access Groups
- Active Users
- Auto Actions
- Bank Holidays
- Base Currency
- Base Currency Rates
- Cloud Security
- Company Date and Numeric Format
- Company Info
- Configuration
- Conversions - Master, Conversions - Accounts and VAT Code
- Conversions - Master, Conversions - Activity Types
- Conversions - Master, Conversions - Contact Classifications
- Conversions - Master, Conversions - Contacts
- Conversions - Master, Conversions - Currency Codes
- Conversions - Master, Conversions - Items
- Conversions - Master, Conversions - Locations
- Conversions - Master
- Conversions - Master, Conversions - Suppliers
- Conversions - Master, Conversions - Tags/Objects
- Conversions - Master, Conversions - Users
- Countries
- Countries Regions
- Currency Round Off
- Days and Months
- Departments
- Discount Options
- Display Groups
- Exchange Rates Settings
- Form Settings
- Global Warnings on UnOKed Records
- Internet Enablers
- Journaling
- KPIs
- Languages
- Locking
- Locking Exceptions
- Nature of Business
- Number Series Defaults
- Opened Windows History
- Optional Features, including:
- 'Options' card
- 'Unsupported' card
- 'Security' card
- 'Performance' card
- 'Options' card
- Password Security
- Printers
- Reporting Periods
- Round Off
- Sales Groups
- Single Functions
- Special Days
- Styles
- Sub-Ledger Control Accounts
- Task Manager Access
- User Warnings on UnOKed Records
- Values in Text
- VAT Reg. Number Masks
- Weeks
- Home page for System Module manual
- Home page for Standard ERP manual
Page Setup
This page describes the Page Setup setting in the System module.---
The Page Setup setting in the System module allows you to specify how page setups for forms will be saved. Please refer to the Page Setup page for more details about page setups for forms.
- Store one for All Users
- Select the Store one for All Users option if you need there to be a universal page setup for each form. This universal page setup will be used by all users.
- If you do not select this option, each user will be able to save their own page setup for each form. Each user that will print a particular form will therefore need to set their own page setup for that form.
- In both cases, the page setup for a particular form is platform-specific. So, if you are not using the Store one for All Users option and if a user is likely to print a particular document on more than one platform (for example, from Windows and macOS machines), that user should set separate page setups for each platform (from a machine of each type). If you are using the Store one for All Users option, there will be a universal page setup for Windows users and one for macOS users.
- If you do not select this option, each user will be able to save their own page setup for each form. Each user that will print a particular form will therefore need to set their own page setup for that form.
Go back to:
- Home page for Settings in the System module
- Home page for System Module manual
- Home page for Standard ERP manual
Password Security
This setting allows you to set rules for passwords. These rules will apply to the passwords assigned to each Person record (allowing users to log in to your Hansa system) and to each Customer record (allowing Customers to log in to your Web Shop).To open the Password Security setting, double-click on 'Password Security' in the 'Settings' list in the System module. The 'Password Security: Inspect' window is opened:
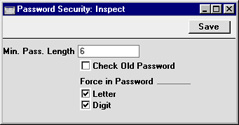
Print Conditions
Print Conditions allow you to specify that particular elements will be printed on Form Templates only if particular conditions are met. Please refer to the Conditional Printing of Elements page for details.---
Go back to:
- Home page for Settings in the System module
- Home page for System Module manual
- Home page for Standard ERP manual
Printers
This setting is associated with the use of printers other than the primary printer selected in the Windows Control Panel or the Macintosh Chooser. The Printers setting lets you redirect the printer output to a different printer.This is practical if for instance you want to print reports to a laser printer and documents, e.g. invoices, to a dot matrix printer using pre-printed continuous stationery.
The printers defined here are used when printing documents. Reports are always printed to the printer specified in the first row of this setting. If this setting is configured as recommended below, this will be the printer selected in the Control Panel (Windows) or the Chooser (Macintosh). Windows users can direct reports to specific printers by opening a list of reports, highlighting one in the list, selecting 'Page Setup' from the File menu and selecting a printer there.
Double-clicking 'Printers' in the 'Settings' list in the System module opens the 'Printers: Inspect' window listing the Printers that have already been entered. To add a new Printer, simply enter its details on the first blank line and click [Save] to save and close. Click the close box to close without saving changes.

The Printer described in the first row should be the one that you wish to be used as a default printer: it will be used if no Printer has been specified for use with a particular document. It is recommended that this row be left blank (apart from the Code) as in the illustration, signifying that the Printer selected in the Control Panel (Windows) or Chooser (Macintosh) will be the default Printer.
For each available printer, the fields should be completed as outlined below:
- Code
- Enter here an arbitrary name for the printer. When defining documents, this Code will be used to determine which printer will be used to print them out (see example).
- Print Server IP & Port
- Enter here the full network IP address of the computer to which the printer is attached. If the printer is attached to a printer server, that server must be switched on and Hansa must be running.
- In the example illustrated, the Printer known to Hansa as "PSERVER" is attached to a print server whose IP address is 192.20.20.20, while the "ACCT" Printer is attached to a computer with the IP address of 192.20.20.22. The "DEFAULT" printer has a blank IP address, signifying that the printer is attached to your own computer: the first row of the Printers setting should always have a blank IP address.
- The IP address of a particular computer can be obtained from the appropriate communications Control Panel.
- The Hansa print server facility and the third column of the grid are described here.
- In the example illustrated, the Printer known to Hansa as "PSERVER" is attached to a print server whose IP address is 192.20.20.20, while the "ACCT" Printer is attached to a computer with the IP address of 192.20.20.22. The "DEFAULT" printer has a blank IP address, signifying that the printer is attached to your own computer: the first row of the Printers setting should always have a blank IP address.
- Hardw. Port
- Enter here the port of the computer named in the previous field to which the printer is attached. The following values can be used:
- Blank or P
- Leaving the Port blank (or entering "P") will cause the default printer of the specified computer to be used (i.e. that which has been selected in the Control Panel or Chooser). In this case, the built-in printer drivers will be used.
- LPT1 - LPT5
- To print directly to a parallel port of the Windows machine whose IP address appears in the Print Server field, enter the port number here (between LPT1 and LPT5). The built in Windows printer driver will be bypassed.
- COM1 - COM5
- To print directly to a serial port of the Windows machine whose IP address appears in the Print Server IP field, enter the port number here (between COM1 and COM5). The built in Windows printer driver will be bypassed.
- In some Windows NT4 installations, the serial port entry can be case sensitive. An entry of "com1" can sometimes be successful where "COM1" fails.
- In some Windows NT4 installations, the serial port entry can be case sensitive. An entry of "com1" can sometimes be successful where "COM1" fails.
- LP0 - LP3
- To print directly to a parallel port of the Linux machine whose IP address appears in the Print Server field, enter the port number here (between LP0 and LP3).
- 1 or 5
- To print directly to the printer port of the Macintosh whose IP address appears in the Print Server IP field, enter "1" or "5" here. Use "1" if the printer communicates at 9.6kbps (standard) or "5" if it communicates at 57kbps. The built in Macintosh printer driver will be bypassed.
- F
- This signifies that the machine whose IP address appears in the Print Server IP field is a Fax Server. In the third column of the grid, enter the port number of the Hansa Fax Server. This should be the port specified in the Print Server Port field in the Program Mode register on the Hansa Fax Server.
- In all cases when a Port is indicated, Hansa will only send variable data for a document through the port. All text items and formatting information will be lost, but the physical positioning on the page is preserved. It is thus assumed that pre-printed stationery is being used.
- Note that if you have a printer installed (using a driver in the Control Panel or Chooser) but are printing directly to the serial/parallel port, the driver can interfere with the direct printing from Hansa. If you have problems try to deinstall the printer drivers.
- Blank or P
Printers - Defining when Printers are to be used
Hansa's documents are user-definable, a process which can include specifying which printer is to be used for a specific document. For example, you may wish to print a document to a specific printer that you know will always contain the correct stationery. The following example will use the Invoice Definition window to illustrate the process, but the procedure can be followed for any of Hansa's user-definable documents.Having entered all available printers in the Printers setting as described here, move to the Sales Ledger and click the [Documents] button in the Master Control panel or select 'Documents' from the File menu. Highlight 'Invoices' in the 'Documents' list window and select 'Define Document' from the Operations menu.
The following window opens:
The "FAKTURA" and "INVOICE" Forms are designed using the Form register described here.
If the Printer field is blank in any row in the 'Define Document' window, the first record in the Printers setting will be used.
Printers - Setting up a Print Server
In some larger installations it can be useful to set up a print server to look after the printing of documents. Hansa can be configured to act as a print server. It periodically interrogates the data server for print jobs. When a user prints a document, it is held on the data server until the next interrogation by the print server. It is then taken from the data server by the print server. The data server is therefore made available for the next data processing task more quickly while the print server looks after communications with the printer.The copy of Hansa that acts as the print server should be on its own dedicated machine (i.e. not on the same machine as the data server or any of the clients). Up to six printers can be attached to this machine. Because the print server is on a separate machine, it must be backed up separately.
To configure the Hansa print server, follow these steps:
- Create a new database on the machine that is to act as your dedicated print server following the instructions on the Creating a New Database page. Only one Company is necessary: specify a suitable name such as "Hansa Print Server".
- Using the Modules menu, change to the System module and open the System Usage setting. Ensure that the Server box on card 1 is checked. This may result in you needing to apply for a new database key for the print server database.
- Select 'Technics' from the Modules menu and click the [Prog Mode] button in the bottom left-hand corner of the screen (or select 'Program Mode' from the Registers menu).
- Complete the 'Server' and 'Print Server' cards of this setting as follows:
Server Card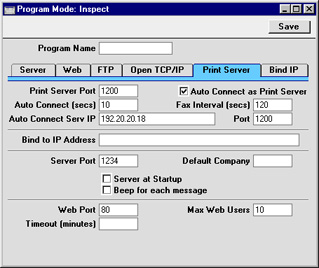
- Server Port
- Enter an arbitrary four-digit code to identify the database. Even though the sole purpose of this database is to act as a print server and so no clients will be logging on, a Server Port number is still required to activate TCP/IP. The Port specified here must be unique (i.e. it must be different to the Server Port specified in the data server).
- Print Server Port
- Enter the Server Port specified in the Program Mode register on the data server. This is used to enable the print server to locate the correct copy of Hansa on the server. If you are using the Hansa parallel server facility, enter the Server Port from the distributor.
- A consequence of this field is that if you have more than one data server machine (with different databases), you will need a separate print server for each one.
- A consequence of this field is that if you have more than one data server machine (with different databases), you will need a separate print server for each one.
- Auto Connect Serv IP
- Specify here the IP address of the data server machine. This can be obtained from the TCP/IP control software on the server and is used to enable the print server to locate the correct data server on the network. If you are using the Hansa parallel server facility, enter the IP address of the distributor.
- Auto Connect Time (secs)
- The print server periodically interrogates the data server for print jobs. Specify here in seconds how often it should do this (10 is the recommended figure).
- Fax Interval (secs)
- This field is used for fax servers only. Please refer to the Setting up a Fax Server page for details.
- Port
- This field should be the same as the Print Server Port above.
- Auto Connect as Print Server
- This box must be checked on the print server to ensure it checks the data server for print jobs every so often.
- Server Port
- Once the 'Server' and 'Print Server' cards of this register are complete, click the [Save] button in the Button Bar to save. If you have entered any Port numbers for the first time (or changed the ones that were already there), quit Hansa and restart to allow the changes to take effect.
- If you have used the Timed Operations setting in the Technics module on the main data server to ensure it creates a daily back-up file or to specify that it starts up and shuts down automatically, you should use the same setting on the print server to shut it down during this time. The print server interrogates the data server periodically: it will not get a response when the data server is backing itself up or is shut down.
If you have used the Timed Operations setting on the main data server to create a daily back-up file (i.e. you have entered an Operation Time, checked the backup box and specified a Backup Path), the Database Closing Time on the print server should be set to three minutes before the Operation Time on the data server. The Database Opening Time on the print server should be a few minutes after the back-up process on the data server has finished.
If you have used the Timed Operations setting on the main data server to shut it down during the night, perhaps to allow third-party back-up software to operate (i.e. you have entered Database Opening and Closing Times), the Database Closing Time on the print server should be set to three minutes before the Database Closing Time on the data server. The Database Opening Time on the print server should be a few minutes after the Database Opening Time on the data server.
In both cases, the Database Opening Time on the print server should be before the time when users begin logging in to the data server.
- The final task is to select 'Server' or 'External Gateway' from the Modules menu. The 'Server Status' screen appears. The print server can now be left alone. 'External Gateway' is recommended as you can change from there to the Technics module to check settings etc when necessary. If you do this, return to the External Gateway module when you've finished, to prevent messages appearing that will stop the program running. In the Server and External Gateway, these messages will be written to the log file and will not appear on screen.
- Changing to the data server (or to one of the clients with access to the System module), the Printers setting should now be configured to make the print server available. If you choose to do this work on the server and it is running, ensure no other user is logged in, select 'Quit, remove autoserver' from the File menu and restart Hansa. You will then be able to change the Printers setting. If your server does not have a graphical interface, you will need to change the Printers setting from a client machine.
The first row of this setting should be blank (apart from the Code) as in the illustration, signifying that the Printer selected in the Control Panel (Windows) or Chooser (Macintosh) will be the default Printer.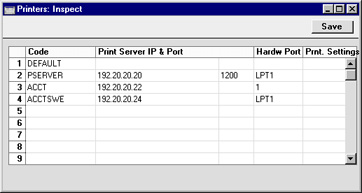
In the illustration, the print server has been entered on the second row. The IP address of the print server machine has been entered in the Print Server IP field and the Port field shows the same number that was entered to the Print Server Port field in the Program Mode register on the print server (step 4 above). Use the Hardware Port to instruct the print server which printer is to be used. If several printers have been attached to the print server, you should enter separate rows in this setting with appropriate Hardware Ports to allow documents to be printed on the correct printer.
When the Printers setting is complete, save it by clicking the [Save] button in the Button Bar.
- Finally, following the instructions on the Defining when Printers are to be used page, go to the 'Define Document' window for each document that is to be printed through the print server and specify the print server in the Printer field.
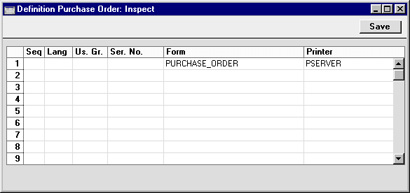
Printers - Setting up a Fax Server
In some larger installations it can be useful to set up a fax server to fax documents to their recipients. Hansa can be configured to act as a fax server. In the same manner as the print server, it periodically interrogates the data server for fax jobs. When a user prints a document that is to be sent by fax, it is held on the data server until the next interrogation by the fax server. It is then taken from the data server by the fax server. The data server is therefore made available for the next data processing task more quickly while the fax server looks after communications with the recipient's fax machine.The copy of Hansa that acts as the fax server should be on its own dedicated machine (i.e. not on the same machine as the data server or any of the clients) although it can be the copy of Hansa that is being used as the print server. If so, remember that there may be a delay in printing if a document is being faxed. The machine must be a Macintosh containing or connected to a fax modem and with a fixed IP address. The operating system should be OS 9. Because it is on a separate machine, the fax server must be backed up separately.
To configure the Hansa fax server, follow these steps:
- Create a new database on the machine that is to act as your dedicated fax server following the instructions on the Creating a New Database page. Only one Company is necessary: specify a suitable name such as "Hansa Fax Server".
- Using the Modules menu, change to the System module and open the System Usage setting. Ensure that the Server box on card 1 and the Fax box on card 5 are both checked. This may result in you needing to apply for a new database key for the fax server database.
- Select 'Technics' from the Modules menu and click the [Prog Mode] button in the bottom left-hand corner of the screen (or select 'Program Mode' from the Registers menu).
- Complete the 'Server' and 'Print Server' cards of this setting in the same manner as described for the print server. The Fax Interval is the time in seconds that the fax server should wait between faxes. The fax server is fully occupied when it is sending a fax and can't be used, so there needs to be an interval time to allow you to check the fax queue between faxes if necessary. If you leave the Fax Interval field blank, the interval will be 30 seconds.
Click the [Save] button in the Button Bar to save. If you have entered any Port numbers for the first time (or changed the ones that were already there), quit Hansa and restart to allow the changes to take effect.
If you have already set up your print server and want it to be the fax server as well, there is no need to do this step.
- Staying in the Technics module, open the Fax Settings setting:
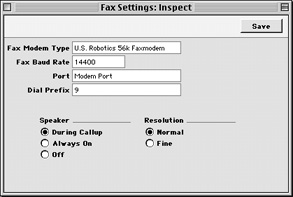
- Fax Modem Type
- Paste Special
Choices of possible entries
- Specify here the type of fax modem that is connected to your fax server machine. If your fax modem is not listed in the 'Paste Special' list, please contact your local Hansa representatives, although "US Robotics 56K"can be used for the majority of modems.
- Fax Baud Rate
- Paste Special
Choices of possible entries
- Enter the speed of your fax modem in bps here.
- Port
- Paste Special
Choices of possible entries
- Specify here the hardware port used for communication between the fax server computer and the modem.
- Dial Prefix
- If the modem needs to dial a number (e.g. to get an outside line) before the fax number itself, enter that number here.
- Speaker
- Click an option to choose when you want to hear sound from the modem.
- Resolution
- Click an option to choose the resolution of faxed documents.
- Fax Modem Type
- If you have used the Timed Operations setting in the Technics module on the main data server to ensure it creates a daily back-up file or to specify that it starts up and shuts down automatically, you should use the same setting on the fax server to shut it down during this time. The fax server interrogates the data server periodically: it will not get a response when the data server is backing itself up or is shut down.
If you have used the Timed Operations setting on the main data server to create a daily back-up file (i.e. you have entered an Operation Time, checked the backup box and specified a Backup Path), the Database Closing Time on the fax server should be set to three minutes before the Operation Time on the data server. The Database Opening Time on the fax server should be a few minutes after the back-up process on the data server has finished.
If you have used the Timed Operations setting on the main data server to shut it down during the night, perhaps to allow third-party back-up software to operate (i.e. you have entered Database Opening and Closing Times), the Database Closing Time on the fax server should be set to three minutes before the Database Closing Time on the data server. The Database Opening Time on the fax server should be a few minutes after the Database Opening Time on the data server.
In both cases, the Database Opening Time on the fax server should be before the time when users begin logging in to the data server.
- The final task is to select 'Server' from the Modules menu. The 'Server Status' screen appears. The fax server can now be left alone. 'External Gateway' is recommended as you can change from there to the Technics module to check the fax queue when necessary. If you do this, return to the External Gateway module when you've finished, to prevent messages appearing that will stop the program running. In the Server and External Gateway, these messages will be written to the log file and will not appear on screen.
- Changing to the data server (or to one of the clients with access to the System module), open the System Usage setting in the System module and ensure that the Fax box on card 5 is checked. This may result in you needing to apply for a new database key for the main database. If you choose to do this work on the server and it is running, ensure no other user is logged in, select 'Quit, remove autoserver' from the File menu and restart Hansa. You will then be able to change the System Usage setting. If your server does not have a graphical interface, you will need to change the System Usage and Printers (step 9 below) settings from a client machine.
- The Printers setting should now be configured to make the fax server available.
The first row of this setting should be blank (apart from the Code) as in the illustration, signifying that the Printer selected in the Control Panel (Windows) or Chooser (Macintosh) will be the default Printer.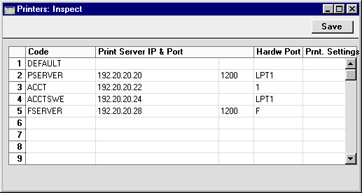
In the illustration, the fax server has been entered on the bottom row. The IP address of the fax server machine has been entered in the Print Server IP field and the Port field shows the same number that was entered to the Print Server Port field in the Program Mode register on the fax server (step 4 above). The Hardware Port has been set to "F", to instruct the fax server that the fax modem is to be used. Separate machines are being used as the fax and print servers.
When the Printers setting is complete, save it by clicking the [Save] button in the Button Bar.
- Finally, following the instructions on the Defining when Printers are to be used page, go to the 'Define Document' window for each document that is to be printed through the fax server and specify the fax server in the Printer field.
In the example illustration, it has been determined that Purchase Orders will first be printed on the print server (providing a hard copy for checking and filing) and then on the fax server. The fax number will be taken from the appropriate Supplier record. Note that because the same document is being printed twice, the Seq. field has been used to specify the order of printing.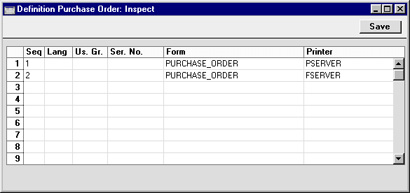
Note that any pictures included in the Form (i.e. PICT and EPS files on Macintosh, BMP in Windows) will not be faxed.
Note too that fax numbers should not contain spaces, dashes or other non-numeric characters if you will be sending faxes through the fax server. These characters can be removed using the 'Update Fax Numbers' Maintenance function.
When a user prints a document that is to be sent by fax, it is held on the data server until the next interrogation by the fax server. It is then taken from the data server by the fax server, where it is placed in a queue. You can view this queue on the fax server machine by opening the Fax Queue register in the Technics module.
The Fax Queue register has the following features:
- Invoices and Quotations are placed in the Queue with a higher priority than Customer Letters.
- Successful faxes will be deleted from the Queue automatically.
- If a fax is not sent the first time, two more attempts will be made to send it. If it is still unsuccessful, it will not be deleted from the Queue, from where you can delete it or try sending it again. The Failed column in the 'Fax Queue: Browse' window will show how many attempts have been made to send a particular fax.
- To try sending an unsuccessful fax again, open it from the 'Fax Queue: Browse' window and choose 'Retry Fax' from the Operations menu. You can change the Fax Number before selecting this function. If you want three more attempts to be made to send the fax, set the number of Tries back to zero and save. To try sending all unsuccessful faxes again, choose 'Retry All' from the Operations menu of the 'Fax Queue: Browse' window.
- To pause all fax activity, select 'Add Pause Fax Job' from the Operations menu of the 'Fax Queue: Browse' window. A dummy record is added to the head of the Fax Queue. No faxes will be sent until you delete this record. The fax server is fully occupied when it is sending faxes and can't be used, so you should use this feature if you need to work on the fax server machine (e.g. you need to check the contents of the Fax Queue).
- To remove a fax from the Queue, open it from the 'Fax Queue: Browse' window and choose 'Remove Fax Job' from the Operations menu. To remove all faxes from the Queue, choose 'Remove All Fax Jobs' from the Operations menu of the 'Fax Queue: Browse' window.
Remote Backups
Please refer to the Remote Back-ups page for full details about this setting.---
Go back to:
- Home page for Settings in the System module
- Home page for System Module manual
- Home page for Standard ERP manual
Reporting Periods
This setting allows you to name and define certain time periods. These should be the periods that you will commonly use when producing reports: using 'Paste Special' from the Period field of a report specification window will bring up a list of the Report Periods entered using this setting. For example, if you want to produce monthly reports you should define each month in the setting.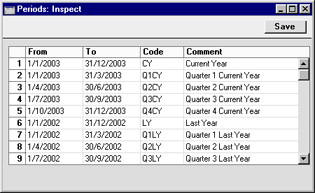
To enter a new Reporting Period, simply click in the first blank line and enter details as appropriate. Click [Save] to save and close, or the close box to close without saving changes.
Note that the Reporting Period in the first row of this setting will be offered as a default wherever a Reporting Period is required. You might therefore like to change the first row from time to time so that a useful option is always offered as a default. To delete the old first row once it is no longer useful, click on the row number and press the Backspace key. To insert a new record on the first row, click on the row number and press the Return key.
Round Off
This page describes the Round Off setting in the System module.---
Use the Round Off setting to control how different figures will be rounded.
Rounding throughout the system. When you enter a Sub System record (i.e. a record that will eventually post to the Nominal Ledger, such as an Invoice or Purchase Invoice), several figures in that record will be subject to the rounding process. When you then mark the record as OK and save, causing a Nominal Ledger Transaction to be created automatically, any amounts lost or gained due to the rounding process will be posted to the Round Off Gain or Round Off Loss Accounts specified in the Account Usage S/L setting. These Accounts will be used in Transactions generated from all Sub System records (e.g. in Transactions generated from both Sales and Purchase Invoices).
There are two settings that control rounding: this one, and the Currency Round Off setting, also in the System module. When you enter a Sub System record, rounding rules will be taken from the row in the Currency Round Off setting for the Currency/Payment Term/Register combination. If there is no row in the Currency Round Off setting for that combination, rounding rules will be taken from this setting. The Currency Round Off setting only affects rounding for VAT, row sums and totals.
To open the Round Off setting, ensure you are in the System module using the [Module] button in the Master Control panel and click the [Settings] button, also in the Master Control panel. The 'Settings' list opens: double-click 'Round Off'. When the 'Round Off: Inspect' window opens, enter your requirements for the rounding process as necessary. Click [Save] to save and close, or the close box to close without saving changes.
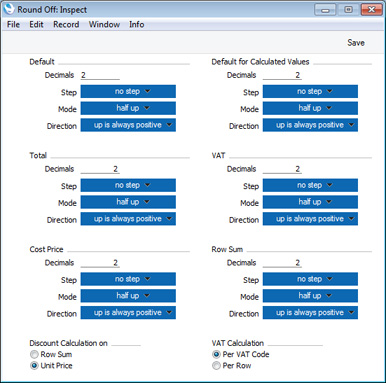
- Decimals
- Specify the number of decimal places that you need. Example values are:
- 2
- Rounds to two decimal places.
- 1
- Rounds to one decimal place.
- 0
- Rounds to the nearest whole number.
- -1
- Rounds to the nearest 10.
- -2
- Rounds to the nearest 100.
- 2
- Step
- Choose an option from the Step pop-up to specify the rounding increment, as follows:
- no step
- A rounding increment of 1 will be used. For example, if you are rounding to two decimal places, values after rounding will follow the sequence 0.00, 0.01, 0.02, 0.03 and so on. 0.023 will be rounded to 0.02 using this option.
- 5
- A rounding increment of 5 will be used. For example, if you are rounding to two decimal places, values after rounding will follow the sequence 0.00, 0.05, 0.10, 0.15 and so on. 0.023 will be rounded to 0.00 using this option.
- 2.5
- A rounding increment of 2.5 will be used. For example, if you are rounding to two decimal places, values after rounding will follow the sequence 0.00, 0.025, 0.05, 0.075 and so on. 0.023 will be rounded to 0.025 using this option. Note that this option will sometimes result in one extra decimal place than specified being used.
- no step
- Mode
- Choose an option from the Mode pop-up to specify how 0.5 will be rounded. The options are:
- half up
- 0.5 will be rounded up to 1.0 when rounding to zero decimal places.
- half down
- 0.5 will be rounded down to 0.0 when rounding to zero decimal places.
- to even
- 0.5 will be rounded to the nearest even whole number. For example, when rounding to zero decimal places, 1.5 will be rounded to 2, 2.5 will be rounded to 2, 3.5 will be rounded to 4.
- to odd
- 0.5 will be rounded to the nearest odd whole number. For example, when rounding to zero decimal places, 1.5 will be rounded to 1, 2.5 will be rounded to 3, 3.5 will be rounded to 3.
- truncate
- Rounding will be carried out by removing decimals. For example, 1.999 will be rounded to 1.99 (when rounding to two decimal places), to 1.9 (one decimal place) or to 1 (zero decimal places).
- half up
- Direction
- The Direction will only be used if the Mode is "half up" or "half down". It specifies what "up" and "down" mean for negative numbers.
- up is always positive
- If the Mode is “half up”,-1.5 will be rounded up to -1, +1.5 will be rounded up to 2.
- If the Mode is “half down”, -1.5 will be rounded down to -2, +1.5 will be rounded down to 1.
- If the Mode is “half down”, -1.5 will be rounded down to -2, +1.5 will be rounded down to 1.
- up is away from zero
- If the Mode is “half up”, -1.5 will be rounded up to -2, +1.5 will be rounded up to 2.
- If the Mode is “half down”, -1.5 will be rounded down to -1, +1.5 will be rounded down to 1.
- This option will ensure a negative record will completely cancel a positive one.
- If the Mode is “half down”, -1.5 will be rounded down to -1, +1.5 will be rounded down to 1.
- up is always positive
- Default
- The Default section has the following effects:
- It controls the number of decimals that will be displayed in Price fields and in fields with calculated values (e.g. Sum). For example, if the Default number of decimals is 4, four decimals will always be displayed. So, a value of 1 will be displayed as 1.0000, and 1.25 will be displayed as 1.2500.
- It sets the maximum number of decimals that can be used anywhere in this setting (except the Cost Price section). For example, if the Default number of decimals is 4, the Row Sum will be rounded to four decimal places, even if you specified in the relevant section of this setting that it should be rounded to six.
- The Quantity field in all matrices will not follow the number of decimal places specified here. This field can support up to three decimal places. For example, if you enter "1", "1" will be displayed in the field, if you enter "1.123", "1.123" will be displayed in the field, and so on. If you enter "1.1234", then it will be rounded to three decimal places following the Default rules for Step, Mode and Direction.
- The Unit Price field in all matrices can also support up to three decimal places, and will always display a minimum of two (even if the Default number of decimals is less than two). For example, if you enter "1", "1.00" will be displayed in the field, if you enter "1.123", "1.123" will be displayed in the field, and so on. If you enter "1.1234", then it will be rounded to three decimal places following the Default rules for Step, Mode and Direction. If the Default number of decimals is greater than three, then the appropriate number of trailing zeros will be added to the figures. For example, if the Default number of decimals is five and you enter "1.12", "1.12000" will be displayed.
- It controls the number of decimals that will be displayed in Price fields and in fields with calculated values (e.g. Sum). For example, if the Default number of decimals is 4, four decimals will always be displayed. So, a value of 1 will be displayed as 1.0000, and 1.25 will be displayed as 1.2500.
- Default for Calculated Values
- This section controls the rounding of calculated figures not mentioned elsewhere in this setting (for example, figures resulting from Currency conversions). The number of decimals should not be more than the Default number of decimals specified above.
- Total
- This section controls the rounding of the figures shown in the TOTAL field below all matrices. The number of decimals should not be more than the Default number of decimals specified above.
- VAT
- This section controls the rounding of the VAT calculation in each matrix row (but the figures shown in the VAT field below all matrices are rounded using the Calculated Values section above). The number of decimals should not be more than the Default number of decimals specified above.
- Calc Cost Value
- This section allows you to determine the rounding method to be used when stock values are calculated.
- Whenever the Weighted Average or Queued value of an Item is updated (e.g. when you mark a Goods Receipt as OK and save it), the calculation will use the rounding method specified here. Weighted Average or Queued values will then be shown in the Stock List report and will be used to calculate the values of outgoing stock transactions.
- If you have chosen to have the Cost Prices of your Items updated automatically from Goods Receipts, the updating of Item Cost Prices will also use this rounding method.
- The number of decimals that you specify here can be more than the Default number of decimals specified above.
- The Currency Round Off setting does not contain rounding options for Cost Prices. Therefore, rounding rules for Cost Prices will always be taken from this Round Off setting.
- Whenever the Weighted Average or Queued value of an Item is updated (e.g. when you mark a Goods Receipt as OK and save it), the calculation will use the rounding method specified here. Weighted Average or Queued values will then be shown in the Stock List report and will be used to calculate the values of outgoing stock transactions.
- Row Sum
- These options control the rounding used in the calculation of the figures shown in the Sum field (Qty * Unit Price) in all matrices and consequently in the Subtotal field below matrices as well. The number of decimals should not be more than the Default number of decimals specified above.
- Discount Calculation
- This group of options allows you to determine how discounts are calculated in sales transactions (i.e. in Quotations, Sales and Purchase Orders, Invoices, Contracts, Work Sheets and Project Budgets). In certain circumstances (where there is a very small unit price and a large quantity), the two alternatives can produce different results due to rounding. If you choose the Row Sum option, the discount will be calculated after the multiplication of the unit price and the quantity. If you choose the Unit Price option, the discount will be applied to the unit price before it is multiplied by the quantity.
- For example, you receive an Order for 20,000 items priced at 0.05 with a 25% discount. Using the Row Sum option, the calculated discount is 250:
- 20000 x 0.05 = 1000. 25% of 1000 = 250
- Using the Unit Price option, the calculated discount is 200:
- 25% of 0.05 rounded to two decimal places is 0.01. 0.01 x 20000 is 200
- For example, you receive an Order for 20,000 items priced at 0.05 with a 25% discount. Using the Row Sum option, the calculated discount is 250:
- VAT Calculation
- Specify here how VAT is to be rounded off.
- Per VAT Code
- VAT subtotals will be calculated for each VAT Code used in a transaction. These subtotals will then be rounded as determined in the Currency Round Off setting or using the option chosen above (whichever is appropriate). The subtotals will then be added together to produce the overall VAT total.
- Per Row
- The VAT amount for each individual transaction row will be rounded as determined in the Currency Round Off setting or using the option chosen above (whichever is appropriate). These amounts will then be added together to produce the overall VAT total.
- Note that the transaction row sum will be rounded as determined in the Currency Round Off setting or using the option chosen above (whichever is appropriate) before the VAT calculation is carried out.
- Per VAT Code
Settings in the System module:
- Access Groups
- Active Users
- Auto Actions
- Bank Holidays
- Base Currency
- Base Currency Rates
- Company Date and Numeric Format
- Company Info
- Configuration
- Conversions - Master, Conversions - Accounts and VAT Code
- Conversions - Master, Conversions - Activity Types
- Conversions - Master, Conversions - Contact Classifications
- Conversions - Master, Conversions - Contacts
- Conversions - Master, Conversions - Currency Codes
- Conversions - Master, Conversions - Items
- Conversions - Master, Conversions - Locations
- Conversions - Master
- Conversions - Master, Conversions - Suppliers
- Conversions - Master, Conversions - Objects
- Conversions - Master, Conversions - Users
- Countries
- Countries Regions
- Currency Round Off
- Days and Months
- Departments
- Discount Options
- Display Groups
- Exchange Rates Settings
- Form Settings
- Global Warnings on UnOKed Records
- Internet Enablers
- Journaling
- KPIs
- Languages
- Locking
- Locking Exceptions
- Number Series Defaults
- Opened Windows History
- Optional Features
- Password Security
- Printers
- Reporting Periods
- Round Off
- Sales Groups
- Single Functions
- Special Days
- Styles
- Sub-Ledger Control Accounts
- Task Manager Access
- User Warnings on UnOKed Records
- Values in Text
- VAT Number Masks
- Weeks
- Home page for System Module manual
- Home page for Standard ERP manual
Sales Groups
Sales Groups are used to divide the employees of your company into groups. These groups will be used by the Limited Access module.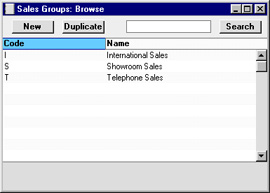
Once you have defined your Sales Groups, you should assign one Group to each Person record, using the Sales Group field on the 'Access' card:
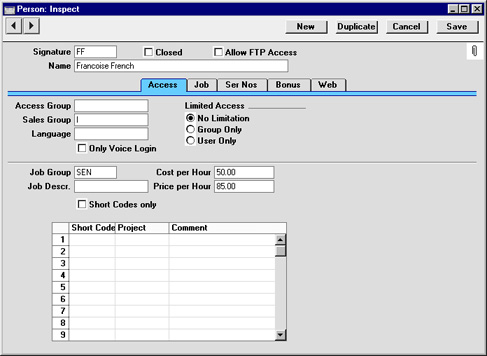
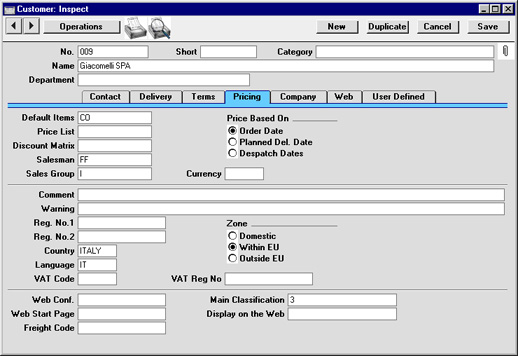
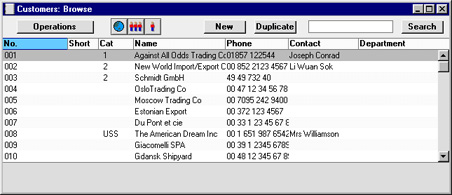

- Lists all records in the register.

- Lists records belonging to members of the same Sales Group as the current user (i.e. records whose Sales Group is the same as that of the current user).

- Lists records belonging to the current user (i.e. records whose Person field contains the initials of the current user).
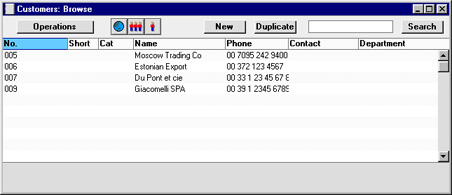
- No Limitation
- The Person will be able to see all the records in the register. They will be able to reduce the list so that it only shows records belonging to members of their Sales Group or their own records, using the buttons described above.
- Group Only
- The Person will only be able to see those records belonging to members of their Sales Group. They will be able to reduce the list to show their own records only.
- User Only
- The Person will only be able to see their own records.
Single Functions
There are two methods that you can use to control the access that your employees have to your Standard ERP database: Access Groups and Single Functions. An employee with an Access Group can be given access to any part of the system, while one belonging to a Single Function (a "Single Function" User) can only be given access to a limited number of Standard ERP functions (up to a maximum of three). "Single Function" Users are therefore much more restricted in what they can do, so they are treated differently for licensing purposes.If you have any Single Function Users, you should use this setting to define the various combinations of functions available to them. For example, you might have some Single Function Users that can only enter Orders, and some that can enter Orders and Quotations. In this case you would enter two records in this setting, one granting access to the Order register only and the other to the Order and Quotation registers. You should then enter the Single Function Users themselves in the Person register as Named Users, specifying the appropriate Single Function for each one using the field on the 'Access' card.
To work with the Single Functions setting, ensure you are in the System module and then open the ‘Settings’ list by clicking the [Settings] button in the Navigation Centre or using the Ctrl-S/⌘-S keyboard shortcut. Double-click 'Single Functions' in the resulting 'Settings' list to open the 'Single Functions: Browse' window. This lists the Single Function records that have already been entered: to enter a new record, select ‘New’ from the Create menu in the Button Bar. The 'Single Function: New' window appears: enter the details as appropriate and click [Save] to save the new record.
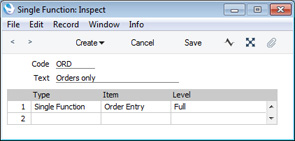
- Code
- Enter the unique Code by which the Single Function record is to be identified from elsewhere in Standard ERP. The Code may consist of up to five characters, and you can use both numbers and letters.
- Text
- Assign a descriptive name to the Single Function record. This will be shown in the 'Single Functions: Browse' window and the 'Paste Special' list.
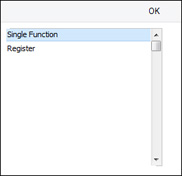
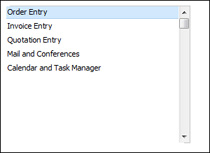
Finally, use the last column to determine the access level of the Group. A further 'Paste Special' list displays the available options:
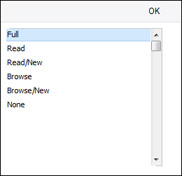
- Browse
- Allows access to the browse and 'Paste Special' windows only. Searches can be performed. Records cannot be entered or modified.
- Browse/New
- Allows access to the browse and 'Paste Special' windows and the creation of new records. Existing records cannot be viewed, changed or copied.
- Read
- Allows access to the browse window and the double-clicking of items so that they can be viewed in an inspect window. Records cannot be entered or modified.
- Read/New
- Allows access to the browse window and the double-clicking of items so that they can be viewed in an inspect window. New records can be created. Existing records cannot be modified, but they can be copied.
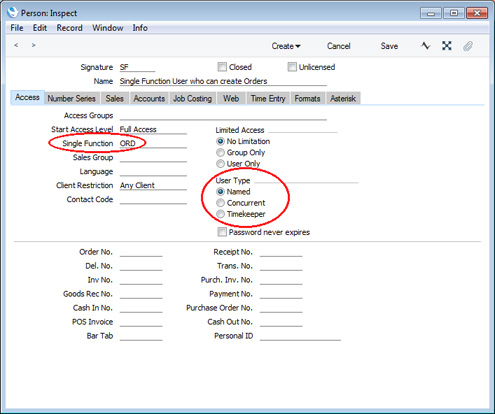
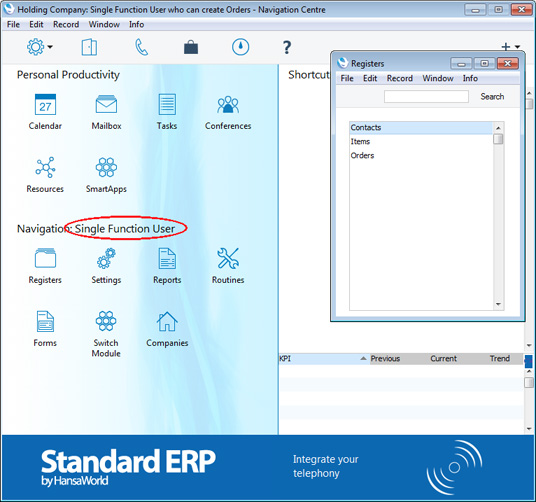
Settings in the System module:
- Access Groups
- Active Users
- Auto Actions
- Base Currency
- Base Currency Rates
- Company Date and Numeric Format
- Company Info
- Configuration
- Conversions - Master, Conversions - Accounts and VAT Code
- Conversions - Master, Conversions - Activity Types
- Conversions - Master, Conversions - Contact Classifications
- Conversions - Master, Conversions - Contacts
- Conversions - Master, Conversions - Currency Codes
- Conversions - Master, Conversions - Items
- Conversions - Master, Conversions - Locations
- Conversions - Master
- Conversions - Master, Conversions - Suppliers
- Conversions - Master, Conversions - Objects
- Conversions - Master, Conversions - Users
- Countries
- Countries Regions
- Currency Round Off
- Days and Months
- Departments
- Discount Options
- Display Groups
- Exchange Rates Settings
- Form Settings
- Global Warnings on UnOKed Records
- Internet Enablers
- Journaling
- KPIs
- Languages
- Locking
- Locking Exceptions
- Number Series Defaults
- Opened Windows History
- Optional Features
- Password Security
- Printers
- Reporting Periods
- Round Off
- Sales Groups
- Single Functions
- Styles
- Sub-Ledger Control Accounts
- Task Manager Access
- User Warnings on UnOKed Records
- Values in Text
- VAT Number Masks
- Weeks
- Home page for System Module manual
- Home page for Standard ERP manual
Special Days
This page describes the Special Days setting in the System module.---
The Special Days setting allows you to list your national public holidays. This setting will be used as a look-up table by the Bank Holidays, Bank Holidays for Sales Forecast and Customers' Bank Holidays settings.
To work with this setting, first ensure you are in the System module. Then, if you are using Windows or macOS, click the [Settings] button in the Navigation Centre and then double-click 'Special Days' in the 'Settings' list. If you are using iOS or Android, select 'Settings' from the Tools menu (with 'wrench' icon) and tap 'Special Days' in the 'Settings' list. The 'Special Days: Browse' window will open. This contains a list of the records already entered to this setting.
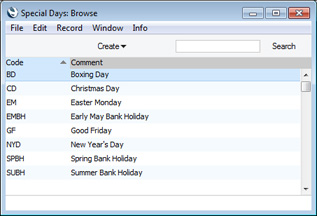

- Code
- Enter a unique code for the Special Day.
- Comment
- Enter the name of the Special Day.
---
Settings in the System module:
- Access Groups
- Active Users
- Auto Actions
- Bank Holidays
- Base Currency
- Base Currency Rates
- Company Date and Numeric Format
- Company Info
- Configuration
- Conversions - Master, Conversions - Accounts and VAT Code
- Conversions - Master, Conversions - Activity Types
- Conversions - Master, Conversions - Contact Classifications
- Conversions - Master, Conversions - Contacts
- Conversions - Master, Conversions - Currency Codes
- Conversions - Master, Conversions - Items
- Conversions - Master, Conversions - Locations
- Conversions - Master
- Conversions - Master, Conversions - Suppliers
- Conversions - Master, Conversions - Objects
- Conversions - Master, Conversions - Users
- Countries
- Countries Regions
- Currency Round Off
- Days and Months
- Departments
- Discount Options
- Display Groups
- Exchange Rates Settings
- Form Settings
- Global Warnings on UnOKed Records
- Internet Enablers
- Journaling
- KPIs
- Languages
- Locking
- Locking Exceptions
- Number Series Defaults
- Opened Windows History
- Optional Features
- Password Security
- Printers
- Reporting Periods
- Round Off
- Sales Groups
- Single Functions
- Special Days
- Styles
- Sub-Ledger Control Accounts
- Task Manager Access
- User Warnings on UnOKed Records
- Values in Text
- VAT Number Masks
- Weeks
- Home page for System Module manual
- Home page for Standard ERP manual
Styles
This page describes the Styles setting in the System module.---
Use the Styles setting to define the different font Styles that you will use in the Fields and Text objects in your Form Templates, ensuring a consistency of appearance.
The Styles setting is in the System module. To open this setting, ensure you in this module and then click the [Settings] button in the Master Control panel. Double-click 'Styles' in the 'Settings' list in the System module to open the 'Styles: Browse' window and see a list of the Styles you have previously entered.
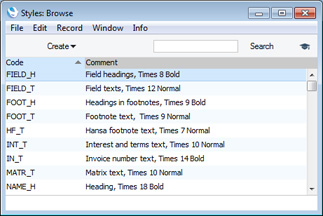
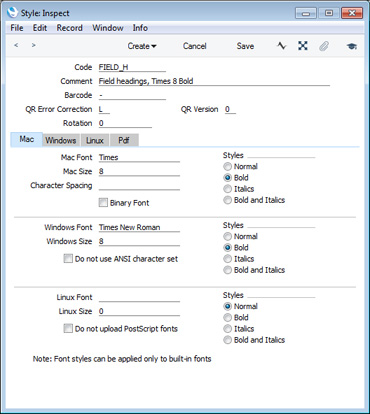
- Code
- The code for the Style.
- Comment
- Any description.
- The Comment will be shown in the 'Paste Special' list that you will use when assigning Styles to Fields and Text objects in Form Templates, so it should be descriptive enough to make the selection of the correct Style easy for all users.
- The Comment will be shown in the 'Paste Special' list that you will use when assigning Styles to Fields and Text objects in Form Templates, so it should be descriptive enough to make the selection of the correct Style easy for all users.
- Barcode
- Paste Special
Choices of possible entries
- If you will use the Style to print barcodes, specify the barcode format here. The available options are "Code 128', "Code 39', "EAN 13" and "QR Code".
- If you choose "Code 128', "Code 39' or "EAN 13", you must also specify a barcode font on the 'Mac', 'Windows', 'Linux' and 'Pdf' cards. Fonts in the IDAutomation family are supported. Do not specify a font if you choose "QR Code".
- If you choose "Code 128', "Code 39' or "EAN 13", you must also specify a barcode font on the 'Mac', 'Windows', 'Linux' and 'Pdf' cards. Fonts in the IDAutomation family are supported. Do not specify a font if you choose "QR Code".
- QR Error Correction
- Paste Special Choices of possible entries
- If the Barcode field contains "QR Code", specify the level of error correction that you want to be incorporated in the printed QR Codes. Possible values are "L" (Low), "M" (Medium), "Q" (Quartile) and "H" (High.).
- If the Barcode field contains "QR Code", specify the level of error correction that you want to be incorporated in the printed QR Codes. Possible values are "L" (Low), "M" (Medium), "Q" (Quartile) and "H" (High.).
- QR Version
- If the Barcode field contains "QR Code", use this field to specify the version or module configuration of the QR Codes that will be printed. You can enter a numeric value between 1 (QR Codes will contain 21 x 21 modules) and 40 (QR Codes will contain 177 x 177 modules). This choice will depend on the quantity of information being printed and on the error correction level. When choosing a larger version number, be sure to leave enough space in the Form Template for the QR Code to be printed.
- Rotation
- If you need text to be printed at an angle, specify the angle here.
- Mac/Windows/Linux Font
- Paste Special
Fonts available on your computer
- The name of the font, as it appears in the Windows directory or the System folder.
- Mac/Windows/Linux Size
- The font size in points.
- Styles
- Select one of the available style types.
- Character Spacing
- This is used when printing bank giro forms, where a fixed character spacing is required. Specify here the spacing in pixels from the start of one character to the start of the next. Usually this will be six pixels or less.
- You can only use Styles with a Character Spacing in Fields and Text objects with a left or right justification. The Character Spacing will have no effect in Fields and Text objects with a centre justification.
- This feature is Mac OS X only.
- You can only use Styles with a Character Spacing in Fields and Text objects with a left or right justification. The Character Spacing will have no effect in Fields and Text objects with a centre justification.
- Do not use ANSI character set
- Use this option if the Style is to use a non-standard character set (for example, that used in barcodes).
Pdf card
If you will use a Style in a Form Template that you will print to pdf files, you should fill in the fields on the 'Pdf' card, especially if the Style uses a non-standard font. The standard fonts are Times New Roman PS MT, Arial MT, Courier, Symbol and Zapf Dingbats (Windows) and Times, Helvetica, Courier, Symbol and Zapf Dingbats (Mac OS X). Most pdf readers are able to read and print these fonts. If the Style uses a non-standard font, you will need to have that font embedded in pdf files, so that the font can be read and printed by pdf readers. This is particularly important for barcode fonts.You can create pdf files from Standard ERP using two methods:
- Open a record, click the Printer icon and, in the print dialogue window, choose to print to pdf. In this case, the pdf will be generated by the operating system, which will embed any fonts as necessary.
- Other methods of creating pdf files include:
- Click the [Forms] button in the Navigation Centre, double-click a document in the list and choose 'Pdf' as the Media option in the specification window;
- Open a record such as an Invoice or Quotation and choose 'Create E-Mail' from the Operations menu. A pdf file of the record (e.g. the Invoice or Quotation) will be attached to the Mail; and
- Run a Maintenance function such as 'Create Mails from Invoices' in the Sales Ledger. Again, pdf files will be attached to the Mails.
In all three cases (Forms, Create menu functions, Maintenance functions), the pdf will be generated by Standard ERP, which will embed fonts following the instructions on the 'Pdf' cards of the relevant Style records. In a multi-user system, the pdf file will sometimes be generated by the client (e.g. from the Create menu) and sometimes by the server (e.g. Maintenance functions).
If a Pdf file is generated by Standard ERP and you find that the Times font has been used where you are expecting a different font, then it is likely that you need to use the 'Pdf' card in the relevant Style record to embed the intended font in the Pdf file.
- Click the [Forms] button in the Navigation Centre, double-click a document in the list and choose 'Pdf' as the Media option in the specification window;

- Font File
- Paste Special
Opens the standard 'Open File' dialogue that you can use to locate the font file
- Specify the path to the font file. You can do this using an absolute path (C:/Hansa/fonts/test.ttf) or a relative path (fonts/test.ttf), relative to the directory or folder containing the Standard ERP application.
- As previously mentioned, in a multi-user system, pdf files can sometimes be generated by a client application and sometimes by the server. Therefore it is recommended that you enter a relative path in this field and that you store the font files inside the directory or folder containing the Standard ERP application on the server and on all clients. The relative path will then point to the font file in all situations.
- The font file must be an OpenType font with the .ttf extension or a Type 1 Post Script font with the .afm or .pfa extensions. Other font formats are not supported.
- As previously mentioned, in a multi-user system, pdf files can sometimes be generated by a client application and sometimes by the server. Therefore it is recommended that you enter a relative path in this field and that you store the font files inside the directory or folder containing the Standard ERP application on the server and on all clients. The relative path will then point to the font file in all situations.
- Pdf Built-in font
- Paste Special
Choices of possible entries
- If you want to embed one of the standard fonts in pdf files, specify that font here. This will usually be because the Style uses one of the standard fonts and you want to embed that font in pdf files. This will help ensure the Style prints as you expect, but will also slightly increase the size of the pdf file.
- If you specify both a Pdf Built-in font and a Font File in the field above, the Pdf Built-in font will be used.
- If you specify both a Pdf Built-in font and a Font File in the field above, the Pdf Built-in font will be used.
- Pdf Size
- The font size in points.
- Styles
- Select one of the available style types.
Note that the .ttf extension does not guarantee that the font is an OpenType font, as this extension is also used with TrueType fonts. If you are using Windows, you can confirm the font format by checking the file properties or the file icon, which should contain the letter "O". If you are using Mac OS X, use the Font Book application to confirm the font format. If there is still a problem (i.e. the Pdf font is not visible in a pdf file and has been replaced by Times), check the hansa.log file for error messages.
If you will use a Form Template to create pdf files, as well as specifying the fonts that will be embedded as described here, you should also specify a PDF Code page for that Form Template and, if appropriate, specify that pdf files will be created in landscape format. Please refer here for details.
---
Settings in the System module:
- Access Groups
- Active Users
- Auto Actions
- Bank Holidays
- Base Currency
- Base Currency Rates
- Company Date and Numeric Format
- Company Info
- Configuration
- Conversions - Master, Conversions - Accounts and VAT Code
- Conversions - Master, Conversions - Activity Types
- Conversions - Master, Conversions - Contact Classifications
- Conversions - Master, Conversions - Contacts
- Conversions - Master, Conversions - Currency Codes
- Conversions - Master, Conversions - Items
- Conversions - Master, Conversions - Locations
- Conversions - Master
- Conversions - Master, Conversions - Suppliers
- Conversions - Master, Conversions - Objects
- Conversions - Master, Conversions - Users
- Countries
- Countries Regions
- Currency Round Off
- Days and Months
- Departments
- Discount Options
- Display Groups
- Exchange Rates Settings
- Form Settings
- Global Warnings on UnOKed Records
- Internet Enablers
- Journaling
- KPIs
- Languages
- Locking
- Locking Exceptions
- Number Series Defaults
- Opened Windows History
- Optional Features
- Password Security
- Printers
- Reporting Periods
- Round Off
- Sales Groups
- Single Functions
- Special Days
- Styles
- Sub-Ledger Control Accounts
- Task Manager Access
- User Warnings on UnOKed Records
- Values in Text
- VAT Number Masks
- Weeks
- Home page for System Module manual
- Home page for Standard ERP manual
Sub-Ledger Control Accounts
In this setting you specify the Accounts that are to be part of the sub-ledger Control Accounts feature. This is activated for the Sales and Purchase Ledgers using the Sub-ledger Checking check boxes on card 1 of the Account Usage S/L and Account Usage P/L settings respectively.The feature prevents the user posting to the specified Control Accounts manually from the Transaction register in the Nominal Ledger. Instead, it will only be possible to post to these Accounts (such as, on the Sales Ledger side, Debtor Accounts) from the sub-ledger (i.e. from Invoices or Receipts in the Sales Ledger). If you try to post to a controlled Account directly from the Nominal Ledger (using the Transaction register) you will get an alert message.
If this feature is in use, you will still be able to enter Receipts and Payments by journal in the Nominal Ledger. However, it will prevent you from using the Debtor and Creditor Accounts accidentally and incorrectly in other Nominal Ledger Transactions, thus rendering them inaccurate. For details of this process, please refer to the description of flip E of the Transaction screen on this page.
The Debtor and Creditor Control Accounts specified on card 1 of the Account Usage S/L and P/L settings are automatically protected when this feature is activated. All other Accounts that you want to be part of the sub-ledger control feature (i.e. the Accounts which are not to be used in the Transaction register) must be entered in this setting. To do this, double-click 'Sub-ledger Control Accounts' in the 'Settings' list. The 'Sub-ledger Control Accounts: Inspect' window is shown.
For each row, use the Code field to enter an Account Category. Two Account Categories are valid: 1 for accounts receivable (debtors), and 2 for accounts payable (creditors). In the Account field, enter the Account Number of the Control Account of which use in the Nominal Ledger is to be prohibited. Use 'Paste Special' if necessary. The text in the Type field is entered by the program, depending on the Account Category chosen.
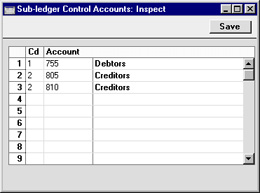
An attempt to enter or change a Transaction posting to a protected Account will give the following error message:
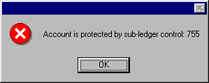
Task Manager Access
Please refer here for details about the Task Manager Access setting.---
Settings in the System module:
- Access Groups
- Active Users
- Auto Actions
- Bank Holidays
- Base Currency
- Base Currency Rates
- Cloud Security
- Company Date and Numeric Format
- Company Info
- Configuration
- Conversions - Master, Conversions - Accounts and VAT Code
- Conversions - Master, Conversions - Activity Types
- Conversions - Master, Conversions - Contact Classifications
- Conversions - Master, Conversions - Contacts
- Conversions - Master, Conversions - Currency Codes
- Conversions - Master, Conversions - Items
- Conversions - Master, Conversions - Locations
- Conversions - Master
- Conversions - Master, Conversions - Suppliers
- Conversions - Master, Conversions - Tags/Objects
- Conversions - Master, Conversions - Users
- Countries
- Countries Regions
- Currency Round Off
- Days and Months
- Departments
- Discount Options
- Display Groups
- Exchange Rates Settings
- Form Settings
- Global Warnings on UnOKed Records
- Internet Enablers
- Journaling
- KPIs
- Languages
- Locking
- Locking Exceptions
- Nature of Business
- Number Series Defaults
- Opened Windows History
- Optional Features
- Password Security
- Printers
- Reporting Periods
- Round Off
- Sales Groups
- Single Functions
- Special Days
- Styles
- Sub-Ledger Control Accounts
- Task Manager Access
- User Warnings on UnOKed Records
- Values in Text
- VAT Reg. Number Masks
- Weeks
- Home page for System Module manual
- Home page for Standard ERP manual
User Warnings on UnOKed Records
Please refer to the description of the Global Warnings on UnOKed Records setting for details about this setting.---
Settings in the System module:
- Access Groups
- Active Users
- Auto Actions
- Bank Holidays
- Base Currency
- Base Currency Rates
- Company Date and Numeric Format
- Company Info
- Configuration
- Conversions - Master, Conversions - Accounts and VAT Code
- Conversions - Master, Conversions - Activity Types
- Conversions - Master, Conversions - Contact Classifications
- Conversions - Master, Conversions - Contacts
- Conversions - Master, Conversions - Currency Codes
- Conversions - Master, Conversions - Items
- Conversions - Master, Conversions - Locations
- Conversions - Master
- Conversions - Master, Conversions - Suppliers
- Conversions - Master, Conversions - Objects
- Conversions - Master, Conversions - Users
- Countries
- Countries Regions
- Currency Round Off
- Days and Months
- Departments
- Discount Options
- Display Groups
- Exchange Rates Settings
- Form Settings
- Global Warnings on UnOKed Records
- Internet Enablers
- Journaling
- KPIs
- Languages
- Locking
- Locking Exceptions
- Number Series Defaults
- Opened Windows History
- Optional Features
- Password Security
- Printers
- Reporting Periods
- Round Off
- Sales Groups
- Special Days
- Styles
- Sub-Ledger Control Accounts
- Task Manager Access
- User Warnings on UnOKed Records
- Values in Text
- VAT Number Masks
- Weeks
- Home page for System Module manual
- Home page for Enterprise by HansaWorld manual
Values in Text
This page describes the Values in Text setting in the System module.---
There will be occasions when you need amounts to be printed on forms in words rather than figures, for example when printing cheques. The Values in Text setting is where you should specify the words and rules to be used. You can enter a separate record in this setting for each Language.
To work with this setting, first ensure you are in the System module. Then, if you are using Windows or Mac OS X, click the [Settings] button in the Navigation Centre and then double-click 'Values in Text' in the 'Settings' list. If you are using iOS or Android, select 'Settings' from the Tools menu (with 'wrench' icon) and tap 'Values in Text' in the 'Settings' list. The 'Values in Text: Browse' window will open. This contains a list of the records already entered to this setting, one for each Language. Double-click (Windows/Mac OS X) or tap (iOS/Android) on a line to open the edit window, or add a new record by selecting 'New' from the Create menu (Windows/Mac OS X) or the + menu (iOS/Android).
When the record is complete, click the [Save] button (Windows/Mac OS X) or tap √ (iOS/Android) to save it, or use the close box (Windows/Mac OS X) or < (iOS/Android) to close it without saving changes.
Please follow the links below for details about each part of the setting:
- Introduction
- Header and Card 1
- Card 2
- Printing Amounts in Words in Forms
- Fields that use the Values in Text setting
Settings in the System module:
- Access Groups
- Active Users
- Auto Actions
- Bank Holidays
- Base Currency
- Base Currency Rates
- Company Date and Numeric Format
- Company Info
- Configuration
- Conversions - Master, Conversions - Accounts and VAT Code
- Conversions - Master, Conversions - Activity Types
- Conversions - Master, Conversions - Contact Classifications
- Conversions - Master, Conversions - Contacts
- Conversions - Master, Conversions - Currency Codes
- Conversions - Master, Conversions - Items
- Conversions - Master, Conversions - Locations
- Conversions - Master
- Conversions - Master, Conversions - Suppliers
- Conversions - Master, Conversions - Objects
- Conversions - Master, Conversions - Users
- Countries
- Countries Regions
- Currency Round Off
- Days and Months
- Departments
- Discount Options
- Display Groups
- Exchange Rates Settings
- Form Settings
- Global Warnings on UnOKed Records
- Internet Enablers
- Journaling
- KPIs
- Languages
- Locking
- Locking Exceptions
- Number Series Defaults
- Opened Windows History
- Optional Features
- Password Security
- Printers
- Reporting Periods
- Round Off
- Sales Groups
- Single Functions
- Special Days
- Styles
- Sub-Ledger Control Accounts
- Task Manager Access
- User Warnings on UnOKed Records
- Values in Text
- VAT Number Masks
- Weeks
- Home page for System Module manual
- Home page for Standard ERP manual
Values in Text - Header and Card 1
This page describes the header and card 1 of the Values in Text setting. Please follow these links for descriptions of the other parts of the setting:- Introduction
- Header and Card 1
- Card 2
- Printing Amounts in Words in Forms
- Fields that use the Values in Text setting
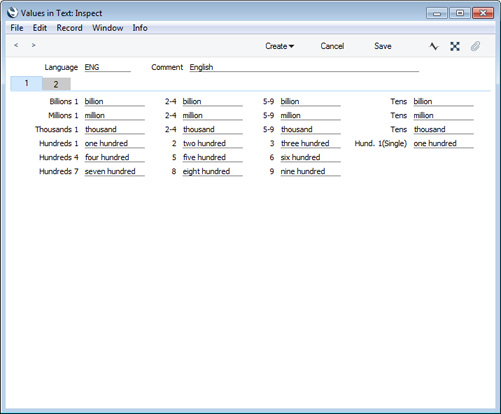
- Language
- Paste Special Languages setting, System module
- You can enter separate records in the Values in Text setting for each Language. Specify the Language here.
- You can enter separate records in the Values in Text setting for each Language. Specify the Language here.
- Comment
- Enter a name for the Values in Text record, to be shown in the 'Values in Text: Browse' window.
- Billions
- Use these fields to specify the words for "billion", as follows:
- 1
- Enter the word for one billion, suitable for use in phrases such as "one billion pounds".
- 2-4
- Enter the word for a billion to be used when an amount is between two and four billion, suitable for use in phrases such as "two billion pounds".
- 5-9
- Enter the word for a billion to be used when an amount is between five and nine billion, suitable for use in phrases such as "five billion pounds".
- Tens
- Enter the word for a billion to be used when an amount is a number of tens of billions, suitable for use in phrases such as "ten billion pounds".
- 1
- Millions, Thousands
- Use these fields to specify the words for "million" and "thousands" in a similar manner to that used for "billion" described above.
- Hundreds
- Use these fields to specify the words for "hundred". In each field you should enter the word for the number of hundreds as well as the word "hundred" itself. The Hund .1 (Single) field is used for one hundred when it's not followed by any tens or units (e.g. 100.00, 100.10, 2100.00), while the Hundreds 1 field is used at other times (e.g. 101.00, 110.00 and 2110.00).
- Introduction
- Header and Card 1
- Card 2
- Printing Amounts in Words in Forms
- Fields that use the Values in Text setting
Settings in the System module:
- Access Groups
- Active Users
- Auto Actions
- Bank Holidays
- Base Currency
- Base Currency Rates
- Company Date and Numeric Format
- Company Info
- Configuration
- Conversions - Master, Conversions - Accounts and VAT Code
- Conversions - Master, Conversions - Activity Types
- Conversions - Master, Conversions - Contact Classifications
- Conversions - Master, Conversions - Contacts
- Conversions - Master, Conversions - Currency Codes
- Conversions - Master, Conversions - Items
- Conversions - Master, Conversions - Locations
- Conversions - Master
- Conversions - Master, Conversions - Suppliers
- Conversions - Master, Conversions - Objects
- Conversions - Master, Conversions - Users
- Countries
- Countries Regions
- Currency Round Off
- Days and Months
- Departments
- Discount Options
- Display Groups
- Exchange Rates Settings
- Form Settings
- Global Warnings on UnOKed Records
- Internet Enablers
- Journaling
- KPIs
- Languages
- Locking
- Locking Exceptions
- Number Series Defaults
- Opened Windows History
- Optional Features
- Password Security
- Printers
- Reporting Periods
- Round Off
- Sales Groups
- Single Functions
- Special Days
- Styles
- Sub-Ledger Control Accounts
- Task Manager Access
- User Warnings on UnOKed Records
- Values in Text
- VAT Number Masks
- Weeks
- Home page for System Module manual
- Home page for Standard ERP manual
Values in Text - Card 2
This page describes card 2 of the Values in Text setting. Please follow these links for descriptions of the other parts of the setting:- Introduction
- Header and Card 1
- Card 2
- Printing Amounts in Words in Forms
- Fields that use the Values in Text setting
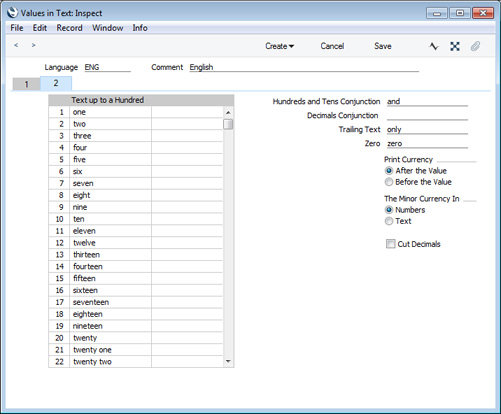
- Text up to a Hundred
- Use this grid to enter words for each number between one and 99.
- In Languages that do not have genders, use the left-hand column only, as shown in the illustration. In Languages where each number has separate masculine and feminine forms to agree with Currency names of different genders, enter the masculine form in the left-hand column and the feminine form in the right-hand column.
- In Languages that do not have genders, use the left-hand column only, as shown in the illustration. In Languages where each number has separate masculine and feminine forms to agree with Currency names of different genders, enter the masculine form in the left-hand column and the feminine form in the right-hand column.
- Hundreds and Tens Conjunction
- Enter here the word that is to appear between the hundreds and the tens in any amount. In English, the word "and" is used (for example, one hundred and twenty).
- Decimals Conjunction
- Enter here the word that is to appear between the Major and Minor Currency amounts. The Minor Currency is the one hundredth part of the Currency (for example, pence, cents or öre). In English, the word "and" can again be used (for example five pounds and forty pence), but you can also leave the field empty (five pounds forty pence).
- Trailing Text
- Enter here any text that is to appear after the amount. For example, some users might require the word "only" to appear after the amount on their cheques.
- Zero
- Enter here the word to be used for zero.
- Print Currency
- Use these options to specify whether the word for the Currency should appear before the amount or after it. In the latter case, it will appear before the Minor Currency amount. For example, ?5.40 can be written as pounds five forty pence or as five pounds forty pence. The word for the Currency itself ("pounds" in the example) will be taken from the Currency register, also in the System module.
- The Minor Currency In
- The Minor Currency is the one hundredth part of the Currency (for example, pence, cents or öre). Use these options to specify whether the amount is to be printed in words or figures. For example, ?5.40 can be written as five pounds forty pence or as five pounds 40 pence. The word for the Minor Currency (e.g. the word "pence") will be taken from the Currency register.
- Cut Decimals
- Select this option if you do not want Minor Currency amounts to be printed. For example, if you are using this option, an amount of ?5.40 will be printed as five pounds. Unlike the other fields and check boxes described above, this option affects amounts both in words and in figures. You should only use it with Currencies where there are no Minor Currency values e.g. in Byelorussia.
- Introduction
- Header and Card 1
- Card 2
- Printing Amounts in Words in Forms
- Fields that use the Values in Text setting
Settings in the System module:
- Access Groups
- Active Users
- Auto Actions
- Bank Holidays
- Base Currency
- Base Currency Rates
- Company Date and Numeric Format
- Company Info
- Configuration
- Conversions - Master, Conversions - Contact Classifications
- Conversions - Master, Conversions - Contacts
- Conversions - Master, Conversions - Currency Codes
- Conversions - Master, Conversions - Items
- Conversions - Master, Conversions - Locations
- Conversions - Master
- Conversions - Master, Conversions - Suppliers
- Conversions - Master, Conversions - Objects
- Conversions - Master, Conversions - Users
- Countries
- Countries Regions
- Currency Round Off
- Days and Months
- Departments
- Discount Options
- Display Groups
- Exchange Rates Settings
- Form Settings
- Global Warnings on UnOKed Records
- Internet Enablers
- Journaling
- KPIs
- Languages
- Locking
- Locking Exceptions
- Number Series Defaults
- Opened Windows History
- Optional Features
- Password Security
- Printers
- Reporting Periods
- Round Off
- Sales Groups
- Single Functions
- Special Days
- Styles
- Sub-Ledger Control Accounts
- Task Manager Access
- User Warnings on UnOKed Records
- Values in Text
- VAT Number Masks
- Weeks
- Home page for System Module manual
- Home page for Standard ERP manual
Values in Text - Card 3
This page describes card 3 of the Values in Text setting. Please follow these links for descriptions of the other parts of the setting:- Introduction
- Header and Card 1
- Card 2
- Card 3
- Printing Amounts in Words in Forms
- Fields that use the Values in Text setting
If you are entering a Values in Text record for a Language that does not use the Western Arabic numeral system (0, 1, 2, 3, 4, etc.), the fields on card 3 allow you to enter suitable numerals for the Language together with the relevant Thousand and Decimal Separators:
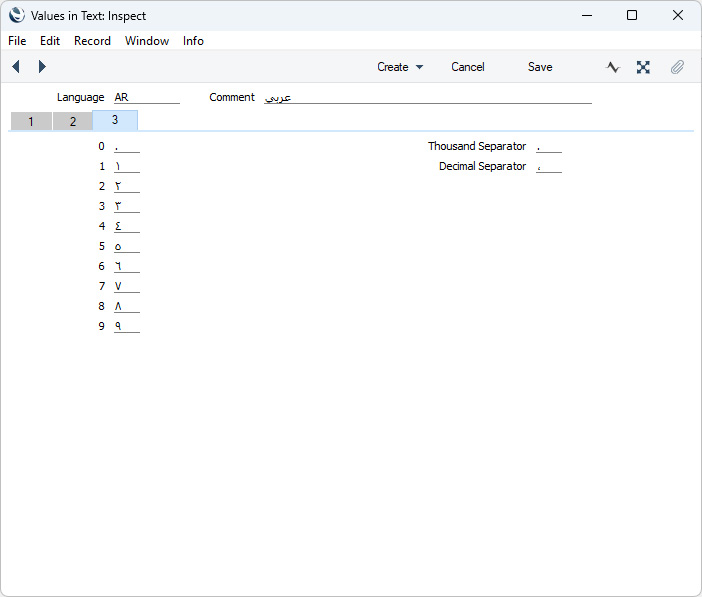
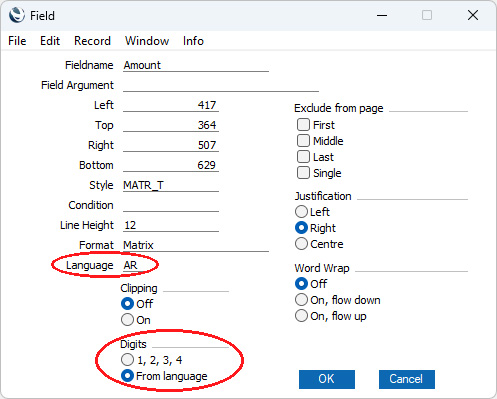
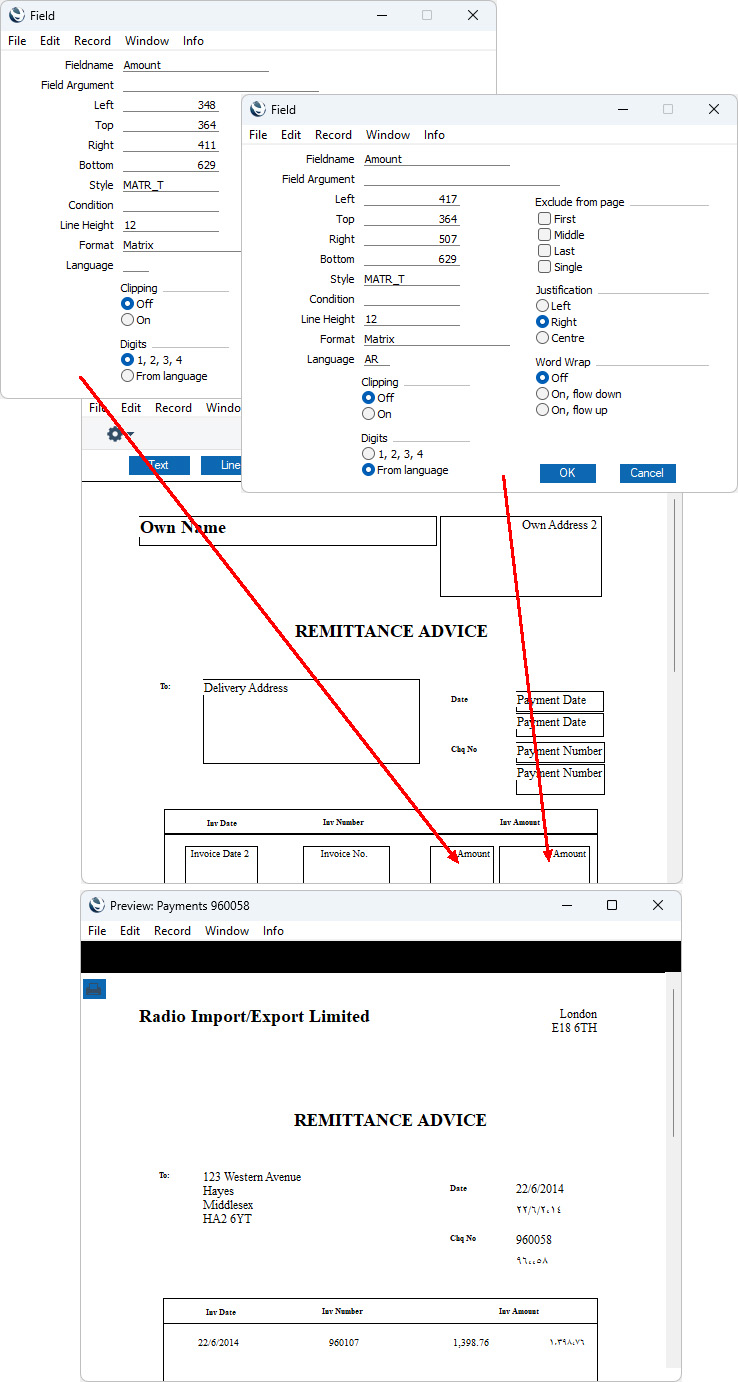
You can use this feature in any Form Template field that is likely to print numerals (e.g. dates, Customer Numbers and Names and Item Numbers as well as prices, quantities and other numeric values, as shown for the Date, Chq No and Amount fields in the illustration above). If you have specified on card 2 in the relevant Values in Text record that the Minor Currency will be printed as Numbers, this includes "Amount in Text" fields (please refer to the Printing Amounts in Words in Forms page for an illustration). However, the feature is limited to the Form Templates that you will use to print the following forms: Invoices of all kinds (i.e. including Cash Notes, Credit Notes, Interest Invoices, Proforma Invoices and Project Invoices), POS Invoices, Bar Tabs of all kinds (i.e. including Bar Tab Kitchen Orders and Bar Tab Receipts), Receipt Forms and Payment Forms.
Please follow the links below for more details about the Values in Text setting:
- Introduction
- Header and Card 1
- Card 2
- Card 3
- Printing Amounts in Words in Forms
- Fields that use the Values in Text setting
Go back to:
- Home page for Settings in the System module
- Home page for System Module manual
- Home page for Standard ERP manual
Values in Text - Including Amounts in Words in Forms
This page describes how to print amounts in words rather than figures in forms, using information entered in the Values in Text setting. Please follow these links for descriptions of the other parts of this setting:- Introduction
- Header and Card 1
- Card 2
- Printing Amounts in Words in Forms
- Fields that use the Values in Text setting
When you need amounts to be printed on a form in words as defined in the Values in Text setting, follow the steps below. You can only follow this process using Windows or Mac OS X, not iOS or Android.
- In the System module, open the Form Template register by clicking the [Registers] button in the Navigation Centre and double-clicking 'Form Templates' in the resulting list.
- A list of Form Templates is opened. Find the one that is to feature the amount in words and double-click, or select 'New' from the Create menu in the Button Bar to create a new Form Template.
- You can include fields that will print amounts in words in Form Templates of many types. Please refer to the Fields that use the Values in Text setting page for a full list.
To add a field that will print an amount in words in your Form Template, click the [Field] button and then draw a box where the amount in words is to appear. In the dialogue box that opens when you release the mouse button, place the insertion point in the Fieldname field and use 'Paste Special' to bring up a list of fields.
Depending on the Form Type, the name of the field that will print the amount in words will usually be "Amount in Text" (as in the illustration) or "To Pay in Text". Double-click one of these as appropriate. Design the rest of the Form Template (full details are to be found here) and save it. An example (intended for printing on pre-printed stationery) is shown below: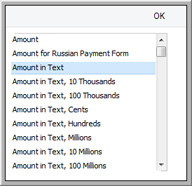
When printed, it will look like this: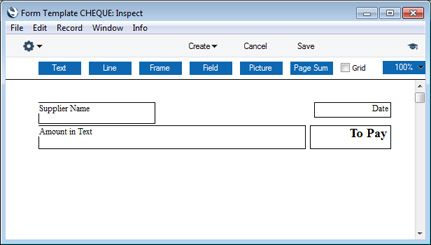

- The Values in Text record for the Language specified in the record being printed will be used. In some cases (e.g. Payments and Receipts), the record being printed won't itself have a Language so the Language from the connected Supplier or Customer will be used.
- If the record being printed doesn't have a Language field or that field is empty, the Values in Text record for the Language specified in the current user's Person record will be used.
- The Language specified in the Company Info setting will be used.
Including Amounts in Words in Cheques
When printing cheques in some countries, the amount in words is broken down so that the word for each digit is printed separately, sometimes in its own box. An example is shown in the illustration below: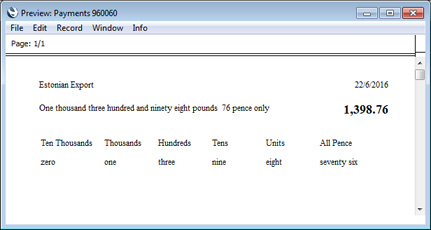
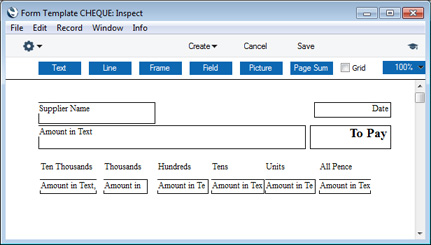
- Amount in Text
- The full amount is printed in words.
- Amount in Text, Cents
- Both digits after the decimal point are printed in words. This is always printed in words, even if it was specified on card 2 of the relevant Value in Text record that the Minor Currency is to be printed as a number.
- Amount in Text, Units
- The first digit before the decimal point is printed in words (the units).
- Amount in Text, Tens
- The second digit before the decimal point is printed in words (the tens).
- Amount in Text, Hundreds
- The third digit before the decimal point is printed in words (the hundreds).
- Amount in Text, Thousands
- The fourth digit before the decimal point is printed in words (the thousands).
- Amount in Text, 10 Thousands
- The fifth digit before the decimal point is printed in words.
- Amount in Text, 100 Thousands
- The sixth digit before the decimal point is printed in words.
- Amount in Text, Millions
- The seventh digit before the decimal point is printed in words.
- Amount in Text, 10 Millions
- The eighth digit before the decimal point is printed in words.
- Amount in Text, 100 Millions
- The ninth digit before the decimal point is printed in words.
Please follow the links below for more details about the Values in Text setting:
- Introduction
- Header and Card 1
- Card 2
- Printing Amounts in Words in Forms
- Fields that use the Values in Text setting
Settings in the System module:
- Access Groups
- Active Users
- Auto Actions
- Bank Holidays
- Base Currency
- Base Currency Rates
- Company Date and Numeric Format
- Company Info
- Configuration
- Conversions - Master, Conversions - Accounts and VAT Code
- Conversions - Master, Conversions - Activity Types
- Conversions - Master, Conversions - Contact Classifications
- Conversions - Master, Conversions - Contacts
- Conversions - Master, Conversions - Currency Codes
- Conversions - Master, Conversions - Items
- Conversions - Master, Conversions - Locations
- Conversions - Master
- Conversions - Master, Conversions - Suppliers
- Conversions - Master, Conversions - Objects
- Conversions - Master, Conversions - Users
- Countries
- Countries Regions
- Currency Round Off
- Days and Months
- Departments
- Discount Options
- Display Groups
- Exchange Rates Settings
- Form Settings
- Global Warnings on UnOKed Records
- Internet Enablers
- Journaling
- KPIs
- Languages
- Locking
- Locking Exceptions
- Number Series Defaults
- Opened Windows History
- Optional Features
- Password Security
- Printers
- Reporting Periods
- Round Off
- Sales Groups
- Single Functions
- Special Days
- Styles
- Sub-Ledger Control Accounts
- Task Manager Access
- User Warnings on UnOKed Records
- Values in Text
- VAT Number Masks
- Weeks
- Home page for System Module manual
- Home page for Standard ERP manual
Values in Text - Fields that use the Values in Text setting
This page lists the fields that you can include in Form Templates when you need amounts to be printed in words or phrases using information entered in the Values in Text setting. Please follow these links for descriptions of the other parts of this setting:- Introduction
- Header and Card 1
- Card 2
- Printing Amounts in Words in Forms
- Fields that use the Values in Text setting
The fields listed below are all fields that you can include in Form Templates when you need amounts to be printed in words or phrases constructed using a Values in Text record.
| Form | Field | Prints in words |
| Bar Tabs | To Pay in Text | Total |
| Cash In | To Pay in Text | Total |
| Cash In Receipts | To Pay in Text | Total |
| Cash Out | To Pay in Text | Total |
| Cash Out Invoices | To Pay in Text | Total |
| Cash Out Payments | To Pay in Text | Total |
| Cash Out Personnel Payments | To Pay in Text | Total |
| Cheque Documents | Amount in Text | Sum of the Invoice Values for a Supplier |
| Amount in Text, Cents | The digits after the decimal point in the sum of the Invoice Values for a Supplier | |
| Amount in Text, Units | The first digit before the decimal point in the sum of the Invoice Values for a Supplier | |
| Amount in Text, Tens | The second digit before the decimal point in the sum of the Invoice Values for a Supplier | |
| Amount in Text, Hundreds | The third digit before the decimal point in the sum of the Invoice Values for a Supplier | |
| Amount in Text, Thousands | The fourth digit before the decimal point in the sum of the Invoice Values for a Supplier | |
| Amount in Text, 10 Thousands | The fifth digit before the decimal point in the sum of the Invoice Values for a Supplier | |
| Amount in Text, 100 Thousands | The sixth digit before the decimal point in the sum of the Invoice Values for a Supplier | |
| Amount in Text, Millions | The seventh digit before the decimal point in the sum of the Invoice Values for a Supplier | |
| Amount in Text, 10 Millions | The eighth digit before the decimal point in the sum of the Invoice Values for a Supplier | |
| Amount in Text, 100 Millions | The ninth digit before the decimal point in the sum of the Invoice Values for a Supplier | |
| To Pay in Text | Sum of the Invoice Values for a Supplier | |
| To Pay in Text in Base 1 | Sum of the Invoice Values for a Supplier, expressed in Base Currency 1 | |
| To Pay in Text in Base 2 | Sum of the Invoice Values for a Supplier, expressed in Base Currency 2 | |
| Total Sum in Text | Sum of the Bank Amounts for a Supplier | |
| Contracts | To Pay in Text | TOTAL |
| Contract Quotations | To Pay in Text | Cost |
| Credit Agreements | To Pay in Text | Total Value |
| Daily Allowances | Amount in Text | TOTAL |
| Delivery Notes/ Picking Lists | Number of Items in Text | The number of different Items in the Delivery |
| To Pay in Text | Total value from the Order | |
| VAT Total | VAT Total from the Order | |
| Electronic Purchase Invoices | Amount in Text | TOTAL |
| Expenses | Amount in Text | TOTAL |
| Amount in Text, Base Currency 1 | TOTAL, expressed in Base Currency 1 | |
| Gift Vouchers | Amount in Text | Value |
| Internal Invoices | Amount in Text | TOTAL |
| Row Number in Text | Row number (only printed if the row has an Item Number) | |
| To Pay in Text | TOTAL | |
| VAT in Text | VAT Total | |
| Internal Orders | To Pay in Text | TOTAL |
| Invoices | Amount in Text | TOTAL |
| Amount in Text, Base Currency 1 | TOTAL, expressed in Base Currency 1 | |
| Amount in Text, Base Currency 2 | TOTAL, expressed in Base Currency 2 | |
| Number of Items in Text | The number of different Items in the Invoice | |
| Quantity in Text | Total quantity | |
| Row Number in Text | Row number (only printed if the row has an Item Number) | |
| To Pay in Text | TOTAL - the total value of any Prepayments connected to the Invoice | |
| VAT in Text | VAT Total | |
| Orders | Amount in Text, Base Currency 1 | TOTAL, expressed in Base Currency 1 |
| Amount in Text, Base Currency 2 | TOTAL, expressed in Base Currency 2 | |
| Number of Items in Text | The number of different Items in the Order | |
| To Pay in Text | TOTAL | |
| Own Cheques | Amount in Text | Amount |
| Amount in Text with asterisk | Amount formatted for Argentina, for example, "One Hundred *******" | |
| Amount in Text with Parentheses (Mexico) | Amount formatted for Mexico, for example, "(One Hundred M.N.)" | |
| Payment Forms | Amount in Text | Payment per Supplier option: Sum of the Invoice Values for a Supplier Payment option: Invoice Value |
| Amount in Text, Cents | Payment per Supplier option: The digits after the decimal point in the sum of the Invoice Values for a Supplier Payment option: The digits after the decimal point in the Invoice Value | |
| Amount in Text, Units | Payment per Supplier option: The first digit before the decimal point in the sum of the Invoice Values for a Supplier Payment option: The first digit before after the decimal point in the Invoice Value | |
| Amount in Text, Tens | Payment per Supplier option: The second digit before the decimal point in the sum of the Invoice Values for a Supplier Payment option: The second digit before after the decimal point in the Invoice Value | |
| Amount in Text, Hundreds | Payment per Supplier option: The third digit before the decimal point in the sum of the Invoice Values for a Supplier Payment option: The third digit before after the decimal point in the Invoice Value | |
| Amount in Text, Thousands | Payment per Supplier option: The fourth digit before the decimal point in the sum of the Invoice Values for a Supplier Payment option: The fourth digit before after the decimal point in the Invoice Value | |
| Amount in Text, 10 Thousands | Payment per Supplier option: The fifth digit before the decimal point in the sum of the Invoice Values for a Supplier Payment option: The fifth digit before after the decimal point in the Invoice Value | |
| Amount in Text, 100 Thousands | Payment per Supplier option: The sixth digit before the decimal point in the sum of the Invoice Values for a Supplier Payment option: The sixth digit before after the decimal point in the Invoice Value | |
| Amount in Text, Millions | Payment per Supplier option: The seventh digit before the decimal point in the sum of the Invoice Values for a Supplier Payment option: The seventh digit before after the decimal point in the Invoice Value | |
| Amount in Text, 10 Millions | Payment per Supplier option: The eighth digit before the decimal point in the sum of the Invoice Values for a Supplier Payment option: The eighth digit before after the decimal point in the Invoice Value | |
| Amount in Text, 100 Millions | Payment per Supplier option: The ninth digit before the decimal point in the sum of the Invoice Values for a Supplier Payment option: The ninth digit before after the decimal point in the Invoice Value | |
| To Pay in Text | Payment per Supplier option: Sum of the Invoice Values for a Supplier Payment option: Invoice Value | |
| To Pay in Text in Base 1 | Payment per Supplier option: Sum of the Invoice Values for a Supplier, expressed in Base Currency 1 Payment option: Invoice Value, expressed in Base Currency 1 | |
| To Pay in Text in Base 2 | Payment per Supplier option: Sum of the Invoice Values for a Supplier, expressed in Base Currency 2 Payment option: not printed | |
| Total Sum in Text | Payment per Supplier option: Sum of the Bank Amounts for a Supplier Payment option: not printed | |
| Personnel Payment Receipts | To Pay in Text | Sum |
| POS Invoices | Amount in Text | TOTAL |
| Row Number in Text | Row number (only printed if the row has an Item Number) | |
| To Pay in Text | TOTAL | |
| Production Operation Picking Lists | Number of Items in Text | The number of different Items in the Production Operation, including both In Items and Out Items |
| Purchase Invoice Forms | Amount in Text | TOTAL |
| Amount in Text, Base Currency 1 | TOTAL, expressed in Base Currency 1 | |
| Amount in Text, Base Currency 2 | TOTAL, expressed in Base Currency 2 | |
| Purchase Orders | To Pay in Text | TOTAL |
| Purchase Order Contracts | To Pay in Text | TOTAL |
| Purchase Order Quotations | To Pay in Text | TOTAL |
| Receipt Forms | To Pay in Text | Sum of the Invoice Values for a Customer (with any Settlement Discounts or Bank Fees deducted) |
| To Pay in Text in Base 1 | Sum of the Invoice Values for a Customer (with any Settlement Discounts or Bank Fees deducted), expressed in Base Currency 1 | |
| Rental Quotations | Amount in Text | TOTAL |
| To Pay in Text | TOTAL | |
| Quotations | Amount in Text | TOTAL |
| Amount in Text, Base Currency 1 | TOTAL, expressed in Base Currency 1 | |
| To Pay in Text | TOTAL | |
| Service Orders | To Pay in Text | total of (Qty * Item Sales Price including VAT) for all rows |
| Simulations | Amount in Text, Credit Value in Base Currency 1 | Total Credit (from the footer), expressed in Base Currency 1 |
| Amount in Text, Debit Value in Base Currency 1 | Total Debit (from the footer), expressed in Base Currency 1 | |
| Stock Movements | To Pay in Text | total of (Recvd Qty * R. New Unit Price) for all rows |
| Transactions | Amount in Text, Credit Value in Base Currency 1 | Total Credit (from the footer), expressed in Base Currency 1 |
| Amount in Text, Credit Value in Base Currency 2 | Total Credit (from the footer), expressed in Base Currency 2 | |
| Amount in Text, Debit Value in Base Currency 1 | Total Debit (from the footer), expressed in Base Currency 1 | |
| Amount in Text, Debit Value in Base Currency 2 | Total Debit (from the footer), expressed in Base Currency 2 |
- Introduction
- Header and Card 1
- Card 2
- Printing Amounts in Words in Forms
- Fields that use the Values in Text setting
Settings in the System module:
- Access Groups
- Active Users
- Auto Actions
- Bank Holidays
- Base Currency
- Base Currency Rates
- Company Date and Numeric Format
- Company Info
- Configuration
- Conversions - Master, Conversions - Accounts and VAT Code
- Conversions - Master, Conversions - Activity Types
- Conversions - Master, Conversions - Contact Classifications
- Conversions - Master, Conversions - Contacts
- Conversions - Master, Conversions - Currency Codes
- Conversions - Master, Conversions - Items
- Conversions - Master, Conversions - Locations
- Conversions - Master
- Conversions - Master, Conversions - Suppliers
- Conversions - Master, Conversions - Objects
- Conversions - Master, Conversions - Users
- Countries
- Countries Regions
- Currency Round Off
- Days and Months
- Departments
- Discount Options
- Display Groups
- Exchange Rates Settings
- Form Settings
- Global Warnings on UnOKed Records
- Internet Enablers
- Journaling
- KPIs
- Languages
- Locking
- Locking Exceptions
- Number Series Defaults
- Opened Windows History
- Optional Features
- Password Security
- Printers
- Reporting Periods
- Round Off
- Sales Groups
- Single Functions
- Special Days
- Styles
- Sub-Ledger Control Accounts
- Task Manager Access
- User Warnings on UnOKed Records
- Values in Text
- VAT Number Masks
- Weeks
- Home page for System Module manual
- Home page for Standard ERP manual
VAT Number Masks
VAT Numbers are formatted differently according to their country of issue. For example, Belgian VAT Numbers start with "BE" and contain six digits followed by a dash, then two more digits, two alpha characters and finally a "9". This setting is used to ensure all VAT Numbers entered to Hansa are formatted correctly.For each Country with which your business trades, use a separate row to enter the appropriate format (VAT Mask). Where a Country has more than one possible format, these should each be entered on a separate row, with a appropriate identifying Comment. 'Paste Special' can be used from the Country field to bring up a list of Countries, to ensure the correct code is entered.
The format of the VAT Number is defined in the Mask field. For example, the Belgian format will be entered as "BE######-##??9", where # means any number and ? means any character, number or alpha. # is obtained by pressing Option-3 on the Macintosh. Note that the validation check is case sensitive, so be sure to enter upper- or lower-case letters as appropriate.
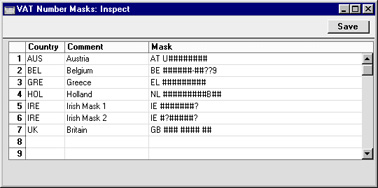
Weeks
This setting is used to define the Week Numbers that are shown in the six-monthly and monthly Calendar views. Week Numbers can vary from country to country and depending on when the year started.Click the [Settings] button in the Master Control panel or select 'Settings' from the File menu to open the 'Settings' list. Double-click 'Weeks' in the list. The 'Weeks: Browse' window lists the records that have already been entered: double-click one to modify it or click [New] to create a new record.