Introduction to Customer Documents
Customer documents can be printed from the Sales Ledger. Use the Modules menu to ensure you are in the Sales Ledger and then select 'Documents' from the File menu or click [Documents] in the Master Control panel. Then, double-click the appropriate item in the list. A specification window will then appear, where you can decide the Customers for which documents are to be printed. Click [Run] to print the documents.It is often possible to report on a selection range, such as a range of Customers. To do this, enter the lowest and highest values of the range, separated by a colon. For example, to report on Customers 001 to 010, enter "001:010" in the Customer field. Depending on the field, the sort used might be alpha or numeric. In the case of an alpha sort, a range of 1:2 would also include 100, 10109, etc.
To determine which Form is printed, follow this procedure (when Hansa is supplied, a sample Form will be printed):
- Design a Form (or change the sample Form supplied to reflect your own requirements) using the Form register in the System module. This process is fully described here. The sample Form supplied has the Form Code "CUST_LABEL".
- Change to the Sales Ledger module and open the 'Documents' window using the 'Documents' item on the File menu or by clicking the [Documents] button in the Master Control panel.
- Highlight the item in the list and select 'Define Document' from the Operations menu. The subsequent window is used to assign a Form (or more than one Form) to the document and is fully described here. In this instance, enter "CUST_LABEL" in the Form field of the first line.
- The 'Define Document' function only needs to be used once. After this has been done, Form selection will be automatic.
Contact Labels
This document in the CRM module prints name and address labels to Contact Persons (Contact records not marked as Customers or Suppliers). It can print the Invoice Address from the 'Contact' card of the Contact record or the Delivery Address from the 'Delivery' card, depending on which fields you have included in your Form design. The address will be taken from the individual Contact Person record or, if that is blank, from the parent Customer or Supplier record. To print labels for Customers and Suppliers, use the Customer/Supplier Labels document.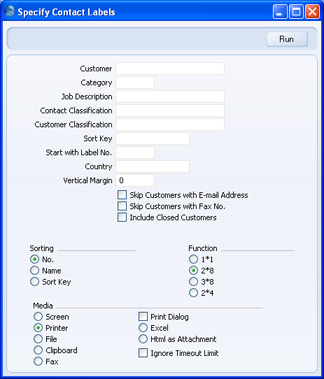
- Customer
- Paste Special
Customers, Suppliers and Contact Persons in Contact register
- Range Reporting Alpha
- Enter the Customer, Supplier or Contact Person Number or range of Numbers. Labels will be printed for each Contact Person in the range, and for each Contact Person working for Customers and Suppliers in the range. A label will not be printed for a Customer or Supplier that does not have any Contact Persons. Labels will not be printed for Closed Contact Persons, or for Contact Persons whose Customer Relations records have been marked as Invalid.
- By default, the 'Paste Special' list shows Customers. Click the [Suppliers] button if you need to see Suppliers, and the [All Contacts] button if you need to see Customers, Suppliers and Contact Persons.
- Enter the Customer, Supplier or Contact Person Number or range of Numbers. Labels will be printed for each Contact Person in the range, and for each Contact Person working for Customers and Suppliers in the range. A label will not be printed for a Customer or Supplier that does not have any Contact Persons. Labels will not be printed for Closed Contact Persons, or for Contact Persons whose Customer Relations records have been marked as Invalid.
- Category
- Paste Special
Customer Categories setting, Sales Ledger
- Select a Customer Category. Labels will be printed for all Contact Persons belonging to Customers in that Category.
- Job Description
- Paste Special
Job Descriptions setting, CRM module
- If you wish to print labels for Contact Persons with a particular Job Description, enter that Job Description here.
- Contact Classification
- Paste Special
Contact Classifications setting, CRM module
- Select a Contact Classification. Labels will be printed for all Contact Persons with that Classification.
- Customer Classification
- Paste Special
Contact Classifications setting, CRM module
- Select a Contact Classification. Labels will be printed for all Contact Persons belonging to Customers and Suppliers with that Classification. If you enter a number of Classifications separated by commas, labels will only be printed for Contact Persons belonging to those Customers and Suppliers featuring all the Classifications listed.
- Sort Key
- Range Reporting
Alpha
- Enter a Sort Key. Labels will be printed for all Contact Persons belonging to Customers and Suppliers with that Sort Key.
- Start with Label No.
- If you will be printing to a sheet of labels, some of which have already been used, specify here where on the sheet you wish to begin printing.
- Country
- Paste Special
Countries setting, System module
- To print labels for Contact Persons belonging to Customers and Suppliers in a particular Country, enter that Country here.
- Vertical Margin
- If you want the labels to be printed with a non-standard vertical margin (vertical spacing between the labels), specify the margin that you want to be used here. The standard margins that will be used if you leave this field empty are:
Note: entering a vertical margin that is significantly different to standard may result in the printing of fewer labels than expected.Label Format Vertical Margin 2 x 8 103 3 x 8 103 1 x 1 1 2 x 4 206
- Skip Customers with E-Mail Address
- Check this box if you do not want to print labels for Contact Persons belonging to Customers and Suppliers that have email addresses.
- Skip Customers with Fax No.
- Check this box if you do not want to print labels for Contact Persons belonging to Customers and Suppliers that have fax numbers.
- Include Closed Customers
- Usually, labels will not be printed for Contact Persons belonging to Closed Customers and Suppliers (those whose Closed box on the 'Terms' card is checked). If you want to include Contact Persons belonging to Closed Customers and Suppliers in your label-printing run, check this box. Labels will never be printed for Closed Contact Persons.
- Sorting
- The labels can be sorted by Customer/Supplier Number, Customer/Supplier Name or Sort Key. If there are several Contact Persons belonging to a Customer or Supplier, they will always be sorted by Contact Person Name.
- Function
- Choose which of the four standard label formats you would like to use.
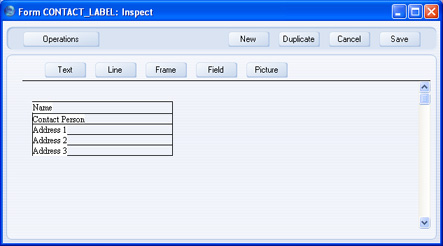
If you want static text to be printed on your labels (i.e. text that identifies the information on the labels, such as "Contact Name"), follow these steps:
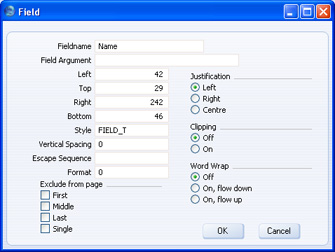
- Click the [Field] button and draw a rectangle where you want the static text to appear. The Field dialogue box opens.
- Leave the Fieldname blank and enter the static text in the Field Argument field.
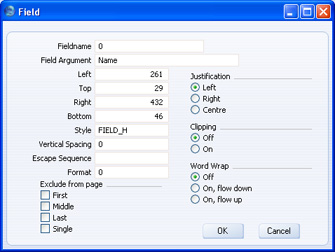
- Click [OK] to save.
- Do not use the [Text] button for this purpose: any text entered this way will be printed for the first label only.
Customer Labels
This document prints name and address labels to Customers. The Invoice Address from the 'Contact' card of the Customer screen is used.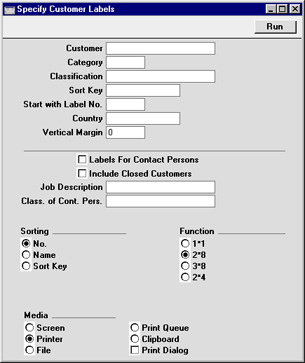
- Customer
- Paste Special
Customer register
- Range Reporting Alpha
- Enter the Customer Number or range of Numbers for which you want the labels printed.
- Enter the Customer Number or range of Numbers for which you want the labels printed.
- Category
- Paste Special
Customer Categories setting, Sales Ledger
- Select a Customer Category. Labels will be printed for all Customers in that Category.
- Classification
- Paste Special
Customer Classifications setting, CRM module
- Select a Customer Classification. Labels will be printed for all Customers in that Classification. If you enter a number of Classifications separated by commas, labels will only be printed for those Customers featuring all the Classifications listed.
- Sort Key
- Enter a Sort Key. Labels will be printed for all Customers with that Sort Key.
- Start with Label No.
- If you will be printing to a sheet of labels, some of which have already been used, specify here where on the sheet you wish to begin printing.
- Country
- Paste Special
Countries setting, System module
- To print labels for Customers in a particular Country, enter that Country here.
- Vertical Margin
- If you want the labels to be printed with a non-standard vertical margin (vertical spacing between the labels), specify the margin that you want to be used here. The standard margins (which will be used if you leave this field empty) are:
Label Format Vertical Margin 2 x 8 103 3 x 8 103 1 x 1 1 2 x 4 206 - Labels for Contact Persons
- If you have the CRM module and wish to print labels for all Contact Persons for the Customers in the selection (or for Contact Persons selected using the two options below), switch on this check box.
- Include Closed Customers
- Usually, labels will not be printed for Closed Customers (Customers whose Closed box on the 'Terms' card is checked). If you want to include such Customers in your label printing run, check this box.
- Job Description
- Paste Special
Job Descriptions setting, CRM module
- If you have the CRM module and wish to print labels for Contact Persons with a particular Job Description, enter that Job Description here.
- Class. of Cont. Pers.
- Paste Special
Customer Classifications setting, CRM module
- Select a Customer Classification. Labels will be printed for all Contact Persons with that Classification.
- Sorting
- The labels can be sorted by Customer Number, Customer Name or Sort Key.
- Function
- Choose which of the four standard label formats you would like to use.

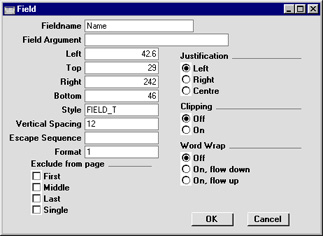
If you want static text to be printed on your labels (i.e. text that identifies the information on the labels, such as "Customer Name"), follow these steps:
- Click the [Field] button and draw a rectangle where you want the static text to appear. The Field dialogue box opens.
- Leave the Fieldname blank and enter the static text in the Field Argument field.
- Click [OK] to save.
- Do not use the [Text] button for this purpose: any text entered this way will be printed for the first label only.